

- Background
- Cart
- Step #1. Open Your MySQL Console
- Step #2. Enter the Provided Commands
- Report
- Solution 1: Sudo then Change Password
- Conclusion
- Solution 1: Sudo Into MySQL
- Solution 3 – Start MySQL in Safe Mode
- Closing
- Solution 1: Run artisan command
- Solution 2: Set Database Credentials in this way
- Solution 3: delete bootstrap/cache
- Conclusion
- Причина возникновения ошибки 1045
- Что делать?
- Phpmyadmin
- Установка новой версии
- MySQL 1045 error Access Denied triggers in the following cases
- 1) Connecting to wrong host:
- 2) User does not exist:
- 3) User exists but client host does not have permission to connect:
- 4) Password is wrong, or the user forgot his password:
- 5) Special characters in the password being converted by Bash:
- 6) SSL is required but the client is not using it:
- 7) PAM backend not working:
- Answer
- Related Questions In Other DevOps Questions
- Join the world’s most active Tech Community!
- Welcome back to the World’s most active Tech Community!
- Subscribe to our Newsletter, and get personalized recommendations.
- Solution
- Solve Access Denied for User Root Error
- Test Root User MySQL Access
- How do I fix error 1045 28000 Access denied?
- How do I fix error 1045 28000 Access denied?
- How do I fix MySQL error Access denied for user root localhost?
- How do I fix error 1045 28000 Access denied?
- How do I fix MySQL error Access denied for user root localhost?
Background
After the virtual machine has been provisioning with LAMP and you check the MariaDB status
systemctl status mariadbThe MariaDB status showed the ERROR 1045 (28000): Access Denied for user ‘root’@’localhost’ (using password: NO).
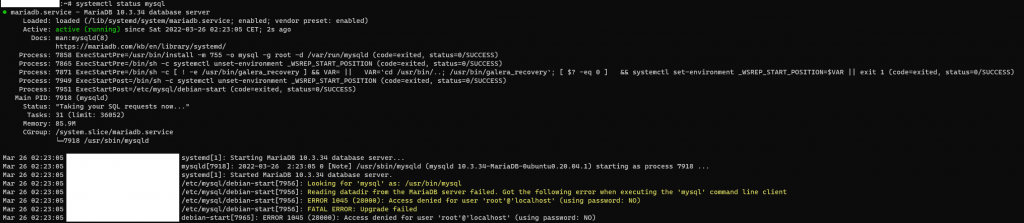
It happened before BUT no documentation to fix this.
sudo apt-get update
sudo apt-get install mysql-server-5.5
sudo apt-get install mysql-client-5.5
sudo apt-get install mysql-common
sudo apt-get install glade
sudo apt-get install ntp
Then I did:
cd ~/Desktop/iPDC-v1.3.1/DBServer-1.1
mysql -uroot -proot <"Db.sql"
Got this error message:
ERROR 1045 (28000): Access denied for user 'root'@'localhost' (using password: YES)
How can I fix this?
Apr 29
in Other DevOps Questions
by
Kichu
• 19,040 points
•
2,008 views
I recently tried to login into my MariaDB database via shell and got this error even though I’m 100% sure the password is correct:
mysql -u root -p
ERROR 1045 (28000): Access denied for user 'root'@'localhost' (using password: YES)
I’m running a node.js server that connects to the same database with the same password with no problems…

RiggsFolly
90.3k20 gold badges100 silver badges144 bronze badges
asked May 3 at 6:33

2
You don’t have privileges to connect to the root mysql user. Simply use sudo:
sudo mysql -u root -pEnter password that you use on your machine, after that enter password to the root mysql user.
answered Jun 21 at 20:27

I am new to Oracle Cloud and not an expert on MySql, I have built my first Arm-based Ampere A1. I was successfully able to install Apache web server. I tried to do a yum install for MySQL.
I can start and stop mysqld
/usr/sbin/mysqld (mysqld 8.0.27) starting as process 2408
I can confirm that port 3306 starts
However when I try to login into MySQL itself
$mysql -u root
I get the following error:
ERROR 1045 (28000): Access denied for user ‘root’@’localhost’ (using password: YES).
I have tried the following
- I have updated /etc/my.cnf with a password for root
- Turned off SELinux
- sudo mysqld —skip-grant-tables —skip-networking
Any help is greatly appreciated!
I already have a mysql database in local (installed, configured and containing things for a service).
When I try to install phpmyadmin, I get the following error : ERROR 1045 (28000): Access denied for user 'root'@'localhost' (using password: NO).
Here are the steps I do to install phpmyadmin :
- Install phpmyadmin database : Yes
- Socket Unix
- Name of the database : phpmyadmin
- MySQL ID : root@localhost
- MySQL password : mypassword
- MySQL password confirmation : mypassword
- ERROR
The login and password I give to phpmyadmin are the one of the root account for the MySQL service. They work good.
I dont get why phpmyadmin ask for the password if it try to connect to the user without using it (using password: NO).
Do you have a solution to force make it using the password ? I can’t disable the password of MySQL because the service is accessible by the internet. (And I want to learn a «clean» solution).
Introduction
Most MySQL users encountered the ERROR 1698 (28000): Access denied for user ‘root’@’localhost’. This error message usually appears for new installations of MySQL when you try to connect to MySQL with the root user.
This guide will show you how to quickly resolve the access denied for user root on localhost. The outlined instructions apply to both MySQL and MariaDB. There will be no need to modify any tables or to perform complex configuration.
Prerequisites
- Access to a command line or terminal window
- MySQL or MariaDB installed
- User with sudo or root privileges
When you install MySQL and try to access it on the local machine with the root user, the command you use is:
mysql -u root -pIn most cases, you will receive the error message Access denied for user ‘root’@’localhost’.

You can enable access for root using one MySQL command.
The same as Ulrich Metzger, after upgrading my machine to Ubuntu 16.04 and Mysql-server-5.7, I couldn’t log in with root because the plugin column changed.
My problem was not solved with sudo dpkg-reconfigure mysql-server-5.7 + removing + purging + cleaning.
I had to stop the mysql service:
# sudo service mysql stop
Then restart the mysql daemon with the —no-grant-tables option:
# sudo mysqld_safe —no-grant-tables &
Then in another terminal, enter the mysql console (which now doesn’t need authentication) with the command mysql, and update the password and plugin columns via a SQL UPDATE:
UPDATE mysql.user SET authentication_string=PASSWORD(''), plugin='mysql_native_password'
WHERE User='root' AND Host='localhost';
Finally, kill the mysqld_safe command, restart mysql service and connect to mysql normally:
# sudo service mysql start
# mysql![]()
I have installed MariaDB on Ubuntu 16.04. But when trying for the first time is says:
~$ mysql
ERROR 1045 (28000): Acces denied for user 'username'@ 'localhost' (using password: NO)
And when I try mysql_secure_installation to set a root password is says:
~$ mysql_secure_installation
NOTE: RUNNING ALL PARTS OF THIS SCRIPT IS RECOMMENDED FOR ALL MariaDB SERVERS IN PRODUCTION USE! PLEASE READ EACH STEP CAREFULLY!
In order to log into MariaDB to secure it, we'll need the current
password for the root user. If you've just installed MariaDB, and
you haven't set the root password yet, the password will be blank,
so you should just press enter here.
Enter current password for root (enter for none):
ERROR 1045 (28000): Access denied for user 'root'@'localhost' (using password: NO)
Enter current password for root (enter for none):
Giving Enter doesn’t work.
I read something about «UNIX_SOCKET plugin is installed by default in new installs of Ubuntu 15.10» but I do not understand how I can log in with this. I hope getting a answer soon!
Дата: 25.11.2013
Автор: Василий Лукьянчиков , vl (at) sqlinfo (dot) ru
Статистика форума SQLinfo показывает, что одной из наиболее популярных проблем является ошибка mysql №1045 (ошибка доступа).
Текст ошибки содержит имя пользователя, которому отказано в доступе, компьютер, с которого производилось подключение, а также ключевое слово YES или NO, которые показывают использовался ли при этом пароль или была попытка выполнить подключение с пустым паролем.
Типичные примеры:
ERROR 1045 (28000): Access denied for user ‘root’@‘localhost’ (using password: YES) — сервер MySQL
— сообщает, что была неудачная попытка подключения с локальной машины пользователя с именем root и
— не пустым паролем.
ERROR 1045 (28000): Access denied for user ‘root’@‘localhost’ (using password: NO) — отказано в
— доступе с локальной машины пользователю с именем root при попытке подключения с пустым паролем.
ERROR 1045 (28000): Access denied for user ‘ODBC’@‘localhost’ (using password: NO) — отказано в
— доступе с локальной машины пользователю с именем ODBC при попытке подключения с пустым паролем.
To reset your mysqld password just follow these instructions :
Stop the mysql demon process using this command :
sudo /etc/init.d/mysql stopStart the mysqld demon process using the —skip-grant-tables option with this command
sudo /usr/sbin/mysqld --skip-grant-tables --skip-networking &Because you are not checking user privs at this point, it’s safest to disable networking. In Dapper, /usr/bin/mysqld… did not work. However, mysqld —skip-grant-tables did.
start the mysql client process using this command
mysql -u rootfrom the mysql prompt execute this command to be able to change any password
FLUSH PRIVILEGES;Then reset/update your password
SET PASSWORD FOR root@'localhost' = PASSWORD('password');If you have a mysql root account that can connect from everywhere, you should also do:
UPDATE mysql.user SET Password=PASSWORD('newpwd') WHERE User='root';Alternate Method:
USE mysql UPDATE user SET Password = PASSWORD('newpwd') WHERE Host = 'localhost' AND User = 'root';once have received a message indicating a successful query (one or more rows affected), flush privileges:
FLUSH PRIVILEGES;Then stop the mysqld process and relaunch it with the classical way:
sudo /etc/init.d/mysql stop
sudo /etc/init.d/mysql start
There is another way using «Purge» given in link
Source
пришлось поменять сервер, и тут возникла проблема с подключением к базе данных, а если быть точнее, то с подключением из Laravel.
На старом сервере была MySQL 8.0, тут же MariaDB 10.5.15, вроде как они работают на одном драйвере, но может быть ошибаюсь.
Команды в терминале выглядят вот так:
mysql -u root
use table;
select * from users;
Всё работает правильно, как и нужно.
PhpMyAdmin тоже работает правильно, а вот сайт:
SQLSTATE[HY000] [1045] Access denied for user 'root'@'localhost' (using password: YES) (SQL: select * from `users` where `email` = 123@gmail.com limit 1)Получается как-то так, пробовал выдавать права (хотя не понимаю зачем, это же root), пробовал:
ALTER USER 'root'@'localhost' IDENTIFIED VIA mysql_native_password USING PASSWORD('root');
Никак не помогает, пробовал создавать новых пользователей — тоже не работает, как я понимаю вся проблема именно в подключении из Laravel,
'mysql' => [ 'driver' => 'mysql', 'url' => env('DATABASE_URL'), 'host' => env('DB_HOST', '127.0.0.1'), 'port' => env('DB_PORT', '3306'), 'database' => env('DB_DATABASE', 'forge'), 'username' => env('DB_USERNAME', 'forge'), 'password' => env('DB_PASSWORD', ''), 'unix_socket' => env('DB_SOCKET', ''), 'charset' => 'utf8mb4', 'collation' => 'utf8mb4_unicode_ci', 'prefix' => '', 'prefix_indexes' => true, 'strict' => true, 'engine' => null, 'options' => extension_loaded('pdo_mysql') ? array_filter([ PDO::MYSQL_ATTR_SSL_CA => env('MYSQL_ATTR_SSL_CA'), ]) : [], ],Этот код config/database.php я не менял, и по идее он должен работать, а по факту — нет.
I am trying to set up MariaDB server under xubuntu 20.04 and import all the db’s I had previously on another machine under xubuntu 18 (following the notes I took when doing it there coming from opensuse).
The installed mariadb has datadir in /var/lib/mysql, and contains only a «null» msyql db with a root user with no password (as tested entering as sudo mysql -u root mysql which requires my personal passwd password).
I stopped the MariaDB server from the system installation, edited the mariadb.conf.d/50-server.cnf with my few changes (chief of them is that the datadir is /elsewhere/Mysql), then
I rsynced all my databases from the previous machine (I had prepared also mysql dumps,but since the MariaDB version is the same, I thought this was easier).
Then a systemctl start mariadb returns with no error but a systemctl status mariadb shows that the post-processing debian-start has given the error reported in the subject.
MariaDB looks running OK. I can enter with the mysql client in all my personal databases using my old mysql password, and I can also enter as mysql root using my old mysql root password. Those passwords are of course not the same as the passwd ones.
So I can work normally, only there is this slightly disturbing message from debian-start as if it was trying to login using no root password (which succeeds using the original mariadb.conf.d/50-server.cnf).
This did not occur on Ubuntu 18 (there I had to set ProtectHome=false, but apparently this is not required on 20)
Any way to get rid of the annoying message, or should I just live with it since all the rest works ?
MySQL treats differently «localhost» and «127.0.0.1»; the first is used to run a Unix socket connection on /var/lib/mysql/mysql.sock or whatever. So you need two different GRANT instructions in your mysql.user table (at least I do on OpenSuSE Linux; on e.g. Windows your mileage may vary):
(mysql connection as root)
GRANT ALL PRIVILEGES (*or privilege list*) ON yourdb.* TO user@localhost IDENTIFIED BY 'password';
GRANT ALL PRIVILEGES (*or privilege list*) ON yourdb.* TO user@127.0.0.1 IDENTIFIED BY 'password';
FLUSH PRIVILEGES;
Then, it is obvious that your script is indeed trying to install as «root@localhost». If you can’t edit the script or the installer config, you can work through that by temporarily disabling root password:
USE mysql;
UPDATE user SET Password = NULL WHERE User='root' AND Host='localhost';
FLUSH PRIVILEGES;
…for greater safety, do not logout from mysql after doing this. After the install has completed, you will have to reset the root password:
GRANT ALL PRIVILEGES ON mysql.* TO root@localhost IDENTIFIED BY 'newpassword';
FLUSH PRIVILEGES;
This does not solve the problem of what does the script do after install. Chances are that it will still use root at localhost, and still use no password. So as soon as you reset the password, it will stop working. You need to find references to root and localhost (they may be specified separately) in the script’s config: there must be something like
user = root
host = localhost
dbname = somedb
or maybe
'username' => 'root',
"hostaddr" => "localhost",
...
and change them. You can create a new user in MySQL by just issuing a new GRANT statement.
Cart
No products in the cart.


Let’s learn how to get rid of it.
Step #1. Open Your MySQL Console

- Left click your WAMP icon located at the bottom right of your desktop.
- Click on MySQL Console.
Step #2. Enter the Provided Commands

If you have a password, you can ignore this part.
- Type in:
use MySQL; - Press Enter.
- Set your MySQL password with the following command, replacing “EnterYourPasswordHere” with your new chosen password:
UPDATE mysql.user SET Password=PASSWORD("EnterYourPasswordHere") WHERE User="root"; - Press Enter.
- Flush the privileges by typing:
FLUSH PRIVILEGES; - Exit by typing:
Exit - Press Enter.

Using a text editor, such as Notepad++, open your config.inc.php file.
- Find the following line of code:
$cfg['Servers'][$i]['password'] = ''; // MySQL password - Change the
'password'to the newly chosen password you created in Step #2. - Click Save.

Report
You have already reported this
I’m trying to install queXS cati app on my Ubuntu desktop and I installed MySQL server and PHP 5 and I cannot login into MySQL server as root without password:
mysql -u root it says
ERROR 1045(28000) : Access denied for user 'root@localhost' (using password: no )But it’s okay when I enter mysql -u root -p
I can’t figure out what the problem is.

oerdnj
7,86238 silver badges49 bronze badges
asked Jan 7, 2014 at 10:42
1
Add switch -p for password based login:
mysql -u root -pThat is the normal behaviour. You set a root password for your database so from now on you can’t access it without password. That is why it reports:
Obviously when you give the password with the -p switch you succeed.

answered Jan 7, 2014 at 10:47

falconerfalconer
14.5k3 gold badges44 silver badges66 bronze badges
In simple words your «root» session does not know the password of the mysql root user.
If you want to make it easier to access your mysql, create a file .my.cnf in /root/ with these lines:
[mysqladmin] user = root password = mysqlrootpassword
[mysql] user = root password = mysqlrootpassword
[mysqldump] user = root password = mysqlrootpassword
where of course mysqlrootpassword is your password for mysql’s root password. When you execute mysql it uses this password.
Attend to the safety of this file — give it secure rights, so that nobody on your server can read it!

Zanna♦
67.1k54 gold badges203 silver badges316 bronze badges
answered Jan 16, 2014 at 22:25
2
Login to webmin and under servers, access the mySQLdatabase server.You will then be able to set the (user) password provided you have:
mysql -u (**user**) -p < /usr/share/doc/rsyslog-mysql-5.8.10/createDB.sql.The web gui is easy but to be secure use the terminal.
cheers.

answered Sep 24, 2014 at 12:36

1
running openSuse 12.1 . on a notebook…
well i configured apache 2 and mysql — (after starting it on the runlevel.
well — i did all i needed to do — but now i stuck….
after installing phpmyadmin . i tried to find the site … i couldnt
then i tried to start the mysql via command line — which failed … duhhhhhh!!?? What can i do now — what is wrong here
linux-wyee:/home/martin # mysql start
ERROR 1045 (28000): Access denied for user 'root'@'localhost' (using password: NO)
linux-wyee:/home/martin #
hmmm i have no glue — probably i have messed up some passwords . what do you think!
how can i make sure that all runs nice -and nothing — that means no pART OF the apache2, mysql and all that things
quits to work propperly
asked Mar 13, 2012 at 19:05

1
maybe you should use systemctl to start the mysql server daemon
sudo systemctl start mysql.serviceAlso if you want to add the server to the suse standard runlevels you should use:
sudo systemctl enable mysql.serviceNext up you must execute mysql_secure_installation as root.
sudo mysql_secure_installationhere you must follow the steps and enter the password for the root mysql user. note that this is not the root user of your linux box.
Now simply use the mysql client. Simply issue
mysql^^And remember you are on suse. Something sugested like rcscript start would not work because suse is using systemd now.
answered Mar 13, 2012 at 19:29

l1zardl1zard
1,0312 gold badges10 silver badges19 bronze badges
1
Your mysql install is just complaining that you can’t connect to the instance on mysql locally as root without using a password. If you forgot the password or don’t know what it is, you can reset it as follows:
- Create a file (ideally in a directory that only root can read) called
init.txtwith the following text:
Now you can kill MySQL once again and restart the service normally (I think Suse uses rcmysql start:
Connect to the server as you’d normarlly do with:
Enter the password you specified in the init.txt file and you should be good to go. DELETE the init.txt file!!!!
answered Mar 13, 2012 at 19:33

IcarusIcarus
5694 silver badges8 bronze badges
2
grep 'temporary password' /var/log/mysqld.log
Sort date (newest date)
You may see something like this;
[root@SERVER ~]# grep 'temporary password' /var/log/mysqld.log
2016-01-16T18:07:29.688164Z 1 [Note] A temporary password is generated for root@localhost: O,k5.marHfFu
2016-01-22T13:14:17.974391Z 1 [Note] A temporary password is generated for root@localhost: b5nvIu!jh6ql
2016-01-22T15:35:48.496812Z 1 [Note] A temporary password is generated for root@localhost: (B*=T!uWJ7ws
2016-01-22T15:52:21.088610Z 1 [Note] A temporary password is generated for root@localhost: %tJXK7sytMJV
2016-01-22T16:24:41.384205Z 1 [Note] A temporary password is generated for root@localhost: lslQDvgwr3/S
2016-01-22T22:11:24.772275Z 1 [Note] A temporary password is generated for root@localhost: S4u+J,Rce_0t
[root@SERVER ~]# mysql_secure_installation
Securing the MySQL server deployment.
Enter password for user root:
The existing password for the user account root has expired. Please set a new password.
New password:
Re-enter new password:
If you see it says
... Failed! Error: Your password does not satisfy the current policy requirements
That means your password needs to have a character such as ! . # - etc...
mix characters well, upper case, lower case, ! . , # etc...
New password:
Re-enter new password:
The 'validate_password' plugin is installed on the server.
The subsequent steps will run with the existing configuration
of the plugin.
Using existing password for root.
Estimated strength of the password: 100
Change the password for root ? ((Press y|Y for Yes, any other key for No) : Y
New password:
Re-enter new password:
Estimated strength of the password: 100
Do you wish to continue with the password provided?(Press y|Y for Yes, any other key for No) : Y
By default, a MySQL installation has an anonymous user,
allowing anyone to log into MySQL without having to have
a user account created for them. This is intended only for
testing, and to make the installation go a bit smoother.
You should remove them before moving into a production
environment.
Remove anonymous users? (Press y|Y for Yes, any other key for No) : Y
Success.
Normally, root should only be allowed to connect from
'localhost'. This ensures that someone cannot guess at
the root password from the network.
Disallow root login remotely? (Press y|Y for Yes, any other key for No) : Y
Success.
By default, MySQL comes with a database named 'test' that
anyone can access. This is also intended only for testing,
and should be removed before moving into a production
environment.
Remove test database and access to it? (Press y|Y for Yes, any other key for No) : Y - Dropping test database...
Success. - Removing privileges on test database...
Success.
Reloading the privilege tables will ensure that all changes
made so far will take effect immediately.
Reload privilege tables now? (Press y|Y for Yes, any other key for No) : Y
Success.
All done!
[root@SERVER ~]# mysql -u root -p
Enter password:
Welcome to the MySQL monitor. Commands end with ; or \g.
Your MySQL connection id is 11
Server version: 5.7.10 MySQL Community Server (GPL)
Watch the last 10 minutes of this video, it teaches you how you do it.
This “access denied” error is one of the most common errors you’ll get when working with MySQL.
Learn how to fix it, and see a range of solutions if the suggested fix does not work, in this article.
When you try to connect to a MySQL database on your own computer (called “localhost”), you may get this error:
Access denied for user 'root'@'localhost' (using password: YES)
You might get an error code in front of it:
ERROR 1045 (28000): Access denied for user 'root'@'localhost' (using password: YES)
You might also get the error with “using password no”:
Access denied for user 'root'@'localhost' (using password: NO)
You’ll see this if you log into MySQL using the command line:
mysql -u root -p
What does this mean? How can you fix it?
There are a few solutions to this, which I’ve detailed below. Try one, and if it doesn’t work, try another one.
Also a tip for logging in: don’t enter your password in the command line itself, because this will be stored in your command history. Use the -p option, as mentioned above, and then you’ll be prompted to enter the password.
Solution 1: Sudo then Change Password
If you get the “access denied” error, one way to solve it is by using sudo to log in to mysql and change the root password.
Step 1: Open the command line on your system.
Step 2: Open mysql using the sudo command:
sudo mysql
Step 3: Enter the password for this account.
Step 4: Change the auth_plugin to mysql_native_password, and the password for the root account, in a single command:
ALTER USER 'root'@'localhost'
IDENTIFIED WITH mysql_native_password BY 'your_new_password';
Substitute the word your_new_password with a new secure password that you want to use for the root account.
The mysql_native_password method is a traditional method of authentication and will allow you to login.
Step 5: Flush the privileges, which tells the server to refresh the grant tables and apply your changes, with this command:
FLUSH PRIVILEGES;SELECT user, plugin
FROM mysql.userStep 7: Exit the console by pressing CTRL + D or typing exit.
exit;
Step 8: Log in to mysql using the root account and the new password you set, which should work:
mysql -u root -p
You should now be logged in to the root account in mysql.
If the above solution did not work, you may need to edit the mysql.cnf file to allow for changes to the root account.
Step 1: Open the my.cnf file. This may be stored in:
/etc/my.cnf
/etc/mysql/my.cnf
If you’re not sure where it is, search your MySQL installation folder (e.g. on Windows or Mac) for the file.
If you don’t have a my.cnf file (MacOS does not include one by default). You can create one in the /etc folder if you like.
[mysqld]
skip-grant-tables
Step 3: Restart the MySQL server.
Step 4: Login to the root account:
mysql -u root -p
Step 5: Flush the privileges, which tells the server to refresh the grant tables and apply your changes, with this command:
FLUSH PRIVILEGES;Step 6: Set a new password for the account:
ALTER USER 'root'@'localhost' IDENTIFIED BY 'your_new_password';Substitute the word your_new_password with a new secure password that you want to use for the root account.
Step 7: Open the my.cnf file you opened in step 1, and remove the line about skip-grant-tables, and save the file.
Step 8: Restart the MySQL server again.
Step 9: Log in to the root account again:
mysql -u root -p
You should now be able to log in successfully with your new password and not get an error.
Conclusion
If you have any questions, feel free to use the comments section below.
Using this guide, you will discover three methods of resolving this error.”
The best way to understand this error is to break it down into single components. This error occurs when you attempt to login into your MySQL instance on your local machine, hence ‘localhost.’
An example is as shown:

- ERROR 1045 (28000) – refers to the ERROR CODE and SQLSTATE, respectively. For example, in MySQL and MariaDB, the error code 1045 means access denied for that username with the specified password.
- The second is the message string. The error message follows the format: Access denied for user ‘%s’@’%s’ (using password: %s).
Solution 1: Sudo Into MySQL
The first and most common method to resolve this error is to sudo into your MySQL instance and set the auth_plugin to mysql_native_password.
Open your terminal and run:
Enter the password for the account and proceed.
Next, change the auth_plugin and set a new password for the root account as shown:
Changing the authentication plugin will allow you to log in to your server.
Next, flush the privileges to update the grant tables:
Finally, exit the terminal and attempt your login:
If the error persists, you may need to edit the MySQL configuration file. In most cases, it is under the name my.cnf in the /etc or /etc/mysql directories.
If the file does not exist, create it.
Close and save the file.
Next, restart the MySQL server and log in.
$ sudo service mysql restart
$ mysql -u root -p
Once logged in, flush the privileges and set a new password:
Ensure to replace the command above with a secure password.
Once completed, edit my.cnf file and remove the entry we added earlier.
Restart the MySQL server and log in with your new password.
Solution 3 – Start MySQL in Safe Mode
MySQL provides you with the mysqld_safe utility for starting the MySQL server. This utility allows us to specify safe features when starting and restarting the server for diagnosing errors.
Start by stopping the MySQL Server.
$ sudo service mysql stop
Next, start MySQL with no authentication as;
$ mysqld_safe —skip-grant-tables &
The command will start the server in the background as a job.

Once the daemon is running (with authentication disabled), open a new terminal and run:
The command above should allow you to log in without a password.
Once logged in, flush the privileges and set a new password as:
Close the session and restart MySQL.
Now log in to your server with your new password.
Closing
In this article, we covered three main methods of resolving the
We hope this tutorial helped you resolve this error.
I just installed a fresh copy of Ubuntu 10.04.2 LTS on a new machine. I logged into MySQL as root:
david@server1:~$ mysql -u root -p123I created a new user called repl. I left host blank, so the new user can may have access from any location.
mysql> CREATE USER 'repl' IDENTIFIED BY '123';
Query OK, 0 rows affected (0.00 sec)
I checked the user table to verify the new user repl was properly created.
mysql> select host, user, password from mysql.user;
+-----------+------------------+-------------------------------------------+
| host | user | password |
+-----------+------------------+-------------------------------------------+
| localhost | root | *23AE809DDACAF96AF0FD78ED04B6A265E05AA257 |
| server1 | root | *23AE809DDACAF96AF0FD78ED04B6A265E05AA257 |
| 127.0.0.1 | root | *23AE809DDACAF96AF0FD78ED04B6A265E05AA257 |
| ::1 | root | *23AE809DDACAF96AF0FD78ED04B6A265E05AA257 |
| localhost | | |
| server1 | | |
| localhost | debian-sys-maint | *27F00A6BAAE5070BCEF92DF91805028725C30188 |
| % | repl | *23AE809DDACAF96AF0FD78ED04B6A265E05AA257 |
+-----------+------------------+-------------------------------------------+
8 rows in set (0.00 sec)
I then exit, try to login as user repl, but access is denied.
david@server1:~$ mysql -u repl -p123
ERROR 1045 (28000): Access denied for user 'repl'@'localhost' (using password: YES)
david@server1:~$ mysql -urepl -p123
ERROR 1045 (28000): Access denied for user 'repl'@'localhost' (using password: YES)
david@server1:~$
Why is access denied?

asked Mar 28, 2013 at 19:44

1
The reason you could not login as repl@'%' has to do with MySQL’s user authentication protocol. It does not cover patterns of users as one would believe.
Look at how you tried to logged in
mysql -u repl -p123Since you did not specify an IP address, mysql assumes host is localhost and tries to connect via the socket file. This is why the error message says Access denied for user 'repl'@'localhost' (using password: YES).
One would think repl@'%' would allow repl@localhost. According to how MySQL perform user authentication, that will simply never happen. Would doing this help ?
mysql -u repl -p123 -h127.0.0.1Believe it or not, mysql would attempt repl@localhost again. Why? The mysql client sees 127.0.0.1 and tries the socket file again.
Try it like this:
mysql -u repl -p123 -h127.0.0.1 --protocol=tcpThis would force the mysql client to user the TCP/IP protocol explicitly. It would then have no choice but to user repl@'%'.

answered Mar 28, 2013 at 20:40

RolandoMySQLDBARolandoMySQLDBA
174k31 gold badges303 silver badges494 bronze badges
0
You should issue for localhost specific to it.
GRANT USAGE ON *.* TO 'repl'@'localhost' IDENTIFIED BY '123';And try connecting.
answered Mar 29, 2013 at 5:40

MannojMannoj
1,4792 gold badges14 silver badges34 bronze badges
The problem is these two accounts, added by default.
http://dev.mysql.com/doc/refman/5.5/en/default-privileges.html
+-----------+------------------+-------------------------------------------+
| host | user | password |
+-----------+------------------+-------------------------------------------+
| localhost | | |
| server1 | | |
+-----------+------------------+-------------------------------------------+
A blank user name is a wildcard, so no matter what account you use, it matches this user if MySQL thinks you’re connecting from localhost or your local server name (server1 in this case)… since they have no password, any password you try is wrong. User authentication only tries the first match, so the user you created never gets noticed when your host is localhost (or your server name).
Delete these two from the mysql.user table and then FLUSH PRIVILEGES;.
Or, the mysql_secure_installation script can do this for you, although I tend to prefer doing things manually.
http://dev.mysql.com/doc/refman/5.5/en/mysql-secure-installation.html
answered Mar 30, 2013 at 2:02

Michael — sqlbotMichael — sqlbot
22.1k2 gold badges45 silver badges75 bronze badges
Database may not be configured yet just issue a no-arg call:
mysql <enter>
Server version: xxx
Copyright (c) xxx
Type 'help;' or '\h' for help. Type '\c' to clear the current input statement.
Mysql [(none)]>
If Mysql must be set a root password, you can use
mysql_secure_installationanswered Apr 18, 2020 at 7:45

Make sure that all fields in the connector are set up with the correct details
host = «localhost»,
user = «CorrectUser»,
passwd = «coRrectPasswd»,
database = «CorreCTDB»
Check for upper and lowercase errors as well — 1045 is not a Syntax error, but has to do with incorrect details in the connector
answered Dec 13, 2019 at 22:59

This could be an issue with corruption of your mysql database. Tables inside mysql database like user table can get corrupt and may cause issued.
Please do a check on those
myisamchk /var/lib/mysql/mysql/ *.MYI
Usually while checking or fixing myisam tables we would like to take mysql down first. If this problem is still not solve please try this out aswell.
If they are corrupt then you can fix them using
myisamchk —silent —force —fast /path/table-name.MYI
Thanks,
Masood
answered Mar 31, 2013 at 17:25

SQLSTATE[HY000] [1045] Access denied for user 'root'@'localhost' (using password: NO)So here I am writing all the possible solutions that I have tried to resolve this error.
- How To Solve SQLSTATE[HY000] [1045] Access denied for user ‘root’@’localhost’ (using password: NO) Error?
- SQLSTATE[HY000] [1045] Access denied for user ‘root’@’localhost’ (using password: NO)
Solution 1: Run artisan command
First of all, Run this route-cache command.
php artisan route:cacheThen, Run this route-clear command.
php artisan route:clearNow, Run this config-cache command.
php artisan config:cacheThen, Run this config-clear command.
php artisan config:clearNow, optimize by running this command.
php artisan optimizeHere is All Command list.
php artisan route:cache
php artisan route:clear
php artisan config:cache
php artisan config:clear
php artisan optimize
And Now, Your error must be solved. Thanks.
Solution 2: Set Database Credentials in this way
This error also occurs when You have used a Special character in your Database then You need to define all variable Always enclose them in «». Just like this.
DB_CONNECTION=mysql
DB_HOST=127.0.0.1
DB_PORT=3306
DB_DATABASE="your_database_name"
DB_USERNAME="put_db_user_name _here"
DB_PASSWORD="put_db_password_here_if_have_set"
If You have no Password for your Database then define DB_PASSWORD=””.
DB_PASSWORD=""And then run all artisan commands just like this.
php artisan route:cache
php artisan route:clear
php artisan config:cache
php artisan config:clear
php artisan optimize
And Now, Your error must be solved. Thank you.
Solution 3: delete bootstrap/cache
If Your Problem is still not resolved then just open bootstrap/cache/config.php and delete config.php file in the bootstrap/cache folder.
Conclusion
It’s all About this error. I hope We Have solved Your error. Comment below Your thoughts and your queries. Also, Comment below which solution worked for you?
Причина возникновения ошибки 1045
Как ни банально, но единственная причина это неправильная комбинация пользователя и пароля. Обратите внимание, речь идет о комбинации пользователь и пароль, а не имя пользователя и пароль. Это очень важный момент, так как в MySQL пользователь характеризуется двумя параметрами: именем и хостом, с которого он может обращаться. Синтаксически записывается как ‘имя пользователя’@’имя хоста’.
Таким образом, причина возникновения MySQL error 1045 — неправильная комбинация трех параметров: имени пользователя, хоста и пароля.
В качестве имени хоста могут выступать ip адреса, доменные имена, ключевые слова (например, localhost для обозначения локальной машины) и групповые символы (например, % для обозначения любого компьютера кроме локального). Подробный синтаксис смотрите в документации
Замечание: Важно понимать, что в базе не существует просто пользователя с заданным именем (например, root), а существует или пользователь с именем root, имеющий право подключаться с заданного хоста (например, root@localhost) или даже несколько разных пользователей с именем root (root@127.0.0.1, root@webew.ru, root@’мой домашний ip’ и т.д.) каждый со своим паролем и правами.
Примеры.
1) Если вы не указали в явном виде имя хоста
GRANT ALL ON publications.* TO ‘ODBC’ IDENTIFIED BY ‘newpass’;
ERROR 1045 (28000): Access denied for user ‘ODBC’@‘localhost’ (using password: YES)
2) Другой первопричиной ошибки mysql 1045 может быть неправильное использование кавычек.
CREATE USER ‘new_user@localhost’ IDENTIFIED BY ‘mypass’; — будет создан пользователь ‘new_user@localhost’@’%’
3) Неочевидный вариант. IP адрес 127.0.0.1 в имени хоста соответствует ключевому слову localhost. С одной стороны, root@localhost и ‘root’@’127.0.0.1’ это синонимы, с другой, можно создать двух пользователей с разными паролями. И при подключении будет выбран тот, который распологается в таблице привелегий (mysql.user) раньше.
4) Аккаунт с пустым именем пользователя трактуется сервером MySQL как анонимный, т.е. позволяет подключаться пользователю с произвольным именем или без указания имени.
Например, вы создали пользователя »@localhost с пустым паролем, чтобы каждый мог подключиться к базе. Однако, если при подключении вы укажите пароль отличный от пустого, то получите ошибку 1045. Как говорилось ранее, нужно совпадение трех параметров: имени пользователя, хоста и пароля, а пароль в данном случае не совпадает с тем, что в базе.
Что делать?
Во-первых, нужно убедиться, что вы используете правильные имя пользователя и пароль. Для этого нужно подключиться к MySQL с правами администратора (если ошибка 1045 не дает такой возможности, то нужно перезапустить сервер MySQL в режиме —skip-grant-tables), посмотреть содержимое таблицы user служебной базы mysql, в которой хранится информация о пользователях, и при необходимости отредактировать её.
SELECT user,host,password FROM mysql.user;
+—————+——————+——————————————-+
| user | host | password |
+—————+——————+——————————————-+
| root | house-f26710394 | *81F5E21E35407D884A6CD4A731AEBFB6AF209E1B |
| aa | localhost | *196BDEDE2AE4F84CA44C47D54D78478C7E2BD7B7 |
| test | localhost | |
| new_user | % | |
| | % | *D7D6F58029EDE62070BA204436DE23AC54D8BD8A |
| new@localhost | % | *ADD102DFD6933E93BCAD95E311360EC45494AA6E |
| root | localhost | *81F5E21E35407D884A6CD4A731AEBFB6AF209E1B |
+—————+——————+——————————————-+
Если изначально была ошибка:
- значит вы указывали при подключении неверный пароль, так как пользователь root@localhost существует. Сам пароль храниться в зашифрованном виде и его нельзя узнать, можно лишь задать новый
в данном случае в таблице привилегий отсутствует пользователь ‘ODBC’@’localhost’. Его нужно создать, используя команды GRANT, CREATE USER и SET PASSWORD.
Экзотический пример. Устанавливаете новый пароль для root@localhost в режиме —skip-grant-tables, однако после перезагрузки сервера по прежнему возникает ошибка при подключении через консольный клиент:
ERROR 1045 (28000): Access denied for user ‘root’@‘localhost’ (using password: YES)
Оказалось, что было установлено два сервера MySQL, настроенных на один порт.
Phpmyadmin
При открытии в браузере phpmyadmin получаете сообщение:
Error
MySQL said:
#1045 — Access denied for user ‘root’@’localhost’ (using password: NO)
Connection for controluser as defined in your configuration failed.
phpMyAdmin tried to connect to the MySQL server, and the server rejected the connection. You should check the host, username and password in your configuration and make sure that they correspond to the information given by the administrator of the MySQL server.
Ни логина, ни пароля вы не вводили, да и пхпадмин их нигде требовал, сразу выдавая сообщение об ошибке. Причина в том, что данные для авторизации берутся из конфигурационного файла config.inc.php Необходимо заменить в нем строчки
$cfg[‘Servers’][$i][‘user’] = ‘root’; // MySQL user
$cfg[‘Servers’][$i][‘password’] = »; // MySQL password (only needed
$cfg[‘Servers’][$i][‘user’] = ‘ЛОГИН’;
$cfg[‘Servers’][$i][‘password’] = ‘ПАРОЛЬ’
Установка новой версии
Устанавливаете новую версию MySQL, но в конце при завершении конфигурации выпадает ошибка:
ERROR Nr. 1045
Access denied for user ‘root’@‘localhost’ (using password: NO)
Это происходит потому, что ранее у вас стоял MySQL, который вы удалили без сноса самих баз. Если вы не помните старый пароль и вам нужны эти данные, то выполните установку новой версии без смены пароля, а потом смените пароль вручную через режим —skip-grant-tables.
P.S. Статья написана по материалам форума SQLinfo, т.е. в ней описаны не все потенциально возможные случаи возникновения ошибки mysql №1045, а только те, что обсуждались на форуме. Если ваш случай не рассмотрен в статье, то задавайте вопрос на форуме SQLinfo
Вам ответят, а статья будет расширена.
Дата публикации: 25.11.2013
© Все права на данную статью принадлежат порталу SQLInfo.ru. Перепечатка в интернет-изданиях разрешается только с указанием автора и прямой ссылки на оригинальную статью. Перепечатка в бумажных изданиях допускается только с разрешения редакции.
MySQL 1045 error Access Denied triggers in the following cases
1) Connecting to wrong host:
[engineer@percona]# mysql -u root -psekret mysql: [Warning] Using a password on the command line interface can be insecure. ERROR 1045 (28000): Access denied for user ‘root’@‘localhost’ (using password: YES) |
If not specifying the host to connect (with -h flag), MySQL client will try to connect to the localhost instance while you may be trying to connect to another host/port instance.
Fix: Double check if you are trying to connect to localhost, or be sure to specify host and port if it’s not localhost:
[engineer@percona]# mysql -u root -psekret -h <IP> -P 3306 |
2) User does not exist:
[engineer@percona]# mysql -u nonexistant -psekret -h localhost mysql: [Warning] Using a password on the command line interface can be insecure. ERROR 1045 (28000): Access denied for user ‘nonexistant’@‘localhost’ (using password: YES) |
Fix: Double check if the user exists:
mysql> SELECT User FROM mysql.user WHERE User=‘nonexistant’; Empty set (0.00 sec) |
If the user does not exist, create a new user:
mysql> CREATE USER ‘nonexistant’@‘localhost’ IDENTIFIED BY ‘sekret’; Query OK, 0 rows affected (0.00 sec) |
3) User exists but client host does not have permission to connect:
[engineer@percona]# mysql -u nonexistant -psekret mysql: [Warning] Using a password on the command line interface can be insecure. ERROR 1045 (28000): Access denied for user ‘nonexistant’@‘localhost’ (using password: YES) |
Fix: You can check to see which host user/host MySQL allows connections with the following query:
mysql> SELECT Host, User FROM mysql.user WHERE User=‘nonexistant’; +————-+————-+ | Host | User | +————-+————-+ | 192.168.0.1 | nonexistant | +————-+————-+ 1 row in set (0.00 sec) |
If you need to check from which IP the client is connecting, you can use the following Linux commands for server IP:
[engineer@percona]# ip address | grep inet | grep -v inet6 inet 127.0.0.1/8 scope host lo inet 192.168.0.20/24 brd 192.168.0.255 scope global dynamic wlp58s0 |
or for public IP:
[engineer@percona]# dig +short myip.opendns.com @resolver1.opendns.com 177.128.214.181 |
You can then create a user with correct Host (client IP), or with ‘%’ (wildcard) to match any possible IP:
mysql> CREATE USER ‘nonexistant’@‘%’ IDENTIFIED BY ‘sekret’; Query OK, 0 rows affected (0.00 sec) |
4) Password is wrong, or the user forgot his password:
[engineer@percona]# mysql -u nonexistant -pforgotten mysql: [Warning] Using a password on the command line interface can be insecure. ERROR 1045 (28000): Access denied for user ‘nonexistant’@‘localhost’ (using password: YES) |
Fix: Check and/or reset password:
You cannot read user passwords in plain text from MySQL as the password hash is used for authentication, but you can compare hash strings with “PASSWORD” function:
mysql> SELECT Host, User, authentication_string, PASSWORD(‘forgotten’) FROM mysql.user WHERE User=‘nonexistant’; +————-+————-+——————————————-+——————————————-+ | Host | User | authentication_string | PASSWORD(‘forgotten’) | +————-+————-+——————————————-+——————————————-+ | 192.168.0.1 | nonexistant | *AF9E01EA8519CE58E3739F4034EFD3D6B4CA6324 | *70F9DD10B4688C7F12E8ED6C26C6ABBD9D9C7A41 | | % | nonexistant | *AF9E01EA8519CE58E3739F4034EFD3D6B4CA6324 | *70F9DD10B4688C7F12E8ED6C26C6ABBD9D9C7A41 | +————-+————-+——————————————-+——————————————-+ 2 rows in set, 1 warning (0.00 sec) |
We can see that PASSWORD(‘forgotten’) hash does not match the authentication_string column, which means password string=’forgotten’ is not the correct password to log in. Also, in case the user has multiple hosts (with different password), he may be trying to connect using the password for the wrong host.
In case you need to override the password you can execute the following query:
mysql> set password for ‘nonexistant’@‘%’ = ‘hello$!world’; Empty set (0.00 sec) |
5) Special characters in the password being converted by Bash:
[engineer@percona]# mysql -u nonexistant -phello$!world mysql: [Warning] Using a password on the command line interface can be insecure. ERROR 1045 (28000): Access denied for user ‘nonexistant’@‘localhost’ (using password: YES) |
Fix: Prevent bash from interpreting special characters by wrapping password in single quotes:
[engineer@percona]# mysql -u nonexistant -p’hello$!world’ mysql: [Warning] Using a password on the command line interface can be insecure ... mysql> |
6) SSL is required but the client is not using it:
mysql> create user ‘ssluser’@‘%’ identified by ‘sekret’; Query OK, 0 rows affected (0.00 sec) mysql> alter user ‘ssluser’@‘%’ require ssl; Query OK, 0 rows affected (0.00 sec) ... [engineer@percona]# mysql -u ssluser -psekret mysql: [Warning] Using a password on the command line interface can be insecure. ERROR 1045 (28000): Access denied for user ‘ssluser’@‘localhost’ (using password: YES) |
Fix: Adding –ssl-mode flag (–ssl flag is deprecated but can be used too)
[engineer@percona]# mysql -u ssluser -psekret —ssl-mode=REQUIRED ... mysql> |
You can read more in-depth on how to configure SSL in MySQL in the blog post about “Setting up MySQL SSL and Secure Connections” and “SSL in 5.6 and 5.7“.
7) PAM backend not working:
mysql> CREATE USER ‘ap_user’@‘%’ IDENTIFIED WITH auth_pam; Query OK, 0 rows affected (0.00 sec) ... [engineer@percona]# mysql -u ap_user -pap_user_pass mysql: [Warning] Using a password on the command line interface can be insecure. ERROR 1045 (28000): Access denied for user ‘ap_user’@‘localhost’ (using password: YES) |
Fix: Double check user/password is correct for the user to authenticate with the PAM currently being used.
In my example, I am using Linux shadow files for authentication. In order to check if the user exists:
[engineer@percona]# cat /etc/passwd | grep ap_user ap_user:x:1000:1000::/home/ap_user:/bin/bash |
To reset password:
[engineer@percona]# sudo passwd ap_user Changing password for user ap_user. New password: |
Finally, if you are genuinely locked out and need to circumvent the authentication mechanisms in order to regain access to the database, here are a few simple steps to do so:
- Stop the instance
- Start the instance
- Stop the instance
- Edit my.cnf and remove skip-grant-tables and skip-networking
- Start MySQL again
Learn more about Percona Server for MySQL
Answer
It seems that you have forgotten root password which was set during installation of MariaDB
Solution:- reset root password
Follow below steps to reset root password:-
1) Stop mariadb services
service mysql stop
2) Run mysqld safe version by below command
sudo mysqld_safe —skip-grant-tables &
3) Run mysql client with below commnad on new terminal
mysql -u root
4) Set password in user table of mysql database
use mysql;
update user SET PASSWORD=PASSWORD(«<new_password>») WHERE USER=’root’;
flush privileges;
exit
5) Login with new password, set in above command
mysql -u root -p
Enter password:
↑ Starting and Stopping MariaDB ↑
Related Questions In Other DevOps Questions
- All categories
-

Apache Kafka -

Apache Spark -

Azure -

Big Data Hadoop -

Blockchain -
C# -
C++ -

Career Counselling -

Cloud Computing -

Cyber Security & Ethical Hacking -

Data Analytics -

Database -
Data Science -

DevOps & Agile -
Digital Marketing -

Events & Trending Topics -

IoT (Internet of Things) -

Java -
Kotlin -

Linux Administration -

Machine Learning -

MicroStrategy -
PMP -

Power BI -

Python -

RPA -
SalesForce -

Selenium -

Software Testing -

Tableau -

Talend -
TypeSript -

Web Development -
Ask us Anything! -
Others
Join the world’s most active Tech Community!
Welcome back to the World’s most active Tech Community!
Subscribe to our Newsletter, and get personalized recommendations.
Already have an account? Sign in.
Solution
From the other cloud services that we have, we knew that this is something to do with the ‘UNIX_SOCKET’ authentication.
We also know that cause as this new machine has been rebuilt a few times, changing the root password OR changing the MariaDB root password has got nothing to do with this.
After logging in to MariaDB, we found nothing on this query:
SELECT plugin from mysql.user where User='root';We tried the following query:
UPDATE mysql.user SET plugin = 'mysql_native_password', Password = PASSWORD('new_password') WHERE User = 'root';We found something interesting configuration on the /etc/mysql/debian.cnf . The password was blank on both client and mysql_upgrade. We put the password for testing purposes.
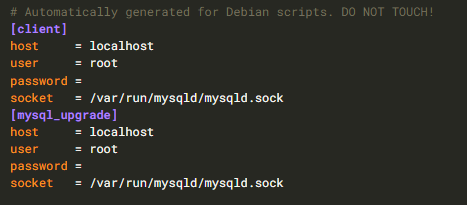
Note: Ensure to double quote within the password. For instance: password = “password”
Restart the MariaDB:
systemctl restart mariadbCheck the MariaDB status:
systemctl status mariadbThe issue has gone.
Note: This may fix the issue, however, we are investigating this approach and we believe it’s not safe to put the password into this file. On the flip side though, the MariaDB root password has to be different anyway from the operating system root.
Change the MariaDB root password:
mysqladmin --user=root --password=currentpassword password "newpassword"Test the root account.
Open the file – /etc/mysql/debian.cnf
Change the password to a new password.
Note: Ensure to double quote within the password. For instance: password = “password”
Stop MariaDB service:
sudo systemctl stop mariadbStart the MariaDB service:
sudo systemctl start mariadbCheck the status again:
sudo systemctl status mariadbSolve Access Denied for User Root Error
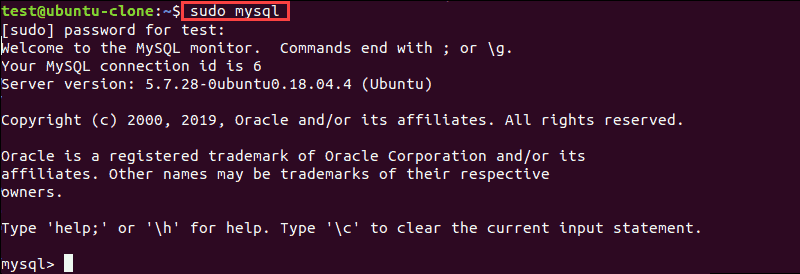
To be able to log into MySQL as root, first use sudo to modify the root user:
sudo mysqlEnter your password at the prompt. A MySQL shell loads.
Use the ALTER USER command and change the authentication method to log into MySQL as root:
ALTER USER 'root'@'localhost' IDENTIFIED WITH mysql_native_password BY 'insert_password';
This command changes the password for the user root and sets the authentication method to mysql_native_password. This is a traditional method for authentication, and it is not as secure as auth_plugin. In the example above, we set “root” as the password, but we encourage you to set a stronger password.
Test Root User MySQL Access
After you run the commands listed above, exit the MySQL shell by pressing CTRL + D on your keyboard or type exit; and hit enter. There is no need to restart the mysqld service to log in.
Now try again to access MySQL with root. In the terminal, type in:
mysql -u root -pEnter the password you used with the ALTER USER command. Do not type in the system password to access MySQL as it will not work. If everything worked fine, you should see the MySQL welcome message.
NOTE: The ALTER USER command may not work for MySQL and MariaDB versions older than 5.7.6 and 10.1.20 respectively.
Conclusion
Now you know how to bypass the MySQL ERROR 1698 (28000): Access denied for user ‘root’@’localhost’.
There are different ways to approach this issue, but we selected the easiest and fastest method. Make sure to enter the commands as listed in the article to avoid errors in SQL syntax.
How do I fix error 1045 28000 Access denied?
Set root user password Login as user root with blank password >,mysql -u root mysql>, ALTER USER ‘root’@’localhost’ IDENTIFIED BY ‘abc’,
How do I fix error 1045 28000 Access denied?
Set root user password Login as user root with blank password >,mysql -u root mysql>, ALTER USER ‘root’@’localhost’ IDENTIFIED BY ‘abc’,
How do I fix MySQL error Access denied for user root localhost?
Use the ALTER USER command and change the authentication method to log into MySQL as root : ALTER USER ‘root’@’localhost’ IDENTIFIED WITH mysql_native_password BY ‘insert_password’, This command changes the password for the user root and sets the authentication method to mysql_native_password
")


")