

This chapter has three distinct subjects.
First we look at login logging ; how can we find out who is logging in to the system, when and from where. And who is not logging in, who fails at or .
Second we discuss how to configure the syslog daemon, and how to test it with .
The last part is mostly about and mentions the and commands for .
The author selected Open Internet/Free Speech Fund to receive a donation as part of the Write for DOnations program.
- Introduction
- Introduction
- Logging root actions
- Configure audit
- Searching root activities
- 4 Commands to see logged users on Linux
- 1. Use w command to see logged in users in Linux
- 2. Check who is logged in with who command
- 3. Just get logged in users with users command
- 4. Using finger command to see logged in users
- Bonus Tip: see who logged on your system since last reboot
- Viewing Linux login history
- 1. View history of all logged users
- 2. View login history of a certain user
- 3. Display IP addresses in login history instead of hostname
- 4. Display only last N logins
- 5. View all the bad login attempts on your Linux server
- Лог загрузки
- Логи авторизации, в том числе ssh
- Логи ошибок в Ubuntu
- Cron logs
- Лог действий пользователя
- Step 1 — Logging In and Checking auth. log
- Step 3 — Testing Root Login
- Login logging
- /var/run/utmp (who)
- /var/log/wtmp (last)
- /var/log/lastlog (lastlog)
- /var/log/btmp (lastb)
- su and ssh logins
- How To Use the “lastlog” Command
- Step 2 — Disabling Root Login
- Syslogd
- about syslog
- about rsyslog
- modules
- facilities
- priorities
- actions
- configuration
- restarting rsyslogd
- Logger
- Solution
- Step 6 — Testing the Rotation
- How To Use the “last” Command
- Step 5 — Rotating Log Files
- The logrotate Configuration File
- Practice
- Step 4 — Creating and Testing Your Own Log Messages
- Watching logs
- Step 3 — Using the rsyslog Daemon
- The rsyslog Configuration File
- Rotating logs
- Step 2 — Viewing Log File Contents
- Step 1 — Checking the Default Log File Location
- Prerequisites
- Review Authentication Attempts
- Conclusion
- Conclusion
- Conclusion
Introduction
In this tutorial, you will disable the root login on Ubuntu, preventing unauthorized root access over SSH and improving your Linux-based system’s security.
Introduction
Linux and the applications that run on it can generate all different types of messages, which are recorded in various log files. Linux uses a set of configuration files, directories, programs, commands and daemons to create, store and recycle these log messages. Knowing where the system keeps its log files and how to make use of related commands can therefore help save valuable time during troubleshooting.
In this tutorial, we will have a look at different parts of the Linux logging mechanism.
The commands in this tutorial were tested in plain vanilla installations of CentOS 9, Ubuntu 22.10, and Debian 11.
Logging root actions
Capturing execve system calls and store them in the audit log
Configure audit
auditctl -a exit,always -F arch=b64 -F euid=0 -S execve -k root-commands
auditctl -a exit,always -F arch=b32 -F euid=0 -S execve -k root-commands
auditctl -a exit,always -S all -F euid=0 -F perm=awx -k root-commands
Searching root activities
After logging the events for a while, we might want to search for them. By specifying a key (root-commands), you can quickly find them again.
ausearch -k root-commands.
This will perform a search through all audit entries, for which the key is root-commands.
So you are interested in Linux security? Join the Linux Security Expert training program, a practical and lab-based training ground. For those who want to become (or stay) a Linux security expert.
See training package
 Security scanning with Lynis and Lynis Enterprise
Run automated security scans and increase your defenses. Lynis is an open source security tool to perform in-depth audits. It helps with system hardening, vulnerability discovery, and compliance.
4 Commands to see logged users on Linux

Almost all these commands rely on the data stored in the /var or /proc directory. If you know a little about the directory structure in Linux, you know that these two directories contains data about the running processes on your system.
1. Use w command to see logged in users in Linux
wAnd here is the output for the w command:
[email protected]:~$ w 09:54:54 up 26 min, 3 users, load average: 0.00, 0.00, 0.00
USER TTY FROM [email protected] IDLE JCPU PCPU WHAT
root pts/0 202.91.87.114 09:37 21.00s 0.00s 0.00s -bash
abhi pts/1 202.91.87.114 09:47 0.00s 0.00s 0.00s w
rohini pts/2 157.43.53.142 09:48 6:13 0.00s 0.00s -bash
Let me explain a few terms in the output of the w command. The same terms would be used in other commands as well.
2. Check who is logged in with who command
Who command is another simple one. Just type who and it will show who is logged on to your Linux system currently.
who[email protected]:~$ who
root pts/0 Aug 6 09:37 (202.91.87.114)
abhi pts/1 Aug 6 09:47 (202.91.87.114)
rohini pts/2 Aug 6 09:48 (157.43.53.142)3. Just get logged in users with users command
[email protected]:~$ users
abhi rohini root
4. Using finger command to see logged in users
You may need to install finger command first because not all Linux distributions have it installed by default.
It is available in the universe repository of Ubuntu and you can install it with this command:
sudo apt install fingerOnce installed, just type finger in terminal:
fingerAnd you’ll see who is logged in on your Linux system.
[email protected]:~$ finger
Login Name Tty Idle Login Time Office Office Phone
abhi Abhishek pts/1 Aug 6 09:47 (202.91.87.114)
rohini Rohini Rachita pts/2 13 Aug 6 09:48 (157.43.53.142)
root root *pts/0 Aug 6 09:37 (202.91.87.114)
Bonus Tip: see who logged on your system since last reboot
lastHere’s the output of the last command which is self-explanatory I believe.
[email protected]:~$ last
rohini pts/3 157.43.53.142 Tue Aug 6 10:05 - 10:05 (00:00)
rohini pts/2 157.43.53.142 Tue Aug 6 09:48 still logged in
abhi pts/1 202.91.87.114 Tue Aug 6 09:47 still logged in
root pts/0 202.91.87.114 Tue Aug 6 09:37 still logged in
reboot system boot 4.15.0-52-generi Tue Aug 6 09:28 still running
wtmp begins Tue Aug 6 09:28:43 2019
Let me show you how to view the Linux login history so that you are aware of who is accessing your system and from where.
Viewing Linux login history
Linux is very good at keeping logs of everything that goes on your system. Quite naturally, it also stores logs about login and login attempts. The login information is stored in three places:
- /var/log/wtmp – Logs of last login sessions
- /var/run/utmp – Logs of the current login sessions
- /var/log/btmp – Logs of the bad login attempts
Let’s see these things in a bit detail.
1. View history of all logged users
To view the history of all the successful login on your system, simply use the command last.
lastabhi pts/0 202.91.87.115 Wed Mar 13 13:31 still logged in
root pts/0 202.91.87.115 Wed Mar 13 13:30 - 13:31 (00:00)
servesha pts/0 125.20.97.117 Tue Mar 12 12:07 - 14:25 (02:17)
servesha pts/0 209.20.189.152 Tue Mar 5 12:32 - 12:38 (00:06)
root pts/0 202.91.87.114 Mon Mar 4 13:35 - 13:47 (00:11)
wtmp begins Mon Mar 4 13:35:54 2019The last line of the output tells you the when was the wtmp log file was created. This is important because if the wtmp file was deleted recently, last command won’t be able to show history of the logins prior to that date.
You may have a huge history of login sessions so it’s better to pipe the output through less command.
2. View login history of a certain user
last <username>last servesha
servesha pts/0 125.20.97.117 Tue Mar 12 12:07 - 14:25 (02:17)
servesha pts/0 209.20.189.152 Tue Mar 5 12:32 - 12:38 (00:06)
wtmp begins Mon Mar 4 13:35:54 20193. Display IP addresses in login history instead of hostname
last -i4. Display only last N logins
If your system has a good uptime, perhaps your login history would be huge. As I mentioned earlier, you can use the less command or other file viewing commands like head or tail.
Last command gives you the option to display only certain number of login history.
last -N5. View all the bad login attempts on your Linux server
Now comes the important part: checking the bad login attempts on your server.
You can do that in two ways. You can either use the last command with the btmp log file:
last -f /var/log/btmpor you can use the lastb command:
lastbBoth of these commands will yield the same result. The lastb is actually a link to the last command with the specified file.
root ssh:notty 218.92.0.158 Wed Mar 13 14:34 - 14:34 (00:00)
sindesi ssh:notty 59.164.69.10 Wed Mar 13 14:34 - 14:34 (00:00)
root ssh:notty 218.92.0.158 Wed Mar 13 14:34 - 14:34 (00:00)
sindesi ssh:notty 59.164.69.10 Wed Mar 13 14:34 - 14:34 (00:00)
root ssh:notty 218.92.0.158 Wed Mar 13 14:34 - 14:34 (00:00)
You should deploy Fail2Ban to protect your server in such cases. Fail2Ban will ban such IPs from your server and thus giving your server an extra layer of protection.
How to Clear Systemd Journal Logs in Linux
This quick tutorial shows you two ways to clear systemd journal logs from your Linux system.
![]()

I hope this tutorial teach you to view login history in Linux and now you can use this knowledge to better manage and protect your Linux system.
Приветствую читателей своего сайта. Сегодня я всесторонне рассмотрю тему тему логов в Ubuntu — ошибки, загрузка, системные логи, cron и остальное. Постараюсь дать обзорную информацию по основным моментам в этой теме. Материал в основном рассчитан на новичков, но возможно восполнит пробелы и специалистов.
Традиционно логи в Linux хранятся в директории . Вот описание стандартных лог файлов Ubuntu, которые там присутствуют. Кстати, если вы только планируете устанавливать ubuntu, то можете воспользоваться моей подробной статьей на этот счет — установка ubuntu server. Так же вам может быть интересен мой обзор и сравнение сервера убунту с другими linux системами — Ubuntu Server — обзор для начинающих, сравнение, отзывы.
- syslog или messages. Последнего чаще всего нет и вместо него только syslog. Это традиционные глобальные системные журналы операционной системы linux. Сюда пишутся события загрузки, ядра системы, системы инициализации systemd и т.д.
- auth.log — лог авторизации и аутентификации в системе.
- dmesg — в этом логе хранится информация о загрузке ядра и драйверов оборудования.
- alternatives.log — лог файл программы update-alternatives. Не знаю, за какие такие заслуги ей выделили отдельный лог файл, а cron, к примеру, нет.
- kern.log — лог сообщений ядра ubuntu, да и любой другой linux системы.
- maillog — сообщения почтовой системы. Обычно postfix или exim. Если на сервере ubuntu они не установлены, то и почтового лога не будет.
- dpkg.log — логирование работы пакетных менеджеров ubuntu. Обычно это apt или apt-get.
- lastlog и wtmp — информация о прошлых авторизациях пользователей.
Лог загрузки
Начнем с самого начала. В момент загрузки системы записывается вся основная информация, имеющая к ней отношение. Если у вас будут какие-то ошибки во время старта сервера, вы сможете их увидеть в этом логе. Посмотреть лог загрузки Ubuntu можно следующим образом.
sudo dmesg
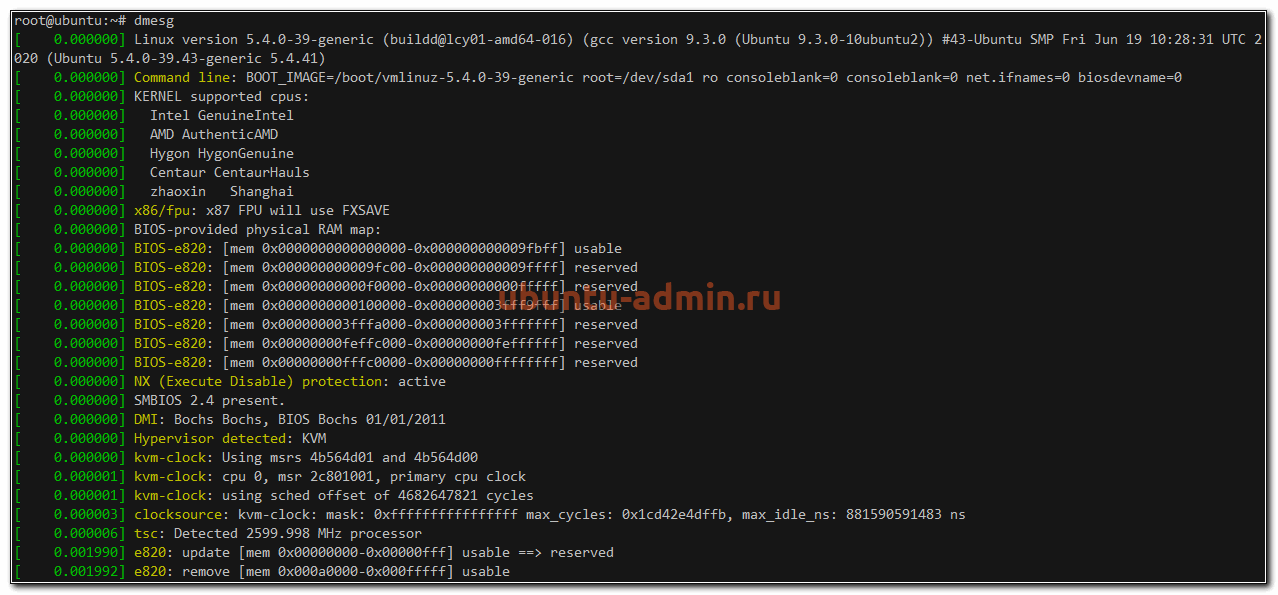
У вас получится очень длинный вывод всего того, что происходило с системой на старте. Если ищите что-то конкретное, то можете сделать фильтрацию вывода с помощью grep. Допустим, вам надо узнать информацию только о диске.
sudo dmesg | grep sda
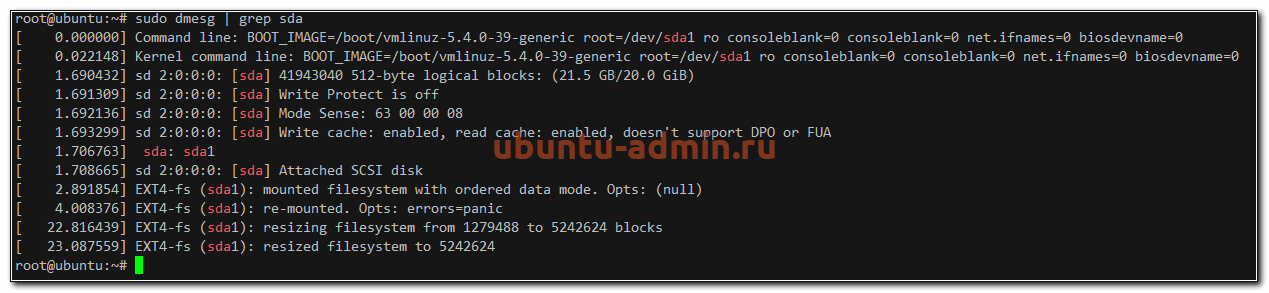
Вы увидите лог загрузки системы ubuntu, содержащий информацию только о диске sda. Аналогичным образом можно фильтровать вывод по другим темам. Например, посмотреть все ошибки, которые были во время загрузки.
sudo dmesg | grep error
И так далее. Информация, которую выводит команда dmesg, хранится в log файле .
Логи авторизации, в том числе ssh
Для того, чтобы узнать, кто и когда проходил авторизацию на сервере ubuntu, можно воспользоваться логами из файла . Авторизация по ssh там будет выглядеть следующим образом.
sshd[2774]: Accepted publickey for root from 21.17.214.129 port 2673 ssh2: RSA SHA256:MCDja9Ve7rYZCzeVGpYXpqRxfAanWwVkcd+lU3GS
sshd[2774]: pam_unix(sshd:session): session opened for user root by (uid=0)
systemd-logind[628]: New session 6 of user root.

Здесь мы видим ip адрес, с которого произошло подключение и слепок сертификата, так как аутентификация была произведена с его помощью. Если хотите повысить уровень логирования подключений по ssh и получать больше информации, то можете отредактировать конфигурационный файл sshd — , добавив туда следующий параметр.
LogLevel VERBOSE
Не забудьте перезапустить службу sshd для принятия изменений:
sudo systemctl restart sshd
После этого логирование подключений по ssh будет более подробное.
Лог локального входа в ubuntu тоже хранится в файле . Информация о подключении через консоль выглядит следующим образом.
login[680]: pam_unix(login:session): session opened for user root by LOGIN(uid=0)
systemd-logind[628]: New session 9 of user root.
login[3094]: ROOT LOGIN on '/dev/tty1'

Устройство /dev/tty1 говорит о том, что вход локальный.
Вы можете быстро посмотреть информацию о последних входах в систему с помощью команды last. Эта информация хранится в бинарном логе .

Примерно то же самое можно увидеть с помощью utmpdump.
sudo utmpdump /var/log/wtmp
Логи ошибок в Ubuntu
Рассмотрим теперь вопрос с расположением лога ошибок в Ubuntu. Как такового отдельного error log в традиционных linux системах нет. И Убунта тут не исключение. Ошибки придется искать по системным и программным логам выборкой ключевых слов. Обычно используют следующие фразы:
- error или err
- critical или crit
- debug
- warn
Например, посмотрим в логе загрузки dmesg все сообщения уровня предупреждений (warn).
sudo dmesg -l warn

А теперь проверим ошибки в системном логе.
sudo cat /var/log/syslog | grep error
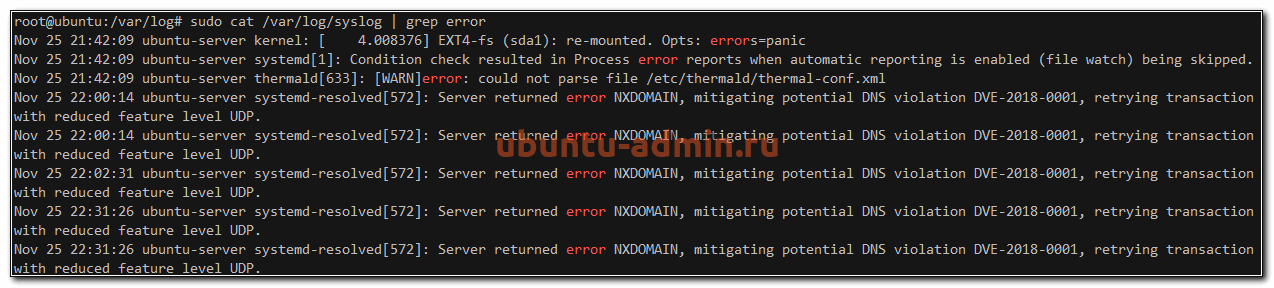
Видим некоторые ошибки в службе systemd-resolved.
Cron logs
Часто хочется проверить лог запуска периодических заданий cron. В Ubuntu, как мне кажется, сделали не удобно. По умолчанию, cron logs не выделены в отдельный файл. Искать их стоит в общем системном логе syslog. Например, в Centos существует отдельный лог-файл /var/log/cron, где собрана вся информация о запущенных заданиях. Предлагаю сделать так же в Ubuntu.
Для этого открываем конфигурационный файл и добавляем туда следующую информацию.
cron.* /var/log/cron.log
По умолчанию, она присутствует в конфиге, но закомментирована. Вам нужно убрать # в начале строки, чтобы раскомментировать ее. Так же я рекомендую сделать так, чтобы эти логи не дублировались в общий системный лог. Для этого немного измените следующую строку.
*.*;auth,authpriv.none,cron.none-/var/log/syslog
Я добавил в нее cron.none, чтобы логи cron не писались больше в системный лог syslog. После этого перезапустите службы rsyslog и cron и проверяйте изменения.
sudo systemctl restart rsyslog
sudo systemctl restart cron
sudo cat /var/log/cron.log

Теперь у нас все логи Cron в Ubuntu будут в отдельном файле.
Лог действий пользователя
Мне часто задают вопросы, как посмотреть лог действий пользователя в системе или как узнать, какие программы он запускал. По умолчанию, такие действия не логируются в ubuntu. Для этого нужно устанавливать какое-то дополнительное программное обеспечение. Я даже не знаю, кто умеет это делать. Обычно если надо фиксировать действия пользователя, включается лог работы sudo.
Для того, чтобы включить логирование действий пользователя через sudo, редактируем файл . Добавляем туда строку.
Defaults logfile=/var/log/sudo.log
Теперь выполните какую-нибудь команду через sudo.
sudo cat /var/log/cron.log
Nov 25 23:10:36 : root : TTY=pts/3 ; PWD=/root ; USER=root ; COMMAND=/usr/bin/cat /var/log/cron.log
Выполненная команда пользователя сохранена в логе sudo.log. Теперь никто не сможет выполнить незаметно административные действия на сервере. Конечно, человек с полными правами сможет изменить любой лог файл, удалив свои действия при желании. Для этого важные логи нужно отправлять куда-то в другое место, но это уже тема отдельной статьи.
На сегодня по логам в Ubuntu у меня все. Желаю вам логов без ошибок и вечного аптайма (шутка, надо ставить обновы и перезагружаться).
Step 1 — Logging In and Checking auth. log
- sammy@your_server_ip
- your_private_key sammy@your_server_ip
The -i flag represents the identity file from which your_private_key is read for authentication.
Next, inspect the auth.log file by moving to the /var/log directory:
- /var/log/
Use cat auth.log to display the contents of the file:
- auth.log
Enter your password if prompted.
You will receive an output similar to this:
May 29 18:46:32 ubuntu sshd[3886]: Disconnected from invalid user cally 43.155.90.144 port 47454 [preauth]
May 29 18:51:56 ubuntu sshd[3890]: Received disconnect from 195.38.129.16 port 10017:11: Bye Bye [preauth]
May 29 18:51:56 ubuntu sshd[3890]: Disconnected from authenticating user root 195.38.129.16 port 10017 [preauth]
May 29 18:52:24 ubuntu sshd[3892]: Received disconnect from 178.128.234.248 port 58660:11: Bye Bye [preauth]
May 29 18:52:24 ubuntu sshd[3892]: Disconnected from authenticating user root 178.128.234.248 port 58660 [preauth]
May 29 18:52:34 ubuntu sshd[3894]: Received disconnect from 43.134.106.128 port 33854:11: Bye Bye [preauth]
May 29 18:52:34 ubuntu sshd[3894]: Disconnected from authenticating user root 43.134.106.128 port 33854 [preauth]
May 29 18:53:07 ubuntu sshd[3896]: Invalid user projects from 176.183.60.72 port 42070
May 29 18:53:07 ubuntu sshd[3896]: Received disconnect from 176.183.60.72 port 42070:11: Bye Bye [preauth]
May 29 18:53:07 ubuntu sshd[3896]: Disconnected from invalid user projects 176.183.60.72 port 42070 [preauth]
May 29 18:57:27 ubuntu sshd[3900]: Received disconnect from 92.255.85.135 port 20436:11: Bye Bye [preauth]
May 29 18:57:27 ubuntu sshd[3900]: Disconnected from authenticating user root 92.255.85.135 port 20436 [preauth]
May 29 19:06:40 ubuntu sshd[3903]: Invalid user default from 27.71.207.190 port 57513
May 29 19:06:41 ubuntu sshd[3903]: Connection closed by invalid user default 27.71.207.190 port 57513 [preauth]
...
The auth.log file logs all authentication attempts made to a server. You might see a lot of unknown and unauthorized requests being received by your server. For this reason, you might want to disable root login on your system and rotate your keys and passwords regularly.
You have now reviewed the authentication logs that indicate your server has received more than just your authentication requests. Next, you will update your server’s SSH configuration so that the root access is completely disabled on your server.
Step 3 — Testing Root Login
If using password-based login:
- root@your_server_ip
If using key-based login:
- your_private_key root@your_server_ip
The attempt to SSH as root will fail with an error message like this:
root@your_server_ip: Permission denied (publickey).If using password-based login:
- sammy@your_server_ip
If using key-based login:
- your_private_key sammy@your_server_ip
You can now continue using the server as needed.
Login logging
To keep track of who is logging into the system, Linux can maintain the , , and files.
/var/run/utmp (who)
[root@rhel4 ~]# who
paul pts/1 Feb 14 18:21 (192.168.1.45)
sandra pts/2 Feb 14 18:11 (192.168.1.42)
inge pts/3 Feb 14 12:01 (192.168.1.33)
els pts/4 Feb 14 14:33 (192.168.1.19)
/var/log/wtmp (last)
The /var/log/wtmp file is updated by the . Use to see the /var/run/wtmp file.
[root@rhel4a ~]# last | head
paul pts/1 192.168.1.45 Wed Feb 14 18:39 still logged in
reboot system boot 2.6.9-42.0.8.ELs Wed Feb 14 18:21 (01:15)
nicolas pts/5 pc-dss.telematic Wed Feb 14 12:32 - 13:06 (00:33)
stefaan pts/3 pc-sde.telematic Wed Feb 14 12:28 - 12:40 (00:12)
nicolas pts/3 pc-nae.telematic Wed Feb 14 11:36 - 12:21 (00:45)
nicolas pts/3 pc-nae.telematic Wed Feb 14 11:34 - 11:36 (00:01)
dirk pts/5 pc-dss.telematic Wed Feb 14 10:03 - 12:31 (02:28)
nicolas pts/3 pc-nae.telematic Wed Feb 14 09:45 - 11:34 (01:48)
dimitri pts/5 rhel4 Wed Feb 14 07:57 - 08:38 (00:40)
stefaan pts/4 pc-sde.telematic Wed Feb 14 07:16 - down (05:50)
[root@rhel4a ~]#
The last command can also be used to get a list of last reboots.
[paul@rekkie ~]$ last reboot
reboot system boot 2.6.16-rekkie Mon Jul 30 05:13 (370+08:42)
wtmp begins Tue May 30 23:11:45 2006
[paul@rekkie ~]
/var/log/lastlog (lastlog)
Use to see the /var/log/lastlog file.
 [root@rhel4a ~]# lastlog | tail
tim pts/5 10.170.1.122 Tue Feb 13 09:36:54 +0100 2007
rm pts/6 rhel4 Tue Feb 13 10:06:56 +0100 2007
henk **Never logged in**
stefaan pts/3 pc-sde.telematic Wed Feb 14 12:28:38 +0100 2007
dirk pts/5 pc-dss.telematic Wed Feb 14 10:03:11 +0100 2007
arsene **Never logged in**
nicolas pts/5 pc-dss.telematic Wed Feb 14 12:32:18 +0100 2007
dimitri pts/5 rhel4 Wed Feb 14 07:57:19 +0100 2007
bashuserrm pts/7 rhel4 Tue Feb 13 10:35:40 +0100 2007
kornuserrm pts/5 rhel4 Tue Feb 13 10:06:17 +0100 2007
[root@rhel4a ~]#
/var/log/btmp (lastb)
There is also the command to display the file. This file is updated by the login program when entering the wrong password, so it contains failed login attempts. Many computers will not have this file, resulting in no logging of failed login attempts.
[root@RHEL4b ~]# lastb
lastb: /var/log/btmp: No such file or directory
Perhaps this file was removed by the operator to prevent logging lastb\ info.
[root@RHEL4b ~]#
[root@RHEL4b ~]# touch /var/log/btmp
[root@RHEL4b ~]# ll /var/log/btmp
-rw-r--r-- 1 root root 0 Jul 30 06:12 /var/log/btmp
[root@RHEL4b ~]# chmod o-r /var/log/btmp
[root@RHEL4b ~]# lastb
btmp begins Mon Jul 30 06:12:19 2007
[root@RHEL4b ~]#
Failed logins via ssh, rlogin or su are not registered in /var/log/btmp. Failed logins via tty are.
[root@RHEL4b ~]# lastb
HalvarFl tty3 Mon Jul 30 07:10 - 07:10 (00:00)
Maria tty1 Mon Jul 30 07:09 - 07:09 (00:00)
Roberto tty1 Mon Jul 30 07:09 - 07:09 (00:00)
btmp begins Mon Jul 30 07:09:32 2007
[root@RHEL4b ~]#
su and ssh logins
Depending on the distribution, you may also have the file being filled with messages from the auth and/or authpriv syslog facilities. This log will include su and/or ssh failed login attempts. Some distributions put this in , verify the syslog configuration.
[root@RHEL4b ~]# cat /var/log/secure
Jul 30 07:09:03 sshd[4387]: Accepted publickey for paul from ::ffff:19\
2.168.1.52 port 33188 ssh2
Jul 30 05:09:03 sshd[4388]: Accepted publickey for paul from ::ffff:19\
2.168.1.52 port 33188 ssh2
Jul 30 07:22:27 sshd[4655]: Failed password for Hermione from ::ffff:1\
92.168.1.52 port 38752 ssh2
Jul 30 05:22:27 sshd[4656]: Failed password for Hermione from ::ffff:1\
92.168.1.52 port 38752 ssh2
Jul 30 07:22:30 sshd[4655]: Failed password for Hermione from ::ffff:1\
92.168.1.52 port 38752 ssh2
Jul 30 05:22:30 sshd[4656]: Failed password for Hermione from ::ffff:1\
92.168.1.52 port 38752 ssh2
Jul 30 07:22:33 sshd[4655]: Failed password for Hermione from ::ffff:1\
92.168.1.52 port 38752 ssh2
Jul 30 05:22:33 sshd[4656]: Failed password for Hermione from ::ffff:1\
92.168.1.52 port 38752 ssh2
Jul 30 08:27:33 sshd[5018]: Invalid user roberto from ::ffff:192.168.1\
.52
Jul 30 06:27:33 sshd[5019]: input_userauth_request: invalid user rober\
to
Jul 30 06:27:33 sshd[5019]: Failed none for invalid user roberto from \
::ffff:192.168.1.52 port 41064 ssh2
Jul 30 06:27:33 sshd[5019]: Failed publickey for invalid user roberto \
from ::ffff:192.168.1.52 port 41064 ssh2
Jul 30 08:27:36 sshd[5018]: Failed password for invalid user roberto f\
rom ::ffff:192.168.1.52 port 41064 ssh2
Jul 30 06:27:36 sshd[5019]: Failed password for invalid user roberto f\
rom ::ffff:192.168.1.52 port 41064 ssh2
[root@RHEL4b ~]#
auth.*,authpriv.* /var/log/customsec.log
How To Use the “lastlog” Command
This information is provided by accessing the /etc/log/lastlog file. It is then sorted according to the entries in the /etc/passwd file:
- lastlog
Username Port From Latest
root pts/1 rrcs-72-43-115-1 Thu Sep 5 19:37:02 +0000 2013
daemon **Never logged in**
bin **Never logged in**
sys **Never logged in**
sync **Never logged in**
games **Never logged in**
. . .
Step 2 — Disabling Root Login
In this step, you will edit the sshd_config file to disable the root login and then restart the sshd daemon to read the configuration after the modifications.
The sshd_config file stores the SSH daemon configuration containing the parameters used by sshd. The daemon is responsible for handling SSH connections. You need to restart the sshd daemon to apply the configuration changes. This configuration change will instruct the sshd not to permit root login over SSH.
Open the file sshd_config located in the /etc/ssh directory using nano or your favorite text editor:
- /etc/ssh/sshd_config
Review the file, looking for the PermitRootLogin line:
...
#LoginGraceTime 2mPermitRootLogin yes#StrictModes yes
#MaxAuthTries 6
#MaxSessions 10
...
Change the value of the key PermitRootLogin from yes to no:
...
#LoginGraceTime 2mPermitRootLogin no#StrictModes yes
#MaxAuthTries 6
#MaxSessions 10
...
Save and close the file.
Next, you will restart the sshd daemon to read the configuration after the modifications you just made.
- systemctl restart sshd
This command will restart the sshd service using systemctl.
In this step, you changed the configuration file to deny root login requests and restarted the sshd to read the latest configuration. Next, you will test whether root login is disabled or not by making a root login attempt to your server.
Syslogd
about syslog
The standard method of logging on Linux was through the daemon. Syslog was developed by for sendmail, but quickly became a standard among many Unix applications and was much later written as rfc 3164. The syslog daemon can receive messages on udp from many applications (and appliances), and can append to log files, print, display messages on terminals and forward logs to other syslogd daemons on other machines. The syslogd daemon is configured in .
about rsyslog
The new method is called reliable and extended syslogd and uses the daemon and the configuration file. The syntax is backwards compatible.
Each line in the configuration file uses a to determine where the message is coming from. It also contains a for the severity of the message, and an to decide on what to do with the message.
modules
The new has many more features that can be expanded by using modules. Modules allow for example exporting of syslog logging to a database.
root@rhel65:/etc# man rsyslog.conf
root@rhel65:/etc# man rsyslogd
root@rhel65:/etc#
facilities
The command will explain the different default facilities for certain daemons, such as mail, lpr, news and kern(el) messages. The local0 to local7 facility can be used for appliances (or any networked device that supports syslog). Here is a list of all facilities for rsyslog.conf version 1.3. The security keyword is deprecated.
auth (security)
authpriv
cron
daemon
ftp
kern
lpr mail
mark (internal use only)
news
syslog
user
uucp
local0-7
priorities
Here is a list of all priorities, in ascending order. The keywords warn, error and panic are deprecated.
debug
info
notice
warning (warn)
err (error)
crit
alert
emerg (panic)
actions
root,user1 list of users, separated by comma's
* message to all logged on users
/ file (can be a printer, a console, a tty, ...)
-/ file, but don't sync after every write
| named pipe
@ other syslog hostname
In addition, you can prefix actions with a — to omit syncing the file after every logging.
configuration
Below a sample configuration of custom local4 messages in .
local4.crit /var/log/critandabove
local4.=crit /var/log/onlycrit
local4.* /var/log/alllocal4
restarting rsyslogd
Don’t forget to restart the server after changing its configuration.
root@rhel65:/etc# service rsyslog restart
Shutting down system logger: [ OK ]
Starting system logger: [ OK ]
root@rhel65:/etc#
Logger
The logger command can be used to generate syslog test messages. You can aslo use it in scripts. An example of testing syslogd with the tool.
[root@rhel4a ~]# logger -p local4.debug "l4 debug"
[root@rhel4a ~]# logger -p local4.crit "l4 crit"
[root@rhel4a ~]# logger -p local4.emerg "l4 emerg"
[root@rhel4a ~]#
The results of the tests with logger.
[root@rhel4a ~]# cat /var/log/critandabove
Feb 14 19:55:19 rhel4a paul: l4 crit
Feb 14 19:55:28 rhel4a paul: l4 emerg
[root@rhel4a ~]# cat /var/log/onlycrit
Feb 14 19:55:19 rhel4a paul: l4 crit
[root@rhel4a ~]# cat /var/log/alllocal4
Feb 14 19:55:11 rhel4a paul: l4 debug
Feb 14 19:55:19 rhel4a paul: l4 crit
Feb 14 19:55:28 rhel4a paul: l4 emerg
[root@rhel4a ~]#
Solution
1. Display the /var/run/utmp file.
who
2. Display the /var/log/wtmp file.
last
3. Use the lastlog and lastb commands, understand the difference.
lastlog : when users last logged on
lastb: failed (bad) login attempts
4. Examine syslog to find the location of the log file containing ssh failed logins.
Answer depends on whether you machine uses or (newer).
[root@rhel53 ~]# grep authpriv /etc/syslog.confauthpriv.* /var/log/secure[root@rhel71 ~]# grep ^authpriv /etc/rsyslog.confauthpriv.* /var/log/securepaul@debian8:~$ grep ^auth /etc/rsyslog.confauth,authpriv.* /var/log/auth.log5. Configure syslog to put local4.error and above messages in /var/log/l4e.log and local4.info only .info in /var/log/l4i.log. Test that it works with the logger tool!
echo local4.error /var/log/l4e.log >> /etc/syslog.conf
echo local4.=info /var/log/l4i.log >> /etc/syslog.conf
service syslog restart
echo local4.error /var/log/l4e.log >> /etc/rsyslog.conf
echo local4.=info /var/log/l4i.log >> /etc/rsyslog.conf
service rsyslog restart
logger -p local4.error "l4 error test"
logger -p local4.alert "l4 alert test"
logger -p local4.info "l4 info test"
cat /var/log/l4e.log
cat /var/log/l4i.log
6. Configure /var/log/Mysu.log, all the su to root messages should go in that log. Test that it works!
echo authpriv.* /var/log/Mysu.log >> /etc/syslog.conf
This will log more than just the usage.
7. Send the local5 messages to the syslog server of your neighbour. Test that it works.
On RHEL5, edit to enable remote listening on the server.
On RHEL7, uncomment these two lines in to enable ‘UDP syslog reception’.
# Provides UDP syslog reception
$ModLoad imudp
$UDPServerRun 514
On Debian/Ubuntu edit or .
on the client: logger -p local5.info "test local5 to neighbour"
8. Write a script that executes logger to local4 every 15 seconds (different message). Use tail -f and watch on your local4 log files.
root@rhel53 scripts# cat logloop
#!/bin/bash
for i in `seq 1 10`
do
logger -p local4.info "local4.info test number $i"
sleep 15
done
root@rhel53 scripts# chmod +x logloop
root@rhel53 scripts# ./logloop &
[1] 8264
root@rhel53 scripts# tail -f /var/log/local4.all.log
Mar 28 13:13:36 rhel53 root: local4.info test number 1
Mar 28 13:13:51 rhel53 root: local4.info test number 2
...
Step 6 — Testing the Rotation
logrotate can be manually run to recycle one or more files. And to do that, you specify the relevant configuration file as an argument to the command.
To see how this works, here is a partial list of log files under /var/log directory in a test CentOS server:
- /var/log
total 49324
…
-rw-------. 1 root root 84103 Jan 3 17:20 messages
-rw-------. 1 root root 165534 Dec 10 23:12 messages-20221211
-rw-------. 1 root root 254743 Dec 18 00:00 messages-20221218
-rw-------. 1 root root 217810 Dec 25 00:00 messages-20221225
-rw-------. 1 root root 237726 Dec 31 23:45 messages-20230101
drwx------. 2 root root 6 Mar 2 2022 private
drwxr-xr-x. 2 root root 6 Feb 24 2022 qemu-ga
lrwxrwxrwx. 1 root root 39 Mar 2 2022 README -> ../../usr/share/doc/systemd/README.logs
-rw-------. 1 root root 2514753 Jan 3 17:25 secure
-rw-------. 1 root root 2281107 Dec 10 23:59 secure-20221211
-rw-------. 1 root root 9402839 Dec 17 23:59 secure-20221218
-rw-------. 1 root root 8208657 Dec 25 00:00 secure-20221225
-rw-------. 1 root root 7081010 Dec 31 23:59 secure-20230101
drwxr-x---. 2 sssd sssd 6 Jan 17 2022 sssd
-rw-------. 1 root root 0 Dec 8 22:11 tallylog
-rw-rw-r--. 1 root utmp 2688 Jan 3 16:22 wtmp
The partial contents of the logrotate.conf file looks like this:
- /etc/logrotate.conf
# see "man logrotate" for details
# global options do not affect preceding include directives
# rotate log files weekly
weekly
# keep 4 weeks worth of backlogs
rotate 4
# create new (empty) log files after rotating old ones
create
# use date as a suffix of the rotated file
dateext
# uncomment this if you want your log files compressed
#compress
# packages drop log rotation information into this directory
include /etc/logrotate.d
# system-specific logs may be also be configured here.
Next you run the logrotate command:
- /etc/logrotate.conf
Messages scroll over as new files are generated, errors are encountered etc. When the dust settles, you check for new mail, secure, or messages files:
- /var/log/mail*
-rw------- 1 root root 0 Dec 17 18:34 /var/log/maillog
-rw-------. 1 root root 1830 Dec 16 16:35 /var/log/maillog-20131216
-rw------- 1 root root 359 Dec 17 18:25 /var/log/maillog-20131217 - /var/log/messages*
-rw------- 1 root root 148 Dec 17 18:34 /var/log/messages
-rw-------. 1 root root 180429 Dec 16 16:35 /var/log/messages-20131216
-rw------- 1 root root 30554 Dec 17 18:25 /var/log/messages-20131217
ls -l /var/log/secure*-rw------- 1 root root 0 Jan 3 12:34 /var/log/secure
-rw-------. 1 root root 4187 Jan 3 16:41 /var/log/secure-20230103
-rw------- 1 root root 591 Jan 3 18:28 /var/log/secure-20230103 ```As we can see, all three new log files have been created. The maillog and secure files are still empty, but the new messages file already has some data in it.
How To Use the “last” Command
Usually, you will only be interested in the most recent login attempts. You can see these with the last tool:
- last
demoer pts/1 rrcs-72-43-115-1 Thu Sep 5 19:37 still logged in
root pts/1 rrcs-72-43-115-1 Thu Sep 5 19:37 - 19:37 (00:00)
root pts/0 rrcs-72-43-115-1 Thu Sep 5 19:15 still logged in
root pts/0 rrcs-72-43-115-1 Thu Sep 5 18:35 - 18:44 (00:08)
root pts/0 rrcs-72-43-115-1 Thu Sep 5 18:20 - 18:20 (00:00)
demoer pts/0 rrcs-72-43-115-1 Thu Sep 5 18:19 - 18:19 (00:00)
This provides a formatted version of information saved in another file, /etc/log/wtmp.
Step 5 — Rotating Log Files
As more and more information is written to log files, they get bigger and bigger. This obviously poses a potential performance problem. Also, the management of the files becomes cumbersome.
Linux uses the concept of rotating log files instead of purging or deleting them. When a log is rotated, a new log file is created and the old log file is renamed and optionally compressed. A log file can thus have multiple old versions remaining online. These files will go back over a period of time and will represent the backlog. Once a certain number of backlogs have been generated, a new log rotation will cause the oldest log file to be deleted.
The rotation is initiated through the logrotate utility.
The logrotate Configuration File
Like rsyslog, logrotate also depends on a configuration file and the name of this file is logrotate.conf. It’s located under /etc.
Here is what you see in the logrotate.conf file of your Debian server:
- /etc/logrotate.conf
# see "man logrotate" for details
# global options do not affect preceding include directives
# rotate log files weekly
weekly
# keep 4 weeks worth of backlogs
rotate 4
# create new (empty) log files after rotating old ones
create
# use date as a suffix of the rotated file
#dateext
# uncomment this if you want your log files compressed
#compress
# packages drop log rotation information into this directory
include /etc/logrotate.d
# system-specific logs may also be configured here.
By default, log files are to be rotated weekly with four backlogs remaining online at any one time. When the program runs, a new, empty log file will be generated and optionally the old ones will be compressed.
The only exception is for wtmp and btmp files. wtmp keeps track of system logins and btmp keeps track of bad login attempts. Both these log files are to be rotated every month and no error is returned if any previous wtmp or btmp file can be found.
Custom log rotation configurations are kept under the /etc/logrotate.d directory. These are also included in the logrotate.conf with the include directive. The Debian installation shows you the content of this directory:
- /etc/logrotate.d
total 32
-rw-r--r-- 1 root root 120 Jan 30 2021 alternatives
-rw-r--r-- 1 root root 173 Jun 10 2021 apt
-rw-r--r-- 1 root root 130 Oct 14 2019 btmp
-rw-r--r-- 1 root root 160 Oct 19 2021 chrony
-rw-r--r-- 1 root root 112 Jan 30 2021 dpkg
-rw-r--r-- 1 root root 374 Feb 17 2021 rsyslog
-rw-r--r-- 1 root root 235 Feb 19 2021 unattended-upgrades
-rw-r--r-- 1 root root 145 Oct 14 2019 wtmp
The contents of the rsyslog shows how to recycle a number of log files:
- /etc/logrotate.d/rsyslog
/var/log/syslog
/var/log/mail.info
/var/log/mail.warn
/var/log/mail.err
/var/log/mail.log
/var/log/daemon.log
/var/log/kern.log
/var/log/auth.log
/var/log/user.log
/var/log/lpr.log
/var/log/cron.log
/var/log/debug
/var/log/messages
{ rotate 4 weekly missingok notifempty compress delaycompress sharedscripts postrotate /usr/lib/rsyslog/rsyslog-rotate endscript
}
As you can see, the messages file will be reinitialized every day with four days’ worth of logs being kept online. Other log files are rotated every week.
Also worth noting is the postrotate directive. This specifies the action that happens after the whole log rotation has completed.
Practice
1. Display the /var/run/utmp file with the proper command (not with cat or vi).
2. Display the /var/log/wtmp file.
3. Use the lastlog and lastb commands, understand the difference.
4. Examine syslog to find the location of the log file containing ssh failed logins.
5. Configure syslog to put local4.error and above messages in /var/log/l4e.log and local4.info only .info in /var/log/l4i.log. Test that it works with the logger tool!
6. Configure /var/log/Mysu.log, all the su to root messages should go in that log. Test that it works!
7. Send the local5 messages to the syslog server of your neighbour. Test that it works.
8. Write a script that executes logger to local4 every 15 seconds (different message). Use tail -f and watch on your local4 log files.
Step 4 — Creating and Testing Your Own Log Messages
- Add a log file specification in
/etc/rsyslog.conffile - Restart the
rsyslogdaemon - Test the configuration using the logger utility
- /etc/rsyslog.conf
Here’s the output:
…
# New lines added for testing log message generation
local4.crit /var/log/local4crit.log
local4.=info /var/log/local4info.log
Next, the service you’ll restart so the config file data is reloaded:
- /etc/init.d/rsyslog restart
To generate the log message now, the logger application is called:
- logger local4.info " This is a info message from local 4"
Looking under the /var/log directory now shows two new files:
…
-rw------- 1 root root 0 Jan 3 11:21 local4crit.log
-rw------- 1 root root 72 Jan 3 11:22 local4info.log
…
The size of the local4info.log is non-zero. So when you open it, you’ll see the message has been recorded:
- /var/log/local4info.log
Jan 3 11:22:32 TestLinux root: This is a info message from local 4 Watching logs
You might want to use the command to look at the last lines of a log file. The option will dynamically display lines that are appended to the log.
paul@ubu1010:~$ tail -f /var/log/udev
SEQNUM=1741
SOUND_INITIALIZED=1
ID_VENDOR_FROM_DATABASE=nVidia Corporation
ID_MODEL_FROM_DATABASE=MCP79 High Definition Audio
ID_BUS=pci
ID_VENDOR_ID=0x10de
ID_MODEL_ID=0x0ac0
ID_PATH=pci-0000:00:08.0
SOUND_FORM_FACTOR=internal
[root@rhel6 ~]# watch who
Something similar to this, repeating the output of the command every two seconds, will appear on the screen.
Every 2.0s: who Sun Jul 17 15:31:03 2011
root tty1 2011-07-17 13:28
paul pts/0 2011-07-17 13:31 (192.168.1.30)
paul pts/1 2011-07-17 15:19 (192.168.1.30)
Step 3 — Using the rsyslog Daemon
At the heart of the logging mechanism is the rsyslog daemon. This service is responsible for listening to log messages from different parts of a Linux system and routing the message to an appropriate log file in the /var/log directory. It can also forward log messages to another Linux server.
The rsyslog Configuration File
The rsyslog daemon gets its configuration information from the rsyslog.conf file. The file is located under the /etc directory.
The rsyslog.conf file tells the rsyslog daemon where to save its log messages. This instruction comes from a series of two-part lines within the file.
This file can be found at rsyslog.d/50-default.conf on Ubuntu.
The two part instruction is made up of a selector and an action. The two parts are separated by white space.
The selector part specifies what the source and importance of the log message is and the action part says what to do with the message.
The selector itself is again divided into two parts separated by a dot (.). The first part before the dot is called facility (the origin of the message) and the second part after the dot is called priority (the severity of the message).
Together, the facility/priority and the action pair tell rsyslog what to do when a log message matching the criteria is generated.
You can see an excerpt from a CentOS /etc/rsyslog.conf file with this command:
- /etc/rsyslog.conf
You should see something like this as the output:
# rsyslog configuration file
# For more information see /usr/share/doc/rsyslog-*/rsyslog_conf.html
# or latest version online at http://www.rsyslog.com/doc/rsyslog_conf.html
# If you experience problems, see http://www.rsyslog.com/doc/troubleshoot.html
#### GLOBAL DIRECTIVES ####
# Where to place auxiliary files
global(workDirectory="/var/lib/rsyslog")
# Use default timestamp format
module(load="builtin:omfile" Template="RSYSLOG_TraditionalFileFormat")
# Include all config files in /etc/rsyslog.d/
include(file="/etc/rsyslog.d/*.conf" mode="optional")
#### MODULES ####
module(load="imuxsock" # provides support for local system logging (e.g. via logger command) SysSock.Use="off") # Turn off message reception via local log socket; # local messages are retrieved through imjournal now.
module(load="imjournal" # provides access to the systemd journal StateFile="imjournal.state") # File to store the position in the journal
#module(load="imklog") # reads kernel messages (the same are read from journald)
#module(load="immark") # provides --MARK-- message capability
# Provides UDP syslog reception
# for parameters see http://www.rsyslog.com/doc/imudp.html
#module(load="imudp") # needs to be done just once
#input(type="imudp" port="514")
…
To understand what this all means, let’s consider the different types of facilities recognized by Linux. Here is a list:
- auth or authpriv: Messages coming from authorization and security related events
- kern: Any message coming from the Linux kernel
- mail: Messages generated by the mail subsystem
- cron: Cron daemon related messages
- daemon: Messages coming from daemons
- news: Messages coming from network news subsystem
- lpr: Printing related log messages
- user: Log messages coming from user programs
- local0 to local7: Reserved for local use
And here is a list of priorities in ascending order:
- debug: Debug information from programs
- info: Simple informational message — no intervention is required
- notice: Condition that may require attention
- warn: Warning
- err: Error
- crit: Critical condition
- alert: Condition that needs immediate intervention
- emerg: Emergency condition
…
# Log cron stuff
cron.* /var/log/cron
…
This just tells the rsyslog daemon to save all messages coming from the cron daemon in a file called /var/log/cron. The asterisk (*) after the dot means messages of all priorities will be logged. Similarly, if the facility was specified as an asterisk, it would mean all sources.
Facilities and priorities can be related in a number of ways.
mail.warn /var/log/mail.warn This will log every message equal to or greater than the warn priority, but leave everything below it. So messages with err, crit, alert, or emerg will also be recorded in this file.
mail.=info /var/log/mail.infomail.!info /var/log/mail.info mail.!=info /var/log/mail.info In the first case, the mail.info file will contain everything with a priority lower than info. In the second case, the file will contain all messages with a priority above info.
Multiple facilities in the same line can be separated by commas.
Multiple sources (facility.priority) in the same line are separated by a semicolon.
# Everybody gets emergency messages
*.emerg :omusrmsg:*
Try to see what the rsyslog.conf is saying in your Linux system. Here is an excerpt from a Debian server for another example:
# /etc/rsyslog.conf configuration file for rsyslog
#
# For more information install rsyslog-doc and see
# /usr/share/doc/rsyslog-doc/html/configuration/index.html
#################
#### MODULES ####
#################
module(load="imuxsock") # provides support for local system logging
module(load="imklog") # provides kernel logging support
#module(load="immark") # provides --MARK-- message capability
# provides UDP syslog reception
#module(load="imudp")
#input(type="imudp" port="514")
# provides TCP syslog reception
#module(load="imtcp")
#input(type="imtcp" port="514")
###########################
#### GLOBAL DIRECTIVES ####
###########################
#
# Use traditional timestamp format.
# To enable high precision timestamps, comment out the following line.
#
$ActionFileDefaultTemplate RSYSLOG_TraditionalFileFormat
#
# Set the default permissions for all log files.
#
$FileOwner root
$FileGroup adm
$FileCreateMode 0640
$DirCreateMode 0755
$Umask 0022
…
As you can see, Debian saves all security/authorization level messages in /var/log/auth.log whereas CentOS saves it under /var/log/secure.
The configurations for rsyslog can come from other custom files as well. These custom configuration files are usually located in different directories under /etc/rsyslog.d. The rsyslog.conf file includes these directories using the $IncludeConfig directive.
Here is what it looks like in Ubuntu:
…
#
# Include all config files in /etc/rsyslog.d/
#
$IncludeConfig /etc/rsyslog.d/*.conf
…
Check out the contents under the /etc/rsyslog.d directory with:
- /etc/rsyslog.d
You’ll see something similar to this in your terminal:
-rw-r--r-- 1 root root 314 Sep 19 2021 20-ufw.conf
-rw-r--r-- 1 root root 255 Sep 30 22:07 21-cloudinit.conf
-rw-r--r-- 1 root root 1124 Nov 16 2021 50-default.conf
Because of being part of a network operating system, rsyslog daemon can’t only save log messages locally, it can also forward them to another Linux server in the network or act as a repository for other systems. The daemon listens for log messages in UDP port 514. The example below will forward kernel critical messages to a server called “texas”.
kern.crit @texas Rotating logs
A lot of log files are always growing in size. To keep this within bounds, you may want to use to rotate, compress, remove and mail log files. More info on the logrotate command in . Individual configurations can be found in the directory.
Below a screenshot of the default Red Hat logrotate.conf file.
root@rhel65:/etc# cat logrotate.conf
# see "man logrotate" for details
# rotate log files weekly
weekly
# keep 4 weeks worth of backlogs
rotate 4
# create new (empty) log files after rotating old ones
create
# use date as a suffix of the rotated file
dateext
# uncomment this if you want your log files compressed
#compress
# RPM packages drop log rotation information into this directory
include /etc/logrotate.d
# no packages own wtmp and btmp -- we'll rotate them here
/var/log/wtmp { monthly create 0664 root utmp minsize 1M rotate 1
}
/var/log/btmp { missingok monthly create 0600 root utmp rotate 1
}
# system-specific logs may be also be configured here.
root@rhel65:/etc#
Step 2 — Viewing Log File Contents
Here are some common log files you will find under /var/log:
wtmputmpdmesgmessagesmaillogormail.logspoolerauth.logorsecure
To see who is currently logged in to the Linux server, use the who command. This command gets its values from the /var/run/utmp file (for CentOS and Debian) or /run/utmp (for Ubuntu).
Here is an example from Ubuntu:
root@ubuntu-22:~# who
root pts/0 2023-01-03 16:23 (198.211.111.194)
root@ubuntu-22:~# last
root pts/0 198.211.111.194 Tue Jan 3 16:23 still logged in
reboot system boot 5.19.0-23-generi Thu Dec 8 21:48 still running
wtmp begins Thu Dec 8 21:48:51 2022- last
The result may look like this in Debian:
root@debian-11-trim:~# last reboot
reboot system boot 5.10.0-11-amd64 Thu Dec 8 21:49 still running
wtmp begins Thu Dec 8 21:49:39 2022
To see when did someone last logged in to the system, use lastlog:
- lastlog
On a Debian server, you may see output like this:
root@debian-11-trim:~# lastlog
Username Port From Latest
root pts/0 162.243.188.66 Tue Jan 3 16:23:03 +0000 2023
daemon **Never logged in**
bin **Never logged in**
sys **Never logged in**
sync **Never logged in**
games **Never logged in**
man **Never logged in**
lp **Never logged in**
mail **Never logged in**
news **Never logged in**
uucp **Never logged in**
proxy **Never logged in**
www-data **Never logged in**
backup **Never logged in**
list **Never logged in**
irc **Never logged in**
gnats **Never logged in**
nobody **Never logged in**
_apt **Never logged in**
messagebus **Never logged in**
uuidd **Never logged in**
…
For other text-based log files, you can use cat, head or tail commands to read the contents.
In the example below, you’re trying to look at the last ten lines of the /var/log/messages file on a Debian server:
- /var/log/messages
You’ll receive an output similar to this:
root@debian-11-trim:~# tail /var/log/messages
Jan 1 00:10:14 debian-11-trim rsyslogd: [origin software="rsyslogd" swVersion="8.2102.0" x-pid="30025" x-info="https://www.rsyslog.com"] rsyslogd was HUPed
Jan 3 16:23:01 debian-11-trim DropletAgent[808]: INFO:2023/01/03 16:23:01 ssh_watcher.go:65: [SSH Watcher] Port knocking detected.
Jan 3 16:23:01 debian-11-trim DropletAgent[808]: INFO:2023/01/03 16:23:01 do_managed_keys_actioner.go:43: [DO-Managed Keys Actioner] Metadata contains 1 ssh keys and 1 dotty keys
Jan 3 16:23:01 debian-11-trim DropletAgent[808]: INFO:2023/01/03 16:23:01 do_managed_keys_actioner.go:49: [DO-Managed Keys Actioner] Attempting to update 1 dotty keys
Jan 3 16:23:01 debian-11-trim DropletAgent[808]: INFO:2023/01/03 16:23:01 do_managed_keys_actioner.go:70: [DO-Managed Keys Actioner] Updating 2 keys
Jan 3 16:23:01 debian-11-trim DropletAgent[808]: INFO:2023/01/03 16:23:01 do_managed_keys_actioner.go:75: [DO-Managed Keys Actioner] Keys updated
Step 1 — Checking the Default Log File Location
- /var/log
You’ll see something similar to this on your CentOS system:
[root@centos-9-trim ~]# ls -l /var/log
total 49316
drwxr-xr-x. 2 root root 6 Sep 27 19:17 anaconda
drwx------. 2 root root 99 Jan 3 08:23 audit
-rw-rw----. 1 root utmp 1234560 Jan 3 16:16 btmp
-rw-rw----. 1 root utmp 17305344 Jan 1 00:00 btmp-20230101
drwxr-x---. 2 chrony chrony 6 Aug 10 2021 chrony
-rw-r--r--. 1 root root 130466 Dec 8 22:12 cloud-init.log
-rw-r-----. 1 root adm 10306 Dec 8 22:12 cloud-init-output.log
-rw-------. 1 root root 36979 Jan 3 16:03 cron
-rw-------. 1 root root 27360 Dec 10 23:15 cron-20221211
-rw-------. 1 root root 94140 Dec 17 23:07 cron-20221218
-rw-------. 1 root root 95126 Dec 24 23:14 cron-20221225
-rw-------. 1 root root 95309 Dec 31 23:04 cron-20230101
…
Prerequisites
To complete this tutorial, you will need:
- One Ubuntu 20.04 server with a non-root user with
sudoprivileges, a firewall, and at least 1GB of RAM, which you can set up by following the Ubuntu 20.04 initial server setup guide.
Review Authentication Attempts
Modern Linux systems log all authentication attempts in a discrete file. This is located at /var/log/auth.log. You can view this file using less:
- /var/log/auth.log
May 3 18:20:45 localhost sshd[585]: Server listening on 0.0.0.0 port 22.
May 3 18:20:45 localhost sshd[585]: Server listening on :: port 22.
May 3 18:23:56 localhost login[673]: pam_unix(login:session): session opened fo
r user root by LOGIN(uid=0)
May 3 18:23:56 localhost login[714]: ROOT LOGIN on '/dev/tty1'
Sep 5 13:49:07 localhost sshd[358]: Received signal 15; terminating.
Sep 5 13:49:07 localhost sshd[565]: Server listening on 0.0.0.0 port 22.
Sep 5 13:49:07 localhost sshd[565]: Server listening on :: port 22.
. . .
When you are finished viewing the file, you can use q to quit less.
Conclusion
Hopefully this tutorial has given you some ideas about Linux logging. You can try to look into your own development or test systems to have a better idea. Once you are familiar with the location of the log files and their configuration settings, use that knowledge for supporting your production systems. Then you can create some aliases to point to these files to save some typing time as well.
Conclusion
In this article, you configured the sshd configuration to disable the root login on Ubuntu. Now you know how to prevent root login to your Linux-based machines, thus adding an extra layer of security to your machines.
Conclusion
It is important to understand where the system keeps information about logins so that you can monitor your server for changes that do not reflect your usage.
")


")