
Table of Contents
Authenticity of a certificate is verified by signing from a Certificate Authority. We will be using CA cert and CA key for signing a Certificate Signing Request provided by the client. It is not recommended to sign a certificate directly with root CA, rather than use intermediate CA. This is because, if RootCA is compromised, it will be difficult to revoke a RootCA. In this article we will see how to create a RootCA and we will be using that RootCA to create an intermediate CA.
Acting as a certificate authority (CA) means dealing with cryptographic
pairs of private keys and public certificates. The very first cryptographic
pair we’ll create is the root pair. This consists of the root key
() and root certificate (). This pair forms
the identity of your CA.
Typically, the root CA does not sign server
or client certificates directly. The root CA is only ever used to create
one or more intermediate CAs, which are trusted by the root CA to sign
certificates on their behalf. This is best practice. It allows the root
key to be kept offline and unused as much as possible, as any compromise
of the root key is disastrous.
It’s best practice to create the root pair in a secure environment.
Ideally, this should be on a fully encrypted, air gapped computer that is
permanently isolated from the Internet. Remove the wireless card and fill
the ethernet port with glue.
12 years, 10 months ago
103k times
I’ve downloaded and compiled Android 2.1 version with signed-google_ion-ota-14721.zip image for my HTC phone. The compile completed successfully and so the system image flash.
How can I sign my own Android application with the system signature?

11 gold badges89 silver badges102 bronze badges
asked Sep 3, 2010 at 11:02

Details from this google groups thread:
- Build and flash to your Dream your own Android using https://web.archive.org/web/20081211205758/http://source.android.com:80/documentation/building-for-dream. Use the
mkkey.sh script on
https://web.archive.org/web/20091213215940/http://pdk.android.com/online-pdk/guide/release_keys.html to create
new certificates, including x509 certificates before you do ‘make’.- In the
AndroidManifest.xmlof your application: under the<manifest>element, add the attributeandroid:sharedUserId="android.uid.system".- Export an unsigned version of your Android application using Eclipse: right-click on the project >> Android Tools >> Export
Unsigned Application Package.Use
<root-of-android-source-tree>/out/host/<your-host>/framework/signapk.jarto sign your app usingplatform.x509.pemandplatform.pk8in<root-of-android-source-tree>/build/target/product/security
generated earlier:java -jar signapk.jar platform.x509.pem platform.pk8 YourApp-unsigned.apk YourApp-signed.apk.Install the app to your device:
adb install YourApp-signed.apk- Run your app
- Use
adb shell psto confirm that your app is running as system.

answered Sep 6, 2010 at 13:02
6 gold badges26 silver badges24 bronze badges
The procedure works fine I have tried it.
So long as you don’t forget to run zipalign after signing as the signing processes leaves the APK unaligned and it will NOT install. You will need to install the aligned APK.
zipalign -fv 4 YourApplication-signed.apk YourApplication-aligned.apk
answered Feb 23, 2014 at 12:55

Your server creates a key pair, consisting of a private and a public key. The server never gives out the private key, of course, but everyone may obtain a copy of the public key. The public key is embedded within a certificate container format (X.509). This container consists of meta information related to the wrapped key, e.g. the IP address or domain name of a server, the owner of that server, an e-mail contact address, when the key was created, how long it is valid, for which purposes it may be used for, and many other possible values.
First of all, it can use the public key within the certificate it just got sent to verify the signed data. Since only the owner of the private key is able to sign the data correctly in such a way that the public key can correctly verify the signature, it will know that whoever signed this piece of data, this person is also owning the private key to the received public key.
But what stops a hacker from intercepting the packet, replacing the signed data with data he signed himself using a different certificate and also replace the certificate with his own one? The answer is simply nothing.
Finally it checks the information within the certificate itself. Does the IP address or domain name really match the IP address or domain name of the server the client is currently talking to? If not, something is fishy!
People may wonder: What stops a hacker from just creating his own key pair and just putting your domain name or IP address into his certificate and then have it signed by a CA? Easy answer: If he does that, no CA will sign his certificate. To get a CA signature, you must prove that you are really the owner of this IP address or domain name. The hacker is not the owner, thus he cannot prove that and thus he won’t get a signature.
But what if the hacker registers his own domain, creates a certificate for that, and have that signed by a CA? This works, he will get it CA signed, it’s his domain after all. However, he cannot use it for hacking your connection. If he uses this certificate, the browser will immediately see that the signed public key is for domain example.net, but it is currently talking to example.com, not the same domain, thus something is wrong again.
Monday, January 9th, 2023
At first glance, an SSL certificate seems straightforward. You install it on your server to secure your visitors’ sensitive data, and it works flawlessly until expiration. Most web owners rarely delve deeper into SSL/TLS technical aspects.
They let professionals handle the certificate configuration and renewal. Many won’t even care about the difference between root certificates and intermediate certificates, but if you want to install your cert by yourself, you should know the mechanism behind it.
- Table of Contents
- Root Programs and Root Stores
- Public Key Infrastructure
- Digital Signatures
- What Is the SSL Chain of Trust?
- What Is a Root SSL Certificate?
- What is a Server SSL Certificate?
- 1. Their Overall Value
- 2. Digital signature sequence
- 3. Issuance procedure
- 4. Lifespan
- 5. Storage Protocol
- How to Tell if a Certificate is Root or Intermediate?
- Final Words
- Save 10% on SSL Certificates when ordering today!
- Frequently Asked Questions
- How to get the root and intermediate certificates?
- How to identify the root and intermediate certificates?
- How to combine the root and intermediate certificates?
- How to fix the missing intermediate or root certificate?
- Create Root CA
- Create directory structure for Root CA
- Creating data base for issued certificates
- openssl conf file preparation
- Create Private key for RootCA
- Create Root CA Certificate
- Verify the Root CA
- Create directory structure for Intermediate Certificates
- Creating data base for Intermediate certs
- Creating Openssl configuration
- Create Private key for Intermediate CA
- Create CSR for Intermediate CA
- Create Intermediate CA certificate.
- Verify the Intermediate Certificate
- Create Certificate Bundle.
- Verify Certificate Bundle
- Practical Example of the certificate chains
- Create the root key
- Updated Answer
- Directory structure
- Create the root certificate
- Prepare the root directory
- Prepare the configuration file
- Verify the root certificate
- Original Answer
- Creating a self-signed certificate authority (CA)
- Importing the CA certificate
- Creating a code-signing certificate (SPC)
- Using the certificate for signing code
- Full Microsoft documentation
- Downloads
Table of Contents

One is the server certificate issued for your domain; the other is the intermediate certificate, and finally, there’s also the root certificate. The intermediate certificate links your server certificate to the root certificate. Altogether, they form the SSL chain of trust. If one component in the chain is missing, browsers won’t trust the server’s SSL certificate and will issue an HTTPS warning.
Wait, what? Server certificates, intermediate certificates, root certificates, chain of trust, it’s all a bit too much for novices. If you’re one of them don’t worry, in this article, we’ll explain the difference between root certificates and intermediate certificates and why they are crucial to how the SSL/TLS works. But first, a few words about the structure that holds them all together.
Root Programs and Root Stores
The root store includes pre-downloaded root certificates (and their public keys) that stay on the device’s operating system or third-party software such as web browsers. Here are a few examples of popular root programs.
- Apple
- Mozilla
- Microsoft
While not all root programs require identical compliance, they adhere strictly to the CA/B forum’s baseline requirements.
Public Key Infrastructure
Digital Signatures
Digital signatures are advanced electronic signatures that require identity verification via a key or certificate associated with them. In the context of SSL, think of them as digital certification.
As you will see in the SSL chain of trust diagram, a root certificate digitally signs an intermediate cert and passes some of its trust to the intermediate SSL. The latter is automatically trusted because the signature comes directly from the root.
What Is the SSL Chain of Trust?
Let’s come back to the chain of trust and look at the whole picture. The SSL chain of trust is an ordered list of certificates that allow the receiver (a web browser) to verify that the sender (your secure server) and the CA are reliable.
The image below illustrates how the chain of trust functions:

Image credit: Yanpas – CC BY-SA 4.0
Now that you know about the chain of trust, let’s take each element and put it under the microscope.
What Is a Root SSL Certificate?
A root SSL certificate sits at the top of the trust hierarchy and is the backbone of Public Key Infrastructure. Root SSL certificates are signed by trusted Certificate Authorities. Who decides which CA is trustworthy? In a nutshell, browsers, and applications because they include a root store in their installation pack.
A root certificate is used to issue other certificates. If the private root keys were stolen, cyber-criminals would forge their own trusted certificates. As a result, all the existing certificates signed by the hacked CA would have to be revoked. If something goes wrong with the root certificate, the CA is swiftly removed from all the root stores and ceases to exist.
To avoid the unthinkable, CAs use rigorous security procedures. They store the CA key in a unique Hardware Security Module. Moreover, the physical computing device resides in a locked vault with steel doors and guards.
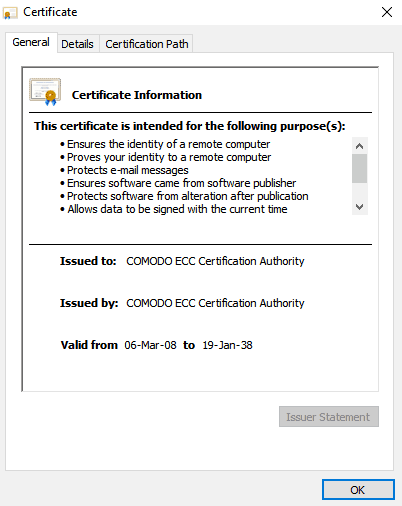
Unlike commercial certificates, root certs have a much longer lifespan. Here’s the validity period of Sectigo (formerly Comodo CA) ECC. As you can see it expires in the distant 2038.
What is a Server SSL Certificate?
Server certificates are signed from intermediate certs, which come from the root certificates. Server SSL certificates have a one-year validity and are the certificates everyone gets when ordering SSL.
To encrypt your website and activate HTTPS, you must install an SSL certificate on your server. Hence the name – server SSL certificates.
The root vs. intermediate certificate comparison comes down to their hierarchical position in the chain of trust. Without root certificates or root CAs, there won’t be intermediate certs or server certificates.
Here’s what sets root certificates and intermediate certificates apart:
1. Their Overall Value
Root certificates are the core of the entire SSL issuing process. If a root cert gets compromised, the breach could bankrupt the CA that issued it. On the other hand, intermediate certificates, while also important, are, ultimately, just intermediates and hold a lesser weight in the chain of trust.
2. Digital signature sequence
The root certificate uses the private key to sign the intermediate certificate, while the latter uses the same key to sign other intermediates and the server certificate.
3. Issuance procedure
The Certificate Authority signs the root certificate, which is then included in the root stores of various apps and programs. To better protect their root certs, CAs use intermediate certificates to act as the “middlemen ” between root and server certificates.
4. Lifespan
5. Storage Protocol
Root certs reside in a bulletproof hardware security module, behind still doors, and under 24/7 guard supervision. As for the intermediate certs, they are stored on your server in the installation directory.
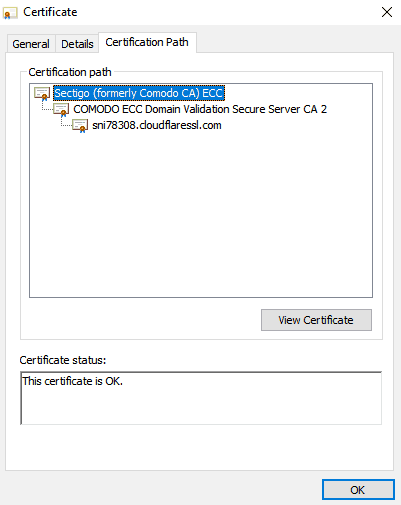
How to Tell if a Certificate is Root or Intermediate?
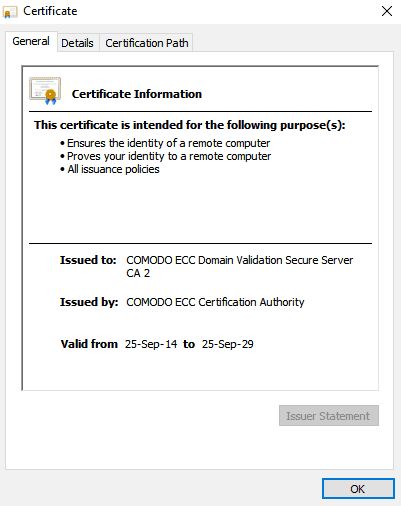
You can tell a root certificate from an intermediate one by inspecting the certificate itself. If the Issued to and Issued by fields are identical, then it’s a root certificate, as only a valid certificate authority can issue trusted roots; otherwise, it’s an intermediate.
Final Words
Hopefully, you now have a complete grasp of what really makes a digital certificate so secure. By understanding what is the difference between root certificates and intermediate certificates, you’ve solved the SSL/TLS puzzle. The SSL chain of trust is one of the reasons why SSL certificates are ubiquitous and efficient. The other is the high-end encryption impossible to crack by even the brightest hacker.
Save 10% on SSL Certificates when ordering today!
Fast issuance, strong encryption, 99.99% browser trust, dedicated support, and 25-day money-back guarantee. Coupon code: SAVE10
Frequently Asked Questions
How to get the root and intermediate certificates?
When you order an SSL certificate, the CA delivers the installation files in an archived ZIP folder. Inside it, you will find the server certificate issued for your domain and a CA Bundle file containing the root and intermediate certificates. Some CAs may send the root and intermediate certificates in separate text files
How to identify the root and intermediate certificates?
You don’t need to identify the root and intermediate certificates when configuring your SSL certificate if you’ve received them inside a CA Bundle file. Open the file with any text editor, and you’ll notice that all certificates are inside in the correct order. If you’ve received the root and intermediate certificates in separate files, check the file name, as it must include the word “root” or “intermediate” for easy identification.
How to combine the root and intermediate certificates?
- Intermediate certificate 1
- Intermediate certificate 2
- Root Certificate to complete the chain of trust.
How to fix the missing intermediate or root certificate?
Create Root CA
Create directory structure for Root CA
We will be creating a directory structure in the parent directory ca
[[email protected] int]# mkdir ca;cd ca
[[email protected] ca]# mkdir certs crl newcerts pvt_key
[[email protected] ca]# ll
total 16
drwxr-xr-x. 2 root root 4096 Aug 9 12:15 certs
drwxr-xr-x. 2 root root 4096 Aug 9 12:15 crl
drwxr-xr-x. 2 root root 4096 Aug 9 12:15 newcerts
drwxr-xr-x. 2 root root 4096 Aug 9 12:15 pvt_key
Creating data base for issued certificates
We will be creating a flat file called serial and a file called index.txt. The serial file contain the next available serial number in Hex. Index.txt will have the details on the issued certificates
[[email protected] ca]# touch index.txt
[[email protected] ca]# echo 00 > serial
[[email protected] ca]# ll
total 20
drwxr-xr-x. 2 root root 4096 Aug 9 12:15 certs
drwxr-xr-x. 2 root root 4096 Aug 9 12:15 crl
-rw-r--r--. 1 root root 0 Aug 9 12:34 index.txt
drwxr-xr-x. 2 root root 4096 Aug 9 12:15 newcerts
drwxr-xr-x. 2 root root 4096 Aug 9 12:15 pvt_key
-rw-r--r--. 1 root root 3 Aug 9 12:34 serial
openssl conf file preparation
We must prepare an openssl configuration file for us to use. Below code snippet shows the configuration file used for this article. Explanations for the section of interest is given below code snippet
# OpenSSL root CA configuration file.
# Copy to `/root/ca/openssl.cnf`.
[ ca ]
# `man ca`
default_ca = CA_default
[ CA_default ]
# Directory and file locations
dir = /root/int/ca
certs = $dir/certs
crl_dir = $dir/crl
new_certs_dir = $dir/newcerts
database = $dir/index.txt
serial = $dir/serial
RANDFILE = $dir/pvt_key/.rand
# The root key and root certificate.
private_key = $dir/pvt_key/ca.key.pem
certificate = $dir/certs/ca.cert.pem
# For certificate revocation lists.
crlnumber = $dir/crlnumber
crl = $dir/crl/ca.crl.pem
crl_extensions = crl_ext
default_crl_days = 30
# SHA-1 is deprecated, so use SHA-2 instead.
default_md = sha256
name_opt = ca_default
cert_opt = ca_default
default_days = 375
preserve = no
policy = policy_ca
[ policy_ca ]
# The root CA should only sign intermediate certificates that match.
# See the POLICY FORMAT section of `man ca`.
countryName = match
stateOrProvinceName = match
organizationName = match
organizationalUnitName = optional
commonName = supplied
emailAddress = optional
[ policy_int ]
# Allow the intermediate CA to sign a more diverse range of certificates.
# See the POLICY FORMAT section of the `ca` man page.
countryName = optional
stateOrProvinceName = optional
localityName = optional
organizationName = optional
organizationalUnitName = optional
commonName = supplied
emailAddress = optional
[ req ]
# Options for the `req` tool (`man req`).
default_bits = 4096
distinguished_name = req_distinguished_name
string_mask = default
# SHA-1 is deprecated, so use SHA-2 instead.
default_md = sha256
# Extension to add when the -x509 option is used.
x509_extensions = v3_ca
[ req_distinguished_name ]
countryName = Country Name (2 letter code)
countryName_default = AU
countryName_min = 2
countryName_max = 2
stateOrProvinceName = State or Province Name (full name)
localityName = Locality Name (eg, city)
organizationalUnitName = Organizational Unit Name (eg, section)
0.organizationName = Organization Name (eg, company)
commonName = Common Name (eg, YOUR name)
commonName_max = 64
emailAddress = Email Address
emailAddress_max = 40
[ v3_ca ]
# Extensions for a typical CA (`man x509v3_config`).
subjectKeyIdentifier = hash
authorityKeyIdentifier = keyid:always,issuer
basicConstraints = critical, CA:true
keyUsage = critical, digitalSignature, cRLSign, keyCertSign
[ v3_intermediate_ca ]
# Extensions for a typical intermediate CA (`man x509v3_config`).
subjectKeyIdentifier = hash
authorityKeyIdentifier = keyid:always,issuer
basicConstraints = critical, CA:true, pathlen:0
keyUsage = critical, digitalSignature, cRLSign, keyCertSign
[ usr_cert ]
# Extensions for client certificates (`man x509v3_config`).
basicConstraints = CA:FALSE
nsCertType = client, email
nsComment = "OpenSSL Generated Client Certificate"
subjectKeyIdentifier = hash
authorityKeyIdentifier = keyid,issuer
keyUsage = critical, nonRepudiation, digitalSignature, keyEncipherment
extendedKeyUsage = clientAuth, emailProtection
[ server_cert ]
# Extensions for server certificates (`man x509v3_config`).
basicConstraints = CA:FALSE
nsCertType = server
nsComment = "OpenSSL Generated Server Certificate"
subjectKeyIdentifier = hash
authorityKeyIdentifier = keyid,issuer:always
keyUsage = critical, digitalSignature, keyEncipherment
extendedKeyUsage = serverAuth
[ crl_ext ]
# Extension for CRLs (`man x509v3_config`).
authorityKeyIdentifier=keyid:always
[ ocsp ]
# Extension for OCSP signing certificates (`man ocsp`).
basicConstraints = CA:FALSE
subjectKeyIdentifier = hash
authorityKeyIdentifier = keyid,issuer
keyUsage = critical, digitalSignature
extendedKeyUsage = critical, OCSPSigning- we will have to specify [ ca ], section to pick the options available from [ CA_default ]. This can be seen in the below code snippet.
- We will have to update the directory path in the section under [ CA_default ], with the path we have created
[ ca ]
# `man ca`
default_ca = CA_default
[ CA_default ]
# Directory and file locations
dir =
certs = $dir/certs
crl_dir = $dir/crl
new_certs_dir = $dir/newcerts
database = $dir/index.txt
serial = $dir/serial
RANDFILE = $dir//.rand# The root key and root certificate. # For certificate revocation lists. crl_ext 30# SHA-1 is deprecated, so use SHA-2 instead. sha256 ca_default ca_default 375 no policy_ca
- we will be providing a separate policy for ca and intermediate ca
- For CA , we will be providing [ policy_ca ], for intermediate CA, we will be providing [ policy_int ]
- In the below code snippet, it can be seen phrases match, optional, supplied
- If the value is «match» then the field value must match the same field in the CA certificate.
- If the value is «supplied» then it must be present, but value need not to be same as CA
- If the value is «optional» then it may/maynot be present.
# The root CA should only sign intermediate certificates that match.
# See the POLICY FORMAT section of `man ca`.
countryName = match
stateOrProvinceName = match
organizationName = match
organizationalUnitName = optional
commonName = supplied
emailAddress = optional# Allow the intermediate CA to sign a more diverse range of certificates.
# See the POLICY FORMAT section of the `ca` man page.
countryName = optional
stateOrProvinceName = optional
localityName = optional
organizationName = optional
organizationalUnitName = optional
commonName = supplied
emailAddress = optional
- Parameter mentioned in the [ req ] sections are applied when creating CSR or Certificates
req # Options for the `req` tool (`man req`). 4096 default# SHA-1 is deprecated, so use SHA-2 instead. sha256# Extension to add when the -x509 option is used. v3_ca
- The value given in the field «distinguished name» need to be declared. This section contains the infomration which is required for creating a new Ceritifacte signing request (CSR)
 [ ]
countryName = Country Name (2 letter code)
countryName_default = AU
countryName_min = 2
countryName_max = 2
stateOrProvinceName = State or Province Name (full name)
localityName = Locality Name (eg, city)
organizationalUnitName = Organizational Unit Name (eg, section)
0.organizationName = Organization Name (eg, company)
commonName = Common Name (eg, YOUR name)
commonName_max = 64
emailAddress = Email Address
emailAddress_max = 40
- The fields [ v3_ca ] and [ v3_intermediate_ca ] , will be used as extension parameter for creating root and intermediate certificate
# Extensions for a typical CA (`man x509v3_config`). keyid:always,issuer critical, CA:true critical, digitalSignature, cRLSign, keyCertSign # Extensions for a typical intermediate CA (`man x509v3_config`). keyid:always,issuer critical, CA:true, critical, digitalSignature, cRLSign, keyCertSignCreate Private key for RootCA
- We will be creating a private key for with 4096 bits size and we will be using 3des encryption
- It is necessary to ensure, we use protect the key with password, hence using 3des encryption and AES 256 encryption
[[email protected] ca]# openssl genrsa -aes256 -out pvt_key/ca.key.pem 4096
Generating RSA private key, 4096 bit long modulus
...............++
..............................................................................++
e is 65537 (0x10001)
Enter pass phrase for pvt_key/ca.key.pem:
Verifying - Enter pass phrase for pvt_key/ca.key.pem:
[[email protected] ca]#
Create Root CA Certificate
- Certificate can be created by req utility in openssl
- For creating Root CA certificate, we will be mentioning the custom openssl config file.
[[email protected] ca]# openssl req -config openssl.cnf -key pvt_key/ca.key.pem -new -x509 -days 10000 -sha256 -extensions v3_ca -out certs/ca.cert.pem
Enter pass phrase for pvt_key/ca.key.pem:
You are about to be asked to enter information that will be incorporated
into your certificate request.
What you are about to enter is what is called a Distinguished Name or a DN.
There are quite a few fields but you can leave some blank
For some fields there will be a default value,
If you enter '.', the field will be left blank.
-----
Country Name (2 letter code) [AU]:IN
State or Province Name (full name) []:Karnataka
Locality Name (eg, city) []:Bangalore
Organizational Unit Name (eg, section) []:LinuxDataHub_CA
Organization Name (eg, company) []:LinuxDataHub
Common Name (eg, YOUR name) []:linuxdatahub_ca_cert
Email Address []:[email protected]
Verify the Root CA
We can verify the Certificate to check the signature algorithm, validity, Issuer etc. Below code snippet shows the same
[[email protected] ca]# openssl x509 -noout -text -in certs/ca.cert.pem
Certificate:
Data:
Version: 3 (0x2)
Serial Number:
b9:98:38:94:0c:bd:1d:ba
Signature Algorithm:
Not Before: Aug 9 14:26:44 2022 GMT
Not After : Dec 25 14:26:44 2049 GMT
Subject: C=IN, ST=Karnataka, L=Bangalore, OU=LinuxDataHub_CA, O=LinuxDataHub, CN=linuxdatahub_ca_cert/[email protected]Subject Public Key Info:
Public Key Algorithm: rsaEncryption
Public-Key: (bit)
Modulus:
Exponent: 65537 (0x10001)
X509v3 Subject Key Identifier:
7E:B0:9C:31:D7:A9:A7:10:52:14:51:97:1E:52:13:1D:04:73:4F:3C
X509v3 Authority Key Identifier:
keyid:7E:B0:9C:31:D7:A9:A7:10:52:14:51:97:1E:52:13:1D:04:73:4F:3C
X509v3 Basic Constraints: criticalX509v3 Key Usage: critical
Digital Signature, Certificate Sign, CRL Sign
Signature Algorithm:
Create directory structure for Intermediate Certificates
We will creating a directory structure for holding the files related to Intermediate cert generation
[[email protected] ca]# mkdir intermediate;cd intermediate
[[email protected] intermediate]# mkdir certs crl csr newcerts pvt_key
[[email protected] intermediate]# ll
total 20
drwxr-xr-x. 2 root root 4096 Aug 9 18:50 certs
drwxr-xr-x. 2 root root 4096 Aug 9 18:50 crl
drwxr-xr-x. 2 root root 4096 Aug 9 18:50 csr
drwxr-xr-x. 2 root root 4096 Aug 9 18:50 newcerts
drwxr-xr-x. 2 root root 4096 Aug 9 18:50 pvt_key
Creating data base for Intermediate certs
We will be creating a flat files called serial and crlnumber and a file called index.txt. The serial file contain the next available serial number in hex. Index.txt will have the details on the issued certificates. crlnumber file is used to keep track of the revoked certificates.
[[email protected] intermediate]# pwd /root/int/ca/intermediate
[[email protected] intermediate]# touch index.txt
[[email protected] intermediate]# echo 00 > serial
[[email protected] intermediate]# echo 01 > crl/crlnumber
Creating Openssl configuration
We will be reusing the openssl configuration file which we have used, But with small modification
[ ca ]
# `man ca`
default_ca = CA_default
[ CA_default ]
# Directory and file locationsdir = /root/int/ca/intermediatecerts = $dir/certs
crl_dir = $dir/crl
new_certs_dir = $dir/newcerts
database = $dir/index.txt
serial = $dir/serial
RANDFILE = $dir/pvt_key/.rand
# The root key and root certificate.
private_key = $dir/pvt_key/certificate = $dir/certs/# For certificate revocation lists.crlnumber = $dir/crl/crlnumberpolicy =
Create Private key for Intermediate CA
- We will be creating an intermediate private key for with 4096 bits size and we will be using 3des encryption
[[email protected] intermediate]# openssl genrsa -aes256 -out pvt_key/intermediate.key 4096
Generating RSA private key, 4096 bit long modulus
....................................++
...++
e is 65537 (0x10001)
Enter pass phrase for pvt_key/intermediate.key:
Verifying - Enter pass phrase for pvt_key/intermediate.key:
[[email protected] intermediate]#
Create CSR for Intermediate CA
We will create a CSR using the private key which we have generated in the above step. It should be noted that the Common Name of the CSR should be different from the Root CA
[[email protected] intermediate]# openssl req -config openssl.cnf -new -sha256 -key pvt_key/intermediate.key -out csr/ntermediate.csr
Enter pass phrase for pvt_key/intermediate.key:
You are about to be asked to enter information that will be incorporated
into your certificate request.
What you are about to enter is what is called a Distinguished Name or a DN.
There are quite a few fields but you can leave some blank
For some fields there will be a default value,
If you enter '.', the field will be left blank.
-----
Country Name (2 letter code) [AU]:IN
State or Province Name (full name) []:Karnataka
Locality Name (eg, city) []:Bangalore
Organizational Unit Name (eg, section) []:LDH-Banglore
Organization Name (eg, company) []:LinuxDataHub
Common Name (eg, YOUR name) []:LDH-Banglore-int-ca
Email Address []:[email protected][[email protected] intermediate]#
Create Intermediate CA certificate.
- We will be using the Root CA to sign the intermediate CSR.
- Below code snippet shows the signing process, we will be using the v3_intermediate_ca extension
[[email protected] intermediate]# openssl ca -config /root/int/ca/openssl.cnf -extensions v3_intermediate_ca -days 3650 -notext -md sha256 -in csr/ntermediate.csr -out certs/int.ca
Using configuration from /root/int/ca/openssl.cnf
Enter pass phrase for /root/int/ca/pvt_key/ca.key.pem:
Check that the request matches the signature
Signature ok
Certificate Details:
Serial Number: 0 (0x0)
Validity
Not Before: Aug 9 14:32:20 2022 GMT
Not After : Aug 6 14:32:20 2032 GMT
Subject:
countryName = IN
stateOrProvinceName = Karnataka
organizationName = LinuxDataHub
organizationalUnitName = LDH-Banglore
commonName = LDH-Banglore-int-ca
emailAddress = [email protected]X509v3 extensions:
X509v3 Subject Key Identifier:
54:D1:6D:89:6D:22:9A:39:0C:F0:65:29:30:9E:5B:D9:50:DF:EB:C1
X509v3 Authority Key Identifier:
keyid:7E:B0:9C:31:D7:A9:A7:10:52:14:51:97:1E:52:13:1D:04:73:4F:3C
X509v3 Basic Constraints: critical pathlen:0
X509v3 Key Usage: critical
Digital Signature, Certificate Sign, CRL Sign
Certificate is to be certified until Aug 6 14:32:20 2032 GMT (3650 days)
Sign the certificate? [y/n]:y
1 out of 1 certificate requests certified, commit? [y/n]y
Write out database with 1 new entries
Data Base Updated
- Since we have signed the intermediate CSR with RootCA, the index file belonging to RootCA will have the details. The Database file have been mentioned on the openssl conf file
[[email protected] ca]# cat index.txt
V 320806143220Z 00 unknown /C=IN/ST=Karnataka/O=LinuxDataHub/OU=LDH-Banglore/CN=LDH-Banglore-int-ca/[email protected]
Verify the Intermediate Certificate
- We can list the content of the Intermediate certificate to view the issuer, expiry and other details for the certificates.
[[email protected] newcerts]# openssl x509 -noout -text -in int.ca
Certificate:
Data:
Version: 3 (0x2)
Serial Number: 0 (0x0)
Signature Algorithm: WithRSAEncryption
Issuer: C=IN, ST=Karnataka, L=Bangalore, OU=LinuxDataHub_CA, O=LinuxDataHub, CN=linuxdatahub_ca_cert/[email protected]Validity
Not Before: Aug 9 14:32:20 2022 GMT
Not After : Aug 6 14:32:20 2032 GMTSubject: C=IN, ST=Karnataka, O=LinuxDataHub, OU=LDH-Banglore, CN=LDH-Banglore-int-ca/[email protected]Subject Public Key Info:
Public Key Algorithm: rsaEncryption
Public-Key: ( bit)
Modulus:
Exponent: 65537 (0x10001)
X509v3 extensions:
X509v3 Subject Key Identifier:
54:D1:6D:89:6D:22:9A:39:0C:F0:65:29:30:9E:5B:D9:50:DF:EB:C1
X509v3 Authority Key Identifier:
keyid:7E:B0:9C:31:D7:A9:A7:10:52:14:51:97:1E:52:13:1D:04:73:4F:3C
X509v3 Basic Constraints: critical, pathlen:0
X509v3 Key Usage: critical
Digital Signature, Certificate Sign, CRL Sign
Signature Algorithm: WithRSAEncryption
- We can verify the intermediate certificate validity by checking against the Root CA
[[email protected] newcerts]# openssl verify -CAfile ../certs/ca.cert.pem int.ca
int.ca: OK
Create Certificate Bundle.
For an application to verify the authenticity of a certificate, it need to verify the signing authority of signing CA. If we use an intermediate CA as the signing authority. The application need to verify the validity of the intermediate CA. For that we need to provide the Root CA also to the application. We will have to create a certificate bundle which contains the RootCA and the intermediate CA , for the application to verify.
For creating a certificate bundle, we need to concatenate the RootCA and intermediate CA to one file
[[email protected] intermediate]# cat ../certs/ca.cert.pem certs/int.ca > cert-bundle.pemVerify Certificate Bundle
Openssl certificate chain can be verified against RootCA using the below command
[[email protected] intermediate]# openssl verify -CAfile ../certs/ca.cert.pem cert-bundle.pem
cert-bundle.pem: OK
Practical Example of the certificate chains
Below pic shows the certificate bundle of our website linuxdatahub.com provided by the CA providers

Create the root key
Create the root key () and keep it absolutely
secure. Anyone in possession of the root key can issue
trusted certificates. Encrypt the root key with AES 256-bit
encryption and a strong password.
Use 4096 bits for all root and intermediate certificate
authority keys. You’ll still be able to sign server
and client certificates of a shorter length.
 /root/ca
openssl genrsa -aes256 -out private/ca.key.pem
chmod private/ca.key.pem
Updated Answer
If you’re using an older version such as Windows 7, you’ll need to stick with MakeCert or another solution. Some people suggest the Public Key Infrastructure Powershell (PSPKI) Module.
Directory structure
Below is the complete directory structure after the exercise of creating RootCA and intermediate CA
[[email protected] int]# tree .
.
└── ca
├── certs
│   └── ca.cert.pem
├── crl
├── index.txt
├── index.txt.attr
├── index.txt.old
├── intermediate
│   ├── cert-bundle.pem
│   ├── certs
│   │   ├── int.ca
│   │   └── int.ca.crt
│   ├── crl
│   │   └── crlnumber
│   ├── csr
│   │   └── ntermediate.csr
│   ├── index.txt
│   ├── newcerts
│   ├── openssl.cnf
│   ├── pvt_key
│   │   └── intermediate.key
│   └── serial
├── newcerts
│   └── 00.pem
├── openssl.cnf
├── pvt_key
│   └── ca.key.pem
├── serial
└── serial.old
11 directories, 18 files
Create the root certificate
Use the root key () to create a root
certificate (). Give the root certificate
a long expiry date, such as twenty years. Once the root
certificate expires, all certificates signed by the CA become invalid.
Whenever you use the req tool, you must specify
a configuration file to use with the option,
otherwise OpenSSL will default to .
 /root/ca
openssl req -config openssl.cnf -key private/ca.key.pem -new -x509  -days  -sha256 -extensions v3_ca -out certs/ca.cert.pem
chmod certs/ca.cert.pem
Prepare the root directory
Choose a directory () to store all keys and certificates.
Create the directory structure. The and files act as a
flat file database to keep track of signed certificates.
 /root/ca
mkdir certs crl newcerts private
chmod  private
touch index.txt  > serial
Prepare the configuration file
You must create a configuration file for OpenSSL to use.
Copy root configuration file
to .
# `man ca` [ CA_default ] # Directory and file locations. dir = /root/ca certs = $dir/certs crl_dir = $dir/crl new_certs_dir = $dir/newcerts database = $dir/index.txt serial = $dir/serial RANDFILE = $dir/private/.rand # The root key and root certificate. private_key = $dir/private/ca.key.pem certificate = $dir/certs/ca.cert.pem # For certificate revocation lists. crlnumber = $dir/crlnumber crl = $dir/crl/ca.crl.pem crl_extensions = crl_ext default_crl_days = 30 # SHA-1 is deprecated, so use SHA-2 instead. default_md = sha256 name_opt = ca_default cert_opt = ca_default default_days = 375 preserve = no policy = policy_strict
We’ll apply for all root CA signatures, as the
root CA is only being used to create intermediate CAs.
# The root CA should only sign intermediate certificates that match.# See the POLICY FORMAT section of `man ca`.
We’ll apply for all intermediate CA signatures,
as the intermediate CA is signing server and client certificates
that may come from a variety of third-parties.
# Allow the intermediate CA to sign a more diverse range of certificates.# See the POLICY FORMAT section of the `ca` man page.
# Options for the `req` tool (`man req`). # SHA-1 is deprecated, so use SHA-2 instead. # Extension to add when the -x509 option is used.
# See <https://en.wikipedia.org/wiki/Certificate_signing_request>. # Optionally, specify some defaults. #emailAddress_default =
We’ll apply the v3_ca extension when we create the root certificate.
# Extensions for a typical CA (`man x509v3_config`). We’ll apply the extension when we create
the intermediate certificate.
ensures that there can be no further certificate authorities
below the intermediate CA.
# Extensions for a typical intermediate CA (`man x509v3_config`). # Extensions for client certificates (`man x509v3_config`). "OpenSSL Generated Client Certificate"
We’ll apply the extension when signing server
certificates, such as those used for web servers.
# Extensions for server certificates (`man x509v3_config`). "OpenSSL Generated Server Certificate"
The extension is automatically applied when
creating certificate revocation lists.
# Extension for CRLs (`man x509v3_config`). We’ll apply the extension when signing the Online Certificate Status Protocol (OCSP) certificate.
# Extension for OCSP signing certificates (`man ocsp`). Verify the root certificate
openssl x509 -noout -text -in certs/ca.cert.pem
The output shows:
- the
used- the dates of certificate
- the
bit length- the
, which is the entity that signed the certificate- the
, which refers to the certificate itself
The and are identical
as the certificate is self-signed. Note that
all root certificates are self-signed.
Original Answer
Creating a self-signed certificate authority (CA)
makecert -r -pe -n "CN=My CA" -ss CA -sr CurrentUser ^ -a sha256 -cy authority -sky signature -sv MyCA.pvk MyCA.cer(^ = allow batch command-line to wrap line)
The private key should be stored in the MyCA.pvk file, and the certificate in the MyCA.cer file.
Importing the CA certificate
Because there’s no point in having a CA certificate if you don’t trust it, you’ll need to import it into the Windows certificate store. You can use the Certificates MMC snapin, but from the command line:
certutil -user -addstore Root MyCA.cerCreating a code-signing certificate (SPC)
makecert -pe -n "CN=My SPC" -a sha256 -cy end ^ -sky signature ^ -ic MyCA.cer -iv MyCA.pvk ^ -sv MySPC.pvk MySPC.cerIt is pretty much the same as above, but we’re providing an issuer key and certificate (the -ic and -iv switches).
We’ll also want to convert the certificate and key into a PFX file:
pvk2pfx -pvk MySPC.pvk -spc MySPC.cer -pfx MySPC.pfxIf you are using a password please use the below
pvk2pfx -pvk MySPC.pvk -spc MySPC.cer -pfx MySPC.pfx -po fessIf you want to protect the PFX file, add the -po switch, otherwise PVK2PFX creates a PFX file with no passphrase.
Using the certificate for signing code
signtool sign /v /f MySPC.pfx ^ /t http://timestamp.url MyExecutable.exe(See why timestamps may matter)
signtool sign /v /n "Me" /s SPC ^ /t http://timestamp.url MyExecutable.exeSome possible timestamp URLs for signtool /t are:
http://timestamp.verisign.com/scripts/timstamp.dllhttp://timestamp.globalsign.com/scripts/timstamp.dllhttp://timestamp.comodoca.com/authenticodehttp://timestamp.digicert.com
Full Microsoft documentation
Downloads
MakeCert is available from the Visual Studio Command Prompt. Visual Studio 2015 does have it, and it can be launched from the Start Menu in Windows 7 under «Developer Command Prompt for VS 2015» or «VS2015 x64 Native Tools Command Prompt» (probably all of them in the same folder).
")


")