
The DocumentRoot is the top-level directory in the document tree visible from the web and this directive sets the directory in the configuration from which Apache2 or HTTPD looks for and serves web files from the requested URL to the document root.
DocumentRoot "/var/www/html"
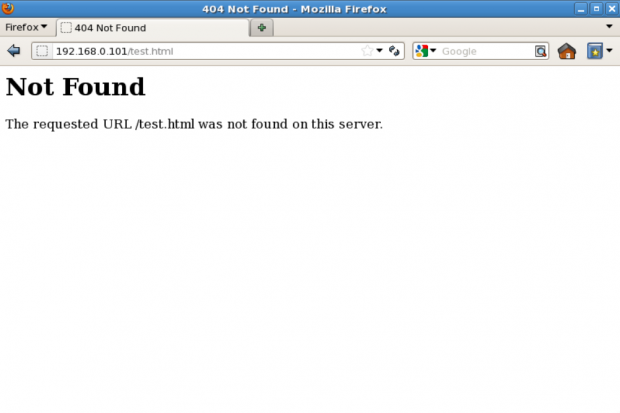
then access to http://domain.com/index.html refers to /var/www/html/index.html. The DocumentRoot should be described without a trailing slash.
In this short quick tip, we will show you how to find the Apache DocumentRoot directory in a Linux system.
- Finding Apache Document Root
- Use the Super Global Variable
- – Coding Example for Getting PHP Root Directory With $_SERVER
- Execute the Dirname() Function
- – Discussing the Levels Parameter in PHP Version 7 and Above
- – Coding Example for Getting PHP Root Directory by Using Dirname()
- Use Dirname() With __DIR__
- – Coding Example for Getting PHP Root Path By Using __DIR__
- How To Get To Root Directory in PHP
- – Coding Example for Using the Chroot() Function
- PHP Get Root Directory of Website
- – Coding Example for Getting Root Directory of Website
- Comparing the Magical Constants
- – Coding Example for Comparing the Magical Constants
- Что за корневая папка?
- Содержимое папки root
- Где находится корень сайта?
- Для чего нужен корневой каталог?
- Как зайти в корень сайта
- Через терминал
- Через FTP-клиент
- Через панель управления хостинга
- Через стороннюю панель управления
- Через файловый менеджер
- Как загружать файлы в корневой каталог?
- Корень (слэш) в HTML и PHP
- PHP — Корень сайта
- Replies
- Site Content
- Server Configuration
- Reply
- Ubuntu/Debian
- CentOS/RHEL/Fedora
- Final thoughts
- Structure Of A Root Directory
- How Do I Find Root Directory Of A Website? Where Is Root Directory Of My Website?
- Method 1. cPanel
- Method 2. VPS Hosting
- How To Find System Root Directory In Windows?
- Final Thoughts
- 1. How to hide Apache Version and OS Identity from Errors
- 2. Disable Directory Listing
- 3. Keep updating Apache Regularly
- 4. Disable Unnecessary Modules
- 5. Run Apache as separate User and Group
- 6. Use Allow and Deny to Restrict access to Directories
- 7. Use mod_security and mod_evasive Modules to Secure Apache
- Mod_security
- 8. Disable Apache’s following of Symbolic Links
- 9. Turn off Server Side Includes and CGI Execution
- 10. Limit Request Size
- 11. Protect DDOS attacks and Hardening
- 12. Enable Apache Logging
- 13. Securing Apache with SSL Certificates
- Before You Begin
- Install NGINX
- Stable Versus Mainline
- Binary Versus Compiling from Source
- Installation Instructions
- Configuration Notes
- NGINX Configuration Best Practices
- Use Multiple Worker Processes
- Disable Server Tokens
- Set Your Site’s Root Directory
- Serve Content Over IPv4 and IPv6
- Static Content Compression
- Configuration Recap
- (Slightly More) Advanced Configurations
Finding Apache Document Root
$ grep -i 'DocumentRoot' /etc/apache2/sites-available/000-default.conf
$ grep -i 'DocumentRoot' /etc/apache2/sites-available/default-ssl.conf

$ grep -i 'DocumentRoot' /etc/httpd/conf/httpd.conf
$ grep -i 'DocumentRoot' /etc/httpd/conf.d/ssl.conf

Note that the location of the DocumentRoot directory may vary depending on the value of the DocumentRoot directive set in the Apache or httpd configuration.
If you want to change the location of the Apache DocumentRoot directory, please read our article that explains How to Change Default Apache ‘DocumentRoot’ Directory in Linux.
On a side note, the individual directories for all your virtual hosts must be located under the DocumentRoot. For example, if your DocumentRoot is /var/www/html, and you have two sites called example1.com and example2.com, you can create their directories as shown.
$ sudo mkdir -p /var/www/html/example1.com/
$ sudo mkdir -p /var/www/html/example2.com/
Then in the virtual host configuration files, point their DocumentRoot to the above directories.
Here are some additional guides about Apache web server, that you will find useful:
 The PHP root directory can be extracted through PHP built-in functions and constants. Moreover, the stated directory can be changed to your preferred path. So, our expertly written article will educate you about the various simple ways to access your root directory along with changing it.
Continue reading to get the PHP root path printed on your browser window in a few seconds.
- Get Root Directory: Use the Super Global Variable
- Get Base Directory: Execute the Dirname() Function
- PHP Root Path: Use Dirname() With __DIR__
- How To Get To Root Directory in PHP: Use Chroot()
- PHP Get Root Directory of Website: Going to the Top
- PHP Root Directory Path: Comparing the Magical Constants
- Winding Up
Use the Super Global Variable
You might find it hard to believe but the super global variable can help you in finding the PHP root directory path. Certainly, the PHP root path is stored on the of the $_SERVER array. Therefore, accessing the given element will return the parent directory path accurately. Also, it would be best to note that the $DOCUMENT_ROOT element is defined in the server’s configuration file.
– Coding Example for Getting PHP Root Directory With $_SERVER
Please feel free to see how the $_SERVER array helps in your root directory search process:
Execute the Dirname() Function
Certainly, you don’t need to worry if your currently installed version of PHP is below 5.3.0 because you can execute the . The dirname() function will let you pass the required file or folder path and an optional number of levels. Next, the same function will return the PHP root directory path with maximum accuracy.
Furthermore, its syntax is right here: dirname(path, levels).
– Discussing the Levels Parameter in PHP Version 7 and Above
In PHP version 7 and above, the dirname() function allows you to specify the number of levels while acquiring the PHP root directory. You can pass an integer value that comes above one as the second argument to the dirname() function. For example, if you want to PHP get base directory that is one level above your current directory, then you’ll pass two and so on.
– Coding Example for Getting PHP Root Directory by Using Dirname()
Imagine having a script file saved in the “src” directory that exists in the “MyWebsite” directory with the path: “C:xampphtdocsMyWebsitesrc.” Now, let’s assume you also want to get the base directory that exists three levels above your script file. Here, the simplest way to pass the path of your current file to the dirname() function is by passing the __FILE__ constant to it. Next, you’ll pass three as the number of levels.
Please have a look at this code representation that depicts the stated example in the easiest possible manner so you can use it in your programming practice:
Use Dirname() With __DIR__
Are you using a PHP version 5.3.0 and above, and looking for a solution to get the PHP root path? Then do nothing else except for passing the magical constant “__DIR__” to the . The given constant will return the path of your current directory and the dirname() function will return the PHP root directory of the same.
– Coding Example for Getting PHP Root Path By Using __DIR__
For instance, let’s discuss a case in which the main directory of your PHP project is “MyProject” and it is saved in the “htdocs” folder located in the xampp folder in C drive. This hypothetical directory consists of two subfolders: “assets” and “images” and your current file “myFile.php” is located in the “assets” folder.
Now, you may want to PHP get base directory path of your current directory. Here, you’ll simply pass the magic constant __DIR__ to the dirname() function to acquire accurate results.
Please feel free to use the short code snippet we have provided for you below that implements the dirname() function with the __DIR__ constant:
How To Get To Root Directory in PHP
Undeniably, the given function accepts a directory that apparently changes the PHP root directory of the current process to the same, and makes “/” the current directory.
You will need to use this syntax in any relevant code you are planning to create: chroot(directory).
– Coding Example for Using the Chroot() Function
Here is a code fragment to help you in switching to the root directory easily:
The chroot() function doesn’t work on Windows Operating System while it requires root privileges on the systems stated above.
PHP Get Root Directory of Website
Do you have a large website directory consisting of various directories, subdirectories, and files? Would you like to see the topmost level of your website directory without jumping through all the layers? Well, you can do this by applying a small trick with the combination of the and the $_SERVER variable. In the end, you’ll PHP get root directory of website without wasting your time in counting the levels backward.
– Coding Example for Getting Root Directory of Website
Comparing the Magical Constants
Interestingly, the __DIR__ and __FILE__ constants provide almost similar results. The only exception between both of them is that the __DIR__ constant returns the path of your current directory. On the other hand, the __FILE__ constant gives back the path of your current file. Therefore, you will notice a difference of one level when you use them inside the dirname() function.
– Coding Example for Comparing the Magical Constants
Let’s assume that you are willing to find the results returned by the two magical constants and their effect with the dirname function
Undoubtedly, being familiar with your PHP root directory path can be quite helpful while working on large projects. Having covered different ways to get the base directory path, here are some notable facts to help you ensure the correctness of your concepts:
- The $_SERVER[“DOCUMENT_ROOT”] returns the PHP root directory of your current file
- In PHP versions before 5.3, you can use the dirname() function with the __FILE__ constant and a level >= two to PHP get base directory of your current file
- In PHP version from 5.3 and over, you can use the dirname() function with the __DIR__ constant to PHP get base directory of your current directory
- You can get to the root directory by using the chroot() function in BSD and GNU Operating Systems
- The combo of the explode() function with $_SERVER[“DOCUMENT_ROOT”] serves to be an efficient way to get the root directory
Your Go-To Resource for Learn & Build: CSS,JavaScript,HTML,PHP,C++ and MYSQL. Meet The Team
Выясняем, что такое корневая директория, где находится корень сайта, и для чего она может понадобиться.
Что за корневая папка?
Корневая папка (корневой каталог, корень, root) — это ключевая директория компьютера или сервера. В частности, на базе Linux. С нее начинается файловая система, в ней хранятся все остальные подкаталоги, содержащие системные и пользовательские файлы.
Что касается сервера, это может быть точно такая же папка root, как и в любом дистрибутиве Linux, если мы говорим о выделенном сервере (физическом или виртуальном). Она будет содержать в себе те же компоненты, что и обычный компьютер. А в случае с виртуальным хостингом эта папка может называться public_html или www. Там будут только данные сайта. Получить доступ к «настоящему» root там не получится.
Тем не менее эта директория тоже будет считаться корнем сайта, и этот термин будет уместно использовать в отношении условных public_html или www. И в различных инструкциях авторы будут ссылаться именно на нее, упоминая root.
Комьюнити теперь в Телеграм
Подпишитесь и будьте в курсе последних IT-новостей
Содержимое папки root
Как я уже сказал ранее, корневой каталог может представлять собой разные сущности в зависимости от типа сервера.
Например, на стандартной VDS/VPS такая директория может содержать в себе следующие папки:
- /bin с системными программами, файлами и компонентами, необходимыми для загрузки ОС;
- /boot с компонентами загрузчика, включающими в себя ядро Linux и базовый набор файлов для старта сервера;
- /dev с файлами, привязанными к конкретным устройствам, подключаемым к системе;
- /etc с другими скриптами и файлами, от которых не зависит запуск сервера.
Таких подкаталогов в корне может быть больше. Все зависит от конфигурации компьютера и ОС.
На виртуальном хостинге же папка public_html или ее аналог не содержит ничего, она пустая по умолчанию. В нее помещают HTML-документы, JS-скрипты и CSS-файлы необходимые для работы размещаемого сайта. Скорее всего, корнем для вас станет директория, в которую будет помещен файл index.html с главной страницей вашего ресурса.
Где находится корень сайта?
Зависит от того, что подразумевается под местоположением директории. Ведь мы уже выяснили, что корнем может быть папка www. Для html корнем станет именно директория, указанная в настройках сервера. А в случае с PHP, к примеру, это будет именно корневой каталог системы. В CMS WordPress — это хранилище в интерфейсе самой платформы, в Bitrix для поиска корня есть команда GetCurPage().
Для чего нужен корневой каталог?
Это основа вашего сервера и сайта. В нем лежат все ключевые компоненты. Он нужен для работы ресурса в целом. Удалите что-то из корня и распрощаетесь с рабочей операционной системой.
Если же говорить о конкретном применении root-каталога вебмастерами на практике, то речь пойдет о:
- Загрузке файла Robots.txt, куда будут прописываться страницы, запрещенные для индексации поисковыми машинами. Через нее скрывают разного рода техническую информацию и конфиденциальные данные.
- Добавлении документа sitemap.xml (карта сайта), где расписывается структура страниц, чтобы поисковому боту было проще ориентироваться на сайте.
- Хранении данных, необходимых для подтверждения прав на владение ресурсом. Туда добавляют скрипты с настройками сторонних ресурсов для интеграции с ними (например, скрипт Яндекс.Метрики).
- Хранении архива с резервной копией данных сайта. Бэкап необходим для восстановления проекта после сбоя и потери файлов.
- Для установки CMS (соответствующие установочные скрипты запускаются именно из root-каталога).
Как зайти в корень сайта
Вход в корневую директорию требуется довольно частно, и есть как минимум четыре способа туда зайти.
Основной — через терминал. То есть при помощи командной строки и текстовых утилит. Но есть и специализированное программное обеспечение с графическим интерфейсом.
В корень можно зайти через FTP (как на сервер, так и на виртуальный хостинг). А еще у некоторых хостинг-провайдеров имеется фирменный файловый менеджер для работы с файлами сервера через браузер.
Через терминал
Чтобы управлять сервером через терминал, надо подключиться к нему через Secure Shell (SSH). Для этого:
- Запускаем терминал (в macOS или Linux).
- Вводим команду ssh root@IP-адрес сайта.
- Указываем пароль администратора для авторизации.
Если вы управляете сервером через протокол SSH, то проще всего будет зайти в корневой каталог, используя встроенную в Linux команду для перемещения по жесткому диску. Речь идет о команде cd. Когда вы используете ее без дополнительных опций (не указывая конкретный путь), то она автоматически отправляет пользователя в корневую директорию сервера.
Сразу же можно проверить его содержимое, воспользовавшись командой ls.
Через FTP-клиент
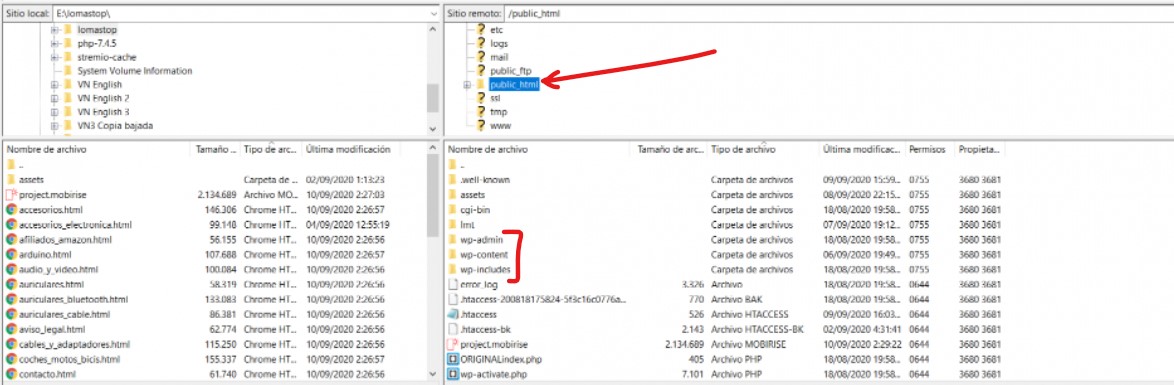
Рассмотрим эту процедуру на примере утилиты FileZilla:
- Заходим на официальный сайт разработчика программы и скачиваем ее.
- Открываем FileZilla и заполняем поля хост, имя пользователя и пароль в верхней части интерфейса.
- Затем кликаем по кнопке «Быстрое соединение», чтобы получить доступ к корневой директории.

FTP-клиенты мало чем отличаются от файловых менеджеров. Большая их часть визуально напоминает Total Commander. Перед вами появится двухпанельный интерфейс: в одной из панелей будут локальные файлы и папки, во второй — файлы и папки хостинга.
Для управления используются горячие клавиши или элементы в верхней панели FileZilla.
Через панель управления хостинга
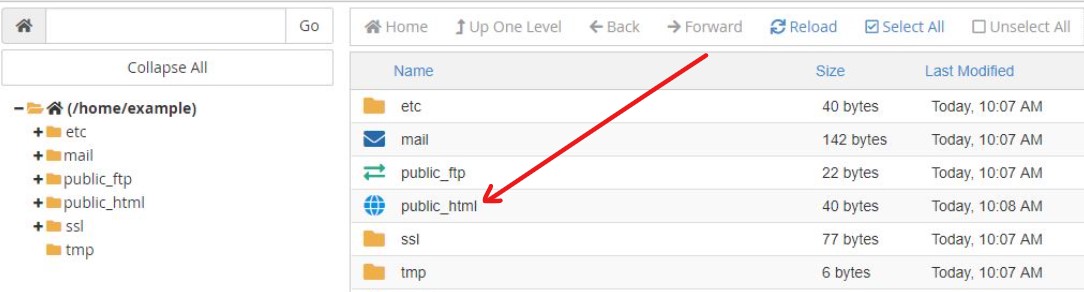
Я уже говорил ранее, что некоторые провайдеры предоставляют доступ к файлам на сервере через собственное веб-приложение. Расскажу о том, как работает такое приложение у Timeweb (для управления виртуальным хостингом).
- Открываем сайт Timeweb.
- Заходим в саму ПУ.
- Переходим во вкладку «Файловый менеджер».
- Открываем директорию public_html.
Если вы пользуетесь услугами другого хостинга, то в нем наверняка есть альтернативное схожее решение для управления файлами сервера напрямую через браузер. Можете уточнить у техподдержки или самостоятельно поискать в ПУ пункт с названием «Файловый менеджер».
Через стороннюю панель управления
Некоторые вебмастера используют для управления сайтом программы в духе ISPmanager. Расскажу о переходе в корень виртуального выделенного сервера на ее примере.
- Заходим в панель ISPmanager.
- Авторизуемся, используя данные администратора.
- Открываем меню «Система».
- Выбираем подпункт «Менеджер файлов».
Через файловый менеджер
В Explorer (Windows) и в Finder (macOS) есть встроенная поддержка протокола FTP. То есть для подключения к серверу не нужно скачивать стороннее ПО. Достаточно ввести FTP-адрес в соответствующее поле файлового менеджера операционной системы.

В macOS это делается следующим образом:
- Открываем Finder.
- Одновременно нажимаем клавиши Cmd + K.
- Указываем адрес сервера в формате ftp://IP-адрес сайта
- Кликаем по кнопке «Подключиться».
- Авторизуемся, используя данные, которые выдал хостинг.
- Открываем Explorer.
- Вводим во встроенную поисковую строку ftp://IP-адрес сайта
- Авторизуемся, используя данные, которые выдал хостинг.
Корневая папка станет частью файловой системы. С ней можно будет взаимодействовать, как с любым другим каталогом. То есть копировать туда файлы или редактировать их. Правда, для этого потребуются права администратора.
Как загружать файлы в корневой каталог?
Загружать файлы в корень сервера можно через одну из панелей управления указанных выше или через FTP-клиент.
- Открываем FileZilla (мы уже скачали, установили и настроили ее ранее в инструкции по подключению через FTP).
- Напротив строки «Локальный сайт» вводим путь до файлов на диске, которые надо загрузить в root.
- Напротив строки «Удаленный сайт» вводим путь до root-каталога. Например, до папки public_html.
- Выделяем папку, которую нужно перенести, и открываем меню «Файл».
- В появившемся списке опций выбираем «Загрузить на сервер» или просто жмем на Enter.
В случае с виртуальным хостингом Timeweb достаточно открыть фирменный менеджер файлов через браузер и перетащить в него файлы с жесткого диска. Здесь полноценно поддерживается Drag & Drop. Но такой метод менее удобен, так как он требует держать браузер открытым и отнимает много времени на загрузку большого количества файлов.
На этом ликбез можно заканчивать. Вы узнали, что такое «корень», зачем он нужен и как загрузить в него файлы. Осталось выбрать наиболее удобный способ для подключения к хранилищу сервера и управления им.
Статья, в которой рассмотрим как в php получить путь до корня сайта. Кроме того познакомимся с тем, чем отличается абсолютный путь в PHP и HTML.
Корень (слэш) в HTML и PHP
PHP в отличие от HTML видит файловую систему глубже. В HTML корнем сайта является некоторая директория, которая определяется настройками веб-сервера. Т.е. это определённый каталог в файловой системе, начиная с которого размещаются документы (файлы) этого сайта.
Например, в HTML путь к изображению image1.jpg, которое расположено в каталоге images относительно корня сайта будет иметь следующий вид:
/images/image1.jpgВ php слэш (/) обозначает корень файловой системы, а не корень сайта.
Т.е. такая запись в php будет означать, что файл image1.jpg расположен в директории images, которая находится в корне файловой системы.
/images/image1.jpgЧтобы к этому файлу добраться из php необходимо будет проделать более длинный путь. Т.е. сначала добраться до корня сайта (некоторой директории), а потом от него до нужного файла.
Например, на хостинге (в зависимости от хостинга путь до корня сайта может отличаться) путь к файлу будет следующим:
/home/m/mysiteru/public_html/images/image1.jpg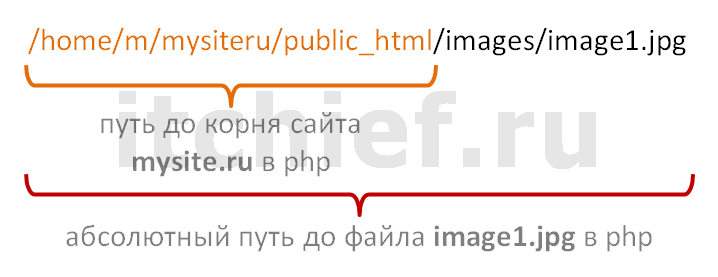
Например, путь к файлу сайта, который работает на веб-сервере Apache (сборка Денвер) в операционной системе Windows будет следующим:
Z:/home/mysite.ru/www/images/image1.jpgPHP — Корень сайта
Получить корневую папку сайта в скрипте php можно используя предопределённый (глобальный) массив $_SERVER:
$_SERVER['DOCUMENT_ROOT']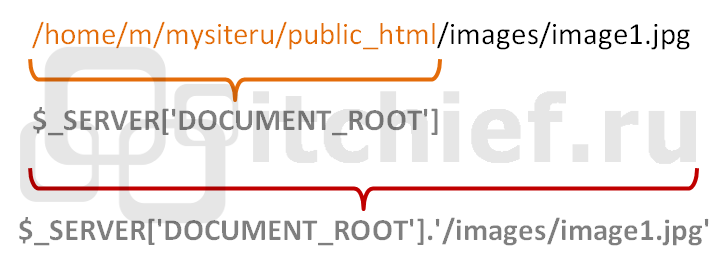
Чтобы посмотреть путь к корневому каталогу достаточно создать любой php файл и поместить в него следующее содержимое:
<?php
// вывести корень сайта
echo $_SERVER['DOCUMENT_ROOT'];
Абсолютный путь обычно применяют тогда, когда вы не знаете местоположение файлов относительно скрипта, в котором вы их используете.
Например, скопируем файл image1.jpg, расположенный в корне сайта, в каталог images (/assets/images — путь от корня сайта):
<?php
// получить корень сайта
$root = $_SERVER['DOCUMENT_ROOT'];
//скопировать файл image1.png в папку images, расположенную в корне сайта
copy($root.'/image1.jpg', $root.'/assets/images/image1.jpg');

4 years, 5 months ago
Can you let me know where the website data/public html folder for my website is located?
Replies
/var/www/html/yourdomain.com//srv/http/yourdomain.com//home/${USER}/
If you haven’t setup your server, read about LAMP or LEMP stacks, they’ll get you started.
That being said, most web servers have a standard of configuration for their directory structure when first initializing the website.
Site Content
Also keep in mind, depending on your distro/server version these may differ. But in general the document root for Apache and Nginx (most common opensource web servers) might be in one of these directories:
- /var/www/
- /srv/www/
- /srv/http/
- /home/${USER}/
- /usr/share/
- /usr/local/
So say you are running an Nginx webserver and are looking for content being served when you visit your site www.example.com you might find it here: /var/www/html/example.com/public_html
Server Configuration
To find out exactly where your document root lives, you can look in your servers configuration file. Here you can also modify your web servers configurations, like what port you’ll be serving your site, or change where your document root lives, etc., you might find that config in one of these directories:
- /etc/apache2/
- /etc/nginx/
- /etc/httpd/
To add onto Austin’s post, I’d like to provide some instructions on how to find the configuration file.
The common Apache configuration file path is in/etc/apache2/sites-available/examplesite. Depending on what your developer named the directory, examplesite will vary. To verify the directory name, you would run the command ls -la /etc/apache2/sites-available. The output of that command would look something like this:
total 24
drwxr-xr-x 3 root root 4096 Sep 4 19:54 .
drwxr-xr-x 8 root root 4096 Aug 26 15:25 ..
-rw-r--r-- 1 root root 1332 Feb 3 2019 000-default.conf
-rw-r--r-- 1 root root 6338 Feb 3 2019 default-ssl.conf
drwxr-xr-x 2 root root 4096 Sep 4 19:54 examplesite
# domain: example.com
# public: /var/www/html/example.com/public_html/
<VirtualHost *:80> # Admin email, Server Name (domain name), and any aliases ServerAdmin webmaster@example.com ServerName example.com ServerAlias www.example.com # Index file and Document Root (where the public files are located) DirectoryIndex index.html index.php DocumentRoot /var/www/html/example.com/public_html # Log file locations LogLevel warn ErrorLog /var/www/html/example.com/log/error.log CustomLog /var/www/html/example.com/log/access.log combined
</VirtualHost>In this output, you’ll want to focus on # Index file and Document Root (where the public files are located). Index files are where you will make modifications to change the look of the front web page. To edit an index file, you’ll have to run the command nano /etc/apache2/sites-available/examplesite/example.conf.
If you get permission denied errors in any part of this process, you’ll need to run the command using sudo before it, and enter the root password of your Linode (not your Manager password). Running a sudo command for editing the example configuration file would look something like this: sudo nano /etc/apache2/sites-available/examplesite/example.conf
In OpenLiteSpeed default configuration it is located in:
Reply
Please enter an answer
Tips:
I’m a blockquote.
I’m a link
**I am bold** I am bold
*I am italicized* I am italicized
Community Code of Conduct
Apache web server is probably the most used web server across platforms including different Linux distributions and Windows. The web server is used to deliver web content and can serve many queries at once.
In this short tutorial, you are going to learn how to modify the root directory for Apache web server. For the purpose of this tutorial, we will use Ubuntu/Debian and RHEL/CentOS/Fedora based installations of the web server.
However the paths and directives are practically the same for other distributions as well, so you will be able to apply the learned in different OSes as well.
To make the necessary changes you need to modify the DocumentRoot directive of the web server. This is the directory from which Apache will read the contents that the visitor will access over browser. Or in other words, this is the directory that forms the tree of directories that will be accessible over web.
The default DocumentRoot for Apache is:
/var/www/html
or
/var/www/
These paths are described in the Apache’s configuration file.
Ubuntu/Debian
/etc/apache2/sites-enabled/000-default
/etc/apache/apache2.conf
CentOS/RHEL/Fedora
/etc/httpd/conf/httpd.conf
To change the document root for your Apache web server simply open the corresponding file with your favourite text editor and search for DocumentRoot.
#
# DocumentRoot: The directory out of which you will serve your
# documents. By default, all requests are taken from this directory, but
# symbolic links and aliases may be used to point to other locations.
#DocumentRoot "/var/www/html"
After that change the path to the new target directory and make sure that Apache is able to read/write in that directory. Once you have modified the DocumentRoot, save the file and restart apache with:
# systemctl restart apache [For SystemD]
# service httpd restart [For SysVinit]
Final thoughts
The change of default document root is an easy task that can be completed in a couple of minutes. When making such changes is important to make sure that you do not make any typos and make sure to always restart Apache after making changes to its configuration file.
Are you looking for what is a root directory of a website? A root directory is a folder on the server or in cPanel that incorporates all of the contents or files of your website. It is the top folder in the directory, usually designated as public_html.
To make it easy, let’s begin this article with what is a root directory of a website and where to find the root directory of a website. Also, read What Is The Difference Between A Database And A Website?
The root directory is a Unix-like operating system, and the root folders are marked with the slash “/”. This folder, which is sometimes referred to as public_html, htdocs, www, or wwwroot, holds the index files index.php, index.html, and default.html.
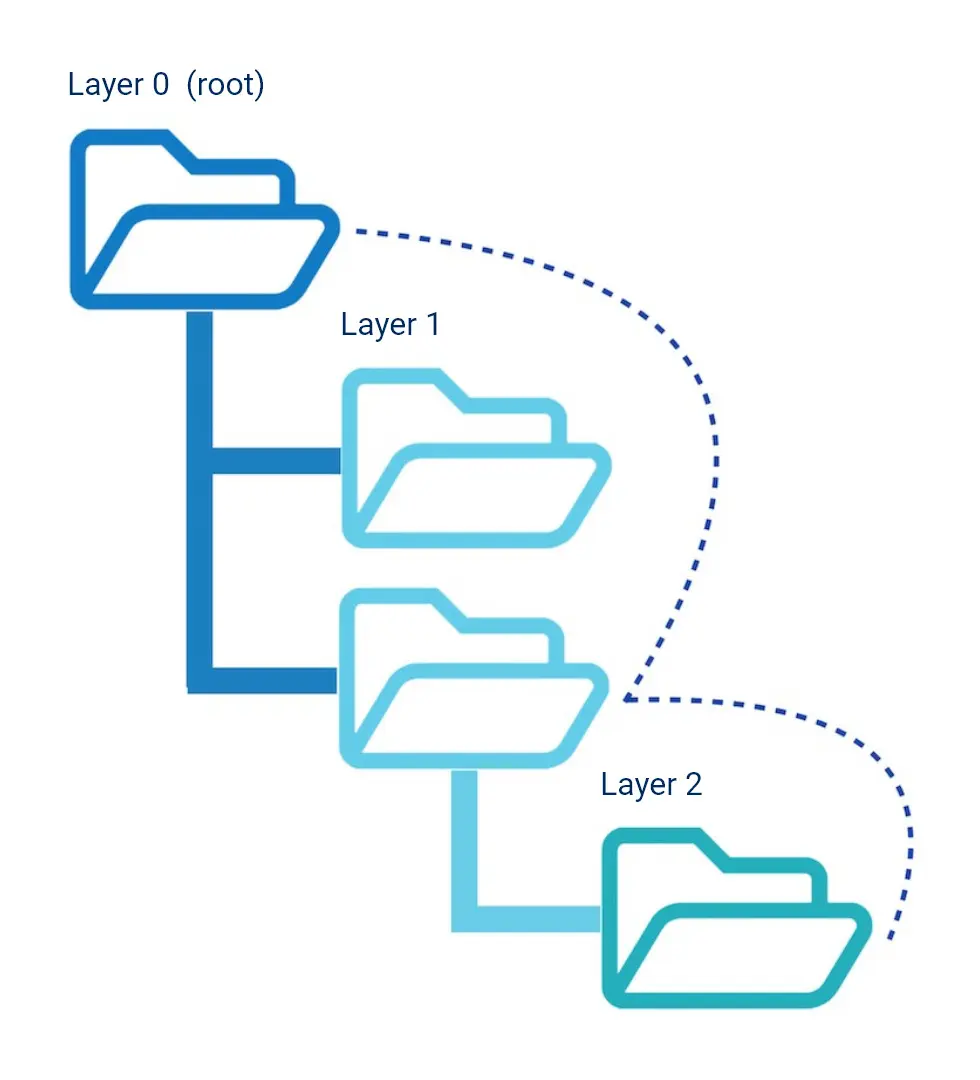
Among them, the root folder is always on the top of all folders. From the root directory, all the subsequent directories expand outwards. There could be multiple levels and subdirectories between the root directory (level 0) and the bottom-most subdirectory, as discussed in the next section.
Example of root directory: Our website domain is the root directory folder (level 0) and is represented as https://basicwebguide.com/.
The first level or subdirectory could be your pages like https://basicwebguide.com/about us/.
Apart from these, the root directory stores libraries, media files, HTML codes, etc., under different subdirectory root folders. It also incorporates sensitive data or information like robots.txt and sitemap files.
Structure Of A Root Directory
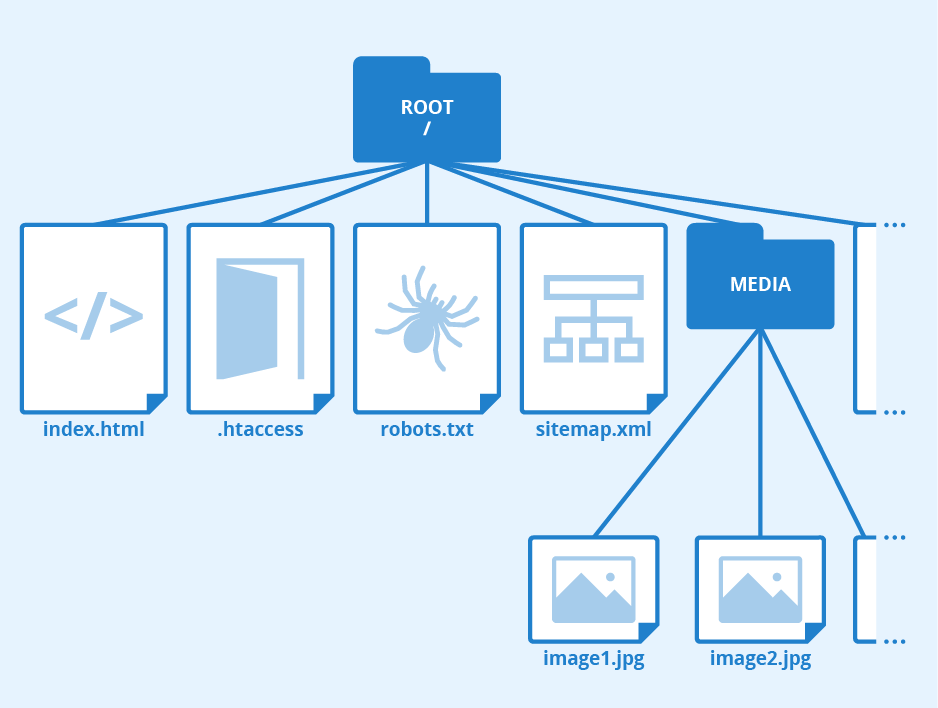
Remember, all files inside your cPanel or hosting are not root directory folders; there could be settings or installation folders. The root directory folder usually begins from public_html/
Let’s understand it with a simple example of the root directory system of a website.
Application/
| Library/
| Templates/
| +-- config.php
public_html/
+-- Media/
| +-- image1.jpg
| +-- image2.jpg
--- includes/
| +-- style.css
| +-- script.js
+-- index.php
As earlier mentioned, the root directory hierarchy begins from the moment where a visitor reaches your website via a browser. So, in the above example, the root directory folder is public_html/, whereas +– Media/ is the subdirectory or sublevels.
In the end, when a visitor visits your homepage, the +–index.php folder gets active. Remember, the files or folders that are not liable for being publicly exposed, like database login, are always outside the root folder.
How Do I Find Root Directory Of A Website? Where Is Root Directory Of My Website?
After knowing what is a root directory of a website, you probably looking for how to access the root directory. So, I will give you a brief overview to find root directory folders.
Depending on the hosting you are availing of, the root directory files can be accessed through cPanel, web hosting, or VPS hosting. Commonly, you find your root directory files of a website inside the public_html folder.
Method 1. cPanel
The easiest way to find the root directory of a website is by utilizing the cPanel (I’m supposing your site is hosted on cPanel). Nowadays, cPanel becomes the first choice of almost all site owners due to its simplicity.
- Log in to your cPanel (with username and password).
- Once logged in, scroll down, and look for the files section.
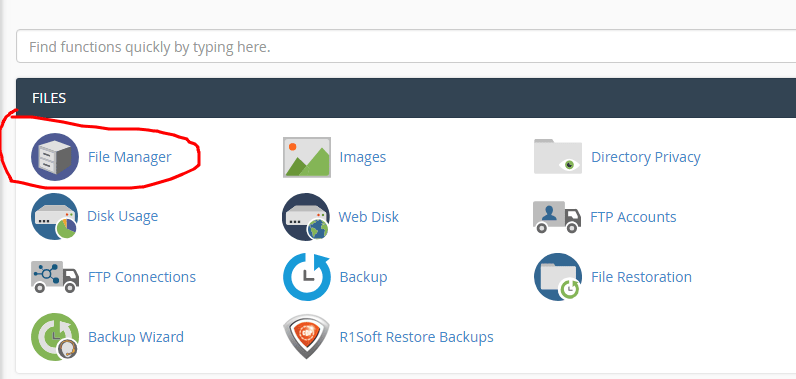
- Carefully look at the different folders; you can see the public_html folder.
- Now, click on the public_html folder, where you can access all the root folders or subdirectories relevant to your website.
Remember, all directories within the public_html folder must have 0755 permissions, and the public_html folder must always have 0750 permissions.
Method 2. VPS Hosting
VPS hosting is a virtualized version of a specialized physical server and has its own processors, memory, and disk storage. If you’re using VPS like DigitalOcean, Vultr, etc., then you can find the root directory using an FTP client like FileZilla.
How To Find System Root Directory In Windows?
You shouldn’t be confused the root directory of a website with the root directory of a system like Windows. We already discussed what is a root directory of a website and where to find it.
To identify the drivers that are really that are being used, as well as the system log archives and troubleshoot failure dump files, navigate to the system root directory. Let’s see how to find root directory of Windows.
- Press Window and R key simultaneously; Win+R.
- Type Cmd in the program front and hit the Enter button.

- A Command Window will appear on your screen.
- Type set systemroot in front of the system user name (as shown in the above screenshot).
- The next line displays the SystemRoot (or system root directory) of your system; In our case, it is SystemRoot=C:\Windows.
Final Thoughts
It is all about what is a root directory of a website. In this article, we have comprehensively discussed what is root directory folder, why it exists, and how to find root directory of a website.
In simple terms, the root directory is the primary folder of your website’s all content and files. The root directory can be located through cPanel or FTP clients like FileZilla.
Also, it could have multiple subdirectories that depend on your website design and structure. I hope you like this post; any queries and suggestions are welcome.
We all are very familiar with Apache web server, it is a very popular web server to host your web files or your website on the web. Here are some links which can help you to configure Apache web server on your Linux box.

Here in this tutorial, I’ll cover some main tips to secure your web server. Before you apply these changes in your web server, you should have some basics of the Apache server.
- Document root Directory: /var/www/html or /var/www
- Main Configuration file: /etc/httpd/conf/httpd.conf (RHEL/CentOS/Fedora) and /etc/apache2/apache2.conf (Debian/Ubuntu).
- Default HTTP Port: 80 TCP
- Default HTTPS Port: 443 TCP
- Test your Configuration file settings and syntax: httpd -t
- Access Log files of Web Server: /var/log/httpd/access_log
- Error Log files of Web Server: /var/log/httpd/error_log
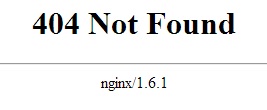
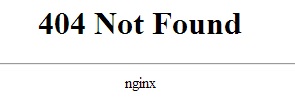
1. How to hide Apache Version and OS Identity from Errors
When you install Apache with source or any other package installers like yum, it displays the version of your Apache web server installed on your server with the Operating system name of your server in Errors. It also shows the information about Apache modules installed in your server.
In above picture, you can see that Apache is showing its version with the OS installed in your server. This can be a major security threat to your web server as well as your Linux box too. To prevent Apache to not to display these information to the world, we need to make some changes in Apache main configuration file.
Open configuration file with vim editor and search for “ServerSignature“, its by default On. We need to Off these server signature and the second line “ServerTokens Prod” tells Apache to return only Apache as product in the server response header on the every page request, It suppress the OS, major and minor version info.
# vim /etc/httpd/conf/httpd.conf (RHEL/CentOS/Fedora)
# vim /etc/apache2/apache2.conf (Debian/Ubuntu)
ServerSignature Off
ServerTokens Prod
# service httpd restart (RHEL/CentOS/Fedora)
# service apache2 restart (Debian/Ubuntu)
2. Disable Directory Listing
By default Apache list all the content of Document root directory in the absence of index file. Please see the image below.
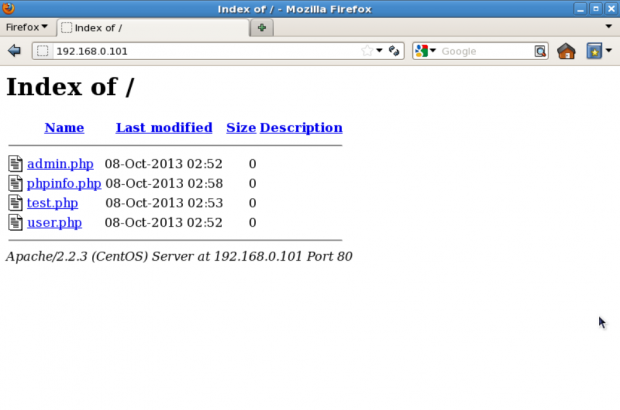
We can turn off directory listing by using Options directive in configuration file for a specific directory. For that we need to make an entry in httpd.conf or apache2.conf file.
<Directory /var/www/html> Options -Indexes
</Directory>

3. Keep updating Apache Regularly
Apache developer community is continuously working on security issues and releasing its updated version with new security options. So It is always recommended to use the latest version of Apache as your web server.
To check Apache version: You can check your current version with httpd -v command.
# httpd -v
Server version: Apache/2.2.15 (Unix)
Server built: Aug 13 2013 17:29:28
# yum update httpd
# apt-get install apache2
It is also recommended to keep your Kernel and OS updated to the latest stable releases if you are not running any specific application which works only on specific OS or Kernel.
4. Disable Unnecessary Modules
# grep LoadModule /etc/httpd/conf/httpd.conf
# have to place corresponding `LoadModule' lines at this location so the
# LoadModule foo_module modules/mod_foo.so
LoadModule auth_basic_module modules/mod_auth_basic.so
LoadModule auth_digest_module modules/mod_auth_digest.so
LoadModule authn_file_module modules/mod_authn_file.so
LoadModule authn_alias_module modules/mod_authn_alias.so
LoadModule authn_anon_module modules/mod_authn_anon.so
LoadModule authn_dbm_module modules/mod_authn_dbm.so
LoadModule authn_default_module modules/mod_authn_default.so
LoadModule authz_host_module modules/mod_authz_host.so
LoadModule authz_user_module modules/mod_authz_user.so
LoadModule authz_owner_module modules/mod_authz_owner.so
LoadModule authz_groupfile_module modules/mod_authz_groupfile.so
LoadModule authz_dbm_module modules/mod_authz_dbm.so
LoadModule authz_default_module modules/mod_authz_default.so
LoadModule ldap_module modules/mod_ldap.so
LoadModule authnz_ldap_module modules/mod_authnz_ldap.so
LoadModule include_module modules/mod_include.so
LoadModule log_config_module modules/mod_log_config.so
LoadModule logio_module modules/mod_logio.so
LoadModule env_module modules/mod_env.so
LoadModule ext_filter_module modules/mod_ext_filter.so
....
5. Run Apache as separate User and Group
Create Apache User and Group
# groupadd http-web
# useradd -d /var/www/ -g http-web -s /bin/nologin http-web
User http-web
Group http-web
6. Use Allow and Deny to Restrict access to Directories
<Directory /> Options None Order deny,allow Deny from all
</Directory>
- Options “None” – This option will not allow users to enable any optional features.
- Order deny, allow – This is the order in which the “Deny” and “Allow” directives will be processed. Here it will “deny” first and “allow” next.
- Deny from all – This will deny request from everybody to the root directory, nobody will be able to access root directory.
7. Use mod_security and mod_evasive Modules to Secure Apache
These two modules “mod_security” and “mod_evasive” are very popular modules of Apache in terms of security.
Mod_security
Where mod_security works as a firewall for our web applications and allows us to monitor traffic on a real time basis. It also helps us to protect our websites or web server from brute force attacks. You can simply install mod_security on your server with the help of your default package installers.
Install mod_security on Ubuntu/Debian
$ sudo apt-get install libapache2-modsecurity
$ sudo a2enmod mod-security
$ sudo /etc/init.d/apache2 force-reload
Install mod_security on RHEL/CentOS/Fedora/
# yum install mod_security
# /etc/init.d/httpd restart
Mod_evasive
mod_evasive works very efficiently, it takes one request to process and processes it very well. It prevents DDOS attacks from doing as much damage. This feature of mod_evasive enables it to handle the HTTP brute force and Dos or DDos attack. This module detects attacks with three methods.
- If so many requests come to a same page in a few times per second.
- If any child process trying to make more than 50 concurrent requests.
- If any IP still trying to make new requests when its temporarily blacklisted.
mod_evasive can be installed directly from the source. Here, we have an Installation and setup guide of these modules which will help you to set up these Apache modules in your Linux box.
8. Disable Apache’s following of Symbolic Links
Options -FollowSymLinks
# Enable symbolic links
Options +FollowSymLinks
Note: To enable rewrite rules inside “.htaccess” file “AllowOverride All” should be present in the main configuration globally.
9. Turn off Server Side Includes and CGI Execution
We can turn off server side includes (mod_include) and CGI execution if not needed and to do so we need to modify main configuration file.
Options -Includes
Options -ExecCGI
We can do this for a particular directory too with Directory tag. Here In this example, we are turning off Includes and Cgi file executions for “/var/www/html/web1” directory.
<Directory "/var/www/html/web1">
Options -Includes -ExecCGI
</Directory>
Here are some other values with can be turned On or off with Options directive.
- Options All – To enable All options at once. This is the default value, If you don’t want specify any values explicitly in Apache conf file or .htaccess.
- Options IncludesNOEXEC – This option allows server side includes without the execute permission to a command or cgi files.
- Options MultiViews – Allows content negotiated multiviews with mod_negotiation module.
- Options SymLinksIfOwnerMatch – It’s similar to FollowSymLinks. But, this will follow only when the owner is the same between the link and the original directory to which it is linked.
10. Limit Request Size
By default Apache has no limit on the total size of the HTTP request i.e. unlimited and when you allow large requests on a web server its possible that you could be a victim of Denial of service attacks. We can Limit the requests size of an Apache directive “LimitRequestBody” with the directory tag.
You can set the value in bytes from 0 (unlimited) to 2147483647 (2GB) that are allowed in a request body. You can set this limit according to your site needs, Suppose you have a site where you allows uploads and you want to limit the upload size for a particular directory.
<Directory "/var/www/myweb1/user_uploads"> LimitRequestBody 512000
</Directory>
11. Protect DDOS attacks and Hardening
Well, it’s true that you cannot completely protect your web site from DDos attacks. Here are some directives which can help you to have a control on it.
- TimeOut : This directive allows you to set the amount of time the server will wait for certain events to complete before it fails. Its default value is 300 secs. It’s good to keep this value low on those sites which are subject to DDOS attacks. This value totally depends on kind of request you are getting on your website. Note: It could pose problems with come CGI scripts.
- MaxClients : This directive allows you to set the limit on connections that will be served simultaneously. Every new connection will be queued up after this limit. It is available with Prefork and Worker both MPM. The default value of it is 256.
- KeepAliveTimeout : Its the amount of time the server will wait for a subsequent request before closing the connection. Default value is 5 secs.
- LimitRequestFields : It helps us to set a limit on the number of HTTP request’s header fields that will be accepted from the clients. Its default value is 100. It is recommended to lower this value if DDos attacks are occurring as a result of so many http request headers.
- LimitRequestFieldSize : It helps us to set a size limit on the HTTP Request header.
12. Enable Apache Logging
To do so you need to include the mod_log_config module. There are three main logging-related directives available with Apache.
- TransferLog: Creating a log file.
- LogFormat : Specifying a custom format.
- CustomLog : Creating and formatting a log file.
You can also use them for a particular website it you are doing Virtual hosting and for that you need to specify it in the virtual host section. For example, here is the my website virtual host configuration with logging enabled.
<VirtualHost *:80>
DocumentRoot /var/www/html/example.com/
ServerName www.example.com
DirectoryIndex index.htm index.html index.php
ServerAlias example.com
ErrorDocument 404 /story.php
ErrorLog /var/log/httpd/example.com_error_logCustomLog /var/log/httpd/example.com_access_log combined</VirtualHost>
13. Securing Apache with SSL Certificates
Last, but not the least SSL certificates, you can secure your all the communication in an encrypted manner over the Internet with SSL certificate. Suppose you have a website in which people login by proving their Login credentials or you have an E- Commerce website where people provides their bank details or Debit/Credit card details to purchase products, by default your web server send these details in plain – text format but when you use SSL certificates to your websites, Apache sends all this information in encrypted text.
You can purchase SSl certificates from So many different SSL providers like namecheap.com. If you are running a very small web business and do not willing to purchase an SSL certificate you can still assign a Self signed certificate to your website. Apache uses the mod_ssl module to support SSL certificate.
# openssl genrsa -des3 -out example.com.key 1024
# openssl req -new -key example.com.key -out exmaple.csr
# openssl x509 -req -days 365 -in example.com.com.csr -signkey example.com.com.key -out example.com.com.crt
<VirtualHost 172.16.25.125:443> SSLEngine on SSLCertificateFile /etc/pki/tls/certs/example.com.crt SSLCertificateKeyFile /etc/pki/tls/certs/example.com.key SSLCertificateChainFile /etc/pki/tls/certs/sf_bundle.crt ServerAdmin [email protected] ServerName example.com DocumentRoot /var/www/html/example/ ErrorLog /var/log/httpd/example.com-error_log CustomLog /var/log/httpd/example.com-access_log common
</VirtualHost>
Open up your browser, type https://example.com, and you will be able to see the new self-signed certificate.
This guide is the first of a four-part series. Parts One and Two will walk you through installing NGINX Open Source from the NGINX repositories and making some configuration changes to increase performance and security. Parts Three and Four set up NGINX to serve your site over HTTPS and harden the TLS connection.
Before You Begin
- You will need root access to the system, or a user account with
sudoprivilege. - Set your system’s hostname.
- Update your system.
Install NGINX
Stable Versus Mainline
The first decision to make about your installation is whether you want the Stable or Mainline version of NGINX Open Source. Stable is recommended, and will be what this series of guides uses. More on NGINX versions here.
Binary Versus Compiling from Source
There are three primary ways to install NGINX Open Source:
A pre-built binary from your Linux distribution’s repositories. This is the easiest installation method because you use your package manager to install the
nginxpackage. However, for distributions which provide binaries (as opposed to build scripts), you’ll be running an older version of NGINX than the current stable or mainline release. Patches can also be slower to land in distro repositories from upstream.A pre-built binary from NGINX Inc.’s repository. This is the installation method used in this series. It’s still an easy installation process which only requires that you add the repository to your system and then install as normal. This method has the benefit of the most vanilla, upstream configuration by default, with quicker updates and newer releases than a Linux distribution’s repository. Compile-time options often differ from those of the NGINX binary in distribution repositories, and you can use
nginx -Vto see which your binary was built with.
Installation Instructions
Configuration Notes
As use of the NGINX web server has grown, NGINX, Inc. has worked to distance NGINX from configurations and terminology that were used in the past when trying to ease adoption for people already accustomed to Apache.
Sure, it can. The NGINX packages in Debian and Ubuntu repositories have changed their configurations to this for quite a while now, so serving sites whose configuration files are stored in /sites-available/ and symlinked to /sites-enabled/ is certainly a working setup. However it is unnecessary, and the Debian Linux family is the only one which does it. Do not force Apache configurations onto NGINX.
NGINX Configuration Best Practices
There is a large variety of customizations you can do to NGINX to fit it better to your needs. Many of those will be exclusive to your use case though; what works great for one person may not work at all for another.
This series will provide configurations that are general enough to be useful in just about any production scenario, but which you can build on for your own specialized setup. Everything in the section below is considered a best practice and none are reliant on each other. They’re not essential to the function of your site or server, but they can have unintended and undesirable consequences if disregarded.
Two quick points:
Before going further, first preserve the default
nginx.conffile so you have something to restore to if your customizations get so convoluted that NGINX breaks.cp /etc/nginx/nginx.conf /etc/nginx/nginx.conf.backup-originalAfter implementing a change below, reload your configuration with:
nginx -s reload
Use Multiple Worker Processes
worker_processes auto;Disable Server Tokens
NGINX’s version number is visible by default with any connection made to the server, whether by a successful 201 connection by cURL, or a 404 returned to a browser. Disabling server tokens makes it more difficult to determine NGINX’s version, and therefore more difficult for an attacker to execute version-specific attacks.
Server tokens enabled:
Server tokens disabled:
server_tokens off;Set Your Site’s Root Directory
This series will use /var/www/example.com/ in its examples. Replace example.com where you see it with the IP address or domain name of your Linode.
root /var/www/example.com;Then create that directory:
mkdir -p /var/www/example.com
Serve Content Over IPv4 and IPv6
Default NGINX configurations listen on port 80 and on all IPv4 addresses. Unless you intend your site to be inaccessible over IPv6 (or are unable to provide it for some reason), you should tell NGINX to also listen for incoming IPv6 traffic.
listen [::]:80;If your site uses SSL/TLS, you would add:
listen [::]:443 ssl;You can also specify your Linode’s public IP addresses for NGINX to listen on. For example, the line would then be listen 203.0.113.4:80;.
Static Content Compression
You do not want to universally enable gzip compression because, depending on your site’s content and whether you set session cookies, you risk vulnerability to the CRIME and BREACH exploits.
Compression has been disabled by default in NGINX for years now, so it’s not vulnerable to CRIME out of the box. Modern browsers have also taken steps against these exploits, but web servers can still be configured irresponsibly.
On the other hand, if you leave gzip compression totally disabled, you rule out those vulnerabilities and use fewer CPU cycles, but at the expense of decreasing your site’s performance. There are various server-side mitigations possible and the release of TLS 1.3 will further contribute to that. For now, and unless you know what you’re doing, the best solution is to compress only static site content such as images, HTML, and CSS.
gzip on;
gzip_types text/html text/plain text/css image/*;- File: /etc/nginx/conf.d/example1.com.conf
- File: /etc/nginx/conf.d/example2.com.conf
Configuration Recap
To summarize where we are so far:
The stable version of NGINX Open Source was installed from the nginx.org repository.
One basic website is accessible:
The root directory is located at
/var/www/example.com/The configuration file is located at
/etc/nginx/conf.d/example.com.conf- File: /etc/nginx/conf.d/example.com.conf
- File: /etc/nginx/nginx.conf
(Slightly More) Advanced Configurations
By now you should have a basic NGINX installation and a some foundational settings to get you started. For slightly more advanced configurations, yet still applicable to anyone hosting a site on a Linode, see Part 2 of this series: (Slightly more) Advanced Configurations for NGINX
")


")