

- Reset Lost Linux Root Password from the Grub Menu
- Reset Lost Root Password Using Live CD
- Frequently Asked Questions
- 1. How does full disk encryption affect my ability to change my root password?
- 2. What is the difference between root and superuser password?
- 3. Can I create an expiration date for passwords?
- Step 1: Reboot your Ubuntu 20.04 LTS Operating System and load the GRUB menu by holding the Shift Key on Keyboard
- Step 2: Press ‘e’ to edit the commands
- Step 3: Edit the clause of the second last line from ‘ro quiet splash $vt_handoff’ to ‘rw init=/bin/bash’
- Step 4: Press F10 or Ctrl-x to save the edits and boot
- Step 5: Type the command ‘mount | grep -w /’ to confirm the read and write access rights
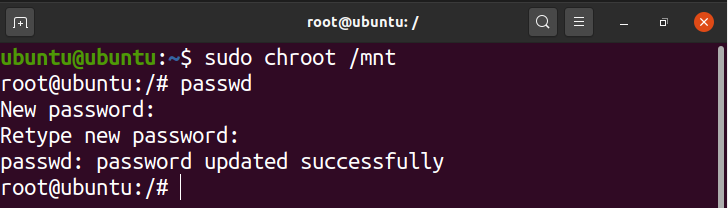
- Step 6: Type the ‘passwd’ command and provide the new password for the root
- Step 7: Type the command ‘exec /sbin/init’ to reboot your Ubuntu 20.04 LTS Operating System
- Conclusion
- About the author
- Conclusion
- Final thoughts
- About the author
- Boot system into recovery mode
- Change boot parameters
- Change the password of your root account
- Troubleshooting
- Changing Your Root Password in Ubuntu
- Step 1: Open a Terminal Window
- Step 2: Change Your Root Password
- Resetting a Root Password in Ubuntu
- Step 1: Boot to Recovery Mode
- Step 2: Drop Out to Root Shell
- Step 3: Remount the File System with Write-Permissions
- Step 4: Change the Password
- Changing the Root Password in CentOS
- Step 1: Access the Command Line (Terminal)
- Step 2: Change the Password
- Step 1: Access Boot Menu
- Step 2: Edit Boot Options
- Step 3: Remount the Drive
- Step 4: Changing the Password
- Step 5: Restart
- Option 1: Changing Ubuntu Password in the Command Line
- Option 2: Change sudo Password with the passwd Command
- Option 3: Changing Ubuntu Password Using GUI
- Reset Ubuntu password from recovery mode
- Step 1: Boot into recovery mode
- Step 2: Drop to root shell prompt
- Step 3: Remount the root with write access
- Step 4: Reset username or password
- Possible Troubleshoot:
- Alternate method to reset Ubuntu password
- Step 1
- Step 2
- Step 3
- Step 4
- If resetting Ubuntu passwords is this easy, isn’t this a security risk?
- Bonus Tip: Handling the possible keyring issue after changing the password
- Did it help you?
- Change user password in Ubuntu [Command Line]
- Change (or set) the root password in Ubuntu
- Change Ubuntu password using GUI
- More on user passwords in Linux
- Reset forgotten password for Ubuntu or any other Linux distribution on WSL
- Step 1: Switch to root as default user
- Step 2: Reset the password for the account
- Step 3: Set regular user as default again
- If resetting WSL password is this easy, is this not a security risk?
- Were you able to reset WSL password?
- Lost Password?
- The Standard Way
- The Other Way
- The Other Way Lucid
- Why are you looking at this wiki page?
- How can I reset my MySQL password?
- Another way, purge
- The Easiest Method
Reset Lost Linux Root Password from the Grub Menu
1. First and foremost, to recover a lost root password, we need to restart the Linux host, assuming you forgot the password for root.
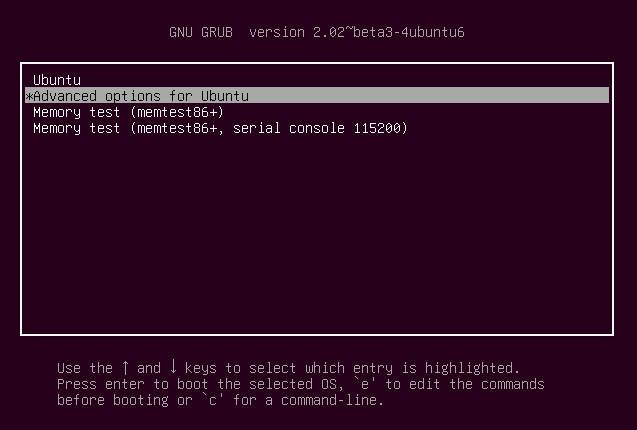
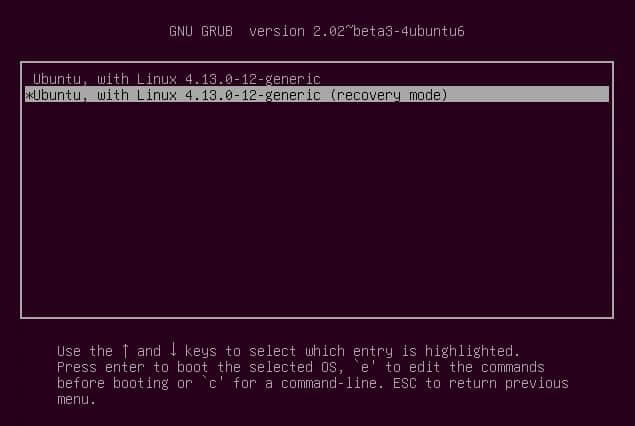
2. Once the GRUB page appears, quickly select the “*Advanced options for GNU/Linux” option by pressing the down arrow key and Enter button.

3. Now press e to edit the commands.
You need to modify it or change it from “read-only” mode to “read-write” mode. Find the line beginning with “Linux.” Look for ro and change it to rw. Add init=/bin/bash at the end of the line.

4. Press F10. This will display a screen with a prompt.

5. Mount your root file system in read-write mode:

Once you are done, type:
This will exit the prompt and reboot the computer.
Reset Lost Root Password Using Live CD
If you have a Linux Live CD/USB, then you can boot into it and use it to reset the root password.
1. Download the latest version of Ubuntu, and create a bootable Live CD/USB from it. Boot your system from the removable drive as opposed to your hard drive.
2. On the display screen select “Try Ubuntu.” This will bring you to the Live CD desktop.

In most cases it will be “/dev/sda1,” although it can differ depending on how your hard disk is partitioned.
mntrecover devsda1 mntrecover

6. At this point we need to jail ourselves in the “mnt/recovery” directory. This means that we are pretending to be on the regular Linux filesystem. This is simply known as chrooting.
8. Once completed, exit from the chroot shell:
9. Unmount the root partition:
and exit your root:
10. Lastly, remove the Live CD and reboot into your Linux system.
Frequently Asked Questions
1. How does full disk encryption affect my ability to change my root password?
Although encryption can complicate things when you’re trying to repair a problem on Linux, this is not the case when you’re trying to change the root password. You can still do it easily from grub as described above as long as you are able to gain access to the disk.
The only difference now is that outsiders won’t be able to just slide in and do the same themselves.
2. What is the difference between root and superuser password?
3. Can I create an expiration date for passwords?
Additionally, you could use the -w flag to set the number of days required for an advanced warning about the need to change the password . Typing passwd -w 7 root will send you warnings about changing the root password a week prior to the deadline you previously set with the -x flag.
Want to keep digging into Linux? We have a guide for setting up Bluetooth on Linux. You can also check out our list of tools to create your very own Linux distro!

Subscribe to our newsletter!
Our latest tutorials delivered straight to your inbox
You have forgotten your root password, and now you have no idea how to retrieve your Ubuntu 20.04 LTS Operating System? In this post, we will guide you on how to reset your root password on Ubuntu 20.04 LTS System from the GRUB menu. The Grand Unified Bootloader or GNU GRUB menu is a boot loader and software or program that loads and transfers control to the Operating System like Linux- it runs when a computer starts. So, let’s begin with the step-by-step guide of resetting the password of the root.
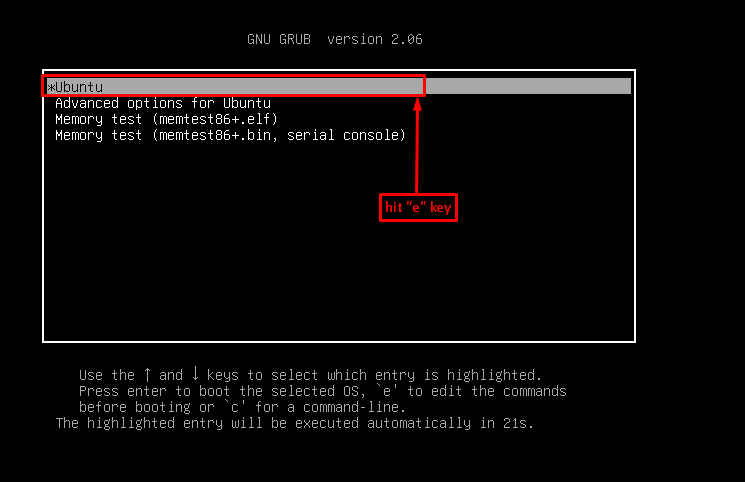
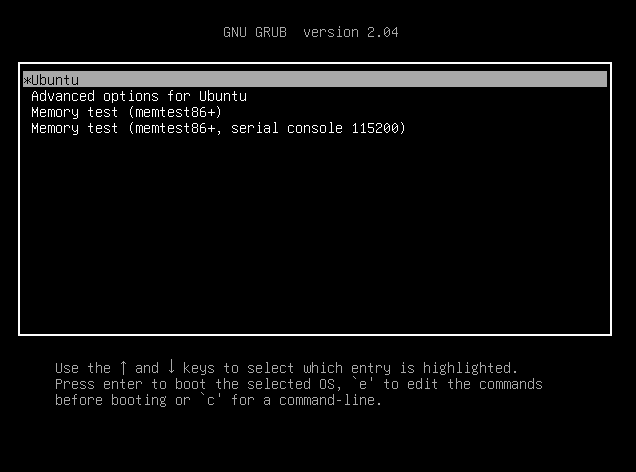
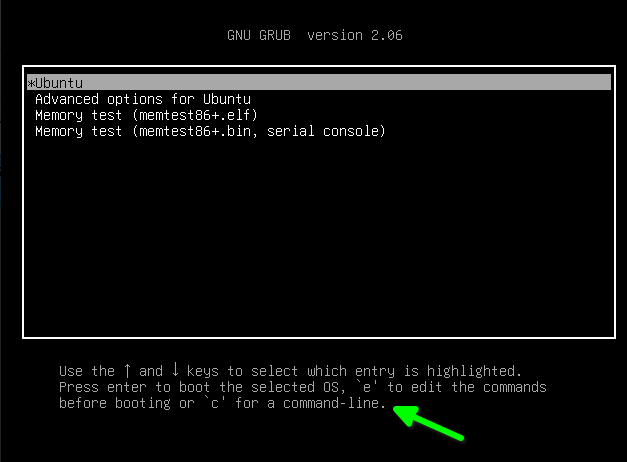
Step 1: Reboot your Ubuntu 20.04 LTS Operating System and load the GRUB menu by holding the Shift Key on Keyboard
The first step is to start your computer machine and keep pressing the shift button on your keyboard until the GRUB menu appears, as shown in the picture below:

Step 2: Press ‘e’ to edit the commands
Now, select the boot Operating system, which is Ubuntu in our case, and press the ‘e’ key on your keyboard to edit some commands. By doing so, we can load the root shell Command prompt. Pressing the ‘e’ key on your keyboard allows you to have an edit screen, as shown in the picture below:
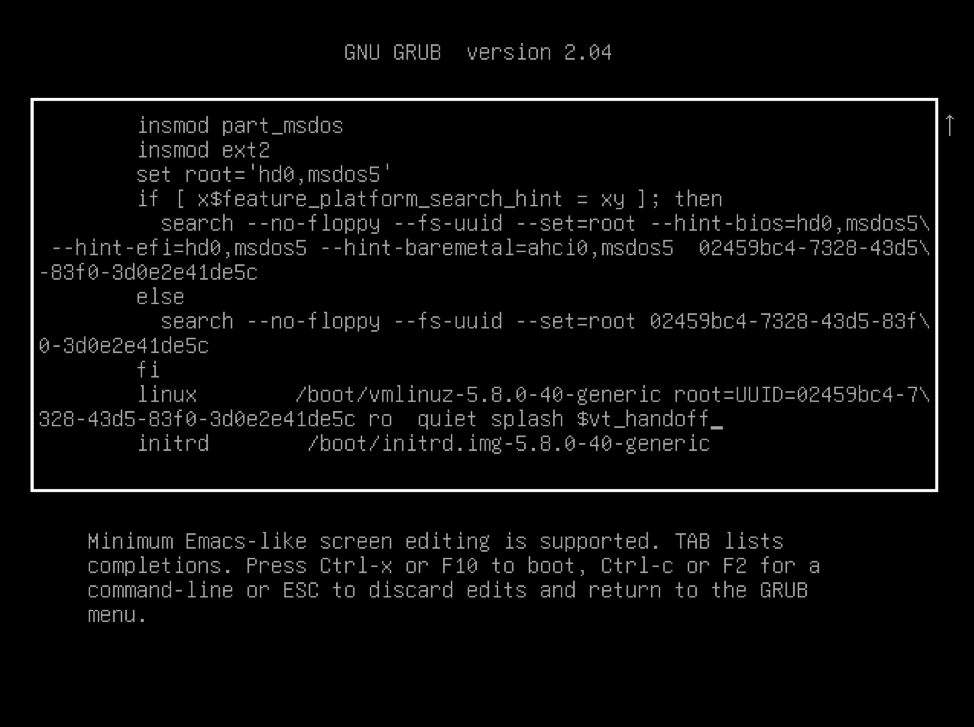
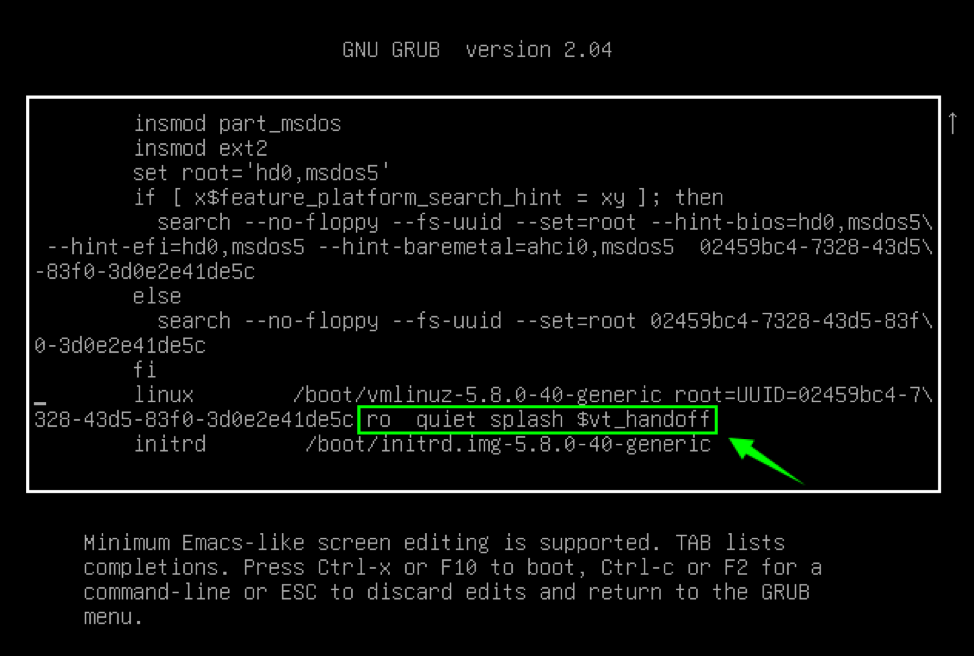
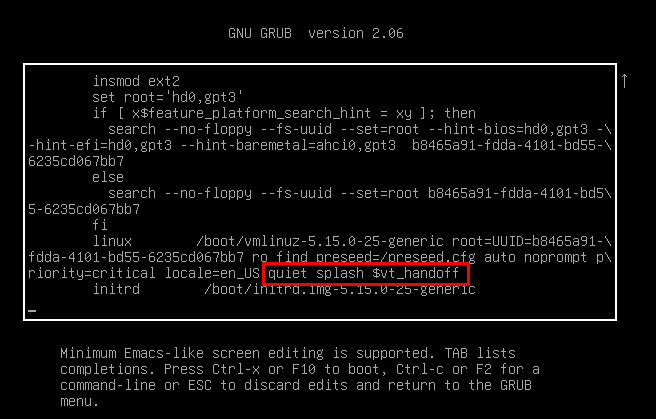
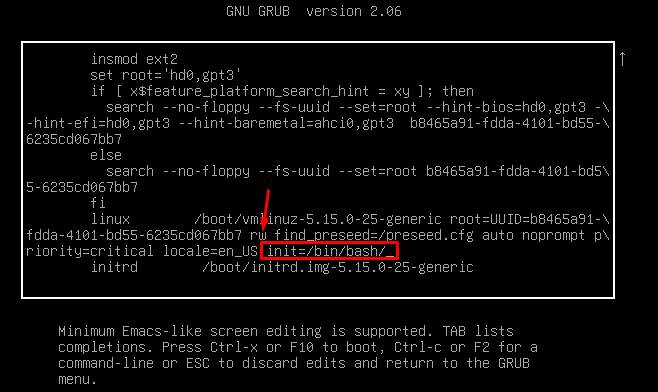
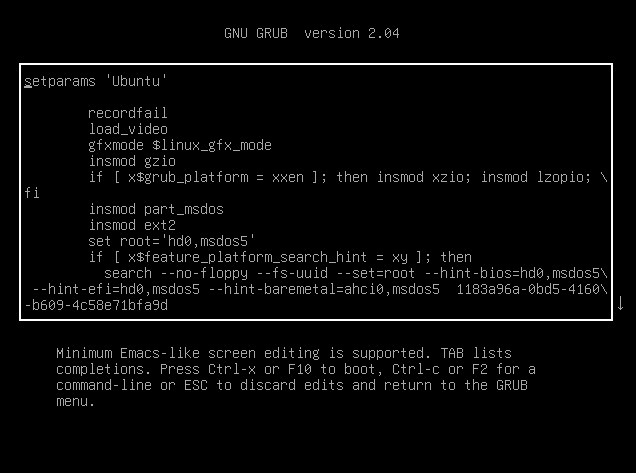
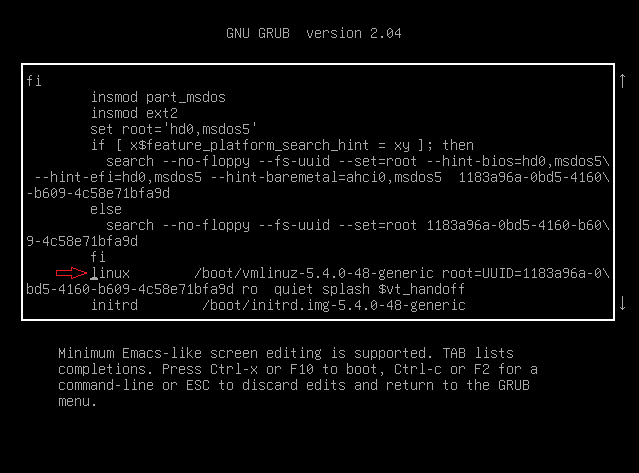
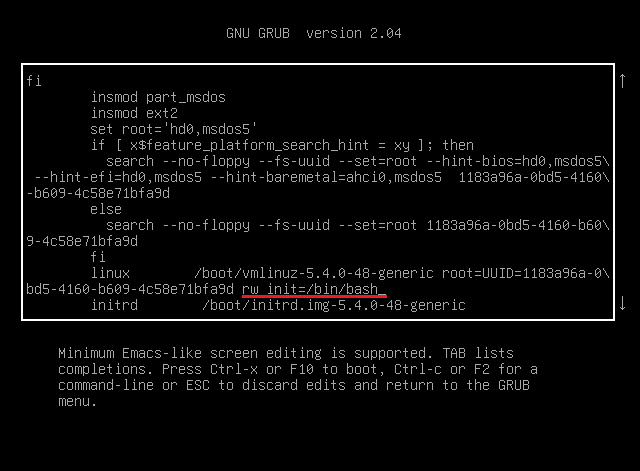
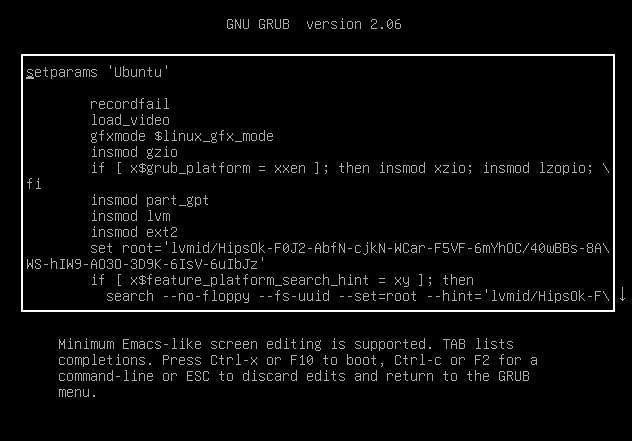
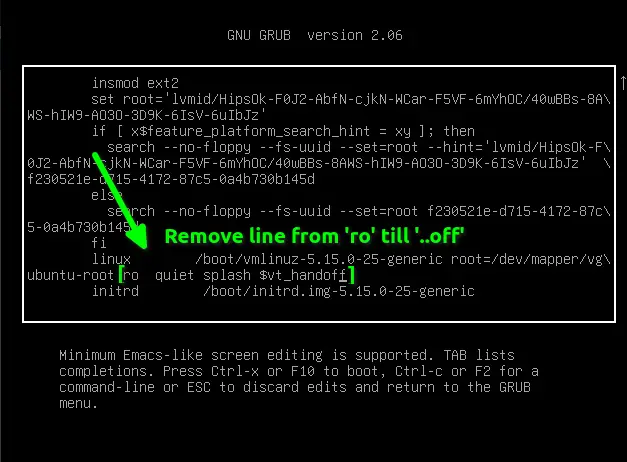
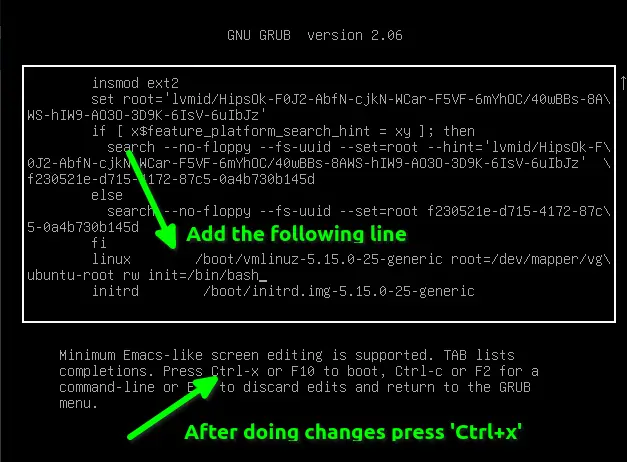
Step 3: Edit the clause of the second last line from ‘ro quiet splash $vt_handoff’ to ‘rw init=/bin/bash’
After entering into the editing mode of commands, scroll down until the last, find a line that starts with the word ‘linux’ and change the last clause of this line that reads ‘ro quiet splash $vt_handoff’ to this clause, ‘rw init=/bin/bash’, as shown in the pictures below:
ro quiet splash $vt_handoff
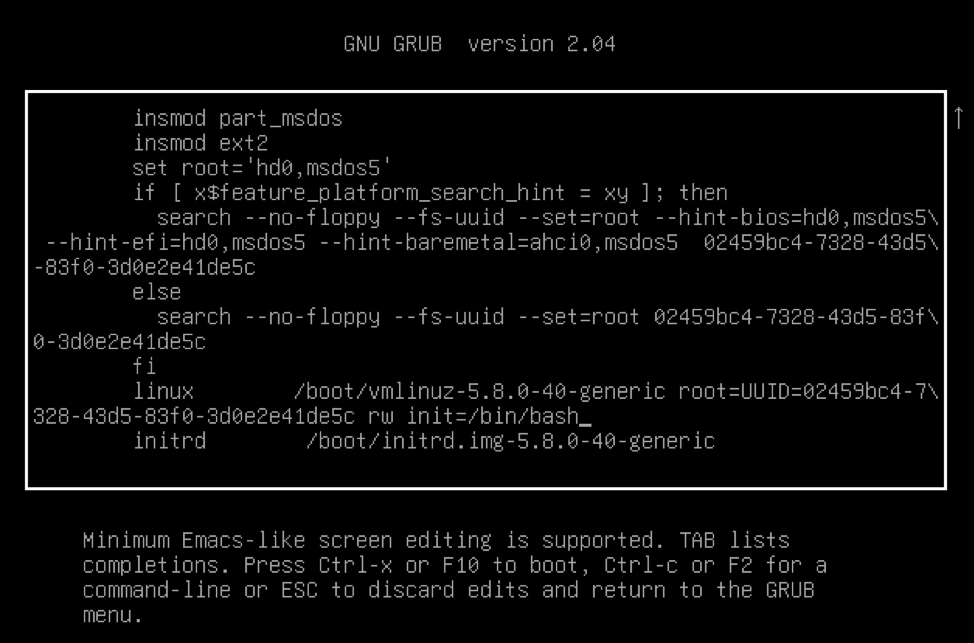
Step 4: Press F10 or Ctrl-x to save the edits and boot
Once you have edited the line for loading the root shell command prompt, Press F10 or CTRL+X to save and boot the system. After the reboot, a shell command prompt screen of the root will appear, as shown in the picture below:
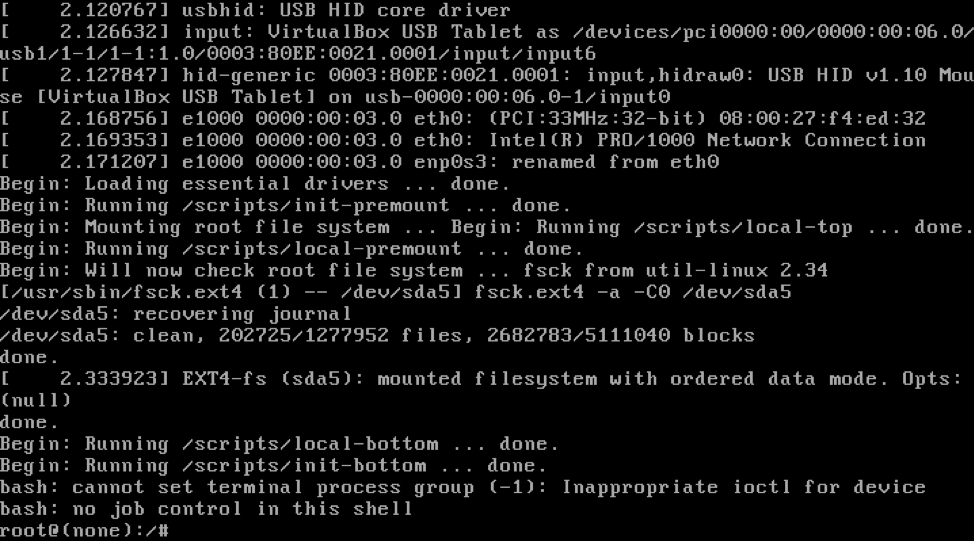
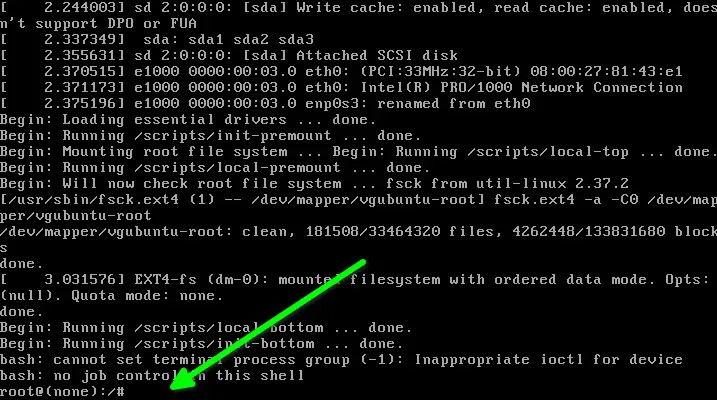
Step 5: Type the command ‘mount | grep -w /’ to confirm the read and write access rights
In the root shell command prompt screen, type the command given below for confirmation of the read and write privileges.

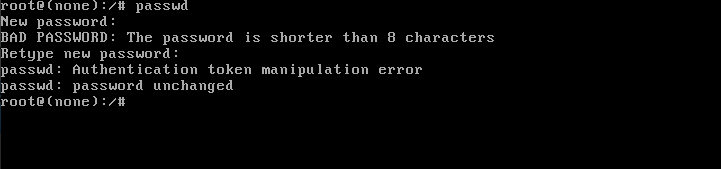
Step 6: Type the ‘passwd’ command and provide the new password for the root
Once read and write access rights are confirmed, type the ‘passwd’ command and enter or set the new password for the root.
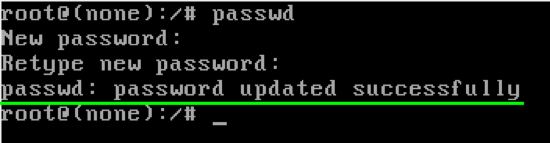
You can see that the password is updated successfully.
Step 7: Type the command ‘exec /sbin/init’ to reboot your Ubuntu 20.04 LTS Operating System
After successfully updating the password of the root, the last step is to just reboot your system by typing the command given below:
After running the above command, your computer will reboot and load the welcome screen of the Ubuntu 20.04 LTS system.
Conclusion
The article contains a step-by-step and easy-to-understand guide on how to reset your forgotten root password on the Ubuntu 20.04 LTS system.
About the author
A Javascript Developer & Linux enthusiast with 4 years of industrial experience and proven know-how to combine creative and usability viewpoints resulting in world-class web applications. I have experience working with Vue, React & Node.js & currently working on article writing and video creation.
This article intends to provide a solution to reset the root password on Ubuntu 22.04. What if the password is forgotten?
The GRUB boot loader acts as an escape plan to switch to a new root password. GRUB (GRand Unified Boot Loader) boot loader starts up from the BIOS and leads up to load the installed operating system. The GRUB boot loader will be used to reset the root password.
Choose the first option “Ubuntu” and enter inside it using the “e” key to edit a few settings.
Replace the line “quiet splash $vt_handoff” to “init=/bin/bash“. Moreover, change the permission from “ro” to “rw” as well.
After that, press CTRL+X or F10 to boot with the above written settings.

Upon successful execution of the command, you need to enter a new password. For confirmation, it will ask to enter the password again. After doing so, the password will be updated.
Conclusion
Check out how to reset the forgotten root password in Ubuntu.
Although it is difficult, it is still possible to reset the forgotten root password in Ubuntu. There are a couple of methods to do so. In short, the process is to get access to the root shell and change the password from there.
Method 1: Root shell from boot
When you are booting into Ubuntu, press, and hold Shift. This should open up the GRUB menu. In case there is multi-boot configured, there is probably no need to press the Shift key.
Select “Ubuntu” and press “e”. This will open up the grub parameters to edit.
Now, use the arrow keys and scroll down to the line that starts with “linux /boot/vmlinuz”.
From that line, replace “ro quiet splash $vt_handoff” with “rw init=/bin/bash”.
Press “Ctrl + X” or F10. This will reboot the system with the tweaks we just made. It will start the system and directly land you on the root shell. It is just a one-time thing, so next time the system boots, it will boot normally into the operating system.

Now, run the passwd command to change the root password.

Once the password is changed, you will see the success message.
The task is finished. Run the next command to reboot the system.
Method 2: Change password from Ubuntu live session
For this method to work, we need to have bootable media made from Ubuntu ISO. Download Ubuntu ISO. In my case, I’m running Ubuntu 20.04.1 LTS.

Make a bootable USB flash drive. Check out how to make a bootable USB drive.
Boot into the Ubuntu bootable media. When prompted, select “Try Ubuntu”. This will start the Ubuntu live session.

Once you are in the live session, fire up a terminal.

From the table, we have determined that the boot partition is /dev/sda5. Now, mount it by running this command.
$ devsda5 mnt

Run the next command to cross-mount things from the live install.
$ d dev sys run proc; mnt;

Now, become the root of the system using chroot.

Finally, run the passwd command to change the root password.
Once the process is finished, reboot the system.
Final thoughts
Now, these methods also open up the question of security. In case there is someone else having physical access to the computer. These methods could be used against you. To prevent this, you should configure a password to access the BIOS and boot menu. All modern computers have this feature built-in. However, this is a password that you MUST NOT FORGET.
About the author
Student of CSE. I love Linux and playing with tech and gadgets. I use both Ubuntu and Linux Mint.
It’s quite common to forget the root account password if you haven’t used it for a long time.
Later, you discover that you don’t even know the root password to revert the changes, and you’re now stuck with your system where you don’t know the password for your root account.
In this scenario, the only option left is to reset the root account password, so let’s see how you can reset the password in Ubuntu 22.04.
Boot system into recovery mode
The first step is to boot your system into recovery mode so you can modify boot parameters, which will allow you to set a new password for your root account.
To get into recovery first, you need to power up your system and wait for it to show the grub menu.
If it is directly showing the Ubuntu logo, then you need to restart your system and continue pressing the ‘ESC’ or ‘Shift’ key until it doesn’t take you to the Grub menu.
The same step you can do if you are using Ubuntu on VirtualBox.
Once you are able to access GNU GRUB, press `e` to modify boot parameters.
Change boot parameters
After pressing `e` on the GNU GRUB menu, you will find the boot parameters like in the below image.
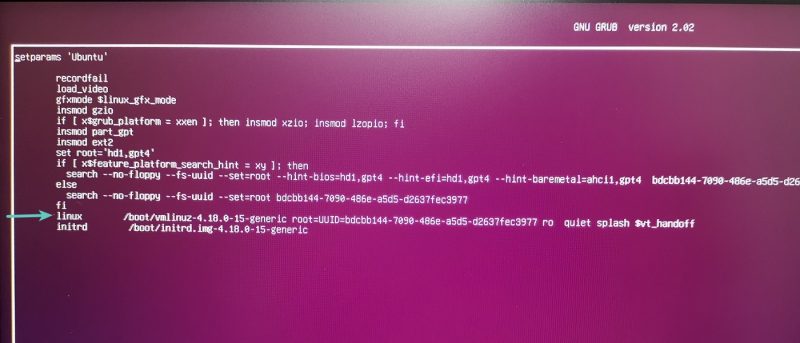
You need to scroll down and find the line where it says "ro quiet splash $vt_handoff", and you have to replace this line of text with "rw init=/bin/bash".
This added line will give you direct access to the root shell with read and write permission.
After making the above changes, your screen should change, as shown below. Let me clear the screen text by pressing `Ctrl+l`.
Change the password of your root account
Your root shell is ready to accept input. To reset the root password, type the passwd command, which will ask you to set a new password for your root account.
# passwd
That’s all it takes to reset your root account password. Quite easy, right?
Troubleshooting
If you get an error like “Authentication token manipulation error” which ends up with a “password unchanged” message, then you might have forgotten to boot your system with read and write permission.
To fix this problem, you can remount your root (/) partition with read and write permissions, which you can easily remount by executing the below code.
# mount -o remount,rw /After that, run the passwd command again to reset the password.
# passwdOnce you are done with the above step, you can restart your computer in normal mode by invoking the below code:
# /sbin/initCorrect, anyone can access your computer through “root shell” or else using “live boot”. To prevent this, you can set a password in the BIOS settings.
After setting up a password, you will find BIOS prompting you to enter a password whenever you try to access your system.
To make it impenetrable, encrypt your disk with some sort of encryption technique, which we’ll cover soon in a separate article.
With that, I’m ending up with this article.

A man with a tech effusive who has explored some of the amazing technology stuff and is exploring more. While moving towards, I had a chance to work on Android development, Linux, AWS, and DevOps with several open-source tools.
It’s a good idea to change your passwords regularly and consider using enterprise password management software.
This guide will help you change your Linux root password in Ubuntu or CentOS, or reset the password.
- A computer running Linux
- Command-line interface (terminal)
Changing Your Root Password in Ubuntu
Step 1: Open a Terminal Window
Right-click the desktop, then left-click Open in terminal.
Alternately, you can click Menu > Applications > Accessories > Terminal.
Step 2: Change Your Root Password
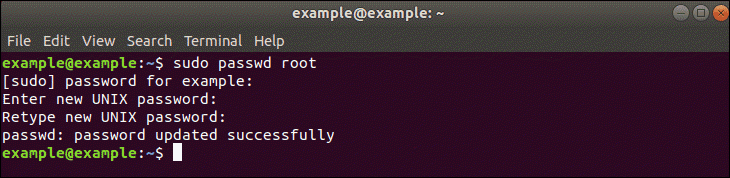
sudo passwd rootThe system will prompt you to enter your password – this is the same password you use to log in to the system.
Next, the system will prompt you to enter a new password. Do so, and then re-enter it exactly the same when the system prompts you to retype the password. This double-entry confirms that you have typed the password correctly.
Resetting a Root Password in Ubuntu
In some situations, you may need to access an account for which you’ve lost or forgotten a password.
Step 1: Boot to Recovery Mode
Restart your system. Once you see the splash screen for the computer manufacturer, hold down the shift key. The system should come up with a black and white GRUB, or boot menu, with different Linux kernel versions displayed.
Step 2: Drop Out to Root Shell
The system should display a menu with different boot options. Use the arrow keys to navigate to the option labeled root and press Enter.
The system should respond by giving you a command-line interface with a prompt.
Step 3: Remount the File System with Write-Permissions
Right now, your system only has read-only access to your system. That means it can look at the data, but cannot make any changes. But we need write-access to change the password, so we’ll need to remount the drive with the appropriate permissions.
At the prompt, type:
mount –o rw,remount /Press Enter. This should allow you to make changes to the data on the hard drive.
Step 4: Change the Password
At the prompt, type:
passwd usernameshutdown –rHit Enter, and your system should restart. Don’t press any keys, let the system come up to the login screen, and test to make sure the new password works.
Note: Learn how to use the chpasswd command. Chpasswd is helpful for managing multiple passwords and making multiple changes.
Changing the Root Password in CentOS
Changing a password in CentOS is almost identical to changing it in Ubuntu.
Step 1: Access the Command Line (Terminal)
Right-click the desktop, then left-click Open in Terminal. Or, click Menu > Applications > Utilities > Terminal.
Step 2: Change the Password
sudo passwd root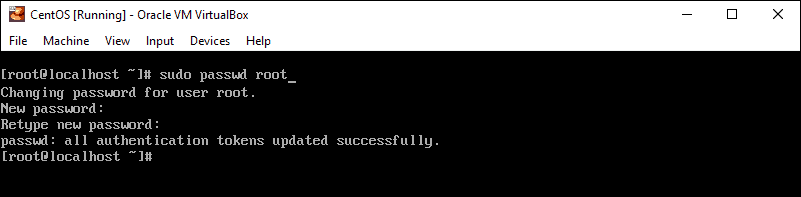
This is a similar process as in Ubuntu, with a couple of variations.
Step 1: Access Boot Menu
Restart the system, then tap the Esc key about once per second to launch the GRUB menu.
Step 2: Edit Boot Options
Use the arrows to highlight the version of Linux you boot into, then press e.
Use the arrows to highlight the line that starts with kernel or Linux.
Step 3: Remount the Drive
mount / -o remount,rwStep 4: Changing the Password
passwdPress Enter, and the system should prompt you to enter and confirm a new password.
Step 5: Restart
mount / -o remount,rosyncrebootYour system should restart. Confirm that your new password works by logging in.
Note: If you ever come across a Linux boot failure, be sure to save our guide on using GRUB rescue to troubleshoot it.
It can be more challenging if you’ve lost or forgotten a password, but with a little creative restarting and editing, you shouldn’t find it too hard.
Are you looking to change the root password in Ubuntu?
Changing passwords is a good practice and should be done periodically.
There are three (3) ways to change passwords in Ubuntu.
The first two (2) options use the command line, and the other uses Linux’s graphical interface (GUI).
- Ubuntu installed and running
- A user with sudo privileges
- Access to a terminal/command line
- The apt-get tool, pre-loaded in Ubuntu and other Debian-based distros
Option 1: Changing Ubuntu Password in the Command Line
To change the sudo password using the sudo command:
1. First, open the terminal using the keyboard shortcut CTRL+ALT+T.
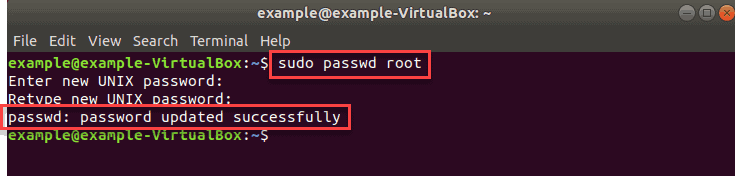
2. Query for a password change by running the command:
sudo passwd rootYou will be prompted to enter and verify a new password. The output will inform you the password was updated successfully.

Option 2: Change sudo Password with the passwd Command
1. First, open the terminal (CTRL+ALT+T).
sudo –iType in your current password and hit Enter. The output you receive should show that you can now run commands as root.

3. Next, change the password by running the command:
passwdType and retype a new password to verify the change.
exit5. Exit out of the terminal with the same command:
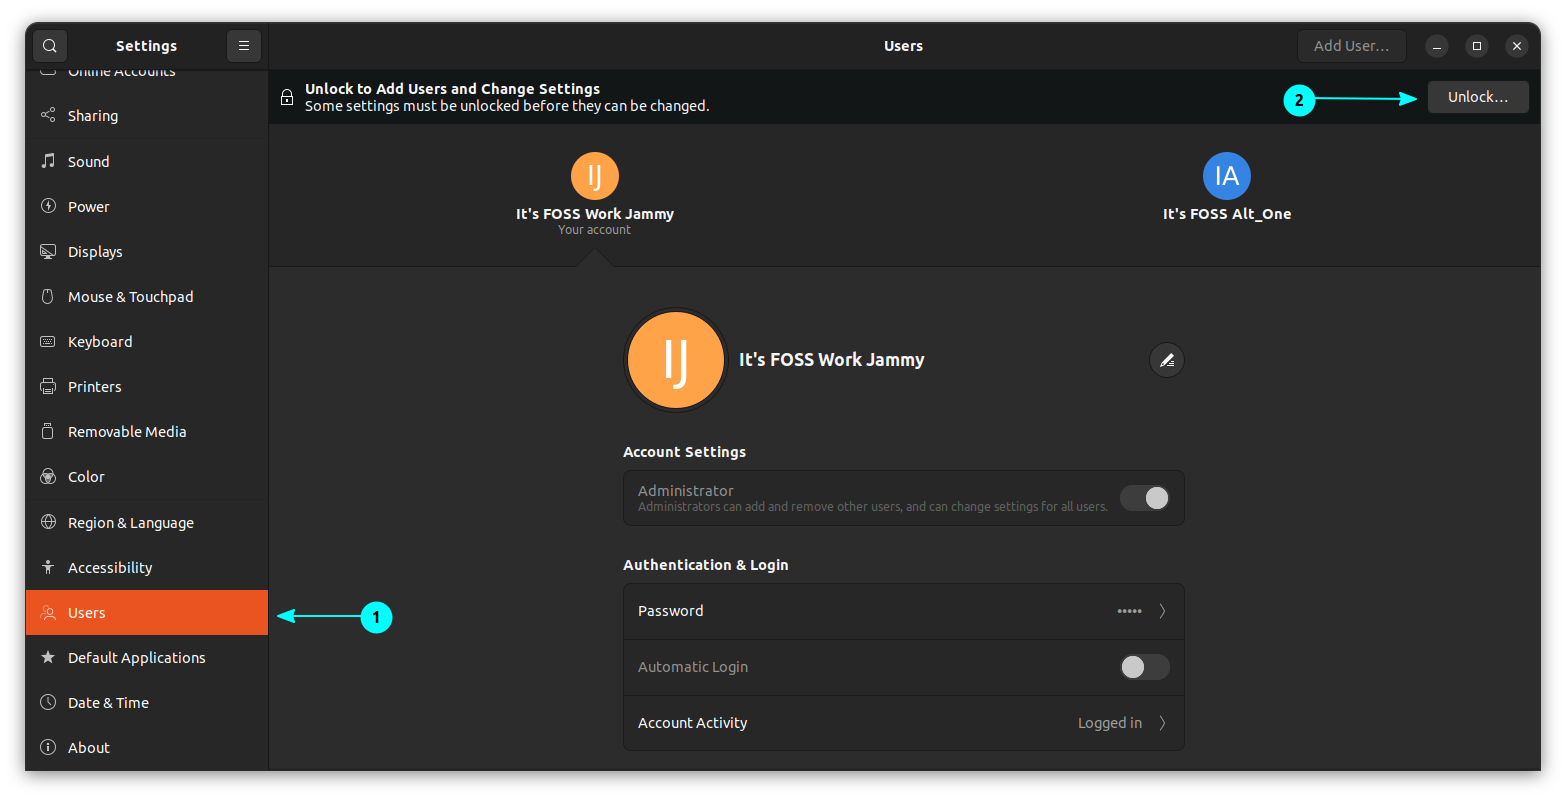
exitOption 3: Changing Ubuntu Password Using GUI
To change the default root password in Ubuntu without using the terminal or any commands, use the graphical interface.
1. Open the Activities overview by pressing the Windows or Super key.
2. Type settings in the search bar and click on the Settings icon.
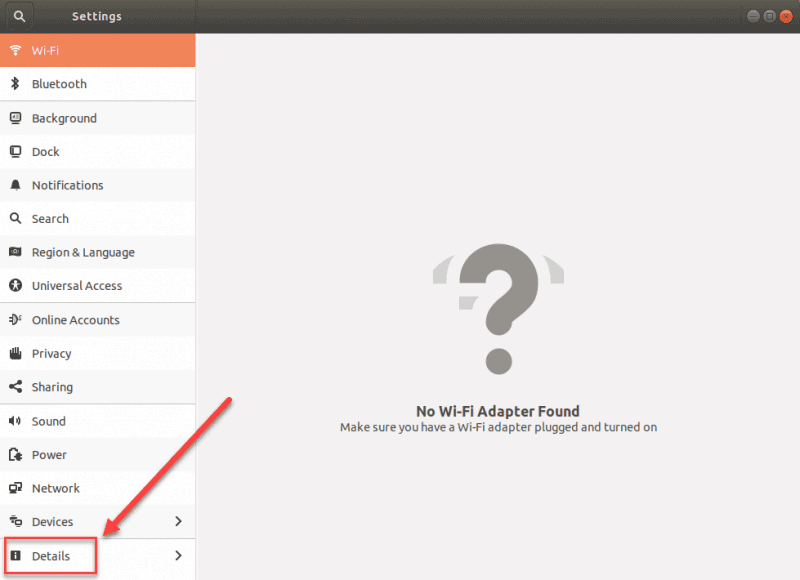
3. In Settings, click on the Details card (which is most likely the last one).
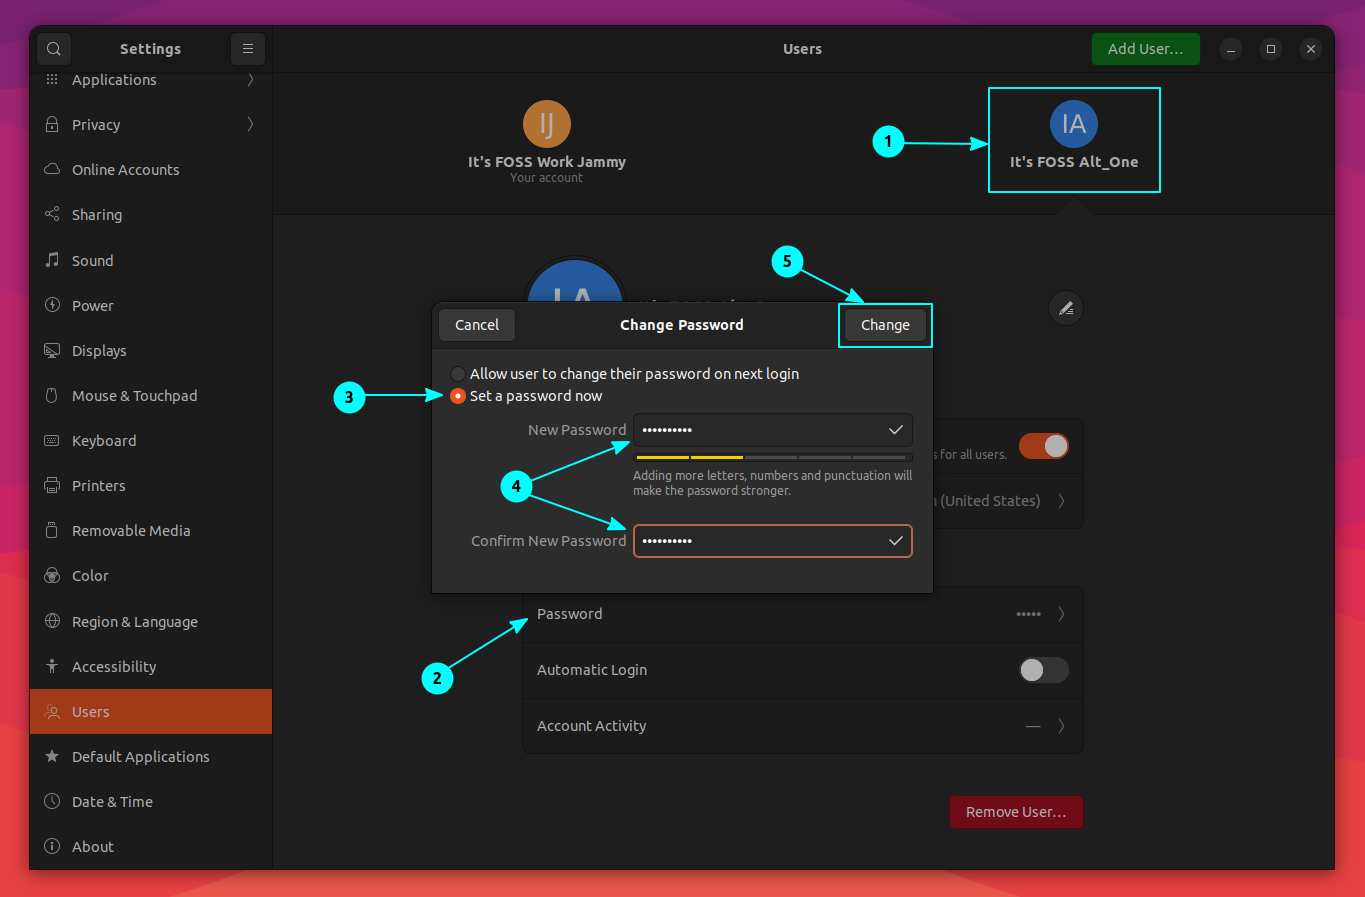
5. This will open a new Change Password pop-up. Type in your current root password, your new root password and verify the new password by retyping it.
6. Once you have filled in all the fields, click Change to confirm the changes.
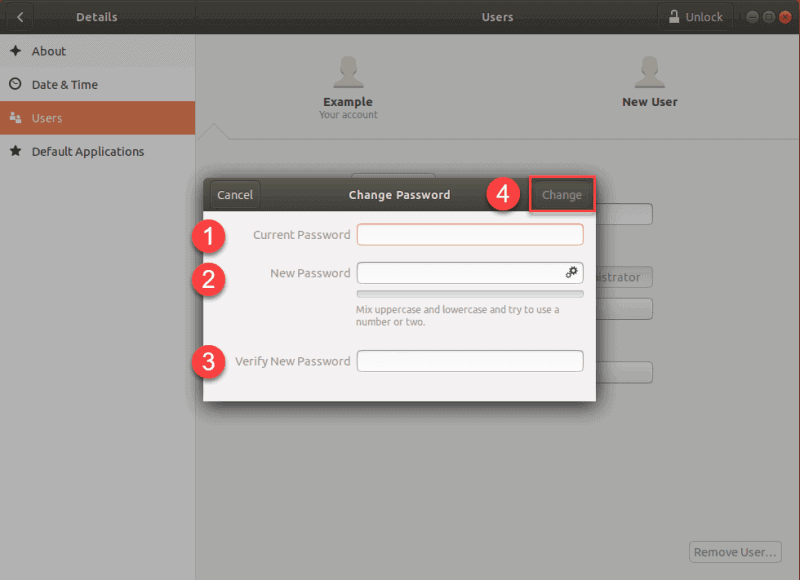
Finally, make sure that your password includes both lower and upper case letters, numbers and special characters. It is essential to have a strong password to prevent brute force attacks.
Forgot your Ubuntu login password? It happens.
If you haven’t used Ubuntu for some time, it’s only natural to not remember the password. The good news is that you don’t need to reinstall the entire operating system because of it. You can recover Ubuntu passwords easily.
The method mentioned here works for resetting an Ubuntu password in VMware, dual boot or single install. All you need is a little bit of patience and to run a couple of commands. You’ll reset the root password within minutes.
Forgot Linux Password on WSL? Here’s How to Reset it Easily
Forgot the password of your Linux distribution app you installed in Windows via WSL? No worries. You can easily reset the Linux password in WSL.

Reset Ubuntu password from recovery mode
Step 1: Boot into recovery mode
Switch the computer on. Go to the grub menu. Generally, it appears automatically – if not, then hold down the shift key or press Esc key until the boot menu appears.
If you’re using Oracle VirtualBox or VMware, you have to hold down the shift key when the logo of Oracle or VMware appears.
In the grub menu, select the “Advanced Options for Ubuntu”:
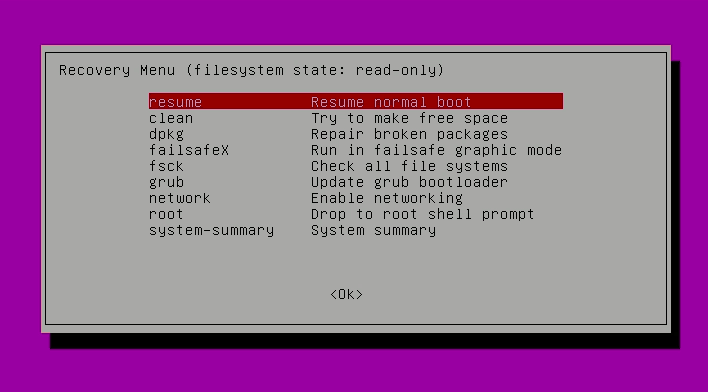
In here, you’ll see the option to go to recovery mode:
It will bring you to a black screen with several lines of output being displayed in a flash. Wait for a few seconds here.
Step 2: Drop to root shell prompt
Now you’ll be presented with different options for recovery mode. Here you need to choose “Root – Drop to root shell prompt“. Just press the enter key to select this option. Like in the picture below:
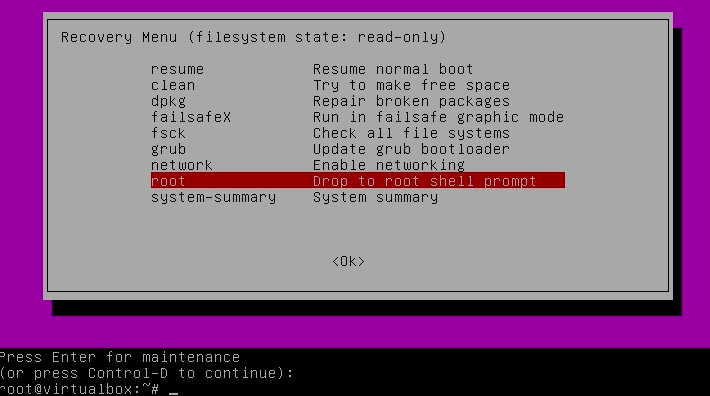
You’ll see that when you select the root shell prompt option, an option to enter commands appears at the bottom. This is your root shell prompt and this is where you’ll use the commands to reset the password.
Step 3: Remount the root with write access
You need to have write access to the root partition. By default, it has read-only access.
Use the command below to remount it with write access:
mount -rw -o remount /
Step 4: Reset username or password
ls /homepasswd usernameIt prompts for a new password. Enter the new password twice.
Do note that nothing is displayed on the screen when you start typing the password. This is perfectly normal and actually a security feature in Linux systems. Just blindly type the password and press enter.
Enter new UNIX password:
Retype new UNIX password:
Voilà! There you go. You have just successfully reset the password. Now exit the root shell prompt:
exitWhen you exit, you’ll be back at the recovery mode menu. Select the normal boot option here.
There will be a warning about graphics mode compatibility. Don’t worry. A complete reboot will fix any issues with this.
You should now be able to log in with the new password.
Possible Troubleshoot:
While entering the new password you might be prompted with Authentication token manipulation error like this:
mount -rw -o remount /Now try to reset the password again. It should work now.
As you can see, it is extremely easy to change Ubuntu password even if you’ve forgotten it. It will barely take a few minutes.
Alternate method to reset Ubuntu password
If for some reason you have difficulty dropping to the root shell and changing the password, you can try these steps.
Step 1
Reboot your computer. Hold shift to bring up the grub screen (if it doesn’t appear automatically). Press E at the grub prompt to edit the grub screen.
Step 2
Find the line starting with linux, change the ro to rw and append init=/bin/bash at the end of that line.
Step 3
Press ctrl-x to save your changes and boot.
In other words, your system will boot up to a passwordless root shell.
Step 4
Set your new password.
Once you’ve set the new password, exit the terminal. Just type reboot in the terminal or use the shutdown command.
shutdown -r nowYour password should be changed now.
If resetting Ubuntu passwords is this easy, isn’t this a security risk?
That’s a fair question. One of the main advantages of Linux over Windows is its security. But if “anyone” can reset the password, how come Ubuntu or other Linux distributions can be considered secure?
Let me explain a few things here. The main security risk is if someone hacks into your account from a remote location via the internet. That’s not happening here.
If anyone has physical access to your computer, the data in your computer is already at risk. Unless the entire disk is encrypted, anyone can “steal” your data using a live USB without even entering your installed operating system.
This lack of root password is a deliberate feature The “advanced options for Ubuntu” in the boot menu allow you to perform some specific root-related tasks from the “root shell prompt”. This is why you’re able to reset the Ubuntu password through this method.
Bonus Tip: Handling the possible keyring issue after changing the password
There is a keyring feature in Ubuntu that is used for keeping passwords locked and safe.
When you reset the forgotten password, the keyring remains unlocked and you may see an error message like this.
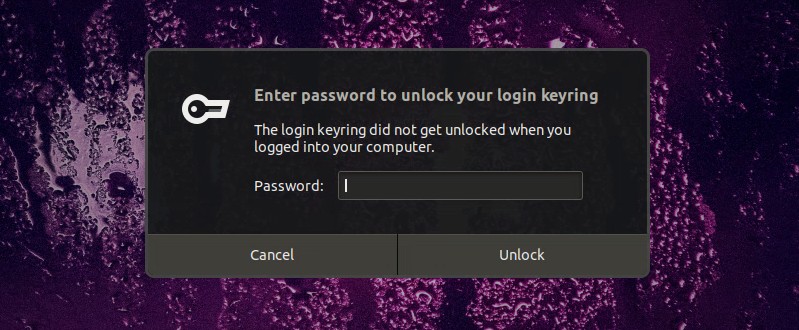
Open the Passwords and Keys application and here, delete the Login passwords.
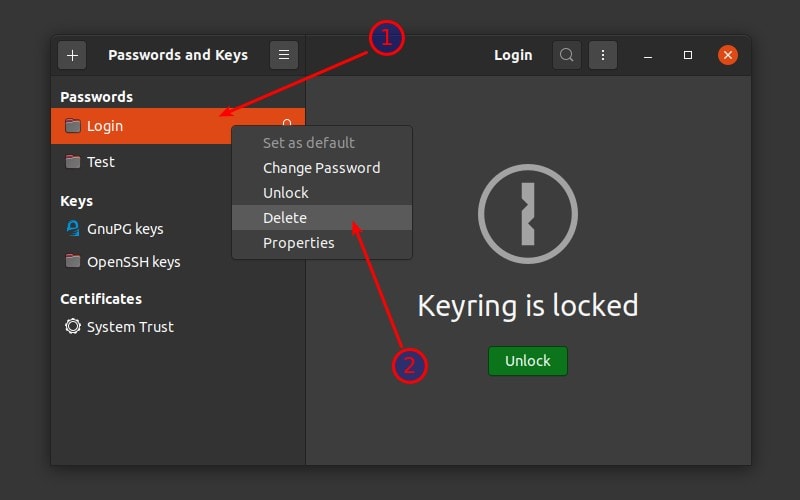
When you try to use Google Chrome again in Ubuntu, it will ask you to create a new keyring. Use the new login password as the keyring password.
Did it help you?

I hope I made things clear about resetting forgotten passwords in Ubuntu.
Why do you need to change the password in Ubuntu? Let me give you a couple of scenarios.
- Change user password via the command line
- Change root user password
- Change user password via GUI
Change user password in Ubuntu [Command Line]
If you want to change your current password, simply run this command in a terminal:
passwdYou’ll be asked to enter your current password and the new password twice.
You won’t see anything on the screen while typing the password. This is perfectly normal behavior for UNIX and Linux.

passwdSometimes, the passwd command will throw errors like:
Small Password: If the new password is shorter than 8 characters
Fails Dictionary Check: Does not contain enough different characters. So, use some other characters than just numbers and try again.
sudo passwd <user_name>
If you changed your password and forgot it later, don’t worry. You can easily reset Ubuntu password.
How to Reset Forgotten Ubuntu Password in 2 Minutes

Change (or set) the root password in Ubuntu
You can set or change root password using the passwd command. However, in most cases, you don’t need it and you shouldn’t be doing it.
Now, about changing the root password.
Else, you can change it using the existing root password.
sudo passwd root

Change Ubuntu password using GUI
I have used GNOME desktop with Ubuntu 22.04 here. The steps should be more or less the same for other desktop environments and Ubuntu versions.
Go to Overview (press Windows/Super key) and search for Settings.
Now, select Set password Now option on the dialog box and type and confirm the new password. If you are changing your own password, you’ll also have to enter your current password.

How to Reset Forgotten Ubuntu Password in 2 Minutes
More on user passwords in Linux
Passwd command in Linux: 8 Practical Examples
![]()
Here’s a fun thing you can do with sudo so that it makes fun of you when you enter incorrect password.
And get familiar with the Seahorse password manager app in Linux desktops.
Seahorse: Manage Your Passwords & Encryption Keys in Linux
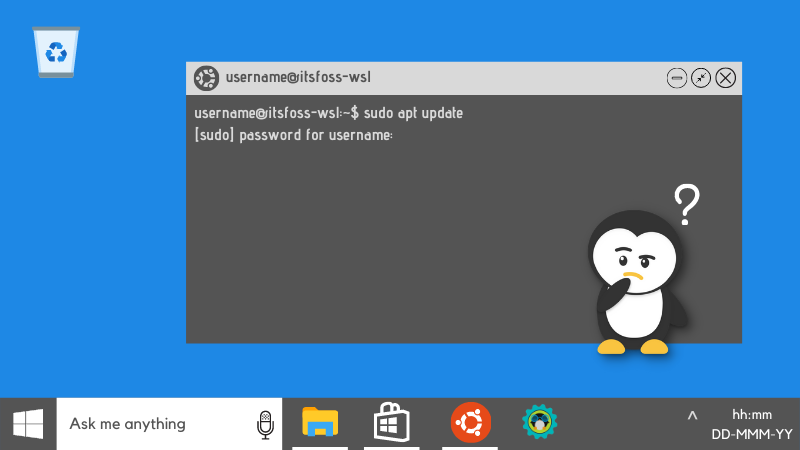
WSL (Windows Subsystem for Linux) is a handy tool for people who want to enjoy the power of Linux command line from the comfort of Windows.
Now, the problem is that if you haven’t used it for some time, you may forget the account password of WSL. And this will become a problem if you have to use a command with sudo because here you’ll need to enter the password.
Don’t worry. You can easily reset it.
Reset forgotten password for Ubuntu or any other Linux distribution on WSL
To reset the Linux password in WSL, you have to:
- Switch the default user to root
- Reset the password for the normal user
- Switch back the default user to the normal user
Let me show you the steps in detail and with screenshots. If you want a video, you can watch that as well.
Step 1: Switch to root as default user
This is done through Windows Command Prompt and you’ll need to know which command you need to run for your Linux distribution.
This information is usually provided in the description of the distribution app in the Windows Store. This is from where you had downloaded your distribution in the first place.

From the Windows menu, start the command prompt:

In here, use your distribution’s command in this fashion. If you were using the Ubuntu app from Windows store, the command would be:
ubuntu config --default-user rootIn the screenshot, I am using Ubuntu 20.04 app from the Windows store. So, I have used ubuntu2004 command.
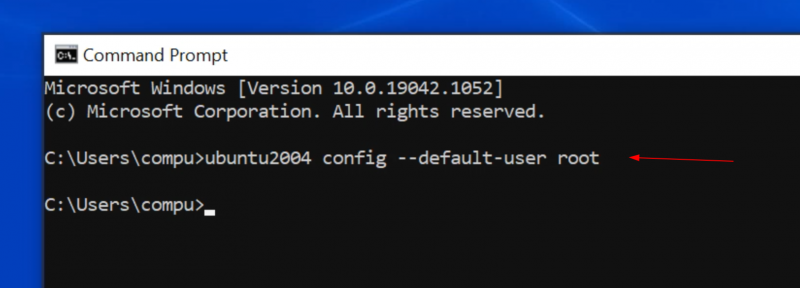
To save you the trouble, I am listing some distributions and their respective commands in this table:
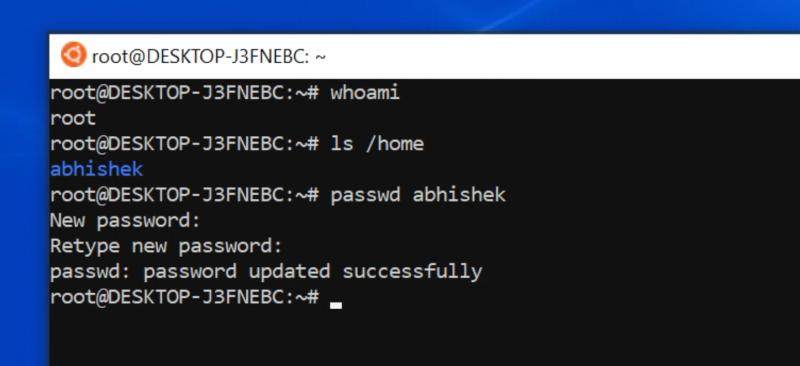
Step 2: Reset the password for the account
passwd usernameIt will ask you to enter a new password. When you type here, nothing will be displayed on the screen. That’s normal. Just type the new password and hit enter. You’ll have to retype the new password to confirm and once again, nothing will be displayed on the screen while you type the password.
Step 3: Set regular user as default again
ubuntu config --default-user username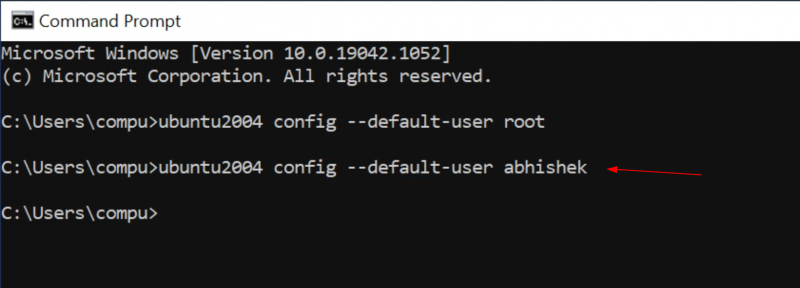
If you forgot the password again in the future, you know the steps to reset it.
If resetting WSL password is this easy, is this not a security risk?
Not really. You need physical access to the computer and access to the Windows account. If someone already has this much access, they can do much more than just change the Linux password in WSL.
Were you able to reset WSL password?
I gave you the commands and explained the steps. I hope this was helpful to you and you were able to reset the password of your Linux distribution in WSL.
If you are still facing issues or if you have a question on this topic, please feel free to ask in the comment section.
Lost Password?
Sometimes it is necessary to get root access, for example when you have forgotten your password or changed something in /etc/sudoers and things do not work as expected.
![]() Be careful, because this step will give you full root access to your system and you can really damage your system! Keep in mind that all the steps you see here can also be done by someone else!
Be careful, because this step will give you full root access to your system and you can really damage your system! Keep in mind that all the steps you see here can also be done by someone else!
Now let us start with a way that should work on any freshly installed Ubuntu system:
The Standard Way
![]() This procedure gives you a full root shell! You can damage your system if you are not careful!
This procedure gives you a full root shell! You can damage your system if you are not careful!
When booting up press SHIFT (in systems 9.10 «karmic» or later) or ESC (in systems 9.04 «jaunty» or earlier) at the grub prompt and use the arrow keys to select the rescue mode option and press enter.
- The file system may be read only (it is in all currently supported releases). Remount as read write
mount -rw -o remount /
- This will boot the system in rescue mode and you should arrive at a prompt that looks like this
root@something
- To reset your password type this in
passwd <username>
Press return, then you will be prompted to enter and confirm a new password.
- Once you are done resetting your password you can than switch back to the normal GUI mode by putting this in
init 2
If if appears to boot normally, but you see a message that says:
- Give root password for maintenance (or type Control-D to continue):
then you will have to try a different trick below.
The Other Way
1. Reboot your computer
2. Press SHIFT or ESC at the grub prompt (as earlier).
3. Select your image.
4. Highlight the line that begins kernel and press ‘e’ to edit
5. Go to the very end of the line, change the ro to rw and add init=/bin/bash
press enter, then press b to boot your system.
Your system will boot up to a passwordless root shell.
7. Set your password.
8. Type in reboot
The Other Way Lucid
At least for ‘Lucid’ I found out that the steps 1-5 in the procedure mentioned above are slightly different:
1. Reboot your computer
2. Hold shift during boot to start GRUB menu
3. Highlight your image and press ‘e’ to edit
4. Find the line starting with linux and append init=/bin/bash at the end of that line
5. Press ctrl-x to boot.
Please do not make any edits to this article. Its contents are currently under review and being merged with the Ubuntu Server Guide. To find the Ubuntu Server Guide related to your specific version, please go to:
Why are you looking at this wiki page?
ERROR 1045: Access denied for user: 'root@localhost' (Using password: NO)
ERROR 1045: Access denied for user: 'root@localhost' (Using password: YES)
To resolve this problem ,a fast and always working way is the «Password Resetting» .
How can I reset my MySQL password?
- Stop the mysql demon process using this command :
sudo /etc/init.d/mysql stop
- Start the mysqld demon process using the —skip-grant-tables option with this command
sudo /usr/sbin/mysqld --skip-grant-tables --skip-networking &
- start the mysql client process using this command
mysql -u root
- from the mysql prompt execute this command to be able to change any password
FLUSH PRIVILEGES;
- Then reset/update your password
SET PASSWORD FOR root@'localhost' = PASSWORD('password');
- If you have a mysql root account that can connect from everywhere, you should also do:
UPDATE mysql.user SET Password=PASSWORD('newpwd') WHERE User='root';
- Alternate Method:
USE mysql UPDATE user SET Password = PASSWORD('newpwd') WHERE Host = 'localhost' AND User = 'root';
- And if you have a root account that can access from everywhere:
USE mysql UPDATE user SET Password = PASSWORD('newpwd') WHERE Host = '%' AND User = 'root';
For either method, once have received a message indicating a successful query (one or more rows affected), flush privileges:
FLUSH PRIVILEGES;
Then stop the mysqld process and relaunch it with the classical way:
sudo /etc/init.d/mysql stopsudo /etc/init.d/mysql start
- web server apache
- php
- mysql server/mysql client installed
- php_mysql support for apache
All packages can be found browsing synaptic.
Another way, purge
I also had some problems with mysql just not accepting my password. I tried the other way as well and it just ended up being difficult. I had not been able to use mysql so it was empty anyway. If this is also your case you may opt for the PURGE way. This removes every file related to mysql. Depending on your installation the packages might be diffrent, mysql-server in 6.10 is called mysql-server-5.0 as an example.
 USE THIS AS A LAST RESORT METHOD, YOU WILL LOSE ALL YOUR MYSQL DATA
sudo apt-get --purge remove mysql-server mysql-common mysql-client
sudo apt-get install mysql-server mysql-common mysql-client
In the next step be sure to chance the your-new-password with the password you want!
mysqladmin -u root password your-new-passwordsudo /etc/init.d/mysql restart
mysql -u root -p
You should now be logged in as root. Make sure to notedown your password! Thanks to Illuvator for posting this method in the ubuntu forum.
The Easiest Method
sudo dpkg-reconfigure mysql-server-N.N
(where N.N is the MySql Server version)
")


")