
The main two commandline possibilities are:
- Use
suand enter the root password when prompted. - Put
sudoin front of the command, and enter your password when prompted.
You shouldn’t need to use root to get rid of a segmentation fault. If root is the only thing that fixes a segfault, then the program has a bug. Programs should not fail like that just because they don’t have root.
If you install the package only for yourself (your own home-dir), you don’t need to become root at all. Neither should you have to become root to «install» it so you can then create a binary-package of it. You only need to become root to actually install the package you created system-wide with the package-manager.
How can I install an RPM on a machine where I don’t have root permissions? I want to install a package for my use only in a personal work directory. I’m running SuSe SLES10.
Please don’t flame me with «This idea is so dumb, you shouldn’t do it because all requests must go through the corporate root god, may he live forever.»

9 gold badges53 silver badges58 bronze badges
asked Nov 11, 2010 at 18:08

answered Nov 12, 2010 at 9:52

30 gold badges520 silver badges906 bronze badges
OK, so I know you shouldn’t install as root
/etc/apache2/envvarsexport APACHE_RUN_USER=www-data
export APACHE_RUN_GROUP=www-dataDebian for instance asks at the installation if you want to use root; if not sudo based system is installed.
1 important thing: make sure you use a strong password when using root and don’t give it out to others.
Who is this running as, root or www-data?
- the original service is run as root
- apache then spawns childs processes that are run as the apache user (in this case www-data)
- How to use the sudo command to become a root user
- Using the “sudo su –”
- Using the “sudo su”
- Using the “sudo -i”
- Using “sudo -s”
- How to use su command to become a root user
- Using “su –”
- Using “su -l”
- Using “–login”
- Bonus Tip
- Conclusion
- About the author
- What is Sudo?
- Giving Sudo Privilege To A User
- How To Use Sudo Once It Is Granted
- How To Remove Sudo Privilege From a User
- How To Check Which Users Have Sudo Privilege in The System
- About the author
- Installing sudo
- Running a command with root privilege
- Current sudo settings
- Managing sudoers
- Groups
- Allowing a user with sudo access
- Adding to wheel group
- Adding in the sudoers
- File permissions
- Passing environment variables
- Editing a file
- Final thoughts
- About the author
- Is there a root user on Ubuntu Server?
- Why is the root user disabled on Ubuntu?
- Sudo: a better way to run root commands
- What is the root password on Ubuntu Server?
- Enable root login on Ubuntu Server
- Additional Resources
- Downloading ROOT Source files:
- Prequisites for ROOT Installation:
- Installing a program as root
- Re: Installing a program as root
- Re: Installing a program as root
- Re: Installing a program as root
- Re: Installing a program as root
- Re: Installing a program as root
- Re: Installing a program as root
- Re: Installing a program as root
- Re: Installing a program as root
- Re: Installing a program as root
- Re: Installing a program as root
- Re: Installing a program as root
- How to install sudo
- Syntax for sudo command
- Editing a file as root
- How to build binaries as a non-root
- Running a graphical command as root
- PolicyKit (preferred when using GNOME)
- KdeSu, KdeSudo (preferred when using KDE)
- Other programs
- Obsolete methods
- Manually via one of the shell-based methods
- Further Reading
- Different examples to use sudo command
- 1. Use sudo to run command as a root user
- 2. Use sudo to run command as a different user
- 3. List user privileges with sudo command
- 4. Display privileges for another user with sudo command
- 5. sudo command to add a user to the sudo group
- 6. sudo command to add users to the sudoers file
- 7. Run command in the background with sudo
- 8. Update sudoers files using sudo command
- 9. sudo command to update the user’s cached credentials
- 10. sudo command to invalidate user’s cached credentials
- 11. sudo command to remove the user’s timestamp completely
- How to extract tar. gz packages to the current directory
- How to extract rpm packages contents
- Other programs
- Calife
- Op
- Super
- How to extract tar. gz archive
- Logging in as root
- Sudo (preferred when not running a graphical display)
How to use the sudo command to become a root user
Using the “sudo su –”
Using the “sudo su”

Using the “sudo -i”
The output shows that the dollar sign($) has been replaced by the pound key(#) which also directs that you are currently logged in using the root privileges.
Using “sudo -s”

How to use su command to become a root user
Using “su –”

Using “su -l”

Using “–login”

During the authentication of su command, you have to put the root password.

Bonus Tip
The output shows that you are not logged in using the root privileges.
Conclusion
About the author
Sudo runs the installer program as root. This does not mean that the program will run as root. All normal program installation is performed by root, because only root can write to the system directories and modify the database of installed packages. With very few exceptions (setuid or setgid programs), when you run the program, it runs with exactly the same privileges you already have — because “your privileges” actually means “the privileges of the processes that are running in your session”.
sudo: ./install: command not found.I also tried running gksu ./install in which case it asks for my password in a separate window and then proceeds to do nothing. I just see the terminal with nothing going on. Can anyone tell me how I can run the install as root?
EDIT: Something weird may be going on. When I do ls I see the correct contents of the mounted disk. Then when I start typing sudo inst and press tab to autocomplete I see a list of files that are not in the mounted disk. Perhaps in some deeper
EDIT2: ls output
activate.ini help install_guide.pdf readme.txt
archives install java sys
bin installer_input.txt license.txt trademarks.txt
etc InstallForMacOSX.app patents.txt version.txt
EDIT3: its a christmas miracle, it works! I added the command exec to mount as exucutive and then did su — in the terminal and proceeded to install with no problems. Thanks so much everybody!
asked Mar 3, 2012 at 17:25

To become actually root:
sudo suTo HAVE a root account:
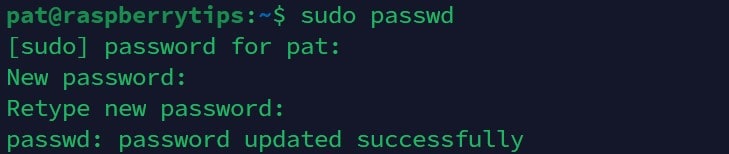
sudo passwd root (then type a new password, and that will be your new root account’s password.)

answered Mar 3, 2012 at 17:28

25 gold badges100 silver badges152 bronze badges
On every Linux system, there is a root account. It’s safer to not use it for everyday tasks though, because careless typos on the command shell or bugs in software could otherwise seriously mess up your system.
By running sudo passwd, you can set a password for root if you really need it, but it’s likely that you don’t and will just invite accidents like accidental file deletions.

answered Mar 3, 2012 at 18:45

Daniel Beck
14 gold badges286 silver badges334 bronze badges
If you need a root shell for a longer time you could use the -s option with the sudo command:
sudo -sto create a permanent root shell. And type
exitto leave the root shell when you’re done with your work.
answered Mar 3, 2012 at 18:34

2 gold badges10 silver badges19 bronze badges
What is Sudo?
- Sudo gives temporary privileges to users that can be taken away any time by root. If we had shared our root password instead, it required changing it when the privileges were to be terminated.
- Working as root at all times is not a good security practice as one can mistakenly mess with sensitive system settings. So it is better to switch to sudo, and then back, when a restricted operation is complete.
- The commands performed as sudo are all logged, along with the username that executed them. This ensures accountability and auditing for all such users
- Give sudo privilege to a user
- Use sudo once it is granted
- Remove sudo privilege from a user
- Check which users have sudo privilege on the system
Giving Sudo Privilege To A User
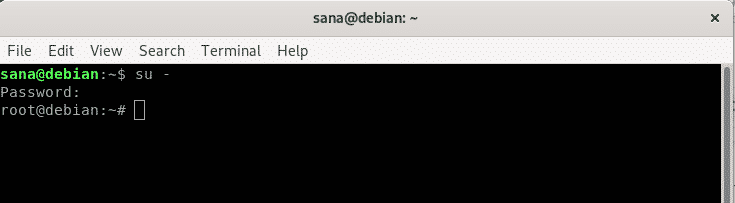
The system will ask you the password for root; providing which, you will be logged in as root.
# apt-get update
# apt-get install sudo
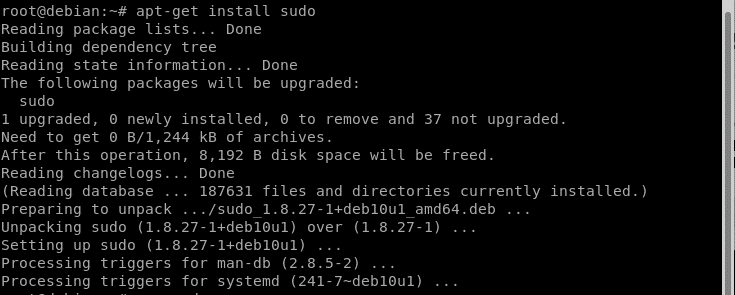
The sudo utility should now be installed on your Debian.
How To Use Sudo Once It Is Granted

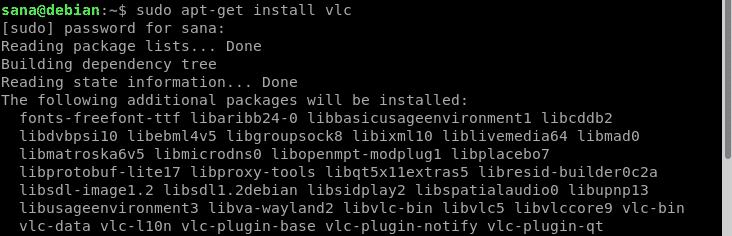
After being verified as sudo, the installation process will begin- as shown above.
How To Remove Sudo Privilege From a User
How To Check Which Users Have Sudo Privilege in The System


About the author
Let’s get started with sudo!
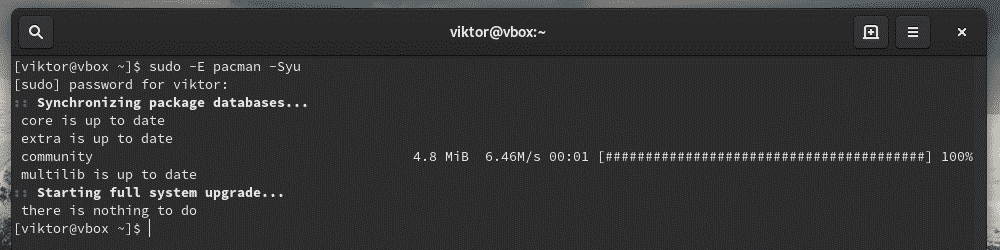
Installing sudo
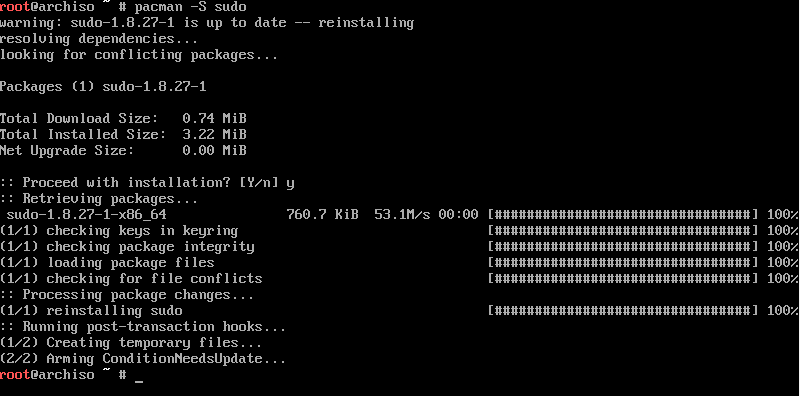
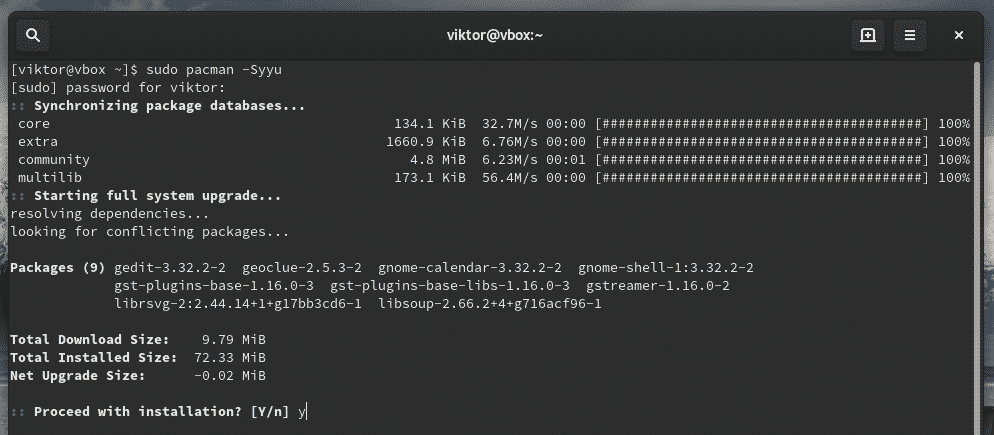
Running a command with root privilege

For example, use sudo to tell pacman to upgrade the entire system.
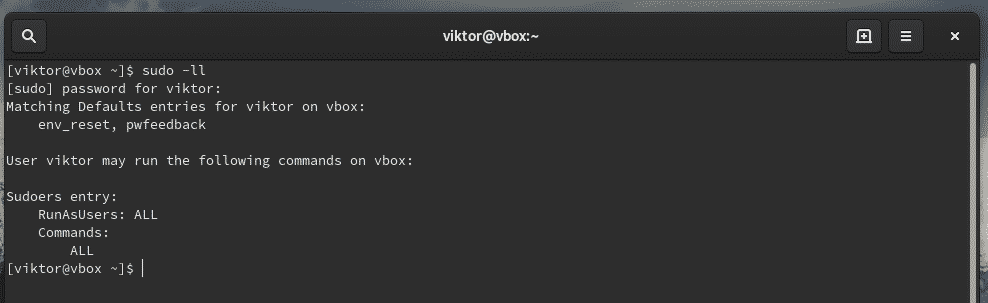
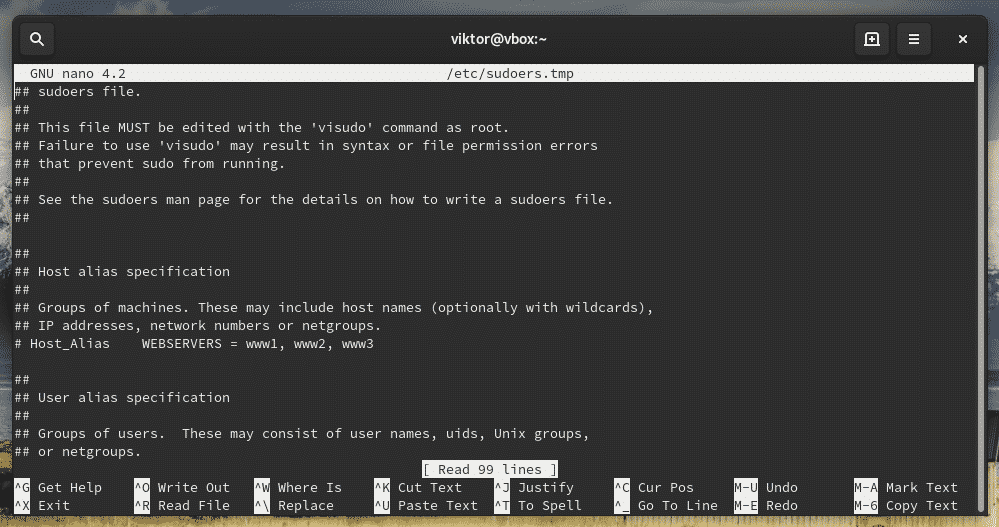
Current sudo settings

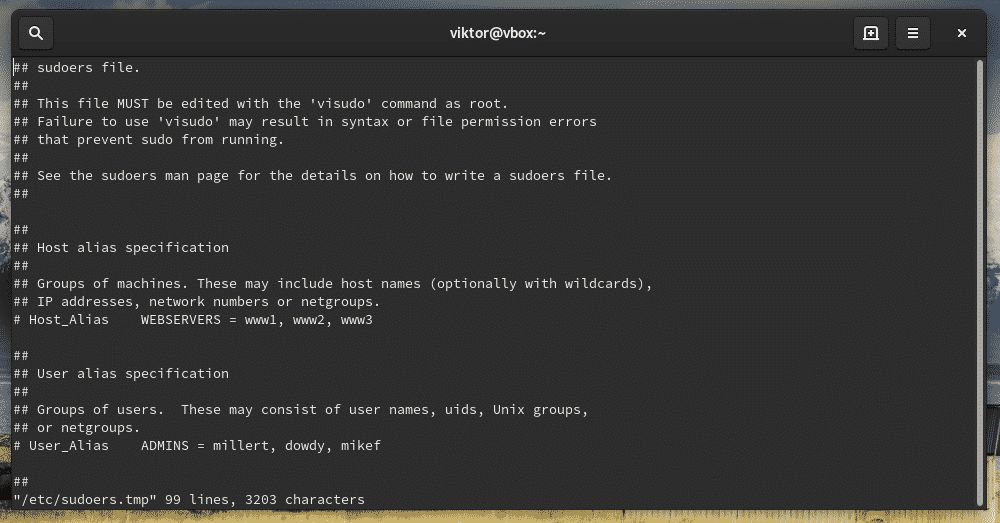
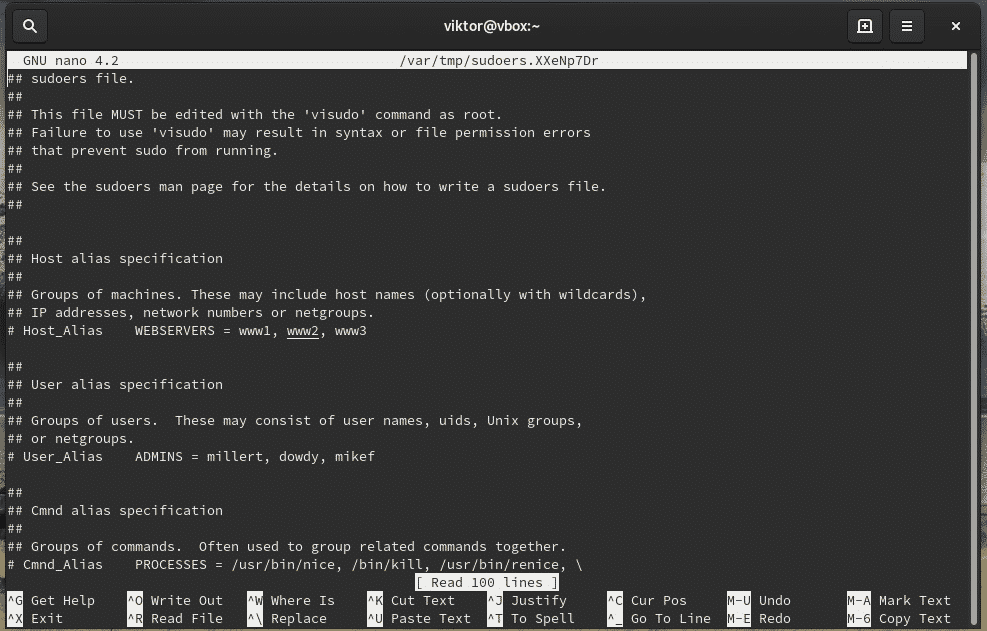
Managing sudoers
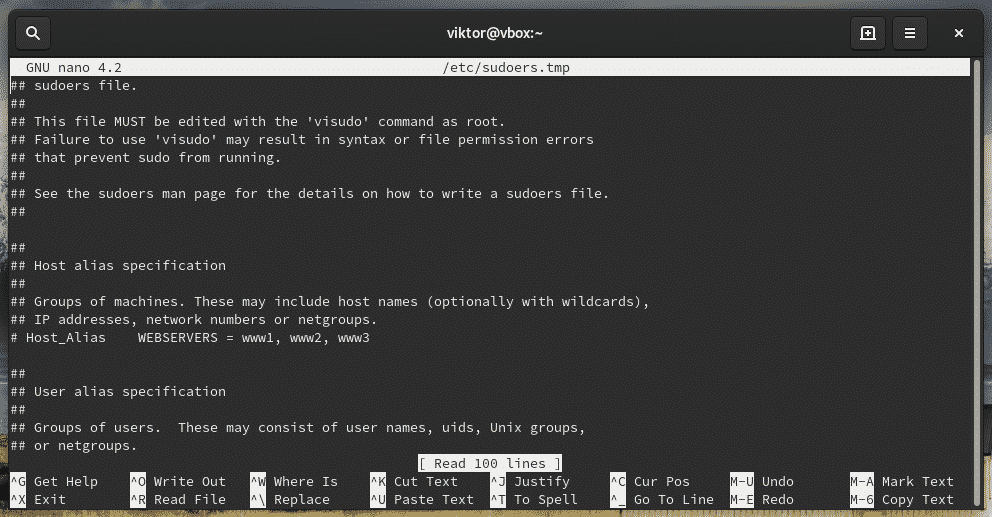
Let’s check out the sudoers.

=editor_name visudo

Defaults =usrbin, env_editor
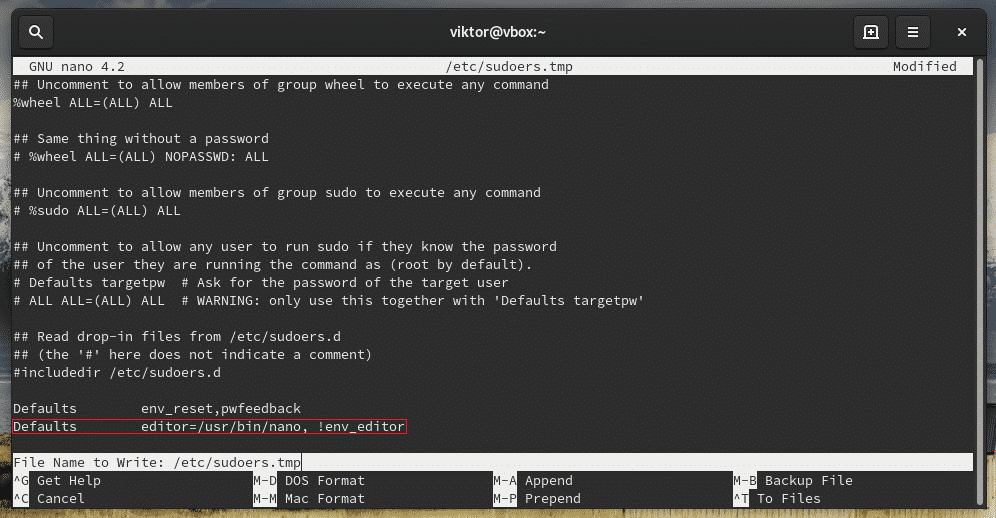
Don’t forget to verify the result.

Groups

Check out sudoers on which groups have access to root privilege.
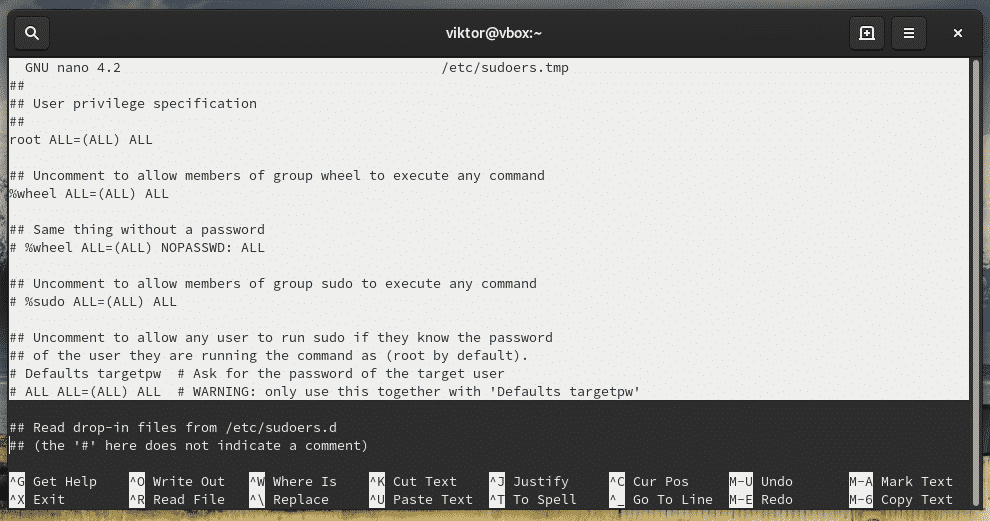

As you can see, the “root” account has access to full root privilege.
- First “ALL” indicates that the rule is for all hosts
- The second “ALL” tells that the user in the first column is capable of running any command with the privilege of any user
- The third “ALL” signifies that any command is accessible
Same goes for the wheel group.

group_name =ALL ALL
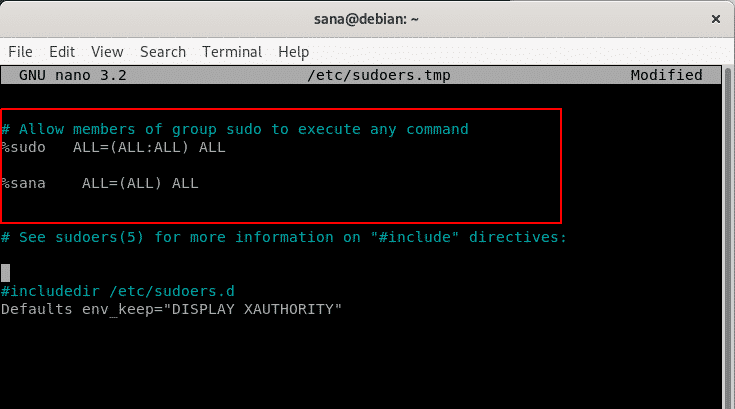
Allowing a user with sudo access
Adding to wheel group

Adding in the sudoers


File permissions
The owner and group for “sudoers” MUST be 0 with the file permission 0440. These are the default values. However, if you tried changing, then reset them to the default values.
root:root etcsudoers
0440 etcsudoers

Passing environment variables
Editing a file
It could also be performed by adding a new group entry in the sudoers file.
newsudo ALL = editor pathto
newsudo ALL = sudoedit pathto
Try out editing a file that requires sudo access.

Note: Sudoedit is equivalent to “sudo -e” command. However, it’s a better path as it doesn’t require having access to sudo.
Final thoughts
his short guide just showcases only a little portion of what you can do with sudo. I highly recommend checking out the man page of sudo.

About the author
Student of CSE. I love Linux and playing with tech and gadgets. I use both Ubuntu and Linux Mint.
Let’s start with a bit of theory, to give you the context, and then I’ll show you how to enable root if you really want it, either in a terminal or even for SSH usage.
Is there a root user on Ubuntu Server?
The “root” still exists on Ubuntu Server and most Linux distributions, but can’t be used by default. The account is disabled for security reasons.
Why is the root user disabled on Ubuntu?
—>
Get My Cheat Sheet!
Grab your free PDF file with all the commands you need to know on Linux!

Sudo: a better way to run root commands

You can basically do everything with sudo, so, in theory, there is no need to use “root” anymore.
What is the root password on Ubuntu Server?
—>
Get My Cheat Sheet!
Grab your free PDF file with all the commands you need to know on Linux!
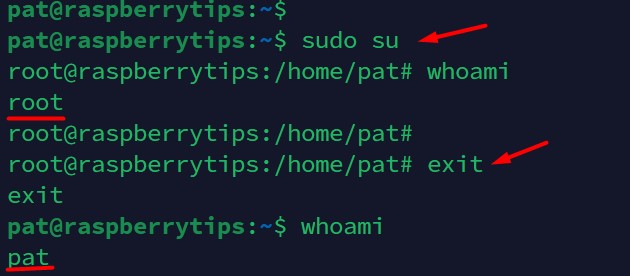
Use the exit command to get back to your normal privileges.exit
I have explained that using “sudo” should be sufficient in most cases and that you can even temporarily switch to the root prompt in a terminal by using “sudo su”. You shouldn’t need anything more, but let’s discuss how to enable root if you really want to do this (not recommended).
Enable root login on Ubuntu Server
Before using the “root” account directly on Ubuntu Server, a password should be set via the command:sudo passwd
As explained previously, having root enabled on your system is a major security issue, so at least try to use a strong password for it. Length is key, using a password generator like this one can help you to get something long enough but easy to remember.
—>
Get My Cheat Sheet!
Grab your free PDF file with all the commands you need to know on Linux!
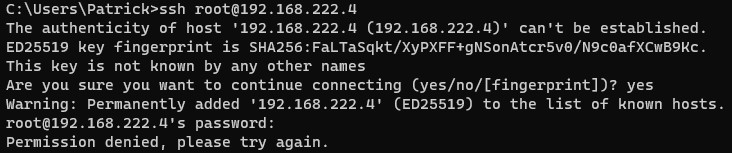
Here is how to allow logging in as root via SSH:

—>
Get My Cheat Sheet!
Grab your free PDF file with all the commands you need to know on Linux!
Additional Resources
Lost with the command line?
You don’t need to learn and remember everything, just download my cheat sheet where I explain the most important commands on Linux, with a brief explanation and some examples.
Download my free PDF cheat sheet.

We are going to install ROOT 6.10.04 in Ubuntu 18.04 which is a latest version of Ubuntu currently available. Many softwares have been upgrade to higher versions in Ubuntu 18.04 like Python3 and gcc 7 etc.
Downloading ROOT Source files:
You can used prebuild binary distribution which do not need compilation but here we are going to build ROOT from source file. You can find all the version of root at https://root.cern.ch/releases . Click on Release 6.10/04 – 2017-07-28 which will take you to a webpage where you can find source as well as binary files for different distribution of Linux. Here you need to download source file named root_v6.10.04.source.tar.gz .
tar -xvzf root_v6.10.04.source.tar.gz root-6.10.04/
Now, you will get a folder named root-6.10.04, which contains the source files. You can read the installation procedure in the file “INSTALL” in “README” folder. We need to install prequisites before we start installing the ROOT.
Prequisites for ROOT Installation:
sudo apt-get install git dpkg-dev cmake g++ gcc binutils libx11-dev libxpm-dev libxft-dev libxext-dev
The above libraries will be sufficient for ROOT installation but if you want you can install few optional also, which may be useful later:
sudo apt-get install gfortran libssl-dev libpcre3-dev \
xlibmesa-glu-dev libglew1.5-dev libftgl-dev \
libmysqlclient-dev libfftw3-dev libcfitsio-dev \
graphviz-dev libavahi-compat-libdnssd-dev \
libldap2-dev python-dev libxml2-dev libkrb5-dev \
libgsl0-dev libqt4-dev
It is recommended to build the ROOT in a separate folder other than the source folder. Hence, we will create a directory (folder) called “root” in the directory where root-6.10.04 is already present.
mkdir root
cd root
Now you are in root directory and ready to build ROOT. The ROOT has provided you options to enable many libraries which are disabled by default. If you want to use them later in your project, you should enable them now. Suppose you want to enable “mathmore” library then you should used “cmake ../root-6.10.04 -Dmathmore=ON” . You can see the complete list of libraries and their default value at https://root.cern.ch/building-root.
cmake ../root-6.10.04/ -Dall=ON
cmake --build . -- -j3
. bin/thisroot.sh
Now, your ROOT is ready for use and you can check by typing “root”.
root
A ROOT environment will open in terminal with the logo of ROOT. Currently the ROOT can be accessed only form the current folder. For ROOT to work from all the directories, you need to modfiy the “.bashrc” file.

First get out of the ROOT enviroment by typing:
.q
Now you need to know the path of current root directory which can be obtained by “pwd”.
pwd
Here, we get something like this
/home/anil/Products/root
This path should be used to define “ROOTSYS”. Now open the .bashrc file.
gedit ~/.bashrc
# For ROOT
export ROOTSYS=/home/anil/Products/root
export PATH=$ROOTSYS/bin:$PATH
export LD_LIBRARY_PATH=$ROOTSYS/lib/:$LD_LIBRARY_PATH
You should replace the path with your own path obtained from command “pwd”. Now, you can use ROOT in any folder.
Update Fri Dec 20, 2019:
This method of -Dall=ON was working fine in the earlier versions like 6.10.04. Nowadays -Dall=ON is not skipping the libraries if prerequisites are incomplete. So, I would recommend going with the basic compilation of root if you are a beginner and don’t want any other specific library.
cmake ../root-6.18.04/You can still add specific libraries using -D flag for e.g.
cmake ../root-6.18.04/ -Dminuit2=ONThe remaining commands are the same.
mkdir root
cd root
cmake ../root-6.18.04/
make -j8
make install
Cern Root Tutorial 1: Getting Started with Root Macro and Compilation
https://youtube.com/watch?v=6bNy44v06qA%3Ffeature%3Doembed
Arch + Ubuntu 16.04 via Efi, Gpt, grub2
sda1 -> efi boot
sda2 -> encrypted, lvm on top
dev/mapper/vg-arch -> my arch linux
dev/mapper/vg-ubuntu -> my ubuntu installation
Arch is running fine. After the ubuntu installation I updated grub, so both are now bootable.
Problem: after booting into Ubuntu, I get the error:
root device mounted successfully, but /sbin/init does not exist ubuntu/etc/default/grub
GRUB_DEFAULT=0
GRUB_TIMEOUT=5
GRUB_DISTRIBUTOR='lsb_release -i -s 2> /dev/null || echo Debian'
GRUB_CMDLINE_LINUX_DEFAULT="quiet splash"
GRUB_CMDLINE_LINUX="cryptdevice=/dev/sda2/luksvg"grub-mkconfig -o /boot/grub/grub.cfg
grub-install --target=x86_64-efi --efi-directory=/boot --recheckgrub.cfg
# DO NOT EDIT THIS FILE
#
# It is automatically generated by grub-mkconfig using templates
# from /etc/grub.d and settings from /etc/default/grub
#
### BEGIN /etc/grub.d/00_header ###
insmod part_gpt
insmod part_msdos
if [ -s $prefix/grubenv ]; then load_env
fi
if [ "${next_entry}" ] ; then set default="${next_entry}" set next_entry= save_env next_entry set boot_once=true
else set default="0"
fi
if [ x"${feature_menuentry_id}" = xy ]; then menuentry_id_option="--id"
else menuentry_id_option=""
fi
export menuentry_id_option
if [ "${prev_saved_entry}" ]; then set saved_entry="${prev_saved_entry}" save_env saved_entry set prev_saved_entry= save_env prev_saved_entry set boot_once=true
fi
function savedefault { if [ -z "${boot_once}" ]; then saved_entry="${chosen}" save_env saved_entry fi
}
function load_video { if [ x$feature_all_video_module = xy ]; then
insmod all_video else insmod efi_gop insmod efi_uga insmod ieee1275_fb insmod vbe insmod vga insmod video_bochs insmod video_cirrus fi
}
if loadfont unicode ; then set gfxmode=auto load_video insmod gfxterm set locale_dir=$prefix/locale set lang=de_DE insmod gettext
fi
terminal_input console
terminal_output gfxterm
if [ x$feature_timeout_style = xy ] ; then set timeout_style=menu set timeout=5
# Fallback normal timeout code in case the timeout_style feature is
# unavailable.
else set timeout=5
fi
### END /etc/grub.d/00_header ###
### BEGIN /etc/grub.d/10_linux ###
menuentry 'Arch Linux' --class arch --class gnu-linux --class gnu --class os $menuentry_id_option 'gnulinux-simple-a677b991-e4a0-41ae-9711-b4716a2e977d' { load_video set gfxpayload=keep insmod gzio insmod part_gpt insmod fat set root='hd0,gpt1' if [ x$feature_platform_search_hint = xy ]; then search --no-floppy --fs-uuid --set=root --hint-bios=hd0,gpt1 --hint-efi=hd0,gpt1 --hint-baremetal=ahci0,gpt1 9E14-B35F else search --no-floppy --fs-uuid --set=root 9E14-B35F fi echo 'Linux linux wird geladen …' linux /vmlinuz-linux root=/dev/mapper/luksvg-arch rw cryptdevice=/dev/sda2:luksvg quiet echo 'Initiale Ramdisk wird geladen …' initrd /initramfs-linux.img
}
submenu 'Erweiterte Optionen für Arch Linux' $menuentry_id_option 'gnulinux-advanced-a677b991-e4a0-41ae-9711-b4716a2e977d' { menuentry 'Arch Linux, mit Linux linux' --class arch --class gnu-linux --class gnu --class os $menuentry_id_option 'gnulinux-linux- advanced-a677b991-e4a0-41ae-9711-b4716a2e977d' { load_video set gfxpayload=keep insmod gzio insmod part_gpt insmod fat set root='hd0,gpt1' if [ x$feature_platform_search_hint = xy ]; then search --no-floppy --fs-uuid --set=root --hint-bios=hd0,gpt1 --hint-efi=hd0,gpt1 --hint-baremetal=ahci0,gpt1 9E14-B35F else search --no-floppy --fs-uuid --set=root 9E14-B35F fi echo 'Linux linux wird geladen …' linux /vmlinuz-linux root=/dev/mapper/luksvg-arch rw cryptdevice=/dev/sda2:luksvg quiet echo 'Initiale Ramdisk wird geladen …' initrd /initramfs-linux.img
}
menuentry 'Arch Linux, with Linux linux (fallback initramfs)' --class arch --class gnu-linux --class gnu --class os $menuentry_id_option 'gnulinux-linux-fallback-a677b991-e4a0-41ae-9711-b4716a2e977d' { load_video set gfxpayload=keep insmod gzio insmod part_gpt insmod fat set root='hd0,gpt1' if [ x$feature_platform_search_hint = xy ]; then search --no-floppy --fs-uuid --set=root --hint-bios=hd0,gpt1 --hint-efi=hd0,gpt1 --hint-baremetal=ahci0,gpt1 9E14-B35F else search --no-floppy --fs-uuid --set=root 9E14-B35F fi echo 'Linux linux wird geladen …' linux /vmlinuz-linux root=/dev/mapper/luksvg-arch rw cryptdevice=/dev/sda2:luksvg quiet echo 'Initiale Ramdisk wird geladen …' initrd /initramfs-linux-fallback.img }
}
### END /etc/grub.d/10_linux ###
### BEGIN /etc/grub.d/20_linux_xen ###
### END /etc/grub.d/20_linux_xen ###
### BEGIN /etc/grub.d/30_os-prober ###
### END /etc/grub.d/30_os-prober ###
### BEGIN /etc/grub.d/40_custom ###
# This file provides an easy way to add custom menu entries. Simply type the
# menu entries you want to add after this comment. Be careful not to change
# the 'exec tail' line above.
### END /etc/grub.d/40_custom ###
### BEGIN /etc/grub.d/41_custom ###
if [ -f ${config_directory}/custom.cfg ]; then source ${config_directory}/custom.cfg
elif [ -z "${config_directory}" -a -f $prefix/custom.cfg ]; then source $prefix/custom.cfg;
fi
### END /etc/grub.d/41_custom ###so I thought maybe I have to set hooks in Ubuntu like I did in arch /etc/mkinitcpio.conf, but how?
Forum rules
There are no such things as «stupid» questions. However if you think your question is a bit stupid, then this is the right place for you to post it. Please stick to easy to-the-point questions that you feel people can answer fast. For long and complicated questions prefer the other forums within the support section.
Before you post please read how to get help. Topics in this forum are automatically closed 6 months after creation.
Installing a program as root
I am not a COMPLETE noob, since I’ve installed Mint on several machines, but this one is a problem.
New NVIDIA driver updates keep telling me that they must be installed as «root». I’ve searched the web and forums and all I can find is people telling me NEVER to run, or install anything, as root. Apparently it’s just not supposed to be done, and no one will SAY how to do it because it’s too dangerous.
I tried myself to go to the Login Window Preferences and under Options selected «Allow Root Login», but that doesn’t seem to do a thing.
So, how does one install new driver updates? ![]()
Last edited by LockBot on Wed Dec 28, 2022 7:16 am, edited 1 time in total.
Reason: Topic automatically closed 6 months after creation. New replies are no longer allowed.
Re: Installing a program as root
by » Mon Jan 02, 2017 4:46 pm
The only driver that appears there is .132 which is 2D. I downloaded .134 from NVIDIA for 3D graphics in order to run X-Plane 10.
The installation worked fine on a computer I built from a motherboard with a GTX-650 graphics card, but now I’m trying to install on an older HP Pavilion laptop with the NVIDIA C67 card. When I run the program, it hangs trying to initialize OpenGL. It may just be the card. ![]()

jimallyn
- Level 19

- Posts: 9075
- Joined: Thu Jun 05, 2014 7:34 pm
- Location: Wenatchee, WA USA
Re: Installing a program as root
by jimallyn » Mon Jan 02, 2017 5:18 pm
I agree with MintBean, the best way to install drivers is with Mint’s Driver Manager. If you want the newest version, you may have to install from Nvidia’s latest release. Try this: open a terminal, navigate to wherever you have saved the driver file, then enter sudo NVIDIA-Linux-x86_64-304.134.run. That will ask for your password, then will run the installer as root. Note: it is possible that this could screw up your video and make it impossible to boot into the GUI. I had that happen once, and had to boot to terminal and remove the drivers from there, then reboot. Let’s hope that doesn’t happen, but if it does, people on the forums can almost surely walk you through it.
“If the government were coming for your TVs and cars, then you’d be upset. But, as it is, they’re only coming for your sons.” — Daniel Berrigan
Re: Installing a program as root
by » Mon Jan 02, 2017 5:19 pm
The recommended driver is for GeForce7 series cards, which appears to be what you have from a quick Google or am I mistaken? I’ve never heard of this concept of a driver for 2D and a separate driver for 3D — are you sure you have this straight?
If you’re running the Mint Cinnamon edition and it’s not complaining about running in software rendering mode, you’re running in 3D accelerated mode.
Open a terminal (Applications->Accessories->Terminal).
if step 4 fails with a message including ‘permission denied’, try entering sudo ./some-app.run (you will need to enter your password for this).

karlchen
- Level 22
- Posts: 17344
- Joined: Sat Dec 31, 2011 7:21 am
- Location: Germany
Re: Installing a program as root
by karlchen » Mon Jan 02, 2017 5:29 pm
This must be some kind of misunderstanding: software which is installed system-wide is always installed with root privileges, no matter whether you use Software Manager, Synaptic or an apt-get commandline. The same is also true if you install software system-wide manually; you will do so with root privileges.
So in order to install the downloaded NVidia driver software you would proceed like this:
- cd /path/to/folder/where/you/saved/the_file
- chmod +x NVIDIA-Linux-x86_64-304.134.run
- sudo ./NVIDIA-Linux-x86_64-304.134.run
Re: Installing a program as root
by » Mon Jan 02, 2017 5:30 pm
Still working on it. I scrapped the HD and re-loaded Mint MATE instead of Cinnamon. Now I get the NVIDIA .132 drivers to load (which WERE on the driver updater) without crashing Cinnamon. MATE seems to be better at accepting the «recommended» drivers.
karlchen
- Level 22
- Posts: 17344
- Joined: Sat Dec 31, 2011 7:21 am
- Location: Germany
Re: Installing a program as root
by karlchen » Mon Jan 02, 2017 5:39 pm
Cinnamon insists on having 3D hardware acceleration. Mate does not. This is why some problems with video driver software will be encountered on Cinnamon desktops only. ![]()
Re: Installing a program as root
by » Mon Jan 02, 2017 5:47 pm
Ahah! And I need 3D capability for X-Plane. That why it WILL run on my other computer using Cinnamon with the GTX card. It MUST be the drivers for this HP laptop then that are the problem. So now I need to find some way of installing the .124 drivers from NVIDIA without having to install as root.
If I was smarter and already KNEW how to run as root, this whole thing would have been over 12 hours ago.
Re: Installing a program as root
by » Mon Jan 02, 2017 5:49 pm
Mate was not working anyhow. I downloaded the DVD drivers from X-Plane and keep getting «BadValue» and «Major Opcode Failed» errors. I’m off to scrape the drive again and return to Cinnamon. ![]()

austin.texas
- Level 20
- Posts: 12003
- Joined: Tue Nov 17, 2009 3:57 pm
- Location: at /home
Re: Installing a program as root
by austin.texas » Mon Jan 02, 2017 5:51 pm
flaugher wrote: I’ve searched the web and forums and all I can find is people telling me NEVER to run, or install anything, as root. Apparently it’s just not supposed to be done, and no one will SAY how to do it because it’s too dangerous.
Mint 18.2 Cinnamon, Quad core AMD A8-3870 with Radeon HD Graphics 6550D, 8GB DDR3, Ralink RT2561/RT61 802.11g PCI
Linux Linx 2018
Re: Installing a program as root
by » Mon Jan 02, 2017 5:55 pm
Well, see, that’s what I THOUGHT to begin with. I usually install things using ./ which normally works fine. I think the REAL problem is that I’m an Aggie! Woo-ahh! ![]() (I wish they had a maroon icon)
(I wish they had a maroon icon)
austin.texas
- Level 20
- Posts: 12003
- Joined: Tue Nov 17, 2009 3:57 pm
- Location: at /home
Re: Installing a program as root
by austin.texas » Mon Jan 02, 2017 6:04 pm
flaugher wrote: I think the REAL problem is that I’m an Aggie! Woo-ahh!
(I wish they had a maroon icon)
Happy New Year!
Mint 18.2 Cinnamon, Quad core AMD A8-3870 with Radeon HD Graphics 6550D, 8GB DDR3, Ralink RT2561/RT61 802.11g PCI
Linux Linx 2018
su -c 'service apache restart'The command to run must be passed using the -c option. Note that you need quotes so that the command is not parsed by your shell, but passed intact to the root shell that su runs.
To run multiple commands as root, it is more convenient to start an interactive shell.
$ su
# command 1
# command 2
...
# exit
On some systems, you need to be in group number 0 (called wheel) to use su. (The point is to limit the damage if the root password is accidentally leaked to someone.)
How to install sudo
In most of the Linux distributions, sudo is pre-installed on the system. However, if you do not find the sudo package on the system, you can install it from the default package management repositories.
To install sudo on CentOS, Fedora, and RHEL
# yum install sudoTo install sudo on Ubuntu and Debian
# apt install sudoSyntax for sudo command
Some of the options available in sudo command are:
- -V: display version information of sudo
- -h: display help message and exit
- -l: list user’s privileges or check a specific command
- -k: reset the user’s timestamp
- -u: run the command as a different user
Editing a file as root
See How do I edit a file as root?
How to build binaries as a non-root
./configure --prefix=$HOME && make && make installanswered Feb 18, 2014 at 15:07

Another option is to install from source, where you can usually change the install directory using the --prefix switch.
answered Nov 13, 2010 at 15:38

John T
27 gold badges339 silver badges347 bronze badges
There are clever tricks to help you in the manual build process. For example, you can utilize the dependencies already listed in an RPM to get all of your dependencies: https://stackoverflow.com/a/13877738/1236128.
answered Oct 21, 2019 at 7:18

You can try --prefix and --dbpath options. Not all RPMs will support --prefix, but if your rolling your own RPMs that won’t be an issue, just make them relocatable.
rpm -ivh --dpath ~/rpmdb --prefix ~/ mypkg-1.0-1.el8.x86_64.rpmYou could also ask your IT to make the system RPM DB writable.
Also answered here How to install packages on Linux without root-access?
answered Jun 25, 2022 at 5:14

Running a graphical command as root
See also Wikipedia.
PolicyKit (preferred when using GNOME)
Simply prefix your desired command with the command pkexec. Be aware that while this works in most cases, it does not work universally.
KdeSu, KdeSudo (preferred when using KDE)
kdesu and kdesudo are graphical front-ends to su and sudo respectively. They allow you to run X Window programs as root with no hassle. They are part of KDE. Type
kdesu -c 'command --option argument'and enter the root password, or type
kdesudo -c 'command --option argument'and enter your password (if authorized to run sudo). If you check the “keep password” option in KdeSu, you will only have to type the root password once per login session.
Other programs
Ktsuss (“keep the su simple, stupid”) is a graphical version of su.
Beesu is a graphical front-end to the su command that has replaced Gksu in Red Hat-based operating systems. It has been developed mainly for RHEL and Fedora.
Obsolete methods
gksu and gksudo
gksu and gksudo are graphical front-ends to su and sudo respectively. They allow you to run X Window programs as root with no hassle. They are part of Gnome. Type
gksu command --option argumentand enter the root password, or type
gksudo command --option argumentand enter your password (if authorized to run sudo).
gksu and gksudo are obsolete. They have been replaced by PolicyKit in GNOME, and many distributions (such as Ubuntu) no longer install them by default. You should not depend on them being available or working properly.
Manually via one of the shell-based methods
Use one of the methods in the «running a shell command as root section». You will need to ensure that neither the DISPLAY environment variable nor the XAUTHORITY environment get reset during the transition to root. This may require additional configuration of those methods that is outside the scope of this question.
Further Reading
man page for sudo command
Different examples to use sudo command
1. Use sudo to run command as a root user
$ sudo command
2. Use sudo to run command as a different user
golinux@ubuntu-PC:~$ sudo -u deepak whoami
golinux@ubuntu-PC:~$ sudo passwd deepak New password:
Retype new password:
passwd: password updated successfully
3. List user privileges with sudo command
$ sudo -l$ sudo --listdeepak@ubuntu:~$ sudo -l
Use -l twice for longer output:
deepak@ubuntu:~$ sudo -ll
Matching Defaults entries for deepak on ubuntu: env_reset, mail_badpass, secure_path=/usr/local/sbin\:/usr/local/bin\:/usr/sbin\:/usr/bin\:/sbin\:/bin\:/snap/bin
User deepak may run the following commands on ubuntu:
Sudoers entry:
As you can see, it does not run the command but only checks where it is located in the system.
golinux@ubuntu-PC:~$ sudo -l adduser
4. Display privileges for another user with sudo command

5. sudo command to add a user to the sudo group

On RHEL, CentOS, and Fedora, you can use:
6. sudo command to add users to the sudoers file
$ sudo visudo
7. Run command in the background with sudo
The -b or --background option can be used to run the given command in the background. When you use this option, you cannot use shell job control to manipulate the process.
$ sudo -b command$ sudo --background command8. Update sudoers files using sudo command
$ sudo -e file$ sudo --edit fileYou can only edit files on the directory which is non-writable. It opens a nano editor to edit a file.
$ sudo -e /etc/sudoers.d/01-sudo-rule
deepak@ubuntu:~$ sudo -e /etc/sudoers.d/01-sudo-rule>>> /etc/sudoers.d/01-sudo-ssh: syntax error near line 2 <<<
sudo: parse error in /etc/sudoers.d/01-sudo-rule near line 2
sudo: no valid sudoers sources found, quitting
sudo: unable to initialize policy plugin
9. sudo command to update the user’s cached credentials
$ sudo -v$ sudo --validategolinux@ubuntu-PC:~$ sudo -v [sudo] password for golinux:
10. sudo command to invalidate user’s cached credentials
$ sudo -k $ sudo --reset-timestamp
11. sudo command to remove the user’s timestamp completely
$ sudo -K$ sudo --remove-timestampHow to extract tar. gz packages to the current directory
export file=foo-bar.tar.gz
# Note that `xovf` switch order *matters*
gzip -dc $file | tar -xovf -
How to extract rpm packages contents
export ins=foo-bar.rpm
rpm2cpio $ins | cpio -idv
Other programs
Calife
Op
Super
How to extract tar. gz archive
gzip -dc foo-bar.tar.gz | tar xvf –
cd foo-bar-dir
Logging in as root
If there is a root password set and you are in possession of it, you can simply type root at the login prompt and enter the root password. Be very careful, and avoid running complex applications as root as they might do something you didn’t intend. Logging in directly as root is mainly useful in emergency situations, such as disk failures or when you’ve locked yourself out of your account.
Sudo (preferred when not running a graphical display)
This is the preferred method on most systems, including Ubuntu, Linux Mint, (arguably) Debian, and others. If you don’t know a separate root password, use this method.
Sudo requires that you type your own password. (The purpose is to limit the damage if you leave your keyboard unattended and unlocked, and also to ensure that you really wish to run that command and it wasn’t e.g. a typo.) It is often configured to not ask again for a few minutes so you can run several sudo commands in succession.
sudo service apache restartIf you need to run several commands as root, prefix each of them with sudo. Sometimes, it is more convenient to run an interactive shell as root. You can use sudo -i for that:
$ sudo -i
# command 1
# command 2
...
# exit
Instead of sudo -i, you can use sudo -s. The difference is that -i reinitializes the environment to sane defaults, whereas -s uses your configuration files for better or for worse.
")


")