

To let this tutorial work better, please consider the below Prerequisites:
- Set Root password
- Configure SSH config to permit root login
- Loggin as root
- Allow SSH root login on Debian
- How to Enable root login over SSH
- Описание
- Разрешаем root доступ по SSH с вводом пароля
- Разрешение входа root по SSH в Ubuntu 20.04, пошаговые инструкции
- Разрешить SSH Доступ пользователю или группе
- Запретить SSH Доступ пользователю или группе
- Применение корневых настроек
- Включить вход в систему с правами root
- Отключить root-вход
Set Root password
sudo passwd rootyou succeed to change the root password, now you need to change some configuration on for the permit root login.
Configure SSH config to permit root login
nano /etc/ssh/sshd_config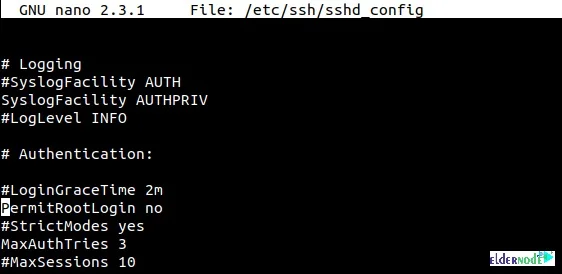
As you see, the is set to No. It means that the root login via SSH has been disabled. So, to enable root login change the to . Find PermitRootLogin and delete No or without-password and type .
PermitRootLogin without-passwordPermitRootLogin yesAfter edit the SSH config file, press and button twice for save and exit.
Restart SSH service for loading new configuration on SSH_config file.
sudo systemctl restart sshdsudo service sshd restart
To let this tutorial work better, please consider the below Prerequisites:
Loggin as root
Allow SSH root login on Debian
Since the PermitRootLogin parameter controls the ssh root permission, you must change its values. The parameter is /etc/ssh/sshd_config and the value of the PermitRootLogin is ”without-password”. So, you need to ser PermitRootLogin to yes to Permit root login.
How to Enable root login over SSH
Open the ssh configuration file and use your favorite text editor.
nano /etc/ssh/sshd_configThen, Search for PermitRootLogin and change its value to “Yes”. If the line exists and is commented out with a ”#”, remove the ”#”.
PermitRootLogin yesNow, you can save the updated /etc/ssh/sshd_config file and restart the SSH server. Use the command below to do this:
systemctl restart sshd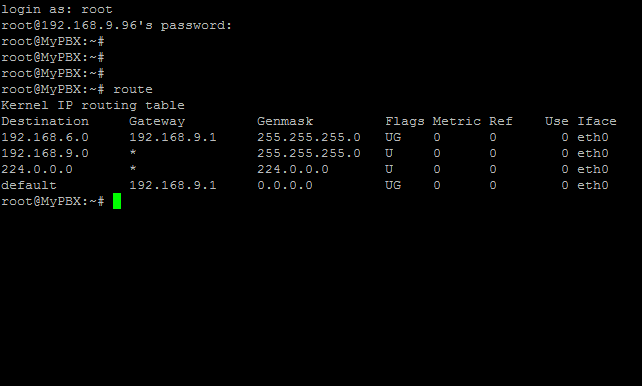
Разрешение входа рута в систему по SSH обычно считают плохой практикой безопасности.
Вместо этого вы можете выполнить задачи администрирования, осуществив вход по учетной записью пользователя и выполнять команды, используя sudo.
Отключить доступ root
Просмотрим содержание конфигурационного файла SSH, используя следующую команду:
# cat /etc/ssh/sshd_config
В этом файле мы найдем следующую строчку:
#PermitRootLogin no
Раскомментируем эту строчку с помощью любого текстового редактора и перезапустим сервис, чтобы изменения встпупили в силу:
# /etc/init.d/ssh restart
Как ранее упомянуто, хорошая практика безопасности не должна предоставлять доступ руту через SSH вообще.
AllowUsers root@xxx.xxx.xxx.xxx
Перезапустим службу SSH, чтобы изменения вступили в силу.
# /etc/init.d/ssh restart
Пожалуйста, не спамьте и никого не оскорбляйте.
Это поле для комментариев, а не спамбокс.
Рекламные ссылки не индексируются!
- 29.09.2019
- 12 691
- 02.10.2021
- 6
Хотя это и не рекомендуется делать из соображений безопасности, иногда возникает необходимость разрешить пользователю root доступ через SSH. В данной статье пойдет речь о том, как это сделать.
Описание
В последних версиях Ubuntu, например, доступ для пользователя root — отключен, как впрочем и сама учетная запись root. Чтобы это изменить, необходимо внести правки в конфигурационный файл ssh, который обычно расположен по следующему пути: /etc/ssh/sshd_config
Разрешаем root доступ по SSH с вводом пароля
Первым делом ищем в конфигурационном файле строчку PermitRootLogin, скорей всего она будет закомментирована символом #. Для примера в Ubuntu 18.04.3 эта строчка имеет следующий вид:
#PermitRootLogin prohibit-passwordЧтобы разрешить доступ для рута через ssh, необходимо эту строчку раскомментировать и заменить на следующую:
PermitRootLogin yesНеобходимо иметь ввиду, что к моменту внесения этих изменений, пользователь root уже должен быть активен в системе, чтобы под ним можно было зайти — о том, как это сделать, можно прочитать в данной статье.
После внесения изменений, необходимо применить конфигурацию, сделать это можно следующей командой:
sudo service sshd reloadТеперь можно попробовать зайти на сервер через ssh под учетной записью root и введя его пароль.
SSH (Secure Shell) используется для безопасной обработки сетевых сервисов в незащищенной сети.
Некоторые примеры включают в себя: удаленную командную строку, вход в систему и удаленное выполнение команд.
В этой статье вы узнаете, как включить SSH-доступ для пользователя root на сервере/настольном Ubuntu 20.04.
Разрешение входа root по SSH в Ubuntu 20.04, пошаговые инструкции
Откройте файл /etc/ssh/sshd_config с правами администратора и измените следующую строку:
FROM:
#PermitRootLogin prohibit-password
TO:
PermitRootLogin yes
Быстрый способ выполнить эту работу – просто использовать команду sed, как показано ниже:
$ sudo sed -i 's/#PermitRootLogin prohibit-password/PermitRootLogin yes/' /etc/ssh/sshd_config
Перезапустите службу SSH:
$ sudo systemctl restart ssh
По умолчанию пароль root не установлен в Ubuntu 20.04, и появится сообщение об ошибке:
Permission denied, please try again
По этой причине нам необходимо установить пароль root.
При появлении запроса введите текущий пароль пользователя, а затем новый пароль root:
$ sudo passwd
[sudo] password for itsecforu
Enter new UNIX password:
Retype new UNIX password:
passwd: password updated successfully
Учитывая, что ваша система Ubuntu 20.04 разрешает входящий трафик на порту 22 по ssh, теперь вы должны быть готовы к SSH-входу в систему от пользователя root:
$ ssh root@ubuntu-server
root@ubuntu-server's password:
Welcome to Ubuntu Focal Fossa (GNU/Linux 5.3.0-23-generic x86_64)
Пожалуйста, не спамьте и никого не оскорбляйте.
Это поле для комментариев, а не спамбокс.
Рекламные ссылки не индексируются!
По умолчанию в SSH root не включен из соображений безопасности. Однако, если вы управляете большим количеством систем и вам нужен постоянный root-доступ для выполнения скриптов, автоматизации и т. Д., Включение этой функции является обязательным.
Чтобы было ясно, включение входа в систему Root через SSH опасно. Не делайте этого, если вы новичок в SSH!
Первым шагом к включению входа в систему с правами root через SSH является включение учетной записи Root. Для многих дистрибутивов Linux (Ubuntu и ему подобных) Root не активен в целях безопасности. Вместо этого пользователи делают все через привилегии sudo. По большей части не использовать учетную запись Root — это нормально, и sudo справится с этой задачей. Однако при использовании SSH пользователям необходимо знать пароль root.
Сначала войдите на свой удаленный сервер / ПК, на котором вы хотите удаленно включить Root over SSH:
ssh [email protected]Если вы настроили свой дистрибутив Linux и не настраивали пользователя Root, вам необходимо выполнить следующие шаги, чтобы настроить Root. Пожалуйста, поймите, что этот процесс не будет работать без пользователя, который может использовать sudo. Для начала откройте терминал. В терминале запустите:
sudo -s
Использование sudo с -s предоставит пользователю оболочку Root, как и вход в систему с помощью su. Отсюда можно вызвать команду «новый пароль» для пользователя Root.
passwd
Запуск passwd предложит пользователю указать «новый пароль UNIX». Введите новый пароль для учетной записи Root на вашем ПК. В целях безопасности не используйте тот же пароль для Root, что и для вашей обычной учетной записи. Обязательно создайте безопасный, но запоминающийся пароль для учетной записи.
После установки пароля выйдите из оболочки Root с помощью exit.
exit
Наконец, убедитесь, что новый пароль Root работает, войдя в него через su.
su -
В этом руководстве мы рассмотрим, как разрешить или запретить доступ SSH к определенному пользователю или группе в Linux
Файл конфигурации OpenSSH по умолчанию имеет две директивы для разрешения и запрета доступа SSH к определенному пользователю (пользователям) или группе.
Во-первых, мы увидим, как разрешить SSH-доступ для определенного пользователя, например sk.
Обратите внимание, что все команды должны выполняться как пользователь root.
Разрешить SSH Доступ пользователю или группе
Перейдите на ваш удаленный сервер и отредактируйте файл sshd_config:
$ sudo vi /etc/ssh/sshd_config
Добавьте или отредактируйте следующую строку:
Замените «sk» на свое имя пользователя.
Вы также можете указать несколько пользователей, как показано ниже.
Чтобы разрешить целую группу, скажем, например, root, добавьте / отредактируйте следующую строку:
Те, кто входит в группу, могут передавать ssh на удаленный сервер.
Сохраните и закройте конфигурационный файл SSH.
Перезапустите службу SSH, чтобы изменения вступили в силу.
$ sudo systemctl restart sshd
Теперь пользователям sk, itsecfor или всем пользователям под группой «root» разрешено ssh на ваш удаленный сервер. Другие пользователи (кроме sk, itsecforu и пользователи «root») не могут.
Если вы попытаетесь передать ssh на удаленный сервер с помощью любого из недопустимых пользователей, вы получите следующее сообщение об ошибке:
Permission denied, please try again.
Теперь давайте рассмотрим, как запретить / отключить доступ ssh определенному пользователю или группе.
Запретить SSH Доступ пользователю или группе
Чтобы отключить или запретить доступ SSH к любому пользователю или группе, вам необходимо добавить / изменить следующие директивы в файле sshd_config вашего удаленного сервера.
Чтобы запретить доступ SSH к определенному пользователю с именем «sk», отредактируйте файл sshd_config:
$ sudo vi /etc/ssh/sshd_config
Добавьте / отредактируйте следующую строку в файле sshd_config.
Аналогично, чтобы запретить доступ SSH нескольким пользователям, укажите имена пользователей как показано ниже.
Чтобы запретить доступ SSH ко всей группе, например root, добавьте:
Сохраните и закройте файл конфигурации ssh.
Перезапустите службу ssh, чтобы внести изменения.
$ sudo systemctl restart sshd
если вы пытаетесь использовать ssh для сервера с использованием запрещенных пользователей, например sk:
Появится следующее сообщение:
 sk@192.168.1.150's password:
Permission denied, please try again.
sk@192.168.1.150's password:
Что еще более важно, вы также должны отключить вход пользователя root.
Доступ root по ssh считается плохой практикой с точки зрения безопасности.
Чтобы отключить root ssh login, отредактируйте файл sshd_config:
$ sudo vi / etc / ssh / sshd_config
Найдите следующую строку, Раскомментируйте ее и установите значение равным no.
PermitRootLogin no
Перезапустите службу SSH. Вы только что отключили вход ssh root.
In my project, I have to install some package remotely. If I have to login in debian, I say:
$ ssh root@remotehostname
root@remotehostname's password:
it logs in successfully.
I have login in ubuntu in directly using
$ root@remotehostname root@remotehostname's password:it is throw error message in
Permission denied, please try again.How to solve this problem?

33 gold badges235 silver badges226 bronze badges
asked Aug 23, 2013 at 5:47

Reegan Miranda
6 gold badges43 silver badges55 bronze badges
check the /etc/ssh/sshd_config whether the configure PermitRootLogin yes below # Authentication:. If not yes, it doesn’t permit login as root.
you can change it to yes.
Then, restart ssh service to apply the changes:
sudo service sshd restart

26 silver badges37 bronze badges
answered Aug 23, 2013 at 6:10

Ubuntu documentation says:
By default, the Root account password is locked in Ubuntu.
It also says:
It talks at length about why it’s been done this way.
Enabling the root account:
sudo -iTo enable the Root account (i.e. set a password) use:
sudo passwd rootUse at your own risk!
Logging in to X as root may cause very serious trouble. If you believe
you need a root account to perform a certain action, please consult
the official support channels first, to make sure there is not a
better alternative.
Do not enable the root account. Do not set a password for the root account.
A better way is to allow root login using public key authentication, not with password. The reasoning is explained in the Debian mailing list archives.
Open
/etc/ssh/sshd_configand check ifPermitRootLoginis set toyes. If not, then set it to yes and restartsshwithsudo service ssh restartCreate the
.sshdirectory in root’s home if it doesn’t exist and make sure it has strict permissions:sudo -i mkdir -p .ssh sudo -i chmod 700 .sshCreate a public/private key pair in the system you want to login from.
Append your public key to
.ssh/authorized_keysof root, and make sure the file has strict permissions:cat id_rsa.pub | sudo -i tee -a .ssh/authorized_keys sudo -i chmod 600 .ssh/authorized_keys
With this setup you should be able to login as root using your private key.
If you have previously enabled the root account, make sure to disable it now:
sudo passwd -l rootanswered Aug 30, 2013 at 12:12

29 gold badges224 silver badges235 bronze badges
ssh user@remotehostname
user@remotehostname's password:
and then do what you want using sudo or get a root shell the recommended way:
user@remotehostname$ sudo su
Password:
root@remotehostname#
and then do your housekeeping. Instead of ‘sudo su’ you also could use ‘sudo -i’, which is equivalent, or ‘sudo -s’, that keeps the current environment.
See Ubuntu Sudo/Root documentation
answered Sep 1, 2013 at 19:42

1 gold badge8 silver badges3 bronze badges
edit your /etc/sshd_config doing:
sudo /etc/sshd_configsearch for line having PermitRootLogin into Authentication Section and uncomment PermitRootLogin or set PermitRootLogin yes. Or simply add this line to the end of file:
PermitRootLogin yesNext you’ll gonna restart ssh daemon doing
/etc/init.d/ssh restart service ssh restartsudo commandsudo suto continue session under your root account
answered Aug 26, 2013 at 18:26

1 silver badge2 bronze badges
ssh -l user localhost "sudo whoami"rootSo long as:
All that is different was the word sudo was added before carrying out the command
If there are security issues with keys etc then you could take a look at a language called expect — using an expect script you will be able to ssh / telnet what ever it is to a remote host and send passwords etc accordingly
answered Aug 26, 2013 at 18:41

V H
2 gold badges28 silver badges48 bronze badges
answered Aug 30, 2013 at 3:46

8 silver badges19 bronze badges
- Edit sshd_config file
vi /etc/ssh/sshd_config - Comment out
#PermitRootLogin without-passwordunder Authentication: - insert below
PermitRootLogin yes - Save the file.
- Restart the ssh service
service ssh restart
answered Oct 28, 2014 at 8:17

1 bronze badge
By default, the Root account password is locked in Debian based systems like Ubuntu:
sudo -i;Now set the password for root account:
sudo passwd;Simply adding a password for root is not enough.
Incoming ssh connections need to be enabled as below:
PermitRootLogin without-passwordPermitRootLogin yesThen restart SSH:
sudo service ssh restart;Finally Restart the system:
sudo reboot;answered Feb 8, 2016 at 12:28

Pratik Patil
3 gold badges31 silver badges31 bronze badges
Edit the
/etc/ssh/sshd_configfile and change the line that says “PermitRootLogin forced-commands-only” to “PermitRootLogin without-password”.Restart the sshd server with “
service sshd restart”.
SSH your machine using root with your keypair
answered May 19, 2018 at 11:57

Ali Azhar
19 silver badges14 bronze badges
Currently this is my setup (ssh_config):
Host *
PasswordAuthentication yes
PermitRootLogin without-password
StrictModes no
# ForwardAgent no
# ForwardX11 no
# ForwardX11Trusted yes
# RhostsRSAAuthentication no
# RSAAuthentication yes
# PasswordAuthentication yes
# HostbasedAuthentication no
# GSSAPIAuthentication no
# GSSAPIDelegateCredentials no
# GSSAPIKeyExchange no
# GSSAPITrustDNS no
# BatchMode no
# CheckHostIP yes
# AddressFamily any
# ConnectTimeout 0
# StrictHostKeyChecking ask
# IdentityFile ~/.ssh/identity
# IdentityFile ~/.ssh/id_rsa
# IdentityFile ~/.ssh/id_dsa
# IdentityFile ~/.ssh/id_ecdsa
# IdentityFile ~/.ssh/id_ed25519
# Port 22
# Protocol 2
# Cipher 3des
# Ciphers aes128-ctr,aes192-ctr,aes256-ctr,arcfour256,arcfour128,aes128-cbc,3des-cbc
# MACs hmac-md5,hmac-sha1,umac-64@openssh.com,hmac-ripemd160
# EscapeChar ~
# Tunnel no
# TunnelDevice any:any
# PermitLocalCommand no
# VisualHostKey no
# ProxyCommand ssh -q -W %h:%p gateway.example.com
# RekeyLimit 1G 1h SendEnv LANG LC_* HashKnownHosts yes GSSAPIAuthentication yes GSSAPIDelegateCredentials no
(output from sshd -d)
debug1: sshd version OpenSSH_7.2, OpenSSL 1.0.2g 1 Mar 2016
debug1: private host key #0: <key0>
debug1: private host key #1: <key1>
debug1: private host key #2: <key2>
debug1: private host key #3: <key3>
debug1: rexec_argv[0]='/usr/sbin/sshd'
debug1: rexec_argv[1]='-d'
debug1: Set /proc/self/oom_score_adj from 0 to -1000
debug1: Bind to port 22 on 0.0.0.0.
Server listening on 0.0.0.0 port 22.
debug1: Bind to port 22 on ::.
Server listening on :: port 22.
debug1: Server will not fork when running in debugging mode.
debug1: rexec start in 5 out 5 newsock 5 pipe -1 sock 8
debug1: inetd sockets after dupping: 3, 3
Connection from <ip-client> port 51229 on <ip-server> port 22
debug1: Client protocol version 2.0; client software version OpenSSH_7.3
debug1: match: OpenSSH_7.3 pat OpenSSH* compat 0x04000000
debug1: Enabling compatibility mode for protocol 2.0
debug1: Local version string SSH-2.0-OpenSSH_7.2p2 Ubuntu-4ubuntu2.1
debug1: permanently_set_uid: 107/65534 [preauth]
debug1: list_hostkey_types: ssh-rsa,rsa-sha2-512,rsa-sha2-256,ecdsa-sha2-nistp256,ssh-ed25519 [preauth]
debug1: SSH2_MSG_KEXINIT sent [preauth]
debug1: SSH2_MSG_KEXINIT received [preauth]
debug1: kex: algorithm: curve25519-sha256@libssh.org [preauth]
debug1: kex: host key algorithm: ecdsa-sha2-nistp256 [preauth]
debug1: kex: client->server cipher: chacha20-poly1305@openssh.com MAC: <implicit> compression: none [preauth]
debug1: kex: server->client cipher: chacha20-poly1305@openssh.com MAC: <implicit> compression: none [preauth]
debug1: expecting SSH2_MSG_KEX_ECDH_INIT [preauth]
debug1: rekey after 134217728 blocks [preauth]
debug1: SSH2_MSG_NEWKEYS sent [preauth]
debug1: expecting SSH2_MSG_NEWKEYS [preauth]
debug1: rekey after 134217728 blocks [preauth]
debug1: SSH2_MSG_NEWKEYS received [preauth]
debug1: KEX done [preauth]
debug1: userauth-request for user root service ssh-connection method none [preauth]
debug1: attempt 0 failures 0 [preauth]
debug1: PAM: initializing for "root"
debug1: PAM: setting PAM_RHOST to "<ip-client>"
debug1: PAM: setting PAM_TTY to "ssh"
debug1: userauth-request for user root service ssh-connection method publickey [preauth]
debug1: attempt 1 failures 0 [preauth]
debug1: userauth_pubkey: test whether pkalg/pkblob are acceptable for RSA SHA256:N8vfYcI48gJ/9FlB8lXEkrKcZQvQ5EOOztKWHPzxkI [preauth]
debug1: temporarily_use_uid: 0/0 (e=0/0)
debug1: trying public key file /root/.ssh/authorized_keys
debug1: fd 4 clearing O_NONBLOCK
debug1: matching key found: file /root/.ssh/authorized_keys, line 1 RSA SHA256:N8vfYcI48gJ/9FlB8lXEkrKcZQvQ5EOOzFtWHPzxkI
debug1: restore_uid: 0/0
Postponed publickey for root from <ip-client> port 51229 ssh2 [preauth]
debug1: userauth-request for user root service ssh-connection method publickey [preauth]
debug1: attempt 2 failures 0 [preauth]
debug1: temporarily_use_uid: 0/0 (e=0/0)
debug1: trying public key file /root/.ssh/authorized_keys
debug1: fd 4 clearing O_NONBLOCK
debug1: matching key found: file /root/.ssh/authorized_keys, line 1 RSA SHA256:N8vfYcI48gJ/9FlB8lXEkrKcZQvQ5EOOzFtWHPzxkI
debug1: restore_uid: 0/0
ROOT LOGIN REFUSED FROM <ip-client>
Failed publickey for root from <ip-client> port 51229 ssh2: RSA SHA256:N8vfYcI48gJ/9FlB8lXEkrKcZQvQ5EOOzFtKWHPzkI
ROOT LOGIN REFUSED FROM <ip-client> [preauth]
(output from login attempt -vvv)
OpenSSH_7.3p1, OpenSSL 1.0.2j 26 Sep 2016
debug1: Reading configuration data /etc/ssh/ssh_config
debug2: resolving "<hostname>" port 22
debug2: ssh_connect_direct: needpriv 0
debug1: Connecting to <hostname> [<server_ip>] port 22.
debug1: Connection established.
debug1: identity file dragonflame type 1
debug1: key_load_public: No such file or directory
debug1: identity file dragonflame-cert type -1
debug1: Enabling compatibility mode for protocol 2.0
debug1: Local version string SSH-2.0-OpenSSH_7.3
debug1: Remote protocol version 2.0, remote software version OpenSSH_7.2p2 Ubuntu-4ubuntu2.1
debug1: match: OpenSSH_7.2p2 Ubuntu-4ubuntu2.1 pat OpenSSH* compat 0x04000000
debug2: fd 3 setting O_NONBLOCK
debug1: Authenticating to <hostname>:22 as 'root'
debug3: hostkeys_foreach: reading file "<user_path>.ssh/known_hosts"
debug3: record_hostkey: found key type ECDSA in file <user_path>.ssh/known_hosts:2
debug3: load_hostkeys: loaded 1 keys from <hostname>
debug3: order_hostkeyalgs: prefer hostkeyalgs: ecdsa-sha2-nistp256-cert-v01@openssh.com,ecdsa-sha2-nistp384-cert-v01@openssh.com,ecdsa-sha2-nistp521-cert-v01@openssh.com,ecdsa-sha2-nistp256,ecdsa-sha2-nistp384,ecdsa-sha2-nistp521
debug3: send packet: type 20
debug1: SSH2_MSG_KEXINIT sent
debug3: receive packet: type 20
debug1: SSH2_MSG_KEXINIT received
debug2: local client KEXINIT proposal
debug2: KEX algorithms: curve25519-sha256@libssh.org,ecdh-sha2-nistp256,ecdh-sha2-nistp384,ecdh-sha2-nistp521,diffie-hellman-group-exchange-sha256,diffie-hellman-group16-sha512,diffie-hellman-group18-sha512,diffie-hellman-group-exchange-sha1,diffie-hellman-group14-sha256,diffie-hellman-group14-sha1,ext-info-c
debug2: host key algorithms: ecdsa-sha2-nistp256-cert-v01@openssh.com,ecdsa-sha2-nistp384-cert-v01@openssh.com,ecdsa-sha2-nistp521-cert-v01@openssh.com,ecdsa-sha2-nistp256,ecdsa-sha2-nistp384,ecdsa-sha2-nistp521,ssh-ed25519-cert-v01@openssh.com,ssh-rsa-cert-v01@openssh.com,ssh-ed25519,rsa-sha2-512,rsa-sha2-256,ssh-rsa
debug2: ciphers ctos: chacha20-poly1305@openssh.com,aes128-ctr,aes192-ctr,aes256-ctr,aes128-gcm@openssh.com,aes256-gcm@openssh.com,aes128-cbc,aes192-cbc,aes256-cbc,3des-cbc
debug2: ciphers stoc: chacha20-poly1305@openssh.com,aes128-ctr,aes192-ctr,aes256-ctr,aes128-gcm@openssh.com,aes256-gcm@openssh.com,aes128-cbc,aes192-cbc,aes256-cbc,3des-cbc
debug2: MACs ctos: umac-64-etm@openssh.com,umac-128-etm@openssh.com,hmac-sha2-256-etm@openssh.com,hmac-sha2-512-etm@openssh.com,hmac-sha1-etm@openssh.com,umac-64@openssh.com,umac-128@openssh.com,hmac-sha2-256,hmac-sha2-512,hmac-sha1
debug2: MACs stoc: umac-64-etm@openssh.com,umac-128-etm@openssh.com,hmac-sha2-256-etm@openssh.com,hmac-sha2-512-etm@openssh.com,hmac-sha1-etm@openssh.com,umac-64@openssh.com,umac-128@openssh.com,hmac-sha2-256,hmac-sha2-512,hmac-sha1
debug2: compression ctos: none,zlib@openssh.com,zlib
debug2: compression stoc: none,zlib@openssh.com,zlib
debug2: languages ctos:
debug2: languages stoc:
debug2: first_kex_follows 0
debug2: reserved 0
debug2: peer server KEXINIT proposal
debug2: KEX algorithms: curve25519-sha256@libssh.org,ecdh-sha2-nistp256,ecdh-sha2-nistp384,ecdh-sha2-nistp521,diffie-hellman-group-exchange-sha256,diffie-hellman-group14-sha1
debug2: host key algorithms: ssh-rsa,rsa-sha2-512,rsa-sha2-256,ecdsa-sha2-nistp256,ssh-ed25519
debug2: ciphers ctos: chacha20-poly1305@openssh.com,aes128-ctr,aes192-ctr,aes256-ctr,aes128-gcm@openssh.com,aes256-gcm@openssh.com
debug2: ciphers stoc: chacha20-poly1305@openssh.com,aes128-ctr,aes192-ctr,aes256-ctr,aes128-gcm@openssh.com,aes256-gcm@openssh.com
debug2: MACs ctos: umac-64-etm@openssh.com,umac-128-etm@openssh.com,hmac-sha2-256-etm@openssh.com,hmac-sha2-512-etm@openssh.com,hmac-sha1-etm@openssh.com,umac-64@openssh.com,umac-128@openssh.com,hmac-sha2-256,hmac-sha2-512,hmac-sha1
debug2: MACs stoc: umac-64-etm@openssh.com,umac-128-etm@openssh.com,hmac-sha2-256-etm@openssh.com,hmac-sha2-512-etm@openssh.com,hmac-sha1-etm@openssh.com,umac-64@openssh.com,umac-128@openssh.com,hmac-sha2-256,hmac-sha2-512,hmac-sha1
debug2: compression ctos: none,zlib@openssh.com
debug2: compression stoc: none,zlib@openssh.com
debug2: languages ctos:
debug2: languages stoc:
debug2: first_kex_follows 0
debug2: reserved 0
debug1: kex: algorithm: curve25519-sha256@libssh.org
debug1: kex: host key algorithm: ecdsa-sha2-nistp256
debug1: kex: server->client cipher: chacha20-poly1305@openssh.com MAC: <implicit> compression: none
debug1: kex: client->server cipher: chacha20-poly1305@openssh.com MAC: <implicit> compression: none
debug3: send packet: type 30
debug1: expecting SSH2_MSG_KEX_ECDH_REPLY
debug3: receive packet: type 31
debug1: Server host key: ecdsa-sha2-nistp256 SHA256:fhpfMHmWqXoSHcM3rdkwMDFpb8pxIZnTqSo6IKpIqnw
debug3: hostkeys_foreach: reading file "<user_path>.ssh/known_hosts"
debug3: record_hostkey: found key type ECDSA in file <user_path>.ssh/known_hosts:2
debug3: load_hostkeys: loaded 1 keys from <hostname>
debug3: hostkeys_foreach: reading file "<user_path>.ssh/known_hosts"
debug3: record_hostkey: found key type ECDSA in file <user_path>.ssh/known_hosts:2
debug3: load_hostkeys: loaded 1 keys from <server_ip>
debug1: Host '<hostname>' is known and matches the ECDSA host key.
debug1: Found key in <user_path>.ssh/known_hosts:2
debug3: send packet: type 21
debug2: set_newkeys: mode 1
debug1: rekey after 134217728 blocks
debug1: SSH2_MSG_NEWKEYS sent
debug1: expecting SSH2_MSG_NEWKEYS
debug3: receive packet: type 21
debug2: set_newkeys: mode 0
debug1: rekey after 134217728 blocks
debug1: SSH2_MSG_NEWKEYS received
debug2: key: dragonflame (0x60006bcb0), explicit
debug3: send packet: type 5
debug3: receive packet: type 7
debug1: SSH2_MSG_EXT_INFO received
debug1: kex_input_ext_info: server-sig-algs=<rsa-sha2-256,rsa-sha2-512>
debug3: receive packet: type 6
debug2: service_accept: ssh-userauth
debug1: SSH2_MSG_SERVICE_ACCEPT received
debug3: send packet: type 50
debug3: receive packet: type 51
debug1: Authentications that can continue: publickey,password
debug3: start over, passed a different list publickey,password
debug3: preferred publickey,keyboard-interactive,password
debug3: authmethod_lookup publickey
debug3: remaining preferred: keyboard-interactive,password
debug3: authmethod_is_enabled publickey
debug1: Next authentication method: publickey
debug1: Offering RSA public key: dragonflame
debug3: send_pubkey_test
debug3: send packet: type 50
debug2: we sent a publickey packet, wait for reply
debug3: receive packet: type 60
debug1: Server accepts key: pkalg rsa-sha2-512 blen 279
debug2: input_userauth_pk_ok: fp SHA256:N8vfYcI48gJ/9FlB8lXEkrKcZQvQ5EOOzFtKWHPzxkI
debug3: sign_and_send_pubkey: RSA SHA256:N8vfYcI48gJ/9FlB8lXEkrKcZQvQ5EOOzFtKWHPzxkI
debug3: send packet: type 50
debug3: receive packet: type 51
debug1: Authentications that can continue: publickey,password
debug2: we did not send a packet, disable method
debug3: authmethod_lookup password
debug3: remaining preferred: ,password
debug3: authmethod_is_enabled password
debug1: Next authentication method: password
(output from ls -alF .ssh)
ls -alF .ssh
total 12
drwx------ 2 root root 4096 Jan 16 15:01 ./
drwx------ 10 root root 4096 Jan 16 04:26 ../
-rw------- 1 root root 405 Jan 16 15:00 authorized_keys
Is there something obvious I’m missing? Any ideas?
Thanks in advance!
Применение корневых настроек
Теперь, когда в настройках включен вход в систему с правами root, вам необходимо перезапустить демон SSH, чтобы применить изменения. На большинстве компьютеров с Linux это легко сделать с помощью systemd. В терминале получите root-доступ с помощью su или sudo:
su -
sudo -s
После получения root используйте systemd для перезапуска демона SSH.
systemctl restart sshd
Не использовать systemd? Вместо этого попробуйте эту команду:
service ssh restart
Если ни одна из команд не работает для перезапуска демона SSH, надежный способ — просто перезапустить сервер, на котором запущен SSH:
reboot
[email protected]Включить вход в систему с правами root
Примечание. Не хотите удаленно изменять свой SSH-сервер? Измените его локально, а не в терминале.
ssh [email protected]Мы подключены (удаленно) через SSH к серверу SSH. Затем повысите обычное соединение до Root-доступа, войдя в систему через su.
Затем, используя текстовый редактор Nano, откройте файл конфигурации SSH-сервера.
nano /etc/ssh/sshd_config
Просмотрите файл конфигурации, найдите «PermitRootLogin». Перед ним может стоять «нет». В этом случае измените «нет» на «да».
В других случаях SSH «PermitRootLogin» может сказать «запретить пароль». Удалите «запретить-пароль» и измените его на «да».
После изменения настроек Root для SSH-сервера вам необходимо сохранить изменения конфигурации. Изменения конфигурации сохраняются в Nano при нажатии комбинации клавиш Ctrl + O. Закройте редактор Nano, нажав Ctrl + X, когда конфигурация сохранится правильно.
Отключить root-вход
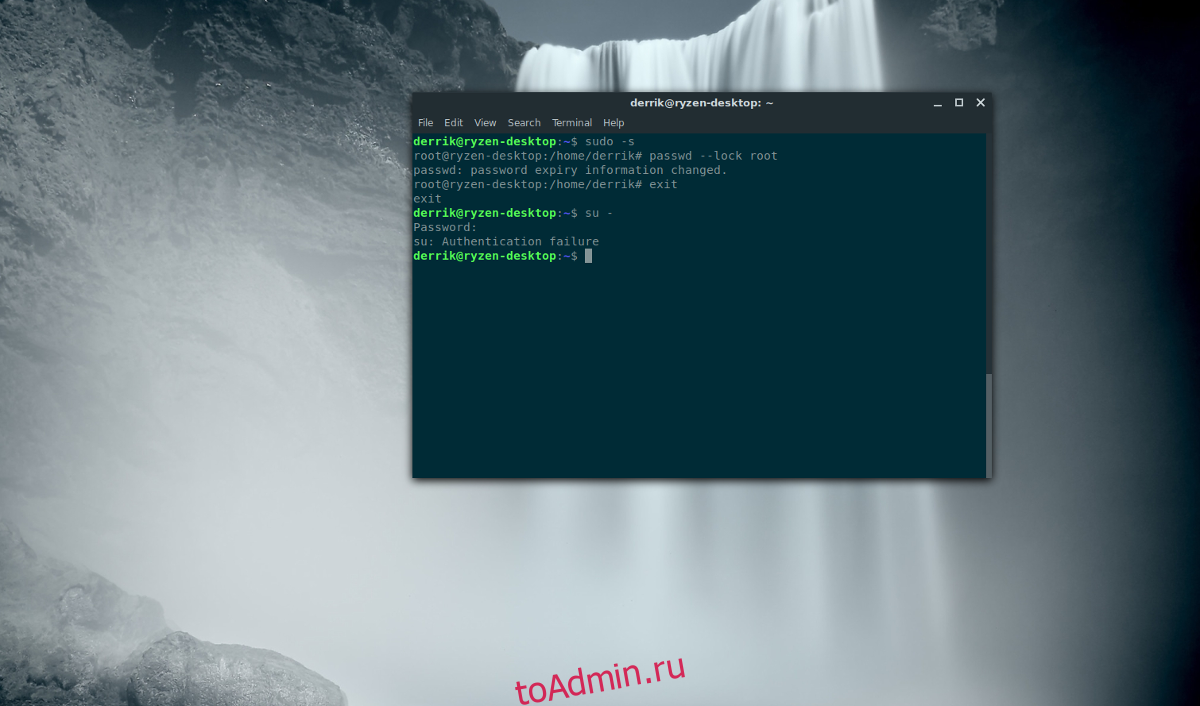
Больше не хотите входить в систему через SSH? К счастью, эту функцию так же легко отключить, как и включить. Первый способ — просто заблокировать учетную запись Root. Выполнение этого способа позволяет включать и выключать параметр на лету, разблокировав учетную запись Root. Чтобы заблокировать Root, получите оболочку суперпользователя через sudo и запустите:
passwd --lock root
Эта команда шифрует учетную запись root и фактически отключает ее. Чтобы вернуть его для использования с Root over SSH, следуйте инструкциям в верхней части статьи.
В качестве альтернативы, чтобы полностью отключить вход в систему Root, откройте терминал (с Root):
su -
sudo -s
В файле конфигурации SSH найдите «PermitRootLogin» и измените его с «да» на «нет».
nano /etc/ssh/sshd_config
Нажмите Ctrl + O, чтобы сохранить, выйдите, нажав Ctrl + X, а затем перезагрузитесь. После сброса вход в систему Root работать не будет.
")


")