

Earlier, installing Android applications on Windows was an extremely technical and lengthy process. We typically had to sideload our favorite Android applications to use them on a Windows PC. But then, Microsoft made it a bit simple by integrating the Amazon App Store into Microsoft Store with Windows 11. Yet, it also didn’t work well because some popular applications aren’t there in the Amazon App Store.
The new Windows 11 comes with Windows Subsystem for Android (WAS), which lets you run Android apps on Windows 11. You first need to root your Windows PC to use the Windows Subsystem for Android and run Android applications. Root? This sounds like something tricky to do. Don’t worry. It’s much easier with Magisk. Using Magisk Manager, you can root your Windows 11 PC in a few simple steps. This detailed tutorial lists all the steps to root Windows Subsystem for Android.

- How To Check if the Windows Subsystem for Android Is Rooted or Not?
- Will Windows 11 Natively Run Android Apps?
- How Do I Get Windows Subsystem on Android?
- How Do I Enable Windows Subsystem on Android?
- Magisk on WSA (with Google Apps)
- Support for generating from these systems
- Features
- Text Guide
- FAQ
- Credits
- Magisk on WSA (with Google Apps)
- Pre-request
- Features
- Text Guide
- FAQ
- Credits
- WSA(Windows Subsystem for Android™️) GApps + Root Guide
- Minimum Requirements
- Pre-notice
- 0. Getting Ready for installation
- 1. Getting Ready for WSA File
- 2. Modified WSA Sideload
- 3. Install GApps
- 4. Root
- Frequently happening Errors
- Download and Install the Magisk Application
- Download the Magisk Application
- Enable Developer Mode in WSA
- Establish the Connection with ADB
- Install the Magisk Application
- Run Any Android Application
- What is Magisk Manager?
- Install Modded WSA
- Uninstall Previous WSA
- Install Android SDK Platform Tools
- Download Modded WSA
- Enable Developer Mode On Windows 11
- Enable Virtual Machine Option in Windows 11
- Install Modded WSA Using PowerShell
How To Check if the Windows Subsystem for Android Is Rooted or Not?
You can easily check whether Windows Subsystem for Android is rooted by installing a root checker application from Playstore.
1. Open Playstore on your Windows, and search for the Rooth Checker by Joeykrim. Click on the Install button to download the application.
3. Then, open the Rooth Checker application, and click on the Verify Root button.
4. After verifying it, you will see a popup stating your PC is rooted.
Will Windows 11 Natively Run Android Apps?
Yes, you can run Android applications on your Windows 11 by easily downloading them from the Amazon Appstore. The Amazon Appstore supports multiple Android applications.
How Do I Get Windows Subsystem on Android?
There are multiple methods to get Windows Subsystem for Android. You can install Amazon Appstore from the Microsoft Store. Another way is to install any Android application from Microsoft Store for the first time. It will automatically install Windows Subsystem on Android on your Windows PC.
How Do I Enable Windows Subsystem on Android?
You can download Amazon Appstore from Microsoft Store on your Windows 11 to automatically enable the Windows Subsystem for Android (WSA). Otherwise, you can install any Android application from Microsoft Appstore to enable WSA.
Magisk on WSA (with Google Apps)
⚠️ For fork developers: Please don’t build using GitHub Actions, as GitHub will count your forked GitHub Actions usage against this upstream repository, which may cause this upstream repository gets disabled by GitHub staff like MagiskOnWSA because of numerous forks building GitHub Actions, and counting the forks’ Action usage against this upstream repository.
Support for generating from these systems
Linux (x86_64 or arm64)
The python3 library
requestsis used.Python version ≥ 3.7.2.
Ubuntu (You can use WSL2)
Ready to use right out of the box.
Debian (You can use WSL2)
Ready to use right out of the box.
openSUSE Tumbleweed (You can use WSL2)
Ready to use right out of the box.
run.shwill handle all dependencies automatically.No need to type any commands.
Features
- Integrate Magisk and GApps in a few clicks within minutes
- Keep each build up to date
- Support both ARM64 and x64
- Support MindTheGapps
- Remove Amazon Appstore
- Fix VPN dialog not showing (use our VpnDialogs app)
- Add device administration feature
- Unattended installation
- Automatically activates developers mode in Windows 11
- Update to the new version while preserving data with a one-click script
- Merged all language packs
Text Guide
FAQ
Credits
- StoreLib: API for downloading WSA
- Magisk: The most famous root solution on Android
- The Open GApps Project: One of the most famous Google Apps packages solution
- WSA-Kernel-SU and kernel-assisted-superuser: The kernel
sufor debugging Magisk Integration - WSAGAScript: The first GApps integration script for WSA
- erofs-utils: Pre-build
erofs-utilswith erofsfuse enabled
The repository is provided as a utility.
Android is a trademark of Google LLC. Windows is a trademark of Microsoft Corporation.
Magisk on WSA (with Google Apps)
Pre-request
- Ubuntu (you can use WSL2)
Features
- Integrate Magisk and OpenGApps in a few clicks within minutes
- Keep each build up to date
- Support both ARM64 and x64
- Support all OpenGApps variants except for aroma (aroma does not support x86_64, please use super instead)
- Remove Amazon AppStore
- Fix VPN dialog not showing (use our VpnDialogs app)
- Add device management feature
- Unattended installation
- Automatically activates developers mode in Windows 11
- Update to the new version while preserving data with a one-click script
- Merged all language packs
- Support managing start menu icons (manually installing WSAHelper to use this feature)
Text Guide
FAQ
Can I delete the installed folder?
How can I update WSA to a new version?
Delete the
downloadfolder
Rerun the script, replace the content of your previous installation and rerunInstall.ps1. Don’t worry, your data will be preserved.How can I get the logcat from WSA?
How can I update Magisk to a new version?
Do the same as updating WSA
How to pass safetynet?
Like all the other emulators, no way.
Virtualization is not enabled?
Install.ps1helps you enable it if not enabled. After rebooting, rerunInstall.ps1to install WSA. If it’s still not working, you have to enable virtualization in BIOS. That’s a long story so ask Google for help.How to remount the system as read-write?
No way in WSA since it’s mounted as read-only by Hyper-V. You can modify the system by making a Magisk module. Or directly modify the system.img. Ask Google for help.
I cannot
adb connect localhost:58526Make sure developer mode is enabled. If the issue persists, check the IP address of WSA on the setting page and try
adb connect ip:5555.Magisk online module list is empty?
Magisk actively removes the online module repository. You can install the module locally or by
adb push module.zip /data/local/tmpandadb shell su -c magisk --install-module /data/local/tmp/module.zip.Can I use Magisk 23.0 stable or a lower version?
No. Magisk has bugs preventing itself from running on WSA. Magisk 24+ has fixed them. So you must use Magisk 24 or higher version.
How can I get rid of Magisk?
Choose
noneas the root solution.
Credits
- StoreLib: API for downloading WSA
- Magisk: The most famous root solution on Android
- The Open GApps Project: One of the most famous Google Apps packages solution
- WSA-Kernel-SU and kernel-assisted-superuser: The kernel
sufor debugging Magisk Integration - WSAGAScript: The first GApps integration script for WSA
WSA(Windows Subsystem for Android™️) GApps + Root Guide
Minimum Requirements
- Windows 11 64bit (x86_64)
Control Panel-> FromPrograms and Features, Check all threeWindows Hypervisor Platform,Virtual Machine Platform,Windows Subsystem for Linuxis all enabled- Virtualization enabled in BIOS
WSL2,Linux Distribution for WSL, Ubuntu 18.04 is Recommended.- Please search Google for WSL Installations.
Pre-notice
- GApps installation script part is referenced from WSAGAScript by ADeltaX.
- For modified kernel, I used and built LSPosed/WSA-Kernel-SU which license is GPLv2.
- While working on Sideload, It regenerates
%AppData%\SideloadedWSAfolder. It deletes files which exists in the directory, so if there is a file in the directory, please backup or move it to another place. - After working on Sideload, If you delete
%AppData%\SideloadedWSAfolderWindows Subsystem for Android™️will not work as intended. - When
runningthe ps1 file,Right click and Run in PowerShellis default.
0. Getting Ready for installation
- Clone this Repository(
Run "git clone https://github.com/aroxu/wsa-root-gapps-guide.git"), or Download it.If you downloaded this repository please change it’s name to
wsa-root-gapps-guide.zipand extract it.
1. Getting Ready for WSA File
- Enter https://store.rg-adguard.net, and paste
https://www.microsoft.com/store/productId/9P3395VX91NRinto link input line. - On Link input, enter
https://www.microsoft.com/store/productId/9P3395VX91NR, select SLOW option, and press✔. - Download the file which starts with
MicrosoftCorporationII.WindowsSubsystemForAndroidand ends with.msixbundle. - Change the downloaded file name into
wsa.msixbundle.
2. Modified WSA Sideload
- Settings → Updates & Security → Enable Developer Mode.
- Open
wsa.msixbundlewith your archive manager, or change the extension to.zip. - Copy or decompress the msix file which name is
WsaPackage_<version>_Release-Nightlyamong the files inside thewsa.msixbundlefile to the current folder. - Changed the copied msix file name to
modified.zipand decompress it. - Remove files and folder which is
AppxMetadatafolder,AppxSignature.p7x,appxblockmap.xml,[content_types]in extracted contents. - Copy and execute
1. sideload.ps1file in themodifiedfolder which comes from clone source
3. Install GApps
From here you need WSL2. Any distribution is fine, But I recommend Ubuntu 18.04.
Items with WSL2 works comes with🐧emoji.
- Enter OpenGApps and press
x86_64,11.0,picoin order, and click ⬇️ (Download) button to download GApps. - On Modified WSA Folder, Create folders named
#IMAGES,#GAPPS. (Do not remove #.) At this point, you should create it not inmodified, but in root of themodifieddirectory. - Copy GApps into
#GAPPSfolder which you have donwloaded. At this point you should not extract it. - Press
Win + Rand enterexplorer %AppData%\SideloadedWSA, from there copyproduct.img,system.img,system_ext.img,vendor.imgfiles into#IMAGESfolder which is in your Modified WSA Directory. - Open
2._install_gapps.shas Notepad++ or VSCode, etc. and edit like this:Root= Change the upper one into Modified WSA direcotry which you are working on.Root= - 🐧 Open WSA2 Distribution which is installed, and use
sudo -ito enter root. - 🐧 Enter following command:
apt update -y apt upgrade -y apt-get update -y apt-get upgrade -y apt-get install -y unzip lzip wget
- 🐧 Move to the Modified WSA directory which you are working on. For Example: If the working Modified WSA directory is
C:\Users\user\Desktop\wsa-root-gapps-guide:/mnt/c/Users/user/Desktop/wsa-root-gapps-guide
- 🐧 Enter following command:
chmod a+x 2._install_gapps.sh ./2._install_gapps.sh
- Copy all contents in
#IMAGESwhich is in Modified WSA Folder. PressWin + R, enterexplorer %AppData%\SideloadedWSA, and paste into it. - Prepare adb. (You can download it from here: https://dl.google.com/android/repository/platform-tools_r31.0.3-windows.zip)
- Start
Windows Subsystem for Android™️, enableDeveloper Option, and executeFilesright at the top. - Extract
platform-tools, and open Windows Terminal at current direcotyr and typeadb connect <WSA_IP_ADDRESS>,adb shellin order and enter the following command: - On Start Menu click
Play store, and Log In. There may be error happening, at then relaunch the program and relogin.
4. Root
- Run adb and enter the following command:
su Enter the command which you want to run as root.
Frequently happening Errors
- Powershell script does not run / cannot be run. What should I do?
Unrestricted For your security, do all the tasks you have to do and change it back when it's done. RemoteSigned
Download and Install the Magisk Application
After installing the modded WSA the next step is to download and install the Magisk application.
Download the Magisk Application
You need first to download the Magisk Manager application. After downloading the application, extract the file anywhere on your PC where you can easily access it.
Enable Developer Mode in WSA
1. Press the Windows key and type Windows Subsystem for Android and open it.
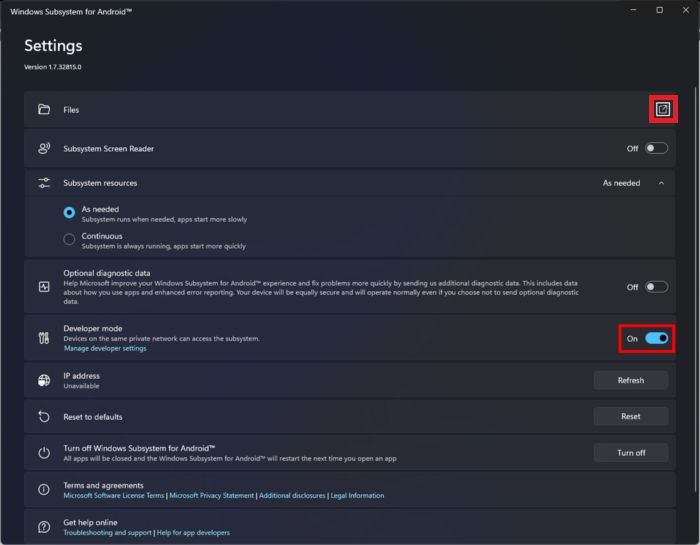
2. Then, scroll down, and click on the Developer Mode toggle to enable the option.
Establish the Connection with ADB
Now, you are set to install and run Android applications on your Windows PC with the help of WSA. But before that, you need to sideload the Magisk Manager application. Sideloading the Magisk Manager application will require creating a connection between WSA and ADB. You can easily establish the connection with ADB in a few simple steps.
1. Press the Windows key and type Windows Subsystem for Android.
2. Scroll down, and look for the IP Address section.
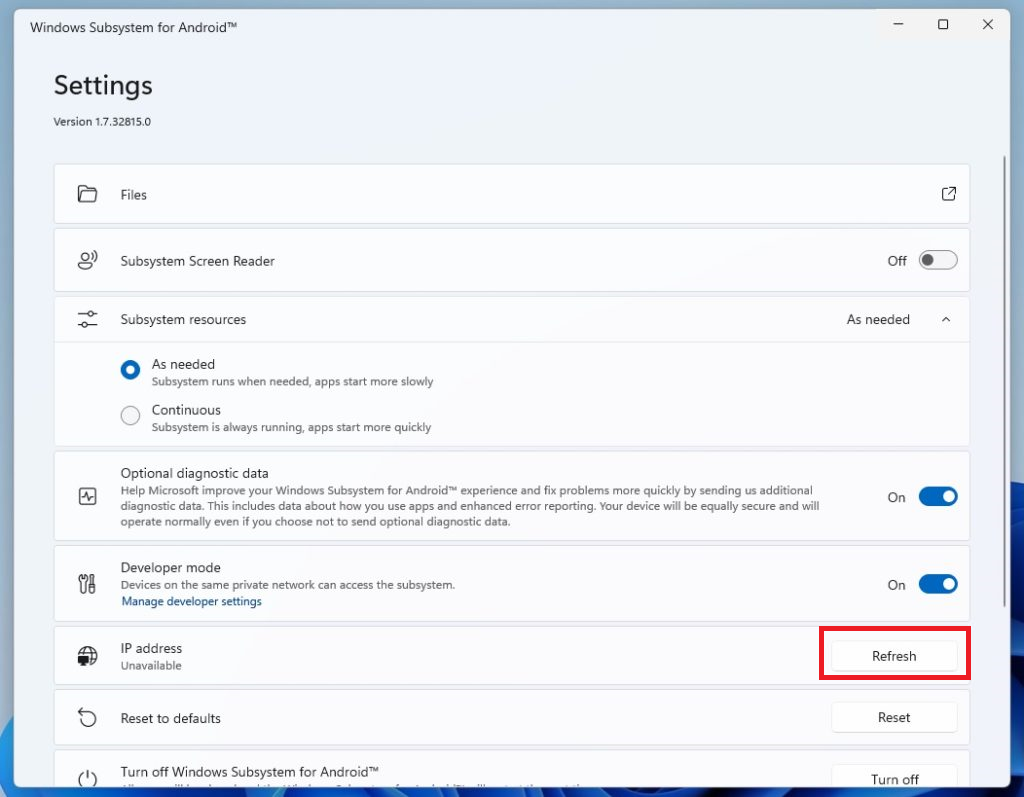
3. Click on the Refresh button to get the updated IP Address of your WSA.
4. Then, head to the folder where you extracted the Android SDK Platform Tool zip file, and type CMD.
5. After typing CMD in the bar, press the Enter key to run the Command Prompt.
6. Now, run the mentioned command: adb connect (Your IP Address Here). For instance, adb connect 202.142.122.36
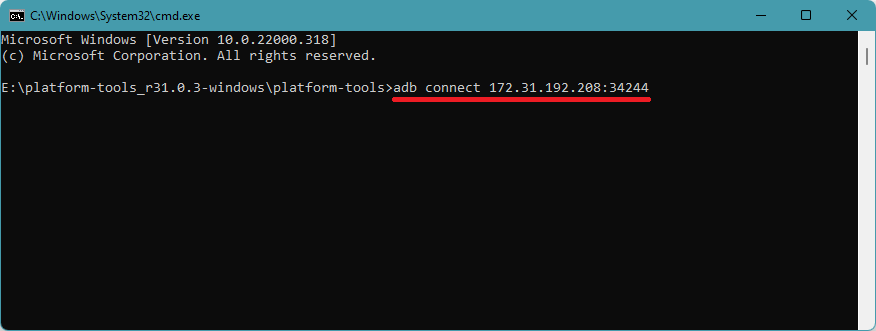
7. Keep executing the command, until you get the connection successful message.
You have now successfully created a connection between WSA and ADB.
Install the Magisk Application
1. Open the folder where you extracted the Magisk file.
2. Now, transfer the extracted file to the platform-tools folder, or the folder where you extracted the Android SDK Platform Tool zip file.
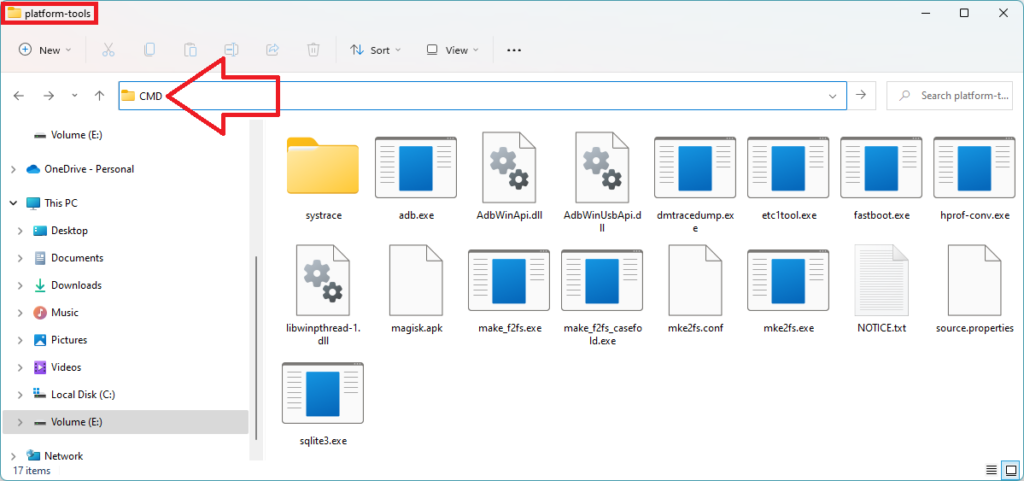
3. Once done, open CMD and execute this command to install Magisk Application: adb install magisk.apk.
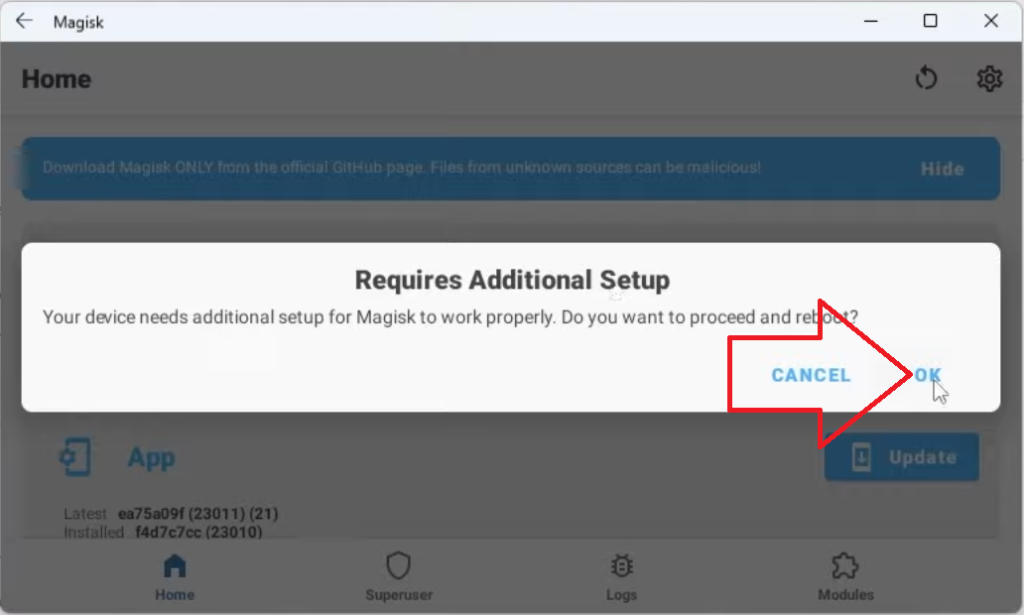
4. Once you have installed the Magisk Manager application, open it. When you open the application, it will ask you to download a proprietary code. So, click on the OK button.
Run Any Android Application
1. Press the Windows Key, type Play Store in the search bar and open it.
2. Now, search for any Android application you want to install on your Windows PC.
What is Magisk Manager?
Magisk Manager is a popular rooting tool. It lets you root your Android phone without reporting Google about it. Google prevents rooting Android smartphones. What Magisk Manager does is, it simply tricks the Google SafeNet, which detects whether your device is rooted. The primary purpose of Magisk Manager is to trick the Google SafeNet and lets you root your Android phone with ease. Magisk Manager has a high success rate and rarely fails to root your smartphone or Windows.
Install Modded WSA
Now when you know what Magisk Manager is let’s start with the steps to root Windows Subsystem for Android. The very first thing you need to do is install modded WSA on your Windows 11 PC.
Uninstall Previous WSA
You will need to uninstall the current version of WSA installed on your Windows 11 PC before manually installing the modded WSA. Here are the steps to remove the current version of WSA.
1. Press the Windows key and type Windows Subsystem for Android in the search bar.
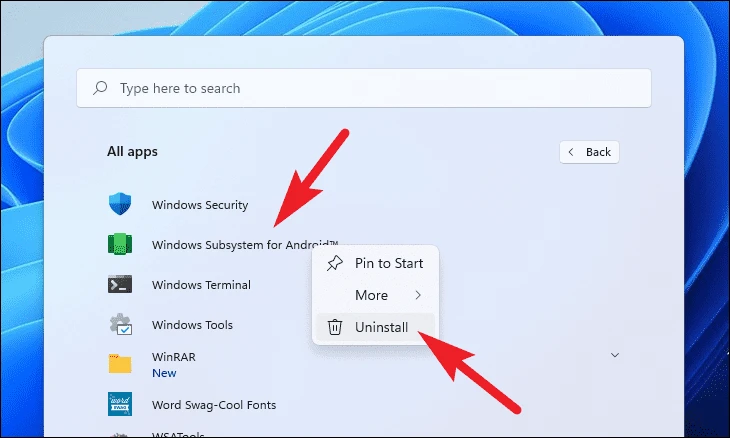
2. Right-click on the Windows Subsystem for Android, and then click on the Uninstall button. Then, restart or reboot your Windows PC.
If you do not see the Windows Subsystem for Android in the search results. Then, it means your system doesn’t have WSA installed. You can skip to the next step.
Install Android SDK Platform Tools
Once you have uninstalled the current version of WSA you will need to download and install Android SDK Platform Tools to install the modded version of WSA. Android SDK Platform Tools are a way to develop applications for the Android platform. It will download as a zip file. After downloading the zip file, extract it anywhere on your PC where accessible.
Download Modded WSA
The next step is to download the modded WSA. After downloading the modded WSA extract the zip file anywhere on your Windows 11 PC. Also, don’t add any space while saving the file. Otherwise, it will create an issue while installing the modded WSA. You only need to download the Modded WSA. No need to install or make any changes as of now.
Enable Developer Mode On Windows 11
1. Press Windows Key + I to open Settings.
2. Head to Privacy and Security Settings and search for the For Developer option.
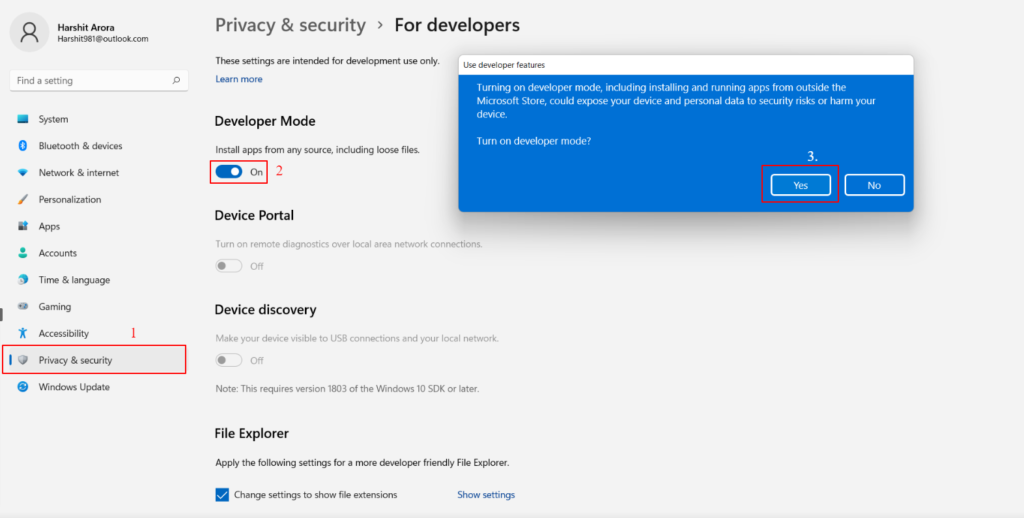
3. After that, tap on the toggle to enable the Developer Mode and confirm it by clicking on Yes.
Enable Virtual Machine Option in Windows 11
1. Press the Windows key and type Turn Windows features on or off in the search bar. Now, open it
2. Then, search for Virtual Machine Platform and check the checkbox to enable it.
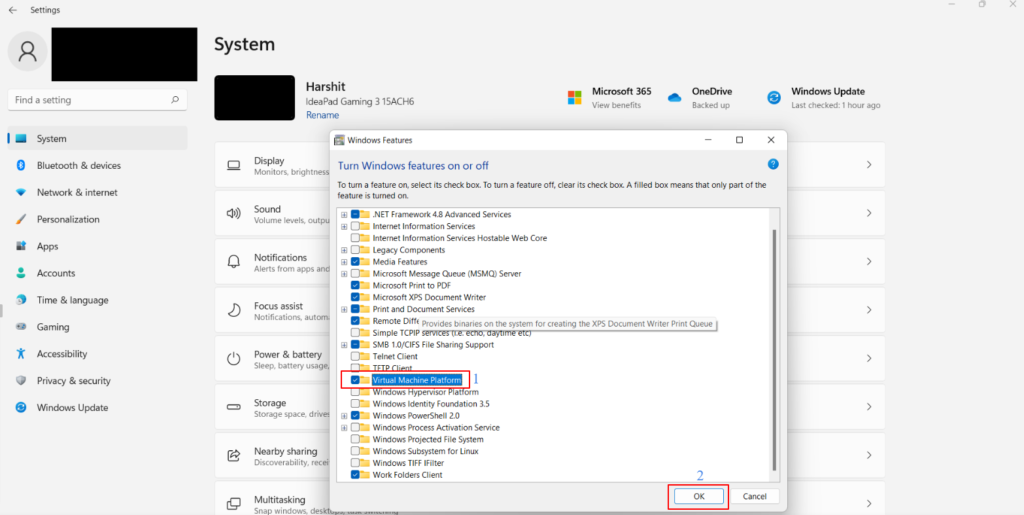
3. At last, click on the OK button and reboot your PC.
Install Modded WSA Using PowerShell
cdD: (Replace ‘D’ with your Drive Name)CD + Folder Name, For instance, CD WSA_ROOTED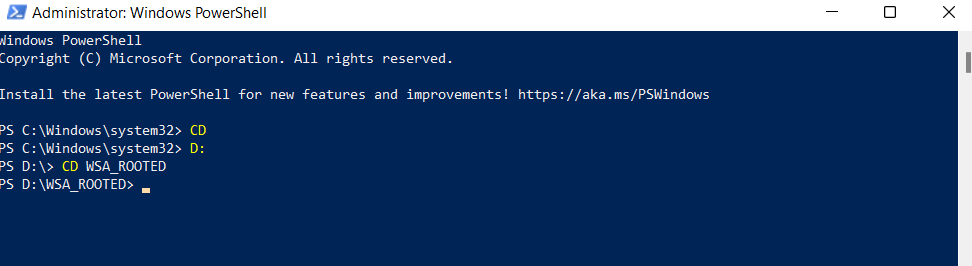
3. After running the above-mentioned commands, execute this command:
Add-AppxPackage -Register .\AppxManifest.xmlNow, close the PowerShell. You have successfully installed modded WSA on your Windows 11 PC.
")


")