

Visual Studio is primarily designed for installation from an internet-connected machine, since many components are updated regularly. However, with some extra steps, it’s possible to deploy Visual Studio in an environment where a working internet connection is unavailable.
Root Certificates are embedded within our operating system all around. These are also known as Trusted Root Certificates, created by the Certificate Authority (CA), accrediting that a website or software
Root Certificates are embedded within our operating system all around. These are also known as Trusted Root Certificates, created by the Certificate Authority (CA), accrediting that a website or software is who they claim they are. It is more like a digital certificate of authentication
By default, Windows 11 updates its root certificate over the internet through Windows Update at least once a week through a Trusted Root Certificate List (CTL). However, if your device is not connected to the internet, certificates will likely expire over time, thus causing certain scripts and applications to not function properly, or experience problems while browsing the internet.
Let us help you avoid this problem by showing you how to update your system’s Root Certificates.
Before we begin, let us guide you on how to see and manage the Root Certificates on Windows 11 and find out which certificates are expired or about to expire.
Проблема: при установке framework 4.6.2 для windows7 sp1, есть две ошибки сертификата
// Ошибка 1: Не удалось установить цепочку сертификатов для доверенного корневого центра // Ошибка 2: Цепочка сертификатов была обработана, но завершилась недоверенным корневым сертификатомИзвестные проблемы с обновлением безопасности 3135996 для обновления безопасности .NET Framework 4.6.1 / 4.6 3136000 и Windows Vista SP2, Windows Server 2008 SP2, Windows 7 SP1 и Windows Server 2008 R2 SP1
В нем упоминается несколько моментов:
Во-первых, компьютер не может быть подключен к сети. Необходимо подключиться к центру сертификации. Решение этой проблемы очень простое. Просто убедитесь, что вы можете подключиться к следующему URL-адресу:
Вторая возможность заключается в том, что ваше устройство не может быть подключено к Интернету, поэтому вы должны вручную загрузить сертификат и импортировать его. Это основная задача, которую я решил на этот раз.
Загрузить сертификат: MicrosoftRootCertificateAuthority2011.cer
Microsoft Root Certificate Authority 2011
Самый простой способ, конечно, шаг за шагом.
Здесь следует отметить, что это «Trusted Root Certification Authority». Если вы просто дважды щелкнете по файлу cer и импортируете сертификат, если вы снова установите программу напрямую, он появится из-за недоверия, о котором я говорил в начале. Вторая ошибка. Проще говоря, место импорта должно быть оптимистичным.
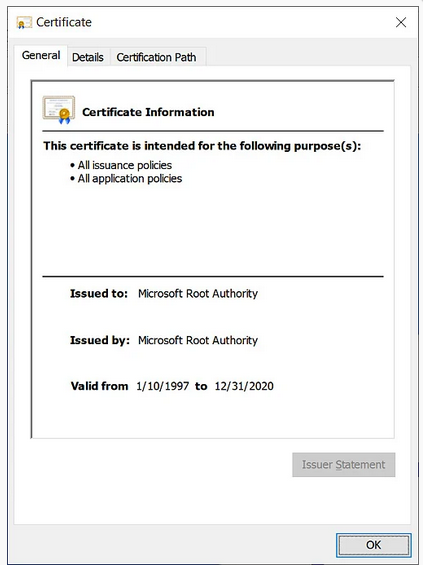
По информации Bleeping Computer, в конце этого месяца закончится срок действия корневого сертификата некоторых версий Windows, включая XP/2000/Server 2003/Windows 7/Vista/Server 2008/Server 2008 R2. Microsoft просит системных администраторов не удалять корневые сертификаты Windows с истекшими сроками действия. Они необходимы для корректной работы ОС, а их отсутствие может вызвать сбой системы.
Эта просьба компании также относится к корневому сертификату Microsoft Root Authority, который закончится 31 декабря 2020 года.
Проверить срок действия корневых сертификатов в Windows можно в хранилище сертификатов (панель управления, вкладка «Содержимое», кнопка «Сертификаты). В Windows 7/10 это можно также сделать с помощью утилиты Certmgr.exe (средство диспетчера сертификатов) или Certmgr.msc.
У всех корневых сертификатов есть срок действия, по истечению которого они и все полученные на их основе сертификаты становятся недействительными. Но обычно это не проблема, так как производители ПО и устройств своевременно выпускают обновление, заменяющее истекший корневой сертификат на новый с другим сроком действия. Если это не произойдет, то пользовательские устройства, например, больше не смогут устанавливать безопасные интернет-соединения, поскольку защита, обеспечиваемая корневым сертификатом, была нарушена.
Microsoft не пояснила, когда будет выпущен новый корневой сертификат взамен текущего. Компания предупредила, что в любом случае сертификаты с истекшим сроком действия все еще используются Windows для обратной совместимости и никогда не должны удаляться из системы. Даже если в системе есть доверенный корневой сертификат с истекшим сроком действия, то все, что было подписано с использованием этого сертификата до даты истечения срока действия, требует, чтобы этот доверенный корневой сертификат был подтвержден в системе.
Microsoft уточнила, что если сертификаты с истекшим сроком действия не отозваны, то их можно использовать для проверки всего, что было подписано ими до истечения срока их действия.
14 января 2020 года закончился период расширенной поддержки операционной системы Windows 7. Компьютеры под ее управлением продолжат работать, но производитель ОС не гарантирует их безопасность и советует перейти на Windows 10. Microsoft будет до 10 января 2023 года платно поддерживать Windows 7 для участников программы расширенных обновлений безопасности (Extended Security Updates program — ESU).
См. также:
- Install certificates required for Visual Studio offline installation
- How to refresh certificates when offline
- Option 1 — Manually install certificates from a layout folder
- Option 2 — Distribute trusted root certificates in an enterprise environment
- Option 3 — Install certificates as part of a scripted deployment of Visual Studio
- What are the certificates files in the Certificates folder?
- Why are the certificates from the Certificates folder not installed automatically?
- Checking if certificates are already installed
- Install Visual Studio
- See also
- View trusted root certificates using Windows PowerShell
- Install certificates needed for Visual Studio offline installation
- What are the certificates files in the certificates folder?
- Why are the certificates from the certificates folder not installed automatically?
- Checking if certificates are already installed
- How to create a layout for a previous Visual Studio 2017 release
- How to get support for your offline installer
- Практика Self-signed certificate
- OpenSSL
- Реализация TLS
- Реализация mTLS
- Реализация mTLS в браузере
- Дополнительные возможности OpenSSL
- Конвертация форматов сертификатов
- Отладка с помощью OpenSSL
- Install Visual Studio
- Практика CA Smallstep
- Установка Smallstep и CLI step
- Генерация ключей и сертификатов
- Дополнительные возможности CA Smallstep
- Customizing the network layout
- Updating a network install layout
- Deploying from a network installation
- Error codes
- Update root certificates from a remote computer
- Export Root Certificates
- Import Root Certificates
- From an SST File
- Download Latest Root Certificates for Windows
- Install All Certificates using SST File
- Install Individual Root Certificates using SST File
- From an STL File
- View trusted root certificates using the Certificate MMC
- Анонс
- Заключение
- Final Thoughts
Install certificates required for Visual Studio offline installation
Visual Studio is primarily designed to be installed on an internet-connected machine, since many components are updated regularly. However, with some extra steps, it’s possible to deploy Visual Studio in an environment where a working internet connection is unavailable.
The Visual Studio setup engine installs only content that is trusted. It does this by checking Authenticode signatures of the content being downloaded and verifying that all content is trusted before installing it. This keeps your environment safe from attacks where the download location is compromised.
How to refresh certificates when offline
There are three options for installing or updating certificates in an offline environment.
Option 1 — Manually install certificates from a layout folder
When you create a network layout or a local offline cache, the necessary certificates are downloaded to the Certificates folder. You can manually install the certificates by right-clicking each of the certificate files, selecting Install Certificate, and then clicking through the Certificate Manager wizard. If asked for a password, leave it blank.
Option 2 — Distribute trusted root certificates in an enterprise environment
Option 3 — Install certificates as part of a scripted deployment of Visual Studio
Copy the Certificate Manager Tool (certmgr.exe) to the network layout or local cache installation location. Certmgr.exe is not included as part of Windows itself, but is available as part of the Windows SDK.
certmgr.exe -add [layout path]ertificatesanifestRootCertificate.cer -n Microsoft Root Certificate Authority 2011 -s -r LocalMachine root
certmgr.exe -add [layout path]ertificatesanifestCounterSignRootCertificate.cer -n Microsoft Root Certificate Authority 2010 -s -r LocalMachine root
certmgr.exe -add [layout path]ertificatess_installer_opc.RootCertificate.cer -n Microsoft Root Certificate Authority 2010 -s -r LocalMachine root
certutil.exe -addstore -f
certutil.exe -addstore -f
certutil.exe -addstore -f
Deploy the batch file to the client. This command should be run from an elevated process.
What are the certificates files in the Certificates folder?
- manifestRootCertificate.cer contains:
- Root certificate: Microsoft Root Certificate Authority 2011
- manifestCounterSignRootCertificate.cer and vs_installer_opc.RootCertificate.cer contain:
- Root certificate: Microsoft Root Certificate Authority 2010
The Visual Studio Installer requires only the root certificates to be installed on the system. All of these certificates are required for Windows 7 Service Pack 1 systems that do not have the latest Windows Updates installed.
Why are the certificates from the Certificates folder not installed automatically?
Checking if certificates are already installed
Run mmc.exe.
a. Click File, and then select Add/Remove Snap-in.
b. Double-click Certificates, select Computer account, and then click Next.
c. Select Local computer, and then click Finish.
d. Expand Certificates (Local Computer).
e. Expand Trusted Root Certification Authorities, and then select Certificates.- Check this list for the necessary root certificates.
f. Expand Intermediate Certification Authorities, and then select Certificates.
- Check this list for the required intermediate certificates.
- Check this list for the required intermediate certificates.
Install Visual Studio
See also

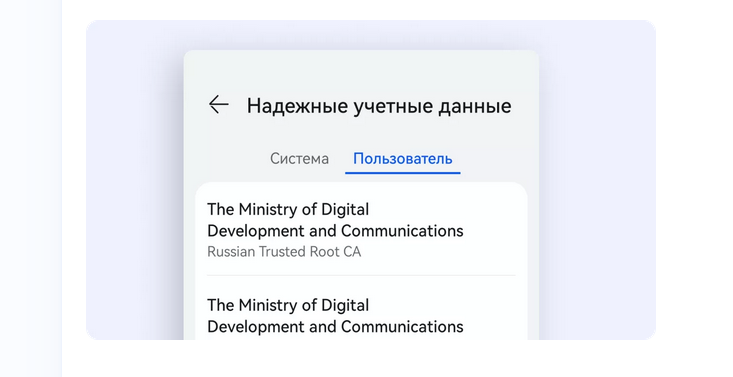
«Сбер» для безопасного доступа к сайтам банка после перехода на российские TLS-сертификаты предлагает всем пользователям установить корневой сертификат Russian Trusted Root CA с сайта «Госуслуги» или использовать «Яндекс Браузер«.
«Сбер» пояснил, что скоро только российские сертификаты обеспечат защищённый доступ к сайтам и онлайн-сервисам «Сбера» с любых устройств пользователей. Для этого нужно или использовать браузеры с поддержкой российских сертификатов («Яндекс Браузер» или «Атом«) или установить сертификаты для своей операционной системы.
«Сбер» предупредил, что скоро большинство сайтов в рунете перейдут на российские TLS-сертификаты и пользователям всё равно придётся выбирать: установить корневой сертификат Russian Trusted Root CA или использовать «Яндекс.Браузер».
Национальный удостоверяющий центр выдаёт сертификаты на домены только тех организаций, которые явно это запросили. Полный список этих доменов публично доступен по адресу www.gosuslugi.ru/tls.
«Яндекс Браузер» применяет национальные сертификаты не для всего рунета, а только на тех сайтах, которые есть в списке на www.gosuslugi.ru/tls. Попытка применить сертификат на других доменах приведёт к стандартной ошибке и недоступности сайта для пользователя.
Национальные сертификаты используют общепринятую открытую криптографию и работают по стандартным правилам (это обычный RSA с длинным ключом, ровно такой же, какой выписывают другие центры сертификации).
15 сентября Минцифры и «Сбер» сообщили, что онлайн-сервисы «Сбера» через несколько дней начнут переход на российские TLS-сертификаты. Фактически это означает, что облачные сервисы «Сбера» будут полноценно работать только в «Яндекс Браузере» и браузере «Атом» от VK. Также можно установить в системе сертификат Национального удостоверяющего центра Минцифры России — Russian Trusted Root CA.cer.
В марте 2022 года в условиях противодействия санкционной политике Минцифры организовало на базе НУЦ с использованием ЕПГУ выпуск для российских юридических лиц сертификатов безопасности (TLS-сертификатов) для сайтов. TLS-сертификаты необходимы для подтверждения легитимности сайтов и шифрования сетевого трафика между сайтом и браузером пользователя по протоколу HTTPS. Любое юридическое лицо или орган государственной власти может бесплатно получить один или несколько TLS-сертификатов и встроить их в свои информационные ресурсы. Получить сертификат можно через портал «Госуслуги».
В мае 2022 года пользователь Хабра ifap заметил, что Минцифры не имеет соответствующих полномочий по выдаче сертификата, а у якобы создавшего его НУЦ НИИ «Восход» прекращена аккредитация собственного УЦ.
Для ознакомления с проблемой установки и работой корневого сертификата Russian Trusted Root CA есть четыре публикации на Хабре по этой ситуации:
1. «Суверенный, сувенирный, самопровозглашенный«.
2. «Импортозамещение центров сертификации».
3. Про поддержку Certificate Transparency для национальных сертификатов.
4. Про поддержку сайтов с национальными сертификатами в «Яндекс Браузере».
Пояснение «Сбера» по этой ситуации: Мы первые в стране начали перевод своих сайтов на российские сертификаты удостоверяющих центров. Почему это важно? Чтобы вы никогда не потеряли доступ к личному кабинету и другим сервисам «Сбера». Объясняем. Сайты должны иметь сертификат удостоверяющего центра, чтобы гарантировать пользователем бесперебойный и безопасный доступ. Раньше такие «документы» выдавали только иностранные компании, но недавно появилась возможность установить сертификат, созданный Минцифры РФ.
Только зарегистрированные пользователи могут участвовать в опросе. Войдите, пожалуйста.
Вы установите «Яндекс браузер» или Russian Trusted Root CA для работы с сервисами «Сбера»?
Russian Trusted Root CA
Еще не решил, но уже задумался
Установлю на одно отдельное устройство для работы только со «Сбером»
Пока (или вообще) ничего не буду ставить
Проголосовали 1988 пользователей.
Воздержались 243 пользователя.
- «{{PLACEHOLDER}}»
- «{{PLACEHOLDER}}»
ms.assetid: 9750A3F3-89C7-4A8F-BA75-B0B06BD772C2
author: TerryGLee
ms.author: tglee
manager: douge
ms.workload: - «multiple»
Install certificates required for Visual Studio offline installation
Visual Studio is primarily designed to be installed on an internet-connected machine, since many components are updated regularly. However, with some extra steps, it’s possible to deploy Visual Studio in an environment where a working internet connection is unavailable.
How to refresh certificates when offline
There are three options for installing or updating certificates in an offline environment.
Option 1 — Manually install certificates from a layout folder
When you create a network layout, the necessary certificates are downloaded to the Certificates folder. You can then manually install the certificates by double-clicking each of the certificate files, and then clicking through the Certificate Manager wizard. If asked for a password, leave it blank.
Update: For Visual Studio 2017 version 15.8 Preview 2 or later, you can manually install the certificates by right-clicking each of the certificate files, selecting Install Certificate, and then clicking through the Certificate Manager wizard.
Option 2 — Distribute trusted root certificates in an enterprise environment
Option 3 — Install certificates as part of a scripted deployment of Visual Studio
certmgr.exe -add -c certificates\manifestSignCertificates.p12 -n Microsoft Code Signing PCA 2011 -s -r LocalMachine CA
certmgr.exe -add -c certificates\manifestSignCertificates.p12 -n Microsoft Root Certificate Authority -s -r LocalMachine root
certmgr.exe -add -c certificates\manifestCounterSignCertificates.p12 -n Microsoft Time-Stamp PCA 2010 -s -r LocalMachine CA
certmgr.exe -add -c certificates\manifestCounterSignCertificates.p12 -n Microsoft Root Certificate Authority -s -r LocalMachine root
certmgr.exe -add -c certificates\vs_installer_opc.SignCertificates.p12 -n Microsoft Code Signing PCA -s -r LocalMachine CA
certmgr.exe -add -c certificates\vs_installer_opc.SignCertificates.p12 -n Microsoft Root Certificate Authority -s -r LocalMachine root
certmgr.exe -add [layout path]\certificates\manifestSignCertificates.cer -n Microsoft Root Certificate Authority 2011 -s -r LocalMachine root
certmgr.exe -add [layout path]\certificates\manifestCounterSignCertificates.cer -n Microsoft Root Certificate Authority 2010 -s -r LocalMachine root
certmgr.exe -add [layout path]\certificates\vs_installer_opc.SignCertificates.cer -n Microsoft Root Certificate Authority -s -r LocalMachine root
Deploy the batch file to the client. This command should be run from an elevated process.
What are the certificates files in the Certificates folder?
The three .P12 files in this folder each contain an intermediate certificate and a root certificate. Most systems that are current with Windows Update have these certificates already installed.
- ManifestSignCertificates.p12 contains:
- Intermediate certificate: Microsoft Code Signing PCA 2011
- Not required. Improves performance in some scenarios if present.
- Root certificate: Microsoft Root Certificate Authority 2011
- Required on Windows 7 Service Pack 1 systems that do not have the latest Windows Updates installed.
- Intermediate certificate: Microsoft Code Signing PCA 2011
- ManifestCounterSignCertificates.p12 contains:
- Intermediate certificate: Microsoft Time-Stamp PCA 2010
- Not required. Improves performance in some scenarios if present.
- Root certificate: Microsoft Root Certificate Authority 2010
- Required for Windows 7 Service Pack 1 systems that do not have the latest Windows Updates installed.
- Intermediate certificate: Microsoft Time-Stamp PCA 2010
- Vs_installer_opc.SignCertificates.p12 contains:
- Intermediate certificate: Microsoft Code Signing PCA
- Required for all systems. Note that systems with all updates applied from Windows Update might not have this certificate.
- Root certificate: Microsoft Root Certificate Authority
- Required. This certificate ships with systems running Windows 7 or later.
- Intermediate certificate: Microsoft Code Signing PCA
Update: For Visual Studio 2017 version 15.8 Preview 2 or later, the Visual Studio Installer requires only the root certificates to be installed on the system.
Why are the certificates from the Certificates folder not installed automatically?
Checking if certificates are already installed
Run mmc.exe.
a. Click File, and then select Add/Remove Snap-in.
b. Double-click Certificates, select Computer account, and then click Next.
c. Select Local computer, click Finish, and then click OK.
d. Expand Certificates (Local Computer).
e. Expand Trusted Root Certification Authorities, and then select Certificates.- Check this list for the necessary root certificates.
f. Expand Intermediate Certification Authorities, and then select Certificates.
- Check this list for the required intermediate certificates.
- Check this list for the required intermediate certificates.
Install Visual Studio
After you install the certificates, deployment of Visual Studio can proceed by using the instructions from the Deploying from a network installation section of the «Create a network installation of Visual Studio» page.
See also
View trusted root certificates using Windows PowerShell
Get-Childitem cert:\LocalMachine\root |format-list
Get-ChildItem cert:\LocalMachine\root | Where {$_.NotAfter -lt (Get-Date).AddDays(40)}
Now that you know how to manage the Root Certificates, let us update them.
Install certificates needed for Visual Studio offline installation
certmgr.exe -add -c certificates\manifestSignCertificates.p12 -n "Microsoft Code Signing PCA 2011" -s -r LocalMachine CA
certmgr.exe -add -c certificates\manifestSignCertificates.p12 -n "Microsoft Root Certificate Authority" -s -r LocalMachine root
certmgr.exe -add -c certificates\manifestCounterSignCertificates.p12 -n "Microsoft Time-Stamp PCA 2010" -s -r LocalMachine CA
certmgr.exe -add -c certificates\manifestCounterSignCertificates.p12 -n "Microsoft Root Certificate Authority" -s -r LocalMachine root
certmgr.exe -add -c certificates\vs_installer_opc.SignCertificates.p12 -n "Microsoft Code Signing PCA" -s -r LocalMachine CA
certmgr.exe -add -c certificates\vs_installer_opc.SignCertificates.p12 -n "Microsoft Root Certificate Authority" -s -r LocalMachine root
Deploy the batch file to the client. This command should be run from an elevated process.
What are the certificates files in the certificates folder?
The three .p12 files in this folder each contain an intermediate certificate and a root certificate. Most systems that are current with Windows Update will have these certificates already installed.
Why are the certificates from the certificates folder not installed automatically?
Checking if certificates are already installed
- Run mmc.exe
- Click on File and select Add/Remove Snap-in
- Double-click on Certificates, select Computer account and click Next
- Select Local computer, click Finish, and click Ok
- Expand Certificates (Local Computer)
- Expand Trusted Root Certification Authorities and select Certificates
- Check this list for the necessary root certificates.
- Expand Intermediate Certification Authorities and select Certificates
- Check this list for the required intermediate certificates.
- Click on File and select Add/Remove Snap-in
- Double-click on Certificates, select My user account, click Finish and OK.
- Expand Certificates – Current User
- Expand Intermediate Certification Authorities and select Certificates
- Check this list for the required intermediate certificates.
How to create a layout for a previous Visual Studio 2017 release
Note: The VS 2017 bootstrappers available on http://www.visualstudio.com will download and install the latest VS 2017 release available whenever they are run. If you download a VS bootstrapper today and run it 6 months from now, it will install the VS 2017 release that is available at that later time. If you create a layout, installing VS from that layout will install the specific version of VS that exists in the layout. Even though a newer version may exist online, you will get the version of VS that is in the layout.
If you need to create a layout for an older version of Visual Studio 2017, you can go to https://my.visualstudio.com to download «fixed» versions of the Visual Studio 2017 bootstrappers for supported versions, which will allow you to create a network install layout for that older version.
How to get support for your offline installer
If you experience a problem with your offline installation, we want to know about it. The best way to tell us is by using the Report a Problem tool. When you use this tool, you can send us the telemetry and logs we need to help us diagnose and fix the problem.
We have other support options available, too. For a list of those, see our Talk to us page.
Практика Self-signed certificate
OpenSSL
Начнем с классики криптографии OpenSSL. Сейчас широко используется версия 1.1.1, но ее поддержка заканчивается в 2023. Следующая версия 3.0 будет поддерживаться до 2026 года. Проверка установленной версии:
OpenSSL 1.1.1k FIPS 25 Mar 2021
Если OpenSSL не установлен, то его можно установить на всех востребованных платформах.
Реализация TLS
Для нашего CA генерируем приватный ключ 2048-бит RSA. Администратор CA должен хранить его в секрете от всех:
openssl genrsa -out root_ca.key 2048
Далее для нашего CA генерируем X.509 сертификат на 365 дней (root_ca.crt) и подписываем его приватным ключом (root_ca.key). Получается самоподписанный сертификат, его можно и нужно будет скопировать на все компьютеры, между которыми необходимо организовать TLS соединение. При ответах на вопросы, которые будет задавать OpenSSL, можно указывать произвольные данные, CA я назвал «My CN»:
openssl req -x509 -new -key root_ca.key -days 365 -out root_ca.crt
Смотрим получившийся сертификат, убеждаемся, что данные в нем корректные:
openssl x509 -text -in root_ca.crt
Генерируем приватный ключ для HTTPS сервера, его нужно будет скопировать только на компьютер, на котором он будет работать и никуда больше:
openssl genrsa -out server.key 2048
openssl req -new -key server.key -subj "/CN=xx.xx.xx.xx/CN=server/CN=server.example.com" -out server.csr
Можно посмотреть получившийся запрос на сертификат и убедиться в его корректности:
openssl req -text -in server.csr
Теперь генерируем сертификат X.509 (server.crt) на 365 дней для HTTPS сервера и подписываем его приватным ключом CA (root_ca.key):
openssl x509 -req -in server.csr -CA root_ca.crt -CAkey root_ca.key -CAcreateserial -out server.crt -days 365 -extensions SAN -extfile openssl.cnf
Файл openssl.cnf должен содержать список SAN (Subject Alternative Name) идентичный тому, что был в CSR запросе на сертификат:
[SAN]
subjectAltName = @alt_names
[alt_names]
IP.1 = xx.xx.xx.xx
DNS.1 = server
DNS.2 = server.example.com
Можно посмотреть на получившийся сертификат и убедиться в его корректности:
openssl x509 -text -in root_ca.crt
С ключами и сертификатами закончили, переходим к запуску HTTPS сервера. Копируем следующие файлы на компьютер, на котором будет работать HTTPS сервер:
Пишем простейший HTTPS сервер, на JS:
const fs = require('fs');
const https = require('https');
https .createServer( { requestCert: false, rejectUnauthorized: false, ca: fs.readFileSync('root_ca.crt'), cert: fs.readFileSync('server.crt'), key: fs.readFileSync('server.key') }, (req, res) => { console.log("req.client.authorized: ", req.client.authorized) if (req.client.authorized) { const cert = req.socket.getPeerCertificate(false) // true - получить все сертификаты, false - последний console.log("cert: ", cert) } res.end('Hello, world!'); } ) .listen(9443);
Запускать данный скрипт будем с помощью Node.js. Если Node.js не установлен, то устанавливаем:
sudo yum groupinstall 'Development Tools'
sudo yum install nodejs
Проверяем, что Node и Npm установились успешно:
Проверяем сервер curl-ом:
При первом запросе возникнет ошибка:
curl: (60) SSL certificate problem: self signed certificate in certificate chain
Это значит, что самоподписанный корневой сертификат нашего CA (root_ca.crt) не находится в хранилище доверительных сертификатов. Процесс загрузки сертификатов в это хранилище специфичен для операционной системы. Приведу алгоритм для RH Linux:
Если сертификат не в PEM (текстовом) формате, то его надо сконвертировать в текстовой формат:
openssl x509 -in root_ca.crt -out root_ca.pem -outform PEM
Копируем сертификат в определенный каталог на сервере. ДляRH 7 и выше это каталог:
Выполняем команду обновления хранилища сертификатов:
Теперь curl проходит
на Windows есть специфика — в curl необходимо добавлять параметр «ssl-no-revoke», чтобы не проверялся список отозванных сертификатов:
При этом сервер выведет в консоль строку:
Это значит, что мы установили TLS соединение только с проверкой сертификата сервера, а не клиента. Переходим к mTLS.
Реализация mTLS
В коде сервера включаем mTLS, а именно выставляем в true параметр requestCert, чтобы HTTPS сервер запрашивал клиентский сертификат и параметр rejectUnauthorized, чтобы сервер отклонял запросы клиентов, которые не прошли авторизацию:
{
requestCert: true,
rejectUnauthorized: true,
}
Алгоритм генерации клиентских сертификатов аналогичен серверным.
Генерируем приватный ключ для клиента:
openssl genrsa -out client.key 2048
Генерируем запрос на сертификат CSR со списком CN:
openssl req -new -key client.key -subj "/CN=xx.xx.xx.xx/CN=client/CN=client.example.com" -out client.csr
Генерируем сертификат для клиента и подписываем его приватным ключом CA:
openssl x509 -req -in client.csr -CA root_ca.crt -CAkey root_ca.key -CAcreateserial -out client.crt -days 365 -extensions SAN -extfile openssl.cnf
Файл openssl.cnf — такой же как и для сервера, только вместо «server» пишем «client».
Копируем следующие файлы на компьютер, на котором будет работать клиент:
Теперь если просто вызвать curl:
То произойдет ошибка авторизации
curl: (35) error:14094410:SSL routines:ssl3_read_bytes:sslv3 alert handshake failure
Поэтому вызываем curl с дополнительными параметрами, в которых указываем ключ клиента и сертификаты клиента и СА:
curl --cert ./client.crt --key client.key --cacert root_ca.crt https://server.example.com:9443
Теперь запрос проходит, при этом сервер выведет в консоль следующую строку и далее содержимое полученного от клиента сертификата:
Это значит, что мы установили mTLS соединение с проверкой сертификата как сервера, так и клиента. Теперь установим mTLS из браузера.
Реализация mTLS в браузере
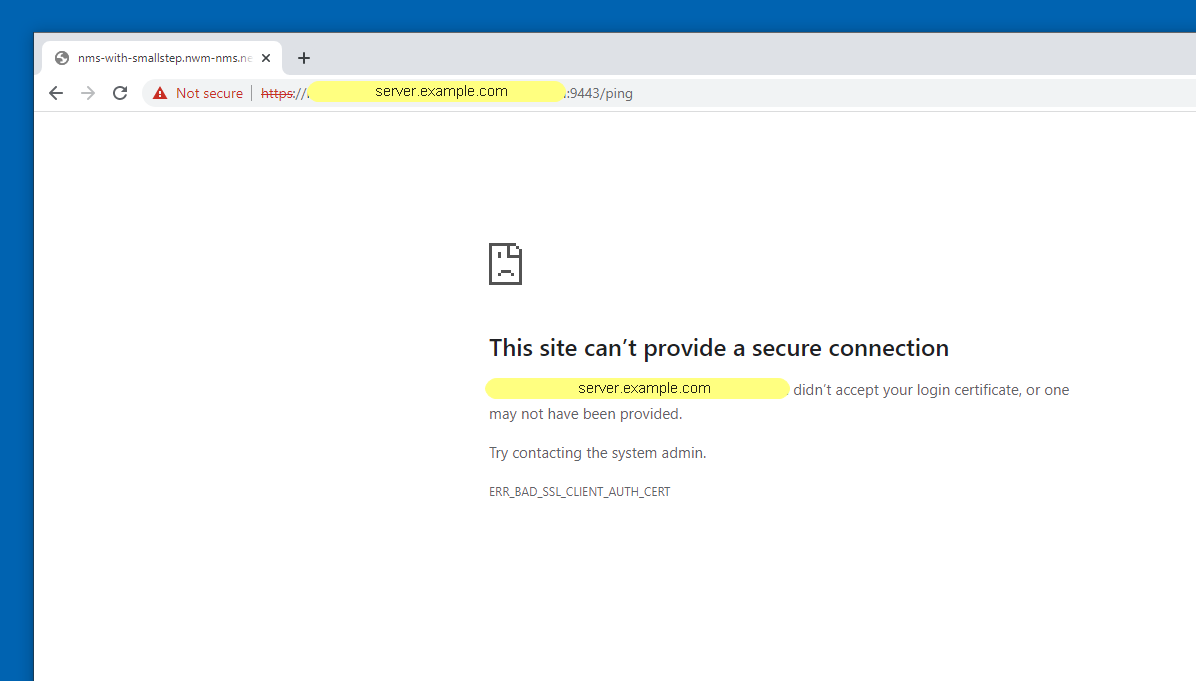
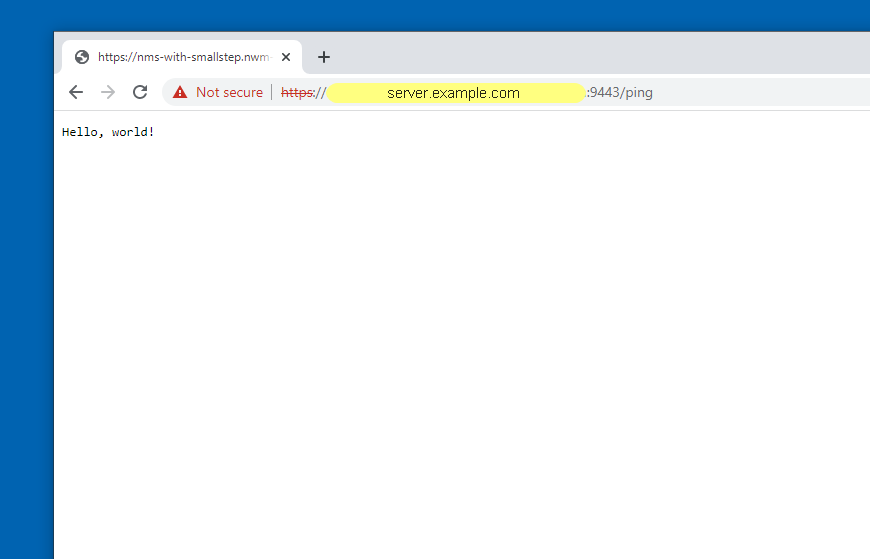
Если просто запустить наш запрос к серверу (https://server.example.com:9443) из браузера, то выдается ошибка клиентского сертификата ERR_BAD_SSL_CLIENT_AUTH_CERT. Рабочие адреса закрасил желтым:
Для загрузки в браузер клиентский сертификат и приватный ключ надо сконвертировать в формат p12. Этот формат определяется стандартом PKCS #12 и является архивом для хранения нескольких объектов. В нашем случае файл будет хранить клиентский сертификат и его приватный ключ. Понятно, что приватный ключ — это чувствительная к разглашению информация и ее владелец не должен выкладывать p12 сертификат в открытый доступ. Для конвертации тоже используем OpenSSL:
openssl pkcs12 -inkey client.key -in client.crt -export -out client.p12
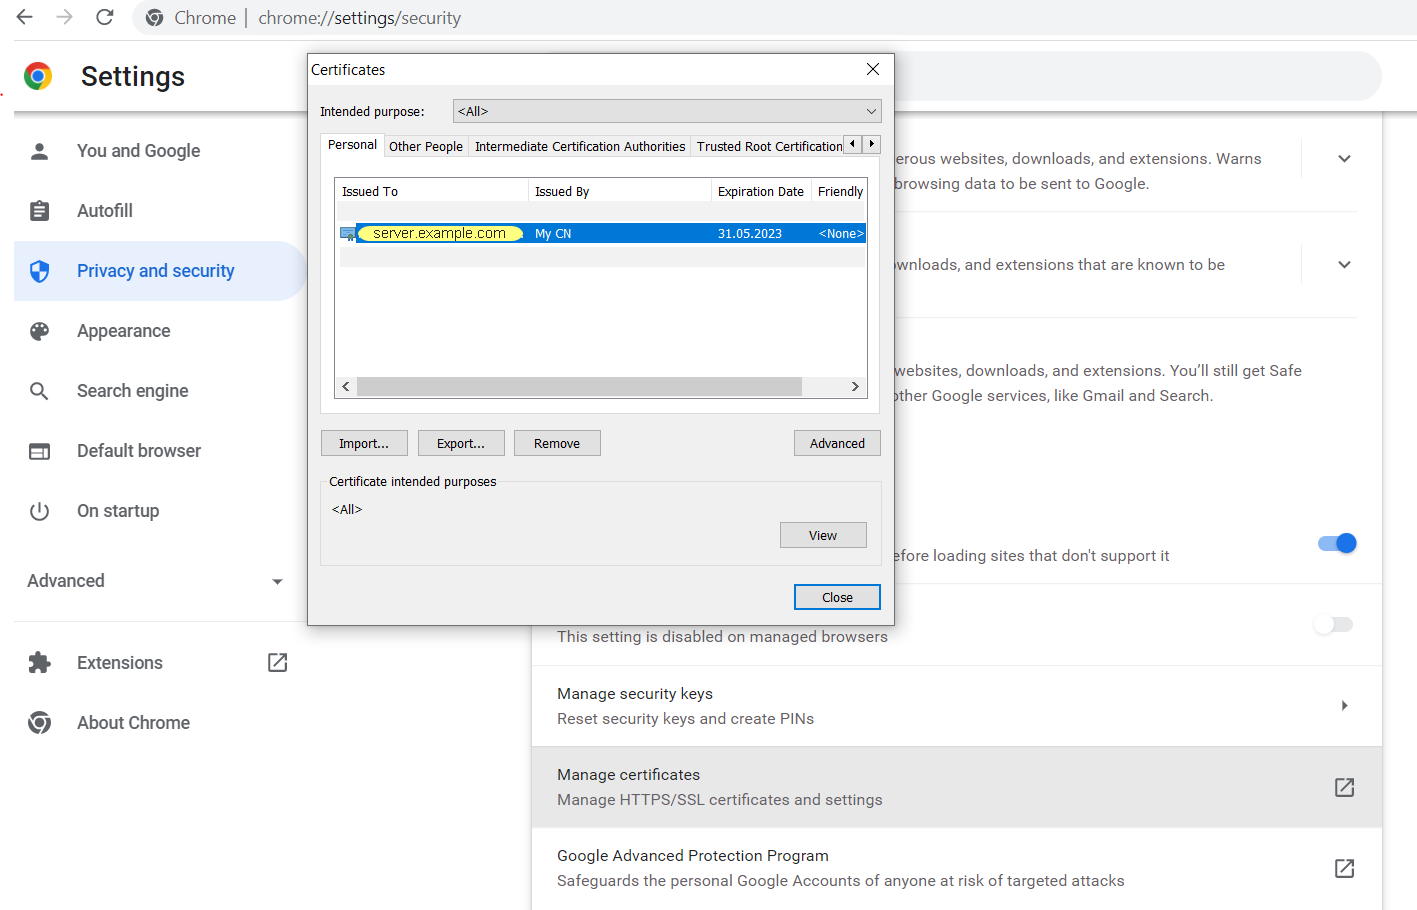
Импортируем client.p12 в браузер. Для этого, например в Chrome, идем в меню: Settings / Privacy and security / Manage certificates, в открывшемся окне нажимаем Import, выбираем наш файл client.p12 и место хранения «Personal». Видим, что клиентский сертификат, выданный нашим удостоверяющим центром «My CN», появился в хранилище персональных сертификатов:
Вызываем запрос заново, уже лучше, но браузер все равно пишет, что соединение не безопасно. Это из-за того, что клиентский сертификат выдан удостоверяющим центром «My CN», которого нет в списке доверительных CA (Trusted Root Certification Authorities).
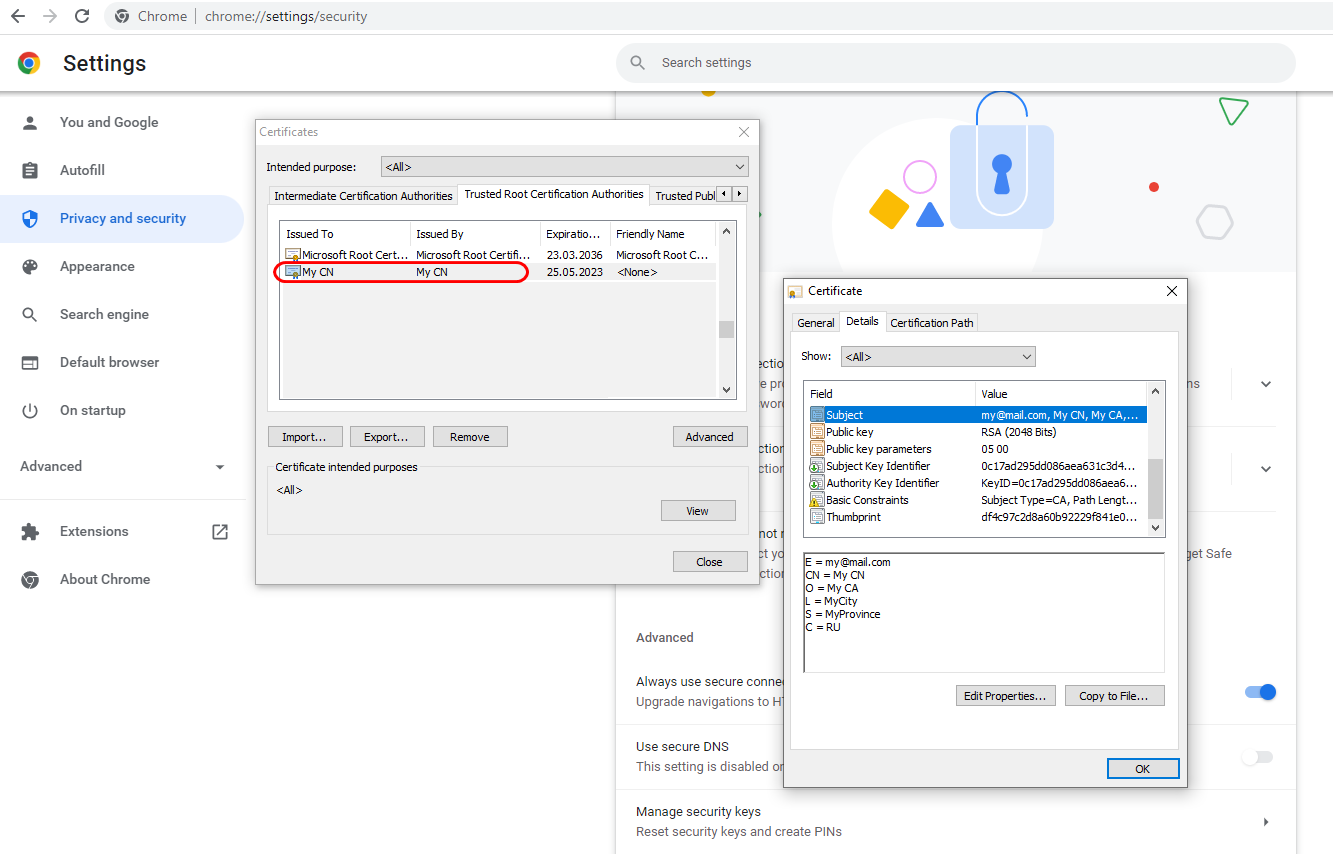
Добавляем корневой сертификат нашего CA (root_ca.crt) в Trusted Root Certification Authorities. Делается с помощью того же вызова Import, что и для клиентского сертификата, но хранилище указываем Trusted Root Certification Authorities. Проверяем, что наш CA «My CN» появился в хранилище:
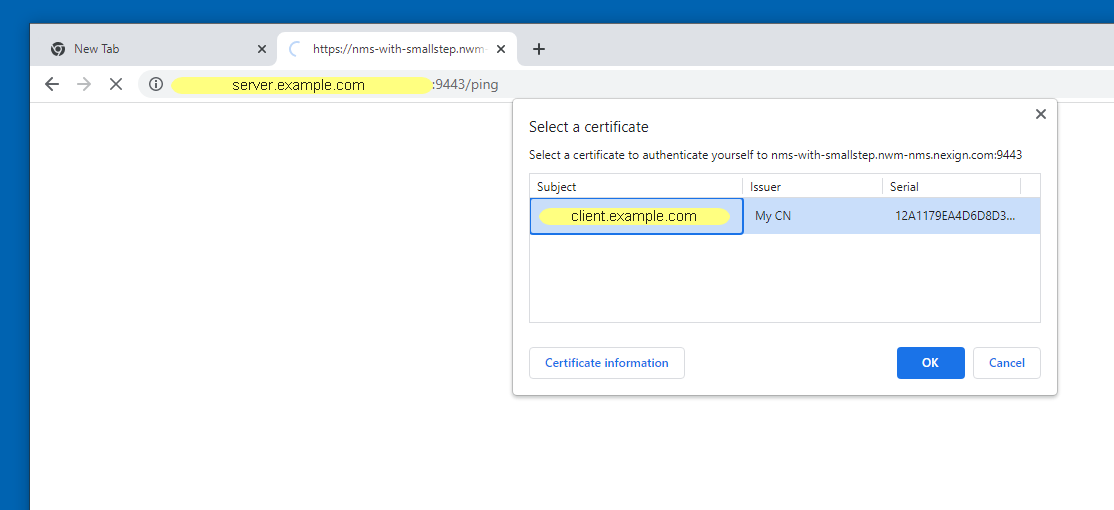
Повторяем наш запрос (https://server.example.com:9443). При первом запросе браузер находит подходящий клиентский сертификат и просит явно подтвердить его использование:
Дальнейшие вызовы проходят без запросов на подтверждение клиентского сертификата:
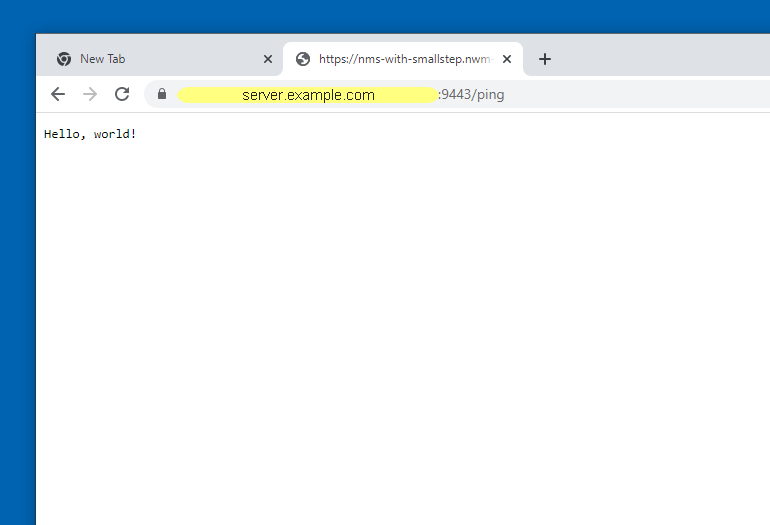
Если щелкнуть на замочке а адресной строке, то можно посмотреть сертификат сервера и убедиться, что мы взаимодействуем с правильным сервером (Issued to: server.example.com), сертификат которому выдан нашим удостоверяющим центром (Issued by: My CN) и время действия сертификата еще не прошло (Valid to: 31.05.2023):

Таким образом мы организовали mTLS соединение из браузера. Далее приведу для справки несколько дополнительных возможностей OpenSSL, которые могут пригодиться в процессе работы.
Дополнительные возможности OpenSSL
Конвертация форматов сертификатов
Конвертируем сертификат в der (бинарный формат):
openssl x509 -outform der -in client.crt -out client.der
Конвертируем сертификат в PEM (текстовой формат)
openssl x509 -inform der -in client.cer -out client.pem
Отладка с помощью OpenSSL
Проверка, что сертификат подписан определенным (root_ca.pem) удостоверяющим центром:
openssl verify -verbose -x509_strict -CAfile root_ca.pem server.crt
openssl s_server -accept 9443 -cert server.crt -key server.key
Запускаем OpenSSL client
openssl s_client -connect xx.xx.xx.xx:9443 -prexit -showcerts -state -status -tlsextdebug -verify 10
При вызове curl параметр:
-k — позволяет подсоединяться к серверу без проверки цепочки сертификатов (certificate path validation).
—ssl-no-revoke — предотвращает проверку отозванных сертификатов
Install Visual Studio
Having installed the certificates, deployment of Visual Studio can proceed offline without additional special steps, using the instructions here.
Практика CA Smallstep
Установка Smallstep и CLI step
CA Smallstep — это open source CA, который можно развернуть локально для автоматического получения X.509 сертификатов. На официальном сайте есть ряд инструкций по его установке и настройке. Для экспериментов я использовал вариант с docker:
Краткая выжимка из инструкции по установке на RH Linux. Сначала устанавливаем docker:
sudo yum -y update
sudo yum install -y yum-utils
sudo yum-config-manager --add-repo https://download.docker.com/linux/centos/docker-ce.repo
sudo yum -y install docker-ce
sudo systemctl start docker
Проверяем корректность установки docker:
sudo docker run hello-world
sudo docker pull smallstep/step-ca
Инициализируем наш CA:
docker run -it -v step:/home/step smallstep/step-ca step ca init
должна вернуться строка:
На этом же или другом компьютере по инструкции устанавливаем утилиту CLI step. Краткая выжимка:
Загружаем бинарник step: https://github.com/smallstep/cli/releases/tag/v0.19.0
tar -xf step_linux_0.19.0_386.tar.gz
Копируем утилиту step в /usr/bin
Регистрируем CLI step для использования с нашим CA. Этот процесс называется «bootstrap». Значение параметра «ca-url» — это IP и порт, на котором запущен Smallstep CA, «fingerprint » — это сохраненное значение при инициализации CA:
Проверка связи с CA:
step ca health
должна вернуться строка:
Все готово для генерации ключей и сертификатов.
Генерация ключей и сертификатов
Также как и в случае с OpenSSL, сначала генерируем ключ и сертификат для сервера и установки TLS соединения, потом для клиента и установки mTLS.
В отличии от OpenSSL, CA Smallstep может одновременно сформировать приватный ключ сервера 2048-бит RSA (server.key) и запрос на сертификат (server.csr). В запросе явно указываем, что пароль должен быть пустой (no-password), xx.xx.xx.xx — это IP адрес сервера, для которого генерируется запрос:
step certificate create --csr --no-password --insecure --kty=RSA --size=2048 "xx.xx.xx.xx" server.csr server.key
Подписываем сертификат на нашем CA Smallstep:
step ca sign server.csr server.crt
Смотрим полученный сертификат:
step certificate inspect server.crt
Получаем с CA Smallstep его корневой сертификат:
step ca root root_ca.crt
Смотрим корневой сертификат:
step certificate inspect root_ca.crt
Аналогично OpenSSL копируем ключи и сертификаты на наш HTTPS сервер:
Проверяем сервер curl-ом:
Все нормально, теперь генерируем ключ и сертификат для клиента.
Аналогично серверу одновременно формируем приватный ключ клиента 2048-бит RSA (client.key) и запрос на сертификат (client.csr). Явно указываем, что пароль должен быть пустой (no-password), xx.xx.xx.xx — это IP адрес клиента, для которого генерируется запрос:
step certificate create --csr --no-password --insecure --kty=RSA --size=2048 "xx.xx.xx.xx" client.csr client.key
Подписываем сертификат на CA:
step ca sign client.csr client.crt
step certificate inspect client.crt
Получаем корневой сертификат CA:
step ca root root_ca.crt
Смотрим корневой сертификат:
step certificate inspect root_ca.crt
Копируем на клиента:
Для проверки вызываем curl с параметрами:
curl --cert ./client.crt --key client.key --cacert root_ca.crt https://xx.xx.xx.xx:9443
Отлично — mTLS тоже работает с выданными CA Smallstep сертификатами!
Дополнительные возможности CA Smallstep
С помощью CLI step можно проверить необходимость обновления сертификата:
step certificate needs-renewal server.crt
Если обновление не требуется возвращается строка:
certificate does not need renewal
Если требуется, то строка пустая и тогда необходимо обновить сертификат:
step ca renew server.crt server.key
При необходимости сертификат можно отозвать, в этом случае его невозможно будет продлить, только получить заново:
step ca revoke --cert server.crt --key server.key
Посмотреть все сертификаты в цепочке:
step certificate inspect server.crt --bundle
Запуск CLI step в режиме отладки:
STEPDEBUG=1 step /команда/
Customizing the network layout
There are several options you can use to customize your network layout. You can create a partial layout that only contains a specific set of language locales, workloads, components, and their recommended or optional dependencies. This may be useful if you know that you are only going to deploy a subset of workloads to client workstations. Common command-line parameters for customizing the layout include:
--addto specify workload or component IDs. If--addis used, only those workloads and components specified with--addwill be downloaded. If--addis not used, all workload and components will be downloaded.--includeRecommendedto include all the recommended components for the specified workload IDs--includeOptionalto include all the recommended and optional components for the specified workload IDs.--langto specify language locales.
Here are a few examples of how to create a custom partial layout.
- To download all workloads and components for only one language, run:
vs_enterprise.exe --layout C:\vs2017offline --lang en-US - To download all workloads and components for multiple languages, run:
vs_enterprise.exe --layout C:\vs2017offline --lang en-US de-DE ja-JP - To download one workload for all languages, run
vs_enterprise.exe --layout C:\vs2017offline --add Microsoft.VisualStudio.Workload.Azure --includeRecommended - To download two workloads and one optional component for three languages, run:
vs_enterprise.exe --layout C:\vs2017offline --add Microsoft.VisualStudio.Workload.Azure --add Microsoft.VisualStudio.Workload.ManagedDesktop --add Component.GitHub.VisualStudio --includeRecommended --lang en-US de-DE ja-JP - To download two workloads and all of their recommended components, run:
vs_enterprise.exe --layout C:\vs2017offline --add Microsoft.VisualStudio.Workload.Azure --add Microsoft.VisualStudio.Workload.ManagedDesktop --add Component.GitHub.VisualStudio --includeRecommended - To download two workloads and all of their recommended and optional components, run:
vs_enterprise.exe --layout C:\vs2017offline --add Microsoft.VisualStudio.Workload.Azure --add Microsoft.VisualStudio.Workload.ManagedDesktop --add Component.GitHub.VisualStudio --includeOptional
- To download all workloads and components for only one language, run:
Updating a network install layout
As product updates become available, you may want to update the network install layout to incorporate updated packages.
Deploying from a network installation
- Users can install by running:
\\server\products\VS2017\vs_enterprise.exe - Administrators can install in an unattended mode by running:
\\server\products\VS2017\vs_enterprise.exe --quiet --wait --norestart
- Users can install by running:
Tip
Error codes
Update root certificates from a remote computer
One way to update the Root Certificate(s) is to copy a valid certificate from another computer that is already installed, and then re-install it on your device. The process is simple as Windows is already equipped to export and import Root Certificates. However, to do this, make sure that both the source and the destination operating systems are the same.
We have divided this method into “Exporting a Root Certificate” and “Importing a Root Certificate” for your convenience.
Export Root Certificates
- Open the Certificate Management Console on the source computer (as discussed earlier in this post).
- From there, right-click on the certificate that you want to move to another device, expand All Tasks from the context menu, and then click Export.

- The Certificate Export Wizard will now be open. On the welcome screen, click Next.
- Click Next on the next screen while leaving the default settings.

- On the next screen, click Browse and save the .cer file with a name of your choice, then click Next.

- On the final screen, confirm the settings and click Finish. Then click Ok on the confirmation dialog box.
You will now see the exported .cer file at the destination you chose in step 5. Copy this file onto a USB flash drive and plug it into the target system for the Root Certificate to be installed.
Import Root Certificates
- Open the Certificate Management Console on the source computer and navigate to the Certificates folder from the left pane.
- Right-click Certificates, expand All Tasks, and click Import from the context menu.

- On the welcome screen of Certificate Import Wizard, click Next.
- Click Browse on the next screen and select the .cer file which has been exported from another computer, then click Next.

- Now select “Automatically select the certificate store based on the type of certificate” and click Next.

- On the final screen of the wizard, click Finish.
The certificate will now be updated on your computer which you can see through the Certificate Management Console.
Another way to install this exported certificate is directly through the .cer file. Double-click the .cer file to launch it. From the certificate, click Install Certificate.

The Certificate Import Wizard will now be launched. From there, select Local Machine as the Store Location and then click Next.

The remaining steps for importing the certificate are the same as we had discussed above.
From an SST File
Serialized Certificate Store Format (SST) files are certificates created directly from a CA. An SST file contains certificates used to authenticate the identities of websites, apps, and programs.
The SST file can be downloaded on demand from Microsoft using Windows Update so you may have all the latest certificates at once.
Let us show you how to download the file, and then discuss different methods to install it.
Download Latest Root Certificates for Windows
cd /d "PathToFolder"This is where the SST file will be downloaded. Replace PathToFolder with the complete path of the empty folder, as in the example below.

certutil.exe -generateSSTFromWU roots.sst
You will now find that the SST file has been downloaded. This file contains all the latest Root Certificates. You can now install them all at once, or one-by-one (only the ones that are required).
Install All Certificates using SST File
Once you open the downloaded roots.sst file, you will see that it holds many certificates. In our case, it holds 436 files. These can all be installed instantly using Windows PowerShell. Here is how:
- Open PowerShell with administrative privileges.
- Now run the following command while replacing CertPath with the complete path to the downloaded SST file:
$sstStore = ( Get-ChildItem -Path <em>CertPath</em>\roots.sst) - Next, paste the following command to import all the certificates on your PC:
$sstStore | Import-Certificate -CertStoreLocation Cert:\LocalMachine\Root
You will now find that the certificates have been imported to your machine from the downloaded SST file. You can verify this through the Certificate Management Console.
Install Individual Root Certificates using SST File
Another method to install the Root Certificates from an SST file is one-by-one. This may take a while, but the method can only be used when you wish to install specific certificates.
To do so, run the SST file by double-clicking on it. It will open in an identical console to MMC. From there, you can export a certificate and then import it on the local machine using the method we have already discussed above.
Alternatively, you can also double-click on the certificate and install it directly.

From an STL File
Serialized Certificate Trust List (STL) files also contain Root Certificates, but the file formatting is different than an SST file. Microsoft maintains an STL file you can download to obtain the latest Root Certificates for your Windows. The STL is updated twice a month.
Download Latest STL File
Once downloaded, extract its content using a third-party compression/decompression tool. The extracted folder should now contain only one STL file. You may then proceed to import the file using Command Line Interface (CLI).
cd /d "PathToExtracted"
certutil -addstore -f root authroot.stl
You can now confirm that the latest certificates have been installed using the Certificate Management Console.
View trusted root certificates using the Certificate MMC
Windows comes with various Management Consoles that are used for managing different aspects of the operating system. One of these consoles is the Certificate Management Console.
- Start by typing in mmc.exe in Run to launch Microsoft Management Console.
- From the top menu, click File and then click Add/remove snap-in.

- From the pop-up window, select Certificates under “Available Snap-ins” and then click Add.

- In the next window, select Computer account and click Next.

- Leave the default setting on the next page and click Finish.

- Back in the Add/Remove Snap-in window, click OK.
- Now, on the console, navigate to the following using the left pane:
Certificates (Local Computer) >> Trusted Root Certification Authorities >> Certificates
Here, you can view all the active and expired Root Certificates on your machine in the middle pane. It also states CA under the “Issued by” column, as well as the expiry date in another column.
Анонс
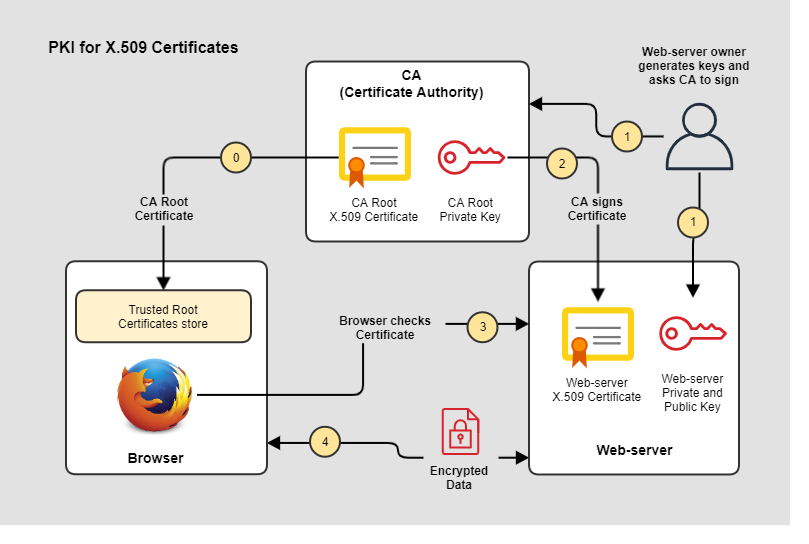
В предыдущей статье «Сам себе PKI: Теория на примере Let’s Encrypt» мы рассмотрели теорию и разобрали пример, как происходит установка HTTPS соединения между браузером и веб-сайтом при использовании сертификатов Let’s Encrypt. В этой статье перейдем к практике и самостоятельно реализуем ту же самую схему:
Сначала вручную (с помощью OpenSSL) пройдем цепочку генерации и использования самоподписанных сертификатов в HTTPS сервере.
Далее развернем собственный удостоверяющий центр Smallstep и будем получать сертификаты, подписанные им.
Схема PKI остаётся той же, только изменяются компоненты:
В качестве CA вместо Let’s Encrypt, будет использоваться OpenSSL и CA Smallstep.
В роли Web-сервера вместо Интернет веб-сайта, будет выступать простой HTTPS сервер, запущенный на Node.js.
Заключение
В данной статье мы рассмотрели две возможности генерации ключей и сертификатов для клиента и сервера:
С помощью OpenSSL.
Используя CA Smallstep.
И двумя способами установили TLS и mTLS соединения:
С помощью curl.
Из браузера, загрузив в него клиентский и корневой сертификаты.
Теперь у нас есть понимание, как организовать свою систему PKI с помощью CA любого производителя, т.к. логика взаимодействия у всех аналогичная. Более того, большинство CA используют под капотом OpenSSL, оборачивая его в свой API.
Final Thoughts
Although it may not seem like it, a Root Certificate is essential for your daily work on a PC, as it is making authorization handshakes and trust with other components in the background while you continue with your work.
However, once a certificate has expired, it can be safely deleted, as it is no longer valid. That said, we recommend that you install a new, valid certificate in its place before removing the old one.
")


")