
")
Proxmox VE based on Debian Linux operating system, which is why Proxmox official of the ISO CD image will include the complete Debian Linux operating system and the reasons for Proxmox VE package.
- Background#
- Migration#
- Shutdown all guests#
- Prepare ZFS Export#
- Hardware Migration#
- Prepare Proxmox 7 Iso USB#
- Proxmox installation#
- Proxmox VE 7. 0 installed
- 2.1.EXT4 / XFS File System Installation
- Create Backups#
- Администрирование host системы
- Additions#
- Restoring the pmxcfs database file#
- Файловая система кластера Proxmox (pmxcfs)
- System Requirements
- 1.1 The minimum hardware configuration for testing and evaluation scenarios
- 1.2 Recommended hardware configuration, suitable for the production scene
- Preparations#
- Configuration#
- Restore configs#
- Restore storage configuration#
- Install custom apt packages#
- Restore network configuration#
- Restore further customization#
- Restore remaining files#
- Verify#
- Restore/Reissue subscription#
- Update#
- Check#
- SSL Setup#
- Prepare VM start#
- Conclusion#
Background#
If there is neither a hardware nor a software change, restoring Proxmox is easy: Copy all the files back.
Most often, however, something will have changed. For me this was:
This is a fairly standard setup, so I decided to do these two steps in parallel.

TL;DR Migration is a tedious process
because it depends on a number of custom setup parameters. Understandably,
the Proxmox docs provide only basic information on how to migrate the hypervisor itself.
This is a report on my experiences migrating from Raid and PM 6.4 to ZFS and PM 7.0.
Skip what is not relevant to you.
На сайте с 03.02.2010
df -h
Filesystem Size Used Avail Use% Mounted on
udev 10M 0 10M 0% /dev
tmpfs 788M 404K 787M 1% /run
/dev/mapper/pve-root 95G 95G 0 100% /
tmpfs 5.0M 0 5.0M 0% /run/lock
tmpfs 1.6G 16M 1.6G 1% /run/shm
/dev/mapper/pve-data 800G 111G 689G 14% /var/lib/vz
/dev/sda1 495M 58M 413M 13% /boot
tmpfs 3.0G 0 3.0G 0% /tmp
/dev/fuse 30M 28K 30M 1% /etc/pve
/var/lib/vz/private/100 10G 1.7G 8.4G 17% /var/lib/vz/root/100
/var/lib/vz/private/101 50G 5.7G 45G 12% /var/lib/vz/root/101
none 512M 4.0K 512M 1% /var/lib/vz/root/100/dev
none 512M 0 512M 0% /var/lib/vz/root/100/dev/shm
none 1.0G 4.0K 1.0G 1% /var/lib/vz/root/101/dev
none 1.0G 0 1.0G 0% /var/lib/vz/root/101/dev/shm
/var/lib/vz/private/102 200G 9.3G 191G 5% /var/lib/vz/root/102
none 1.0G 4.0K 1.0G 1% /var/lib/vz/root/102/dev
none 1.0G 0 1.0G 0% /var/lib/vz/root/102/dev/shm
/var/lib/vz/private/103 10G 1.7G 8.4G 17% /var/lib/vz/root/103
none 512M 4.0K 512M 1% /var/lib/vz/root/103/dev
none 512M 0 512M 0% /var/lib/vz/root/103/dev/shm
/var/lib/vz/private/108 30G 21G 9.6G 69% /var/lib/vz/root/108
none 512M 4.0K 512M 1% /var/lib/vz/root/108/dev
none 512M 0 512M 0% /var/lib/vz/root/108/dev/shm
/var/lib/vz/private/122 100G 723M 100G 1% /var/lib/vz/root/122
none 512M 4.0K 512M 1% /var/lib/vz/root/122/dev
none 512M 0 512M 0% /var/lib/vz/root/122/dev/shm
/dev/mapper/pve-root 95G 95G 0 100% /
В pve-root места нету, и из за этого бывают проблемы. Найти что его занимает не получается.
Вот тут возможно похожая проблема
Вообщем надо как-то увеличить место в pve-root.
«Тролль: Прочитал, обосрал, в бан. Прочитал, обосрал, в бан. Романтика.» (с)

На сайте с 14.05.2010
df -i на всякий конечно ))
а так -в /etc/ 90гб — круто .. там файлики лежат с конфигами. она от силы должна
как то столько занимать
29M /etc/
Качественная помощь в обслуживании серверов. (/ru/forum/661100)
Бесплатных консультаций не даю, не помогаю, не обучаю. Минималка от 100$. Как пропатчить KDE-просьба не спрашивать. Есть форумы (http://linux.org.ru) и полезные сайты (http://www.opennet.ru/).
Migration#
Shutdown all guests#
Prepare ZFS Export#
If ZFS is used, pools should be exported
for the time of the migration.
- Go to PM GUI > Datacenter > Storage
- uncheck «enabled» for all ZFS storage
Then unmount and export pools:
zfs unmount tank_hdd
zfs unmount tank_ssd
zpool export tank_hdd
zpool export tank_ssd
Optionally, test import:
zpool import tank_hdd
zpool import tank_ssd
zpool status
Export again for migration.
Just to be on the safe side, a good precaution is also to disconnect all data drives.
For me this meant shutting down the external JBOD.
Hardware Migration#
Now it was time for migrating the Raid1 to a ZFS Mirror.
First, I attached the two SSDs to my HBA,
which would not boot Proxmox. Until I realized that it appears recommended
to directly attach the root pool to SATA/SAS ports on the mainboard.5
Prepare Proxmox 7 Iso USB#
Flash Proxmox Iso to USB. See the docs6 and the download section.7
I used Etcher (chocolatey install with choco install etcher).
Proxmox installation#
- insert USB (Proxmox 7)
- follow install instructions8
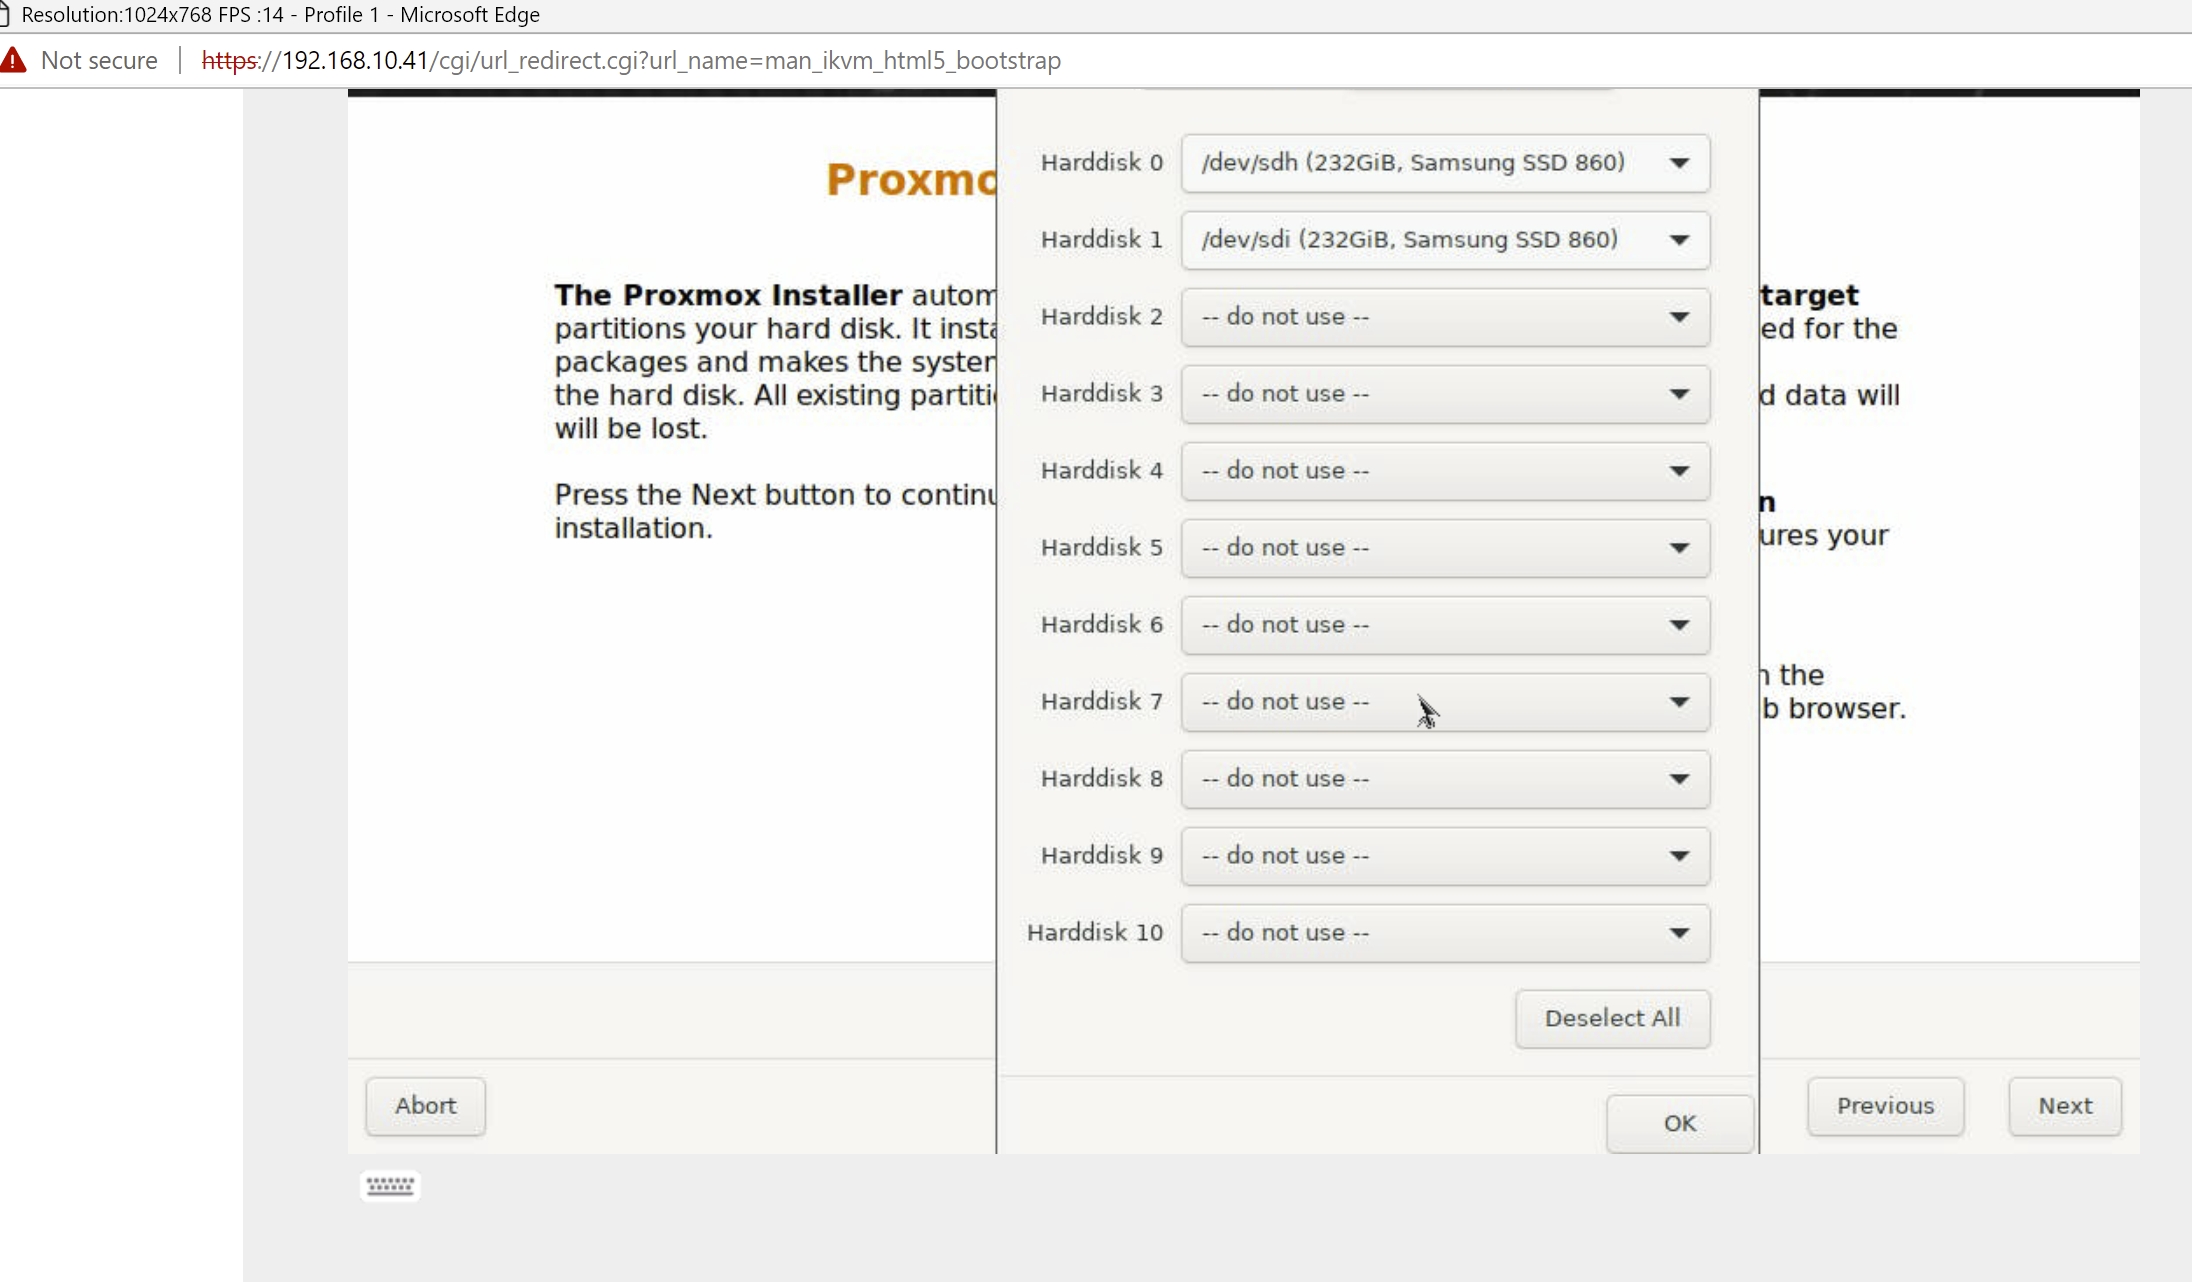
I used the IPMI interface iKVM/HTML5 Console:
- note that it is tricky to copy & paste
- select English keyboard layout for iKVM/iHTML
- use the iKVM keyboard for special characters
Select your root partitions to install the ZFS root pool:
- provide the base network details (see
/etc/hostsand/etc/network/interfaces):- eno1
- address 192.168.10.42/24
- proxmox.local.mytld.com
- gateway 192.168.10.1
Proxmox VE 7. 0 installed
- Complete operating system (Debian Linux, 64-bit);
- Proxmox VE installation program uses ext4, xfs file system or ZFS on a local disk partition and install the operating system;
- Proxmox VE Linux kernel, support for KVM and LXC;
- For managing virtual machines, containers, host systems, clusters, and all the necessary resources to complete toolset;
Web-based management interface.
By default, all of the hard disk, the original disk data will be formatted Proxmox VE server is formatted off below Proxmox VE 7.0 installation begins, as shown in FIG.

- Install Proxmox VE: mounting a normal mode;
- Install Proxmox VE (Debug mode): debug mode installation;
- Rescue Boot: Rescue mode is activated;
- Test Memory: memory test.
Select «Install Proxmox VE» option, after the start of the normal mode installation, the installer prompts you to select the target hard disk installed, as shown in Fig.

Target hard disk: Is the system installation disk, when multiple drives on your server, you can select the system disk you want to install.
Optinos: Buttons for setting the target hard disk file system type used, using the default ext4 file system.
If you choose to use or ext4 xfs file system, the installation destination hard disk is formatted as an LVM volume group, and by «Optinos» button is further provided in the space LVM.
If you select the ZFS file system, ZFS offers a variety of software-level RAID, if your server does not have a hardware RAID card, ZFS will be particularly convenient. ZFS RAID levels can be set via the Options button, and the composition of the ZFS file system need to select the hard disk device according to the list. In addition, ZFS also offers a wealth of other key parameters.
Temporarily Btrfs file system is recommended, since Btrfs does not yet have the conditions used in the production system. Compared with ext4 and xfs file system, Btrfs file system can provide better performance. One advantage of using Btrfs most important thing is to support replication and on-write snapshots, which for virtual machine deployment and cloning is useful. However, Btrfs does not yet have the conditions used in the production system, but in terms of test scenarios for Btrfs is a very good choice.
2.1.EXT4 / XFS File System Installation
At present, most of the Linux file system by default uses ext4 file system, Proxmox VE 7.0 also uses the default ext4 file system. ext4 file system is a system log file, the file system is used in the next Proxmox VE suitable production environment. But in recent years, the popularity of ext4 as good as XFS, like CentOS7 has begun to shift xfs file system, this file system is considered more appropriate big data environment.
Choose the default file system «ext4» system installation, as shown in FIG.

If you choose to use or ext4 xfs file system, the installation destination hard disk is formatted as an LVM volume group, and by «Optinos» button is further provided in the space LVM.
The first step: LVM configuration parameters
Proxmox VE 7.0 creates a named pve the LVM volume group (VG), and three logical volumes (LVs), respectively, root, data, swap. By then «Options» button to select the «ext4» filesystem, «hdsize» box will automatically recognize the size of the target disk.
If you want to select the AF target partition and format the hard disk by the Proxmox VE, then the remaining parameters blank, click on «Next» to install. Note that here I used the default installation, the target hard drive is 40GB.
hdsize: Defines the size of the target hard disk capacity, by setting this parameter, you can configure the reserved portion of the hard disk space to him with (e.g., in a configuration other physical volumes and volume groups PV VG same disk, to create a type of storage services LVM). Not recommended to reserve space, not to create additional volume groups on the system tray, use the target to complete hard disk space.
swapsize: Same size defines swap logical volume capacity, the server and the default size of physical memory, a minimum value of 4GB, a maximum of 8GB, the maximum value is not greater than hdsize / 8. Note that, as «swapsize» is set to 0, will not create a swap logical volume.
maxroot: Defines the size of root logical volume capacity, the maximum limit hdsize / 4. ISO root logical volume is mainly used to store the operating system image.
pve-swapsize-rootsize-datasizeNote that I am here to target hard disk / dev / sda capacity is 40G, the target hard disk / dev / sda further partition, as shown in Fig.

Thus pve capacity equal volume group:
/dev/sda3/dev/sda -/dev/sda1-/dev/sda2In fact, we do not need such a precise calculation, we know what minfree representatives on it. Official recommendation, if pve volume group size exceeds the capacity of 128G, minfree use the default 16GB, otherwise it is set to hdsize / 8.
LVM need minfree pve available space in the volume group to create a snapshot (if you do not need to use lvmthin snapshot). According to the official forum technical paste, minfree helpful for lvm snapshot, as shown in Fig.

maxvz: Defines the size of data capacity of a logical volume, the logical volume data is mainly used for the virtual machine files, virtual machine file size can not exceed maxvz.
datasize hdsize - rootsize - swapsize - minfreeNote 1: This uses hdsize capacity rather than pve capacity, mainly because EFI BIOS boot partition and system partition occupies too small, hasize capacity and pve capacity or less, for the convenience of calculation, can be used directly hdsize.
Note 2: When using LVM thin models, only datasize will be created when the data volume is larger than 4GB.
Note 3: If set to 0, the data volume is not created, and accordingly adjust the storage configuration.
Step two: Check the disk partition parameters
Proxmox VE 7.0 After installation is complete, we look at the host server Proxmox VE disk partition, 6, 7 and 8 shown in FIG.


From FIGS. 7 and 8, we can see that, in addition to / dev / partition a hard disk device and such information actually stored SDA, there are a number of similar logic device / dev / mapper of, Linux logical device has a mapping mechanism , as shown in FIG.

According to FIG. 9, in Proxmox VE system, / dev / pve / root and / dev / mapper / pve-root and / dev / dm-1 is a thing, as a partition is to be treated, they are equal .
In summary, Proxmox VE 7.0 scores the target hard drive from the BISO BOOT, EFI partition, and creates a volume group (VG) on the third partition when installing. That is, after the PROXMOX VE 7.0 is installed, Proxmox VE 7.0 is partitioned to the target hard disk / dev / sda, and the space mounted in the BIOS BOOT and EFI system is mounted in the / boot directory. The system also establishes a volume group (VG) named «PVE» using the Device Mapper mechanism, and finally create a logical volume (LV) in the PVE volume group. The remaining / dev / sda3 partition space is built into a physical volume (PV), and / DEV / SDA3 physical volumes are added to the PVE volume group, as shown in FIGS. 10, 11, and 12.


Step 3: Default storage location
ISO mirror storage path: / var / lib / vz / template / ISO
Backup path: / var / lib / vz / dump /
The information of Local and Local-LVM storage points in the web ui interface are shown in FIGS. 13, 14, and 15.


You only need to click «Local — ISO Mirror / Backup / CT Templates — Upload», you can upload the ISO mirror / backup / CT template, as shown in Figure 16. After the upload is complete, as shown in Figure 17.


ProxMox VE 7.0 After the installation is complete, the PVE volume group is created by default, and then on the basis of the PVE volume group, the root logical volume is created as the root partition of the system, and the size is 25% of the system disk, and it is also used to save ISO mirroring. Create a DATA logical volume as a disk as a virtual machine, as shown in FIGS. 18 and 19.


Step 4: PVE Default Storage Summary
Local storage point and root logical volume, / dev / mapper / pve-root is something, and the ISO mirror can be stored in the root logical volume by / var / lib / Vz, and the path correspondence is shown in Figure 20.


Do you feel that these mappings are chaotic? In fact, it can be understood, because whether it is the interface of the Proxmox Ve’s web ui or the CLI interface, the display of this part is a little less complete, and many people have a little covered in understanding, they have to be imagined. Below, I put these mappings to make a form, I hope to help you learn Proxmox VE, as shown in Figure 22.

Create Backups#
- Create LXC Dumps
- Create ZFS Snapshots of VM volumes and data disks
- Transfer/Send snapshots and backups offsite
- Create a Proxmox config backup
For creating config backups, I used two approaches.
First, a backup script from DerDanilo
will create a comprehensive *.tar.gz of all relevant
files.4
Almost all files you need are in /etc, so
creating a compressed archive of this folder
directly will likely do as well.
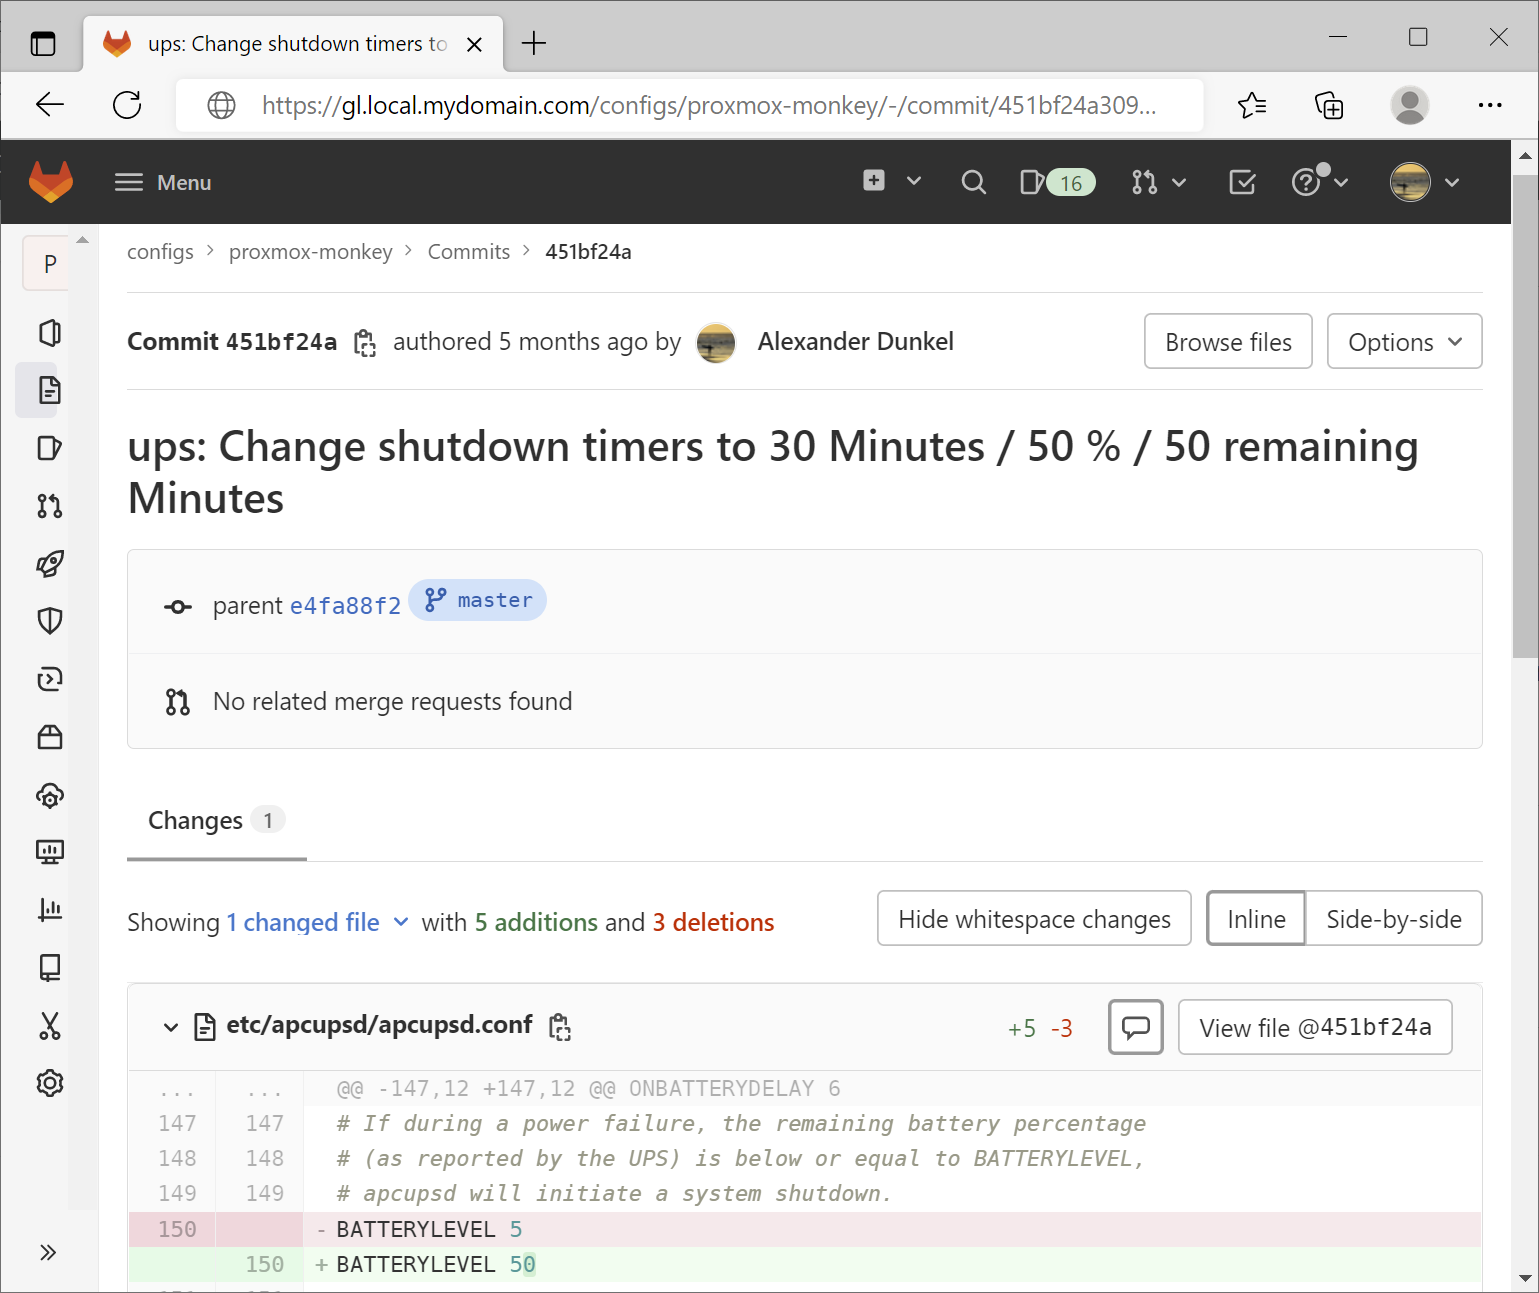
Second, I have a local git repository on Proxmox
to selectively track changes of all relevant files, synced with my private
Gitlab. The main purpose here is not backup, but monitoring and annotation
of changes and general reproducibility.
A visual example
The setup is straightforward:
cd /root
mkdir -p config/proxmox
git init
git remote add origin git@gitlab.local.mytld.com/configs/proxmox.git
nano filelist.txt
Add files to be tracked. Click to see my list.
filelist.txt
## container configs
/etc/pve/lxc/100.conf
/etc/pve/lxc/101.conf
/etc/pve/lxc/102.conf
/etc/pve/lxc/103.conf
/etc/pve/lxc/104.conf
/etc/pve/lxc/105.conf
/etc/pve/lxc/106.conf
/etc/pve/lxc/107.conf
/etc/pve/lxc/108.conf
/etc/pve/lxc/109.conf
/etc/pve/lxc/110.conf
/etc/pve/lxc/120.conf
## storage config
/etc/pve/storage.cfg
## network
/etc/resolv.conf
/etc/network/interfaces
## user config
/etc/pve/user.cfg
## datacenter
/etc/pve/datacenter.cfg
## nodes
/etc/pve/nodes/monkey/config
## special files
/etc/pve/.vmlist
/etc/pve/.version
/etc/pve/.members
/etc/subuid
/etc/subgid
/etc/timezone
/etc/hostname
## telegraf mod
/etc/pve/status.cfg
/etc/telegraf/telegraf.conf
/etc/sudoers
## docker mod
/etc/modules-load.d/modules.conf
## apt sources
/etc/apt/sources.list.d/influxdb.list
/etc/apt/sources.list.d/pve-enterprise.list
## root/user config
/root/.bashrc
## apcupsd mod
/etc/default/apcupsd
/etc/apcupsd/apcupsd.conf
## postfix mod
/etc/postfix/main.cf
/etc/postfix/smtp_header_checks
## tools
/root/drive_check.sh
/root/prox_config_backup.sh
Files cannot be tracked directly in Proxmox, because a
database-driven file system is used for storing configuration files.11
# Shell script to copy important configuration files from the current# environment to this repository.# Exit as soon as a command fails -e# Accessing an empty variable will yield an error -u# Full path to repo directory# copy all files from filelist.txt, excluding # comments, recreate all paths on target directorygrep -e xargs cp --parents --target-directory Update and commit files:
chmod +x get-files.sh
bash get-files.sh
git add .
git commit -m
For the migration itself, I used a spare SSD as a working drive, which was not part of my ZFS pool.
It is easy to get confused with drive letters, when you have 20+ drives,
and drive letters may change between reboots. I suggest using absolute disk ids from
/dev/disk/by-id/.
Copy either the git files or the compressed config backups4 to the temporary drive:
mkdir /tmp/migration
/dev/disk/by-id/ata-Samsung_SSD_840_EVO_1TB_S1D9NEAD808121E-part1
/tmp/migration
mount -v  cp /root/config/proxmox    ls -alh# compressed backupproxmox_backup_root.local.mytld.com_2022-01-22.08.03.27.tar.gz
cp  tar -zxvf  var/tmp/proxmox-DeXUKUc3
tar -xvf proxmoxetc.2022-01-22.08.03.27.tar
tar -xvf proxmoxroot.2022-01-22.08.03.27.tar
tar -xvf proxmoxpve.2022-01-22.08.03.27.tar
umount
Администрирование host системы
Additions#
Restoring the pmxcfs database file#
- Install a new proxmox server with same name
systemctl stop pve-clustercp config.db.bak /var/lib/pve-cluster/config.dbreboot
This is also described as a shortcut in the Proxmox docs11,
but I have not tried it so far and thus, cannot report how
successful this will be. Comments?
Файловая система кластера Proxmox (pmxcfs)
Файловая система кластера Proxmox («pmxcfs») — это управляемая базой данных файловая система для хранения конфигурационных файлов, реплицируемых в реальном времени на все узлы кластера с помощью corosync . Мы используем ее для хранения всех конфигурационных файлов, связанных с PVE.
Хотя файловая система хранит все данные в базе данных на диске, копия данных находится в оперативной памяти. Это накладывает ограничение на ее максимальный размер, который в настоящее время составляет 30 МБ. Этого по-прежнему достаточно для хранения конфигурации нескольких тысяч виртуальных машин.
Эта система обеспечивает следующие преимущества:
- Непрерывная репликация всей конфигурации на все узлы в режиме реального времени
- Обеспечивает строгую проверку согласованности, чтобы избежать дублирования идентификаторов виртуальных машин
- Только для чтения, когда узел теряет кворум
- Автоматическое обновление конфигурации кластера corosync для всех узлов
- Включает распределенный механизм блокировок
System Requirements
If you want to run Proxmox VE in a production environment, recommend the use of high profile server hardware. Proxmox VE supports cluster deployment mode, in order to further reduce the impact of a host failure, you can have a high availability cluster virtual machines and containers to run Proxmox VE.
Proxmox VE support local storage (DAS), SAN, NAS, and distributed storage (e.g. Ceph RBD) and the like.
1.1 The minimum hardware configuration for testing and evaluation scenarios
Minimum hard disk configuration Proxmox VE server used only for testing and evaluation scenarios, can not be used in the production scene.
- CPU: 64 bit (Intel EMT64 or the AMD64);
- Support for Intel VT / AMD-V’s CPU / motherboard that supports KVM full virtualization;
- RAM: 1GB RAM, plus additional RAM required for client space;
- hard disk;
- A network card (NIC).
1.2 Recommended hardware configuration, suitable for the production scene
- CPU: 64 bit (Intel EMT64 or AMD64), supports Intel VT / AMD-V, the CPU is recommended to use a multi-core;
- Memory: Debian Linux operating system and Proxmox VE service requires at least 2GB, plus customer specified memory space. For Ceph and ZFS, it requires additional memory, such as the per TB or Ceph ZFS storage requires approximately 1GB memory;
- High-performance redundant storage resources, it is preferable to use the SSD;
- System installation disk: Use hardware RAID card with battery protection write cache, or without ZFS RAID card (ZIL equipment suggested the use SSD);
- Virtual machine storage: For local storage, use a hardware RAID card with battery-backed write cache, or without ZFS RAID card and Ceph. Note, ZFS and Ceph is not compatible with hardware RAID controller; you can also use shared storage or distributed storage;
- NIC: at least two Gigabit Ethernet, according to the storage cluster configuration and technology used, can be configured more network card, the card can be configured Gigabit;
- To use PCI passthrough, CPU must support VT-d / AMD-d technology.
Preparations#
While it is not advised, there is a small list of packages
that I have installed directly on Proxmox itself. This includes
some basic packages, e.g.:
telegraf: Monitoring of system metrics to InfluxDBiotop,sysstat,ledmon,htop: Local administrationgit: Tracking changes of Proxmox configuration fileslibsasl2-modules,postfix-pcre: Forward of notifications to external mailboxapcupsd: APC UPS Daemonbyobu: Terminal multiplexer
I keep note of these packages, but also went through the list of all packages installed,
to see if I missed any:
Just to verify, also see what the check tool says:
Configuration#
The strategy here was going step by step and in the correct order.
Below, configurations are restored selectively.
An alternative is to restore configurations
through the Proxmox Cluster File System database,
see a note at the end.
First, connect via ssh, using the password set during installation.
lsblk
NAME MAJ:MIN RM SIZE RO TYPE MOUNTPOINT
sda :0  .8G  disk
├─sda1 :1  .8G  part
└─sda9 :9  8M  part
sdb :16  .8G  disk
├─sdb1 :17  .8G  part
└─sdb9 :25  8M  part
...
Import ZFS pools
zpool import tank_hdd
zpool import tank_ssd
zpool status
Restore configs#
Mount migration drive
mkdir /tmp/migration
/dev/disk/by-id/ata-Samsung_SSD_840_EVO_1TB_S1D9NEAD808121E-part1
/tmp/migration
mount -v     ls -alh# set the path for the migration steps below/var/tmp/proxmox-DeXUKUc3
Restore home folder:
- Either restore selectively,
- or copy all, YMMV
mv ~/.ssh ~/.ssh.bak
mv ~/.rnd ~/.rnd.bak
cp -avr /root/. ~/
SSH would not work afterwards, before I realized that
authorized_keys is a symlink to /etc/pve/priv/authorized_keys.
rm ~/.ssh/authorized_keys
mv ~/.ssh.bak/authorized_keys ~/.ssh/authorized_keys
Restore storage configuration#
Compare files (byobu):
nano /etc/pve/storage.cfg
nano $BAKPATH/etc/pve/storage.cfg
— update selectively, if necessary
Install custom apt packages#
apt update
apt-get install sudo byobu iotop git apcupsd
apt-get install lm-sensors
sudo sensors-detect # answer all yes# for postfix:apt-get install libsasl2-modules
apt install postfix-pcre
...
Restore network configuration#
I have two network cards, eno1 and eno2. The first is
used for the Management subnet, the second for the Service subnet(s),
based on tagged VLAN traffic. I added the eno2 network configuration
here, since eno1 was already setup during the Proxmox installation.
Compare/check/merge network interfaces
nano /etc/network/interfaces
nano /etc/network/interfaces
nano /etc/pve/user.cfg
nano $BAKPATH/etc/pve/user.cfgRestore further customization#
cp -a /etc/postfix/main.cf /etc/postfix/main.cf
cp -a /etc/postfix/smtp_header_checks /etc/postfix/smtp_header_checks
Example: User Mappings
lxc.idmap: u 0 100000 33
lxc.idmap: g 0 100000 33
lxc.idmap: u 33 1005 1
lxc.idmap: g 33 1005 1
lxc.idmap: u 34 100034 65502
lxc.idmap: g 34 100034 65502
In order to allow the use of these settings, add this line
to both /etc/subgid and /etc/subuid on the host.
groupadd samba_user -g useradd samba_user -u -g /etc/default/apcupsd # type yes/etc/apcupsd/apcupsd.conf # copy from backupRestore remaining files#
These files did not change or needed no manual merge.
cp -a /etc/pve/lxc/* /etc/pve/lxc//etc/resolv.conf # (not changed)/etc/pve/datacenter.cfg # change keyboard to de/etc/pve/nodes/monkey/config # Add ACME config/etc/pve/.vmlist # not necessary, automatically generated/etc/pve/.version # not necessary, automatically generated/etc/pve/.members # (not changed)/etc/subuid # manual merge (add one line, for LXC uid mapping)/etc/subgid # manual merge (add one line, for LXC gid mapping)/etc/timezone # (not changed)/etc/hostname # (not changed)/etc/apt/sources.list.d/pve-enterprise.list # not changed (or newer)Verify#
- reboot
- Open new Brower (e.g. firefox), head to:
http://192.168.10.42:8006
Restore/Reissue subscription#
New hardware requires updating the subscription key9, if you have one:
- go to node in gui/subscription
- upload subscription key
- in web, click
reissue - in gui, click check
Update#
- Go to updates in gui and install all
Check#
- at this stage, all VMs appear in the list
- all storages appear in the list
SSL Setup#
I have a split-brain DNS setup, meaning that my services (Proxmox..)
can only be reached through the internal subnet, through a local
DNS server. Proxmox gets SSL certificates through ACME,
configured with DNS credentials flow for my A record/TLD.
cp /etc/pve/priv/acme/default /etc/pve/priv/acme
cp /etc/pve/priv/acme/plugins.cfg /etc/pve/priv/acme
Configs appear in gui: Check.
Check Certificate Management.
Go to Node/Certificates/Acme
- click Order Certificates now
- looks good.
Prepare VM start#
zfs mount -l tank_hdd/data
zfs mount -l tank_ssd/lxc
zpool list
> NAME SIZE ALLOC FREE CKPOINT EXPANDSZ FRAG CAP DEDUP HEALTH ALTROOT
> rpool 232G .43G 231G - - % % .00x ONLINE -
> tank_hdd .7T .74T .9T - - % % .00x ONLINE -
> tank_ssd 464G .3G 395G - - % % .00x ONLINE -Check if 10 applies to you:
- go through all menu items in proxmox gui and check each (datacenter and node)
- test starting an LXC
- error: «storage encrypted_zfs does not exist»
pvesm add zfspool encrypted_zfs -pool tank_ssd/lxc encrypted_zfs appears in the storage list
- start LXC: looks good.
- start next LXC: looks good.
- check web: looks good.
- start all other LXC and VM
Conclusion#
Any customization makes migration, backup and restore more tedious. I was not even sure
whether I should publish my notes, since the process is highly custom. But maybe
someone can benefit from this, as a starting point.
")


")