
В некоторый случаях файловая система в Linux может перейти в состояние read-only, при котором вы можете только читать данные с диска, а при попытке записи любых изменение или создании нового файла появдляется ошибка Read-only file system.
With virtualisation, many virtual machines try to access the same physical resources at the same time. Due to physical limitations (number of read/write operations – IOPS; throughput; latency) there might be a problem to satisfy all storage requests of all physical machines at the same time. What usually happens: you will be able to see «SCSI retries» and failed SCSI operations in the operating systems of your virtual machines. If you get too many errors/retries in a certain period of time, the kernel will set the mounted filesystems read-only in order to prevent damage to the filesystem.
To cut the long story short: Your physical storage is not «powerful» enough. There are too many processes (virtual machines) accessing the storage system at the same time, your virtual machines do not get the response from the storage fast enough, and the filesystem goes read-only.
There are not terribly many things you can do. The obvious solution is better/additional storage. You can also modify the parameters for SCSI timeouts in the Linux kernel. Details are described, e.g., in:
However, this will only «postpone» your problems, because the kernel only gets more time before the filesystem will be set read-only. (I.e., you do not solve the cause of the problem.)
My experience (several years with VMware) is that this problem only exists with Linux kernels (we’re using RHEL and SLES) and not with Windows servers. Also, this problem occurs on all sorts of storage – FC, iSCSI, local storage. For us, the most critical (and expensive) component in our virtual infrastructure is storage. (We’re now using HP LeftHand with 1 Gbps iSCSI connections, and have not had any storage issues ever since. We chose LeftHand (over traditional FC-solutions) for its scalability.
Опишу что есть. Сервер HP с ОС Debian 7. На нем xen 4.1 Domain-0 . Гость тоже xen и тот же debian 7.
Имеется проблема с файловой системой ext4 у гостя. Работает работает а потом бац и вот:
Код: Выделить всё
Вот файл fstab гостя:
Изначально barrier=0 не было, прочитал что есть баг в ксене и что лечится отключением барьеров, выключил. Прошло около 3 месяцев и казалась проблема решена. Как бац и снова этот косяк.
Файловая система при обнаружении ошибок монтируется в режим только для чтения, потом я вижу что все работает но не работает, перегружаю гостя и получаю:
После перезагрузки должно было выполнится автоматическая проверка фс чего не произошло, видно выше. Делаю это вручную и выполняю ребут как того требует система. После этого все работает. Но на сколько долго не понятно.
У кого есть какие мысли по этому поводу? Можно ли как-то автоматизировать процесс, если не получится починить.
Поправите меня, если я не прав, буду тока рад.
I am using Gentoo Linux and for a while now, the root file system is mounted read-only on booting. For obvious reasons, this is quite annoying as most services do not start up correctly (I do not use a separate file system for /var). After the system is up, I have to log in, remount the root file system read-write, fix /etc/mtab, mount all other file systems in from /etc/fstab and then start up all the missing daemons. I know that there are ways to make a system run properly with a read-only file system, but I would rather restore the old behaviour of a writable root file system.
The strange thing is that after running mount / -o remount,rw, the file system is mounted in writable mode without any errors. I suspected some problem with fsck, but now I have disabled automatic file system checks on the partition (tune2fs -c0 -i0).
When I run dmesg, only these lines mention the partition at all, although I am not sure if not something gets lost because /var/log is not writable:
The line in /etc/fstab looks like this:
/dev/sda5 / ext3 noatime 0 1
I am using the kernel 2.6.34-gentoo-r6 (the same problem existed with a previous 2.6.31 kernel). I have created it using genkernel 3.4.10.906. My grub configuration looks like this:
title=Gentoo Linux (2.6.34-gentoo-r6)
root (hd0,0)
kernel /kernel-genkernel-x86_64-2.6.34-gentoo-r6 root=/dev/ram0 real_root=/dev/sda5 vga=792 CONSOLE=/dev/tty1 resume=/dev/sda6
initrd /initramfs-genkernel-x86_64-2.6.34-gentoo-r6
Apart from that, I run baselayout 2.0.0 with openrc 0.6.3, if that is any important. sysvinit 2.87-r3 is also installed, I don’t know if it’s actually used.
Here is the output of dumpe2fs:
I have no idea what could cause this problem. I cannot find any error messages, and searching the internet, I only find manuals how to deliberately mount the root filesystem read-
- (warning). fsck died with exit status 4 failed! (code 4).
- Using read-only File System in OpenShift containers
- Default configuration
- Mounting the Root FS read-only
- A practical example with a JBoss EAP Application
- Why is the root file-system not mounted read-only by default ?
- Conclusion
- Ошибки файловой системы и опция remount-ro
- Read-only файловая система в виртуальных машинах
(warning). fsck died with exit status 4 failed! (code 4).
by TSerzhO_ » 2013-02-19 10:36
Code: Select all
by TSerzhO_ » 2013-02-19 10:45
I have a ScreenShots, but can’t to attach it, because of:
by michapma » 2013-02-19 11:04
Secondly, don’t apologize for being a noob, it’s impossible to start as a guru. You did a good job of describing your problem and providing enough information for someone to provide help.
by TSerzhO_ » 2013-02-19 11:06
Last edited by TSerzhO_ on 2013-02-19 11:09, edited 1 time in total.
by michapma » 2013-02-19 14:54
When you’re entering your message, at the bottom is an area with two tabs: «Options» and «Upload attachment.» Use the second one. Otherwise, you can host the image online using a free site of your choice.
by TSerzhO_ » 2013-02-27 14:56
by mahboobehd » 2016-01-27 23:05
I am running debian_squeeze_i386_desktop.qcow2, and it was working properly before I tried to make a bridge between host system and qemu.
Thank you in advace for the help,
Mahboobeh
by kiyop » 2016-01-28 11:23
mahboobehd wrote:I have the same problem,
Even if you have similar problem, the cause of the problem may be different.
it is better for you to start a new thread. You can link this thread in your new thread.
Your debian_squeeze is booting as the host system, isn’t it?
I wonder if /dev/sda1 has bad sector(s).
I suggest you backing-up important data to a safe place such as a partition in an USB media (removable media).
Can you unmount /dev/sda1?
After backing up all the important data, unmount the partition which contains the copied data, and remove the USB media. Then, you can check /dev/sda1 like
umount /dev/sda1
fsck -f -y -c -c /dev/sda1
with root privilege.
Using read-only File System in OpenShift containers
The CIS Security Best Practices,
mandates the use of a read-only file system in containers.
This guide explains how to use read-only File System in OpenShift.
Default configuration
By default, when a container is created in OpenShift, the root filesystem is
mounted as read-write.
On this root filesystem, OpenShift applies additional security restrictions:
First, create a dummy container based on the RHEL 7.5 image:
oc new-app —name rootfs registry.access.redhat.com/rhel:7.5
oc patch dc rootfs —type=json -p
Watch the container being created:
oc get pods -w -l app=rootfs
Once created, check the container root filesystem mount:
oc rsh mount head -n 1
You should get something like this:
overlay on / type overlay (rw,relatime,context=»system_u:object_r:svirt_sandbox_file_t:s0:c4,c27″,lowerdir=/var/lib/docker/overlay2/l/DOKXVDUEKEI37AXQ7HKYX54UGF:/var/lib/docker/overlay2/l/F6L6WHTZAHKPX722FPFCSPJR7Z:/var/lib/docker/overlay2/l/AZIFQJPO3T2VMKKXOLDVL4Y7RI,upperdir=/var/lib/docker/overlay2/2b1a55df9f0b3d935d2c92ea324d79ccfac956a1be469f82662f8305419c615a/diff,workdir=/var/lib/docker/overlay2/2b1a55df9f0b3d935d2c92ea324d79ccfac956a1be469f82662f8305419c615a/work)
The root file system is mounted as read-write.
By default, OpenShift is using the restricted Security Context Constraints (SCC):
As you can see, the Read Only Root Filesystem option is NOT enabled in
this SCC.
This can easily be verified by getting a terminal on the running container:
find / -xdev -writable -ls
You should get a similar result:
So, the only writeable files and directories on a RHEL7 image are:
As you can see, the default RHEL 7.5 image comes with a relevant set of Unix permissions
and do not requires a read-only root file system.
You can convince yourself by creating a file in /tmp:
And being forbidden to create a file elsewhere:
$ touch /bar
touch: cannot touch : Permission denied
Mounting the Root FS read-only
At this point, if you still want to mount the root filesystem as read-only, you would need to:
Create a SCC named readonly-fs that mounts the root file system as read-only:
oc create -f read-only-scc.yaml
Create a service account:
Assign the readonly-fs SCC to the readonly service account:
Assign the readonly service account to the rootfs deployment:
oc patch dc/rootfs —patch
Verify that the root file system is mounted read-only:
$ oc rsh mount head -n 1
overlay on / overlay (ro,relatime,context=,lowerdir=/var/lib/docker/overlay2/l/6HXYZ6ASQAXKMULESF4PBCMOVC:/var/lib/docker/overlay2/l/F6L6WHTZAHKPX722FPFCSPJR7Z:/var/lib/docker/overlay2/l/AZIFQJPO3T2VMKKXOLDVL4Y7RI,upperdir=/var/lib/docker/overlay2/0ceff5b5dae1a00ee14086e6bd0ef5db1600f5f1f2de192255917ceb09ebd31d/diff,workdir=/var/lib/docker/overlay2/0ceff5b5dae1a00ee14086e6bd0ef5db1600f5f1f2de192255917ceb09ebd31d/work)
If you re-run the find / -xdev -writable -ls command, you should get a different result:
If you try to create a file in /tmp, you should get an explicit error message:
$ touch /tmp/foo
touch: cannot touch ‘/tmp/foo’: Read-only file system
But since /tmp and /var/tmp are required to be writable my most applications,
you would need to mount a writable tmpfs filesystem in those locations:
oc volume dc/rootfs —add —overwrite —name tmp —mount-path /tmp —type emptyDir
oc volume dc/rootfs —add —overwrite —name vartmp —mount-path /var/tmp —type emptyDir
If you re-run the touch /tmp/foo command, it should now succeed while the
rest of the root file system is still read-only.
A practical example with a JBoss EAP Application
In this example, we will deploy a very classical JBoss EAP application:
the «openshift-tasks» whose source code can be found here.
First, deploy the application as usual, with the oc new-app command:
oc new-app —name=openshift-tasks jboss-eap70-openshift~https://github.com/nmasse-itix/openshift-tasks.git
oc expose service openshift-tasks
Assign the readonly service account created before to the openshift-tasks deployment:
oc patch dc/openshift-tasks —patch
Override the container entrypoint so that we can work on the configuration
without crashing the container:
oc patch dc/openshift-tasks —type=json -p
Copy the JBoss EAP original configuration and create a Config Map from it:
mkdir jboss-config
oc rsync :/opt/eap/standalone/configuration/ jboss-config
oc create configmap jboss-config —from-file=jboss-config
Now, mount this config map somewhere and override the JBoss EAP configuration
directory with a tmpfs mount:
oc volume dc/openshift-tasks —add —overwrite —name config-template —mount-path /opt/eap/standalone/configuration.template —type configMap —configmap-name=jboss-config
oc volume dc/openshift-tasks —add —overwrite —name config —mount-path /opt/eap/standalone/configuration/ —type emptyDir
Add an init container that will copy the original JBoss configuration to the tmpfs mount:
Note: the cp -L switch is required to dereference symlinks created by the Config Map.
Add tmpfs mountpoints where required:
oc volume dc/openshift-tasks —add —overwrite —name tmp —mount-path /tmp —type emptyDir
oc volume dc/openshift-tasks —add —overwrite —name vartmp —mount-path /var/tmp —type emptyDir
oc volume dc/openshift-tasks —add —overwrite —name jboss-logs —mount-path /opt/eap/standalone/log —type emptyDir
oc volume dc/openshift-tasks —add —overwrite —name jboss-data —mount-path /opt/eap/standalone/data —type emptyDir
oc volume dc/openshift-tasks —add —overwrite —name jboss-tmp —mount-path /opt/eap/standalone/tmp —type emptyDir
oc volume dc/openshift-tasks —add —overwrite —name jolokia-config —mount-path /opt/jolokia/etc/ —type emptyDir
Now, we need to handle the deployments directory that contains the EAR to deploy.
But since JBoss needs to create files in the deployments directory, it cannot be
read-only.
Override the default deployments directory of JBoss with a tmpfs mountpoint:
oc volume dc/openshift-tasks —add —overwrite —name jboss-deployments —mount-path /opt/eap/standalone/deployments —type emptyDir
Add a sidecar container, whose job is to copy the EAR to the new writable deployments mountpoint:
Add a trigger on image change for this new side-car container:
oc triggers dc/openshift-tasks —from-image=openshift-tasks:latest -c jboss-deployments
Remove the entrypoint override:
Watch the container start:
oc get pods -w -l app=openshift-tasks
Why is the root file-system not mounted read-only by default ?
Even if it can be seen as a good practice to mount the root filesystem as read-only,
there also other good reasons not to do so.
Several reasons are tied to the current state of container images, namely those found on
Docker Hub:
There are also other reasons related to maintenance and ease of use:
Lastly, we can also mention the short-lived containers (deployment containers,
init containers, build containers, etc.) that are created for a one-time task
and destroyed just after. A read-only root file system would not change anything
in this use case.
Conclusion
As a conclusion, it is definitelly possible to use read-only root filesystems in
OpenShift. For very specific environments where the risks are high, you might consider
this option.
The rationale around the read-only root file system from the CIS Security Best Practices is:
While I definitely agree with the rationale, I also think the read-only root file system
has an impact on the way container are managed and the perceived security gain must be weighted
with the required cost to implement, maintain and support this configuration.
Also, as you can see in this example, the default OpenShift configuration provides
other mechanisms to reach the same goals.
There are improvements in the upstream projects to secure containers using a read-only root file system.
Some applications can leverage such feature, others were not designed for it and cannot leverage it.
The decision to go for a read-only root file system must be studied and decided on case by case basis.
Ошибки файловой системы и опция remount-ro
Проверьте параметры монтирования дисков при загрузке Linux. Настройки монтирования файловых систем при загрузке задаются в файле /etc/fstab.
$ cat /etc/fstab
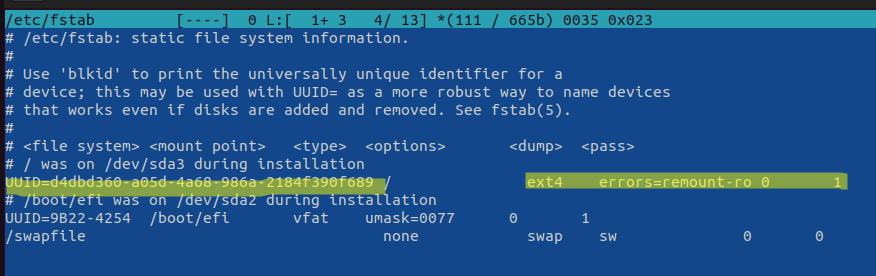
Обратите что в fstab есть строка монтирования корневой директории вида:
UUID=aaaaaaaaa-aaaa-aaaa-aaaa-aaaaaaaaa / ext4 errors=remount-ro 0 1
Параметр
errors=remount-ro
означает, что данная директория будет смонтирована в режиме чтения, если на файловой системе устройства обнаружены проблемы. В этом случае нужно выполнить проверку диска с помощью FSCK.
Обычные файловые системы такие как EXT4/BTRFS/XFS можно монтировать как в режиме записи, так и только для чтения (в отличии от файловых систем ISO или SquashFS, которые доступны только для чтения).
Вы можете вывести соответствие между UUID диска и именем устройства:
$ sudo blkid
В данном примере вы получили, что вашему UUID соответствует устройство /dev/sda3.

Также можно имена устройства и точки монтирования с помощью команды:
$ df –h
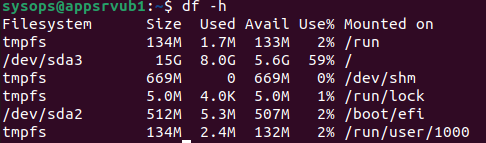
Т.к. в данном примере ошибки обнаружены в корневой директории которая является точкой монтирования, вы сможете выполнить ее проверку только загрузившись с LiveCD. Для исправления ошибок файловой системы используется команда:
$ sudo fsck –y /dev/sda3
$ sudo fsck –y UUID=aaaaaaaaa-aaaa-aaaa-aaaa-aaaaaaaaa
Если вы не можете прямо сейчас выполнить проверку диска, и вы хотите немедленно вывести файловую систему из режима read-only, нужно выполниться команду:
$ sudo mount -o remount,rw /
Обязательно запланируйте проверку файловой системы на ближайшее время.
Read-only файловая система в виртуальных машинах
Файловая система раздела Linux на виртуальной машине можете перейти в read-only в случае недоступность системы хранения данных (СХД). Самый простой способ восстановить работу ОС – выполнить сброс виртуальной машины (фактически перезапуск с параметрами по умолчанию).
Может оказаться, что ВМ с Linux вообще не загружается и вам доступна только командная строка initramfs с предупреждениями:
UNEXPECTED INCONSISTENCY: RUN fsck MANUALLY.
Fsck exitrd with code 4.
The root file system of /dev/sdx requires a manual fsck.
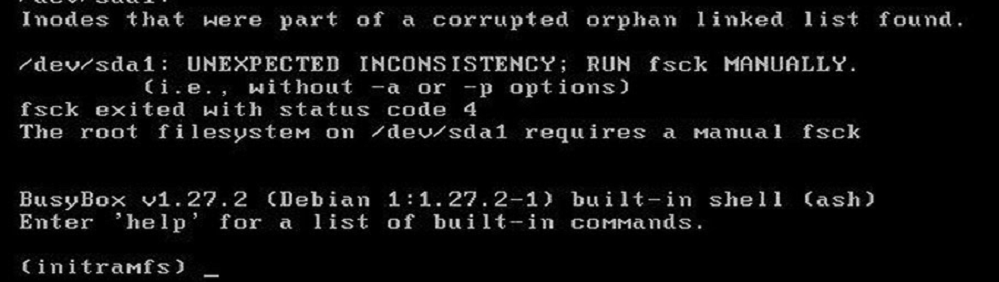
Initramfs это начальная файловая система в оперативной памяти, которая основана на tmpfs, которая содержит утилиты и скрипты, необходимые для работы с дисками, файловыми системами и тд. После запуска initramfs отобразится проблемная ситуация.
Если же ошибок нет – просто вводим exit. Иначе выполняем проверку диска:
$ fsck /dev/sda3 –y
Здесь указан том (в данной случае /dev/sda1), для которого требуется выполнить ручную проверку. С помощью следующей команды можно проверить все подключенные файловые системы:
$ fsck –A –y /dev/sda1
После этого перезагрузите ВМ.
")


")