


Здесь вы узнаете как получить РУТ права для телефона Samsung Galaxy Note 4 SM-N910C , работающем на Android 4.4 KitKat.
Телефон Samsung Galaxy Note 4 SM-N910C выпущен в 2014 году фирмой Samsung. Экран телефона обладает диагональю 5.7 дюйма и имеет разрешение 1440 x 2560.
В смартфоне установлен процессор Samsung Exynos 7 Octa 5433 с частотой 1900 и видеоускоритель Mali-T760 MP6.


Приложение для root-прав на андроид. Версии для ПК Windows и для OS Android


Популярное приложение для получения root-прав на андроид телефоны и планшеты.


Разработчик: HEXAMOB S.L.
Программа, которая поможет вам узнать, как получить права ROOT на вашем мобильном устройстве.

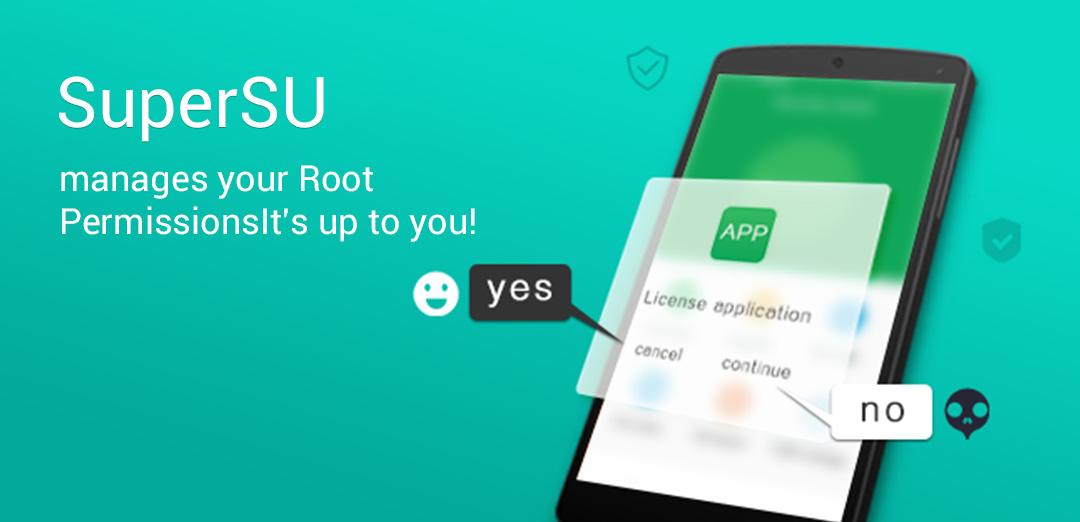

Самое необходимое приложение для всех, у кого есть ROOT доступ и права суперпользователя на телефоне.


Хотите получить root права на телефон? Это приложение поможет
ROOT права позволяют расширить функционал Samsung Galaxy Note 4 SM-N910C и операционной системы Android 4.4 KitKat, на которой он работает. Вы сможете изменять стандартное программное обеспечение, удалять любые приложения, получите возможность устанавливать сторонние прошивки и программы, требующие полный доступ к системе. К установке РУТ прав стоит отнестись очень серьезно!
Что именно дают права Root на Андроид:
И многие другие полезности.
T-Mobile Galaxy Note 4 runs on the APQ8084 chipset from Qualcomm which supports LTE bands, unlike the international Exynos 5 variant. Also, it’s often less painful for developers to root and make custom ROMs (specially AOSP based) on devices running Qualcomm chipsets since the company releases source code for its architecture. Samsung doesn’t releases source code for its Exynos chipsets and hence the incompatibility with AOSP based custom ROMs.
There are many benefits to rooting an Android device, you’d be able to completely remove bloatware from your Note 4 with root access, giving better performance and battery life on the device. Other than that, there are several apps on the Play store that takes advantage of root access on your phone and help turbo boost the productivity of your device.
Read: Essential Root Apps for your Rooted Android Devices
- ROOT T-MOBILE GALAXY NOTE 4 SM-N910T
- CHECK DEVICE MODEL NO.
- BACKUP YOUR DEVICE
- INSTALLATION INSTRUCTIONS
- Что нам понадобится?
- Download CFAR Files To Root Galaxy Note 4 (Primary Method)
- CFAR Root for Samsung Note 4 on Android 6. 1 Marshmallow
- How to Root Galaxy Note 4 on Android 6. 1 Marshmallow For N910H, N910F, N910T, N910P/C/R4 and More?
ROOT PACKAGE INFO
You only are responsible for your device. We won’t be liable if any damage occurs to your device and/or its components.
ROOT T-MOBILE GALAXY NOTE 4 SM-N910T
Before you begin with guide instructions below, make sure your android device is adequately charged — at least 50% battery of the device.
CHECK DEVICE MODEL NO.
To make sure your device is eligible with this, you must first confirm its model no. in ‘About device’ option under Settings. Another way to confirm model no. is by looking for it on the packaging box of your device. It must be SM-N910T!
This guide is specifically for the T-Mobile Galaxy Note 4 with model no. SM-N910T. Do not use the procedures discussed here on any other device of Samsung or any other company. You have been warned!
BACKUP YOUR DEVICE
Back up important data and stuff before you start playing around here as there are chances you might lose your apps and app-data (app settings, game progress, etc.), and in rare case, files on the internal memory, too.
For help on Backup and Restore, check out our exclusive page on that linked right below.
ANDROID BACK UP AND RESTORE GUIDE: APPS AND TIPS
You must have proper and working driver installed on your windows computer to be able to successfully root your Galaxy Note 4. If you are not sure, check the link below.
SAMSUNG GALAXY NOTE 4 DRIVERS INSTALLATION GUIDE
INSTALLATION INSTRUCTIONS
Download the CF Auto Root file given below and transfer it to a separate folder on your computer (just to keep things tidy, that is).
CF AUTO ROOT FILE
Important Note: Backup important files stored on internal SD card of your device, so that in case a situation arises requiring you to do a factory reset after rooting, which might delete internal sd card too, your files will remain safe on PC.
If you see FAIL message instead of the RESET or PASS in Odin’s top left box, that’s a problem. Try this now: disconnect your Galaxy Note 4 from PC, close Odin, remove phone’s battery and put it back inside in 3-4 seconds, open Odin and then repeat from Step 3 of this guide again.
Also, If device is Stuck at setup connection or on any other process, then too, try this: disconnect your Galaxy Note 4 from PC, close Odin, remove phone’s battery and put it back inside in 3-4 seconds, open Odin and then repeat from Step 3 of this guide again.
That’s all. If you need help regarding this, feel free to ask us in comments below.
It was easy to root T-Mobile Galaxy Note 4 SM-N910T using CF-Auto-Root, right? Let us know how you plan to use root privileges on your Galaxy Note 4 now.
Suggestions are most welcomed!
- 9.10.2014
- Обсуждений: 5
Получение root-прав на Samsung Galaxy S5 (и S5 Prime) или Galaxy Note 4 может быть очень простой процедурой, особенно если вы знаете про Chainfire и CF-Auto-Root. Позавчера мы уже об этом говорили: «Как получить root на Galaxy Note 4 любой модели с помощью Chainfire». Этот инструмент рутования позволяет установить SuperSU на ваш смартфон с TouchWiz уже будет с правами суперпользователя.


Убедитесь, что вы внимательно прочли предупреждение при скачивании CF-Root – вам нужна версия для вашей модели Galaxy Note 4! Иначе вы просто получите из смартфона кирпич. Кроме того, если у вас уже установлен Kies, то устанавливать драйвера вам не нужно.
Шаг 2. Извлеките содержимое архива CF-Root в отдельную папку на вашем рабочем столе. У вас должен быть файл с tar-расширением, а не файл, который заканчивается на «img».
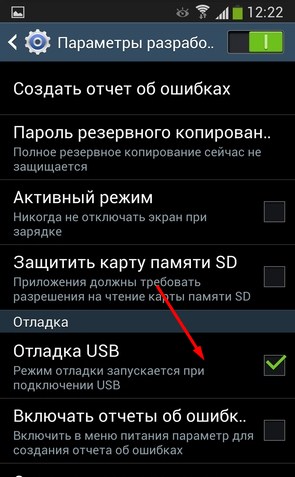
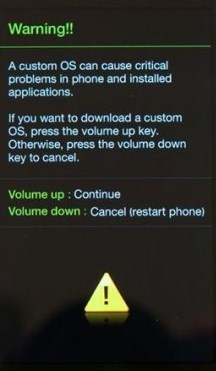
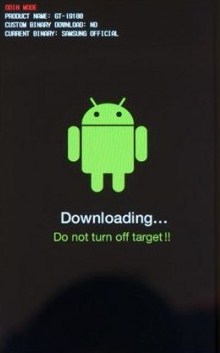
Шаг 4. Выключите Galaxy Note 4 и на всякий случай выньте и вставьте батарею обратно. Затем одновременно нажмите кнопки уменьшения звука, Home и кнопку питания(Volume Down + Home + Power) для загрузки специального режима Download Mode. Если телефон покажет вам на экране предупреждение о кастомной прошивке, то пропустите его, нажав на кнопку увеличения громкости.
Шаг 5. Подключите телефон к компьютеру и дождитесь пока Windows проверит и установит драйвера. После установки драйверов ODIN должен автоматически обнаружить устройство. Ни в коем случае не трогайте в ODIN никаких настроек!
Шаг 6. После того, как Galaxy Note 4 будет обнаружен программой ODIN, нажмите кнопку START и подождите, пока ODIN устанавливает пакет CF-Auto-Root на устройстве. Ваш смартфон после процедуры должен сам автоматически перезагрузиться, что должно указывать на успешное завершение процедуры. Не паникуйте, если первая загрузка будет происходить дольше, чем обычно.

Если по каким-то причинам Galaxy Note 4 войдет в циклическую перезагрузку, то вам следует проверить скачали ли вы верную версию CF-Auto-Root для вашего фаблета. Рекомендуем заново пройти всю процедуру.
Замечу, что CF-Auto-Root увеличит счетчик перепрошивок на 1 и отключит Knox вместе с гарантией. Если вы убьете фаблет, то в сервисе вам по гарантии никто не поможет, так что задумайтесь над своими действиями.
Нашли ошибку? Выделите ее и нажмите Ctrl+Enter
Сайт AndroGoo представляет инструкцию по получению рут прав Samsung Galaxy Note 4 SM-N910C. Сделайте свой смартфон еще фунцкиональнее с правами суперпользователя.
В умелых руках рут права станут универсальным инструментом, который позволит без ограничений управлять работой своего смартфона или планшета, удалять и редактировать системные файлы, оптимизировать работу процессора, оперативной памяти и многое другое. Если вы интересуетесь внутренней структурой операционной системы, хотите поэкспериментировать с ней или просто выжать из своего гаджета максимум возможностей, root права Samsung Galaxy Note 4 SM-N910C станут вам в этом незаменимым помощником.
Инструкция актуальна для операционной системы Android 4.4 и Android 5.1.1! Если для смартфона была выпущена нова версия ОС, сообщите об этом в комментариях под записью.
Что нам понадобится?


Если установка рут из-за каких либо причин была неудачной и смартфон перестал включаться — прошейте его, используя с нашего сайта.
Almost all of the Samsung Galaxy Note 4 variants have been updated to the latest Android 6.0.1 Marshmallow firmware update. This includes the Galaxy Note 4 SM-N910F, N910G, N910C, etc. and also the US and Korean variants like the N910P, N910T, N910V, N910A and N910S/L/K. It brings many new features to the new TouchWiz OS and the Marshmallow goodies as well. It is available in many regions including South Asia, Europe, Korea, US, etc. However now for those of you who have already updated, Chainfire, the developer behind root access for Android devices, has stepped into releasing a CF-Auto-Root (CFAR root) procedure for many of the Galaxy Note 4 variants. The CFAR is a basically a tar file embedded with latest SuperSU that can be flashed using Odin tool. This is a popular rooting method for Samsung devices and you can look for our successful tutorial for Samsung Galaxy S5, Note 5, the Galaxy S6 (Edge, Plus), Galaxy S7 (Edge) and more. with CF-Auto-Root. All these devices run on the latest TouchWiz firmware and the CF-Auto-Root is one of the safest option available to gain root privilege.
However, the CF-Root file is available only for the N910C/F/G, some US carriers, and Korean variants for the Android 6.0.1. So for other variants, CFAR only supports root for devices running on older Android 5.1.1 Lollipop. Soon the files may show up for these variants as well. So stay tuned. This procedure is simple and will help you root your device with ease.
Download CFAR Files To Root Galaxy Note 4 (Primary Method)
You can download the latest CFAR from this link.
CFAR Root for Samsung Note 4 on Android 6. 1 Marshmallow
Note: This TWRP and SuperSU files are for an alternative method. If you are also looking for TWRP and want to flash SuperSU manually through TWRP for Root, then grab the files from this section and head over to this tutorial for alternative root method: How to Root Samsung Galaxy devices with TWRP and SuperSU. Otherwise, if you are just looking for root via CFAR, then head over to the tutorial below.
Warning: Once you root or install a custom package, your warranty may be void and may trip Knox for Samsung. We at AndroidSage won’t be liable for any damage to your Android device. Reader’s discretion is advised.
How to Root Galaxy Note 4 on Android 6. 1 Marshmallow For N910H, N910F, N910T, N910P/C/R4 and More?
If you are just looking just for root and not a custom recovery, then all you need to do is download the CFAR file from above and flash it via Odin software and add the CFAR into AP. Before you proceed, take a note that CFAR may sometimes prove unstable for Android 6.0.1 Marshmallow. This means that after flashing with ODIN, the device may reboot a few times and may also take around 5 minutes to boot. So you may see some inconsistency at first. The CFAR binaries are regularly updated and you should see a more stable version each time. If it still doesn’t boot, then something has gone wrong, and you should probably reflash your stock boot.img and recovery.img or just restore the full stock firmware onto your device.
1. Verify your device for compatibility. The listed firmware is compatible with Samsung Galaxy Note 4 SM-G900F, N910H, N910F, N910T, N910P/C/R4, N910S/K/L, etc. devices only
3. “Enable OEM Unlock” from Developer Options before you proceed. this is important.
4. Make sure you have latest device drivers setup on your PC for a better connection. Get it from the download section official from the manufacturer.
Step 1: Download the exact CF file for your for your Galaxy device. Extract the zip file to get the firmware with .tar or .tar.md5 extension and place at a location where you can easily locate it in your PC.
Step 2: Now boot your device into Download/Odin Mode. To do so, turn off your device completely and then press and hold Power button + Volume Down + Home keys for a few seconds. If you see a warning sign press Volume up/ Volume down to get the Odin screen.
Step 4: While your device is still in the Odin Mode, connect your device to your PC using a USB cable.
Step 5: After a successful connection, the ID: COM in the Odin should turn Blue and an Added!! message should be displayed in the Log tab. In case your device doesn’t show up in Odin, then you can troubleshoot it with the steps given at the end of the tutorial.
Step 6: Now click on AP button and add the firmware file by navigating to the file path. Once added, it should show like this — File PathCF-Auto-Root-trelte-treltexx-smn910c.zip
Step 7: Take care that only Auto Reboot and F.Reset Time are selected in the Options tab. Do not check Re-Partition.
Step 8: Once done, verify everything and proceed with installation by selecting Start button.
Step 9: When you get a PASS! message in the Log tab on your Odin software, that means firmware has successfully been installed and the device will restart itself. If not then reboot manually.
")


")