
Прежде чем начать взлом Android, надо понять, как он в целом работает, и лишь затем можно приступать к разблокировке загрузчика системы. Итак, попробуем разобраться.
Отказ от ответсвенности: этот мануал предоставлен только для ознакомительных целей, вы не должны использовать эту возможность на чужих телефонах без разрешения владельца ни при каких обстоятельствах. Ни автор, ни переводчик не отвечают за различные случаи применения этого хака.
От переводчика (автора темы): не знаю, может эти способы уже обсуждались на форуме, но поиском ничего не нашел, поэтому решил выложить, так как часто встречаются проблемы с экраном блокировки.
Не так давно я у меня была проблема с девайсом на андроиде, который был заблокирован с помощью графического ключа и мне удалось разблокировать его через adb. Это мануал по тому, как вам справиться с этим, если когда-нибудь и вы столкнетесь с этой проблемой.
На устройстве необходимо чтобы было включен usb debugging, если он не включен, но у вас имеется cwm, вы можете выполнить теже инструкции через cwm, рут не обязателен (хотя лучше если устройство будет рутовано).
Этот методы был протестирован на Gingerbread, Ice Cream Sandwich и Jelly Bean.
Обо способа работают через adb.
adb shell
cd /data/data/com.android.providers.settings/databases
sqlite3 settings.db
update system set value=0 where name=’lock_pattern_autolock’;
update system set value=0 where name=’lockscreen.lockedoutpermanently’;
.quit
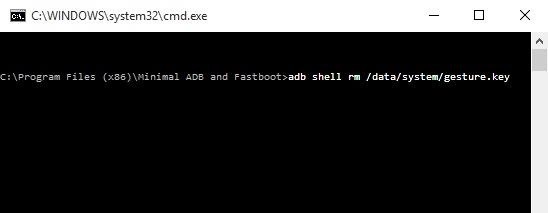
adb shell rm /data/system/gesture.key
Вы можете попробовать оба способа, вот пример того, как я действовал, чтобы удалить блокировку:
- Воспользовался способом 1.
- Перезагрузился.
- Воспользовался способом 2.
- Перезагрузился.
Если после второй перезагрузки изменений не произошло, тогда попробуйте:
adb shell rm /data/data/com.android.providers.settings/databases/settings.db
И снова перезагрузиться.
- В первом способе каждая строка это различная команда, так что нажимайте Enter после набора каждой строки.
- Во втором способе наберите полностью команду, затем нажмите Enter.
- После применения обох способов и перезагрузки вы можете увидеть экран блокировки, но это не значит, что он работает, просто попробуйте ввести любой ключ и он разблокируется, затем удалите экран блокировки в настройках.
- Эти спобобы могут работать, а могут не работать на различных устройствах, так что все что вы можете это попытаться, но я не гарантирую работу.
P.S. я (автор темы), не являюсь автором мануала, я просто привел на 4pda вольный перевод этой инструкции: http://forum.xda-developers.com/showthread.php?t=1800799
Сообщение отредактировал vaalf — 16.01.17, 19:37
Forgotten your phone password? Not able to access your data on your Android phone? Worry not! Read this article to know all the possible ways to unlock Android phone password without performing factory reset with buttons.
If you want to gain back access to your phone data without the use of security passcode, all the available ways in which you can unlock Android phone is by erasing the device and resetting it completely. Here are the 6 different ways which tell you about how to unlock Android phone password without factory reset.
- Way 1: Unlock Android Password With 4uKey For Android
- Way 2: Unlock Android Phone Password Using Android Device Manager
- Way 3: Unlock Locked Android Phone Using Forgot Pattern Feature
- Way 4: Unlock Android Phone With Find My Mobile (Samsung Only)
- Way 5: Unlock Android Password Using Android Debug Bridge
- Way 6: Unlock Android Password With Safe Mode
- Conclusion
- Что такое Root?
- Зачем это нужно?
- Какие минусы и опасности получения прав суперпользователя?
- Как получить root на моем устройстве?
- Что делать, если Root так и не был получен?
- Part 1: How to Unlock Android Phone without Google Account
- Use 4uKey for Android to Unlock Android Phone without Google Account
- Remotely Unlock Android Phone without Google Account
- Part 2: How to Unlock Android Phone with Google Account
- Unlock Android Phone Using Google Account
- Bypass FRP to Unlock Google Locked Android Phone
- Conclusion
- What is bootloader?
- Advantage of Unlock bootloader
- Disadvantage of Unlock bootloader
- Step 1 – Unlock the developer mode
- Step 2 – Interlinking the devices
- Step 3 – Applying the commands
- Step 4 – Unlocking the bootloader!
- F.A.Q (Frequently Asked Questions)
- 8 Methods to Unlock Android Without Password
- Method 1. How to Unlock Android Phone without Password — 4ukey for Android
- Method 2. How to Unlock Android Phone without Password — Android Device Manager
- Method 3. How to Unlock Android Phone without Password — Find My Mobile
- Method 4. How to Unlock Android Phone — Forgot Pattern (Android 4.4 or Lower)
- Method 5. How to Unlock Android Phone — Use ADB to Delete Password
- Method 6. How to Unlock Android Phone — Safe Mode to Bypass Third-party Lock
- Method 7. How to Unlock Android Phone without Code — for Android 5.0-5.1
- Method 8. How to Unlock Android Phone without Code — Factory Reset
- Wrapping Up
- What is Bootloader?
- Advantage of Unlock bootloader
- Disadvantage of Unlock bootloader
- How to Unlock Bootloader on any Android Phone
- Method #1 – Unlock Bootloader All Phones
- Step 1: Unlocking developer mode
- Step 2: Attach your phone and PC
- Step 3: Insert ADB/ Fastboot commands
- Step 4: Finally, unlock the bootloader
- Method #2 – Unlock Bootloader Samsung phones
- Step 1: Open developer settings
- Step 2: Simply unlock the bootloader
- Method #3 – Unlock Bootloader Xiaomi phones
- Step 1: Unlock Developer settings
- Step 2: Log in to Mi account
- Step 3: Join the devices
- Frequently Asked Questions (FAQs)
- Last thoughts:
- Подготовка устройства к получению root доступа
- Инструкция по получению root с помощью Unlock Root
- Как разблокировать загрузчик
- Обновлено до последних версий apk (Updated 29/01/2016)
- Что происходит при включении и запуске Android?
- Часто возникающие проблемы и вопросы
- Видео инструкция Unlock Root
- Устанавливаем драйвера
Way 1: Unlock Android Password With 4uKey For Android


- Download Tenorshare 4uKey software on your PC and install it. Run the software and connect your phone using the USB.
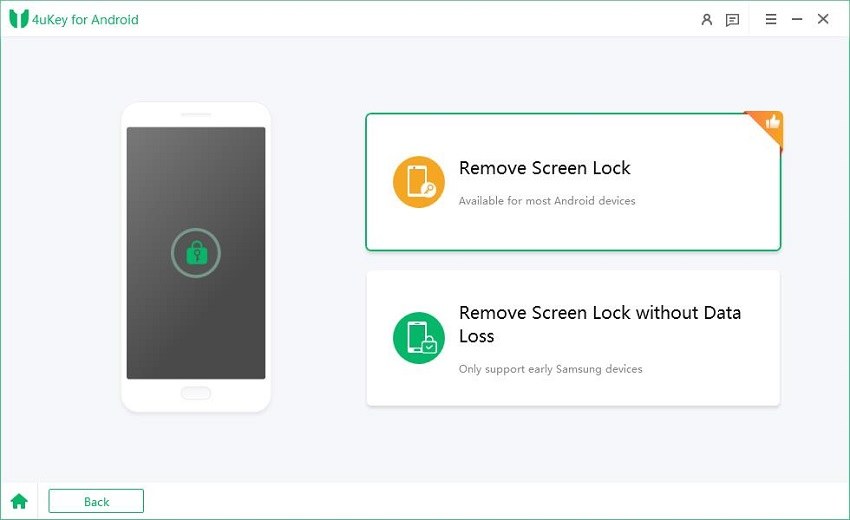
Once your device is connected to the laptop/PC, click on «Remove Screen Lock» feature.

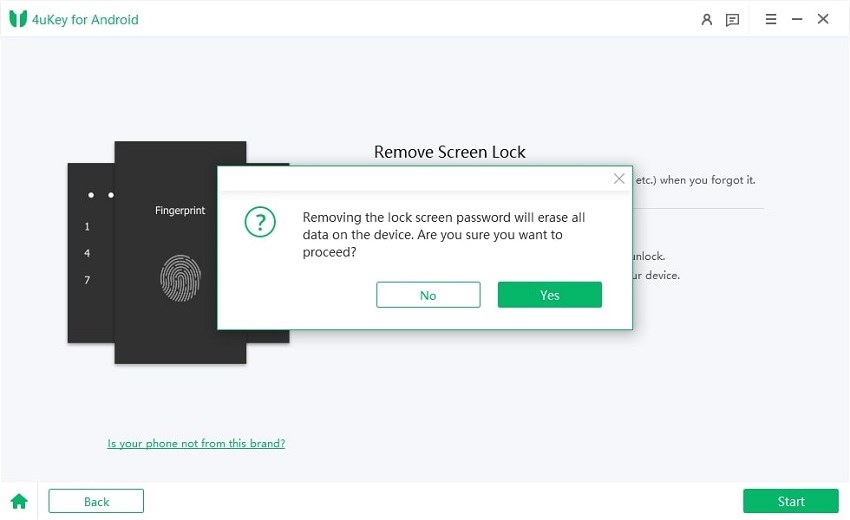
Click on Start and then you will be asked if you want to erase all data on your device, tap Yes!
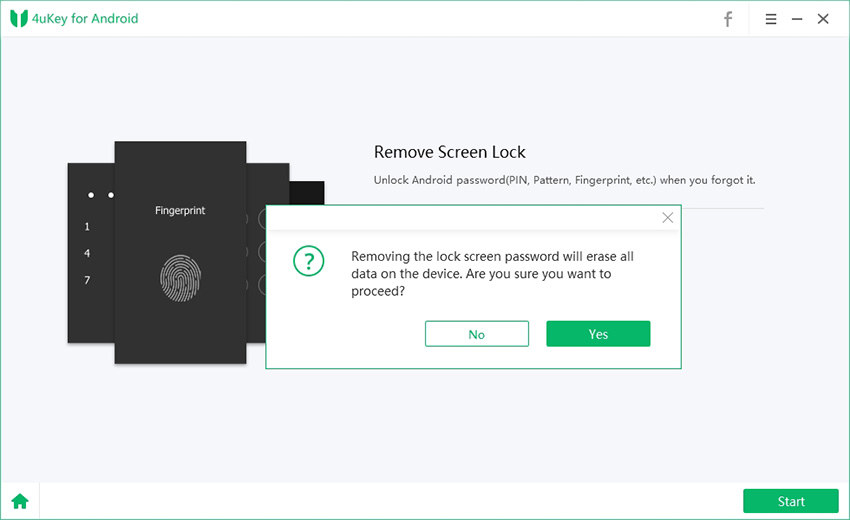
Now, the software will start to unlock your device automatically.

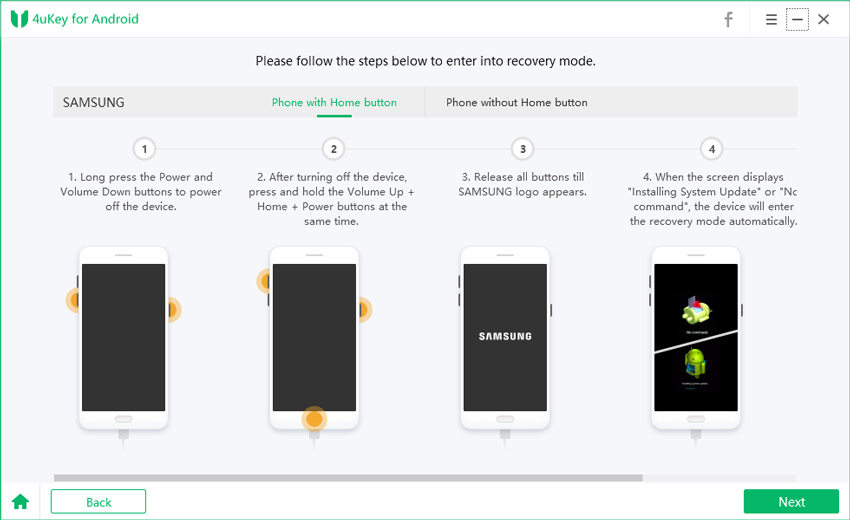
- Then follow the on-screen guide to put your phone into recovery mode.
Please kindly wait for a moment, then you can use your device without any limits.
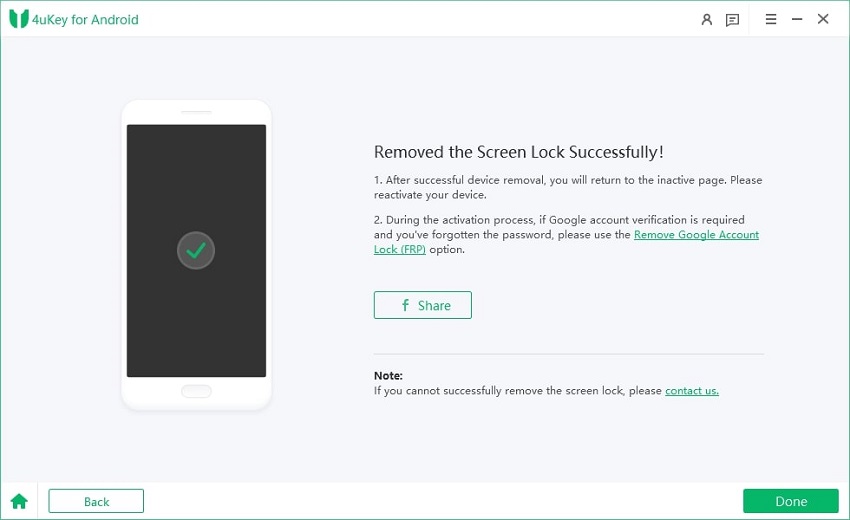
- All the settings, info and data on your phone along with your passcode will be erased and then you can reset your phone by restoring the latest backup version of your phone.
Way 2: Unlock Android Phone Password Using Android Device Manager
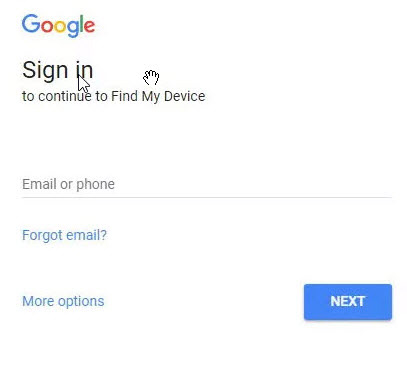
- Open Google Android Device Manager on your pc or another accessible phone.
Login by providing the Google account details and tap “Lock” and create a new passcode.
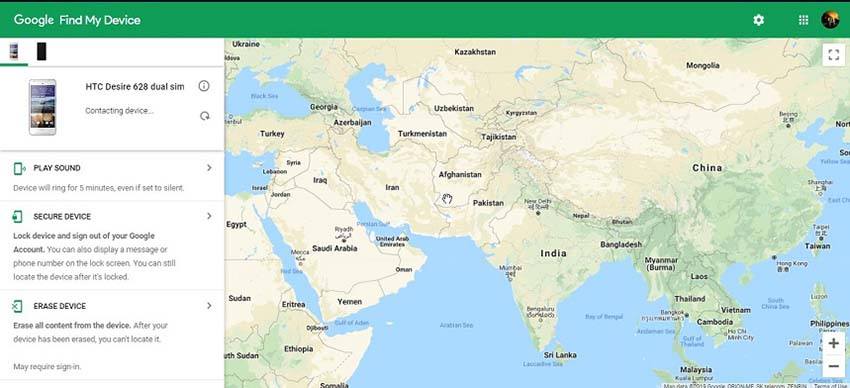
- You can then login with the newly generated passcode and your phone will get unlocked.
Way 3: Unlock Locked Android Phone Using Forgot Pattern Feature
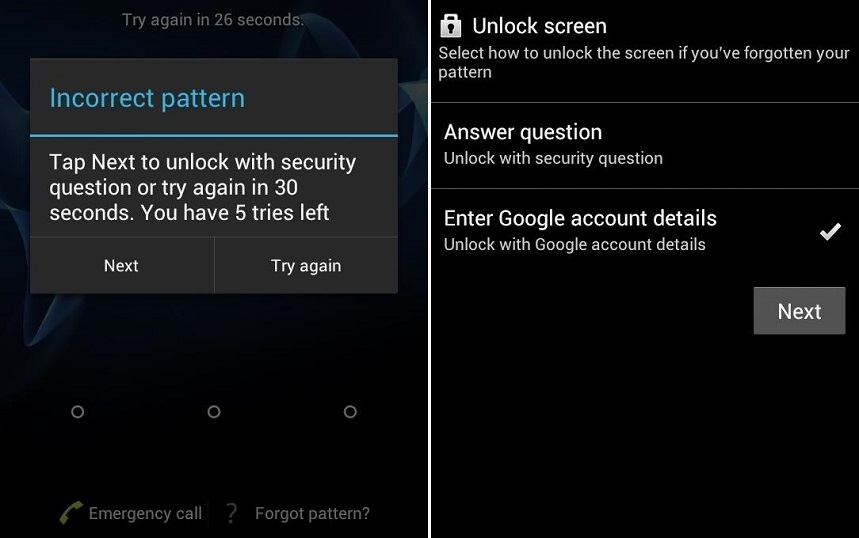
- On the main screen, which asks for the password, pattern or PIN, enter the wrong pattern for five times.
Once you do this, on the bottom right corner of the screen, you can see “Forgot Pattern” option, click on that.
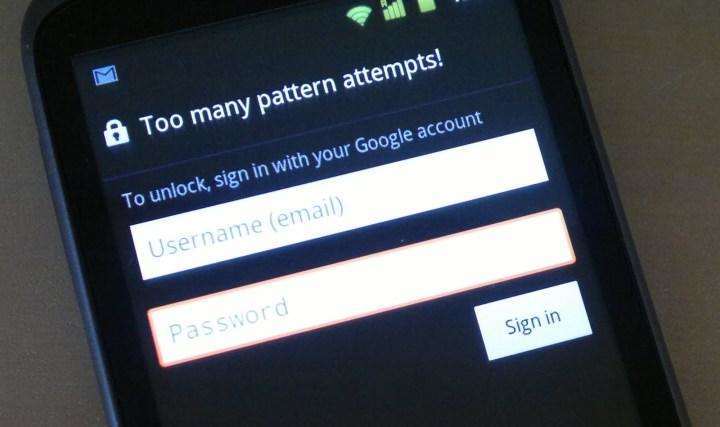
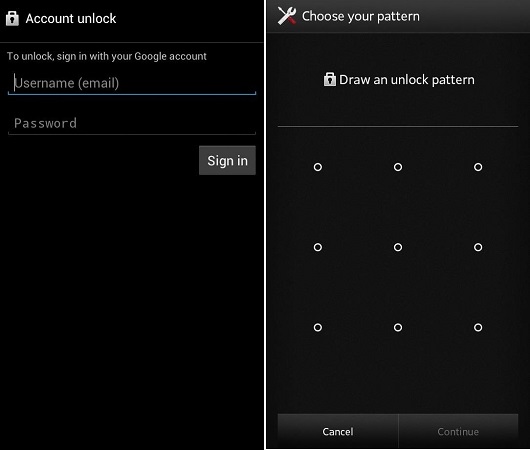
It will ask you to enter the backup PIN or log in with Google credentials. Choose the second option to login with Google credentials and go for Account Unlock.
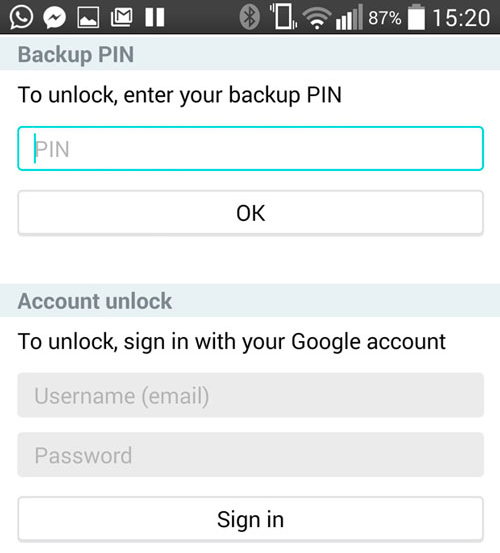
- Once you enter the Google sign in details, your phone will get unlocked.
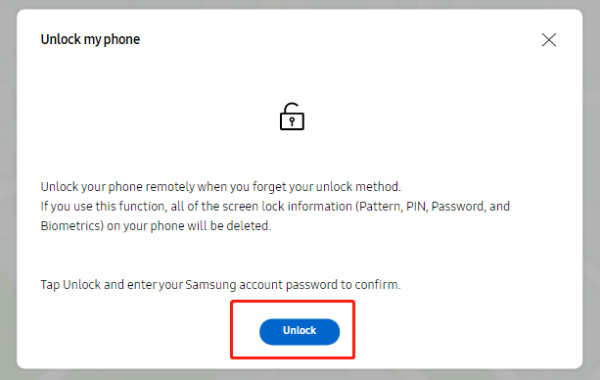
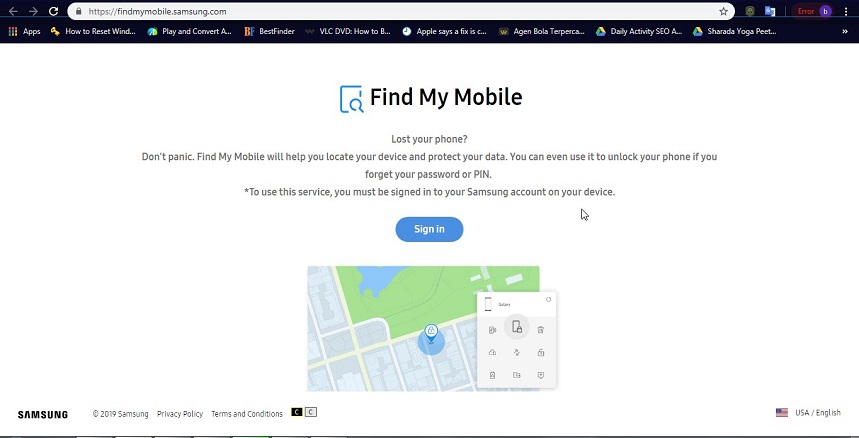
Way 4: Unlock Android Phone With Find My Mobile (Samsung Only)
- On your PC or some other mobile phone, open the browser and go to findmymobile website.
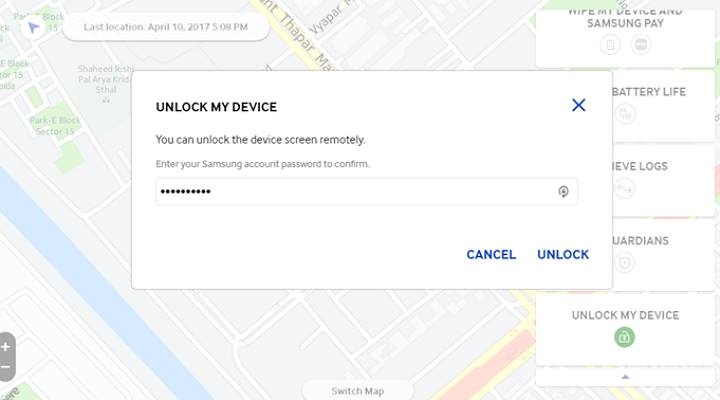
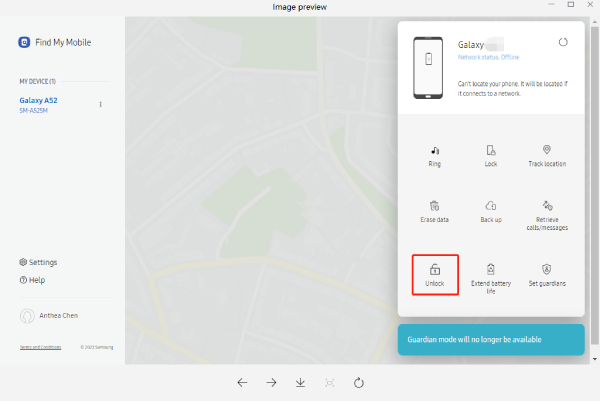
On the right panel, out of all the options, select “Unlock” option.
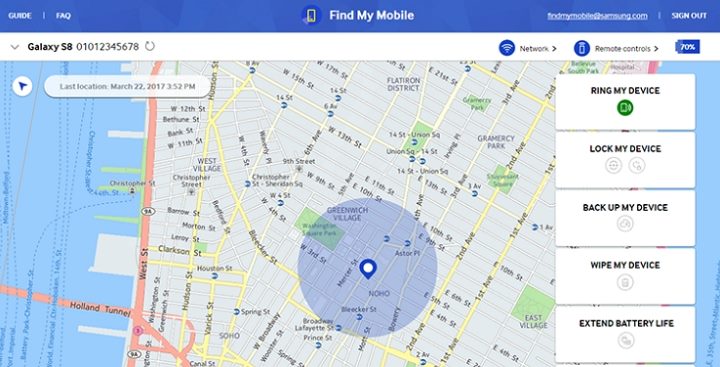
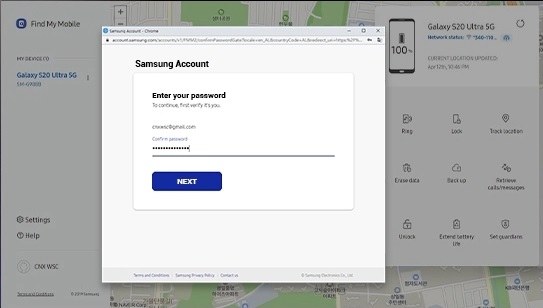
Enter your Samsung account password to confirm and click on Unlock to finish.
- Waiting for a while, you can unlock your device without password.
Way 5: Unlock Android Password Using Android Debug Bridge
- Search for Android SDK package on the internet and download it to your laptop or PC.
Go to your Android device manufacturer’s website and download the Android USB drivers from there.
- Connect your locked Android phone to the laptop or PC and launch the command prompt window.
Enter this in the window: adb shell rm /data/system/gesture.key and then press “Enter”. Then you can reset your android phone.
Way 6: Unlock Android Password With Safe Mode
- Keep pressing the power button on your Android phone till the Power Menu pops on the screen.
- Now tap the “Power Off” option on the display screen and keep holding it.
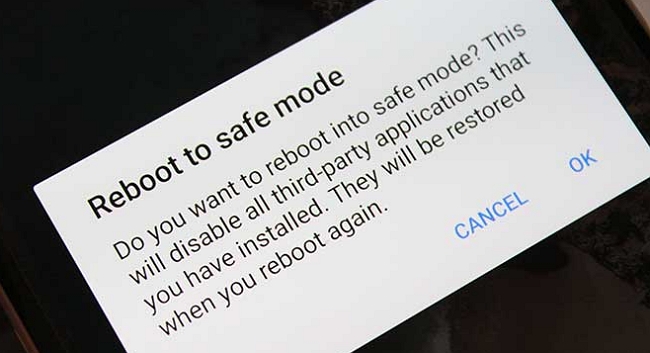
A message will pop up on the screen prompting for your to confirm Reboot in Safe Mode, click on “OK” to confirm.
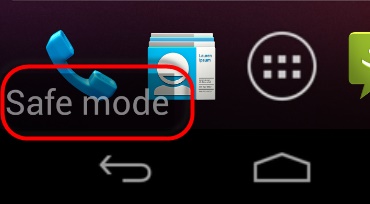
Once in Safe Mode, the third party lock screen application gets automatically disabled and it can be easily uninstalled from the “Applications” option from “Settings” menu.
- Once you reboot your phone again and go off Safe Mode, you can easily access your phone without the security lock screen of the third-party lock screen application.
Conclusion

Remove Android Screen Lock & Bypass Samsung FRP Lock
- Bypass Google account verification on Samsung devices (Android 6-13)
- Remove Android password, pattern, PIN, and fingerprint lock just one click away
- Support removing screen lock and FRP on both Win & Mac
Free Trial
Free Trial
Уровень сложности: для продвинутых. Несмотря на то, что операционная система Android является гораздо более открытой, чем большинство конкурентов, все же в ней тоже существуют свои запреты и ограничения. Обычному пользователю не позволят бесцеремонно вмешиваться в работу системных программ, удалять важные файлы или делать потенциально опасные настройки. Однако, все эти возможности становятся доступны в том случае, если владелец получает права суперпользователя или так называемый root. В этой статье мы расскажем, какие дополнительные возможности это дает, чем опасно и как это сделать.
Что такое Root?
Рутирование устройства означает получение прав суперпользователя, что примерно соответствует аналогичному понятию из мира Linux. Благодаря этому вы сможете выполнять практически любые действия, в том числе потенциально опасные. Другими словами, это получение полного контроля над своим устройством.
Зачем это нужно?
Среди преимуществ можно выделить следующее:
- получение доступа и возможность изменения системных файлов и приложений;
- возможность установки множества приложений, которые требуют для своей работы root:
- установка сторонних прошивок и модов;
- удаление предустановленных программ и прочего мусора;
- активация многих дополнительных функций Android;
- увеличение производительности и автономности с помощью специальных программ и твиков.
Какие минусы и опасности получения прав суперпользователя?
В Интернете достаточно страшилок по этому поводу и некоторые из них имеют под собой почву. Итак, среди недостатков root замечены следующие:
- это лишает вас гарантии (на самом деле все признаки этой операции можно устранить);
- вы не сможете получать обновления по воздуху от производителя;
- в некоторых случаях процедура получения прав суперпользователя грозит выходом из строя вашего устройства (но чаще всего гаджет можно оживить).
Как получить root на моем устройстве?
Процедура получения прав суперпользователя, как правило, не сложная и при внимательном выполнении всех инструкций проходит без всяких проблем. Более того, создано несколько универсальных утилит, которые автоматизируют этот процесс и делают доступным даже самым начинающим пользователям. Одной из самых известных является Framaroot. Эта программа позволяет рутировать очень большое количество разных устройств. И даже если название вашего гаджета отсутствует в списке поддерживаемых, все равно имеет смысл попробовать, так как есть довольно большая вероятность получения root, а негативных последствий точно не будет.
Итак, для получения root с помощью программы Framaroot необходимо выполнить следующие действия.
2. Установите программу из загруженного apk-файла на свое устройство.

3. Запустите утилиту. В том случае, если устройство поддерживается программой, то на главном экране вы увидите выпадающий список возможных действий, среди которых есть варианты для получения и удаления root. Кроме этого, чуть ниже имеется одно или несколько названий эксплоитов, которые доступны для применения.

4. Тапните по одному из доступных эксплоитов и через пару секунд появится подсказка, описывающая результаты его работы. Если один способ не срабатывает, то попробуйте другой. Иногда бывает, что при получении прав суперпользователя Framaroot аварийно закрывается. В этом случае просто перезапустите программу и попробуйте еще раз.

5. Как только вы получите подсказку, что устройство успешно рутировано, следует перезагрузить устройство.
Что делать, если Root так и не был получен?
Framaroot является достаточно универсальной программой, но даже она не может обеспечить успешную работу на всем спектре Android-устройств. В этом случае посетите форум нашего сайта, найдите тему, посвященную вашему устройству и там вы, скорее всего, обнаружите очень подробные и действенные инструкции, посвященные получению прав суперпользователя именно на вашем смартфоне или планшете.
Setting up a screen lock is a secure way to prevent unauthorized access to the data on our smartphones; however, it can also lock you out of the phone if you made your password, PIN or pattern so hard to guess that even you can’t remember it. If this happens to you and you can’t unlock your phone, worry not! Depending on whether you have added a Google account to your device or not, there can be different ways toget back into your Android device. In this post, we’ll guide you on how to unlock Android phone with or Google account. Plus, we will also look at how to unlock Google locked Android phone if you are stuck on Google account verification.
- Part 1: How to Unlock Android Phone without Google Account
- Part 2: How to Unlock Android Phone with Google Account
Part 1: How to Unlock Android Phone without Google Account
Use 4uKey for Android to Unlock Android Phone without Google Account
Let’s see how to unlock Android phone without Google account.
Download and install the latest version of 4ukey for Android on your Windows PC or Mac.
You will find that there are two features on the home interface, select «Remove Screen Lock».
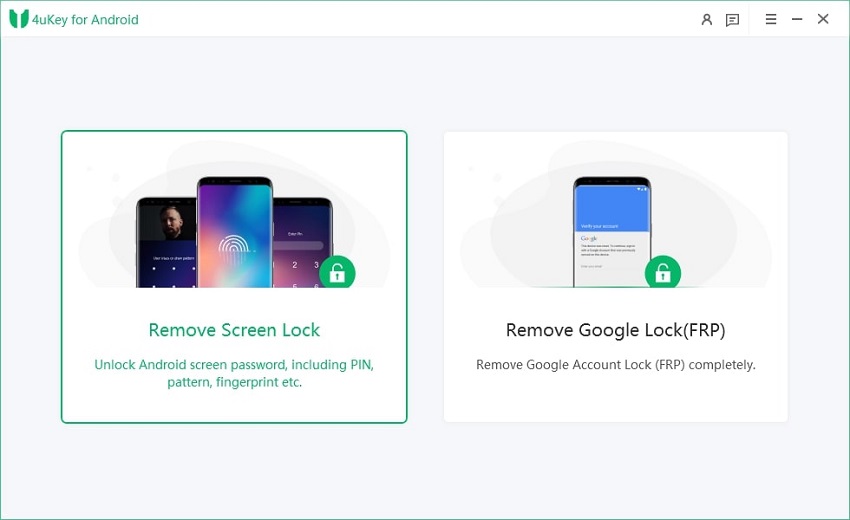
Select Remove Screen Lock(the first option) again and click «Start».
Confirm the data loss warning message by clicking the «Yes» button.
-
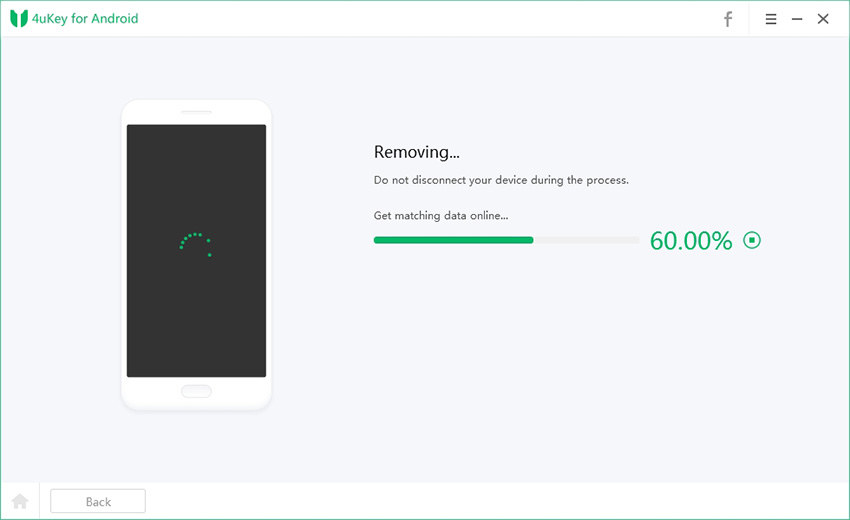
Wait for the process to complete and you can access your phone without any password.

Video guide on How to Unlock Android Phone without Password
Remotely Unlock Android Phone without Google Account
The above method works on most Android phone, while the method introduced in this section works on Samsung devices only. Samsung devices come with a Remote Recovery feature through which you can remotely unlock your Samsung phone when you forget your unlock metod. To utilize this feature, you won’t need a Google accout, but you need to make sure that you have added a Samsung account to your device and that the Find my mobile and Remote unlock are enabled.
Here’s how to unlock Android phone without Google account remotely.
- Visit Samsung Find My Mobile website on any available computer or mobile and sign in to the Samsung account that was used on your device.
- Select the locked device from the device list.
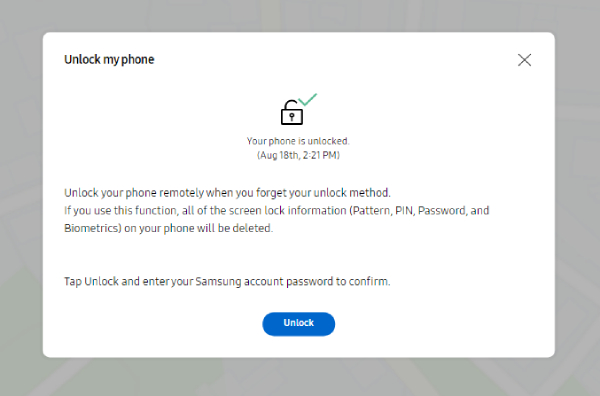
Now select the Unlock option frm the right panel.
Click Unlock again and enter your Samsung account password for verification.
Your Samsung phone will be unlocked in a while.
Part 2: How to Unlock Android Phone with Google Account
In the case of your Google account being used on the locked Android phone, you can try to unlock Android phone using Google account, but the premise is that you remember the password to the synced Google account. If you forget your Google account password and are looking for advice on how to unlock Android phone locked with google account, this section also tells you the way to remove Google account without password.
Unlock Android Phone Using Google Account
- Make sure your locked device is connected to a WiFi network or the mobile data is turned on.
- Go to Google’s Find My Device website in your computer browser and sign in to your Google account that is synced on the locked device.
Select the evice you want to unlock from the list of devices your Google Account is connected to. Click «ERASE DEVICE».
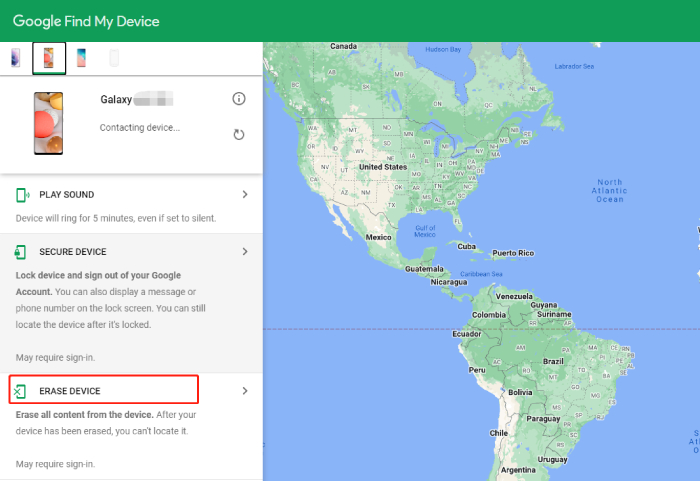
- On the popup windows, click on «Erase» to confirm.
- Allow several minutes for the data erase process to complete. Once done, all your device data including the screen lock information will be cleared and you’ll be able to get into your device without password.
Bypass FRP to Unlock Google Locked Android Phone
Let’s look at how to unlock Samsung phone with google account.
Note: The software can remove Google account without password from Samsung devices running on Android 6 or above.
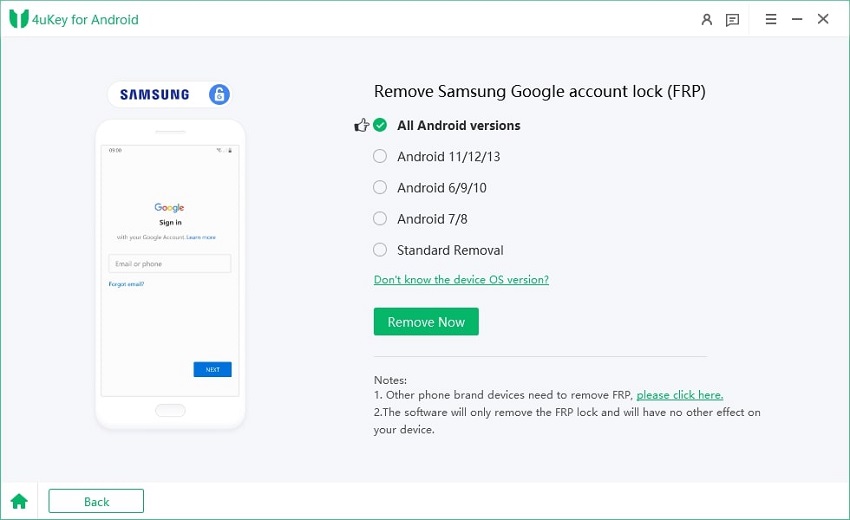
Starting by downloading and installing 4uKey for Android on your computer. Open the program and select «Remove Google Lock(FRP)».

Restart your device and when it opens with the Welcome screen, connect it to the computer and select your device OS version. Click «Start» after confirmation.
Tap on Emergency call and dial *#0*# to enter the phone’s hidden diagnostic mode.
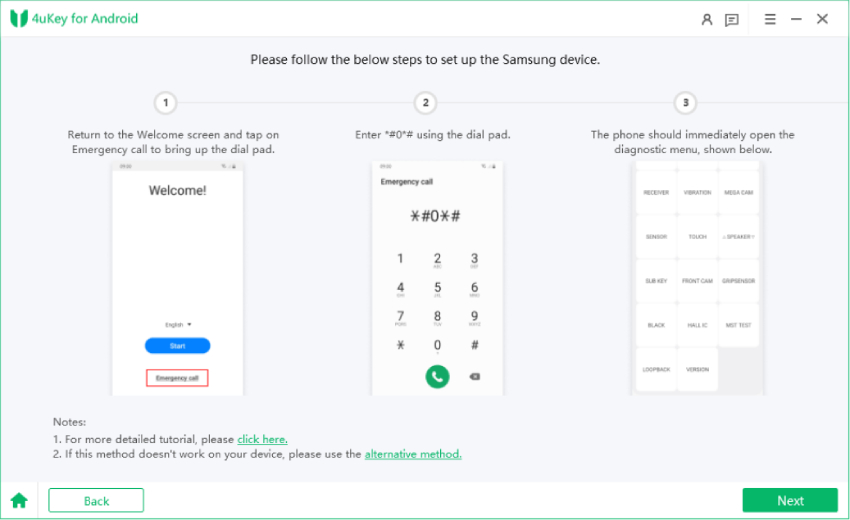
After the phone enters the diagnostic mode, clcik Next on your computer.
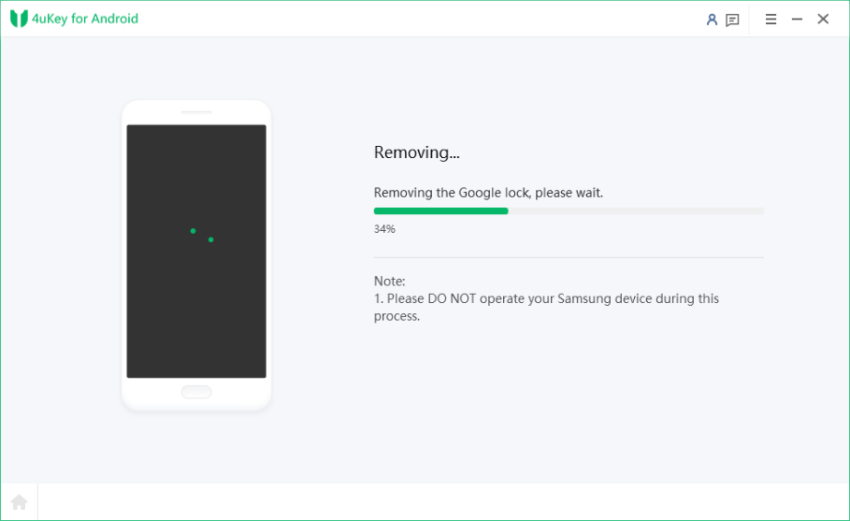
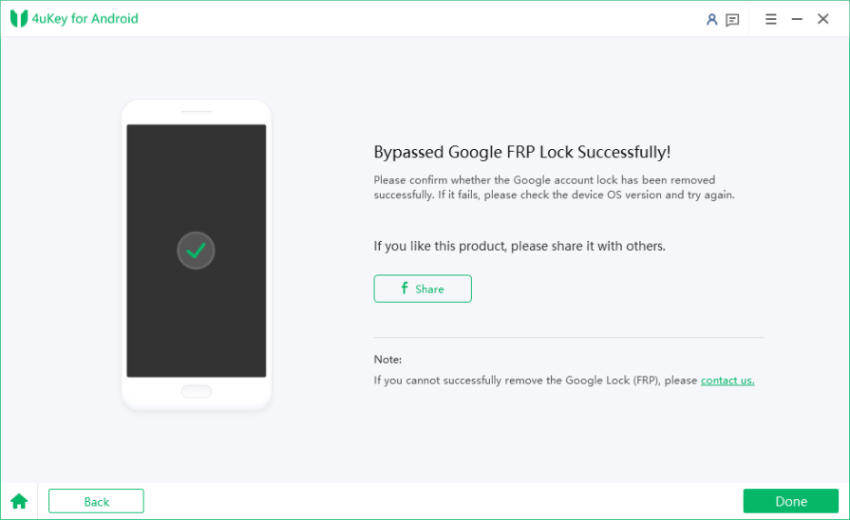
Wait for a while, you will successfully unlock your Android phone without Google account verification.
Video Guide on How to Unlock a Google Locked Phone
Conclusion
Remove Android Screen Lock & Bypass Samsung FRP Lock
- Bypass Google account verification on Samsung devices (Android 6-13)
- Remove Android password, pattern, PIN, and fingerprint lock just one click away
- Support removing screen lock and FRP on both Win & Mac
Free Trial
Free Trial
There are two methods in which one needed the computer while the other didn’t need it since you will require in your smartphone while choosing anyone you prefer to use.
Besides this, in this tutorial, we have covered everything that you will necessitate for the process, such as essential tools and software with a precise step-by-step guide.
With the below method, you can do several things; for instance, if you desire to root android phone without pc, then the first thing you require is to unlock the bootloader.
Moreover, it won’t affect the device in any way, unlike the rooting process, where you will lose all the warranty privileges, and there’s a constant risk, but the risk is minimal.
But before heading toward the method of how to unlock bootloader on any Android phone, let’s first understand the terminology and get a grasp of what you are doing!
What is bootloader?
During the boot process, the bootloader operates on the internal booting settings and encrypts the security data—such as Pin, Passwords, and fingerprint scanner details.
The code is executed when the operating system start/boot, while every manufacture has a different OS kernel and has their version of the bootloader to start the phone.
The features that will be achieved from unlock bootloader on any Android phone are quite tempting, on the other hand, so it’s necessary to understand the pros and cons.
Advantage of Unlock bootloader
The first thing you can perform after unlocking the bootloader is to obtain a custom recovery like TWRP. That will authorize you to flash powerful settings over the device.
You can try out equipping different things, and implementing customization are the primary elements that can be attained after unlock bootloader on any Android phone.
The most annoying part of the system layering is that it provides bloatware apps, but once the bootloader is unlocked, you can delete the system apps without any trouble.
Several customizations features authorize you to modify and alter system limits, while the overclocking attributes will increase the performance speed of the smartphone.
Disadvantage of Unlock bootloader
The main working of the bootloader is to encrypt PIN, Pattern, fingerprint, but when you unlock them, the security factor becomes vulnerable and easy to access by others.
Typically as part of the process, the system will entirely erase data, while if you didn’t take the backup before, you lose your precious data, so make sure to take backup.
Let’s suppose someone steals your handset, your device’s bootloader is unlocked, then the thief will freeze your device and bypass the encryption key and install a new UI.
You are theoretically bricking your device in an indirect format since with unlocking the bootloader, you can install custom ROM, and it somehow crashes and brick the phone.
There are two methods from which you obtain unlock the bootloader on any Android phone without worrying. The first process includes the full support of the computer.
Disclaimer: The magisk update is not responsible for damage performed at your risk, while our team recommends you to take an entire backup of your data first.
Step 1 – Unlock the developer mode
- Inside the phone, click on the settings apps→about phone→build number.
- Tap on the build number a few times till you are developer doesn’t appear.
- Now, proceed to the setting menu, and search for the “developer mode” first.
- Enable the unlock OEM and USB debugging settings for the upcoming part.
Step 2 – Interlinking the devices
- Put the device into the fastboot mode, and join to the PC will help the cable.
- Install essential USB drivers with ADB driver for better usage of the process.
- After installing the drivers, hold shift and right-click on the remaining space.
- Following that, you will notice that open command window here; tap it first.
Step 3 – Applying the commands
- Before entering into the cmd prompt, confirm that you obtain a USB debugging message prompt on the screen and confirm access by pressing the OK button.
- Use – adb devices – the first command to check the device is connected or not.
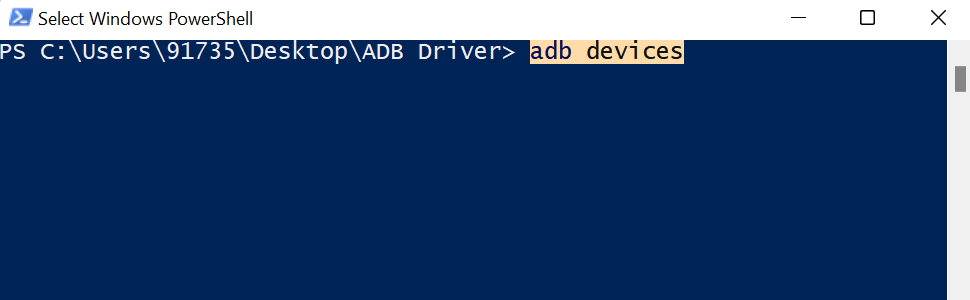
- If the prompt is not showing your handset in the first place, like the screenshot, reconnect the device into fastboot and check if it has an issue with the cable.
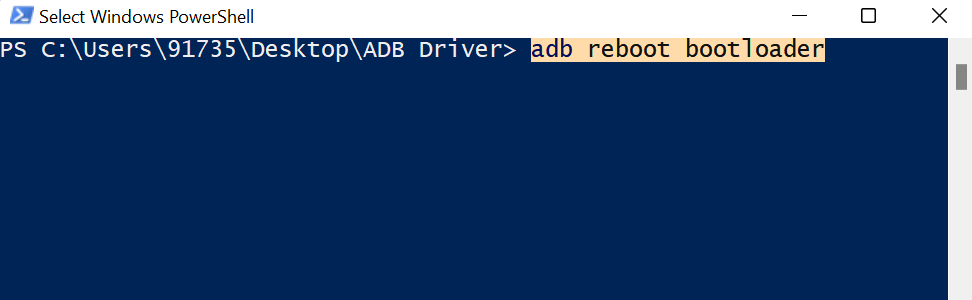
- Now enter the second command – adb reboot bootloader -This will reset all of the settings while this command will unlock bootloader on any android phone.
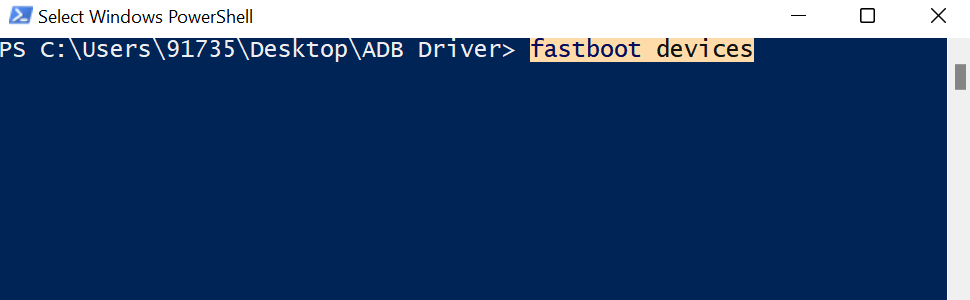
- From the above step, the phone will go into the fastboot mode. Next, you have insert – fastboot devices – to once again enter into the phone fastboot mode.
- Lastly, you can enter – fastboot oem unlock – to unlock the bootloader. Yet, if this command doesn’t work, try – fastboot flashing unlock – this one out.
Step 4 – Unlocking the bootloader!
- On the smartphone screen, a message will pop to unlock the bootloader or not!
- Besides this, you can navigate through the Volume up and down buttons, while the Power button will help you select the respective option you want to choose.
- Select Yes to unlock the bootloader, or pick No to didn’t perform that process.
- With this, the handset will restart, and you can enjoy the customization traits.
F.A.Q (Frequently Asked Questions)
Q- What does unlock bootloader mean?
Ans. Unlocking the bootloader grants your the choice to change the system firmware of your phone and freely install the privileges to improve and modify the phone skills.
Q- Is bootloader unlock safe?
Ans. Unlocking the bootloader is safe until you have entered into the endless world of customization of ROM. But if you didn’t want to install, avoid the unlocking process.
Q- How unlock bootloader without PC?
Ans. Desire to unlock the bootloader without PC assistance; you will be required a third-party app to run the commands—it is a risky task, so avoid using this process.
Q- Will unlock bootloader erase data?
Ans. The unlocked bootloader instruct wipe data and when you switch the stock ROM interface into a custom ROM. In that case, you will most likely delete data files as well.
Q- Does unlocking the bootloader will violate the warranty?
Q- Does unlock bootloader helps in rooting?
There is no doubt that there are various methods to learn how to unlock android phone without password. But to select which one is the best is a pretty hard decision. In this article, we are going to explain the various methods that can be used to unlock the Android phone without a passcode. And we are also providing you the best tool you can use to unlock your device without much hassle.
8 Methods to Unlock Android Without Password
How do I unlock my Android phone if I forgot the password? Here we list 8 different methods that can help you out.
Method 1. How to Unlock Android Phone without Password — 4ukey for Android
The key features will help you to gain a clear perspective on the working of the tool.
- The software can unlock Pattern, password, and fingerprint lock easily.
- It has a wide array of support for various Android devices and OS versions.
- The unlock method is entirely safe and secure.
- It gives a 100% guarantee that your device will be accessible again.
Connect your Android phone using a USB cable. Choose Remove Screen Lock on the main interface to get started.
Tap on the «Start» option to move forward with the password removal. The password removal will erase the existing data from the device. Click on the «OK» button and continue the process.
-
As you can see, the software has a very simple and convenient process of removing the passcode from your device.
Method 2. How to Unlock Android Phone without Password — Android Device Manager
The Android device manager is the second best method to resolve the problem about how to unlock android phone without password remotely. If you’ve ever enabled it and had Google Account on your mobile, this service will access your device and unlock it automatically.
You need to visit the official website for Google Android Device Manager and log in with your Google credentials.
As you log in, you will be redirected to the exact location of the device on the map. As you click on the device name, you will see 3 different options.
- Tap on the «Erase» button to remove Android password. The «Lock» option enables you to set up a new password, but it can’t bypass the password if you forgot it.
After that, you will be able to unlock the device with no data remained.
Method 3. How to Unlock Android Phone without Password — Find My Mobile
People who have Samsung mobile phones will be glad to know that Samsung phones have an additional feature of «Find My Mobile» to help them access their device in such conditions. You can learn how to unlock a locked Samsung Galaxy easily and quickly below:
The first thing you need to do is to open the Samsung Find My Mobile website and log in with your Samsung account.
- Once you are logged in to your account, you will be directed to the home screen interface. On the home screen, you will see various options. Among them, choose the «Unlock» option.
Then you should enter the password of your Samsung account to confirm removing the old screen lock. Wait a few minutes, you will be able to unlock your phone without password.
- The feature can help every Samsung user to recover their device password easily.
- The method only works for Samsung devices with network connected.
- You need an existing Samsung account and have enabled Remote unlock option.
Method 4. How to Unlock Android Phone — Forgot Pattern (Android 4.4 or Lower)
This is used to be the most common method to unlock Android device before the fast upgrade of Android versions. After a few failed attempts of entering the wrong password, the screen used to display a message stating the Forgot pattern.
And this is how to unlock android phone with the «Forgot Pattern» method:
After you’ve made a few attempts of entering the wrong password, you will see the Forgot pattern option on the screen.
- Then you will be prompted to choose the method which you want to use to unlock the device. Select the Enter Google account details option and click on the Next button.
Enter your primary account details and you will be navigated to a screen where you can add a new pattern. Confirm the pattern and your device unlock pattern will be changed.
Method 5. How to Unlock Android Phone — Use ADB to Delete Password
This method can be used to understand how to delete Android password if you have enabled the USB debugging option in your phone. And you also need to connect your device to a computer via USB cable.
Open Command Prompt in your computer and open the ADB installation directory. Type the command- adb shell rm /data/system/gesture.key in the space and run it by hitting the Enter key.
This will erase the password file from your device temporarily. So, you need to reset the password as soon as possible.
Method 6. How to Unlock Android Phone — Safe Mode to Bypass Third-party Lock
Another method that you can try out to unlock Android phone without password is Safe Boot. It is also quite simple but only works when you’ve set a password from a third-party app instead of the inbuilt security system.
Boot the device in Safe Mode using the power button and tap on Ok when the device prompts you to reboot to safe mode.
- This will disable the third-party lock screen for some time so that you can easily clear the app data or uninstall the app.
Method 7. How to Unlock Android Phone without Code — for Android 5.0-5.1
- Tap on the Emergency button from the lock screen and press the Asterisk button 10 times from the dialer. Copy the string and paste it in the same space as many times as possible. Ultimately, the device will prevent you from pasting the string.
- Now, return to the lock screen and open the camera. When the camera opens up, open the notification panel and choose the Settings option.
Once more you will be prompted to enter the password. Again paste the string in the space and keep on repeating the same step until screen crashes.
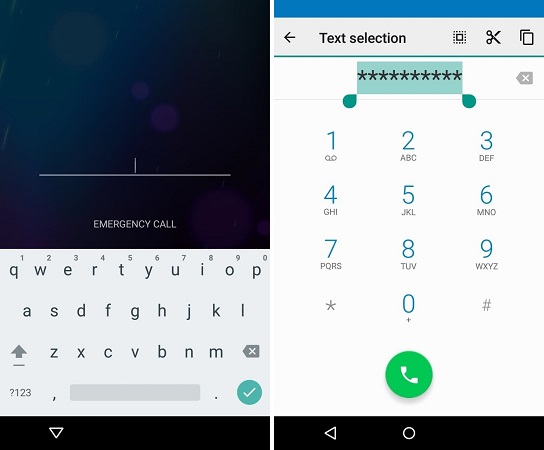
- When the device gets the interface working, you will be navigated to the home screen automatically.
Method 8. How to Unlock Android Phone without Code — Factory Reset
- From the boot loader screen, use the volume up and down button to navigate and the power button to select an option.
Choose the Recovery Mode option and select the «Wipe data/Factory Reset» option from the list.
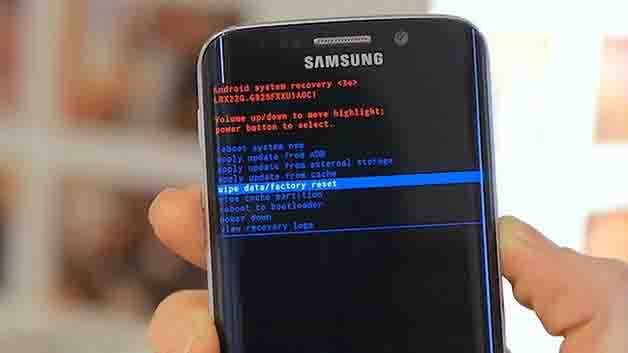
- This will wipe out all the existing data and settings from your device and you can freely access your phone once again.
Wrapping Up
Remove Android Screen Lock & Bypass Samsung FRP Lock
- Bypass Google account verification on Samsung devices (Android 6-13)
- Remove Android password, pattern, PIN, and fingerprint lock just one click away
- Support removing screen lock and FRP on both Win & Mac
Free Trial
Free Trial
You can’t access unique and exciting custom ROMs unless you know how to unlock bootloader on any Android phone. Here’s an easy tutorial to open those settings.
Whether you want to utilize the exciting privileges of rooting or merely want to add extra customization features, you need to be aware of the proper method to unlock bootloader on any Android phone. Because without this, you can’t move forward.
Even though you heard that techie stuff for the first time, worry not, you can unleash your phone’s true abilities. With that said, let’s grasp a bit of info on the bootloader.
What is Bootloader?
The bootloader of the bootstrap command software is operating system software that is responsible to kick start the overall system processes in the RAM section. The boot program starts working with several processes when you press the power button.
Consequently, the system process checks the entire system behind the booting logo, and everything completely in only a few seconds. Besides, it’s stored primary system data that helps us to factory reset the phone or simply boot it into the safe.
Now that you have understood the basics about the bootloader and it’s working, let’s move forward to why you need to unlock the bootloader in the first place!
The reason can differ from person to person, but in most cases, if you want to root any Android phone or flash the latest Android version over your phone, the first thing you need to perform is to unlock bootloader on any Android phone.
But it doesn’t mean that unlocking those attributes would come without impacts. So, it’s necessary to understand the pros and cons before leading to unlock bootloader on any Android phone.
Advantage of Unlock bootloader
First and foremost, you can easily root your device if you have unlocked the bootloader settings. Besides this, you can also add different custom ROMs and other software.
To flash those characteristics, you will need a custom TWRP recovery that can only be installed once you have opened the bootloader features of your phone not long ago.
Moreover, you can apply impressive features such as overclocking and underclocking to get more performance for advanced-level gaming sessions and better battery life.
You can take advanced complete backup that can attain after root your smartphone without a PC and changing the overall settings and Android interface layout traits.
Disadvantage of Unlock bootloader
The locked bootloader offers better security protection and armed firewall settings, but once you have unlocked those doors, you have to compromise with security.
Your device won’t be eligible for the future Android update. In case the device is stuck in the bootloop, you will get a hard time repairing it from the authentic service center.
How to Unlock Bootloader on any Android Phone
Disclaimer: Droidmeguide is not accountable for specific damage that happens to the reader’s device. Make sure to take a Backup Android Phone to avoid any further risks.
Method #1 – Unlock Bootloader All Phones
Step 1: Unlocking developer mode
- First and foremost, you have open the Settings App.
- Inside the Settings menu, click on the About Phone section.
- Next, you have to tap on the Build Number several times.
- A pop-up message will appear saying, you are now a developer.
- following this, you can enter the Developer mode menu.
- Enable both the OEM unlocking and USB debugging options.
Step 2: Attach your phone and PC
- Ensure you have downloaded and installed USB drivers/ ADB tools.
- Press “cmd” in the search bar of Windows to open a command prompt.
- Interlink your phone using the original data cable to the computer.
- Make sure have got USB debugging alert and click on OK.
Step 3: Insert ADB/ Fastboot commands
- Inside the command prompt, enter “adb devices” to check phone connectivity.
- If you see a combination of numbers and alphabets, you are ready for next step.
- Now, you have to boot into the bootloader. Enter “adb reboot bootloader”
- Following this, you can enter the fastboot command. Use “fastboot devices”
- Unlock the OEM feature by applying “fastboot OEM unlock” command.
- Lastly, you can utilize “fastboot flashing unlock” to finish the process.
Step 4: Finally, unlock the bootloader
- Inside the phone’s screen, you have options to unlock the bootloader or not.
- Navigate via the Volume keys to apply to require step and press Power button.
- You have to pick the option that says Yes, unlock the bootloader.
- After this, the phone will take some time to complete the reset.
- Now, you have successfully unlocked the bootloader on your phone.
Method #2 – Unlock Bootloader Samsung phones
Step 1: Open developer settings
- Like usual, go to Settings → About Phone → Tap on build number.
- Click on the build number a few times to open developer mode.
- Now, navigate to Additional Settings and then Developer Settings.
- Following this, enable USB debugging and OEM unlocking toggle.
- Lastly, you have to Turn off your device by pressing the Power key.
Step 2: Simply unlock the bootloader
- Press and hold the Volume Up + Down key, until the fastboot logo appears.
- Next, you have to connect your Samsung device to your PC through a USB cable.
- A warning message will appear on the screen, then long press Volume Up key.
- On the next screen, you have to press Volume Up key to unlock the bootloader.
With this method, you can successfully unlock bootloader on any Samsung phone.
Method #3 – Unlock Bootloader Xiaomi phones
Step 1: Unlock Developer settings
- Go to the Settings App and enter the About Phone section.
- Tap on MIUI version a few times, till you’re developer didn’t appear.
- Navigate to the Additional settings and press on Developer Mode.
- Allow OEM unlocking, USB debugging, and Install Via USB toggles.
Step 2: Log in to Mi account
- First of all, turn off the Wifi, the enable Mobile data and location options.
- Now, log in to your Mi account and allow the Find my device toggle.
- Again, navigate to developer mode to enter in Mi unlock status.
- Tap on the Agree button and click on Add account and device.
- Once, you have successfully added the account, turn off your device
- Press Volume Down + Power button to enter into fastboot mode.
Step 3: Join the devices
- Download and extract the Mi Unlock Tool inside your computer.
- Following this, connect your Xiaomi phone to a PC using a USB cable.
- Open the Mi unlock tool, there you will see your device is connected.
- If not, try to reconnect once again and click on the Unlock button.
- With this, you will unlock the Xiaomi phone’s bootloader precisely.
Frequently Asked Questions (FAQs)
Q- How unlock bootloader without PC?
Ans. First of all, you will need two phones to unlock the bootloader without a PC. With this, you also need to download & install a third-party ADB command tool apk.
Q- Is bootloader unlock good?
Q- Unlock bootloader will erase data?
Ans. Yes, if you are unlocking the bootloader your data can wipe out from the internal storage. Therefore, we recommend you take a backup before starting the process.
Q- How to avoid bootloop problem on Android?
Ans. To avoid the bootloop issues, you can start with soft resetting the phone. Or you can factory reset/hard reset will do the work too. Lastly, by using TWRP recovery.
Q- Can I root my phone without unlocking the bootloader?
Ans. No, you can root your phone without unlocking the bootloader because you won’t be able to boot the device. So make sure to unlock it first before rooting.
Last thoughts:
I hope that you grasp the information about how to unlock bootloader on any Android phone, while I have also covered different methods for Samsung and Xiaomi phones.
If you encounter any problem during the unlock process or facing a bootloop issue on your phone, let us know in the comment section to solve your trouble ASAP!

Unlock Root поможет вам получить права администратора, а также и удалить их на вашем андроид-девайсе в один клик (ROOT—UnROOT)!
Поддержка более 200 устройств (список внутри) на ОС Android начиная с 2.1 и заканчивая 4.0.3. С помощью программы вы без лишних усилий сможете сделать рутинг – получить полный контроль над ПО и ОС вашего девайса.
Процедура получения root-доступа очень часто связана с определенным риском и повышенной ответственностью за Android устройство. Даже, если вероятность нанести своему смартфону или планшету вред очень мала, то она все равно есть, а это уже тот фактор, который удерживает многих пользователей от проведения данной кастомной операции. С Unlock Root такой проблемы возникнуть не должно. Да, разработчики программы не берут на себя ответственность за возможные неполадки, связанные с получением root-прав, но почти 10 миллионов успешных операций — это отличное подтверждение надежности данного инструмента, который к тому же регулярно усовершенствуется в течение 2 лет.
Основное предназначение Unlock Root — получение прав суперпользователя. Программа делает эту процедуру максимально простой и безопасной, а исход ее почти всегда положительный. В основном проблемы связаны с тем, что какая-то конкретная модель устройства не имеет поддержки в Unlock Root, или драйвера на ПК были установлены некорректно. И если в первом случае ничего поделать нельзя, то вторая проблема решается переустановкой драйверов. В конце поста более детально расписаны наиболее частые проблемы.
Помимо получения root-прав Unlock Root также работает в обратном направлении: лишает Android устройство root-доступа. Это необходимо для восстановления гарантии. При этом также необходимо позаботиться об установке стоковой прошивки.
Преимущества root на Android:
— возможность куда более расширенной и полной настройки девайса (например поставить на него стороннюю прошивку, полностью изменить внешний вид ОС, изменить разные функции и поднять настройки на более «чувствительный» уровень);
— уменьшение энергопотребления и повышение производительности (возможность настроить частоту процессора и различные модификации прошивок, таких например как CyanogenMod, с помощью которой вы сможете достичь повышения производительности и оптимизацию на более плавную и максимально быструю работу, а Oxygen например, позволит сэкономить батарею);
— установка любых приложений на карту памяти (включая кэш)
— поставить firewall, чтобы ограничивать доступ программ к интернету.
— резервное копирование системы.
Рут открывает большой простор для экспериментов над вашим девайсом, вы сможете сделать с ним абсолютно всё, но не переусердствуйте. Вперёд!
Список поддерживаемых Unlock Root устройств
Acer ginger
Acer Liquid
Acer Liquid
Acer Liquid MT
Acer S300
AFTI SO1
BBK vivo V1
Bird Android
Bird Android
Bird Desire HD
Bird HTC A9191 for AT
Bird T8585
Bird Thl V7
BlueStacks BlueStacks
FIH ChangHong-Z-ME
GIGABYTE GSmart G1310
GIGABYTE GSmart G1317D
GIGABYTE GSmart G1345
HLMobile GN103
HTC ADR6300
HTC ADR6325
HTC ADR6350
HTC ADR6350
HTC ADR6400L
HTC Desire HD
HTC Desire HD
HTC Desire HD
HTC Desire HD
HTC Desire S
HTC Dream/Sapphire
HTC Dream/Sapphire
HTC Dream/Sapphire
HTC Eris
HTC HERO200
HTC HTC A9188
HTC HTC Aria A6380
HTC HTC ChaCha
HTC HTC Desire
HTC HTC Desire
HTC HTC Desire
HTC HTC Desire
HTC HTC Desire S
HTC HTC Desire S
HTC HTC Desire Z
HTC HTC Dream
HTC HTC EVO 4G For Sprint
HTC HTC Glacier
HTC HTC Glacier
HTC HTC HD2
HTC HTC HD2
HTC HTC HD2
HTC HTC HD7 4G T9299 For AT
HTC HTC HD7 4G T9299 For AT
HTC HTC HD7 4G T9299 For AT
HTC HTC Hero
HTC HTC Holiday
HTC HTC Incredible S
HTC HTC Incredible S
HTC HTC Incredible S
HTC HTC Legend
HTC HTC Magic
HTC HTC Magic
HTC HTC Panache
HTC HTC Pyramid
HTC HTC Pyramid
HTC HTC Pyramid
HTC HTC Pyramid
HTC HTC Ruby
HTC HTC Runnymede
HTC HTC Salsa
HTC HTC ShooterCT
HTC HTC ShooterU
HTC HTC Tattoo
HTC HTC Vision
HTC HTC Vision
HTC HTC Vision
HTC HTC Wildfire
HTC HTC Wildfire
HTC htc wildfire s a510e
HTC htc wildfire s a510e
HTC Inspire HD
HTC Nexus One
HTC Nexus One
HTC Nexus One
HTC Nexus One
HTC NexusHD2
HTC NexusHD2
HTC PC36100
HTC PC36100
HTC PG06100
HTC PG86100
HTC PG86100
HTC T-Mobile G1
HTC T-Mobile G2
HTC T-Mobile myTouch 3G
HTC X515e
HUAWEI GM FOX
HUAWEI HUAWEI-M860
HUAWEI HUAWEI-U8850
HUAWEI Ideos
HUAWEI Ideos
HUAWEI IDEOS S7
HUAWEI IDEOS S7 Slim
HUAWEI U8180
HUAWEI U8500
HUAWEI U8500
HUAWEI U8650
HUAWEI U8660
HUAWEI u8800
HUAWEI u8800
HUAWEI U8800
huawei U8800Pro
HUAWEI U8800Pro
HUAWEI UM840
HUAWEI Vodafone 858
ingenic T301
koobee A106
KTTech KM-S120
KTTech KM-S20
KTTech KM-S200
KTTech KM-S200
KTTech KM-S220
KTTech SHW-M250K
KTTech SHW-M250S
lenovo 3GC101
lenovo 3GW101
LENOVO A1_07
Lenovo Lenovo A1-32AB0
Lenovo Lenovo A60
lenovo Lenovo A66t
Lenovo Lenovo P70
LGE LG-C660
LGE LG-C660h
LGE LG-C800
LGE LG-E510
LGE LG-E510f
LGE LG-E730
LGE LG-E739
LGE LG-MS910
LGE LG-P500
LGE LG-P500
LGE LG-P500h
LGE LG-P690
LGE LG-P698
LGE LG-P698f
LGE LG-P920
LGE LG-P920
LGE LG-P920h
LGE LG-P925
LGE LG-P925g
lge LG-P970
LGE LG-P970
lge LG-P990
LGE LG-P990
lge LG-P990h
lge LG-P990hN
lge LG-P993
lge LG-P999
LGE LG-P999
LGE LG-SU660
LGE LG-SU660
LGE Optimus 2X
LGE Optimus Me
LGE VM670
mesada ANDROID MID
MID MID reference device (b01ref)
motorola A853
motorola A953
motorola A953
Motorola Droid
Motorola Droid
motorola DROID BIONIC
motorola DROID X2
motorola DROID2
motorola DROID2 GLOBAL
motorola DROIDX
motorola MB200
motorola MB200
motorola MB300
motorola MB300
motorola MB525
motorola MB525
motorola MB525
Motorola MB525
motorola MB525
motorola MB526
motorola MB526
motorola MB526
Motorola MB526
motorola MB855
motorola MB860
motorola MB860
motorola ME511
motorola ME525
motorola ME525
motorola ME525
motorola ME600
motorola ME722
motorola ME722
motorola ME860
motorola Milestone
Motorola Milestone
Motorola Milestone
motorola Milestone XT720
motorola MotoA953
motorola MotoA953
Motorola Motorola_i1
Motorola MT810
motorola XT300
motorola XT301
Motorola XT531
motorola XT610
motorola XT701
motorola XT702
motorola XT711
motorola XT720
motorola XT800
motorola XT800
motorola XT800
motorola XT806
motorola XT910
motorola XT910
ONDA TT101
PANTECH ADR8995
PANTECH IM-A690S
PANTECH IM-A710K
PANTECH IM-A730S
PANTECH IM-A760S
PANTECH IM-A770K
PANTECH IM-A780L
Raymond T1301
samsung Galaxy Nexus
Samsung GT-B7510
Samsung GT-I5500
samsung GT-I5500
Samsung GT-I5500B
samsung GT-I5500B
samsung GT-I5500L
Samsung GT-I5500L
Samsung GT-I5500L
samsung GT-I5500L
Samsung GT-I5503
samsung GT-I5503
samsung GT-I5503T
Samsung GT-I5508
Samsung GT-I5510
samsung GT-I5510
samsung GT-I5510
Samsung GT-I5700
samsung GT-I5700L
samsung GT-I5800
samsung GT-I5800
samsung GT-I5801
samsung GT-I5801
Samsung GT-I6500U
samsung GT-I8150
samsung GT-I8150
samsung GT-I9000
samsung GT-I9000
samsung GT-I9000
samsung GT-I9000
samsung GT-I9000
samsung GT-I9000
samsung GT-I9000
samsung GT-I9000
samsung GT-I9000B
samsung GT-I9000T
samsung GT-I9001
samsung GT-I9001
samsung GT-I9001
samsung GT-I9003
samsung GT-I9003
samsung GT-I9003
samsung GT-I9003
samsung GT-I9003L
samsung GT-I9008L
samsung GT-I9018
samsung GT-I9088
samsung GT-I9100
samsung GT-I9100
samsung GT-I9100
samsung GT-I9100
samsung GT-I9100
samsung GT-I9100
samsung GT-I9100G
samsung GT-I9100G
samsung GT-I9100G
samsung GT-I9100M
samsung GT-I9100P
samsung GT-I9100T
samsung GT-I9100T
samsung GT-I9108
samsung GT-I9108
samsung GT-I9220
samsung GT-I9220
samsung GT-N7000
samsung GT-N7000
samsung GT-P1000
samsung GT-P1000
samsung GT-P1000
samsung GT-P1000
samsung GT-P1000
samsung GT-P1000L
samsung GT-P1000N
samsung GT-P1000N
samsung GT-P1010
samsung GT-S5360
samsung GT-S5360
samsung GT-S5360L
samsung GT-S5570
samsung GT-S5570
samsung GT-S5570
samsung GT-S5570
samsung GT-S5570L
samsung GT-S5570L
samsung GT-S5660
samsung GT-S5660
samsung GT-S5660
samsung GT-S5660
samsung GT-S5660L
Samsung GT-S5670
samsung GT-S5670
samsung GT-S5670
samsung GT-S5670L
Samsung GT-S5830
samsung GT-S5830
samsung GT-S5830
samsung GT-S5830
samsung GT-S5830
Samsung GT-S5830
samsung GT-S5830L
samsung GT-S5838
Samsung I9000
samsung Nexus S
samsung Nexus S
samsung Nexus S
samsung SAMSUNG-SGH-I727
samsung SAMSUNG-SGH-I777
samsung SAMSUNG-SGH-I897
SAMSUNG SAMSUNG-SGH-I897
SAMSUNG SAMSUNG-SGH-I897
Samsung SAMSUNG-SGH-I997
samsung SC-02B
samsung SC-02C
Samsung SCH-I100
samsung SCH-i509
samsung SCH-i509
Samsung SCH-i559
Samsung SCH-i569
samsung SCH-i579
samsung SCH-i589
samsung SCH-i809
samsung SCH-i909
samsung SCH-i909
samsung SCH-W899
samsung SGH-I896
samsung SGH-T679
Samsung SGH-T959
Samsung SGH-T959
Samsung SGH-T959V
samsung SGH-T959V
samsung SGH-T989
samsung SHV-E120L
samsung SHV-E120S
samsung SHW-M110S
samsung SHW-M190S
samsung SHW-M240S
samsung SHW-M250K
samsung SHW-M250L
samsung SHW-M250S
samsung SHW-M290K
Samsung SPH-D700
samsung SPH-D710
Samsung SPH-M900
Samsung SPH-M910
Samsung SPH-M930BST
samsung YP-G1
samsung YP-G70
samsung YP-G70
Sony Ericsson E10a
Sony Ericsson E10i
Sony Ericsson E15a
Sony Ericsson E15i
Sony Ericsson E16i
Sony Ericsson LT15a
Sony Ericsson LT15a
Sony Ericsson LT15a
Sony Ericsson LT15i
Sony Ericsson LT15i
Sony Ericsson LT15i
Sony Ericsson LT18i
Sony Ericsson MK16a
Sony Ericsson MK16i
Sony Ericsson MT11i
Sony Ericsson MT15a
Sony Ericsson MT15i
Sony Ericsson MT15i
Sony Ericsson R800a
Sony Ericsson R800a
Sony Ericsson R800i
Sony Ericsson R800i
Sony Ericsson R800x
Sony Ericsson SK17a
Sony Ericsson SK17a
Sony Ericsson SK17i
Sony Ericsson ST15i
Sony Ericsson ST18a
Sony Ericsson ST18a
Sony Ericsson ST18i
Sony Ericsson U20a
Sony Ericsson U20i
Sony Ericsson U20i
Sony Ericsson WT19i
Sony Ericsson X10a
Sony Ericsson X10a
Sony Ericsson X10i
Sony Ericsson X10i
Sony Ericsson X8
Sony Ericsson Xperia X8
SonyEricsson OMS1_6
Xiaomi MI-ONE Plus
yulong 8810
YuLong 8811
YuLong CoolPad8013
YuLong D530
YuLong D530
YuLong D539
YuLong E239
YuLong N930
ZhiQi SmartQT12
ZT SDP Generic
ZTE Blade
ZTE Light
ZTE V9
ZTE V9
ZTE Vodafone 945
ZTE ZTE-BLADE
ZTE ZTE-BLADE
ZTE ZTE-BLADE
ZTE ZTE-C N600
ZTE ZTE-C N600
ZTE ZTE-C N760
ZTE ZTE-C N780
ZTE ZTE-C N880
ZTE ZTE-C N880S
ZTE ZTE-T U880
ZTE ZTE-U V880
ZTE ZTE-U V880
ZTE ZTE-U X850
ZTE ZTE-U X850
ZTE ZTE-U X876
Подготовка устройства к получению root доступа
- Не забывайте, что при получении root-доступа вы теряете гарантию.
- Чтобы ее восстановить вы можете воспользоваться Unlock Root (так как приложение может также вернуть заводские настройки) или установить стоковый ROM.
- Также необходимо позаботиться о сохранности данных, хранящихся на девайсе, так как при получении root-доступа может потребоваться вайп. Создайте резервные копии приложений, настроек, контактов, списков вызовов и текстовых сообщений. Все важные файлы переместите на ПК.
- Не забудьте включить опцию USB отладки (Настройки — Приложения — Разработка — «Отладка по USB», здесь можете найти описание того, как это сделать в Android 4.2).
- Включите поддержку неизвестных источников (Приложения — «Неизвестные источники»)
- Позаботьтесь о том, чтобы батарея вашего девайса была заряжена.
- Для проведения процедуры придется использовать Windows ПК и USB шнур.
- Отключите все средства безопасности как на смартфоне, так и на ПК.
- Так как вы лишаетесь гарантии, то вся ответственность за девайс ложиться только на вас.
- Установите драйвер ABD для вашего устройства: . .
- Если у Вас HTC то для получения root необходим S-OFF (разблокированный загрузчик) — Подробное руководство по разблокировке загрузчика смартфонов HTC через официальный сайт htcdev.com
Инструкция по получению root с помощью Unlock Root
2. Сохраните файл на ПК и установите его.
3. Запустите исполнимый файл.
4. Установите драйвера для своего устройства, если не сделали этого ранее.
5. Подключите девайс к ПК, используя USB кабель.
6. В Unlock Root нажмите кнопку «root«.
7. Вы увидите список девайсов.
8. Выберите свой смартфон/планшет и начинайте процедуру.
9. Если все прошло успешно, то вы увидите подтверждающее сообщение.
10. Перезагрузите смартфон, предварительно отключив его от компьютера.
Как разблокировать загрузчик
Большинство смартфонов Android имеют так называемый режим fastboot. Это своего рода «расширенный загрузчик». С помощью этого режима обычный загрузчик можно разблокировать. Базовым инструментом для этого является «Android Debug Bridge», или ADB. Он ориентирован, в первую очередь, для разработчиков приложений под Android, но и обычным пользователям дает много возможностей.
Для начала вам нужны драйвера для смартфона. Их можно легко установить автоматически из Windows 7, просто подключив смартфон к ПК.
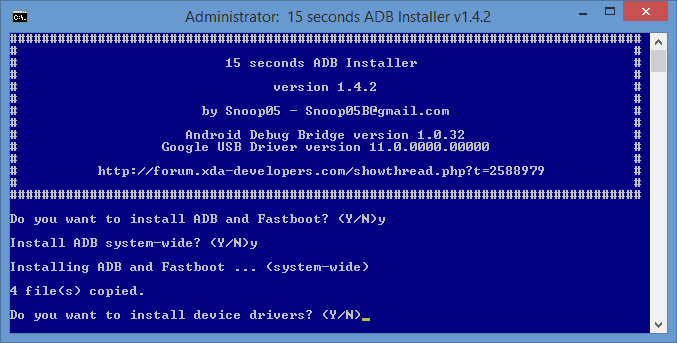
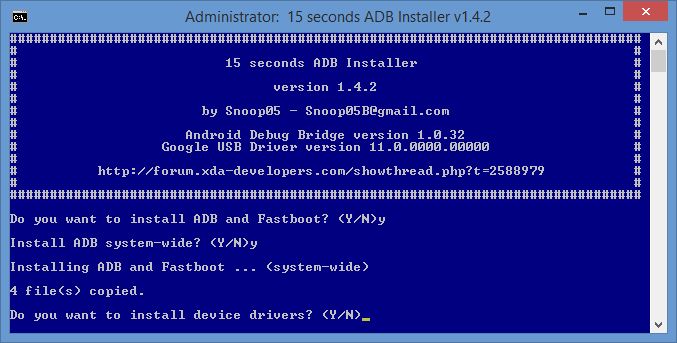
Также нужны драйвера ADB и Fastboot. Для этого загрузите из интернета установщик и запустите скачанный файл в режиме администратора. Обязательно установите драйвера для всей системы. Установщик спросит вас, действительно ли вы хотите это сделать.
После того, как вы совершили эти шаги, необходимо подключить устройство к ПК в режиме fastboot. У многих смартфонов есть для этого специальная комбинация клавиш. В качестве альтернативы, однако, вы также можете подключить включенный смартфон к ПК и ввести команду «adb reboot bootloader» в командной строке. Однако сначала вы должны включить «Отладку по USB» в настройках смартфона. Если необходимо, вы также должны включить функцию «Разрешить OEM-разблокировку».
Теперь вы можете легко разблокировать загрузчик командой «fastboot flashing unlock». Затем снова загрузитесь в режим fastboot и введите «fastboot flashing unlock_critical», чтобы окончательно разблокировать загрузчик. Таким образом вы можете свести к минимуму риск того, что ваш смартфон превратится в «кирпич» при установке новой прошивки.
В качестве альтернативы на некоторых смартфонах разблокировка может быть выполнена с помощью команды «fastboot oem unlock».
Однако бывают исключения. Например, смартфоны Samsung не имеют реального режима fastboot. Вместо этого есть режим загрузки. Чтобы разблокировать загрузчик, необходимо использовать программу Odin, которая может устанавливать файлы, умеющие это делать. Для получения root-прав или установки кастомного ROM или Recovery на устройства Samsung это не обязательно.
Еще одно исключение составляют смартфоны от Sony. Перед тем, как взломать смартфон, вам сначала сначала придется зарегистрировать устройство на странице разработчика, введя IMEI и свой e-mail, чтобы получить специальный код разблокировки.
О том, как инсталлировать кастомную систему восстановления данных, читайте в следующем материале.
Обновлено до последних версий apk (Updated 29/01/2016)
Unlock Root — root в два клика на любом Android устройстве!:
рейтинг из на основе оценок.
Всего отзывов.
Что происходит при включении и запуске Android?
Перед нами выключенный смартфон под управлением Android. Давайте разберемся, что произойдет, если его включить.
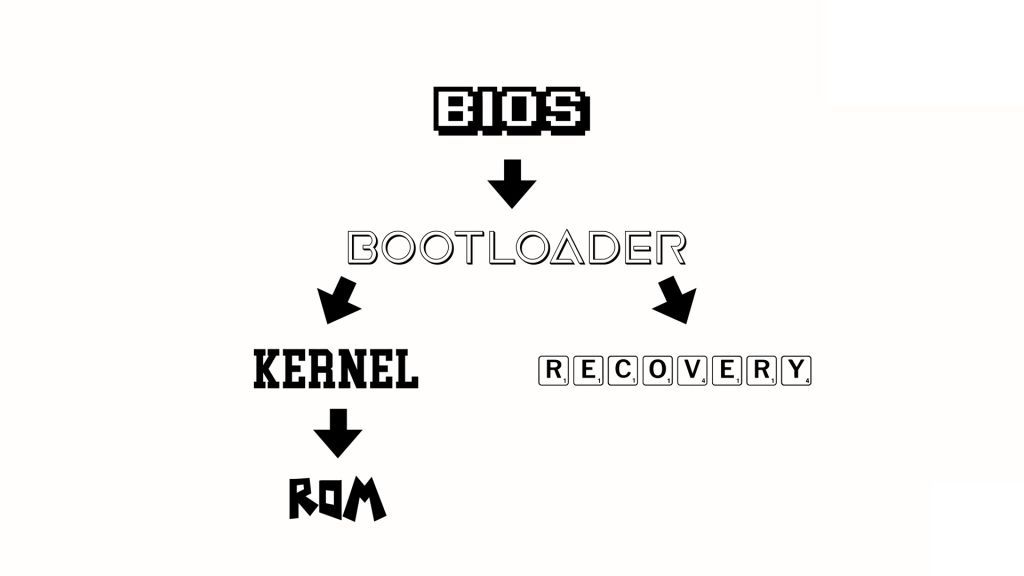
Сначала произойдет запуск BIOS мобильного телефона. ВIOS (Basic Input/Output System ) в переводе с английского означает «Базовая система ввода / вывода». Она постоянно автосохраняется и обеспечивает работу входов и выходов. В частности, эта система также запускает загрузчик (Bootloader).
Как явствует из названия, загрузчик загружает другие части операционной системы, например, ядро. Ядро операционной системы — это основная ее часть. По сути, это нижний уровень системы Android, который отвечает за ход основных процессов и организацию данных.
Затем запускается основная операционная система под названием «ПЗУ/ ROM». ROM означает «Read Only Memory», или «Постоянное запоминающее устройство», используемое для запоминания всего массива неизменяемых данных. Будучи обычным пользователем, вы ничего не можете в ней поменять.
Параллельно загрузчик запускает не только ядро, но и Recovery, или систему восстановления.
Если система Android вдруг оказывается повреждена, можно загрузить Recovery и из нее восстановить OS с нуля или с момента сохранения. Также в системе Recovery можно (и нужно) создавать резервные копии.
В свою очередь, загрузчик может находиться в трех разных состояниях: «Заблокировано», «Открыто» или «Зашифровано». Если загрузчик открыт, в систему могут быть внесены глубокие изменения, например, можно установить собственную операционную систему, также называемую «кастомной ПЗУ», вместо стандартной, то есть, «стоковой ПЗУ». Но и другие моменты, такие как изменение Recovery или получение root-прав на смартфон, можно проводить только с помощью открытого загрузчика.
Если загрузчик зашифрован, могут быть установлены лишь самые срочные обновления системы от изготовителя. То же самое относится и к заблокированному загрузчику, но, в отличие от зашифрованного, его можно разблокировать.
Часто возникающие проблемы и вопросы
- Если появилось сообщение «FAIL TO GET SHELL ROOT«, то с этим ничего поделать нельзя: получить root-доступ при помощи Unlock Root на вашем устройстве невозможно.
- Чтобы проверить, получен ли root-доступ, на Android необходимо установить приложение «antutu cpu master free». После запуска телефон должен запросить разрешение на Root для данного приложения — в таком случае все прошло успешно.
- До получения root-доступа необходимо разблокировать бутлоадер.
- Работает ли Unlock Root с Linux? — нет.
- Для восстановления гарантии на Android устройстве помимо unroot необходимо еще восстановить стоковый ROM.
- На Windows XР может возникать Ошибка запуска установки. Для ее устранения необходимо перезагрузить Unlock Root.
- Некоторые антивирусы могут видеть в Unlock Root угрозу и препятствовать процессу получения root-доступа. Чтобы этого не происходило средства защиты необходимо отключить.
- Если появляется ошибка «FAIL CHMOD BUSYBOX» или что-то подобное, это означает, что операцию не удалось провести. При этом можно попробовать совершить вторую попытку.
- Для ошибки «NOT FIND ONLINE DEVICE» необходимо переустановить драйвера.
- Если после установки драйверов, программа все еще предлагает их установить, компьютер необходимо перезагрузить.
Наиболее полный список устройств, с которыми работает Unlock Root, ищите по этой .
Можно ли обойтись без этого инструмента? Существуют ли другие аналоги? Делимся своими идеями в комментариях.
Видео инструкция Unlock Root
https://youtube.com/watch?v=6tm80wttTLY%3Frel%3D0
Устанавливаем драйвера
Существует несколько методов установки ADB драйверов. Перечислим наиболее распространенные.
- Скачав архив с драйверами, его необходимо распаковать. При этом на телефоне должен быть активирован режим «Только зарядка» (отладка по USB отключена). Далее стоит найти папку фирмы своего девайса, в которой необходимо найти, запустить и установить exe файл. На этом все.
Режим «Только зарядка» подразумевает под собой убранную галочку с опций «Накопитель» или «Устройство хранения данных» и «Отладка по USB«.
- Второй метод немного сложнее, но он пригодится на тот случай, если первый не сработает. Для начала необходимо скачать usb_driver.zip . После чего архив нужно распаковать, а телефон подключить к ПК в режиме «Только зарядка» (отладка по USB отключена). Затем правой кнопкой мышки клацнуть по «Моему компьютеру» и выбрать «Управление«, а затем «Диспетчер устройств«. Среди списка должно быть что-то с названием «Adb interface» или «Неизвестные устройства«. Находим свой смартфон, клацаем по нему правой кнопкой мышки, выбираем опцию «Обновить драйвер«. При этом необходимо выбрать ручную установку и проделать все самостоятельно: в появившемся окне проводника выбрать папку с драйверами, открыть Android ADB Driver, выбрать файл android_winusb.in, нажать «Открыть» и проделать все последующие действия. Если при выборе inf файла появляется сообщение с текстом «Не найдено сведений об оборудовании«, то необходимо воспользоваться вот этим , начиная с 3 пункта.
")


")