

We can do this by using the chown command, which stands for change owner. Using this command, we can change the ownership of a file and the directories and symbolic links.
In this tutorial, we will learn to change the ownership of files using the chown command.
- Linux Permissions
- Basic Ideas
- The Chmod Command
- Symbolic Chmod Commands
- Numeric Chmod Commands
- The Basics
- Assigning Permissions
- Recursively change permissions of all files within a directory
- Conclusion
- File ownership in Unix
- Changing owner of a file in Unix
- Changing owner for multiple files
- Changing group ownership for a file
- See Also
- Chown Command Examples in Linux
- Changing the Owner of a File in Linux
- Changing the Group Ownership of a File in Linux
- Changing a File’s Owner and Group in Linux
- Working with a Symbolic Link File
Linux Permissions
The files and directories in a Linux system are protected using the chown command. Before we get to the chown command, let’s understand the basic three permissions that are used in Linux:
- Read: Allows a user to read the files. When assigned to a directory, it allows the user to read subdirectories.
- Write: Allows a user to modify a file. When assigned to a directory, users can create, modify, and rename files. Using write permissions, a user can also delete a file.
- Execute: Allows a user to execute files, such as shell scripts. However, if you need to navigate inside a directory, you need the Execute permissions.

Remember the ls -l command – we can list the files in a current or specified directory. In the output, we also get to see the files and directories and the owner’s name, groups, and others.
Let’s first look at the chown command:
chown [OPTION]… [OWNER][:[GROUP]] FILE…
There are essentially three core elements of this command:
- Owner: is the username of the user to whom you want to assign the ownership
- Group: is the group name of the group to whom you want to assign permissions
- File: Is the name of the mentioned file whose ownership needs to be changed
When changing the ownership, there are specific important points you should keep in mind:
USER– If a username is specified without the group name, only the user becomes the owner of the mentioned file. The existing group ownership is not changed.USER:– If a username is specified with a colon, but without the group name, the user becomes the file owner. However, the user’s login group also becomes the file owner.USER:GROUP– In this case, the mentioned username and group become the owner of the specified file.:GROUP– If no username is specified, but only the group name, then the existing user’s ownership is retained, but the group ownership is changed of the specified file.:– If we do not specify the username or group name, then no change is made to the specified file’s ownership. Existing ownership is retained as is.
To create the file, we use the touch command:
touch permit.txt
chown arthur permit.txt
When we hit Enter, we get an error:
chown: changing ownership of 'permit.txt': Operation not permitted
This is because even the owner of the file cannot change ownership. We need to be either root or have the root-equivalent permissions.

We run the same command with sudo, and no error is displayed. The command runs successfully.
sudo chown arthur permit.txt

If we run the ls -l command in the output, we will have arthur as the file owner. Since we did not change the group ownership, it still has edxd.

sudo chown root permit.txt data
id edxd

sudo chown 1001 permit.txt
The command executes successfully.

We verify the output with the ls -l command:
sudo chown root:root permit.txt

sudo chown edxd: permit.txt

When we verify it with the ls -l command, we notice that edxd and its login group are the owners.
We will now only change the group ownership on the permit.txt file.
sudo chown :root permit.txt

When we verify the output, we see that only the group owner has changed.
When working with some files or folders on Linux you might have seen an error saying Permission Denied.
This is a common error that is associated with the permissions for the specific file/folder.
In some GUI versions of Linux such as Ubuntu, you can change the permissions from file managers. Here, we will be focusing on a more general way to do it using any Linux terminal or command line.
Table of Contents
- Basic Ideas
- The Chmod Command
- Symbolic Chmod Commands
- Numeric Chmod Commands
- Recursively change permissions of all files within a directory
- Conclusion
Basic Ideas
Before we move on to the methods to change the permissions, you need to have some basic ideas of how the file/folder permissions work on Linux.
- Owner: This is the user who created the file/folder.
- Group: The users who are in a group.
- Others: Any user outside the Group and the Owner. This user class is often called World.
Any files or folders can have three different kinds of permissions associated with them –
- Read permission: A user can read files with this permission.
- Write permission: This permission allows a user to modify the file.
- Execution permission: It allows a user to execute the file.
Use the ls -l command to list the files, directories, and their permissions:
ls -l
You can also see the permissions of a specific file using:
ls -l filename.extension
After running the ls -l command, you will see something like this:
[email protected]: ~/Desktop# ls -l
total 20
drwxr-xr-x 2 root root 4096 Sep 21 2017 BUET_INFO
-rw-r--r-- 1 root root 18 Sep 28 2016 Default_MAC.txt
-rwxr-x--x 1 root root 252 Mar 7 2020 pycharm.desktop
-rw-r--r-- 1 root root 263 Sep 16 2016 users.csv
drwxr-xr-x 2 root root 4096 Nov 17 2016 Words
Right now we’ll focus on the text on the left, drwxr-xr-x or -rw-r--r-- in lines 3 and 4 respectively. These are the permissions for each of the directories and files that are listed to the right.
Don’t worry, they are pretty easy to understand even though they might look intimidating at first. Now let’s analyze these two examples to understand what they mean.
If you count the characters here, you will find every one of these codes has 10 characters.
That leaves us to decode the next 9 characters for both examples. If you simply divide these characters into groups of 3s, decoding them becomes much simpler. Take a look:
d rwx r-x r-x
- rw- r-- r--
For both of the examples, we have just divided the last 9 characters into three groups, each consisting of 3 characters.
Let’s analyze the first example:
d rwx r-x r-x

These characters stand for:
r = Enables permission for reading
w = Enables permission for writing
x = Enables permission for execution

Let’s also take a look at our second example of permissions from earlier:
The Chmod Command
Now we’re ready to learn the commands to change the permissions of files and folders.
The chmod command changes the file permissions. There are two methods for changing permissions with chmod. By using:
- Symbolic chmod commands. (The notation we’ve used in the examples above,
drwxr-xr-x,-rw-r--r--) - Numeric chmod commands. (We’ll cover this a bit further down. Examples 777,
644)
Symbolic Chmod Commands
In Linux systems “mode” refers to permissions. The command chmod stands for “change mode”.
The easiest way of using the chmod command is the symbolic or text commands. The command usually takes at least three inputs and the file/directory name. The syntax can be written in a simple format as:
chmod [user class][operation][permissions] [filename/directory name]
- u – The owner of the file/directory.
- g – Users who are members of the same group.
- o – Other users.
- a – All users, same as ugo
- + For adding specified permissions.
- – For removing specified permissions.
- = Sets the current permissions to the specified ones. If nothing is specified after
=sign, all the current permissions of the specified user class get removed.
- r – Sets the permissions to read.
- w – Sets the write permissions.
- x – Sets the permission for execution.
Let’s look at some examples.
chmod o+w filename.extension
Here’s how the permissions look for Default_MAC.txt initially.
[email protected]: ~/Desktop# ls -l
total 20
drwxr-xr-x 2 root root 4096 Sep 21 2017 BUET_INFO
-rw-r--r-- 1 root root 18 Sep 28 2016 Default_MAC.txt
-rwxr-x--x 1 root root 252 Mar 7 2020 pycharm.desktop
-rw-r--r-- 1 root root 263 Sep 16 2016 users.csv
drwxr-xr-x 2 root root 4096 Nov 17 2016 Words
Now I’ll run the command on Default_MAC.txt:
sudo chmod o+w Default_MAC.txt
Here’s the resulting output when listing files with their permissions. Keep in mind that you might have to use the sudo command to run it successfully.
[email protected]: ~/Desktop# ls -l
total 20
drwxr-xr-x 2 root root 4096 Sep 21 2017 BUET_INFO
-rw-r--rw- 1 root root 18 Sep 28 2016 Default_MAC.txt
-rwxr-x--x 1 root root 252 Mar 7 2020 pycharm.desktop
-rw-r--r-- 1 root root 263 Sep 16 2016 users.csv
drwxr-xr-x 2 root root 4096 Nov 17 2016 Words
Some more examples with the chmod command:
chmod u-x filename.extension
This command will remove execution permission from the Owner.
chmod g=r filename.extension
chmod o= filename.extension
chmod ug+rwx filename.extension
chmod ugo-rwx filename.extension
chmod a-rwx filename.extension
chmod ugo= filename.extension
If you want to change the permissions for a directory, just replace the file name with the directory name. This concludes the symbolic method for changing the permissions of a file or a folder.
Numeric Chmod Commands
This is an elegant technique that will allow you to change file or directory permissions while typing less than using the symbolic approach.
The Basics
We’ll start with the basics. Each permission has a digit or value associated with it. The digits are:
- r = 4, Read permission has a value of 4.
- w = 2, Write permission has a value of 2.
- x = 1, Execution permission has a value of 1.
- – = 0, no permission has a value of 0.
We add different values together to get different sets of permissions we want to have.
Here are the combinations:
- 4 + 2 = 6, means that 6 is rw
- 4 + 1 = 5, means that 5 is rx
- 2 + 1 = 3, means that 3 is x
- 4 + 2 + 1 = 7, means that 7 is rwx
We will add the values of these permissions (rwx) together, 4+2+1, which gives us 7.
If we want permissions to only be read & write (rw), we will have 4+2+0 = 6.
Likewise, the digit 5 means read & execution (rx) permissions, 3 means write & execution (wx), and so on.
This is how you can represent permissions with the help of a single digit.
Assigning Permissions
We’ll take the digits representing the permissions and form a 3-digit number with them.
As an example, we’ll use the number 643:
- The first number, 6, represents the permissions for the Owner
- The second digit, 4 is the permissions for the Group user class
- The third digit, 3 designates the permissions for the Others user class
Here is a little image trying to explain this visually.

Let’s take another example, for practice reasons:
This time we take the number 751:
- 7 means that the Owner has all the permissions (read, write, & execution)
- 5 designates that the Group user class has read & execution permissions
- 1 marks the Others user class only has execution permission.
The syntax of chmod command with the numeric method is:
chmod [number] [filename/directory name]
Doesn’t that look cleaner than when using the symbolic notation? I believe you’ll encounter numeric notation more often, however you are free to use whichever notation feels more natural.
Finally, let’s look at some of the examples with the command:
chmod 777 filename.extension
chmod 777 Default_MAC.txt
[email protected]: ~/Desktop# ls -l
total 20
drwxr-xr-x 2 root root 4096 Sep 21 2017 BUET_INFO
-rwxrwxrwx 1 root root 18 Sep 28 2016 Default_MAC.txt
-rwxr-x--x 1 root root 252 Mar 7 2020 pycharm.desktop
-rw-r--r-- 1 root root 263 Sep 16 2016 users.csv
drwxr-xr-x 2 root root 4096 Nov 17 2016 Words
Now let’s take away all of its permissions. To do this we set the permissions to 000:
chmod 000 filename.extension
[email protected]: ~/Desktop# ls -l
total 20
drwxr-xr-x 2 root root 4096 Sep 21 2017 BUET_INFO
---------- 1 root root 18 Sep 28 2016 Default_MAC.txt
-rwxr-x--x 1 root root 252 Mar 7 2020 pycharm.desktop
-rw-r--r-- 1 root root 263 Sep 16 2016 users.csv
drwxr-xr-x 2 root root 4096 Nov 17 2016 Words
Here are a few more random examples, in hopes that it helps better understand the numeric notation:
chmod 400 filename.extension
chmod 747 filename.extension
chmod 001 filename.extension
Recursively change permissions of all files within a directory
A frequent situation you’ll encounter is having to recursively change permissions of files within a directory.
You can use the recursive option with the chmod command for doing it. The -R option enables the chmod command to change permissions recursively.
chmod -R 644 [directory name]
This command will change all the file and subdirectory permissions recursively within the directory you specified.
Conclusion
In this tutorial we hope you’ve understood how to change permissions of files and directories in Linux using the chmod command.
If you face any problems, take a look at the manuals page for the chmod command. The manual is also available in the terminal, when you type man chmod.
File ownership in Unix
Here’s a setup for today: I have created a temporary directory with a few files and made myself the owner of all the files:
ubuntu$ ls -al /home/greys/example/
total 12
drwxr-xr-x 3 greys admin 4096 Feb 9 03:55 .
drwxr-xr-x 13 greys greys 4096 Feb 9 03:54 ..
drwxr-xr-x 2 greys admin 4096 Feb 9 03:55 dir1
-rw-r--r-- 1 greys admin 0 Feb 9 03:54 file1
-rw-r--r-- 1 greys admin 0 Feb 9 03:55 file2
Changing owner of a file in Unix
ubuntu$ chown nobody file1ubuntu$ id
uid=1000(greys) gid=113(admin) groups=33(www-data),113(admin)
ubuntu$ chown nobody file1
chown: changing ownership of `file1': Operation not permittedBut if we become root:
ubuntu$ sudo -i
[sudo] password for greys:
ubuntu#
ubuntu# cd /home/greys/example
ubuntu# chown nobody file1
ubuntu# ls -l file1
-rw-r--r-- 1 nobody admin 0 Feb 9 03:54 file1Changing owner for multiple files
If you’re going to change owner of a few files, this can easily be done using either a full list of files or a mask.
First, here’s an example of updating ownership for a specified list of files (and as you can see, directories as well):
ubuntu# chown nobody file2 dir1
ubuntu# ls -al
total 12
drwxr-xr-x 3 greys admin 4096 Feb 9 03:55 .
drwxr-xr-x 13 greys greys 4096 Feb 9 03:54 ..
drwxr-xr-x 2 nobody admin 4096 Feb 9 03:55 dir1
-rw-r--r-- 1 nobody admin 0 Feb 9 03:54 file1
-rw-r--r-- 1 nobody admin 0 Feb 9 03:55 file2
ubuntu# ls -l dir1/file3
-rw-r--r-- 1 greys admin 0 Feb 9 03:55 dir1/file3If your intention is to change ownership of all the files and directories of a certain location in your filesystem, you need to use a -R option of the chown command, which means recursive ownership change:
ubuntu# chown -R nobody dir1
ubuntu# ls -l dir1/file3
-rw-r--r-- 1 nobody admin 0 Feb 9 03:55 dir1/file3
ubuntu# chown -R greys /home/greys/example/
ubuntu# ls -l /home/greys/example/
total 4
drwxr-xr-x 2 greys admin 4096 Feb 9 03:55 dir1
-rw-r--r-- 1 greys admin 0 Feb 9 03:54 file1
-rw-r--r-- 1 greys admin 0 Feb 9 03:55 file2Changing group ownership for a file
For example, I’m a member of quite a few groups on one of my Ubuntu servers:
ubuntu$ id greys
uid=1000(greys) gid=1000(greys) groups=1000(greys),4(adm),20(dialout),24(cdrom),46(plugdev),114(lpadmin),115(sambashare),116(admin)
ubuntu$ touch file
ubuntu$ ls -al file
-rw-r--r-- 1 greys greys 0 2012-09-20 10:48 fileubuntu$ chgrp admin fileand this is just to confirm that the change actualyl happened:
ubuntu$ ls -al file
-rw-r--r-- 1 greys admin 0 2012-09-20 10:48 file
That’s it for today, good luck with changing file owners on your Unix system!
See Also
- Unix Commands
- Finding the owner of a file in Unix
- Find files which belong to a given Unix user
- Basic Unix Commands
- What to do when numeric user id is shown instead of username
However, files or directories ownership verdicts are not final as it is possible to chown (Change Ownership) of any file and/or directory within the Linux operating system.
The command not only applies to files and directories but also symbolic links. This command alters the permission access rights associated with files, directories, and symbolic links.
Chown Command Examples in Linux
$ sudo chown [Command_Option] targeted_file_name
$ ls -l [targeted_file_name]
$ ls -l passwd

From the above screen capture, the file passwd belongs to the owner dnyce and group dnyce. Both owner and group associated with this file have Read and Write (rw) permissions.
Changing the Owner of a File in Linux
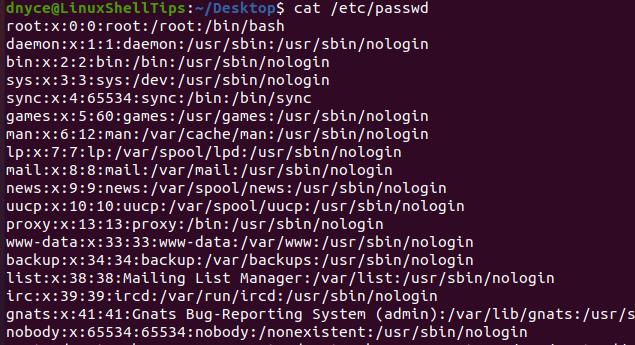
Before we change the ownership of a targeted file, we should first make sure the new owner of the file exists.
$ cat /etc/passwd
$ sudo chown root passwd
$ ls -l passwd
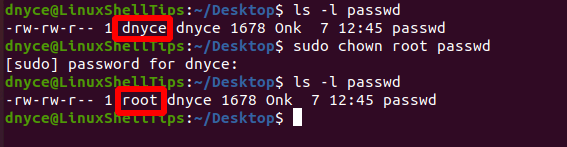
As you have noted, the ownership of file passwd changed from dnyce to root.
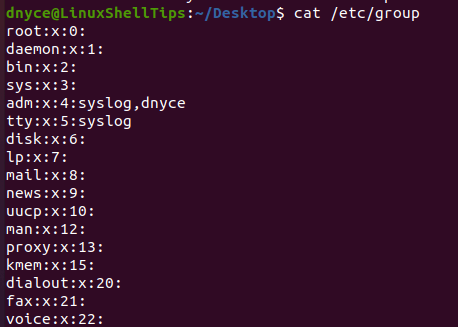
Changing the Group Ownership of a File in Linux
$ cat /etc/group
$ sudo chown :tutorials passwd
$ ls -l passwd

As you can see, the group ownership of the above file (passwd) successfully changed from dnyce to tutorials.
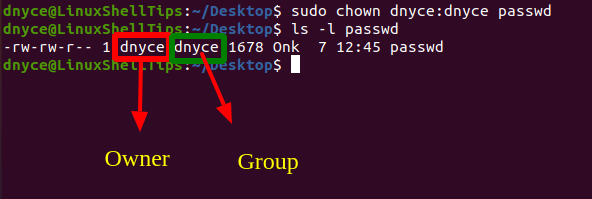
Changing a File’s Owner and Group in Linux
$ sudo chown dnyce:dnyce passwd
$ ls -l passwdv
Working with a Symbolic Link File
For some reason, the files on your Linux system might be associated with symbolic links. They have the same functionality as shortcuts on a Windows operating system. A symbolic link file is not a real file but a pointer to that file you wish to Read, Write, or Execute.
$ ln -s path_to_source_file name_of_symbolic_link
Let us create a symbolic link for the passwd file.
$ ln -s passwd passwd_link
$ ls -l passwd_link

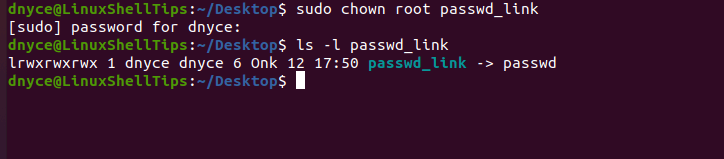
$ sudo chown root passwd_link
On re-checking the ownership and permissions settings of this symbolic link file, nothing seems to have changed.
$ ls -l passwd_link
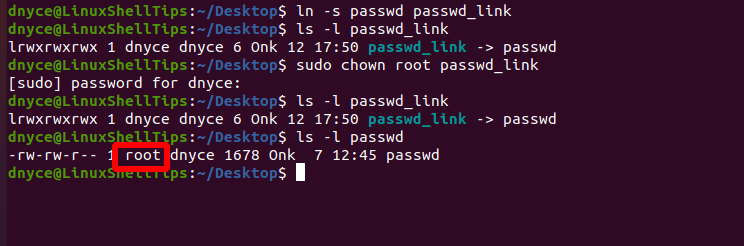
However, the ownership and permissions settings of the source file (passwd) changed.
$ ls -l passwd
To forcefully change the ownership of a source file associated with a symbolic link file, the chown command should include the -h option.
$ sudo chown -h root passwd_link
$ sudo chown [USER]:[GROUP] file1 file2 file3
$ sudo chown --from=dnyce root passwd
To copy ownership settings of file passwd to file new_data.txt:
$ sudo chown --reference=passwd new_data.txt
")


")