
![VIDEO] Root Gingerbread on your Incredible 2 (2.3.3 ONLY!)](https://masterhitech.ru/wp-content/uploads/2023/07/lgos-gingerbreak-2-570x312.jpg "VIDEO] Root Gingerbread on your Incredible 2 (2.3.3 ONLY!)")
Gingerbreak – программа предназначенная для получения root-прав при помощи обнаруженной уязвимости на устройствах под управлением Android 2.3 (Gingerbread), но есть шанс, что может работать на Froyo и/или Honeycomb.
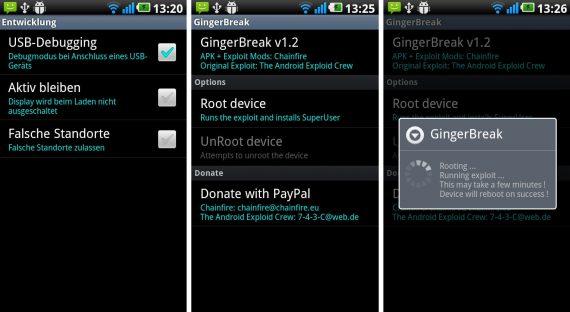
Данная программа поможет получить Root-права. Что для этого нужно?
- текущую версию GingerBreak (Отключите антивирус на всякий случай)
- нашу программу на телефон и устанавливаем
- Включаем отладку USB. Для этого заходим в Настройки -> Приложения -> Разработка -> Отладка USB. Ставим галочку.
- Проверяем, чтобы флэшка была вставлена и работала
- Запускаем GingerBreak
- Выбираем Root Device
- Подождите несколько минут. Если нет никаких проблем, то устройство перезагрузится (отмечу, что перезагрузка может занять долгое время, поэтому ждем)
- Радуемся!
Регистрация: 6 лет назад
Список поддерживаемых/неподдерживаемых устройств содержится под спойлерами ниже. Список неполный, если вашего устройства, сообщите мне — добавлю в шапку со ссылкой на ваш пост об успехе или неудаче.
Устройства, на которых можно получить рут
Устройства, на которых получение рута невозможно или опасно
- Samsung Galaxy Ace
- HTC Desire S (S-ON)
- HTC Wildfire (S-ON)
- HTC Incredible S (2.3.3) — может получиться кирпич!, либо просто не работает (S-ON)
- Samsung Galaxy Mini, но тут написано, что работает SuperOneClick
- SE Xperia Neo (2.3.3)
- SGS (2.3.3 JVH)
Для тех из вас, кто не знаком с линейкой ядер CF-Root для устройств Samsung, CF-Root построен на стандартном ядре Samsung и добавляет к нему root, Busybox и ClockworkMod recovery. Обратите внимание, что это ни в коем случае не ROM.
Это ядро предназначено только для GSM-версии Galaxy Tab, и любой желающий опробовать его на другом варианте должен сделать это без какой-либо поддержки со стороны разработчика.
Итак, приступим к рутированию Galaxy Tab!
Заявление об ограничении ответственности: Пожалуйста, следуйте этому руководству на свой страх и риск. AddictiveTips не несет ответственности, если ваше устройство будет повреждено или заблокировано во время процесса.
- Для начала загрузите файл CF-Root по ссылке выше и распакуйте его, чтобы найти CF-Root-TAB7_XX_OXA_JQ1-v3.3-CWM3RFS.tar.
- Убедитесь, что ваше устройство отключено от компьютера, а затем запустите ODIN.
- Нажмите кнопку КПК в ODIN и выберите файл с именем CF-Root-TAB7_XX_OXA_JQ1-v3.3-CWM3RFS.tar.
- Теперь переведите телефон в режим загрузки и подключите его к компьютеру.
- Убедитесь, что вы видите это Переразбиение не проверено.
- Как только все вышеперечисленные шаги будут выполнены, просто нажмите Начинать кнопку в ODIN.
- После завершения процесса — что не должно занять более нескольких секунд — устройство перезагрузится.
Вот и все! Теперь у вас должен быть полный root-доступ к вашей вкладке Galaxy Tab.
Для обновлений и дальнейших запросов посетите ветка форума на XDA-Developers.
![VIDEO] Root Gingerbread on your Incredible 2 (2.3.3 ONLY!)](https://android-hit.ru/upload/iblock/e2a/e2add9f686b02df414dc38ff197c56ff.png)
- Исправлен баг голосового поиска
Дата выхода: 6 декабря 2010 года
Версия ядра Linux: 2.6.35
Версия API: 9


Приложение для root-прав на андроид. Версии для ПК Windows и для OS Android


Популярное приложение для получения root-прав на андроид телефоны и планшеты.


Разработчик: HEXAMOB S.L.
Программа, которая поможет вам узнать, как получить права ROOT на вашем мобильном устройстве.


Самое необходимое приложение для всех, у кого есть ROOT доступ и права суперпользователя на телефоне.


Хотите получить root права на телефон? Это приложение поможет

ROOT права позволяют расширить функционал телефонов и планшетов с операционной системой Android 2.3.6 Gingerbread. Вы сможете изменять стандартное программное обеспечение, удалять любые приложения, получите возможность устанавливать сторонние прошивки и программы, требующие полный доступ к системе. К установке РУТ прав стоит отнестись очень серьезно!
Что именно дают права Root на Андроид:
- Доступ к системным файлам и программам с возможностью изменения и удаления
- Активация дополнительных функций Андроид
- Увеличение быстродействия операционной системы
- Создание резервных копий прошивки и данных, их переноса
- Детальное изменение внешнего вида ОС Андроид
- Установка сторонних прошивок и модов
- Удаление рекламы из приложений
- Увеличение автономности работы батареи
- Разгон или понижение скорости процессора
- Установка приложений, которые требуют ROOT
И многие другие полезности.
![VIDEO] Root Gingerbread on your Incredible 2 (2.3.3 ONLY!)](https://android-hit.ru/upload/iblock/010/010956c035e75e4566507fb18e0fb185.png)
- Некоторые улучшения и API для платформы Android 2.3
Дата выхода: 6 декабря 2010 года
Версия ядра Linux: 2.6.35
Версия API: 9
Приложение для root-прав на андроид. Версии для ПК Windows и для OS Android
Популярное приложение для получения root-прав на андроид телефоны и планшеты.
Разработчик: HEXAMOB S.L.
Программа, которая поможет вам узнать, как получить права ROOT на вашем мобильном устройстве.
Самое необходимое приложение для всех, у кого есть ROOT доступ и права суперпользователя на телефоне.
Хотите получить root права на телефон? Это приложение поможет

ROOT права позволяют расширить функционал телефонов и планшетов с операционной системой Android 2.3.3 Gingerbread. Вы сможете изменять стандартное программное обеспечение, удалять любые приложения, получите возможность устанавливать сторонние прошивки и программы, требующие полный доступ к системе. К установке РУТ прав стоит отнестись очень серьезно!
Что именно дают права Root на Андроид:
- Доступ к системным файлам и программам с возможностью изменения и удаления
- Активация дополнительных функций Андроид
- Увеличение быстродействия операционной системы
- Создание резервных копий прошивки и данных, их переноса
- Детальное изменение внешнего вида ОС Андроид
- Установка сторонних прошивок и модов
- Удаление рекламы из приложений
- Увеличение автономности работы батареи
- Разгон или понижение скорости процессора
- Установка приложений, которые требуют ROOT
И многие другие полезности.

Galaxy Ace S5830 задуман как бюджетное Android-устройство от Samsung с неплохим 3,5-дюймовым экраном, но жалким разрешением 320 на 480 пикселей. Тем не менее, Android — это одна из ОС, которая может заставить самые медленные и старые устройства выглядеть роскошно. Galaxy Ace — не исключение. Теперь, когда устройство внедрено, оно готово продемонстрировать свой истинный потенциал. Подробнее о руте после скачка.
Инструкции по рутированию будут разделены на две части: рутирование на Android 2.2 Froyo и рутирование на Android 2.3 Gingerbread.
Заявление об ограничении ответственности: Пожалуйста, попробуйте это руководство на свой страх и риск. AddictiveTips не будет нести ответственности в случае повреждения вашего устройства из-за этого метода.
- Для Фройо
- Для пряников
- Читайте нас где удобно
- Ещё на эту тему было
- Для тех, кто долистал
- GingerBreak. Root using GingerBreak
- Steps of the Android Rooting method: GingerBreak.
- Download
- Download sources
- Other important informations to read before rooting
- Source
- Related links
- Legal conditions
- [GUIDE/VIDEO] Root Gingerbread on your Incredible 2 (2. 3 ONLY!)
- Similar threads
- [ROOT][CWM][GUIDE][GINGERBREAD] Rooting the Samsung Epic 4g
- Similar threads
- Важно знать
- [GUIDE/VIDEO] Root Gingerbread on your Incredible 2 (2. 3 ONLY!)
- Similar threads
- Как программа работает?
- About this article
Для Фройо
- Для начала загрузите SuperOneClick по ссылке выше и извлеките его в любое место на вашем компьютере.
- Убедитесь, что на вашем телефоне включена отладка по USB в Настройки > Приложения > Разработка > USB отладки.
- Теперь подключите телефон к компьютеру и запустите SuperOneClick.exe и ударил Корень кнопка.
Для пряников
- Для начала скачайте upd_1.zip по ссылке выше и скопируйте в корень SD-карты.
- Перезагрузитесь в режим восстановления, удерживая кнопки «Домой» и «Питание», отпуская кнопку питания, как только увидите логотип Samsung.
- Перейдите к обновление с sdcard а затем выберите upd_.1zip.
- Как только файл будет прошит, перезагрузите устройство.
Метод укоренения очень прост как для Froyo, так и для Gingerbread.
[VIA XDA-Developers]
Постоянные читатели нашего ресурса, должно быть, заметили, что мы очень любим всячески модифицировать свои девайсы, получая рут-доступ или меняя прошивки. А потому мы просто не можем пройти мимо очередного приложения для получения рут-доступа прямо с вашего коммуникатора.

Как водится, корни подобных хак-приложений ведут на XDA-форум. Так вот теперь участник сообщества Chainfire предоставил на наш суд приложение Gingerbreak, которое призвано быстро и легко получать права суперпользователя на андрофоне.
Gingerbreak умеет не только получать постоянные права суперпользователя, но и делать unroot, возвращая систему к исходному состоянию.
Пользоваться Gingerbreak’ом просто. Для начала устанавливаем apk, причем обязательно во внутреннюю память телефона, а не на карту памяти. Далее нам необходимо убедится, что в настройках стоит галочка «usb debugging». Разработчик утверждает, что нам еще понадобится смонтированная в системе sd-карта. Процесс получения рута может занять некоторое время вплоть до 10 минут. Далее, если все прошло успешно, то ваш девайс будет перезагружен. В некоторых случаях, даже если аппарат подвиснет и не перезагрузится, вы все равно можете получить рута. Проверьте результат, вытащив и вставив аккумулятор через 15 минут работы программы.
Не забываете перезагружаться между попупытками получения рута/уаления рута!
Тогда можно поддержать её лайком в соцсетях. На новости сайта вы ведь уже подписались? 😉
Читайте нас где удобно
Ещё на эту тему было
Для тех, кто долистал
Ай-ти шуточка бонусом. Купил телефон на Android, гуляю с зарядкой.
![VIDEO] Root Gingerbread on your Incredible 2 (2.3.3 ONLY!)](https://android-hit.ru/upload/iblock/4dd/4dd8e9ee5dff67e8c5af706b8e4db045.png)
- Улучшения производительности сетевого стека для аппарата Nexus S 4G, другие изменения и улучшения
- Исправлен баг Bluetooth на Samsung Galaxy S
- Улучшено приложение Gmail
- Исправлена проблема с часовыми поясами (GMT+3 и GMT+4)
Дата выхода: 6 декабря 2010 года
Версия ядра Linux: 2.6.35
Версия API: 9
Приложение для root-прав на андроид. Версии для ПК Windows и для OS Android
Популярное приложение для получения root-прав на андроид телефоны и планшеты.
Разработчик: HEXAMOB S.L.
Программа, которая поможет вам узнать, как получить права ROOT на вашем мобильном устройстве.
Самое необходимое приложение для всех, у кого есть ROOT доступ и права суперпользователя на телефоне.
Хотите получить root права на телефон? Это приложение поможет

ROOT права позволяют расширить функционал телефонов и планшетов с операционной системой Android 2.3.5 Gingerbread. Вы сможете изменять стандартное программное обеспечение, удалять любые приложения, получите возможность устанавливать сторонние прошивки и программы, требующие полный доступ к системе. К установке РУТ прав стоит отнестись очень серьезно!
Что именно дают права Root на Андроид:
- Доступ к системным файлам и программам с возможностью изменения и удаления
- Активация дополнительных функций Андроид
- Увеличение быстродействия операционной системы
- Создание резервных копий прошивки и данных, их переноса
- Детальное изменение внешнего вида ОС Андроид
- Установка сторонних прошивок и модов
- Удаление рекламы из приложений
- Увеличение автономности работы батареи
- Разгон или понижение скорости процессора
- Установка приложений, которые требуют ROOT
И многие другие полезности.
root
Z4root
ОС Android 2.3
Gingerbread
![VIDEO] Root Gingerbread on your Incredible 2 (2.3.3 ONLY!)](https://lh3.googleusercontent.com/blogger_img_proxy/AByxGDT0iBq9wfWua_EPruSq5G1zPQEKNyHJtW1EwWcRFPLqH-hAuYrL4r3__kvOJvsakuCJCS3y5y_5Yx5YgWOVvGO022_Ir7XX6bHll_2XwvxDSnFjvHrvARj49omhEbMqcFOHLFpKiBeC3H-8GBc=s0-d)
root
GingerBreak
GingerBreak
Android версий 2.2
Froyo
3.0
Honeycomb
Установка программы и получение root прав.
(Внимание!
Данная процедура может привести к неработоспособности вашего
устройства! все что вы делаете, вы делаете на свой страх и риск.)
- Убедитесь, что в настройках вашего устройства опция «Отладка USB«(USB debugging) включена.
- Убедитесь, что в ваше устройство вставлена отформатированная SD карта памяти, и телефон или планшет её распознает.
- Установите программу GingerBreak на устройство (не на SD карту!)
- Запустите программу и нажмите «Root device»
- Подождите несколько минут. Если все хорошо, ваше устройство
перезагрузится. (перезагрузка может происходить долго, минут 10, не
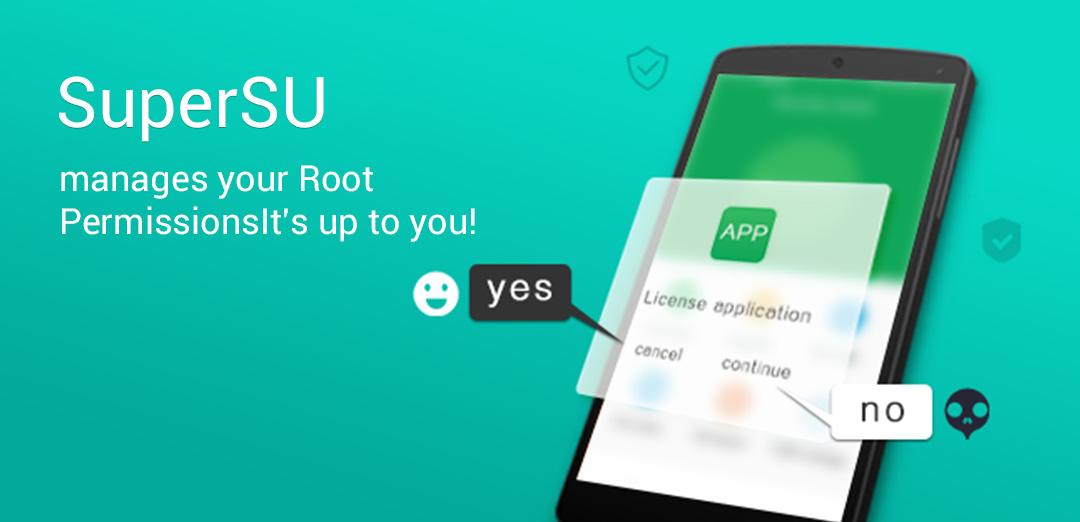
пугайтесь, программа в это время очищает кеш устройства) - Убедитесь, что теперь у вас установлена программа Superuser и она работает.
- Не обязательно: Установите программу BusyBox из Маркета. Разработчик советует stericsson BusyBox.
- Не обязательно: Удалите программу GingerBreak, она вам больше не понадобится.
Superuser
GingerBreak
AD
Как установить GingerBreak с помощью adb:
— Установите ADB, как написано в этой инструкции.
— Включите в настройках планшета или телефона режим «отладка USB» (USB debugging)
— Подключите ваше устройство к компьютеру, запустите
командную строку, перейдите в папку, где находится программа
Gingerbreak и выполните следующую команду:
adb install GingerBreak-v1.20.apk
После этого вы сможете запустить на своем устройстве программу GingerBreak и получить права доступа root, следуя приведенной ранее инструкции.
Страница программы GingerBreak на форуме xda.
http://www.4tablet-pc.net/reviews-a-articles/166-getting-root-access-to-the-android-23-gingerbread.html
—>
GingerBreak. Root using GingerBreak
Gingerbreak is a “root” tool to make “root” your Android phone or tablet with a one click method. Easy and fast.
Steps of the Android Rooting method: GingerBreak.
- 1 – Download GingerBreak APK
- 2 – If you have downloaded the apk on your pc, connect the device to your PC and copy it into the SD card. If you have downloaded directly on the device, go to step 3.
- 3 – Make sure that this enabled the resources of other platforms apart from Google Play. I can look at the following path: Menu Setting Unknown sources (ON)
- 4 – After this is done, use any File Manager (Astro File Manager, ES File Explorer,…) to install the file. You can install any file manager from Google Play.
- 5 – Make sure you have an SD card (formatted and) inserted
- 6 – From your device, click on the GingerBreak APK file and then follow all the on-screen instructions you see.
- 7 – Once the app is installed on your phone, launch GingerBreak app and when it will be opened, click on the “Root” button in the application.
- 8 – Wait a few minutes for the process to finish and reboot your device once it is done (note that the reboot itself can take around minutes due to cache wipe).
Android USB Drivers app
Download
![VIDEO] Root Gingerbread on your Incredible 2 (2.3.3 ONLY!)](https://hexamob.com/wp-content/themes/hexamob/img/usb-drivers-english.png)
Download sources
Remember, you must root your device at your own risk.
Other important informations to read before rooting
- You must have USB debugging enabled on your device
- You need to have an SD card (formatted and) inserted – if it doesn’t work, try formatting the SD card in your computer, or switching it with a different (or old, etc) SD card
- The APK must be installed on the device, NOT SD card.
- The exploit may take a while to run, but not more than 10 minutes, if it does, get me a logcat, and reboot the device. So check that out after you manually pull battery after 15 minutes or so of being stuck.
- Always reboot between root attempts!
- Sometimes root access can’t be attained, due to blocked bootloaders, efuses, S-ON,… and this rooting method could not work on your device. For temproot access, use the raw binary exploit (linked below), not this APK.
Source
Related links
Legal conditions

Владельцы Motorola Droid 4, ожидающие получения root-доступа на своем устройстве, у нас для вас отличные новости. Ваше ожидание окончено, так как Droid 4 наконец-то внедрен! В последнее время Motorola, возможно, изо всех сил пыталась заблокировать свои телефоны, но это серьезный удар по всем этим усилиям. Как всегда, мы представили вам полный метод рутирования вашего Droid 4, поэтому читайте после перехода, чтобы получить дополнительную информацию, ссылку для загрузки и инструкции по установке.
Эксплойт, используемый для получения root-доступа, взят прямо из блога Дэна Розенберга, но мало что известно о самом эксплойте или, если уж на то пошло, о степени успеха. Мы предполагаем, что это связано с тем, что разработчики не хотят, чтобы Motorola узнала об этом достаточно рано, поэтому патч для этого эксплойта, отключающий этот метод получения root, откладывается как можно дольше, сохраняя доступ root доступным на этом устройстве для как можно дольше.
Лучшая особенность этого корневого метода заключается в том, что это более или менее метод одного щелчка, что упрощает даже начинающим пользователям Android рутирование своего Droid 4. Нет необходимости запускать какие-либо сложные команды из командной строки на вашем ПК. или эмулятор терминала на вашем телефоне, или даже прошить любые файлы в режиме загрузчика или восстановления. Все, что вам нужно сделать, это запустить предоставленный командный файл на вашем компьютере с телефоном, подключенным в режиме отладки USB, и вы получите root-доступ.
У вас достаточно подробностей и вам не терпится получить root-права на Verizon Driod 4 на Android 2.3 Gingerbread? Ну вот!
Заявление об ограничении ответственности: Пожалуйста, следуйте этому руководству на свой страх и риск. AddictiveTips не несет ответственности, если ваше устройство будет повреждено или заблокировано во время процесса.
- Прежде всего, загрузите «Root for Droid 4» по указанной выше ссылке и извлеките содержимое загруженного zip-файла на свой компьютер.
- Включите отладку по USB на вашем Droid 4 в «Настройки»> «Приложения»> «Разработка».
- Установите драйверы Motorola USB для вашей версии Windows по приведенным выше ссылкам, если они еще не установлены.
- Теперь подключите телефон к компьютеру через USB.
- После подключения откройте файл с именем run.bat из папки, в которую вы извлекли содержимое загруженного корневого файла.
- Следуйте любым инструкциям на экране, которые вы получите после запуска этого файла.
Это должно сработать. Ваш Motorola Droid 4 теперь должен быть рутирован. Теперь вы можете использовать приложения, требующие root-доступа, изменять системные файлы, удалять вредоносное ПО и вывести свой телефон на новый уровень.
[via dan rosenberg]
Rooting your Android device will allow you to customize its software, extend its battery life, boost its memory, and install apps exclusive to rooted devices. You can root your Android 2.3.6 Gingerbread device using Kingo for Windows, or using One Click Root software for Windows or Mac OS X.
-

Select the option to download the Kingo app to your Windows-based computer.
- If using Mac OS X, skip to method two of this article and root your Android using One Click Root software.
-

-

Back up all personal data on your Android to Google’s server, your computer, or to another cloud storage service. All personal data will be erased from your device during the rooting process.
-

Tap on “Settings,” then tap on “About phone.”
-

Tap repeatedly on “Build number” until a pop-up message informs you that you’re now a developer.
-

-

Connect the Android device to your computer using a USB cable. Upon recognizing your device, Kingo will automatically search for and install the necessary updated drivers for your device.
-

Place a checkmark next to “Always allow from this computer” on your Android, then tap on “OK.”
-

Click on “Root” in the Kingo app. Kingo will automatically root your device, which may take up to several minutes. Your Android will be rebooted several times throughout the rooting process.
-

Click on “Finish” in Kingo when the app informs you rooting has been successful.
-

-

Select the option to download One Click Root to your computer.
-

-

Back up all personal data on your Android to Google’s server, your computer, or to another cloud storage service. All personal data will be erased from your device during the rooting process.
-

Tap on “Settings,” then tap on “About phone.”
-

Tap repeatedly on “Build number” until a pop-up message displays on-screen informing you that you’re now a developer.
-

Tap on “Developer options,” then place a checkmark next to “USB debugging.” This is required to allow One Click Root to root your Android.
-

Connect the Android device to your computer using a USB cable. Upon recognizing your device, One Click Root will automatically search for and install the necessary updated drivers for your device.
-

Place a checkmark next to “Always allow from this computer” on your Android, then tap on “OK.”
-

Click on “Root” in the One Click Root app. The application will automatically root your device, which may take up to several minutes. Your Android will be rebooted several times during the rooting process.
-

Click on “Finish” in One Click Root when the app informs you rooting has been successful.
-

-

Perform a hard reset on your Android if the device stops working after rooting is complete. Rooting is not guaranteed to work on every Android with 2.3.6 Gingerbread, and a hard reset will restore your device back to the original factory settings.
-

-

-

Ask a Question
200 characters left
Include your email address to get a message when this question is answered.
Root your Android device at your own risk. Rooting your device will void the manufacturer’s warranty, and could render your device inoperable if any mistakes are made during the rooting process.
[GUIDE/VIDEO] Root Gingerbread on your Incredible 2 (2. 3 ONLY!)
-
notluK
-
Aug 15, 2011
alternative browser
============================
Using the following guide we will gain S-OFF, install a custom recovery (ClockworkMod), and get Superuser access (Sexy); through use of Revolutionary.
The utility it was created by AlphaRev and unrevoked, all credit goes to them.
Consider donating to them if you feel so inclined, they do a lot for the community!
!!!!
Please realize that there are risks involved. Anything that happens to your phone, which includes but is not limited to; Bird Flu, Smallpox, and Anthrax exposure, is in no way anyone on this site’s responsibility, proceed with caution.
Also: I did all of this on a Windows machine, any Linux/Mac-dependent situations that I’ve missed feel free to fill in.
==============================
Before starting the process download these files:
==============================
2. Serial Number and Beta Key
Revolutionary will give you your device’s Serial number, on the page you downloaded Revolutionary there should now be a blue box, below the download links.
Select your OS, Device, HBOOT Version, and then input the Serial number and proceed.
You will be given a Beta Key you need to input in Revolutionary and then proceed.
3. Wait
Revolutionary should boot your phone into HBOOT a couple times.
After some time it should now read «-Revolutionary-» at the top of your HBOOT screen.
Revolutionary should ask you whether you’d like to flash ClockworkMod (You do).
4. Install Superuser and Reboot
After Revolutionary is done talking about Lemons and Lemonade you can scroll down (Volume) on the HBOOT screen to «Recovery» and select it (Power).
This should boot you into ClockworkMod
Scroll down and select to «install zip from sdcard»>»choose zip from sdcard» then select the «su-2.3.6…» zip file.
After it’s all done back out of the menus and reboot.
Check in your app draw for the «superuser» app to ensure you are rooted.
Congrats, you should now be rooted!
Have trouble with the guide? Either post your experience here or take a quick look at unrevoked’s Common Problems & Questions HERE.
Want to unroot? Check out this thread.
Last edited: Sep 21, 2011
Thanks for sharing the info. I’m really wanting to try this and get rid of bloat, but I think I’ll wait for a few other brave, and appreciated, souls to have success then I’ll jump in the pool. I’m also new to rooting HTC phones as I just came from Samsung. Think I want to read a little more to make sure I understand everything.
That is basically the steps I used, however CWM was not downloading so I had to flash manually, but that was fairly simple. I was rooted, s-off, backed up and CM7 installed in about an hour after the Revolution today. This phone is a beast when overclocked, but there is really no need to do it.
I’m having a little trouble understanding the directions on XDA…do you know if there is a more «layman’s friendly» how-to on AC?
Hold tight, just did it on my phone and writing out a guide right now!
Hold tight, just did it on my phone and writing out a guide right now!
No worries homie! I actually had no problems following your original instructions and am happily rooted. Obviously I didn’t wait. I just figured others would have the same confusions I did…especially with so many of us former Samsung users flooding these DInc2 forums.
Thanks for your help!
Maybe a stupid question, but this is permanent root right?
//drbg781 yes it is permanent root; i.e. root won’t go away after reboot.
Thanks…I was in the middle of a back-up before I had the chance to re-boot. What a day for us GB people!
To flash CWM manually we need these two:
1. Extract the contents of the first (the zip file) to somewhere easy to access. In my case I’ll use my desktop as an example, I placed the contents of «android-win-tools» on my desktop.
2. Now place the «cwm-x.x.x.x-vivow.img» file you downloaded on your desktop too.
3. Open command prompt/terminal. (Start > type «cmd’ under search and hit «Enter» on Windows) and navigate to your desktop. (More than likely just type «cd desktop», hit Enter and you’ll be there)
4. Leave command prompt open
5. Make sure your phone is off (battery pull ensures that for me).
6. Hold down Power and Volume Down, phone will start and bring up HBOOT, wait for sdcard checks to clear (weird green text).
7. Now plug the USB in to your computer and phone and press power button once.
«» text will change to «» and then «».. we’re in business.
8. Now in your command prompt/teminal type:
fastboot flash recovery cwm-4.0.1.4-vivow.img
(I shouldn’t have to say it, but if the numbers are different on your .img file, use your’s not mine.)
Hit enter.
9. Magic pixies will rush CWM to your phone, bringing all it’s recovery goodness.
10. Unplug USB, hit Power once, then wait again for that green text to flash, now move down to «Recovery» and hit the Power button.
Last edited: Aug 16, 2011
Thank You! One of the best guides I’ve used. Simple and worked like a charm. Finally Free!
Sent from my ADR6350 using Tapatalk
Sent from my ADR6350 using Tapatalk
This is specifically for 2.3.3 as noted in my original post.
Just shutting down should be fine if Fastboot is disabled. ( Settings > Power )
How do you unroot your phone from 2.2?
Stupid question but how hard would it be to go back to stock everything just in case something hardware based goes wrong and I need to return the phone?
Stupid question but how hard would it be to go back to stock everything just in case something hardware based goes wrong and I need to return the phone?
I was wondering the same thing actually…
Similar threads

[ROOT][CWM][GUIDE][GINGERBREAD] Rooting the Samsung Epic 4g
-
-
Jan 22, 2012
alternative browser

Last edited: Jan 22, 2012
Q. Is this the same method as EI22 Gingerbread?
A. Yes its the same method used currently to root EL30. Once done you can move onward to any new EL30 kernels or flash to custom EL30 based ROMs.
Q. What is rooting going to do for me?
A. In short, if you have come this far you probably have a general idea of what it will do. It will allow you to unlock areas of your device otherwise locked by default from Google/manufacture & carriers. Once it is applied you can flash custom ROMs (stock OS modified), kernels, themes and other modifications. Other well known options are free wireless tethering using your device and also bloatware removal.
Last edited: Jan 24, 2012
Make sure your battery is fully charged before attempting anything in this thread. *** NEVER PULL YOUR CABLE WHILE ODIN IS FLASHING ***
If your phone is not being recognized by Odin, try the following.
— Use a different USB computer port
— Use a different USB cable
— Pull your battery out of your device and leave it out.
— Plug in your device via USB cable and connect it to your computer.
— Then boot into Download Mode (hold 1 on physical keyboard and press power).
— Run the Odin package.
— When completed and you get the Green PASS, you can pop your battery back in and then reboot the phone and you should be good to go.
Note: Some devices have given some trouble and you have to attempt this twice to get it to work. Also make sure all anti virus software is off/disabled. One last option is remove your sdcard if everything else fails.
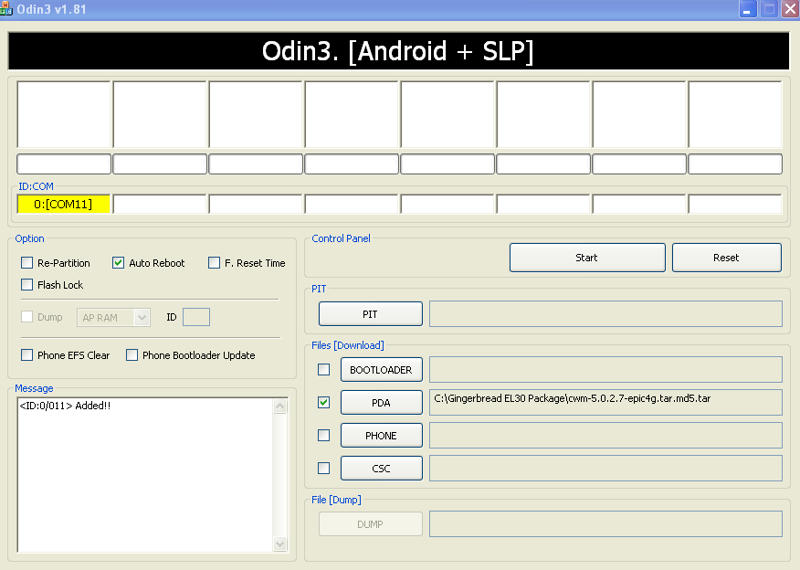
1. Open Odin 1.85
2. Check only Auto Reboot as show in the screenshot below.
3. Goto the PDA box on the right side. Click the PDA button and navigate to file on your hard drive and select it. Check the PDA box (check box) (Shown below)
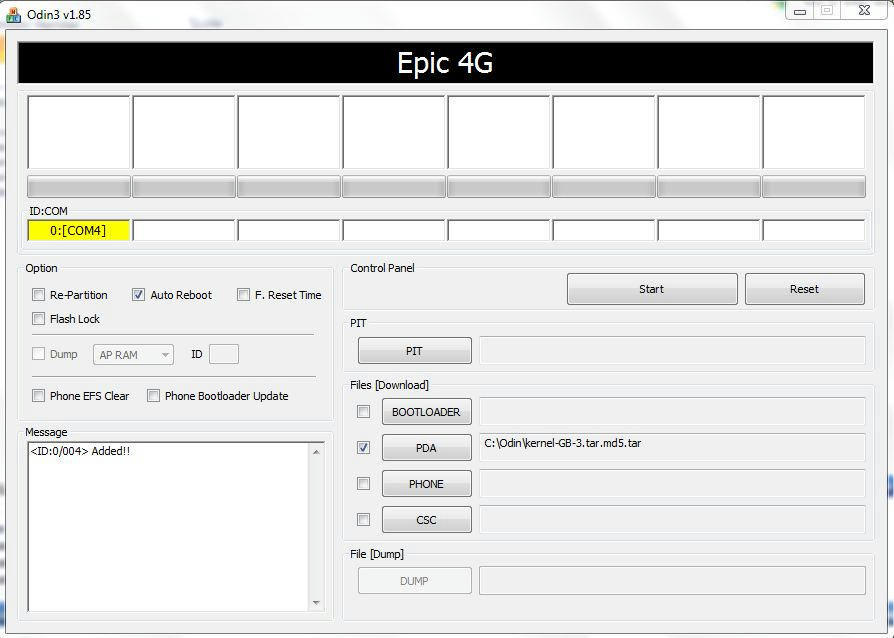
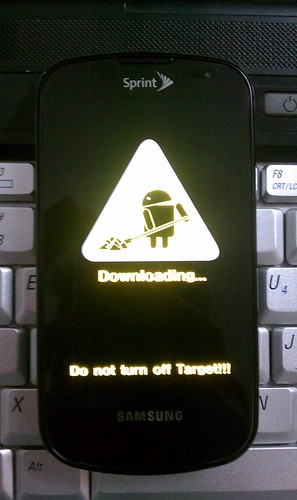
4. Power off your Epic 4g, once it is completely off open your physical keyboard and press and hold the » 1 » key and continue to hold while pressing POWER. This will boot you into Download Mode within a few seconds. Black screen with yellow graphics/print of Android guy shoveling…
5. Now take your USB cable and connect it to your computer and then plug it into your device.
6. You should see a YELLOW box light up on the upper left hand side of Odin that says COM:XXX. Ignore the number it varies, this signals you have made a connection to Odin and are ready to go. Problems connecting see trouble shooting at end of this tutorial.
7. Double check in Odin you have only Auto Reboot checked, and the file in the PDA SLOT.
8. Press START.
9. This will flash a custom kernel to your device and should only take about 10 seconds or so… Your device will automatically reboot when finished.
[/INFO]
[INFO]:: Step by Step Procedure Part 2 (Flashing CWM «ClockWorkMod» Recovery) ::
This will install ClockWorkMod 5.0.2.7 which does have ROM Manager support.
1. Power off your device, and boot into Download Mode as we did in Part 1, step 4.
2. Open Odin and make sure only Auto Reboot is checked/selected.
3.Goto the PDA box on the right side. Click the PDA button and navigate to file in the PDA SLOT and check PDA box next to it.
4. Connect your device once again via USB cable and verify your connected to Odin by looking for the YELLOW COM box lite up.
5. Everything above is good then press START
6. This will take less than a minute to complete and automatically reboot. This will place CWM (ClockWorkMod) recovery on your device in place of the stock recovery.[/INFO]
[INFO]:: Step by Step Procedure Part #3 (Flashing SU «SuperUser or Root» access in CWM) ::
Stock EL30 Kernel
Last edited: Jan 24, 2012
The developers that have hung in there for the Epic 4g community.
DKRockstar
chris41g
koush
mkasick
qbking77 (thanks for the videos and explanation once again. )
Anyone else associated with the development of CWM 5.0.2.7, and the rooting process of Gingerbread.
Last edited: Jan 24, 2012
quick question. What benefit do i get from the EL30 kernel?
None really at this time. I believe its stock with root.
Give it a few days and i’m sure there will be a few kernels to play with.
Thanks for the help.
Oh one more question. When someone says «oh just flash the ABC_ROM» or «just flash that zip file» what does that mean? Is that going into CWM and doing a «flash from SD card»?
OK, so I’m really confused now. I’ve read a bunch of stuff and know enough to be dangerous, but not enough to get my self out of trouble (if I get there).Thanks for the help.
Oh one more question. When someone says «oh just flash the ABC_ROM» or «just flash that zip file» what does that mean? Is that going into CWM and doing a «flash from SD card»?
First, I apologize for the missing SU file.. Can’t believe I missed that. I will fix that immediately.
Second, the 5.0.2.7 CWM Flashable when applied by flashing in your current CWM will update it to official CWM 5.0.2.7.
Third. Yes when it says to flash the ABCROM.zip file that means exactly that, to boot into CWM and select Install from SDCARD.
As far as updating to the EL30 kernel that is provided its really of no use at this moment other than to obtain root access on official Gingerbread EL30.
So I can just move the CWM.zip to the SD card and use CWM to update itself. (sounds weird).
Same for the kernel, copy the zip over and use CWM.
As to moving to the new Kernel I thought it would be good the be on the latest update. The no-CIQ and GPS fix would be welcome features. Of course I’m thinking of jumping to a custom ROM like CleanGb which already has GPS and no-CIQ baked in.
whats the opinon? Update to EL30 or just go with a custom ROM?
first off thank you for your quick response and overall thanks for all your hard work putting this together and helpings us noobs. Your instructions for the EI22 root were spot on and easy to follow.So I can just move the CWM.zip to the SD card and use CWM to update itself. (sounds weird).
Same for the kernel, copy the zip over and use CWM.As to moving to the new Kernel I thought it would be good the be on the latest update. The no-CIQ and GPS fix would be welcome features. Of course I’m thinking of jumping to a custom ROM like CleanGb which already has GPS and no-CIQ baked in.
whats the opinon? Update to EL30 or just go with a custom ROM?
My personal opinion, your already rooted and going to update your CWM. Might as well just jump on a custom ROM. If you prefer wait a few days and grab the EL30 versions of your favorite ROMs as they will all be updated very soon.
Okay, I think I might have «bricked» my phone. I followed all the instructions and I tried transferring the kernel. It failed so I just tried rebooting the phone. Now the only thing it will do is show a picture with a cell phone, then 2 dots, then a triangle with exclamation point, then 2 dots, then a computer. This is obviously just a black and white little icon/picture. I am trying to take a picture, but am VERY unsuccessful at this point. Should I be scared?
Pull your battery first.
Next was this when you were using Odin that you got a fail?
su-3.0-efgh-signed.zip (Place this on your sdcard of your device)
link is dead…Looks llike it was mentioned a few days ago…..not sure if it was fixed and down again…
:'(
nevermind, i found the new link. thanks for making this so easy for a newb like me!
Yes, I can’t get that .zip file. How necessary is that?
Thank you for the link update.
the link to the su-3.0-efgh-signed.zip file is gone. is there any way i can still download that file?…nevermind, i found the new link. thanks for making this so easy for a newb like me!
Updated the OP with the new link information on SU …
Similar threads
Важно знать
- USB Debugging (Отладка USB?) должно быть включено
- Карта памяти должна присутствовать и быть отформатирована
- Программа должна быть установлена только в память устройства!
- Получение рута не должно занимать более 10 минут. Тем не менее, рут может быть получен, так что после 15 минут можно спокойно вытаскивать батарею. Если рут не получен в течение 10 минут и Вы владеете английским, то следуйте указаниям из первого поста в соответствующей теме.
- Всегда перезагружайтесь между попытками получения рута!
- Программа может получить (временный) рут, который, однако, не сохраняется из-за различных ограничений разработчика, таких как S-ON на HTC Desire
- Gingerbreak не следует использовать для получения временного рута без перезагрузки, т.к. эксплоит взламывает vold (Volume Daemon?) – использование телефона в таком режиме небезопасно. Если после перезагрузки рут не остался – у вас (всё ещё осталась) проблема.
[GUIDE/VIDEO] Root Gingerbread on your Incredible 2 (2. 3 ONLY!)
-
notluK
-
Aug 15, 2011
alternative browser

1.whats a good way to back up my stuff before i try this?
2. can i revert to stock unrooted, and if so how do i do it?
3. should i uninstall any launcher apps like LauncherPro before hand?
UPDATE: i went for it and cant get past the «plug in your phone» step. maybe im an idiot but it keeps popping up a Wizard window and the damn Verizon page in my browser. and then Rev never finds my phone. what do i do?
Last edited: Aug 25, 2011
Did you install the drivers and uninstall htc sync? About the only thing I can think if since the wizard is popping up
So I haven’t done any more. Thanks for the reply.
How do I find sync if I have it?
sent from my DInc2 with Tapatalk
I found the drivers and installed them. I couldn’t find htcsync on my machine. Then I looked at the clock and went to sleep.So I haven’t done any more. Thanks for the reply.
How do I find sync if I have it?
sent from my DInc2 with Tapatalk
In the OP, did you click on the «HERE» to install the drivers mentioned?
Using the following guide we will gain S-OFF, install a custom recovery (ClockworkMod), and get Superuser access (Sexy).
If you did, then you should see the HTC drivers listed in your add/remove software screen.
sent from my DInc2 with Tapatalk
Cool I didn’t get that far. But I do have the drivers installed now.sent from my DInc2 with Tapatalk
It’s very important to read through all the steps several times before giving this a try. it makes the process lots easier.

Worked perfectly, now what is the best way to get rid of all the verizon bloat?? Titanium and freeze it or delete it?

This worked great!! Thanks for posting and updating.
Just switched over from the fascinate so I know how much of the process works, but HTC is kind of a totally different ball game when it comes to rooting
NVM! got it now to just get rid of all this bloatware!
Last edited: Aug 30, 2011
Completely new to Rooting, I just upgraded to the HTC Incredible 2 the other day, coming from a Motorola Droid 2 Global.
Time to start exploring what I can do with a rooted phone, thanks to everyone!
It doesn’t really matter which way I try, I can’t get my computer to recognize my phone. Each time the process gets stuck when the command prompt says «Waiting for Device» — Any suggestions? Rooted other phones before, but have never had this much trouble.
UPDATE: was able to book into Hboot and get into recovery (Clockwork). I created a backup OK, so it appears we are fine, just don’t have the app listed and no UI access to it, we only can use the recover mode (which is used most of the time anyway).
Ok i got the recovery installed(clockworkmod) but superuser will not work? I have tried every update i can find on the internet and none off them work. I have been flashing updates and tries downloading superuser from several sites and i get the same message everytime! I downloaded superuser from the market, then tried the new update from androidsu.com and still days same error mssg. that no files found that there is a error. where can i find the correct update i am using the 2.3.6 update from android su.com????????????????????????
Try a few of the older superusers, anything 2.3.x essentially.
Maybe even try flashing CWM again if that doesn’t work.
Can you post the exact error message if you still haven’t resolved the issue?
Working on an unrooting walkthrough and videos to accompany all guides.
Working on an unrooting walkthrough and videos to accompany all guides.
Hell yeah, appreciate everything you do for us new guys!
Similar threads
Как программа работает?
- APK устанавливает необходимые файлы в нужное для работы скрипта место
- APK запускает эксплоит
- Эксплоит пытается получить рут
- В случае удачи раздел /system перемонтируется в режиме чтение-запись, затем запускается установочный скрипт
- Установочный скрипт пытается установить в систему бинарный файл su и superuser APK, а затем осуществить перезагрузку
About this article
Thanks to all authors for creating a page that has been read 51,971 times.
")


")