

I want to add some root CAs that doesn’t come with the default firefox on Ubuntu, but I don’t know how.
I tried adding them to the local certificates with certutil, but it didn’t work. It messed up my certificates database.
$ certutil -A -d .mozilla/firefox/kek3dogy.default/ -i /usr/local/share/ca-certificates/FNMT_ACRAIZ.crt -n "Certificado Raiz FNMT" -t "TCu,Cuw,Tuw"$ certutil -L -d .mozilla/firefox/kek3dogy.default/
Certificate Nickname Trust Attributes SSL,S/MIME,JAR/XPI
Go Daddy Secure Certification Authority ,,
VeriSign Class 3 Secure Server CA - G3 ,,
VeriSign Class 3 Extended Validation SSL CA ,,
DigiCert High Assurance CA-3 ,,
GlobalSign Domain Validation CA - G2 ,,
GeoTrust SSL CA ,,
StartCom Class 2 Primary Intermediate Server CA ,,
Google Internet Authority ,,
Certificado Raiz FNMT CT,C,c
USERTrust Legacy Secure Server CA ,,
HP Jetdirect 2B0EAD20 ,,
Akamai Subordinate CA 3 ,,
VeriSign, Inc. ,,
Thawte SGC CA ,,
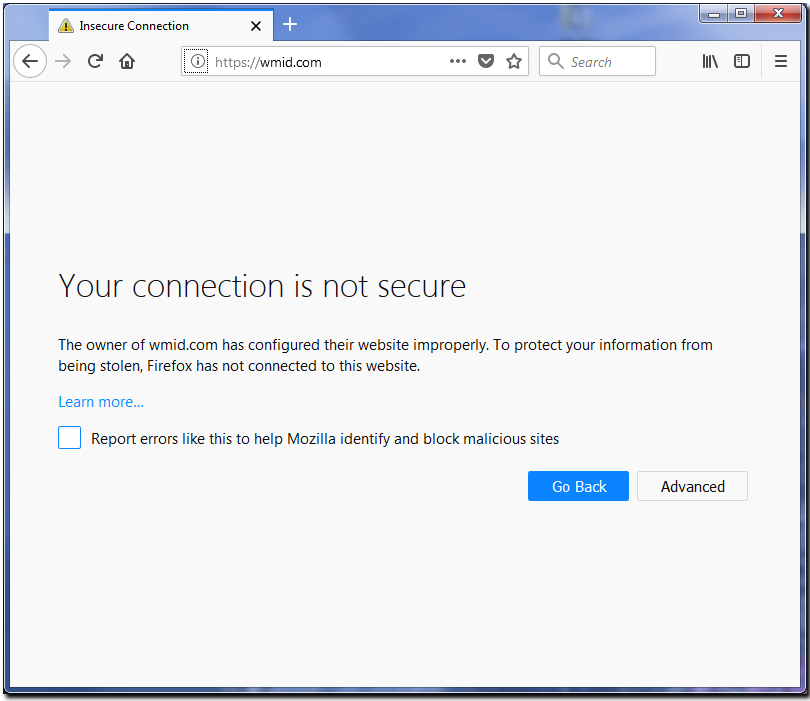
VeriSign Class 3 Secure Server CA - G2 ,,The certificate won’t show up on Firefox. I tried this several times, even deleting the profile, and it showed up once on the Firefox interface, but completely empty.
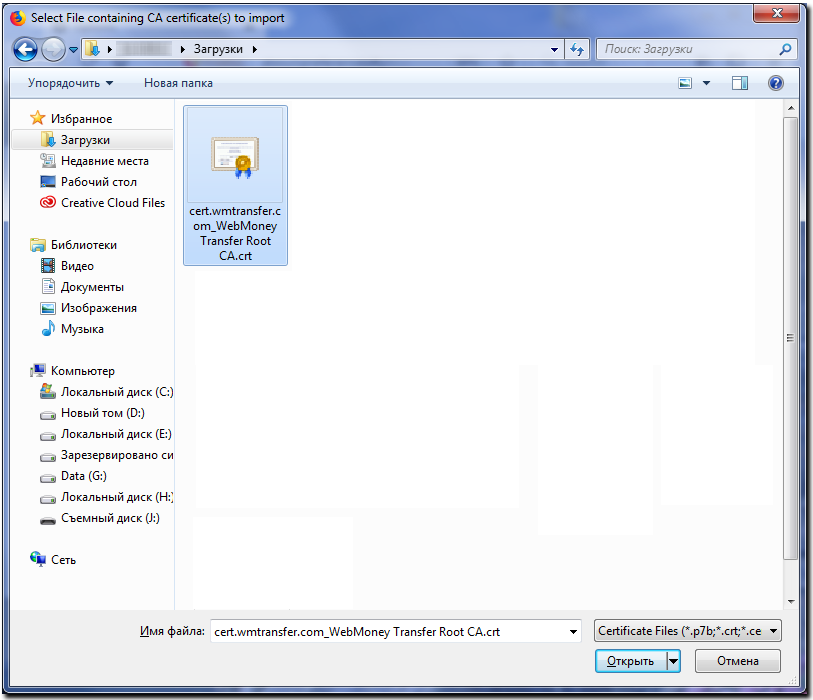
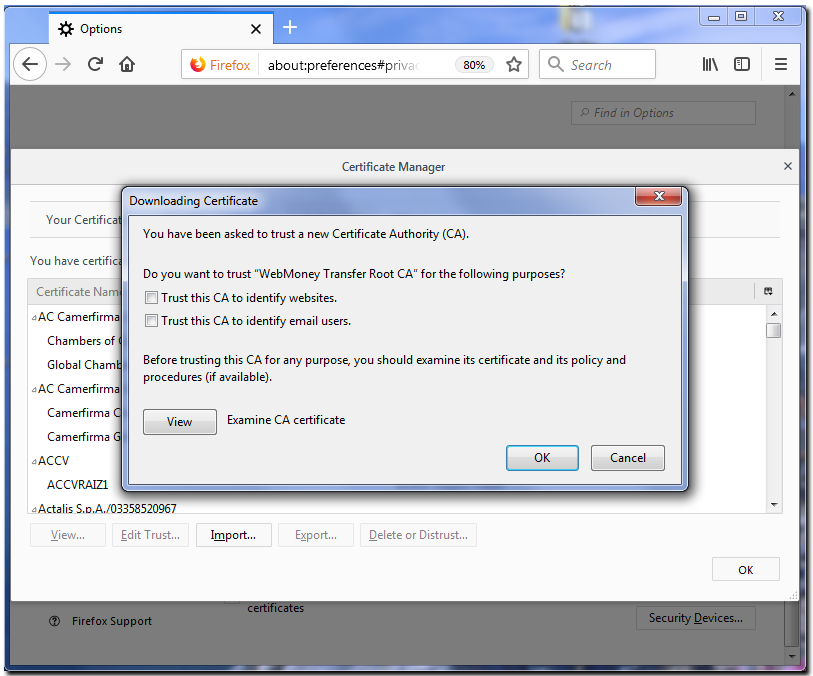
To do this download the certificate and save it to your hard disk or launch it from the current place.
If you have launched the certificate file then you will see the «Downloading Certificate» window:#1 (see Next).
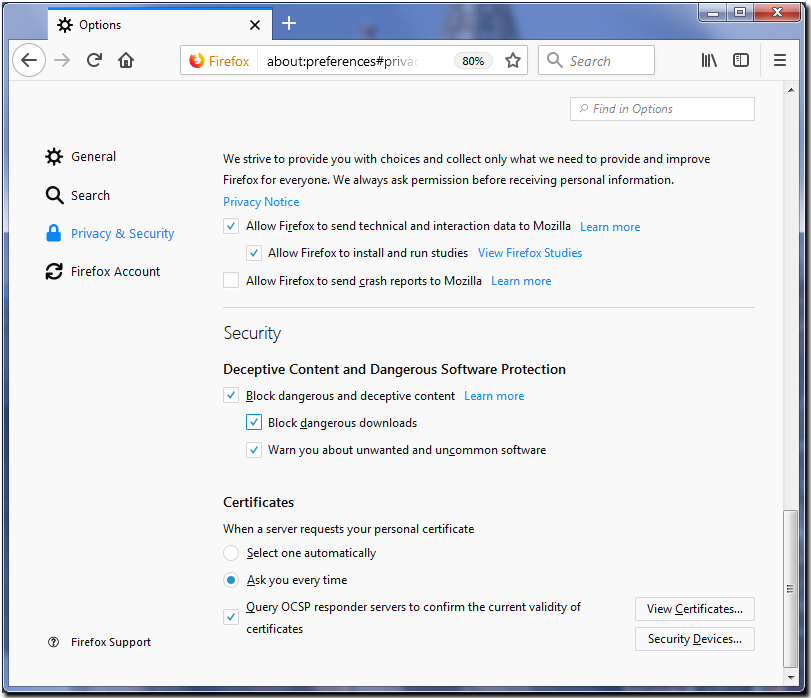
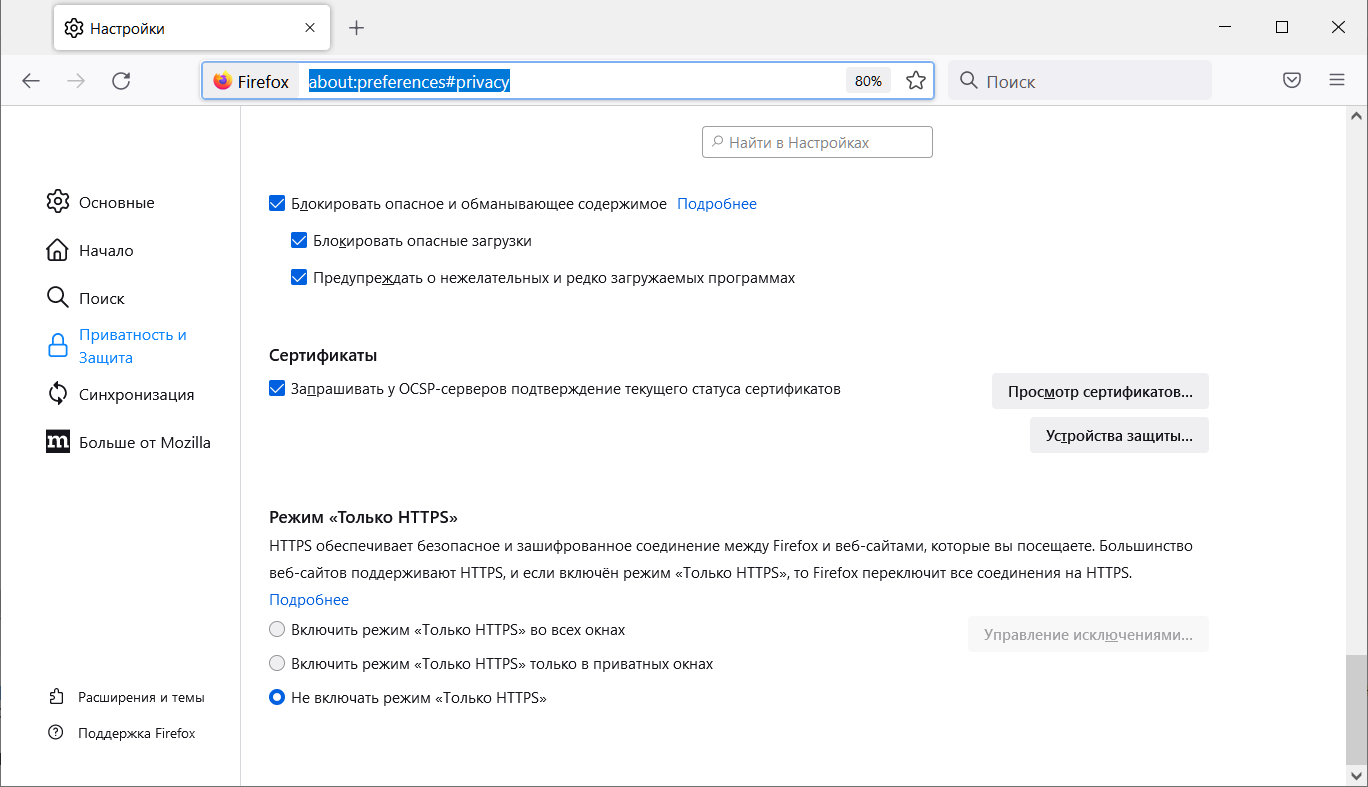
If you have saved the certificate to the hard disk, then go to the Options menu and select Privacy&Security. Go to the Sertificate section and click the «View certificates» button.
Find the saved certificate file on the hard disk and click the «Open» button.
In the Downloading Certificate window it is necessary to select for what purposes you trust the certificate.
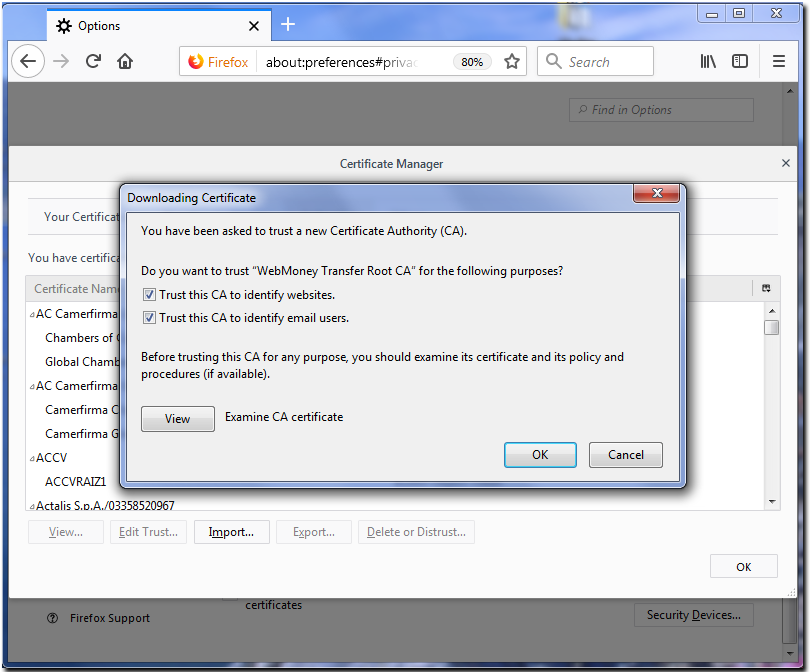
Select all of the checkboxes presented and click the «OK» button.
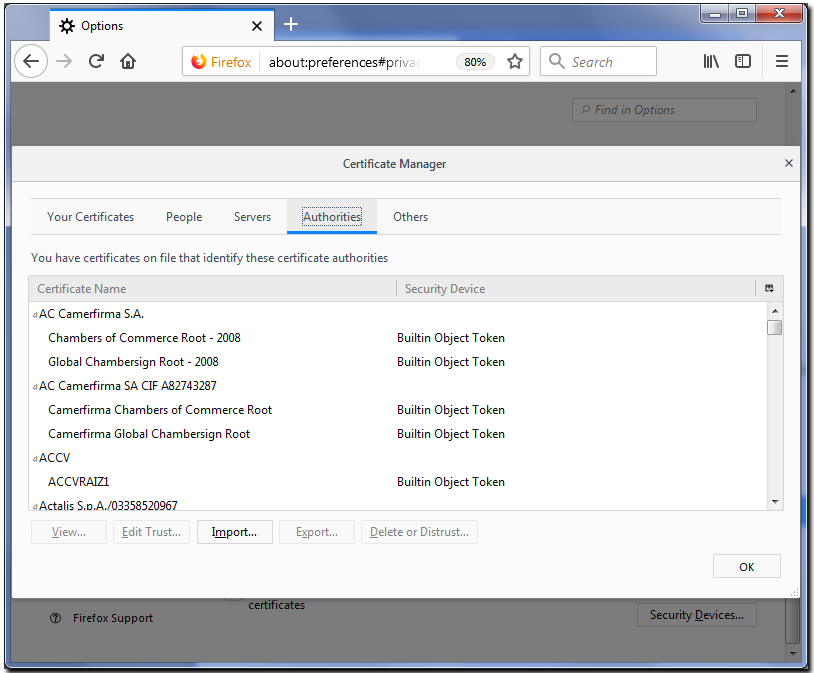
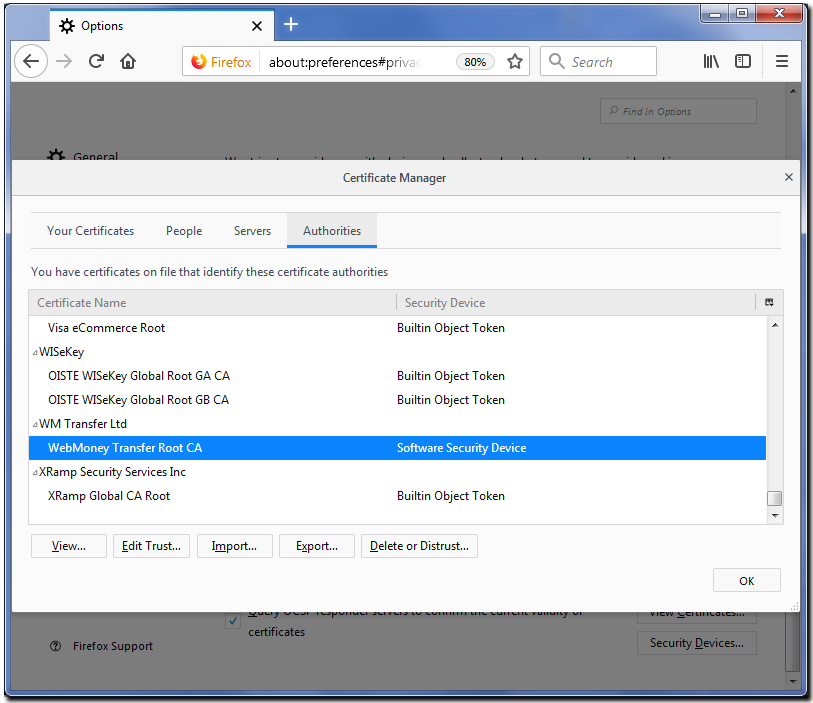
To check whether you did everything correctly in the Certificate Manager window select the Authorities tab, and at the end of the list you should be able to find the root certificate you have just installed.
Select it and click on «View».
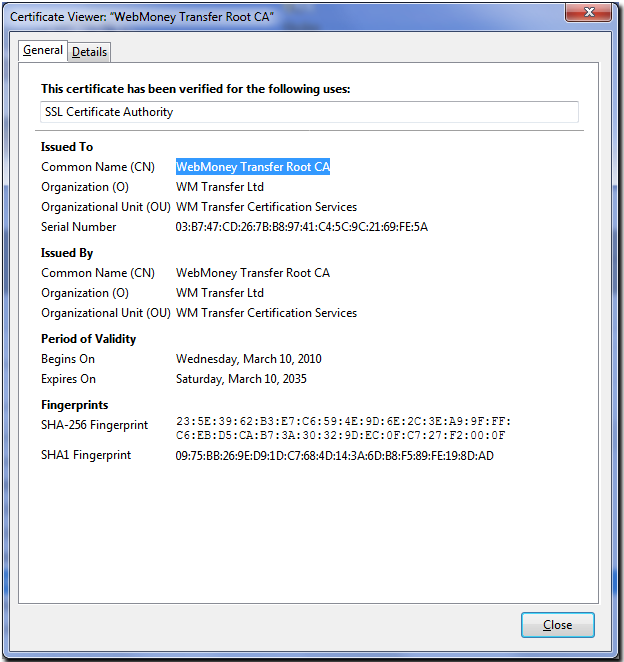
Verify that the certificate is valid and its validity period ends 03/10/2035
Close all windows and check that the certificate is working by establishing a secure connection with the website.
See also: Configuring Mozilla Firefox
Registering WM Keeper WebPro in Mozilla Firefox
Keeper WebPro personal certificate export in Mozilla Firefox
Keeper WebPro personal certificate import in Mozilla Firefox
- Go to the Windows CA server, in my case https://ca.example.com/certsrv/.
- Select ‘Download a CA certificate, certificate chain, or CRL.
- Select DER and ‘Download CA certificate’
- This will download a certnew.cer file
- Convert the certificate to the proper format with openssl. We can do this step on either Windows or Linux, in the sample below we will use our Windows system:
- We must now get the contents of this ca-example-com.crt file copied to our Linux VM. At this point the certificate is in a text format, so I chose to create a new file and paste in the contents. For example:
- We must now change the permissions of the file such that the owner has read/write and all other users can read. We will do this with the following command:
- Now that the certificate is in the proper location, format, and permissions, we’ll run the update process:
From here we could test and confirm that our certificate is properly installed on the system by trying to access a site using this cert. For example: wget https://vc1.example.com
This should no longer return text similar to Unable to locally verify the issuer's authority.
Next we need to update Firefox to trust this root certificate as well. We will do this by creating a custom Firefox policy on the system. To begin we will create a policy file with a text editor, for example:sudo nano /usr/lib/firefox/distribution/policies.json
The next time you start Firefox, this root certificate will be trusted and you should no longer receive warnings when browsing your internal sites.
This entry was posted in Lab Infrastructure. Bookmark the permalink.


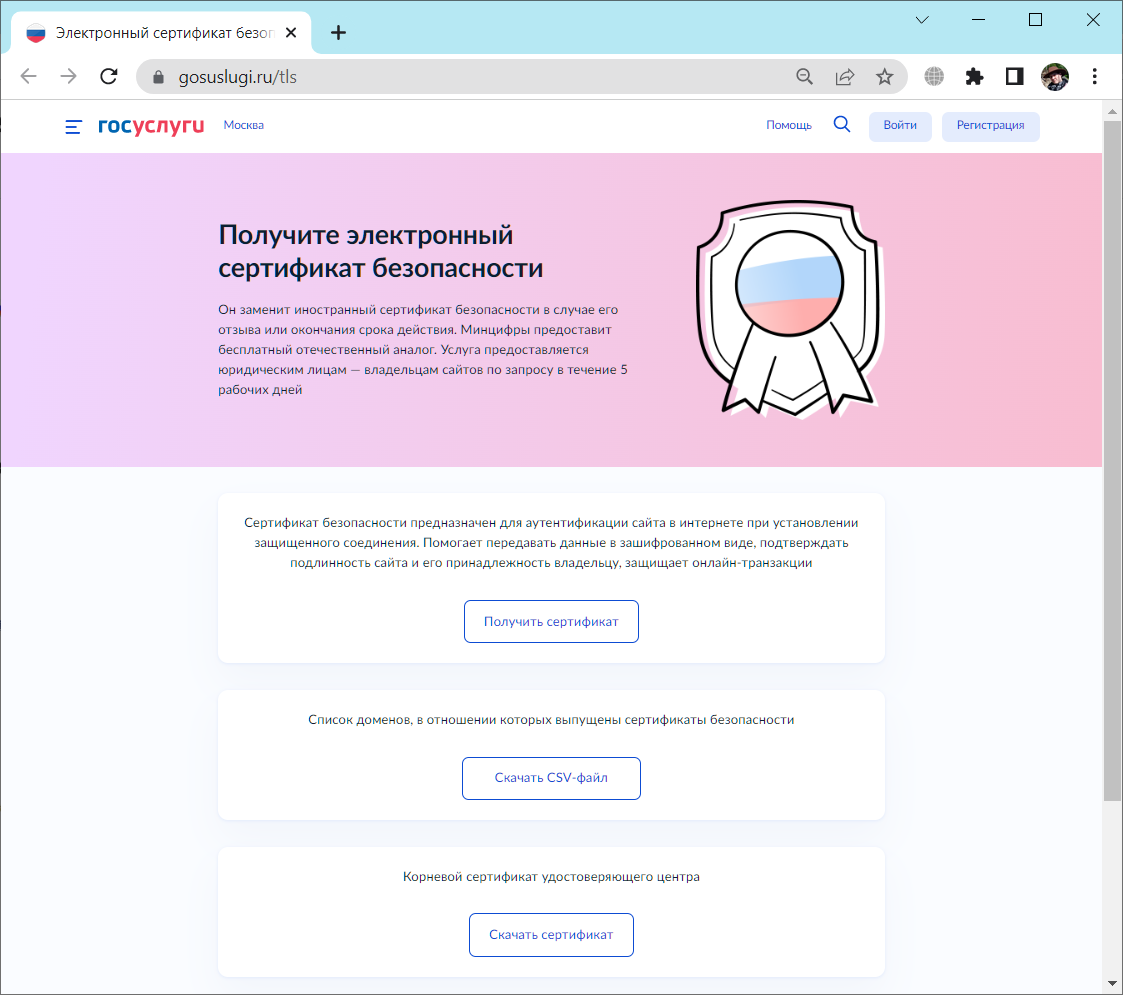
В связи с санкциями многие иностранные сервисы отказываются выдавать или продлевать сертификаты безопасности для сайтов в домене RU. Возможно, это просто связано с невозможностью произвести оплату за сертификат. К тому же сохраняется риск отзыва уже выданных сертификатов, непонятно, правда, зачем их отзывать, если они сами протухнут через год.
В итоге многие учреждения переходят на использование сертификатов, выдаваемых Министерством цифрового развития, связи и массовых коммуникаций Российской Федерации. Сертификаты пока раздают только юридическим лицам и процесс этот небыстрый. На данный момент выпущено 4883 сертификата.
И вот тут возникает маленькая, но очень большая проблема. Корневой сертификат Минцифры не поддерживается обычными браузерами, сайты с таким сертификатом не будут открываться.
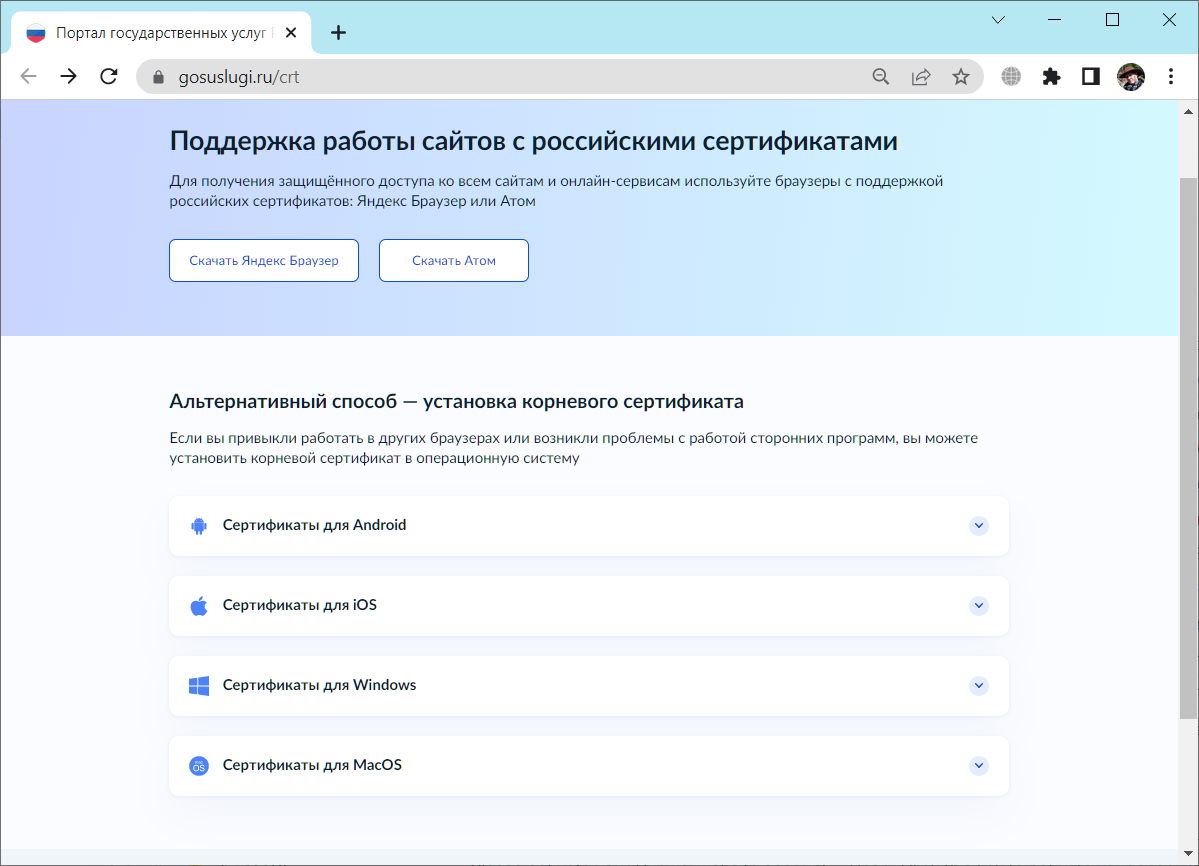
- Настройка российских сертификатов в разных ОС
- Устанавливаем корневой сертификат Russian Trusted Root CA в Windows
- Устанавливаем корневой сертификат Russian Trusted Root CA в Mozilla Firefox
- Ещё
- Linux
- System (Debian / Ubuntu)
- System (Fedora)
- Browser (Firefox, Chromium, …)
- Windows
- System
- Mozilla Firefox
- Installing the Certificate
- Install a Certificate Authority on Ubuntu
Настройка российских сертификатов в разных ОС
Windows — поддержка работы сайтов с российскими сертификатами
MacOS — поддержка работы сайтов с российскими сертификатами
iOS — поддержка работы сайтов с российскими сертификатами
Android — поддержка работы сайтов с российскими сертификатами
Red Hat Enterprise Linux — поддержка работы сайтов с российскими сертификатами
Устанавливаем корневой сертификат Russian Trusted Root CA в Windows
Качаем корневой сертификат здесь:
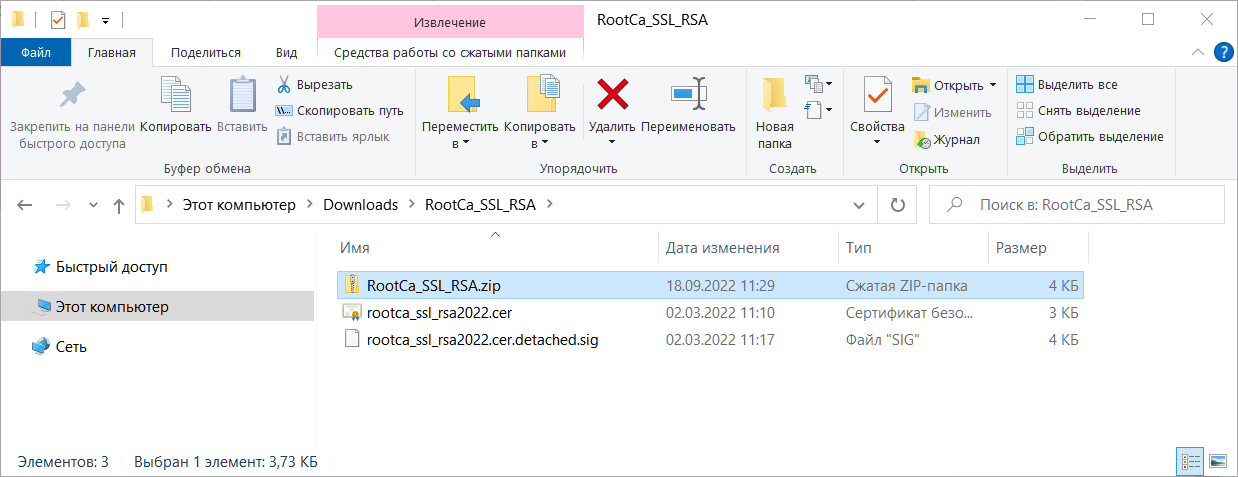
Распаковываем. Внутри два файла:
- rootca_ssl_rsa2022.cer — корневой сертификат.
- rootca_ssl_rsa2022.cer.detached.sig — отделённая подпись корневого сертификата, она нам не понадобится.
Нажимаем правой кнопкой на rootca_ssl_rsa2022.cer, «Установить сертификат».
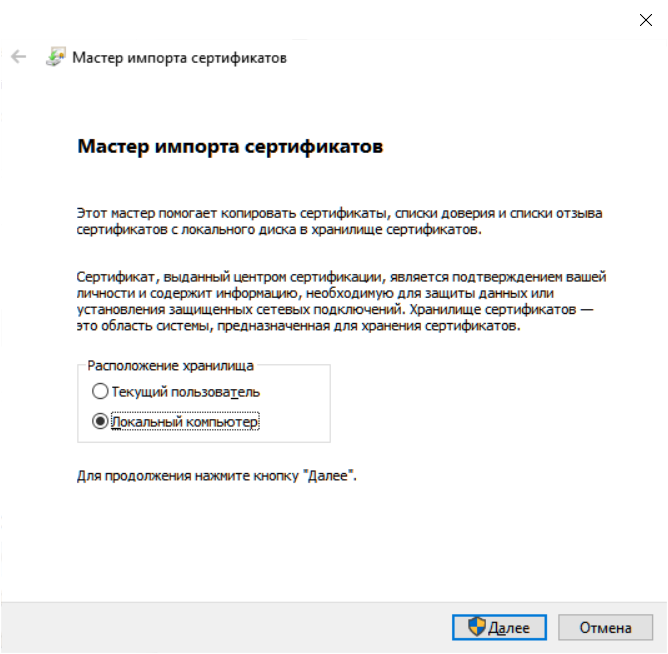
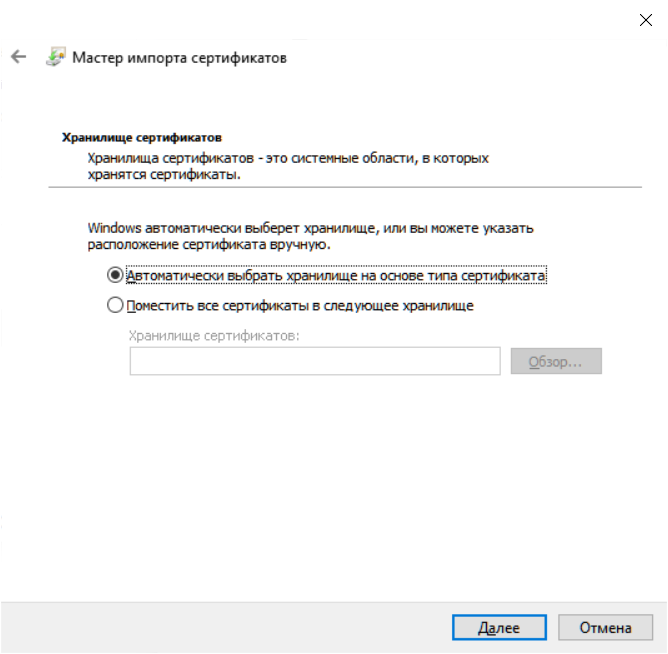
Для применения сертификата для всех пользователей компьютера выбираем «Локальный компьютер», Далее.
OK. Перезагружаем компьютер.
Если посмотреть в оснастку сертификатов локального компьютера, то можно увидеть в доверенных корневых центрах сертификации новый сертификат Russian Trusted Root CA.

Сайты с сертификатами выданными Минцифры теперь будут открываться во всех браузерах. Кроме Mozilla Firefox, у этого браузера своё хранилище сертификатов и корневой сертификат нужно добавлять уже через настройки браузера.
Устанавливаем корневой сертификат Russian Trusted Root CA в Mozilla Firefox
Запускаем Mozilla Firefox. Открываем настройки безопасности.
about:preferences#privacy
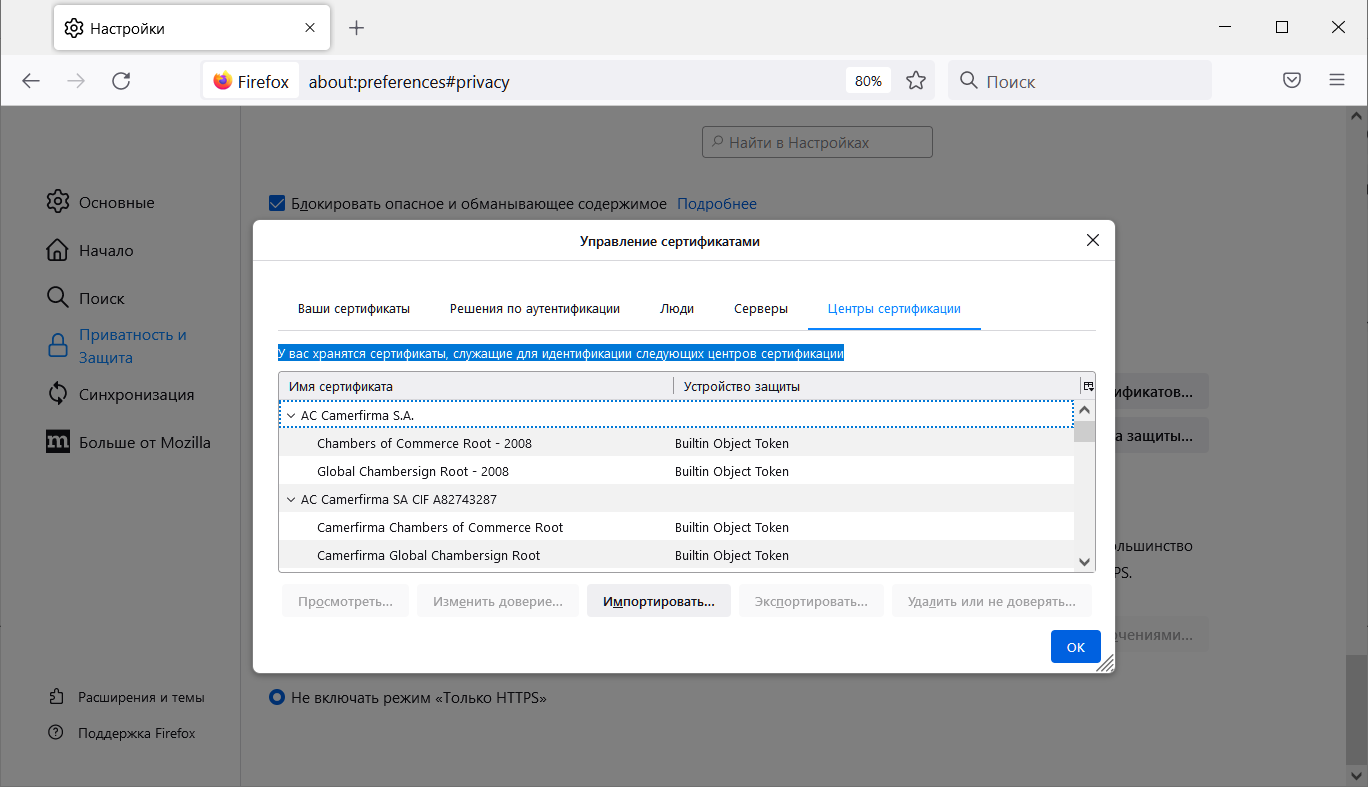

Устанавливаем обе галки для доверия. OK.
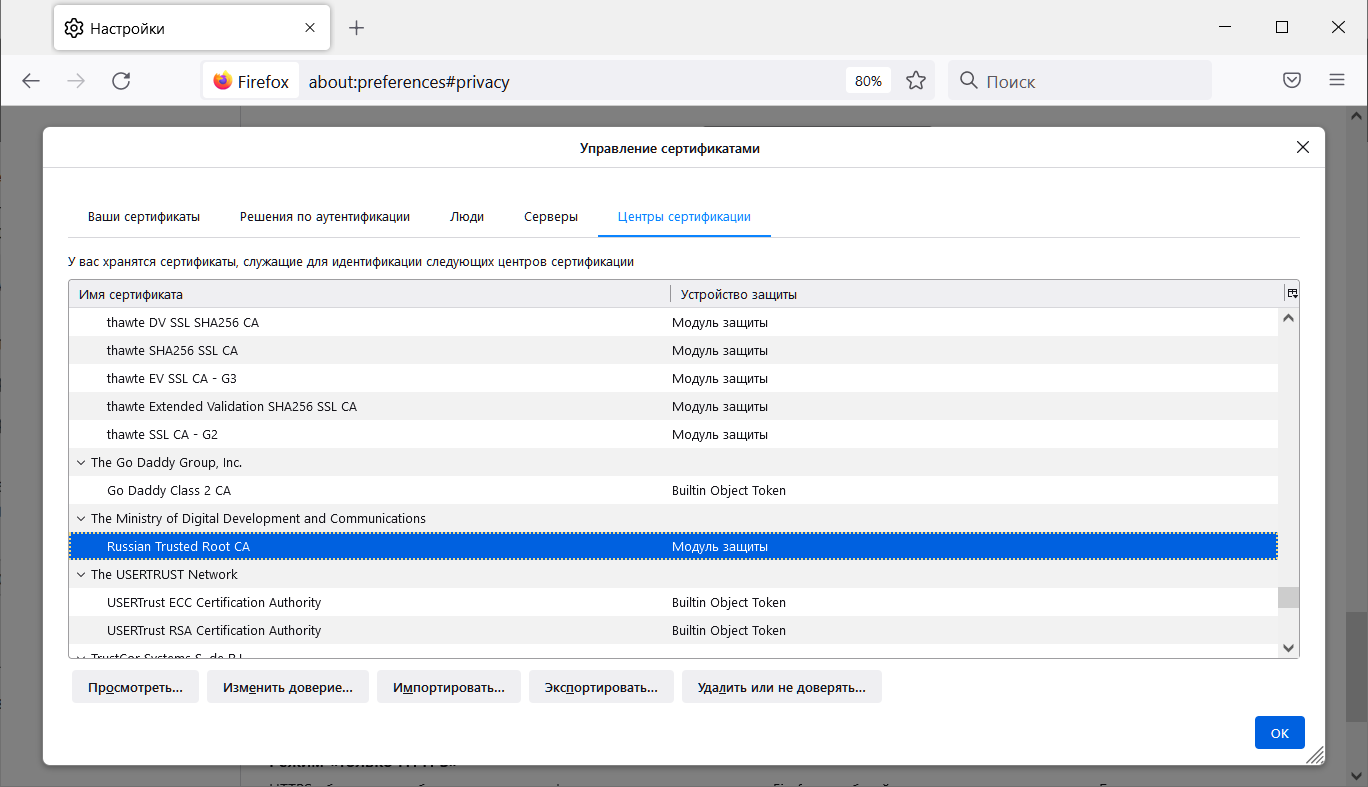
Сайты с сертификатами выданными Минцифры теперь будут открываться в браузере Mozilla Firefox.
Ещё
Сертификаты и инструкции по установки для Android, iOS, MacOS и Windows можно найти здесь:
Can anyone point me to a good tutorial on installing a root certificate on Ubuntu?

55 gold badges76 silver badges81 bronze badges
asked Oct 28, 2011 at 18:01

sudo mkdir /usr/local/share/ca-certificates/extraCopy the CA
.crtfile to this directory:sudo cp foo.crt /usr/local/share/ca-certificates/extra/foo.crtsudo dpkg-reconfigure ca-certificatesTo do this non-interactively, run:
sudo update-ca-certificates
In case of a .pem file on Ubuntu, it must first be converted to a .crt file:
openssl x509 -in foo.pem -inform PEM -out foo.crtOr a .cer file can be converted to a .crt file:
openssl x509 -inform DER -in foo.cer -out foo.crt
answered Jan 12, 2012 at 12:37

2 gold badges15 silver badges6 bronze badges
sudo cp foo.crt /usr/local/share/ca-certificates/foo.crtthen, update CA store
sudo update-ca-certificatesThat’s all. You should get this output:
Updating certificates in /etc/ssl/certs... 1 added, 0 removed; done.
Running hooks in /etc/ca-certificates/update.d....
Adding debian:foo.pem
done.
done.
No file is needed to edit. Link to your CA is created automatically.
Please note that the certificate filenames have to end in .crt, otherwise the update-ca-certificates script won’t pick up on them.
This procedure works also in newer versions: manuals.

answered Nov 15, 2013 at 17:44

Clarification between update-ca-certificates and dpkg-reconfigure ca-certificates and why one works and the other does not!!
update-ca-certificatesorsudo update-ca-certificateswill only work if/etc/ca-certificates.confhas been updated./etc/ca-certificate.confis only updated once you randpkg-reconfigure ca-certificateswhich updates the certificate names to be imported into/etc/ca-certificates.conf.
This is stated in the header of the /etc/ca-certificates.conf file:
# This file lists certificates that you wish to use or to ignore to be
# installed in /etc/ssl/certs.
# update-ca-certificates(8) will update /etc/ssl/certs by reading this file.
#
# This is autogenerated by dpkg-reconfigure ca-certificates. <=======
# Certificates should be installed under /usr/share/ca-certificates
# and files with extension '.crt' is recognized as available certs.
#
# line begins with # is comment.
# line begins with ! is certificate filename to be deselected.
#
mozilla/ACCVRAIZ1.crt
mozilla/AC_RAIZ_FNMT-RCM.crt
mozilla/Actalis_Authentication_Root_CA.crt
mozilla/AddTrust_External_Root.crt
...
As you can see, the format in /etc/ca-certificates.conf is <folder name>/<.crt name>
sudo mkdir /usr/share/ca-certificates/extraCopy the .crt file to this directory:
sudo cp foo.crt /usr/share/ca-certificates/extra/foo.crtAppend a line to
/etc/ca-certificates.confusing<folder name>/<.crt name>:echo "extra/foo.crt" | sudo tee -a /etc/ca-certificates.confUpdate certs non-interactively with sudo update-ca-certificates
$ sudo update-ca-certificates ... Updating certificates in /etc/ssl/certs... 1 added, 0 removed; done.

answered Jul 19, 2019 at 12:23

6 silver badges13 bronze badges
In most cases running an own CA (certification authority) is not advisable. But there are exceptions: If you want to secure internal services of your company, using your own CA might be necessary. During my employment at ADITO Software GmbH I created a tool for X.509 certificate management. The root certificate of my tool had to be imported into every PC of the company. Unfortunately there are some pitfalls which I did not expect, but after some research I figured out how to import the new CA to Linux- and Windows PCs and to every major webbrowser.
Linux
System (Debian / Ubuntu)
Installing the root certificate on a Linux PC is straight forward:
sudo mkdir /usr/local/share/ca-certificates/extra
sudo cp root.cert.pem /usr/local/share/ca-certificates/extra/root.cert.crt
sudo update-ca-certificates
After these steps the new CA is known by system utilities like curl and get. Unfortunately, this does not affect most web browsers like Mozilla Firefox or Google Chrome.
System (Fedora)
Setup on Fedora Linux is a bit different:
sudo cp root.cert.pem /etc/pki/ca-trust/source/anchors/
sudo update-ca-trust
Browser (Firefox, Chromium, …)
Manual setup of your certificate is also possible via GUI, e.g. in Firefox: “Settings” => “Privacy and Security” => “Show certificates” => “Certificate authorities” => “Import” (Similar in Chromium)
sudo apt install libnss3-toolsThis little helper script finds trust store databases and imports the new root certificate into them.
#!/bin/bash
### Script installs root.cert.pem to certificate trust store of applications using NSS
### (e.g. Firefox, Thunderbird, Chromium)
### Mozilla uses cert8, Chromium and Chrome use cert9
###
### Requirement: apt install libnss3-tools
###
###
### CA file to install (CUSTOMIZE!)
###
certfile="root.cert.pem"
certname="My Root CA"
###
### For cert8 (legacy - DBM)
###
for certDB in $(find ~/ -name "cert8.db")
do certdir=$(dirname ${certDB}); certutil -A -n "${certname}" -t "TCu,Cu,Tu" -i ${certfile} -d dbm:${certdir}
done
###
### For cert9 (SQL)
###
for certDB in $(find ~/ -name "cert9.db")
do certdir=$(dirname ${certDB}); certutil -A -n "${certname}" -t "TCu,Cu,Tu" -i ${certfile} -d sql:${certdir}
done
After execution of this script your root CA should be known to Firefox, Chrome, Chromium, Vivaldy and other browsers.
Windows
System
New root certificates can easily be imported into Windows via Active Directory. However, if you do not have Active Directory enabled on your Windows machines, this is how you manually import your certificate:
Change your certificate’s file name extension from .pem to .crt and open the file. Then select “Install certificate” => “Local machine” and browse the certificate store. Your certificate should be installed into “Trusted Root Certification Authorities”.
On Windows most webbrowsers and other applications use the OS trust store, so Google Chrome and Vivaldi should accept your certificates instantly. However, Firefox needs special treatment ..
Mozilla Firefox
Like on Linux platforms, Firefox uses its own certificate trust store. You can manually import your root certificate via the Firefox settings, or force Firefox to use the Windows trust store:
/* Enable experimental Windows trust store support */
pref("security.enterprise_roots.enabled", true);
Firefox should know your CA after a browser restart.
Installing the Certificate
sudo cp example.crt /etc/ssl/certs
sudo cp example.key /etc/ssl/private
Now simply configure any applications, with the ability to use public-key cryptography, to use the certificate and key files. For example, Apache can provide HTTPS, Dovecot can provide IMAPS and POP3S, etc.
answered Oct 28, 2011 at 18:05

6 silver badges17 bronze badges
answered Mar 29, 2018 at 21:26

Here are the simple steps:
Install CA certificates to allow SSL-based applications to check for the authenticity of SSL connections:
sudo apt-get install ca-certificatessudo cp file.crt /usr/local/share/ca-certificates/For PEM file, see: Convert .pem to .crt and .key.
Optionally, if using Charles proxy, this command can work:
curl -L chls.pro/ssl | sudo tee /usr/local/share/ca-certificates/charles.crtsudo update-ca-certificatesThe command will update
/etc/ssl/certsdirectory to hold SSL certificates and generatesca-certificates.crtfile (a concatenated single-file list of certificates).Note: Don’t add certificates manually (as suggested here), as they are not persistent and going to be removed.
Note: If you’re running as root, you can drop the sudo from the above commands.
answered May 17, 2019 at 11:07

2 gold badges76 silver badges90 bronze badges
Install a Certificate Authority on Ubuntu
I have tested this on Ubuntu 14.04.
Here is my solution, I looked and looked for a long time trying to figure out how to get this to work.
- Extract the .cer from browser. I used IE 11.
- Settings -> Internet Options -> Intermediate Certificate Authorities
- Select The Certificate Authority You Want To Export (
certutil -config - -pingwill show you the ones you are using if you are behind a corporate proxy) - Export -> Select The Format You Want To Use: DER Encoded .cer
- Get the .cer files to Ubuntu somehow
- Convert to .crt
openssl x509 -inform DER -in certificate.cer -out certificate.crt - Make extra directory
sudo mkdir /usr/share/ca-certificates/extra - Copy certificates over
sudo cp certificate.crt /usr/share/ca-certificates/extra/certificate.crt sudo update-ca-certificates- If not, then you have to do what I did, go to
sudo nano /etc/ca-certificates.conf - Scroll down and find your .cer and remove the
!from in front of the file name (update-ca-certificates doc) — if you don’t find your certificate rundpkg-reconfigure ca-certificates - Run
sudo update-ca-certificates - You may need to individually trust the CAs from Firefox, Chrome, etc.. , I needed it to work with Docker so after these steps it worked with Docker.

1 silver badge3 bronze badges
answered Sep 13, 2016 at 19:50

2 silver badges3 bronze badges
cat YOUR_CERT_HERE.crt >> /etc/ssl/certs/ca-certificates.crt
answered Nov 6, 2018 at 21:34

Have the (root / CA) certificate available on a web server, local to your network if you like.
- Browse to it with Firefox.
- Open the cert and tell Firefox to add it as an exception.
- Firefox will ask you whether you want to trust this certificate for identifying websites, for e-mail users or for software publishers.
- Enjoy!
Update: It will be necessary to check if this works on Ubuntu 11. I’ve realised that I just did this on Ubuntu 12.04 LTS.

54 gold badges315 silver badges489 bronze badges
answered Jun 29, 2012 at 5:54

")


")