

Why are we waiting? Let’s get into business.
Such apps which are unsupported by your Motorola Moto X Play result in a boot loop. I know, the boot loop might freak you out. Because all you did is to add a new feature to your phone, isn’t so?
Don’t worry! I have a fix for you. And I am going to use the concept of Magisk and rooting.
Disclaimer: By attempting any of the processes listed in this thread you accept full responsibility for your actions. I will not be held responsible if your device stops working, catches fire, or turns into a hipster and claims to have been modified before it was cool.
- How to Root Motorola Moto X Play without Computer (KingoRoot apk for Android)
- Other Android Root Software without Computer
- How to Root Motorola Moto X Play with Computer
- Other Android Root Software with Computer
- Prerequisites
- Downloads
- How to unlock Moto X Play bootloader
- How to install TWRP on Moto X Play and root it
- Reader Interactions
- Android 11 Features
- Downloads For (Motorola Moto X Play)
- How to Safely Root Moto X Play & Install TWRP Recovery
- Install TWRP Recovery On Motorola Moto X
- Root Motorola Moto X Play
- Disclaimer
- Download Section
- Prerequisites
- Root Moto X Play and Install TWRP
- Reader Interactions
- How To Root Moto X Play XT1562
- A. Download tools
- B. Enable USB debugging and OEM Unlocking
- C. File preparation
- D. Driver Installation on Moto X Play
- E. Unlock the Bootloader in Moto X Play
- F. Install TWRP recovery and flash SuperSu on Moto X Play
- About Author
- Magisk isn’t working
- Why should you uninstall Magisk?
- How to Uninstall Magisk and Unroot your Motorola Moto X Play?
- 1. Uninstall Magisk using Magisk App on Motorola Moto X Play
- 2. Uninstall Magisk using TWRP And Unroot Motorola Moto X Play
- MagiskHide or SafetyNet fails after an update
- How to Root Motorola Moto X Play using Magisk Patched Boot. img
- Step 1 : Install Android SDK
- Step 2 : Enable USB Debugging and OEM Unlocking on Motorola Moto X Play
- Step 3 : Unlock Motorola Moto X Play Bootloader
- Step 4 : Extract Boot.img from Motorola Moto X Play Firmware
- Step 5 : Patch Stock Boot.img via Magisk
- Step 6 : Boot to Fastboot Mode on Motorola Moto X Play
- Step 7 Flash Magisk Patched Boot.img and Root Motorola Moto X Play
- Invalid image
- Unable to repack boot image
- Motorola Moto X Play got stuck at boot after uninstalling Magisk from app
- I can’t root Motorola Moto X Play with Magisk
- Process error
- Magisk ERROR when installing
- What is a Magisk App?
- I unroot Motorola Moto X Play but still the apps say my mobile is rooted.
- What is Magisk?
- Magisk keeps uninstalling
- OTA Update fails after using Magisk Root [Install failReason
How to Root Motorola Moto X Play without Computer (KingoRoot apk for Android)
Before starting the rooting process, follow these steps.
1. Backup Your Android Device.
2. Make sure your battery is charged to 80%.
3. Make sure you know other data such as model number, kernel number, build number, etc.
4. Wi-Fi Internet connection necessary.
5. Allow installation of apps from unknown sources. (Settings > Security > Unknown Sources)
Root Android via KingoRoot APK
1. Free download KingoRoot.apk. (https://root-apk.kingoapp.com/)
2. Install KingoRoot.apk on your device.
3. Launch «Kingo ROOT» app and start rooting.
4. Waiting for a few seconds.
Other Android Root Software without Computer
Framaroot
KingRoot
Romaster SU
Baidu Root
Universal AndRoot
z4root
VISIONary+
GingerBreak
Root Dashi
Towelroot
Root Tool
360 Root
Poot
DingDong Root
Baidu Super Root
Root Genius
PingPong Root
Root Zhushou
Ct_hack root
OneClickRoot
Root Master
Universal Root
How to Root Motorola Moto X Play with Computer
Before starting the rooting process, follow these steps.
1. Backup Your Android Device.
2. Make sure your battery is charged to 80%.
3. Make sure you know other data such as model number, kernel number, build number, etc.
4. Use the original USB cable.
5. Internet connection necessary.
6. Allow installation of apps from unknown sources. (Settings > Security > Unknown Sources)
Root Android via KingoRoot (PC Version)
1. Download and install KingoRoot Android (PC Version).
2. Launch Kingo Android Root.
3. Plug your Android device into your computer via USB cable.
4. Enable «USB Debugging mode» on your Android device.
5. Read notifications carefully before rooting your device.
6. Click «ROOT«.
7. Waiting for a few seconds.
8. Check the root status of your device.
Other Android Root Software with Computer
KingRoot
ROOT Wizard
SuperOneClick
VRoot
MTKdroidTools
Geno Tools
Kingo Android Root
Nexus Root Toolkit
Root with Restore by Bin4ry
Unlock Root Pro
DooMLoRD Easy Rooting Toolkit
Post your question or comment
Rooting is a big step if this is your first time, so make sure you know all you should. Like, you’ll be losing your warranty, might brick your device, the usual stuff you’ll find everywhere. If you’ve thought this through, we can help you root your Moto X Play. But before we can do that, you will need to unlock the bootloader of your device. This is the very first step towards voiding your warranty. Motorola, like many other OEMs, officially supports bootloader unlocking for those who want to. Even before that, we need to make sure you meet some required conditions.
Prerequisites
- You’ll need Motorola USB Drivers installed on your PC.
- ADB and fastboot drivers must also be installed. If you’re not a developer, it is best to go with Minimal ADB and Fastboot which is much smaller in size.
- Make sure your phone is charge up to at least 50% or more.
- Unlocking the bootloader can potentially wipe the slate clean on your phone so make sure you back up everything, including the files stored on the internal storage.
- The method described here is for Moto X Play running official Android 6.0.1 firmware. Do not try this on any other device or software version, unless you intentionally want to brick it.
Downloads
Don’t miss: Update Moto X Play to Android 7.1.1 Nougat
How to unlock Moto X Play bootloader
How to install TWRP on Moto X Play and root it
- Download the TWRP image file from the download section above, rename it to recovery.img for ease of installation and move it into your adb installation folder.
- Reboot your phone into fastboot mode again using the Power and Volume Down buttons and connect it to your PC with a USB cable.
- Enter the given command to flash the recovery image onto your device.
fastboot flash recovery recovery.img
- The flashing hardly takes a couple of seconds.
- Once completed, use the volume keys on your phone to navigate to and select Recovery. Volume Down key moves the selector while Volume Up key will select the current option.
- Your phone should now boot into TWRP recovery. Swipe to allow modifications if asked.
- Select Backup and select all the available partitions, then swipe to create a backup. This is an optional step but it is what will save your device in case things go south.
- When the Backup is complete, go to the main menu and select Advanced > Terminal.
- In the terminal, enter the following command
echo SYSTEMLESS=true>>/data/.supersu
- Now go back to the TWRP main menu, select Install and then select the SuperSU zip you’ve previously transferred to your external SD card.
- Swipe to flash the zip and then tap Reboot System when the flashing process is complete.
You may also like: How to Wirelessly Access Android Devices from Desktop
Your device should now reboot and you’ll find the SuperSU app in your app drawer. Because this is essentially your first boot since unlocking your bootloader, it might take a while so be patient.
<!—
—>
Reader Interactions
Recently Google released the stable version of Android 11 to its pixel line up and many other OEMs like OnePlus and Samsung have also rolled out beta builds of their Android 11 firmware. But thankfully developers have also started working on Android 11 based Custom ROMs which is a great sign and we are seeing Android 11 based ROMs already.
There is no doubt that Android is the most popular and most loved smartphone OS in the world. Due to the Open Source Project, Android OS customization and development become sky-high. While AOSP source code helps the developers to build Custom ROMs easily for each and every Android device model. This ensures the compatibility, stability of the ROM and its features as well for a particular device
Android 11 Features
The installation is pretty simple and easy. If you have installed any custom ROM before then you will have no issue flashing the ROM as the process is exactly the same. But before proceeding to the installation let me clear that this build is in the very early stage which means there will be bugs and many functions may not work properly. So we do recommend not to flash the ROM on your primary device.
- Camera (and flashlight)
- WiFi
- Battery LED
- Bluetooth
- Telephony (Calls and Data)
- Audio (Record and Playback)
- Video Playback
- Sensors
- VoLTE
- HW crypto
- Maybe more
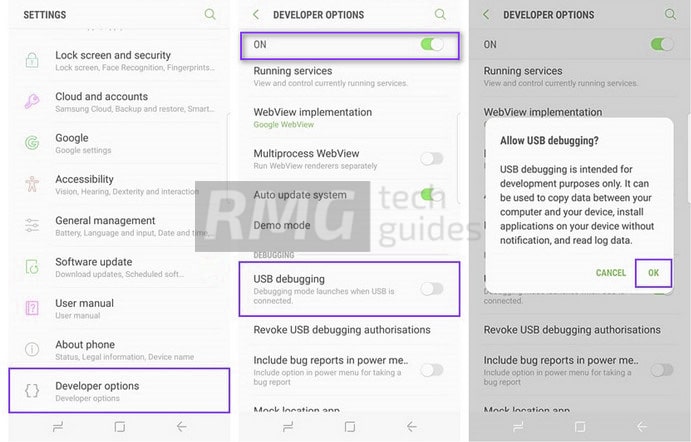
- Enable USB Debugging on your Motorola Moto X Play. Settings > About Phone > Tap on Build Number 7 times > Go back to Settings > System > Advanced > Developer Options > Enable USB Debugging
- Make sure the bootloader on your device is unlocked and your device is rooted and you have a custom recovery installed.
- Make sure your device has more than 50% battery.
- Make sure you have taken a backup of your important data. Now proceed To Install Havoc OS Android 11 ROM On your Galaxy device
- Make sure that you have installed TWRP recovery on your Android device.
Downloads For (Motorola Moto X Play)
- Download Android 11 AOSP ROM (MalluOS) || Development Page
- Make sure your device is rooted and have the latest TWRP recovery installed. (Check the Pre-Requirement Section Above)
- First, download the files from the above link and extract them
- Now transfer the files to the internal storage of your device.
- Now reboot to the TWRP recovery
- Take a nandroid backup by selecting the option from the home screen and then your data and cache from the recovery menu.
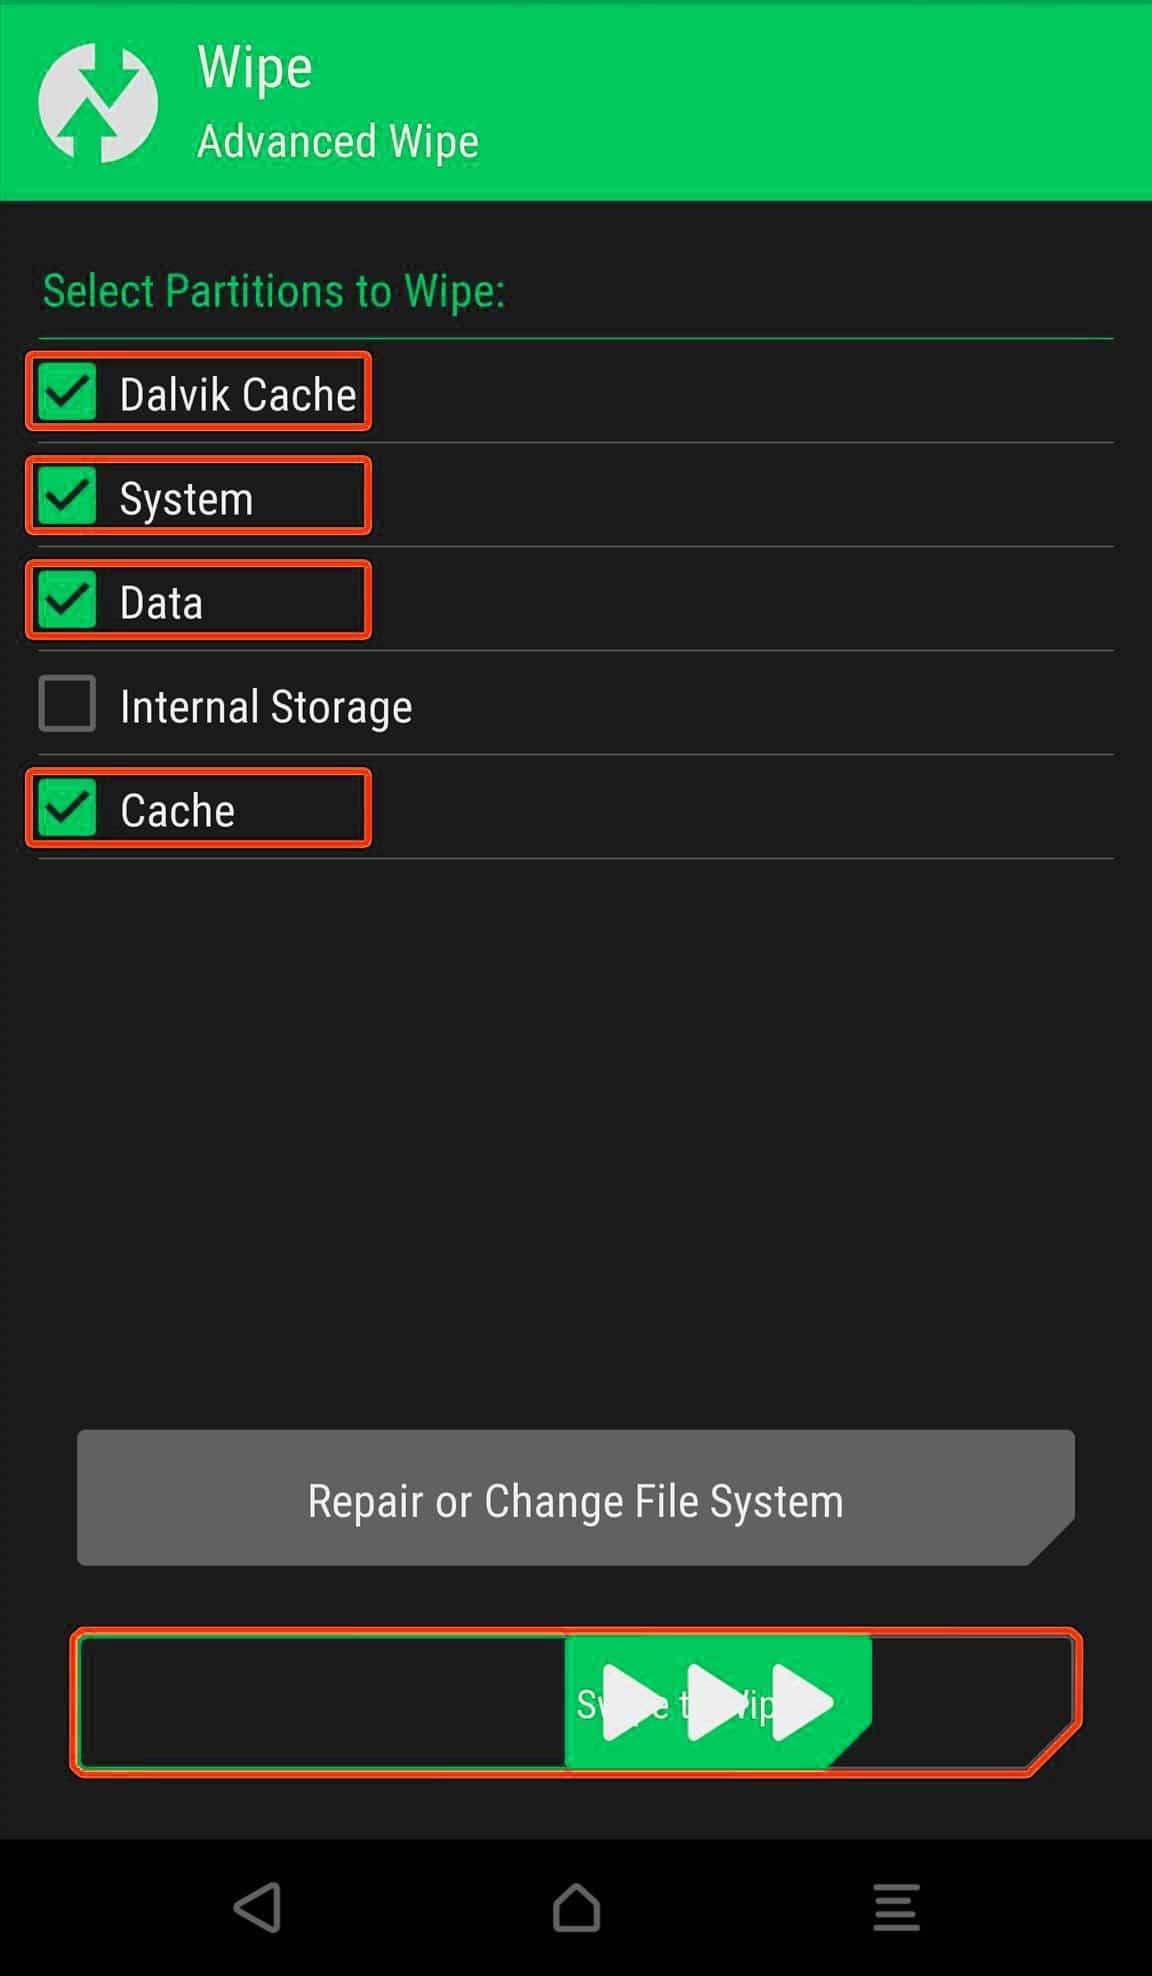
- Now return to the main menu of TWRP and wipe cache, data, and system before flashing the ROM

- In order to Wipe data: Go to Wipe —> Advanced Wipe and select Dalvik/ART cache, cache, System, Vendor, and Data and then swipe to wipe. (Don’t select the internal storage)
- Now return to the main menu of TWRP again and install the ROM which is just a .zip file
- Go to Install -> Install Zip > ROM File (.zip)

Once the flashing process is completed, reboot your phone and you will be booted into AOSP ROM Based on Android 11. If you have any doubts regarding this process, feel free to comment below.

An NIT Rourkela Graduate in CS, Blogger, Android Geek, and a Tennis Fanatic. I have been writing about Android OS for Last 8 years.
To root theMOTO X play, first you have to unlock the bootloader of the phone and after that, you can easily install the TWRP recovery and get the root access. Once the phone is rooted you can easily install custom ROMS, install rooted apps and take the android backup of your system. All credit goes to the XDA member vache, who released the TWRP 2.8.7.0 for the Moto X Play android smartphone, which allow you to flash custom zip files and root package on your phone.
If you have a Motorola Moto X play and you want to root it then this article will guide you to Safely Root Moto X Play & Install TWRP Recovery.
*Make sure there is at least 80% battery left on your smartphone before begin rooting your device.
How to Safely Root Moto X Play & Install TWRP Recovery
For Unroot / Unbrick Guide Of Moto X Play ( Restore the Stock ROM on Moto X Play) Visit this link–>>How To Unroot / Unbrick Moto X Play 2015 (Back To Stock)
Remember Before rooting:
Safely Root Moto X Play & Install TWRP Recovery
- This tutorial is only for Motorola Moto X Play
- Rooting your phone can void your warranty
- After rooting you can tweak your phone
- You can unroot it if you want
- You can overclock or underclock your CPU to make your phone faster
- Make sure you have unlocked the bootloader:Follow the Guide:-To Unlock bootloader of your Moto X Play visit Motorola’s site here.
- Backup your device completely, including storage, SMS, contacts, etc.
- Enable USB debugging on your phone.
Setting->About Phone->Build Number->Tap 7 times on build number->It will enable the developer mode in the main setting->Go to Developer->Enable the Debugging
USB drivers and ADB fastboot file
Download the TWRP recovery
How to Safely Root Moto X Play & Install TWRP Recovery
Step By Step Guide

Install TWRP Recovery On Motorola Moto X
- First Unlock the bootloader tutorial link is above
- Then install the USB Drivers and ADB fastboot file on your PC(Above Link).Now you will see the ADB folder on your C Drive (C:/ADB)
- Now download the TWRP Recovery file to your PC
- Now Follow this guide to Install TWRP Recovery On Moto X Play 2015 via ADB & Fastboot command.Guide > How to Install TWRP Recovery via Fastboot On Any Android Device (use the TWRP recovery file from the download section above)
- TWRP is now installed on your device.Now follow the steps below to root Moto X Play 2015
Root Motorola Moto X Play
- Download the SuperSu from the download section above(UPDATE-SuperSU-v2.46.zip)
- Put it in the internal memory of your Moto X Play
- Now follow the guide to Flash SuperSu via TWRP and Root Xiaomi Mi 5.Guide > How To Flash SuperSU using TWRP Recovery & Root Any Android device
- Done!!!Your Xiaomi Mi 5 is now rooted.
DONE!!! Your Moto X Play is now rooted and TWRP is installed on your Phone
To verify the root status install Root Checker.
If you have any question related to this post feel free to leave that in the comment section below.
An NIT Rourkela Graduate in CS, Blogger, Android Geek, and a Tennis Fanatic. I have been writing about Android OS for Last 8 years.
TWRP version 2.8.7.0 is available for the Moto X Play at this moment and could be updated to the latest one soon enough. Using this recovery, you can flash the SuperSU package to gain root access for the device. Moreover, using the TWRP recovery, you can take nandroid backup and also install custom ROMS, as well as available modified kernels for your device.
To start with, here is a tutorial that will help you successfully root and install TWRP on your Moto X Play.
Disclaimer
Rooting your device may void warranty. We at DroidViews, are not responsible for any damage to your device whatsoever. We won’t be held responsible if you brick your device. Reader’s discretion is advised.
Download Section
Backup Apps and Data
While this process may not wipe any of your data, a backup is highly recommended. Once you install TWRP, backup your system, data,etc. from the recovery. It will be helpful in case anything goes wrong.
Prerequisites
- Unlocked bootloader is required to install a custom recovery like TWRP. Follow Motorola’s bootloader unlocking guide form this link.
- Set up ADB and Fastboot on your computer. You can download the minimal ADB and fastboot tool from here (unzip it) or get the quick ADB and fastboot installer from here.
- Install Motorola USB Drivers on your computer.
- Open Settings> Developer options and enable USB Debugging on your device.
- Go to Developer options and enable Allow OEM unlock.
Root Moto X Play and Install TWRP
- Download the TWRP and SuperSU files from the download section and transfer them to your PC. Also place the SuperSU package file into your device’s internal storage.
- Make sure you have setup ADB and fastboot on your PC. Also, accept Always allow from this computer when you plug in the device for the first time to enable USB Debugging.
- Now power off your device and unplug it from your PC.
- Boot into the bootloader. To do so, press and hold volume down and the power button for 5-6 seconds.
- You will see the bootloader screen. Now connect your device to the PC using a USB cable.
- Navigate to the location where you have placed the TWRP file. Rename the recovery file to a simple one, like recovery.img. While the folder with recovery.img file is open, right-click on an empty space and select “Open command window here” option to launch a cmd window.
- Now type the following in the command prompt to get a code to check your device connectivity
fastboot devices
- Now flash Moto X Play TWRP recovery. Use the following command for that.
fastboot flash recovery recovery.img
- TWRP recovery will now be installed on your Moto X Play. Now boot your phone in recovery mode. You can do this by pressing and holding volume down and power keys or simply enter the following command.
fastboot boot recovery.img
- Once into the TWRP recovery, you can backup or nandroid backup your current ROM.
- Now return to the TWRP home screen and tap Install and navigate to the SuperSU file in your device’s storage and select it.
- Confirm the swipe operation at the bottom to install the SuperSU package.
- Once the installation is complete, reboot to system.
Now you will have root access on your Moto X Play. If it doesn’t boot, you can always restore the stock ROM from the backup. For any queries, comment down below.
<!—
—>
Reader Interactions
How To Root Moto X Play XT1562
NOTE: Backup all your files like photos, video, mp3 including contacts, SMS etc to your computer as unlocking the Moto X Play Bootloader will completely wipe/delete all files on the device in step B.
A. Download tools
Download Universal Windows ADB Driver
Download Moto X Play TWRP Recovery (twrp-lux-2.8.7-r4.img)
Download Motorola Driver
Download ADB FASTBOOT FILES.zip
B. Enable USB debugging and OEM Unlocking
- Go to Settings > About phone, and then tap ‘Build number’ 7 times or until you get the message ‘You’re now a developer!’.
- Go back to Settings, choose ‘Developer options’. Find the ‘USB debugging’ option and enable it.
- In the ‘Developer Option’ you will also find the ‘OEM Unlocking’ option, just enable it. It will ask for your PIN/Screen unlock code to enable it.
C. File preparation
- Copy and paste the SuperSu Zip file to your Phone’s external memory from your PC.
- ADB FASTBOOT FILES.zip and select Extract to “ADB FASTBOOT FILES” folder
- Now put the twrp-lux-2.8.7-r4.img file in the ADB FASTBOOT FILES folder.
D. Driver Installation on Moto X Play
Install Universal Windows ADB Driver on your PC then install Motorola Driver and restart your PC.
E. Unlock the Bootloader in Moto X Play
Now your Bootloader is unlocked in Moto X Play. Don’t close the CMD Window
F. Install TWRP recovery and flash SuperSu on Moto X Play
- Just check USB Debugging and OEM Unlocking in turn on
- Now connect your Moto X Play to PC via USB
- In the command prompt type this and hit enter
adb reboot bootloader
- Your phone will reboot and boot into bootloader mode,
- Type this command and hit enter, just make sure twrp-lux-2.8.7-r4.img file is in the ADB FASTBOOT folder
fastboot flash recovery twrp-lux-2.8.7-r4.img
- It will return to finish once the flashing process complete
- Now take your phone and use Volume UP or down Key to navigate “RECOVERY MODE”
- Once you find RECOVERY MODE just press Power button to enter in recovery mode
- You will see TWRP recovery mode, tap on Install
- Browse and select UPDATE-SuperSU-v2.46.zip ( If you put in exrternal then browse external)
- Swipe to confirm the flash
- Once done do Wipe Dalvik & Cache then tap on Reboot System To Restart
- Your OnePlus 2 is now rooted.
- To check whether phone has root access or not, just go to Google Play Store and install Root Checker and run it.
Hope you have understood this The Mahabhata type guide, in case any confusion or problem just comment here.
(Visited 3,363 times, 1 visits today)
About Author

Tanmoy Das
Magisk isn’t working
If you can boot up, but Magisk isn’t working as expected (not detecting the Magisk installation, loss of root, etc), there are a few troubleshooting steps you can try.
- First, Reboot. Sometimes this helps Magisk to mount everything as it should.
- Try removing any installed modules. So that you can see if it’s a faulty module causing issues.
- If that seems to fix it, just install the modules one at a time to find which one causes issues.
- If nothing else works, try starting from the very beginning with a new installation.
- check here: “Asking for help/reporting bugs”.
Why should you uninstall Magisk?
Even though Magisk is a saver to all Android apps, certain apps like Banking apps, Snapchat, UPI Payment apps don’t support rooted phones. That is why you need to uninstall Magisk to facilitate the functions of such apps.
How to Uninstall Magisk and Unroot your Motorola Moto X Play?
Amongst the various ways of uninstalling Magisk, today I am going to teach you the two easiest ways. Using them you can either uninstall or obliterate Magisk.
1. Uninstall Magisk using Magisk App on Motorola Moto X Play
- Firstly open the Magisk app on your phone.
- Then you will see the Uninstall button. Just tap on it.
- Finally tap on Complete Uninstall in the pop up message.
- Now you will be asked for the permission to download a file. Just tap on the Download button.
- Then allow Magisk Manager to access photos, media and files on your Motorola Moto X Play by tapping on Allow.
- So that the Magisk Uninstaller file will be downloaded and Magisk will be uninstalled from the Motorola Moto X Play.
- Once the uninstallation is completed your phone will be rebooted automatically.
- And that’s all! You are good to go!
2. Uninstall Magisk using TWRP And Unroot Motorola Moto X Play
In some instances, the manual removal of Magisk can result in boot loop relapse. So you can use TWRP recovery file manager instead. Here are the steps.
- As the first step download the Magisk App and save it to the internal storage of your device.
- Now rename the .apk file extension to uninstall.zip. Just as in the below picture.
- Then download the file and save it in the internal storage.
- Now turn off your phone.
- And press and hold “Volume Down + Power Key” to boot the phone to TWRP recovery mode.
- Tap on Install button to flash the file on your phone.
- As the next step, navigate the file and move the slider to the right.
- Thereafter the installation will be started and you have to wait untill the files are installed.
- Once it is completed you have to reboot the Motorola Moto X Play.
- That’s all! You uninstalled Magisk.
Note: If you are using TWRP as a method to uninstall Magisk, you need to flash the Magisk Module Uninstaller Zip onto your Motorola.
As you all know, Magisk is a fascinating app that allows you to customize your phone. However, the not only application supports Magisk. To get rid of that problem, you can keep unrooting the phone whenever you use that app. But it is troublesome and time-consuming. So the better option would be to uninstall Magisk and then unroot the Motorola Moto X Play.
MagiskHide or SafetyNet fails after an update
If MagiskHide or SafetyNet starts failing after an update to either Magisk, the app, or both you can fix it by toggling MagiskHide off and on (also see ”Test MagiskHide”).
How to Root Motorola Moto X Play using Magisk Patched Boot. img
Step 1 : Install Android SDK
Firstly you need to install the Android SDK Platform Tools on your PC. As some of you are already aware this is the recommended official ADB and Fastboot binary given by Google. Just download it and extract it to any convenient location on your PC. Then you will have the platform-tools folder, which is essential for the process.
Step 2 : Enable USB Debugging and OEM Unlocking on Motorola Moto X Play
Then you should enable USB Debugging and OEM Unlocking on your Motorola Moto X Play. By unlocking OEM, you will be able to make your phone discoverable by the PC in ADB mode. And then allowing you to boot your device to Fastboot Mode.
Here’s how you gonna do that. : Enable USB Debugging and OEM Unlocking
Step 3 : Unlock Motorola Moto X Play Bootloader
As the third step, you need to unlock the bootloader of the phone. Don’t ever forget that unlocking will wipe all the device data. So, perform a complete backup beforehand and then refer to our guide on How to Unlock the Bootloader on Motorola Moto X Play.
Step 4 : Extract Boot.img from Motorola Moto X Play Firmware
Then you have to download the firmware for your Motorola Moto X Play. You have to download the same version that is currently installed onto your device. After downloading, extract the file to a suitable location on your PC.
Still Can’t found boot.img or Don’t know how to find?
Step 5 : Patch Stock Boot.img via Magisk
- Firstly install the Magisk app to your phone. Read More: Everything about Magisk
- And confirm whether the boot.img has been transferred to the device.
- Now tap on Install button. (see below image)
- In the Options menu, enable both the Preserve Force Encryption and Recovery Mode options.
- Then tap Next.
- You will be navigated to the Method selection screen. Now choose Select and Patch a file.
- As the next step, browse to the extracted boot.img file and select it.
- And tap in the Let’s Go button and Magisk will now load the boot.img file and start patching.
- You will see a message saying Download Complete once the patching is done.
- Then the patched patched boot image file will be saved as magisk_patched.img in Internal Storage > Downloads.
- You can rename the file by deleting the random numbers at the end of the name. So the file will be named as magisk_patched.img.
- Finally transfer the file to the internal storage of your device for future use.
Step 6 : Boot to Fastboot Mode on Motorola Moto X Play
- Enable USB Debugging and connect your device to the PC using a USB cable.
- Now go to the platform-tools folder, type CMD in the address bar and press Enter. or Search CMD and open it. after that, navigate to the platform-tools folder
- That will launch the Command Prompt.
- Then type the following command in the CMD window to boot your device to Fast boot mode.
adb reboot bootloaderfastboot devicesDisable DM Verity: Only if you have a problem with performing step 7.
Step 7
Flash Magisk Patched Boot.img and Root Motorola Moto X Play
- First transfer the magisk_patched.img file to the platform-tools folder.
- Then type the following command in the CMD window to flash the Magisk Patched file.
fastboot flash boot magisk_patched.img- Finally enter the following command to reboot your device to the OEM.
fastboot rebootNow, you have successfully rooted your device.
Invalid image
If you see a message in the install log, indicating “Invalid image: not signed”, that means your boot image is not signed. Don’t panic! It’s perfectly normal and nothing to worry about.
Unable to repack boot image
Q : I tried to install MAGISK v16.O using MAGISK installer. But there is a message saying, Installation failed with (! Unable to repack boot image! Failed! ! Installation failed). What can I do to get rid of this?
A: Just try uninstalling v15.3 first and then install v16.0 clean.
Motorola Moto X Play got stuck at boot after uninstalling Magisk from app
Q: I installed Magisk via TWRP(Temp version) and installed some modules. Thereafter, I decided to uninstall Magisk using the Magisk Manager APK. Then the phone rebooted and stuck into the phone logo with the red danger logo. I tried flashing Magisk again via Temp TWRP, but now a few apps keep crashing. I tried uninstalling and reinstalling them. But couldn’t fix it. Can you help me?
A: If your phone is stuck in the boot loop or apps still crashing, then you have to wipe the Dalvik cache again. If you still need to unroot for whatever reason you can try this:
- update magisk first and then clicking uninstall from Magisk manager.
- manually flash uninstaller.zip from TWRP.
- flash the uninstaller as a module as stated in this post.
- Finally if it’s still no use, then you can factory reset the device to remove the root.
I can’t root Motorola Moto X Play with Magisk
Process error
A “process error” when installing Magisk is usually caused when the app doesn’t have storage permission. So you can fix it by clearing app data.
Magisk ERROR when installing
Q: I got this error when installing Magisk using TWRP. What am I supposed to do now?
Updater process ended with ERROR:1
Error installing zip file '/sdcard/MagiskManager/Magisk-v13.3.zip'
A: I advise you to use the magisk_uninstaller.zip first. From what I saw in your log, your boot. img is already patched by something else. Therefore, you need to install Magisk on your stock boot.img.
What is a Magisk App?
Magisk app is created to manage the Magisk process. It helps you to completely hide the root from your phone. Therefore the apps which didn’t function due to permission issues will function under rooted conditions.
I unroot Motorola Moto X Play but still the apps say my mobile is rooted.
Q: I completely unrooted my mobile a few days back. But still, many apps say that the device is rooted. Thereafter I rooted my device using Magisk HIDE. Please help me!
A: If your bootloader is unlocked, they will report your device as a rooted device. According to your description, Magisk Hide alone has failed to do the job. I suggest you try the “Repackage Magisk Manager” option in the Magisk Manager settings. It worked for me.
What is Magisk?
Magisk helps you to modify the system but systemlessly. In complex technical terms, Magisk is a universal systemless interface. And it is creating an altered mask of the system without changing the system itself.
So, you will be able to modify both the performance and functionality of your Motorola Moto X Play. By making modifications that cannot be detected by Google SafetyNet.
Magisk keeps uninstalling
Q: During the past 4 days I had to re-install Magisk 16.3 at least 4 times a day. Because it keeps uninstalling itself. I have previously experienced this issue with Magisk, but it has gotten worse instead of being solved.
A: After uninstalling, you can try flashing the stock boot image from your ROM/firmware package/factory image.
OTA Update fails after using Magisk Root [Install failReason
- To start you need to fully restore to stock and erase user data. (basically, the same as starting with a brand new phone).
- Then, flash Magisk (I used the image provided on the thread about Magisk) fastboot flash boot magisk_patched.img.
- Boot to Android.
- Next, install magisk manager.
- Verify root works.
- Now, reboot to bootloader, flash default boot.img: fastboot flash boot boot.img.
- Next, reboot to android.
- Finally, apply OTA update.
")


")