

До этого момента мы описывали основы того, как Git работает и как его использовать, а так же мы познакомились с некоторыми инструментами Git, которые делают его использование простым и эффективным.
В этой главе мы рассмотрим некоторые настройки Git и систему хуков, что позволяет настроить поведение Git.
Таким образом, вы сможете заставить Git работать именно так как нужно вам или вашей компании.
- Applicable Plans — All Cloud Hosting Plans
- Overview
- Where is the global git config file located?
- Git config global username and email
- How to set global git config settings?
- How to do a git config global edit?
- Configure Git global’s core editor
- How do you override Git config global?
- List and show global git config
- Remove global git config settings
- Become a Git power user
- Git config file locations
- System, global and local Git config files
- Names of Unix and Windows Git config files
- Where are Windows Git config files located?
- Where are Git config files for Ubuntu Linux located?
- Find Git config files on your own
- Can’t find the global git config file .gitconfig?
- Become a Git power user
- Первоначальная настройка Git
- Имя пользователя
- Выбор редактора
- Настройка ветки по умолчанию
- Проверка настроек
- Git Quick Start
- Quick Start — Command line (Mac OS X/Linux/UNIX)
- Create the Git repo on the local computer
- Move the Git repo to the Virtual Server
- Clone the Git repo to the local computer
- Committing your changes back to the Git repo on the VS
- Quick Start — Git for Windows GUI
- Create the Git repo on the Virtual Server
- Create the Git repo on the local computer
- Make the Initial Commit
- Move the Git repo to the Virtual Server
- Cloning the repository
- Committing Your Changes
- Pushing your changes to the remote repo
- What is covered in this User Guide
- Other Git resources
- Git usage
- Windows
- Mac OS X/Linux/UNIX
- Installing Git
- Installing Git using the Control Panel
- Installing Git using the ISPmanager Control Panel
- Конфигурация Git
- Базовая конфигурация клиента
- core.editor
- commit.template
- user.signingkey
- core.excludesfile
- help.autocorrect
- Цвета в Git
- color.ui
- color.*
- Внешние программы слияния и сравнения
- Форматирование и пробелы
- core.autocrlf
- core.whitespace
- Конфигурация сервера
- receive.fsckObjects
- receive.denyNonFastForwards
- receive.denyDeletes
- Git configuration — Virtual Server
- Create the directory for the Git repositories
- Create the user that will have access to the Git repositories
- Adding the SSH public keys
Applicable Plans — All Cloud Hosting Plans
Overview
Git is a distributed version control system (also called a source code management system), generally used by software developers to manage and track changes in source code. More information about Git can be found on the Git home page — http://git-scm.com/.
Git can be used for almost any size project, from single developers storing files on their local computer all the way up to projects like github — https://github.com/, which hosts over 3 million Git repositories. The source code for the Linux kernel, which is currently over 15 million lines of code, is managed with Git (Git was actually written just for this purpose).
For a very detailed resource about using Git, see The Git Book, available for free directly from the Git web site — http://git-scm.com/book. Links to other Git documentation, including videos and links to books written about Git, is available here — http://git-scm.com/documentation/
Git Quick Start
Quick Start — Command line (Mac OS X/Linux/UNIX)
Quick Start — Git for Windows GUI
Other Git resources
Git usage
Windows
Mac OS X/Linux/UNIX
https://youtube.com/watch?v=aW4ZXonqjKY%3Ffeature%3Doembed%26enablejsapi%3D1%26origin%3Dhttps%3A
Where is the global git config file located?
- C:\Users\<username> on Windows
- ~home/<username> on Linux
- ~root/ for sudo operations
The git config –list command will show global git config settings.
Git config global username and email
How to set global git config settings?
To be more expressive, you can include the –add switch when you set a global git config property:
How to do a git config global edit?
The global git config is simply a text file, so it can be edited with whatever text editor you choose. Open, edit global git config, save and close, and the changes will take effect the next time you issue a git command. It’s that easy.
git config --global --editConfigure Git global’s core editor
How do you override Git config global?
Git uses as cascading application of gitconfig files to determine the value of a Git config property to use at runtime. There are five commonly encountered Git config scopes, listed here from the most specific to the most general:
- workingtree
- local
- global
- system
- portable
List and show global git config
To see all of properties configured globally in Git, you can use the –list switch on the git config command. Adding the –show-origin switch will also tell you the global .gitconfig file’s location.
git config --global --list --show-originRemove global git config settings
To delete git config settings simply use the unset command:
git config --global --unset core.editorOccasionally, a property gets set twice and the –unset switch fails. In this case, simply use the global git config’s–unset-all switch.
git config --global --unset-all core.editorThe global git config is an important file for customizing your version control experience. Knowing how to show Git config settings is important, as is being able to edit, update and remove settings. Knowing how will certainly make your experience with the global Git config tool more pleasurable.
Become a Git power user
- How to do a Git clean up of branches and commits
- Learn to rebase onto master and rebase from the master branch
- Squash all Git commits on a branch down to one
- Shelve your changes with Git stash pop and apply
- Easily explain the Git vs GitHub difference
- Add a shallow git clone of depth 1 do your Jenkins jobs
- Set up a local Git server with a bare Git repo
https://youtube.com/watch?v=5R0i3OBuUp8%3Ffeature%3Doembed
Git config file locations
That then leads to the question about where all of these variously scoped Linux and Windows git configuration files can be found. Here we will answer all of those questions about Git config file locations and where the various gitconfig files are stored.
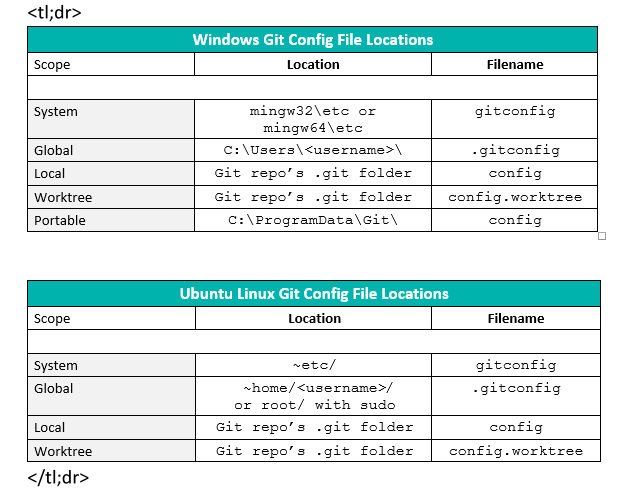
Full list of where the Git configuration files config, gitconfig and .gitconfig are located on Windows and Ubuntu Linux.
System, global and local Git config files
Listed in descending order of specificity, Git provides four standard scopes for storing configuration data, plus a portable scope on Windows:
- Worktree
- Local
- Global
- System
- Portable
The scopes are cascading with the most specific file taking precedence over the most general. Local scope overrides global scope. Global scope overrides system scope.
If you set up multiple Git worktrees on the same computer, you can also use the Git worktree scope, although doing so requires this scope to be enabled. Worktree scope is the most specific and will override local.
Names of Unix and Windows Git config files
Just to make life a bit more complicated, the variously scoped Git configuration files all have different names:
- – the extensionless system Git config file
- – the global Git config file has no name, but is instead just an extension
- – the local Git configuration file is simply named config, and like the system Git config file, has no extension
- – the Git worktree configuration file flaunts both a name and an extension
Where are Windows Git config files located?
Here is where you will find Git configuration files on Windows:
Where are Git config files for Ubuntu Linux located?
As for the location of the Linux Git configuration files, here is where you’ll find them on Ubuntu:
Find Git config files on your own
Here is the git config command with list and show-origin swtiches run on Windows:
$ git config --list --show-origin $ git config --list --show-originfile: /etc/gitconfig user.name=Syster Sally
file: /home/gme/.gitconfig user.name=Glow Ball
file: .git/config user.name=Low Calsudo git -c core.editor=ls\ -al config --system --editThe animated GIF below, pulled from 1998 when such things were cool, shows the above command being run on Ubuntu 20. Note how the command above lists the home directory as the location for the global Git config file, but when the sudo command is used below the global Git config file is in ~root.
Git config file locations on Ubuntu Linux.
Can’t find the global git config file .gitconfig?
Git doesn’t actually create the gitconfig or .gitconfig files until they are referenced for the first time. Just asking Git to edit the file will force its creation, but until that happens, efforts to find the .gitconfig or gitconfig file will be fruitless.
/c/ global/windows git config files (master) $ sudo git config --edit --global $ sudo git config --edit --system
Each of these Git commands will open the corresponding Windows or Linux Git config file in the configuration specified editor. You may edit the file if you please, or simply close the editor immediately to force config file creation.
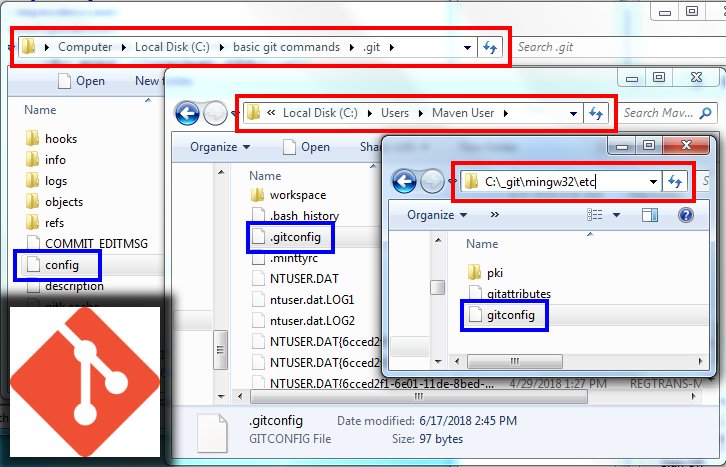
Figure 2. The three main locations of Windows Git configuration files.
$ git config --global core.editor "'C:/Program Files/Notepad++/notepad++.exe' -multiInst -notabbar -nosession -noPlugin"Always be careful editing the Git config files, because if you incorrectly edit any of these files, you just might ruin your entire Linux or Windows Git configuration.
Become a Git power user
- How to do a Git clean up of branches and commits
- Learn to rebase onto master and rebase from the master branch
- Squash all Git commits on a branch down to one
- Shelve your changes with Git stash pop and apply
- Easily explain the Git vs GitHub difference
- Add a shallow git clone of depth 1 do your Jenkins jobs
- Set up a local Git server with a bare Git repo
Первоначальная настройка Git
Теперь, когда Git установлен в вашей системе, самое время настроить среду для работы с Git под себя.
Это нужно сделать только один раз — при обновлении версии Git настройки сохранятся.
Но, при необходимости, вы можете поменять их в любой момент, выполнив те же команды снова.
В состав Git входит утилита git config, которая позволяет просматривать и настраивать параметры, контролирующие все аспекты работы Git, а также его внешний вид.
Эти параметры могут быть сохранены в трёх местах:
Файл
~/.gitconfigили~/.config/git/configхранит настройки конкретного пользователя.
Этот файл используется при указании параметра--globalи применяется ко всем репозиториям, с которыми вы работаете в текущей системе.Файл
configв каталоге Git (т. е..git/config) репозитория, который вы используете в данный момент, хранит настройки конкретного репозитория.
Вы можете заставить Git читать и писать в этот файл с помощью параметра--local, но на самом деле это значение по умолчанию.
Неудивительно, что вам нужно находиться где-то в репозитории Git, чтобы эта опция работала правильно.
Чтобы посмотреть все установленные настройки и узнать где именно они заданы, используйте команду:
$ git config --list --show-originИмя пользователя
Первое, что вам следует сделать после установки Git — указать ваше имя и адрес электронной почты.
Это важно, потому что каждый коммит в Git содержит эту информацию, и она включена в коммиты, передаваемые вами, и не может быть далее изменена:
$ git config --global user.name "John Doe"
$ git config --global user.email johndoe@example.com
Опять же, если указана опция --global, то эти настройки достаточно сделать только один раз, поскольку в этом случае Git будет использовать эти данные для всего, что вы делаете в этой системе.
Если для каких-то отдельных проектов вы хотите указать другое имя или электронную почту, можно выполнить эту же команду без параметра --global в каталоге с нужным проектом.
Многие GUI-инструменты предлагают сделать это при первом запуске.
Выбор редактора
Теперь, когда вы указали своё имя, самое время выбрать текстовый редактор, который будет использоваться, если будет нужно набрать сообщение в Git.
По умолчанию Git использует стандартный редактор вашей системы, которым обычно является Vim.
Если вы хотите использовать другой текстовый редактор, например, Emacs, можно проделать следующее:
$ git config --global core.editor emacsВ системе Windows следует указывать полный путь к исполняемому файлу при установке другого текстового редактора по умолчанию.
Пути могут отличаться в зависимости от того, как работает инсталлятор.
В случае с Notepad++, популярным редактором, скорее всего вы захотите установить 32-битную версию, так как 64-битная версия ещё не поддерживает все плагины.
Если у вас 32-битная Windows или 64-битный редактор с 64-битной системой, то выполните следующее:
$ git config --global core.editor "'C:/Program Files/Notepad++/notepad++.exe' -multiInst -notabbar -nosession -noPlugin"Настройка ветки по умолчанию
Когда вы инициализируете репозиторий командой git init, Git создаёт ветку с именем master по умолчанию.
Начиная с версии 2.28, вы можете задать другое имя для создания ветки по умолчанию.
Например, чтобы установить имя main для вашей ветки по умолчанию, выполните следующую команду:
$ git config --global init.defaultBranch mainПроверка настроек
Если вы хотите проверить используемую конфигурацию, можете использовать команду git config --list, чтобы показать все настройки, которые Git найдёт:
$ git config --list
user.name=John Doe
user.email=johndoe@example.com
color.status=auto
color.branch=auto
color.interactive=auto
color.diff=auto
...
Некоторые ключи (названия) настроек могут отображаться несколько раз, потому что Git читает настройки из разных файлов (например, из /etc/gitconfig и ~/.gitconfig).
В таком случае Git использует последнее значение для каждого ключа.
Также вы можете проверить значение конкретного ключа, выполнив git config <key>:
$ git config user.name
John Doe
Git Quick Start
- You have Git installed on your local computer
- You have a directory containing files you want to manage with Git
- You have uploaded your SSH public key to the git user on the Virtual Server
Neither of these examples are meant to be a comprehensive guide to using Git, they are simply a quick overview of a common Git workflow.
Quick Start — Command line (Mac OS X/Linux/UNIX)
Create the Git repo on the local computer
The git commit command will open a file in your default text editor. Add a commit message like «Initial commit», and save and exit the file.
The next step is to create what is called a «bare» repository from your project files.
This creates a bare repository, called project_folder.git
Move the Git repo to the Virtual Server
What you will see will look similar to this:
Clone the Git repo to the local computer
Committing your changes back to the Git repo on the VS
Now you can do your work on the project. When you are ready to commit your changes, use the git status command to see what files need to be committed, and then the git add command to add your new files or any file changes. Then use git commit to commit the changes, and the git push command to push your changes back to the repo.
Use git status to see what changes have been made. In this example, file1.txt and file3.c have been modified, and file4.txt has been added.
Use git add to add the changed files and the new file.
bash-3.2$ git add file1.txt file3.c file4.txt
bash-3.2$
The git commit command will let you commit your changes. The command will open your default text editor, and allow you to add a commit message, usually used to describe what you changed.
Once you have added your commit message, save and exit the file.
Now you can keep working, and adding your changes back to the repo as needed.
Quick Start — Git for Windows GUI
Create the Git repo on the Virtual Server
Before you can create the repo on your local computer, you will first need to create the repo on the Virtual Server so you can upload your local repo to it. If you do not do this, you will not be able to upload your repo from your local computer to the Virtual Server.
Change directories to /opt/git, and use the mkdir ProjectFolder.git command to create the repo. Then change directories into the new directory, and use git --bare init to create the repository.

You can disconnect from the VS at this point. When you are ready to push your changes to the Virtual Server, you will need to reopen the connection using PuTTY and Pagent.
Create the Git repo on the local computer
Navigate to the location of the ProjectFolder folder, and right click on the folder icon. From the list, chose Git Gui

This will open the Git Gui startup screen.

Click on Create New Repository.
This will open the Create New Repository screen. Click on Browse, and navigate to the folder where you are creating the Git repo.

Once you have found the correct folder, click on Create.
This opens the main Git Gui window, which is what you will see from now on when you right click on the project folder and select Git Gui from the menu.

In order to put the ProjectFolder repo on the Virtual Server, you will need to let Git know who you are, so that any commit messages will have the correct name. From the main Git Gui window, go to Edit > Options.

Once you have made your changes, click Save.
Make the Initial Commit
Now you need to move the files in your repo from Unstaged to Staged, and then commit the repo. Once that is done, you will need to push the repo to the VS.
In the main Git Gui window, all your files are currently listed in the Unstaged Changes column. Click on the icon to the left of each file name, and that will move the file to the Staged Changes (Will Commit) column.

Once you have moved all the files to Staged Changes (Will Commit), enter in a commit message and click Commit.

Move the Git repo to the Virtual Server
In the main Git Gui window, go to Remote > Push. This opens the Push window.

The master branch should already be highlighted.
Once you have entered in the location, click on Push. This will open the status window. If the push is successful, you will see a screen similar to this.

Cloning the repository
To clone a repository, right click on any folder that doesn’t currently contain a Git repo, and select Git Gui. This will take you to the Git Gui startup screen.

Click on Clone Existing Repository.
This opens the Clone Existing Repository screen.

Target Directory — the location where you are cloning the Git repo on the local computer. This folder cannot currently exist on your computer. Browse to the parent folder where you want to clone the repo, and then add the folder name — in this example, the repo is being cloned into ProjectRepo folder in the Documents folder.
Once you have entered the information, click on Clone. A status window will appear, showing the progress. Once the clone is complete, the main Git Gui screen will appear. Note that the path at the top of the window shows the location where the repo was cloned to.

Committing Your Changes
At this point, you can do your work on the project files. In this example, you’ve modified file1.txt, file3.c, and added file5.txt. In order for Git Gui to see these files in the main screen, you may have to click the Rescan button. Notice that your new file and your changed files will appear in the Unstaged Changes column.

Click the icon to the left of the file name to move it from Unstaged Changes to Staged Changes (Will Commit).

Once you have moved the files to Staged Changes (Will Commit), enter a Commit Message, and click on the Commit button.

Pushing your changes to the remote repo
Once you have committed the changes, click on the Push button just below the Commit button. This will open the Push Branches screen.

Since you are pushing back to an existing repository, leave the default Destination Repository of Remote — origin as is.
Click on Push to push your changes. A status window will appear.

This shows that you have successfully pushed your changes back to the repository. You can close the window.
Now you can keep working, and adding your changes back to the repo as needed.
What is covered in this User Guide
Also, two Quick Start guides are provided — one for using Git from the command line (Mac OS X/Linux/UNIX) and one for using the Git for Windows GUI. These Quick Start guides provide a simple overview of a common Git workflow, and are not intended as a comprehensive guide to using Git.
If you need a more robust configuration, including more fine-grained access controls, you can look at an application like Gitolite — https://github.com/sitaramc/gitolite. The documentation for Gitolite can be found here — http://sitaramc.github.com/gitolite/master-toc.html. There are also several tutorials available online that cover installing and configuring Gitolite.
Other Git resources
Git usage
Windows
There are additional GUI clients for Windows available, but the Git on Windows client is the standard. A list of GUIs is available here — http://git-scm.com/downloads/guis
Mac OS X/Linux/UNIX
There are also GUI clients for Mac OS X available, such as GitX or Tower. A list of GUIs for all platforms is here — http://git-scm.com/downloads/guis
Installing Git
Installing Git using the Control Panel
Installing Git using the ISPmanager Control Panel
If you are using the ISPmanager Control Panel, you can install Git from that Control Panel.
Information on how to tell which version of ISPmanager you are using can be found here — ISPmanager versions
Конфигурация Git
$ git config --global user.name "John Doe"
$ git config --global user.email johndoe@example.com
Сейчас вы познакомитесь с несколькими наиболее интересными опциями, которые можно установить для настройки поведения Git.
Кратко: Git использует набор конфигурационных файлов для изменения стандартного поведения, если это необходимо.
Вначале, Git ищет настройки в файле /etc/gitconfig, который содержит настройки для всех пользователей в системе и всех репозиториев.
Если передать опцию --system команде git config, то операции чтения и записи будут производиться именно с этим файлом.
Следующее место, куда смотрит Git — это файл ~/.gitconfig (или ~/.config/git/config), который хранит настройки конкретного пользователя.
Вы можете указать Git читать и писать в него, используя опцию --global.
Наконец, Git ищет параметры конфигурации в файле настроек в каталоге Git (.git/config) текущего репозитория.
Эти значения относятся только к текущему репозиторию и доступны при передаче параметра --local команде git config.
(Если уровень настроек не указан явно, то подразумевается локальный.)
Каждый из этих уровней (системный, глобальный, локальный) переопределяет значения предыдущего уровня, например, значения из .git/config важнее значений из /etc/gitconfig.
Базовая конфигурация клиента
Конфигурационные параметры Git разделяются на две категории: настройки клиента и настройки сервера.
Большая часть — клиентские, для настройки ваших личных предпочтений в работе.
Существует много, очень много настроек, но подавляющее большинство из них применимо только в конкретных случаях; мы рассмотрим только самые основные и самые полезные из них.
Для просмотра полного списка настроек, поддерживаемых вашей версией Git, выполните команду:
Эта команда выведет список доступных настроек с довольно подробным описанием.
Так же, соответствующую документацию можно найти здесь https://git-scm.com/docs/git-config.html.
core.editor
По умолчанию, Git использует ваш редактор по умолчанию ($VISUAL или $EDITOR), если значение не задано — переходит к использованию редактора vi при создании и редактировании сообщений коммитов или тегов.
Чтобы изменить редактор по умолчанию, воспользуйтесь настройкой core.editor:
$ git config --global core.editor emacsТеперь, вне зависимости от того, какой редактор является основным для вашего окружения, Git будет вызывать Emacs для редактирования сообщений.
commit.template
Если указать путь к существующему файлу, то он будет использован как сообщение по умолчанию при создании коммита.
Смысл создания шаблона сообщения коммита в том, чтобы лишний раз напомнить себе (или другим) о требованиях к формату или стилю оформления сообщения коммита.
Например, предположим что вы создали файл ~/.gitmessage.txt, который выглядит так:
Subject line (try to keep under 50 characters)
Multi-line description of commit,
feel free to be detailed.
[Ticket: X]
Обратите внимание, что шаблон напоминает коммитеру о том, чтобы строка заголовка сообщения была короткой (для поддержки однострочного вывода команды git log --oneline), что дополнительную информацию в сообщении следует располагать ниже, а так же о том, что было бы неплохо при наличии добавить ссылку на номер задачи или сообщения в системе отслеживания ошибок.
Чтобы заставить Git отображать содержимое этого файла в редакторе каждый раз при выполнении команды git commit, следует установить значение параметра commit.template:
$ git config --global commit.template ~/.gitmessage.txt
$ git commit
Теперь, при создании коммита, в вашем редакторе будет отображаться сообщение изменённого вида:
Subject line (try to keep under 50 characters)
Multi-line description of commit,
feel free to be detailed.
[Ticket: X]
# Please enter the commit message for your changes. Lines starting
# with '#' will be ignored, and an empty message aborts the commit.
# On branch master
# Changes to be committed:
# (use "git reset HEAD <file>..." to unstage)
#
# modified: lib/test.rb
#
~
~
".git/COMMIT_EDITMSG" 14L, 297C
Если ваша команда придерживается требований к сообщениям коммитов, то создание шаблона такого сообщения и настройка Git на его использование увеличит вероятность соответствия заданным требованиям.
Данная настройка определяет какая программа будет использована для разбиения текста на страницы при выводе такой информации как log и diff.
Вы можете указать more или любую другую (по умолчанию используется less), а так же выключить совсем, установив пустое значение:
$ git config --global core.pager ''В таком случае, Git будет выводить весь текст полностью, вне зависимости от его длины.
user.signingkey
Если вы создаёте подписанные аннотированные теги (как описано в разделе Подпись главы 7), то установка GPG ключа в настройках облегчит вам задачу.
Установить ключ можно следующим образом:
$ git config --global user.signingkey <gpg-key-id>Теперь, вам не нужно указывать ключ для подписи каждый раз при вызове команды git tag:
core.excludesfile
В разделе Игнорирование файлов главы 2 сказано, что вы можете указывать шаблоны исключений в файле .gitignore вашего проекта, чтобы Git не отслеживал их и не добавлял в индекс при выполнении команды git add.
Однако, иногда вам нужно игнорировать определённые файлы во всех ваших репозиториях.
Если на вашем компьютере работает Mac OS X, вероятно вы знакомы с файлами .DS_Store.
Если вы используете Emacs или Vim, то вы знаете про файлы, имена которых заканчиваются на ~ или .swp.
Данная настройка позволяет вам определить что-то вроде глобального файла .gitignore.
Если вы создадите файл ~/.gitignore_global с содержанием:
help.autocorrect
Если вы ошибётесь в написании команды, Git покажет вам что-то вроде этого:
$ git chekcout master
git: 'chekcout' is not a git command. See 'git --help'.
The most similar command is checkout
Git старается угадать, что вы имели ввиду, но при этом команду не выполняет.
Если вы установите help.autocorrect в значение 1, то Git будет выполнять эту команду:
$ git chekcout master
WARNING: You called a Git command named 'chekcout', which does not exist.
Continuing under the assumption that you meant 'checkout'
in 0.1 seconds automatically...
Обратите внимание, что команда выполнилась через «0.1» секунды.
help.autocorrect — это число, указываемое в десятых долях секунды.
Поэтому, если вы установите значение 50, то Git даст вам 5 секунд изменить своё решение перед тем, как выполнить скорректированную команду.
Цвета в Git
Git полностью поддерживает цветовой вывод в терминале, что позволяет быстро и легко визуально анализировать вывод команд.
Существует несколько опций для настройки цветов.
color.ui
Git автоматически подсвечивает большую часть своего вывода, но это можно отключить, если вам не нравится такое поведение.
Для отключения цветового вывода в терминал, выполните следующую команду:
$ git config --global color.ui falseЗначение по умолчанию — auto, при котором цвета используются при непосредственном выводе в терминал, но исключаются при перенаправлении вывода в именованный канал или файл.
Вы так же можете установить значение always, что делает вывод одинаковым как в терминал, так и в именованный канал.
Скорее всего, вам это не понадобится; в большинстве случаев, при желании использовать цвета в перенаправленном выводе, указывается флаг --color команде Git для принудительного использования цветовых кодов.
Практически всегда стандартное значение подходит лучше всего.
color.*
Если вы хотите явно указать вывод каких команд должен быть подсвечен и как, Git предоставляет соответствующие настройки.
Каждая из них может быть установлена в значения true, false или always:
color.branch
color.diff
color.interactive
color.status
Каждая из них имеет вложенную конфигурацию, которую можно использовать для настройки отдельных частей вывода при желании переопределить их цвет.
Например, чтобы установить для метаинформации вывода команды diff синий цвет, чёрный фон и полужирный шрифт, выполните команду:
$ git config --global color.diff.meta "blue black bold"Для установки цвета доступны следующие значения: normal, black, red, green, yellow, blue, magenta, cyan, или white.
Для указания атрибутов текста, как bold в предыдущем примере, доступны значения: bold, dim, ul (подчёркнутый), blink и reverse (поменять местами цвет фона и цвет текста).
Внешние программы слияния и сравнения
Хоть в Git и есть встроенная программа сравнения, которая описывается в этой книге, вы можете установить вместо неё другую.
Вы также можете настроить графический инструмент разрешения конфликтов слияния вместо того, чтобы разрешать конфликты вручную.
Мы покажем как настроить Perforce Visual Merge Tool (P4Merge) для разрешения конфликтов слияния, так как это прекрасный и бесплатный инструмент.
Если у вас есть желание попробовать P4Merge, то она работает на всех основных платформах, так что у вас должно получиться.
В примерах мы будем использовать пути к файлам, которые работают в системах Linux и Mac; для Windows вам следует изменить /usr/local/bin на путь к исполняемому файлу у вас в системе.
$ cat /usr/local/bin/extMerge
#!/bin/sh
/Applications/p4merge.app/Contents/MacOS/p4merge $*
Скрипт вызова программы сравнения проверяет наличие 7 аргументов и передаёт 2 из них в скрипт вызова программы слияния.
По умолчанию, Git передаёт следующие аргументы программе сравнения:
path old-file old-hex old-mode new-file new-hex new-modeТак как вам нужны только old-file и new-file, следует использовать скрипт, который передаст только необходимые параметры.
$ cat /usr/local/bin/extDiff
#!/bin/sh
[ $# -eq 7 ] && /usr/local/bin/extMerge "$2" "$5"
Так же следует убедиться, что созданные скрипты могут исполняться:
$ sudo chmod +x /usr/local/bin/extMerge
$ sudo chmod +x /usr/local/bin/extDiff
Теперь можно изменить файл конфигурации для использования ваших инструментов слияния и сравнения.
Для этого необходимо изменить ряд настроек: merge.tool — чтобы сказать Git какую стратегию использовать, mergetool.<tool>.cmd — чтобы сказать Git как запускать команду, mergetool.<tool>.trustExitCode — чтобы сказать Git как интерпретировать код выхода из программы, diff.external — чтобы сказать Git какую команду использовать для сравнения.
Таким образом, команду конфигурации нужно запустить четыре раза:
$ git config --global merge.tool extMerge
$ git config --global mergetool.extMerge.cmd \ 'extMerge "$BASE" "$LOCAL" "$REMOTE" "$MERGED"'
$ git config --global mergetool.extMerge.trustExitCode false
$ git config --global diff.external extDiff
или вручную отредактировать файл ~/.gitconfig добавив соответствующие строки:
[merge] tool = extMerge
[mergetool "extMerge"] cmd = extMerge "$BASE" "$LOCAL" "$REMOTE" "$MERGED" trustExitCode = false
[diff] external = extDiff
После этого, вы можете запускать команды diff следующим образом:
$ git diff 32d1776b1^ 32d1776b1Вместо отображения вывода diff в терминале Git запустит P4Merge, выглядеть это будет примерно так:
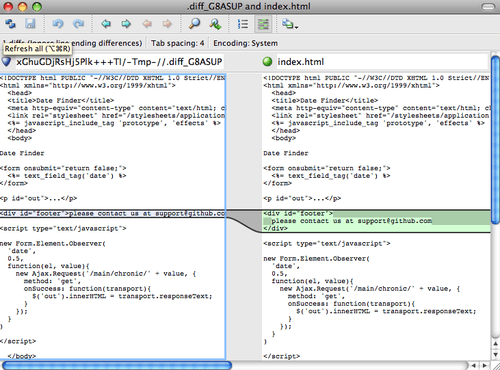
Рисунок 142. P4Merge
Если при слиянии двух веток у вас возникнут конфликты, выполните команду git mergetool; она запустит P4Merge чтобы вы могли разрешить конфликты используя графический интерфейс.
Используя скрипт обёртку для вызова внешних программ, вы можете легко изменить вызываемую программу.
Например, чтобы начать использовать KDiff3 вместо P4Merge, достаточно изменить файл extMerge:
$ cat /usr/local/bin/extMerge
#!/bin/sh
/Applications/kdiff3.app/Contents/MacOS/kdiff3 $*
Теперь, Git будет использовать программу KDiff3 для сравнения файлов и разрешения конфликтов слияния.
Git изначально настроен на использование ряда других инструментов для разрешения конфликтов слияния, поэтому вам не нужно дополнительно что-то настраивать.
Для просмотра списка поддерживаемых инструментов, выполните команду:
$ git mergetool --tool-help
'git mergetool --tool=<tool>' may be set to one of the following: emerge gvimdiff gvimdiff2 opendiff p4merge vimdiff vimdiff2
The following tools are valid, but not currently available: araxis bc3 codecompare deltawalker diffmerge diffuse ecmerge kdiff3 meld tkdiff tortoisemerge xxdiff
Some of the tools listed above only work in a windowed
environment. If run in a terminal-only session, they will fail.
Если вы хотите использовать KDiff3 только для разрешения конфликтов слияния, но не для сравнения, выполните команду:
$ git config --global merge.tool kdiff3Если выполнить эту команду вместо настройки использования файлов extMerge и extDiff, то Git будет использовать KDiff3 для разрешения конфликтов слияния, а для сравнения — стандартную программу diff.
Форматирование и пробелы
Проблемы форматирования и пробелов являются одними из самых неприятных и незаметных проблем, с которыми сталкивают разработчики при совместной работе, особенно используя разные платформы.
Это легко может произойти с патчами или с любой другой совместной работой, так как редакторы молча исправляют несоответствия, и если ваши файлы когда либо касаются систем Windows, то переносы строк могут быть заменены.
В Git есть несколько настроек, чтобы справиться с этими проблемами.
core.autocrlf
Если вы программируете в Windows и работаете с людьми, которые не используют её (или наоборот), рано или поздно, вы столкнётесь с проблемами переноса строк.
Это происходит потому, что Windows при создании файлов использует для обозначения переноса строки два символа «возврат каретки» и «перевод строки», в то время как Mac и Linux используют только один — «перевод строки».
Это незначительный, но невероятно раздражающий факт кроссплатформенной работы; большинство редакторов в Windows молча заменяют переносы строк вида LF на CRLF или вставляют оба символа, когда пользователь нажимает клавишу ввод.
Git может автоматически конвертировать переносы строк CRLF в LF при добавлении файла в индекс и наоборот — при извлечении кода.
Такое поведение можно включить используя настройку core.autocrlf.
Если у вас Windows, то установите значение true — при извлечении кода LF окончания строк будут преобразовываться в CRLF:
$ git config --global core.autocrlf trueЕсли у вас система Linux или Mac, то вам не нужно автоматически конвертировать переносы строк при извлечении файлов; однако, если файл с CRLF окончаниями строк случайно попал в репозиторий, то Git может его исправить.
Можно указать Git конвертировать CRLF в LF во время коммита, но не наоборот, установив настройке core.autocrlf значение input:
$ git config --global core.autocrlf inputТакая конфигурация позволит вам использовать CRLF переносы строк в Windows, при этом в репозитории и системах Mac и Linux будет использован LF.
Если вы используете Windows и программируете только для Windows, то вы можете отключить описанный функционал задав значение false, сохраняя при этом CR символы в репозитории:
$ git config --global core.autocrlf falsecore.whitespace
Git поставляется настроенным на обнаружение и исправление некоторых проблем с пробелами.
Он в состоянии найти шесть основных проблем, обнаружение трёх из них включено по умолчанию, а трёх других — выключено.
Те, что включены по умолчанию — это blank-at-eol, что ищет пробелы в конце строки; blank-at-eof, что ищет пробелы в конце файла; и space-before-tab, что ищет пробелы перед символом табуляции в начале строки.
Те, что выключены по умолчанию — это indent-with-non-tab, что ищет строки с пробелами вначале вместо символа табуляции (и контролируется настройкой tabwidth); tab-in-indent, что ищет символы табуляции в отступах в начале строки; и cr-at-eol, которая указывает Git на валидность наличия CR в конце строки.
Указав через запятую значения для настройки core.whitespace, можно сказать Git какие из этих опций должны быть включены.
Чтобы отключить ненужные проверки, достаточно удалить их из строки значений или поставить знак - перед каждой из них.
Например, чтобы включить все проверки, кроме space-before-tab, выполните команду (при этом trailing-space является сокращением и охватывает как blank-at-eol, так и blank-at-eof):
$ git config --global core.whitespace \ trailing-space,-space-before-tab,indent-with-non-tab,tab-in-indent,cr-at-eolИли можно указать только часть проверок:
$ git config --global core.whitespace \ -space-before-tab,indent-with-non-tab,tab-in-indent,cr-at-eolGit будет искать указанные проблемы при выполнении команды git diff и пытаться подсветить их, чтобы вы могли исправить их перед коммитом.
Так же эти значения будут использоваться во время применения патчей командой git apply.
При применении патчей, можно явно указать Git информировать вас в случае нахождения проблем с пробелами:
$ git apply --whitespace=warn <patch>Так же можно указать Git автоматически исправлять эти проблемы перед применением патча:
$ git apply --whitespace=fix <patch>Эти настройки так же применяются при выполнении команды git rebase.
Если проблемные пробелы попали в коммит, но ещё не отправлены в удалённую ветку, можно выполнить git rebase --whitespace=fix для автоматического исправления этих проблем.
Конфигурация сервера
Для серверной части Git не так много настроек, но есть несколько интересных, на которые стоит обратить внимание.
receive.fsckObjects
Git способен убедиться, что каждый объект, отправленный командой push, валиден и соответствует своему SHA-1-хешу.
По умолчанию эта функция отключена; это очень дорогая операция и может привести к существенному замедлению, особенно для больших объёмов отправляемых данных или для больших репозиториев.
Вы можете включить проверку целостности объектов для каждой операции отправки, установив значение receive.fsckObjects в true:
$ git config --system receive.fsckObjects trueТеперь, Git будет проверять целостность репозитория до принятия новых данных для уверенности, что неисправные или злонамеренные клиенты не смогут отправить повреждённые данные.
receive.denyNonFastForwards
Если вы перебазируете коммиты, которые уже отправлены, и попытаетесь отправить их снова или попытаетесь отправить коммит в удалённую ветку, в которой не содержится коммит, на который она указывает, то данные приняты не будут.
В принципе, это правильная политика; но в случае перебазирования — вы знаете, что делаете и можете принудительно обновить удалённую ветку используя флаг -f для команды push.
Для запрета перезаписи истории установите receive.denyNonFastForwards:
$ git config --system receive.denyNonFastForwards trueСделать то же самое можно другим способом — используя хук на стороне сервера, мы рассмотрим его немного позже.
Этот подход позволяет более гибко настроить ограничения, например, запретить перезапись истории определённой группе пользователей.
receive.denyDeletes
Политику denyNonFastForwards можно обойти, удалив ветку и создав новую с таким же именем.
Для предотвращения этого, установите receive.denyDeletes в значение true:
$ git config --system receive.denyDeletes trueЭта команда запретит удаление веток и тегов всем пользователям.
Чтобы удалить ветку, придётся удалить все соответствующие ей файлы на сервере вручную.
Куда более интересный способ — это настроить права пользователей, с ним вы познакомитесь в разделе Пример принудительной политики Git.
Git configuration — Virtual Server
Create the directory for the Git repositories
Create the user that will have access to the Git repositories
Use the mkdir .ssh command to create the directory, and the touch .ssh/authorized_keys command to create the file.
Note that the .ssh directory starts with a dot (.). This means that you will not see it using a regular directory listing command such as ls or ll, you will need to use the -a switch to see the hidden files.
Once you have created the directory and file, you will need to change the owner and group to git:git, and change the permissions on the authorized_keys file to 600.
Do this with the chown -R git:git .ssh command (note the capital R), and then change directories into .ssh and use the chmod 600 authorized_keys command.
Adding the SSH public keys
An Internet search for «SSH key generation (your OS)» will also find quite a few tutorials on how to generate an SSH key pair.
The best method is to use scp, either from the command line of your local computer or from an SCP client like FileZilla — http://filezilla-project.org/.
")


")