
- Step 1 — Identifying the Database Version
- Step 2 — Stopping the Database Server
- Step 4 — Changing the Root Password
- Prerequisites
- Step 1 — Identifying the Database Version and Stopping the Server
- Step 3 — Changing the Root Password
- Changing the MariaDB Password
- Changing the MySQL Password
- Step 4 — Reverting Your Database Server to Normal Settings
- Prerequisites
- Step 1 — Identifying the Database Version and Stopping the Server
- Step 3 — Changing the Root Password
- Changing the MariaDB Password
- Changing the MySQL Password
- Step 4 — Reverting Your Database Server to Normal Settings
- Access denied for user ‘root’@’localhost’ (using password
- MySQL 8 set new root password
- Not able to connect with root and no password
- 1699 SET PASSWORD has no significance for user ‘root’@’localhost’ as authentication plugin does not support it.
- 1287 ‘SET PASSWORD FOR = PASSWORD(»)’ is deprecated and will be removed in a future release. Please use SET PASSWORD FOR = » instead
- MySQL set new root password
- Windows Resetting the Root Password
- Ubuntu Resetting the Root Password
- Reset the user by query
- Подготовка
- Как изменить пароль пользователя MySQL
- Войдите в оболочку MySQL как root.
- Установите пароль пользователя MySQL.
- Подтвердите новый пароль.
- How to Reset MySQL Root Password in Windows
- Step 1: Stop the MySQL server
- Step 2: Launch a Text Editor
- Step 3: Create a New Text File with the Password Command
- Step 4: Open a Command Prompt
- Step 5: Restart the MySQL Server with Your New Config File
- Step 6: Clean up
- Как поменять пароль root в MySQL
- Если пароль root ИЗВЕСТЕН
- Если пароль root НЕ ИЗВЕСТЕН
- Setup Windows Environment
- Step 1: Create a MySQL Initialization File.
- Step 2: Stop the MySQL Services.
- Step 3: Start the Services Using the Initialization File.
- Step 4: Connect to MySQL and Reset the Password.
- Step 5: Restart the MySQL Service.
- Summary
- Resetting root password for Windows and Unix
- Resetting root password using –skip-grant-tables option
- Check MySQL Version
- Stop MySQL Server
- Skip Grant Tables & Networking
- Login To MySQL Shell
- Reset Root Password
- How to set a password for the root user of the MySQL service #
- Another way to set the root user password in the MySQL #
- How to change the MySQL root password if you forget it! #
- Fix Error & reset root password when ” /var/run/mysqld’ for UNIX socket file don’t exists” #
- Set a new root password #
- How Reset Mysql 8. x Password #
- How to set up, change, and recover a MySQL root password
- Setting the password for the first time
- Changing the MySQL root user password
- Recover your MySQL password
- How To Solve The MySQL Error: Access denied for user root@localhost
- Resetting MySQL root password
- Prerequisites
- How to reset MySQL root password in Linux
- Step 1: Log in to MySQL
- Step 2: Finding the. pid file used by the MySQL service
- Step 3: Killing the mysqld /. pid process
- Step 4: Creating a new root password file
- Step 5: Restarting the MySQL Server and Applying the Newly created Password
- How to reset MySQL root password in Windows
- Step 1: Stopping the MySQL server.
- Step 2: Open your favorite text editor
- Step 3: Creating a new Password text file using the password command
- Step 4: Launch CMD (Command Prompt)
- Step 5: Restarting MySQL Server and Applying the new Config file
- Generic instructions for resetting MySQL root password
- Change root password
- How do I find my MySQL root password?
- How set MySQL root password?
- How do I change the root password in MySQL 8?
Step 1 — Identifying the Database Version
Most modern Linux distributions ship with either MySQL or MariaDB, a popular drop-in replacement which is fully compatible with MySQL. Depending on the database used and its version, you’ll need to use different commands to recover the root password.
You can check your version with the following command:
- mysql --version
You’ll see some output like this with MySQL:
mysql Ver 14.14 Distrib 5.7.16, for Linux (x86_64) using EditLine wrapperOr output like this for MariaDB:
mysql Ver 15.1 Distrib 5.5.52-MariaDB, for Linux (x86_64) using readline 5.1Make note of which database and which version you’re running, as you’ll use them later. Next, you need to stop the database so you can access it manually.
Step 2 — Stopping the Database Server
To change the root password, you have to shut down the database server beforehand.
You can do that for MySQL with:
- systemctl stop mysql
And for MariaDB wtih:
- systemctl stop mariadb
After the database server is stopped, you’ll access it manually to reset the root password.
Step 4 — Changing the Root Password
One simple way to change the root password for modern versions of MySQL is using the ALTER USER command. However, this command won’t work right now because the grant tables aren’t loaded.
Let’s tell the database server to reload the grant tables by issuing the FLUSH PRIVILEGES command.
- FLUSH PRIVILEGES
Now we can actually change the root password.
For MySQL 5.7.6 and newer as well as MariaDB 10.1.20 and newer, use the following command.
- ALTER @ IDENTIFIED BY
For MySQL 5.7.5 and older as well as MariaDB 10.1.20 and older, use:
- SET PASSWORD FOR @ PASSWORD
Make sure to replace new_password with your new password of choice.
Note: If the ALTER USER command doesn’t work, it’s usually indicative of a bigger problem. However, you can try UPDATE ... SET to reset the root password instead.
- UPDATE mysql.user SET authentication_string PASSWORD WHERE User AND Host
Remember to reload the grant tables after this.
In either case, you should see confirmation that the command has been successfully executed.
Query OK, 0 rows affected (0.00 sec)The password has been changed, so you can now stop the manual instance of the database server and restart it as it was before.
Prerequisites
To recover your MySQL or MariaDB root password, you will need:
- Access to the Ubuntu 18.04 server running MySQL or MariaDB with a sudo user or other way of accessing the server with root privileges. In order to try out the recovery methods in this tutorial without affecting your production server, use the initial server setup tutorial to create a test server with a regular, non-root user with sudo privileges. Then install MySQL following How to install MySQL on Ubuntu 18.04.
Step 1 — Identifying the Database Version and Stopping the Server
Ubuntu 18.04 runs either MySQL or MariaDB, a popular drop-in replacement that is fully compatible with MySQL. You’ll need to use different commands to recover the root password depending on which of these you have installed, so follow the steps in this section to determine which database server you’re running.
Check your version with the following command:
- mysql --version
If you’re running MariaDB, you’ll see “MariaDB” preceded by the version number in the output:
mysql Ver 15.1 Distrib 10.1.47-MariaDB, for debian-linux-gnu (x86_64) using readline 5.2You’ll see output like this if you’re running MySQL:
mysql Ver 14.14 Distrib 5.7.32, for Linux (x86_64) using EditLine wrapperMake a note of which database, as this determines the appropriate commands to follow in the rest of this tutorial.
In order to change the root password, you’ll need to shut down the database server. If you’re running MariaDB, you can do so with the following command:
- systemctl stop mariadb
For MySQL, shut down the database server by running:
- systemctl stop mysql
With the database stopped, you can restart it in safe mode to reset the root password.
Step 3 — Changing the Root Password
The database server is now running in a limited mode; the grant tables are not loaded, and there’s no networking support enabled. This lets you access the server without providing a password, but it prohibits you from executing commands that alter data. To reset the root password, you must load the grant tables now that you’ve gained access to the server.
Tell the database server to reload the grant tables by issuing the FLUSH PRIVILEGES command:
- ">FLUSH PRIVILEGES
You can now change the root password. The method you use depends on whether you are using MariaDB or MySQL.
Changing the MariaDB Password
If you are using MariaDB, execute the following statement to set the password for the root account, making sure to replace new_password with a strong new password that you’ll remember:
- ">UPDATE mysql.user SET password PASSWORD WHERE user
You’ll see this output indicating that the password changed:
Query OK, 1 row affected (0.00 sec)MariaDB allows using custom authentication mechanisms, so execute the following two statements to make sure MariaDB will use its default authentication mechanism for the new password you assigned to the root account:
- ">UPDATE mysql.user SET authentication_string WHERE user
- ">UPDATE mysql.user SET plugin WHERE user
You’ll see the following output for each statement:
Query OK, 0 rows affected (0.01 sec)The password is now changed. Type exit to exit the MariaDB console and proceed to Step 4 to restart the database server in normal mode.
Changing the MySQL Password
For MySQL, execute the following statement to change the root user’s password, replacing new_password with a strong password you’ll remember:
- ">UPDATE mysql.user SET authentication_string PASSWORD WHERE user
You’ll see this output indicating the password was changed successfully:
Query OK, 1 row affected (0.00 sec)MySQL allows using custom authentication mechanisms, so execute the following statement to tell MySQL touse its default authentication mechanism to authenticate the root user using the new password:
- ">UPDATE mysql.user SET plugin WHERE user
You’ll see output similar to the previous command:
Query OK, 1 row affected (0.00 sec)The password is now changed. Exit the MySQL console by typing exit.
Let’s restart the database in normal operational mode.
Step 4 — Reverting Your Database Server to Normal Settings
In order to restart the database server in its normal mode, you have to revert the changes you made so that networking is enabled and the grant tables are loaded. Again, the method you use depends on whether you used MariaDB or MySQL.
For MariaDB, unset the MYSQLD_OPTS environment variable you set previously:
- systemctl unset-environment MYSQLD_OPTS
Then, restart the service using systemctl:
- systemctl restart mariadb
For MySQL, remove the modified systemd configuration:
- systemctl revert mysql
You’ll see output similar to the following:
Removed /etc/systemd/system/mysql.service.d/override.conf.
Removed /etc/systemd/system/mysql.service.d.
Then, reload the systemd configuration to apply the changes:
- systemctl daemon-reload
Finally, restart the service:
- systemctl restart mysql
The database is now restarted and is back to its normal state. Confirm that the new password works by logging in as the root user with a password:
- mysql -u root -p
You’ll be prompted for a password. Enter your new password, and you’ll gain access to the database prompt as expected.
Prerequisites
To recover your MySQL or MariaDB root password, you will need:
Access to the Ubuntu 20.04 server running MySQL or MariaDB with a sudo user or other way of accessing the server with root privileges.
In order to test the recovery methods in this tutorial without affecting your production server, create a test server and then follow our initial server setup tutorial. Make sure to create a regular, non-root user with sudo privileges. Then install MySQL following our guide on How To Install MySQL on Ubuntu 20.04 or install MariaDB following How To Install MariaDB on Ubuntu 20.04.
Note: Both database installation guides retain the default configuration for the database root account where a password is not needed to authenticate, as long as you can access the system’s root account. You can still follow this guide to set and verify a new password.
Step 1 — Identifying the Database Version and Stopping the Server
Ubuntu 20.04 runs either MySQL or MariaDB—a popular drop-in replacement that is fully compatible with MySQL. You’ll need to use different commands to recover the root password depending on which of these you have installed, so follow the steps in this section to determine which database server you’re running.
Check your version with the following command:
- mysql --version
If you’re running MariaDB, you’ll see “MariaDB” preceded by the version number in the output:
mysql Ver 15.1 Distrib 10.3.25-MariaDB, for debian-linux-gnu (x86_64) using readline 5.2You’ll see output like this if you’re running MySQL:
mysql Ver 8.0.22-0ubuntu0.20.04.3 for Linux on x86_64 ((Ubuntu))Note the database you are running. This will determine the appropriate commands to follow in the rest of this tutorial.
In order to change the root password, you’ll need to shut down the database server. If you’re running MariaDB, you can do so with the following command:
- systemctl stop mariadb
For MySQL, shut down the database server by running:
- systemctl stop mysql
With the database stopped, you can restart it in safe mode to reset the root password.
Step 3 — Changing the Root Password
The database server is now running in a limited mode; the grant tables are not loaded, and there’s no networking support enabled. This lets you access the server without providing a password, but it prohibits you from executing commands that alter data. To reset the root password, you must load the grant tables now that you’ve gained access to the server.
Tell the database server to reload the grant tables by issuing the FLUSH PRIVILEGES command:
- ">FLUSH PRIVILEGES
You can now change the root password. The method you use depends on whether you are using MariaDB or MySQL.
Changing the MariaDB Password
If you are using MariaDB, execute the following statement to set the password for the root account, making sure to replace new_password with a strong new password that you’ll remember:
- ">ALTER @ IDENTIFIED BY
You’ll see this output indicating that the password changed:
Query OK, 0 rows affected (0.001 sec)MariaDB allows using custom authentication mechanisms, so execute the following two statements to make sure MariaDB will use its default authentication mechanism for the new password you assigned to the root account:
- ">UPDATE mysql.user SET authentication_string WHERE user
- ">UPDATE mysql.user SET plugin WHERE user
You’ll see the following output for each statement:
Query OK, 0 rows affected (0.01 sec)The password is now changed. Type exit to exit the MariaDB console and proceed to Step 4 to restart the database server in normal mode.
Changing the MySQL Password
For MySQL, execute the following statement to change the root user’s password, replacing new_password with a strong password you’ll remember. MySQL allows using custom authentication mechanisms, so the following statement also makes sure that MySQL will use its default authentication mechanism to authenticate the root user using the new password:
- ">ALTER @ IDENTIFIED WITH caching_sha2_password BY
You’ll see this output indicating the password was changed successfully:
Query OK, 0 rows affected (0.01 sec)The password is now changed. Exit the MySQL console by typing exit.
Let’s restart the database in normal operational mode.
Step 4 — Reverting Your Database Server to Normal Settings
In order to restart the database server in its normal mode, you have to revert the changes you made so that networking is enabled and the grant tables are loaded. Again, the method you use depends on whether you used MariaDB or MySQL.
For MariaDB, unset the MYSQLD_OPTS environment variable you set previously:
- systemctl unset-environment MYSQLD_OPTS
Then, restart the service using systemctl:
- systemctl restart mariadb
For MySQL, remove the modified systemd configuration:
- systemctl revert mysql
You’ll see output similar to the following:
Removed /etc/systemd/system/mysql.service.d/override.conf.
Removed /etc/systemd/system/mysql.service.d.
Then, reload the systemd configuration to apply the changes:
- systemctl daemon-reload
Finally, restart the service:
- systemctl restart mysql
The database is now restarted and is back to its normal state. Confirm that the new password works by logging in as the root user with a password:
- mysql -u root -p
You’ll be prompted for a password. Enter your new password, and you’ll gain access to the database prompt as expected.
Access denied for user ‘root’@’localhost’ (using password
On fresh installation on Linux Mint 19 and Ubuntu 18.04 you can see that MySQL server is installed by default. If you try to log in you will get an error like:
In order to log in your MySQL server and create new user or get access to your DB you can do:
- Login in MySQL with your OS account password by:
sudo mysql -u root
sudo mysql -u root -p
After entering your user OS password you could be asked for MySQL root password — enter nothing and finally you will enter in MySQL server:
sudo mysql -u root -p
[sudo] password for myuser:
Enter password:
Welcome to the MySQL monitor. Commands end with ; or \g.
Your MySQL connection id is 23
Server version: 5.7.23-0ubuntu0.18.04.1 (Ubuntu)
After successful login you can select any of the other sections or just remove the root password by:
ALTER USER 'root'@'localhost' IDENTIFIED WITH mysql_native_password BY '';and restart mysql server by(optional):
sudo systemctl stop mysqlMySQL 8 set new root password
If you can log in to your MySQL server and you wanto to change your password by query you can do it by:
ALTER USER 'root'@'localhost' IDENTIFIED WITH mysql_native_password BY '123456';or removing the root password:
ALTER USER 'root'@'localhost' IDENTIFIED WITH mysql_native_password BY '';Not able to connect with root and no password
If you remove your root password or set it to null then you may experience problems when you try to connect with root. It’s advisable to create another DBA user while playing with these settings.
One of the reasons to not be able to connect would be: auth_socket plugin. This is a new change since 5.7:
If we want to configure a password, we need to change the plugin and set the password at the same time, in the same command. First changing the plugin and then setting the password won’t work, and it will fall back to auth_socket again. So, run:ALTER USER 'root'@'localhost' IDENTIFIED WITH mysql_native_password BY 'test';For more information you can check the link in references
1699 SET PASSWORD has no significance for user ‘root’@’localhost’ as authentication plugin does not support it.
In case that you are trying to change your root password(or other user password without success you can check previous section.
1287 ‘SET PASSWORD FOR = PASSWORD(»)’ is deprecated and will be removed in a future release. Please use SET PASSWORD FOR = » instead
If you see this warning your can solve it just by removing:
SET PASSWORD FOR [email protected]=PASSWORD('1234');SET PASSWORD FOR [email protected]='';It seems that most DB tools are not updated with last changes and still produce old format queries
MySQL set new root password
As the previous section if you want to change your root password you can do it by running:
after MySQL 5.7.6:
ALTER USER 'root'@'localhost' IDENTIFIED BY 'newPass';prior MySQL 5.7.5:
SET PASSWORD FOR 'root'@'localhost' = PASSWORD('newPass');This way you will reset only the root password. If your forgot your root password than you can check next section.
Windows Resetting the Root Password
For this solution you will need administrative rights:
- Stop the MySQL server(service)
- Create new text file — C:\mysqlResetRoot.txt
- Add this line(for earlier version use — see prevoius section):
ALTER USER 'root'@'localhost' IDENTIFIED BY 'newPass';Open Command Prompt
- start menu, type cmd and enter
- WINDOWS+R and type cmd
Go to your MySQL installation folder:
cd "C:\Program Files\MySQL\MySQL Server 5.7\bin- Start MySQL with this command:
mysqld --init-file=C:\\mysqlResetRoot.txtUbuntu Resetting the Root Password
For Ubuntu and Linux Mint you can do these steps:
- Open terminal
- Login with the user running the MySQL service
- Stop the MySQL server by
sudo systemctl stop mysqlfor older versions of Ubuntu you can use:
sudo /etc/init.d/mysql stop or
service mysqld stop- Create new text file — /home/user/mysqlResetRoot.txt
- Add this line(for earlier version use — see prevoius section):
ALTER USER 'root'@'localhost' IDENTIFIED BY 'newPass';- Start MySQL with this command:
mysqld --init-file=/home/me/mysqlResetRoot.txt &Reset the user by query
Another option to reset the password of your root account is by update statement. This is a simple update — set which will set new password:.
UPDATE mysql.user SET authentication_string = PASSWORD('newPass'), password_expired = 'N' WHERE User = 'root' AND Host = 'localhost';Finally reload the table grants by:
FLUSH PRIVILEGES;Подготовка
В зависимости от версии сервера MySQL или MariaDB, которую вы используете в своей системе, вам нужно будет использовать разные команды для изменения пароля пользователя.
Чтобы узнать версию сервера базы данных, введите следующую команду:
mysql --versionЕсли в вашей системе установлен MySQL, результат будет выглядеть примерно так:
mysql Ver 14.14 Distrib 5.7.22, for Linux (x86_64) using EditLine wrapperИли выведите такой вывод для MariaDB:
mysql Ver 15.1 Distrib 10.1.33-MariaDB, for debian-linux-gnu (x86_64) using readline 5.2Обязательно отметьте, какую версию MySQL или MariaDB вы используете. Если вы хотите получить список всех учетных записей пользователей MySQL, ознакомьтесь с этим руководством.
Как изменить пароль пользователя MySQL
Выполните следующие действия, чтобы изменить пароль пользователя MySQL:
Войдите в оболочку MySQL как root.
Войдите в оболочку MySQL, набрав следующую команду и при появлении запроса введите пароль root-пользователя MySQL:
mysql -u root -pЕсли вы не установили пароль для пользователя root MySQL, вы можете войти в систему с помощью sudo mysql .
Установите пароль пользователя MySQL.
Введите следующие команды, если у вас MySQL 5.7.6 и новее или MariaDB 10.1.20 и новее:
">ALTER USER 'user-name'@'localhost' IDENTIFIED BY 'NEW_USER_PASSWORD';">FLUSH PRIVILEGES;">UPDATE mysql.user SET authentication_string = PASSWORD('NEW_USER_PASSWORD')">WHERE User = 'user-name' AND Host = 'localhost';">FLUSH PRIVILEGES;Введите следующие команды, если у вас MySQL 5.7.5 и ранее или MariaDB 10.1.20 и ранее:
">SET PASSWORD FOR 'user-name'@'localhost' = PASSWORD('NEW_USER_PASSWORD');">FLUSH PRIVILEGES;
Убедитесь, что вы изменили user-name на имя пользователя, для которого хотите изменить пароль. Если пользователь подключается к серверу MySQL с другого хоста, измените localhost на удаленное имя хоста или IP-адрес.
В обоих случаях, если все пойдет хорошо, вы увидите следующий результат:
Query OK, 0 rows affected (0.00 sec)Выйдите из командной строки MySQL, выполнив:
">quit;Подтвердите новый пароль.
Чтобы убедиться, что новый пароль применен правильно, введите:
mysql -u user-name -h localhost -pВам будет предложено ввести новый пароль пользователя. Введите его, и вы войдете на свой сервер MySQL.
How to Reset MySQL Root Password in Windows
Step 1: Stop the MySQL server
1. Begin by checking if you’re logged in as an administrator.
2. Press Win+R (hold the Windows/Super key, and press “r”.) Once the “Run” box appears type:
services.msc3. Click OK.
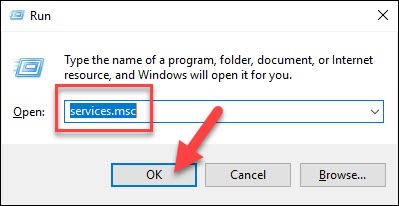
4. Scroll down the list of services to find the MySQL service. Right-click that entry, then left-click Stop.
Step 2: Launch a Text Editor
Click on the menu and search for Notepad.
Alternatively, you can use the path: menu > Windows Accessories > Notepad.
Step 3: Create a New Text File with the Password Command
1. Enter the following line into the text editor:
ALTER USER 'root'@'localhost' IDENTIFIED BY 'NewPassword';Make sure you keep the quote marks and semicolon. Replace NewPassword with the password of your choice.

2. Use the File > Save As menu to save the file to the root of your hard drive (C: ). Choose a filename, such as mysql-init.txt.
Consequently, the localhost command makes the password change on your local system. If you’re changing the password on a system over the network, substitute the hostname for localhost.
Step 4: Open a Command Prompt
1. Press Ctrl+Shift+Esc.
2. Then, click on the File menu > Run new task.
3. Type cmd.exe, and check the box to run as administrator.
4. Click OK.
Step 5: Restart the MySQL Server with Your New Config File
1. Navigate to the MySQL directory using the command prompt:
cd "C:\Program Files\MySQL\MySQL Server 8.0\bin"2. Then, enter the following:
mysqld --init-file=C:\\mysql-init.txtNote that there are two slashes after the C: prompt.Also, if you chose a different filename in Step 2, use that name after the double slash.
Step 6: Clean up
Now, you can log into your MySQL server as root using the new password.
Double-check to make sure it works. If you have unique configuration options (such as launching MySQL with a —defaults-file option), go ahead and do so.
Once MySQL launches, and you’ve confirmed the password change, delete the C:\mysql-init.txt file.
Conclusion
After reading this guide, you should be ready to reset the root password on MySQL in Linux and Windows. Granted, it is not too challenging, yet it is a secure way to change a sensitive password.
Как поменять пароль root в MySQL
Если пароль root ИЗВЕСТЕН
Возьмем самую простую ситуацию, когда пароль от учетной записи root вам известен и все что нужно сделать, это просто его поменять. Чтобы задать новый пароль для учетной записи root, необходимо проделать следующие действия:
В том случае, если вы пользуетесь каким-либо веб-интерфейсом, например, phpMyAdmin, то тогда вы можете пропустить пункт 1 и сразу же выполнить запрос для нужной версии MySQL (пункт 2) прямо из интерфейса phpMyAdmin (вкладка SQL).
1) Подключаемся в консоль MySQL сервера с правами root (не забываем ввести пароль, после появления соответствующего запроса):
mysql -u root -p2) Меняем пароль для пользователя root:
Для MySQL версий 5.7.6 и новее (5.7.7, 5.7.8…)
ALTER USER 'root'@'localhost' IDENTIFIED BY '';Для MySQL версий 5.7.5 и старее (5.7.4, 5.7.3…)
SET PASSWORD FOR 'root'@'localhost' = PASSWORD('');NEW_PASSWORD — это пароль, который вам необходимо поменять на свой собственный.
В результате выполнения данной команды, мы должны получить вот такой вывод в консоли:
Query OK, 0 rows affected (0.01 sec)В том случае, если указанные выше команды по какой то причине не сработали, вы можете воспользоваться следующим запросом:
UPDATE mysql.user SET authentication_string=PASSWORD(''), plugin='mysql_native_password' WHERE User='root';В результате выполнения данной команды, мы должны получить вот такой вывод в консоли:
Query OK, 1 row affected, 1 warning (0.00 sec)
Rows matched: 1 Changed: 1 Warnings: 1
3) Перезагружаем привилегии, чтобы изменения вступили в силу:
flush privileges;4) Для выхода из консоли MySQL сервера выполняем команду выхода:
exit;После этого, пароль должен поменяться.
Если пароль root НЕ ИЗВЕСТЕН
Если вы не знаете текущий пароль root (потеряли, забыли) в MySQL, то придется пойти чуть более сложным путем, чем описанные действия выше:
1) Останавливаем mysqld:
sudo service mysql stop2) Проверяем, что нет запущенных процессов mysqld:
ps -eaf|grep mysqldЕсли все нормально, то вывод команды должен состоять лишь из одной строки, примерно такого содержания:
root 24902 1530 0 11:41 pts/0 00:00:00 grep --color=auto mysqld3) Создаем каталог /var/run/mysqld для запуска mysqld в safe режиме из консоли
sudo mkdir /var/run/mysqld4) Делаем владельцем данного каталога пользователя mysql (чтобы не было проблем с правами)
sudo chown mysql /var/run/mysqld5) Запускаем MySQL в ручном режиме из консоли, пропуская проверку прав (опция —skip-grant-tables). А также отключаем доступ к серверу через и —skip-networking), чтобы злоумышленник не мог воспользоваться тем, что мы отключили проверку прав пользователей. При использовании данной опции, доступ к серверу становится возможным только через localhost.
sudo mysqld_safe --skip-grant-tables --skip-networking &В случае успешного запуска, вывод в консоли должен быть примерно таким:
# sudo mysqld_safe --skip-grant-tables --skip-networking &
[1] 26152
2019-05-02T14:17:14.807620Z mysqld_safe Logging to syslog.
2019-05-02T14:17:14.815041Z mysqld_safe Logging to '/var/log/mysql/error.log'.
2019-05-02T14:17:14.856418Z mysqld_safe Starting mysqld daemon with databases from /var/lib/mysql
6) Подключаемся из консоли к серверу mysqld и выбираем базу данных mysql:
mysql -u root mysql7) Используем плагин mysql_native_password, иначе в некоторых случаях будем получать ошибку «ERROR 1524 (HY000): Plugin ‘auth_socket’ is not loaded», а нам это не нужно:
update user set plugin="mysql_native_password";Вывод в результате выполнения данной команды должен быть примерно таким:
Query OK, 0 rows affected (0.00 sec)
Rows matched: 4 Changed: 0 Warnings: 0
8) Перезагружаем привилегии:
flush privileges;9) Меняем пароль для нужного пользователя, в нашем случае это root:
Для MySQL версий 5.7.6 и новее (5.7.7, 5.7.8…)
ALTER USER 'root'@'localhost' IDENTIFIED BY '';Для MySQL версий 5.7.5 и старее (5.7.4, 5.7.3…)
SET PASSWORD FOR 'root'@'localhost' = PASSWORD('');NEW_PASSWORD — это пароль, который вам необходимо поменять на свой собственный.
В результате выполнения данной команды, мы должны получить вот такой вывод в консоли:
Query OK, 0 rows affected (0.01 sec)В том случае, если указанные выше команды по какой то причине не сработали, вы можете воспользоваться следующим запросом:
UPDATE mysql.user SET authentication_string=PASSWORD(''), plugin='mysql_native_password' WHERE User='root';В результате выполнения данной команды, мы должны получить вот такой вывод в консоли:
Query OK, 1 row affected, 1 warning (0.00 sec)
Rows matched: 1 Changed: 1 Warnings: 1
9) После чего, вводим команду exit для отключения:
exit;10) Выключаем запущенный в ручном режиме Mysqld сервер:
sudo mysqladmin -S /var/run/mysqld/mysqld.sock shutdownЕсли все пройдет успешно, то вывод должен быть примерно таким:
2019-05-02T14:30:03.404615Z mysqld_safe mysqld from pid file /var/run/mysqld/mysqld.pid ended
[1]+ Done sudo mysqld_safe --skip-grant-tables --skip-networking
Если же команда не сработала и вы получаете вот такую (или любую другую) ошибку:
mysqladmin: connect to server at 'localhost' failed
error: 'Access denied for user 'root'@'localhost' (using password: NO)'
То можно принудительно завершить процесс с помощью следующей команды:
sudo kill `cat /var/run/mysqld/mysqld.pid`11) Проверяем, что нет запущенных процессов mysqld:
ps -eaf|grep mysqldЕсли все нормально, то вывод команды должен состоять лишь из одной строки, примерно такого содержания:
root 24902 1530 0 11:41 pts/0 00:00:00 grep --color=auto mysqld12) Запускаем Mysql-server в нормальном режиме:
sudo service mysql startИ пытаемся подключиться к нашему серверу с новым паролем, который мы установили.
Setup Windows Environment
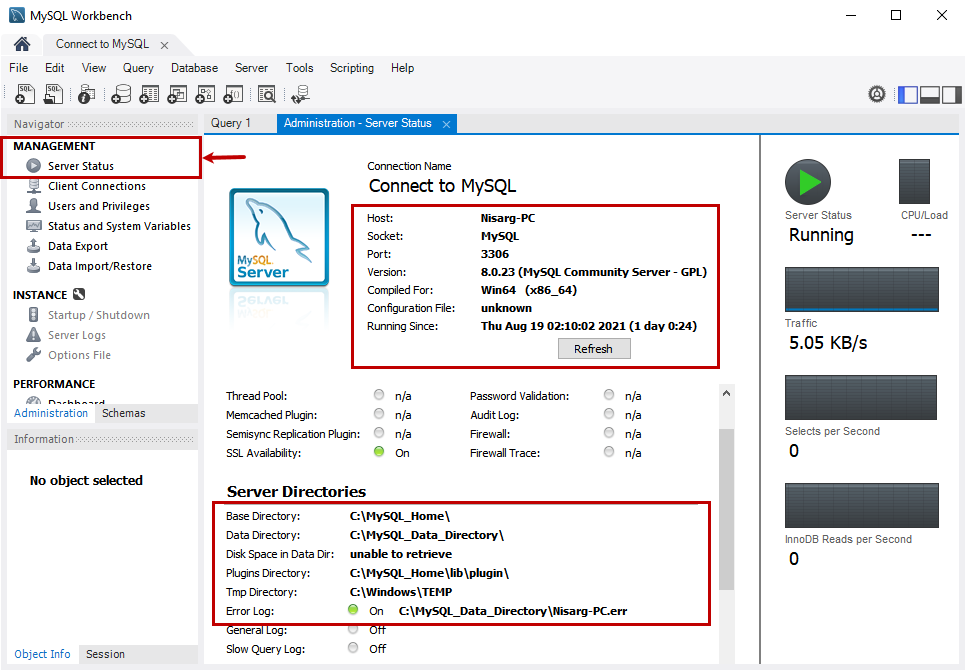
We are going to learn the methods to reset root passwords in a Windows environment. For the demonstration, I created a virtual machine and installed Windows 10 and MySQL Server on it. The installation of the MySQL server was performed by using the MySQL installation wizard. The configuration of MySQL is as follows:
- MySQL Version: 8.0.23 (MySQL Community Server)
- MySQL Home directory: C:\MySQL_Home\
- Location of data directory: C:\MySQL_Data_Directory\
- Location of initialization file: C:\MySQL_Home\my.ini
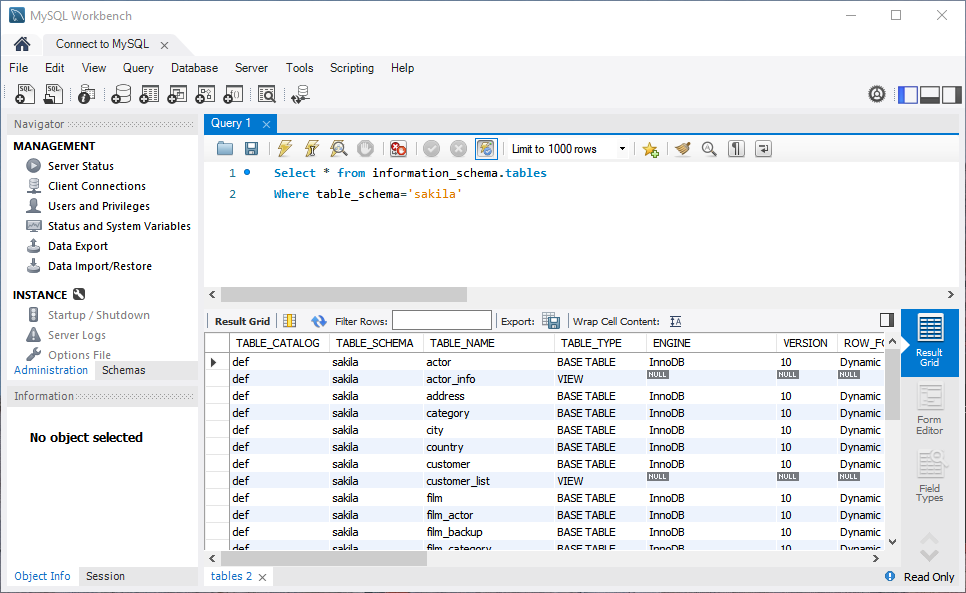
You can view the above details from MySQL workbench. Open MySQL Workbench and connect to MySQL Server ? Click Server Status from the Navigator pane. See the following image:
Also, you can use the mysqladmin command to view the details of the MySQL Server. The mysqladmin command is used to perform various administrative activities, such as creating and dropping the database, viewing the server status, configuration details, and more. You can read 4.5.2 mysqladmin — A MySQL Server Administration Program to learn more about the mysqladmin command.
Run the following query to populate the status of the MySQL server.
C:\MySQL_Home\bin>mysqladmin -u root -p version
Enter password: **************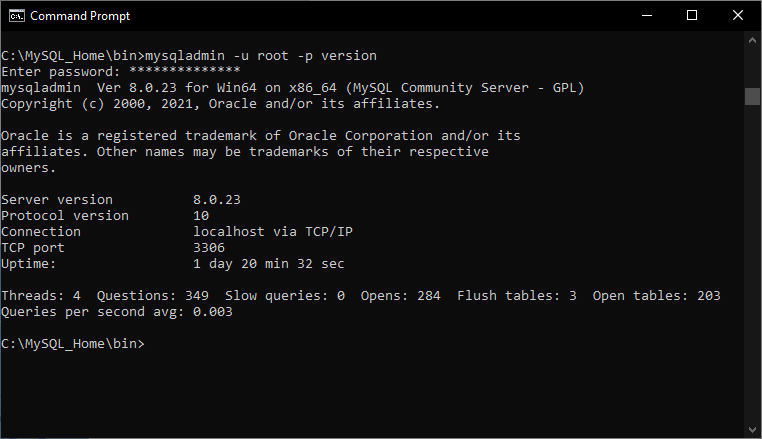
Steps to reset the password of the root user:
- Create an initialization file that has ALTER USER command.
- Stop the MySQL Services.
- Start the services using mysqld and specify the file that has an ALTER USER command.
- Connect to MySQL workbench and reset the root password.
- Restart the service.
Now, let us see how we can reset the root password.
Step 1: Create a MySQL Initialization File.
First, let us create a text file with a query that is used to change the password. To change the password, we will use the following ALTER USER command.
ALTER USER 'root'@'localhost' IDENTIFIED BY '1234567';Save the file in the appropriate location.
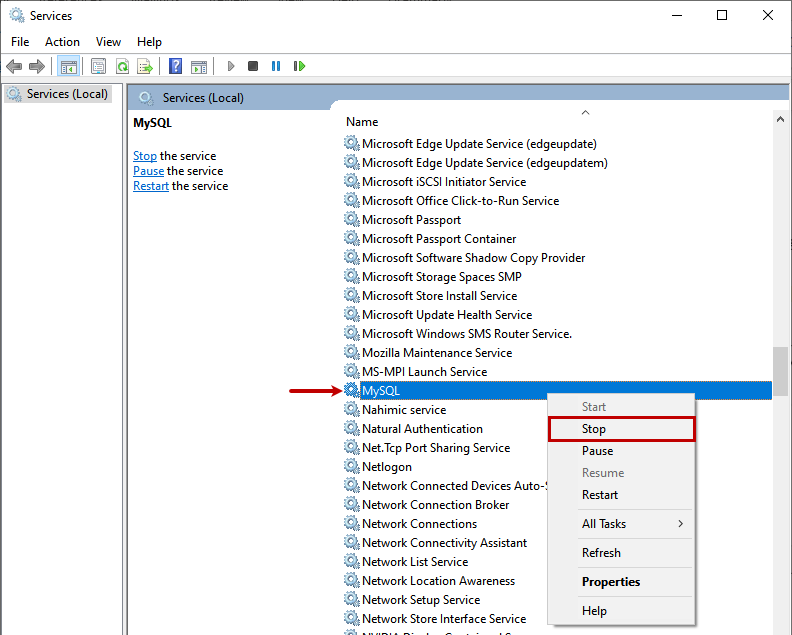
Step 2: Stop the MySQL Services.
To change the password, we must stop the MySQL services. To stop the MySQL Services, Open Control Panel ? Open Administrative tools ? Open Services ? Locate MySQL Service from the list ? Right-click MySQL and select Stop.
Alternatively, you can run the following PowerShell command to stop the MySQL service.
PS C:\> net stop MySQL;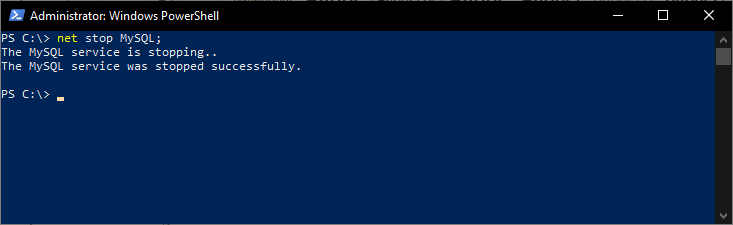
Step 3: Start the Services Using the Initialization File.
We are using the mysqld command to start the MySQL Service. The mysqld is a single-threaded program. It has various configuration options that can be specified at the start-up of the MySQL Server. You can view the list of the options by running the following command.
C:\>C:\MySQL_Home\bin\mysqld --verbose --help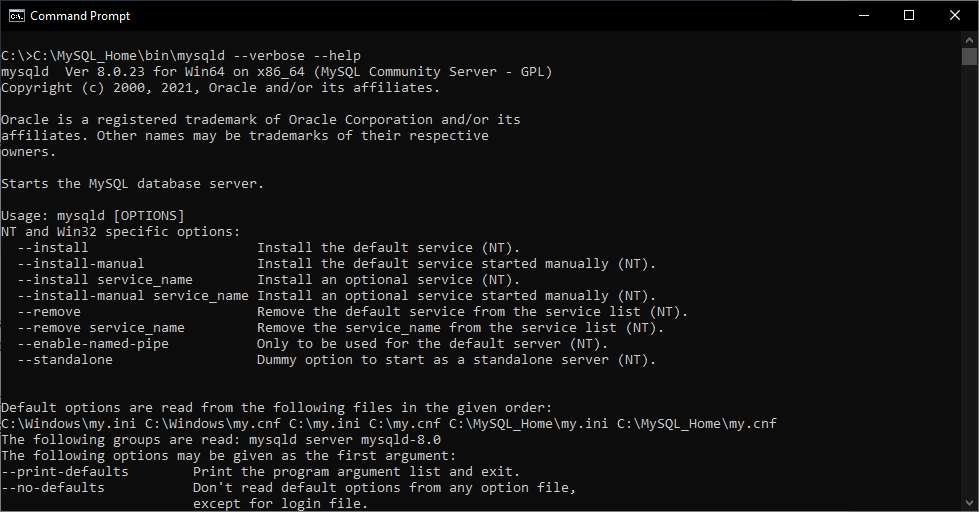
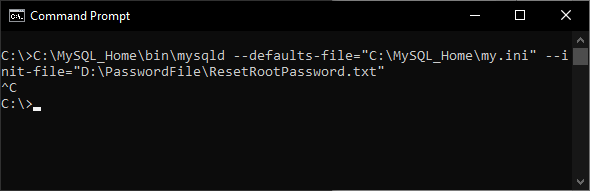
We are going to use the – -init-file option in the mysqld command. The – -init-file option reads the command from the file specified in the option. If you have installed the MySQL Server using MySQL installation wizard, as I have, you must specify the – -defaults-files. In the – – defaults-file option and the location of the my.ini configuration file. I have created a file named ResetRootPassword.txt in the D:\PasswordFile directory. The mysqld command with an option is as follows:
C:\>C:\MySQL_Home\bin\mysqld --defaults-file = "C:\MySQL_Home\my.ini"
--init-file="D:\PasswordFile\ResetRootPassword.txt"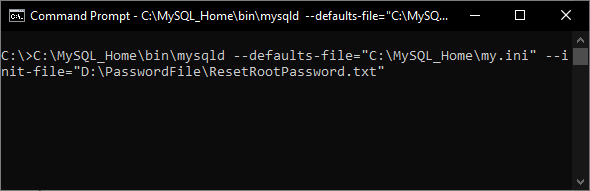
Step 4: Connect to MySQL and Reset the Password.
Now, let us connect to MySQL using MySQL workbench. Open MySQL workbench ? Connect using root user.
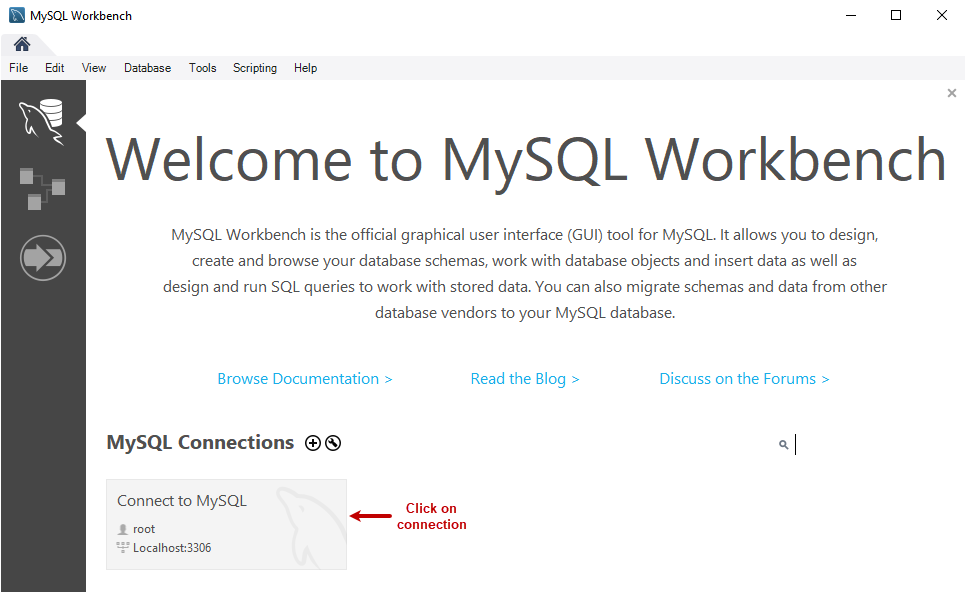
Specify the new password and connect to MySQL.
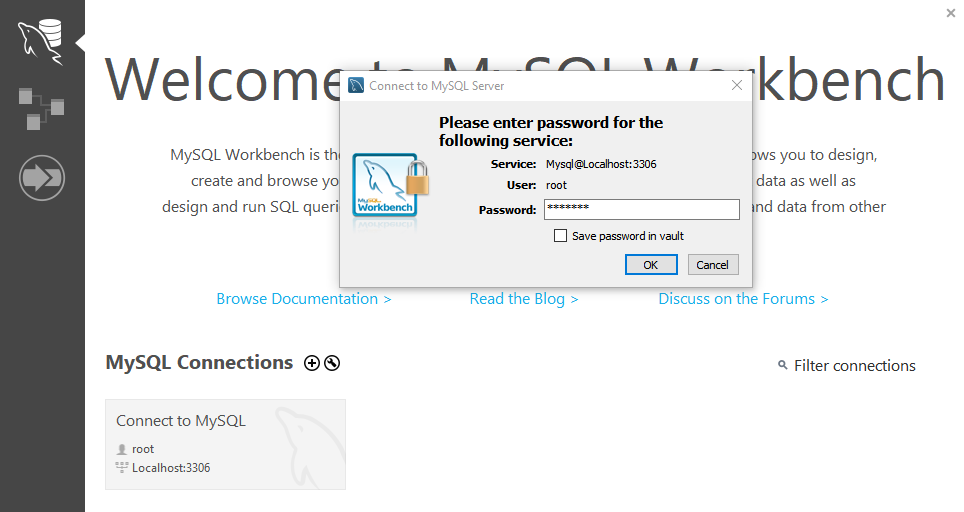
Once connected, run the following command to reset the password.
ALTER USER 'root'@'localhost' IDENTIFIED BY 'NewPassword123';
Once the password is reset, close the MySQL workbench, kill the mysqld service by clicking the Ctrl+C command.
Once services are stopped, delete the ResetRootPassword.txt file.
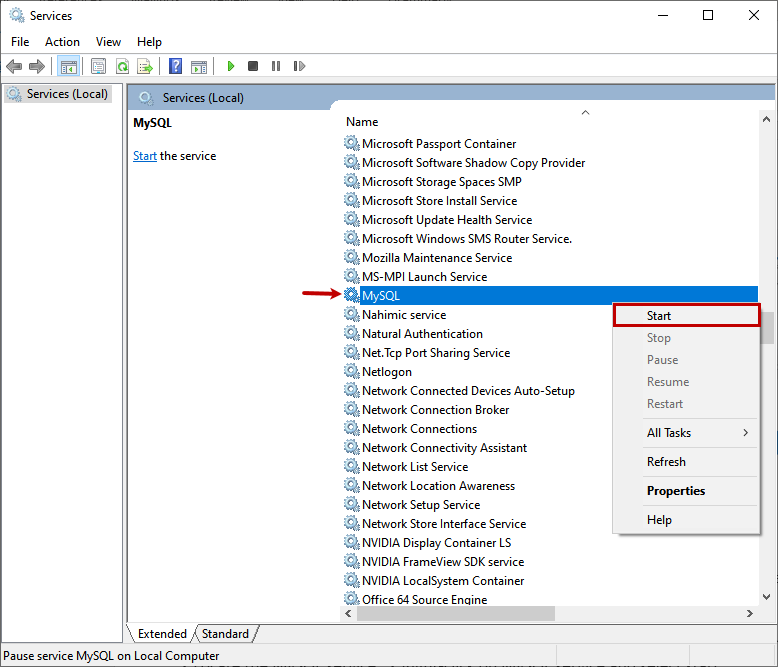
Step 5: Restart the MySQL Service.
Now, restart the MySQL service from services.msc. Open Control Panel ? Open Administrative tools ? Open Services ? Locate the MySQL service ? Right-click the MySQL service and select Start.
Now, connect to the MySQL server using the root user as explained in the previous section.
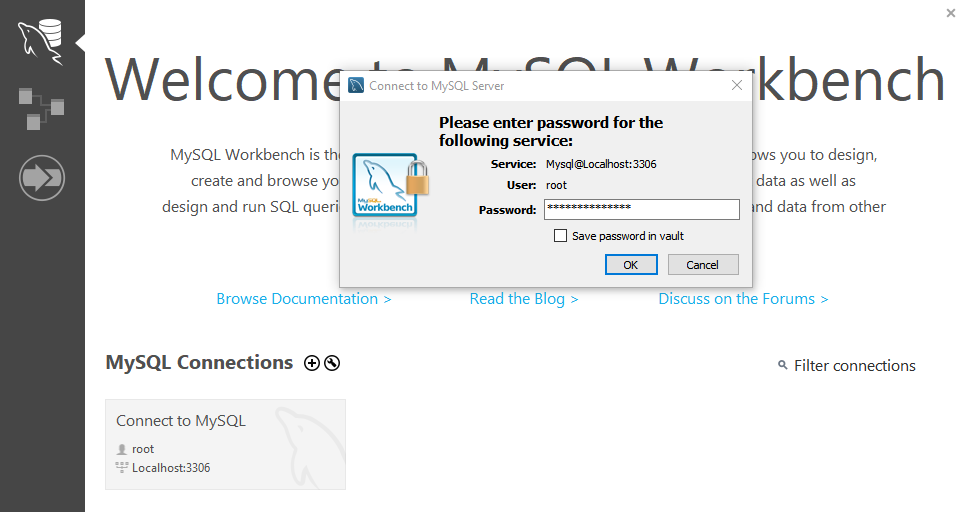
As you can see in the following screenshot, we are connected to the MySQL Server.
Summary
As database administrators, it is our responsibility to keep track of important passwords, especially superuser passwords. If the password is lost and unrecoverable, it can be very stressful. In this article, I covered the step-by-step process of resetting the password of the root user. This article might be helpful to recover the root password of MySQL on Windows.
Tags: mysql function, reset password Last modified: September 16, 2021
Resetting root password for Windows and Unix
Resetting a root password requires you to restart your MySQL server and add the —init-file option to the sqld command.
The —init-file option is used to provide an initialization file. The file should contain SQL statements that you want to run during the startup process.
If you’re using Windows, then you need to create an init.txt file with the following content:
Next, stop the currently running MySQL service.
After that, you need to restart the service using mysqld —init-file=init.txt command. Keep in mind that you need to provide the absolute path to the init file.
The full working example may look as follows:
mysqld --init-fileC:init.txtOnce the server has started, you can test connecting to the MySQL server using the root account.
Don’t forget to delete the init.txt file as well to prevent others from finding out your root password.
The method above should work both for Windows and Unix-like operating systems.
Resetting root password using –skip-grant-tables option
Alternatively, you can use the —skip-grant-tables option to reset your root password when you forgot it.
The --skip-grant-tables option is used to start the MySQL server without loading the grant tables, allowing anyone to connect to your MySQL server without username and password.
To reset your root password using this option, you need to:
- Restart your MySQL server with
--skip-grant-tablesenabled - Load the grant table so that you can change the root password with
ALTER USERstatement - Alter the password for
root@localhost
First, turn off your MySQL server and run it again using the mysqld command with —skip-grant-tables added:
sudo service mysql stop
mysqld --skip-grant-tables
That should restart MySQL server with —skip-grant-tables option enabled.
Next, use the mysql command to log into the server from the command line:
Once inside, load the grant tables using the following command:
Finally, alter the password for root user with the ALTER USER statement
You can change NewPassword with your actual desired password.
And now you’re done. Stop the running mysqld command with CTRL + C shortcut and run it normally:
Now that MySQL server is started normally, you should be able to login using root user with the new password you’ve set using the ALTER USER statement.
You have learned how to reset MySQL root password. Nice work!
Check MySQL Version
First, check the version of your MySQL because this post contains the solution of changing the root password on version 8 or higher. If the version of your MySQL is lower than 8, then the answer will be different. Run the following command:
#! /bin/bashmysql --versionMySQL Version Output:
mysql Ver 8.0.27-0ubuntu0.20.04.1 for Linux on x86_64 ((Ubuntu))Read Also: How to Deploy Laravel Project with Apache on Ubuntu
Stop MySQL Server
To change the MySQL root password, you first need to shut down the MySQL server, run the following command:
#! /bin/bashsudo systemctl stop mysql.serviceCheck the status of the MySQL server to verify. Run the following command:
#! /bin/bashsudo systemctl status mysql.serviceSkip Grant Tables & Networking
To start the MySQL server without granting the tables and networking check, set the environment variable MYSQLD_OPTS, which MySQL uses on startup. Run the following command:
#! /bin/bashsudo systemctl set-environment MYSQLD_OPTS="--skip-networking --skip-grant-tables"Alright, the environment variable is a set, and we can log in to the MySQL shell providing no password.
Login To MySQL Shell
At this stage, we can access the MySQL database without a password:
#! /bin/bashsudo mysql -u rootWelcome to the MySQL monitor. Commands end with ; or \g.Your MySQL connection id is 20Server version: 8.0.27-0ubuntu0.20.04.1 (Ubuntu)Oracle is a registered trademark of Oracle Corporation and/or itsaffiliates. Other names may be trademarks of their respectiveowners.Type 'help;' or '\h' for help. Type '\c' to clear the current input statement.
Reset Root Password
Now, flush the privileges first. Run the following command:
#! /bin/bashmysql> flush privileges;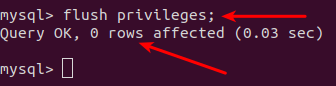
Select the MySQL database. Run the following command:
#! /bin/bashmysql> use mysql;
And set the new password for the root user, run the following command:

At the place of (YOUR NEW PASSWORD) provide your new password. After successfully changing the MySQL root password, log out from the MySQL shell.
#! /bin/bashmysql> quit;
How to set a password for the root user of the MySQL service #
If there is no password for the root user before, you can easily set the password with the following command:
mysqladmin -u root password NEWPASSWORD
Instead of “NEWPASSWORD”, you have to enter the password you want. But if the password for the root user of the MySQL service already exists, you must proceed with the following command:
mysqladmin -u root -p 'OLDPASSWORD' password NEWPASSWORD
You must enter the current password instead of “OLDPASSWORD” and the new password instead of NEWPASSWORD. It should also be noted that if you want to change the password of another MySQL user, you can replace the username with root.
Note that you must have a very strong password that includes uppercase and lowercase letters, numbers and special characters such as @ #! And… Use so that it is not easy to guess.
Another way to set the root user password in the MySQL #
You can also do this in the mysql syntax environment. To enter the mysql command environment, you must enter the following command:
mysql -u root -p PASSWORD
Instead of PASSWORD you have to enter the root password. After entering the mysql command environment, you can change the password with the following command:
update user set password=PASSWORD("NEWPASSWORD") where User='root';Instead of NEWPASSWORD you have to enter a new password. and then run:
flush privileges;
quit
How to change the MySQL root password if you forget it! #
If you have forgotten the MySQL root password, there is no need to worry and you can set a new password by following these steps:
First, stop the MySQL service with the following command:
systemctl stop mysql
Then we run the MySQL service with the following command without having to enter a password:
sudo mysqld_safe --skip-grant-tables &
Make sure you type the ampersand (&) at the end of the command. This runs the command in the background and allows you to type the commands in the following steps. Running MySQL with the —skip-grant-tables option enabled is highly insecure, and should only be done for a brief period while you reset the password. The steps below show you how to stop the mysqld_safe server instance safely and start the MySQL server securely after you have reset the root password.
Fix Error & reset root password when ” /var/run/mysqld’ for UNIX socket file don’t exists” #
maybe like me when you useing the code mysqld_safe –skip-grant-tables & face the following error:
mysqld_safe Directory '/var/run/mysqld' for UNIX socket file don't exists.
for fix above issue , run below command :
 $ mkdir -p /var/run/mysqld
$ chown mysql:mysql /var/run/mysqld
then try again :
sudo mysqld_safe --skip-grant-tables &
Now we can log in to mysql with the following command with the root user:
mysql -u root
Set a new root password #
Run the following commands if you run MySQL 5.7.6 and later or MariaDB 10.1.20 and later:
mysql > ALTER USER 'root'@'localhost' IDENTIFIED BY 'MY_NEW_PASSWORD';
mysql > FLUSH PRIVILEGES;
If ALTER USER statement doesn’t work for you, try to modify the user table directly:
mysql > UPDATE mysql.user SET authentication_string = PASSWORD('MY_NEW_PASSWORD')
mysql > WHERE User = 'root' AND Host = 'localhost';
mysql > FLUSH PRIVILEGES;
Run the following commands if you have MySQL 5.7.5 and earlier or MariaDB 10.1.20 and earlier:
mysql > SET PASSWORD FOR 'root'@'localhost' = PASSWORD('MY_NEW_PASSWORD');
mysql > FLUSH PRIVILEGES;
In both cases if all goes well, you should see the following output:
Query OK, 0 rows affected (0.00 sec)
How Reset Mysql 8. x Password #
Reset MySQL 8 root password completely different. run below command :
sudo service mysql stop
sudo mysqld --skip-grant-tables &
mysql -u root mysql
mysql > UPDATE mysql.user SET authentication_string=null WHERE User='root';
mysql > flush privileges;
mysql > ALTER USER 'root'@'localhost' IDENTIFIED WITH mysql_native_password BY 'your_new_password_here';
mysql > flush privileges;
mysql > exit;
After doing the work and setting the new password, we can restart the MySQL service with the following command:
sudo systemctl restart mysql
How Setup Outlook with Email Hosting (Cpanel)How install PHP extension (like Zip) on Cantos / Ubuntu / Linux
How to set up, change, and recover a MySQL root password
There is a high possibility that you already have MySQL running somewhere else in your database. In this instance, there might come a time when you have to change or set up the root user password. This can be as a result of forgetting the root password or simply wanting to strengthen your password.
This process is handled through the command line and works with either MySQL or MariaDB installations. And well, as long as you have admin access, either by using sudo or su syntaxes, the Linux distribution you are using does not matter since the process is similar.
Please note: there have been many attacks across the IT landscape, thus necessitating very strong passwords, which I highly recommend for your databases. You can try out an unsystematic password generator, then save the password via the aid of a password manager.
Let’s carry on.
Setting the password for the first time
Typically, during the installation of MySQL, you are required to set an initial password. However, if this was not done while installing and setting up MySQL, you will first have to set up a password. Here is how to do that:
- First, open up a terminal window.
- After launching the terminal, paste and execute this command:
mysqladmin -u root password Fosslinux
Where Fosslinux is the password that you will be using from now on, this means that every time you log into MySQL using the command mysql -u root -p, you will have to key in the password we have just configured.
Note: If you encounter the following error: Access denied for user ‘root’@’localhost,’ scroll down to find the solution provided in this article.
Alternatively, you can use the following method to set up the root password for the first time. Use the command below:
mysql_secure_installation

This command will set the root user password and allow you to get rid of anonymous users and the test database. In addition, it will also disallow remote root login. This, in turn, further assures you of concrete security to your MySQL database.
After setting up the MySQL root password for the first time, it is time to learn how to change it.
Changing the MySQL root user password
To change the MySQL root password, follow the steps mentioned herein:
- First, create a new file using the command below:
ALTER USER 'root'@'localhost' IDENTIFIED BY 'Fosslinux$11';

Where Fosslinux$11 is the new password that will be used. Remember to satisfy the current password policy by combining uppercase, lowercase, numeric and special characters.
Save the file as ~/mysql-pwd
- Next, stop the MySQL daemon using the following command:
sudo systemctl stop mysql

- Now that the daemon is stopped, issue and execute the following command on your terminal:
sudo mysqld -init-file=~/mysql-pwd

- As soon as the command prompt completes executing the above command, proceed and restart the MySQL daemon using the following command:
sudo systemctl start mysql

- At this point, you should be able to log into the MySQL command prompt using the newly set admin passcode by executing the command below:
mysql -u root -p
When a prompt appears, key in the admin password you created, and you will be all set to go.

Now that we have fruitfully learned how to change the newly created MySQL root password, it is time to learn how to recover a forgotten or lost MySQL root password.
Recover your MySQL password
Well, let’s say that you have forgotten your MySQL root user password, and you desperately need to recover it. All you need to do is to follow the steps mentioned herein:
1. Stop the MySQL server process using the command:
sudo service mysql stop

2. Start the MySQL server using the following command:
sudo mysqld_safe --skip-grant-tables --skip-networking &
3. Connect to the MySQL server as the root user using the command:
mysql -u root
You will be required to issue the following MySQL commands for you to reset the root password after completing the steps mentioned above:
mysql> use mysql;
mysql> update user set authentication_string=password('NEWPASSWORD') where user='root';
mysql> flush privileges;
mysql> quit
Note: Please do not forget that NEWPASSWORD refers to the new password you will be using to log in as a root user.
Once you are done running all the commands mentioned above, proceed and restart the MySQL daemon using this command:
sudo service mysql restart

By now, you should be able to log into MySQL using the newly set password.
That’s all. We believe you are now in a position to set, reset, and recover your MySQL root password.
A key point to note: Remember to set a very strong password for the MySQL root user. A password that is difficult to crack. This will boost the security of your databases. As you already know, databases house very sensitive data, so the last thing you want is for anyone to access your information without your consent. Use of a long password and ones that cannot be easily memorized and guessed are highly recommended. If you use a password generator to create your password, remember to store it in a password vault.
While using MySQL, you might be so embarrassed if you encounter error messages. For instance, most users complain of facing this error message: Access denied for user root@localhost. This might not be very pleasant, but we have a solution for you.
How To Solve The MySQL Error: Access denied for user root@localhost
This error message usually appears for new installations of MySQL when you attempt to connect to MySQL with the root user.
Here is how to quickly resolve the access denied for user root on localhost. The outlined steps can be used for both MySQL and MariaDB. You do not have to make modifications to any tables or carry out any complex configurations.
As we have already seen in this article, when you install MySQL and want to gain access to it on the local machine with the root user, you use the following command:
mysql -u root -p
In most instances, you will receive the error message we just mentioned: “Access denied for user root@localhost.”
For you to log into MySQL as root, first use sudo to make modifications to the root user:
sudo mysql
Then, input your passcode at the prompt. A MySQL shell will load.

Use the ALTER USER command and change the method of authentication to log into MySQL as root:
ALTER USER 'root'@'localhost' IDENTIFIED WITH mysql_native_password BY 'insert_password';
Example:
For the sake of the tutorial, I will change the password to ‘Fosslinux as shown in the command line and output below:
ALTER USER 'root'@'localhost' IDENTIFIED WITH mysql_native_password BY 'Fosslinux';
Output

What the above command-line does, is it changes the password for the user root and sets the authentication method to mysql_native_password. This is a traditional mode of authentication. Unfortunately, in most cases, the error above occurs since the authentication mode used is auth_plugin which is not safe, thus the error.
Note: While typing your desired password, make sure it follows the password-provided rules, a combination of capital and small letter plus numerics if you intend to input a stronger password.
After running the commands listed above, exit the MySQL shell by clicking CTRL + D on your keyboard or key in “exit” on the MySQL shell and click enter. You do not have to restart the MySQL service for you to log in using the command below:
sudo service mysql restart 
At this point, you can now attempt to access MySQL with root again. In the terminal, key in:
mysql -u root -p
Input the passcode you used with the ALTER USER command and do not input the system password to try and access MySQL because it will not work. You should now see the MySQL welcome message if it all went well.

Please note: The ALTER USER command may fail to work for the versions of MySQL and MariaDB older than 5.7.6 and 10.1.20, respectively.
In summary, now you are in a position to bypass the MySQL ERROR 1698 (28000): Access denied for user ‘root’@’localhost’. There are various ways to bypass this error, but we used the much simpler and faster method. Ensure that you input the commands as listed in this article to avoid errors in SQL syntax. It is more advisable to copy and paste them.
Resetting MySQL root password
There are lots of questions asked by MySQL users about “How to reset MySQL root password.” If you had set up a root password but unfortunately lost track of it, then this article tutorial will guide you through the process of resetting the root password both on Linux and Windows.
Prerequisites
- Existing MySQL database
- Admin privileges on the PC hosting the MySQL database
- Access to Windows or Linux server running MySQL
- Command-line interface or terminal access
- A text editor. (Don’t worry since Windows users have Notepad installed by default on their computers while Linux users have vim pre-installed).
Once you have all the mentioned prerequisites, let’s roll on and learn how to reset or change the MySQL root password.
We shall do this process on two fronts:
- How to reset MySQL root password in Linux
- How to reset MySQL root password in Windows
How to reset MySQL root password in Linux
Step 1: Log in to MySQL
When booting into your Linux operating system, it is essential to log in to the same user that usually runs MySQL. This is crucial to avoid errors such as creating files owned by the root user, which might cause damage to your system. However, you might as well log in as a root user once you start your MySQL server. To do this, ensure you start MySQL using the syntax below.
user=fosslinux

Step 2: Finding the. pid file used by the MySQL service
The next step is locating the .pid file. In most Linux systems, they are stored in this location:
/var/lib/mysql or /var/run/mysqld/ or /usr/local/mysql/data/.

Since not all Linux systems are the same, you can try out any of the paths mentioned above and see if you can locate the file. To quickly find the file, you can narrow your search to files starting with mysqld (or your hostname) and ending with .pid.
Note: Searching the file will simplify the process; hence we recommend you try it out.
Once you find the file, now proceed to the next step
Step 3: Killing the mysqld /. pid process
Before resetting or creating a new root password, we first have to stop the MySQL server. This can be done by opening the terminal and executing the command line below:
kill `cat /mysql-data-directory/host_name.pid`

Note: Replace the mysql-data-directory/host_name.pid with the filename we found in step 2. Also, it is vital to specify the entire file path to avoid getting errors.
Additional tip: Always ensure you use the back-tick key instead of a single-quote mark key. The back-tick key is located above the tab-key on most computers and before the one numkey.
Step 4: Creating a new root password file
Now it is time to open your favorite text editor. For our case, we shall use the Vim text editor. Open terminal using the shortcut CTRL + ALT + T, then run the command below:
sudo vim mysql-init

Note: if you get an error after running the command above, execute this command to proceed with the other processes:
sudo apt install vim

Now add the line below in the file:
ALTER USER 'root'@'localhost' IDENTIFIED BY 'NewPassword';

Note: When manually typing the line above into the terminal, remember to include all the semicolons and single-quote marks. Also, replace the “NewPassword” phrase with the new password you want to use. Finally, ensure you use a strong and secure password or refer here to learn how to generate a strong random password on Linux.
The above command will only work on the host machine you are using when running the command. However, if you plan to connect to a different system, replacing the localhost with the relevant or rather appropriate hostname is recommended for the command to work. If you fail to do so, you will encounter errors.
Once you have added the new file to your text editor, save it to:
home/mysql-init.

Step 5: Restarting the MySQL Server and Applying the Newly created Password
It is time to apply the changes we made to our newly created password. First, we shall restart the MySQL server by executing the command below in the terminal:
mysqld --init-file=/home/mysql-init &

This command will launch MySQL and apply the text-file password we created in the previous step. Depending on the method you use to start your server, you might be required to add other options such as –defaults-file before the init command.
After you apply the newly created password and restart the MySQL server, it is time to clean up. We shall do this by logging into your MySQL server as a root user and verifying that the password we created actually works. Once you confirm that the file works well, proceed and delete the file we created in step 4 above.
How to reset MySQL root password in Windows
If you are a Windows user and would love to learn how to reset your MySQL root password on Windows, read this article to the end.
Step 1: Stopping the MySQL server.
Before stopping the MySQL server, you must check to ensure you are logged in as an administrator.
- Press the Win + R keys on windows to launch the Run dialogue box the type:
services.msc
- Next click OK.

Run dialogue box - Scroll down through the list of services and locate the MySQL service. Right-click on it and then select the Stop option as shown in the image below:
Step 2: Open your favorite text editor
For illustration purposes, we shall be using the default Notepad text editor. However, don’t freak out if you have a different text editor since the processes are similar.
- Now click on the Start menu and search for Notepad. Click on it to launch.
Alternatively, use this path to find Notepad: menu>Windows Accessories>Notepad.
Step 3: Creating a new Password text file using the password command
Copy and paste the syntax below into the text editor to avoid errors while manually typing:
ALTER USER 'root'@'localhost' IDENTIFIED BY 'NewPassword';

Like we did for Linux, ensure to keep the semicolon and the single quote marks and replace the NewPassword phrase with the new password you intend to use on your MySQL.
Click on the File option, then Save As to save the text file password onto the root of your hard drive. Save the file as mysql-init.txt.

Consequently, the localhost command can only make password changes on your system. Therefore, if you intend on changing the password on a different system like over the network, then substitute the localhost with the appropriate hostname for the different system.
Step 4: Launch CMD (Command Prompt)
- Click on the Ctrl + Shift + Esc keys on your keyboard
- Select file menu, then Run a new task
- Type cmd.exe and select the Run as administrator checkbox
- Click OK to launch a command prompt with administrator privileges.

Create a new task and run cmd
Step 5: Restarting MySQL Server and Applying the new Config file
- Using the command prompt, navigate to the MySQL directory:
cd C:\Program Files\MySQL\MySQL Server 8.0\bin
- Next, input the following command:
mysqld --init-file=C:\\mysql-init.txt

Note: You should take into consideration that there are two backslashes before the mysql-init prompt. Besides, if you used a different name to the one we used for illustration in step 2 above, then you should use that name immediately after the two backslashes without spacing.
Once this is complete, you can now log into your MySQL as a root user using the newly created password.
Ensure you double-check to ascertain that the new password works flawlessly. After confirmation, proceed and do away with the mysql-init.txt file we stored in our C:\ directory.
Generic instructions for resetting MySQL root password
The preceding sections have provided in-depth instructions on resetting MySQL root passwords for Linux and Windows. Alternatively, when using any platform, you can use the MySQL client to reset the password. However, it is vital to note that this method is less secure compared to the preceding methods.
To use the MySQL client, follow the steps highlighted below:
1. The first step is to stop the MySQL server. After stopping, restart it with the option below:
--skip-grant-tables
This option will enable anyone to connect without a password but will all privileges, and it disables account-management statements such as ALTER USER and SET PASSWORD.
This option is deemed insecure since if the server starts with the –skip-grant-tables option, skip-networking is enabled by disabling remote connections.
2. Now connect to the MySQL server by running the command below:
mysql
Note: no password is required while restarting the MySQL server using MySQL client since the server started with the –skip-grant-tables.
3. Now, in the MySQL client, run the command below to tell the server to reload the grant tables. This will enable the account management statements that had been stopped earlier to work again:
mysql> FLUSH PRIVILEGES;
After running the command, run the ALTER USER command to change the password. Replace the MyNewPass, with the new password you intend to use.
mysql> ALTER USER 'root'@'localhost' IDENTIFIED BY 'MyNewPass';
Note: To change the root password for a different system, ensure to alter the localhost with the system’s hostname.
Now you can connect to your MySQL server as a root user using the password we created. Then, stop and restart the server normally without the –skip-grant-tables options and without enabling the skip-networking variable.
That’s all you have successfully reset your MySQL root password.
Change root password
cd /usr/local/mysql/bin/
./mysql -u root -p
> Enter password: [type old password invisibly]
use mysql;
update user set password=PASSWORD("NEW_PASSWORD_HERE") where User='root';
flush privileges;
quit
answered Apr 16, 2012 at 22:35

bobbob
6,9472 gold badges44 silver badges41 bronze badges
1
The instructions provided in the mysql website is so clear, than the above mentioned
$ sudo /usr/local/mysql/support-files/mysql.server stop$ sudo /usr/local/mysql/support-files/mysql.server start --skip-grant-tables/usr/local/mysql/bin/mysql- mysql> ALTER USER ‘root’@’localhost’ IDENTIFIED BY ‘MyNewPass’;
$ sudo /usr/local/mysql/support-files/mysql.server stop$ sudo /usr/local/mysql/support-files/mysql.server start/usr/local/mysql/support-files/mysql -u root -p- Enter the new password i.e MyNewPass
Reference: http://dev.mysql.com/doc/refman/5.7/en/resetting-permissions.html

answered Jun 11, 2016 at 17:02

2
- Stop the mysqld server.
- Mac OS X: System Preferences → MySQL → Stop MySQL Server
- Linux (From Terminal):
sudo systemctl stop mysqld.service
Start the server in safe mode with privilege bypass
- From Terminal:
sudo /usr/local/mysql/bin/mysqld_safe --skip-grant-tables
- From Terminal:
In a new terminal window:
sudo /usr/local/mysql/bin/mysql -u root
This will open the MySQL command-line client. From here enter:
Stop the mysqld server again and restart it in normal mode.
- Mac OS X (From Terminal):
sudo /usr/local/mysql/support-files/mysql.server restart - Linux Terminal:
sudo systemctl restart mysqld
- Mac OS X (From Terminal):
answered Sep 4, 2016 at 12:05

imbondimbond
1,9401 gold badge19 silver badges21 bronze badges
2
For the new MySQL 5.7, for some reason the binary commands of MySQL aren’t attached to the shell, and you have to do:
Restart the Mac after the installation.
Go to MySQL install folder in the terminal:
cd /usr/local/mysql/bin/Access to MySQL:
./mysql -u root -pAnd enter the initial password given to the installation.
In the MySQL client, change the password:
answered Feb 25, 2017 at 19:09

DeoxyseiaDeoxyseia
1,28917 silver badges28 bronze badges
0
In the terminal, write mysql -u root -p and hit Return.
Enter the current MySQL password that you must have noted down.
And set the password:
SET PASSWORD = PASSWORD(‘new_password’);
Please refer to this documentation here for more details.
answered Jan 21, 2016 at 18:09

Nitish PareekNitish Pareek
2,3233 gold badges17 silver badges18 bronze badges
0
If you have forgot the MySQL root password, can’t remember or want to break in….. you can reset the MySQL database password from the command line in either Linux or OS X as long as you know the root user password of the box you are on:
(1) Stop MySQL
sudo /usr/local/mysql/support-files/mysql.server stop(2) Start it in safe mode:
sudo mysqld_safe --skip-grant-tables(3) This will be an ongoing command until the process is finished so open another shell/terminal window, log in without a password:
mysql -u root
UPDATE mysql.user SET Password=PASSWORD('password') WHERE User='root';
In the UPDATE command above just replace the ‘password’ with your own new password, make sure to keep the quotation marks
(4) Save and quite
FLUSH PRIVILEGES;
\q
(5) Start MySQL
sudo /usr/local/mysql/support-files/mysql.server start
answered Feb 19, 2015 at 12:54

Hom BahraniHom Bahrani
2,43924 silver badges22 bronze badges
I solved this by:
- Shutting down my MySQL server:
mysql.server stop - Running MySQL in safe mode:
mysqld_safe --skip-grant-tables - In another terminal, login with
mysql -u root - In the same terminal, run
UPDATE mysql.user SET authentication_string=null WHERE User='root';, thenFLUSH PRIVILEGES;and then exit withexit; - Stop the safe mode server with
mysql.server stopand then start the normal one;mysql.server start
Now you can set your new password with
ALTER USER 'root'@'localhost' IDENTIFIED WITH caching_sha2_password BY 'yourpasswd';answered Oct 29, 2020 at 23:30

LemonLemon
9227 silver badges29 bronze badges
None of the previous comments solved the issue on my Mac.
I used the commands below and it worked.
brew services stop mysql
pkill mysqld
rm -rf /usr/local/var/mysql/ # NOTE: this will delete your existing database!!!
brew postinstall mysql
brew services restart mysql
mysql -u root
answered Jan 16, 2020 at 9:16
1
When I installed OS X v10.10 (Yosemite), I got a problem with MySQL. I tried lot of methods, but none worked. I actually found a quite easy way. Try this out.
sudo /usr/local/mysql/support-files/mysql.server stop
Start in safe mode:
sudo mysqld_safe —skip-grant-tables
Open another terminal, log in as su privileges, and then, log in to the MySQL client (mysql) without a password
mysql -u root
Change the password
You are done now.
answered Dec 8, 2014 at 18:03

1
The methods mentioned in existing answers don’t work for MySQL 5.7.6 or later. According the MySQL documentation, this is the recommended way.
B.5.3.2.3 Resetting the Root Password: Generic Instructions
MySQL 5.7.6 and later:
mysql> ALTER USER 'root'@'localhost' IDENTIFIED BY 'MyNewPass';
Reference: https://dev.mysql.com/doc/refman/5.7/en/resetting-permissions.html
answered Oct 16, 2018 at 12:52

If you can’t remember your password, @radtek’s answer worked for me except in my case I had set up MySQL using brew which meant that steps 1 and 2 of his answer had to be changed to:
/usr/local/bin/mysql.server stop/usr/local/bin/mysqld_safe --skip-grant-tables
Note: the lack of sudo.
answered Jan 19, 2018 at 7:07

schminnieschminnie
511 silver badge3 bronze badges
I think this should work:
ALTER USER 'root'@'localhost' IDENTIFIED BY 'YOURNEWPASSWORD'(Note that you should probably replace root with your username if it isn’t root.)
answered Nov 22, 2018 at 21:59
This is what exactly worked for me:
From the terminal, run this command:
lsof -i:3306If any PID is returned, kill it using kill -9 PID
Start MySQL with the command:
sudo /usr/local/mysql/bin/mysqld_safe --skip-grant-tablesUPDATE mysql.user SET authentication_string='your_password' where User='root'
answered Jul 25, 2018 at 7:50

sgssgs
911 silver badge4 bronze badges
How do I find my MySQL root password?
user SET Password=PASSWORD(‘new password’) WHERE User=’root’, FLUSH PRIVILEGES, mysqladmin -u root -p shutdown Note: Once you shutdown mysqladmin, you would be seeing the safe mode exits in Terminal 1. sudo service mysql start That’s it and it works like a charm with the new password! 5 июн
How set MySQL root password?
Configuring a default root password for MySQL/MariaDB Use the following procedure to set a root password. To change the root password, type the following at the MySQL/MariaDB command prompt: ALTER USER ‘root’@’localhost’ IDENTIFIED BY ‘MyN3wP4ssw0rd’, flush privileges, exit, Store the new password in a secure location
How do I change the root password in MySQL 8?
ALTER USER ‘root’@’localhost’ IDENTIFIED BY ‘new_password’, In the above change “new_password” with the password that you wish to use. This will start the MySQL service and during the process it will execute the init-file that you have created and thus the password for the root user will be updated
")


")