
In this article, I will take you through 17 Linux chown command examples to change owner and group. As you might be aware that all the file and directories in Linux are having a owner and Group assigned so if you decide to change the owner and group of a file or directory in Linux then you need to use chown and chgrp command.
chown is an open source Linux command used for changing the ownership of Files and Directories. chgrp is also an open source Linux command to change the group of files and directories. Here we will only look at the chown command and will see chgrp command in later articles. I will go through the usage of chown command using various examples.

- Environment
- Issue
- Setup an environment:
- Change Complete Ownership of Directory
- Resolution
- Change User Ownership of Directory
- Change Group Ownership of Directory
- Change home directory of the user
- Chown Command Examples in Linux
- Changing the Owner of a File in Linux
- Changing the Group Ownership of a File in Linux
- Changing a File’s Owner and Group in Linux
- Working with a Symbolic Link File
- Why Change Directory Ownership in Linux?
- Changing Directory Ownership in Linux
- Changing Directory Ownership
- Changing Directory and Sub-directories Ownership
- Example 1: How to Check chown command version
- Example 3: How to Enable Verbose mode
- Example 5: How to Change the ownership of a Directory
- Example 6: How to Only change the Owner of a File
- Example 7: How to Change Only the Group of a File
- Example 8: How to Change the owner and group of a Symbolic Link
- Example 9: How to replicate File Access to Another File
- Example 10: How to Recursively change the ownership of all the Files in a Directory
- Example 11: Change owner only when if it is assigned to Specific Owner
- Example 12: Change the group of a file Only when it is assigned to a Specific Group
- Example 13: Change the owner and group of a file Only when it is assigned to a Specific Owner and Group
- Example 14: How to forcefully change the owner and group of a Symbolic Link File
- Example 15: How to forcefully change the owner and group of a Symbolic link directory
- Example 16: How to Check all the other options of chown command
- Example 17: How to Check Man page of chown command
Environment
- RHEL 6
- RHEL 7
- RHEL 8
- All Linux flavors
Issue
- Change Owner of Home Directory
Setup an environment:


As you can see on the above image after login both is redirected to their home directory.
Change Complete Ownership of Directory
Could not chdir to home directory /home/abc: Permission denied
-bash: /home/abc/.bash_profile: Permission denied


Resolution
#chown -R abc:abc abc

Now your login issue has also been resolved. You will get no error login.
Change User Ownership of Directory
Change the only UID of the home directory

Change Group Ownership of Directory
This case also similar to case 2 but here we will not get an error message. In this case, we will change the group ownership of the directory.
Now you have successfully resolved your ownership issue. This is not only for the home directory. This will work on any directory so be careful about it.
Note: Do not run the below command
# chown -R abc:abc /
This will corrupt your system and after reboot, it is very hard to recover the system, Because mostly directories required only specific ownership and this will affect your system
Change home directory of the user
# chown -R xyz:xyz abc
# usermod -d /home/xyz abc
However, files or directories ownership verdicts are not final as it is possible to chown (Change Ownership) of any file and/or directory within the Linux operating system.
The command not only applies to files and directories but also symbolic links. This command alters the permission access rights associated with files, directories, and symbolic links.
Chown Command Examples in Linux
$ sudo chown [Command_Option] targeted_file_name
$ ls -l [targeted_file_name]
$ ls -l passwd

From the above screen capture, the file passwd belongs to the owner dnyce and group dnyce. Both owner and group associated with this file have Read and Write (rw) permissions.
Changing the Owner of a File in Linux
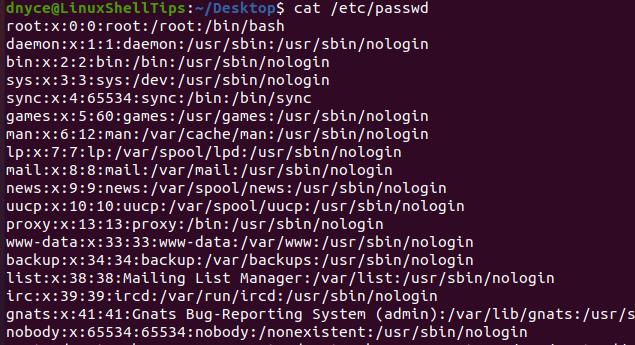
Before we change the ownership of a targeted file, we should first make sure the new owner of the file exists.
$ cat /etc/passwd
$ sudo chown root passwd
$ ls -l passwd
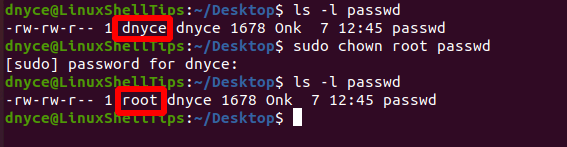
As you have noted, the ownership of file passwd changed from dnyce to root.
Changing the Group Ownership of a File in Linux
$ cat /etc/group
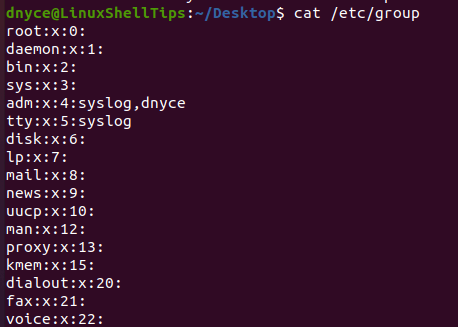
$ sudo chown :tutorials passwd
$ ls -l passwd

As you can see, the group ownership of the above file (passwd) successfully changed from dnyce to tutorials.
Changing a File’s Owner and Group in Linux
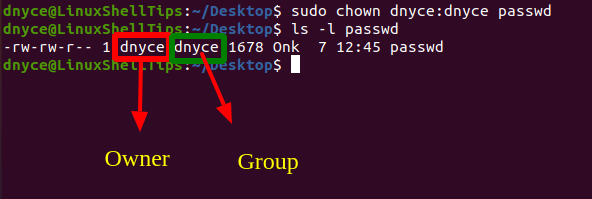
$ sudo chown dnyce:dnyce passwd
$ ls -l passwdv
Working with a Symbolic Link File
For some reason, the files on your Linux system might be associated with symbolic links. They have the same functionality as shortcuts on a Windows operating system. A symbolic link file is not a real file but a pointer to that file you wish to Read, Write, or Execute.
$ ln -s path_to_source_file name_of_symbolic_link
Let us create a symbolic link for the passwd file.
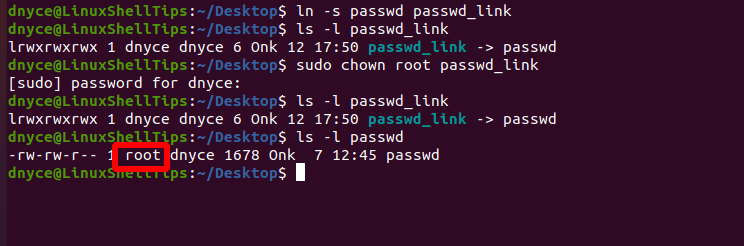
$ ln -s passwd passwd_link
$ ls -l passwd_link

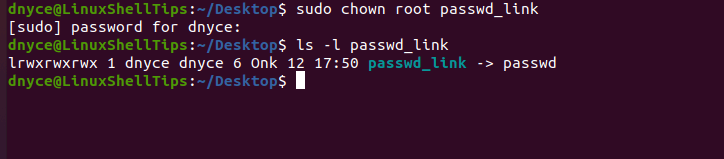
$ sudo chown root passwd_link
On re-checking the ownership and permissions settings of this symbolic link file, nothing seems to have changed.
$ ls -l passwd_link
However, the ownership and permissions settings of the source file (passwd) changed.
$ ls -l passwd
To forcefully change the ownership of a source file associated with a symbolic link file, the chown command should include the -h option.
$ sudo chown -h root passwd_link
$ sudo chown [USER]:[GROUP] file1 file2 file3
$ sudo chown --from=dnyce root passwd
To copy ownership settings of file passwd to file new_data.txt:
$ sudo chown --reference=passwd new_data.txt
Under a Linux file system, we have files, folders, and directories. A folder only contains files and a directory contains both folders and files. Each of these files, folders, and directories are associated with an owner, a group, and permission access rights.
This article guide will walk us through determining and changing the ownership of a directory on a Linux system.
Why Change Directory Ownership in Linux?
- You might need an already created directory to only be accessible by a specific user.
- In an organizational setting, when a user quits, changing the directory ownership to folders and data prevents/revokes the initial access privileges the user had.
- When working with scripts like Python or Bash scripts, their execution might need access to directory data and therefore a directory owner must be identified for these scripts to execute successfully.
- During file transfers between different Linux systems on a network, directory ownership needs to be changed with respect to the users involved.
$ ls -l LinuxShellTips_Files
$ ls -l -d LinuxShellTips_Files
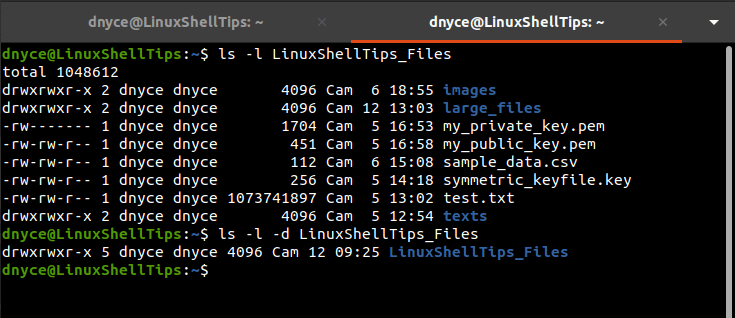
The first column reveals the associated permission access rights, the second column reveals the associated owner, and the third column shows the associated group.
In the above case, we have owner dnyce and group dnyce for LinuxShellTips_Files directory, its sub-directories and files.
Changing Directory Ownership in Linux
To meet this objective, we are going to borrow the effectiveness of the Linux chown command-line utility, which is part of the GNU Coreutils package and is primarily used to change the owner and group name of a targeted file.
$ chown [OPTION]... [OWNER][:[GROUP]] FILE...
As per the above chown command syntax, we first need to identify the new owner and group name that will inherit the to-be vacated directory ownership.
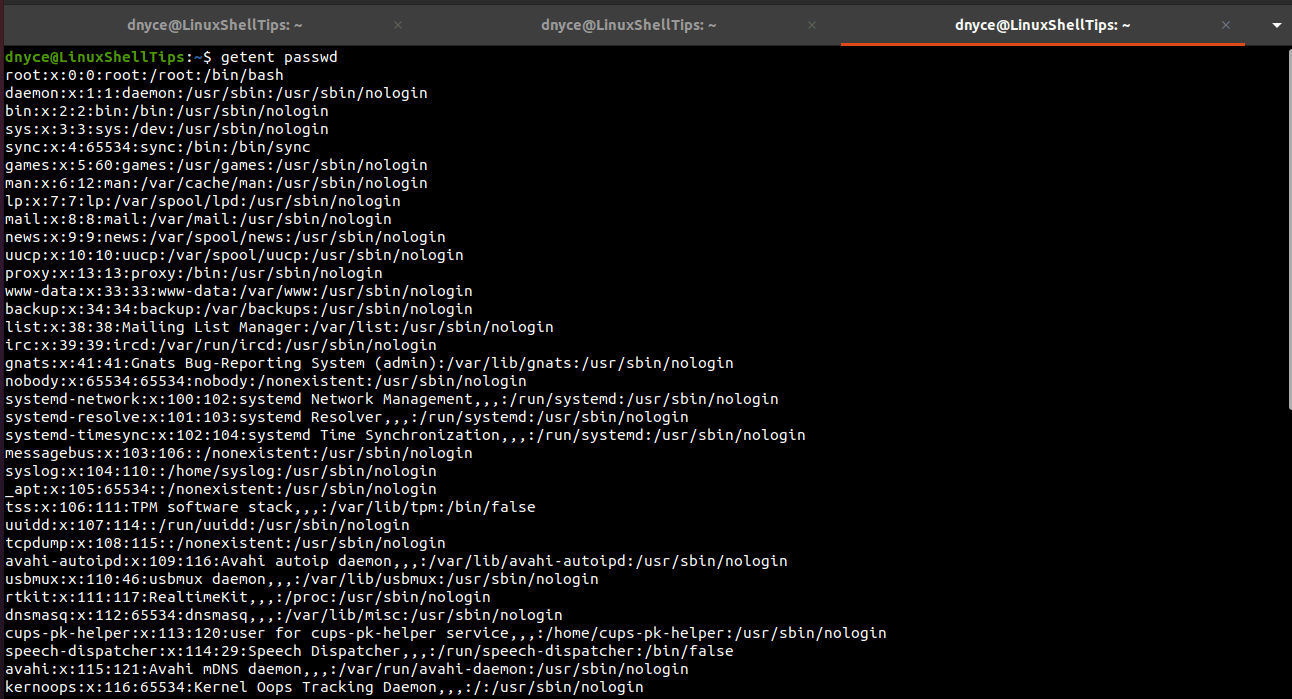
To list all the active owners in your Linux system run the command:
$ getent passwd
To list all the active groups in your Linux system, run the command:
$ getent group

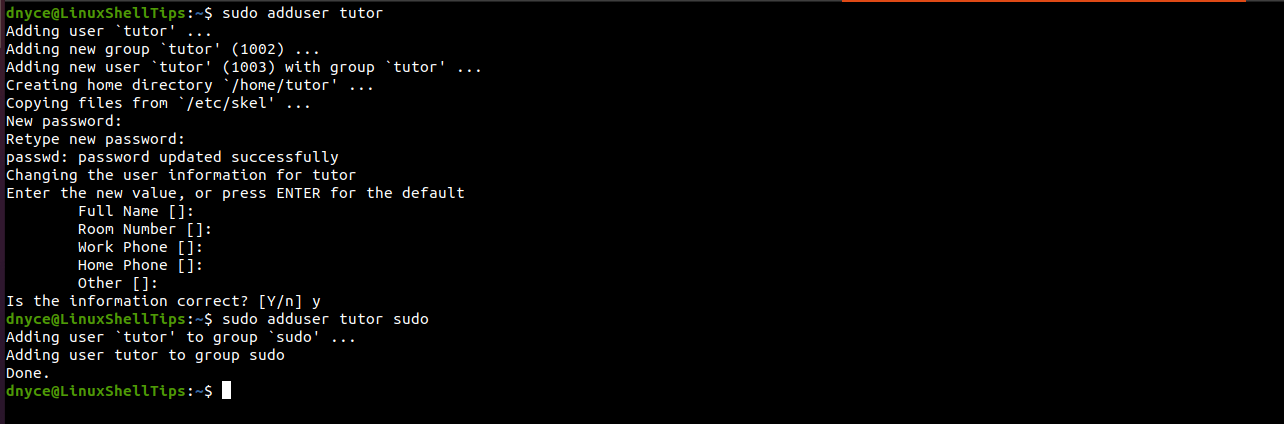
$ sudo adduser tutor
$ sudo adduser tutor sudo
Changing Directory Ownership
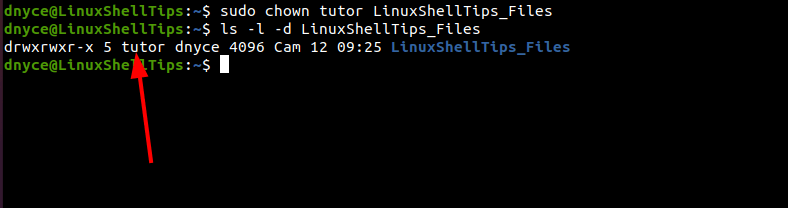
$ sudo chown tutor LinuxShellTips_Files
Confirm that the directory ownership has changed:
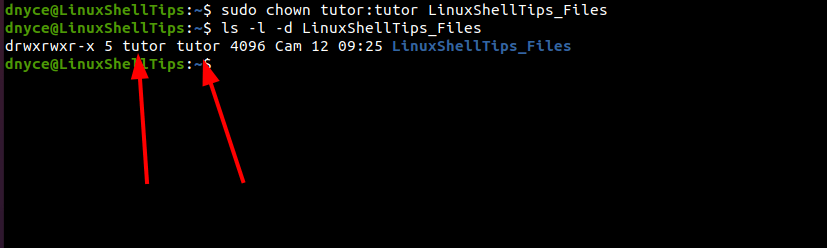
$ ls -l -d LinuxShellTips_Files
$ sudo chown tutor:tutor LinuxShellTips_Files
Changing Directory and Sub-directories Ownership
The sub-directories in the above parent directory have different ownership and to change their ownership to be the same as the parent directory, run:
$ sudo chown -R tutor:tutor LinuxShellTips_Files
Confirm if the ownership changes took place:
$ ls -l -d LinuxShellTips_Files
$ ls -l LinuxShellTips_Files

31 Popular ps command in Linux/Unix with Examples (Monitor Linux Processes)
Example 1: How to Check chown command version
If you want to check chown command version then you need to use chown --version command as shown below. As you can see from below output current chown version is 8.22.
[root@localhost ~]#
[root@localhost ~]# chown centos:centos hello.txtExample 3: How to Enable Verbose mode
If you want to enable the verbose mode then you need to use -v option with chown command as shown below. Enabling the verbose mode will show the command output in detail.
[root@localhost ~]# chown -v centos:centos hello.txtchanged ownership of ‘hello.txt’ from root:root to centos:centos
output a diagnostic for every file processed. More can be checked on chown Page.
[root@localhost ~]# chown -c centos:centos hello.txtlike verbose but report only when a change is made. More can be checked on chown command Page.
[root@localhost ~]# chown -c root:root hello.txtchanged ownership of ‘hello.txt’ from centos:centos to root:root
Example 5: How to Change the ownership of a Directory
If you want to change the ownership of a directory then you need to use same chown command as you have used in above examples. There is not much difference in changing the ownership of a file and directory. In this example we are changing the ownership of example directory but first we need to check the current owner and group of this directory by using ls -lrtd example command. As you can see from below output owner is root and associated group is also root.
[root@localhost ~]# ls -lrtd exampledrwxrwxrwx 2 root root 35 Jun 28 14:02 example
[root@localhost ~]# chown -v centos:centos examplechanged ownership of ‘example’ from root:root to centos:centos
[root@localhost ~]# ls -lrt exampletotal 2848
-rwxrwxrwx 1 root root 58 Jun 28 14:02 hello.rs
-rwxrwxrwx 1 root root 2912208 Jun 28 14:02 hello
Example 6: How to Only change the Owner of a File
[root@localhost ~]# ls -lrt hello.txt-r--rw-rw- 1 centos centos 29 Jun 18 03:23 hello.txt
Now we can change the owner of hello.txt file to root using chown -v root hello.txt command as shown below.
[root@localhost ~]# chown -v root hello.txtchanged ownership of ‘hello.txt’ from centos to root
If you verify again using ls -lrt hello.txt command then you can see that owner is not changed to root.
[root@localhost ~]# ls -lrt hello.txt-r--rw-rw- 1 root centos 29 Jun 18 03:23 hello.txt
Example 7: How to Change Only the Group of a File
If you are only interested in changing the group of a File then you can do that by using below chown command. In this example hello.txt group is root which we will change it to group centos. Before changing the group we need to verify current group of hello.txt file by using ls -lrt hello.txt command as shown below.
[root@localhost ~]# ls -lrt hello.txt-r--rw-rw- 1 root root 29 Jun 18 03:23 hello.txt
Now we can change the group of hello.txt file using chown -v :centos hello.txt command as shown below.
[root@localhost ~]# chown -v :centos hello.txtchanged ownership of ‘hello.txt’ from root:root to :centos
If you verify again using ls -lrt hello.txt command then you can see that the group is now changed to centos.
[root@localhost ~]# ls -lrt hello.txt-r--rw-rw- 1 root centos 29 Jun 18 03:23 hello.txt
Example 8: How to Change the owner and group of a Symbolic Link
If you want to change the owner and group of a Symbolic Link then you need use below chown command. In this example, we have a symbolic link hello pointing to hello.txt file as shown below. Also we can see root is the current owner and group of this symbolic link.
[root@localhost ~]# ls -lrt hellolrwxrwxrwx 1 root root 9 Aug 19 17:58 hello -> hello.txt
[root@localhost ~]# chown -v centos:centos hellochanged ownership of ‘hello’ from root:root to centos:centos
If you want to verify the changes then you can run ls -lrt hello command and check the ownership.
[root@localhost ~]# ls -lrt hellolrwxrwxrwx 1 centos centos 9 Aug 19 17:58 hello -> hello.txt
Example 9: How to replicate File Access to Another File
If you want to replicate access of a file to another file then you need to use --reference option with chown command as shown below. In this example we are replicating the access of hello.txt file to example.txt file. First check the access of hello.txt file using ls -lrt hello.txt command.
[root@localhost ~]# ls -lrt hello.txt-r--rw-rw- 1 centos centos 29 Jun 18 03:23 hello.txt
Then replicate the hello.txt file access to example.txt file using chown -v --reference=hello.txt example.txt command as shown below.
[root@localhost ~]# chown -v --reference=hello.txt example.txtchanged ownership of ‘example.txt’ from root:root to centos:centos
use RFILE’s owner and group rather than specifying OWNER:GROUP values. More can be checked on chown command Page.
Example 10: How to Recursively change the ownership of all the Files in a Directory
If you want to recursively change the ownership of all the files in a directory then you need to use -R option with chown command as shown below. In this example, we have a directory example which contains two files hello.rs and hello.
[root@localhost ~]# ls -lrt exampletotal 2848
-rwxrwxrwx 1 root root 58 Jun 28 14:02 hello.rs
-rwxrwxrwx 1 root root 2912208 Jun 28 14:02 hello
[root@localhost ~]# chown -R -v centos:centos examplechanged ownership of ‘example/hello.rs’ from root:root to centos:centos
changed ownership of ‘example/hello’ from root:root to centos:centos
ownership of ‘example’ retained as centos:centos
operate on files and directories recursively. More can be checked on chown command Page.
[root@localhost ~]# ls -lrt exampletotal 2848
-rwxrwxrwx 1 centos centos 58 Jun 28 14:02 hello.rs
-rwxrwxrwx 1 centos centos 2912208 Jun 28 14:02 hello
Example 11: Change owner only when if it is assigned to Specific Owner
[root@localhost ~]# ls -lrt hello.txt-r--rw-rw- 1 centos centos 29 Jun 18 03:23 hello.txt
[root@localhost ~]# ownership of ‘hello.txt’ retained as centoschange the owner and/or group of each file only if its current owner and/or group match those specified here. More can be checked on chown command Page.
[root@localhost ~]# chown -v --from=centos root hello.txtchanged ownership of ‘hello.txt’ from centos to root
Example 12: Change the group of a file Only when it is assigned to a Specific Group
[root@localhost ~]# ls -lrt hello.txt-r--rw-rw- 1 root centos 29 Jun 18 03:23 hello.txt
Now to change the group of hello.txt file to root from centos group you need to use chown -v --from=:centos :root hello.txt command as shown below.
[root@localhost ~]# chown -v --from=:centos :root hello.txtchanged ownership of ‘hello.txt’ from root:centos to :root
Example 13: Change the owner and group of a file Only when it is assigned to a Specific Owner and Group
[root@localhost ~]# ls -lrt hello.txt-r--rw-rw- 1 root root 29 Jun 18 03:23 hello.txt
Now to change the owner and group of hello.txt file to centos you need to use chown -v --from=root:root centos:centos hello.txt command as shown below.
[root@localhost ~]# chown -v --from=root:root centos:centos hello.txtchanged ownership of ‘hello.txt’ from root:root to centos:centos
[root@localhost ~]# ls -lrt hello.txt-r--rw-rw- 1 centos centos 29 Jun 18 03:23 hello.txt
Example 14: How to forcefully change the owner and group of a Symbolic Link File
If you want to forcefully change the owner and group of a Symbolic Link file then you need to use -h option with chown command as shown below. First we need to check the owner and group of symbolic link hello using ls -lrt hello command.
[root@localhost ~]# ls -lrt hellolrwxrwxrwx 1 root root 9 Aug 19 17:58 hello -> hello.txt
Now to change the owner and group of hello symbolic link to centos you need to use chown -v -h centos:centos hello command as shown below.
[root@localhost ~]# chown -v -h centos:centos hellochanged ownership of ‘hello’ from root:root to centos:centos
affect symbolic links instead of any referenced file (useful only on systems that can change the ownership of a symlink). More can be checked on chown command Page.
If you again check the owner and group of symbolic Link hello using ls -lrt hello command then you can see it has now changed to centos as described below.
[root@localhost ~]# ls -lrt hellolrwxrwxrwx 1 centos centos 9 Aug 19 17:58 hello -> hello.txt
Example 15: How to forcefully change the owner and group of a Symbolic link directory
If you want to forcefully change the owner and group of a Symbolic link directory then you need to use -H option with chown command as shown below. In this example, first we are checking the owner and group of example directory symlink test using ls -lrt test command as shown below.
[root@localhost ~]# ls -lrt testlrwxrwxrwx 1 root root 7 Aug 19 18:51 test -> example
Here we are changing the owner and group of symbolic link test using chown -v -R -H centos:centos test command as shown below.
[root@localhost ~]# chown -v -R -H centos:centos testownership of ‘test/hello.rs’ retained as centos:centos
ownership of ‘test/hello’ retained as centos:centos
ownership of ‘test’ retained as centos:centos
if a command line argument is a symbolic link to a directory, traverse it. More can be checked on chown command Page.
Example 16: How to Check all the other options of chown command
If you want to check all the available options of chown command then you need to use chown --help command as shown below.
[root@localhost ~]#
Example 17: How to Check Man page of chown command
If you want to check the man page of chown command then you need to use man chown command as shown below.
[root@localhost ~]#
12 Popular Unix/Linux uname command examples(How to Get Kernel Version)
Learn HTML Tables(v5) with Best Examples
Easy Steps to Install GCC(C and C++ Compiler) on CentOS 7
C# data types with Best Examples (.NET v4.7)
How to Transfer Files to an AWS EC2 Instance Using WinSCP in 3 Easy Steps
Learn HTML Image Maps(v5) with Best Examples
How to Install PHP on RedHat/CentOS 7 with Easy Steps
How to Install Ruby on Ubuntu 18.04 with Easy Steps
")


")