

- Content
- How to Disable the Root User
- How to Disable the Root User Using Terminal
- How to Disable the Root User Using Directory Utility
- How to disable the root user on Mac?
- An Explanation of Root User on Mac
- How to log in as a root user on Mac?
- FAQs about sudo Mac Terminal
- About This Article
- What is a root user on Mac?
- What is sudo in Mac Terminal?
- How to Enable Root User Using the Directory Utility
- How to Log In as the Root User
- How to Change the Root User Password
- How do you run Terminal in sudo mode?
- Enable/disable the root user with Terminal
- Frequently Asked Questions
- Can I change the username for the root user account?
- Can the password for my Mac and root user be the same?
- Is it safe to keep the root user enabled?
- Things You Should Know
- How to Enable Root User via the Terminal
- How to change the root password on Mac?
- Mac sudo password not working, what to do?
- Об этой статье
Content
Home
>
Wiki Tips
Updated on Wednesday, May 31, 2023


- Кавычки вокруг пути к файлу необходимы только в том случае, если путь к файлу содержит пробелы.
- A mistake in root access could wipe your computer or make it unusable. The risk is higher in 10.10 or earlier, or in 10.11 with SIP disabled. Keep your administrator password private to prevent others from gaining root access.
Home
>
Wiki Tips
What Is Sudo in Mac Terminal & How to Run Sudo on Mac
Updated on Sunday, June 25, 2023

English
Deutsch
This post is an overview of sudo in Mac Terminal. It elaborates what sudo in Mac Terminal is, how to enter sudo mode on Mac, and the basic sudo commands. Also, it answers the common questions about sudo. — From iBoysoft
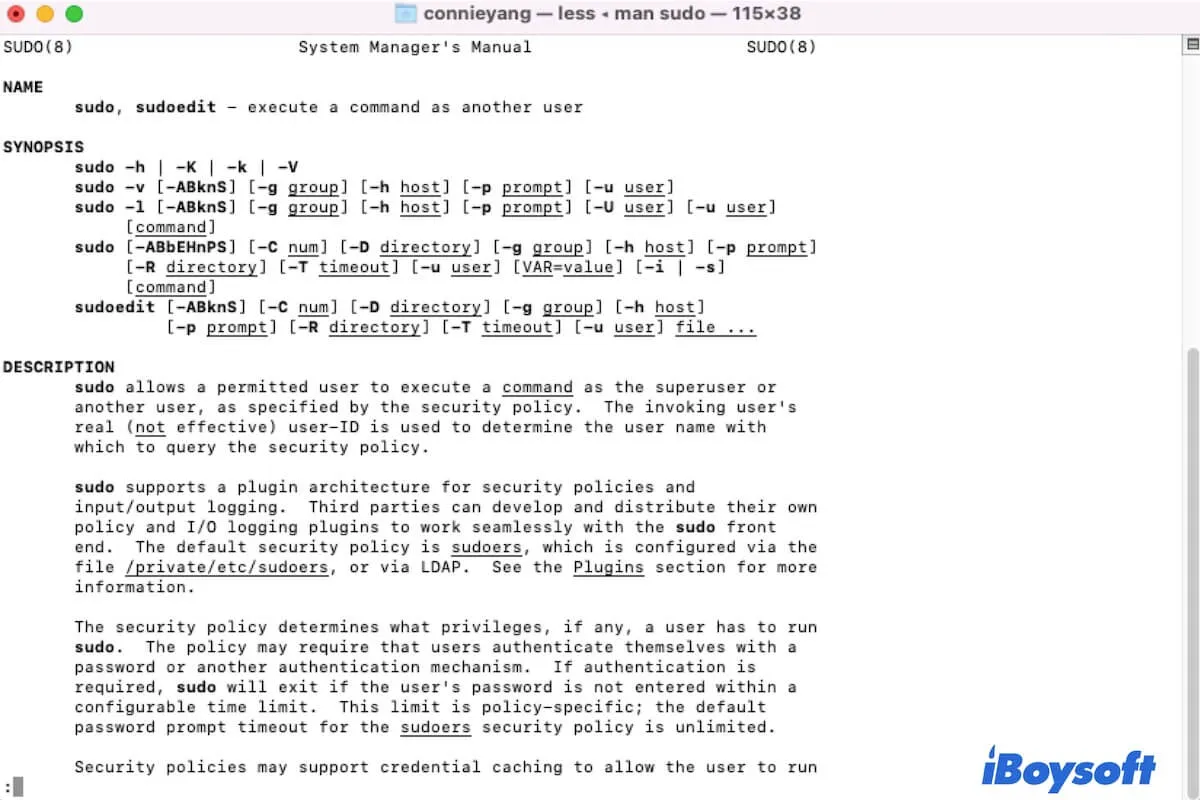
Table of Contents:
- Ошибка, допущенная во время работы с привилегиями суперпользователя, может уничтожить систему или сделать компьютер непригодным для использования. Риск выше в версии 10.10 и более ранних, а также в 10.11, когда выключена функция защиты целостности системы. Надежно храните пароль администратора, чтобы злоумышленники не смогли получить права суперпользователя.

21 gold badges153 silver badges168 bronze badges
asked Jul 29, 2015 at 12:43

$ sudo some command hereanswered Jul 29, 2015 at 12:47

85 gold badges741 silver badges886 bronze badges
answered Jul 29, 2015 at 21:15

search for terminal
after opening the termincal type
su <admin-user-name> //su - switch usersudo open MySQLWorkbench.appanswered Mar 28, 2019 at 18:58

Bhaskara Arani
1 gold badge26 silver badges44 bronze badges
sudo <command>You can also switch to root and every command will be run as root
sudo suanswered Sep 22, 2019 at 15:41

2 silver badges12 bronze badges
Add sudo to your command line, like:
$ sudo firebase initanswered Mar 3, 2017 at 6:50

sudo dscl . -create /Users/joeadmin
sudo dscl . -create /Users/joeadmin UserShell /bin/bash
sudo dscl . -create /Users/joeadmin RealName "Joe Admin"
sudo dscl . -create /Users/joeadmin UniqueID "510"
sudo dscl . -create /Users/joeadmin PrimaryGroupID 20
sudo dscl . -create /Users/joeadmin NFSHomeDirectory /Users/joeadmin
sudo dscl . -passwd /Users/joeadmin password
sudo dscl . -append /Groups/admin GroupMembership joeadmin
press enter after every sentence
Then do a:
sudo reboot
31 gold badges106 silver badges135 bronze badges
answered Dec 13, 2017 at 2:46

MGCXXXXXXXXD6N:~ username$ su <admin_user>
Password: ******
bash-3.2$ _________Give your command here. It works_________________
answered Oct 14, 2021 at 12:36
Любую программу в Mac OS X можно открыть с привилегиями (правами) суперпользователя, если вы знаете пароль администратора. Но не делайте этого, если являетесь неопытным пользователем, потому что ваши действия могут нанести вред программе или системе.
-
-

Откройте терминал. Войдите в учетную запись администратора на компьютере. Нажмите > > .
-

- Введите sudo «\путь к файлу программы на жестком диске.app/Contents/MacOS/название программы«.
Например, чтобы открыть iTunes, введите «/Applications/iTunes.app/Contents/MacOS/iTunes»}} и нажмите . - Введите пароль к учетной записи администратора, в которую вы вошли. Нажмите .
- Если команда работает, программа откроется с правами суперпользователя. Если в терминале появилось сообщение «command not found» (команда не найдена), перейдите к следующему шагу.
- Введите sudo «\путь к файлу программы на жестком диске.app/Contents/MacOS/название программы«.
-

Откройте содержимое программного пакета. Если быстрый метод не привел к успеху, найдите программу в Finder. Щелкните правой кнопкой мыши (или зажмите и щелкните левой кнопкой) по значку программы и в меню выберите Показать содержимое пакета.
-

Найдите исполняемый файл. На экране отобразится одна или несколько папок. Исполняемый файл находится в одной из них, как правило, в папке /Contents/MacOS.
- Зачастую исполняемый файл носит то же имя, что и программа, но может называться по-другому, например, «run.sh.»
- В большинстве случаев значок исполняемого файла выглядит как черный квадрат со словом «exec».
-

Введите команду «sudo» в терминале. Введите , а затем поставьте пробел. Пока не вводите команду.
-

Перетащите исполняемый файл в терминал. Путь к файлу будет автоматически вставлен в терминал.
-

Введите пароль, чтобы подтвердить запуск команды. Нажмите . Введите пароль к учетной записи администратора, в которую вы вошли, а затем еще раз нажмите . Программа откроется с правами суперпользователя.
-

-

Временно станьте администратором. В терминале введите команду , поставьте пробел, а затем введите административное имя пользователя и пароль. Так вы станете администратором на временной основе.
-

Откройте программу с помощью команды «sudo». Введите команду sudo «\путь к файлу программы на жестком диске.app/Contents/MacOS/имя программы«. Если это не привело к успеху или вам нужны дополнительные инструкции, читайте первый раздел этой статьи.
-

Вернитесь в гостевую учетную запись. Когда вы завершите все задачи, которым требуются права суперпользователя, в терминале введите . Так вы выйдете из административной учетной записи и вернетесь в гостевую учетную запись.
-

- Перезагрузите компьютер. Зажмите + , когда услышите звук загрузки компьютера, чтобы войти в режим восстановления.
- В меню сверху выберите > .
- Введите csrutil disable; reboot в терминале.
- Пусть компьютер перезагрузится как обычно. Теперь воспользуйтесь вышеописанными методами, чтобы открыть программу с привилегиями суперпользователя. Когда закончите, повторите описанный процесс, но вместо введите , чтобы снова активировать функцию защиты целостности системы.
-

Используйте текстовый редактор «nano» вместо текстового редактора с графическим интерфейсом пользователя. Безопаснее и надежнее редактировать системные файлы с помощью текстового редактора в терминале. Nano — это простейший текстовый редактор, который предустанавливается в Mac OS X. Чтобы открыть этот редактор с привилегиями суперпользователя, введите , поставьте пробел, а затем введите путь к текстовому документу. Теперь документ можно отредактировать из-под терминала. Когда закончите, нажмите + , чтобы сохранить внесенные изменения, а затем нажмите + , чтобы закрыть «nano».
- Например, команда sudo nano /etc/hosts откроет файл «hosts» с правами суперпользователя.
- Рекомендуем сначала создать резервную копию системных файлов, а потом приступить к их редактированию. Для этого введите sudo cp путь_к_системному_файлу путь_к_файлу_резервной_копии. Например, команда sudo cp /etc/hosts /etc/hosts.backup создаст копию файла «hosts» под именем «hosts.backup». Если вы допустили ошибку, переименуйте неправильный файл в sudo mv /etc/hosts /etc/hosts.bad, а затем восстановите резервную копию с помощью sudo cp /etc/hosts.backup /etc/hosts.[8]
How to Disable the Root User
To help protect your Mac from malicious activities, or even accidental damage, disable root as soon as it’s no longer required.
How to Disable the Root User Using Terminal
- Launch Terminal via Finder (“Applications -> Utilities”) or Spotlight.
- Enter the
dsenableroot -dcommand and press Enter.

- Enter the password for your current account. You should see a prompt letting you know that the root user has been disabled.
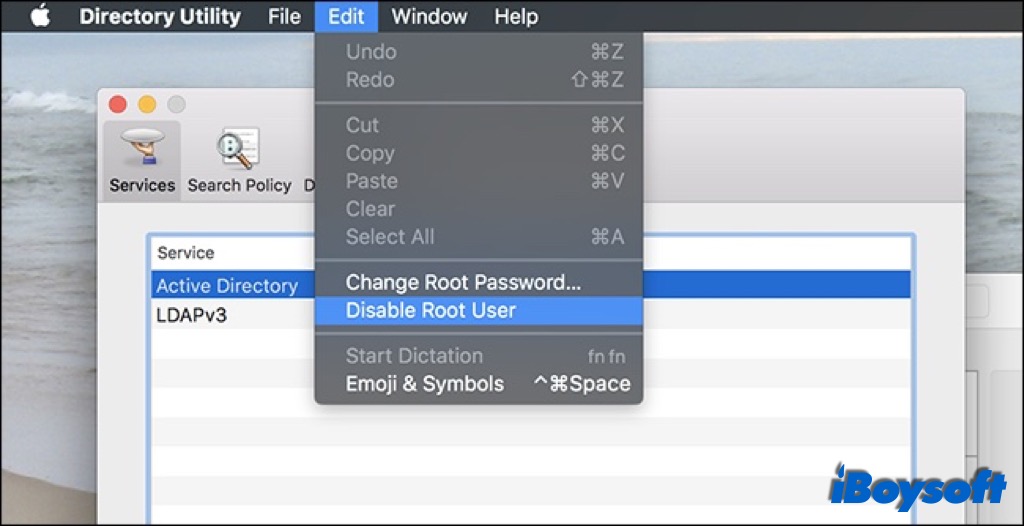
How to Disable the Root User Using Directory Utility
- Launch Directory Utility.
- Click on the lock icon in the bottom-left corner of the window and enter your user password or use Touch ID for authentication.
- Click on “Edit” in the menu bar, then select “Disable Root User.”

Note: you don’t need the root account for most fixes. You can even fix a frozen Mac without root access.
How to disable the root user on Mac?
- Log out of the root user account and log in to your administrator account.
- Navigate to the Apple menu > System Preferences > Users & Groups.
- Unlock the lock with the administrator’s name and password.
- Choose Login Options, then click on Join > Open Directory Utility.
- Unlock the lock again, then choose Edit > Disable Root User from the menu bar.
An Explanation of Root User on Mac
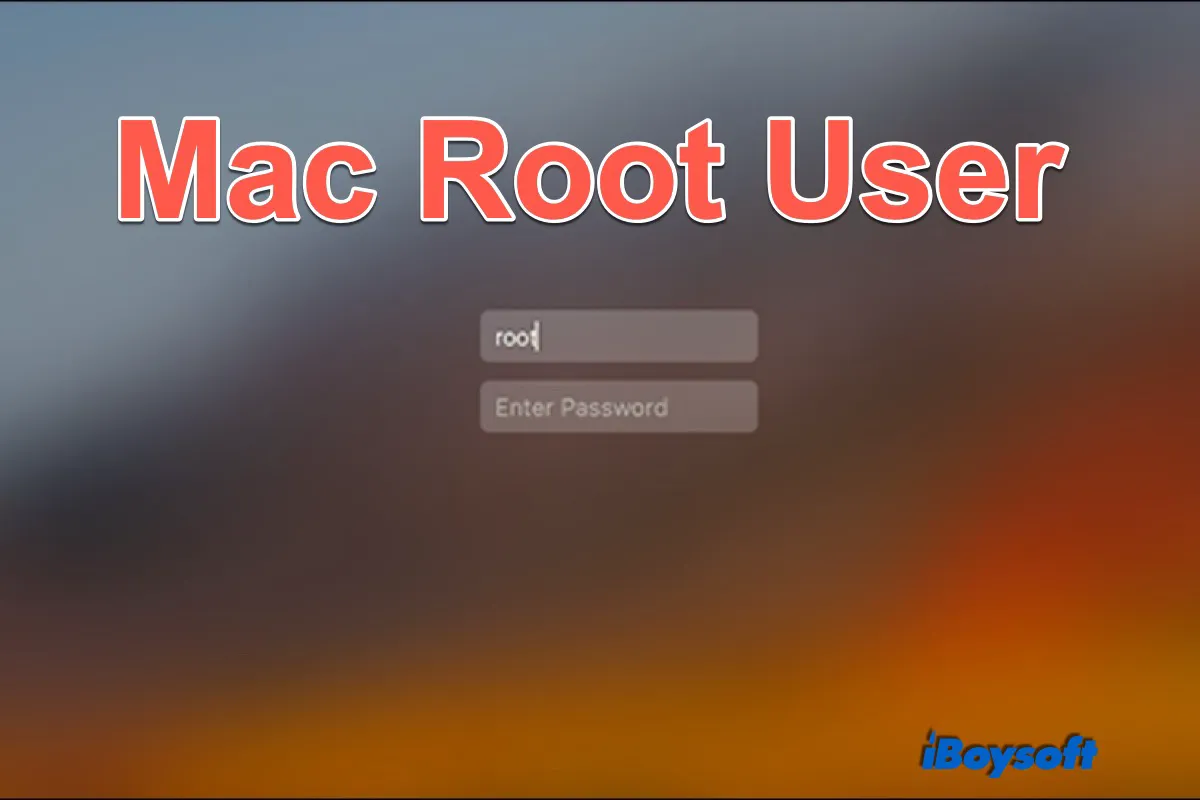
Table of Contents:
How to log in as a root user on Mac?
To turn off FileVault:
- Click the Apple menu, and navigate to System Preference > Security & Privacy.
- Select the FileVault tab.
- Click the lock at the left bottom and enter your password when asked.
- Click Turn Off FileVault.
To disable automatic login:
- Head to the Apple menu > System Preferences > Users & Groups.
- Click the lock and enter your admin name and password.
- Tap the Login Options.
- Then set the Automatic Login to Off.
- Choose the Apple menu > Log Out [name of current user account], then click Log Out on the pop-up window.
- At the login window, log in with the user name ”root” and the password you created for the root user.
FAQs about sudo Mac Terminal
Jessica Shee is a senior tech editor at iBoysoft. Throughout her 3 years of experience, Jessica has written many informative and instructional articles in data recovery, data security, and disk management to help a lot of readers secure their important documents and take the best advantage of their devices.
About This Article
Thanks to all authors for creating a page that has been read 716,789 times.
What is a root user on Mac?
- Choose the Apple menu > System Preferences, then click Users & Groups.
- Click on the padlock icon, enter an administrator name and password, then click Unlock.
- Click Login Options on the lower area of the left column.
- Click on the Join button next to Network Account Server.
- Tap Open Directory Utility.
- Click the padlock icon in the Directory Utility window, enter your administrator name and password, then choose Modify Configuration.
- From the menu bar in Directory Utility, choose Edit > Enable Root User, then enter a new password and verify it.
- Click on the OK button.
What is sudo in Mac Terminal?
You can get more information about sudo in Terminal. Simply open Terminal and type in man sudo and then hit Return. Then, you’ll get a detailed explanation about sudo.
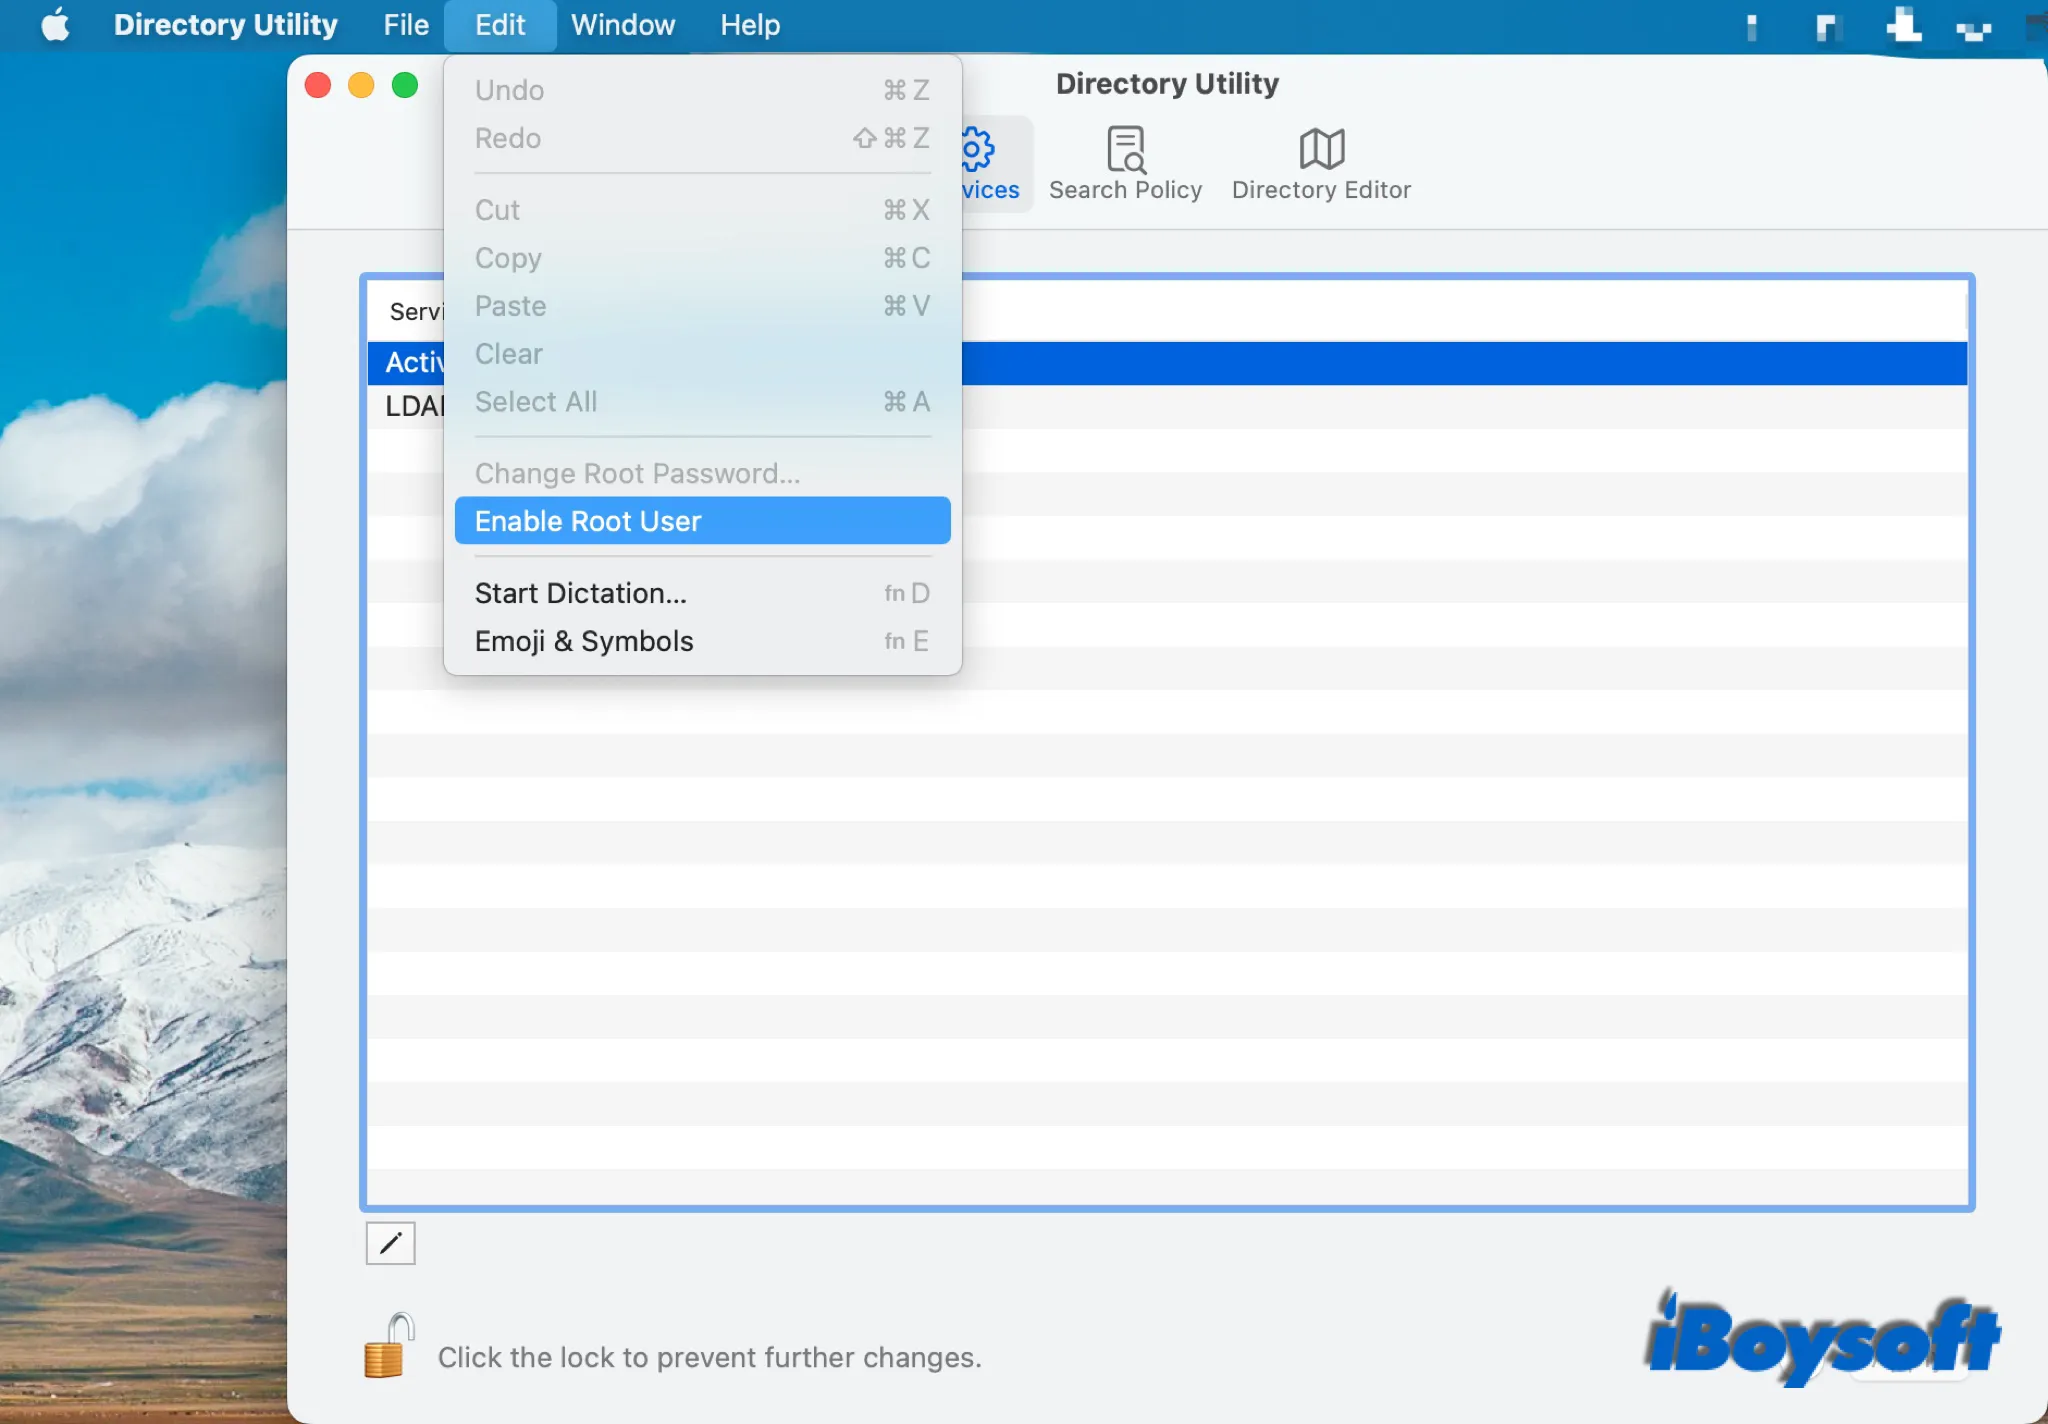
How to Enable Root User Using the Directory Utility
- Open your Mac’s Spotlight by clicking the menu bar icon in the upper-right corner of the screen or pressing Command + Space.
- Search for “directory utility” in the Spotlight window, then select the application when it appears.

- Click on the lock icon in the bottom-left corner of the Directory Utility window.

- Use Touch ID or type your Mac password when prompted.
- Click on “Edit” in the menu bar and select “Enable Root User” from the drop-down.

- A pop-up will appear requesting your root user password. Create or enter your root user password.

- Click “OK” or press Enter to enable the root user.
How to Log In as the Root User
Once it’s enabled, you can log in to the root account from the login screen.
- Log out of your current user account.
- Select “Other” on the login screen.

- For “username,” enter your username or “root,” then enter the password you created for your root account.
- Log in to the account.
To avoid accidental damage to your Mac, you should only log in to the root account when you have a task that specifically requires root privileges.
How to Change the Root User Password
- Launch “System Preferences.”
- Go to “Users & Groups.”

- Click on the lock icon, then enter the administrator name and password to gain access to the underlying settings.
- Click on “Login Options” in the sidebar.

- Click the “Join” button next to “Network Account Server” in the pane on the right.

- Click “Open Directory Utility” in the pop-up that appears.

- Click on the lock icon in the Directory Utility window, then enter your user password or authenticate with Touch ID.
- From the menu bar in Directory Utility, choose “Edit,” then select “Change Root Password.”

- Enter a new root password when prompted.
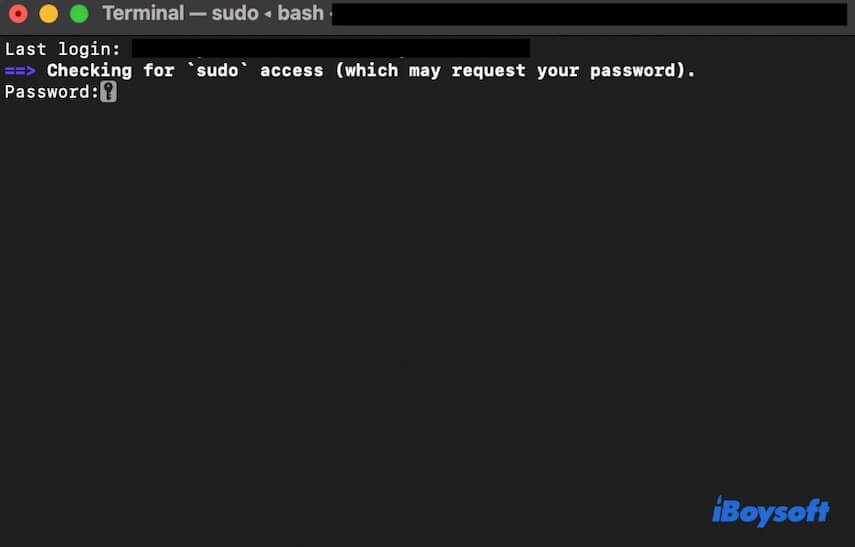
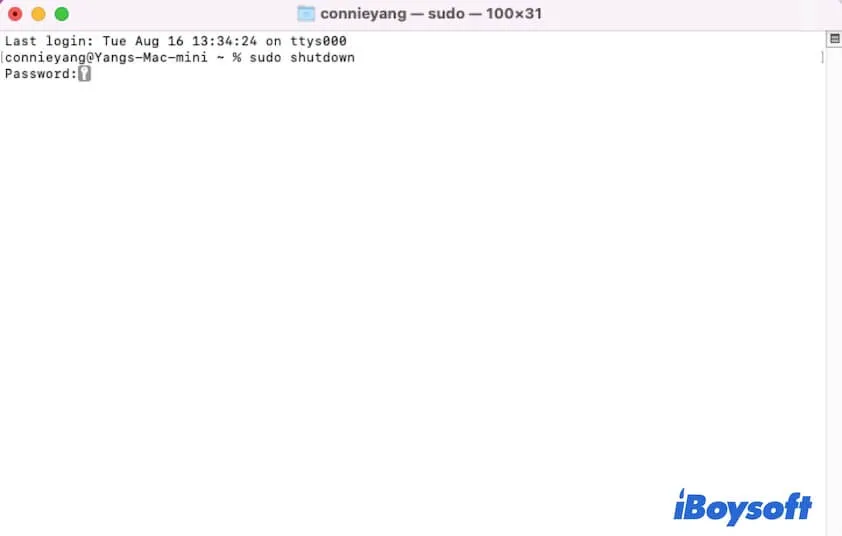
How do you run Terminal in sudo mode?
To enter sudo mode in Terminal, you need to run the fixed command with «sudo». For example, if you need to turn off your Mac, type in the shutdown command line with sudo, just as below:% sudo shutdown
Enable/disable the root user with Terminal
- Open Finder > Applications > Utilities > Terminal, double-click to launch it.
- Type one of the commands(the first one for enabling, the second one for disabling) below to manage the root user:
- Press Enter and type your password to confirm.
Amanda is one of the main columnists at iBoysoft. She loves exploring new technologies, focusing on macOS, Windows OS, data recovery, data security, disk management, and other tech-related issues. She takes delight in providing technical and informative articles to help people out of problems and get the utmost out of their devices.
Jessica Shee is a senior tech editor at iBoysoft. Throughout her 3 years of experience, Jessica has written many informative and instructional articles in data recovery, data security, and disk management to help a lot of readers secure their important documents and take the best advantage of their devices.
Frequently Asked Questions
Can I change the username for the root user account?
Can the password for my Mac and root user be the same?
Is it safe to keep the root user enabled?
Image credit: markusspiske via Pixabay.

Natalie dela Vega
Natalie is a writer specializing in tech how-tos and gaming. When she’s not writing, she plays PC games and travels. Here at MakeTechEasier, you will see her write about guides, tips, and solutions for Windows and iOS.
Subscribe to our newsletter!
Our latest tutorials delivered straight to your inbox
Things You Should Know
- Root privileges lets you open any Mac application with an administrator password.
- Using root privileges can damage your device if done incorrectly.
- Limit yourself tasks you understand well to avoid damage to your applications and computer.
-
-

- This administrator account must have a non-blank password, or Terminal will not allow you to access root privileges.
-

- Enter sudo «\file path from hard drive to application.app/Contents/MacOS/application name«.
For example, to open iTunes, type and press . - Enter the password for the administrator account you are currently logged into. Press .
- If the command works, the application should open with root privileges. If Terminal says «command not found,» continue to the next step.
- Enter sudo «\file path from hard drive to application.app/Contents/MacOS/application name«.
-

Open the application’s package contents. If the quick way didn’t work, locate the application in Finder. Right-click (or -click) its icon and select Show Package Contents from the drop-down menu.
-

Find the executable file. You should now see one or more folders inside the application. Locate the executable file inside this folder. This is usually inside /Contents/MacOS.
- The executable often has the same name as the application, but it could have another name, such as «run.sh.»
- The executable file icon is usually a black square with the word «exec» in small letters.
-

-

Drag the executable file into the Terminal line. This should automatically insert the file path to the executable file.
-


-

- Restart your computer. Hold down + after you hear the start up noise to enter Recovery Mode.
- Select from the top menu, then .
- Enter csrutil disable; reboot in Terminal.
- Let the computer restart as usual. You can now use the steps above to open any application with full root privileges. When you are finished, consider repeating these instructions with instead of to reinstate SIP.
-

- For example, sudo nano /etc/hosts will open the hosts file with root access.
- It’s a good idea to make a backup before you edit any configuration files. To do this, enter sudo cp filepath_of_config_file new_filepath of backup. For example, sudo cp /etc/hosts /etc/hosts.backup creates a copy of the hosts file named hosts.backup. If you make a mistake, move the misconfigured file with (for example) sudo mv /etc/hosts /etc/hosts.bad and restore the backup with sudo cp /etc/hosts.backup /etc/hosts.[7]
Add New Question
Why does mine say «operation not permitted»?

Ask a Question
200 characters left
Include your email address to get a message when this question is answered.
The quotation marks around the file path are only necessary if the file path contains spaces.
Thanks for submitting a tip for review!
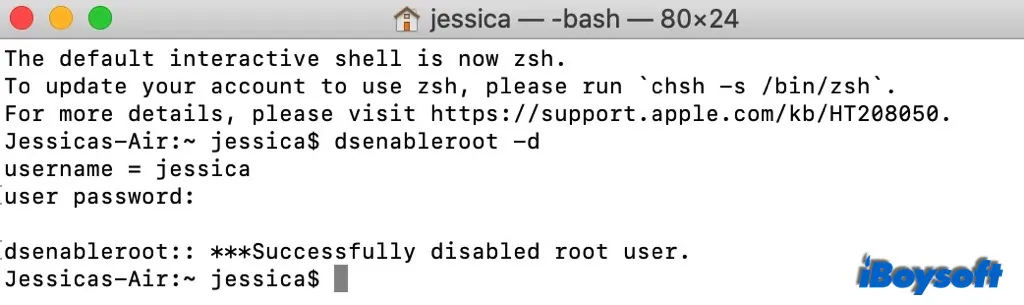
How to Enable Root User via the Terminal
You can enable root access via your Mac’s terminal.
- To launch the Terminal, either open a new Finder window and navigate to “Applications -> Utilities -> Terminal” or search for “terminal” using Spotlight.

- In Terminal, type
dsenablerootafter the “%” symbol and press Enter.

- Your username should come up. Enter your user password at the prompt and press Enter.
- Enter or create your root password and verify it.
- You should see a success message indicating that you have enabled the root user.

How to change the root password on Mac?
- Choose Apple menu > System Preferences > Users & Groups.
- Click the lock icon, then enter your administrator name and password.
- Click Login Options, then click Join > Open Directory Utility.
- Click the lock icon in the new window, then enter your administrator name and password.
- From the menu bar, choose Edit > Change Root Password…, then enter a new root password.
Mac sudo password not working, what to do?
- Quit Terminal and then relaunch it. Then, run the sudo command again.
- Disable TextExpander. If you have installed TextExpander on Mac, check if this utility cause the Mac sudo password not to work. That’s because some users report that this program can auto-capitalize the first word in a sentence, causing the first letter of the password to be capitalized when typing.
- Change your password and use the new password to check if the sudo command works this time.
- Restart your Mac. That can refresh the system and eliminate the tiny errors in macOS that may lead to the admin password not working for sudo.
")


")