

usrvmware/misc/bin/tally_vob.sh failed: exit code 1

Solution for ESXi root Account Locked Out
Step 1: Login on DUCI using F2, Select “Troubleshooting Options” and Press Enter

Step 2: Select “Disable ESXi Shell” and Press Enter, You will see status will change from Disabled to Enabled in right side window.
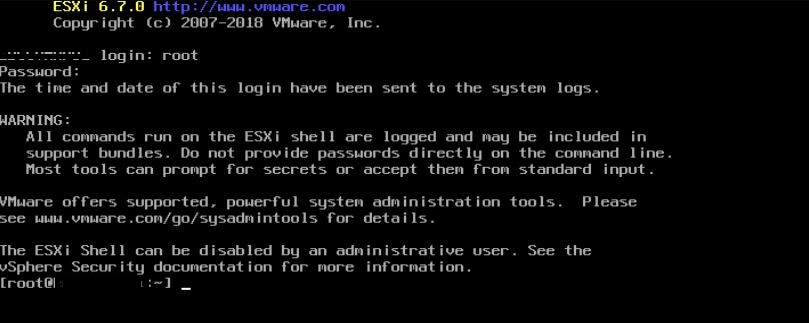


Step 7: Now try to login using SSH & you will be logged in as root successfully.
Step 8: You can use ALT+F2 to get DUCI back as normal ESXi interface.
Reference: VMware KB 1 , VMware KB 2
When starting one of my VMware ESXi 6.5 lab hosts I was unable to login using the vSphere Host Client. I tried to make an SSH session to the host but got an “Access Denied” message.
2018-01-02T10:57:00.003Z: [GenericCorrelator] 5612887277us: [vob.user.account.locked] Remote access for ESXi local user account 'root' has been locked for 900 seconds after 58 failed login attempts.
2018-01-02T10:57:00.003Z: [UserLevelCorrelator] 5612887277us: [vob.user.account.locked] Remote access for ESXi local user account 'root' has been locked for 900 seconds after 58 failed login attempts.
2018-01-02T10:57:00.003Z: [UserLevelCorrelator] 5612887502us: [esx.audit.account.locked] Remote access for ESXi local user account 'root' has been locked for 900 seconds after 58 failed login attempts.
2018-01-02T11:02:08Z sshd[117700]: Connection from 192.168.249.23 port 63449
2018-01-02T11:02:09Z sshd[117701]: pam_tally2(sshd:auth): user root (0) tally 72, deny 5
2018-01-02T11:02:14Z sshd[117700]: error: PAM: Authentication failure for root from 192.168.249.23
2018-01-02T11:02:14Z sshd[117710]: pam_tally2(sshd:auth): user root (0) tally 73, deny 5
By default the ESXi 6.x password requirements for lockout behavior are:
- A maximum of ten failed attempts is allowed before the account is locked
- Password lockout is active on SSH and the vSphere Web Service SDK
- Password lockout is not active on the Direct Console Interface (DCUI) and the ESXi Shell
pam_tally2 --user root
In my example the there were 58 failed root login attempts:
Login Failures Latest failure From
root 58 01/02/18 10:56:59 unknown
pam_tally2 --user root --reset
After this command I was able to login the vSphere Host Client. In the vSphere Host Client I found the VM that is causing the root account lockout:

The VM was monitoring the vSphere ESXi host with the wrong root password. After changing the password the account lockout problem was solved.
Forgetting passwords is something that unfortunately happens to everyone, and resetting the ESXi root password requires a bit of attention from your side. And that’s why password managers exist. No, it’s not ok to write them down on yellow sticky notes stuck to your monitor unless you want to give your security guys a heart attack. I guess, given this post’s title, you know where I’m going with this if you forgot your ESXi root password
It’s 10 in the evening. You get a call and start troubleshooting right away. You figure that a management services restart will fix the issue. Your host is connected to a remote KVM switch, so you press F2 and type in the password. No dice. Maybe, it’s a typo maybe not. You try again, and again and end up locking yourself out because of a forgotten root password. You did save the ESXi password but along the way, you changed it and forgot to update it in your password manager. According to VMware, the only supported fix is to re-install ESXi unless you’re still running ESX which is highly unlikely.
In today’s post, I’ll show you how you can use a Live Linux CD/DVD, to change the root password on your ESXi host. VMware does not support this method citing complexity, but I don’t buy this – there is nothing really complex about it. ESXi saves the root password encrypted in as is standard with Linux.

An invalid password typed in at the console
How it all works
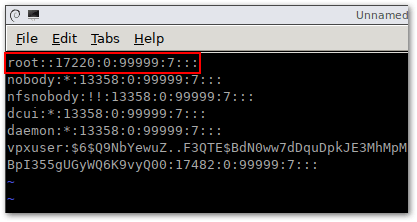
First off, SSH to your host and have a look at . You should see something like this.

This is from a test ESXi host I use, so be my guest and try to reverse hash the password. Good luck with that. The string boxed in red is what we’re after. Deleting it will reset the password to null. Of course, if you can’t root to your host, there’s no way you can do this, hence why we use a live CD. Booting off a Linux Live CD/DVD allows us to access and change the file. The trick is knowing which file to change. Changing the one that’s accessible when SSH’ed to the host is of no use since the changes are overwritten once you boot up the host.
As you probably know, ESXi uses several disk partitions. One, in particular, is called This partition contains the hypervisor core files and the host’s configuration which is what ends up being loaded into memory. The partition, by default, is called /dev/sda5.
file we’re after is found in a compressed archive called which is found under . So, here’s what we need to do.
- Download a Live Linux CD/DVD. Take your pick from this . I chose the Gparted LiveCD one.
- Burn a USB or CD/DVD with the Live CD/DVD and boot your host off it.
- to a temp folder.
- and edit the shadow file.
- Recompress the archive and overwrite
- Unmount and reboot the host.
It is of utmost importance to note that you will not be able to ‘deceive’ ESXi’s security and change the node’s root password without powering it off. Meaning you need to evacuate the VMs to other hosts in the cluster or shut them down to place the host in maintenance mode.
For this post, in order to reset the ESXi root password, I’m using a nested host for convenience’s sake alone. And, yes, I carried out this same procedure a number of times on physical ESXi hosts. Note also, that the host must be powered down for this to work so unless migrated, all hosted VMs will obviously stop working.

Booting off the GParted LiveCD
– Locate the 2 partitions sized 250MB. As mentioned, is what we’re after assuming you installed ESXi on the first available disk. This may differ if, for instance, you installed ESXi on a USB device.
“vSphere 6.x partitions layout.”
Note that the partition layout changed dramatically in vSphere 7 compared to vSphere 6.x. It is now consolidated in fewer partitions leveraging dynamic sizing and VMFS-L.

vSphere 6.x vs vSphere 7 partitions layout
mkdir /boot /temp
mount /dev/sda5 /boot
cp state.tgz /temp
tar -xf state.tgz
tar -xf local.tgz

The first batch of commands that need to be run to get to the shadow password file
Delete the encrypted root password to reset it to null i.e. the root account will not have a set password
tar -cf local.tgz etc/
tar -cf state.tgz local.tgz
mv state.tgz /boot
– Once the ESXi host is back online, try logging in as either from the DCUI (console) or via SSH using or similar. You should be able to log in without keying in a password although you will be reminded to set one which is what you should do.
How do I recover my root password?
Here’s a video demonstrating how to carry out the password recovery procedure from start to finish and reset the root password
There isn’t really much more to add other than to urge you to get into a habit of saving your passwords using a reliable password manager. While unsupported by VMware, the procedure of resetting a default ESXi root password outlined today works every time, at least on but it should also work with older releases. I have not come across any side-effects when using this hack for ESXi root recovery, understandably so, considering we’re simply zeroing out a hash value from a password file. Ever lost your password and was frozen out of ESXi? What did you do? Let me know in the comments below. And if you need any help about how to reset ESXi root password, I’m happy to help out.
To cut a long story short, I found myself trying to log in as root on a test VCSA I had recently set up and, for the life of me, I could not recall the password. As luck would have it, I neither saved the password to KeePass nor did I write it down in VM’s annotation field. So much for good habits!
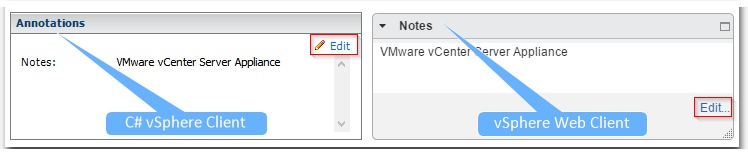
Figure 1 – The Annotations / Notes fields as displayed in the vSphere traditional and Web clients
As I wasn’t particularly keen on reinstalling the appliance from scratch, I googled around to see if resetting a root password on vCSA can be done. Surely enough it can, hence today’s post! So, if you ever found yourself locked out of VCSA because you forgot the root password, read on!
Disclaimer: I tested the procedure on VCSA 6.0 U2 and VCSA 6.5. In theory, it should work on earlier releases but I do not have the time to test this out on every version released to date. Do so at your own risk and always back up the appliance before effecting any changes.
First, shut down the VCSA and take a snapshot.
1. Start the appliance up and press the space bar to freeze the GRUB menu. Note that you need to be somewhat quick here.
2. Press e to enable edit mode.
3. Append rw init=/bin/bash to the list of options as shown in Fig. 2.
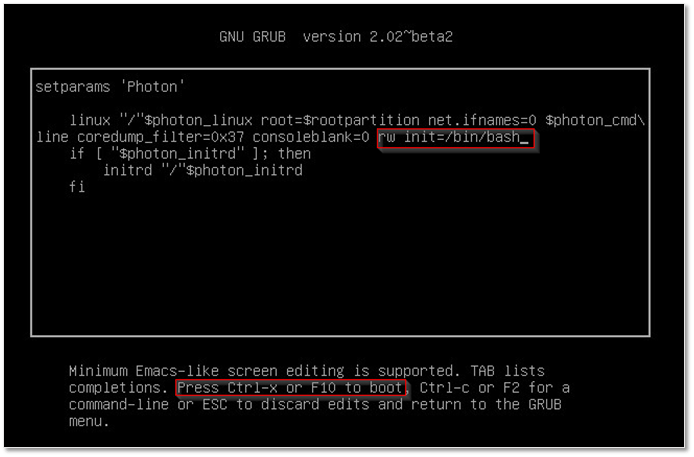
Figure 2 – Setting the boot options in GRUB
4. Press F10 to reboot. The appliance will now boot up in bash or root shell.
5. Type passwd to change the root password. Type it twice and press Enter to confirm.
6. Optionally, you can unmount the file system using umount /
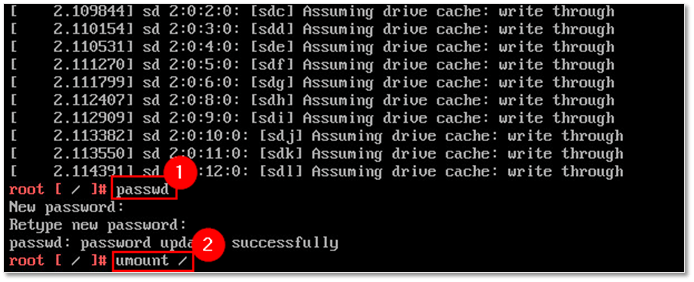
Figure 3 – Changing the root password and unmounting the file system
7. Reboot the appliance using the power options from the VMRC or vSphere client menu.
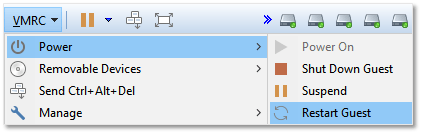
Figure 4 – Rebooting the appliance from VMRC
You should now be able to log in with root using the new password as shown in this next video.
VCSA 6. 0 Update 2
The process is very similar to the one for VCSA 6.5. First, shut down the VCSA and take a snapshot.
1. Press the space bar to freeze the GRUB menu.
2. Press p and type in the password to unlock the advanced features in GRUB (refer to The GRUB Password section further down).
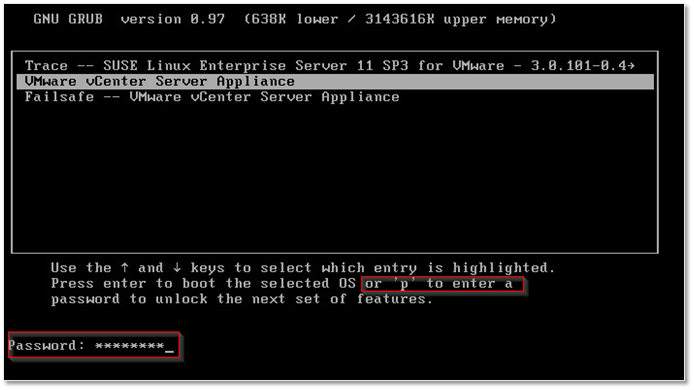
Figure 5 – Accessing advanced features in GRUB
3. Press e to enable Edit mode
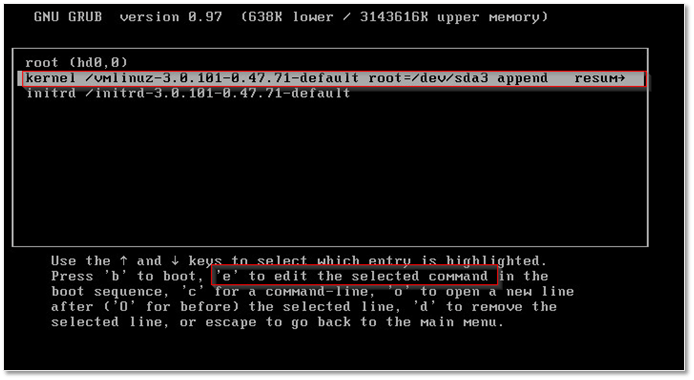
Figure 6 – Editing the boot up options in GRUB
5. Append init=/bin/bash to the kernel boot options

Figure 7 – Setting the VCSA to boot up as a root shell
7. Type in the passwd command. Type in the new password twice and press Enter to confirm.
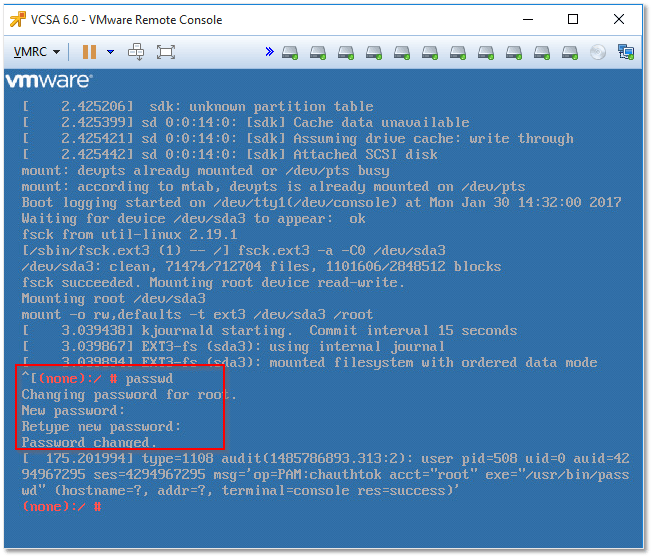
Figure 8 – Changing the root password from a root shell
Here’s a second video illustrating the password change procedure on 6.0 U2.
The GRUB Password
While carrying out research for this post, most of the info I came across stated that the GRUB password on VCSA is set to vmware by default unless the root password was changed via VAMI, in which case both the GRUB and root password are set to be the same. When I installed VCSA 6.0 U2 (version 6.0.0.20000-3634791) I found that this was not the case. The GRUB password was by default set the same as that for root. At no point during the vCSA installation do you get to set the GRUB password and you also cannot skip setting one for root. So, I don’t know how and when the GRUB password is set to vmware. And yes, I’m positive that I did not change the root password using VAMI or otherwise.
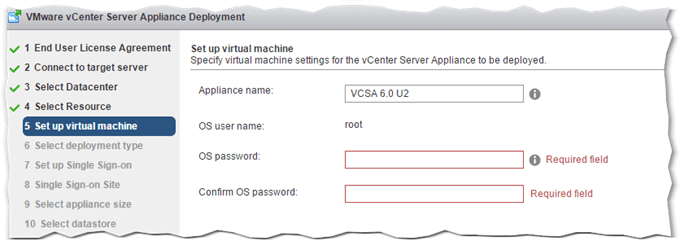
Figure 9 – Setting the root password while installing VCSA 6.0 U2
Note: On VCSA 6.5 you’ll find that access to GRUB is not password protected much to the horror of the security folk!
Changing the root password and expiration settings
There will be times where you will not be able to log in as root despite being sure that you’re typing in the correct password. This will occur whenever the root password expires after the default password lifetime of 365 days. Additionally, it is very common to set the expiration period to 90 days or less to tighten up security. You can disable password expiry altogether but this is definitely not recommended.
The root password and expiry settings are easily managed using VAMI which you will access via this https://<VCSA FQDN or IP>:5480> link. Figures 10-11, show the root account management pages for VCSA 6.0 U2 and 6.5 respectively.
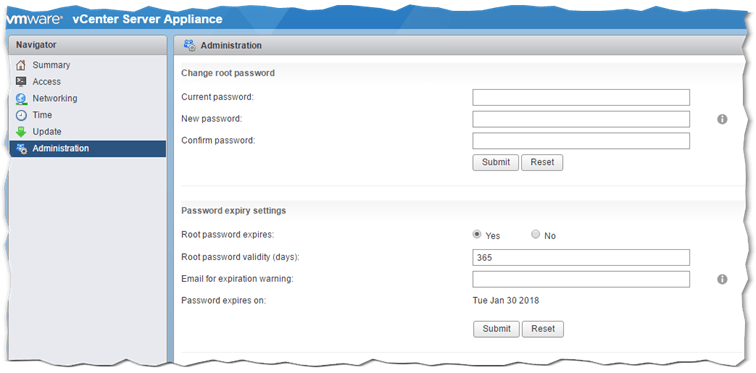
Figure 10 – VCSA 6.0 U2: Root password and expiration settings in VAMI
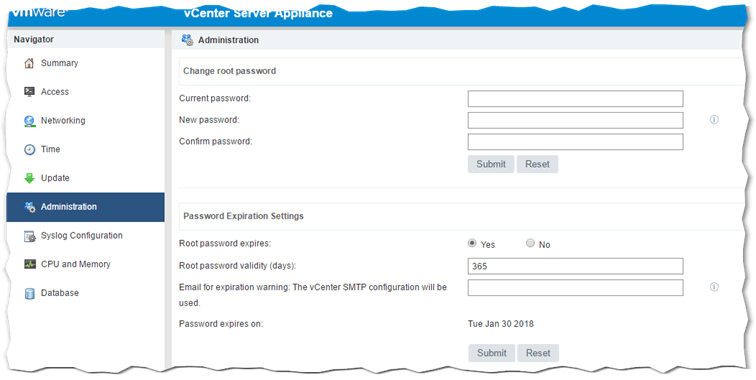
Figure 10 – VCSA 6.5: Root password and expiration settings in VAMI
Alternatively, use the chage command from the ESXi shell as shown in Figure 11 which consists of a screen grab of the root settings in VAMI next to a screen grab of the VCSA VM’s console while in shell. Here’s a step by step explanation of the commands used.
1. chage -l root : Displays the account details for root which include the account and password expiry dates, the date at which the password was last changed, etc.
3. chage -M 30 root : Here I’ve used the chage command to set the password expiration period to 30 days from when the password was last changed.
4. Same as (1). You can see that the “Maximum number of days between password change“value – which is a bit misleading if you ask me – is now set to 30. The change is also reflected in the VAMI settings screens when it is refreshed.
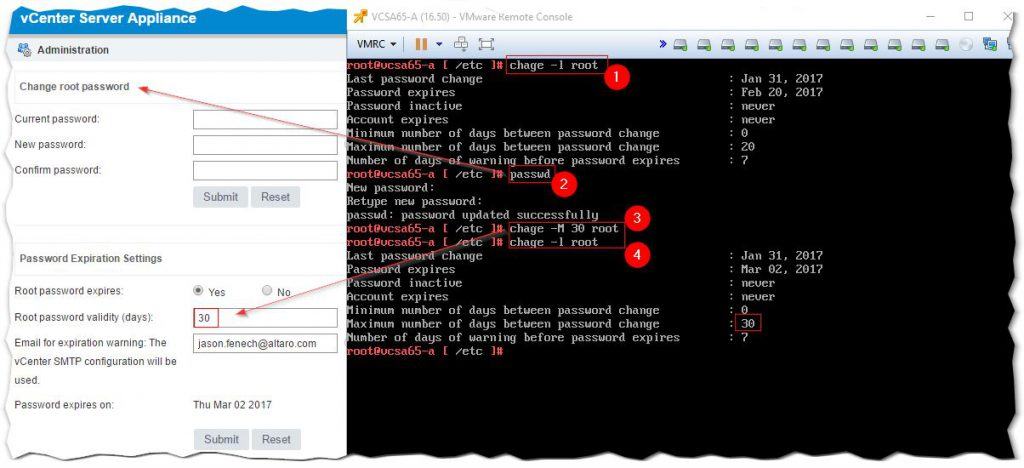
Figure 11 – Changing the expiration period of an account using chage
This concludes today’s post. As always, make sure to take a snapshot or a backup of the appliance when committing these type of changes. This allows you to quickly revert to a working vCSA instance should you hit a dead end.
So, in today’s post, I’ll go over the process of joining ESXi 6.5 to Active Directory. My test setup consists of a single unmanaged ESXi 6.5 host and a Windows 2012 Domain Controller (DC) running DNS, a single forest / domain setup and hosting all FSMO roles.
Requirements
Time synchronization: The time on the ESXi host and the DC must be in sync. To do this, configure both to use the same NTP source or simply configure the NTP service on ESXi to use the DC as a time source. By default, a DC holding the PDC Emulator role is also responsible for keeping time for the whole forest.
DNS Resolution: The ESXi host must be able to resolve the domain and domain controller(s) DNS names. The easiest solution to this is to add the IP address of a DC which is configured as a DNS server for that domain.
- 88 – Kerberos authentication
- 123 – NTP
- 135 – RPC
- 137 – NetBIOS Name Service
- 139 – NetBIOS Session Service (SMB)
- 389 – LDAP
- 445 – Microsoft-DS Active Directory, Windows shares (SMB over TCP)
- 464 – Kerberos – change/password changes
- 3268- Global Catalog search
Configuring Active Directory
There’s little work to be done here. Just add A and PTR records for the ESXi host to the domain’s DNS zone as shown in Figure 1.
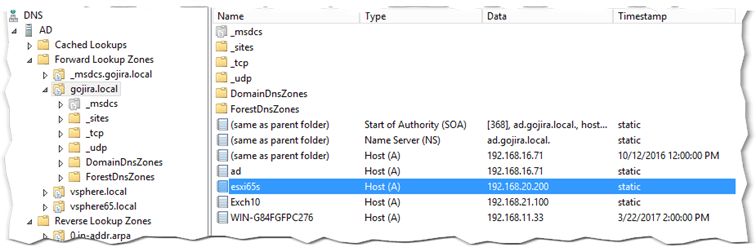
Figure 1 – Creating DNS records for ESXi on a Microsoft DNS server
Configuring ESXi
You can configure ESXi 6.5 several ways. These include the DCUI, the ESXi command line, PowerCLI or via the embedded ESXi host or thick client.
Enable the Active Directory Firewall Rule
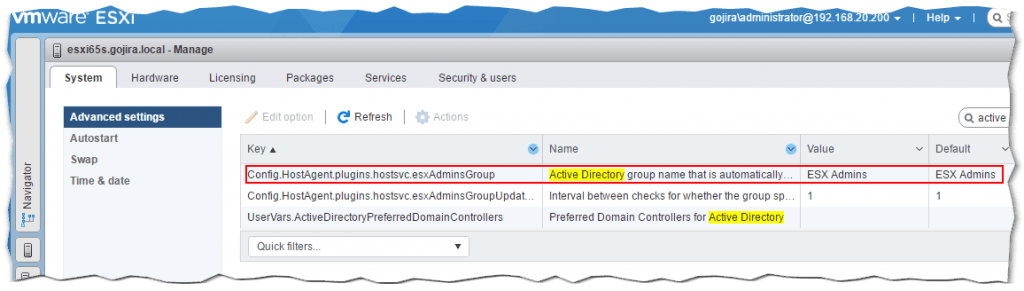
While writing this post, I learned that the Active Directory All firewall rule on ESXi is disabled by default. This, of course, plays havoc with the AD integration process since ESXi won’t be able to reach the DC. Using the host client, enable the firewall rule as shown in Figure 4. Highlight the rule, right-click on it and select Enable.
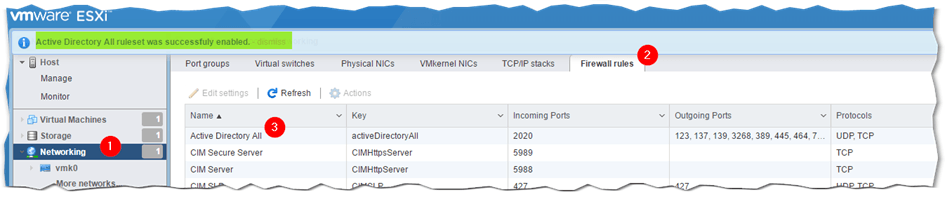
Figure 4 – Enabling the Active Directory All firewall rule on ESXi
The easy way to configure DNS settings on ESXi is via the DCUI or the thick client. This is shown respectively in Figures 5 and 6. From the DCUI, log in as root, press F2 and navigate to the DNS Configuration menu option and press Enter.
On the DNS Configuration window, add the IP address of a DC running the DNS service as a primary or alternate DNS server. The Hostname value must match the DNS A record created for the ESXi host in the domain DNS zone.
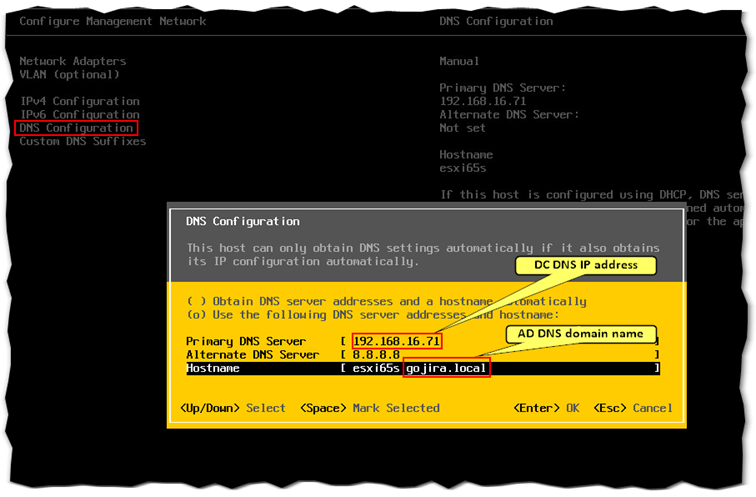
Figure 5 – Configuring the DNS settings on ESXi using the DCUI
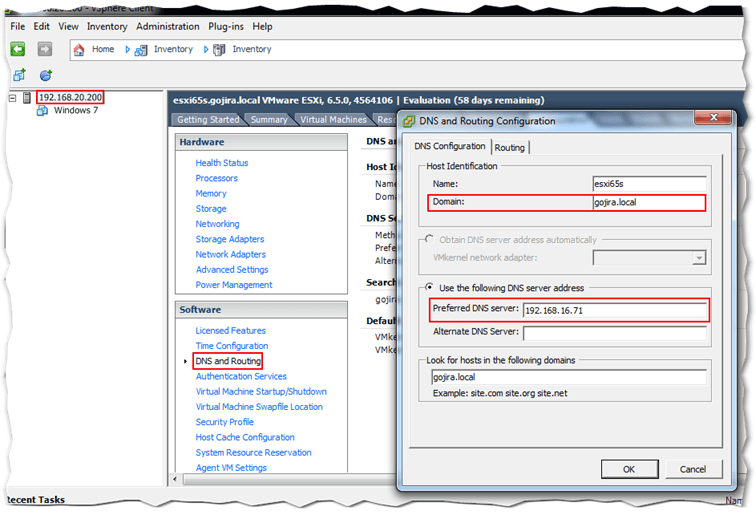
Figure 6 – Configuring the DNS settings on ESXi via the thick client
As per the requirements, ESXi must be time synced to the domain. One way of achieving this, is to add the IP address of the DC holding the PDC role to the list of NTP servers on ESXi. Figure 7 outlines how to do this using the thick (C#) client. Make sure that the NTP Client Enabled option is ticked on.
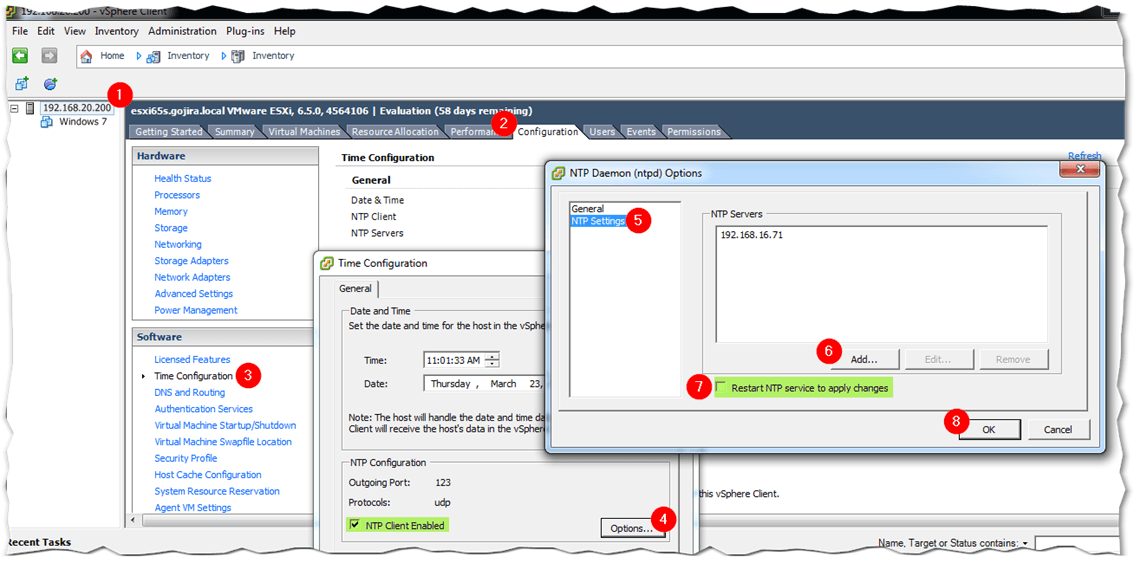
Figure 7 – Managing the NTP service on ESXi via the thick client
Alternatively, SSH to ESXi, log in as root and edit /etc/ntp.conf using vi. Add the line server x.x.x.x as shown in Fig.8 where x.x.x.x corresponds to the IP address of the NTP server you wish to use, which in my case happens to be the DC itself. When you’re done, restart the ntp service by running /etc/init.d/ntpd restart as shown in Fig. 8.
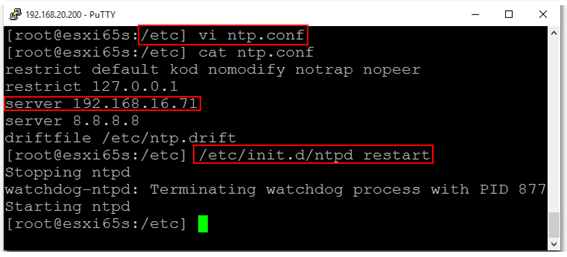
Figure 8 – Adding an NTP time source via the command line and restarting the NTP daemon
Once SSH’ed to ESXi, carry out an nslookup test to see if the AD domain name can be resolved. As per my example, the AD domain name is gojira.local which correctly resolves as shown in Fig. 9.
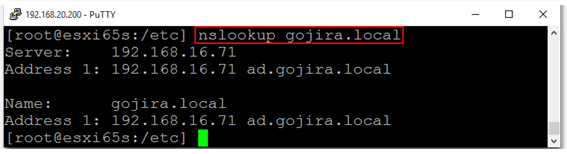
Figure 9 – Running nslookup to check if the AD domain name resolves correctly
Joining Active Directory
Now that the pieces are all in place, it’s just a matter of joining ESXi to the domain. To do this, I’ve used the embedded host client to make things a little bit interesting. If you wish, however, you can do the same via the ESXi command line or the thick client.
Using the embedded host client
- As per Figure 10, log in as root and select Manage from Navigator.
- Select Authentication (3) from the Security & Users tab (2).
- Next, click on the Join Domain button (4) and enter the AD domain name (5) and credentials (6) with the required rights to join computers to a domain. Make sure to abide by the formatting shown in the screenshot.
- Click Join Domain (7) from the Join Domain window. ESXi is added to Active Directory as per the highlighted fields in green.
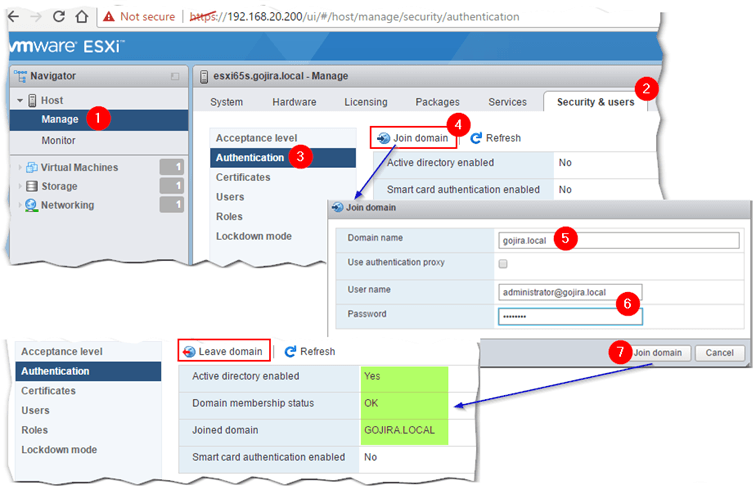
Figure 10 – Use the host client to join ESXi to Active Directory
You can leave the domain any time by clicking on the Leave domain option.
Using the ESXi command line
Later versions of ESXi include the domainjoin-cli cmdlet from the likewise-open package which is also included with many Linux distros.
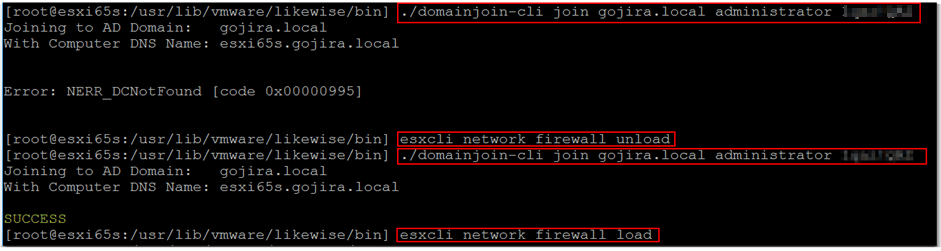
Figure 11 – Joining ESXi to AD using domainjoin-cli
As per Fig. 12, you can run domainjoin-cli query to verify that the DC is reachable.

Figure 12 – Running domainjoin-cli query to verify correct AD functionality
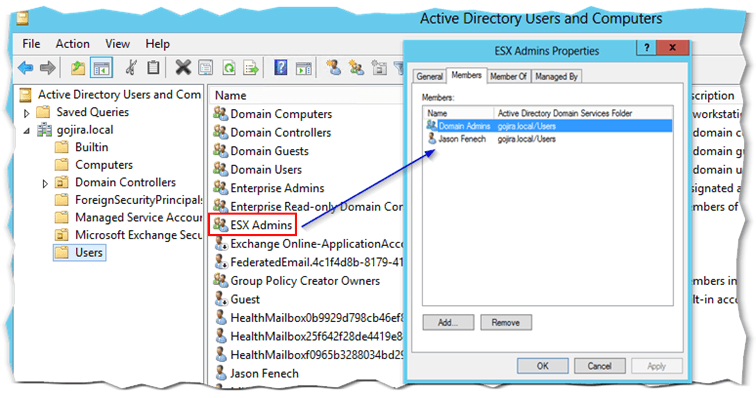
From the AD side of things, you should see a new computer account created for ESXi under Computers.
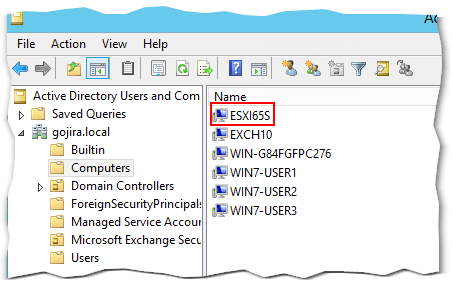
Figure 13 – A computer account for ESXi is created in AD on joining the domain
Time to test!
Single sign-on using Windows credentials
Next up is a video that shows SSO in action when using the old vSphere client. In addition, I also show where from ESXi is be joined to and removed from an AD domain.
Granting permissions on vSphere objects
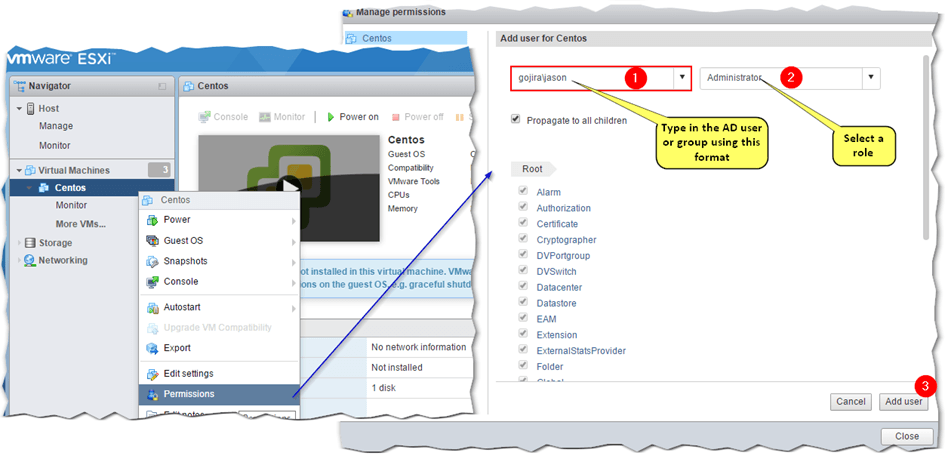
Figure 14 – Granting permissions using AD security principles via the embedded ESXi host client
")


")