
It’s a good idea to change your passwords regularly and consider using enterprise password management software.
This guide will help you change your Linux root password in Ubuntu or CentOS, or reset the password.
- A computer running Linux
- Command-line interface (terminal)
This guide will show you how to reset a forgotten root password. Several methods are listed to help you accomplish this.
Warning: An attacker could use some of the methods mentioned below to break into your system. No matter how secure the operating system is or how good passwords are, having physical access amounts to loading an alternate OS and exposing your data, unless you use data-at-rest encryption.
Состояние перевода: На этой странице представлен перевод статьи Reset lost root password. Дата последней синхронизации: 13 октября 2021. Вы можете помочь синхронизировать перевод, если в английской версии произошли изменения.
На этой странице вы сможете узнать, как сбросить забытый пароль суперпользователя. Существуют несколько способов, которые могут вам в этом помочь.
Важно: Недобросовестный пользователь может использовать указанные здесь методы для получения доступа к вашей системе. Неважно, насколько операционная система защищена от атак и как хороши ваши пароли: имея физический доступ к компьютеру, любой сможет это сделать, если вы, конечно, не выполните шифрование хранимых данных.
Read Also: How to Reset Forgotten Root Password in Debian 10
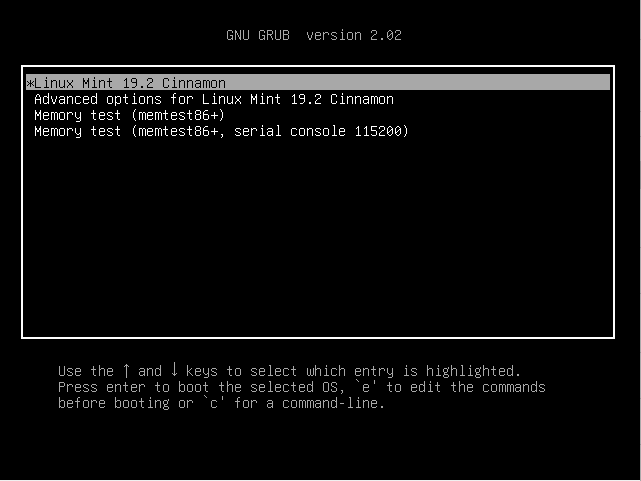
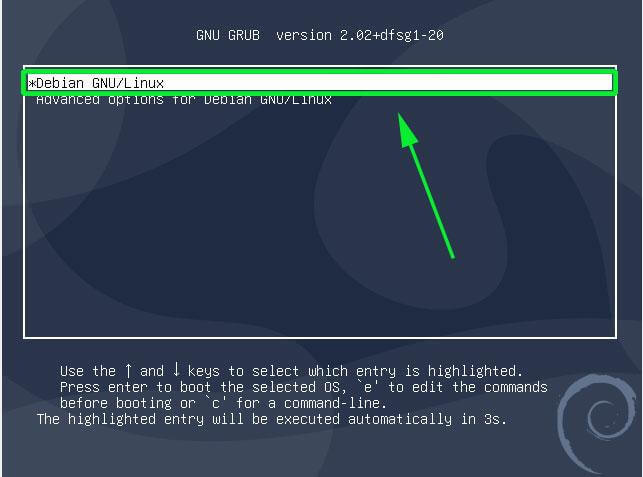
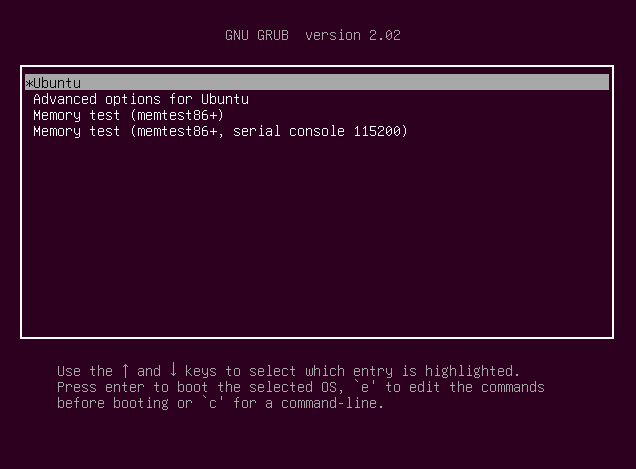
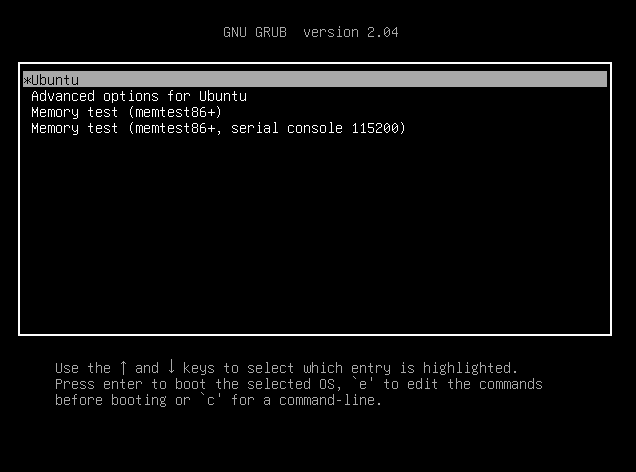
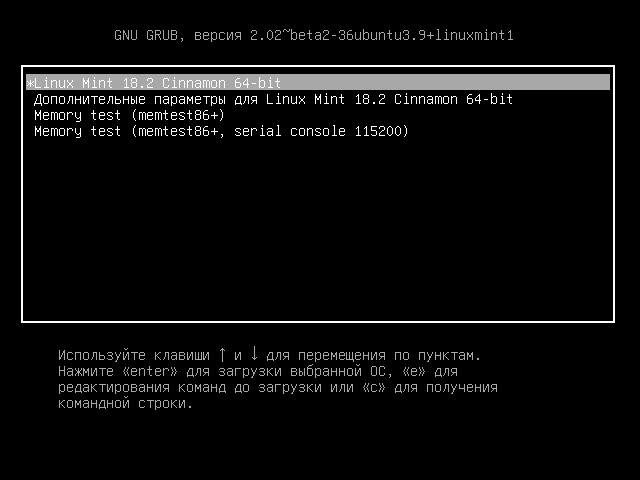
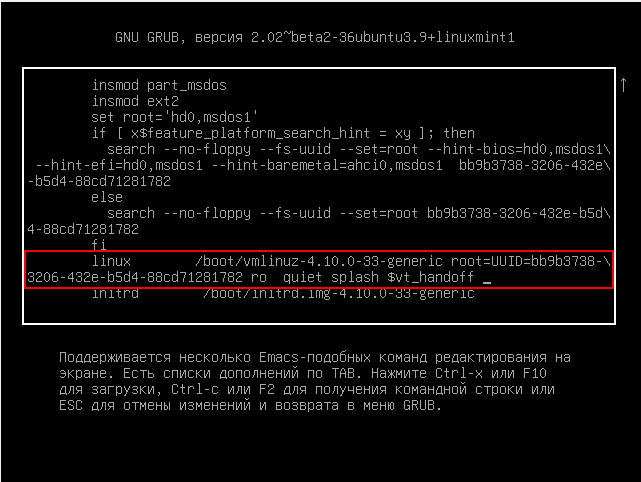
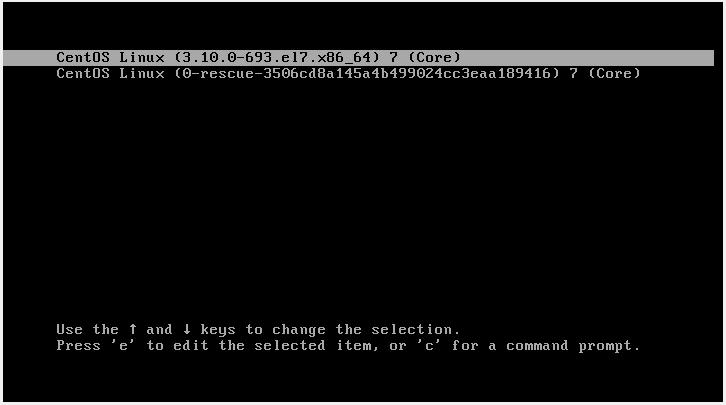
To get started, power on or reboot your Linux Mint system. After a few seconds, you should get a grub menu on the screen as shown below.
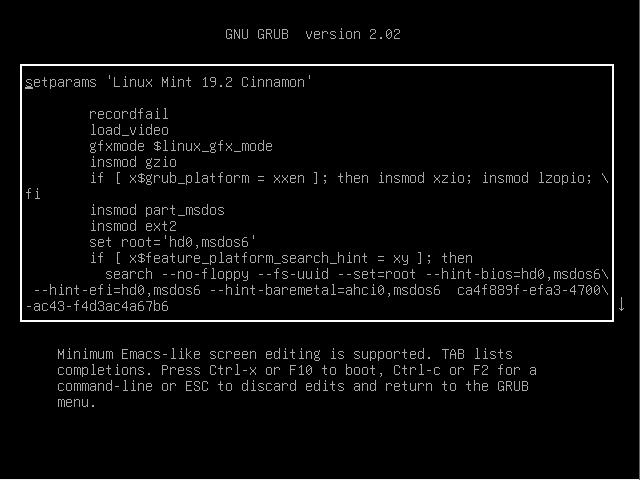
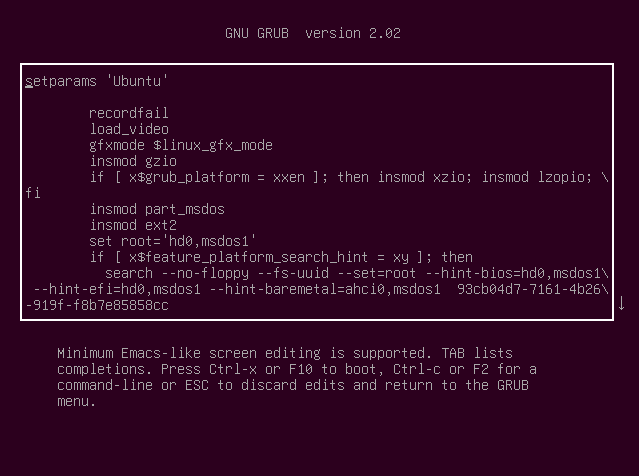
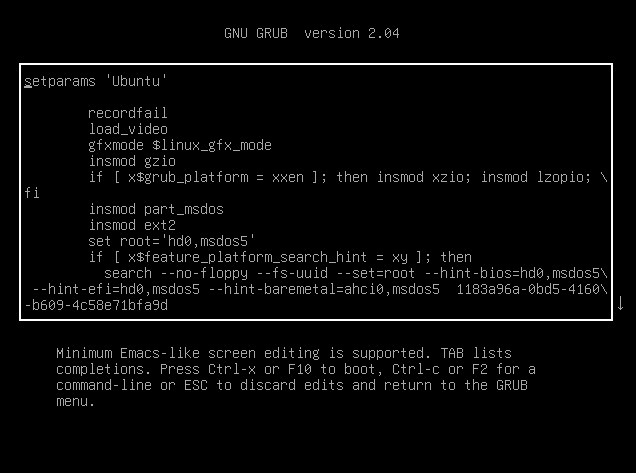
On the first highlighted option, press 'e' on the keyboard to edit the grub parameters. You should get the screen shown below.
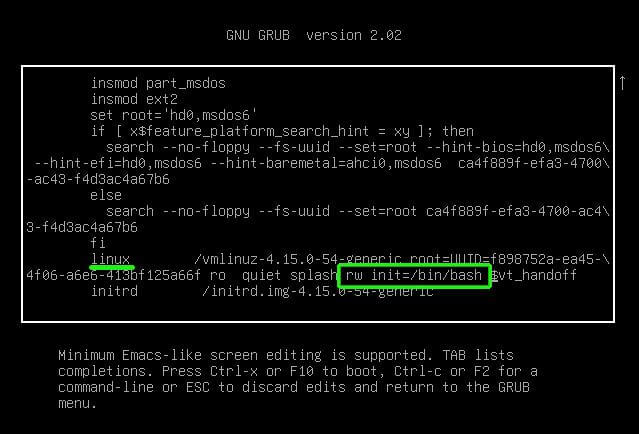
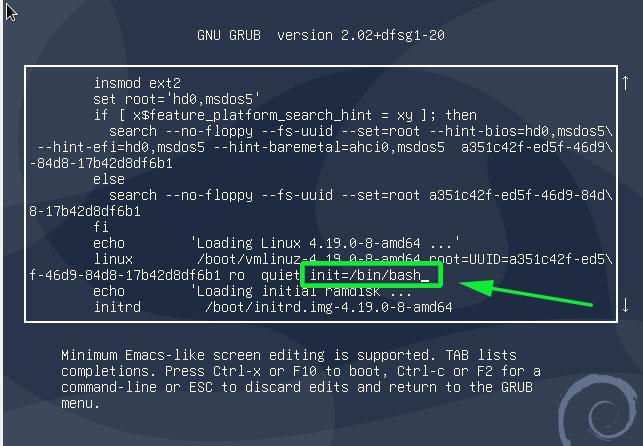
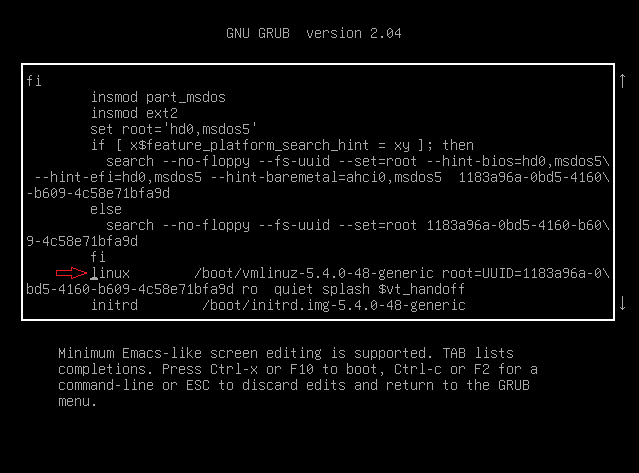
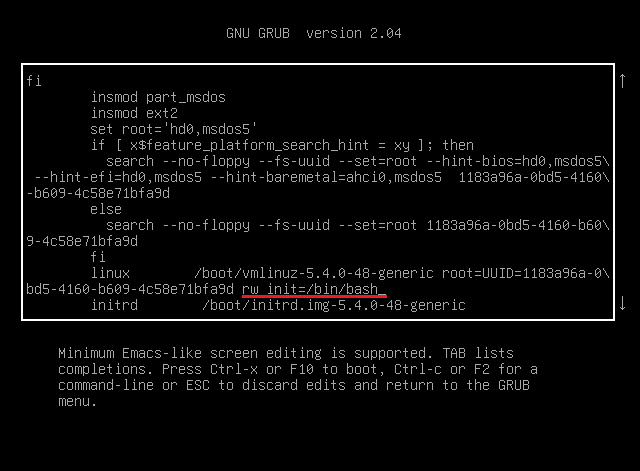
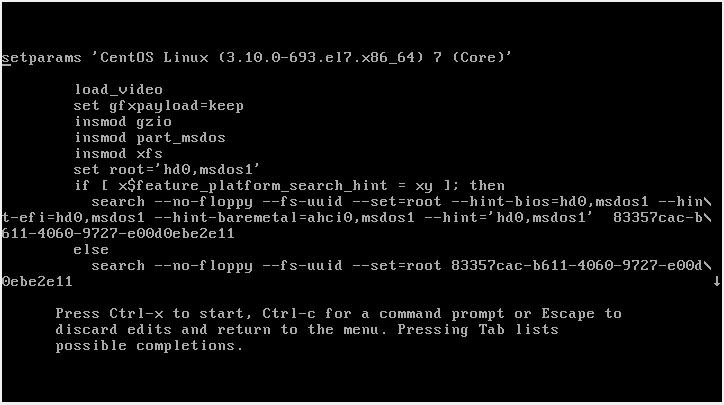
Next, scroll down using the arrow down cursor key until you get to the line beginning with 'linux'. Navigate until you get to the ro quiet splash section and add rw init=/bin/bash.
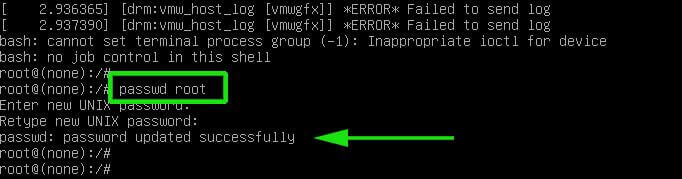
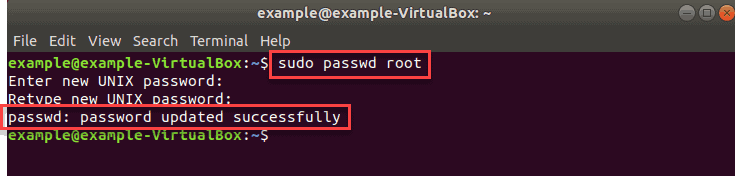
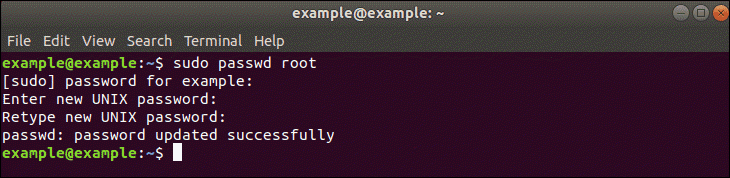
To reset the forgotten root password in Linux Mint, simply run the passwd root command as shown.
# passwd root
Specify the new root password and confirm it. If the password matches, you should get a ‘password updated successfully‘ notification.
If you read this far, tweet to the author to show them you care. Tweet a thanks

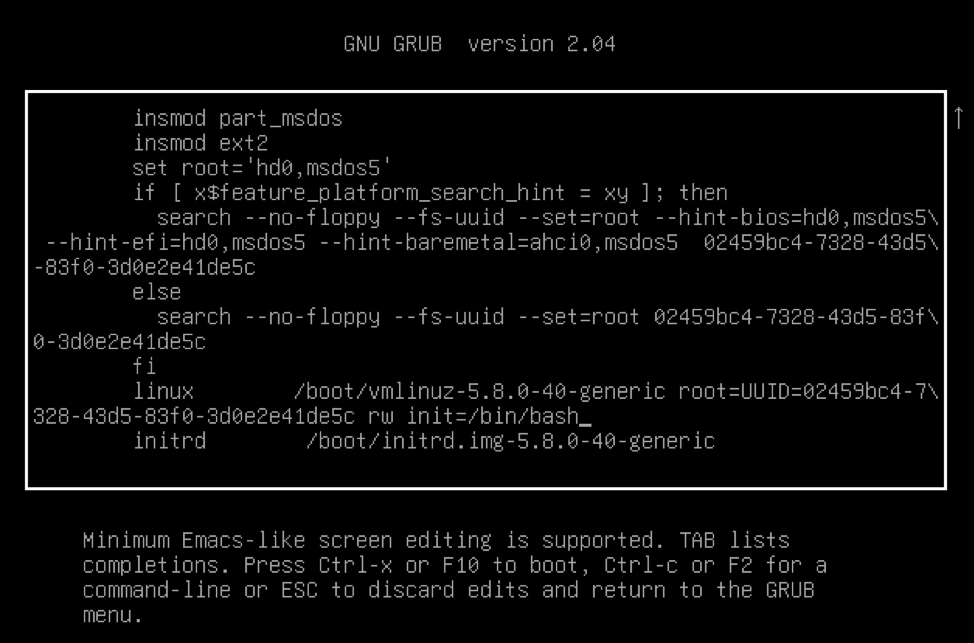
So, first power on or reboot your Debian 10 system. You should be presented with a GRUB menu as shown below. On the first option, proceed and press the ‘e’ key on the keyboard before the system starts booting.
This ushers you to the screen shown below. Scroll down and locate the line that begins with ‘linux’ that precedes the /boot/vmlinuz-* section that also specifies the UUID.
Move the cursor to the end of this line, just after ‘ro quiet’ and append the parameter init=/bin/bash.
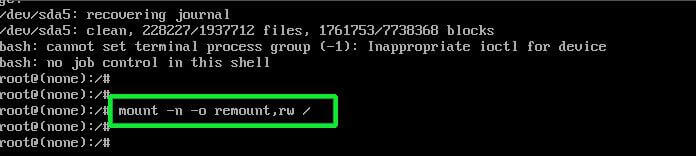
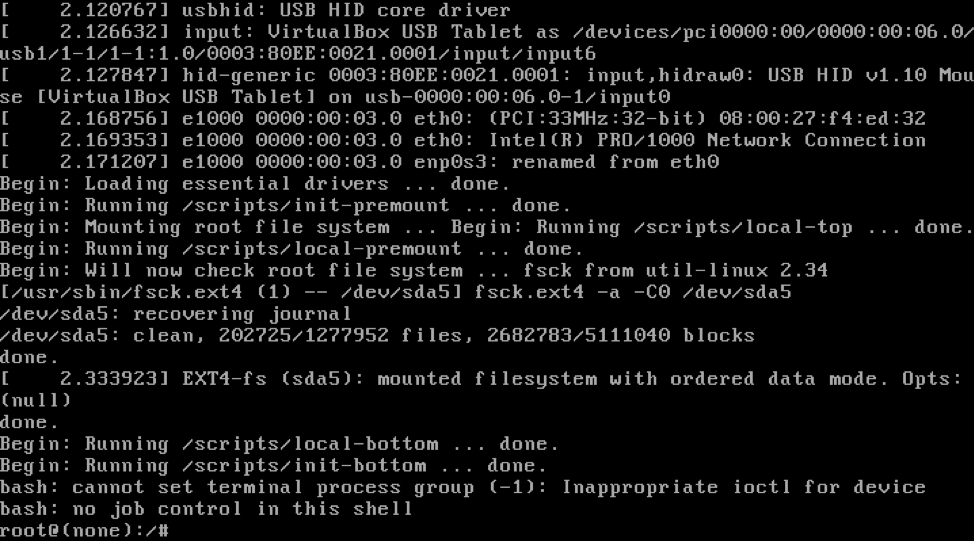
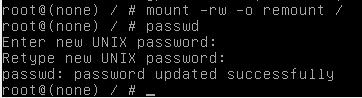
For you to reset the password, you need to change the access right from read-only to read-write. Therefore, run the command below to remount the root filesystem with rw attributes.
:/# mount -n -o remount,rw /
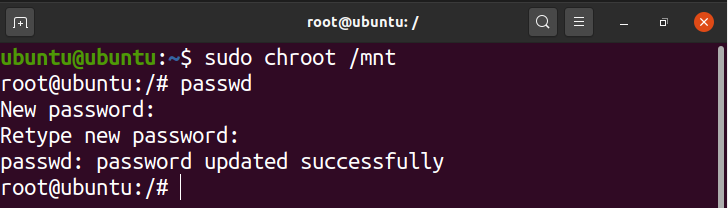
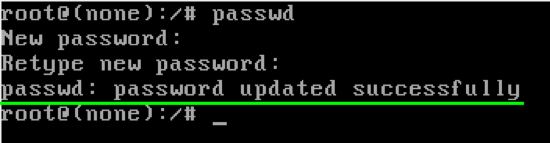
Next, reset the root password by executing the good old passwd command as shown.
:/# passwd
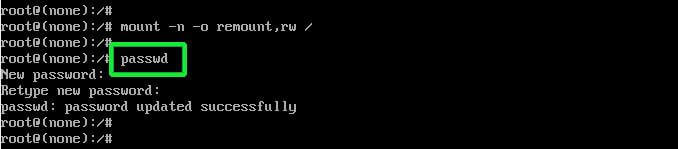
Provide the new password and retype it to confirm. If all went well and the passwords match you should get a ‘password updated successfully’ notification at the end of the console
And that’s how you reset a forgotten root password on Debian 10.
- Что такое группа wheel в Linux
- Что такое однопользовательский режим в Unix
- Option 1: Changing Ubuntu Password in the Command Line
- Option 2: Change sudo Password with the passwd Command
- Option 3: Changing Ubuntu Password Using GUI
- Step 1: Log in as the MySQL User
- Step 2: Find the .pid File for the MySQL Service
- Step 3: Kill the mysqld Process
- Step 4: Create the Password File
- Step 5: Restart the MySQL Server and Apply the New Password
- Step 6: Cleaning Up
- Final thoughts
- About the author
- Step 1: Reboot your Ubuntu 20.04 LTS Operating System and load the GRUB menu by holding the Shift Key on Keyboard
- Step 2: Press ‘e’ to edit the commands
- Step 3: Edit the clause of the second last line from ‘ro quiet splash $vt_handoff’ to ‘rw init=/bin/bash’
- Step 4: Press F10 or Ctrl-x to save the edits and boot
- Step 5: Type the command ‘mount | grep -w /’ to confirm the read and write access rights
- Step 6: Type the ‘passwd’ command and provide the new password for the root
- Step 7: Type the command ‘exec /sbin/init’ to reboot your Ubuntu 20.04 LTS Operating System
- Conclusion
- About the author
- Change or Reset Root Password as Sudo User
- Change or Reset Root Password Using GRUB Menu
- Conclusion
- About the author
- Как поменять пароль для пользователя Linux
- How to Reset MySQL Root Password in Windows
- Step 1: Stop the MySQL server
- Step 2: Launch a Text Editor
- Step 3: Create a New Text File with the Password Command
- Step 4: Open a Command Prompt
- Step 5: Restart the MySQL Server with Your New Config File
- Step 6: Clean up
- Changing Your Root Password in Ubuntu
- Step 1: Open a Terminal Window
- Step 2: Change Your Root Password
- Using the debug shell
- Через отладочную консоль
- Using a LiveCD
- Changing the Root Password in CentOS
- Step 1: Access the Command Line (Terminal)
- Step 2: Change the Password
- Step 1: Access Boot Menu
- Step 2: Edit Boot Options
- Step 3: Remount the Drive
- Step 4: Changing the Password
- Step 5: Restart
- Сброс пароля в Linux Mint, Ubuntu, Debian, Kali Linux (также должно работать для других производных Debian)
- Сброс пароля в RHEL/CentOS 7
- Resetting a Root Password in Ubuntu
- Step 1: Boot to Recovery Mode
- Step 2: Drop Out to Root Shell
- Step 3: Remount the File System with Write-Permissions
- Step 4: Change the Password
- При помощи LiveCD
- В GRUB 2 нельзя изменить пароль в однопользовательском режиме?
- Как сбросить пароль в Arch Linux, BlackArch (а также в других производных Arch Linux)
- Что делать если забыт пароль от входа Linux
- Используя bash в качестве init
- Using bash as init
Что такое группа wheel в Linux
Применительно к компьютерам, термин wheel относится к учётным записям пользователя с битом wheel – системному параметру, который предоставляет дополнительные специальные системные привилегии, которые позволяют пользователю выполнять команды для служебного пользования, к которым обычные пользователи не могут получить доступ. Этот термин происходит от сленговой фразы big wheel (букв. «большое колесо»), отсылающего на человека с большой властью или влиянием. Он был впервые использован в этом контексте в отношении операционной системы TENEX, позже распространенной под названием TOPS-20 в 1960-х и начале 1970-х годов.
Этот термин был принят пользователями Unix в 1980-х годах из-за движения разработчиков операционной системы и пользователей от TENEX/TOPS-20 к Unix.
Современные системы Unix обычно используют группы пользователей в качестве протокола безопасности для управления правами доступа. Группа wheel – это особая группа пользователей, используемая в некоторых системах Unix для управления доступом к команде sudo, которая позволяет пользователю маскироваться как другой пользователь (обычно суперпользователь).
Что такое однопользовательский режим в Unix
Однопользовательский режим – это режим, в котором многопользовательская компьютерная операционная система загружается в одиночного суперпользователя. Этот режим в основном используется для обслуживания многопользовательских сред, таких как сетевые серверы. Для некоторых задач может потребоваться эксклюзивный доступ к общим ресурсам, например, запуск fsck в сетевом ресурсе. Этот режим также может использоваться в целях безопасности – сетевые службы не запускаются, что исключает возможность внешних помех. В некоторых системах потерянный пароль суперпользователя можно изменить, переключившись на однопользовательский режим. Поскольку при входе в этот решим не запрашивается никакой пароль, это можно рассматривать как уязвимость безопасности.
Unix-подобные операционные системы обеспечивают однопользовательский режим работы либо с помощью уровня выполнения в стиле System V, либо с загрузчиками в стиле BSD, либо с другими параметрами загрузки.
Уровень выполнения обычно изменяется с помощью команды init, уровень выполнения 1 или S будет загружаться в однопользовательский режим.
Параметры загрузчика могут быть изменены во время запуска перед выполнением ядра. В FreeBSD и DragonFly BSD он может быть изменен перед перезагрузкой системы с помощью команды nextboot -o «-s» -k kernel, и ее загрузчик предложит возможность загрузки в однопользовательском режиме. В Solaris команда
reboot -- -s
приведет к перезагрузке в однопользовательском режиме.
In this article, you will learn how to reset the forgotten root password on Ubuntu 18.04 LTS and Ubuntu 20.04 LTS.
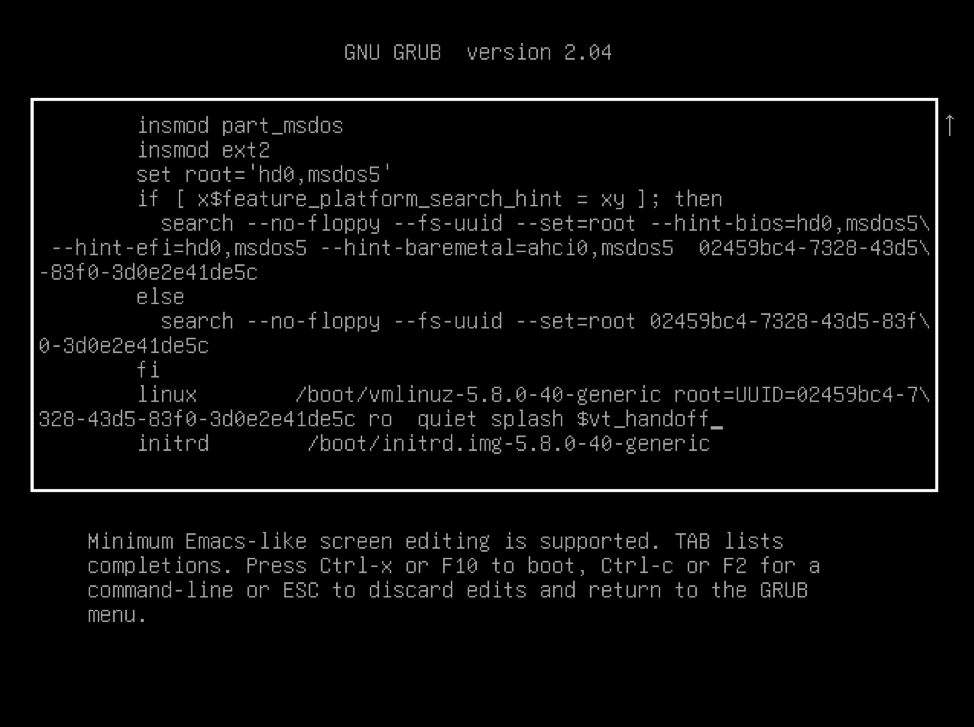
Firstly, you need to either power on or reboot your Ubuntu system. You should get a grub menu as shown below. If you are running your system on VirtualBox, press the ‘SHIFT’ key on the keyboard to bring up the boot menu.
Next, press the 'e' key to edit the grub parameters. This should display a screen as shown below.
Scroll down until you get to the line that begins with 'linux /boot/vmlinuz' the entire line is highlighted below.
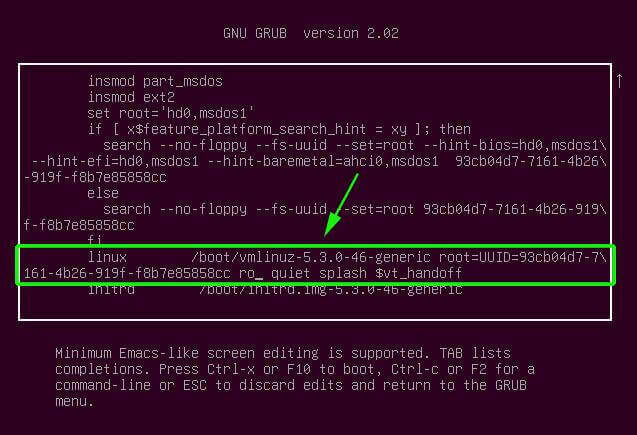
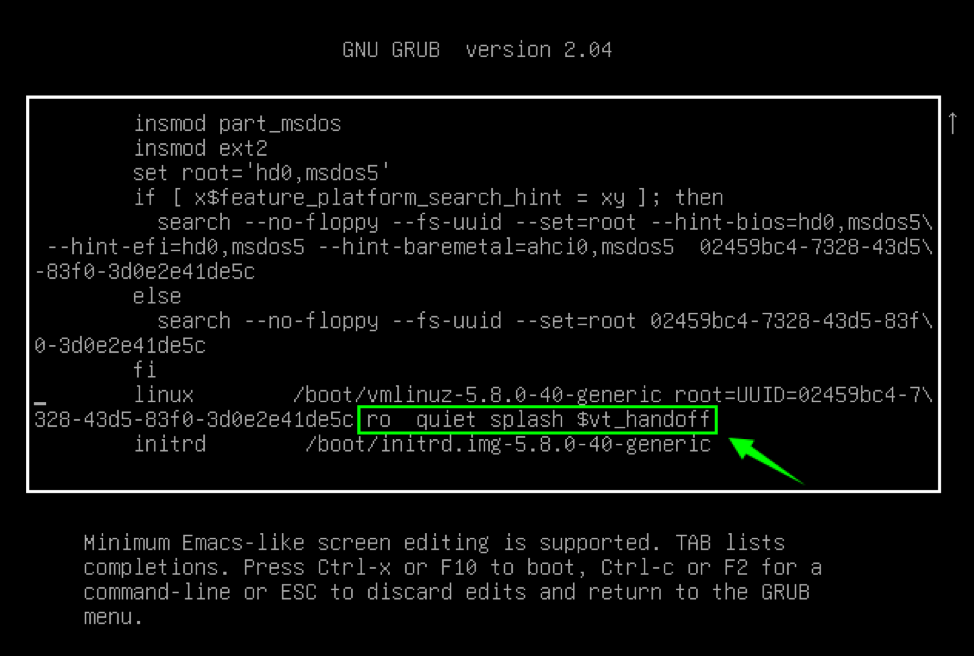
Narrow down to a section that reads "ro quiet splash $vt_handoff".
Replace "ro quiet splash $vt_handoff" with rw init=/bin/bash as shown. The aim is to set the root file system with read and write commands denoted by the rw prefix.
Thereafter, press ctrl + x or F10 to reboot your system. Your system will boot into a root shell screen as shown below. You can confirm that the root filesystem had read and write access rights by running the command.
# mount | grep -w /
The output in the screenshot below confirms read and write access rights denoted by rw.
To reset the root password execute the command.
# passwd
Provide a new password and confirm it. Thereafter, you will get a ‘password updated successfully’ notification.
With the root password successfully changed, reboot into your Ubuntu system by running the command.
# exec /sbin/init
Thank you for coming this far. We hope that you can now comfortably reset the forgotten root password on your Ubuntu system from the grub menu.
If you read this far, tweet to the author to show them you care. Tweet a thanks
Are you looking to change the root password in Ubuntu?
Changing passwords is a good practice and should be done periodically.
There are three (3) ways to change passwords in Ubuntu.
The first two (2) options use the command line, and the other uses Linux’s graphical interface (GUI).
- Ubuntu installed and running
- A user with sudo privileges
- Access to a terminal/command line
- The apt-get tool, pre-loaded in Ubuntu and other Debian-based distros
Option 1: Changing Ubuntu Password in the Command Line
To change the sudo password using the sudo command:
1. First, open the terminal using the keyboard shortcut CTRL+ALT+T.
2. Query for a password change by running the command:
sudo passwd rootYou will be prompted to enter and verify a new password. The output will inform you the password was updated successfully.

Option 2: Change sudo Password with the passwd Command
1. First, open the terminal (CTRL+ALT+T).
sudo –iType in your current password and hit Enter. The output you receive should show that you can now run commands as root.

3. Next, change the password by running the command:
passwdType and retype a new password to verify the change.
exit5. Exit out of the terminal with the same command:
exitOption 3: Changing Ubuntu Password Using GUI
To change the default root password in Ubuntu without using the terminal or any commands, use the graphical interface.
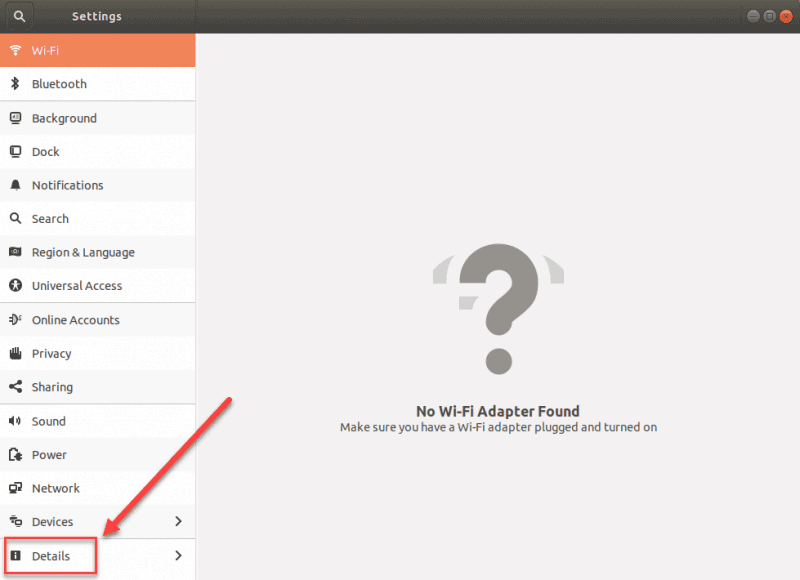
1. Open the Activities overview by pressing the Windows or Super key.
2. Type settings in the search bar and click on the Settings icon.
3. In Settings, click on the Details card (which is most likely the last one).
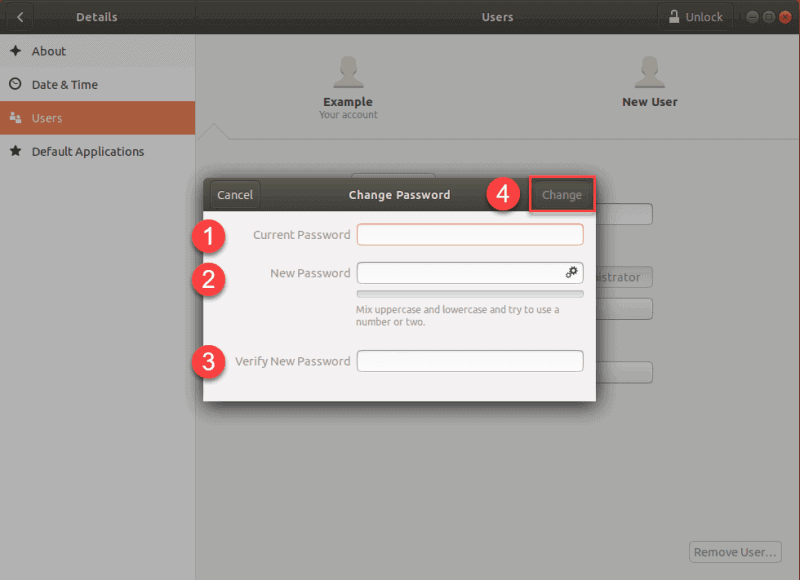
5. This will open a new Change Password pop-up. Type in your current root password, your new root password and verify the new password by retyping it.
6. Once you have filled in all the fields, click Change to confirm the changes.
Finally, make sure that your password includes both lower and upper case letters, numbers and special characters. It is essential to have a strong password to prevent brute force attacks.
If you’ve never set a root password on your MySQL database, you should be able to connect to it. However, this is not a good security practice as anyone can access your database.
If your database has a root password, but you lost track of it, this guide will help you reset a MySQL Root password on Linux and Windows.
- An existing MySQL database
- Access to a Linux or Windows server running MySQL
- Administrator privileges on the computer that hosts the MySQL database
- A text editor. Notepad is included by default in Window. Vim is installed by default in Linux.
- Access to a command-line interface (or terminal)
Step 1: Log in as the MySQL User
Step 2: Find the .pid File for the MySQL Service
The next step is to find the .pid file for the MySQL service.
Most systems store them in /var/lib/mysql/, /var/run/mysqld/, or /usr/local/mysql/data/ path. The filename usually starts with mysqld (or your system’s hostname) and ends with the .pid extension.
Step 3: Kill the mysqld Process
kill `cat /mysql-data-directory/host_name.pid`Replace mysql-data-directory/host_name.pid with the filename you found in the previous step. Ensure to specify the whole path to the file. Also, make sure to use the back-tick key (usually above the tab key) and not a single-quote mark in the beginning of the command.
Step 4: Create the Password File
1. Open your favorite text editor. In this example, we use vim:
sudo vimALTER USER 'root'@'localhost' IDENTIFIED BY 'NewPassword';
Bear in mind to include the single-quote marks and the semicolon. Replace NewPassword with the password you want to use. Finally, make sure to use a strong secure password, like these examples.
The command will work for the machine you’re currently using. If you’re connecting to a different system, replace localhost with the appropriate hostname.
3. Save the file to home/me/mysql-init.
Step 5: Restart the MySQL Server and Apply the New Password
mysqld --init-file=/home/me/mysql-init &This launches MySQL, and apply the text-file password change. Depending on how you start your server, you may need to add other options (such as --defaults-file before the init command.)
Step 6: Cleaning Up
Lastly, log into your MySQL server using the root account, and verify the new password works. Then, delete the file you created in Step 4.
Check out how to reset the forgotten root password in Ubuntu.
Although it is difficult, it is still possible to reset the forgotten root password in Ubuntu. There are a couple of methods to do so. In short, the process is to get access to the root shell and change the password from there.
Method 1: Root shell from boot
When you are booting into Ubuntu, press, and hold Shift. This should open up the GRUB menu. In case there is multi-boot configured, there is probably no need to press the Shift key.
Select “Ubuntu” and press “e”. This will open up the grub parameters to edit.
Now, use the arrow keys and scroll down to the line that starts with “linux /boot/vmlinuz”.
From that line, replace “ro quiet splash $vt_handoff” with “rw init=/bin/bash”.
Press “Ctrl + X” or F10. This will reboot the system with the tweaks we just made. It will start the system and directly land you on the root shell. It is just a one-time thing, so next time the system boots, it will boot normally into the operating system.

Now, run the passwd command to change the root password.

Once the password is changed, you will see the success message.
The task is finished. Run the next command to reboot the system.
Method 2: Change password from Ubuntu live session
For this method to work, we need to have bootable media made from Ubuntu ISO. Download Ubuntu ISO. In my case, I’m running Ubuntu 20.04.1 LTS.

Make a bootable USB flash drive. Check out how to make a bootable USB drive.
Boot into the Ubuntu bootable media. When prompted, select “Try Ubuntu”. This will start the Ubuntu live session.

Once you are in the live session, fire up a terminal.

From the table, we have determined that the boot partition is /dev/sda5. Now, mount it by running this command.
$ devsda5 mnt

Run the next command to cross-mount things from the live install.
$ d dev sys run proc; mnt;

Now, become the root of the system using chroot.

Finally, run the passwd command to change the root password.
Once the process is finished, reboot the system.
Final thoughts
Now, these methods also open up the question of security. In case there is someone else having physical access to the computer. These methods could be used against you. To prevent this, you should configure a password to access the BIOS and boot menu. All modern computers have this feature built-in. However, this is a password that you MUST NOT FORGET.
About the author
Student of CSE. I love Linux and playing with tech and gadgets. I use both Ubuntu and Linux Mint.
You have forgotten your root password, and now you have no idea how to retrieve your Ubuntu 20.04 LTS Operating System? In this post, we will guide you on how to reset your root password on Ubuntu 20.04 LTS System from the GRUB menu. The Grand Unified Bootloader or GNU GRUB menu is a boot loader and software or program that loads and transfers control to the Operating System like Linux- it runs when a computer starts. So, let’s begin with the step-by-step guide of resetting the password of the root.
Step 1: Reboot your Ubuntu 20.04 LTS Operating System and load the GRUB menu by holding the Shift Key on Keyboard
The first step is to start your computer machine and keep pressing the shift button on your keyboard until the GRUB menu appears, as shown in the picture below:

Step 2: Press ‘e’ to edit the commands
Now, select the boot Operating system, which is Ubuntu in our case, and press the ‘e’ key on your keyboard to edit some commands. By doing so, we can load the root shell Command prompt. Pressing the ‘e’ key on your keyboard allows you to have an edit screen, as shown in the picture below:
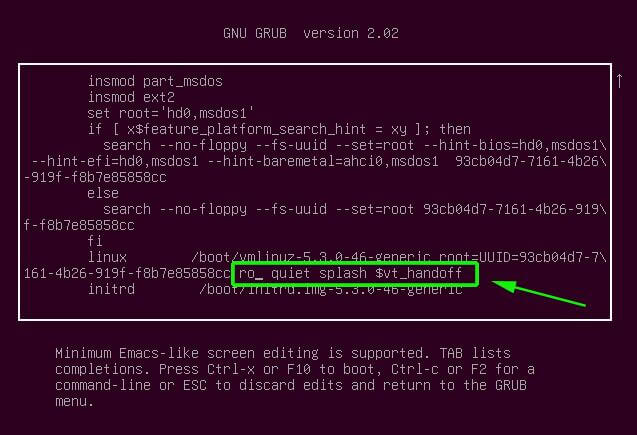
Step 3: Edit the clause of the second last line from ‘ro quiet splash $vt_handoff’ to ‘rw init=/bin/bash’
After entering into the editing mode of commands, scroll down until the last, find a line that starts with the word ‘linux’ and change the last clause of this line that reads ‘ro quiet splash $vt_handoff’ to this clause, ‘rw init=/bin/bash’, as shown in the pictures below:
ro quiet splash $vt_handoff
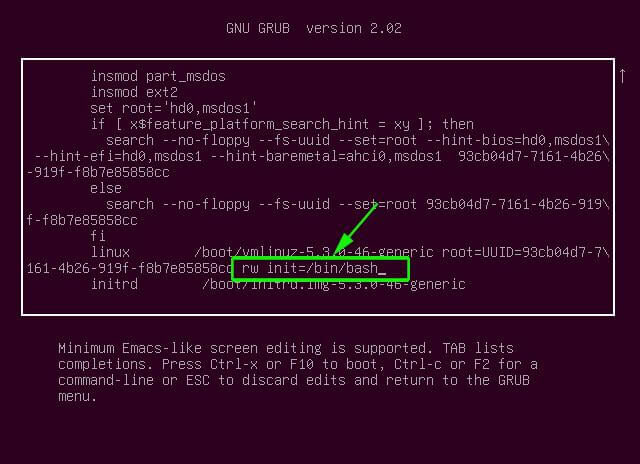
Step 4: Press F10 or Ctrl-x to save the edits and boot
Once you have edited the line for loading the root shell command prompt, Press F10 or CTRL+X to save and boot the system. After the reboot, a shell command prompt screen of the root will appear, as shown in the picture below:
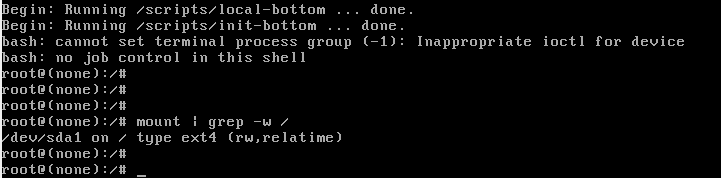
Step 5: Type the command ‘mount | grep -w /’ to confirm the read and write access rights
In the root shell command prompt screen, type the command given below for confirmation of the read and write privileges.

Step 6: Type the ‘passwd’ command and provide the new password for the root
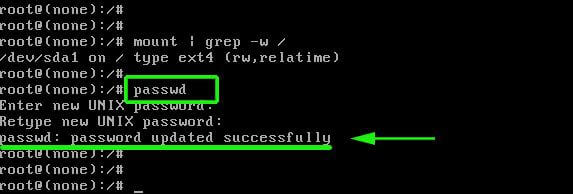
Once read and write access rights are confirmed, type the ‘passwd’ command and enter or set the new password for the root.
You can see that the password is updated successfully.
Step 7: Type the command ‘exec /sbin/init’ to reboot your Ubuntu 20.04 LTS Operating System
After successfully updating the password of the root, the last step is to just reboot your system by typing the command given below:
After running the above command, your computer will reboot and load the welcome screen of the Ubuntu 20.04 LTS system.
Conclusion
The article contains a step-by-step and easy-to-understand guide on how to reset your forgotten root password on the Ubuntu 20.04 LTS system.
About the author
A Javascript Developer & Linux enthusiast with 4 years of industrial experience and proven know-how to combine creative and usability viewpoints resulting in world-class web applications. I have experience working with Vue, React & Node.js & currently working on article writing and video creation.
But what do you do if the root password must be modified or reset?
This article shows you how to change the root password for your Linux Mint 20 system via three different methods.
Note: To change the root password, you must have either the current root password, sudo privileges, or have physical access to the system. It is also recommended to save the new password(s) in a secure location to be accessed when needed.
In this article, we will cover how to:
- Change or reset root password as root user
- Change or reset root password as sudo user
- Change or reset root password using GRUB menu
It is worth mentioning that all the commands included in this article have been tested in the Linux Mint 20 system. These commands have been performed in the Terminal, which can be opened using the Ctrl+Alt+T key shortcut, or by clicking on the terminal icon present in the taskbar of the Linux system.
You will be prompted to enter a new root password. Type the new password and hit the Enter key. Then, re-enter the password and press the Enter key to avoid any typos.
After entering the password, you will be shown a message saying that the password has been updated successfully.

Change or Reset Root Password as Sudo User
After entering the password, you will be shown a message saying that the password has been updated successfully.

Change or Reset Root Password Using GRUB Menu
Next, navigate to the Advanced options.

Then, to switch to the edit window, click ‘e’ on the keyboard.


“linux bootvmlinuz-5.4.0—generic ==\2d26aa-051e
ro quiet splash”

Replace ‘ro‘ with ‘rw’ in the above line and, at the end of the line, append ‘init=/bin/bash’. It should now look like this:
“linux bootvmlinuz-5.4.0—generic ==\
2d26aa-051e-4dbe-adb2-7fbb843f6581 rw quiet splash =bin”
Adding ‘rw’ and ‘init=/bin/bash’ in the above line basically tells the system to log in to bash with read/write privileges. Note that this configuration will only apply for the current boot, not for subsequent boots.


You will be prompted for the root password. Input the root password and press the Enter key. Then, retype the password and press Enter to avoid any typos.
After entering the password, you will then see a message stating that the new password has been updated.

That is all you need to do to change or reset the root password of your Linux Mint 20 system without the sudo or root login. It is good practice to change the password frequently after some time, especially if you think it has been compromised.
Conclusion
In this article, we have identified three different methods to modify or reset the root password on your system. You can opt for any method, based on the privileges you have. If you have the root password or sudo privileges, you can easily reset the root password using the simple ‘passwd’ command. Otherwise, you can use the GRUB menu to change the root password, but only if you have physical access to the system.
I hope this article has helped you in changing or resetting the root password of your system.
About the author
I am a self-motivated information technology professional with a passion for writing. I am a technical writer and love to write for all Linux flavors and Windows.
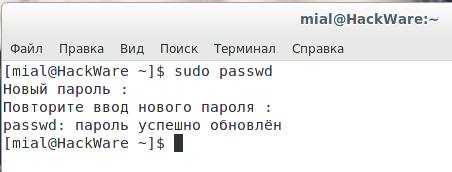
Как поменять пароль для пользователя Linux
Любые пользователи из группы администраторов (чей аккаунт входит в группу wheel) могут поменять пароль для любого другого пользователя – как для непривилегированных учётных записей, так и для других администраторов, в том числе для root’a. Т.е. если вы забыли пароль root, но помните пароль пользователя, имеющего право на выполнение команд с sudo, то пароль может восстановить командой passwd. Чтобы поменять пароль пользователя root выполните:
sudo passwd
Чтобы поменять пароль любого пользователя выполните:
sudo passwd имя_пользователя
Где вместо имя_пользователя нужно подставить имя учётной записи пользователя Linux.
How to Reset MySQL Root Password in Windows
Step 1: Stop the MySQL server
2. Press Win+R (hold the Windows/Super key, and press “r”.) Once the “Run” box appears type:
services.msc3. Click OK.
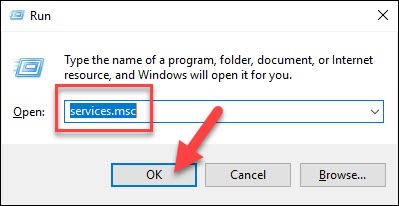
4. Scroll down the list of services to find the MySQL service. Right-click that entry, then left-click Stop.
Step 2: Launch a Text Editor
Click on the menu and search for Notepad.
Alternatively, you can use the path: menu > Windows Accessories > Notepad.
Step 3: Create a New Text File with the Password Command
ALTER USER 'root'@'localhost' IDENTIFIED BY 'NewPassword';Make sure you keep the quote marks and semicolon. Replace NewPassword with the password of your choice.

2. Use the File > Save As menu to save the file to the root of your hard drive (C: ). Choose a filename, such as mysql-init.txt.
Consequently, the localhost command makes the password change on your local system. If you’re changing the password on a system over the network, substitute the hostname for localhost.
Step 4: Open a Command Prompt
1. Press Ctrl+Shift+Esc.
2. Then, click on the File menu > Run new task.
4. Click OK.
Step 5: Restart the MySQL Server with Your New Config File
1. Navigate to the MySQL directory using the command prompt:
cd "C:\Program Files\MySQL\MySQL Server 8.0\bin"mysqld --init-file=C:\\mysql-init.txtNote that there are two slashes after the C: prompt.
Also, if you chose a different filename in Step 2, use that name after the double slash.
Step 6: Clean up
Now, you can log into your MySQL server as root using the new password.
Double-check to make sure it works. If you have unique configuration options (such as launching MySQL with a --defaults-file option), go ahead and do so.
Once MySQL launches, and you’ve confirmed the password change, delete the C:\mysql-init.txt file.
After reading this guide, you should be ready to reset the root password on MySQL in Linux and Windows. Granted, it is not too challenging, yet it is a secure way to change a sensitive password.
Changing Your Root Password in Ubuntu
Step 1: Open a Terminal Window
Right-click the desktop, then left-click Open in terminal.
Alternately, you can click Menu > Applications > Accessories > Terminal.
Step 2: Change Your Root Password
sudo passwd rootThe system will prompt you to enter your password – this is the same password you use to log in to the system.
Next, the system will prompt you to enter a new password. Do so, and then re-enter it exactly the same when the system prompts you to retype the password. This double-entry confirms that you have typed the password correctly.
Using the debug shell
- Append
systemd.debug_shellto the kernel parameters. - This will do a normal boot but start
debug-shell.servicewhich runs a root shell (/bin/sh) ontty9. PressCtrl+Alt+F9to access it. - Use the passwd command to create a new password for the root user.
- When done, stop
debug-shell.service.
Через отладочную консоль
- Добавьте параметр ядра
systemd.debug_shell. - Система загрузится как обычно, но запустит службу
debug-shell.service, которая запустит командный интерпретатор (/bin/sh) на консолиtty9. НажмитеCtrl+Alt+F9чтобы перейти в неё. - Используйте команду passwd для установки нового пароля суперпользователя.
- После завершения остановите
debug-shell.service.
Using a LiveCD
With a LiveCD a couple methods are available: change root and use the passwd command, or erase the password field entry directly editing the password file. Any Linux capable LiveCD can be used, albeit to change root it must match your installed architecture type. Here we only describe how to reset your password with chroot, since manual editing the password file is significantly more risky.
- Boot the LiveCD and mount the root partition of your main system.
- Use the
passwd --root MOUNT_POINT USER_NAMEcommand to set the new password (you will not be prompted for an old one). - Unmount the root partition.
- Reboot, and enter your new password.
Если у вас есть установленный sudo и настроен доступ для группы wheel или для пользователя, чей пароль вы помните, вы можете сменить пароль root с помощью команды sudo passwd root.
Changing the Root Password in CentOS
Changing a password in CentOS is almost identical to changing it in Ubuntu.
Step 1: Access the Command Line (Terminal)
Right-click the desktop, then left-click Open in Terminal. Or, click Menu > Applications > Utilities > Terminal.
Step 2: Change the Password
sudo passwd root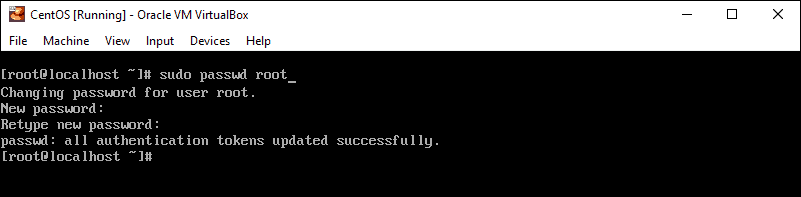
This is a similar process as in Ubuntu, with a couple of variations.
Step 1: Access Boot Menu
Restart the system, then tap the Esc key about once per second to launch the GRUB menu.
Step 2: Edit Boot Options
Use the arrows to highlight the version of Linux you boot into, then press e.
Use the arrows to highlight the line that starts with kernel or Linux.
Step 3: Remount the Drive
mount / -o remount,rwStep 4: Changing the Password
passwdPress Enter, and the system should prompt you to enter and confirm a new password.
Step 5: Restart
mount / -o remount,rosyncrebootYour system should restart. Confirm that your new password works by logging in.
Note: If you ever come across a Linux boot failure, be sure to save our guide on using GRUB rescue to troubleshoot it.
It can be more challenging if you’ve lost or forgotten a password, but with a little creative restarting and editing, you shouldn’t find it too hard.
Сброс пароля в Linux Mint, Ubuntu, Debian, Kali Linux (также должно работать для других производных Debian)
Чтобы прервать загрузку GRUB (первый шаг) во время запуска компьютера нажмите и удерживайте клавишу SHIFT – это работает всегда, даже на Linux Mint, где по умолчанию показ меню GRUB отключён.
Остановите загрузку удерживая клавишу SHIFT при запуске компьютера, вы увидите:
Нажмите клавишу «e» и вы перейдёте к редактированию настроек загрузки:

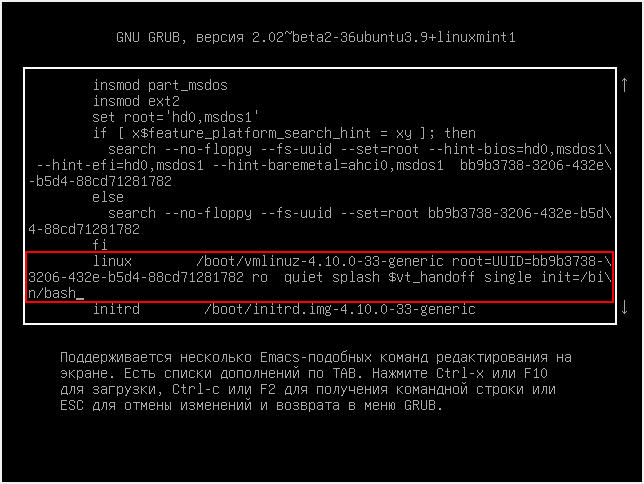
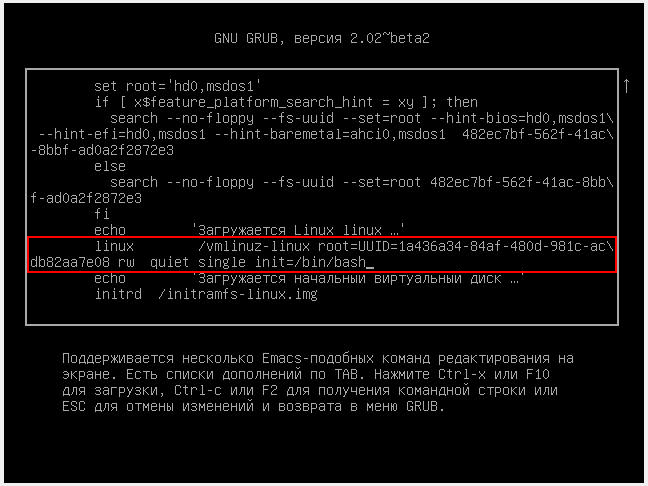
На экране отсутствует нужная нам строка, пролистните курсорными клавишами вниз и найдите строку, начинающуюся с linux:
Перейдите в конец этой строки, поставьте пробел и допишите:
single init=/bin/bash
Должно получиться примерно так (номер ядра может отличаться):
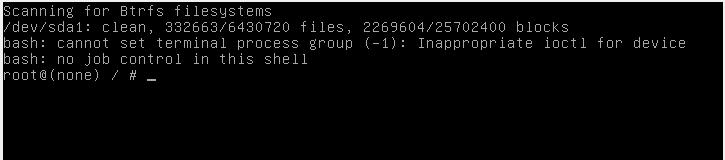
Когда всё готово нажмите Ctrl+x или F10, чтобы загрузка продолжилась с установленными опциями.
Вы увидите приглашение оболочки, также обратите внимание, что мы вошли как root, т.е. у нас имеются повышенные привилегии, в том числе на использование команды passwd:
Командой passwd меняем пароль, как можно увидеть, команда passwd завершилась ошибкой:
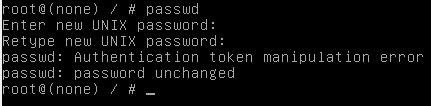
passwd: Authentication token manipulation error
passwd: password unchanged
Чтобы понять причину ошибки, введём команду:
mount
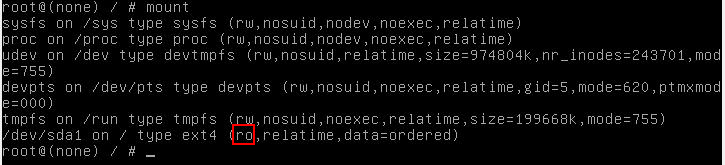
Буквы ro говорят о том, что файловая система смонтирована только для чтения и по этой причине сделанные изменения не могут быть сохранены. Перемонтируем файловую систему:
mount -rw -o remount /
Как видим, после этого смена пароля прошла успешно:
Для выхода наберите:
sync
umount /
Чтобы выключить компьютер выполните:
poweroff -f
Или перезагрузите компьютер командой:
reboot -f
Сброс пароля в RHEL/CentOS 7
Кроме необходимости смонтировать файловую систему для запиши, в RHEL/CentOS 7 также имеется особенность, связанная с наличием SELinux.
Во время появления меню GRUB нажмите клавишу «a», чтобы остановить загрузку:
Затем нажмите «e» для перехода к редактированию параметров загрузки:
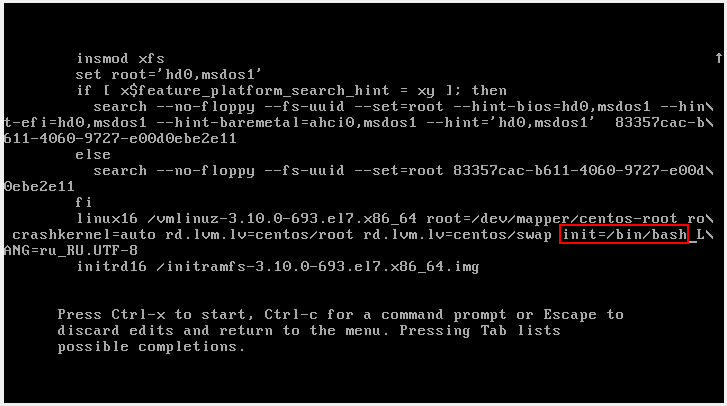
На экране отсутствует нужная нам строка, пролистните курсорными клавишами вниз и найдите строку, начинающуюся с linux16:

Найдите часть строки
rhgb quiet
и замените на
init=/bin/bash
Должно получиться примерно так:
Когда всё готово нажмите Ctrl+x или F10, чтобы загрузка продолжилась с установленными опциями.
Проверим права на запись:
mount | grep root
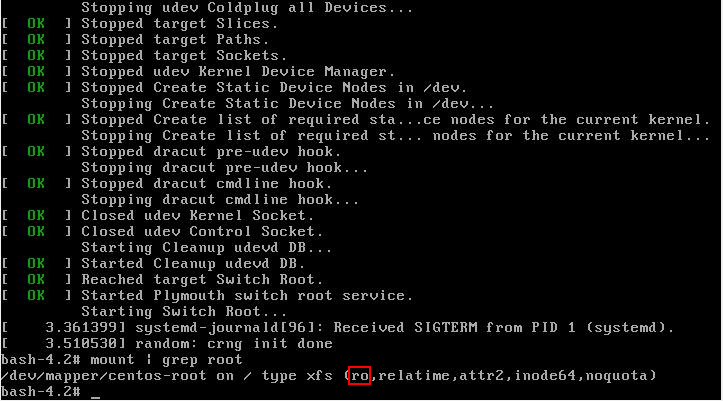
Как можно убедиться, права на запись отсутствуют. Перемонтируем файловую систему с правами записи:
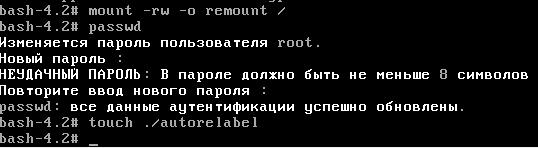
mount -rw -o remount /
passwd
touch /.autorelabel
Для выхода наберите:
sync
umount /
Чтобы выключить компьютер выполните:
poweroff -f
Или перезагрузите компьютер командой:
reboot -f
Resetting a Root Password in Ubuntu
In some situations, you may need to access an account for which you’ve lost or forgotten a password.
Step 1: Boot to Recovery Mode
Restart your system. Once you see the splash screen for the computer manufacturer, hold down the shift key. The system should come up with a black and white GRUB, or boot menu, with different Linux kernel versions displayed.
Step 2: Drop Out to Root Shell
The system should display a menu with different boot options. Use the arrow keys to navigate to the option labeled root and press Enter.
The system should respond by giving you a command-line interface with a prompt.
Step 3: Remount the File System with Write-Permissions
Right now, your system only has read-only access to your system. That means it can look at the data, but cannot make any changes. But we need write-access to change the password, so we’ll need to remount the drive with the appropriate permissions.
At the prompt, type:
mount –o rw,remount /Press Enter. This should allow you to make changes to the data on the hard drive.
Step 4: Change the Password
At the prompt, type:
passwd usernameshutdown –rHit Enter, and your system should restart. Don’t press any keys, let the system come up to the login screen, and test to make sure the new password works.
Note: Learn how to use the chpasswd command. Chpasswd is helpful for managing multiple passwords and making multiple changes.
При помощи LiveCD
- Загрузитесь с LiveCD и смонтируйте корневой раздел вашей основной системы.
- Используйте команду
passwd --root ТОЧКА_МОНТИРОВАНИЯ ИМЯ_ПОЛЬЗОВАТЕЛЯдля установки нового пароля (старый пароль запрошен не будет). - Размонтируйте корневой раздел.
- Перезагрузитесь и введите новый пароль.
В GRUB 2 нельзя изменить пароль в однопользовательском режиме?
В официальной документации Red Hat мне встретилось утверждение, что в GRUB 2 больше не выполняется сброс пароля в однопользовательском режиме, как это было в GRUB. И что теперь для работы в однопользовательском режиме, а также в аварийном режиме требуется пароль рута. Возможно, это применимо только к последним версиям Red Hat Enterprise Linux, поскольку, как видно из этой инструкции и скриншотов, в GRUB 2 можно изменить пароль в однопользовательском режиме. В документации, на которую дана ссылка, описано два способа сброса пароля root в Red Hat Enterprise Linux на тот случай, если описанный здесь метод не сработал.
Как сбросить пароль в Arch Linux, BlackArch (а также в других производных Arch Linux)
Во время появления меню GRUB нажмите клавишу «a», чтобы остановить загрузку:

Затем нажмите «e» для перехода к редактированию параметров загрузки:
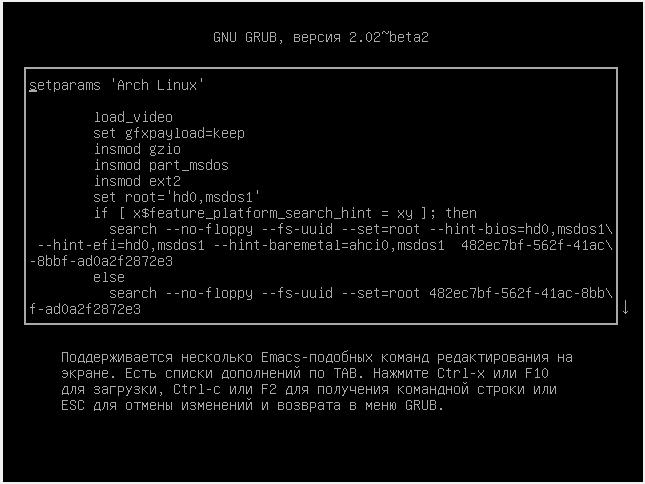
На экране отсутствует нужная нам строка, пролистните курсорными клавишами вниз и найдите строку, начинающуюся с linux.
Перейдите в конец этой строки, поставьте пробел и допишите:
single init=/bin/bash
Должно получиться примерно так:
Когда всё готово нажмите Ctrl+x или F10, чтобы загрузка продолжилась с установленными опциями.
passwd
Для выхода наберите:
sync
umount /
Чтобы выключить компьютер выполните:
poweroff -f
Или перезагрузите компьютер командой:
reboot -f
Что делать если забыт пароль от входа Linux
Алгоритм во всех дистрибутивах Linux схож:
- Прерывание работы загрузчика GRUB
- Добавление опции загрузки, включающей однопользовательский режим
- Возобновление загрузки
- Изменение пароля командой passwd
- Перезагрузка в обычном режиме
Обратите внимание, что изменения, внесённые на втором шаге (изменение опций загрузки), являются временными – действуют только на одну последующую загрузку. Поэтому при перезагрузке на пятом шаге не нужно ничего предпринимать – система включится в обычном режиме.
Для перемещения в конец строки и в начало строки (на втором шаге) используйте сочетания клавиш Ctrl+a и Ctrl+e.
Хотя алгоритм сброса пароля root схож, но в различных дистрибутивах могут быть свои нюансы, рассмотрим их подробнее.
Кстати: если вы хотите защитить систему от смены пароля, описанного в этой статье, смотрите материал «Как защитить загрузчик GRUB паролем».
Используя bash в качестве init
- Добавьте параметр ядра
init=/bin/bashв настройках вашего загрузчика. - Сейчас ваша корневая файловая система смонтирована только для чтения, поэтому перемонтируйте ее на чтение-запись командой
mount -n -o remount,rw /. - Используйте команду passwd для установки нового пароля суперпользователя.
- Перезагрузитесь с помощью команды
reboot -fи не забудьте свой пароль снова!
Примечание: Некоторые клавиатуры не распознаются должным образом при загрузке bash из GRUB, и вы не сможете ничего ввести в консоли. В этом случае вам остается лишь использовать другой способ.
Using bash as init
- Append the
init=/bin/bashkernel parameter to your boot loader’s boot entry. - Your root file system is mounted as read-only now, so remount it as read/write:
mount -n -o remount,rw /. - Use the passwd command to create a new password for the root user.
- Reboot by typing
reboot -fand do not lose your password again!
Note: Some keyboards may not be loaded properly by the init system with this method and you will not be able to type anything at the bash prompt. If this is the case, you will have to use another method.
")


")