

- Введение
- Шаг 1 – Определяем версию и останавливаем сервер базы данных.
- Шаг 2 – Перезапускаем сервер базы данных в режиме –skip-grant-tables
- Настройка режима –skip-grant-tables для MariaDB
- Настройка режима –skip-grant-tables для MySQL
- Шаг 3 – Изменение пароля root
- Меняем пароль root для MariaDB
- Меняем пароль root для MySQL
- Шаг 4 – Запускаем сервер базы данных в штатном режиме.
- Установка MySQL 8
- Настройка MySQL
- Настройка аутентификации с помощью пароля
- Автоматический запуск MySQL
- Устраняем ошибку
- Introduction
- Prerequisites
- Step 1 — Identifying the Database Version
- Step 2 — Stopping the Database Server
- Step 3 — Restarting the Database Server Without Permission Checking
- Step 4 — Changing the Root Password
- Step 5 — Restart the Database Server Normally
- Introduction
- Step 1 — Installing MySQL
- Step 2 — Configuring MySQL
- Step 3 — Creating a Dedicated MySQL User and Granting Privileges
- Step 4 — Testing MySQL
- Conclusion
- Introduction
- Prerequisites
- Step 1 — Identifying the Database Version and Stopping the Server
- Step 2 — Restarting the Database Server Without Permission Checks
- Configuring MariaDB to Start Without Grant Tables
- Configuring MySQL to Start Without Grant Tables
- Step 3 — Changing the Root Password
- Changing the MariaDB Password
- Changing the MySQL Password
- Step 4 — Reverting Your Database Server to Normal Settings
- Update Password
- Process A — Secure
- Process B — Less Secure
- Summary
- Change the MySQL root password
- Reset the MySQL root password
- Change the MySQL root password
- Reset the MySQL root password
Введение

В этой статье мы расскажем, как можно решить проблему, когда вы забыли или потеряли пароль root от MySQL или MariaDB. Отчаиваться не стоит, так как его можно сбросить, если иметь доступ к серверу и учетную запись пользователя операционной системы с привилегиями root. Данное руководство было протестировано в операционной системе Ubuntu 20.04 на двух популярных СУБД – MySQL и MariaDB.
Важно: В версии Ubuntu 20.04 дефолтная конфигурация MySQL или MariaDB позволяет получить доступ к базе данных (с правами администратора) без ввода пароля, если мы устанавливаем соединение с сервером БД под пользователем root . В этом случае нам нет необходимости сбрасывать пароль. Чтобы проверить была ли конфигурация аутентификации по умолчанию изменена, вводим команду sudo mysql. Если получаем ошибку access denied, то прибегаем к действиям, указанным с статье.
Шаг 1 – Определяем версию и останавливаем сервер базы данных.
Необходимы различные действия для сброса root пароля в зависимости от того, какая СУБД у нас установлена – MySQL или MariaDB. Для того, чтобы определить, какой сервер базы данных установлен в системе вводим:
mysql --version
Если используется MariaDB, то в выводе получим следующее: (разумеется, версия БД может меняться)
MariaDB output
mysql Ver 15.1 Distrib 10.3.25-MariaDB, for debian-linux-gnu (x86_64) using readline 5.2
MySQL output
mysql Ver 8.0.22-0ubuntu0.20.04.3 for Linux on x86_64 ((Ubuntu))
Чтобы произвести сброс root-пароля в MySQL или MariaDB, нам необходимо остановить сервер базы данных.
sudo systemctl stop mariadb
sudo systemctl stop mysql
После остановки базы данных производим ее перезапуск в безопасном режиме для сброса пароля root.
Шаг 2 – Перезапускаем сервер базы данных в режиме –skip-grant-tables
Запуск MySQL и MariaDB в режиме –skip-grant-tables позволяет подключиться к базе данных с правами root без пароля. Поскольку это уязвимый режим работы СУБД, рекомендуется запуск сервера БД в однопользовательском режиме .
Настройка режима –skip-grant-tables для MariaDB
Зададим переменную окружения MYSQLD_OPTS, используемую в MariaDB при запуске:
sudo systemctl set-environment MYSQLD_OPTS="--skip-grant-tables --skip-networking"
Запустим сервер БД:
sudo systemctl start mariadb
Корректность запуска сервера смотрим командой:
sudo systemctl status mariadb
Теперь подключаемся к базе данных пользователем root без пароля:
sudo mysql -u root
Подключившись к консоли MariaDB, меняем пароль root, как показано в Шаге 3 далее.
Настройка режима –skip-grant-tables для MySQL
Чтобы запустить сервер MySQL в этом режиме, изменим конфигурацию systemd для MySQL, чтобы при запуске сервер запустился с дополнительными параметрами.
sudo systemctl edit mysql
После выполнения команды будет открыт новый файл в nano-редакторе, где мы будем внесем необходимые параметры запуска сервера MySQL. Изначально файл будет пустым. Добавим следующие строки:
[Service]
ExecStart=
ExecStart=/usr/sbin/mysqld --skip-grant-tables --skip-networking
Нажимаем CTRL-X, чтобы выйти из файла, затем – Y, чтобы сохранить внесенные изменения. Перезагружаем systemd, чтобы перечитать изменения:
sudo systemctl daemon-reload
Запускаем сервер MySQL:
sudo systemctl start mysql
и подключаемся пользователем root:
sudo mysql -u root
Далее переходим к Шагу 3.
Шаг 3 – Изменение пароля root
Поскольку СУБД запущена в режиме –skip-grant-tables, мы имеем возможность получить доступ к серверу баз данных без пароля, но не можем выполнять запросы на изменением данных. Чтобы установить пароль root , нам необходимо перезагрузить таблицы предоставления привилегий, выполнив инструкцию:
FLUSH PRIVILEGES;
Теперь сброс пароля root в MySQL или MariaDB возможен .
Меняем пароль root для MariaDB
ALTER USER 'root'@'localhost' IDENTIFIED BY 'new_password';
В строке ‘new_password’ указываем свой пароль.
Output
Query OK, 0 rows affected (0.001 sec)
Далее установим механизм аутентификации по умолчанию:
UPDATE mysql.user SET authentication_string = '' WHERE user = 'root';
UPDATE mysql.user SET plugin = '' WHERE user = 'root';
Пароль изменен. Выходим из консоли MariaDB и смотрим Шаг 4 для перезапуска сервера базы данных в штатном режиме.
Меняем пароль root для MySQL
Для MySQL выполняем следующий запрос, заменив new_password на свой пароль. MySQL позволяет использовать настраиваемые механизмы аутентификации, поэтому добавляем инструкцию, указывающую MySQL использовать механизм аутентификации по умолчанию:
ALTER USER 'root'@'localhost' IDENTIFIED WITH caching_sha2_password BY 'new_password';
Output
Query OK, 0 rows affected (0.01 sec)
Выходим из консоли MySQL и запускаем базу данных в нормальном режиме.
Шаг 4 – Запускаем сервер базы данных в штатном режиме.
Чтобы перезапустить сервер базы данных в штатном режиме, выполним следующие действия:
Удаляем переменную окружения MYSQLD_OPTS:
sudo systemctl unset-environment MYSQLD_OPTS
и перезапускаем сервер MariaDB:
sudo systemctl restart mariadb
Удаляем все изменения конфигурации демона systemd для MySQL:
sudo systemctl revert mysql
Вывод должен быть примерно таким:
Output
Removed /etc/systemd/system/mysql.service.d/override.conf.
emoved /etc/systemd/system/mysql.service.d.
Затем перезагружаем демон systemd:
sudo systemctl daemon-reload
и сервер MySQL:
sudo systemctl restart mysql
После этого база данных должна перейти в нормальное состояние. Пробуем подключится к серверу базы данных пользователем root с новым паролем:
mysql -u root -p
Успех! Не забывайте пароли=)
MySQL – система управления базами данных (СУБД), используемая чаще всего в веб-разработке, но и не только там. MySQL является, наверное, одной из самых распостранённых СУБД. Её сильные стороны – быстрота, надёжность, универсальность. Ниже о том, как MySQL можно установить на сервер Ubuntu 20.04.
Установка MySQL 8
Первым делом, как всегда, необходимо обновить репозитории пакетов сервера:
$ sudo apt update
Теперь можно переходить к установке пакетов MySQL:
$ sudo apt install mysql-serverНа момент написания статьи в репозиториях доступна версия 8.0.22. Проверить версию установленного пакета можно при помощи команды:
$ mysql -V
На этом процесс установки MySQL закончен. Теперь, необходимо внести некоторые изменения в конфигурацию установленной СУБД.
Настройка MySQL
Настройка заключается в изменении некоторых наиболее уязвимых опций СУБД, которые используются по умолчанию. Данное действие производится при помощи встроенного в MySQL специального скрипта:
$ sudo mysql_secure_installationДля начала в открывшемся диалоге необходимо определить, нужно ли производить настройку компоненты валидации пароля, используемой при проверке надёжности пароля в MySQL. Если вы даёте согласие на использование валидации пароля, скрипт предложит вам установить уровень валидации, выбрав из 0 – низкий, 1 – средний, 2 – высокий:
На следующем шаге нужно установить пароль для учётной записи root в MySQL:
Скрипт оценит надёжность введённого пароля и запросит вашего согласия на его использование:

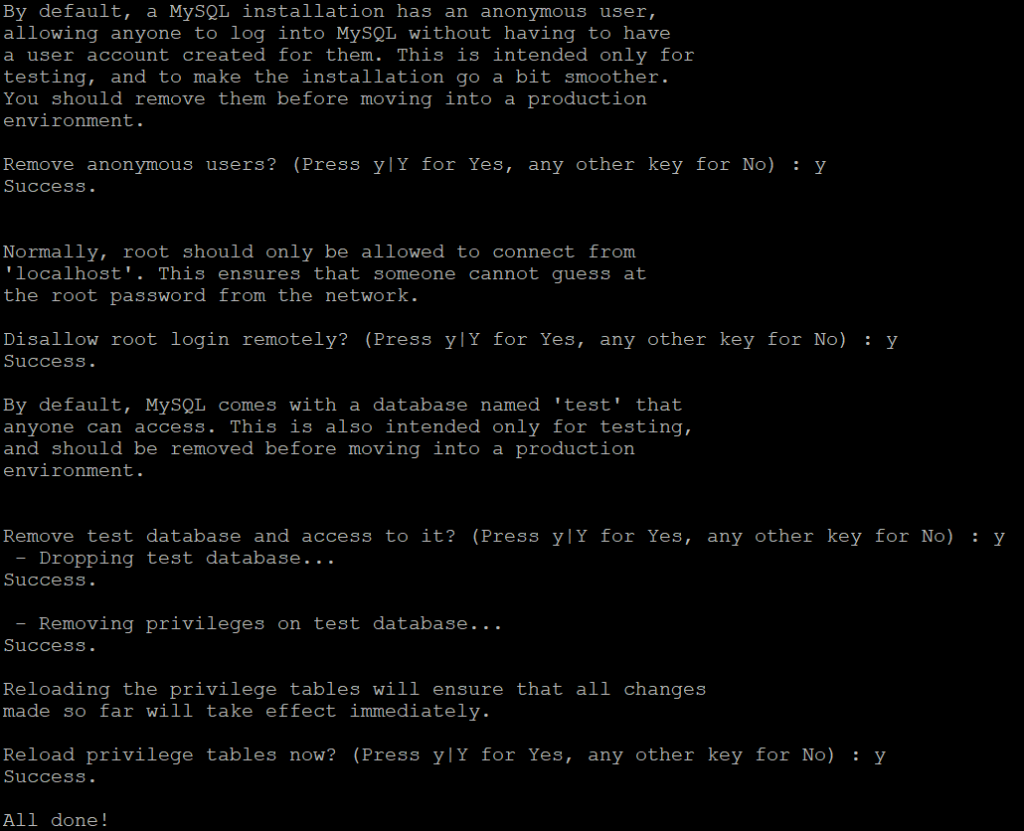
В последующем диалоге можно использовать ответ Yes для удаления анонимных пользователей СУБД, запрещения удалённого подключения под рутовой учётной записью MySQL, удаления дефолтной БД test и для загрузки новых таблиц привилегий:
Настройка аутентификации с помощью пароля
Для аутентификации учётной записи root MySQL по умолчанию используется плагин auth_socket. Это во многом более безопасно и удобно, но может осложнять взаимодействие СУБД с внешними приложениями в случаях, когда необходимо предоставить им доступ к пользователю MySQL.
Чтобы использовать пароль для подключения к СУБД под учётной записью root нужно изменить метод аутентификации. В нашем случае это – auth_socket.
В командной строке необходимо подключиться к MySQL:
$ sudo mysqlи вывести список аккаунтов СУБД, в котором виден используемый ими метод аутентификации (колонка plugin), командой:
mysql> SELECT user, authentication_string, plugin,host FROM mysql.user;Вывод данной инструкции должен выглядеть примерно так:

Для изменения метода аутентификации учётной записи root нужно использовать команду:
mysql> ALTER USER 'root'@'localhost' IDENTIFIED WITH caching_sha2_password BY 'psswd'; где значение psswd необходимо заменить на более надёжный пароль, который будет в дальнейшем использоваться учётной записью root для авторизации в MySQL.
mysql> ALTER USER 'root'@'localhost' IDENTIFIED WITH mysql_native_password BY 'psswd';Для применения произведённых изменений необходимо выполнить инструкцию:
mysql> FLUSH PRIVILEGES;Проверить применение изменений можно набрав команду:
mysql> SELECT user, authentication_string, plugin,host FROM mysql.user;Выход из оболочки MySQL производится командой:
mysql> exit
$ sudo mysql
либо, если аутентификация рутовой учётной записи производится с помощью пароля:
$ mysql -u root -pДалее, создайте нового пользователя:
mysql> CREATE USER 'newuser'@'localhost' IDENTIFIED BY 'psswd';Для предоставления новому пользователю прав на доступ к таблицам базы данных выполните инструкцию:
mysql> GRANT ALL PRIVILEGES ON *.* TO 'newuser'@'localhost' WITH GRANT OPTION;После чего можно выйти из оболочки MySQL:
mysql> exit
Автоматический запуск MySQL
Каким бы способом не был установлен MySQL, его запуск должен производиться автоматически. Чтобы убедиться в этом, необходимо набрать:
$ systemctl status mysql.service 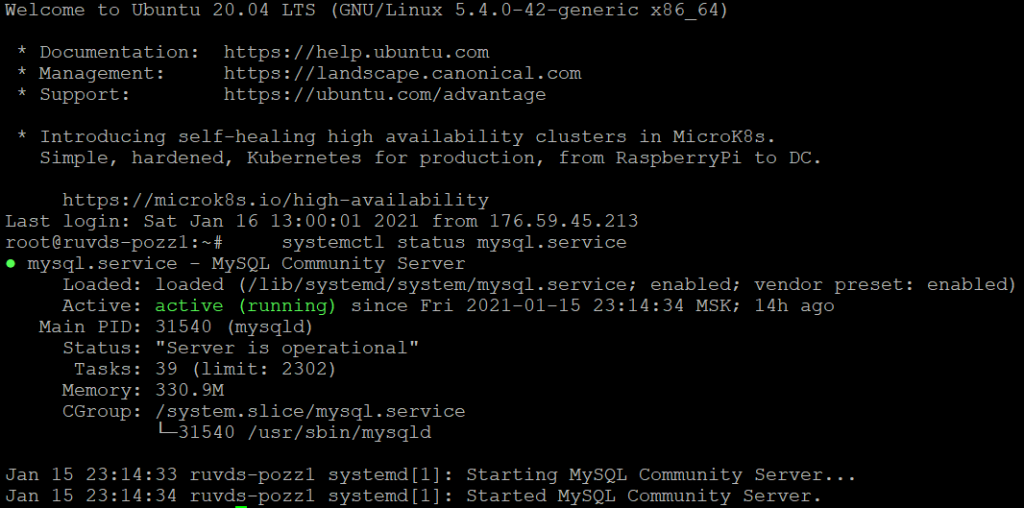
Также, активировать MySQL можно командой:
$ sudo systemctl start mysqlТеперь на вашем сервере произведена базовая установка СУБД MySQL.
Иногда во время инсталляции MySQL пользователь не задает пароль root, тогда в качестве авторизации используется метод unix_socket. Если используется именно авторизация, в качестве пользователя root сможет авторизоваться только суперпользователь системы или пользователь с правами sudo.
Устраняем ошибку
Полное название ошибки выглядит следующим образом:
Переводится ошибка как:
Способ авторизации unix_socket не сохраняет пароли, он выполняет авторизацию не посредством пароля, он проверяет соответствие конкретного пользователя условиям суперпользователя. При этом просто пропустить настройку пароля root (если он не был задан) у пользователя нет возможности. Вот почему программа не позволяет вам пройти дальше. Исправить проблему можно, выполнив подключение к MySQL.
Также нужно поменять метод авторизации и заодно пароль:
В окружении SQL нужно исполнить такую команду:
Закрываем клиент MySQL командой:
После нужно запустить mysql_secure_installation, ввести пароль root. Дальше можно без проблем закончить настройку. Обращаем внимание, что после этого вы сможете подключится к mysql, используя sudo без пароля, поскольку активирован метод авторизации по паролю. Для возвращения прежних настроек после выполнения mysql_secure_installation выполните подключение к MySQL.
Используем пароль и выполняем:
Вот и все — инструкция завершена.
Introduction
This tutorial will cover how to reset the root password for older and newer versions of MySQL and MariaDB.
Prerequisites
To recover your root MySQL/MariaDB password, you will need:
- Access to the Linux server running MySQL or MariaDB with a sudo user.
Step 1 — Identifying the Database Version
Most modern Linux distributions ship with either MySQL or MariaDB, a popular drop-in replacement which is fully compatible with MySQL. Depending on the database used and its version, you’ll need to use different commands to recover the root password.
- mysql
You’ll see some output like this with MySQL:
mysql Ver 14.14 Distrib 5.7.16, for Linux (x86_64) using EditLine wrapperOr output like this for MariaDB:
mysql Ver 15.1 Distrib 5.5.52-MariaDB, for Linux (x86_64) using readline 5.1Make note of which database and which version you’re running, as you’ll use them later. Next, you need to stop the database so you can access it manually.
Step 2 — Stopping the Database Server
To change the root password, you have to shut down the database server beforehand.
You can do that for MySQL with:
- systemctl stop mysql
And for MariaDB wtih:
- systemctl stop mariadb
After the database server is stopped, you’ll access it manually to reset the root password.
Step 3 — Restarting the Database Server Without Permission Checking
Start the database without loading the grant tables or enabling networking:
- mysqld_safe --skip-grant-tables --skip-networking
The ampersand at the end of this command will make this process run in the background so you can continue to use your terminal.
- mysql root
You’ll immediately see a database shell prompt instead.
Type 'help;' or '\h' for help. Type '\c' to clear the current input statement.
mysql>
Type 'help;' or '\h' for help. Type '\c' to clear the current input statement.
MariaDB [(none)]>Now that you have root access, you can change the root password.
Step 4 — Changing the Root Password
Let’s tell the database server to reload the grant tables by issuing the FLUSH PRIVILEGES command.
- FLUSH PRIVILEGES
Now we can actually change the root password.
- ALTER @ IDENTIFIED BY
For MySQL 5.7.5 and older as well as MariaDB 10.1.20 and older, use:
- SET PASSWORD FOR @ PASSWORD
Make sure to replace new_password with your new password of choice.
- UPDATE mysql.user SET authentication_string PASSWORD WHERE User AND Host
Remember to reload the grant tables after this.
In either case, you should see confirmation that the command has been successfully executed.
Query OK, 0 rows affected (0.00 sec)The password has been changed, so you can now stop the manual instance of the database server and restart it as it was before.
Step 5 — Restart the Database Server Normally
For MySQL, use:
-
For MariaDB, use:
-
Then, restart the service using systemctl.
For MySQL, use:
- systemctl start mysql
For MariaDB, use:
- systemctl start mariadb
Now you can confirm that the new password has been applied correctly by running:
- mysql root
The command should now prompt for the newly assigned password. Enter it, and you should gain access to the database prompt as expected.
Introduction
MySQL is an open-source database management system, commonly installed as part of the popular LAMP (Linux, Apache, MySQL, PHP/Python/Perl) stack. It implements the relational model and uses Structured Query Language (better known as SQL) to manage its data.
This tutorial will go over how to install MySQL version 8.0 on an Ubuntu 22.04 server. By completing it, you will have a working relational database that you can use to build your next website or application.
Step 1 — Installing MySQL
On Ubuntu 22.04, you can install MySQL using the APT package repository. At the time of this writing, the version of MySQL available in the default Ubuntu repository is version 8.0.28.
To install it, update the package index on your server if you’ve not done so recently:
- update
Then install the mysql-server package:
- mysql-server
Ensure that the server is running using the systemctl start command:
- systemctl start mysql.service
These commands will install and start MySQL, but will not prompt you to set a password or make any other configuration changes. Because this leaves your installation of MySQL insecure, we will address this next.
Step 2 — Configuring MySQL
Warning: As of July 2022, an error will occur when you run the mysql_secure_installation script without some further configuration. The reason is that this script will attempt to set a password for the installation’s root MySQL account but, by default on Ubuntu installations, this account is not configured to connect using a password.
 ... Failed! Error: SET PASSWORD has no significance for user 'root'@'localhost' as the authentication method used doesn't store authentication data in the MySQL server. Please consider using ALTER USER instead if you want to change authentication parameters.
New password:
This will lead the script into a recursive loop which you can only get out of by closing your terminal window.
First, open up the MySQL prompt:
- mysql
- ALTER @ IDENTIFIED WITH mysql_native_password BY
After making this change, exit the MySQL prompt:
Run the security script with sudo:
- mysql_secure_installation
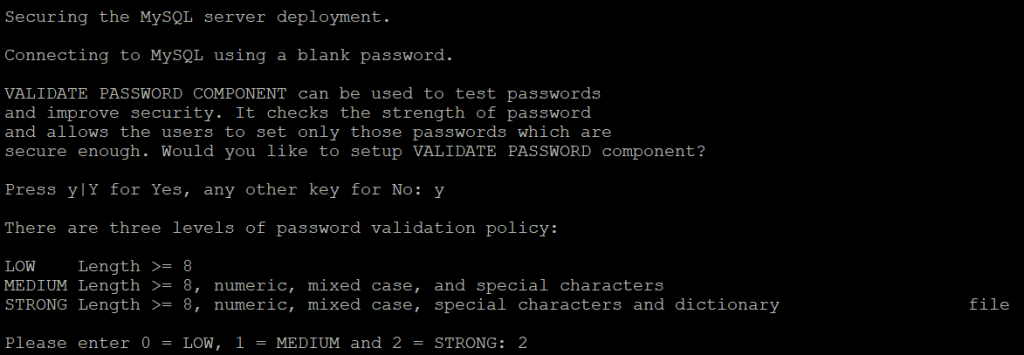
Securing the MySQL server deployment.
Connecting to MySQL using a blank password.
VALIDATE PASSWORD COMPONENT can be used to test passwords
and improve security. It checks the strength of password
and allows the users to set only those passwords which are
secure enough. Would you like to setup VALIDATE PASSWORD component?
Press y|Y for Yes, any other key for No: YThere are three levels of password validation policy:
LOW Length >= 8
MEDIUM Length >= 8, numeric, mixed case, and special characters
STRONG Length >= 8, numeric, mixed case, special characters and dictionary file
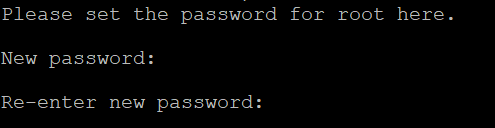
Please enter 0 = LOW, 1 = MEDIUM and 2 = STRONG: 2Please set the password for root here.
New password:
Re-enter new password:If you used the Validate Password Plugin, you’ll receive feedback on the strength of your new password. Then the script will ask if you want to continue with the password you just entered or if you want to enter a new one. Assuming you’re satisfied with the strength of the password you just entered, enter Y to continue the script:
Estimated strength of the password: 100
Do you wish to continue with the password provided?(Press y|Y for Yes, any other key for No) : Y- mysql root
Then go back to using the default authentication method using this command:
- ALTER @ IDENTIFIED WITH auth_socket
Step 3 — Creating a Dedicated MySQL User and Granting Privileges
- mysql
- mysql root
- CREATE @ IDENTIFIED WITH authentication_plugin BY
- CREATE @ IDENTIFIED BY
- CREATE @ IDENTIFIED WITH mysql_native_password BY
- ALTER @ IDENTIFIED WITH mysql_native_password BY
- GRANT PRIVILEGE ON database.table TO @
You can find the full list of available privileges in the official MySQL documentation.
- GRANT CREATE, ALTER, DROP, INSERT, UPDATE, INDEX, DELETE, SELECT, REFERENCES, RELOAD on *.* TO @ WITH GRANT OPTION
- GRANT ALL PRIVILEGES ON *.* TO @ WITH GRANT OPTION
- FLUSH PRIVILEGES
Then you can exit the MySQL client:
- mysql sammy
Finally, let’s test the MySQL installation.
Step 4 — Testing MySQL
Regardless of how you installed it, MySQL should have started running automatically. To test this, check its status.
- systemctl status mysql.service
● mysql.service - MySQL Community Server Loaded: loaded (/lib/systemd/system/mysql.service; enabled; vendor preset: enabled) Active: active (running) since Mon 2022-04-11 16:04:39 UTC; 2h 36min ago Process: 2593 ExecStartPre=/usr/share/mysql/mysql-systemd-start pre (code=exited, status=0/SUCCESS) Main PID: 2601 (mysqld) Status: "Server is operational" Tasks: 38 (limit: 1119) Memory: 354.3M CPU: 19.944s CGroup: /system.slice/mysql.service └─2601 /usr/sbin/mysqldIf MySQL isn’t running, you can start it with sudo systemctl start mysql.
- mysqladmin sammy version
Below is an example of the output:
mysqladmin Ver 8.0.28-0ubuntu4 for Linux on x86_64 ((Ubuntu))
Copyright (c) 2000, 2022, Oracle and/or its affiliates.
Oracle is a registered trademark of Oracle Corporation and/or its
affiliates. Other names may be trademarks of their respective
owners.
Server version 8.0.28-0ubuntu4
Protocol version 10
Connection Localhost via UNIX socket
UNIX socket /var/run/mysqld/mysqld.sock
Uptime: 2 hours 31 min 57 sec
Threads: 2 Questions: 25 Slow queries: 0 Opens: 160 Flush tables: 3 Open tables: 79 Queries per second avg: 0.000
This means MySQL is up and running.
Conclusion
You now have a basic MySQL setup installed on your server. Here are a few examples of next steps you can take:
- Set up a LAMP stack or a LEMP stack
- Practice running queries with SQL
- Manage your MySQL installation with phpMyAdmin
The author selected the COVID-19 Relief Fund to receive a donation as part of the Write for DOnations program.
Introduction
This tutorial demonstrates how to reset the root password for MySQL and MariaDB databases installed with the apt package manager on Ubuntu 20.04. The procedure for changing the root password differs depending on whether you have MySQL or MariaDB installed and the default systemd configuration that ships with the distribution or packages from other vendors. While the instructions in this tutorial may work with other system or database server versions, they have been tested with Ubuntu 20.04 and distribution-supplied packages.
Prerequisites
To recover your MySQL or MariaDB root password, you will need:
Step 1 — Identifying the Database Version and Stopping the Server
- mysql
If you’re running MariaDB, you’ll see “MariaDB” preceded by the version number in the output:
mysql Ver 15.1 Distrib 10.3.25-MariaDB, for debian-linux-gnu (x86_64) using readline 5.2You’ll see output like this if you’re running MySQL:
mysql Ver 8.0.22-0ubuntu0.20.04.3 for Linux on x86_64 ((Ubuntu))- systemctl stop mariadb
For MySQL, shut down the database server by running:
- systemctl stop mysql
With the database stopped, you can restart it in safe mode to reset the root password.
Step 2 — Restarting the Database Server Without Permission Checks
Depending on which database server you’ve installed, the way of starting the server without loading the grant tables differs.
Configuring MariaDB to Start Without Grant Tables
In order to start the MariaDB server without the grant tables, we’ll use the systemd unit file to set additional parameters for the MariaDB server daemon.
- systemctl set-environment
Then start the MariaDB server:
- systemctl start mariadb
This command won’t produce any output, but it will restart the database server, taking into account the new environment variable settings.
You can ensure it started with sudo systemctl status mariadb.
- mysql root
You’ll immediately see a database shell prompt:
Now that you have access to the database server, you can change the root password as shown in Step 3.
Configuring MySQL to Start Without Grant Tables
In order to start the MySQL server without its grant tables, you’ll alter the systemd configuration for MySQL to pass additional command-line parameters to the server upon startup.
- systemctl edit mysql
This command will open a new file in the nano editor, which you’ll use to edit MySQL’s service overrides. These change the default service parameters for MySQL.
MySQL service overrides
/usr/sbin/mysqld --skip-grant-tables --skip-networkingThe first ExecStart statement clears the default value, while the second one provides systemd with the new startup command, including parameters to disable loading the grant tables and networking capabilities.
Press CTRL-x to exit the file, then Y to save the changes that you made, then ENTER to confirm the file name.
Reload the systemd configuration to apply these changes:
- systemctl daemon-reload
Now start the MySQL server:
- systemctl start mysql
The command will show no output, but the database server will start. The grant tables and networking will not be enabled.
- mysql root
You’ll immediately see a database shell prompt:
Now that you have access to the server, you can change the root password.
Step 3 — Changing the Root Password
The database server is now running in a limited mode; the grant tables are not loaded, and there’s no networking support enabled. This lets you access the server without providing a password, but it prohibits you from executing commands that alter data. To reset the root password, you must load the grant tables now that you’ve gained access to the server.
Tell the database server to reload the grant tables by issuing the FLUSH PRIVILEGES command:
- FLUSH PRIVILEGES
You can now change the root password. The method you use depends on whether you are using MariaDB or MySQL.
Changing the MariaDB Password
- ALTER @ IDENTIFIED BY
You’ll see this output indicating that the password changed:
Query OK, 0 rows affected (0.001 sec)- UPDATE mysql.user SET authentication_string WHERE user
- UPDATE mysql.user SET plugin WHERE user
Query OK, 0 rows affected (0.01 sec)The password is now changed. Type exit to exit the MariaDB console and proceed to Step 4 to restart the database server in normal mode.
Changing the MySQL Password
- ALTER @ IDENTIFIED WITH caching_sha2_password BY
You’ll see this output indicating the password was changed successfully:
Query OK, 0 rows affected (0.01 sec)The password is now changed. Exit the MySQL console by typing exit.
Let’s restart the database in normal operational mode.
Step 4 — Reverting Your Database Server to Normal Settings
In order to restart the database server in its normal mode, you have to revert the changes you made so that networking is enabled and the grant tables are loaded. Again, the method you use depends on whether you used MariaDB or MySQL.
For MariaDB, unset the MYSQLD_OPTS environment variable you set previously:
- systemctl unset-environment MYSQLD_OPTS
Then, restart the service using systemctl:
- systemctl restart mariadb
For MySQL, remove the modified systemd configuration:
- systemctl revert mysql
Removed /etc/systemd/system/mysql.service.d/override.conf.
Removed /etc/systemd/system/mysql.service.d.
Then, reload the systemd configuration to apply the changes:
- systemctl daemon-reload
Finally, restart the service:
- systemctl restart mysql
- mysql root
You’ll be prompted for a password. Enter your new password, and you’ll gain access to the database prompt as expected.
Update Password
# Login to MySQL
mysql -uroot -p
# OR
mysql -u root -p# Flush
FLUSH PRIVILEGES;
Process A — Secure
In this process, we will stop and start the MySQL server to use the init script to change the root password.
Step 1 — Stop the Server
We have to stop the server as the first step of this process. It can be done using the commands as shown below.
# Using init
sudo /etc/init.d/mysqld stop
# OR
sudo /etc/init.d/mysql stop# Using service
sudo service mysql stop# Using systemd
sudo systemctl stop mysqld.service
# OR
sudo systemctl stop mysql
Step 2 — Create the Init File
Now create the init file and add the command to update the root password as shown below.
# Create Init File - Use your preferred editor
sudo nano <path to init file>init-file.txt# Add the query to update password
Step 3 — Start MySQL Server
Now start the MySQL server using the init file as shown below.
# Start the server
sudo mysqld --init-file=<path to init file>init-file.txt &
# OR
sudo mysqld_safe --init-file=<path to init file>init-file.txt &
It might throw a bunch of errors depending on your server installation.
You might get the error having a message — mysqld_safe Directory ‘/var/run/
# Stop the server# Make directory
sudo mkdir -p /var/run/mysqld# Change owner
sudo chown mysql:mysql /var/run/mysqld# Start with init file
sudo mysqld_safe --init-file=<path to init file>init-file.txt &
# Start MySQL Server normally - Ubuntu
sudo service mysql start# Navigate to sock directory
cd /var/run# Take backup - sock
sudo cp -rp ./mysqld ./mysqld.bak# Stop the server normally - Ubuntu
sudo service mysql stop# Restore the sock
sudo mv ./mysqld.bak ./mysqld# Start MySQL in unsafe mode
sudo mysqld_safe --skip-grant-tables &
Step 4 — Stop and Start the MySQL server
Now stop and start the MySQL server using the regular commands as shown below.
# Using init
sudo /etc/init.d/mysqld stop
sudo /etc/init.d/mysqld start
# OR
sudo /etc/init.d/mysql stop
sudo /etc/init.d/mysql start# Using service
sudo service mysql stop
sudo service mysql start# Using systemd
sudo systemctl stop mysqld.service
sudo systemctl start mysqld.service
# OR
sudo systemctl stop mysql
sudo systemctl start mysql
Terminate the existing processes if required. Use only if the above commands do not work to stop and start the server.
# Find the processes
ps aux | grep mysqld
ps aux | grep mysql# Kill the processes
sudo killall mysqld
sudo killall mysql
Step 5 — Test Password
Finally, test the new password using the command as shown below.
# Test new password
mysql -u root -p
Process B — Less Secure
In this process, we will stop and then start the MySQL server without requiring any password to log in.
Step 1 — Stop the Server
We have to stop the currently running MySQL server as the first step to complete this process. It can be done using the commands as shown below.
# Using init
sudo /etc/init.d/mysqld stop
# OR
sudo /etc/init.d/mysql stop# Using service
sudo service mysql stop# Using systemd
sudo systemctl stop mysqld.service
# OR
sudo systemctl stop mysql
Step 2 — Start MySQL without password
Now start MySQL server with password disabled using the command as shown below. Make sure to add
# Start without password
sudo mysqld_safe --skip-grant-tables &
You might get the error having a message — mysqld_safe Directory ‘/var/run/
# Stop the server# Make directory
sudo mkdir -p /var/run/mysqld# Change owner
sudo chown mysql:mysql /var/run/mysqld# Start without password
sudo mysqld_safe --skip-grant-tables &
# Start MySQL Server
sudo service mysql start# Navigate to sock directory
cd /var/run# Tack backup - sock
sudo cp -rp ./mysqld ./mysqld.bak# Stop the server
sudo service mysql stop# Restore the sock
sudo mv ./mysqld.bak ./mysqld# Start MySQL in unsafe mode
sudo mysqld_safe --skip-grant-tables &
Step 3 — Connect to MySQL
Now open another terminal or connect to the server via another shell to connect the client.
# Connect Directly
mysql# Connect as Root
mysql -uroot
# OR
mysql -u root
Step 4 — Change password
In this step, change the root password using the commands as shown below. You can also refer to the section Update Password of this tutorial to use other commands to change the password.
# Change Password# Flush
FLUSH PRIVILEGES;
Step 5 — Stop and Start the MySQL server
Now stop and start the MySQL server using the regular commands as shown below.
# Using init
sudo /etc/init.d/mysqld stop
sudo /etc/init.d/mysqld start
# OR
sudo /etc/init.d/mysql stop
sudo /etc/init.d/mysql start# Using service
sudo service mysql stop
sudo service mysql start# Using systemd
sudo systemctl stop mysqld.service
sudo systemctl start mysqld.service
# OR
sudo systemctl stop mysql
sudo systemctl start mysql
Terminate the existing processes if required. Use only if the above commands do not work to stop and start the server.
# Find the processes
ps aux | grep mysqld
ps aux | grep mysql# Kill the processes
sudo killall mysqld
sudo killall mysql
Step 6 — Test Password
Finally, test the new password using the command as shown below.
# Test new password
mysql -u root -p
Summary
Change the MySQL root password
NOTE: When setting a new password, avoid the use of special characters or quotes, as this can sometimes cause issues when accessing the database through shell scripts.
$ /opt/bitnami/mysql/bin/mysqladmin -p -u root password NEW_PASSWORDReset the MySQL root password
Create a file in /tmp/mysql-init with the content shown below (replace NEW_PASSWORD with the password you wish to use).
If your stack ships MySQL v8.x, use this content:
ALTER USER 'root'@'127.0.0.1' IDENTIFIED BY 'NEW_PASSWORD'; ALTER USER 'root'@'localhost' IDENTIFIED BY 'NEW_PASSWORD';If your stack ships MySQL v5.7.x, use this content:
ALTER USER 'root'@'localhost' IDENTIFIED BY 'NEW_PASSWORD';If your stack ships MySQL v5.6.x or earlier, use this content:
UPDATE mysql.user SET Password=PASSWORD('NEW_PASSWORD') WHERE User='root'; FLUSH PRIVILEGES;Stop the MySQL server:
$ sudo /opt/bitnami/ctlscript.sh stop mysqlIf your stack ships MySQL v8.x, use this command:
$ sudo /opt/bitnami/mysql/bin/mysqld_safe --pid-file=/opt/bitnami/mysql/data/mysqld.pid --datadir=/opt/bitnami/mysql/data --init-file=/tmp/mysql-init --lower_case_table_names=1 2> /dev/null &If your stack ships an older version of MySQL, use this command:
$ sudo /opt/bitnami/mysql/bin/mysqld_safe --pid-file=/opt/bitnami/mysql/data/mysqld.pid --datadir=/opt/bitnami/mysql/data --init-file=/tmp/mysql-init 2> /dev/null &Restart the MySQL server:
$ sudo /opt/bitnami/ctlscript.sh restart mysqlRemove the script:
$ rm /tmp/mysql-init
NOTE: We are in the process of modifying the configuration for many Bitnami stacks. On account of these changes, the file paths and commands stated in this guide may change depending on whether your Bitnami stack uses MySQL or MariaDB. To identify which database server is used in your stack, run the command below:
$ test -d /opt/bitnami/mariadb && echo "MariaDB" || echo "MySQL"
Change the MySQL root password
NOTE: When setting a new password, avoid the use of special characters or quotes, as this can sometimes cause issues when accessing the database through shell scripts.
$ /opt/bitnami/mysql/bin/mysqladmin -p -u root password NEW_PASSWORDReset the MySQL root password
Create a file in /tmp/mysql-init with the content shown below (replace NEW_PASSWORD with the password you wish to use).
If your stack ships MySQL v8.x, use this content:
ALTER USER 'root'@'127.0.0.1' IDENTIFIED BY 'NEW_PASSWORD'; ALTER USER 'root'@'localhost' IDENTIFIED BY 'NEW_PASSWORD';If your stack ships MySQL v5.7.x, use this content:
ALTER USER 'root'@'localhost' IDENTIFIED BY 'NEW_PASSWORD';If your stack ships MySQL v5.6.x or earlier, use this content:
UPDATE mysql.user SET Password=PASSWORD('NEW_PASSWORD') WHERE User='root'; FLUSH PRIVILEGES;Stop the MySQL server:
$ sudo /opt/bitnami/ctlscript.sh stop mysqlIf your stack ships MySQL v8.x, use this command:
$ sudo /opt/bitnami/mysql/bin/mysqld_safe --pid-file=/opt/bitnami/mysql/data/mysqld.pid --datadir=/opt/bitnami/mysql/data --init-file=/tmp/mysql-init --lower_case_table_names=1 2> /dev/null &If your stack ships an older version of MySQL, use this command:
$ sudo /opt/bitnami/mysql/bin/mysqld_safe --pid-file=/opt/bitnami/mysql/data/mysqld.pid --datadir=/opt/bitnami/mysql/data --init-file=/tmp/mysql-init 2> /dev/null &Restart the MySQL server:
$ sudo /opt/bitnami/ctlscript.sh restart mysqlRemove the script:
$ rm /tmp/mysql-init
")


")