
» » How To Root Meizu 16X Android Smartphone
WARNING: Rooting your Meizu 16X Smartphone will null its warranty, and you won’t be able to claim it until you unroot your device. So, think well about this before getting started with the rooting procedure.

- Prerequisites:
- Tutorial To Root Meizu 16X:
- Reader Interactions
- Pre-requisites
- Create data backup
- Charge your phone
- Download and Install Android SDK tools to your PC
- Install Smartphone USB Drivers to your PC
- Unlock the Bootloader of your Android phone
- Method 1 – Employing Magisk Manager
- Step 1 – Download and Install latest Magisk version
- Step 2 – Download and install the TWRP Recovery tool
- Step 3 – Download and rename the Magisk file
- Step 4 – Finally, Install Magisk using TWRP
- Method 2 – Using One-Click Root
- Method 3 – Using Root Master
- Final words
- Frequently Asked Questions (FAQs)
- Leave a Reply
- Brief Details and Advantage of TWRP Recovery
- Prerequisite
- Downloads For Rooting MEIZU 16
- Steps to Flash/ Install TWRP on MEIZU 16
- Procedure to Root MEIZU 16/ Install Magisk or SuperSU
- Вариант 1
- Альтернативный вариант рута
- Программы с помощью которых не удалось получить Рут права
- Как проверить наличие root
- Обновляемся до Андроид 10. Прошивка Meizu 16th
- Для чего прошивать Андроид. Причины
- Brief Details and Advantage of TWRP Recovery
- Prerequisite
- Downloads For Rooting Meizu 16X
- Steps to Unlock Bootloader of Meizu 16X
- Steps to Flash/ Install TWRP on Meizu 16X
- Procedure to Root Meizu 16X/ Install Magisk or SuperSU
- Вариант 1
- Альтернативный вариант рута
- Программы с помощью которых не удалось получить Рут права
- Как проверить наличие root
- Прошивка Meizu 16X. Обновление до последнего Андроида
- Зачем прошивать смартфон. Причины
- How to Root Meizu 16X Magisk without TWRP Recovery
- Rooting Introduction
- Quick Steps To Root Meizu 16X Using Magisk
- How to Root your Meizu without Computer?
- How To Install the Patched Boot Image on Meizu 16X
- How to Verify if your phone has a systemless root?
- How to Uninstall Magisk and Unroot Android
- Read Me Once
Prerequisites:
Step 1: The rooting procedure given here is not a data-loss process, but it is safe to take a complete backup of your personal data on your Smartphone. So, take it using appropriate apps.
Step 2: Make sure that your Smartphone has at least 50-60% of battery backup in it as the rooting process is a time-consuming one.

After finishing all these prerequisites, you can move forward to the rooting tutorial given below.
Tutorial To Root Meizu 16X:
Step 1: To get started, download Kingroot app to your Meizu 16X device. Once downloaded, tap on kingroot.apk to install the app on your Smartphone.


If you own a smartphone or tablet other than Meizu 16X and would like to get rooting tutorials for the same, kindly visit our Rooting Tutorials page.
Reader Interactions
- Home
- Meizu
- Meizu 16X
- Rooting allows users to replace system settings and applications, install custom ROMs, increase the speed of the processor, and run specialized apps that require administrator level access.
- There are several other possibilities that come with rooting a device and thus makes this process a sought after technique.
- Before rooting your device you need to be aware of the downsides it entails and more importantly there are a few prerequisites that need to be followed to ensure that the rootings achieved without a hassle.

Even before, we get in to the details of rooting, lets clear the confusion between flashing and rooting.
They are two different concepts and shouldn’t be confused. Here’s a handy guide to help you understand the differences between Rooting and Flashing.
Table of Contents
Pre-requisites
- Are you here to have some tweaks on your phone? Do you want to perform things like personalization, customization, and overclocking stuff! Have you dreamed it but finding it tough to find a the real way to root your Android phone.
- If the answer is YES, then the process will get started from the below prerequisites here –
Create data backup
- Never mess with the data because it’s all you created and the important part of your personal life, including your memories.
- Being the most important thing on your Meizu 16X, that data includes all the important stuff, like your contacts, messages, call logs, as well as the pictures you clicked of your loved ones.
- Everything matters, and that’s why you need to create a backup of all your data before starting the process to root Meizu 16X.
- Rooting reinitializes the phone from the front state, wiping all your essential data.
- So please create a complete data backup before rooting your phone via any below process.
Charge your phone
- After creating the backup, what matters the most is the phone’s battery.
- This point contains significance because it’d be a big problem if your phone gets switched off between the process by accident.
- This problem can either be an uncomplicated reboot or disastrous like the Android brick.
You can bypass this prerequisite just with a simple step, charge your phone at least 40%, and that’s it!
Download and Install Android SDK tools to your PC
Behind taking the above big way, you’ve finally reached the most crucial prerequisite required before any below rooting method.
- These tools are important because the platform tools or SDK tools are required when installing any firmware on the phone.
- So no matter which approach you’re choosing from the below list, download SDK tools below first –
Android SDK Tools – (LINK)
- Downloading would be the first thing, and later you would have to install these SDK tools to your PC.
- You can install SDK Tools simply with the default PC installation steps. Make it!
Note – When installing the Android SDK tools, you must choose the location as C/android-sdk/; otherwise, remember the location if you’re installing it on a different one.
Install Smartphone USB Drivers to your PC
There are two paramount downloads mandated while root Meizu 16X.
he first one was SDK tools, which we downloaded with the a fore-mentioned steps, and subsequently, the next important thing is the USB Drivers.
In that case, we couldn’t skip providing USB Drivers for each phone, and that’s what we’ve done below.
You can observe and catch out your Smartphone manufacturer brand links from the below index and download the compatible USB driver instantly –
- ASUS
- Alcatel
- HTC
- Huawei
- Lenovo
- Motorola
- Realme
- Samsung
- Sony
- Vivo
- Xiaomi
Download the proper driver version from the above list and install it ASAP to your PC to start any procedure below.
Disclaimer: (Unlocking Bootloader section) – If you’re unlocking the bootloader of your Android phone, it means that you’re initializing unlocked access to install any Custom ROM. Subsequently, your phone warranty would get voided, so please be careful about that.
Unlock the Bootloader of your Android phone
Finally, we’re here at the most vital prerequisite needed before every rooting process and always sound complex in front of almost all the rooters. Yeah, you thought right! I’m talking about the Bootloader Unlocking Procedure.
For those who don’t know, Bootloader is a set of code installed on your phone which runs every time while booting the phone to make all the internal processes task. You can call it the brain software of your phone.
However, most brands provide locked Bootloaders with secret keys, whereas some have open access.
If you’re reckoned to find a key or using devices like Motorola, HTC, LG, and Sony, please first visit the official website and find the bootloader key. Or, if you’re not among the above brands, go through the below steps.
The first step toward unlocking Bootloader would be enabling USB Debugging and OEM Unlocking.
For doing that, you need to make the below procedure –
- Open Settings > About phone and find the Build Number there.
- After finding the Build Number, click it repeatedly 7 times to become a developer.
- Get back to Settings main menu and open Developer Options from there.
- Scroll down, and search USB Debugging and OEM Unlocking to enable them both instantly.


Step 1 – Connect your phone with the PC using a working Data cable.
Step 2 – Open the folder where you’ve installed the Android SDK Tools from the above steps.
Step 3 – Find an empty space on that folder screen, and press Shift+Right Click there.
Step 4 – Now, click the “Open PowerShell window here” tab from right-click menu.

Step 5 – Inscribe the below command on the PowerShell window and press Enter button. You will now observe your phone getting rebooted.
adb reboot bootloader
Step 6 – Afterward, choose one of the below commands to execute as per your smartphone model –
- For smartphones designed after 2015 and all SAMSUNG phones – fastboot flashing unlock
- For smartphones designed prior 2015 and all PIXEL phones- fastboot oem unlock
- For smartphones requiring a unique key to find on the website – oem unlock UNIQUE_KEY(Here, insert the unique key in place of UNIQUE_KEY as the command.)
Step 7 – After putting in the proper command from the above list, press the ENTER button.
Step 8 – The Bootloader unlocking process will start soon, and you will get success results soon. After that, paste the below command on PowerShell window –
The above command will reboot your phone with an unlocked bootloader warning message. Thereafter, you can initialize any of the below methods –
Methods to root Meizu 16X
Disclaimer: (Below most) – Rooting an Android phone employing any below method would void your Android Smartphone’s warranty and will clear all the data from your phone. So in any above case, we wouldn’t be responsible, and you would have to take this crapshoot on your own.
Method 1 – Employing Magisk Manager
What if we would say that the very first method we’re revealing here is the world’s favorite rooting procedure? It sounds like someone is talking about the Magisk Manager, right?
Magisk Manager offers thousands of personalization and interface customization modules, which help internalize even a simple Android smartphone with the kind of tweaks one might notice on a flagship phone. You can try this incredible Magisk Manager on any phone to experiment varied customisations and interfaces.
Handy tasks with the handy steps to install Magisk Manager listed below –
Step 1 – Download and Install latest Magisk version
Hit the below-listed download link, where we stored both the Magisk Manager APK version. Download it on your Meizu 16X by clicking the below download link –
Magisk Manager app – (LINK)
- After downloading the Magisk Manager app version, you need to install it on your phone. It’s again a simple process.
- Open Settings > Security > Unknown Sources, and enable the Unknown Sources for third-party installation.
- Afterward, click the Magisk Manager APK file to install it handily.

Step 2 – Download and install the TWRP Recovery tool
- The process would start and end within your phone’s interface.
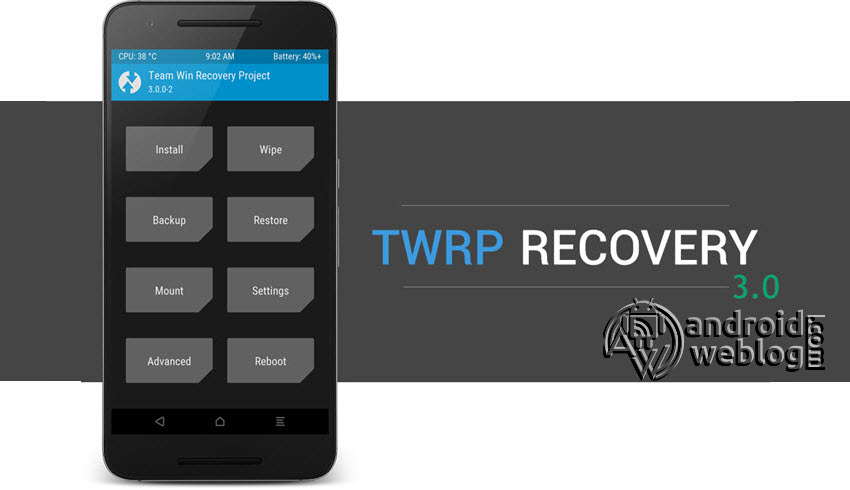
- This time, you would have to install Team Win Recovery Project on your phone, which is a protocol required to install Magisk.
- Download it from below and install the TWRP recovery to your phone using the ADB installation method –
TWRP Recovery – (LINK)
Step 3 – Download and rename the Magisk file
This is the most convenient, where all you ought to do is download the Magisk app from the below link and rename it from Magisk-v23.0.apk to Magisk-v23.0.zip.

Magisk app file – (LINK)
(Rename this .apk file extension to the .zip.)
Step 4 – Finally, Install Magisk using TWRP
- Reboot the phone to the TWRP recovery mode using the button combination.
- Click the Install button on the top left corner of the TWRP screen.
- Now, locate the folder where you’ve downloaded and renamed the Magisk file, and click the Select Storage tab.
- Finally, Swipe to confirm flashing Magisk to your phone and wait for the process completion.
- Later after process completion, click the Reboot System button, and your phone will get rebooted with Magisk Manager root access.


Method 2 – Using One-Click Root
The second method here is the most simplistic one, named with its most influential privilege, One-Click Root. However, it’s a paid tool, which charges $40 for providing you with all the rooting privileges at a single click.
- Firstly, click here, and download the Root Availability tool to find the One-Click Root compatibility with your device.
- If your device is compatible, download Windows/Mac One Click Root program software from this official link.
- Enable USB Debugging on your phone using the above prerequisite steps.
- Connect your phone with the PC using a working USB cable.
- Finally, open the One-Click Root app on your PC and run the Root command ASAP to get root access on your Meizu 16X.


Method 3 – Using Root Master
Root Master is the last method we’ve got here as the best 3 methods of rooting Android phones. Again, this method is also one of the simplest ways to root Meizu 16X and won’t take more than 5 minutes of your most crucial time.
The Root Master is an Android app, and it’ll help you by providing root access without any need for a PC.
This protocol was developed by one of the XDA developers to make the rooting process time-efficient.
- Priorly, download the Root Master APK file on your Android phone.
- Open the app on your phone, and press the tangy START button listed on the app interface.
- Root Master would firstly check for the compatibility of your device with the procedure. You can go one with the same system if your phone is compatible, but if not, choose a different method from the above 2 methods.
- After getting on the next and final procedure step, the Root Master will start the rooting procedure.
- Restart your phone after the successful completion of the procedure.
- Your phone would now have root access, and you can enjoy any privileges without a single interruption.


Final words
No one would ever have the Android rooting topic complex after reading this article entirely.
We can state that true, as we listed above three different procedures, including the convenient steps with most general words and vocabulary. Hope you liked this article, and we solved all your doubts related to rooting.
Frequently Asked Questions (FAQs)
What are the features of rooting Meizu 16X Android phone?
Immense features are waiting for you on the rooting path, where you can observe the most fabulous customization modules, overclocking hacks, and the system app uninstallation capability.
Is there any disadvantage of rooting Meizu 16X?
There is nothing with only advantages, and subsequently, rooting also includes colossal disadvantages, including device vulnerability, unable to access banking apps, and voided warranty.
Did rooting a Meizu 16X smartphone void its warranty?
Absolutely Yes! If you’re dreaming of rooting your phone and enjoying privileges, you’ll have to pay the warranty back.
Is it okay to enable USB Debugging and OEM Unlock on Meizu 16X Android phone?
USB Debugging and OEM Unlock are just some simple developer options, and they won’t have got any side issues at all. So you can enable them without getting worried.
What is the simplest way to root Meizu 16X?
If you want the most simple rooting, you can go for One-Click root. The software is listed in the above methods offers root access at a single click.
Where to get the official Android SDK tools?
We’ve gathered the official Android SDK tools and stored them above. You can download the ZIP file using the link below and enjoy using it.
What is Magisk Manager?
How to root an Meizu 16X Android phone without using a PC?
If you’re unable to use a PC while rooting your phone, you can try the third method, without including a PC, and root your phone within minutes.
Will bootloader unlocking void device warranty?
Leave a Reply
If you are a owner of a MEIZU 16 smartphone, and also want to customize this smartphone, then you have visited the right page.
If you are an Android Enthusiast, and want to Root and Install TWRP recovery on your beloved, then you have landed on the right page. In the due course of the article, we will guiding you through the process to install TWRP and root MEIZU 16.
If you want to unleash the full potential of the hardware of your MEIZU 16, then rooting and flashing the TWRP is the main concern. The Stock ROMs have often limited and unsupported features in the sense of Customization. When you have a rooted device and also flashed TWRP recovery, then you are free to install any Custom ROMs, Mods, Kernel, and Xposed etc., as well as many apps which requires root access to work properly.
Brief Details and Advantage of TWRP Recovery
TWRP (Team Win Recovery Project) is an open source, community development project. By flashing the TWRP, your device will be enabled to install any custom firmware, rooting your smartphone, mod zip files for customizations, Xposed Modules for customized features, one click root and unroot processes. Apart from that, it allows you to take Full Nandroid Backup and restore it later, one click image file flashing, remove bloatware, overclock and underclock. Using TWRP, one can easily clean Wipe, Cache and Data after flashing any image file to reflect the changes and rectify minor errors due to cache.
For installing the TWRP, your MEIZU 16 phone must have the Unlocked bootloader. That means you have to firstly unlock the bootloader to root your device as well doing any customization.
Rooting and flashing the Custom ROM firmware, certainly without any doubt voids your devices warranty and AndroidWeblog.com in no way will be held responsible for warranty void or your bricked device.
Prerequisite
Ensure to check your model number, which must be:
- MEIZU 16
You must have to ensure that prior to rooting your phone , you have read thoroughly the disclaimer and you agree to proceed further on your risk.
- Phone Should be Charged
Your phone must be 70% charged atleast else, it may lead to complications sometimes while experimenting. Why to take risk, try to charge it fully.
- Back Up
If you are either going to root your phone or install a Custom ROM, it is a good habit to make a back up of your phone. Make a back up of all your media like images, videos and all on your PC and your contacts on Cloud.
- Enable USB Debugging
You must enable USB debugging option by going in to Settings, Applications and Developer options.
Downloads For Rooting MEIZU 16
Download MediaTek USB VCOM Drivers here (MT6xxx_USB_VCOM_drivers. zip)
Download TWRP Recovery for MEIZU 16 from here:
TWRP Recovery 3.3.0 (Mediafire Link)
Download SuperSU by Chainfire from here.
Download Magisk Manager from here.
Download Latest version of SPFlash Tool for Windows here.
Steps to Flash/ Install TWRP on MEIZU 16
Step 1: Begin with downloading all the files mentioned above in the prerequisite section.
Step 2: Browse through the files downloaded, and then Right click on the zipped file MT6xxx_USB_VCOM_drivers. zip and extract the same. Then navigate to the extracted folder and then click on the file InstallDriver. exe. This will install the Preloader VCOM in your system.
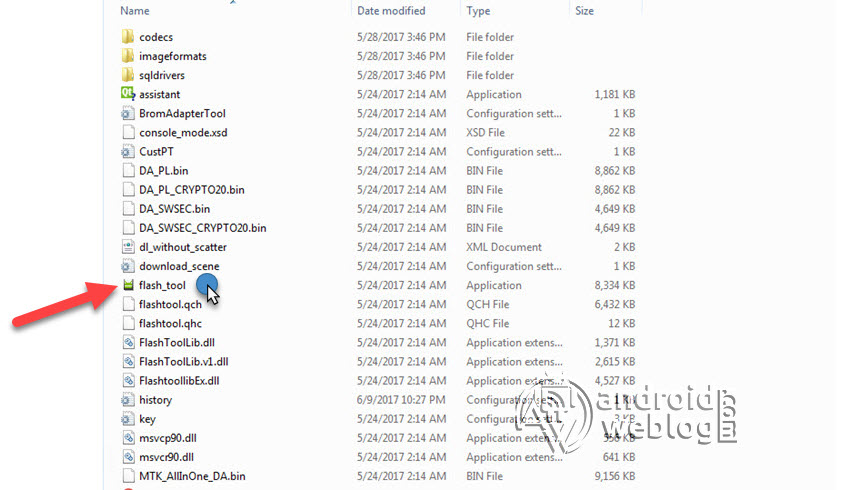
Step 3: Assuming that you have downloaded SP FlashTool (Win) from the provided link above, Then simply click and extract the archive. Then, browse and run the file flash_tool. exe
Step 4: Find the Scatter File from the downloaded TWRP zip file, which you have downloaded. Rename the TWRP (.img) file to recovery.img. Now, on the flash tool interface, navigate and select the scatter file in the extracted folder of the Stock ROM (Download Stock ROM for your MEIZU 16 smartphone).
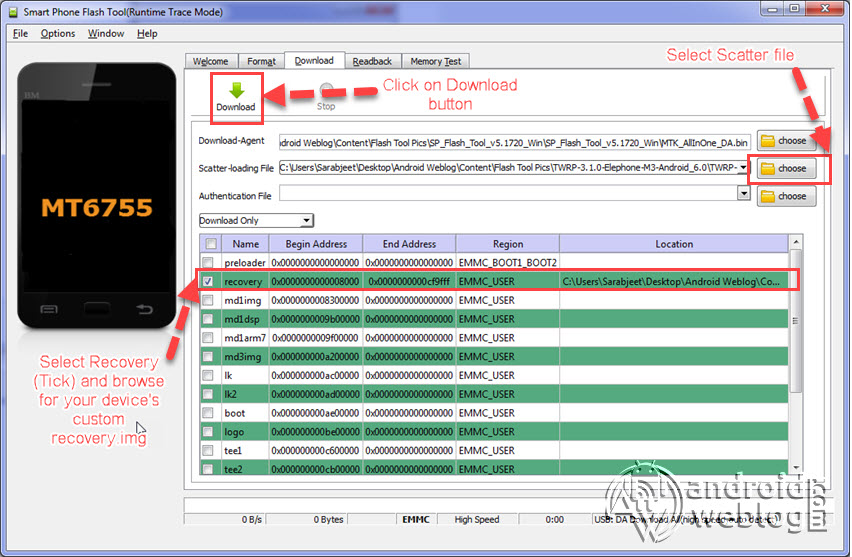
Step 5: At this stage, just leave the recovery as ticket/ checked. Now, at the location tab, click on the storage location field of the recovery and search and browse for the custom recovery image file which is device-specific (As shown in the picture above). Then click the Download button.
Step 6: Now, hook up/ connect your MEIZU 16 to the computer via USB slot. Connecting your smartphone will begin the flashing process automatically, and it requires simply a few seconds to complete.
Step 7: At this point of the custom recovery on your device has been flashed. Now, you may disconnect the device from computer. Now, you need to turn on/ boot your device into TWRP recovery. For doing the same, boot the device while pressing and holding the volume up button. Kindly note that key combinations may vary on your device model, and you can confirm the right key combination for your MEIZU 16. The Volume Up button also starts the bootloader mode on specific devices, which is equipped with menu to browse to the recovery mode. You may try the Volume Up and Volume Down buttons as key combinations. That’s all, you have successfully flashed the TWRP on your MEIZU 16
Procedure to Root MEIZU 16/ Install Magisk or SuperSU
Make sure that you have downloaded SuperSU or Magisk Manager (link in pre-requisite section of this article). Then, proceed to the steps.
Caution: You can use either Magisk Manager or Super SU, but only one, so choose wisely. Go for Magisk Manager if you are not sure.
Step 1: Transfer the downloaded SuperSU.zip or magisk.zip file to the internal storage / SD card of your MEIZU 16 smartphone.
Step 2: Now, just boot into the recovery. From the TWRP interface, you can optionally backup the Stock ROM. Though, I would recommend to backup the Stock ROM. Because if in case process gets failed, you can flash the Stock ROM.
Step 3: Tap on Install ‘, and then navigate to the file ‘SuperSU.zip’ or ‘magisk.zip’ and swipe to confirm flash (located at the bottom of the screen). The flashing process of Magisk/ SuperSU has been started and will take few seconds to complete.
Congratulations, now you have rooted MEIZU 16 and also flashed the TWRP. Now, you can install Xposed Framework, and customize your smartphone as per your preference. If you wish to verify, you may download and check the Root Status through Root Checker app.

Получение root прав на Meizu 16th — простой процесс, благодаря появлению утилит, которые делают это в 1 клик, практически также быстро можно осуществить и перепрошивку или обновление. Для этого я и написал это руководство. Бесплатно и без смс). Почитать про root доступ можно тут.
А ещё вы можете обновить свой смартфон до последнего Android и не только. Всё представлено пошаговыми инструкциями.
Эксперт сервисного центра — Ефремов Авксентий
В качестве небольшой подготовки вам понадобится:
- Зарядить ваш смартфон от 30% и выше
- Включить USB отладку в настройках телефона
- Подключить смартфон к компьютеру
- Если по какой-то причине заблокирован загрузчик, необходимо сделать разблокировку.
Мы будем пользоваться исключительно программами типа «One Click» для получения рут доступа в 1 клик, распространяемыми бесплатно.
Вариант 1

- Скачиваем Rootkhp Pro на ПК, на сайте разработчиков есть ещё и ссылка на инструкцию
- Запуска и нажимаем Root, после уведомления что процесс начался ждём второе уведомление.

- Если вы получили сообщение «Congratulations…» можете закрывать программу и перезагружать устройство.

Альтернативный вариант рута

- Скачиваем ZYKURoot (ищите самую последнюю версию, на момент написания статьи это 2.6).
- Запускается без установки, нажимаем Root.
- Ждём уведомления «Rooted».

Программы с помощью которых не удалось получить Рут права
- Ioroot
- Kingo
- Framaroot
- Bin4ry
- Eroot
- DingDong
- BaiduRoot
- Root Genius
Как проверить наличие root
Обновляемся до Андроид 10. Прошивка Meizu 16th

Эксперт — Волков Мартын
Обновление путём прошивки будет производиться через ZYKUFlasher версии 1.1 — это универсальная программа для прошивки Андроид смартфонов на ПК, она поможет установить как официальную (стоковую), так и неофициальную (кастомную).
- Запускаем ZYKUFlasher (инструкция если нужна)
- В поле «Download Agent» выбираем путь к universal.bin (файл с расширением .bin в папке с прошивкой)
- «Scatter-loading» указываем путь к файлу, заканчивающийся на _emmc.txt
- Нажимаем «Start Flash»
Для чего прошивать Андроид. Причины
- Неожиданные перезагрузки
- Хочется потренироваться
- Глюки, фризы, зависания и другие проблемы
- Устройство зависает при загрузке на бутскрине
- Аппарат впал в вечную перезагрузку (Boot loop)
- Хочется обновиться до последнего Андроида
If you own a Meizu 16X, and also want to root the device, then you are on the right page.
If you are an Android Enthusiast and want to Root and Install TWRP recovery on your beloved, then you have landed on the right page. In the due course of the article, we will be guiding you through the process to root Meizu 16X.
If you want to unleash the full potential of the hardware of your Meizu 16X, then rooting and flashing custom recovery like TWRP is the main concern. The Stock ROMs have often limited and unsupported features in the sense of Customization. When you have a rooted device and also flashed TWRP recovery, then you are free to install any Custom ROMs, Mods, Kernel, and Xposed, etc., as well as many apps that requires root access to work properly. You can easily root the device with One Click Android Root Tool, with either via PC or through the APK, which is a quick process.
Brief Details and Advantage of TWRP Recovery
TWRP (Team Win Recovery Project) is an open-source, community development project. By flashing the TWRP, your device will be enabled to install any custom firmware, rooting your smartphone, mod zip files for customizations, Xposed Modules for customized features, one-click root and unroot processes. Apart from that, it allows you to take Full Nandroid Backup and restore it later, one-click image file flashing, remove bloatware, overclock and underclock. Using TWRP, one can easily clean Wipe, Cache, and Data after flashing any image file to reflect the changes and rectify minor errors due to cache.
For installing the TWRP, your Meizu 16X phone must have the Unlocked bootloader. That means you have to firstly unlock the bootloader to root your device as well doing any customization.
Prerequisite
Ensure to check your model number, which must be:
- Meizu 16X
You must have to ensure that prior to rooting your phone, you have read thoroughly the disclaimer and you agree to proceed further on your risk.
- Phone Should be Charged
Your phone must be 70% charged at least, else, it may lead to complications sometimes while experimenting. Why take the risk, try to charge it fully.
- Back-Up
If you are either going to root your phone or install a Custom ROM, it is a good habit to make a back up of your phone. Make a back up of all your media like images, videos and all on your PC and your contacts on Cloud.
- Enable USB Debugging
(Applicable only for PC method, Skip if you will use APK method)
You must enable the USB debugging option by going into Settings, Applications, and Developer options.
Downloads For Rooting Meizu 16X
Download Universal ADB Drivers here (If your PC have already drivers installed then skip this)
Download platform-tools/ SDK Tools package from Android SDK on PC from here. (Android command line tools> SDK Tools package)
Download TWRP Recovery for Meizu 16X from here:
TWRP Recovery 3.3.1 (Google Drive Link)
Download SuperSU by Chainfire from here.
Download Magisk Manager from here.
Make sure that you have downloaded the required files (link in the pre-requisite section of this article). Then, proceed to the steps.
Steps to Unlock Bootloader of Meizu 16X
Note: If you have already unlocked bootloader, then skip these steps.
Step 1: First, you need to Connect your Meizu 16X Device to the computer, in Fastboot Mode. You can reboot your device to fastboot using the command in ADB terminal:
adb reboot bootloader
Step 2: Now, open the Adb Terminal in PC, and then just enter this command:
fastboot oem unlock-go
Step 3: Then, issue this command:
fastboot oem unlock-go
At this stage, your device will be reboot automatically. Now, you can Root Meizu 16X, as the bootloader of your device is already unlocked.
Steps to Flash/ Install TWRP on Meizu 16X
Step 1: Assuming you have already downloaded the platform-tools from Android SDK (SDK Manager) platform-tools on your PC. The platform-tools contains the required ADB and fastboot binaries.
Step 2: Make sure that the drivers are installed on your computer. Then, skip to the next step.
Step 3: Now, enable the developer settings on your Meizu 16X Device. To achieve the same, just navigate to the Settings -> About and then find the ‘Build Number ‘, and then tap on ‘Build Number’ for 7 times, this will enable the developer settings on your device.
Step 4: If you have USB Debugging already, then skip this step. If you have not, then open the Developer Options and then enable the USB debugging option.
Step 5: Now, open the command prompt in computer/ ADB Terminal, and simply type the command:
adb reboot bootloader
Step 6: Your device should have not entered into fastboot mode. Now copy the TWRP.img file downloaded in prerequisite section, to the same folder where ADB and fastboot binaries are located. Rename the file to ‘twrp.img’ and then enter this command:
fastboot flash recovery twrp.img
and then run this command, type:
fastboot reboot
Step 7 : Some devices might not replace the custom recovery automatically during the first boot. You can search Google for key combinations to enter your device into recovery mode. After running the ‘fastboot reboot’ command, press and hold the proper key combination to enter the device into TWRP Mode. Once the device boots to TWRP mode, the TWRP will automatically patch the stock ROM, to prevent the chances of replacing TWRP with Stock Recovery.
Procedure to Root Meizu 16X/ Install Magisk or SuperSU
Make sure that you have downloaded SuperSU or Magisk Manager (link in the pre-requisite section of this article). Then, proceed to the steps.
Caution: You can use either Magisk Manager or Super SU, but only one, so choose wisely. Go for Magisk Manager if you are not sure.
Step 1: Transfer the downloaded SuperSU or Magisk Manager file to the internal storage / SD card of your Meizu 16X smartphone.
Step 2: Now, just boot into the recovery. From the TWRP interface, you can optionally backup the Stock ROM. Though, I would recommend to backup the Stock ROM. Because if in case process gets failed, you can flash the Stock ROM.
Step 3: Tap on Install ‘, and then navigate to the file ‘SuperSU.zip’ or ‘magisk.zip’ and swipe to confirm flash (located at the bottom of the screen). The flashing process of Magisk/ SuperSU has been started and will take few seconds to complete.
Congratulations, now you have rooted Meizu 16X and also flashed the TWRP. Now, you can install Xposed Framework, and customize your smartphone as per your preference. If you wish to verify, you may download and check the Root Status through the Root Checker app.

Я помогу вам получить root права на Meizu 16X. Для этого я и написал это руководство. Бесплатно и без смс). Узнать о том что такое root можно здесь.
А ещё вы можете обновить свой смартфон до последнего Android и не только. Всё представлено пошаговыми инструкциями.
Эксперт сервисного центра — Гусев Якун
В качестве небольшой подготовки вам понадобится:
- Зарядить ваш смартфон от 30% и выше
- Включить USB отладку в настройках телефона
- Подключить смартфон к компьютеру
- Если по какой-то причине заблокирован загрузчик, необходимо сделать разблокировку.
Мы будем пользоваться исключительно программами типа «One Click» для получения рут доступа в 1 клик, распространяемыми бесплатно.
Вариант 1
- Скачиваем Rootkhp Pro на ПК, на сайте разработчиков есть ещё и ссылка на инструкцию
- Запуска и нажимаем Root, после уведомления что процесс начался ждём второе уведомление.
- Если вы получили сообщение «Congratulations…» можете закрывать программу и перезагружать устройство.
Альтернативный вариант рута
- Скачиваем ZYKURoot (ищите самую последнюю версию, на момент написания статьи это 2.6).
- Запускается без установки, нажимаем Root.
- Ждём уведомления «Rooted».
Программы с помощью которых не удалось получить Рут права
- Eroot
- DingDong
- BaiduRoot
- Root Genius
Как проверить наличие root
Прошивка Meizu 16X. Обновление до последнего Андроида
Эксперт — Белоусов Максим
Выполнять обновление через перепрошивку будем используя ZYKUFlasher 1.1 — это универсальная прошивалка для Андроид смартфонов через компьютер, ей можно установить как стоковые, то есть официальные, так и альтернативные кастомные сборки (ROM, TWRP Recovery).
- Запускаем ZYKUFlasher (инструкция если нужна)
- В поле «Download Agent» выбираем путь к universal.bin (файл с расширением .bin в папке с прошивкой)
- «Scatter-loading» указываем путь к файлу, заканчивающийся на _emmc.txt
- Нажимаем «Start Flash»
Зачем прошивать смартфон. Причины
- Неожиданные перезагрузки
- Хочется потренироваться
- Глюки, фризы, зависания и другие проблемы
- Устройство зависает на логотипе
- Циклическая перезагрузка
- Хочется обновиться до последнего Андроида
- Home
- Meizu
- 16X Root With Magisk
- by Editorial Staff

How to Root Meizu 16X Magisk without TWRP Recovery
Here you will get the two easy rooting methods such as SuperSU, and Magisk, you can use both to root access but from the last a few years, everyone want to use the Magisk method to root their 16X. A lot of developers also prefer to use the Magisk method. Magisk is a system-less root that help you enables root access using the system components, it will not affect your system core-files.
Rooting Introduction
If you know about “Rooting” then, it is very easy, and you will root your Android device easily. A Lot of people don’t know about this. As you know that Android is an open-source OS that allows you to navigate your device as much as you can. You can do a lot of different things if the phone is rooted using Magisk Root, you may get access and control a lot of features such as a clock, access to the cache. You can also remove unwanted software from your 16X.
If your device is rooted then, you can run a firewall, enable a secure system on your device manually. Not only these but also you may back up your system, and a lot of different useful tweaks to get access. In this post, we will show you how to root Meizu 16X.
Now, we will guide you step by step, first of all, you will use the Magisk by patching the official stock boot image, and the flash on Meizu 16X boot partition. You must need to download the patched image file from Magisk Manager and flash it.
Many people don’t know about rooting and they compare rooting with hacking. Here we want to clarify you that rooting is a disparate from the hacking. You can unlock your different features using Rooting. While hacking is a illegal, in this way someone can control and break any system or device.
Quick Steps To Root Meizu 16X Using Magisk
Read Me Once
- I just want to warn you that, Rooting will void the warranty of your smartphone
- Rooting will block the OTA updates
- First of all, you need to charged Meizu 16X upto 70%.
We always advise you before rooting, you need to create a complete backup of all files and save them in a safe location.You can use this image file is only for Meizu 16X. Do not try to use it on any other device/phone.
First of all, you need to connect your 16X with PC using a micro USB cable.- Download ADB and Fastboot files. [Windows]
- Download And Install 16X USB Drivers.
- Download Other Drivers: Mediatek VCOM Drivers or MTK USB Drivers
- Download Latest Meizu 16X Stock ROM
- Download And Install SP Flash tool on your Windows 11, 10, 7 64bit|32bit computer.
Disclaimer: Rooting will affect to your Meizu 16X data. Before root, you need to create a backup and save all data such as images, videos, and files in a safe location. We will not be responsible for any bricking/damage to your phone while installing this ROM.
How to Root your Meizu without Computer?
- First of all, enable the unknown source application, –>>> Go to Settings, – >>> Security, and Tick the option “Unknown Source”
- Make sure that you have downloaded the KINGROOT APP download from the above link.
- After that, you need to Install the Kingroot on your Meizu
- Now open the Kingroot App, then please check whether the phone can root or not.
- You will see a button to root, Now it is your choice whether would you like to root your Android phone or not. If Yes Click it!
- The 6th step is “Don’t press any other button, you will click on continue to root your device.
- Don’t worry, if it will take a few minutes, so be careful and please wait. In case your phone reboots or restart during the rooting.
- So be patient, and please wait until after the restart, you can start again Kingroot app.
- Finally, you will see a message that the root has been done successfully.
First of all, download and extract the ROM from your computer.
Now, connect your device using a micro USB cable, and copy only the boot.img file from the extracted folder to your 16X phone memory.
Then, you need to Launch Magisk Manager.
After that, you will see a popup window that will ask you to install Magisk.
Now, Select INSTALL and choose to install it again, and Now, Press on “Patch Boot Image File”.

Then, Navigate to internal storage and select your phone’s boot image that you transferred earlier.
After that, you need to Wait for a couple of seconds. Magisk will start patching the boot image.
Once the boot image has been patched, copy the “patched_boot.img” from the internal storage and replace it in the same extracted ROM folder on your PC.
How To Install the Patched Boot Image on Meizu 16X
We assume that you have already downloaded the ADB & Fastboot tool from the link given above.
Now, extract the ADB fastboot tool, then move the patched boot image to the same folder.
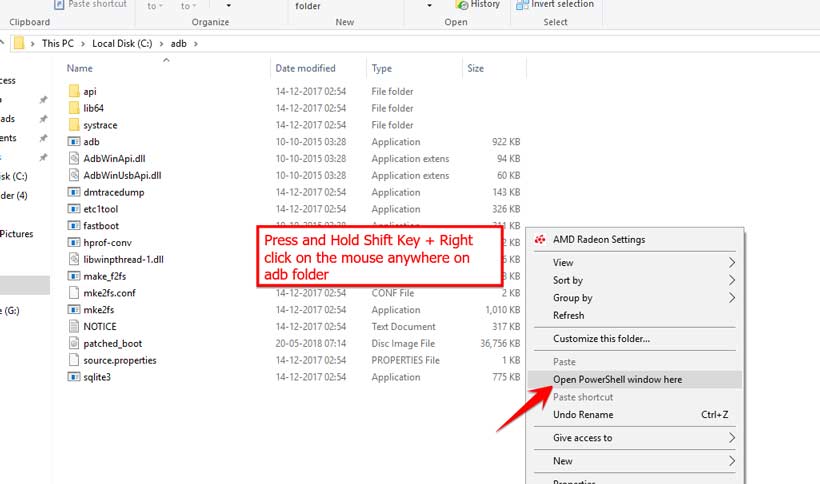
Hold the Shift key and right-click on the mouse to open the command window/PowerShell.
Flash the “patched_boot.img” to install Magisk and root your Android device: fastboot flash boot patched_boot.img
fastboot flash boot_b patched_boot.img
The flashing process will begin. Once done, run fastboot reboot
How to Verify if your phone has a systemless root?
Download and install the Magisk Manager app APK, and launch it.
To verify that you have a systemless root, check the top of the screen and if you see all options with Green Tick which means you have successfully rooted and bypassed SafetyNet.

So, that’s it. Now that you have rooted your Meizu 16X. If you have any queries regarding this, do let us know.
How to Uninstall Magisk and Unroot Android
- Open the “Magisk Manager” app on your phone.
- Now Tap on the “Uninstall” button to uninstall Magisk
- After that, confirm uninstallation by taping the “COMPLETE UNINSTALL”
- Once the uninstallation process is done, you can reboot your device.
Read Me Once
The rooting process will affect your Meizu device data like images, videos, and files. We advise you before starting rooting you need to create a backup and save it in a safe location.
")


")