

Продолжайте удерживать кнопки даже после завершения процесса прошивки. Это обеспечит прямую загрузку вашего телефона в TWRP. Если нет, то сработают DM-Verity и Prenormal RMM / KG State, и вам придется подождать еще 7 дней, пока вы не сможете что-нибудь прошить.

- What is Rooting-
- What is twrp ?
- Note
- Require tools and Files-
- How to Install twrp Recovery on Samsung Galaxy A6 SM-A600FN –
- How to Root Samsung Galaxy A6 SM-A600FN –
- Step by step Rooting Samsung Galaxy A6 2018 Android 9 Pie :
- Install TWRP and Root file on Galaxy A6 2018 Android 9 Pie
- Step by step Rooting Samsung Galaxy A6 SM-A600FN with Magisk v20.0 Android 9 Pie
- Patched AP .tar with Magisk Manager and Rooting Galaxy A6 SM-A600FN with Magisk v20.0 :
- Step by step Rooting Samsung Galaxy A6 SM-A600FN Android 9 Pie
- Patched AP .tar and Rooting Galaxy A6 SM-A600FN Android 9 Pie with Magisk Manager :
- Содержание этой статьи
- Зачем обновлять прошивку
- Android смартфон samsung sm-a600fn как прошить?
- Утилиты / драйвера
- Варианты обновления прошивки
- Прошивка samsung sm-a600fn видеоинструкция
- Hard Reset samsung sm-a600fn или жёсткий сброс настроек
- Root
- Как обмануть местоположение на Андроид
- Why should you Root Samsung Galaxy A6 Plus 2018?
- How to Root Samsung Galaxy A6 Plus 2018 SM-A605F/ SM-A605FN / SM-A605G / SM-A605GN
- Things to check out for;
- Flash TWRP using ODIN
- Install Magisk, RMM State in your Samsung Galaxy A6 Plus 2018 using TWRP
- Why should you Root Samsung Galaxy A6 2018?
- How to Root Samsung Galaxy A6 2018 Pie 9.0 (SM-A600F/ SM-A600G/ SM-A600N)
- Things to check out for;
- Flash Patched Boot Image using ODIN
- Boot into Rooted OS
- Рут права для телефона samsung sm-a600fn
- Вариант 1 — Rootkhp Pro версия 3.4
- Другой вариант получения рут прав на samsung sm-a600fn
- Программы, не решившие проблему с root или не имеющие возможности это сделать
- Как проверить наличие root
- Перепрошивка и обновление samsung sm-a600fn
- Зачем прошивать смартфон
- Why should you Root Samsung Galaxy A6 2018?
- How to Root Samsung Galaxy A6 2018 Android 10 One UI 2.0 (SM-A600F, SM-A600FN, SM-A600G, SM-A600GN, SM-A600N)
- Things to check out for;
- 1. Pre-Requirement Steps
- 1.1 Unlock Bootloader
- 1.2 Preparing Patched AP file
- 2. Flash Patched AP file using ODIN
- 3. Boot into Rooted OS
- Корень Samsung Galaxy A6 / A6 + (2018)
What is Rooting-
Rooting is the way to obtain Supersu Right’s on Android Devices, that means after Rooting the Phone You can unlock All features of the Device and you have Full Permission to Play with it. means you can Install custom ROM, Install Custom Mod’s and tweak your phone using various tricks. Rooting also Best way to Save battery because after Rooting you can Disable all Apps In Single Click and also you have Right to Remove Pre-Installed system app so you can Easily Uninstall Non Require System apps.
What is twrp ?
Note
1. backup NVRAM
2. backup Your Personal data
3. Create a nandroid backup
Some universal Mod for all Android phone-
1. Xperia all in Mod for all android Phone
2. Braviea Engine universal Mod to Enhance videos
Require tools and Files-
How to Install twrp Recovery on Samsung Galaxy A6 SM-A600FN –
Step 2. Check auto Reboot. Reboot Phone to Download Mode and Connect to PC..
Step 3. You can See COM/added Option. Click Start
Step 4. Wait For Success. Done
How to Root Samsung Galaxy A6 SM-A600FN –
adb reboot recovery
Step3. In the twrp Go to backup tab and Create a nadroid backup. Don’t forgot to include NVRAM or imei aka EFS.
Step4. Go to wipe tab and Do a factory Reset.only Do a factory Reset Do’t include other partition’s.
Step5. Go to Install tab and Locate Download SuperSu.zip and confirm Install, wait For Success Done.
Check other articles-
April 28, 2019 | By androidhowto@youtube | Filed in: Root.
Step by step Rooting Samsung Galaxy A6 2018 Android 9 Pie :
Tools that must be prepared:
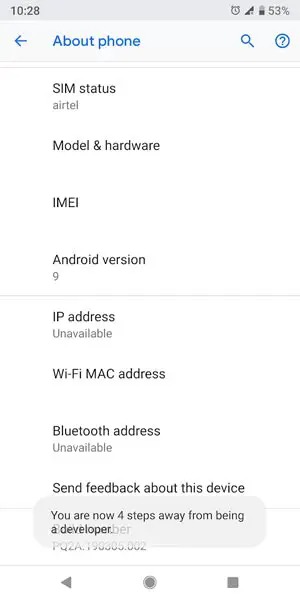
- Enable Developer Options: go to Settings -> About device. Tap 7 times on Build number to enable Developer options.
- Enable OEM unlock and USB debugging options ( Settings -> Developer options )
- Download and Extract ODIN v3.13.1 from https://odindownload.com/SamsungOdin/
- Download and Install Samsung Mobile Phone Drivers: http://developer.samsung.com/technical-doc/view.do?v=T000000117
- Download TWRP Recovery for Galaxy A6 2018
- Download no-verity-opt-encrypt and RMM-State_Bypass_Mesa_v2
- Download Stable Magisk Version: v18.1 ( Magisk-v18.1 ) and Magisk Manager Version: v7.1.1 ( MagiskManager-v7.1.1.apk ) at XDA-Developers Forum.
Install TWRP and Root file on Galaxy A6 2018 Android 9 Pie
If for any reason you fail to install TWRP multiple times/different methods, make sure you check this thread and if something goes wrong and you want to flash the ROM visit this post How to flash ROM on Galaxy A6 2018.
Root SM-A600FN Android 9 Pie Samsung Galaxy A6 2018
Notes / Warning!
- Use at your own risk, I’m not responsible for bricking your device.
- Using the incorrect file may brick your device.
- If your target device has a custom firmware flash counter, Rooting will trigger it. If you’re lucky, Triangle Away has support for your device and can be used to reset the counter.
- If you have a KNOX-enabled device, Rooting will trip the KNOX WARRANTY VOID status !
- If your device storage is encrypted, Rooting will wipe your data !
- If you have locked bootloaders, flashing one of these will probably brick your device – with the exception of Nexus devices, which will usually automatically “OEM unlock” and wipe your data !
- Make sure to backup your important data before root it.
October 28, 2019 | By androidhowto@youtube | Filed in: Root.
Step by step Rooting Samsung Galaxy A6 SM-A600FN with Magisk v20.0 Android 9 Pie
- Enable Developer Options: go to Settings -> About device. Tap 7 times on Build number to enable Developer options.
- Enable OEM unlock option and USB debugging options ( Settings -> Developer options )
- Unlock Bootloader
- Download and Extract ODIN v3.13.1 from https://odindownload.com/SamsungOdin/
- Download and Install Samsung Mobile Phone Drivers: http://developer.samsung.com/technical-doc/view.do?v=T000000117
- Download Latest Magisk Manager ( MagiskManager-v7.3.4.apk )
Patched AP .tar with Magisk Manager and Rooting Galaxy A6 SM-A600FN with Magisk v20.0 :
- Download the firmware Galaxy A6 SM-A600FN.
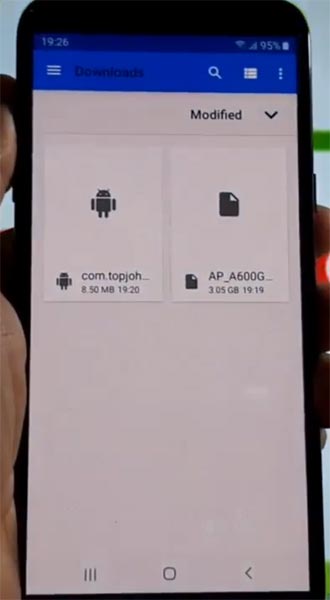
- Unzip the firmware and copy the AP tar file to your device. It is normally named as AP_[device_model_sw_ver].tar.md5. Copy AP tar file and MagiskManager-v7.3.4.apk to your phone.
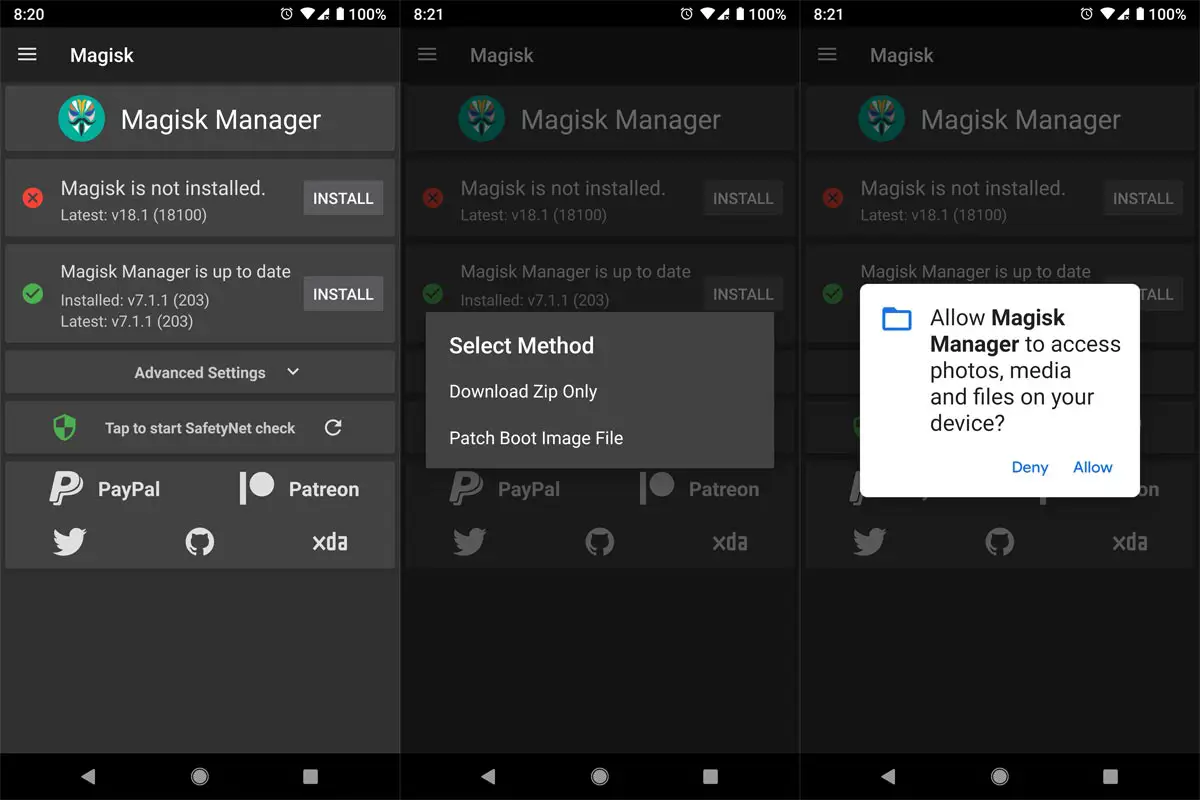
- Install Magisk Manager ( MagiskManager-v7.3.4.apk ) on your phone and you can update it if you want.
- In Magisk Manager: Install → Install → Select and Patch a File
- Select the AP tar file. Magisk Manager will patch the whole firmware file and store the output to [Internal Storage]/Download/magisk_patched.tar. Copy magisk_patched.tar the tar file to your PC
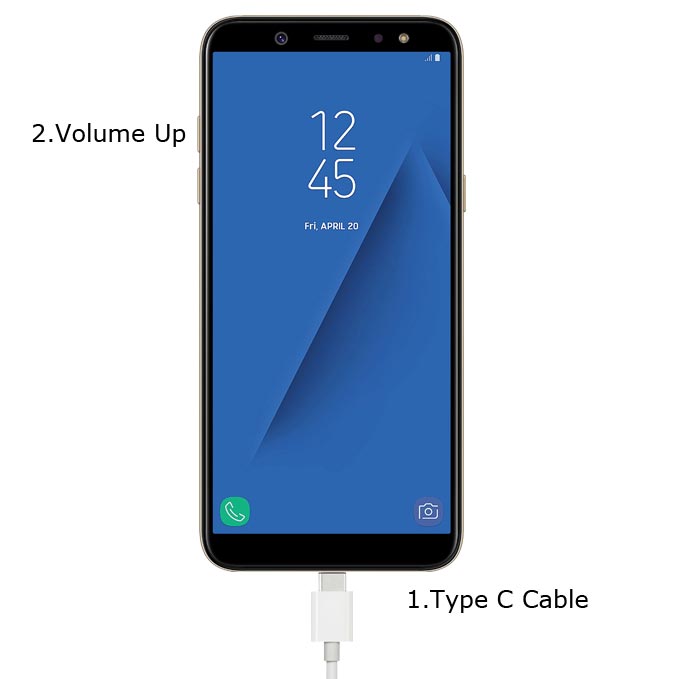
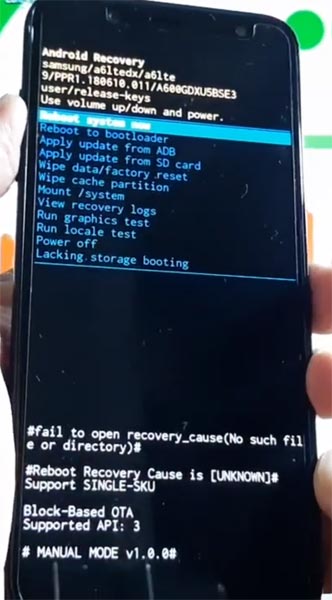
- Reboot to Bootloader: Turn Power Off. Press and hold Volume Up key + Power Key, When Samsung Logo appears release Power Key only, keep pressing Volume Up key until Android Recovery Mode Appears. Select Wipe data / Factory reset. Select Reboot to bootloader. Connect the phone to PC using USB Cable.
- Make sure the boot loader are unlocked ( OEM options is enabled )
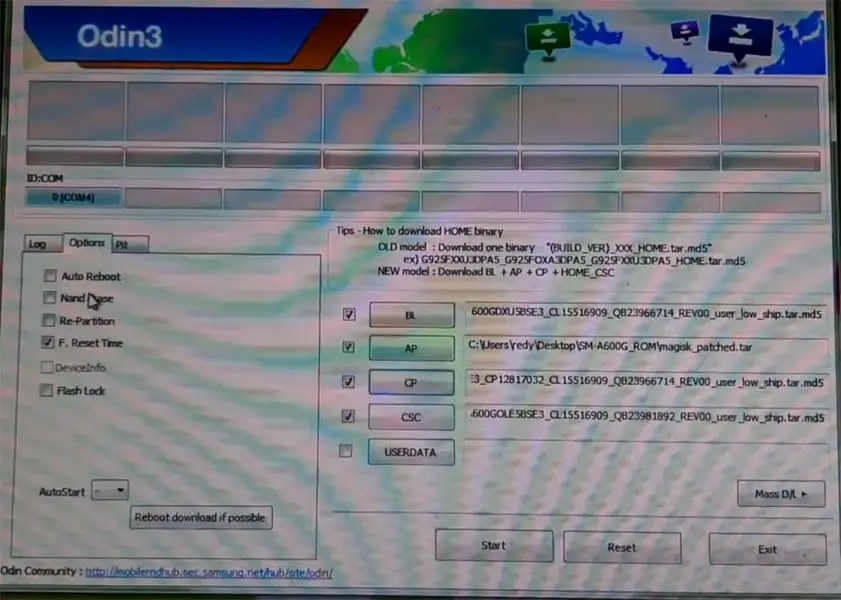
- Flash magisk_patched.tar as AP in ODIN, together with the BL, CP and HOME_CSC files.
Important: check “Auto Reboot” and “F. Reset time” only in Options! - Magisk is now successfully flashed to your device!
- After the device is booted up, do the usual initial setup. It need more time and patient.
- Connect the phone to Internet, Copy Magisk Manager apk file to your phone and install it.
- Open Magisk Manager. It will ask to do additional setups. Let it do its job and the app will automatically reboot your device.
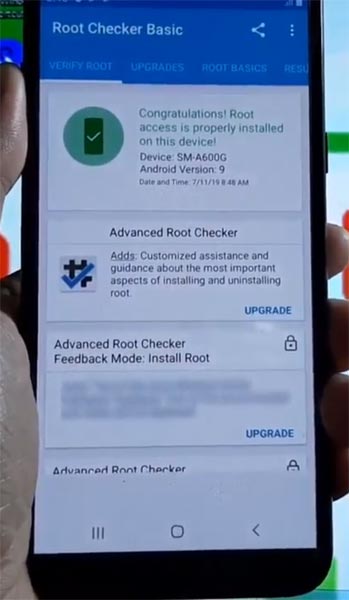
- Done! You can use Root Checker to check it, Enjoy!
If something goes wrong and you want to unroot it, just flash the ROM to make it works again. Read How to flash Galaxy A6.
Notes / Warning!
- Use at your own risk, I’m not responsible for bricking your device.
- Using the incorrect file may brick your device.
- If your target device has a custom firmware flash counter, Rooting will trigger it. If you’re lucky, Triangle Away has support for your device and can be used to reset the counter.
- If you have a KNOX-enabled device, Rooting will trip the KNOX WARRANTY VOID status !
- If your device storage is encrypted, Rooting will wipe your data !
- If you have locked bootloaders, flashing one of these will probably brick your device – with the exception of Nexus devices, which will usually automatically “OEM unlock” and wipe your data !
- Make sure to backup your important data before root it.
July 14, 2019 | By androidhowto@youtube | Filed in: Root.
Step by step Rooting Samsung Galaxy A6 SM-A600FN Android 9 Pie
- Enable Developer Options: go to Settings -> About device. Tap 7 times on Build number to enable Developer options.
- Enable OEM unlock and USB debugging options ( Settings -> Developer options )
- Download and Extract ODIN v3.13.1 from https://odindownload.com/SamsungOdin/
- Download and Install Samsung Mobile Phone Drivers: http://developer.samsung.com/technical-doc/view.do?v=T000000117
- Download Latest Magisk Manager ( MagiskManager-v7.3.2.apk )
Patched AP .tar and Rooting Galaxy A6 SM-A600FN Android 9 Pie with Magisk Manager :
- Download the firmware Galaxy A6 SM-A600FN.
- Unzip the firmware and copy the AP tar file to your device. It is normally named as AP_[device_model_sw_ver].tar.md5. Copy AP tar file and MagiskManager-v7.3.2.apk to your phone.
- Install Magisk Manager ( MagiskManager-v7.3.2.apk ) on your phone.
- In Magisk Manager: Install → Install → Select and Patch a File
- Select the AP tar file. Magisk Manager will patch the whole firmware file and store the output to [Internal Storage]/Download/magisk_patched.tar. Copy magisk_patched.tar the tar file to your PC
- Enter Download Mode : Turn Power Off. Press and hold Volume Up key + Power Key, When Samsung Logo appears release all keys. Select Wipe data / Factory reset, Select Reboot to bootloader. Connect your Samsung Galaxy to PC using USB Cable.
- Flash magisk_patched.tar as AP in ODIN, together with the BL, CP and HOME_CSC files. Never flash only an AP file, as Odin can shrink your /data file-system if you do.
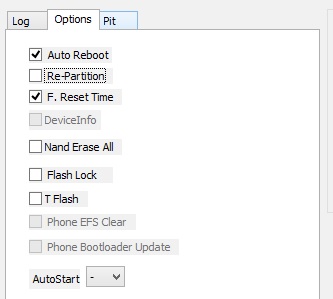
Important: Uncheck “Auto Reboot” in Options! - Magisk is now successfully flashed to your device! Several steps before you can properly use the device.
- Full data wipe is mandatory! Do not skip this step.
Press and hold Volume Down + Power Key, when the screen blank quickly press and hold Volume Up + Power key, when Samsung Logo appears release all keys, then you will see Android Logo screen with text “Erasing”, when screen blank Press and Hold Volume Up + Power key quickly. When Samsung Logo appears release all keys. Select Wipe data / Factory reset. Select Reboot system now. - After the device is booted up, do the usual initial setup. It need more time and patient. After finished, You will see Magisk Manager app in app drawer. If you can not see it, Install it manually.
- Connect the phone to Internet, open Magisk Manager. Magisk Manager will ask to do additional setups. Let it do its job and the app will automatically reboot your device.
- Done! You can use Root Checker to check it, Enjoy!
If something goes wrong and you want to unroot it, just flash the ROM to make it works again. Read How to flash Galaxy A6 SM-A600FN.
Notes / Warning!
- Use at your own risk, I’m not responsible for bricking your device.
- Using the incorrect file may brick your device.
- If your target device has a custom firmware flash counter, Rooting will trigger it. If you’re lucky, Triangle Away has support for your device and can be used to reset the counter.
- If you have a KNOX-enabled device, Rooting will trip the KNOX WARRANTY VOID status !
- If your device storage is encrypted, Rooting will wipe your data !
- If you have locked bootloaders, flashing one of these will probably brick your device – with the exception of Nexus devices, which will usually automatically “OEM unlock” and wipe your data !
- Make sure to backup your important data before root it.
Содержание этой статьи
- Зачем обновлять прошивку
- Android смартфон samsung sm-a600fn как прошить?
- Утилиты / драйвера
- Варианты обновления прошивки
- Прошивка samsung sm-a600fn видеоинструкция
- Hard Reset samsung sm-a600fn или жёсткий сброс настроек
- Как обмануть местоположение на Андроид

Как прошить samsung sm-a600fn официальной, то есть оригинальной (заводской / стоковой) прошивкой без смс и помощи сервисного центра? Да, можно, для этого мы и написали инструкцию. Ещё есть варианты использовать кастомную прошивку от энтузиастов? Эта статья подойдёт как для новичков так и для профессионалов в вопросе обновления прошивки на Android смартфонах и планшетах, как кастомными, так и стоковыми вариациями.
Прошивка для samsung sm-a600fn. Крайткий алгоритм следующий:
- Скачать программу для прошивки (скажем какую)
- Запустить программу
- Скачать прошивку (если ещё не сделали этого, возможно у вас своя)
- Подключить мобильное устройство к компьютеру
- Указать путь к прошивке в программе и начать процесс прошивки.
Зачем обновлять прошивку
- Новые функции и возможности, заложенные в прошивку;
- Самопроизвольная перезагрузка смартфона;
- Попытка восстановления после неудачной прошивки;
- Смартфон не хочет включаться;
Android смартфон samsung sm-a600fn как прошить?
Утилиты / драйвера
Софт есть здесь. Инструкция к нему в архивах прошивок либо на сайте разработичиков.
Варианты обновления прошивки
Инструкция находися в архиве с софтом для каждого из вариантов.
С помощью SamFirm
С помощью ZYKUFlasher (тут всё довольно просто даже без инструкции)

С помощью Odin
UPD выложу сюда крутую штуку. Менеджер прошивок Только для Samsung (Samsung hard downloader)

Список кастомных прошивок
- CyanogenMod теперь это LineageOS
- crDroid
- Paranoid Android
- OmniROM
- Illusion ROMS
- Pacman ROM
- Resurrection Remix (последнее обновление было на базе Android 10)
- MoKee
- FlymeOS
- Temasek’s
- Android Ice Cold Project (сокращённо AICP)
- Bliss
Прошивка samsung sm-a600fn видеоинструкция
Видео в данный момент ещё в процессе обработки и будет загружено в ближайшее время, а пока воспользуйтесь пожайлуйста текстовой инструкцией.
Hard Reset samsung sm-a600fn или жёсткий сброс настроек
Те кто решил сбросить настройки и восстановить телефон в состояние с завода: есть вариант нажать чуть ли не 5 кнопок сразу в определённом порядке, по мне проще использовать софт.
Root
Как обмануть местоположение на Андроид
Начнём с того кому и зачем нужна фейковая локация?
- Пранки и розыгрыши людей
- Обход запретов разных приложений
- Обход запретов по геолокации
- Обман приложений знакомств чтобы не покупать платные функции и подписки в дейтинг приложениях, например, Tinder Gold / Platinum / Plus или премиум на Badoo.
Такие приложения как Fake GPS Pro / Fake GPS location, к сожалению, не помогут вам обойти защиту дейтинг приложения вроде Badoo, Bumble и Tinder, приложение будет видеть ваше настоящее местоположение. Поэтому советуем установить полноценную подмену локации по инструкции. Подключайте мобильное устройство к компьютеру и запускайте установка скачанного патча.
Внимание! Работа патча проверена только на Android с 7 по 12 версии. На более ранних версиях работоспособность не гарантируется, потому что не тестировалось. На устройствах от Apple это работать не будет!
» » Root Samsung Galaxy A6 Plus 2018 SM-A605F/FN/G/GN Oreo using TWRP
Samsung Galaxy A6 Plus comes with Oreo version. Samsung released the latest One UI Update for your device. If you need root on your pie device, you can flash old Oreo firmware using ODIN and root using this below method. After Flash, you can Install Pie firmware using the flashify app. If You again flash Pie, using ODIN, You will lose root access. Below Oreo, version method is a stable Method. Once we get the Pie Stable version, we will update soon.
Why should you Root Samsung Galaxy A6 Plus 2018?
How to Root Samsung Galaxy A6 Plus 2018 SM-A605F/ SM-A605FN / SM-A605G / SM-A605GN
Samsung Galaxy A6 Plus 2018 International variants come with a flexible bootloader. This means that the smartphone can be easily rooted. Also, the device can accept to install TWRP recovery or any other custom recovery file/app alike.
With the help of TWRP Recovery, you can quickly flash the latest version of Magisk into your A6 Plus 2018 to gain root access. Before sharing the tutorial, you may want to know that, with the TWRP recovery present on your device, you can easily install any custom ROM or firmware. Does it seem complicated? Relax, everything will be explained succinctly in bullets.
Things to check out for;
Check your device model number.
Make sure your device battery is charged above 50%
Backup your current files and data, just in case (save them on external storage).
Enable USB Debugging Mode and OEM Unlock in your mobile. To do this; go to settings >>> about >>> Tap on the “Build Number” 7-10 times consistently to enable “Developer Options,” then go to the “Developer Options” and enable USB Debugging Mode and OEM Unlock. There is no complicated process in the Samsung Galaxy A6 Plus 2018.
Download and install the Samsung USB driver to your computer system.
Also, download the ODIN software. Select above Oreo version in the ODIN list. Install ODIN in your PC.
- Download Magisk.Zip (Download Latest version) and RMtate Bypass, Copy it to Your Phone Memory. We Need to flash RMM State to avoid OEM Lock automatically in future after the Root process.
Download and save the TWRP File. Select Correct TWRP file from Below. This TWRPs can support Up to Oreo.
Flash TWRP using ODIN
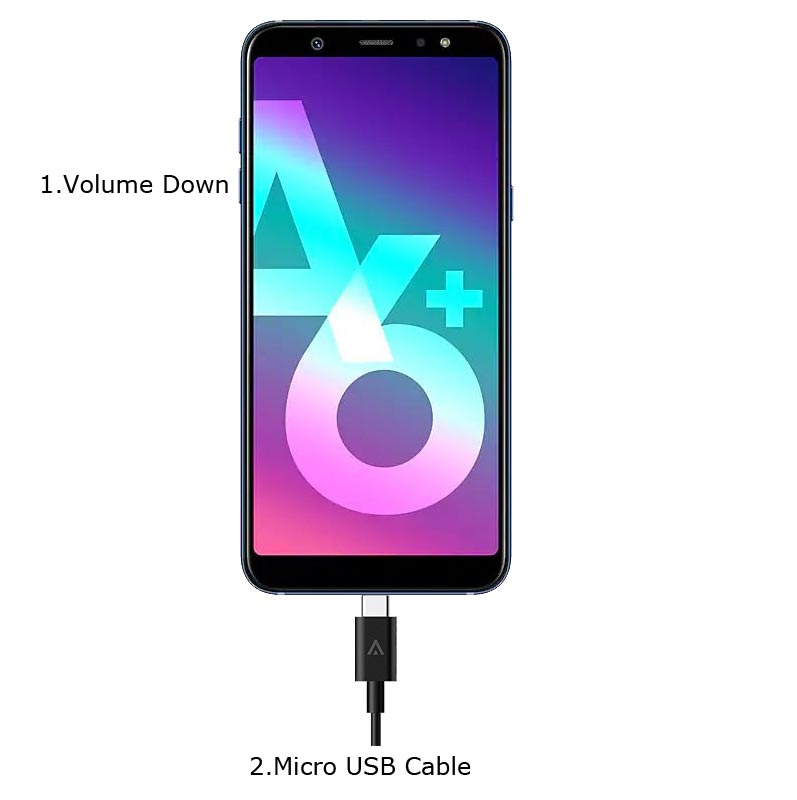
- Connect your USB Cable with PC. Switch off your device. Then, enter into Download mode. To do this; press and hold down the Volume Down buttons and connect your micro USB Cable.
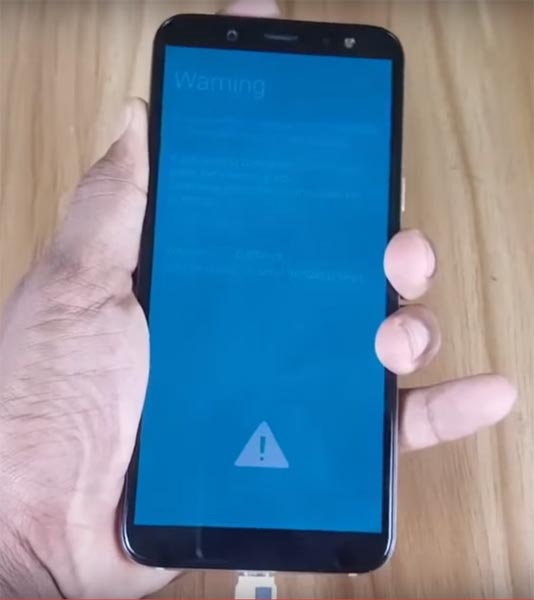
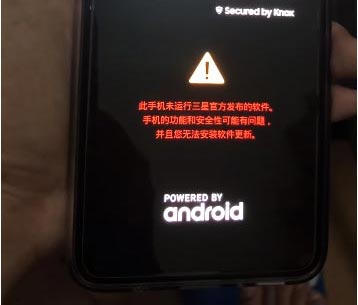
Press the Volume Up button to continue when you see the warning message.
Now, connect the A6 Plus 2018 mobile to the computer via USB cable.
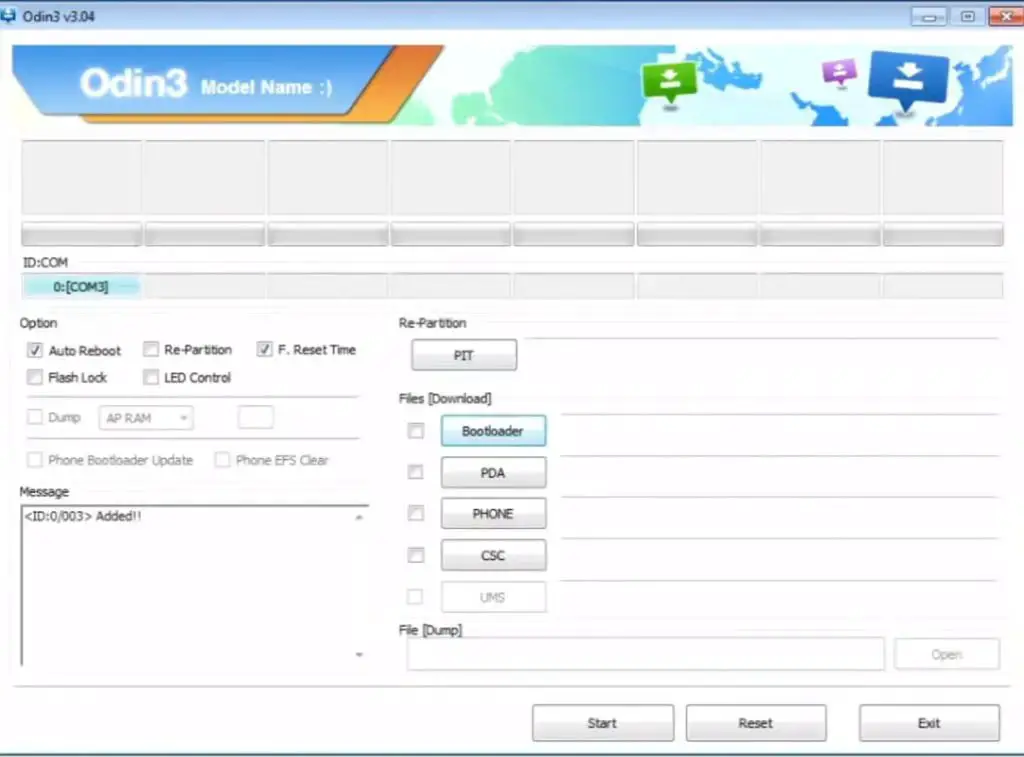
Launch the Odin app on your computer. If the device is detected by this app (Odin), it will show you a message that reads – added!!!
However, if the device is not correctly connected to the PC, you won’t see this message. So, you have to check the USB cable if it is good and reconnect the device.
After connecting the Samsung device, click on the PDA/PA button to browse/search and get the TWRP from where you saved it on your PC. Also, navigate to “options” and tick the Auto Reboot.
Click on “Start”
Once the file is loaded into the device, reboot your device.
Kudos, you have just Installed the TWRP/CF-Auto-Root on your Samsung Galaxy A6 Plus 2018. If you installed TWRP, Don’t turn on your mobile. Immediately, move to Magisk Installation steps.
Install Magisk, RMM State in your Samsung Galaxy A6 Plus 2018 using TWRP
- Boot it Into recovery mode->Volume Up + Power Button.
- Now it Will Boot into TWRP Recovery Mode.
- Select Wipe->Advance Wipe->Select Cache Data.
- Return to Home of TWRP select Install.
- Select Magisk.Zip. After Installation again Navigate to Home select Install. Select RMM State Bypass.
- After the Installation Reboot Your Mobile.
You should not Boot into Normal OS Booting, after TWRP. After TWRP Flash, Immediately Boot into Recovery or Else you will get Warning message FRP Lock. If you accidentally urged and boot frequently, Don’t panic, flash official stock firmware to get back into stock OS.

Selva Kumar is an Android Devices Enthusiast, Who Can Talk and Write About Anything If You Give a Hint About the respective devices. He is a Computer Science Graduate and Certified Android Developer, Making His Career towards this Technology. He is always eager to try new Android devices — not only Software level but Hardware-level Also. Beyond this, He is a Good Swimmer, Guitarist.
» » Root Samsung Galaxy A6 2018 SM-A600F/G/N Pie 9.0 using Magisk
Why should you Root Samsung Galaxy A6 2018?
How to Root Samsung Galaxy A6 2018 Pie 9.0 (SM-A600F/ SM-A600G/ SM-A600N)
First of all, thanks to topjohnwu – XDA developer for finding this way and this genius is a one who discovered and maintaining Magisk. Samsung Galaxy A6 2018 International variants come with a flexible bootloader. This means that the smartphone can be easily rooted. Also, the device can accept to install TWRP recovery or any other custom recovery file/app alike. Don’t try with Snapdragon US Variants like Verizon devices. They come with locked Bootloader.
With the help of TWRP Recovery, you can quickly flash the latest version of Magisk into your A6 2018 to gain root access. Before sharing the tutorial, you may want to know that, with the TWRP recovery present on your device, you can easily install any custom ROM or firmware. Does it seem complicated? Relax, everything will be explained succinctly in bullets.
Things to check out for;
Check your device model number.
- Install Latest Magisk Manager.
Make sure your device battery is charged above 50%
Backup your current files and data- Full Data Loss Process (save them on external storage).
- You cannot use Samsung Pay, Secured folder, and some official apps from Samsung.
- Read full tutorial before the process.
Enable USB Debugging Mode and OEM Unlock on your mobile. To do this; go to settings >>> about >>> Tap on the “Build Number” 7-10 times consistently to enable “Developer Options,” then go to the “Developer Options” and enable USB Debugging Mode and OEM Unlock. There is no complicated process in the Samsung Galaxy A6 2018.
- You can use Phone Info to know your firmware version.
- Extract all the files from the downloaded .zip file — copy “AP” to your mobile.
Navigate to your copied AP File and patch the file.
- Wait for the process to complete, In the end, you will get magisk patched .tar file. The .tar file will be in the same folder where you have the Stock firmware file.
- Copy magisk_patched.tar file to your PC.
Flash Patched Boot Image using ODIN
- Switch off your Mobile. Enter into Download mode->Volume Down+ Volume Up Buttons and Connect Your Mobile To PC via USB Cable, After Samsung Logo Appear, Release all keys.
- After entering into Download Mode, it will say Warning, Press Volume Up button to continue.
- Launch Odin Application.
- It Will Show the message added.
- If you did not get this message Repeat the above steps.
- After Getting Added Message Select, AP/PDA Button then Browse for the magisk patched file selects it. Un-Tick the Auto-Reboot. Same goes for all the extracted data. You should choose all the files other than AP. AP should be magisk patched file.
- Press Start wait for the tasks to complete. After the process complete, Press Volume Down+ Power button to exit Download mode. When the screen goes off, Immediately Press Volume Up + Power buttons to boot into Recovery mode.
- After entering into Stock recovery mode, Go to Wipe Data/Factory Reset and Select Yes to wipe data. It will erase your saved data in your device. Don’t Boot into OS, Read below Boot stages before booting.
Boot into Rooted OS
- Press and Hold Volume Up + Power buttons, release all the keys once the Bootloader warning appears. You have to set up your device like a new device. You can select the root status using Root Checker.
- Stock Recovery Boot – Press and Hold Volume Up + Power buttons, release keys while you hold the Volume Up key.
In my opinion, Samsung Galaxy A6 2018 doesn’t need rooting; If you thought, you could Improve Performance By root, With the Exynos 7870 and 4 GB RAM, your device can perform well. If you don’t know how much RAM you need, You will never use this much RAM. You should not Boot into Normal OS Booting, by pressing the power button, after firmware flash. It will boot you to Non-Rooted environment. If you accidentally urged and boot frequently, Don’t panic, after setup everything, switch off your device and boot into Rooted OS using above mentioned keys. If you root your device, because of the battery drain issues, you can optimize your battery without root.
Selva Kumar is an Android Devices Enthusiast, Who Can Talk and Write About Anything If You Give a Hint About the respective devices. He is a Computer Science Graduate and Certified Android Developer, Making His Career towards this Technology. He is always eager to try new Android devices — not only Software level but Hardware-level Also. Beyond this, He is a Good Swimmer, Guitarist.

Самые простые и быстрые способы получить root права для samsung sm-a600fn на операционной системе Android. Всё в одной статье от наших экспертов и разработчиков, вы можете присоединиться и сотрудничать, обладая должным опытом. Для получения положительного результата вам необходимо повторить 1 из вариантов представленной инструкции.
Что такое root права, какие преимущества и привелегии даёт рутовый доступ. Почитать про root доступ можно тут.
Рут права для телефона samsung sm-a600fn
Эксперт сервисного центра – Михеев Денис со своей инструкцией и свежим взглядом на проблемы получения рут прав
Для начала предподготовка к процессу:
- Произведите зарядку устройства на 40% и более — этого вполне достаточно даже с запасом
- Включить USB отладку. Она может быть включена, если вы ранее производили какие-то действия через компьютер, допустим запускали консоль ADB. В ином случае:
- В настройках-> о телефоне -> номер сборки, кликайте по номеру сборки пока устройство не скажет что вы разработчик (не больше 10 кликов).
- Вернитесь в главное меню с настройками и перейдите в пункт для разработчиков, там можно включить USB отладку.
- Подключите телефон к ПК.
- Если необходимо сделать разблокировку загрузчика (boot loader) перейдите сюда.
Лучший вариант получения Рут прав — программное обеспечение типа «One Click», которые в буквальном понимании делают это в 1 клик.
Вариант 1 — Rootkhp Pro версия 3.4

- Скачиваем Rootkhp Pro 3.4 на ПК, если нажать по ссылке в правом углу вы перейдёте на сайт автора программы, где есть официальная инструкция, она такая же как и у нас.

- Установка не требуется, просто запускаем и нажимаем на кнопку Root, программа выдаст два уведомления, первое означает что процесс пошёл, второе — что Root получен. При этом в теории возможны и сообщения об ошибках.

- Если у вас вылезло сообщение «Congratulations…» (Поздравления с успехом) можете перезагружать свой Андроид.

Другой вариант получения рут прав на samsung sm-a600fn

- Скачать ZYKURoot на компьютер, я использую версию 2.6, инструкцию можно посмотреть тут или прямо у них на сайте.

- Программа не требует установки можно просто запустить.
- Нажимаем Root, пройдёт какое-то время прежде чем вы увидите финальное оповещение.
- Ждём уведомления «Rooted» или же ошибки в случае если что-то пошло не так (не волнуйтесь, ваше телефон в любом случае останется жив).

Программы, не решившие проблему с root или не имеющие возможности это сделать
- Ioroot (Иорут) — что-то не очень известное, но попробовать надо было в научных целях
- Кинго
- Фрамарут — то ещё старьё, но а вдруг справился бы?
- Bin4ry (Бинфору)
Как проверить наличие root
Ещё многие пытаются рутировать с помощью программы Magisk (разблокировать бутлоадер (загрузчик) он не умеет) а также ему необходима прошивка, которую он будет устанавливать на ваш смартфон. Если подытожить Маджиск требует слишком много движений и навыков, что не всегда удобно обычному пользователю, который не является специалистом в IT, а занимается другой работой, но root ему тоже хочется.
Перепрошивка и обновление samsung sm-a600fn

Андроид разработчик и крутой энтузиаст – Кузнецов Гордей
Обновление через перепрошивку будем делать с помощью утилиты ZYKUFlasher версии 1.1 – данное ПО является универсальным для прошивки смартфонов на Android в пару кликов. То есть указываем путь к прошивке и ещё пара настроек, нажимаем Start. Всё что нужно для быстрой прошивки, более подробная инструкция конечно же будет ниже. Можно установить как официальные сток прошивки, так и альтернативные кастомные сборки (ROM, TWRP Recovery), кому что по душе.
Как работает прошивалка ZYKUFlasher:
- Скачиваем ZYKUFlasher (инструкция с сайта программы, в общем то такая же как и тут)
- В строчке «Download Agent» выбираем путь к файлу .bin (в 99% случаев находится в папке с прошивкой)
- В строчке «Scatter-loading» прописываем путь к файлу, с маской *_emmc.txt, например, samsung sm-a600fn_emmc.txt
- Кликаем по кнопке «Start Flash» — т.е начать прошивку
Можно порекомендовать вот этот портал тут обычно свежак.
Зачем прошивать смартфон
Так или иначе причины у всех свои, кто-то обновиться хочет, а кто-то чтобы телефон работал нормально.
- Неожиданные перезагрузки, сбои системы, подвисания главного меню, смс, звонков и других важных, но не ресурсоёмких приложений
- Хочется научиться обновлять прошивку
- Телефон зависает на этапе загрузки, светится логотип Андроид, дальше ничего не происходит
- Циклическая то есть бесконечная перезагрузка телефона, называемая boot loop.
Why should you Root Samsung Galaxy A6 2018?
How to Root Samsung Galaxy A6 2018 Android 10 One UI 2.0 (SM-A600F, SM-A600FN, SM-A600G, SM-A600GN, SM-A600N)
First of all, thanks to the developer for the Root method. topjohnwu – this genius is a one who discovered and maintaining Magisk. Samsung Galaxy A6 2018 International variants come with a flexible bootloader. This means that the smartphone can be easily rooted. Also, the device can accept to install TWRP recovery or any other custom recovery file/app alike. Don’t try with Snapdragon US Variants like Verizon devices. They come with a locked Bootloader.
You can flash TWRP once it is available. With the help of TWRP Recovery, you can quickly flash the Custom ROMs into your Samsung Galaxy A6 2018. Before sharing the tutorial, you may want to know that, with the Magisk present on your device, you can easily install any root apps. Does it seem complicated? Relax, everything will be explained succinctly in bullets.
Things to check out for;
Check your device model number.
- Install Latest Magisk Manager.
Make sure your device battery is charged above 50%
Backup your current files and data- Full Data Loss Process (save them on external storage).
- You cannot use Samsung Pay, Secured folder, and some official apps from Samsung.
- Read the full tutorial before the process.
1. Pre-Requirement Steps
1.1 Unlock Bootloader
Enable USB Debugging Mode and OEM Unlock on your mobile. To do this; go to settings >>> about >>> Tap on the “Build Number” 7-10 times consistently to enable “Developer Options,” then go to the “Developer Options” and enable USB Debugging Mode and OEM Unlock. There is no complicated process in the Samsung Galaxy A6 2018.
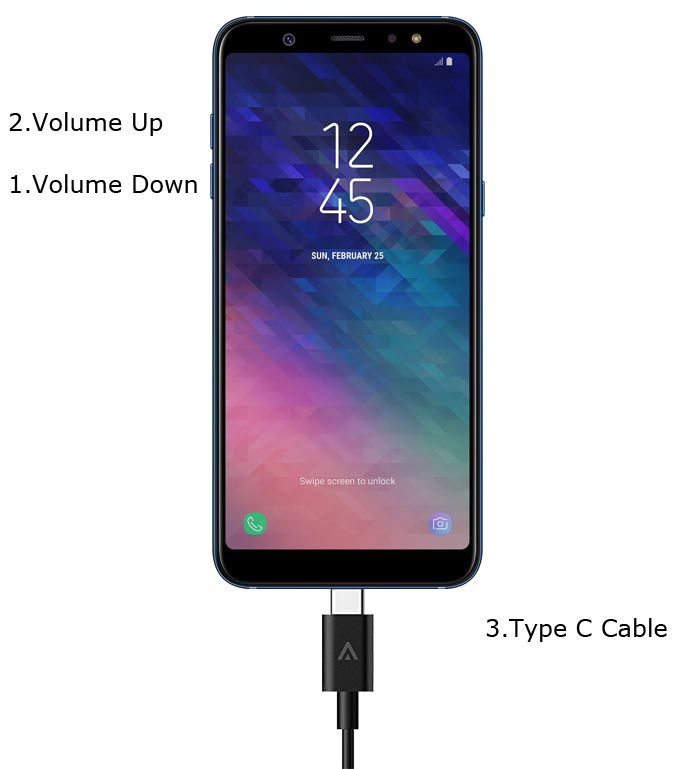
- Switch off your device. Enter into Download Mode-> Volume Down+ Volume Up+ Power and Connect your mobile with PC using USB Cable. When Download mode warning screen Appears, Press Volume Up button to unlock Bootloader.
1.2 Preparing Patched AP file
Enable USB Debugging Mode and OEM Unlock on your mobile. To do this; go to settings >>> about >>> Tap on the “Build Number” 7-10 times consistently to enable “Developer Options,” then go to the “Developer Options” and enable USB Debugging Mode and OEM Unlock. There is no complicated process in the Samsung Galaxy A6 2018.
- Extract all the files from the downloaded .zip file — copy “AP” to your mobile.
Navigate to your copied AP File and patch the file.
- Wait for the process to complete, In the end, you will get magisk patched .tar file. The .tar file will be in the same folder where you have the Stock firmware file.
- Copy magisk_patched.tar file to your PC.
2. Flash Patched AP file using ODIN
- Switch off your Mobile. Enter into Download mode->Volume Down+ Volume Up Buttons and Connect Your Mobile To PC via USB Cable, After Samsung Logo Appear, Release all keys.
- After entering into Download Mode, it will say Warning, Press Volume Up button to continue.
- Launch Odin Application.
- It Will Show the message added.
- If you did not get this message, Repeat the above steps.
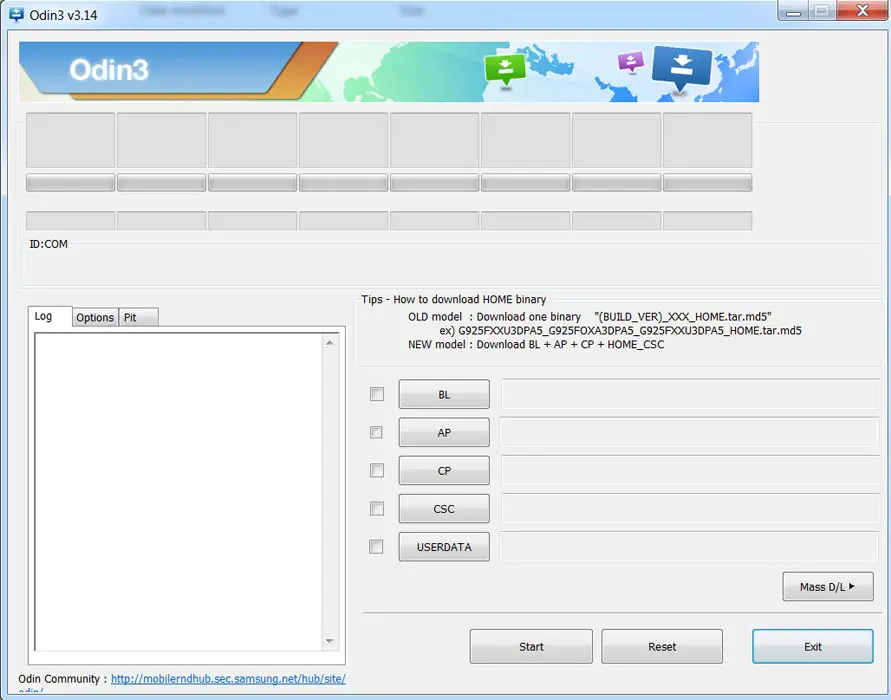
- After Getting Added Message Select, AP/PDA Button, then Browse for the magisk patched file selects it. Un-Tick the Auto-Reboot. The same goes for all the extracted data from the firmware, and You should choose all the files other than regular AP. The AP file should be a magisk patched firmware file.
- Press Start wait for the tasks to complete. After the process complete, Press Volume Down+ Power button to exit Download mode. When the screen goes off, Immediately Press Volume Up + Power buttons to boot into Recovery mode.
- After entering into Stock recovery mode, Go to Wipe Data/Factory Reset and Select Yes to wipe data. It will erase your saved data in your device. Don’t Boot into OS, Read below Boot stages before booting.
3. Boot into Rooted OS
- Stock Recovery Boot – Press and Hold Volume Up + Power buttons, release keys while you hold the Volume Up key.
In my opinion, you don’t need rooting for your SM-A600F, SM-A600FN, SM-A600G, SM-A600GN, SM-A600N. If you thought you could Improve Performance By root; With the Exynos 7870 Octa-Core processor and 3/4 GB RAM, your device can perform well. If you don’t know how much RAM you need, You will never use this much RAM. You should not Boot into Normal OS Booting, by pressing the power button, after firmware flash. It will boot you to a Non-Rooted environment. If you accidentally urged and boot frequently, Don’t panic, after setup everything, switch off your device and boot into Rooted OS using above mentioned keys. If you root your device, because of the battery drain issues, you can optimize your battery without root. Beyond this, if your purpose is to Disable Bloatware apps, you can do that without using this method. When you have any suggestions or doubts, comment below.
Selva Kumar is an Android Devices Enthusiast, Who Can Talk and Write About Anything If You Give a Hint About the respective devices. He is a Computer Science Graduate and Certified Android Developer, Making His Career towards this Technology. He is always eager to try new Android devices — not only Software level but Hardware-level Also. Beyond this, He is a Good Swimmer, Guitarist.
Корень Samsung Galaxy A6 / A6 + (2018)
- На экране «Немодифицированный системный раздел» проведите пальцем по экрану, чтобы разрешить изменения.
- Теперь перейдите в « » -> « в поле, чтобы подтвердить очистку раздела / data, и нажмите Enter. Это полностью сотрет все данные на устройстве.

- Вернитесь на главный экран TWRP, затем нажмите « », а затем «
- Затем перейдите в «Смонтировать» и нажмите кнопку «Включить MTP».
- Подключите Galaxy A6 к ПК с помощью USB-кабеля.
- Перенесите ZIP-файлы RMM Bypass, DM Verity fix и последнюю версию установщика Magisk во внутреннее хранилище.
- В главном меню TWRP нажмите кнопку «Установить» и сначала выберите « » и проведите пальцем, чтобы подтвердить установку.
- Нажмите кнопку «Назад» один раз и
- файл Magisk-v20.0.zip для получения root-прав на Samsung Galaxy A6 / A6 + (2018).
- Когда процесс прошивки завершится, нажмите кнопку «Перезагрузить систему».
После загрузки Galaxy A6 настройте его, следуя инструкциям на экране. Теперь вы должны увидеть Magisk Manager среди других приложений. Если вы хотите проверить, было ли ваше устройство успешно рутировано, загрузите и запустите приложение Root Checker из Play Store.
Теперь, когда ваш телефон рутирован, вы можете начать использовать приложения с поддержкой root, установить модули Magisk, чтобы добавить дополнительные функции, или использовать MagiskHide, чтобы скрыть root от определенных приложений.
Получение root-прав через Magisk также упрощает установку OTA-обновлений на ваш рутированный телефон.
")


")