

May 1st, 2001 | linuxjournal.com
Especially useful for multiboot, partitioned systems, GRUB offers flexibility and convenience for
startup.
GRUB: it’s neither larva, fast food nor the loveliest of acronyms in the GNU herd of free software.
Rather, GRUB is the GNU GRand Unified Bootloader. And, it is truly the greatest loader for booting
Linux and practically any other OS-open source or otherwise-you may have scattered on your platters.
GRUB is in its element with the multiboot, multidisk systems typical of Linux and open-source adventurers
who may simultaneously test or track several Linux distributions, the BSDs, GNU/Hurd, BeOS and perhaps
that vestigial partition for Mr. Bill. Even if you stick with LILO as your system’s primary boot loader,
it’s smart to keep a GRUB boot floppy handy as the best and fastest way to get your system back if
you otherwise cream your master boot record (MBR). If you have done any number of multiboot installations,
you know exactly what I’m talking about. Should you need any more reasons for considering GRUB, check
out the sidebar, «Why GRUB». Let’s get started!
Installation
Installation of GRUB is a two-step process. The first step is to install or build GRUB in a host
OS environment, and for this we will, of course, use Linux. The second step is to install and configure
GRUB as the boot loader for your system.
The first step is the usual: download the source archive, untar it, configure and make install.
Assuming you have found a source mirror (see
www.gnu.org/software/grub/grub.html)
and downloaded the source distribution into a suitable working directory, continue with:
tar -xzvf grub-0.5.96.1.tar.gz
cd grub-0.5.96.1
./configure
make
make install
For the second step of installation, we will first build and work with a GRUB boot floppy. This
way we can use GRUB to learn about its features while testing various configurations for our particular
system. After getting comfortable with the GRUB setup on floppy, we will then install it onto the
MBR of the system’s first hard disk. Even if you decide not to install GRUB on your hard disk right
away, no harm done: you will now have your own GRUB boot floppy available to rescue systems with trashed
boot loaders.
Preparing a GRUB floppy
GRUB recognizes a number of different filesytem types, including
Linux ext2fs, Reiser, MINIX, BSD’s ffs, as well as FAT, so it is possible to make a GRUB boot floppy
with any of these filesystems. We will stick to FAT for this example, however, because it is the lowest
common denominator, and most OSes have tools for mounting and reading/writing files on FAT floppies.
That way, we will always be able to get to its menu configuration file if we need to.
Scrounge around in your junk drawer for some unused floppy (a new one would be even better), and
give it a fresh format and FAT filesystem:
fdformat /dev/fd0
mkfs -t msdos /dev/fd0
We are going to put some files on this disk, so go ahead and mount to your usual floppy mount point
(here I use /floppy):
mount -t msdos /dev/fd0 /floppy
grub> root (fd0)
grub> setup (fd0)
grub> quit
And that’s it! This sequence of commands completes the installation of GRUB on the floppy disk.
It is now bootable and will allow us to boot any other OS on our system.
Demonstrating GRUB
To see how GRUB may be used to boot a multitude of different operating systems, consider this example
setup:
First Hard Disk (SCSI, Linux /dev/sda): 1st primary partition: Win982nd primary partition: Linux-Slackware3rd
primary partition: Linux-Debian4th primary partition: Linux SwapSecond Hard Disk (SCSI, Linux /dev/sdb)1st
primary partition: FreeBSD2nd primary partition: OpenBSD3rd primary partition: BeOS
Note that although GRUB and Linux are capable of dealing with installations in extended partitions,
here we show a preference for using primary partitions whenever possible. Filesystems in primary partitions
are often mountable by other operating systems, whereas cross-OS mounting filesystems in extended
partitions is often not supported.
This system has two hard disks with six different operating systems using seven partitions. As
you probably know, each OS has its own nomenclature for naming devices and partitions. For example,
the Slackware installation would be known to Linux as /dev/sda2 (with swap on /dev/sda4), while FreeBSD
would recognize its filesystem on /dev/da1s1a. Alternatively, if the system were configured with IDE
hard disks, Slackware would be on /dev/hda2, and FreeBSD would refer to its root directory on /dev/ad1s1a.
You get large helpings of this alphabet soup whenever maintaining any multiboot setup.
Since GRUB also needs to be capable of loading any of these systems, it has its own OS-neutral
naming conventions for referring to devices. Hard disks are all hd, floppy disks are fd, device numbering
starts from zero, partition numbering starts from zero and complete device names are enclosed in parentheses.
With these naming rules, the floppy disk is (fd0), the Win98 partition is (hd0,0), and GRUB recognizes
the Slackware and Debian partitions respectively as (hd0,1) for slackware and (hd0,2) for debian.
The BSDs further subdivide their own partitions (or «slices» in BSD terms), and GRUB would refer
to the root mount for the FreeBSD system on (hd1,0,a).
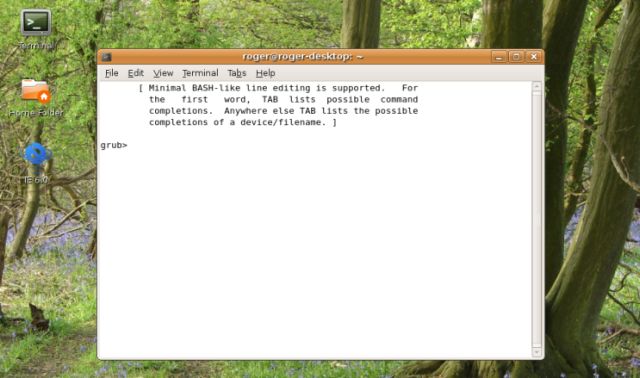
Okay, ready to give GRUB a taste? Slide the GRUB floppy in the drive and reboot your system (with
your system’s BIOS configured to boot from A: drive). You should see GRUB’s terse boot messages and
then find yourself in the GRUB command-line environment as shown in Figure 1.
grub> root (hd0,1)
grub> kernel /vmlinuz root=/dev/sda2 ro vga=791
grub> boot
Badda-bing, badda-boom, that postage-stamp-sized Tux appears in the upper-left corner of your screen
(yes, Slackware is configured to use the framebuffer device), and Linux bootstraps its jolly way into
glorious being.
grub> rootnoverify (hd0,0)
grub> makeactive
grub> chainloader +1
grub> boot
Now your screen turns into a vague blue cloud, and you think you have made some horrible mistake.
Then you realize it’s only Windows and you remind yourself to expunge this partition one day soon.
grub> root (hd0,1)
Filesystem type is ext2fs, partition type 0x83
grub> kernel (hd0,1)/vmlinuz
grub> kernel /vmlinuz.old root=/dev/sda2 ro vga=ask
[Linux-bzImage, setup=0xe00, size=0xfad30]
ro
Finally, the last command is grub> boot. The kernel image specified is now loaded and sent
rolling down the royal road to bootdom.
The second example, using Win98, demonstrates the use of GRUB’s chain-loading mechanism. This method
of booting loads the target OS’s own boot-chain-loader rather than a kernel image of the OS. In this
instance, we specified:
grub> rootnoverify (hd0,0)
grub> chainloader +1
First, the rootnoverify command is for OS filesystems not specifically recognized by GRUB,
so that GRUB will not try to mount the partition. Next, the chainloader command will use the first
sector of the partition of device (hd0,0) and attempt to boot whatever it finds there. This is a common
means of booting OSes that install their own boot loaders in the first sector of the partition where
they are installed (this is sometimes called the partition boot sector or PBR).
Finally, the makeactive command sets the active flag in the partition table for the device
specified by the root command, as some operating systems, like Win98, require.
The GRUB command line is easy and fun, and you should boot the different OSes on your system a
few times to get the hang of it. While you are testing, be sure to keep any notes specific to getting
your particular kernels successfully loaded. This information will be useful later when you configure
the menu system of GRUB to perform these command-line steps automatically.
But before we leave the command line, here are a few more GRUB commands to look at.
The help command will display a list of the 40 or so commands available in GRUB. Typing
the name a particular command after help will produce on-line help for that particular command. So
grub> help kernel will tell you all about using the kernel command.
The cat command can be used to view the contents of a file. For example, grub> cat (hd0,2)/etc/fstab
will show the contents of the /etc/fstab file in the Debian installation. This is a very handy way
of pulling out system configuration information if your normal boot loader gets whacked. Note also
as you are using the GRUB command line that, like bash, up and down arrows will scroll through command
history, and a tab will complete the name of a GRUB command or filename.
Finally, you can call up a specific menu interface with the configfile command as in:
grub> configfile (fd0)/boot/grub/menu.lst
This will switch GRUB into its menu mode with an interface defined by the file, menu.lst. We haven’t
created that file yet, but-look out, segue coming!-that’s exactly what we will do next.
Menu Configuration
Using the GRUB command line is cool, but after a few thousand system starts, you will probably
get a little tired of entering the same commands at the GRUB prompt and long for something a little
more automated. Good news from the GRUB gang: you get a fully configurable menu interface at no extra
charge! The GRUB boot menu gives you point-and-shoot boot selection, unattended default boot after
a configurable timeout, any number of fallback boots if previous boots fail, toggle between command-line
and menu modes, and interactive editing of menu selections and password protection. These features
give GRUB an ease of use to match its tremendous functionality.
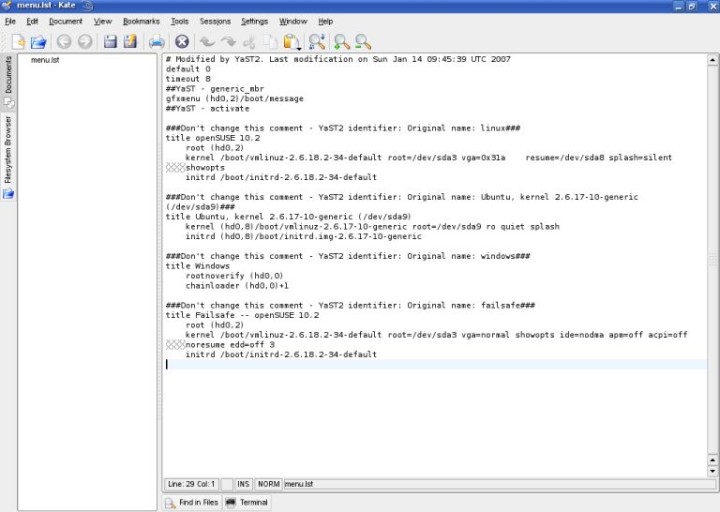
Figure 2. GRUB’s Boot Menu Interface
The fallback command specifies which of the boot stanzas to load if the default should fail.
It is possible to set more than one fallback, as is shown in the example.
The color command lets you breathe a bit of life into the text-mode menu screen. The syntax
for the color command is
color foreground/background [ hilite-fg/hilite-bg ]
where each of the foreground/background colors is specified with a name from the set of black,
blue, green, cyan, red, magenta, brown and light-gray; dark-gray, light-blue, light-green, light-cyan,
light-cyan, light-red, light-magenta, yellow and white. Among these colors, only the first eight are
used for the background. The optional highlight color pair, if specified, will be used to show the
current menu selection. When not specified, GRUB will use the inverse of the normal colors.
The rest of the configuration file consists of the boot stanzas for our demonstration system. The
title command marks the beginning of a new boot stanza, and its argument is the label that will be
displayed for its entry in the menu, from the first non-white-space character to the end of the line.
The remaining commands in each stanza are identical to those used when working from the GRUB command
line. The exception here is that we no longer need to give a boot command; GRUB does this job without
asking.
This example configuration gives only a sample of the many flexible uses of the GRUB boot loader.
Besides multiple OSes, you can use GRUB to set up menu selections for test kernels, rescue kernels,
different kernel options and so on.
All in all, the GRUB configuration file will be very similar to your /etc/lilo.conf. And after
working with the GRUB command line and these examples, it should be a simple matter of firing up your
favorite text editor and creating a menu configuration file suitable for your own system and preferences.
Don’t worry if it’s not perfect the first time; you will see that you can make changes interactively,
and the GRUB command line is always available as a fallback.
Once you’ve got your configuration file, mount your GRUB floppy again, and copy the file (say it
has been saved as mygrub.conf) into the magic location:
cp mygrub.conf /floppy/boot/grub/menu.lst
Now when you boot with your GRUB floppy-presto!-you will be greeted with a lovely boot menu like
the one in Figure 2. If you like, just stare at it for the few seconds it needs to count down from
the timeout setting, and then it will automatically boot into your default OS. Or, use the arrow keys
to highlight the OS you want to load and press return. Or, type c to go to the now-familiar
GRUB command prompt. From the command prompt, press ESC to go back to the boot menu again.
It is also possible to edit the entries displayed in the menu. Typing e will open a simple
vi-like editor interface for the highlighted entry. This allows you to adjust or add any settings
to the configuration before booting. Any changes made here will then remain in effect for the duration
of the GRUB session. To make permanent changes, you will later need to edit the configuration file
on the boot disk, saving the changes with your text editor.
Play with your GRUB floppy configuration until you have it set up the way you like. After just
a few system boots, you’ll be slinging through GRUB like hashbrowns in a diner.
Hard Disk Installation
By this time you may be thinking, «Okay, GRUB has got it goin’ on. But do I have to keep booting
from this lame floppy all the time?» Of course not. Booting from floppy is for weenies.
The operation for installing GRUB on the master boot record of your hard disk is similar to the
creation of a GRUB floppy. The one difference is that our floppy has all the resources GRUB needs
in one place. That is, the boot image, support and configuration files are all on the floppy device
MBR and /boot/grub/ directory. In a hard disk setup, you can choose where you want these resources
to be.
For example, you could set up a /boot/grub directory on the first partition of your first hard
disk and copy all GRUB’s files into it as we did in our floppy setup. In our demonstration system,
this would be the Win98 partition, and you may choose to do it that way if you want. But you can also
set up the /boot/grub directory up in any device/partition on your machine with a filesystem supported
by GRUB. In practice it is usually best to install this support directory in your most frequently
used and/or most stable partition; that is, one that you aren’t reinstalling all the time.
grub> root (hd0,1)
grub> setup (hd0)
grub> quit
You’re done. Your system is now fully GRUB’d, installed in the MBR of your hard disk. Type reboot
as root (or take the floppy out and jab the keyboard with the old three-prong) and watch just how
fast GRUB comes up now!
A few words of explanation about these installation commands. The first, root (hd0,1), tells GRUB
to mount this device, in this case the partition with the Slackware installation. All files will now
be relative to this device, so the GRUB installer will know to look for its support files in the /boot/grub
directory we created in the Slackware partition.
The second command, setup (hd0), is a simplified front end to GRUB’s install command. Note in particular
that we specify the device as (hd0) and not (hd0,0). Device (hd0) results in GRUB’s installation to
the master boot record, which is what we want. If we had instead used (hd0,0), GRUB would be installed
to the boot sector of the first partition, rather than the MBR. The difference is crucial; your technical
writer makes mistakes like this so you don’t have to. While each partition can have a boot sector,
your hard disk will have only one master boot record the BIOS loads every time you start your machine.
Unless you are doing some kind of funky boot-chaining, like using LILO to boot GRUB, you will usually
want to install GRUB in the master boot record.
To check this setup, just edit the menu configuration file in Slackware’s /boot/grub/menu.lst at
any time. Any changes will be reflected in the next boot.
Error Recovery
If you should foul up the hard disk installation somehow or want to uninstall GRUB from your system,
here’s what you need to know.
First, if you ever want to clean your MBR from whatever is installed there, the canonical method
is to use the fdisk program from an MS-DOS boot floppy:
A:> FDISK /MBR
Of course, this isn’t necessary if you just want to go back to LILO as your system’s boot manager.
In that case, simply make sure your /etc/lilo.conf file has a line that reads boot=/dev/hda.
Then, when the rest of the lilo.conf file is the way you want, just rerun LILO. This will put LILO
back on the MBR of your system.
If you install GRUB in the boot sector of a partition, instead of the MBR (such as specifying setup
(hd0,0) instead of setup (hd0)), you may need to reinstall that OS’s boot loader. In the case of DOS/Windows,
this means running the sys command from your DOS/Windows boot floppy: A:> SYS C:.
If, this is a Linux partition, it is again effective to rerun LILO, where /etc/lilo.conf has a
line in the boot stanza that reads root=/dev/hda1.
In general, most OSes will have a way to reinstall their partition’s boot sector without doing
a full reinstallation from scratch. (For FreeBSD, see boot0cfg(8); for OpenBSD, see installboot(8).)
Conclusions
As is typical of GNU software, GRUB is rich with capabilities beyond what are
described here. Some of these include:
- Remapping disks and partition hiding, so you can even run multiple versions of DOS/Windows, on
other than the first hard disk. - Network booting with BOOTP and DHCP protocols, to support multiboot schemes across a network
and diskless operation. - Keyboard remapping, disk geometry access, memory reading, I/O port and processor probes, password
protection, decompression support, etc.
Wayne Marshall
[email protected]
May 1st, 2001 | linuxjournal.com
Especially useful for multiboot, partitioned systems, GRUB offers flexibility and convenience for
startup.
GRUB: it’s neither larva, fast food nor the loveliest of acronyms in the GNU herd of free software.
Rather, GRUB is the GNU GRand Unified Bootloader. And, it is truly the greatest loader for booting
Linux and practically any other OS-open source or otherwise-you may have scattered on your platters.
GRUB is in its element with the multiboot, multidisk systems typical of Linux and open-source adventurers
who may simultaneously test or track several Linux distributions, the BSDs, GNU/Hurd, BeOS and perhaps
that vestigial partition for Mr. Bill. Even if you stick with LILO as your system’s primary boot loader,
it’s smart to keep a GRUB boot floppy handy as the best and fastest way to get your system back if
you otherwise cream your master boot record (MBR). If you have done any number of multiboot installations,
you know exactly what I’m talking about. Should you need any more reasons for considering GRUB, check
out the sidebar, «Why GRUB». Let’s get started!
Installation
Installation of GRUB is a two-step process. The first step is to install or build GRUB in a host
OS environment, and for this we will, of course, use Linux. The second step is to install and configure
GRUB as the boot loader for your system.
The first step is the usual: download the source archive, untar it, configure and make install.
Assuming you have found a source mirror (see
www.gnu.org/software/grub/grub.html)
and downloaded the source distribution into a suitable working directory, continue with:
tar -xzvf grub-0.5.96.1.tar.gz
cd grub-0.5.96.1
./configure
make
make install
For the second step of installation, we will first build and work with a GRUB boot floppy. This
way we can use GRUB to learn about its features while testing various configurations for our particular
system. After getting comfortable with the GRUB setup on floppy, we will then install it onto the
MBR of the system’s first hard disk. Even if you decide not to install GRUB on your hard disk right
away, no harm done: you will now have your own GRUB boot floppy available to rescue systems with trashed
boot loaders.
Preparing a GRUB floppy
GRUB recognizes a number of different filesytem types, including
Linux ext2fs, Reiser, MINIX, BSD’s ffs, as well as FAT, so it is possible to make a GRUB boot floppy
with any of these filesystems. We will stick to FAT for this example, however, because it is the lowest
common denominator, and most OSes have tools for mounting and reading/writing files on FAT floppies.
That way, we will always be able to get to its menu configuration file if we need to.
Scrounge around in your junk drawer for some unused floppy (a new one would be even better), and
give it a fresh format and FAT filesystem:
fdformat /dev/fd0
mkfs -t msdos /dev/fd0
We are going to put some files on this disk, so go ahead and mount to your usual floppy mount point
(here I use /floppy):
mount -t msdos /dev/fd0 /floppy
grub> root (fd0)
grub> setup (fd0)
grub> quit
And that’s it! This sequence of commands completes the installation of GRUB on the floppy disk.
It is now bootable and will allow us to boot any other OS on our system.
Demonstrating GRUB
To see how GRUB may be used to boot a multitude of different operating systems, consider this example
setup:
First Hard Disk (SCSI, Linux /dev/sda): 1st primary partition: Win982nd primary partition: Linux-Slackware3rd
primary partition: Linux-Debian4th primary partition: Linux SwapSecond Hard Disk (SCSI, Linux /dev/sdb)1st
primary partition: FreeBSD2nd primary partition: OpenBSD3rd primary partition: BeOS
Note that although GRUB and Linux are capable of dealing with installations in extended partitions,
here we show a preference for using primary partitions whenever possible. Filesystems in primary partitions
are often mountable by other operating systems, whereas cross-OS mounting filesystems in extended
partitions is often not supported.
This system has two hard disks with six different operating systems using seven partitions. As
you probably know, each OS has its own nomenclature for naming devices and partitions. For example,
the Slackware installation would be known to Linux as /dev/sda2 (with swap on /dev/sda4), while FreeBSD
would recognize its filesystem on /dev/da1s1a. Alternatively, if the system were configured with IDE
hard disks, Slackware would be on /dev/hda2, and FreeBSD would refer to its root directory on /dev/ad1s1a.
You get large helpings of this alphabet soup whenever maintaining any multiboot setup.
Since GRUB also needs to be capable of loading any of these systems, it has its own OS-neutral
naming conventions for referring to devices. Hard disks are all hd, floppy disks are fd, device numbering
starts from zero, partition numbering starts from zero and complete device names are enclosed in parentheses.
With these naming rules, the floppy disk is (fd0), the Win98 partition is (hd0,0), and GRUB recognizes
the Slackware and Debian partitions respectively as (hd0,1) for slackware and (hd0,2) for debian.
The BSDs further subdivide their own partitions (or «slices» in BSD terms), and GRUB would refer
to the root mount for the FreeBSD system on (hd1,0,a).
Okay, ready to give GRUB a taste? Slide the GRUB floppy in the drive and reboot your system (with
your system’s BIOS configured to boot from A: drive). You should see GRUB’s terse boot messages and
then find yourself in the GRUB command-line environment as shown in Figure 1.
grub> root (hd0,1)
grub> kernel /vmlinuz root=/dev/sda2 ro vga=791
grub> boot
Badda-bing, badda-boom, that postage-stamp-sized Tux appears in the upper-left corner of your screen
(yes, Slackware is configured to use the framebuffer device), and Linux bootstraps its jolly way into
glorious being.
grub> rootnoverify (hd0,0)
grub> makeactive
grub> chainloader +1
grub> boot
Now your screen turns into a vague blue cloud, and you think you have made some horrible mistake.
Then you realize it’s only Windows and you remind yourself to expunge this partition one day soon.
grub> root (hd0,1)
Filesystem type is ext2fs, partition type 0x83
grub> kernel (hd0,1)/vmlinuz
grub> kernel /vmlinuz.old root=/dev/sda2 ro vga=ask
[Linux-bzImage, setup=0xe00, size=0xfad30]
ro
Finally, the last command is grub> boot. The kernel image specified is now loaded and sent
rolling down the royal road to bootdom.
The second example, using Win98, demonstrates the use of GRUB’s chain-loading mechanism. This method
of booting loads the target OS’s own boot-chain-loader rather than a kernel image of the OS. In this
instance, we specified:
grub> rootnoverify (hd0,0)
grub> chainloader +1
First, the rootnoverify command is for OS filesystems not specifically recognized by GRUB,
so that GRUB will not try to mount the partition. Next, the chainloader command will use the first
sector of the partition of device (hd0,0) and attempt to boot whatever it finds there. This is a common
means of booting OSes that install their own boot loaders in the first sector of the partition where
they are installed (this is sometimes called the partition boot sector or PBR).
Finally, the makeactive command sets the active flag in the partition table for the device
specified by the root command, as some operating systems, like Win98, require.
The GRUB command line is easy and fun, and you should boot the different OSes on your system a
few times to get the hang of it. While you are testing, be sure to keep any notes specific to getting
your particular kernels successfully loaded. This information will be useful later when you configure
the menu system of GRUB to perform these command-line steps automatically.
But before we leave the command line, here are a few more GRUB commands to look at.
The help command will display a list of the 40 or so commands available in GRUB. Typing
the name a particular command after help will produce on-line help for that particular command. So
grub> help kernel will tell you all about using the kernel command.
The cat command can be used to view the contents of a file. For example, grub> cat (hd0,2)/etc/fstab
will show the contents of the /etc/fstab file in the Debian installation. This is a very handy way
of pulling out system configuration information if your normal boot loader gets whacked. Note also
as you are using the GRUB command line that, like bash, up and down arrows will scroll through command
history, and a tab will complete the name of a GRUB command or filename.
Finally, you can call up a specific menu interface with the configfile command as in:
grub> configfile (fd0)/boot/grub/menu.lst
This will switch GRUB into its menu mode with an interface defined by the file, menu.lst. We haven’t
created that file yet, but-look out, segue coming!-that’s exactly what we will do next.
Menu Configuration
Using the GRUB command line is cool, but after a few thousand system starts, you will probably
get a little tired of entering the same commands at the GRUB prompt and long for something a little
more automated. Good news from the GRUB gang: you get a fully configurable menu interface at no extra
charge! The GRUB boot menu gives you point-and-shoot boot selection, unattended default boot after
a configurable timeout, any number of fallback boots if previous boots fail, toggle between command-line
and menu modes, and interactive editing of menu selections and password protection. These features
give GRUB an ease of use to match its tremendous functionality.
Figure 2. GRUB’s Boot Menu Interface
The fallback command specifies which of the boot stanzas to load if the default should fail.
It is possible to set more than one fallback, as is shown in the example.
The color command lets you breathe a bit of life into the text-mode menu screen. The syntax
for the color command is
color foreground/background [ hilite-fg/hilite-bg ]
where each of the foreground/background colors is specified with a name from the set of black,
blue, green, cyan, red, magenta, brown and light-gray; dark-gray, light-blue, light-green, light-cyan,
light-cyan, light-red, light-magenta, yellow and white. Among these colors, only the first eight are
used for the background. The optional highlight color pair, if specified, will be used to show the
current menu selection. When not specified, GRUB will use the inverse of the normal colors.
The rest of the configuration file consists of the boot stanzas for our demonstration system. The
title command marks the beginning of a new boot stanza, and its argument is the label that will be
displayed for its entry in the menu, from the first non-white-space character to the end of the line.
The remaining commands in each stanza are identical to those used when working from the GRUB command
line. The exception here is that we no longer need to give a boot command; GRUB does this job without
asking.
This example configuration gives only a sample of the many flexible uses of the GRUB boot loader.
Besides multiple OSes, you can use GRUB to set up menu selections for test kernels, rescue kernels,
different kernel options and so on.
All in all, the GRUB configuration file will be very similar to your /etc/lilo.conf. And after
working with the GRUB command line and these examples, it should be a simple matter of firing up your
favorite text editor and creating a menu configuration file suitable for your own system and preferences.
Don’t worry if it’s not perfect the first time; you will see that you can make changes interactively,
and the GRUB command line is always available as a fallback.
Once you’ve got your configuration file, mount your GRUB floppy again, and copy the file (say it
has been saved as mygrub.conf) into the magic location:
cp mygrub.conf /floppy/boot/grub/menu.lst
Now when you boot with your GRUB floppy-presto!-you will be greeted with a lovely boot menu like
the one in Figure 2. If you like, just stare at it for the few seconds it needs to count down from
the timeout setting, and then it will automatically boot into your default OS. Or, use the arrow keys
to highlight the OS you want to load and press return. Or, type c to go to the now-familiar
GRUB command prompt. From the command prompt, press ESC to go back to the boot menu again.
It is also possible to edit the entries displayed in the menu. Typing e will open a simple
vi-like editor interface for the highlighted entry. This allows you to adjust or add any settings
to the configuration before booting. Any changes made here will then remain in effect for the duration
of the GRUB session. To make permanent changes, you will later need to edit the configuration file
on the boot disk, saving the changes with your text editor.
Play with your GRUB floppy configuration until you have it set up the way you like. After just
a few system boots, you’ll be slinging through GRUB like hashbrowns in a diner.
Hard Disk Installation
By this time you may be thinking, «Okay, GRUB has got it goin’ on. But do I have to keep booting
from this lame floppy all the time?» Of course not. Booting from floppy is for weenies.
The operation for installing GRUB on the master boot record of your hard disk is similar to the
creation of a GRUB floppy. The one difference is that our floppy has all the resources GRUB needs
in one place. That is, the boot image, support and configuration files are all on the floppy device
MBR and /boot/grub/ directory. In a hard disk setup, you can choose where you want these resources
to be.
For example, you could set up a /boot/grub directory on the first partition of your first hard
disk and copy all GRUB’s files into it as we did in our floppy setup. In our demonstration system,
this would be the Win98 partition, and you may choose to do it that way if you want. But you can also
set up the /boot/grub directory up in any device/partition on your machine with a filesystem supported
by GRUB. In practice it is usually best to install this support directory in your most frequently
used and/or most stable partition; that is, one that you aren’t reinstalling all the time.
grub> root (hd0,1)
grub> setup (hd0)
grub> quit
You’re done. Your system is now fully GRUB’d, installed in the MBR of your hard disk. Type reboot
as root (or take the floppy out and jab the keyboard with the old three-prong) and watch just how
fast GRUB comes up now!
A few words of explanation about these installation commands. The first, root (hd0,1), tells GRUB
to mount this device, in this case the partition with the Slackware installation. All files will now
be relative to this device, so the GRUB installer will know to look for its support files in the /boot/grub
directory we created in the Slackware partition.
The second command, setup (hd0), is a simplified front end to GRUB’s install command. Note in particular
that we specify the device as (hd0) and not (hd0,0). Device (hd0) results in GRUB’s installation to
the master boot record, which is what we want. If we had instead used (hd0,0), GRUB would be installed
to the boot sector of the first partition, rather than the MBR. The difference is crucial; your technical
writer makes mistakes like this so you don’t have to. While each partition can have a boot sector,
your hard disk will have only one master boot record the BIOS loads every time you start your machine.
Unless you are doing some kind of funky boot-chaining, like using LILO to boot GRUB, you will usually
want to install GRUB in the master boot record.
To check this setup, just edit the menu configuration file in Slackware’s /boot/grub/menu.lst at
any time. Any changes will be reflected in the next boot.
Error Recovery
If you should foul up the hard disk installation somehow or want to uninstall GRUB from your system,
here’s what you need to know.
First, if you ever want to clean your MBR from whatever is installed there, the canonical method
is to use the fdisk program from an MS-DOS boot floppy:
A:> FDISK /MBR
Of course, this isn’t necessary if you just want to go back to LILO as your system’s boot manager.
In that case, simply make sure your /etc/lilo.conf file has a line that reads boot=/dev/hda.
Then, when the rest of the lilo.conf file is the way you want, just rerun LILO. This will put LILO
back on the MBR of your system.
If you install GRUB in the boot sector of a partition, instead of the MBR (such as specifying setup
(hd0,0) instead of setup (hd0)), you may need to reinstall that OS’s boot loader. In the case of DOS/Windows,
this means running the sys command from your DOS/Windows boot floppy: A:> SYS C:.
If, this is a Linux partition, it is again effective to rerun LILO, where /etc/lilo.conf has a
line in the boot stanza that reads root=/dev/hda1.
In general, most OSes will have a way to reinstall their partition’s boot sector without doing
a full reinstallation from scratch. (For FreeBSD, see boot0cfg(8); for OpenBSD, see installboot(8).)
Conclusions
As is typical of GNU software, GRUB is rich with capabilities beyond what are
described here. Some of these include:
- Remapping disks and partition hiding, so you can even run multiple versions of DOS/Windows, on
other than the first hard disk. - Network booting with BOOTP and DHCP protocols, to support multiboot schemes across a network
and diskless operation. - Keyboard remapping, disk geometry access, memory reading, I/O port and processor probes, password
protection, decompression support, etc.
Wayne Marshall
[email protected]
В этом руководстве рассматривается предыдущая версия GRUB. Если вы ищете руководство по GRUB 2, последующей версии популярного начального загрузчика, пожалуйста, взгляните на эту статью.
Самое пугающее в Linux — это страшная фраза «начальный загрузчик». Главная причина этого состоит в том, что большинство новых пользователей Linux работали только с операционной системой Windows, в которой отсутствует полноценный начальный загрузчик или взаимодействие с ним пользователя сведено к минимуму. В мире Windows они никогда не задумывались о начальном загрузчике. Для них процесс загрузки операционной системы был полностью прозрачен. Самое большее, что они делали — это использовали Windows Recovery Console для решения возникающих проблем. Поэтому им необходимо познакомиться с одной из важнейших частей программного обеспечения компьютера — маленькой программой, выполняющей загрузку операционной системы.
В ранее установленных системах мы полагались на программу установки, которая выполняла всю трудную работу. На самом деле, пугающая настройка GRUB, совсем несложная и полностью обратимая процедура. Освоение начального загрузчика GRUB — это очень важный шаг в повышении квалификации пользователя в использовании Linux.
Ну, если вы готовы, читайте дальше.
Но, сначала, важное предисловие. Эта статья состоит из поясняющей информации и примеров, которые помогут вам изучить GRUB. Конечно, все это есть на просторах интернета. Однако, новые пользователи Linux возможно потратят часы на поиск необходимой информации (особенно, если их ПК — персональный компьютер не загружается) немного разочаровавшись. Цель данного руководства предоставить простые и быстрые решения часто встречающихся проблем при мультизагрузочной установки и установки Linux операционных систем.
Все есть файл
Для того чтобы успешно овладеть секретами GRUB вы должны понять один из фундаментальных принципов *NIX-ориентированных операционных систем. Все есть файл. Даже жесткие диски и разделы рассматриваются как файлы. Это не магия. Если вы помните это, то рискованная задача изменения разделов жесткого диска покажется вам ничем не отличающейся от манипуляции с файлами в файловом менеджере (или командной строке).
Введение
GNU GRUB это загрузчик (то есть начальный или первичный загрузчик) способный загружать различные свободно распространяемые и проприетарные операционные системы. GRUB будет хорошо работать с Linux, DOS, Windows или BSD. Аббревиатура GRUB расшифровывается, как GRand Unified Bootloader (Главный унифицированный загрузчик).
GRUB может быть запущен или установлен с любого устройства (гибкого диска — дискеты, жесткого диска, CD- ROM привода, USB диска, сетевого диска) и может загружать операционные системы из различных источников, включая сетевые диски. Также он может может распаковать образ операционной системы перед ее загрузкой.
Вы можете получить дополнительную информацию, гораздо больше, чем в данной статье, из официального руководства GNU GRUB Manual 0.97.
Что такое LILO?
Вы, наверное, слышали о другом начальном загрузчике Linux, который называется LILO (образовано из начальных букв LInux LOader, что означает загрузчик Linux). Не смотря на то, что LILO для многих пользователей Linux подходящий вариант, я считаю, что GRUB — лучший выбор по нескольким причинам:
- LILO поддерживает только 16 различных загрузочных конфигураций, а GRUB поддерживает неограниченное количество конфигураций.
- LILO не может загружаться по локальной сети, а GRUB может.
- LILO должно быть перезаписано всякий раз, после изменения его конфигурационного файла, а для GRUB в этом нет необходимости.
- LILO не имеет командного интерактивного интерфейса.
Подводя итог изложенному выше, отметим, что GRUB выглядит победителем. Итак, позвольте показать, что эта малютка может делать.
Как работает GRUB?
Когда компьютер загружается, BIOS передает управление первому загрузочному устройству, которое может быть жестким диском, дискетой, CD-ROM или другим устройством, распознаваемым BIOS. Для простоты будем считать, что это жесткий диск.
Первый сектор жесткого диска называется Master Boot Record (MBR)(Главная Загрузочная Запись). Длина этого сектора всего 512 байт. Он содержит небольшой фрагмент кода (446 байт), который называется основной загрузчик, и таблицу разделов (64 байта). Таблица разделов содержит описание первичных и дополнительных разделов жесткого диска.
По умолчанию, код MBR просматривается на активном разделе и если он найден, то загружается в память его загрузочный сектор и ему передается управление.
GRUB заменяет код MBR по умолчанию собственным кодом.
При этом работа GRUB состоит из нескольких стадий.
Стадия 1: размещение в MBR. Из-за малого объема MBR размещается только ссылка для перехода к Стадии 2, которая содержит все требуемые данные.
Стадия 2: переход к конфигурационному файлу, который содержит все компоненты пользовательского интерфейса и настройки, необходимые для работы GRUB. Стадия 2 может находиться в любом месте на диске. Если в результате работы Стадии 2 не найдена конфигурационная таблица, GRUB прекратит процесс загрузки и предоставит пользователю возможность выбрать вручную загрузочную конфигурацию из командной строки.
Еще существует Стадия 1.5, которая используется, если загрузочная информация не может быть размещена непосредственно после MBR.
Структура Стадии позволяет GRUB иметь довольно большой объем (~20-30К). Поэтому GRUB достаточно сложный и хорошо конфигурируемый, по сравнению с большинством загрузчиков, которые более компактные и проще укладываются в ограничения для Таблицы Разделов.
Терминология GRUB
Этот раздел предназначен для того чтобы помочь вам освоиться с GRUB без соприкосновения с ним. В следующем разделе рассматриваются актуальные файлы и ручная конфигурация GRUB.
GRUB имеет собственные условные обозначения, которые немного отличаются от общепринятых условных обозначений применяемых в Linux.
Вот, пример типичного начала GRUB:
(hd0,1)
- Обязательные
скобки, в которые должны быть заключены все устройства представленные в списке меню GRUB. -
hdозначает жесткий диск. Гибкий диск обозначается какfd, CD-ROM какcdи т.д. Первый номер(целое число, для квалифицированных пользователей) — это ссылка наномер физического жесткого диска. Нумерацияпервогопривода начинается снуля. В качестве примера,hd2ссылка натретий физический жесткий диск.Второй номер, ссылка наномер разделавыбранного жесткого диска. Нумерация разделов тоже начинается снуля. В этом случае,1соответствуетвторомуразделу.
Отсюда следует, что в GRUB (меню) не различаются IDE и SCSI приводы или первичный и логический разделы. Задача определения какой жесткий диск или раздел должен быть загружен, определяется BIOS и на Стадии 1.
Как видите, условные обозначения очень простые.
Первичные разделы имеют обозначения от 0 до 3 (hd?,0), (hd?,1), (hd?,2), (hd?,3). Логические разделы в дополнительном разделе нумеруются начиная с 4. Их нумерация не зависит от текущего количества первичных разделов на жестком диске. Например, (hd1,7).
Только этих входных данных недостаточно для загрузки операционной системы.
Также GRUB необходимо знать какой из образов операционной системы загружать. Эти параметры и специальные флаги (ключи) присваиваются каждому загрузочному устройству. Например, специальный флаг для Windows Safe Mode.
Здесь показан пример меню GRUB загружающего только Ubuntu.
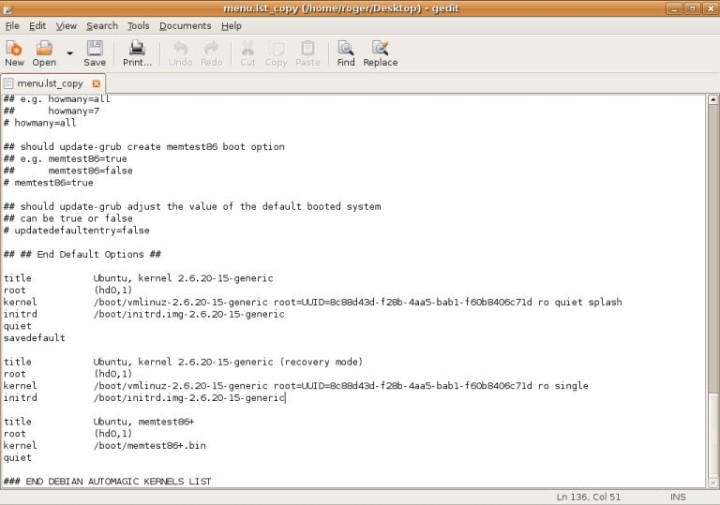
Здесь показан пример меню GRUB для компьютера с тройной загрузочной конфигурацией (SUSE 10.2, Ubuntu 6.10 и Windows XP). Это реальный menu.lst на одной из моих действующих машин.
default 0
timeout 8
Первая строка (default 0) означает, что будет загружена первая операционная система из списка. В нашем случае, это SUSE 10.2. Вторая строка (timeout 8) сообщает сколько времени (в секундах) имеется у пользователя чтобы выбрать систему для загрузки до того как загрузится система по умолчанию. Просто, не правда ли?
gfxmenu (hd0,2)/boot/message
GRUB меню может быть графическим. Все необходимое для отображения изящного пользовательского представления с цветным фоном и некоторыми дополнительными элементами, размещено на первом физическом диске, третьем разделе (hd0,2). Это первичный раздел, как вы успели заметить.
title openSUSE 10.2
root (hd0,2)
kernel /boot/vmlinuz-...
initrd /boot/initrd.img-...
Это первая операционная система в меню.
-
title(заголовок) — элементарно, означает тоже, что и его смысл. Эта строка предназначена помочь пользователю прочитать меню в более доступной терминологии. -
root (hd0,2)указывает GRUB, где размещены его конфигурационные файлы. В этом примере они могут быть найдены на(hd0,2)/boot/grub. -
kernel /boot/vmlinuz-...загрузкамодуляядра текущей операционной системы. Может быть доступно несколько подобных образов. Тот факт, что отсутствует ссылка на загрузочное устройство перед/boot/vmlinuzозначает, что образ размещен натом жеразделе жесткого диска, что и сам GRUB. Это обстоятельство часто определяет ваш выбор операционной системы, загружаемой по умолчанию. -
initrd /boot/initrd.img-...является временным системным файлом, который создается системой при подготовке к загрузке. Подготовка включает в себя адаптацию универсального модуля ядра для конкретного оборудования, до его загрузки.
Дополнительные ключи используются после указания ядра. Они определяют текущее размещение корневой директории (root), используемый графический режим и размещение раздела подкачки (swap). В этой статье не будут рассматриваться подробно расширенные конфигурации GRUB.
title Ubuntu, kernel ... (/dev/sda9)
kernel (hd0,8)/boot/vmlinuz-...
initrd (hd0,8)/boot/initrd.img-...
- В данном случае,
titleотображаемое имя, с некоторыми дополнительными техническими подробностями. -
kernel (hd0,8)/boot/vmlinuz-...размещение9-йраздел напервомжестком диске(hd0,8). Флаг root(/dev/sda9)обозначает, что root разделтак жесодержит в себе модуль ядра, то есть размещаются они на одном разделе жесткого диска. Обычно, это делается из соображений практичности и простоты. Вы можете изменить это размещение во время установки операционной системы. -
initrd (hd0,8)/boot/initrd.img-...здесь ничего нового.
Замечания по разделам модулей ядра и корневому разделу: на старых компьютерах, BIOS которых не поддерживает доступ к более чем 1024 цилиндрам, вы должны были установить загрузочный раздел, содержащий модуль ядра и корневой раздел, в разных местах. Однако пользователи с компьютерами младше чем проблема Y2K (проблема 2000 года) могут не беспокоиться.
Другая вещь, на которую вы должны обратить внимание, это подробная загрузка Ubuntu. Ubuntu загружается с помощью загрузчика OpenSUSE. Это свойство называется совместимая мультизагрузка (Multi-boot Compliance). OpenSUSE распознает Ubuntu и может правильно вызвать ее модули (включая специальные ключи) и cмонтировать разделы. Однако большинство операционных систем лишь частично совместимы с данным свойством (Multi-boot Compliance).
Позже я покажу вам как по разному может быть выполнен вход в Ubuntu с одинаковыми результатами.
title Windows
rootnoverify (hd0,0)
chainloader (hd0,0)+1
-
rootnoverify (hd0,0)означает, что openSUSE не может определить Windows операционную систему, так как она не обладает свойством мультизагрузочной совместимости (Multi-boot Compliance). По этой причине операционная система вызывается без какой-либо дополнительной информации о ее ядре. GRUB предполагает, что требуемый образ ядра будет находиться на указанном разделе имонтируетзагрузчик операционной системы. Как вы видите, Windows была установлена напервомразделепервогожесткого диска. Это самое удачное расположение системы. - Команда
chainloader (hd0,0)+1специально предназначается для применения с операционными системами, которые не могут быть непосредственно загружены. Не удивительно, что Windows операционные системы не могут быть загружены напрямую. Они загружаются с использованием методаchainloading. Как следует из названия, GRUB передает управление загрузочной последовательностью другому загрузчику, размещенному на устройстве, которое указано в меню GRUB. Это может быть Windows операционная система или любая другая, например, Linux.
Вернемся к Ubuntu. Вы, помните я говорил, что мы сможем загрузить Ubuntu другим способом? В самом деле, мы можем просто воспользоваться chainloaded, точно также как и для Windows.
title Ubuntu
root (hd0,8)
chainloader (hd0,8)+1
Это будет работать также хорошо.
Следующий пункт в меню позволяет вам загрузить SUSE в защищенном (failsafe) режиме (разновидность безопасного режима). Этот пункт не содержит очень ценной и полезной информации, поэтому пропустим его, без ущерба для наших знаний.
Позвольте привести несколько примеров.
Приведенный ниже действующий пример, который записан в Ubuntu menu.lst (конечно, закомментирован).
title Windows 95/98/NT/2000
root (hd0,0)
makeactive
chainloader +1
title Linux
root (hd0,1)
kernel /vmlinuz root=/dev/hda3 ro
Теперь вы можете легко понимать язык GRUB. Мы начали с title. root определенный раздел на котором мы рассчитываем найти ядро Windows и смонтировать его (rootnoverify эта работа будет предоставлена загрузчику Windows). makeactive команда, которая делает активным раздел с корневой директорией на диске, указанном в предыдущей строке GRUB root device. Это означает, что команда chainloader выполняется без указания целевого раздела системы (так как этот раздел совпадает с активным).
Второй пункт меню еще проще. Мы назвали его Linux, определили его раздел и загружаем его ядро. Этот случай очень интересный. Так как образ ядра и корневой раздел (root или /) находятся на разных разделах. Этот случай очень похож на случай со старыми компьютерами или компьютером с одним загрузочным разделом.
И наконец, совершенно безумные вещи:
Меню GRUB загружающего более 100 операционных систем: DOS, Windows, Linux, BSD и Solaris
Вы понимаете, что все просто! Когда вы набьете руку, все сомнения исчезнут.
Для получения дополнительной информации, вам необходимо обратиться к GNU GRUB Manual 0.97.
Также вам нужно ознакомиться со статьей The list of command line and menu entry commands.
Конфигурация GRUB
Большую часть времени, у вас не будет желания или необходимости конфигурировать GRUB. Когда вы устанавливаете операционные системы, GRUB будет устанавливаться автоматически и соответствующие строки будут добавлены в конфигурационный файл, особенно, если выбрана правильная последовательность установки операционных систем
(авторитарные, то есть Windows подобные операционные системы, — первыми, гибкие операционные системы, то есть Linux и его семейство, — после).
Тем не менее, вам необходимо знать где и что нужно делать, если что-то пойдет не так.
Установка GRUB
GRUB может быть установлен на различные устройства. Большинство людей будет интересовать процесс установки GRUB на жесткий диск. Однако, изучение других его настроек совсем не повредит. Конечно, вы можете перейти дальше.
Ранее мы не устанавливали GRUB, поэтому нам необходимо знать местонахождение требуемых файлов.
Если GRUB установлен, то его меню находится внутри корневого раздела:
/boot/grub/menu.lst
Всегда, всегда делайте резервную копию этого файла перед любыми изменениями!
Так же GRUB файлы могут находиться внутри образа вашей операционной системы (как правило, CD):
/usr/lib/grub/i386-pc
Вы должны также знать основные команды Linux, относящиеся к жестким дискам и разделам. С этой целью, вы можете посмотреть мою статью «Самые полезные настройки и команды Linux«.
Тем не менее здесь приводится ее краткая версия, для тех кого не радует чтение еще одной статьи.
Вы можете вывести на экран любую информацию о среде вашего ПК (персональный компьютер), используя терминал или текстовый редактор. Чтобы открыть файлы в текстовом редакторе необходимо указать в командной строке текстовый редактор, имя файла и путь к нему. Для открытия системных файлов необходимо иметь права суперпользователя (su или sudo для системных файлов).
$ sudo vi /etc/fstab
ИЛИ
$ sudo gedit /etc/fstab
Или вы можете просто вывести на экран содержимое файлов прямо в терминале с помощью команды cat.
$ (sudo) cat /etc/fstab
Несколько полезных команд, которые могут быть полезны, если вы имеете дело с загрузкой, жесткими дисками и разделами.
Выводит на экран таблицу разделов:
$ fdisk -l
Выводит на экран список монтированных разделов:
$ cat /etc/fstab
Сейчас мы знаем что нужно, и где это найти, для того чтобы установить GRUB.
GRUB на флоппи диске
Для того чтобы установить GRUB на флоппи диск, мы должны скопировать файлы (Стадия 1 и Стадия 2) из директории образа операционной системы , в первый и второй сектор флоппи диска. Для этого будем использовать команду dd, которая копирует информацию посекторно.
Ниже приводится список команд, которые необходимо выполнить (они взяты из руководства):
$ cd /usr/lib/grub/i386-pc
$ dd if=stage1 of=/dev/fd0 bs=512 count=1
$ dd if=stage2 of=/dev/fd0 bs=512 seek=1
Небольшое пояснение: if обозначает файл ввода, of обозначает файл вывода, /dev/fd0 ссылка на первый смонтированный дисковод флоппи дисков, bs заданный размер блока (в байтах), count инструкция, указывающая на количество блоков, которое должно быть скопировано, и seek указывает сколько блоков будет пропущено перед записью. Неудивительно что выбрана такая последовательность команд записи. В начале мы записали stage1 в первый сектор и скопировали stage2 во второй (пропустили первый сектор и затем записали).
Теперь, когда вы поняли всю мощь командной строки, в качестве домашней работы, предлагаю вам самим разобраться с особенностями других команд. Более подробно о команде dd на Wikipedia.
Это все насчет установки GRUB на флоппи диск. Так как мы скопировали стадии из образа операционной системы, то у нас имеется вся необходимая информация для настройки. Конечно, вы всегда можете внести изменения вручную. Однако об этом в следующем разделе.
Установка GRUB по умолчанию
Установка по умолчанию означает размещение GRUB Стадия 1 в первом секторе на жестком диске (Главная Загрузочная Запись - MBR или Таблица Разделов). Это значит, что вы сможете загрузиться без второго устройства, подобного флоппи диску, который стал редким в наши дни. Так же это означает, что если вы установите авторитарную операционную систему позже (подобную Windows) или восстановите главную загрузочную запись по какой-то причине (запустите fdisk /MBR из командной строки DOS) , вы удалите GRUB и сделаете не загружаемыми все системы, представленные в menu.lst.
Для установки GRUB в MBR вам необходимо загрузиться с внешнего носителя (флоппи
диск, live CD Linux). После загрузки, как только будет доступно приглашение
на ввод команды GRUB (grub>), выполните следующие команды:
Найдите корневое устройство GRUB:
grub> find /boot/grub/stage1
GRUB будет искать все доступные Стадии 1 и отобразит их на экране. Если у вас имеется более одного образа операционной системы (например, SUSE, Kubuntu, Mandriva), вам будут доступны несколько Стадий 1.
Допустим, что на компьютере имеются следующие операционные системы, которые установлены в различные разделы жесткого диска.
-
SUSEна(hd0,1) -
Kubuntuна(hd0,2) -
Mandrivaна(hd0,4)
Эти системы имеют свой собственный GRUB, поэтому любая из них может быть использована в качестве GRUB устройства (так как каждая из них имеет свои собственные файлы GRUB).
Если вы хотите использовать SUSE GRUB, вам необходимо сделать корневым устройством GRUB (GRUB root device) первый раздел жесткого диска (hd0,1):
grub> root (hd0,1)
Если вы хотите использовать Mandriva's GRUB, необходимо сделать следующее:
grub> root (hd0,4)
Если вам известно размещение корневого раздела GRUB и необходимых файлов, то можете обойтись без команды find.
Если вы определили корневой раздел, вам необходимо записать информацию в MBR (Главную Загрузочную Запись):
grub> setup (hd0)
И наконец, выйдите из GRUB консоли:
grub> quit
Вот вся последовательность команд, которую вам необходимо выполнить:
grub> find /boot/grub/stage1 (optional)
grub> root (hdX,Y)
grub> setup (hd0)
grub> quit
Вы можете установить GRUB на другой физический диск или раздел. В этом случае вам нужно будет осуществить последовательную загрузку (chainload), то есть необходимо передать управление от GRUB другому загрузчику, который выполнит загрузку системы вместо него.
Это все. Просто и быстро!
Установка GRUB с помощью grub-install
Этот метод считается менее безопасным (согласно руководству), так как осуществляет автоматическое преобразование дисков. Можете успокоиться, для полных новичков, которым нужна подробная помощь при установке, это, наверное, самый предпочтительный метод.
Вам нужно вызвать только одну команду с одним аргументом — указать размещение, куда должен быть установлен загрузчик. Эта команда может быть записана несколькими способами, которые эквивалентны:
$ grub-install /dev/hda
$ grub-install /dev/hd0
$ grub-install '(hd0)'
$ grub-install hd0
После того как вы установили GRUB, ваша операционная система будет загружаться. После загрузки операционной системы, вы можете опять экспериментировать с GRUB. Изменять вручную установки, например, добавлять и удалять конфигурационные данные, менять загрузчики в последовательной загрузке (chainloader), скрывать и отображать разделы.
Настройка GRUB вручную (после установки)
Вы можете переконфигурировать или переустановить GRUB в любой момент.
Резервное копирование!
Во-первых, до внесения изменений в конфигурационный файл GRUB, настоятельно рекомендуется сделать резервную копию существующего меню. Вы можете даже скопировать на другую машину или распечатать меню и хранить его в сейфе.
$ cp /boot/grub/menu.lst /boot/grub/menu.lst_backup
Для получения доступа к GRUB выполните следующую команду в Linux терминале:
$ sudo grub
Через какое-то время, приглашение GRUB будет показано на экране. Наличие приглашение
вы можете определить по его виду: grub>.
Также вы можете получить доступ к командной строке GRUB во время загрузки. Когда меню GRUB загружается, нажмите кнопку C на клавиатуре.
Добавление новой операционной системы в меню GRUB
Предположим, вы имеете ранее установленную операционную систему Sabayon (Sabayon Linux ранее известный как RR4 и RR64 — дистрибутив на ядре Linux, представляющий собою форк дистрибутива Gentoo). В процессе установки вы пропускаете установку GRUB. Это означает, что конфигурационные файлы ранее установленного GRUB не изменились и не содержат данных о Sabayon. И Sabayon не сможет быть загружен.
Примечание: Разделы GRUB меню названы комнатами (возможно это особенность данного экземпляра?).
Таким образом, нам необходимо добавить Sabayon в конфигурационный файл GRUB.
Если вы знаете, где Sabayon был установлен, то вам надо добавить его данные в menu.lst.
title Sabayon
root (hdX,Y)
chainloader +1
Однако это можно сделать во время загрузки компьютера без редактирования меню. Когда установленный GRUB начнет загружаться, нажмите кнопку C, чтобы вызвать командную строку. И затем:
grub> root (hdX,Y)
grub> chainloader +1
При желании вы можете использовать команду find, чтобы узнать требуемые данные.
Это и есть вся магия GRUB. Как вы видите, она очень-очень простая. Но для людей, которые никогда не слышали о GRUB и видели только длинный список странных команд, может показаться устрашающей.
Теперь, когда мы знаем основы начальной загрузки и GRUB, самое время получить дополнительную информацию и разобрать наиболее типичные проблемы, которые могут возникнуть.
")


")