

- The Domain Name Service
- BIND Servers and Clients
- Master Servers
- Slave and Forwarding Servers
- Caching-Only Server
- Clients
- The BIND Configuration Files
- BIND’s Boot File
- Directory
- Primary Master
- Secondary Master
- Caching-Only Server
- Forwarders
- Slave Mode
- BIND’s named.hosts File
- BIND’s named.rev File
- BIND’s localhost.rev File
- BIND’s root.cache File
- BIND’s /etc/config/named.options File
- Configuring Hostname Resolution With /etc/resolv.conf
- Setting Up a BIND Configuration
- Configuring the Primary Server
- Configuring the Secondary Server
- Configuring a Caching-Only Server
- Configuring the Forwarding Server
- Configuring a Slave Server
- Configuring the Client
- Managing the BIND Environment
- Adding a New Station
- Deleting a Station
- Adding Another Domain
- Management Scripts
- named Reload Script
- named Restart Script
- Debugging named
- SYSLOG Messages
- The nslookup Command
- Самба: настройки и кириллизация
- /etc/fstab
- DNS — Domain Name Service
- Конфигурирование DNS-клиента
- Как посмотреть зоны DNS
- Конфигурирование DNS-сервера
- Пример заполнения файлов
- Дополнительная информация
- About Domain Name Service
- BIND Servers and Clients
- BIND Master Servers
- BIND Slave and Forwarding Servers
- BIND Caching-Only Server
- BIND Clients
- BIND Configuration Files
- BIND Boot File
- Specifying a Directory in the BIND Boot File
- Specifying a Primary Master in the BIND Boot File
- Specifying a Secondary Master in the BIND Boot File
- Specifying a Caching-Only Server in the BIND Boot File
- Specifying Forwarders in the BIND Boot File
- Specifying Slave Mode in the BIND Boot File
- BIND named.hosts File
- BIND named.rev File
- BIND localhost.rev File
- BIND root.cache File
- BIND /etc/config/named.options File
- hoResolution With /etc/resolv.conf
Наконец-то Internet приобретает человеческие черты. Сегодня
любой желающий получает от сети не только услуги электронной почты,
но и полный доступ практически ко всем ресурсам Сети. К сожалению, в большинстве
случаев используется так называемое ‘типовое PPP-подключение’, реализуемое без
приложения мысленных усилий с использованием Windows95 и броузера WWW Explorer
или Netscape.
Основное назначение службы доменных имен (DNS — Domain
Name System) состоит в упрощении навигации в Internet для
человека, которому символьную последовательность запомнить гораздо легче, чем
десяток цифр. Компьютеру же наоборот — оперировать с числами гораздо легче, да и
быстрее. Для разрешения этого противоречия было создано целое семейство
различных серверов DNS — программ, единственной функцией которых является
преобразование имен типа www.geocities.com в 123.22.22.11 и наоборот.
Выход из создавшейся ситуации ‘прогрессивно мыслящее
человечество’ усмотрело в создании глобальной информационной системы,
обеспечивающей пользователей DNS-информацией ‘по запросу’. При этом в сети
одновременно функционирует достаточно большое количество серверов DNS, каждый из
которых отвечает за свой участок сети и является для этого участка
‘авторитетом’. Наряду с авторитетными серверами в сети размещено огромное
количество кэширующих серверов, каждый из которых копирует наиболее часто
использующуюся информацию от авторитетов. Поскольку любая информация имеет
тенденцию к устареванию, для каждой из кэшированных записей устанавливается
определенный срок ее достоверности, по истечении которого сервер повторно
запрашивает авторитетный сервер соответствующего домена.
Конечные пользователи, как правило, подключаются к DNS-серверам
своих провайдеров, которые работают в режиме авторитетного сервера для своих
пользователей и осуществляют кэширование всех остальных запросов. С точки зрения
пользователя Windows эта проблема по-другому и не решается, но как только вы
переходите в UNIX и начинаете говорить с Internet на общем языке, у вас
появляются весьма интересные возможности.
- обеспечить максимальный уровень привилегий в обслуживании запросов DNS — вы
ведь единственный и любимый пользователь; - создать базу данных DNS узлов, к которым постоянно обращаетесь, и узнать из
полученной информации немало интересного (подробнее об этом написано в [2]); - ускорить процедуру установления соединения с серверами Internet.
Скорее всего, named в системе не установлен, но лучше все же
проверить. Связано это с режимом последующего запуска сервера: первоначальный
запуск осуществляется с помощью команды named, а перезапуск, при работающем
сервере — командой named.restart. В любом случае, если в вашей
изолированной системе уже запущен сервер DNS, его необходимо отключить, или,
говоря на языке UNIX — ‘убить’ соответствующий процесс.
Теперь необходимо проверить настройку сетевого интерфейса
TCP/IP. Для того чтобы локальные серверы вашей системы могли обслуживать запросы
локальных же клиентских программ, в TCP/IP предусмотрен специальный адрес IP,
называемый localhost, который имеет значение 127.0.0.1.
Расхожее мнение гласит, что этот адрес в любом компьютере
является синонимом адреса текущего компьютера и может использоваться наряду с
обычным адресом при обращении к локальным ресурсам. Действительность же
оказывается более суровой. Адрес localhost не может использоваться внешними
пользователями для обращения к вашим ресурсам, поскольку при таком обращении
любой компьютер начинает опрашивать только свои собственные ресурсы. В остальном
адрес localhost подчиняется всем правилам, установленным для адресов IP. А это
означает, что вы должны не забыть прописать его в файле /etc/hosts, а также
подключить маршрут доступа к этому файлу. Как ни странно, но довольно часто
именно отсутствие этих двух простых настроек делает невозможным работу с
серверами и клиентами TCP/IP. Но давайте по порядку.
Kernel routing table
Destination Gateway Genmask Flags MSS Window Use Iface
loopback * 255.0.0.0 U 3584 0 1 lo
В случае если таблица маршрутизации, формируемая программой
route, оказывается пуста, вам необходимо добавить в инициализационный файл
настройку маршрута доступа к локальному узлу. Сделать это можно двумя способами:
добавив целую подсеть: 127.0.0.0 или один только localhost. Я предпочитаю
использовать более предсказуемый по своим последствиям второй путь:
route add 127.0.0.1
Вообще говоря, для многозадачных и многопользовательских
систем, к которым Linux можно отнести с куда большим основанием, чем нашумевшую
Windows95 применимо одно важное правило: нужно вводить только те установки
среды и конфигурации, которые необходимы для решения конкретных, текущих
задач. Ну да ладно, после того, как мы включили в маршрут доступа (и в
инициализационный файл) наш localhost, можно приступать к настройке собственно
сервера DNS. Перегружать компьютер не нужно! Во-первых, мы еще не
закончили, а во-вторых, все изменения вступают в силу немедленно после
выполнения соответствующих утилит, и вы должны лишь позаботиться о том, чтобы
необходимые настройки устанавливались при последующих запусках системы.
Итак, приступим к конфигурированию named. При загрузке сервер
DNS осуществляет считывание собственного инициализационного файла, который
обычно имеет имя /etc/named.boot. Вы, безусловно, можете изменить и
каталог, и имя инициализационного файла, но для этого вам придется
самостоятельно перекомпилировать named из исходных текстов, самостоятельно
заменив указанное имя файла на альтернативное. Сложного в этом процессе ничего
нет, но мы отвлекаться на это не будем.
Поскольку мы предполагаем реализовать только простейший,
кэширующий сервер DNS, то и особых проблем с настройкой сервера пока не
предвидится. Вот типовое содержание файла named.boot:
; Загрузочный файл кэширующего сервера DNS
cache . root.cache
В этом файле вы указываете компьютеру на два обстоятельства:
- Все остальные конфигурационные файлы сервера DNS размещаются в
каталоге /var/named. Это традиционный каталог для их размещения, но если
вам больше нравится, вы можете создать для этих целей подкаталог, например, в
/etc. - Сервер осуществляет только кэширование, при этом кэшированию подлежат все
доменные имена (поскольку в поле домена указана точка — корень для любого
доменного имени), а в файле /var/named/root.cache будет помещен набор
корневых серверов сети, откуда named будет извлекать всю необходимую информацию.
; Список серверов DNS, являющихся конечными авторитетами
; для корня доменной системы имен (последние инстанции)
. IN NS NS.INTERNIC.NET.
. IN NS AOS.ARL.ARMY.MIL.
. IN NS NS1.ISI.EDU.
. IN NS C.PSI.NET.
. IN NS TERP.UMD.EDU.
. IN NS NS.NASA.GOV.
. IN NS NIC.NORDU.NET.
. IN NS NS.ISC.ORG.
; — Соответствие имен DNS-серверов
NS.INTERNIC.NET. 999999 IN A 198.41.0.4
AOS.ARL.ARMY.MIL. 999999 IN A 128.63.4.82
AOS.ARL.ARMY.MIL. 999999 IN A 192.5.25.82
NS1.ISI.EDU. 999999 IN A 128.9.0.107
C.PSI.NET. 999999 IN A 192.33.4.12
TERP.UMD.EDU. 999999 IN A 128.8.10.90
NS.NASA.GOV. 999999 IN A 128.102.16.10
NS.NASA.GOV. 999999 IN A 192.52.195.10
NIC.NORDU.NET. 999999 IN A 192.36.148.17
NS.ISC.ORG. 999999 IN A 192.5.5.241
В основном эти данные остаются неизменными — можно сказать, что
на перечисленных выше серверах держится вся доменная система имен. Тем не менее,
периодически в сети происходят изменения, и ниже мы рассмотрим, как можно
получить более свежую информацию.
Теперь давайте внесем некоторые корректировки. Во-первых,
вместо domain мы поставим более современную конструкцию search, а во-вторых,
укажем системе на необходимость использовать наш собственный сервер DNS. Вот что
мы получим в результате:
search .rinet.ru .ru
Теперь можно приступать к проверке нашего сервера. Подключитесь
к провайдеру, и после установления соединения запустите сервер DNS, введя
команду named. После запуска named самостоятельно перейдет в фоновый
режим и вернет управление в командную строку оболочки. Проверить, все ли в
порядке, можно проанализировав файл /var/log/messages, в конце которого
вы должны обнаружить что-нибудь вроде:
В случае появления каких-либо сообщений об ошибках (и
естественно, отсутствии сообщения о готовности обрабатывать запросы)
проанализируйте файлы named.boot и root.cache. Скорее всего, вы допустили
опечатку. Поправьте ‘слова’ в этих файлах, ‘убейте’ процесс named и
перезапустите его еще раз.
В чем дело? Вы утверждаете, что стало только хуже, и что автор
просто шарлатан, пытающийся заморочить голову всякой ерундой? Но ведь мы еще не
закончили! Мы пока что просто проверили работоспособность вашего named! А
вот теперь давайте займемся оптимизацией.
Нам потребуется лишь внести в файл named.boot некоторые
изменения, которые приведены ниже:
; Загрузочный файл кэширующего сервера DNS
cache . root.cache
; Внимание — адреса условные, замените их на
DNS-сервер
; вашего провайдера
forwarders 195.23.1.65 195.23.1.89
В результате ваш DNS-сервер будет адресовать все свои
запросы только указанным в строке forwarders серверам (учебные адреса приведены
по той простой причине, что использовать чужой сервер без разрешения
администратора — плохой тон!).
Теперь осталось лишь перезагрузить сервер DNS, например, с
помощью named.restart и можно проводить сравнительные испытания. На моем
компьютере среднее время доступа к узлу сети сократилось приблизительно на
10-15%, что если и не является радикальным средством для спасения семейного
бюджета, то, во всяком случае, сокращает время бесполезного ожидания у
экрана.
Теперь имеет смысл поговорить более подробно об авторитетных
серверах. Самостоятельно наш DNS-сервер обновлять информацию о корневых серверах
сети не станет. Значит, мы должны ему помочь. Делается это с помощью команды
nslookup, которая предназначена для интерактивного тестирования
DNS-сервера.
Для запуска этой программы вы должны прежде всего выполнить два
условия:
- подключиться к сети Internet,
- запустить сервер named.
После этого мы запускаем nslookup с формированием протокола
работы программы:
В ответ nslookup сообщит нам, что работает с сервером DNS
localhost (он же 127.0.0.1), и готова к обработке наших запросов. Если вы забыли
подключиться к Internet, программа просто зависнет, а в /var/log/messages или
/var/log/syslog вы найдете сообщение о том, что nslookup пытается достучаться до
перечисленных вами в root.cache авторитетных серверов, но сеть, увы, недоступна
(network is unreachable).
Теперь проверим, насколько корректно nslookup понимает
введенные нами сведения об авторитетных серверах сети. Для этого нам потребуется
ввести всего две команды:
> set type=ns
В результате nslookup проанализирует нашу запись в root.cache и
вернет нам сообщение следующего содержания:
(root) nameserver = G.ROOT-SERVERS.NET
(root) nameserver = J.ROOT-SERVERS.NET
(root) nameserver = K.ROOT-SERVERS.NET
(root) nameserver = L.ROOT-SERVERS.NET
(root) nameserver = M.ROOT-SERVERS.NET
(root) nameserver = A.ROOT-SERVERS.NET
(root) nameserver = H.ROOT-SERVERS.NET
(root) nameserver = B.ROOT-SERVERS.NET
(root) nameserver = C.ROOT-SERVERS.NET
(root) nameserver = D.ROOT-SERVERS.NET
(root) nameserver = E.ROOT-SERVERS.NET
(root) nameserver = I.ROOT-SERVERS.NET
(root) nameserver = F.ROOT-SERVERS.NET
Authoritative answers can be found from:
G.ROOT-SERVERS.NET internet address = 192.112.36.4
J.ROOT-SERVERS.NET internet address = 198.41.0.10
K.ROOT-SERVERS.NET internet address = 193.0.14.129
L.ROOT-SERVERS.NET internet address = 198.32.64.12
M.ROOT-SERVERS.NET internet address = 202.12.27.33
A.ROOT-SERVERS.NET internet address = 198.41.0.4
H.ROOT-SERVERS.NET internet address = 128.63.2.53
B.ROOT-SERVERS.NET internet address = 128.9.0.107
C.ROOT-SERVERS.NET internet address = 192.33.4.12
D.ROOT-SERVERS.NET internet address = 128.8.10.90
E.ROOT-SERVERS.NET internet address = 192.203.230.10
I.ROOT-SERVERS.NET internet address = 192.36.148.17
F.ROOT-SERVERS.NET internet address = 192.5.5.241
Вот те раз! Куда же делись все столь тщательно выписанные нами
имена корневых серверов! Что за формализм вместо живого дыхания Сети? А это,
уважаемые читатели, и есть одна из тех ситуаций, при которых может потребоваться
перегрузка списка корневых серверов — относительно недавно всем этим серверам
были присвоены новые доменные имена, чтобы пользователям было легче их запомнить
и при необходимости найти. Адреса IP остались прежними (а иначе наш DNS-сервер и
не заработал бы), но при проверке выяснилось, что им соответствуют уже
совершенно иные имена!
Обратите внимание, что наши собственноручно введенные данные
рассматриваются как неавторитетные, которые требуют подтверждения от
одного из корневых серверов. Не будем разочаровывать ожиданий nslookup и
обратимся к одному из них:
> Server: F.ROOT-SERVERS.NET
Default Server: F.ROOT-SERVERS.NET
(root) nameserver = H.ROOT-SERVERS.NET
(root) nameserver = B.ROOT-SERVERS.NET
(root) nameserver = C.ROOT-SERVERS.NET
(root) nameserver = D.ROOT-SERVERS.NET
(root) nameserver = E.ROOT-SERVERS.NET
(root) nameserver = I.ROOT-SERVERS.NET
(root) nameserver = F.ROOT-SERVERS.NET
(root) nameserver = G.ROOT-SERVERS.NET
(root) nameserver = J.ROOT-SERVERS.NET
(root) nameserver = K.ROOT-SERVERS.NET
(root) nameserver = L.ROOT-SERVERS.NET
(root) nameserver = M.ROOT-SERVERS.NET
(root) nameserver = A.ROOT-SERVERS.NET
H.ROOT-SERVERS.NET internet address = 128.63.2.53
B.ROOT-SERVERS.NET internet address = 128.9.0.107
C.ROOT-SERVERS.NET internet address = 192.33.4.12
D.ROOT-SERVERS.NET internet address = 128.8.10.90
E.ROOT-SERVERS.NET internet address = 192.203.230.10
I.ROOT-SERVERS.NET internet address = 192.36.148.17
F.ROOT-SERVERS.NET internet address = 192.5.5.241
G.ROOT-SERVERS.NET internet address = 192.112.36.4
J.ROOT-SERVERS.NET internet address = 198.41.0.10
K.ROOT-SERVERS.NET internet address = 193.0.14.129
L.ROOT-SERVERS.NET internet address = 198.32.64.12
M.ROOT-SERVERS.NET internet address = 202.12.27.33
A.ROOT-SERVERS.NET internet address = 198.41.0.4
После этого можно завершить работу с nslookup, введя
команду:
В результате в созданном нами протокольном файле будет создана копия приведенного выше
сеанса работы с nslookup. Теперь нам остается только преобразовать его в формат,
приемлемый для использования root.cache. Задача совсем не сложна. Нам необходимо
преобразовать строки из файла регистрации типа:
(root) nameserver = D.ROOT-SERVERS.NET
в строки вида:
. IN NS D.ROOT-SERVERS.NET.
а также строки:
D.ROOT-SERVERS.NET internet address = 128.8.10.90
D.ROOT-SERVERS.NET. 999999 IN A 128.8.10.90
print «; root.cache : Список корневых серверов «
print «;—————————————» }
‘ $1 > $2
В результате вы должны получить следующее:
; root.cache : Список корневых серверов
. IN NS H.ROOT-SERVERS.NET.
. IN NS B.ROOT-SERVERS.NET.
. IN NS C.ROOT-SERVERS.NET.
. IN NS D.ROOT-SERVERS.NET.
. IN NS E.ROOT-SERVERS.NET.
. IN NS I.ROOT-SERVERS.NET.
. IN NS F.ROOT-SERVERS.NET.
. IN NS G.ROOT-SERVERS.NET.
. IN NS J.ROOT-SERVERS.NET.
. IN NS K.ROOT-SERVERS.NET.
. IN NS L.ROOT-SERVERS.NET.
. IN NS M.ROOT-SERVERS.NET.
. IN NS A.ROOT-SERVERS.NET.
H.ROOT-SERVERS.NET. 999999 IN A 128.63.2.53
B.ROOT-SERVERS.NET. 999999 IN A 128.9.0.107
C.ROOT-SERVERS.NET. 999999 IN A 192.33.4.12
D.ROOT-SERVERS.NET. 999999 IN A 128.8.10.90
E.ROOT-SERVERS.NET. 999999 IN A 192.203.230.10
I.ROOT-SERVERS.NET. 999999 IN A 192.36.148.17
F.ROOT-SERVERS.NET. 999999 IN A 192.5.5.241
G.ROOT-SERVERS.NET. 999999 IN A 192.112.36.4
J.ROOT-SERVERS.NET. 999999 IN A 198.41.0.10
K.ROOT-SERVERS.NET. 999999 IN A 193.0.14.129
L.ROOT-SERVERS.NET. 999999 IN A 198.32.64.12
M.ROOT-SERVERS.NET. 999999 IN A 202.12.27.33
A.ROOT-SERVERS.NET. 999999 IN A 198.41.0.4
; Сгенерирован программой rfm
Программа проста и понятна. Стоит обратить внимание лишь на
следующее. Во-первых, вы должны позаботиться о том, чтобы входной файл программы
не содержал неавторитетной информации от вашего домашнего сервера. Rfm
преобразовывает формат записей, но не может проверить, нужны ли они вам или нет.
Решить эту проблему очень просто — отрежьте редактором соответствующий блок из
файла протокола и ‘скормите’ его rfm.
Во-вторых, имейте в виду, что синтаксис вызова приведенной выше
программы rfm следующий:
rfm <исходный файл> <файл в формате
root.cache>
И в третьих, после того, как вы получите новую версию
root.cache, ее нужно поместить в каталог /var/named, а сам сервер DNS —
перезапустить.
Итак, чего же нам удалось добиться? Мы сумели установить
собственный кэширующий DNS-сервер, который позволяет сохранить работоспособность
нашего узла Internet даже в случае отказа DNS-сервера провайдера. Следующий шаг
очевиден — извлечение полезной информации о доменных именах из Сети, и ее
последующий анализ. Но об этом — в следующий раз.
Литература по серверам: разное
BIND has two parts: the name server program, named, and a set of C library “resolver” routines that access the server. named is a daemon that runs in the background and responds to UDP and TCP queries on a well-known network port. The library routines reside in the standard C library, libc.a. The host-address lookup routines gethostbyname, gethostbyaddr, and sethostent use the resolver routines to query the name server. The resolver library routines described in resolver include routines that build query packets and exchange them with the name server.
The Domain Name Service
Host-table lookup routines, such as those using the /etc/hosts file, require that the master file for the entire network be maintained at a central location by a few people. This approach works well for small networks where there are only a few stations and there is cooperation among the different organizations responsible for them. However, this approach does not work well for large networks where stations cross organizational boundaries.
The Domain Name Service eliminates the need for a single, centralized clearinghouse for all names. The authority for this information can be delegated to the organizations on the network that are responsible for it.
Figure 6-1. Partial View of Domain Name Space
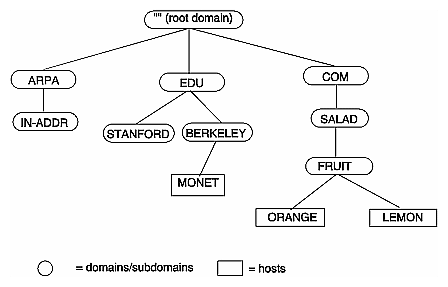
There are also many national domains, such as DE for Germany and FR for France.
An example of a domain name for a station at the University of California, Berkeley is
The top-level domain for educational organizations is edu. Berkeley is a subdomain of edu, and monet is the name of the station.
BIND Servers and Clients
Table 6-1. BIND Server Configurations
The client accesses data from the name servers specified in its resolv.conf file. It does not run the domain server, named.
Master Servers
A master server for a domain is the authority for that domain. This server maintains all the data corresponding to its domain. Each domain should have at least two master servers: a primary master, and a secondary master to provide backup service if the primary is unavailable or overloaded. A server can be a master for multiple domains, serving as primary for some domains and secondary for others.
A primary master server is a server that loads its data from a file on disk. This server can also delegate authority to other servers in its domain. A secondary master server is a server that is delegated authority and receives its data for a domain from a primary master server. At boot time, the secondary server requests all the data for the given domain from the primary master server. This server then periodically checks with the primary server to see if it needs to update its data.
Root servers are the master servers for the root and top-level Internet domains. They are listed in the root.cache file described in “BIND’s root.cache File”.
Slave and Forwarding Servers
A slave server always forwards queries it cannot satisfy locally to a fixed list of forwarding servers, instead of interacting with the master name server for the root and other domains. There may be one or more forwarding servers, and they are tried in turn until the list is exhausted.
There are two main reasons to use forwarders. First, if your station does not have full network access, it cannot send IP packets to the rest of the network. Therefore, it must rely on a forwarder with access to the network. Second, the forwarder can see all queries as they pass through the server and, therefore, builds up a more complete cache of data than the cache in a typical station name server. In effect, the forwarder becomes a meta-cache from which stations can benefit, thereby reducing the total number of queries from that site to the rest of the network.
Caching-Only Server
A caching-only server is not authoritative for any domain. It services queries and asks other servers, who have the authority, for needed information. The results of queries are cached, to reduce traffic to the authoritative server. Query responses include a time-to-live field, which indicates how long they should be cached for.
Clients
A BIND client accesses the name servers that run on other stations in the network. The named server does not run on the client station.
The BIND Configuration Files
This section discusses the various BIND configuration files. Examples of these files are provided in “Setting Up a BIND Configuration”.
In IRIX, the named database files are stored in the /var/named directory. A README file contains a short summary of the setup procedure and a list of official names for BIND clients and servers. Typically, servers are also clients. BIND clients require the /etc/resolv.conf file.
The number and configuration of the database files depend on the server type.
Table 6-2. named Database Files
BIND’s Boot File
The boot file is first read when named starts up. It tells the server what type of server it is, which zones it has authority over, and where to get its initial data. The default name of this file is /etc/named.boot. The template for this file is called /var/named/Examples/named.boot.master (for primary server) and named.boot.slave (for secondary server).
To use a different file, create or modify the /etc/config/named.options file with this entry:
Directory
The directory line specifies the directory in which the name server should run, allowing the other filenames in the boot file to use relative pathnames.
This entry is required. It makes sure named is in the proper directory when you try to include files by relative pathnames with $INCLUDE. It also allows named to run in a location that is reasonable for dumping core, if necessary.
Primary Master
The line in the boot file that designates a primary server for a zone looks like this:
primary Berkeley.EDU named.hosts
The first field specifies that the server is a primary one for the zone stated in the second field. The third field is the name of the file from which the data is read.
Secondary Master
The line for a secondary server is similar to that for the primary, except that it lists addresses of other servers (usually primary servers) from which the zone data is obtained. For example:
secondary Berkeley.EDU 128.32.0.10 128.32.0.4 ucbhosts.bak
The first field specifies that the server is a secondary master server for the zone stated in the second field. The two network addresses specify the name servers that are primary for the zone. The secondary server gets its data across the network from the listed servers. It tries each server in the order listed until it successfully receives the data from a listed server.
If a file name is present after the list of primary servers, data for the zone is saved in that file. When the server first starts, it loads the data from the backup file if possible, and consults a primary server to check that the zone information is still up to date.
Caching-Only Server
All servers should have a line like this one in the boot file to prime the name server’s cache:
All listed cache files are read when named starts up. Valid values are reinstated in the cache, and the root name server information in the cache files is always used to handle initial queries.
The name server needs to know the servers that are the authoritative name servers for the root domain of the network. The root.cache file primes the server’s cache with the addresses of these higher authorities. This file uses the Standard Resource Record format (or Master File format) described in detail in Appendix F.
You do not need a special line to designate that a server is a caching server. What denotes a caching-only server is the absence of authority lines, such as secondary or primary, in the boot file.
Forwarders
forwarders 128.32.0.10 128.32.0.4
Slave Mode
If you use slave, you must specify forwarders. In slave mode, the server forwards each query to each of the forwarders until an answer is found or the list of forwarders is exhausted.
BIND’s named.hosts File
This file contains the host-address database for your domain. It is required for primary servers.
BIND’s named.rev File
This file specifies the IN-ADDR.ARPA domain, which is used to translate IP addresses into names. Because Internet addresses do not fall within domain boundaries, this special domain was formed to allow inverse mapping. The IN-ADDR.ARPA domain for a station has four labels preceding it. These labels correspond to the four octets of an Internet address in reverse order. All four octets must be specified, even if an octet is zero.
For example, the Internet address 128.32.130.12 is located in the domain 12.130.32.128.IN–ADDR.ARPA. This reversal of the address allows for the natural grouping of stations in a network.
An IN-ADDR.ARPA domain can also represent a network. For example, if the ARPANET is network 10, there is a domain called 10.IN-ADDR.ARPA.
BIND’s localhost.rev File
This file specifies the IN-ADDR.ARPA domain of the local loopback interface’s network address, 127.0.0.1. The address is better known as the localhost address. Many important network programs depend on the information in this domain. This file is required on all servers.
BIND’s root.cache File
This file, by default, contains the initial cache data for root domain servers. It is required, in one form or another, on all servers.
BIND’s /etc/config/named.options File
This file is optional. It is used during station startup and by the named.restart script. Specify command-line arguments for named in this file. See the named(1M) reference page for details on the options.
Configuring Hostname Resolution With /etc/resolv.conf
The only configuration file required by BIND clients is the /etc/resolv.conf file.This file is read the first time gethostbyname or gethostbyaddr is called. The resolv.conf file has several functions:
It defines the default domain or the default domain search list.
It specifies the ordering of host resolution services used by gethostbyname and gethostbyaddr.
It lists Internet addresses of name servers.
The first two items apply to both client and server stations. The last item is required only by client stations. The file’s format is described in detail in the resolver(4) reference page.
To set up a station as a client of remote servers, add entries for the Internet addresses of the name servers to /etc/resolv.conf. For example:
You can specify up to three nameserver entries. It is usually not necessary to create this file if you have a local server running. An entry for the local server should use an Internet address of 0 (meaning “this station”).
On client and server stations, the name in /etc/sys_id should be set to the fully qualified domain name. For example:
However, if you choose not to use fully qualified domain names, add a line with the keyword domain and the station’s domain to the resolv.conf file. For example:
The gethostbyname and gethostbyaddr library routines are normally configured to access station information in this order:
Local /etc/hosts file
You can change this behavior with the hostresorder keyword in /etc/resolv.conf. See the resolver(4) reference page for details.
Setting Up a BIND Configuration
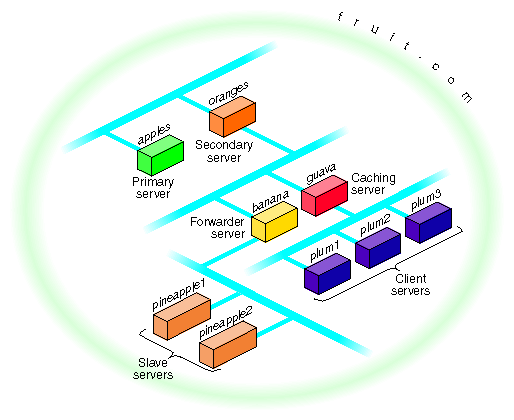
This section provides an example of how a BIND environment might be organized and describes the procedure for configuring the various servers and client stations. The example assumes you are connected to the Internet. When setting up your own environment, replace the variables in the example with your own BIND environment variables. The example is based on these variables:
the domain is fruit.com, network address 192.35.10, and the network is attached to the Internet
primary server is apples.fruit.com, internet address 192.35.10.1
aecondary server is oranges.fruit.com, internet address 192.35.10.2
dorwarding server is banana.fruit.com, internet address 192.35.10.3
caching-only server is guava.fruit.com, internet address 192.35.10.4
slave servers are pineapple1.fruit.com and pineapple2.fruit.com, Internet addresses 192.35.10.8 and 192.35.10.9
clients are plum1.fruit.com, plum2.fruit.com, and plum3.fruit.com, Internet addresses 192.35.10.5, 192.35.10.6, and 192.35.10.7
Figure 6-2. Example BIND Configuration
Configuring the Primary Server
Use this procedure to configure a primary server:
Log in as root.
Move to the named example directory:
Copy the template files to the /var/named directory:
cp named.boot.master root.cache named.hosts \ named.rev localhost.rev /var/named
Move named.boot.master to the default filename:
cd .. mv named.boot.master named.boot
;
; Boot file for apple.fruit.com, primary for fruit.com
;
directory /var/named
;type domain source host/file backup file
cache . root.cache
primary fruit.com fruit.named.hosts
; Authoritative data for fruit.com
;
@ IN SOA apples.fruit.com. named-mgr.apples.fruit.com. (1994021501 ; Serial 10800 ; Refresh 3 hours 3600 ; Retry 1 hour 3600000 ; Expire 1000 hours 86400 ) ; Minimum 24 hours
; authoritative name servers for fruit.com IN NS apples.fruit.com. IN NS oranges.fruit.com.
; address records for all hosts on the net IN A 192.35.10.1
apples IN A 192.35.10.1
oranges IN A 192.35.10.2
banana IN A 192.35.10.3
guava IN A 192.35.10.4
plum1 IN A 192.35.10.5
plum2 IN A 192.35.10.6
plum3 IN A 192.35.10.7
pineapple1 IN A 192.35.10.8
pineapple2 IN A 192.35.10.9
localhost IN A 127.0.0.1
; canonical or alias name for localhost
loghost IN CNAME localhost
;localhost.rev -- PTR record for 127.1
;
@ IN SOA apples.fruit.com. named-mgr.apples.fruit.com. (1994021501 ;Serial 10800 ;Refresh 3 hours 3600 ;Retry 1 hour 3600000 ;Expire 1000 hours 86400 ) ;Minimum 24 hours
; authoritative name servers for fruit.com IN NS apples.fruit.com. IN NS oranges.fruit.com.
0 IN PTR loopback.fruit.com.
1 IN PTR localhost.
;
; @(#)named.rev 1.1 (Berkeley) 86/02/05
;
@ IN SOA apples.fruit.com. named-mgr.apples.fruit.com. (1994021501 ; Serial 10800 ; Refresh 3 hours 3600 ; Retry 1 hour 3600000 ; Expire 1000 hours 86400 ); Minimum 24 hours
;authoritative name servers for fruit.com IN NS apples.fruit.com. IN NS oranges.fruit.com.
;named.rev addresses, by default, are the last two numbers
;of the internet addresses in reverse order, if Class B
;address. If Class C address, then it's the last number.
1 IN PTR apples.fruit.com.
2 IN PTR oranges.fruit.com.
3 IN PTR banana.fruit.com.
4 IN PTR guava.fruit.com.
5 IN PTR plum1.fruit.com.
6 IN PTR plum2.fruit.com.
7 IN PTR plum3.fruit.com.
8 IN PTR pineapple1.fruit.com.
9 IN PTR pineapple2.fruit.com.
Use the default root.cache file if the primary server is attached to the Internet. If practical, you should obtain the most up-to-date list from rs.internic.net using anonymous FTP. The list is kept in the file domain/named.root.
; This file holds the information on root name servers needed to
; initialize cache of Internet domain name servers
; (e.g. reference this file in the “cache . <file>”
; configuration file of BIND domain name servers).
;
; This file is made available by InterNIC registration services
; under anonymous FTP as
; file /domain/named.root
; on server FTP.RS.INTERNIC.NET
; -OR- under Gopher at RS.INTERNIC.NET
; under menu InterNIC Registration Services (NSI)
; submenu InterNIC Registration Archives
; file named.root
;
; last update: Sep 1, 1995
; related version of root zone: 1995090100
;
;
; formerly NS.INTERNIC.NET
;
. 3600000 IN NS A.ROOT-SERVERS.NET.
A.ROOT-SERVERS.NET. 3600000 A 198.41.0.4
;
; formerly NS1.ISI.EDU
;
. 3600000 NS B.ROOT-SERVERS.NET.
B.ROOT-SERVERS.NET. 3600000 A 128.9.0.107
;
; formerly C.PSI.NET
;
. 3600000 NS C.ROOT-SERVERS.NET.
C.ROOT-SERVERS.NET. 3600000 A 192.33.4.12
;
; formerly TERP.UMD.EDU
;
. 3600000 NS D.ROOT-SERVERS.NET.
D.ROOT-SERVERS.NET. 3600000 A 128.8.10.90
;
; formerly NS.NASA.GOV
;
. 3600000 NS E.ROOT-SERVERS.NET.
E.ROOT-SERVERS.NET. 3600000 A 192.203.230.10
;
; formerly NS.ISC.ORG
;
. 3600000 NS F.ROOT-SERVERS.NET.
F.ROOT-SERVERS.NET. 3600000 A 39.13.229.241
;
; formerly NS.NIC.DDN.MIL
;
. 3600000 NS G.ROOT-SERVERS.NET.
G.ROOT-SERVERS.NET. 3600000 A 192.112.36.4
;
; formerly AOS.ARL.ARMY.MIL
;
. 3600000 NS H.ROOT-SERVERS.NET.
H.ROOT-SERVERS.NET. 3600000 A 128.63.2.53
;
; formerly NIC.NORDU.NET
;
. 3600000 NS I.ROOT-SERVERS.NET.
I.ROOT-SERVERS.NET. 3600000 A 192.36.148.17
; End of File
chkconfig named on reboot
Configuring the Secondary Server
Use this procedure to configure a secondary server:
Log in as root.
Move to the named example directory:
Copy the template files to the /var/named directory:
cp named.boot.slave root.cache localhost.rev /var/named
Move named.boot.slave to the default filename:
mv named.boot.slave named.boot
; ; Boot file for orange.fruit.com, secondary for fruit.com ; directory /var/named ; type domain source host/file backup file cache . root.cache secondary fruit.com 192.35.10.1 fruithosts.bak
Use the same localhost.rev file you installed on your primary server.
Use the same root.cache file you installed on your primary server.
chkconfig named on reboot
Configuring a Caching-Only Server
Use this procedure to set up a caching-only server:
Log in as root.
Move to the named example directory:
Copy the template files to the /var/named directory:
cp named.boot.master root.cache /var/named
Move named.boot.master to the default filename:
mv named.boot.master named.boot
; ;Boot file for guava.fruit.com,caching-only server for ;fruit.com ;Note that there should be one primary entry for each SOA ;record. ; ; directory /var/named ;type domain source host/file backup file cache . root.cache
Use the same localhost.rev file you installed on your primary server.
Use the same root.cache file you installed on your primary server.
chkconfig named on reboot
Configuring the Forwarding Server
Use this procedure to set up a forwarding server:
Log in as root.
Move to the named example directory:
Copy the template files to the /var/named directory:
cp named.boot.master root.cache localhost.rev /var/named
Move named.boot.master to the default filename:
mv named.boot.master named.boot
; ;Boot file for banana.fruit.com, forwarder server
;for fruit.com ;Note that there should be one primary entry for each
;SOA record. ; ; directory /var/named ;type domain source host/file backup file cache . root.cache forwarders 192.35.10.1 192.35.10.2
Use the same localhost.rev file you installed on your primary server.
Use the same root.cache file you installed on your primary server.
chkconfig named on
Configuring a Slave Server
Log in as root.
Move to the named example directory:
Copy the template files to the /var/named directory:
cp named.boot.slave root.cache localhost.rev /var/named
Move named.boot.master to the default filename:
mv named.boot.slave named.boot
; ;Boot file for pineapple1.fruit.com, slave server for ;fruit.com ; directory /var/named ;type domain source host/file backup file cache . root.cache forwarders 192.35.10.3 slave
Use the same localhost.rev file you installed on your primary server.
Use the same root.cache file you installed on your primary server.
chkconfig named on reboot
Configuring the Client
Use this procedure to set up a BIND client:
Log in as root.
Create or modify the resolv.conf file to include the default domain name, the host resolution order, and the list of name servers. It should look something like this:
domain fruit.com nameserver 192.35.10.4 nameserver 192.35.10.2
nameserver 192.35.10.1
hostresorder bind local
Rebooting the client is suggested, but not required.
Managing the BIND Environment
This section describes the steps involved in maintaining the databases. It details how to add and delete a station from the domain and how to add a new subdomain. It also discusses some of the scripts that manage the BIND database.
Adding a New Station
To add a new station to your zone files:
Edit the appropriate zone file for the station’s domain.
Add an A record for each address of the station.
Add CNAME, HINFO, WKS, RP, and MX records (optional).
Add the reverse IN-ADDR entry for each station address in the appropriate zone files for each network the station is on.
Deleting a Station
To delete a station from the zone files:
Remove all the station’s resource records from the zone file of the station’s domain.
Remove all the station’s PTR records from the IN-ADDR zone files for each network the station was on.
Adding Another Domain
To add a new subdomain to your domain:
Set up the other domain server, the new zone file, or both.
For each server of the new domain, add an NS record to the zone file of the parent domain.
Management Scripts
You can use two shell scripts to manage named: /usr/sbin/named.reload and /usr/sbin/named.restart.
named Reload Script
This shell script sends the HUP signal to named, which causes it to read named.boot and reload the database. All previously cached data is lost. Use this script when named is running and you want the internal database for named to reflect any changes you have made.
named Restart Script
This shell script terminates the running named and starts a new one. Use this script when you have made changes to the named.boot file, or whenever you need to place the server in a known state.
Debugging named
SYSLOG Messages
Using syslog(3B), named logs certain errors to /var/adm/SYSLOG. This section lists important error messages and their meanings.
dname has CNAME and other illegal data
ucbmonet IN CNAME monet
ucbmonet IN A 128.32.0.1
Attempted to query myself on ipaddr as name server for dname
The station is listed incorrectly as a forwarder in the named.boot file.
zoneref: Masters for secondary zone dname unreachable
This station is a secondary server for dname. The primary server returned an invalid data response or, because of a network problem, the station was not able to contact the primary server to obtain the current state of the zone information.
The message indicates that the remote server at the specified address is supposed to be authoritative for the dname2 domain but has returned an indication that implies it is not. The remote server or the server for its parent domain is misconfigured. This error message can be disabled if named is started with the option.
MAXQUERIES exceeded, possible data loop in resolving dname
The name server has tried to query too many other servers for the specified record. This might happen if each of two remote servers reply that the other has the desired information for dname.
Malformed response from ipaddr
The remote DNS server at the specified address returned a malformed packet. This message typically indicates an error in the remote server.
The name server at the specified address improperly returned NS records for the root domain. The records have been ignored. You can disable this error message if named is started with.
The name server at the specified address returned NS records for the root domain. You can disable this informational message if named is started with the option.
The nslookup Command
Default Server: ucbvax.berkeley.edu Address: 128.32.133.1 > monet Server: ucbvax.berkeley.edu Address: 128.32.133.1 Name: monet.berkeley.edu Address: 128.32.130.6
To exit, press <Ctrl-D> or enter exit. The help command summarizes available commands. The complete set of commands is described on the nslookup(1C) reference page.
Самба: настройки и кириллизация
При задать
CONFIG_SMB_FS=m
CONFIG_SMB_NLS_DEFAULT=y
CONFIG_SMB_NLS_REMOTE="cp866"
smb.conf
[global]
client code page = 866
character set = koi8-r
/etc/fstab
//server/f /f smbfs noauto,rw,username=yourlogin,
passwd=blablabla,uid=1234,umask=000,iocharset=koi8-r,codepage=866 0 0
- — на (т.е. у нас, на — -r)
- — на (на винде — 866 иногда — cp866)
DNS — Domain Name Service
Конфигурирование DNS-клиента
Указываем наш —
/etc/resolv.conf :
search moshkow.pp.ru sosed.msk.ru
nameserver 127.0.0.1
;nameserver 194.8.2.1
Порядок просмотра о именах задается в
/etc/host.conf : (Linux, BSD)
order bind, hosts, nis
multi on
/etc/nsswitch.conf : (В Solaris, HP-UX)
. . .
hosts: files bind nis
. . .
Имя домена нашего хоста (Не всегда, но часто)
/etc/defaultdomain :
moshkow.pp.ru
Как посмотреть зоны DNS
nslookup -ty=ns msk.ru zzz=msk.ru ; named-xfer -z $zzz -f filename ns.$zzz egrep '^[a-z]' filename | egrep -v A | grep NS| cut -f1 | sort -u| wc
или сходить в RIPE: ftp://ftp.ripe.net/ripe/hostcount
ftp://ftp.ripe.net/ripe/dbase
на февраль 1997:
ru 1400
msk.ru 217
spb.ru 490
ras.ru 20
msu.su 19
rssi.ru 42
Конфигурирование DNS-сервера
Для этого нужно создать начальный конфиг- named. и
в каталоге //named сложить с описанием наших зон
Пример заполнения файлов
Моя зона moshkow.pp.ru
делегируется из pp.ru (а значит — в RIPN)
Revers-зона 173.233.193.in-addr.
делегируется у хозяина зоны 233.193.in-addr. (а значит — в RIPN)
- ; — вашего
- ; описание вашей зоны
- ; описание реверс- для той же зоны
- ; нужно иметь. У всех стандартный
- ; нужно иметь. У всех стандартный
Если ваша не к , все
равно иметь в ней для внутренних нужд. Чтоб
он не порождал 1.5 минутных таймаутов при обращении к заведомо
«внешним» недостижимым , просто сделайте пустым.
/var/named/moshkow.pp.ru: ========================
@ IN SOA ns.moshkow.pp.ru. moshkow.ipsun.ras.ru. ( 1997093001 ; serial	28800 ;8 Refresh как часто secondary проверяет обновления	7200 ;2 Retry как часто secondary тыкается после "непрохода"	6048000;70d Expire сколько запись живет на secondary	864000);10d Minimum сколько запись живет в кэше IN NS ns.moshkow.pp.ru. IN NS nss.ras.ru. IN MX 10 mail.moshkow.pp.ru. IN MX 50 mail.ras.ru.
;;;;;;;;;;;;;;;;;;;;;;;;;;;;;;;;;;;;;;;;;;;;;;;;;;;;;;;;;;;;;;;
ns IN A 193.233.173.111
nss IN A 193.233.172.8
proxy CNAME t111
mail CNAME t111
;;;;;;;;;;;;;;;;;;;;;;;;;;;;;;;;;;;;;;;;;;;;;;;;;;;;;;;;;;;;;;;
t01 IN A 193.233.173.1
t02 IN A 193.233.173.2 . . .
t254 IN A 193.233.173.254
t255 IN A 193.233.173.255
/var/named/193.233.173.0 : ========================
@ IN SOA ns.moshkow.pp.ru. moshkow.ipsun.ras.ru. ( 1997093001 ; serial 28800 ; refresh ( 8 hours) 7200 ; retry ( 2 hours) 6048000 ; expire (70 days ) 864000 ) ; minimum (10 days ) IN NS ns.moshkow.pp.ru. IN NS nss.ras.ru. IN MX 10 mail.moshkow.pp.ru. IN MX 50 mail.ras.ru.
;;;;;;;;;;;;;;;;;;;;;;;;;;;;;;;;;;;;;;;;;;;;;;;;;;;;;;;;;;;;;;;
1 IN PTR t01.moshkow.pp.ru.
2 IN PTR t02.moshkow.pp.ru. . . .
255 IN PTR t255.moshkow.pp.ru.
/var/named/root.cache -----------------------------------------
; ftp://ftp.rs.internic.net/domain/named.root
;
. 3600000 IN NS A.ROOT-SERVERS.NET.
A.ROOT-SERVERS.NET. 3600000 A 198.41.0.4
. 3600000 NS B.ROOT-SERVERS.NET.
B.ROOT-SERVERS.NET. 3600000 A 128.9.0.107
. 3600000 NS C.ROOT-SERVERS.NET.
C.ROOT-SERVERS.NET. 3600000 A 192.33.4.12
. 3600000 NS D.ROOT-SERVERS.NET.
D.ROOT-SERVERS.NET. 3600000 A 128.8.10.90
. 3600000 NS E.ROOT-SERVERS.NET.
E.ROOT-SERVERS.NET. 3600000 A 192.203.230.10
. 3600000 NS F.ROOT-SERVERS.NET.
F.ROOT-SERVERS.NET. 3600000 A 192.5.5.241
. 3600000 NS G.ROOT-SERVERS.NET.
G.ROOT-SERVERS.NET. 3600000 A 192.112.36.4
. 3600000 NS H.ROOT-SERVERS.NET.
H.ROOT-SERVERS.NET. 3600000 A 128.63.2.53
. 3600000 NS I.ROOT-SERVERS.NET.
I.ROOT-SERVERS.NET. 3600000 A 192.36.148.17
/var/named/127.0.0.0 --------------------------
@ IN SOA localhost. root.localhost. ( 1997071201 ; Serial 36000 ; Refresh 3600 ; Retry 3600000 ; Expire 36000 ) ; Minimun IN NS localhost.
1 IN PTR localhost.
=========== И НАКОНЕЦ /etc/named.boot
directory /var/named ;
cache . root.cache ;
primary 0.0.127.in-addr.arpa 127.0.0.0 ;
; forwarders 193.124.148.65 193.124.23.4
primary moshkow.pp.ru moshkow.pp.ru ;
primary 173.233.193.in-addr.arpa 193.233.173.0 ;
; secondary moshkow.orc.ru 193.124.148.81 second/moshkow.orc.ru
Дополнительная информация
$INCLUDE /var/named/header
@
$INCLUDE /var/named/fedfond-hosts-spisok
@
Первая строка содержит:
- имя зоны с обязательной точкой в конце
- предопределенные поля IN и
- имя , на котором содержится заведомо правильная о зоне, с обязательной точкой на конце. При необходимости размещения вторичных мы будем брать информацию о зоне именно с этого .
- почтовый адрес ответственного за , в котором знак @ заменен на . а если требуется использовать . в левой части адреса, она должна быть префиксирована двумя знаками \ Именно по этому адресу будет отправлено сообщение в случае успешного зоны. Адрес в приведенном примере будет выглядеть как andrei.arkhipov@elvis.ru
- открывающая круглая скобка
На следующих 5 строках описываются важные для зоны :
Определяет порядковый номер редакции с описанием зоны.
Это число должно изменяться только в сторону увеличения и
изменяться оно должно при каждом внесении изменения в
описания зоны. Рекомендуемый формат:где — год, — месяц, — день, — порядковый номер
внесения изменения в указанный день.Каждые «» секунд вторичные проверяют основной на
предмет увеличения значения ««, и если это произошло
обновляют у себя зону. Рекомендуемое значение: 86400, что
составляет 24 часа.Если основной был недоступен, вторичный будет
производить повторные попытки каждые «» секунд.
Рекомендуемое значение: 7200, что составляет 2 часа.Если в течение «» секунд вторичный не смог
соединиться с основным и обновить информацию о зоне, он считает
себя неспособным давать ответы на о зоне. Рекомендуемое
значение: 2592000, что составляет 30 суток.Значение по умолчанию для времени, в течение которого
держит в . Рекомендуемое значение: 345600, что
составляет 4 суток.
Далее идет описание всех зоны, причем указанный
в первой строке (в записи ) обязательно должен
присутствовать в этом списке, а если необходимо размещение
вторичных на маших АО Релком (ns.spb.su и/или
ns.ussr..), то и они должны присутствовать в списке, а
также в заявке.
В приведенном примере утверждается, что зона присутствует на
серверах ns.elvis.ru и ns2.elvis.ru и требуется размещение
вторичных на ns.spb.su и ns.ussr..
Обратите внимание, что все имена заканчиваются точкой.
The resolver library routines described in resolver include routines that build query packets and exchange them with the name server.
About Domain Name Service
Host-table lookup routines, such as those using the /etc/hosts file, require that the master file for the entire network be maintained at a central location by a few people. This approach works well for small networks where there are only a few stations and there is cooperation among the different organizations responsible for them. However, this approach does not work well for large networks where stations cross organizational boundaries.
The Domain Name Service eliminates the need for a single, centralized clearinghouse for all names. The authority for this information can be delegated to the organizations on the network that are responsible for it.
The Domain Name Service is organized as a hierarchical name space, like the IRIX file system. Figure 6-1 shows a small section of this hierarchy.
Each subtree in the hierarchy is called a , and is given a label. At the top of the hierarchy is the root domain, labelled with the null label (“ ”). The name of the domain is the concatenation of all the domain labels from the root to the current domain. The labels are listed from right to left and are separated by dots. (For example, the name for the domain labelled fruit in Figure 6-1 would be fruit.salad.com.) A label must be unique only within its domain.
Figure 6-1. Partial View of Domain Name Space
There are also many national domains, such as DE for Germany and FR for France.
An example of a domain name for a station at the University of California, Berkeley is monet.berkeley.edu.
The top-level domain for educational organizations is edu. Berkeley is a subdomain of edu, and monet is the name of the station.
BIND Servers and Clients
BIND is based on a server-client relationship. There are several different classes of servers, with varying degrees of authority. This section discusses the interaction between various types of servers, and between servers and clients. This information is summarized in Table 6-1.
Table 6-1 summarizes the general characteristics for various BIND server configurations.
Table 6-1. BIND Server Configurations
The client accesses data from the name servers specified in its resolv.conf file. It does not run the domain server, named.
BIND Master Servers
A master server for a domain is the authority for that domain.
This server maintains all the data corresponding to its domain. Each domain should have at least two master servers: a primary master, and a secondary master to provide backup service if the primary is unavailable or overloaded. A server can be a master for multiple domains, serving as primary for some domains and secondary for others.
A primary master server is a server that loads its data from a file on disk. This server can also delegate authority to other servers in its domain. A secondary master server is a server that is delegated authority and receives its data for a domain from a primary master server. At boot time, the secondary server requests all the data for the given domain from the primary master server. This server then periodically checks with the primary server to see if it needs to update its data.
Root servers are the master servers for the root and top-level Internet domains. They are listed in the root.cache file described in “BIND root.cache File”.
BIND Slave and Forwarding Servers
A slave server always forwards queries it cannot satisfy locally to a fixed list of forwarding servers, instead of interacting with the master name server for the root and other domains.
There may be one or more forwarding servers, and they are tried in turn until the list is exhausted.
There are two main reasons to use forwarders. First, if your station does not have full network access, it cannot send IP packets to the rest of the network. Therefore, it must rely on a forwarder with access to the network. Second, the forwarder can see all queries as they pass through the server and, therefore, builds up a more complete cache of data than the cache in a typical station name server. In effect, the forwarder becomes a meta-cache from which stations can benefit, thereby reducing the total number of queries from that site to the rest of the network.
BIND Caching-Only Server
A caching-only server is not authoritative for any domain. It services queries and asks other servers, who have the authority, for needed information.
The results of queries are cached, to reduce traffic to the authoritative server. Query responses include a time-to-live field, which indicates how long they should be cached for.
BIND Clients
A BIND client accesses the name servers that run on other stations in the network. The named server does not run on the client station.
BIND Configuration Files
This section discusses the various BIND configuration files. Examples of these files are provided in “Setting Up a BIND Configuration”
.
A README file contains a short summary of the setup procedure and a list of official names for BIND clients and servers. Typically, servers are also clients. BIND clients require the /etc/resolv.conf file.
The /var/named/Examples subdirectory contains sample named database files. The files in the Examples directory should be used and changed to reflect your setup. These files use the record format described in Appendix A, “BIND Standard Resource Record Format”. The database files needed to set up your BIND environment are these:
The number and configuration of the database files depend on the server type.
Table 6-2 summarizes which database files are required for each type of server.
Table 6-2. named Database Files
BIND Boot File
To use a different file, create or modify the /etc/config/named.options file with this entry:
Specifying a Directory in the BIND Boot File
The directory line specifies the directory in which the name server should run, allowing the other filenames in the boot file to use relative pathnames.
This entry is required. It makes sure named is in the proper directory when you try to include files by relative pathnames with $INCLUDE. It also allows named to run in a location that is reasonable for dumping core, if necessary.
Specifying a Primary Master in the BIND Boot File
The line in the boot file that designates a primary server for a zone looks like this:
primary Berkeley.EDU named.hosts
The first field specifies that the server is a primary one for the zone stated in the second field. The third field is the name of the file from which the data is read.
Specifying a Secondary Master in the BIND Boot File
The line for a secondary server is similar to that for the primary, except that it lists addresses of other servers (usually primary servers) from which the zone data is obtained. For example:
secondary Berkeley.EDU 128.32.0.10 128.32.0.4 ucbhosts.bak
The first field specifies that the server is a secondary master server for the zone stated in the second field. The two network addresses specify the name servers that are primary for the zone. The secondary server gets its data across the network from the listed servers. It tries each server in the order listed until it successfully receives the data from a listed server.
If a file name is present after the list of primary servers, data for the zone is saved in that file. When the server first starts, it loads the data from the backup file if possible, and consults a primary server to check that the zone information is still up to date.
Specifying a Caching-Only Server in the BIND Boot File
All listed cache files are read when named starts up. Valid values are reinstated in the cache, and the root name server information in the cache files is always used to handle initial queries.
The name server needs to know the servers that are the authoritative name servers for the root domain of the network. The root.cache file primes the server’s cache with the addresses of these higher authorities. This file uses the Standard Resource Record format (or Master File format) described in detail in Appendix F.
You do not need a special line to designate that a server is a caching server. What denotes a caching-only server is the absence of authority lines, such as secondary or primary, in the boot file.
Specifying Forwarders in the BIND Boot File
forwarders 128.32.0.10 128.32.0.4
Specifying Slave Mode in the BIND Boot File
If you use slave, you must specify forwarders. In slave mode, the server forwards each query to each of the forwarders until an answer is found or the list of forwarders is exhausted.
BIND named.hosts File
This file contains the host-address database for your domain. It is required for primary servers.
BIND named.rev File
This file specifies the IN-ADDR.
ARPA domain, which is used to translate IP addresses into names. Because Internet addresses do not fall within domain boundaries, this special domain was formed to allow inverse mapping. The IN-ADDR.ARPA domain for a station has four labels preceding it. These labels correspond to the four octets of an Internet address in reverse order. All four octets must be specified, even if an octet is zero.
For example, the Internet address 128.32.130.12 is located in the domain 12.130.32.128.IN–ADDR.ARPA. This reversal of the address allows for the natural grouping of stations in a network.
An IN-ADDR.ARPA domain can also represent a network. For example, if the ARPANET is network 10, there is a domain called 10.IN-ADDR.ARPA.
BIND localhost.rev File
BIND root.cache File
BIND /etc/config/named.options File
hoResolution With /etc/resolv.conf
The only configuration file required by BIND clients is the /etc/resolv.conf file.
This file is read the first time getaddrinfo is called. The resolv.conf file has several functions:
It defines the default domain or the default domain search list.
It specifies the ordering of host resolution services used by getaddrinfo.
It lists Internet addresses of name servers.
The first two items apply to both client and server stations. The last item is required only by client stations. The file’s format is described in detail in the resolver(4)
reference page.
On client and server stations, the name in /etc/sys_id should be set to the fully qualified domain name. For example:
However, if you choose not to use fully qualified domain names, add a line with the keyword domain and the station’s domain to the resolv.conf file. For example:
The getaddrinfo library routine normally access station information in this order:
Local /etc/hosts file


