

В дистрибутивах Linux пользовательские привилегии предоставляются путем открытия доступа к root. Наличие таких прав позволяет использовать функциональность операционной системы более широко и выполнять необходимые действия в корневом каталоге.
Давайте детально обсудим, что может суперпользователь в Linux, как настроить root и для чего нужна команда
$ sudo useradd -ou 0 -g 0 john
$ sudo passwd john
- Grant Root Privileges To Existent User
- Add User To Root Group
- Delete User With Root Privileges
- Add new user in Kali Linux
- Add user to the root group
- Install the kali-grant-root package
- Delete a user with root privileges
- Conclusion
- Install SUDO on Ubuntu
- Disable Root Login in Linux
- 1. Disable Root Login in Linux with passwd Command
- 2. Disable Root Login Using the usermod Command
- 3. Changing the Login Shell to /usr/sbin/nologin
- 4. Disable Root SSH Login
- 5. Restricting access to the root account services via PAM
- Conclusion
- Working with sudo Command in Linux
- 1. Granting sudo access to users
- 2. sudo command usage
- 3. Running a Sudo command as another user
- 4. Allowing limited commands as sudo for your users
- 5. Other common options with the sudo command
- Bonus – Shortcut to run shell as root – sudo -s
- Difference between sudo and su Commands
- Summary
- References:
- Безопасность использования прав суперпользователя
- Предназначение root-прав в Linux
- Переключение на суперпользователя
- Команда sudo и примеры ее использования
- Предоставление и отзыв прав суперпользователя
- Создание нового пользователя с root
- Для существующей учетной записи
- Откат прав суперпользователя
Grant Root Privileges To Existent User
$ grep john /etc/passwd
john:x:1001:1001::/home/alice:/bin/sh
For this, it is required to edit the file /etc/passwd and just change UID and GID to 0:
$ grep john /etc/passwd
john:x:0:0::/home/john:/bin/sh
Add User To Root Group
$ sudo usermod -a -G root john
Delete User With Root Privileges
$ sudo userdel john
userdel: user john is currently used by process 1
To delete him, firstly open the /etc/passwd file and change his UID.
For example, change the line:
john:x:0:0::/home/john:/bin/sh
to something like:
john:x:1111:0::/home/john:/bin/sh
$ sudo userdel john
In Kali Linux, many commands and tools require root permission to run. However, we can run these commands by prefacing them with the sudo command. But, adding sudo to every command we use and entering the password every time, is quite frustrating.
Add new user in Kali Linux

adduser --home /home/user1 user1

Add user to the root group
sudo usermod -a -G <group_name> <username>
sudo usermod -a -G root user1

Install the kali-grant-root package

sudo apt install kali-grant-root

sudo dpkg-reconfigure kali-grant-root

Now, log out and re-login, and update the repositories. After the update, try any command that requires root permissions. If the above method is successful, You will not be prompted for the password.
Delete a user with root privileges
sudo deluser --remove-home <username>
sudo deluser --remove-home user1

Conclusion
Если необходимо, чтобы программа всегда запускалась с правами root, даже если она запущена не от имени root, а обычным непривилешированным пользователем без использования sudo, то нужно использовать функционал setuid или setgid. Это означает, что программа будет запущена не от имени пользователя, который ее запускат, а от имени владельца исполняемого файла.
Установить признак setuid можно так:
sudo chown root:root ./program
sudo chmod a+s ./program
Всё. Теперь даже если процесс запущен непривилегированным пользователем, он всё равно получит привилегии владельца исполняемого файла, то есть — root
Однако, при попытке запустить GUI-приложение с признаком setuid я получил сообщение вида:
Gtk-WARNING **: 10:17:50.381: This process is currently running setuid or setgid.
This is not a supported use of GTK+. You must create a helper
В этому случае — можно сделать иначе.
Добавить в /etc/sudoers строку вида:
username ALL=(ALL) NOPASSWD: /usr/local/bin/programmname
#!/bin/bash
sudo /usr/local/bin/programmname &
exit 0
В итоге — при запуске скрипта-обертки GUI-программа /usr/local/bin/programmname стартует с правми root без ввода пароля.

Once installed, when we write the Gnu / Linux commands in uppercase in the terminal, the SUDO utility will execute these commands as if we were doing it using «sudo ». Basically It will allow us to avoid having to write «sudo» in front of each command that we launch. Useful I don’t know if it will be, but it seems curious to me for a while.
Install SUDO on Ubuntu
The installation of this utility in our Ubuntu is very simple. To start with, let’s use Git to clone the SUDO repository. In a terminal (Ctrl + Alt + T) we are going to write:

git clone https://github.com/jthistle/SUDO.git
The above command will clone the content of the SUDO GIT repository. Then it will be saved in a directory called «SUDO» that we can find in our current working directory.
We continue moving to the SUDO directory that was just created on our disk:
cd SUDO/

./install.sh
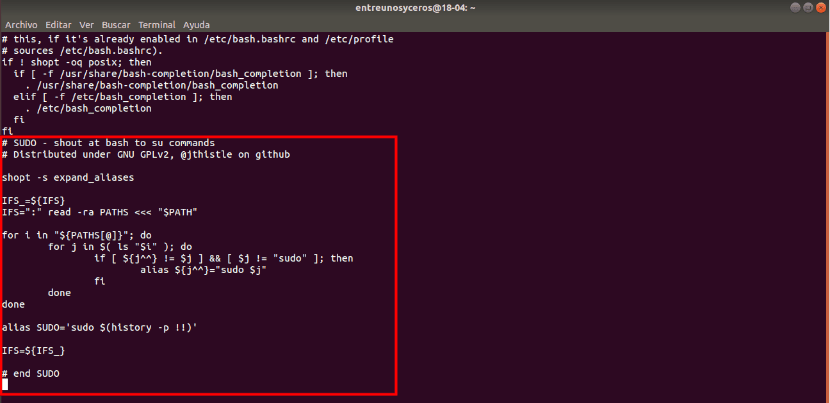
For added security, a backup copy of our file will be created ~/.bashrc. This will be saved as ~ / .bashrc.old. We can use the backup copy to restore in case something goes wrong.
source ~/.bashrc

MKDIR /ubunlog
TOUCH /ubunlog/prueba.txt
LS /ubunlog
Keep in mind that using SUDO will not bypass the password of «sudo«. We are still going to have to type the corresponding password to execute the given command. This utility will only prevent us from typing «sudo » in front of each command that we want to execute.
Of course, write «sudo » It will only steal a few seconds of time, so I don’t think it can be called a problem either. For this reason, I think this is just a curious project created to pass the time.
Disable Root Login in Linux
Most of the methods that we’re listing here are pretty much accessible for every Linux distribution.
Let’s go over all the available methods one by one.
1. Disable Root Login in Linux with passwd Command
To disable the root login, you can use the passwd command below:
2. Disable Root Login Using the usermod Command
3. Changing the Login Shell to /usr/sbin/nologin
In this case, what we’re going to do is to change the default root shell to nologin instead of bash. So whenever someone logs in to the root account even with the correct password, the account will automatically exit the shell.
Two ways to set nologin shell:
- Edit the /etc/passwd file manually
- Use the usermod command to set the default shell
Editing the /etc/passwd file manually:

sudo usermod -s /usr/sbin/nologin root
Once you do this, the default shell will be set and you can verify the same by doing a cat /etc/passwd.


4. Disable Root SSH Login
What if you do not want to disable the root login for the entire operating system but only want to disable access via SSH servers? Well, you can do that by simply editing the /etc/ssh/sshd_config file and disable root login from there.
Edit the SSH config file by using the command below:
sudo nano /etc/ssh/sshd_config
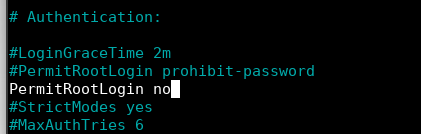
And find the line that says PermitRootLogin. Now you can uncomment the same line and edit it, or add another line with your desired option. In my case, I’ve simply written the same thing on a new line.
5. Restricting access to the root account services via PAM
echo -e "user1\nuser2\nuser3" | sudo tee /etc/allowed_users
Now, open the PAM configuration file for the “sshd” service:
sudo nano /etc/pam.d/sshd
auth required pam_listfile.so item=user sense=allow file=/etc/allowed_users onerr=fail
Conclusion
Well, that’s about it. These are just some of the quick and easy methods to disable root login in Linux that you can work with. For the most part, the first two methods will serve all your purposes. But if you need help with a specific situation, comment below and we can help you out with it better.
When you use the sudo command for the first time, you see the message “With great power, comes great responsibility.”
Also read: Shell Scripting 101: Variables in Shell Scripts
Working with sudo Command in Linux
1. Granting sudo access to users
username ALL=(ALL:ALL) ALL
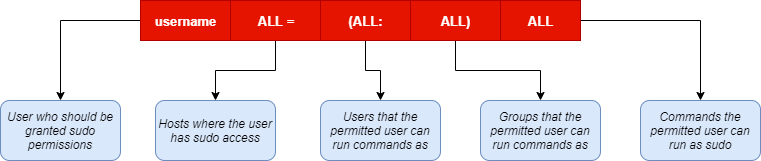
- The “username” will be the name of the user who has the permissions
- The ALL at the beginning specifies which hosts the user has sudo access on
- The second ALL specifies which users the user can run commands as
- The third ALL specifies which groups the user can run commands as
- The ALL at the end specifies which commands the user is allowed to run.
2. sudo command usage
root@shell# sudo apt update
Enter password:
By default, you’ll be required to enter your password to gain access but this can be skipped by adding a “NOPASSWD” attribute when granting permissions in the sudoers file. Though this is NOT recommended.
3. Running a Sudo command as another user
But how do you do the same in Linux? We make use of the -u option like an example below.
root@shell# sudo -u otherusername (command)
Enter otheruser password:
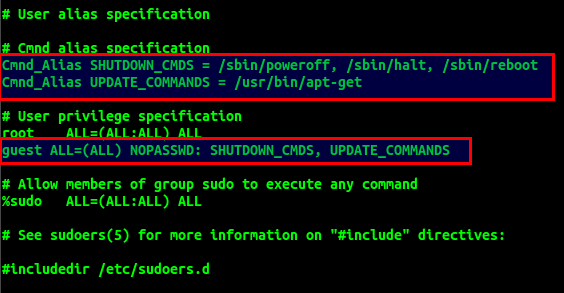
4. Allowing limited commands as sudo for your users
username ALL=NOPASSWD: /sbin/poweroff
5. Other common options with the sudo command
The options that we listed above are some very frequently used options. Below are a few more common options that will come in handy for you.
- -l stands for “list” and it allows a user to list the commands that they are permitted to run on the particular host
- -p allows a user to specify a custom terminal prompt while overriding the one that’s already in use
- -k whenever a user runs sudo, a timestamp is recorded and the timestamp lets the user use sudo without a password until the timeout specified in sudoers (usually 5 minutes). With this option, a user can invalidate the timestamp so the next usage of sudo will require a password again
- -K is similar to the lowercase -k option, but this one allows the user to entirely remove the timestamp.
- -h get all the available options as a list with their explanation and usage
Bonus – Shortcut to run shell as root – sudo -s
[username@host] sudo -s
[root@host]
Difference between sudo and su Commands
Summary
References:
Безопасность использования прав суперпользователя
Если с предназначением root-прав в Linux все понятно, то вот к безопасности их использования есть вопросы. В основном, относится это к серверным машинам, поскольку риск взлома домашнего компьютера очень мал, да и кому нужны файлы обычного пользователя, чтобы ради этого затевать процедуру взлома. Если вы используете Linux как обычную операционную систему, работаете с документами и стандартными программами, используйте root для установки приложений и защиты системы от случайных изменений, которые могут внести другие пользователи компьютера.
С серверной частью все гораздо сложнее, поскольку рут как таковой не предоставляет полной защиты. Часто используемые пароли взламываются путем перебора или поиском бэкдора. Поэтому не стоит полагаться исключительно на защиту паролем, если вы владеете файлами сайтов или используете сервер для других целей. Займитесь настройкой файрвола, если это повысит уровень защиты.
Предназначение root-прав в Linux
Права обычного пользователя в Linux крайне ограничены. Он может управлять только своим каталогом и открывать для чтения определенные файлы из корня. Доступ для их изменения или установки программ отсутствует, что делает привилегии суперпользователя крайне важными при настройке ОС и решении разных проблем. Обычный пользователь ограничивается следующим набором прав:
- чтение, запись и изменение любых атрибутов пользовательской папки;
- то же самое и для каталога
- выполнение программ в любом месте, где нет ограничений;
- чтение файлов с соответствующим атрибутом для всех пользователей.
При наличии рут-прав у юзера появляется гораздо больше возможностей и расширяются границы взаимодействия с операционной системой. Становятся доступными любые действия со всеми папками и файлами.
Комьюнити теперь в Телеграм
Подпишитесь и будьте в курсе последних IT-новостей
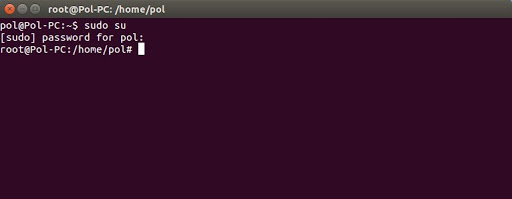
Переключение на суперпользователя
Еще раз уточню, что команда идеально подходит для получения необходимых привилегий без переключения учетной записи. Ее можно использовать как для выполнения одного действия, так и нескольких. Если вы желаете временно получить рут-права через эту команду, введите . В первом случае домашний каталог остается текущим, а во втором меняется на /root.
Примерно так же работает и команда , но она обладает дополнительными аргументами, которые следует уточнить:
- -c – позволяет выполнить команду;
- -g – устанавливает группу для пользователя;
- -G – дополнительные группы для юзера;
- — -l —login – один из режимов входа, при котором происходит переключение домашнего каталога;
- -p – сохранение переменных окружения;
- -s – выбор оболочки для выхода.
Вы уже сами решайте, какой вариант хотите использовать, и готовы ли смириться со всеми ограничениями и недостатками, которые накладывает каждый из них.
Команда sudo и примеры ее использования
тесно связана с root в Linux, поскольку отвечает за передачу прав суперпользователя и позволяет от его имени выполнять команды в Терминале. Существует несколько ее вариаций, использующихся при разных обстоятельствах. Подходит эта команда как для выполнения всего одного действия, так и для передачи прав на всю текущую сессию.
Самый простой пример использования – запуск программы от имени суперпользователя. Для этого вводится:
sudo program \\ program – название приложения, которое вы хотите запустить
применяется для установки софта, команда в таком случае обретает вид:
sudo apt install programВ следующем разделе статьи речь пойдет о передаче прав суперпользователя, что тоже реализуемо при помощи . Я рассмотрю два полезных аргумента. Советую ознакомиться с ними, если хотите упростить выполнение действий через Терминал.

Предоставление и отзыв прав суперпользователя
Каждому пользователю в Linux можно предоставить root-права, добавив его в соответствующую группу. Точно так же их можно и отнять, если вдруг это понадобится. Рассмотрю три варианта действий.
Создание нового пользователя с root
Допустим, что вы, единственный юзер в Linux, хотите создать еще одну учетную запись с правами суперпользователя. В таком случае алгоритм действий обретет следующий вид:
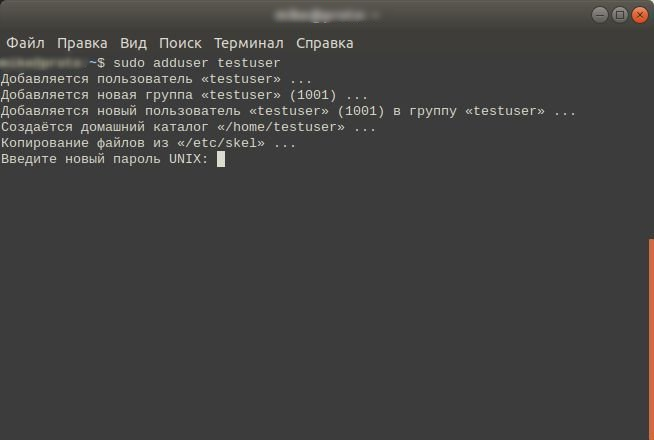
- Откройте Терминал и введите команду
- В консоли появятся инструкции по созданию нового пользователя. Присвойте пароль и подтвердите действие, чтобы завершить создание.
- Добавьте новую учетную запись в группу sudo, введя user здесь тоже понадобится заменить).
- Проверьте выполненные действия, переключившись на новую учетную запись через . Для подтверждения введите пароль (при вводе символы не отображаются на экране).
- Выполните любую команду с и убедитесь, что все прошло успешно.
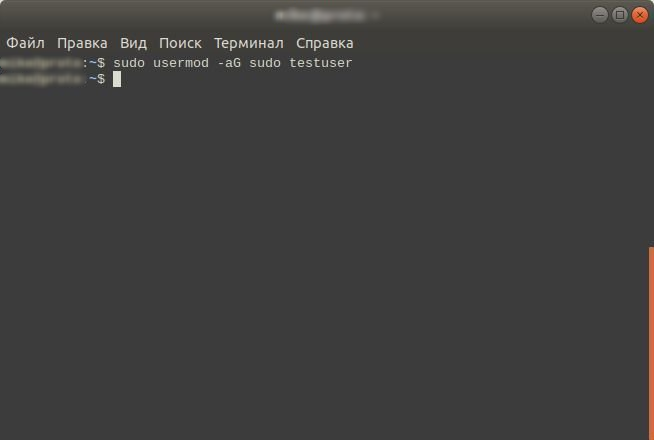
Для существующей учетной записи
Если учетная запись уже добавлена, в консоли остается ввести только одну команду, чтобы добавить пользователя в группу sudo и разрешить ему получение рут-прав. Сама команда представлена ниже, вам остается только скопировать ее и поменять имя юзера.
Используйте предыдущую инструкцию для проверки внесенных изменений.
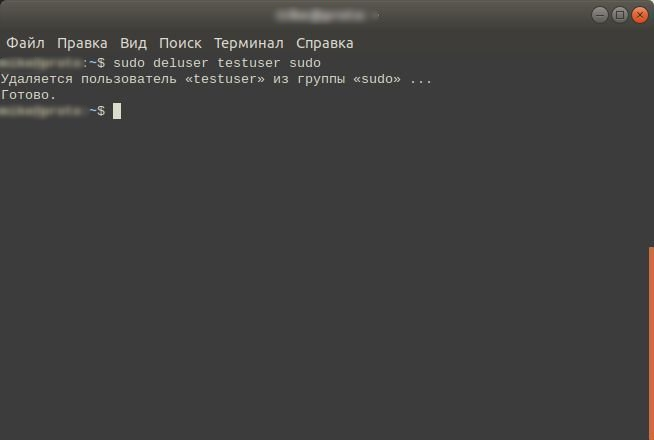
Откат прав суперпользователя
Если вдруг вы решили, что одна из учетных записей больше не должна состоять в группе sudo, отзовите права, введя команду:
Это была вся основная информация о правах суперпользователя в Linux. Вы знаете, что дают такие привилегии, как их правильно использовать и управлять пользователями. В качестве рекомендации скажу, что всегда нужно читать текст ошибок, появляющихся в Терминале, если что-то пошло не так. Это позволит вам быстрее решить проблему без траты времени на поиски в Google.
")


")