

These are instructions on how to root Samsung Galaxy Note 3 SM-N900A (AT&T) using Odin on Windows Computer.
These are instructions on how to root Samsung Galaxy Note 3 SM-N900S (running on android 5.0, built id LRX21V.N900SKSU0GOK3) using Odin on Windows Computer.
Requirements: Your Samsung Galaxy Note 3 SM-N900S should have at least 30-40 percent of battery to perform the rooting process.
These are instructions on how to root Samsung Galaxy Note 3 SM-N900T (T-Mobile) (running on android 5.0, built id LRX21V.N900TUVUFOB6) using Odin on Windows Computer.
Requirements: Your Samsung Galaxy Note 3 SM-N900T (T-Mobile) should have at least 30-40 percent of battery to perform the rooting process.
- Prepare Your Device
- Downloads
- Installation Instructions
- Reader Interactions
- Что нам понадобится?
- Disclaimer:
- Preparations:
- Root AT&T Galaxy Note 3 SM-N900A:
- Hand Picked Articles:
- Reader Interactions
- Disclaimer:
- The Root de la vega method does not work any more! To root your Verizon Galaxy Note 3 SM-N900V on Jelly Bean and KitKat, use Geohot’s TowelRoot app .
- Preparations:
- Rooting Verizon Galaxy Note 3:
- Useful Articles:
- Reader Interactions
- Why should you Root the Samsung Galaxy Note 3 version?
- How to Root Samsung Galaxy Note 3 Lollipop, and Install Magisk Manager? (SM-N900, SM-N9005, SM-N9006, SM-N900K, SM-N900S, SM-N900P, SM-N900R4, SM-N900T, SM-N900V, SM-N900W8)
- Things to check out for;
- Flash TWRP using ODIN
- Install Magisk, forced encryption disabler in your Samsung Galaxy Note 3 using TWRP
- Root Samsung Galaxy Note 3 SM-N900S using Odin
- Notes
- Как получить Root права для Samsung Galaxy Note 3 SM-N900? Способ №2
- Что нам понадобится?
- Root Samsung Galaxy Note 3 SM-N900T (T-Mobile) using Odin
- Notes
This Guide is intended only for the Galaxy Note 3 devices with the model number SM-N900, not for any other device of Samsung. Be extra cautious when you choose the firmware builds as flashing wrong firmwares might result in a bricked device. You alone are responsible for any consequences that might occur during the process, we shall not be held responsible for any damage to your device.
Prepare Your Device
- Charge your Galaxy Note 3 above 60% battery level to avoid shutdowns during the process.
- Enable USB Debugging: Link
- Required USB Drivers: Link
- Backup your device storage, Contacts, SMS, EFS (if you got root), etc. using Google Sync service or any third-party app.
Downloads
Installation Instructions
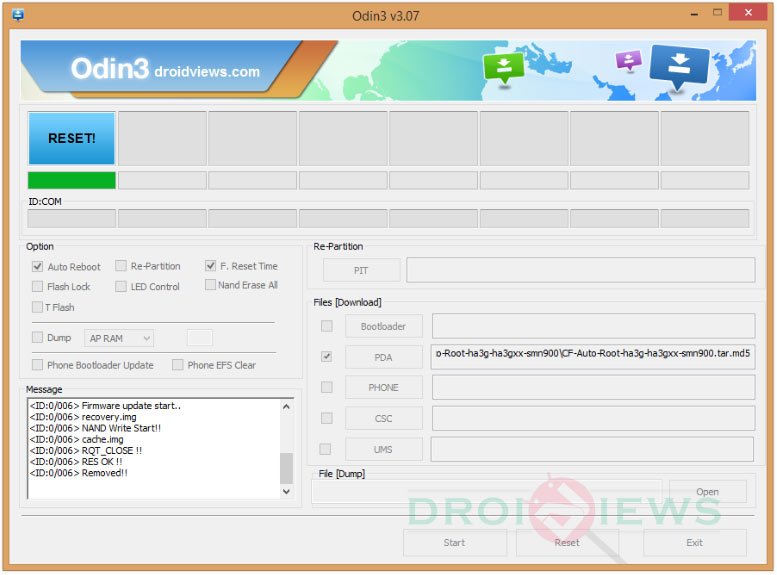
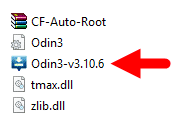
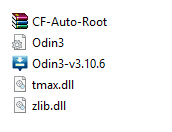
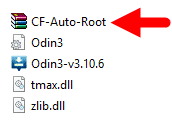
- Download and extract the Odin package on your desktop and place the CWM recovery and CF-Auto-Root files on the desktop.
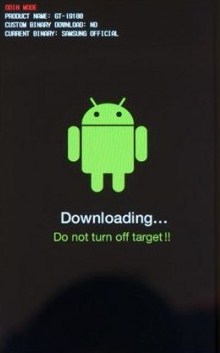
- Boot your device into the Download mode:
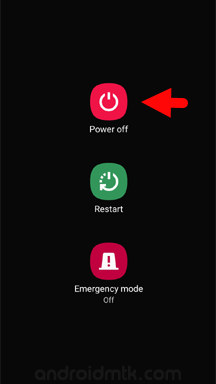
- Power off .
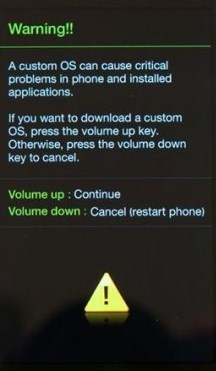
- Now press the Volume Down, Home and Power buttons together until you see the warning screen, use the Power to confirm and enter Download Mode.
- Connect the device to the PC using a USB cable.
- Flash the CWM recovery file n900-cwm-recovery-6.0.5.0-kk_L5.0(0812).tar in the AP tab. For more info, follow our detailed guide on Odin firmware flashing guide from here.
- Similarly, flash the CF-Auto-Root file for rooting your Note 3.
- Now, reboot into recovery mode. To do this:
- Power off .
- Now press the Volume Up, Home and Power buttons altogether and release them as soon as you enter the recovery mode.
- Finally, flash the SuperSU zip file from the recovery mode to gain root access. (Few users reported flashing CF-Auto-Root alone didn’t root the device)
- Reboot the device when you’re done.
That’s it, you have now rooted your device and installed CWM recovery on it.
Leave your valuable comments below.
Reader Interactions
Сайт AndroGoo представляет инструкцию по получению рут прав Samsung Galaxy Note 3 SM-N900. Сделайте свой смартфон еще фунцкиональнее с правами суперпользователя.
В умелых руках рут права станут универсальным инструментом, который позволит без ограничений управлять работой своего смартфона или планшета, удалять и редактировать системные файлы, оптимизировать работу процессора, оперативной памяти и многое другое. Если вы интересуетесь внутренней структурой операционной системы, хотите поэкспериментировать с ней или просто выжать из своего гаджета максимум возможностей, root права Samsung Galaxy Note 3 SM-N900 станут вам в этом незаменимым помощником.
Подходит только для Android 4.3
Что нам понадобится?
- .
- Смартфон.
- Компьютер.
- последней версии.
- Файл
- Если на ПК был Kies — удаляем.
- Устанавливаем драйвера.
- Распаковываем Один на ПК.
- На смартфоне заходим в Настройки, Для разработчиков (если такого пункта нет идем в О телефоне и жмем много раз на Номер сборки) и включаем Отладку по USB.
- Переводим смартфон в Dowload Mode. Для этого полностью его выключаем, зажимаем одновременно кнопки Домой+Включение+Громкость вниз.
- После появления экрана с надписью Warning, подтверждаем выбор нажатием кнопки Громкость вверх.
- Телефон перешел в режим загрузки.
- Запускаем Один. В поле AP выбираем скачанный ранее файл CF Auto Root с архива.

- Подключаем через USB смартфон к ПК.
- Если смартфон определился, как показано на скриншоте ниже (цифра может отличаться) — жмем Start.

- Начнется установка. Если прошивка прошла успешно в окне Odin появится надпись .

- После окончания устройство само перезагрузится. Отсоединяем его от ПК.
- Рут установлен!
Здесь вы узнаете как получить РУТ права для телефона Samsung Galaxy Note 3 SM-N900 , работающем на Android 4.3 Jelly Bean.
Телефон Samsung Galaxy Note 3 SM-N900 выпущен в 2013 году фирмой Samsung. Экран телефона обладает диагональю 5.7 дюйма и имеет разрешение 1080 x 1920.
В смартфоне установлен процессор Samsung Exynos 5 Octa 5420 с частотой 1900 и видеоускоритель Mali-T628 MP6.


Приложение для root-прав на андроид. Версии для ПК Windows и для OS Android


Популярное приложение для получения root-прав на андроид телефоны и планшеты.


Разработчик: HEXAMOB S.L.
Программа, которая поможет вам узнать, как получить права ROOT на вашем мобильном устройстве.


Самое необходимое приложение для всех, у кого есть ROOT доступ и права суперпользователя на телефоне.


Хотите получить root права на телефон? Это приложение поможет

ROOT права позволяют расширить функционал Samsung Galaxy Note 3 SM-N900 и операционной системы Android 4.3 Jelly Bean, на которой он работает. Вы сможете изменять стандартное программное обеспечение, удалять любые приложения, получите возможность устанавливать сторонние прошивки и программы, требующие полный доступ к системе. К установке РУТ прав стоит отнестись очень серьезно!
Что именно дают права Root на Андроид:
- Доступ к системным файлам и программам с возможностью изменения и удаления
- Активация дополнительных функций Андроид
- Увеличение быстродействия операционной системы
- Создание резервных копий прошивки и данных, их переноса
- Детальное изменение внешнего вида ОС Андроид
- Установка сторонних прошивок и модов
- Удаление рекламы из приложений
- Увеличение автономности работы батареи
- Разгон или понижение скорости процессора
- Установка приложений, которые требуют ROOT
И многие другие полезности.

Disclaimer:
Rooting your AT&T Galaxy Note 3 will trip your device custom lash binary but it will not trigger Samsung’s KNOX warranty counter. Besides, involving in any such activity might put your device at risk. We, therefore, advise you to use your discretion before proceeding. Neither the developer of this exploit nor DroidViews will be responsible for any mishap. Learn how to unbrick AT&T Galaxy Note 3 SM-N900A to fix your phone if anything bad happens.
The Root de la Vega method does not work anymore! To root your AT&T Galaxy Note 3 SM-N900A without unlocking the bootloader, use Geohot’s TowelRoot app.
Preparations:
The rooting method described below has been developed by XDA member designgears, and it is a little different than other exploits that we are familiar with. It demands you to install a modified firmware and then copy a rooting package to your device. The procedure is pretty simple but it sounds a little geeky. The only tiresome job for those with slow internet is the file size (2 GB) of the download package. Here are a few things to be taken care of before we proceed to root the AT&T Galaxy Note 3.
- Download Odin 3.09 and extract the zip on your computer: Odin3 v3.09.zip
- Download the rooting package for your device and extract it with : N900AUCUBMI9_VEGA.7z
- Inside the extracted folder, you’ll find 3 files:
- N900AUCUBMI9_OneClickBin.exe
- Root_de_la_Vega.tar
- Root_de_la_Vega.zip (extract)
- root_files (folder)
- root_de_la_vega.sh
- Install the latest Samsung USB Drivers or Kies on your PC (skip if you have any of them already).
- In case you have Kies installed on your computer, make sure to close it while you use Odin.
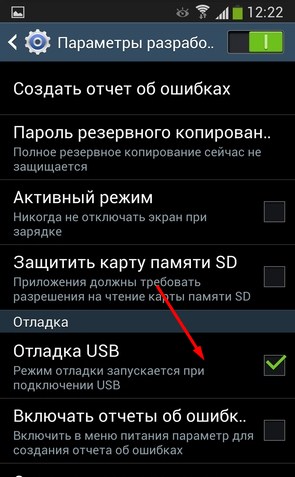
- Go to Settings> General> Developer options> USB Debugging and enable it by checking the box. Learn how to enable Developer options on Android.
- Rooting your Note 3 using this method will wipe all apps and data present on your device. Backup your device’s apps and data using a backup app.
- Charge your phone’s battery to at least 50% level.
- Remove the external SD card (if any) from your device.
Root AT&T Galaxy Note 3 SM-N900A:
Hand Picked Articles:
Reader Interactions

In most cases, our developers come up with a rooting method for a new talked about Android device within a few hours. However, sometimes the hours turn into days and weeks especially if it is a new device from Verizon. The Samsung Galaxy devices from Verizon are have always proved a hard nut to crack for our developers. At the same time, however harder a nut might be, it is always finally cracked. While browsing the Verizon Note 3 section on XDA, I came across a thread where people are offering bounty for the guy who would successfully root this device and devise a method to bypass or unlock the bootloader.
Anyway, if you have the Verizon Galaxy Note 3 SM-N900V and you wish to root it, XDA forum member designgears has a big surprise for you. This talented guy has managed to crack the nut first. This simply means that you can now root your brand new device easily. It should be noted that this method given below gives you root access only. It does not unlock the bootloader or allow you to install a custom recovery. You will still have to wait a little before you can be able to install a custom ROM. By rooting your Note 3, you will be able to install apps that require root permission and thus enjoy better battery, performance and backup your apps with full data.
Disclaimer:
The Root de la vega method does not work any more! To root your Verizon Galaxy Note 3 SM-N900V on Jelly Bean and KitKat, use Geohot’s TowelRoot app.
Preparations:
- Download Odin 3.09 and extract the zip on your computer: Odin3 v3.09.zip
- Download the rooting package for Verizon Note 3 and extract it with 7Zip: Root_de_la_Vega-SM-N900V.7z
- Inside the extracted folder, you’ll find two files:
- Root_de_la_Vega.tar.md5
- Root_de_la_Vega.zip (unzip it too)
- Install the latest Samsung USB Drivers or Kies on your PC (skip if you have any of them already): Download
- Go to Settings> General> Developer options> USB Debugging and enable it by checking the box. If you do not find Developer options on your phone, go to Settings> General> About and tap the Build Number for 7 times. You can then see developer options under Settings.
- Rooting your Note 3 using this method will wipe all apps and data present on your device. We strongly recommend that you backup all important data to external SD card or computer. You can also use these apps to do the same.
- Charge your device to at least 50% of battery level.
Rooting Verizon Galaxy Note 3:
- If you are using an external memory card on your Galaxy Note 3, remove it.
- Boot your Note 3 into Download Mode. To do this, turn off the device and then hold the Volume Down + Home + Power buttons at the same time for about 2-3 seconds. When you see the warning screen, press the Volume Up key to enter Download Mode.
- Open the Odin folder and launch the program.
- Connect the phone to your PC using USB cable.
- When Odin detects the device, you will “Added!!” text on the Message box on Odin.
- Now click the AP button on Odin and select “Root_de_la_Vega.tar.md5” file.
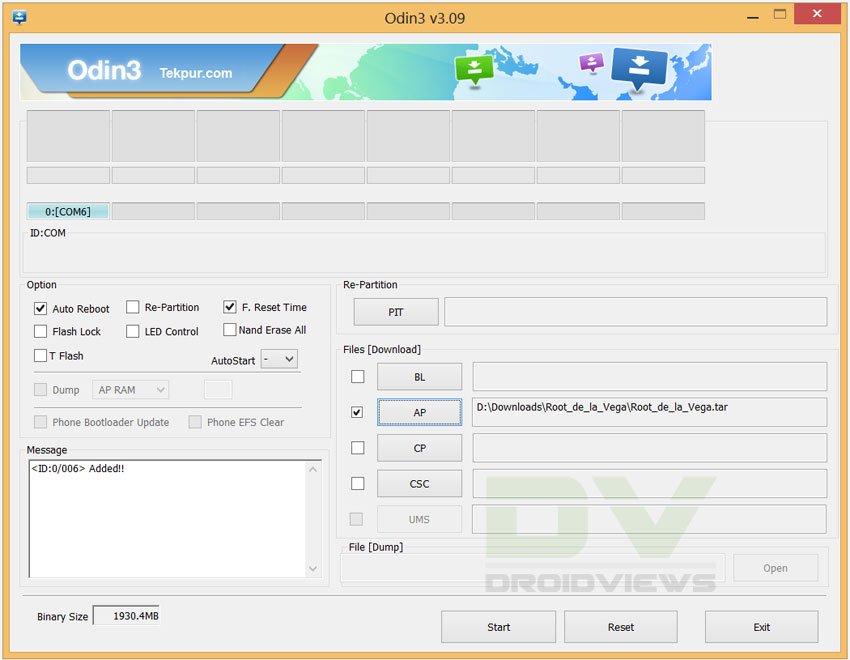
- Then click the Start button and wait till the installation is finished.
- Finally, you will see PASS!! message on Odin, signaling successful installation and then your device will reboot. Wait till it boots up normally.
- Now extract the “Root_de_la_Vega.zip” file and open the extracted folder. You’ll find 2 files inside it:
- root_files (folder)
- root_de_la_vega.sh
- Now connect your device to PC and copy both files to the internal SD card of your device.
- Then reboot your Galaxy Note 3. When the device boots up, go to file manager and delete the 2 files from your device.
- Finally, reboot your phone again. You can now insert your external SD card (if applicable).
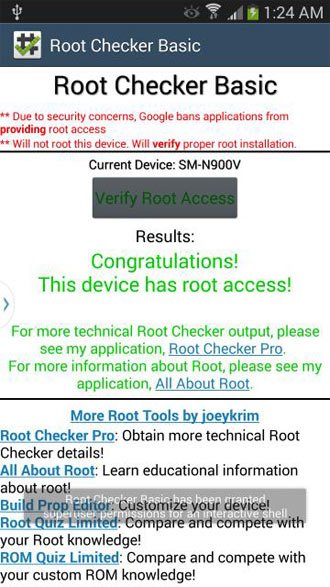
Your Verizon Galaxy Note 3 SM-N900V should now be rooted. To verify the root permission, install the Root Checker app from the Google Play Store and run it.
Useful Articles:
Best Apps for Rooted Android Devices
Customize and Tweak Your Note 3 with Xposed Framework
Add Any App to Floating Pen Window on Galaxy Note 3
How to Install Official Firmware on Galaxy Note 3 (All Models)
Reader Interactions
» » Root Samsung Galaxy Note 3 SM-N900 Lollipop using TWRP and Magisk (All Variants)
Most of the Samsung mobiles can work better even after many years. That’s why most of the people trust Samsung. Yes, Sometimes, the software is not right in some of the Samsung mobiles. But We can’t complain about the hardware. Mostly they won’t meet any component failure issues. Some of the Flagship mobiles are still useful because of the custom ROM. Samsung Galaxy Note 3 is a seven-year-old mobile. But when you notice the hardware, it can even beat most of the entry-level mid-range phones. So, When you flash custom ROMs, you can expect considerable performance improvements. To use Custom ROMs, You need root access. You can root your Samsung Galaxy Note 3 using the below method. Here We are using official TWRP. So, You can expect a high success rate.
Why should you Root the Samsung Galaxy Note 3 version?
We thank you for the hard work of XDA Developer-jcadduono and the TWRP Team. Without the developers, this rooting method is not possible. We Used Old TWRPs and modified them to work compatible with this mobile. Your mobile has 3 GB of RAM. It is not enough for Normal usage. But, Samsung stopped Security patch updates on 60-90 days Interval. Also, It is based on Old OS, So we can’t expect Many optimizations from stock firmware. It has a Qualcomm Snapdragon 800 processor for US Region and Exynos 5420 Octa-Core Processor for International variants.
Due to Poor RAM Management in Old device, you will feel laggy. If we optimize correctly with correct Custom OS after rooting, we can see some Improvements. So, after rooting, I can expect a Lag-free experience? Probably. Also, if we hibernate and eliminate a lot of unwanted bloatware apps and optimize some apps, your device is hardware limited. But, within these limits, we can enhance the performance by 30-40% compared with your old usage. If you use Lite weight Custom ROMs, you can expect a 50-80% improvement in performance based on what custom OS you are choosing.
How to Root Samsung Galaxy Note 3 Lollipop, and Install Magisk Manager? (SM-N900, SM-N9005, SM-N9006, SM-N900K, SM-N900S, SM-N900P, SM-N900R4, SM-N900T, SM-N900V, SM-N900W8)
Samsung Galaxy Note 3 International variants come with a flexible bootloader. It means that the smartphone can be easily rooted. Also, the device can accept to install TWRP recovery or any other custom recovery file/app alike.
With the help of TWRP Recovery, you can quickly flash the latest version of Magisk into your Samsung Galaxy Note 3 to gain root access. Before sharing the tutorial, you may want to know that, with the TWRP recovery present on your device, you can easily install any custom ROM or firmware. Does it seem complicated? Relax, everything will be explained succinctly in bullets.
Things to check out for;
Check your device model number.
- Select TWRP Based on the mobile model number.
Make sure your device battery is charged above 50%
Backup your current files and data and save them on external storage.
- You cannot use Samsung Pay, Secured folder, and some official apps from Samsung.
- Read the full tutorial before the process.
Enable USB Debugging Mode and OEM Unlock on your mobile. To do this; go to settings >>> about >>> Tap on the “Build Number” 7-10 times consistently to enable “Developer Options,” then go to the “Developer Options” and enable USB Debugging Mode and OEM Unlock. There is no complicated process in the Samsung Galaxy Note 3.
Download and install the Samsung USB driver to your computer system.
Also, download the ODIN software. Select the above Oreo version in the ODIN list. Install ODIN on your PC.
- Download Magisk.Zip (Download Latest version) and forced encryption disabler, Copy it to Your Phone Memory. We Need to flash encryption disabler to avoid Boot Warnings in the future after the Root process.
Download and save the TWRP File. Select the Correct TWRP file from Below. In theory, This TWRP can support Up to Nougat. But Samsung doesn’t release significant updates after the Lollipop version.
Flash TWRP using ODIN
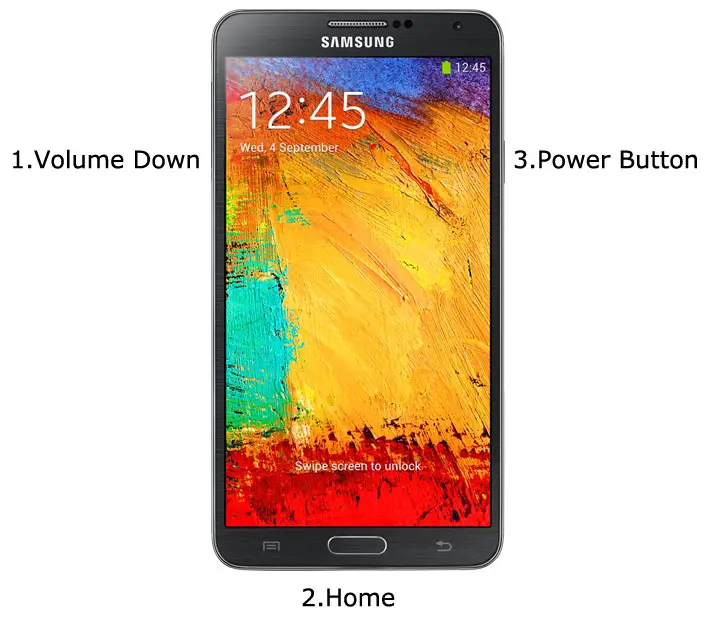
- Connect your USB cable with PC. Switch off your device. Then, enter into Download mode. To do this, press and hold down the Volume Down + Home + Power buttons and connect your micro USB Cable.
Press the Volume Up button to continue when you see the warning message.
Now, connect the Samsung Galaxy Note 3 mobile to the computer via USB cable.
Launch the Odin app on your computer. If the device is detected by this app (Odin), it will show you a message that reads – added!!!
However, if the device is not correctly connected to the PC, you won’t see this message. So, you have to check the USB cable if it is reasonable and reconnect the device.
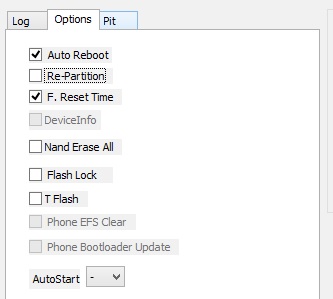
After connecting the Samsung device, click on the PDA/PA button to browse/search and get the TWRP from where you saved it on your PC. Also, navigate to “options” and un-tick the Auto-Reboot.
Click on “Start”
Once the file is loaded into the device, reboot your device.
Kudos, you have just Installed the TWRP on your Samsung Galaxy Note 3. If you installed TWRP, Don’t turn on your mobile. Immediately, move to Magisk Installation steps. Press Volume Down+ Power to exit download mode. Quickly boot into recovery before the first boot. Or Else, you will lose TWRP.
Install Magisk, forced encryption disabler in your Samsung Galaxy Note 3 using TWRP

- Boot it Into recovery mode->Volume Up + Home + Power Button.
- Now it Will Boot into TWRP Recovery Mode.
- Select Wipe->Advance Wipe->Select Cache Data.
- Return to Home of TWRP select Install.
- After Installation again, Navigate to Home select Install. Select forced encryption disabler.
- After the Installation Reboot Your Mobile.
In my opinion, you need rooting for your Samsung Galaxy Note 3 Because you are facing freeze and lag issues frequently. We could Improve Performance By root; With the Quad-Core processor and 3 GB RAM, your device can perform well within its hardware limits. If you don’t know how much RAM you need, You will never use this much RAM. You should not Boot into Normal OS Booting, by pressing the power button, after the twrp flash. If you accidentally urged and boot into the regular OS, Don’t panic, after setup everything, flash TWRP again using ODIN. If you root your device, because of the battery drain issues, you can optimize your battery without root. When Bloatware apps are your problem, you can Disable Bloatware apps using adb commands.

Selva Ganesh is the Chief Editor of this Blog. He is a Computer Science Engineer, An experienced Android Developer, Professional Blogger with 8+ years in the field. He completed courses about Google News Initiative. He runs Android Infotech which offers Problem Solving Articles around the globe.
Root Samsung Galaxy Note 3 SM-N900S using Odin
- Download and Install Samsung USB Driver on the computer. If in case Samsung USB Drivers are already installed on the computer, then SKIP this step.
- Download and extract the root files on the computer. Once the archive is extracted, you will be able to see the following files:
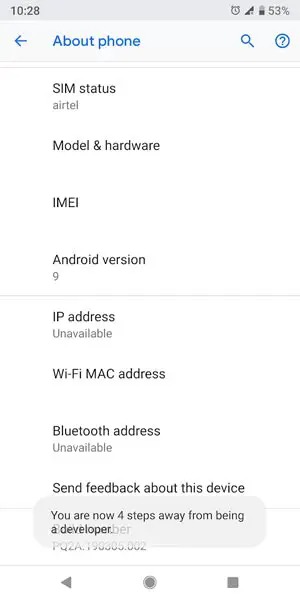
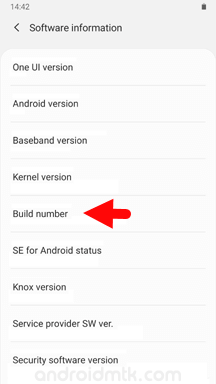
- Enable Developer Options on your Samsung mobile. To Enable Developer Options: Open Settings > About Phone > Tap on the Built Number for 6-8 times until developers option is enabled.
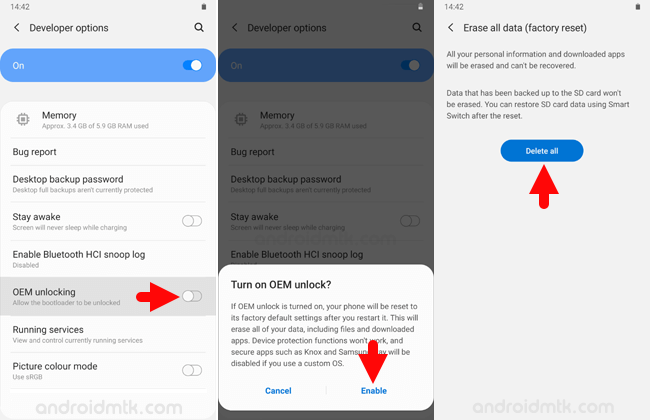
- Enable OEM unlock on your Samsung mobile. To Enable OEM Unlock: Open Settings > Developer Options > Tap on the OEM unlocking checkbox > Tap on Enable > Tap on Delete All button.
- Now, Switch off your Phone.
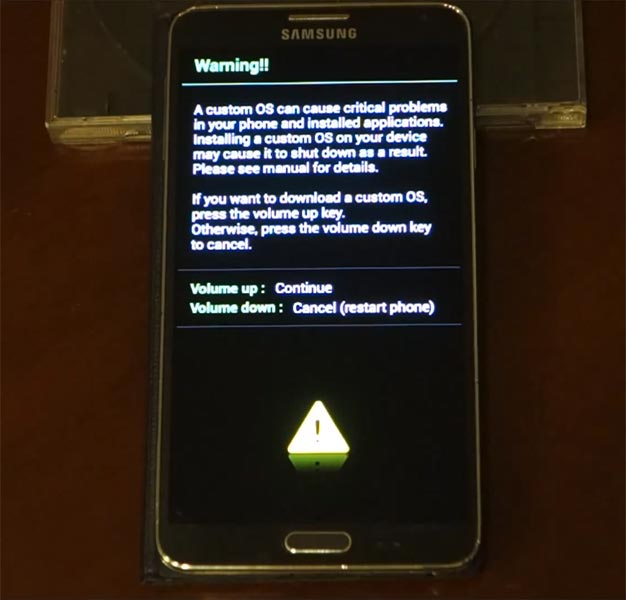
Step 4: Now, you have to enable Download Mode on your phone. To enable download mode Press and hold Volume Down Key, Home Button and Power key at same time for 5-8 seconds (you have to press and hold all three buttons at same time) until download mode is not active.

- In the Download mode you will be able to see a Warning Yellow Triangle Sign. In this situation you have to press the Volume up key to continue.
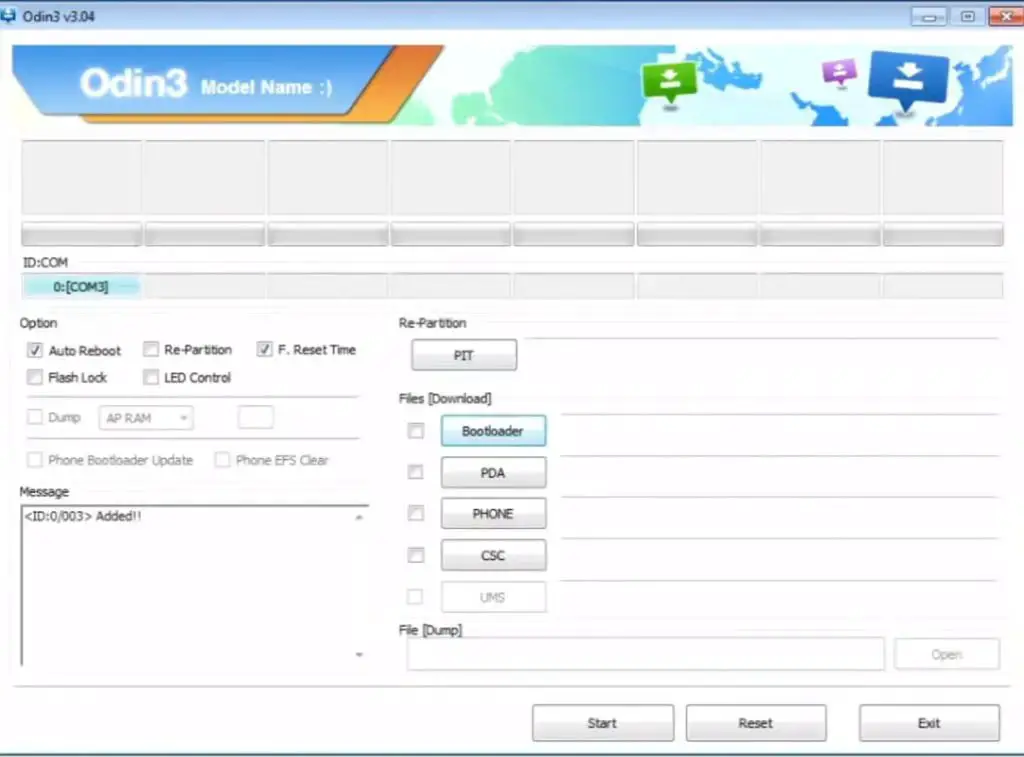
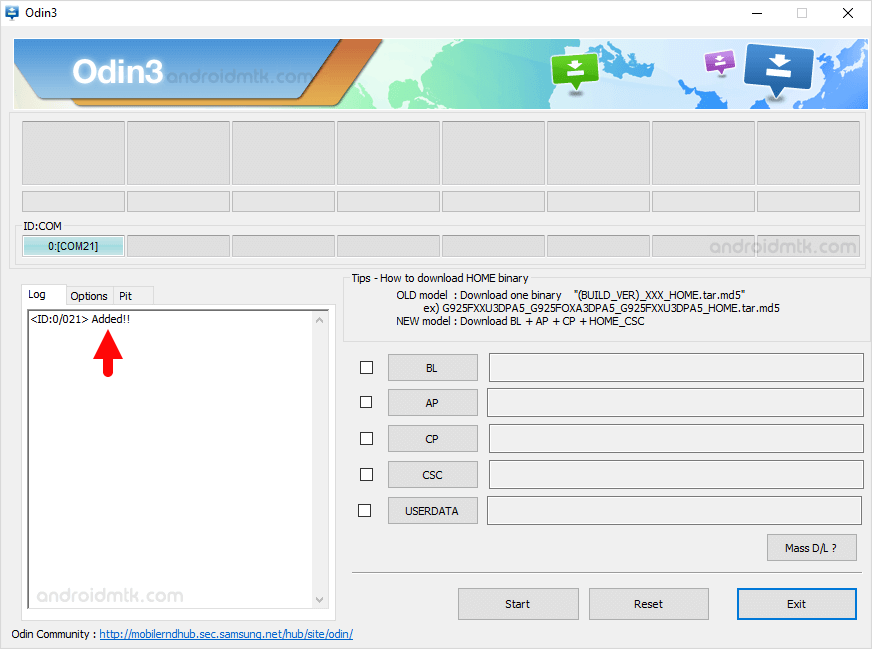
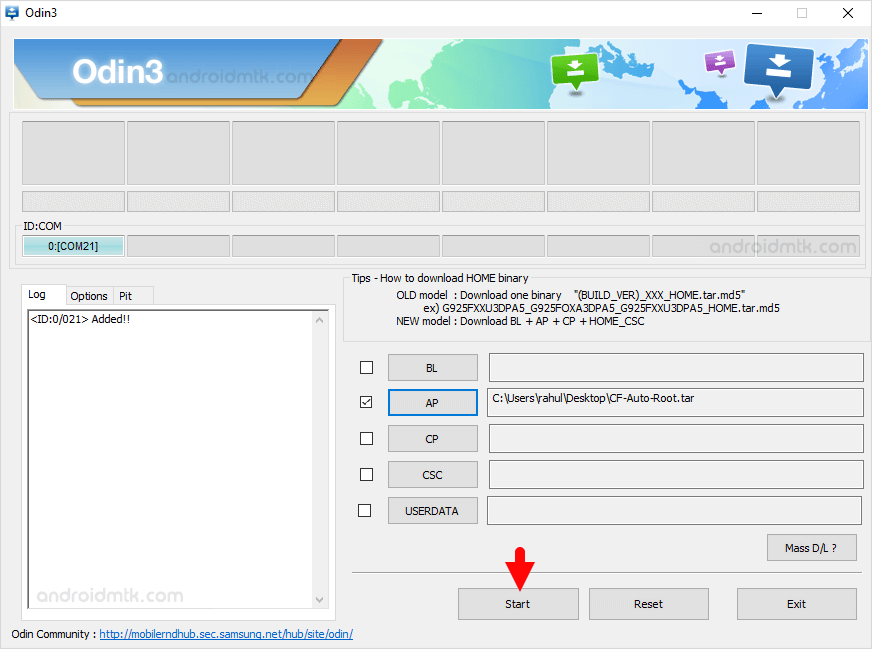
- Now, Open Odin3 (found in the extracted files, that you have downloaded in the Step#2) on your computer. Then connect your phone to the computer.
- Once you have connected the phone to the computer, Odin will automatically recognize the device and show “Added” message at the lower-left panel.
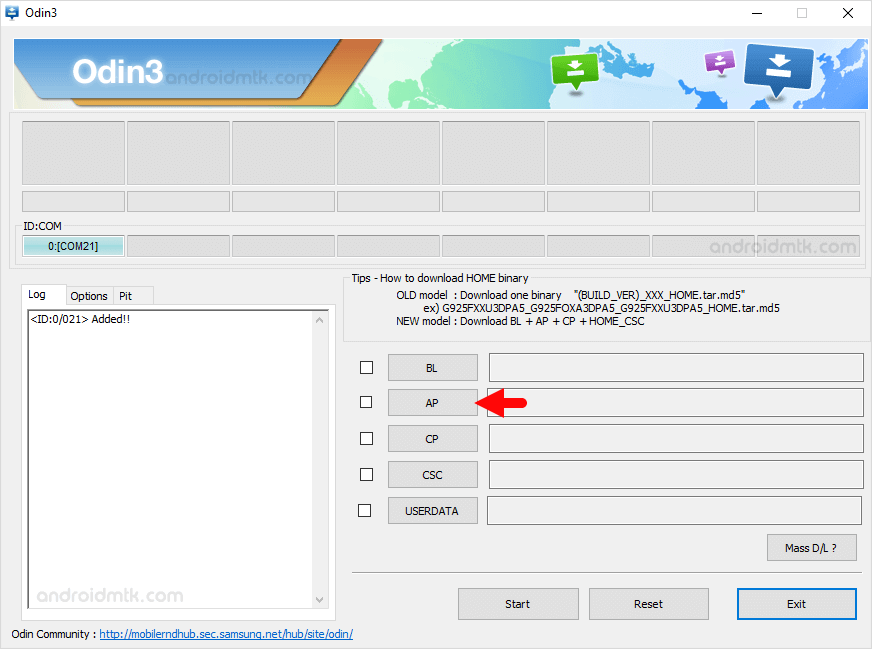
- Once your device detected by Odin, click on the PDA button and select the CF-Auto-Root.tar.md5 file (you have downloaded this file in step#2).
- Now, click on the Start button in Odin to begin the Flashing.
- Flashing usually takes 30-50 seconds to complete the rooting process on your Samsung Galaxy Note 3 SM-N900S. Once Rooting process got completed, you will be able to see a Green Box with Pass written on it in Odin. During this process phone will re-boot automatically.
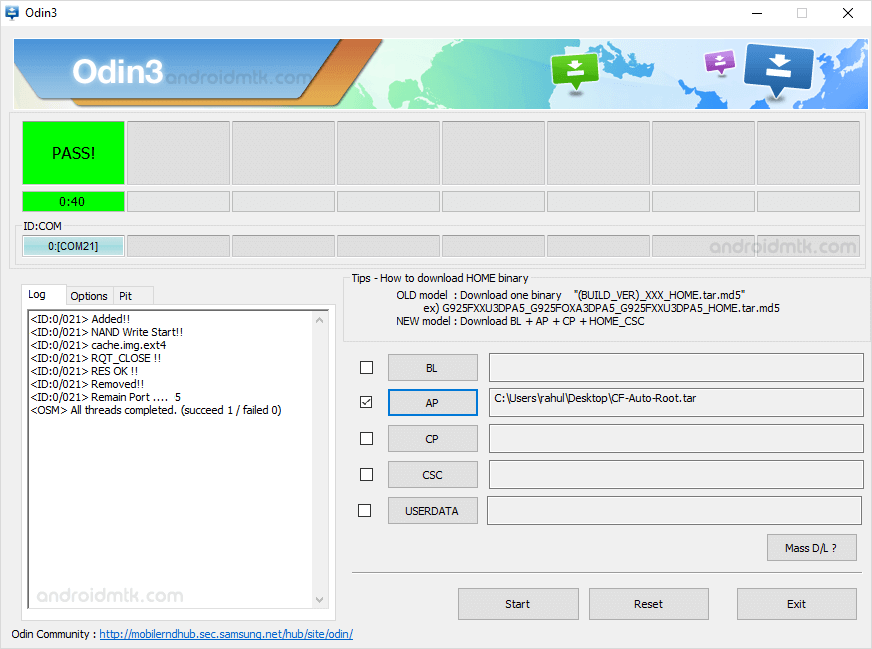
- Once you see, the Pass message in Odin, you can disconnect your Device from the computer.
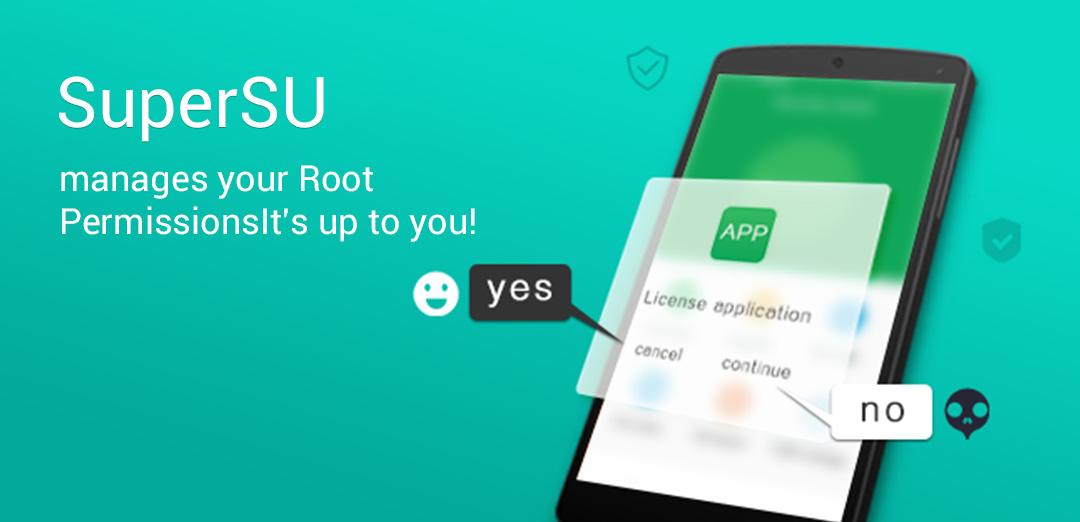
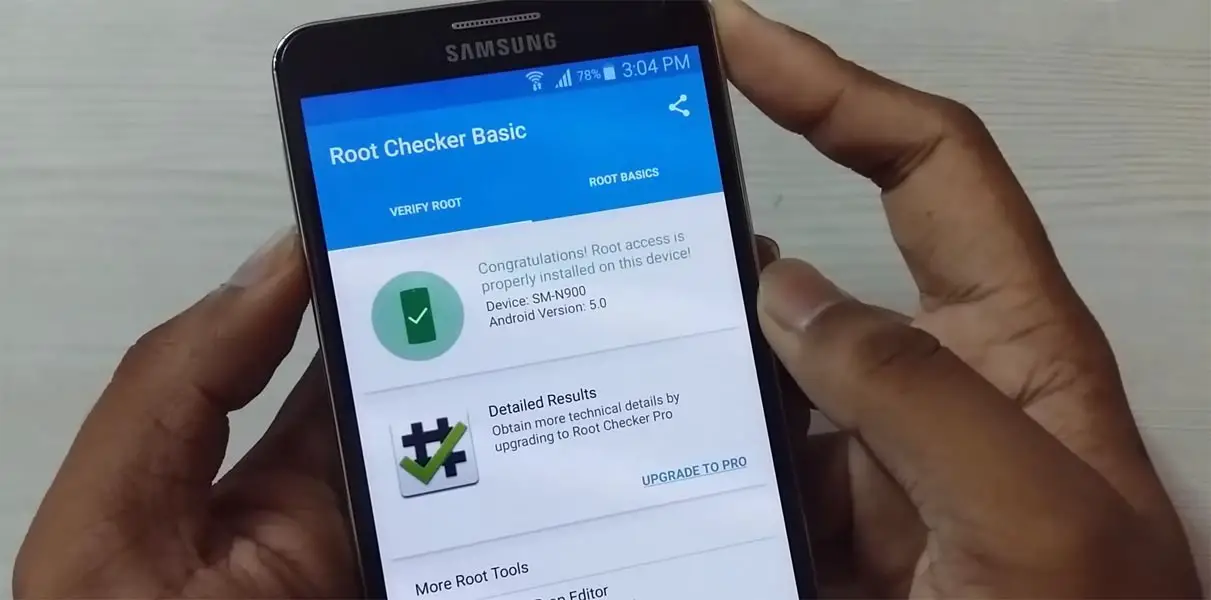
- Now, to make sure you have successfully rooted your Samsung Galaxy Note 3 SM-N900S, open Applications Menu on your phone and Find SuperSU App. If this app exist on your phone then it means you have successfully rooted your device. Congratulations.


Optional: You can also verify the root status of your device by using the Root Checker App.
Notes
Как получить Root права для Samsung Galaxy Note 3 SM-N900? Способ №2
Подходит только для Android 4.4
Что нам понадобится?
- .
- Смартфон.
- Компьютер.
- последней
- Кастомное
- Архив для получения прав суперпользователя — .
- Если на ПК был Kies — удаляем.
- Устанавливаем драйвера.
- Распаковываем Один на ПК.
- На смартфоне заходим в Настройки, Для разработчиков (если такого пункта нет идем в О телефоне и жмем много раз на Номер сборки) и включаем Отладку по USB.
- Копируем файл Update SuperSU в корень карты памяти.
- Переводим смартфон в Dowload Mode. Для этого полностью его выключаем, зажимаем одновременно кнопки Домой+Включение+Громкость вниз.
- После появления экрана с надписью Warning, подтверждаем выбор нажатием кнопки Громкость вверх.
- Телефон перешел в режим загрузки.
- Запускаем Один. В поле AP выбираем скачанный ранее рекавери. Обязательно Снимаем галку с Auto Reboot!

- Подключаем через USB смартфон к ПК.
- Если смартфон определился, как показано на скриншоте ниже (вместо 4 может стоять другая цифра)— жмем Start.
- Начнется установка. Если прошивка прошла успешно в окне Odin появится надпись .
- Отсоединяем смартфон от ПК. Выключаем устройство долгим нажатием кнопки питания.
- Далее заходим в установленное рекавери. Для этого на выключенном смартфоне зажимаем одновременно кнопки Домой+Громкость вверх+Питание.
- В CWM меню выбираем пункт «Install zip from sdcard» и ищем файл SuperSU, который ранее кидали в корень карты памяти. (Передвижение — кнопки регулировки громкости, выбор — питание или громкость вверх)
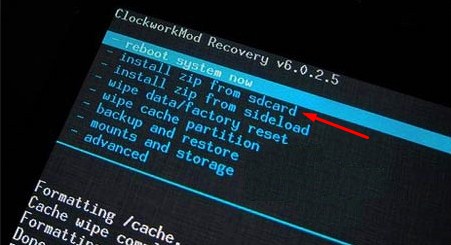
- Далее жмем на пункт «reboot system now».
- Root для Samsung Galaxy Note 3 SM-N900 получен!
Если установка рут из-за каких либо причин была неудачной и смартфон перестал включаться — прошейте его, используя с нашего сайта.
Root Samsung Galaxy Note 3 SM-N900T (T-Mobile) using Odin
- Download and Install Samsung USB Driver on the computer. If in case Samsung USB Drivers are already installed on the computer, then SKIP this step.
- Download and extract the root files on the computer. Once the archive is extracted, you will be able to see the following files:
- Enable Developer Options on your Samsung mobile. To Enable Developer Options: Open Settings > About Phone > Tap on the Built Number for 6-8 times until developers option is enabled.
- Enable OEM unlock on your Samsung mobile. To Enable OEM Unlock: Open Settings > Developer Options > Tap on the OEM unlocking checkbox > Tap on Enable > Tap on Delete All button.
- Now, Switch off your Phone.

Step 4: Now, you have to enable Download Mode on your phone. To enable download mode Press and hold Volume Down Key, Home Button and Power key at same time for 5-8 seconds (you have to press and hold all three buttons at same time) until download mode is not active.
- In the Download mode you will be able to see a Warning Yellow Triangle Sign. In this situation you have to press the Volume up key to continue.
- Now, Open Odin3 (found in the extracted files, that you have downloaded in the Step#2) on your computer. Then connect your phone to the computer.
- Once you have connected the phone to the computer, Odin will automatically recognize the device and show “Added” message at the lower-left panel.
- Once your device detected by Odin, click on the PDA button and select the CF-Auto-Root.tar.md5 file (you have downloaded this file in step#2).
- Now, click on the Start button in Odin to begin the Flashing.
- Flashing usually takes 30-50 seconds to complete the rooting process on your Samsung Galaxy Note 3 SM-N900T (T-Mobile). Once Rooting process got completed, you will be able to see a Green Box with Pass written on it in Odin. During this process phone will re-boot automatically.
- Once you see, the Pass message in Odin, you can disconnect your Device from the computer.
- Now, to make sure you have successfully rooted your Samsung Galaxy Note 3 SM-N900T (T-Mobile), open Applications Menu on your phone and Find SuperSU App. If this app exist on your phone then it means you have successfully rooted your device. Congratulations.

Optional: You can also verify the root status of your device by using the Root Checker App.
")


")