

Using Chainfire one-click root you will be able to root your Samsung devices in just a click away. If you found this article, by searching how to one-click root Samsung Galaxy Note 3 (SC-01F) using Chainfire then you are reading the right article.
- What is Android Rooting?
- Chainfire One-click Root Solution
- Chainfire One-click Root Solutions
- How to Enter Recovery Mode in Samsung Devices
- How to check if Samsung Galaxy Note 3 (SC-01F) is rooted
- Download and Install Android SDK tools to your PC
- Install Smartphone USB Drivers to your PC
- Unlock the Bootloader of your Android phone
- Method 1 – Employing Magisk Manager
- Step 2 – Download and install the TWRP Recovery tool
- Step 3 – Download and rename the Magisk file
- Step 4 – Finally, Install Magisk using TWRP
- Method 2 – Using One-Click Root
- Method 3 – Using Root Master
- Final words
- Frequently Asked Questions (FAQs)
- Leave a Reply
- ROOT SAMSUNG GALAXY NOTE 2 GT-N7100
- CHECK DEVICE MODEL NO.
- BACKUP YOUR DEVICE
- INSTALLATION INSTRUCTIONS
- ROOT T-MOBILE GALAXY NOTE 4 SM-N910T
- Top 1. One Click Root — Best Root tool and most users like it
- How to root Android in one click
- Top 2. Root Genius – Portable software for one click root
- How to use Root Genius
- Top 3. KingoRoot — Best free one-click root tool
- Top 4. iRoot — Most stable one-click root software
- How to one-click root with iRoot
- Top 5. Easy Rooting Toolkit — Best cross-platform one-click root tool
- How to use Easy Rooting Toolkit
- Conclusion
- Вверх 1. One Click Root — Лучший инструмент Root, и большинству пользователей это нравится
- Как подключить Android в один клик
- Вверх 2. Root Genius — портативное программное обеспечение для одного щелчка мыши
- Как использовать Root Genius
- Вверх 3. KingoRoot — Лучший бесплатный инструмент с одним щелчком мыши
- Вверх 4. iRoot — наиболее стабильное одноразовое программное обеспечение root
- Как сделать один клик с помощью iRoot
- Вверх 5. Easy Rooting Toolkit — лучший кросс-платформенный инструмент с одним щелчком мыши
- Как использовать инструмент Easy Rooting Toolkit
- Заключение
What is Android Rooting?
For instance, make sure your visit how to root nox app player or rooting bluestacks Android emulator.
By the way, after learning about Android rooting you might wanna know, what is chainfire one-click root right, then here you go:
Chainfire One-click Root Solution
One-click root can be so relaxing right, because you don’t have to worry about anything. Previously, you might wanna know how to one-click root BlueStacks 3 on your Windows running PC (32-bit). Similarly, Chainfire is one of the best company when it comes to provide one-click root solutions. Chainfire is known as the greatest one-click root solutions providers on the internet and if you want to one-click root your Android device you will have to search your device in the list of Chainfire site. If you are able to find your device then you can simply one-click root your Android device. Right now, it supports more than enough Android smartphones including Samsung Odin root methods, Google Nexus devices, Motorola, Asus and other devices.
Chainfire One-click Root Solutions
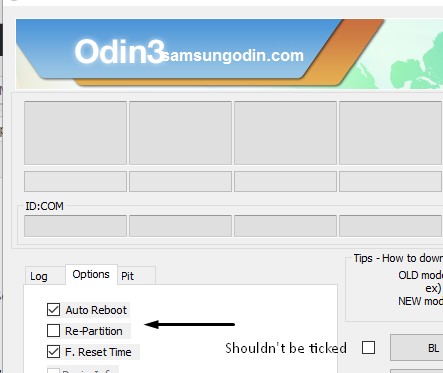
Samsung Odin re partition while firmware flashing
How to Enter Recovery Mode in Samsung Devices
Press + hold (Volume UP + Home + Power button) and leave the power button when your phone vibrate but don’t release home and + volume up buttons, after a while you will automatically boot into the Recovery Mode of you Samsung device.
In recovery mode, you will be able to wipe out data and clear the cache.
That’s how you can one-click root Samsung Galaxy Note 3 (SC-01F) using Chainfire.
How to check if Samsung Galaxy Note 3 (SC-01F) is rooted
In case you miss any of the steps from the guide, we are not responsible of bricking your device.

Even before, we get in to the details of rooting, lets clear the confusion between flashing and rooting.
They are two different concepts and shouldn’t be confused. Here’s a handy guide to help you understand the differences between Rooting and Flashing.
Table of Contents
You can bypass this prerequisite just with a simple step, charge your phone at least 40%, and that’s it!
Download and Install Android SDK tools to your PC
Behind taking the above big way, you’ve finally reached the most crucial prerequisite required before any below rooting method.
Android SDK Tools – (LINK)
Note – When installing the Android SDK tools, you must choose the location as C/android-sdk/; otherwise, remember the location if you’re installing it on a different one.
Install Smartphone USB Drivers to your PC
There are two paramount downloads mandated while root Note 4.
he first one was SDK tools, which we downloaded with the a fore-mentioned steps, and subsequently, the next important thing is the USB Drivers.
In that case, we couldn’t skip providing USB Drivers for each phone, and that’s what we’ve done below.
You can observe and catch out your Smartphone manufacturer brand links from the below index and download the compatible USB driver instantly –
Download the proper driver version from the above list and install it ASAP to your PC to start any procedure below.
Disclaimer: (Unlocking Bootloader section) – If you’re unlocking the bootloader of your Android phone, it means that you’re initializing unlocked access to install any Custom ROM. Subsequently, your phone warranty would get voided, so please be careful about that.
Unlock the Bootloader of your Android phone
Finally, we’re here at the most vital prerequisite needed before every rooting process and always sound complex in front of almost all the rooters. Yeah, you thought right! I’m talking about the Bootloader Unlocking Procedure.
For those who don’t know, Bootloader is a set of code installed on your phone which runs every time while booting the phone to make all the internal processes task. You can call it the brain software of your phone.
However, most brands provide locked Bootloaders with secret keys, whereas some have open access.
If you’re reckoned to find a key or using devices like Motorola, HTC, LG, and Sony, please first visit the official website and find the bootloader key. Or, if you’re not among the above brands, go through the below steps.
The first step toward unlocking Bootloader would be enabling USB Debugging and OEM Unlocking.
For doing that, you need to make the below procedure –


Step 1 – Connect your phone with the PC using a working Data cable.
Step 2 – Open the folder where you’ve installed the Android SDK Tools from the above steps.
Step 3 – Find an empty space on that folder screen, and press Shift+Right Click there.
Step 4 – Now, click the “Open PowerShell window here” tab from right-click menu.

Step 5 – Inscribe the below command on the PowerShell window and press Enter button. You will now observe your phone getting rebooted.
adb reboot bootloader
Step 6 – Afterward, choose one of the below commands to execute as per your smartphone model –
Step 7 – After putting in the proper command from the above list, press the ENTER button.
Step 8 – The Bootloader unlocking process will start soon, and you will get success results soon. After that, paste the below command on PowerShell window –
The above command will reboot your phone with an unlocked bootloader warning message. Thereafter, you can initialize any of the below methods –
Methods to root Note 4
Disclaimer: (Below most) – Rooting an Android phone employing any below method would void your Android Smartphone’s warranty and will clear all the data from your phone. So in any above case, we wouldn’t be responsible, and you would have to take this crapshoot on your own.
Method 1 – Employing Magisk Manager
What if we would say that the very first method we’re revealing here is the world’s favorite rooting procedure? It sounds like someone is talking about the Magisk Manager, right?
Magisk Manager offers thousands of personalization and interface customization modules, which help internalize even a simple Android smartphone with the kind of tweaks one might notice on a flagship phone. You can try this incredible Magisk Manager on any phone to experiment varied customisations and interfaces.
Handy tasks with the handy steps to install Magisk Manager listed below –
Hit the below-listed download link, where we stored both the Magisk Manager APK version. Download it on your Note 4 by clicking the below download link –
Magisk Manager app – (LINK)

Step 2 – Download and install the TWRP Recovery tool
TWRP Recovery – (LINK)
Step 3 – Download and rename the Magisk file
This is the most convenient, where all you ought to do is download the Magisk app from the below link and rename it from Magisk-v23.0.apk to Magisk-v23.0.zip.

Magisk app file – (LINK)
(Rename this .apk file extension to the .zip.)
Step 4 – Finally, Install Magisk using TWRP


Method 2 – Using One-Click Root
The second method here is the most simplistic one, named with its most influential privilege, One-Click Root. However, it’s a paid tool, which charges $40 for providing you with all the rooting privileges at a single click.


Method 3 – Using Root Master
Root Master is the last method we’ve got here as the best 3 methods of rooting Android phones. Again, this method is also one of the simplest ways to root Note 4 and won’t take more than 5 minutes of your most crucial time.
The Root Master is an Android app, and it’ll help you by providing root access without any need for a PC.
This protocol was developed by one of the XDA developers to make the rooting process time-efficient.


Final words
No one would ever have the Android rooting topic complex after reading this article entirely.
We can state that true, as we listed above three different procedures, including the convenient steps with most general words and vocabulary. Hope you liked this article, and we solved all your doubts related to rooting.
Frequently Asked Questions (FAQs)
What are the features of rooting Note 4 Android phone?
Immense features are waiting for you on the rooting path, where you can observe the most fabulous customization modules, overclocking hacks, and the system app uninstallation capability.
Is there any disadvantage of rooting Note 4?
There is nothing with only advantages, and subsequently, rooting also includes colossal disadvantages, including device vulnerability, unable to access banking apps, and voided warranty.
Did rooting a Note 4 smartphone void its warranty?
Absolutely Yes! If you’re dreaming of rooting your phone and enjoying privileges, you’ll have to pay the warranty back.
Is it okay to enable USB Debugging and OEM Unlock on Note 4 Android phone?
USB Debugging and OEM Unlock are just some simple developer options, and they won’t have got any side issues at all. So you can enable them without getting worried.
What is the simplest way to root Note 4?
If you want the most simple rooting, you can go for One-Click root. The software is listed in the above methods offers root access at a single click.
Where to get the official Android SDK tools?
We’ve gathered the official Android SDK tools and stored them above. You can download the ZIP file using the link below and enjoy using it.
What is Magisk Manager?
How to root an Note 4 Android phone without using a PC?
If you’re unable to use a PC while rooting your phone, you can try the third method, without including a PC, and root your phone within minutes.
Will bootloader unlocking void device warranty?
Leave a Reply
You only are responsible for your device. We won’t be liable if any damage occurs to your device and/or its components.
ROOT SAMSUNG GALAXY NOTE 2 GT-N7100
Before you begin with the instructions below, make sure your android device is adequately charged — at least 50% of the device.
CHECK DEVICE MODEL NO.
To make sure your device is eligible with this, you must first confirm its model no. in ‘About device’ option under Settings. Another way to confirm model no. is by looking for it on the packaging box of your device. It must be GT-N7100 !
Do not use the procedures discussed here on any other Galaxy Note 2 (including the Galaxy Note 2 variant at Sprint, AT&T, Verizon, T-Mobile, US Cellular and other International LTE variants) or any other device of Samsung or any other company. You have been warned!
BACKUP YOUR DEVICE
Back up important data and stuff before you start playing around here as there are chances you might lose your apps and app-data (app settings, game progress, etc.), and in rare case, files on the internal memory, too.
For help on Backup and Restore, check out our exclusive page on that linked right below.
ANDROID BACK UP AND RESTORE GUIDE: APPS AND TIPS
You must have proper and working driver installed on your windows computer to be able to successfully root your Samsung Galaxy Note 2.
SAMSUNG DEVICES DRIVERS INSTALLATION GUIDE
INSTALLATION INSTRUCTIONS
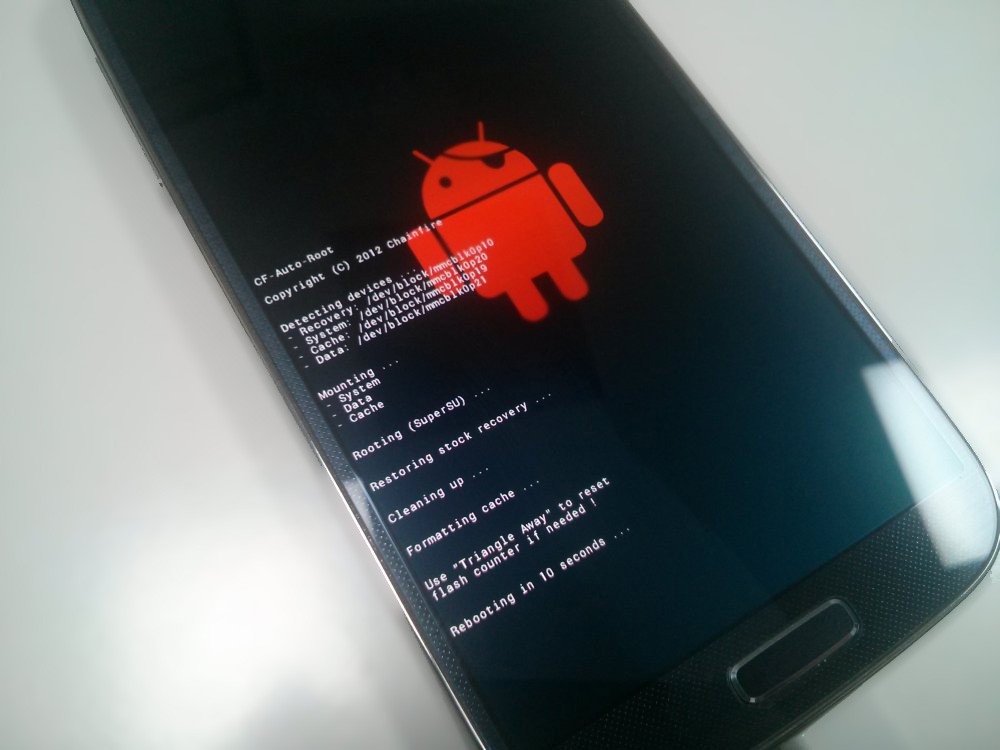
Download the CF Auto Root file given below and transfer it to a separate folder on your computer (just to keep things tidy, that is).
CF AUTO ROOT FILE
Important Note: Backup important files stored on internal SD card of your device, so that in case a situation arises requiring you to do a factory reset after flashing the CF Auto Root, which might delete internal sd card too, your files will remain safe on PC.
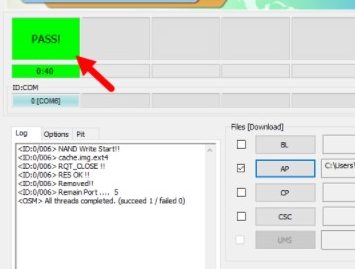
If you see FAIL message instead of the PASS in Odin’s top left box, that’s a problem. Try this now: disconnect your Galaxy Note 2 from PC, close Odin, remove phone’s battery and put it back inside in 3-4 seconds, open Odin and then repeat from Step 2 of this guide again.
Also, If device is Stuck at setup connection or on any other process, then too, try this: disconnect your Galaxy Note 2 from PC, close Odin, remove phone’s battery and put it back inside in 3-4 seconds, open Odin and then repeat from Step 2 of this guide again.
That’s all. If you need help regarding this, feel free to ask us in comments below.
It was easy to root your Galaxy Note 2 with CF Auto Root Tool, right? Let us know how you plan to use root privileges on your Galaxy Note 2.
Your suggestions and queries, if any, are most welcomed!
ROOT PACKAGE INFO
Before you begin with the instructions below, make sure your android device is adequately charged — at least 50% battery of the device.
To make sure your device is eligible with this, you must first confirm its model no. in ‘About device’ option under Settings. Another way to confirm model no. is by looking for it on the packaging box of your device. It must be SM-N9005!
Do not use the procedures discussed here on any other device of Samsung or any other company. This is not for any other variant of NOTE 3 either, so don’t try this on SM-N9000, or NOTE 3 variants at Verizon, T-Mobile, Sprint, AT&T, US Cellular, etc. You have been warned!
SAMSUNG GALAXY NOTE 3 LTE DRIVERS INSTALLATION GUIDE
If you see FAIL message instead of the PASS in Odin’s top left box, that’s a problem. Try this now: disconnect your Galaxy NOTE 3 from PC, close Odin, remove phone’s battery and put it back inside in 3-4 seconds, open Odin and then repeat from Step 2 of this guide again.
Also, If device is Stuck at setup connection or on any other process, then too, try this: disconnect your Galaxy NOTE 3 from PC, close Odin, remove phone’s battery and put it back inside in 3-4 seconds, open Odin and then repeat from Step 2 of this guide again.
It was easy to root your Galaxy NOTE 3 on Android 4.4.2 firmware (N9005XXUENA6), right? Let us know how you plan to use root privileges on your Galaxy NOTE 3.
T-Mobile Galaxy Note 4 runs on the APQ8084 chipset from Qualcomm which supports LTE bands, unlike the international Exynos 5 variant. Also, it’s often less painful for developers to root and make custom ROMs (specially AOSP based) on devices running Qualcomm chipsets since the company releases source code for its architecture. Samsung doesn’t releases source code for its Exynos chipsets and hence the incompatibility with AOSP based custom ROMs.
There are many benefits to rooting an Android device, you’d be able to completely remove bloatware from your Note 4 with root access, giving better performance and battery life on the device. Other than that, there are several apps on the Play store that takes advantage of root access on your phone and help turbo boost the productivity of your device.
Read: Essential Root Apps for your Rooted Android Devices
ROOT T-MOBILE GALAXY NOTE 4 SM-N910T
Before you begin with guide instructions below, make sure your android device is adequately charged — at least 50% battery of the device.
To make sure your device is eligible with this, you must first confirm its model no. in ‘About device’ option under Settings. Another way to confirm model no. is by looking for it on the packaging box of your device. It must be SM-N910T!
This guide is specifically for the T-Mobile Galaxy Note 4 with model no. SM-N910T. Do not use the procedures discussed here on any other device of Samsung or any other company. You have been warned!
You must have proper and working driver installed on your windows computer to be able to successfully root your Galaxy Note 4. If you are not sure, check the link below.
SAMSUNG GALAXY NOTE 4 DRIVERS INSTALLATION GUIDE
Important Note: Backup important files stored on internal SD card of your device, so that in case a situation arises requiring you to do a factory reset after rooting, which might delete internal sd card too, your files will remain safe on PC.
If you see FAIL message instead of the RESET or PASS in Odin’s top left box, that’s a problem. Try this now: disconnect your Galaxy Note 4 from PC, close Odin, remove phone’s battery and put it back inside in 3-4 seconds, open Odin and then repeat from Step 3 of this guide again.
Also, If device is Stuck at setup connection or on any other process, then too, try this: disconnect your Galaxy Note 4 from PC, close Odin, remove phone’s battery and put it back inside in 3-4 seconds, open Odin and then repeat from Step 3 of this guide again.
It was easy to root T-Mobile Galaxy Note 4 SM-N910T using CF-Auto-Root, right? Let us know how you plan to use root privileges on your Galaxy Note 4 now.
Suggestions are most welcomed!
Top 1. One Click Root — Best Root tool and most users like it
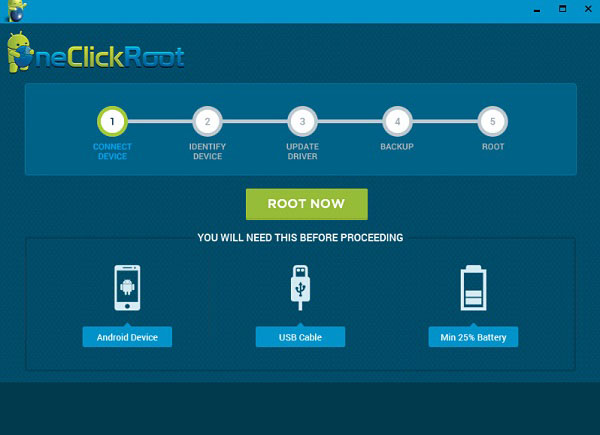
How to root Android in one click
Install One Click Root on your PC and launch it. Click on the CHECK ROOT AVAILABLE button to see whether your device is supported, including brand, Android version, device mode and build number.
Plug your handset to the computer, go to Settings app and turn on the USB Debugging mode under Developer options.
Once click on the ROOT NOW button, the login window will pop up. Here you have to register and purchase the software to continue.
After login your account, One Click Root will root and reboot your Android devices within a few minutes. Then you can use your phone as you wish.
Top 2. Root Genius – Portable software for one click root
Many people do not like to install software on their computer. Portable software means you can use it without installation. Root Genius windows version doesn’t require any installation on your PC. Simply download rootgenius and run while your device connected to the PC. Root Genius is such a portable program that has the capacity to root Android devices in one-click. Plus, this Android rooting tool supports more than 10,000 models of Android devices.
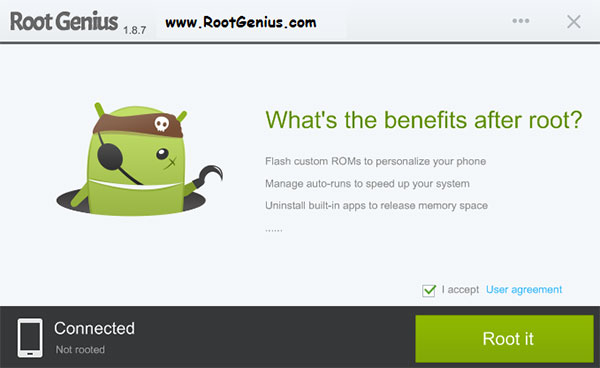
How to use Root Genius
Download this one click root Android tool from its official website to your computer.
Connect your Android phone to the computer with a USB cable.
Top 3. KingoRoot — Best free one-click root tool
is one of the most popular Android root tools available on market. It is an open-source program, so everyone could use it for free. Moreover, KingoRoot is well designed that allows you to root a wider range of Android devices with one click.
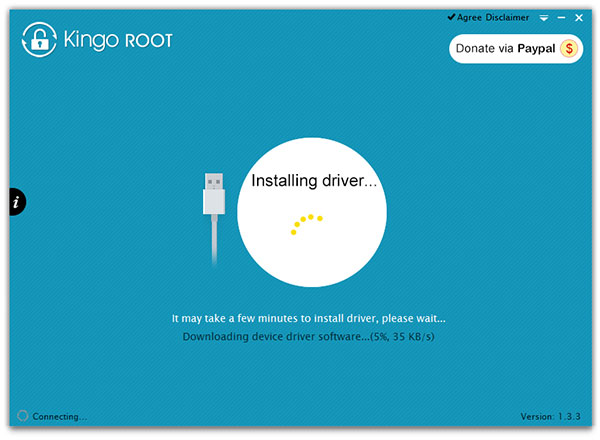
Install this one-click root tool in your Windows computer. And link your Android phone to the computer physically.
Unlock your Android device and set to USB Debugging mode. When you are ready to root the Android phone, launch KingoRoot.
Once it detects your Android phone, a notification will pop up. If you are sure, click on the ROOT button to evoke the Android rooting process.
Leave KingoRoot and your Android phone work alone until it shows you ROOT SUCCEED.
Then you can restart your handset and check the root status.
Top 4. iRoot — Most stable one-click root software
There are many applications on market announced they could root Android in one-click successfully. But according to our testing, stability is one of the most important features a rooting application should have, because software crash during rooting could lead to disasters, even brick the devices. iRoot is the most stable one-click root program in our research with success rate more than 90%.
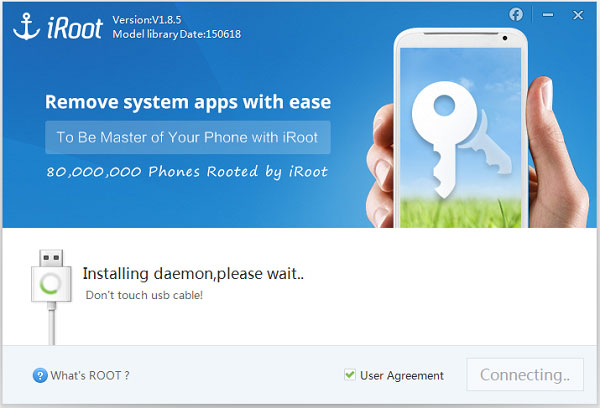
How to one-click root with iRoot
Download and open iRoot on your computer. Plug the Android device to the computer for one-click root. Remember to enable USB debugging mode on your phone.
Wait for a while until iRoot said root successed. Then you can press the Complete button to finish the process.
At this time, you can remove your Android phone and manage your phone completely.
Top 5. Easy Rooting Toolkit — Best cross-platform one-click root tool
Android rooting tools are usually only compatible with Windows. With DooMLoRD’s Easy Rooting Toolkit, you can root Android devices on Windows, Mac or Linux. Moreover, this one-click rooting tool supports a long list of smartphone from Sony, Samsung and other venders.

How to use Easy Rooting Toolkit
Turn on USB debugging mode and Unknown Sources on your Android phone. Then connect it to your computer with a USB cable.
Download the latest update of Easy Rooting Toolkit to your computer and use winrar or winzip to extract it.
After rooting, you can use a root checker app to check the root status.
Conclusion
After reading this tutorial, you would found that rooting an Android device is not as difficult as you thought. There are at least five best one-click root APPs. You can make a decision based on your demands. If you are a beginner and need strong customer service, you can pay for One Click Root. iRoot has higher successful rate of Android rooting and the last version has enhanced stability. KingoRoot is a wide spread one-click rooting tool that supports a wider range of phone models. Root Genius could root an Android phone without installation it on your computer. And Easy Rooting Toolkit works well on Mac, Linux and Windows.
Когда вы купили новый Android-телефон, вы обнаружите, что было много предустановленных приложений бесполезным. Но вы не можете их удалить, потому что производители лишают таких прав. Единственное решение — укоренить свой Android-телефон; то вы можете получить целые элементы управления. Более того, укоренение Android может принести больше преимуществ и преимуществ, таких как установка последней операционной системы Android и функций. Для обычных людей укоренение Android звучит сложной задачей. К счастью, есть несколько рутинных инструментов с одним щелчком мыши, которые помогут вам просто настроить Android-устройство. И в этом уроке мы подробно расскажем об этих одноразовых приложениях APP и их руководствах. Вы можете выбрать любой, который вам нравится, и следовать нашему руководству, чтобы корень вашего телефона Android прямо сейчас.
Вверх 1. One Click Root — Лучший инструмент Root, и большинству пользователей это нравится
Как сказано в названии, One Click Root — это платное программное обеспечение, которое поддерживает одноразовые корневые устройства Android. Это настольное приложение и предлагает более безопасные, простые и быстрые возможности для Android. Когда дело доходит до деталей о том, как достичь одного щелчка одним щелчком мыши, вы можете следовать приведенному ниже руководству.
Как подключить Android в один клик
Установите One Click Root на свой компьютер и запустите его. Нажмите кнопку CHECK ROUT AVAILABLE, чтобы узнать, поддерживается ли ваше устройство, включая бренд, версию Android, режим устройства и номер сборки.
Подключите телефон к компьютеру, перейдите к Настройки приложения и включите USB Debugging в соответствии с Возможности разработчика.
После входа в свою учетную запись One Click Root будет root и перезагрузит ваши устройства Android в течение нескольких минут. Тогда вы можете использовать свой телефон по своему усмотрению.
Вверх 2. Root Genius — портативное программное обеспечение для одного щелчка мыши
Многие люди не хотят устанавливать программное обеспечение на свой компьютер. Портативное программное обеспечение означает, что вы можете использовать его без установки. Версия Windows Root Genius не требует установки на вашем ПК. Просто загрузите rootgenius и запустите, пока ваше устройство подключено к ПК. Root Genius — это такая портативная программа, которая имеет возможность корневать Android-устройства одним щелчком мыши. Кроме того, этот инструмент для удержания Android поддерживает больше, чем модели 10,000 для устройств Android.
Как использовать Root Genius
Загрузите этот одноразовый Android-инструмент с официального сайта на свой компьютер.
Подключите телефон Android к компьютеру с помощью USB-кабеля.
После того как этот root-ключ с одним щелчком мыши обнаружит ваше устройство, вы можете установить флажок Пользовательское соглашение и нажмите на Корни его кнопку.
Вверх 3. KingoRoot — Лучший бесплатный инструмент с одним щелчком мыши
является одним из самых популярных корневых инструментов Android, доступных на рынке. Это программа с открытым исходным кодом, поэтому каждый может использовать ее бесплатно. Кроме того, KingoRoot хорошо спроектирован, что позволяет вам запускать более широкий диапазон устройств Android одним щелчком мыши.
Установите этот инструмент с одним щелчком мыши на компьютер под управлением Windows. И физически привяжите телефон Android к компьютеру.
Разблокируйте Android-устройство и установите режим USB Debugging. Когда вы будете готовы запустить Android-телефон, запустите KingoRoot.
Как только он обнаружит ваш телефон Android, появится уведомление. Если вы уверены, нажмите кнопку ROOT, чтобы вызвать процесс укоренения Android.
Оставьте KingoRoot и ваш телефон Android работать в одиночку, пока он не покажет вам КОРОТКО УСПЕШНО.
Затем вы можете перезапустить трубку и проверить статус корня.
Вверх 4. iRoot — наиболее стабильное одноразовое программное обеспечение root
На рынке появилось много приложений, в которых объявлено, что они могут использовать Android в один клик успешно. Но, согласно нашим испытаниям, стабильность является одной из наиболее важных функций, которые должно иметь приложение для укоренения, поскольку сбой программного обеспечения во время укоренения может привести к катастрофам, даже кирпичным устройствам. iRoot — самая стабильная корневая программа с одним щелчком мыши в наших исследованиях с коэффициентом успеха более 90%.
Как сделать один клик с помощью iRoot
Загрузите и откройте iRoot на своем компьютере. Подключите Android-устройство к компьютеру для root с одним щелчком мыши. Не забудьте включить режим отладки USB на вашем телефоне.
Когда соединение будет завершено, iRoot покажет вам модель вашего телефона. Поверните флажок Пользовательское соглашение и нажмите на Корень кнопка. iRoot будет выполнять работу автоматически.
Подождите некоторое время, пока iRoot не сказал успех в корне, Затем вы можете нажать Завершенный кнопку, чтобы завершить процесс. В настоящее время вы можете удалить свой телефон Android и полностью управлять им.
Вверх 5. Easy Rooting Toolkit — лучший кросс-платформенный инструмент с одним щелчком мыши
Инструменты для укоренения Android обычно совместимы только с Windows. С помощью DooMLoRD Easy Rooting Toolkit вы можете запускать Android-устройства на базе Windows, Mac или Linux. Кроме того, этот инструмент с одним щелчком мыши поддерживает длинный список смартфонов от Sony, Samsung и других вендеров.
Как использовать инструмент Easy Rooting Toolkit
Включите режим отладки USB и неизвестные источники на вашем телефоне Android. Затем подключите его к компьютеру с помощью USB-кабеля.
Загрузите последнее обновление Easy Rooting Toolkit на свой компьютер и используйте winrar или winzip, чтобы извлечь его.
Запустите файл с надписью RUNME.bat и следуйте инструкциям на экране, чтобы один раз щелкнуть ваш Android-телефон.
После укоренения вы можете использовать приложение проверки корневого сервера, чтобы проверить статус root.
Заключение
После прочтения этого урока вы обнаружили, что укоренение устройства Android не так сложно, как вы думали. Есть как минимум пять лучших одноразовых корневых APP. Вы можете принять решение, основанное на ваших требованиях. Если вы новичок и нуждаетесь в сильном обслуживании клиентов, вы можете заплатить за One Click Root. iRoot имеет более высокую успешную скорость укоренения Android, и последняя версия имеет улучшенную стабильность. KingoRoot — это широко распространенный инструмент рутинга с одним щелчком, который поддерживает более широкий диапазон моделей телефонов. Root Genius может подключить Android-телефон без установки его на вашем компьютере. И Easy Rooting Toolkit хорошо работает на Mac, Linux и Windows.
")


")