

I am presuming you are quite new to Linux.
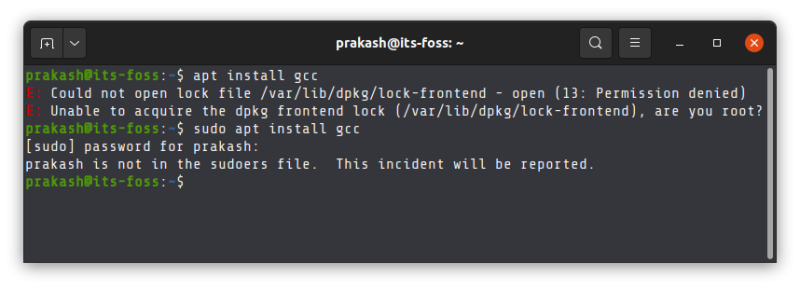
But when you run the command, you encounter this error:
E: Could not open lock file /var/lib/dpkg/lock-frontend – open (13: Permission denied)
E: Unable to acquire the dpkg frontend lock (/var/lib/dpkg/lock-frontend), are you root?
A similar error is this one:
dpkg: error: required read/write access to the dpkg database directory /var/lib/dpkg
E: Sub-process dpkg –set-selections returned an error code (2)
E: Executing dpkg failed. Are you root?
Both errors ask you the same question: are you root? And that’s the answer to this problem. Become root.
- Become root to avoid this error
- Seeing a ‘User is not in sudoer file’ error?
- Where is the incident reported?
- What can you do if a user is not in sudoer list?
- Did this help?
- What is root user? Why is it locked in Ubuntu?
- How to run commands as root user in Ubuntu?
- How to become root user in Ubuntu?
- How to enable root user in Ubuntu?
- How to login as a root in the GNOME desktop
- Step 1: Enable root account
- Step 2: Change GDM configuration
- Step 3: Configure PAM authentication
- Step 4: Log in as root
- Things you should know when running the system as a root user
- Введение
- Этап 1 – Авторизация с учётной записи Root
- Этап 2 – Добавление нового системного пользователя
- Этап 3 – Предоставление привилегий администрирования
- Этап 4 – Первоначальная настройка базового брандмауэра
- При подключении по SSH-ключу к root
- Выводы
- Introduction
- Step 1 — Logging in as root
- About root
- Step 2 — Creating a New User
- Step 3 — Granting Administrative Privileges
- Step 4 — Setting Up a Firewall
- Step 5 — Enabling External Access for Your Regular User
- If the root Account Uses Password Authentication
- If the root Account Uses SSH Key Authentication
- Where To Go From Here?
- Introduction
- Step 1 — Logging in as root
- About root
- Step 2 — Creating a New User
- Step 3 — Granting Administrative Privileges
- Step 4 — Setting Up a Basic Firewall
- Step 5 — Enabling External Access for Your Regular User
- If the root Account Uses Password Authentication
- If the root Account Uses SSH Key Authentication
- Where To Go From Here?
- Introduction
- Step One — Root Login
- About Root
- Step Two — Create a New User
- Step Three — Root Privileges
- Step Four — Add Public Key Authentication (Recommended)
- Generate a Key Pair
- Copy the Public Key
- Option 1: Use ssh-copy-id
- Option 2: Manually Install the Key
- Step Five — Disable Password Authentication (Recommended)
- Step Six — Test Log In
- Step Seven — Set Up a Basic Firewall
- Where To Go From Here?
- 1: How to enable Ubuntu root Login Temporarily?
- 2: How to enable root user in ubuntu via Graphical User Interface?
- 3: How to enable ubuntu root in Command-line?
- Conclusion
- How to change Ubuntu root password?
- How to change the Ubuntu default password using the command line?
- How to change default root password Ubuntu using GUI?
- How to reset the default ubuntu password ?
- How to reset Ubuntu’s root password from Recovery Mode
- How to switch a root user account in Ubuntu
- Sudo Users
- What are Ubuntu default login credentials?
- What is the Ubuntu Default Root Password?
- How to enable root account in Ubuntu?
- How to disable your root user account in Ubuntu?
- Advantages and Disadvantages of Ubuntu
- Conclusion
- 1: Root-логин
- Что такое root?
- 2: Создание нового пользователя
- 3: Привилегии администратора
- 4: Настойка брандмауэра
- 5: Проверка доступа к новому пользователю
- Парольная аутентификация
- Аутентификация по SSH-ключам
- Заключение
Become root to avoid this error
How do you become root in Ubuntu or Debian? You use the sudo command.
Yes, that’s it. Whatever command you were running, just add sudo before it.
sudo your_command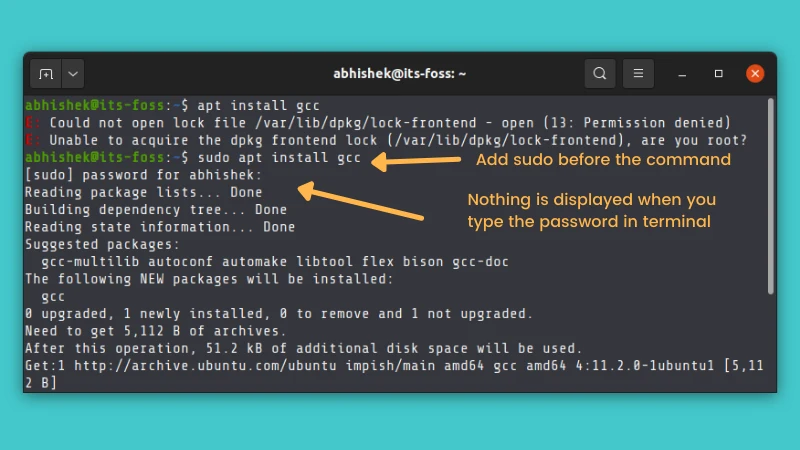
There is nothing wrong with your system. In most Linux systems, password typing doesn’t show the usual asterisks or anything of that sort as a ‘security feature’.
Just type your password and press enter after it. If the password was typed correctly, you should be able to run the command now.
You can even use this handy Linux command line trick to run a previous command with sudo:
sudo !!That was simple and works immediately, unless you do not have sudo access. Then, you’ll see a different error.
Seeing a ‘User is not in sudoer file’ error?
Where is the incident reported?
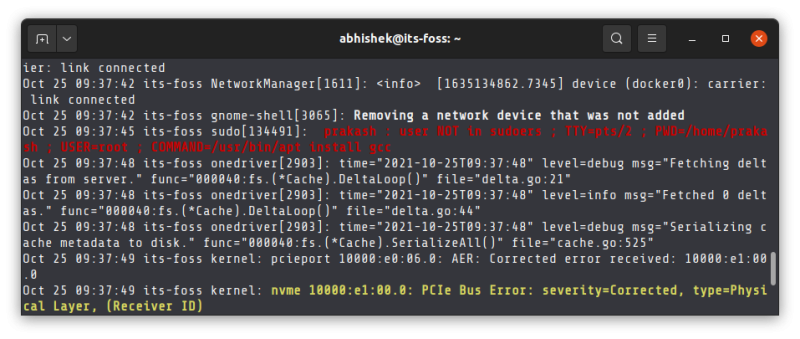
The location of these logs differ from distribution to distribution.
Normally, you may find it in journalctl logs or /var/log/auth.log file in Ubuntu, /var/log/audit/audit.log file in Fedora.
What can you do if a user is not in sudoer list?
- Log in as root or switch to root (if you have root password).
- Add the user into sudoer list (if you have admin/sudo rights from some other user account).
- If you are in multi-user Linux system and do not have root or sudo access yourself, ask your sytem administrator to either grant your user sudo access or install the application you wanted to install.
Did this help?
I hope while solving this classic beginner problem, you get some initial insights into the sudo command. Let me know if you have further questions on this topic in the comment section.
Either you run commands with root privilege like this:
sudo any_commandsudo suWhat is root user? Why is it locked in Ubuntu?

You don’t need to have root privilege for your daily tasks like moving file in your home directory, downloading files from internet, creating documents etc.
Take this analogy for understanding it better. If you have to cut a fruit, you use a kitchen knife. If you have to cut down a tree, you have to use a saw. Now, you may use the saw to cut fruits but that’s not wise, is it?
Does this mean that you cannot be root in Ubuntu or use the system with root privileges? No, you can still have root access with the help of ‘sudo’ (explained in the next section).
How to run commands as root user in Ubuntu?
apt update
Reading package lists... Done
E: Could not open lock file /var/lib/apt/lists/lock - open (13: Permission denied)
E: Unable to lock directory /var/lib/apt/lists/
W: Problem unlinking the file /var/cache/apt/pkgcache.bin - RemoveCaches (13: Permission denied)
W: Problem unlinking the file /var/cache/apt/srcpkgcache.bin - RemoveCaches (13: Permission denied)
So, how do you run commands as root? The simple answer is to add sudo before the commands that require to be run as root.
sudo apt update[email protected]:~$ sudo apt update
[sudo] password for abhishek: If you are absolutely new to Linux, you might be surprised that when you start typing your password in the terminal, nothing happens on the screen. This is perfectly normal because as the default security feature, nothing is displayed on the screen. Not even the asterisks (*). You type your password and press enter.
Bottom line:
To run commands as root in Ubuntu, add sudo before the command.
When asked for password, enter your account’s password.
When you type the password on the screen, nothing is visible. Just keep on typing the password and press enter.
How to become root user in Ubuntu?
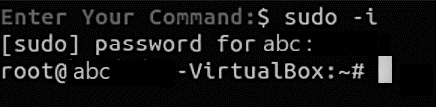
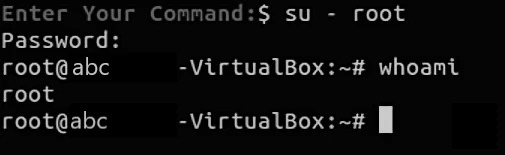
The sudo command allows you to simulate a root login shell with this command:
sudo -i[email protected]:~$ sudo -i
[sudo] password for abhishek: [email protected]:~# whoami
root[email protected]:~# You’ll notice that when you switch to root, the shell command prompt changes from $ (dollar key sign) to # (pound key sign). This makes me crack a (lame) joke that pound is stronger than dollar.
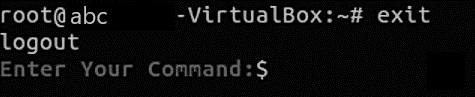
sudo suIf you try to use the su command without sudo, you’ll encounter ‘su authentication failure’ error.
exitHow to enable root user in Ubuntu?
sudo passwd rootAgain, this is not recommended and I won’t encourage you to do that on your desktop. If you forgot it, you won’t be able to change the root password in Ubuntu again.
sudo passwd -dl rootI hope you have a slightly better understanding of the root concept now. If you still have some confusion and questions about it, please let me know in the comments. I’ll try to answer your questions and might update the article as well.
By default, Ubuntu disables the root account. You must use the sudo command for any tasks requiring root privileges.
This is for your own security, of course. Using the system as root all the time is like running around with a sword in your hand. It increases the chances of messing up things.
Logging in as root is still common in the servers. On the desktop side, it’s quite rare to log in as root. Even Kali Linux has changed it.
in this guide, I will show you how to log in as a root in your GNOME desktop using Ubuntu.
How to login as a root in the GNOME desktop
I won’t advise login as root on the desktop. You have sudo mechanism for all your root needs. Do it only if you have a good enough reason. This tutorial is for demo purposes only. You have been cautioned.
Step 1: Enable root account
You want to log in as root. But the root account is disabled by default. The first step is to enable it.
Change the root account password that will eventually enable the root account for you:
sudo passwd root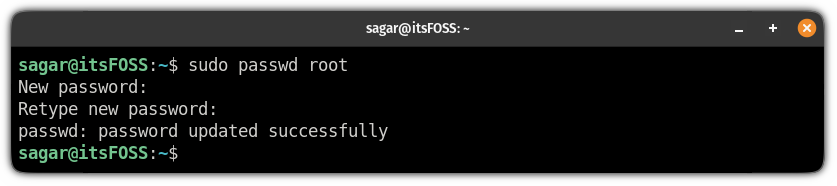
It goes without saying that you should not forget the root password.
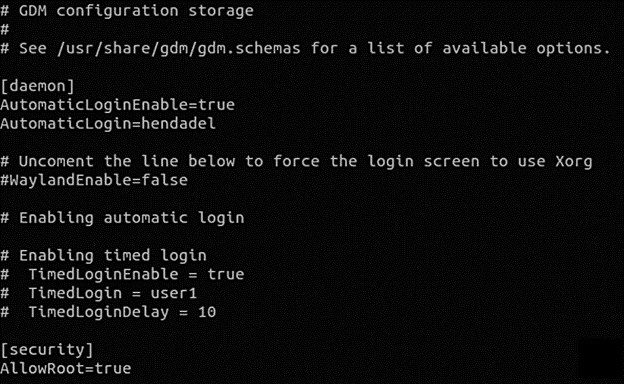
Step 2: Change GDM configuration
Ubuntu uses GNOME by default and GNOME uses the GDM display manager.
To allow log in as root into GNOME, you need to make some changes in the GDM configuration file located at /etc/gdm3/custom.conf.
Make a backup of the config file:
cp /etc/gdm3/custom.conf /etc/gdm3/custom.conf~In the worst case, if you somehow mess things up, the back up file can be used to replace the existing one from the TTY.
sudo nano /etc/gdm3/custom.confAllowRoot=true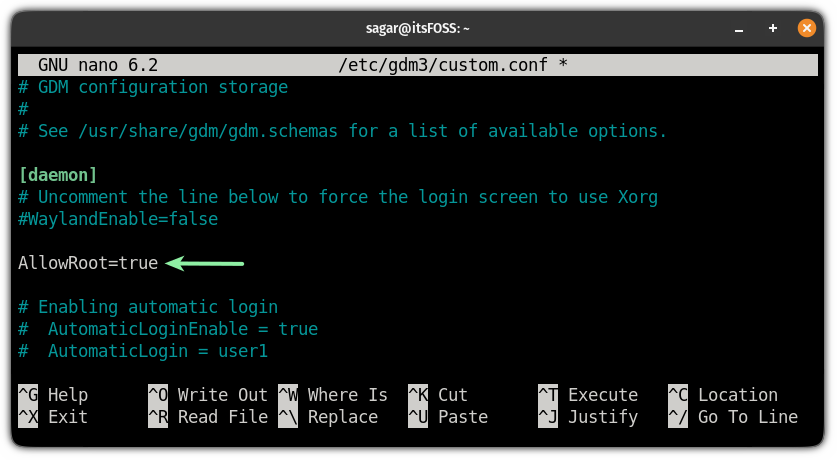
Press Ctrl+X to exit Nano while saving it.
Step 3: Configure PAM authentication
sudo nano /etc/pam.d/gdm-passwordauth required pam_succeed_if.so user != root quiet_success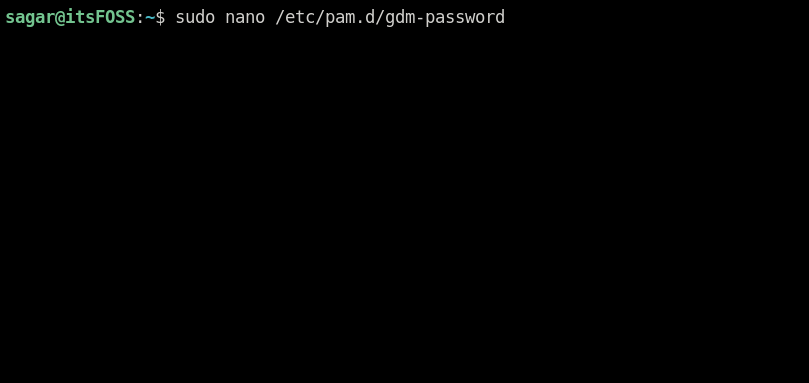
Save changes and exit from the nano text editor.
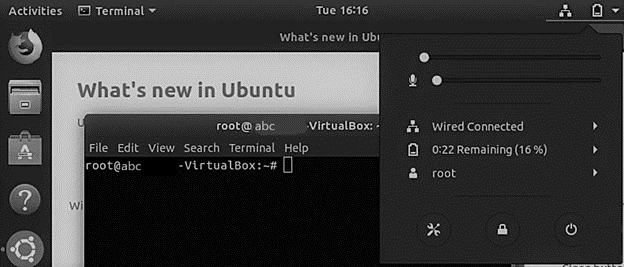
Step 4: Log in as root
Now, reboot your system:
reboot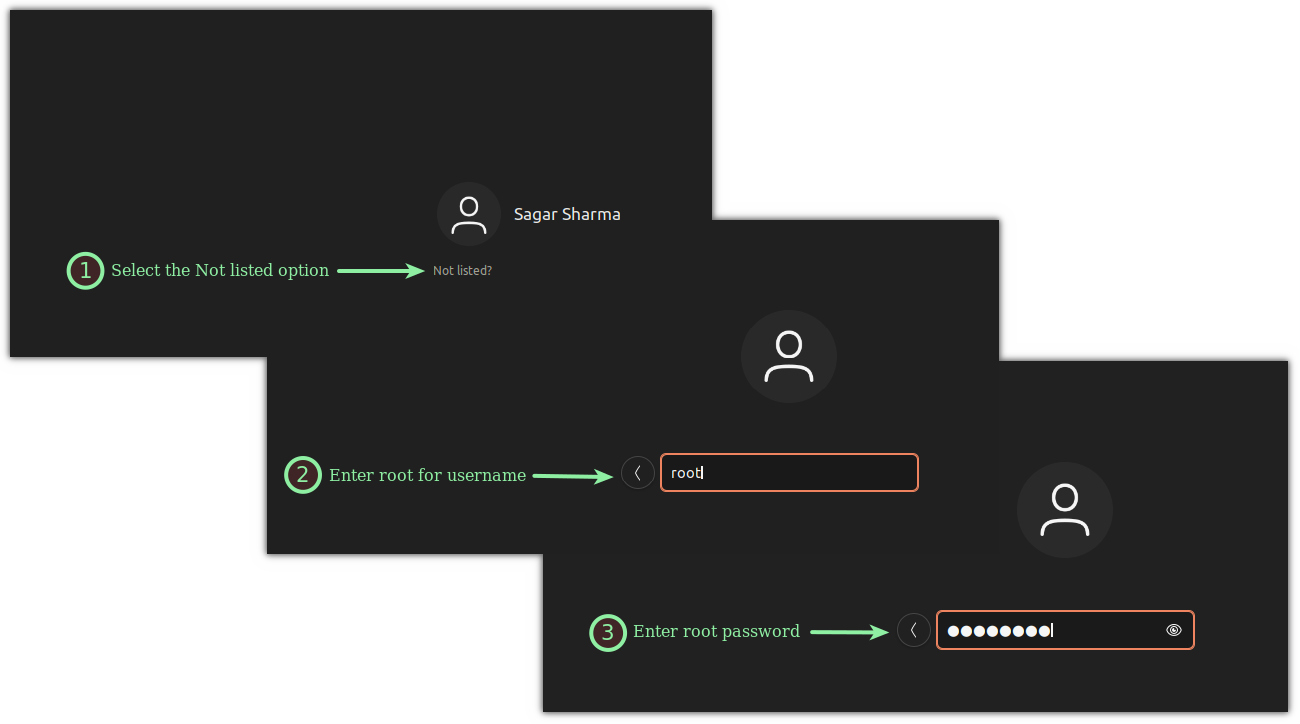
That’s it! Now, you are running your Ubuntu system as a root.
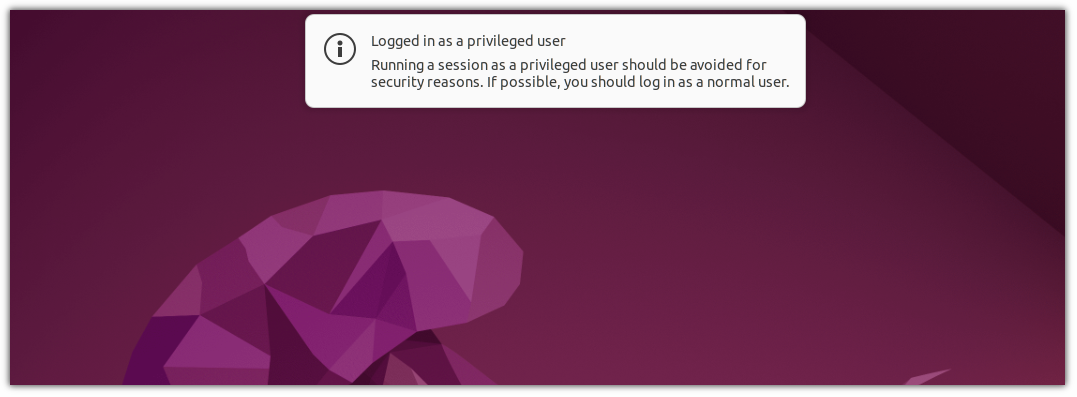
Things you should know when running the system as a root user
There is a reason why Ubuntu disables a root account by default. Want to know why? Here you have it:

Введение
После установки дистрибутива Ubuntu Server 22.04, необходимо выполнить несколько шагов для настройки безопасности системы и ради упрощённого использования.
Этап 1 – Авторизация с учётной записи Root
Мы установим чистый сервер в облачном сервере и из учётной записи будет только “root”. При создании сервера на выбор подключения два варианта:
- По SSH-ключу;
- По логину и паролю.
Подключение к серверу происходит следующим образом:
После этого требуется указать либо пароль, либо в каталоге .ssh должен быть соответствующий файл с ключом. Соглашаемся с подлинностью сервера. Подключение по ключу SSH, возможно потребует парольную фразу и необходимо ввести.
В следующем этапе создадим системного пользователя для использования с определёнными привилегиями и ограничениями по использованию.
Этап 2 – Добавление нового системного пользователя
При первой авторизации как root, следует добавить в систему нового пользователя с использованием команды:
Следует задать пароль для пользователя:
Вводим новый пароль и подтверждаем, необходимо использовать сложный пароль и записать в заметках. Пароль потребуется при использовании команды sudo.
Этап 3 – Предоставление привилегий администрирования
Создав пользователя необходимо добавить в группу sudo. Используем команду:
Ключ “a” указывает на добавление, ключ “G” указывает группу, затем следует название группы и добавляемый пользователь.
При создании пользователя, никаких прав доступа и привилегий нет. В обычные моменты следует перезапустить сервер, внести изменения в конфигурационный файл определённого или нескольких служб.
Этап 4 – Первоначальная настройка базового брандмауэра
Ufw – утилита брандмауэра, каждый установленный пакет добавляется в правило ufw. Наше подключение по SSH также проходит через соответствующее правило ufw. Проверка статуса приложений выполняется следующим образом:
В выходе получаем данные об открытых портах и о приложениях которые добавлены в ufw.
Следующая команда позволяет вывести список приложений, которые работают в настоящее время непрерывно с ufw
ufw app list
#Выход
 Nginx Full
 Nginx HTTP
 Nginx HTTPS
 OpenSSH
Чтобы удостовериться, при подключении не возникнут проблемы, разрешим подключение по OpenSSH, выполнив следующую команду:
ufw allow OpenSSH
Включим брандмауэр и соглашаемся:
Проверим статус приложения и SSH-соединения всё ещё актуален:
#Выход
 Status: active
 To Action               From
 __ ________ _________
 OpenSSH ALLOW Anywhere
Теперь ufw блокирует все внешние подключения кроме OpenSSH.
Этап 5 – Разрешение на подключение удалённо к пользователю
Открываем командную строку и вводим команду:
Необходимо ввести пароль при создании учётной записи. Выполним команду используя sudo (см. рисунок , например:
sudo apt install neovim

После создания пользователя, командный интерпретатор стандартно используется shell. При необходимости изменения на bash, можно выполнить команду:
sudo chsh -s /bin/bash test_server
При подключении по SSH-ключу к root
В каталоге root пользователя хранится каталог .ssh, в каталоге файл authorized_keys отвечающий за ключи SSH, следует скопировать и вставить файл в каталоге пользователя /home/test_server/.ssh/.
Удобнее воспользоваться rsync с целью изменения путь каталога, владельца файла сохранив разрешения:
rsync --archive --chown=test_server:test_server ~/.ssh /home/test_server
Подключение будет успешным, остаётся только работать в системе для своей пользы!
Выводы
- Ufw – помощник для безопасных подключений к серверу;
- SSH-ключ не допускает подключение к серверу без уникального ключа;
- Пользователь с правами sudo, уменьшает риск проявления ошибок в работе сервера, по сравнению команды выполняемые от имени root.
Литейный пр., д. 26, Лит. А
+7 (812) 403-06-99
![]()
ООО «ИТГЛОБАЛКОМ ЛАБС»
Литейный пр., д. 26, Лит. А
+7 (812) 403-06-99
![]()
ООО «ИТГЛОБАЛКОМ ЛАБС»
Introduction
When you first create a new Ubuntu 22.04 server, you should perform some important configuration steps as part of the initial setup. These steps will increase the security and usability of your server and will give you a solid foundation for subsequent actions.
Step 1 — Logging in as root
- root@your_server_ip
About root
Step 2 — Creating a New User
- adduser sammy
You will be asked a few questions, starting with the account password.
Enter a strong password and, optionally, fill in any of the additional information if you would like. This information is not required, and you can press ENTER in any field you wish to skip.
Step 3 — Granting Administrative Privileges
- sammy
Step 4 — Setting Up a Firewall
Ubuntu 22.04 servers can use the UFW firewall to ensure only connections to certain services are allowed. You can set up a basic firewall using this application.
Note: If your servers are running on DigitalOcean, you can optionally use DigitalOcean Cloud Firewalls instead of the UFW firewall. We recommend using only one firewall at a time to avoid conflicting rules that may be difficult to debug.
Applications can register their profiles with UFW upon installation. These profiles allow UFW to manage these applications by name. OpenSSH, the service that allows you to connect to your server, has a profile registered with UFW.
You can examine the list of installed UFW profiles by typing:
- ufw app list
Available applications: OpenSSHYou will need to make sure that the firewall allows SSH connections so that you can log into your server next time. Allow these connections by typing:
- ufw allow OpenSSH
Now enable the firewall by typing:
- ufw
Type y and press ENTER to proceed. You can see that SSH connections are still allowed by typing:
- ufw status
Status: active
To Action From
-- ------ ----
OpenSSH ALLOW Anywhere
OpenSSH (v6) ALLOW Anywhere (v6)
Step 5 — Enabling External Access for Your Regular User
If the root Account Uses Password Authentication
- sammy@your_server_ip
- command_to_run
If the root Account Uses SSH Key Authentication
Note: The rsync command treats sources and destinations that end with a trailing slash differently than those without a trailing slash. When using rsync below, ensure that the source directory (~/.ssh) does not include a trailing slash (check to make sure you are not using ~/.ssh/).
- sammy:sammy ~/.ssh /home/sammy
- sammy@your_server_ip
- command_to_run
Where To Go From Here?
At this point, you have a solid foundation for your server. You can install any of the software you need on your server now.
If you’d like to get more familiar with Linux commands, you can check our Linux Command Line Primer.
Introduction
When you first create a new Ubuntu 20.04 server, you should perform some important configuration steps as part of the initial setup. These steps will increase the security and usability of your server, and will give you a solid foundation for subsequent actions.
Step 1 — Logging in as root
- root@your_server_ip
Accept the warning about host authenticity if it appears. If you are using password authentication, provide your root password to log in. If you are using an SSH key that is passphrase protected, you may be prompted to enter the passphrase the first time you use the key each session. If this is your first time logging into the server with a password, you may also be prompted to change the root password.
About root
Step 2 — Creating a New User
- adduser sammy
You will be asked a few questions, starting with the account password.
Enter a strong password and, optionally, fill in any of the additional information if you would like. This is not required and you can just hit ENTER in any field you wish to skip.
Step 3 — Granting Administrative Privileges
- sammy
Step 4 — Setting Up a Basic Firewall
Ubuntu 20.04 servers can use the UFW firewall to make sure only connections to certain services are allowed. We can set up a basic firewall using this application.
Note: If your servers are running on DigitalOcean, you can optionally use DigitalOcean Cloud Firewalls instead of the UFW firewall. We recommend using only one firewall at a time to avoid conflicting rules that may be difficult to debug.
Applications can register their profiles with UFW upon installation. These profiles allow UFW to manage these applications by name. OpenSSH, the service allowing us to connect to our server now, has a profile registered with UFW.
You can see this by typing:
- ufw app list
Available applications: OpenSSHWe need to make sure that the firewall allows SSH connections so that we can log back in next time. We can allow these connections by typing:
- ufw allow OpenSSH
Afterwards, we can enable the firewall by typing:
- ufw
Type y and press ENTER to proceed. You can see that SSH connections are still allowed by typing:
- ufw status
Status: active
To Action From
-- ------ ----
OpenSSH ALLOW Anywhere
OpenSSH (v6) ALLOW Anywhere (v6)
Step 5 — Enabling External Access for Your Regular User
If the root Account Uses Password Authentication
- sammy@your_server_ip
- command_to_run
If the root Account Uses SSH Key Authentication
Note: The rsync command treats sources and destinations that end with a trailing slash differently than those without a trailing slash. When using rsync below, be sure that the source directory (~/.ssh) does not include a trailing slash (check to make sure you are not using ~/.ssh/).
- sammy:sammy ~/.ssh /home/sammy
- sammy@your_server_ip
- command_to_run
Where To Go From Here?
At this point, you have a solid foundation for your server. You can install any of the software you need on your server now.
Introduction
When you first create a new Ubuntu 16.04 server, there are a few configuration steps that you should take early on as part of the basic setup. This will increase the security and usability of your server and will give you a solid foundation for subsequent actions.
Step One — Root Login
- root@your_server_ip
Complete the login process by accepting the warning about host authenticity, if it appears, then providing your root authentication (password or private key). If it is your first time logging into the server with a password, you will also be prompted to change the root password.
About Root
Step Two — Create a New User
- adduser sammy
You will be asked a few questions, starting with the account password.
Enter a strong password and, optionally, fill in any of the additional information if you would like. This is not required and you can just hit ENTER in any field you wish to skip.
Step Three — Root Privileges
- sammy
Step Four — Add Public Key Authentication (Recommended)
Generate a Key Pair
If you do not already have an SSH key pair, which consists of a public and private key, you need to generate one. If you already have a key that you want to use, skip to the Copy the Public Key step.
- ssh-keygen
Generating public/private rsa key pair.
Enter file in which to save the key (/Users/localuser/.ssh/id_rsa):
Hit return to accept this file name and path (or enter a new name).
Next, you will be prompted for a passphrase to secure the key with. You may either enter a passphrase or leave the passphrase blank.
Note: If you leave the passphrase blank, you will be able to use the private key for authentication without entering a passphrase. If you enter a passphrase, you will need both the private key and the passphrase to log in. Securing your keys with passphrases is more secure, but both methods have their uses and are more secure than basic password authentication.
Copy the Public Key
After generating an SSH key pair, you will want to copy your public key to your new server. We will cover two easy ways to do this.
Note: The ssh-copy-id method will not work on DigitalOcean if an SSH key was selected during Droplet creation. This is because DigitalOcean disables password authentication if an SSH key is present, and the ssh-copy-id relies on password authentication to copy the key.
If you are using DigitalOcean and selected an SSH key during Droplet creation, use option 2 instead.
Option 1: Use ssh-copy-id
- ssh-copy-id sammy@your_server_ip
Option 2: Manually Install the Key
- ~/.ssh/id_rsa.pub
ssh-rsa AAAAB3NzaC1yc2EAAAADAQABAAABAQDBGTO0tsVejssuaYR5R3Y/i73SppJAhme1dH7W2c47d4gOqB4izP0+fRLfvbz/tnXFz4iOP/H6eCV05hqUhF+KYRxt9Y8tVMrpDZR2l75o6+xSbUOMu6xN+uVF0T9XzKcxmzTmnV7Na5up3QM3DoSRYX/EP3utr2+zAqpJIfKPLdA74w7g56oYWI9blpnpzxkEd3edVJOivUkpZ4JoenWManvIaSdMTJXMy3MtlQhva+j9CgguyVbUkdzK9KKEuah+pFZvaugtebsU+bllPTB0nlXGIJk98Ie9ZtxuY3nCKneB+KjKiXrAvXUPCI9mWkYS/1rggpFmu3HbXBnWSUdf localuser@machine.localSelect the public key, and copy it to your clipboard.
- - sammy
- ~/.ssh
- ~/.ssh
Now open a file in .ssh called authorized_keys with a text editor. We will use nano to edit the file:
- ~/.ssh/authorized_keys
Now insert your public key (which should be in your clipboard) by pasting it into the editor.
Hit CTRL-x to exit the file, then y to save the changes that you made, then ENTER to confirm the file name.
Now restrict the permissions of the authorized_keys file with this command:
- ~/.ssh/authorized_keys
Next, we’ll show you how to increase your server’s security by disabling password authentication.
Step Five — Disable Password Authentication (Recommended)
- /etc/ssh/sshd_config
Find the line that specifies PasswordAuthentication, uncomment it by deleting the preceding #, then change its value to “no”. It should look like this after you have made the change:
sshd_config — Disable password authentication
PasswordAuthentication noHere are two other settings that are important for key-only authentication and are set by default. If you haven’t modified this file before, you do not need to change these settings:
sshd_config — Important defaults
PubkeyAuthentication yes
ChallengeResponseAuthentication no
When you are finished making your changes, save and close the file using the method we went over earlier (CTRL-X, then Y, then ENTER).
Type this to reload the SSH daemon:
- systemctl reload sshd
Password authentication is now disabled. Your server is now only accessible with SSH key authentication.
Step Six — Test Log In
Now, before you log out of the server, you should test your new configuration. Do not disconnect until you confirm that you can successfully log in via SSH.
- sammy@your_server_ip
Note about key authentication: If you created your key pair with a passphrase, you will be prompted to enter the passphrase for your key. Otherwise, if your key pair is passphrase-less, you should be logged in to your server without a password.
Remember, if you need to run a command with root privileges, type “sudo” before it like this:
- command_to_run
Step Seven — Set Up a Basic Firewall
Ubuntu 16.04 servers can use the UFW firewall to make sure only connections to certain services are allowed. We can set up a basic firewall very easily using this application.
Different applications can register their profiles with UFW upon installation. These profiles allow UFW to manage these applications by name. OpenSSH, the service allowing us to connect to our server now, has a profile registered with UFW.
You can see this by typing:
- ufw app list
Available applications: OpenSSHWe need to make sure that the firewall allows SSH connections so that we can log back in next time. We can allow these connections by typing:
- ufw allow OpenSSH
Afterwards, we can enable the firewall by typing:
- ufw
Type “y” and press ENTER to proceed. You can see that SSH connections are still allowed by typing:
- ufw status
Status: active
To Action From
-- ------ ----
OpenSSH ALLOW Anywhere
OpenSSH (v6) ALLOW Anywhere (v6)
If you install and configure additional services, you will need to adjust the firewall settings to allow acceptable traffic in. You can learn some common UFW operations in this guide.
Where To Go From Here?
At this point, you have a solid foundation for your server. You can install any of the software you need on your server now.
![How to Enable Root Account in Ubuntu? [Ubuntu Root Login]](https://monovm.com/wp-content/uploads/2021/05/cover849-main.webp)
List of content you will read in this article:
If you are a newbie, you may be scratching your head about how to enable your root account in Ubuntu! Well, for several security purposes, the ubuntu root login account is kept disabled. Before we begin, here is some preface.
When you install Ubuntu, a root account is created. The issue here is that you do not have the provision to set the password for the account.
sudo grep root /etc/passwd

The x in the output signifies that the account’s password is empty.
sudo grep root /etc/shadow

- Temporary Method
- Command-Line and Graphical User Interface Method
- Command-Line Method
1: How to enable Ubuntu root Login Temporarily?
2: How to enable root user in ubuntu via Graphical User Interface?
Type root in the first textbox.
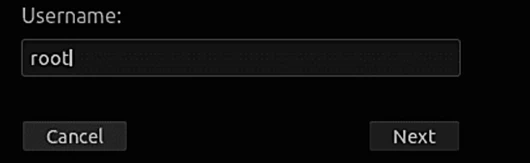
Type your root account password.
As soon as you type the password, you encounter an error message. The reason is that a security layer in the graphical interface stops any login until and unless several other configuration files are configured.
sudo cp /etc/gdm3/custom.conf /etc/gdm3/custom.conf_backup
sudo cp /etc/pam.d/gdm-password /etc/pam.d/gdm-password_backup

Now, simply, open the “/etc/gdm3/custom.conf” configuration file
sudo vi /etc/gdm3/custom.conf

Press save and exit.
Now, open “/etc/pam.d/gdm-password” which is a configuration file.


Just save and hit exit on the ‘gdm’ configuration file.
sudo reboot -f
As you have rebooted your system, login into the root account now.
You can log in to the root account easily.
sudo passwd -dl root

Reverse whatever changes you made in the two configuration files earlier.
Delete “AllowRoot=true” from the “/etc/gdm3/custom.conf” configuration file as shown below.
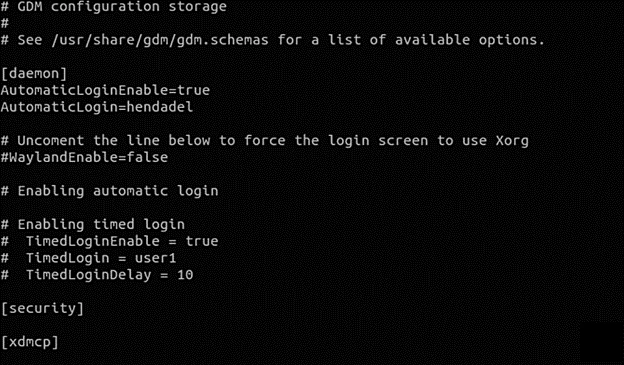
Next, delete the ‘#’ from “/etc/pam.d/gdm-password”.

And you are done!
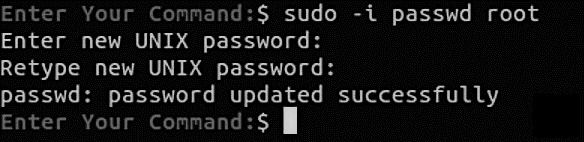
3: How to enable ubuntu root in Command-line?
Using the command-line method, you can easily enable or disable the root account through the command line. Here, you cannot log in through a graphical interface.
sudo -i passwd root
su – root
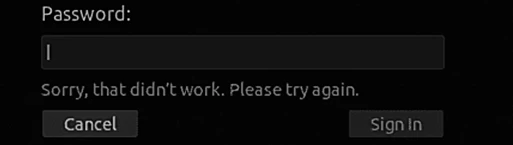
sudo passwd -dl root

To be sure, switch to the root account and see if the process is successful.
su - root
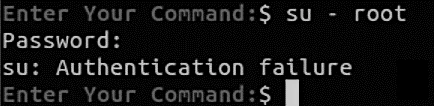
If you see the same message as the above image, then yes, you have successfully disabled the account, as now you can see that the authentication has failed.
Conclusion
We hope that the article solved your queries and provided you with a better understanding of the topic. If you have any questions or suggestions, please leave them in the comment section below.
People are also reading:
![Ubuntu Default Root Password? [Change Ubuntu Password]](https://monovm.com/wp-content/uploads/2021/09/cover451-main.webp)
List of content you will read in this article:
How to change Ubuntu root password?
- Open the terminal by pressing Ctrl+Alt+T or searching for «Terminal» in the Ubuntu Dash.
- Type the command «sudo passwd root» and press Enter. You will be prompted to enter your current user password.
- After authenticating, you can set a new password for the root user. Make sure to choose a strong and secure password.
- Retype the new password when prompted to confirm.
- Once the password change is successful, you can exit the terminal.
How to change the Ubuntu default password using the command line?
- Launch the terminal by pressing Ctrl+Alt+T or searching for «Terminal» in the applications menu.
- To change the root password, you need administrative privileges. Execute the following command to access root privileges: sudo -i
- Once you have root privileges, enter the following command to change the root password: passwd
You will be prompted to enter a new password. Make sure to choose a strong and secure password that includes a combination of uppercase and lowercase letters, numbers, and special characters. Note that the password will not be visible as you type.
- After entering the new password, you will be prompted to confirm it. Re-enter the password carefully, ensuring it matches exactly as you intended.
- If the password change is successful, you will receive a confirmation message. Your Ubuntu system’s root password is now updated.
Remember to keep your root password confidential and avoid using easily guessable information. Regularly changing your passwords enhances the overall security of your Ubuntu system.
How to change default root password Ubuntu using GUI?
- Launch the Terminal: Open the Terminal by clicking on the Applications menu, typing «Terminal» in the search bar, and selecting the Terminal application.
- Access User Accounts: Type «sudo gnome-control-center user-accounts» command in the Terminal and press Enter. This command will open the User Accounts settings.
- Authenticate: Enter your user password when prompted to authenticate your access.
- Modify Root Account: In the User Accounts settings, select the » root » account and click the «Password» button.
- Set New Password: Enter the new password for the root account in the provided fields. Make sure to choose a strong and secure password.
- Apply Changes: Click on the «Change» or «Apply» button to save your changes to the root password.
- Confirm Changes: Close the User Accounts settings and log out of your session. To apply the new root password, you need to log back in using the updated credentials.
Remember, changing the root password in Ubuntu enhances the overall security of your system by preventing unauthorized access. Ensure you choose a unique and robust password to maintain the integrity of your Ubuntu installation.
How to reset the default ubuntu password?
Forgot your Ubuntu login password? If you haven’t used Ubuntu for a long time, and now you want to login in, and you don’t remember your password. So here is the method to reset your Ubuntu Password. You quickly get your password, and you don’t even need to reinstall it.
How to reset or change root password:
Open up the terminal!
After opening the terminal, type the command sudo space passwd space root
- [ Sudo passwd root ] & press enter
- Enter the new root password and press Enter button
- Retype root password and enter
- Password changed successfully
To verify your new password, use this command.
- su root & press Enter key
- Now Enter the new given password of your Ubuntu and press Enter Key
Now you can use your new Ubuntu Root Password. You have successfully made a new password to the Ubuntu root terminal.
How to reset Ubuntu’s root password from Recovery Mode
- Start or restart your Ubuntu system.
- When the GRUB boot menu appears, select the advanced options for Ubuntu and choose the recovery mode option. If you don’t see the GRUB boot menu, you may need to press and hold the Shift key during startup to make it appear.
- In the recovery mode menu, select the option that says «root Drop to root shell prompt.» This will drop you into a root shell with root privileges.
- Remount the file system in read/write mode by running the following command:
mount -o remount,rw /
- Next, you need to change the root password. Use the following command to set a new password:
You will be prompted to enter the new password twice. Note that when you type the password, it won’t be visible on the screen for security reasons. Press Enter once you’ve entered the new password.
- After setting the new password, you can reboot your system by running:
Remember to keep the root password secure and make sure to remember it or store it in a safe place.
How to switch a root user account in Ubuntu
Sudo Users
The first time you use Sudo, you will be prompted to enter the password. If you want to run the command with sudo without entering the password, you must edit the sudoers file.
What are Ubuntu default login credentials?
What is the Ubuntu Default Root Password?
How to enable root account in Ubuntu?
1. Open a terminal: Press `Ctrl + Alt + T` on your keyboard to open a terminal window.
sudo passwd root
4. Next, you will be asked to enter the new password for the root account. Type your desired password and press Enter. Please note that while typing the password, no characters will be displayed on the screen for security reasons.
5. Confirm the new password by typing it again and pressing Enter.
How to disable your root user account in Ubuntu?
- Open a terminal on your Ubuntu system.
- Run the following command to set a password for the root account (if you haven’t already done so): sudo passwd root
You will be prompted to enter and confirm a new password for the root account.
- Once the root password is set, run the following command to lock the root account: sudo passwd -l root
This command locks the root account, effectively disabling it.
Advantages and Disadvantages of Ubuntu
Here you can find the pros and cons of using Ubuntu leaving root logins disabled by default, includes:
- People often forget their login passwords occasionally (the root password).
- It avoids the access of «I can do anything» login by default. It will prompt for a password earlier; the changes can happen!
- Sudo adds a log access of the command(s) run (in /var/log/auth.log). In case you were in trouble, you can go to the authorities and run.
- Every cracker trying to brute-force their manner in on a server will know it has an account named root and could try that first.
- What they do not know is the usernames of your other users. Due to the fact that the root account password is locked, this attack doesn’t pose any threat at all as there may be no password to crack or guess inside the first location.
- Allows easy transfer of admin rights by adding or removing users. When you use only one Ubuntu root password, you could change the root password if you forgot.
- Sudo may be set up with a safety policy.
Automatically the authentication expires after some time (you can also set the time duration). So if you walk away or leave your desktop a few times from the terminal after running commands as root using sudo, you will not be leaving a root terminal open indefinitely.
Conclusion
You can also add special characters to your password. Add up to at least 16 characters with upper, and lowercase letters and numbers. It is how we can change the default root password.
6 мая, 2022 12:30 пп
Когда вы впервые запускаете свежий сервер Ubuntu 22.04, вы должны выполнить его начальную настройку, чтобы обеспечить надежную основу для его работы. В этом руководстве мы расскажем, что нужно сделать, чтобы повысить безопасность и удобство работы вашего сервера.
1: Root-логин
Авторизуйтесь как пользователь root, указав в команде внешний адрес вашего сервера.
Во время первого входа на новый сервер система также предложит вам сменить свой root-пароль.
Что такое root?
Root-пользователь является администратором среды Linux, он обладает очень широкими привилегиями. Поэтому аккаунт root не рекомендуется использовать для обычной работы. Среди полномочий root есть и такие, которые могут при неправильном (даже случайном) использовании разрушить систему.
Для постоянной работы лучше создать нового пользователя с ограниченными привилегиями.
Сейчас мы расскажем, как создать такого пользователя, а потом – как получить расширенные привилегии и применять их в правильные моменты.
2: Создание нового пользователя
В этом примере мы создаем нового пользователя по имени 8host (укажите любое другое имя).
Система задаст вам пару вопросов, в том числе предложит выбрать пароль.
Введите надежный пароль и по желанию предоставьте любую дополнительную информацию (ее вводить не обязательно, и вы можете просто нажать Ввод, чтобы пропустить поле).
3: Привилегии администратора
Итак, у вас есть новый пользователь со стандартными привилегиями. Но в повседневной работе иногда необходимы привилегии администратора.
Чтобы вам не приходилось постоянно прыгать между пользователями, вы можете настроить расширенные привилегии для вашего стандартного аккаунта. Тогда ваш обычный пользователь сможет запускать команды как администратор. Для этого перед командой нужно добавить sudo.
Чтобы получить возможность использовать sudo, вам нужно добавить нового пользователя в системную группу sudo. В Ubuntu 22.04 расширенные привилегии по умолчанию получают все пользователи, которые входят в эту группу.
Как root запустите следующую команду, чтобы добавить нового пользователя в группу sudo. Не забудьте указать правильное имя.
Теперь ваш новый пользователь имеет доступ к команде sudo.
4: Настойка брандмауэра
Чтобы ограничить трафик и поддерживать подключения только к конкретным сервисам, система Ubuntu 22.04 использует брандмауэр UFW.
Приложения могут при установке регистрировать в UFW свои профили. Они позволяют UFW управлять этими приложениями по именам. К примеру, OpenSSH – приложение, через которое вы подключаетесь к своему серверу – тоже имеет свой профиль в UFW.
Чтобы увидеть список доступных профилей, введите:
ufw app list
Вы получите такой вывод:
ufw allow OpenSSH
Теперь включите брандмауэр, набрав:
Нажмите у и Ввод, чтобы продолжить. Чтобы подтвердить, что соединения SSH поддерживаются, введите:
Вы получите такой результат:
Status: active
 To                         Action      From
 --                         ------      ----
 OpenSSH                    ALLOW       Anywhere
 OpenSSH (v6)               ALLOW       Anywhere (v6)
В настоящее время брандмауэр блокирует все подключения, кроме SSH. Если вы хотите установить и настроить дополнительные сервисы, вам необходимо разрешить их входящий трафик в брандмауэре.
5: Проверка доступа к новому пользователю
Настройка SSH-доступа нового пользователя зависит от того, какую аутентификацию использует root – пароль или SSH-ключи.
Парольная аутентификация
Если вы вошли в свою учетную запись root с помощью пароля, значит, SSH поддерживает парольную аутентификацию. Чтобы подключиться по SSH к новому пользователю, откройте новую сессию терминала и используйте команду ssh с именем этого пользователя:
Введите пароль этого пользователя, и вы попадете в систему. Помните: чтобы запустить команду с правами администратора, нужно добавить sudo:
При первом запуске команды sudo в каждой сессии (и иногда при запуске других команд) вам нужно будет ввести пароль пользователя.
Чтобы повысить безопасность сервера, рекомендуем настроить SSH-ключи вместо парольной аутентификации. Следуйте руководству Установка SSH-ключей в Ubuntu 22.04.
Аутентификация по SSH-ключам
Если вы подключились к root через SSH-ключи, скорее всего, парольная аутентификация отключена. В таком случае вам нужно добавить копию открытого ключа в файл ~/.ssh/authorized_keys вашего нового пользователя, чтобы у него был доступ к системе.
Поскольку открытый ключ уже находится на сервере в аккаунте пользователя root, вы можете скопировать его в учетную запись нового пользователя в текущем сеансе.
Проще всего это сделать с помощью команды rsync. Команда скопирует каталог .ssh пользователя root, сохранит привилегии, но изменит его владельца. Вместо 8host укажите имя вашего пользователя.
Примечание: Команда rsync обрабатывает пути, которые заканчиваются косой чертой, иначе, чем те, у которых нет косой черты в конце. При запуске rsync убедитесь, что в исходном каталоге (~/.ssh) вы случайно не поставили косую черту (путь не должен выглядеть так: ~/.ssh/).
Если вы случайно добавите слеш в команду, rsync скопирует содержимое каталога ~/.ssh пользователя root в домашний каталог пользователя sudo вместо того, чтобы скопировать всю структуру каталога ~/.ssh. Файлы будут находиться в неправильном месте, и SSH не сможет их найти.
rsync --archive --chown=8host:8host ~/.ssh /home/8host
Откройте новое окно терминала на локальном компьютере и введите:
При первом запуске sudo в каждой сессии (а также иногда при запуске других команд) система попросит вас ввести пароль текущего пользователя.
Заключение
Готово, начальная настройка сервера завершена, он готов к установке нового программного обеспечения и к разработке приложений. Основные компоненты серверной среды настроены, и теперь можно оптимизировать работу системы.
Tags: Ubuntu, Ubuntu 22.04
")


")