
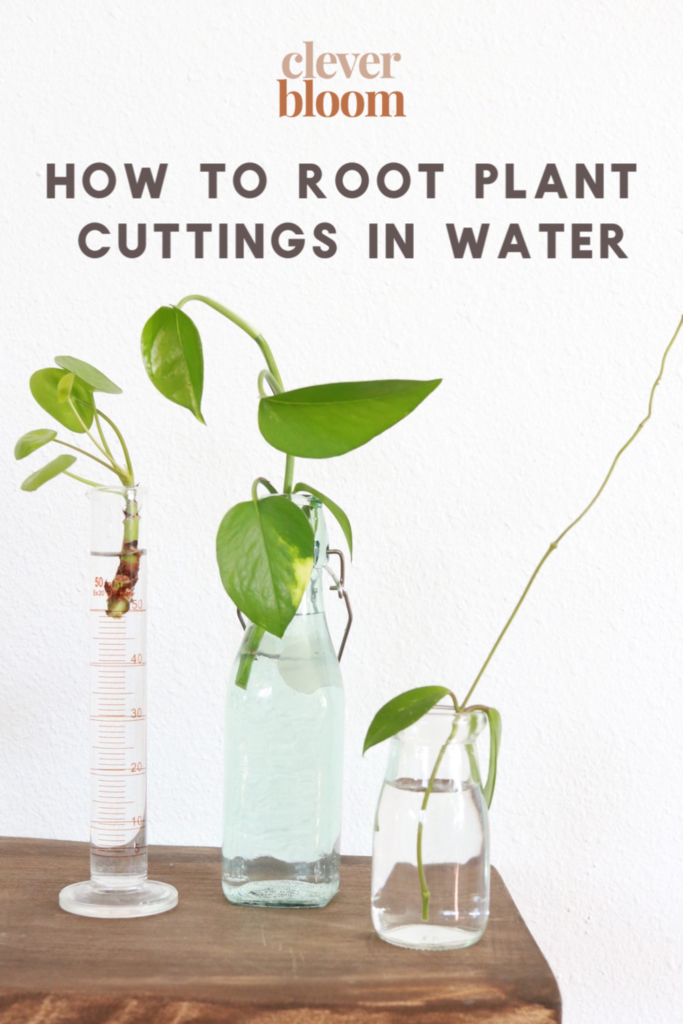
Hello! Thanks for being here! Today I’m going to show you how to root plant cuttings in water. This is a great way of multiplying the plants you have and sharing the plant love with friends. I will say, it’s kind of hard to give away a plant that you’ve been nursing from its beginning. But, it’s so rewarding and so cool to get results! I just gave two Chain of Hearts cuttings away today to super awesome homes. I can’t wait to check in on their progress.

- In the beginning
- Let’s get started
- STEPS
- Need a visual? Watch my propagation tips on AM Northwest.
- Let’s get started
- Need a visual? Watch my propagation tips on AM Northwest.
- Do Cuttings Need Sunlight?
- How Much Light Do Plant Cuttings Need?
- Should Cuttings Be Kept In The Dark?
- Do Cuttings In Water Need Sunlight?
- Do Cuttings Need Light To Root?
- How To Make Cuttings Root Faster
- Conclusion
- Examples Of Stem Cutting Plants
- Examples Of Leaf Cutting Plants
- How Do You Take A Cutting From A Plant?
- Find A Healthy Parent Plant To Take A Cutting From
- Choose A Container and Growing Medium For The Cutting
- Take A Cutting From The Parent Plant
- How To Make A Stem Cutting
- How To Make A Leaf Cutting
- How To Make A Root Cutting
- Apply Rooting Hormone To The Plant Cutting
- Keep The Plant Cutting Humid
- Transplant The Established Plant Cutting
- When Should I Take Plant Cuttings?
- Best Time To Take Stem Cuttings
- Best Time To Take Leaf Cuttings
- Best Time To Take Root Cuttings
- What Is The Best Temperature For Plant Cuttings?
- How Long Does It Take To Grow A Plant From A Cutting?
- How Long Do Plant Cuttings Take To Root?
- How To Encourage Roots To Grow From A Cutting
- Can You Put Cuttings Straight Into Soil?
- What Soil Is Best For Cuttings?
- Do Cuttings Need Light To Root?
- Do Cuttings Need Fertilizer?
- Do Cuttings Need Leaves?
- Conclusion
- So, Which Medium Is Best for Your Root Cuttings?
- Caring for Your Cuttings
- Watering
- Lighting
- Humidity Level
- Temperature
- Protecting From Pests
- Preventing Bacteria and Disease
- When To Fertilize Plant Cuttings
- Transplanting Rooted Cuttings
- Related Question
- Why Do Cuttings Fail?
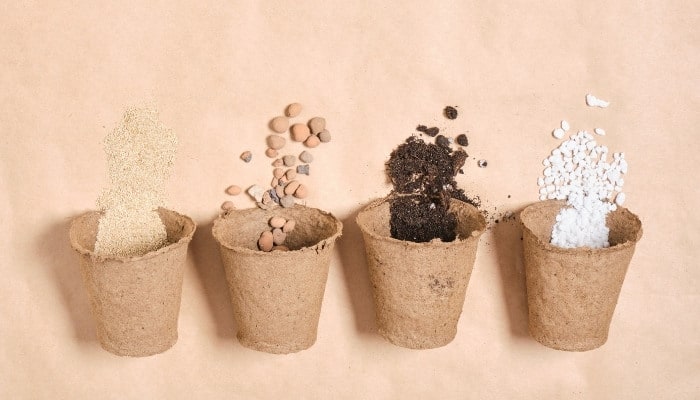
- Mediums for Rooting Cuttings
- Soil
- Properties & Benefits
- Plants To Use With This Medium
- Water
- Properties & Benefits
- Plants To Use With This Medium
- LECA
- Properties & Benefits
- Plants To Use With This Medium
- Perlite
- Properties & Benefits
- Plants To Use With This Medium
- Vermiculite
- Properties & Benefits
- Plants To Use With This Medium
- Coco Coir
- Properties & Benefits
- Plants To Use With This Medium
- Sphagnum or Peat Moss
- Properties & Benefits
- Plants To Use With This Medium
- Sand
- Properties & Benefits
- Plants To Use With This Medium
- Soilless Mixes
- Properties & Benefits
- Plants To Use With This Medium
In the beginning
One day I saw this tiny leaf pop out of soil. It was so tiny and cute! Once it got a little bigger, I asked my supervisor if I could pluck it out and take it home, of course he said yes. I wrapped it in a wet cloth, and home I went.
I took it home, put it in a glass container of water, it rooted, and it made me so happy! I was so in love with this amazing method of reproduction. So let’s talk about How to Root Plant Cuttings in Water.

Most common house plants can be propagated by water method. Right now my new subject is a tiny little stem from my big Fiddle Leaf Fig. So far no roots but there is a tiny green leaf!! If you’re not sure, just try it!
If you want your new plants to be successful and flourish, you need to know which mediums are the best for propagating root cuttings.
What is the best medium for rooting cuttings? Potting soil, peat moss, perlite, vermiculite, sphagnum moss, LECA, and coco coir are among the very best mediums for root cuttings. However, the best medium for your specific root cuttings depends on several factors including the plant species, local environment, time of the year, and more.
Continue reading below to discover which mediums are best for root cuttings, when to use them, and what makes each one so effective!
Let’s get started


STEPS
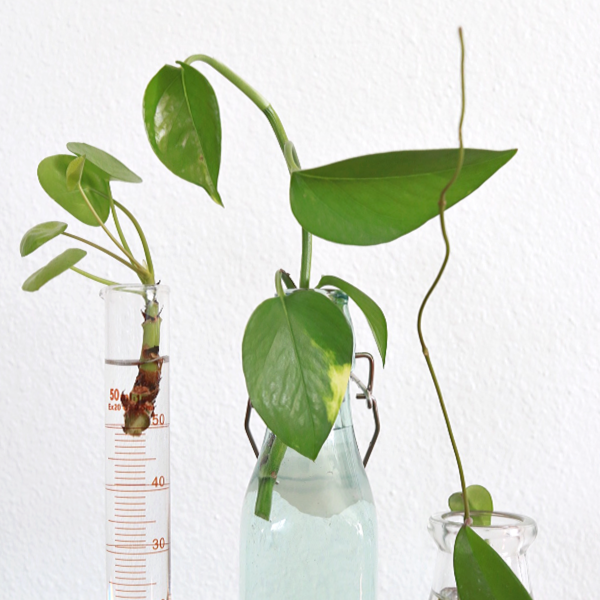
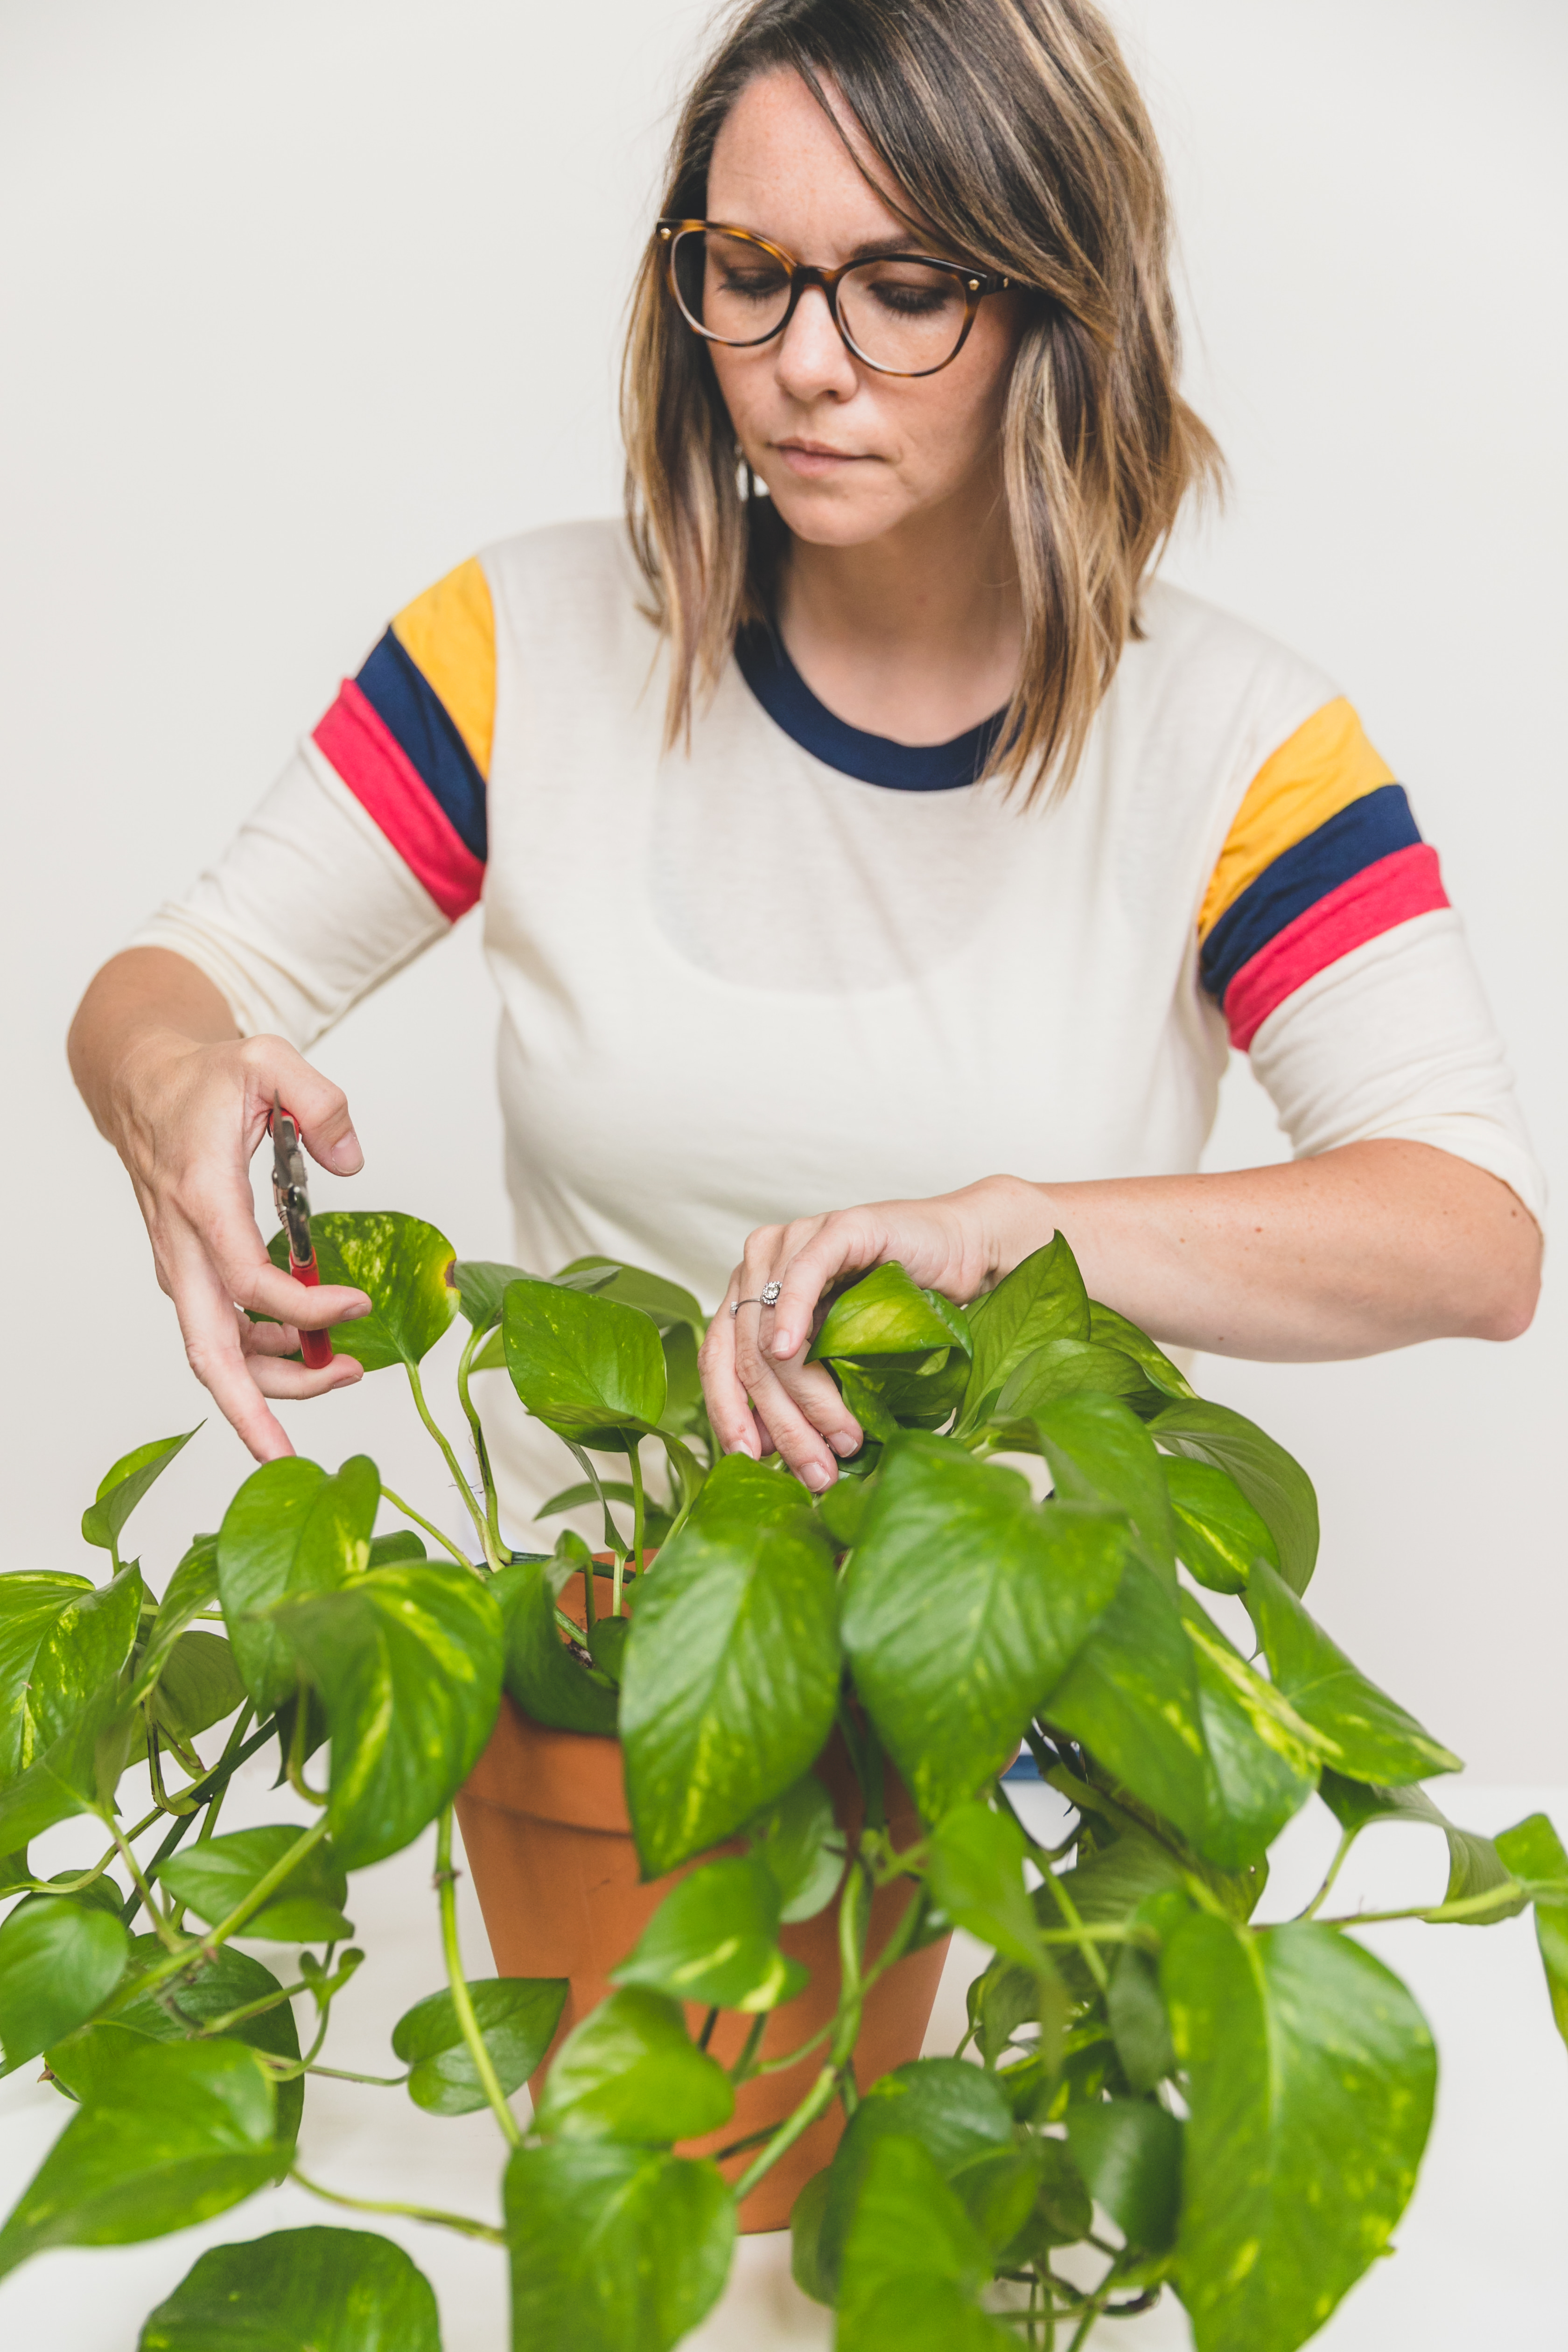
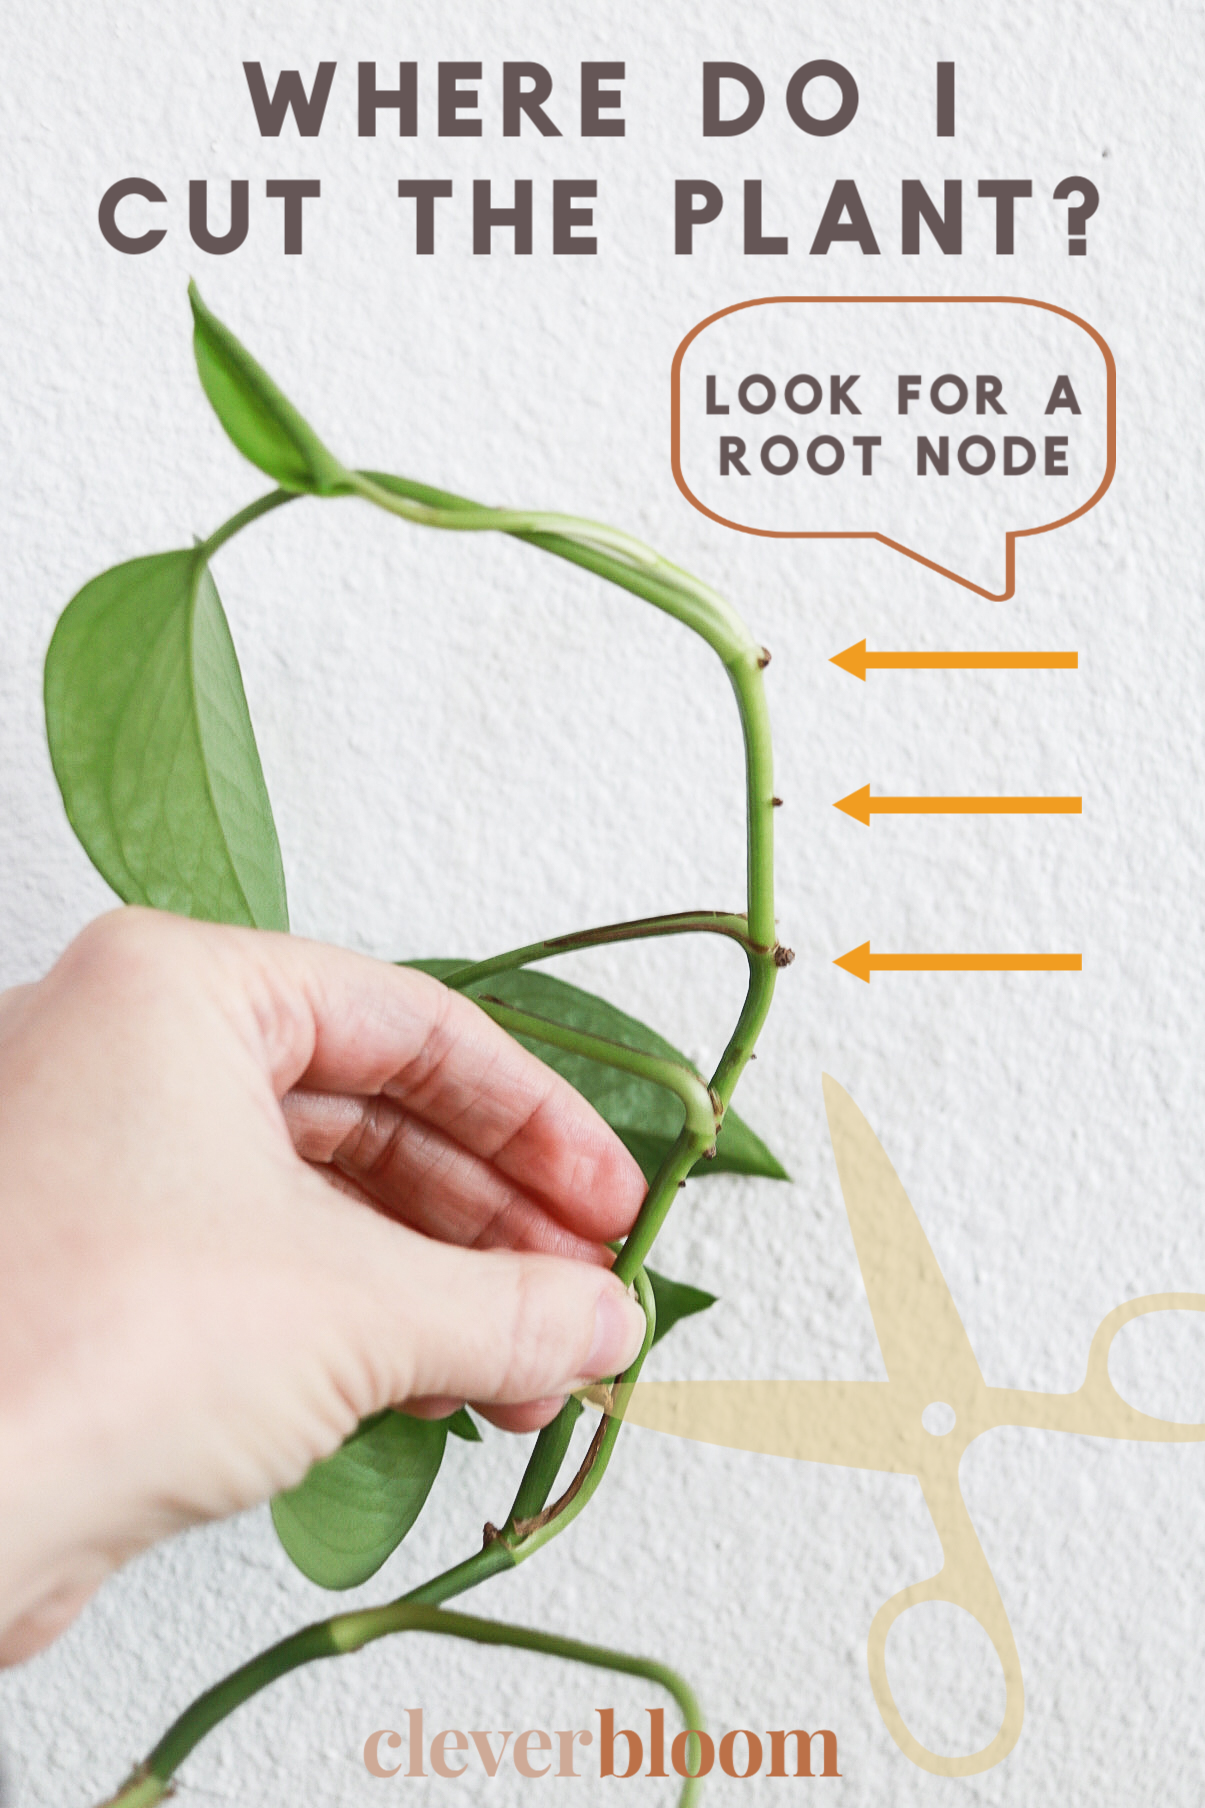
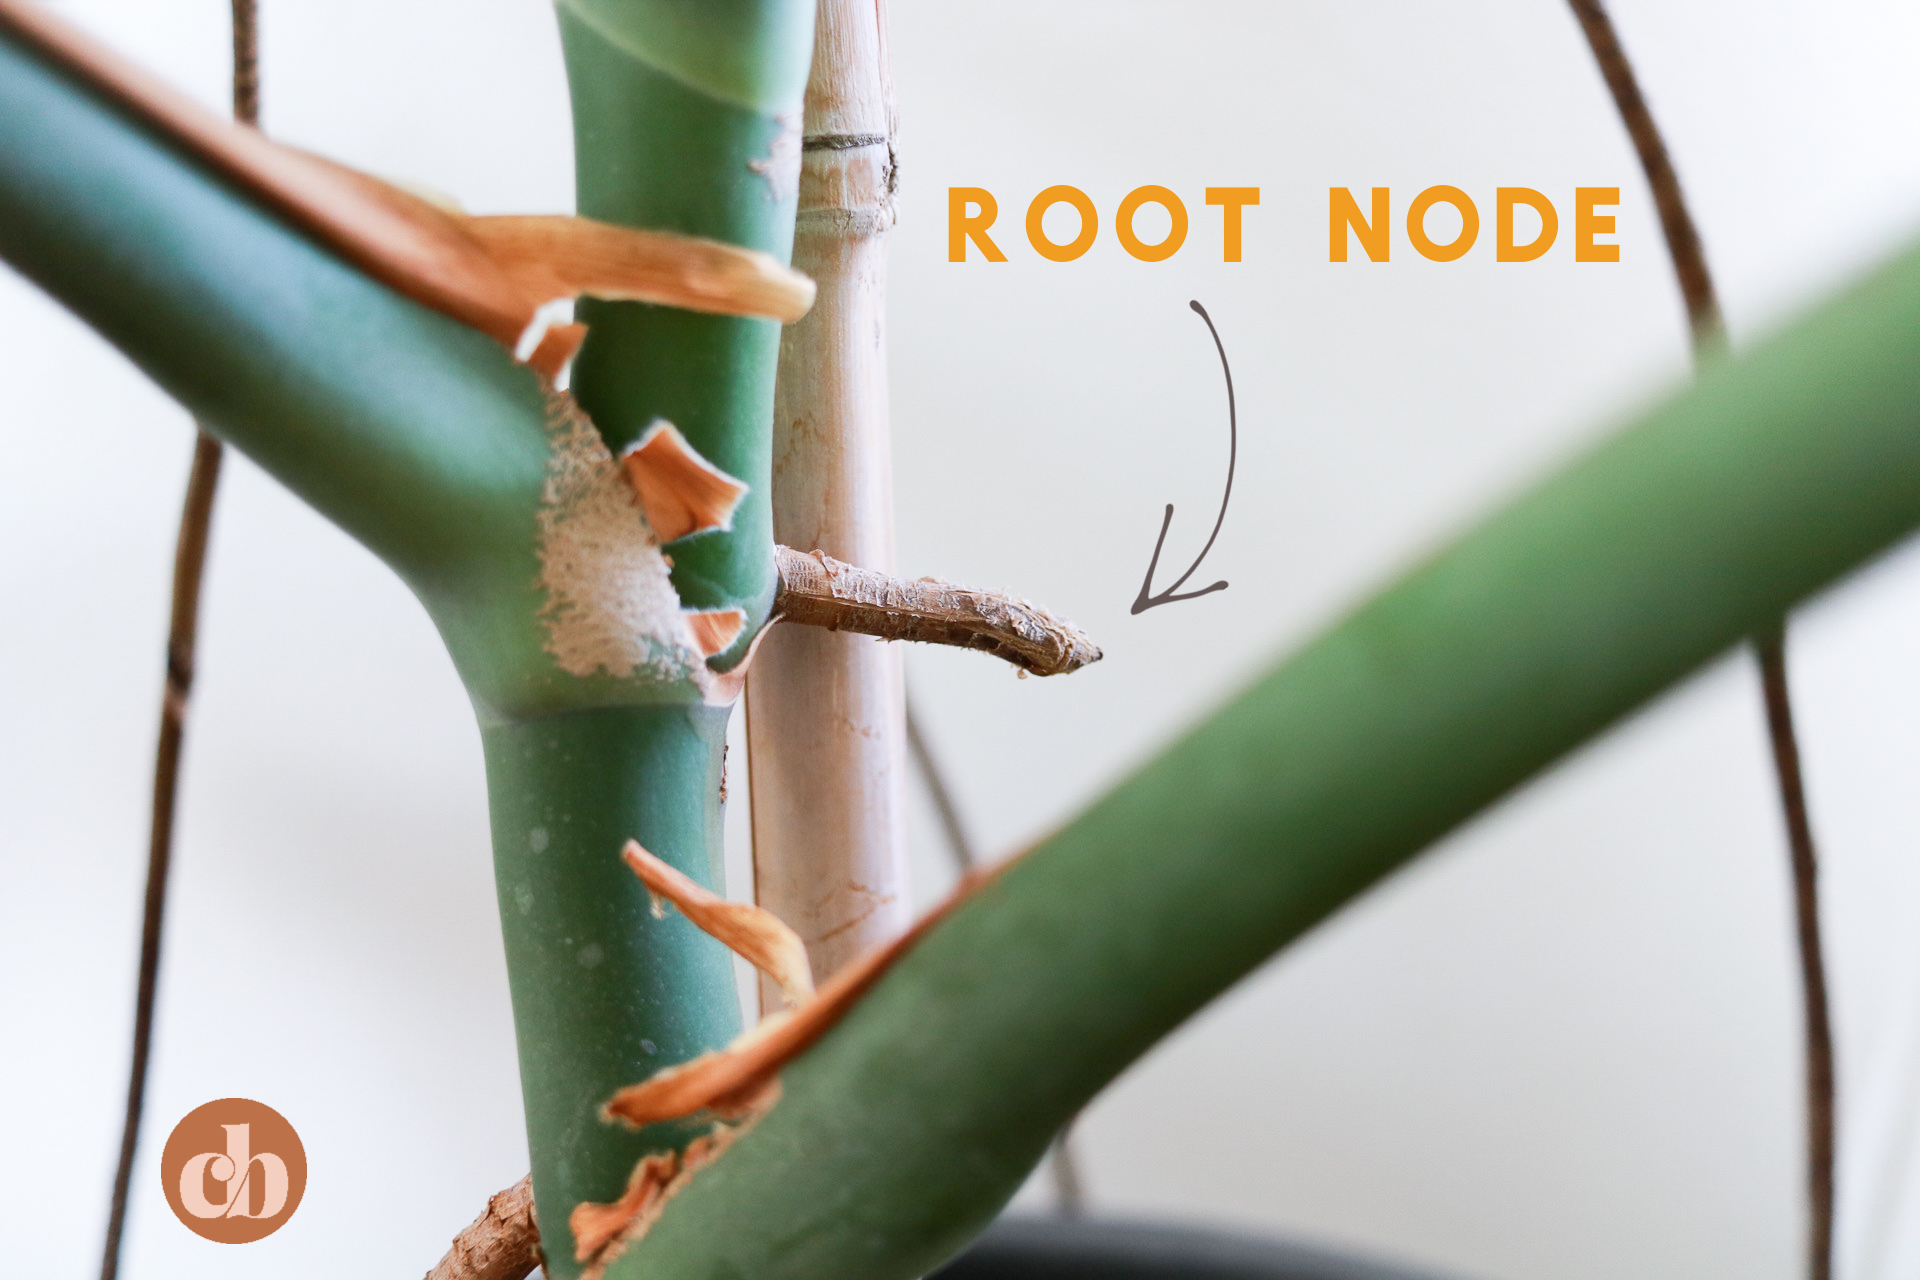
- Identify the location where you will snip your cutting from the main plant. Not all cutting that will root in water have root nodes, but most of them do so find the root node on your plant.
- Carefully cut just below the node with a clean sharp knife or scissors. About 1/4″ below the node.
- Place the cutting in a clean glass. Poor enough room temperature water to cover the nodes of the cutting.
- Change out the water every 3-5 days with fresh room temperature water.
- Wait and watch as your roots grow! This can take weeks to months depending on the plant.
- Once your roots reach approximately 3″-5″ then it’s time to put the cutting in soil!
Need a visual? Watch my propagation tips on AM Northwest.
When you change out the water, be sure to give the roots a little rinse and a little rub with your fingers. The roots can get a mucky film (that’s the technical term) and you want to wipe that away before placing them in the new water.

That’s all you have to do! It’s so simple. Now you can make your own plants and trade with your friends. It’s one of my most favorite things to do. Once you are ready to pot your rooted plant, check out my How to Repot a Houseplant post. There are some good potting tips there!
Lastly, take a look here for my favorite propagation stations! Have a great day and thank you for being here 🙂
This post has affiliate links for your convenience
Hello! Thanks for being here! Today I’m going to show you how to root plant cuttings in water. This is a great way of multiplying the plants you have and sharing the plant love with friends. I will say, it’s kind of hard to give away a plant that you’ve been nursing from its beginning. But, it’s so rewarding and so cool to get results! I just gave two Chain of Hearts cuttings away today to super awesome homes. I can’t wait to check in on their progress.
Most common house plants can be propagated by water method. Right now my new subject is a tiny little stem from my big Fiddle Leaf Fig. So far no roots but there is a tiny green leaf!! If you’re not sure, just try it!
Let’s get started
- Identify the location where you will snip your cutting from the main plant. Not all cutting that will root in water have root nodes, but most of them do so find the root node on your plant.
- Carefully cut just below the node with a clean sharp knife or scissors. About 1/4″ below the node.
- Place the cutting in a clean glass. Poor enough room temperature water to cover the nodes of the cutting.
- Change out the water every 3-5 days with fresh room temperature water.
- Wait and watch as your roots grow! This can take weeks to months depending on the plant.
- Once your roots reach approximately 3″-5″ then it’s time to put the cutting in soil!
Need a visual? Watch my propagation tips on AM Northwest.
When you change out the water, be sure to give the roots a little rinse and a little rub with your fingers. The roots can get a mucky film (that’s the technical term) and you want to wipe that away before placing them in the new water.

That’s all you have to do! It’s so simple. Now you can make your own plants and trade with your friends. It’s one of my most favorite things to do. Once you are ready to pot your rooted plant, check out my How to Repot a Houseplant post. I know you won’t be actually repotting but there are some good tips about potting in general. Thank you so much for visiting! See you next time!
This post has affiliate links for your convenience

Growing plants from cuttings is far from a new technique. Ever since plants have existed, they’ve been sprouting from cuttings all on their own. A branch falls to the ground and, if the conditions are ideal, produces roots and becomes a new plant. Taking cuttings at home is just as simple, in fact even easier, as you get to control the conditions whereas Mother Nature often makes things difficult.
First a definition: taking a cutting involves removing part of a plant and stimulating it to produce roots and new stems and leaves. In other words, the severed part, the cutting, becomes a new plant in its own right.

Also you can take leaf cuttings or even leaf section cuttings from such certain plants, such as African violets, crassulas and snake plants (Sansevieria). In fact, in under laboratory conditions, you can grow many plants from just about any green part of their anatomy.
On the other hand, the “plant part” the mostly likely to provide a viable plant from the widest range of plants under home conditions is the stem. You can take stem cuttings from just about any plant that has a stem: houseplants, shrubs, trees, herbs, perennials and many, many more.
Using Houseplants as an Example
When to Take Cuttings?
Step by Step
1. Begin by selecting a container. A traditional plastic pot is fine, but you can also recycle any small container, such as a yoghurt cup, as long as you punch a hole in its bottom for drainage. Avoid large pots: plants root better in small pots about 2 to 3 inches (5 to 7.5 cm) in diameter or in plug trays. If you want to, though, you can start several cuttings in a larger pot or in a tray.
 2. Fill the pot with potting mix or seed-starting mix or use perlite or vermiculite. Avoid garden soil and even compost: you’ll want the growing mix to be fairly sterile at first.
3. Moisten the mix thoroughly and allow any excess water to drain out.
 4. Using a pencil, punch a hole into the potting soil in the center of the pot. This is the hole into which you’ll be inserting your cutting.
<img data-lazy-fallback="1" data-attachment-id="21587" data-permalink="https://laidbackgardener.blog/2017/03/06/rooting-cuttings-step-by-step/pelarg-8/" data-orig-file="https://i0.wp.com/laidbackgardener.blog/wp-content/uploads/2017/03/20170306d.jpg?fit=875%2C1304&ssl=1" data-orig-size="875,1304" data-comments-opened="1" data-image-meta="{"aperture":"0","credit":"","camera":"LS-4000","caption":"Pelarg+","created_timestamp":"1488526825","copyright":"","focal_length":"0","iso":"0","shutter_speed":"0","title":"Pelarg+","orientation":"1"}" data-image-title="Pelarg+" data-image-description="" data-image-caption="
Pelarg+
» data-medium-file=»https://i0.wp.com/laidbackgardener.blog/wp-content/uploads/2017/03/20170306d.jpg?fit=201%2C300&ssl=1″ data-large-file=»https://i0.wp.com/laidbackgardener.blog/wp-content/uploads/2017/03/20170306d.jpg?fit=687%2C1024&ssl=1″ decoding=»async» loading=»lazy» src=»https://i0.wp.com/laidbackgardener.blog/wp-content/uploads/2017/03/20170306d.jpg?resize=875%2C1304&is-pending-load=1#038;ssl=1″ alt=»Pelarg+» srcset=»https://i0.wp.com/laidbackgardener.blog/wp-content/uploads/2017/03/20170306d.jpg?w=875&ssl=1 875w, https://i0.wp.com/laidbackgardener.blog/wp-content/uploads/2017/03/20170306d.jpg?resize=201%2C300&ssl=1 201w, https://i0.wp.com/laidbackgardener.blog/wp-content/uploads/2017/03/20170306d.jpg?resize=687%2C1024&ssl=1 687w, https://i0.wp.com/laidbackgardener.blog/wp-content/uploads/2017/03/20170306d.jpg?resize=768%2C1145&ssl=1 768w» sizes=»(max-width: 875px) 100vw, 875px» data-recalc-dims=»1″ data-lazy-srcset=»https://i0.wp.com/laidbackgardener.blog/wp-content/uploads/2017/03/20170306d.jpg?w=875&ssl=1 875w, https://i0.wp.com/laidbackgardener.blog/wp-content/uploads/2017/03/20170306d.jpg?resize=201%2C300&ssl=1 201w, https://i0.wp.com/laidbackgardener.blog/wp-content/uploads/2017/03/20170306d.jpg?resize=687%2C1024&ssl=1 687w, https://i0.wp.com/laidbackgardener.blog/wp-content/uploads/2017/03/20170306d.jpg?resize=768%2C1145&ssl=1 768w» data-old-srcset=»data:image/gif;base64,R0lGODlhAQABAIAAAAAAAP///yH5BAEAAAAALAAAAAABAAEAAAIBRAA7″>5. Now, with a sharp knife or pruning shears, cut a healthy stem with at least three nodes and preferably four or five nodes (a node is the spot on the stem where leaves are attached or used to be attached).
 7. For plants you want to see branch abundantly, such as coleus and hibiscus, pinch the tip (that is, remove the bud at the end of the stem). This will stimulate the production of several new stems rather than just one. For stem cuttings of plants where a single stem is the norm (African violets, dieffenbachias, dracaenas, philodendrons, etc.), don’t pinch.
 8. Among easy-to-root plants – and that includes philodendrons, coleus, pileas, begonias and just about any plant with a soft stem and no bark – no rooting hormone is necessary. Woody plants, such as hibiscus, dracaena and croton, are more difficult to root and, for these plants, buy a rooting hormone and apply a bit to the lower extremity of the cutting. This hormone will encourage recalcitrant stems to produce roots.
9. Slip the cutting, bottom end down of course, into the hole you previously prepared, up to the second or third node. Gently press the soil down and around the cutting so it’s held upright. (You may need to stake very large cuttings.)
 10. The vast majority of cuttings root better under high humidity, so cover the pot with a dome or transparent plastic bag, creating a mini-greenhouse where the relative humidity will be almost 100%.
11. Place the pot in a well-lit spot, but away from direct sunlight, and at fairly warm temperatures: 70 to 75°F (21-24°C).
12. Now, wait! Some cuttings are quite quick to root (a coleus may be well-rooted in only 4 to 7 days!), but most will take two or three weeks, even more than a month for woody plant cuttings.
13. You’ll know the cuttings have rooted when you see new leaves start to appear, a sign that roots are beginning to do their job. At this point, remove the mini-greenhouse and place the plant (no longer a cutting) in a place suited to its needs.
Cacti and Succulent Cuttings
Cacti and succulents don’t need high moisture in order to root and in fact, tend to rot when exposed to high humidity.

For these plants, cut off a stem, but don’t plant it right away. Let it dry for a while, until the wound callouses over, before potting it up. You can simply lay the cuttings on their side while you’re waiting. It takes 2 to 3 days for most succulents to form a callus, but a month or more for those with a very thick stem (large cactus and euphorbias, especially).
Stick the cutting upright in a pot of dry soil (not moist as you would for other plants) and don’t water right away. Wait until you see signs of growth, which can take a month or more. Yes, as odd as it may seem, these plants will more easily produce roots in dry soil! And of course, don’t cover them with a mini greenhouse!
Once new growth appears, start a normal watering program and your “succulent cutting” will soon be a thriving plant!
Taking Cuttings in Water: a Horticultural Faux Pas
The problem is that the roots produced on a cutting started in water acclimate to an aquatic environment. When you later transplant the cutting to a pot (and very few plants will be spending all their life in a glass of water), the aquatic roots die and rot, forcing the young plant to start from scratch and produce a new set of roots. Often, it no longer has enough energy for that and dies.
So to ensure good rooting success, I suggest you always start your cuttings directly in some sort of substrate such as potting soil.
Depending on the size of your cutting, the small pot in which it rooted will likely become too small quite rapidly. Don’t hesitate to repot your cuttings into a pot of a size more appropriate to its dimensions. Since it’s never wise to put a small plant in a big pot, you may need to repot your young plant into a larger pot 2 or even 3 times in the first year of its life. It will slow down after that.
Now that you know how to do it, try taking cuttings yourself: your thumb is greener than you think!
Taking plant cuttings is a great way to get new plants for your garden without breaking the bank. However, cuttings need certain light conditions to take root and grow into healthy plants.
So, do plant cuttings need light? Plant cuttings taken from a stem or leaf will need light to root. Root cuttings can be left in the dark until they grow shoots and leaves. Plant cuttings need bright light for photosynthesis so they can make energy for new growth. However, they should be kept out of direct sunlight, which can stress the new plant by overheating or dehydration.
Of course, light is not the only important factor for plant cuttings. There is a balance between competing factors (such as light, water, and temperature) to ensure proper growth.
In this article, we’ll talk about what type of light plant cuttings need. We’ll also answer some common questions about light for plant cuttings.
Let’s get going.
Join 500+ gardeners to get access to news, tips, and information.
Delivered right to your inbox – once per week.
Some plant cuttings do need light in order to grow, and others do not. For example, root cuttings do not need light until they start to form stems and leaves (after all, roots cannot use sunlight in photosynthesis – they need leaves for that!)
Stem cuttings and leaf cuttings are a different story. These types of cuttings do need light for photosynthesis, which in turn allows them to produce roots.

If a cutting has leaves, the energy for new roots will come from photosynthesis (which requires light). If no leaves are present, the cutting will use energy reserves from its shoot (stem) to produce roots and leaves.
Light is important to plant cuttings for other reasons as well. For example, according to the Michigan State University Extension:
“Light provides the energy for callus formation and the subsequent generation of adventitious roots.”
https://www.canr.msu.edu/uploads/resources/pdfs/lighting-of-cuttings.pdf
A callus is the spot where a plant heals over after an injury. A callus helps to protect a plant cutting in two ways:
- From diseases (bacterial, viral, or fungal) that threaten to infect an injured plant by invading through the cut area.
- From dehydration (which is more likely when a plant is exposed to direct sunlight in a dry environment).
Adventitious roots on a plant grow from stem or leaf tissue. They can form in response to stress and injury.
These adventitious roots are necessary for the plant to begin drawing water and nutrients from soil to continue growth. Without the ability to form adventitious roots, a plant cutting could not survive to become a new plant.
Although light is important for plant cuttings, there is a balance to aim for:
- Without enough light, stem or leaf cuttings will not be able to grow roots fast enough to survive.
- With too much light, the plant will be stressed by heat, dehydration, or burned leaves.
The solution is to start with low light right after a cutting is taken. Then, gradually increase light levels later on as roots form and the plant becomes more established.

The Purdue University Extension suggests putting a plant cutting in a bright area, but out of direct sunlight. That way, the leaves will get enough light for photosynthesis & energy production, but the cutting will not overheat.
If water loss in a dry climate is a concern, there are some steps you can take to reduce the risk of drying out the cutting:
- First, water the plant well before taking a cutting (this will reduce water stress later).
- Next, make sure to take the cutting early in the day (before temperatures rise).
- After taking the cutting, remove some leaves to prevent water loss (which occurs via transpiration through the leaves).
- Then, put the cutting in a plastic bag with a damp paper towel inside (this will retain moisture and keep the air around the cutting humid.)
- Finally, keep the cutting out of direct sunlight (since this will cause faster water loss via evaporation).
Remember that for some plants, it can take months for roots to form. To speed things up, remove any flowers or fruit from the cutting that would take energy away from root formation.
Do Cuttings Need Sunlight?
Cuttings do not need sunlight, and they can grow without sunlight (as long as they get artificial light instead). In fact, according to the North Caroline State University Extension, it is a good idea to avoid direct sunlight for cuttings right after they are cut.
You have the option to provide cuttings with diffused sunlight or artificial light.
Diffused sunlight falls evenly with no bright or dark spots. It is scattered and comes from every direction.
Diffused sunlight is not as harsh as direct sunlight. Sunlight is diffused when:
- It is blocked by clouds (such as on an overcast day).
- It reflects off of other objects (such as the ground).
You can use any number of artificial light sources for plant cuttings, including:
- Incandescent bulbs – These bulbs are not very energy efficient. They give off lots of heat, so they might make it too hot for cuttings, especially in a small space.
- Fluorescent bulbs – These bulbs are more energy efficient and give off less heat than incandescent bulbs. You can find full-spectrum fluorescent bulbs, which mimic sunlight to provide more of the different types of light a plant needs to grow.
- LED bulbs – These bulbs are the most energy efficient and give off very little heat. You can find full-spectrum LED lights that provide more of the different types of light that plants need to grow (If you want some LED grow lights for your plants, you can find them online from Ace Hardware).

Join 500+ gardeners to get access to news, tips, and information.
Delivered right to your inbox – once per week.
How Much Light Do Plant Cuttings Need?
Root cuttings do not need light until shoots and leave start to form. Plant cuttings from stems and leaves need less bright light right after they have been cut.

Image courtesy of user Kumar83 at Wikimedia Commons: https://commons.wikimedia.org/wiki/File:Stem_Cutting.jpg
As their root systems get established, they can tolerate more light without suffering from stress, overheating, drought, or burned leaves.
Should Cuttings Be Kept In The Dark?
The University of Maine suggests that root cuttings can be kept in the dark until new shoots appear. After all, the roots cannot do photosynthesis themselves (they need leaves for that!), so they don’t need sunlight right away.
However, stem and leaf cuttings should be placed in bright, indirect sunlight (diffused sunlight) or under artificial lights.

As plant cuttings become established and grow into new plants, they will have the same light and darkness requirements as the parent plant.
According to the Oregon State University Extension, photoperiodism affects whether plants flower. Most plants can be categorized into a few categories:
- Short Day – these plants form flowers only when day length is less than 12 hours (includes chrysanthemums and poinsettias.)
- Long Day – these plants form flowers only when day length is more than 12 hours (includes lettuce, spinach, and potatoes.)
- Day Neutral – these plants form flowers with no regard to day length (includes tomatoes and cucumbers.)
Depending on the plant, it may need a certain length of time in darkness to form flowers and fruit.
Do Cuttings In Water Need Sunlight?
Leaf and stem cuttings in water need some type of light for photosynthesis. That way, they can produce the energy they need to form roots.
The light source for cuttings in water could be either sunlight or artificial light.
Do Cuttings Need Light To Root?
Stem and leaf cuttings do need light to root. According to the University of Michigan, a lack of light will delay rooting.
Root cuttings do not need light, since they already have roots. However, they will need light to continue growing once they form shoots and leaves.
How To Make Cuttings Root Faster
There is a way to make plant cuttings root faster and increase the chances of a successful propagation. Rooting hormone promotes faster root formation from cuttings.
Auxins are one type of plant hormone that promotes root growth. You can find rooting hormone online or at garden supply stores.

When applied to the cut end of a plant cutting, rooting hormone speeds up the process of root formation. This increases the chances of survival for a plant cutting (faster rooting means the plant can absorb water and nutrients from soil much sooner.)
Conclusion
Now you know how much light plant cuttings need and how to give it to them. You also know how to help cuttings adjust to more light gradually.
To find books, courses, seeds, gardening supplies, and more, check out The Shop at Greenupside!

What if I told you that you can create a virtually unlimited supply of new plants from a single mother plant? It sounds too good to be true, but I assure you that you can do exactly that, provided that you learn how to take plant cuttings and care for them to maturity.
So, what is a plant cutting? A plant cutting is a piece of a plant’s stem, leaf, or root that is used to produce a new plant (clone). A successfully cloned plant will have the same traits as the parent plant, and it will produce its own roots, shoots, and leaves.
Of course, there are lots of different ways to take a plant cutting and turn it into a new plant. For example, you can use stem, leaf, or root cuttings to propagate plants, depending on the species.
In this article, we’ll talk about what plant cuttings are. We’ll also look at various methods of taking plant cuttings.
Let’s get going.
Join 500+ gardeners to get access to news, tips, and information.
Delivered right to your inbox – once per week.
A plant cutting (or cutting) is a piece of a plant that is used to produce another plant of the same type (a clone). If successful, a cloned plant cutting will produce its own roots (in water or soil) and begin to grow on its own as a separate plant.
Plant cuttings are often taken from a stem or branch. However, it is also possible to use a leaf or root cutting from some plants to create a clone.
According to Purdue University, the clone (new plant) that grows from a cutting is identical to the parent plant. So, when you clone a plant by cuttings, you keep the traits of the parent plant in the next generation.
Also, new plants grown from cuttings will often reach maturity and begin flowering sooner than plants grown from seed.
Examples Of Stem Cutting Plants
Some popular examples of plants that you can clone (propagate) with stem cuttings include:
- Azalea
- Blackberries
- Common Purslane
- Dracaena
- Ficus
- Hedera (Ivy)
- Lemon Balm
- Mint
- Monstera
- Parsley
- Rosemary
- Thyme
- Willow

Examples Of Leaf Cutting Plants
Some popular examples of plants that you can clone (propagate) with leaf cuttings include:
- African violet
- Begonia
- Cactus
- Crassula
- Haworthia
- Kalanchoe
- Sansevieria
- Sedum

These lists are not exhaustive, and there are many more plants that you can clone by taking cuttings.
How Do You Take A Cutting From A Plant?
Taking a cutting from a plant requires a few important steps. The first and most important step is to find a plant that is healthy enough for a cutting.
Find A Healthy Parent Plant To Take A Cutting From
A plant should be both large enough and mature enough to take a cutting. Don’t cut one of the few leaves or branches from a very young plant.
Instead, choose an established but healthy plant that has plenty of healthy growth (leaves, stems, and roots). Also, make sure to take your cutting at the proper time of year (more on this later).
Choose A Container and Growing Medium For The Cutting
First, find a container with enough space to hold the plant cutting and its growing medium (soil, sand, potting mix, or even water).

Next, fill with the container with your chosen growing medium. Some plants will take root in water, and you can grow many plants without soil in a hydroponic, aquaponics, or aeroponic system.
Just remember that you will need to change the water often to avoid bacteria and root rot.
If you use a soil-less growing system, you will eventually need to transplant the rooted cutting into a growing medium. This may not pose a problem for some plants, but others have delicate roots and are sensitive to transplant shock.
The best growing medium for a particular cutting will depend on the type of plant and the type of cutting (stem, leaf, or root).
Take A Cutting From The Parent Plant
First, find a sharp knife, scissors, pruning shears, or razor blade. Use a clean cloth and some rubbing alcohol to sterilize the blade between cuttings. This will prevent the spread of disease.

Next, decide on the type of cutting you want to take:
- Stem cutting – this type of cutting is common, but can only be taken at certain times of year for hardwood plants.
- Leaf cutting – this type of cutting is less common, and does not work for every type of plant.
- Root cutting – this type of cutting is rare, and only works for a few types of plants.
How To Make A Stem Cutting
According to the North Carolina State University Extension, you should avoid taking cuttings that have flower buds. Otherwise, the plant will waste energy on flowers that it needs for producing roots, stems, and leaves.
The terminal part (tip) of the stem is the best part to take cuttings from. It is also better to take cuttings from the upper part of the plant, which has the new growth.
A stem cutting should be 4 to 6 inches long. After you separate the stem piece from the plant, remove the leaves on the bottom half of the cutting.
Image courtesy of user Kumar83 at Wikimedia Commons: https://commons.wikimedia.org/wiki/File:Stem_Cutting.jpg
Put the cut end of the stem into the growing medium, covering about half of the length of the cutting (2 to 3 inches).
How To Make A Leaf Cutting
According to the Iowa State University Extension, there are a few different ways to make leaf cuttings:
- Leaf-petiole cuttings – with this method, you remove an entire healthy leaf and its petiole (stalk) from the parent plant. The stalk of the leaf is inserted into the growing medium.
- Leaf blade cuttings – plants like jade have leaves attached to the stem (there is no petiole). In this case, you can break off the leaves and stick the cut end into the growing medium.
- Leaf section cuttings – with this method, you remove a leaf and cut it into 3 inch sections. For each section, put the end that was closest to the roots into the growing medium.

How To Make A Root Cutting
According to the Penn State University Extension, root cuttings are best taken from plants when they are dormant.
First, lift the plant out of the soil. You may need to dig around the roots.
Next, wash the soil from the roots. Be careful with delicate roots, since damage could mean that neither the parent nor the clone survives.
Then, cut off a thick root (not a thin hair like root) to a length of 3 to 5 inches long. Remember which side of the root is the top (you could mark it by tying a piece of string to the “top” end.
Finally, insert the root cutting down into the growing medium (it should be standing up, vertically). Push the cutting down into the soil until the top of the root is level with the top of the soil.
Apply Rooting Hormone To The Plant Cutting
Rooting hormone helps plant cuttings to produce roots faster. The faster the roots form, the faster the plant grows, and the sooner you can transplant it.
Rooting hormone comes in powder, liquid, and gel forms. All you need to do is dip the bottom end of the cutting (for example, the leaf petiole or the part of the stem closest to the roots) into the rooting hormone.
Then, place the cutting into the growing medium as usual.
Keep The Plant Cutting Humid
After taking a plant cutting, it should be kept humid to encourage rooting and to prevent it from drying out. After all, the plant has an “open wound” and can lose water and nutrients through this wound.
You can put a clear plastic bag over a cutting to retain moisture, or you can use a spray bottle to mist regularly.
Transplant The Established Plant Cutting
After rooting, you can transplant the established plant cutting outdoors or repot it into a larger container.
Just keep the weather in your climate in mind when you make any decisions about transplanting outdoors.
Join 500+ gardeners to get access to news, tips, and information.
Delivered right to your inbox – once per week.
When Should I Take Plant Cuttings?
The best time to take plant cuttings depends on the type of plant and the propagation method you are using.
Best Time To Take Stem Cuttings
The best time of day to take stem cuttings is in the early morning. The best time of year to take stem cuttings depends on the type of wood:
- Herbaceous plants – taken anytime the plant is growing. These cuttings are taken from non-woody plants such as coleus.
- Softwood – taken from new growth of woody plants as it begins to harden (usually May to July). Look for small leaves that have not reached full size yet to identify softwood.
- Semi-hardwood – taken from new growth after the wood is mature (usually later in the summer, July to early fall). Look for firmer wood and full-size leaves to identify semi-hardwood.
- Hardwood – taken from shoots that grew in the previous summer. These cuttings are usually taken in winter or early spring, during a plant’s dormant phase. Look for firm wood that does not bend easily.

Best Time To Take Leaf Cuttings
The best time to take a leaf cutting is when the plant is healthy. Avoid taking plants with yellow leaves due to nutrient deficiencies or sick-looking leaves from water stress.

Since cuttings do better in warm temperatures, it helps if you take the cutting at a time when it is easier to keep it warm (spring or summer).
If successful, the leaf will produce roots and shoots to make a new plant. Usually, the “mother” leaf itself disintegrates and does not remain as part of the new plant.
Remember that not all plants can be propagated by leaf cuttings.
Best Time To Take Root Cuttings
The best time to take a root cutting is when the plant is dormant. This is also when the roots contain the most stored energy.
The roots that are cut to form a new plant will need this energy to create new shoots and leaves. The new shoots create their own roots, and the original roots disintegrate.
Remember that there are only a few species that you can propagate by root cuttings.
What Is The Best Temperature For Plant Cuttings?
According to the University of Missouri Extension, a temperature of 75 to 80 degrees Fahrenheit (24 to 27 degrees Celsius) will hasten rooting for plant cuttings. Of course, there is a difference between air temperature and soil temperature.
According to Michigan State University, the growing medium (soil) should be 5 to 8 degrees Fahrenheit (3 to 4 degrees Celsius) higher than the air. This will encourage calluses and roots to grow faster than shoots.
To keep the growing medium warmer than the air, heating from the bottom is your best bet. For example, this heating mat from Gardener’s Supply Company will keep the soil warmer than the air around it, which is useful for rooting cuttings and seed germination.
Remember that cold water can reduce the temperature of your cuttings if you mist them with it. Consider using warm (not hot!) water in your spray bottle to avoid exposing cuttings to cold.
How Long Does It Take To Grow A Plant From A Cutting?
In most cases, it will take at least a month to grow a plant from a cutting. Depending on the type of plant and environmental conditions, it can take many months to grow a plant from a cutting.
Remember: you need to account for the time it takes the plant cutting to root, and also the time it takes to grow shoots and leaves to become an established plant.
How Long Do Plant Cuttings Take To Root?
According to the University of Florida, plant cuttings will start to take root within a few weeks. The longer you let a cutting grow, the stronger the root system will become.
If you rooted your cutting in water, I would suggest transplanting it into a container with soil. This will give the roots a chance to absorb nutrients from the soil before you transplant outdoors.
How To Encourage Roots To Grow From A Cutting
There are several ways to encourage roots to grow from a cutting, including:
- Maintain the proper temperature
- Provide adequate humidity
- Use rooting hormone
As mentioned earlier, a good temperature for rooting plant cuttings is 75 to 80 degrees Fahrenheit. Keep the growing medium 5 to 8 degrees Fahrenheit warmer than the surrounding air.
Plant cuttings need humidity, so keep the growing medium moist. Covering a plant cutting with clear plastic helps to retain humidity, which means faster rooting.
You can also use a humidity dome to provide one or more plant cuttings with consistent humidity.
A rooting hormone is another good way to encourage roots to grow faster and stronger from a cutting.
What Is The Best Rooting Hormone?
- Easier rooting for plants that have trouble rooting
- Roots are produced sooner on cuttings
- Root growth is more uniform
- Plant cuttings produce more roots
- Roots grow faster
To use rooting hormone, all you need to do is dip the base end of the plant cutting into the mixture. Then, plant the cutting normally in a container with the growing medium you want to use.
Remember that liquid rooting hormone formulas are usually more effective than powder formulas.
Can You Put Cuttings Straight Into Soil?
You can put cuttings straight into soil, and there is a chance that they will take root and grow into healthy plants. However, it might be better to wait to put your cuttings into soil.
First of all, some cuttings will root better if you expose them to the air first. When you leave a cutting out, it has time to dry up and “scab over” the wound before you put it in the soil.
For example, I have had more luck propagating jade leaf cuttings after leaving them out for a few days to dry before planting the cut ends in the soil.
In addition, rooting hormone may be necessary for plants that are difficult to root. Rooting hormone will also cause plants to produce more roots in less time.
Just remember that when you put cuttings into soil, you will need to maintain proper moisture to keep them alive.
What Soil Is Best For Cuttings?
- sterile (this means that the medium is clean and free of diseases – don’t reuse old potting mix that might contain diseases)
- low in fertility (this means nutrient levels are low, since too much fertilizer can burn plants)
- well-drained (this means that the medium does not hold too much water for too long)
- soilless (this means that the medium does not contain soil, which can hold soil-borne diseases)
Some common materials used to make a mix for plant cuttings include:
- coarse sand (large grains)
- peat moss (retains moisture – if you want to try this water-absorbing material, you can find a large bale of peat moss online from Ace Hardware).
- perlite (holds water and releases it when needed)
- vermiculite (similar to perlite)
- blood meal (adds nitrogen)
- bone meal (adds phosphorus)
- lime (adds calcium)

The Penn State University Extension suggests that you can make four gallons of soilless media by combining:
- 2 gallons of peat moss
- 2 gallons of perlite (or vermiculite)
- Nutrient supplements as needed (blood meal, bone meal, lime, etc.)
- Water to moisten before use
Do Cuttings Need Light To Root?
Cuttings do need light to root. For one thing, light provides the energy for a cutting to form a callus (to heal the wound where the plant was cut).
Light also provides energy for a plant cutting to produce roots. In fact, according to the Michigan State University Extension, light is one of two primary factors that determines root development (temperature is the other factor).
A lack of light delays rooting, but too much light can overheat the growing media or the plant itself, causing stress. The light levels should be uniform during propagation from plant cuttings.
The best way to do this is to use a grow light to provide uniform light for a plant in an otherwise dark room. You can do this with LED grow lights, which don’t give off too much heat.
Do Cuttings Need Fertilizer?
Cuttings may need some fertilizer, especially if you opt to use misting to maintain moisture levels. According to the Michigan State University, misting plants often can leach nutrients out of soilless plant mixes (such as the ones recommended for cuttings).
If cuttings lack nutrients, cuttings can get chlorosis (yellow instead of green coloring on leaves and stems). The roots may also be delayed and slow to grow.
To avoid this, use a small amount of fertilizer dissolved or mixed into the water used to spray mist onto plant cuttings.
Do Cuttings Need Leaves?
Cuttings do not necessarily need leaves, at least at first. For example, root cuttings do not have any leaves at all.
Instead, the root cutting forms new shoots and then leaves. Eventually, the shoots grow new roots.

A stem cutting with leaves will have an easier time establishing itself, since it can use the leaves for photosynthesis (or, as a last resort, as a source of energy and nutrients).
Of course, a leaf cutting is already a leaf itself. However, it will need time to grow new roots, shoots and leaves until it is established.
Conclusion
Now you know what a plant cutting is and some of the different methods you can use to clone plants by cuttings. You also know how to take plant cuttings and how to speed up root formation.
You might also be interested in reading this article on which plant cuttings need light.
To find books, courses, seeds, gardening supplies, and more, check out The Shop at Greenupside!
So, Which Medium Is Best for Your Root Cuttings?
Depending on what you’re trying to grow from root cuttings, you should have no problem if you pick a healthy plant to take the cutting from, treat it with care, and use a proper medium.
You’ll also need to keep your cuttings moist, humid, and in the dark, for at least a couple of weeks before you see any real growth.
Picking the best medium helps ensure your root cuttings have enough water, warmth, air, and space to develop roots.
https://youtube.com/watch?v=jm0XfWA-RxY%3Ffeature%3Doembed
Caring for Your Cuttings
After taking cuttings and setting them up in the best medium there are several aftercare factors to consider and keep up with.
Keep in mind also that it is best to research each root type in addition to applying general care for cuttings.
Watering
Root cuttings require watering every day. Depending on the medium, they may need as much as two to three waterings per day.
After the first two weeks, watering sessions should be reduced.
For cuttings soaking in jars of water, make sure to replace the jars with fresh clean water every three or four days.
Lighting
Most root cuttings don’t require light for the first couple of weeks after they’re cut. Root cuttings thrive and begin developing new roots in darkness.
However, after some time passes, and roots begin to appear, introducing them to sunlight or growing lights is necessary for them to transform into healthy new plants.
Humidity Level
The humidity level that root cuttings are stored in after being cut and potted is crucial.
Most gardeners suggest a humidity level of 80 to 85%. Some gardeners even recommend a 100% humidity level.
The bottom line is that your root cuttings need to be stored somewhere where they won’t dry out and neither will the medium they’re potted/stored in.
Temperature
Most root cuttings survive at temperatures between 50°F and 70°F. That said, the most ideal temperature for root cuttings to quickly develop is 73°F to 77°F.
Keep in mind that the bottom of the containers that hold the root cuttings is the most important area to keep warm (the root zone).
Protecting From Pests
Pests are not a usual issue with fresh root cuttings, but there are always exceptions.
Likewise, even if you selected a pest-free cutting, there is always a chance that pests may find their way to the cuttings or its growing medium.
To prevent pest damage, use sterilized mediums, tools, and containers when dealing with your root cuttings.
Also, try organic pesticides like sprinkling the top side of the medium with cinnamon or spraying it with lemon juice, water, and white vinegar.
Preventing Bacteria and Disease
A few of the most common practices for preventing bacteria and disease from infecting root cuttings include:
- Sanitizing tools, containers, and mediums.
- Selecting clean and healthy cuttings.
- Regularly checking the cuttings for signs of bacteria or disease.
- Keeping the medium free of weeds and insects.
- Storing the root cuttings in a dark and cool place.
When To Fertilize Plant Cuttings
Fertilizing new plant cuttings is actually not a very good practice. In order for root cuttings to begin developing new root systems, they need a “reason.”
Having been cut from their parent plant and removed from their natural environment, they have that reason.
However, if you start feeding them nutrients, they may become lazy and simply soak up the nutrients provided rather than shooting out new roots in an attempt to search for nutrients.
Transplanting Rooted Cuttings
After root cuttings develop an inch or two of new roots, they are ready for transplanting.
The basic steps for transplanting roots are:
- Remove the cutting from its current medium.
- Carefully rinse the soil or medium from the roots.
- Allow the roots to soak in freshwater for several minutes.
- Prepare the ground or container for planting.
- Remove the cutting from the water, and place it in the ground or container.
- Cover the roots with at least 2-3 inches of soil or growing medium.
Depending on the sort of plant you’re dealing with, the amount of light it needs or the best place to sit it after transplanting varies.
Related Question
Why Do Cuttings Fail?
Cuttings may fail for several reasons, the most common being that they were not healthy plants before being cut, the wrong part of the plants were cut, the cutting was executed poorly, the cutting dried out, too many nutrients were provided, or the wrong medium was used.
Mediums for Rooting Cuttings
Taking a root cutting from a plant is easy; simply dig the plant up and remove around 1/4 to 1/3 of the parent plant’s root system.
The next step is planting your root cuttings in the best medium possible.
But first, apply rooting hormone, like the one I use, to the tips of the roots and any sections that you cut or accidentally snapped off.
To do so, just dip the roots straight into the rooting hormone powder or liquid. From there, plant them straight away.
Early spring through early fall, while the plant is still in a full-on growing cycle, is the best time to take root cuttings.
Taking root cuttings during dormant stages yields poor to no results at all.
The average root cuttings take three to four weeks to grow large enough root systems to be potted or planted.
Soil
One of the most commonly used mediums for growing anything, including root cuttings, is soil. It is best used wet for root cuttings.
Soil can also be mixed with peat moss, perlite, and other mediums like LECA for a firmer but equally moist environment for root cuttings.
A major drawback to soil is that it isn’t as “clean” as other methods – not only in that it makes more of a mess but also in that it is more prone to bacteria and disease.
Properties & Benefits
Soil offers a moist and nutritious environment for root cuttings. It also provides a dark environment for roots that prefer less light.
Furthermore, the soil is a great base or additive for root cutting mediums.
Plants To Use With This Medium
Nearly anything that can be propagated with root cuttings will grow in soil. Granted, the best soil for the job varies depending on plant species and other factors.
Water
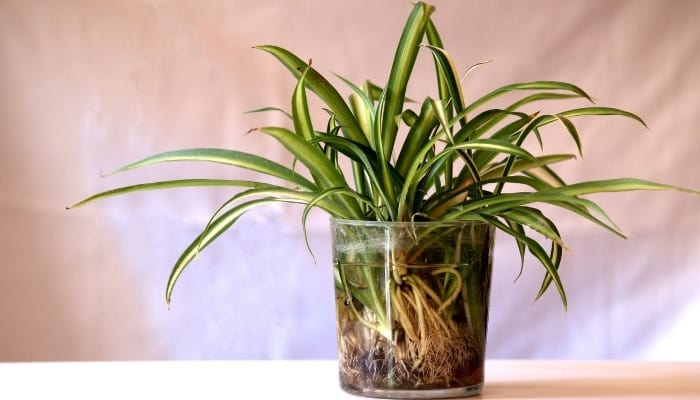
A simple but effective medium for root cuttings is plain old water. Just take your cuttings and stick them in mason jars or glasses full of clean, fresh water.
The cleaner and fresher the water is the better. You should change the water your root cuttings are soaking in at least two to three times per week.
Dip the tips in rooting hormone before plopping them into water.
Properties & Benefits
Water is easy to clean and sterilize and simple to change out every few days. It also allows for better visibility.
Also, you can monitor root cuttings that are soaking in water just by looking through the glass once per day, which is far easier than with any other medium.
Plants To Use With This Medium
As with soil, most plants that you can grow from root cuttings will start to develop new roots simply by soaking in freshwater.
That said, woody-stemmed plants and tree cuttings (find out what works and what doesn’t in this article) may not respond as well in just water.
LECA
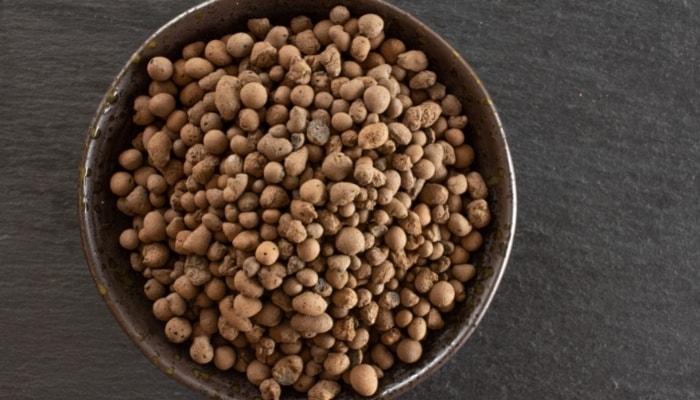
This medium is also sometimes called clay balls, due to their mainly round appearance.
When LECA becomes wet, it absorbs the moisture and slowly releases it directly to the roots of the plants.
LECA can hold water for weeks at a time, depending on how much you water it.
For roots, you can “shower” the LECA with fresh water every 24 to 48 hours and let the excess water drain out of the bottom of the container.
Properties & Benefits
LECA holds moisture better than other mediums and is much easier to remove and transplant things into than soil and other mediums that actually grow plants (unlike water).
This medium is also less prone to disease, bacteria, and pests than soil, water, and most other mediums.
You can learn all about LECA balls in my article here.
Plants To Use With This Medium
Just about any plant that you can think of that grows from root cuttings does well with LECA.
Simply stick the root into a container with pre-soaked LECA, pour some extra water on it, let drain, and set it to the side to let nature take its course.
I’ve seen good results using these LECA balls.
Perlite
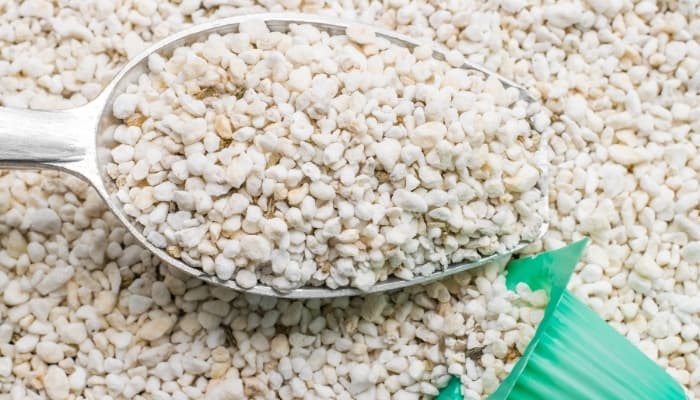
When it comes to getting root cuttings to “take” and start new root systems of their own, perlite is one of the very best mediums to use.
Perlite is easy to work with and yields excellent results.
Simply fill a container up with perlite, stick the root cutting in, and finish filling the container up, firming it up around the cutting as you go.
If the cutting falls over, try repotting it with a bit of sphagnum moss (this small bale is a good bargain) in the mix.
Properties & Benefits
With soil, peat moss, or even sand, perlite is a crucial moisture retainer, and the cutting or plant gets more nutrients from the additional medium.
You can expect to see signs of new growth on your root cuttings in as little as two to three weeks when using this medium.
Plants To Use With This Medium
Perlite is best used with root cutting and plants that prefer to stay moist constantly or for extended periods of time. I highly recommend this brand of perlite for the best results.
Vermiculite
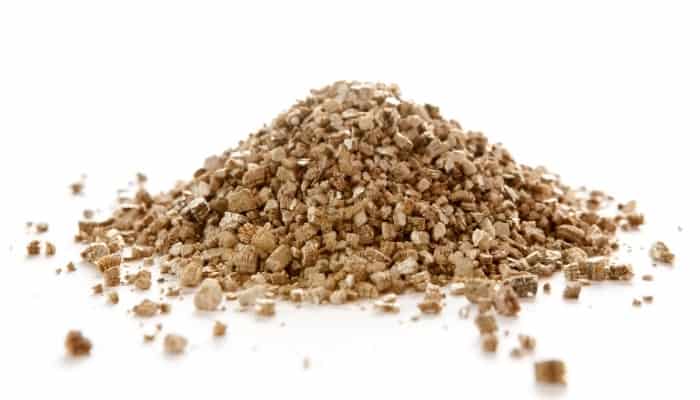
Vermiculite, or magnesium-aluminum-iron silicate, is a mineral that has the ability to absorb 300% to 400% of its weight in water.
In addition, it attracts beneficial nutrients such as calcium, magnesium, and potassium.
One reason that people tend to lean towards perlite over vermiculite is that it doesn’t provide as much aeration as perlite does.
Properties & Benefits
Vermiculite is a naturally occurring mineral in nature that’s made up of lots of cool stuff that plants need, like iron and magnesium.
Its main benefit to root cuttings is how much water it can absorb and feed back to roots over time.
Plants To Use With This Medium
Vermiculite is great to mix with perlite and potting soil, or even sand. If kept moist enough, root cuttings may sprout new roots within 10 to 15 days.
If you choose to use vermiculite either on its own or added to other mediums, I’d go with an organic mix like this one, especially if you’re rooting plants that will one day produce food.
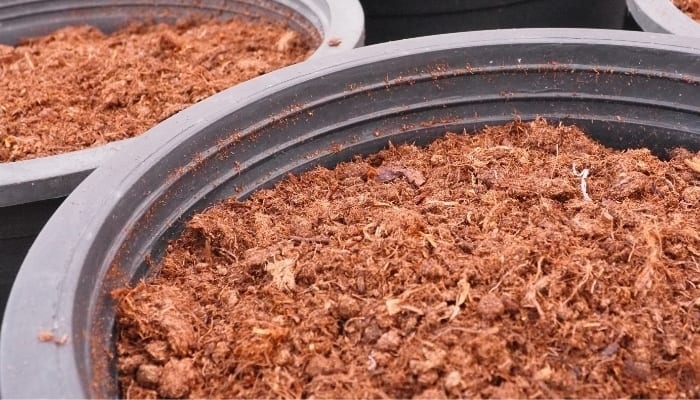
Coco Coir
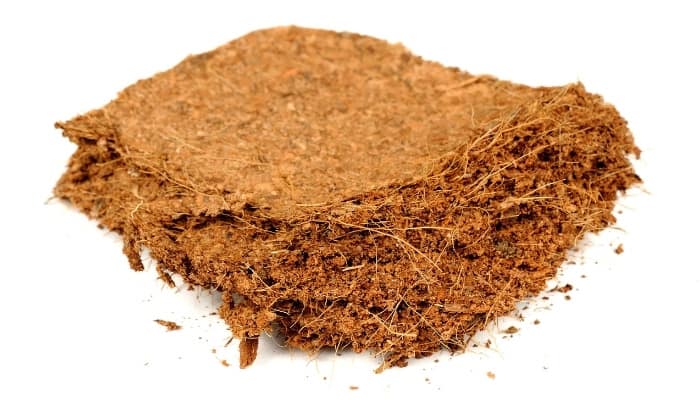
Coconut coir is a great substitute for other mediums. For root cuttings, coco coir has very successful growth rates but does require a bit more water than others.
Coco coir needs watering at least once per day when used for root cuttings or seedlings. When you place it outside or put it under lights, it requires double watering.
If it dries out completely, it may dry out your precious roots along with itself. One option is to use a coco coir mix that contains perlite for additional water retention.
Properties & Benefits
Coco coir is one of the easiest mediums to keep moist, due to its high moisture retention rate. It also holds nutrients very well, offering more sustenance to roots over the long run.
Coco coir also has less shrinkage as well as superior aeration and draining abilities to boot.
Plants To Use With This Medium
Coco coir is best to use with roots that require being extremely wet.
Besides straight water or dirt soup, coco coir is easily the best medium for plants that need extra moisture for their roots. It is also a great substitute for peat moss in soil mixes.
Sphagnum or Peat Moss
Sphagnum and peat moss are also excellent mediums for root cuttings and are actually among the very best.
Both types of moss have extremely high water retention rates and help hold nutrients longer than soil, sand, and perlite.
Sphagnum moss in particular is great for tree roots and other woody-stemmed root cuttings due to its long and fibrous nature.
Properties & Benefits
Among their most beneficial properties are their abilities to reverse compact soil, aerate the soil, and retain moisture and nutrients longer than other mediums.
Plants To Use With This Medium
Sphagnum and peat moss are more than ideal for most root cuttings, seedlings, and plants in general.
They are best mixed with other mediums such as soil, sand, and potting mixes.
Sand
Sand does indeed work well for many root cuttings.
It may not be as nutritious as other mediums, but it does offer a firm hold on cuttings, keeping them well-anchored and allowing for quick draining and space for roots to grow and thrive.
Sand is best as a medium when it’s mixed with a bit of rich soil or potting mix. That way it has the ability to retain more water and nutrients for the plant roots.
Properties & Benefits
The main benefit of sand as a rooting medium is that it offers excellent drainage and good anchoring for cuttings.
Another benefit is that it doesn’t compact in the same manner as the soil does and therefore allows plenty of room for new root systems to develop and spread out.
Plants To Use With This Medium
For root cuttings that need to be constantly moistened but not exposed to excessive amounts of water, sand is perfect.
You can water it multiple times per day and all excess water will drain out quickly.
Soilless Mixes
These mixes are typically made up of three, four, or even five or six ingredients.
The most common mediums found in soilless mixes are sand, pebbles, river rock, peat moss, sphagnum moss, perlite, vermiculite, and tree bark (usually from pine trees).
A few of the best soilless mixes for root cuttings include:
- Peat moss, perlite, vermiculite, and tree bark (30 to 40% peat moss and equal parts of each other ingredient)
- Half perlite, half sphagnum moss
- Peat moss, sand, vermiculite, and coco coir (40% peat moss, and equal parts of each other ingredient)
Properties & Benefits
The main benefit of soilless mixes, in general, is excellent drainage yet high water and nutrient retention rates.
These mixes typically need far less watering than other mediums. In addition, soilless mixes are far less prone to harmful bacteria, disease, and pests commonly found in soil.
Plants To Use With This Medium
The beauty of mixing your own soilless medium is that you can make a perfect growing medium for whatever specific root or plant type you’re dealing with.
")


")