
- List of articles
- Question
- Способы решения ошибки
- Related posts:
- Upgrade to Spectrum 21.2.8 fails with mySQL error «Access denied for user ‘root’@’localhost'»
- Updated On:
- Products
- Issue/Introduction
- Cause
- Environment
- Resolution
- Additional Information
- Feedback
- Solution 1: Sudo then Change Password
- Conclusion
- Solution 1: Sudo Into MySQL
- Solution 3 – Start MySQL in Safe Mode
- Closing
- MySQL 1045 error Access Denied triggers in the following cases
- 1) Connecting to wrong host:
- 2) User does not exist:
- 3) User exists but client host does not have permission to connect:
- 4) Password is wrong, or the user forgot his password:
- 5) Special characters in the password being converted by Bash:
- 6) SSL is required but the client is not using it:
- 7) PAM backend not working:
- Hello.
- UPDATE 2012-01-19 11
- Solve Access Denied for User Root Error
- Test Root User MySQL Access
- Related Questions In Other DevOps Questions
- Join the world’s most active Tech Community!
- Welcome back to the World’s most active Tech Community!
- Subscribe to our Newsletter, and get personalized recommendations.
- Access denied for user ‘[email protected]’ (using password
- Solutions
- Similar questions
- Форум
- Navicat Connect MySQL Report errors :1045 — Access denied for user ‘root’@‘localhost’ (using password
- problem :
- reason :
- Solution :
- If you forget the database password, follow the steps , If not, skip 123
- find MySQL The configuration file my. ini
- stay **[mysqld] Under this item ** Join in skip-grant-tables Save and exit
- restart mysql
- Get into MySQL client
- Get into MySQL database , Reset password
- Delete step 2 The content of , And then restart
- test
- How do I fix Access denied for user root localhost using password yes?
- How to Fix root Access Denied?
- Could not connect to MySQL Server Access Denied for user root’@’localhost using Password yes?
- How do I fix Access denied for user root localhost using password yes?
- How to Fix root Access Denied?
- Could not connect to MySQL Server Access Denied for user root’@’localhost using Password yes?
- How do I fix Access denied for user root localhost using password yes?
- How do I fix yes access denied for password?
- How to Fix root Access denied?
- Could not connect to MySQL server Access denied for user root’@’localhost using password YES?
- How do I fix Access denied for user root localhost using password yes?
- How do I fix root access denied?
List of articles
- navicat Connect MySQL Report errors :1045 — Access denied for user ‘root’@’localhost’ (using password: YES)
- problem :
- reason :
- Solution :
- If you forget the database password, follow the steps , If not, skip 123
- 1. find MySQL The configuration file my.ini
- 2. stay **[mysqld] Under this item ** Join in skip-grant-tables Save and exit
- 3. restart mysql
- 4. Get into MySQL client
- 5. Get into MySQL database , Reset password
- 6. Delete step 2 The content of , And then restart
- 7. test
When running SHOW GRANTS FOR root this is what I get in return:
Error Code: 1141. There is no such grant defined for user 'root' on host '%'
How can I get root its access back? Can someone please guide me on this?
Apr 29
in Other DevOps Questions
by
Kichu
• 19,040 points
reshown
Apr 30
by Hemant
•
1,049 views
i have recently installed MySQL *Ver 8.0.28-0ubuntu0.20.04.3 for Linux on x86_64 ((Ubuntu))*
after installation when i try to access my shell its showing
both with or without sudo, i know this has answers on stack and other forums but none seems to help me, i have tried reinstalling MySQL server but that also didn’t help, i tried skip grant option and then changing root password but that failed as well , need help in this , thank you
I already have a mysql database in local (installed, configured and containing things for a service).
When I try to install phpmyadmin, I get the following error : ERROR 1045 (28000): Access denied for user 'root'@'localhost' (using password: NO).
Here are the steps I do to install phpmyadmin :
- Install phpmyadmin database : Yes
- Socket Unix
- Name of the database : phpmyadmin
- MySQL ID : root@localhost
- MySQL password : mypassword
- MySQL password confirmation : mypassword
- ERROR
The login and password I give to phpmyadmin are the one of the root account for the MySQL service. They work good.
I dont get why phpmyadmin ask for the password if it try to connect to the user without using it (using password: NO).
Do you have a solution to force make it using the password ? I can’t disable the password of MySQL because the service is accessible by the internet. (And I want to learn a «clean» solution).
Introduction
Most MySQL users encountered the ERROR 1698 (28000): Access denied for user ‘root’@’localhost’. This error message usually appears for new installations of MySQL when you try to connect to MySQL with the root user.
This guide will show you how to quickly resolve the access denied for user root on localhost. The outlined instructions apply to both MySQL and MariaDB. There will be no need to modify any tables or to perform complex configuration.
Prerequisites
- Access to a command line or terminal window
- MySQL or MariaDB installed
- User with sudo or root privileges
When you install MySQL and try to access it on the local machine with the root user, the command you use is:
mysql -u root -pIn most cases, you will receive the error message Access denied for user ‘root’@’localhost’.

You can enable access for root using one MySQL command.
I created my database offline using XAMPP. After uploading my site, I imported my database into server PHPmyadmin. Yet when if i load my website it will deny me access to the database displaying this error message:

jarlh
40.4k8 gold badges39 silver badges58 bronze badges
asked Nov 16, 2021 at 8:15

5
mysql -uroot -pCREATE USER 'username'@'%' IDENTIFIED BY 'password';CREATE USER 'username'@'localhost' IDENTIFIED BY 'password';GRANT ALL ON database_name.* TO 'username'@'%';answered Nov 16, 2021 at 8:25

The problem here is incorrect username and password, check your username and password details again
You could also go to c:\xampp\phpmyadmin\config.inc.php
Check for
$cfg['Servers'][$i]['user'] and $cfg['Servers'][$i]['password']
You should see your phpmyadmin username and password.
answered Nov 16, 2021 at 8:27

1
How do I make it so when I put it to type «cookie», it will accept the config.inc values?
That’s not how ‘cookie’ authentication works, it doesn’t read the ‘user’ and ‘password’ fields from config.inc.php because you’re prompted for them when you connect. WAMP, at least last time I checked, uses the ‘config’ auth_type setting, which does use the ‘user’ and ‘password’ that are hardcoded in the configuration.
Your configuration looks okay to me, in particular the use of host ‘localhost’ matches with the hostname of the user that exists in the screenshot, which is a common problem people often encounter (trying to connect via ‘127.0.0.1’ to an account with host field ‘localhost’).
We did recently make some changes to code that handled «special characters» in passwords, would you mind downloading an older version and seeing if you’re able to connect successfully? Version 5.0.0 can be downloaded from https://www.phpmyadmin.net/files/5.0.0/
I see this when I ssh to my Ubuntu server:
Welcome to Ubuntu 20.04.4 LTS (GNU/Linux 5.4.0-1018-aws x86_64)After installing mysql, I try to login to the mysql server but for some reason it asks me for a password that I do not have. So, I ran the following commands to uninstall mysql and reinstall.
Uninstall
sudo apt-get remove --purge mysql*
sudo apt-get purge mysql*
sudo apt-get autoremove
sudo apt-get autoclean
sudo apt-get remove dbconfig-mysql
sudo apt-get dist-upgrade
The I used this link as guide to install mysql, and the commands went as follows:
sudo apt update
sudo apt install mysql-server
sudo systemctl start mysql.service
When I run:
sudo mysql_secure_installationThe prompt asks me to “Enter password for the user root”. Where do I find this password?
The idea of the command is to set the password.
How can I install mysql in this server to then be able to manage my databases?
I recently tried the answer from this question, but it just lead me to the same error.
I am trying to connect to a mysql instance running inside a local Docker Container, but I am getting a
ERROR 1045 (28000): Access denied for user 'root'@'172.17.0.1'
I initialized the container by running:
docker image pull mariadb:10.4
docker run --name mariadbtest -e MYSQL_ROOT_PASSWORD=password -e MYSQL_USER=user -e MYSQL_DATABASE=test -e MYSQL_PASSWORD=password -e MYSQL_ROOT_HOST=localhost -p 3306:3306 -d docker.io/library/mariadb:10.4
When I try to connect to the db using mysql -h localhost -P 3306 --protocol=TCP -u root -p from the host machine, I get the error mentioned in the title. I am able to use the same command to connect as a user that was initialized in the command that started the Docker container (mysql -h localhost -P 3306 --protocol=TCP -u user -p) successfully.
I have verified that I can connect to the db from inside the Docker container itself after running docker exec -it mariadbtest bash and mysql -u root -p.
I’d appreciate any insights into what’s happening.
Question
Hi guys, I am very new to using a service like digitalocean (opposed to a one click setup of mediatemple or godaddy) and I am trying to setup and configure a new DB using MySQL but I keep getting the error
ERROR 1045 (28000): Access denied for user 'root'@'localhost' (using password: YES)I have googled this, and searched the community for answers but cannot seem to solve this issue. Am I missing something? I have tried running it as root, and running it with sudo through another user and cannot get around it. If I offer no password it gives the same error but instead of using password: YES, it’s NO.
Thanks.
Submit an answer
This textbox defaults to using Markdown to format your answer.
You can type !ref in this text area to quickly search our full set of tutorials, documentation & marketplace offerings and insert the link!
Sign In or Sign Up to Answer
These answers are provided by our Community. If you find them useful, show some love by clicking the heart. If you run into issues leave a comment, or add your own answer to help others.
- логин;
- название машины в одном из возможных вариантов: IP-адрес, доменное имя, ключевое слово, символ, группирующий несколько машин;
- пароль.
Способы решения ошибки
Для исправления ошибки выполняйте следующее:
- Убедитесь, используется ли пароль для входа в базу данных. Эта информация доступна в таблице пользователей. Если пароль не нужен, но вы его вводите, то выдастся ошибка. Входите без пароля либо задайте его.
- Проверьте, что при создании нового пользователя было прописано название его машины.
- Убедитесь, что логин и название машины окружены кавычками. Верна такая форма «‘username@localhost’», а не «username@localhost».
- Измените файл config.inc.php с указанием корректных данных. Это актуально в том случае, если ошибка оканчивается на Using password: NO
This content has been archived, and is no longer maintained by Indiana University. Information here may no longer be accurate, and links may no longer be available or reliable.
ERROR 1045: Access denied for user:
‘user_name@localhost’ (Using password: YES)
mysql> GRANT ALL ON *.* to user_name@localhost IDENTIFIED BY 'password';
This is document awmx in the Knowledge Base.
Last modified on 2021-09-08 10:23:03.
Till Ubuntu 12.04, users were able to log into root user in MySQL. But starting Ubuntu 12.04, this feature has been disabled and when you try to log into MySQL as root user, you will get an error saying ‘How to Fix Access denied for user ‘root’@’localhost’ (using password: NO Ubuntu)’. Previously, root access was blocked from remote systems. But now, even local users are unable to login as root in MySQL. This has been done for security purposes to prevent hackers from logging into your MySQL database, once they have access to your system. In this article, we will learn how to overcome this hurdle in Ubuntu.
Generally, users were able to log into root user from local machine with the following command, where <password> was your root user’s password.
$ sudo mysql -u root -p <password>
But now the above command will give you access denied error.
So if you are accessing via localhost, you need to enter the following command instead, omitting the <password>.
$ sudo mysql -u root -p
You will be prompted for root password, which you can enter and login successfully as root user. This has been done so that the user has to manually enter the password, and automated scripts cannot easily log into MySQL root by simply entering the old command that carried the password. Also it avoids the security vulnerability of exposing passwords publicly in commands.
If you are logging in from remote systems, use the following command, where you specify the target MySQL database with -h option.
$ mysql -hxxx.xxx.xxx.xxx -uroot -p
Here also you will be prompted to enter root password. On entering the correct password, you will be able to login successfully. In this case, you need to also ensure that your MySQL database allows remote access.
In this article, we have learnt how to access MySQL as root user in Ubuntu, starting 12.04. You can apply this method to all subsequent Ubuntu systems.
Also read:
How to Remove NaN from Python ListDelete All Except One File in LinuxHow to Mount Remote Directory or Filesystem in LinuxHow to Check Bad Sectors in LinuxHow to Convert Markdown to HTML
Related posts:
Upgrade to Spectrum 21.2.8 fails with mySQL error «Access denied for user ‘root’@’localhost'»
calendar_today
Updated On:
Products
CA Spectrum
DX NetOps
Issue/Introduction
post install log
********** Started: Wed Feb 23 12:57:29 2022 **********
running Custom Script Install-Tools/CUS/mysql.cus
ERROR 1045 (28000) at line 2: Access denied for user ‘root’@’localhost’ (using password: YES)
newUser Failure: mysql —defaults-file=/Spectrum/mysql/my-spectrum.cnf —login-path=myclient mysql
Error(s) occurred. Please see /Spectrum/Install-Tools/LOGS/21.2.8.0.32_20220223/mysql.log.
Script Install-Tools/CUS/mysql.cus has FAILED********** Completed: Wed Feb 23 13:01:31 2022 **********
mysql log
******* Removing and copying new mysql/bin dir *******
******* Removing and copying new mysql/share dir *******
done fetching the old password
myspectrumlogin.cnf alreadly existing in /Spectrum/mysql/data , not updating the existing file
******* Preserving mysql directory *******
…..
Waiting for mysql to start up… try count 1
Creating SPEC_admin user in database …
**^G Error during newUser SPEC_admin 0n3cl1Ck
2022-02-23T12:27:07.737518Z 9 [Note] Access denied for user ‘root’@’localhost’ (using password: NO)
Cause
Rerunning the install causes this error. Renaming the myspectrumlogin.cnf in /Spectrum/mysql/data before running the install again, does not fix the problem and we get the same error and failed install.
Environment
Release : 21.2.8
Component : SPCINS — SPECTRUM INSTALLATION
Resolution
the problem happens when we reinstall so if this is a virtual machine and a pre-upgrade snapshot prior is available, you can restore to the previous versions and install again.
If no snapshot is available, the following resolution needs to be done after the first un successful install before attempting to reinstall.
1. Install the spectrum 21.2.8 latest build
2. Connect to mysql using root user
$SPECROOT/mysql/bin/mysql —defaults-file=$SPECROOT/mysql/my-spectrum.cnf -uroot -pMySqlR00t
3. Update the «root» File_priv.
UPDATE mysql.user SET Grant_priv=’Y’, Super_priv=’Y’ , File_priv=’Y’ WHERE User=’root’;
FLUSH PRIVILEGES;
4. Verify the «root» user File_priv update to «Y» or not
select user, Host, File_priv from mysql.user;
5. Re install the spectrum.
Additional Information
This has been scheduled to be fixed in the 21.2.10 release.
Feedback
thumb_up
Yes
thumb_down
No
在用C#连接mysql数据库时,出现了以下错误:
未经处理的异常
: MySql.Data.MySqlClient.MySqlException: Authentication to host ‘127.0.0.1’ for user ‘root’ using method ‘mysql_native_password’ failed with message: Access denied for user ‘root’@’localhost’ (using password: YES) —> MySql.Data.MySqlClient.MySqlException: Access denied for user ‘root’@’localhost’ (using password: YES)
代码如下:
 Main( constructorString = ; MySqlConnection myConnnect= MySqlConnection(constructorString); myConnnect.Open(); MySqlCommand myCmd= MySqlCommand(, myConnnect); Console.WriteLine(myCmd.CommandText); (myCmd.ExecuteNonQuery() > ); } myCmd.CommandText= ; Console.WriteLine(myCmd.CommandText); (myCmd.ExecuteNonQuery() > ); } myCmd.CommandText= ; Console.WriteLine(myCmd.CommandText); (myCmd.ExecuteNonQuery() > ); } myCmd.Dispose(); myConnnect.Close(); } }
}
1.首先先更改my.ini文件

然后在对应的安装目录中找到my.ini文件

在打开my.ini文件,添加skip-grant-tables保存退出时,可能会提示权限不足,此时需要找到记事本—》右键以管理员身份运行—》文件—》打开
然后打开对应目录的my.ini文件,添加skip-grant-tables保存退出
2.找到命令提示符,右键以管理员身份运行,输入下面命令:
启动:输入 net stop mysql
停止:输入 net start mysql
重启MySQL服务器
但是命令中的mysql对应的是自己安装的mysql版本,例如我的就是MySQL57

因此输入命令也不同

3. cd 进入对应mysql的bin目录,输入mysql -u root -p,要求输入密码时按下回车,就可以免密码登陆

4.进入mysq数据库,输入use mysql

5、给root用户设置新密码入
mysql> update user set password=password(«新密码») where user=»root»;
但由于我的MySQL版本是MySQL57,因此命令有所不同
所以更改语句替换为update mysql.user set authentication_string=password(‘新密码’) where user=’root’ ;即可(两个语句均要注意有分号)
显示下图即可

6.刷新数据库,输入mysql> flush privileges;(注意分号)

7.退出mysql,输入mysql> quit

然后将my.ini文件中添加的skip-grant-tables语句删除,保存退出。
然后再次运行上面的代码,成功!

grep 'temporary password' /var/log/mysqld.log
Sort date (newest date)
You may see something like this;
[root@SERVER ~]# grep 'temporary password' /var/log/mysqld.log
2016-01-16T18:07:29.688164Z 1 [Note] A temporary password is generated for root@localhost: O,k5.marHfFu
2016-01-22T13:14:17.974391Z 1 [Note] A temporary password is generated for root@localhost: b5nvIu!jh6ql
2016-01-22T15:35:48.496812Z 1 [Note] A temporary password is generated for root@localhost: (B*=T!uWJ7ws
2016-01-22T15:52:21.088610Z 1 [Note] A temporary password is generated for root@localhost: %tJXK7sytMJV
2016-01-22T16:24:41.384205Z 1 [Note] A temporary password is generated for root@localhost: lslQDvgwr3/S
2016-01-22T22:11:24.772275Z 1 [Note] A temporary password is generated for root@localhost: S4u+J,Rce_0t
[root@SERVER ~]# mysql_secure_installation
Securing the MySQL server deployment.
Enter password for user root:
The existing password for the user account root has expired. Please set a new password.
New password:
Re-enter new password:
If you see it says
... Failed! Error: Your password does not satisfy the current policy requirements
That means your password needs to have a character such as ! . # - etc...
mix characters well, upper case, lower case, ! . , # etc...
New password:
Re-enter new password:
The 'validate_password' plugin is installed on the server.
The subsequent steps will run with the existing configuration
of the plugin.
Using existing password for root.
Estimated strength of the password: 100
Change the password for root ? ((Press y|Y for Yes, any other key for No) : Y
New password:
Re-enter new password:
Estimated strength of the password: 100
Do you wish to continue with the password provided?(Press y|Y for Yes, any other key for No) : Y
By default, a MySQL installation has an anonymous user,
allowing anyone to log into MySQL without having to have
a user account created for them. This is intended only for
testing, and to make the installation go a bit smoother.
You should remove them before moving into a production
environment.
Remove anonymous users? (Press y|Y for Yes, any other key for No) : Y
Success.
Normally, root should only be allowed to connect from
'localhost'. This ensures that someone cannot guess at
the root password from the network.
Disallow root login remotely? (Press y|Y for Yes, any other key for No) : Y
Success.
By default, MySQL comes with a database named 'test' that
anyone can access. This is also intended only for testing,
and should be removed before moving into a production
environment.
Remove test database and access to it? (Press y|Y for Yes, any other key for No) : Y - Dropping test database...
Success. - Removing privileges on test database...
Success.
Reloading the privilege tables will ensure that all changes
made so far will take effect immediately.
Reload privilege tables now? (Press y|Y for Yes, any other key for No) : Y
Success.
All done!
[root@SERVER ~]# mysql -u root -p
Enter password:
Welcome to the MySQL monitor. Commands end with ; or \g.
Your MySQL connection id is 11
Server version: 5.7.10 MySQL Community Server (GPL)
Watch the last 10 minutes of this video, it teaches you how you do it.
Here is a quick-and-dirty method for checking out how MySQL performs successful authentication.
Please run this query:
SELECT USER(),CURRENT_USER();USER() reports how you attempted to authenticate in mysqld
CURRENT_USER() reports how you were allowed to authenticate by mysqld
Sometimes, USER() and CURRENT_USER() are different. That’s because mysql authentication follows a specfic protocol.
According to MySQL 5.0 Certification Study Guide

pages 486,487 state the following on mysql’s authentication algorithm:
There are two stages of client access control:
In the second stage (which occurs only if a client has already
connected sucessfully), the server checks every query it receives from
the client to see whether the client has sufficient privileges to
execute it.Host values in grant tables may be specified as patterns contains
wildcard values. If a grant table contains entries from
myhost.example.com, %.example.com, %.com, and %, all of them
match a client who connects from myhost.example.com.In the Host Column, literal values such as localhost, 127.0.0.1,
and myhost.example.com sort ahead of values such as %.example.com
that have pattern characters in them. Pattern values are sorted
according to how specific they are. For example, %.example.com is
more specific than %.com, which is more specific than %.The server performs this sorting when it starts. It reads the grant
tables into memory, sorts them, and uses the in-memory copies for
access control.
From this description, you do not need to worry about the order of the mysql.user tables since there is an in-memory copy of the grant tables which is sorted as previously mentioned.
With regard to how you logged in, only mysql -u a worked. Go back and login again and run these commands
SELECT USER(),CURRENT_USER();
SELECT user,host,password FROM mysql.user;
Make sure that
- every user has a password.
- there are no anonymous users (when user is blank)
This is just a guess, but I suspect mysql -u a of connecting via localhost because when the connection protocol is not specified, the default is to connect via the socket file. There may exist an entry in mysql.user that allow anonymous localhost connection.
Run this query:
SELECT user,host,password FROM mysql.user WHERE user='' AND host='localhost';If you get back a row with no password, that fully explains why mysq -u a works.
При использовании C # для подключения к базе данных mysql произошла следующая ошибка:
: MySql.Data.MySqlClient.MySqlException: Authentication to host ‘127.0.0.1’ for user ‘root’ using method ‘mysql_native_password’ failed with message: Access denied for user ‘root’@’localhost’ (using password: YES) —> MySql.Data.MySqlClient.MySqlException: Access denied for user ‘root’@’localhost’ (using password: YES)
 Main( constructorString = ; MySqlConnection myConnnect= MySqlConnection(constructorString); myConnnect.Open(); MySqlCommand myCmd= MySqlCommand(, myConnnect); Console.WriteLine(myCmd.CommandText); (myCmd.ExecuteNonQuery() > Данные успешно вставлены!); } myCmd.CommandText= ; Console.WriteLine(myCmd.CommandText); (myCmd.ExecuteNonQuery() > Данные успешно вставлены!); } myCmd.CommandText= ; Console.WriteLine(myCmd.CommandText); (myCmd.ExecuteNonQuery() > ); } myCmd.Dispose(); myConnnect.Close(); } }
}
1. Сначала измените файл my.ini.

Затем найдите файл my.ini в соответствующем каталоге установки.

При открытии файла my.ini и добавлении таблиц пропуска-грантов для сохранения и выхода может появиться сообщение о недостаточности разрешений. В это время вам нужно найти Блокнот — «Щелкните правой кнопкой мыши, чтобы запустить от имени администратора. «Файл -» Открыть
Затем откройте файл my.ini в соответствующем каталоге, добавьте skip-grant-tables для сохранения и выхода.
2. Найдите командную строку, щелкните правой кнопкой мыши, чтобы запустить ее от имени администратора, и введите следующую команду:
Старт: введите net stop mysql
Стоп: введите net start mysql
Перезагрузите сервер MySQL.
Но mysql в команде соответствует установленной мной версии mysql, например, моя — MySQL57

Таким образом, команда ввода также отличается

3. cd в каталог bin соответствующего mysql, введите mysql -u root -p, нажмите Enter, когда вас попросят ввести пароль, вы можете войти в систему без пароля

4. Войдите в базу данных mysq, введите use mysql

5. Установите новый пароль для пользователя root.
mysql> update user set password = password («новый пароль»), где user = «root»;
Но поскольку моя версия MySQL — MySQL57, команды разные
Таким образом, оператор изменения заменяется обновлением mysql. User set authentication_string = password (‘новый пароль’), где user = ‘root’; OK (обратите внимание, что в обоих операторах есть точка с запятой)
Покажите картинку ниже

6. Чтобы обновить базу данных, введите mysql> flush privileges; (обратите внимание на точку с запятой)

7. Закройте mysql, введите mysql> выйти.

Затем удалите оператор skip-grant-tables, добавленный в файл my.ini, сохраните его и выйдите.
Затем снова запустите приведенный выше код, успех!

This “access denied” error is one of the most common errors you’ll get when working with MySQL.
Learn how to fix it, and see a range of solutions if the suggested fix does not work, in this article.
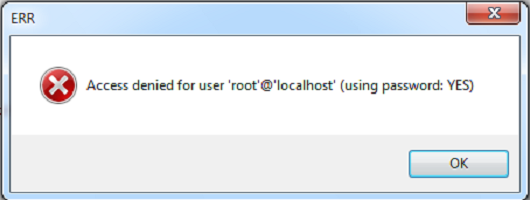
When you try to connect to a MySQL database on your own computer (called “localhost”), you may get this error:
Access denied for user 'root'@'localhost' (using password: YES)
You might get an error code in front of it:
ERROR 1045 (28000): Access denied for user 'root'@'localhost' (using password: YES)
You might also get the error with “using password no”:
Access denied for user 'root'@'localhost' (using password: NO)
You’ll see this if you log into MySQL using the command line:
mysql -u root -p
What does this mean? How can you fix it?
There are a few solutions to this, which I’ve detailed below. Try one, and if it doesn’t work, try another one.
Also a tip for logging in: don’t enter your password in the command line itself, because this will be stored in your command history. Use the -p option, as mentioned above, and then you’ll be prompted to enter the password.
Solution 1: Sudo then Change Password
If you get the “access denied” error, one way to solve it is by using sudo to log in to mysql and change the root password.
Step 1: Open the command line on your system.
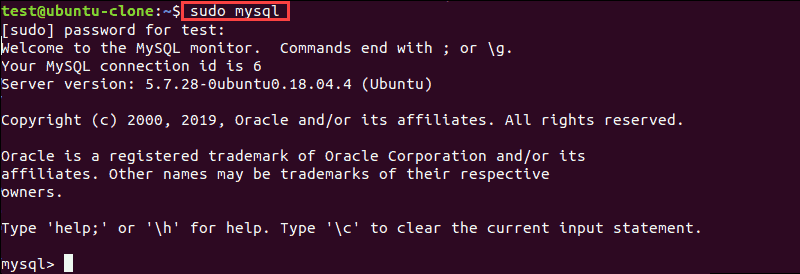
Step 2: Open mysql using the sudo command:
sudo mysql
Step 3: Enter the password for this account.
Step 4: Change the auth_plugin to mysql_native_password, and the password for the root account, in a single command:
ALTER USER 'root'@'localhost'
IDENTIFIED WITH mysql_native_password BY 'your_new_password';
Substitute the word your_new_password with a new secure password that you want to use for the root account.
The mysql_native_password method is a traditional method of authentication and will allow you to login.
Step 5: Flush the privileges, which tells the server to refresh the grant tables and apply your changes, with this command:
FLUSH PRIVILEGES;SELECT user, plugin
FROM mysql.userStep 7: Exit the console by pressing CTRL + D or typing exit.
exit;
Step 8: Log in to mysql using the root account and the new password you set, which should work:
mysql -u root -p
You should now be logged in to the root account in mysql.
If the above solution did not work, you may need to edit the mysql.cnf file to allow for changes to the root account.
Step 1: Open the my.cnf file. This may be stored in:
/etc/my.cnf
/etc/mysql/my.cnf
If you’re not sure where it is, search your MySQL installation folder (e.g. on Windows or Mac) for the file.
If you don’t have a my.cnf file (MacOS does not include one by default). You can create one in the /etc folder if you like.
[mysqld]
skip-grant-tables
Step 3: Restart the MySQL server.
Step 4: Login to the root account:
mysql -u root -p
Step 5: Flush the privileges, which tells the server to refresh the grant tables and apply your changes, with this command:
FLUSH PRIVILEGES;Step 6: Set a new password for the account:
ALTER USER 'root'@'localhost' IDENTIFIED BY 'your_new_password';Substitute the word your_new_password with a new secure password that you want to use for the root account.
Step 7: Open the my.cnf file you opened in step 1, and remove the line about skip-grant-tables, and save the file.
Step 8: Restart the MySQL server again.
Step 9: Log in to the root account again:
mysql -u root -p
You should now be able to log in successfully with your new password and not get an error.
Conclusion
If you have any questions, feel free to use the comments section below.
I tried many steps to get this issue corrected. There are so many sources for possible solutions to this issue that is is hard to filter out the sense from the nonsense. I finally found a good solution here:
Step 1: Identify the database version
mysql --versionYou’ll see some output like this with MySQL:
mysql Ver 14.14 Distrib 5.7.16, for Linux (x86_64) using EditLine wrapperOr output like this for MariaDB:
mysql Ver 15.1 Distrib 5.5.52-MariaDB, for Linux (x86_64) using readline 5.1Make note of which database and which version you’re running, as you’ll use them later. Next, you need to stop the database so you can access it manually.
Step 2: Stopping the database server
To change the root password, you have to shut down the database server beforehand.
You can do that for MySQL with:
sudo systemctl stop mysqlAnd for MariaDB with:
sudo systemctl stop mariadbStep 3: Restarting the database server without permission checking
If you run MySQL and MariaDB without loading information about user privileges, it will allow you to access the database command line with root privileges without providing a password. This will allow you to gain access to the database without knowing it.
To do this, you need to stop the database from loading the grant tables, which store user privilege information. Because this is a bit of a security risk, you should also skip networking as well to prevent other clients from connecting.
Start the database without loading the grant tables or enabling networking:
sudo mysqld_safe --skip-grant-tables --skip-networking &The ampersand at the end of this command will make this process run in the background so you can continue to use your terminal.
Now you can connect to the database as the root user, which should not ask for a password.
mysql -u rootYou’ll immediately see a database shell prompt instead.
MySQL Prompt
Type 'help;' or '\h' for help. Type '\c' to clear the current input statement.
mysql>
MariaDB Prompt
Type 'help;' or '\h' for help. Type '\c' to clear the current input statement.
MariaDB [(none)]>
Now that you have root access, you can change the root password.
Step 4: Changing the root password
mysql> FLUSH PRIVILEGES;Now we can actually change the root password.
For MySQL 5.7.6 and newer as well as MariaDB 10.1.20 and newer, use the following command:
mysql> ALTER USER 'root'@'localhost' IDENTIFIED BY 'new_password';For MySQL 5.7.5 and older as well as MariaDB 10.1.20 and older, use:
mysql> SET PASSWORD FOR 'root'@'localhost' = PASSWORD('new_password');Make sure to replace new_password with your new password of choice.
Note: If the ALTER USER command doesn’t work, it’s usually indicative of a bigger problem. However, you can try UPDATE ... SET to reset the root password instead.
[IMPORTANT] This is the specific line that fixed my particular issue:
mysql> UPDATE mysql.user SET authentication_string = PASSWORD('new_password') WHERE User = 'root' AND Host = 'localhost';Remember to reload the grant tables after this.
In either case, you should see confirmation that the command has been successfully executed.
Query OK, 0 rows affected (0.00 sec)The password has been changed, so you can now stop the manual instance of the database server and restart it as it was before.
Step 5: Restart the Database Server Normally
The tutorial goes into some further steps to restart the database, but the only piece I used was this:
For MySQL, use:
sudo systemctl start mysqlFor MariaDB, use:
sudo systemctl start mariadbNow you can confirm that the new password has been applied correctly by running:
mysql -u root -pThe command should now prompt for the newly assigned password. Enter it, and you should gain access to the database prompt as expected.
Conclusion
You now have administrative access to the MySQL or MariaDB server restored. Make sure the new root password you choose is strong and secure and keep it in safe place.
Using this guide, you will discover three methods of resolving this error.”
The best way to understand this error is to break it down into single components. This error occurs when you attempt to login into your MySQL instance on your local machine, hence ‘localhost.’
An example is as shown:

- ERROR 1045 (28000) – refers to the ERROR CODE and SQLSTATE, respectively. For example, in MySQL and MariaDB, the error code 1045 means access denied for that username with the specified password.
- The second is the message string. The error message follows the format: Access denied for user ‘%s’@’%s’ (using password: %s).
Solution 1: Sudo Into MySQL
The first and most common method to resolve this error is to sudo into your MySQL instance and set the auth_plugin to mysql_native_password.
Open your terminal and run:
Enter the password for the account and proceed.
Next, change the auth_plugin and set a new password for the root account as shown:
Changing the authentication plugin will allow you to log in to your server.
Next, flush the privileges to update the grant tables:
Finally, exit the terminal and attempt your login:
If the error persists, you may need to edit the MySQL configuration file. In most cases, it is under the name my.cnf in the /etc or /etc/mysql directories.
If the file does not exist, create it.
Close and save the file.
Next, restart the MySQL server and log in.
$ sudo service mysql restart
$ mysql -u root -p
Once logged in, flush the privileges and set a new password:
Ensure to replace the command above with a secure password.
Once completed, edit my.cnf file and remove the entry we added earlier.
Restart the MySQL server and log in with your new password.
Solution 3 – Start MySQL in Safe Mode
MySQL provides you with the mysqld_safe utility for starting the MySQL server. This utility allows us to specify safe features when starting and restarting the server for diagnosing errors.
Start by stopping the MySQL Server.
$ sudo service mysql stop
Next, start MySQL with no authentication as;
$ mysqld_safe —skip-grant-tables &
The command will start the server in the background as a job.

Once the daemon is running (with authentication disabled), open a new terminal and run:
The command above should allow you to log in without a password.
Once logged in, flush the privileges and set a new password as:
Close the session and restart MySQL.
Now log in to your server with your new password.
Closing
In this article, we covered three main methods of resolving the
We hope this tutorial helped you resolve this error.
MySQL 1045 error Access Denied triggers in the following cases
1) Connecting to wrong host:
[engineer@percona]# mysql -u root -psekret mysql: [Warning] Using a password on the command line interface can be insecure. ERROR 1045 (28000): Access denied for user ‘root’@‘localhost’ (using password: YES) |
If not specifying the host to connect (with -h flag), MySQL client will try to connect to the localhost instance while you may be trying to connect to another host/port instance.
Fix: Double check if you are trying to connect to localhost, or be sure to specify host and port if it’s not localhost:
[engineer@percona]# mysql -u root -psekret -h <IP> -P 3306 |
2) User does not exist:
[engineer@percona]# mysql -u nonexistant -psekret -h localhost mysql: [Warning] Using a password on the command line interface can be insecure. ERROR 1045 (28000): Access denied for user ‘nonexistant’@‘localhost’ (using password: YES) |
Fix: Double check if the user exists:
mysql> SELECT User FROM mysql.user WHERE User=‘nonexistant’; Empty set (0.00 sec) |
If the user does not exist, create a new user:
mysql> CREATE USER ‘nonexistant’@‘localhost’ IDENTIFIED BY ‘sekret’; Query OK, 0 rows affected (0.00 sec) |
3) User exists but client host does not have permission to connect:
[engineer@percona]# mysql -u nonexistant -psekret mysql: [Warning] Using a password on the command line interface can be insecure. ERROR 1045 (28000): Access denied for user ‘nonexistant’@‘localhost’ (using password: YES) |
Fix: You can check to see which host user/host MySQL allows connections with the following query:
mysql> SELECT Host, User FROM mysql.user WHERE User=‘nonexistant’; +————-+————-+ | Host | User | +————-+————-+ | 192.168.0.1 | nonexistant | +————-+————-+ 1 row in set (0.00 sec) |
If you need to check from which IP the client is connecting, you can use the following Linux commands for server IP:
[engineer@percona]# ip address | grep inet | grep -v inet6 inet 127.0.0.1/8 scope host lo inet 192.168.0.20/24 brd 192.168.0.255 scope global dynamic wlp58s0 |
or for public IP:
[engineer@percona]# dig +short myip.opendns.com @resolver1.opendns.com 177.128.214.181 |
You can then create a user with correct Host (client IP), or with ‘%’ (wildcard) to match any possible IP:
mysql> CREATE USER ‘nonexistant’@‘%’ IDENTIFIED BY ‘sekret’; Query OK, 0 rows affected (0.00 sec) |
4) Password is wrong, or the user forgot his password:
[engineer@percona]# mysql -u nonexistant -pforgotten mysql: [Warning] Using a password on the command line interface can be insecure. ERROR 1045 (28000): Access denied for user ‘nonexistant’@‘localhost’ (using password: YES) |
Fix: Check and/or reset password:
You cannot read user passwords in plain text from MySQL as the password hash is used for authentication, but you can compare hash strings with “PASSWORD” function:
mysql> SELECT Host, User, authentication_string, PASSWORD(‘forgotten’) FROM mysql.user WHERE User=‘nonexistant’; +————-+————-+——————————————-+——————————————-+ | Host | User | authentication_string | PASSWORD(‘forgotten’) | +————-+————-+——————————————-+——————————————-+ | 192.168.0.1 | nonexistant | *AF9E01EA8519CE58E3739F4034EFD3D6B4CA6324 | *70F9DD10B4688C7F12E8ED6C26C6ABBD9D9C7A41 | | % | nonexistant | *AF9E01EA8519CE58E3739F4034EFD3D6B4CA6324 | *70F9DD10B4688C7F12E8ED6C26C6ABBD9D9C7A41 | +————-+————-+——————————————-+——————————————-+ 2 rows in set, 1 warning (0.00 sec) |
We can see that PASSWORD(‘forgotten’) hash does not match the authentication_string column, which means password string=’forgotten’ is not the correct password to log in. Also, in case the user has multiple hosts (with different password), he may be trying to connect using the password for the wrong host.
In case you need to override the password you can execute the following query:
mysql> set password for ‘nonexistant’@‘%’ = ‘hello$!world’; Empty set (0.00 sec) |
5) Special characters in the password being converted by Bash:
[engineer@percona]# mysql -u nonexistant -phello$!world mysql: [Warning] Using a password on the command line interface can be insecure. ERROR 1045 (28000): Access denied for user ‘nonexistant’@‘localhost’ (using password: YES) |
Fix: Prevent bash from interpreting special characters by wrapping password in single quotes:
[engineer@percona]# mysql -u nonexistant -p’hello$!world’ mysql: [Warning] Using a password on the command line interface can be insecure ... mysql> |
6) SSL is required but the client is not using it:
mysql> create user ‘ssluser’@‘%’ identified by ‘sekret’; Query OK, 0 rows affected (0.00 sec) mysql> alter user ‘ssluser’@‘%’ require ssl; Query OK, 0 rows affected (0.00 sec) ... [engineer@percona]# mysql -u ssluser -psekret mysql: [Warning] Using a password on the command line interface can be insecure. ERROR 1045 (28000): Access denied for user ‘ssluser’@‘localhost’ (using password: YES) |
Fix: Adding –ssl-mode flag (–ssl flag is deprecated but can be used too)
[engineer@percona]# mysql -u ssluser -psekret —ssl-mode=REQUIRED ... mysql> |
You can read more in-depth on how to configure SSL in MySQL in the blog post about “Setting up MySQL SSL and Secure Connections” and “SSL in 5.6 and 5.7“.
7) PAM backend not working:
mysql> CREATE USER ‘ap_user’@‘%’ IDENTIFIED WITH auth_pam; Query OK, 0 rows affected (0.00 sec) ... [engineer@percona]# mysql -u ap_user -pap_user_pass mysql: [Warning] Using a password on the command line interface can be insecure. ERROR 1045 (28000): Access denied for user ‘ap_user’@‘localhost’ (using password: YES) |
Fix: Double check user/password is correct for the user to authenticate with the PAM currently being used.
In my example, I am using Linux shadow files for authentication. In order to check if the user exists:
[engineer@percona]# cat /etc/passwd | grep ap_user ap_user:x:1000:1000::/home/ap_user:/bin/bash |
To reset password:
[engineer@percona]# sudo passwd ap_user Changing password for user ap_user. New password: |
Finally, if you are genuinely locked out and need to circumvent the authentication mechanisms in order to regain access to the database, here are a few simple steps to do so:
- Stop the instance
- Start the instance
- Stop the instance
- Edit my.cnf and remove skip-grant-tables and skip-networking
- Start MySQL again
Learn more about Percona Server for MySQL
Hello.
I’m testing out this gem and I’m having an issue with the dump.sql. I’m going to delete this test server as soon as I’m finished writing this.
Here is the error I’m getting:
Russells-iMac:jjlaw Home$ wordmove push --all -e live
▬▬ ✓ Using Movefile: ./Movefile ▬▬▬▬▬▬▬▬▬▬▬▬▬▬▬▬▬▬▬▬▬▬▬▬▬▬▬▬▬▬▬▬▬▬▬▬▬▬▬▬
▬▬ ✓ Pushing wordpress core ▬▬▬▬▬▬▬▬▬▬▬▬▬▬▬▬▬▬▬▬▬▬▬▬▬▬▬▬▬▬▬▬▬▬▬▬▬▬▬▬▬▬▬▬ remote put_directory: /Applications/MAMP/htdocs/jjlaw /var/www/html/jjlaw .git/ .gitignore .sass-cache/ bin/ tmp/ Gemfile Movefile wp-config.php wp-content/.sql wp-content/
I, [2015-07-27T13:46:35.031210
building file list ...
1096 files to consider
sent 22137 bytes received 20 bytes 14771.33 bytes/sec
total size is 16314178 speedup is 736.30
▬▬ ✓ Pushing Uploads ▬▬▬▬▬▬▬▬▬▬▬▬▬▬▬▬▬▬▬▬▬▬▬▬▬▬▬▬▬▬▬▬▬▬▬▬▬▬▬▬▬▬▬▬▬▬▬▬▬▬▬ remote put_directory: /Applications/MAMP/htdocs/jjlaw/wp-content/uploads /var/www/html/jjlaw/wp-content/uploads .git/ .gitignore .sass-cache/ bin/ tmp/ Gemfile Movefile wp-config.php wp-content/.sql wp-content/
I, [2015-07-27T13:46:36.439542
building file list ...
rsync: link_stat failed: No such file or directory (2)
0 files to consider
sent 178 bytes received 20 bytes 132.00 bytes/sec
total size is 0 speedup is 0.00
rsync error: some files could not be transferred (code 23) at /SourceCache/rsync/rsync-45/rsync/main.c(992) [sender2.6.9]
▬▬ ✓ Pushing Themes ▬▬▬▬▬▬▬▬▬▬▬▬▬▬▬▬▬▬▬▬▬▬▬▬▬▬▬▬▬▬▬▬▬▬▬▬▬▬▬▬▬▬▬▬▬▬▬▬▬▬▬▬ remote put_directory: /Applications/MAMP/htdocs/jjlaw/wp-content/themes /var/www/html/jjlaw/wp-content/themes .git/ .gitignore .sass-cache/ bin/ tmp/ Gemfile Movefile wp-config.php wp-content/.sql wp-content/
I, [2015-07-27T13:46:37.613782
building file list ...
255 files to consider
sent 5688 bytes received 20 bytes 3805.33 bytes/sec
total size is 3586162 speedup is 628.27
▬▬ ✓ Pushing Plugins ▬▬▬▬▬▬▬▬▬▬▬▬▬▬▬▬▬▬▬▬▬▬▬▬▬▬▬▬▬▬▬▬▬▬▬▬▬▬▬▬▬▬▬▬▬▬▬▬▬▬▬ remote put_directory: /Applications/MAMP/htdocs/jjlaw/wp-content/plugins /var/www/html/jjlaw/wp-content/plugins .git/ .gitignore .sass-cache/ bin/ tmp/ Gemfile Movefile wp-config.php wp-content/.sql wp-content/
I, [2015-07-27T13:46:38.757478
building file list ...
25 files to consider
sent 699 bytes received 20 bytes 479.33 bytes/sec
total size is 148520 speedup is 206.56
▬▬ ✓ Pushing Languages ▬▬▬▬▬▬▬▬▬▬▬▬▬▬▬▬▬▬▬▬▬▬▬▬▬▬▬▬▬▬▬▬▬▬▬▬▬▬▬▬▬▬▬▬▬▬▬▬▬ remote put_directory: /Applications/MAMP/htdocs/jjlaw/wp-content/languages /var/www/html/jjlaw/wp-content/languages .git/ .gitignore .sass-cache/ bin/ tmp/ Gemfile Movefile wp-config.php wp-content/.sql wp-content/
I, [2015-07-27T13:46:39.847951
building file list ...
rsync: link_stat failed: No such file or directory (2)
0 files to consider
sent 178 bytes received 20 bytes 132.00 bytes/sec
total size is 0 speedup is 0.00
rsync error: some files could not be transferred (code 23) at /SourceCache/rsync/rsync-45/rsync/main.c(992) [sender2.6.9]
▬▬ ✓ Pushing Database ▬▬▬▬▬▬▬▬▬▬▬▬▬▬▬▬▬▬▬▬▬▬▬▬▬▬▬▬▬▬▬▬▬▬▬▬▬▬▬▬▬▬▬▬▬▬▬▬▬▬ remote mysqldump --hostlocalhost --userwordpress --password######### wordpress > /var/www/html/jjlaw/wp-content/dump.sql remote get: /var/www/html/jjlaw/wp-content/dump.sql /Applications/MAMP/htdocs/jjlaw/wp-content/live-backup-1438022801.sql remote delete: /var/www/html/jjlaw/wp-content/dump.sql mysqldump --host127.0.0.1 --userroot --passwordroot jjlaw /Applications/MAMP/htdocs/jjlaw/wp-content/dump.sql
Warning: Using a password on the line interface can be insecure.
mysqldump: Got error: 1045: Access denied user @ (using password: YES) when trying to connect
/Users/Home/.rvm/gems/ruby-2.1.1/gems/wordmove-1.2.0/lib/wordmove/deployer/base.rb:147:in `run': Return code reports an error (RuntimeError)push_db from /Users/Home/.rvm/gems/ruby-2.1.1/gems/wordmove-1.2.0/lib/wordmove/cli.rb:34:in
handle_options from /Users/Home/.rvm/gems/ruby-2.1.1/gems/thor-0.19.1/lib/thor/command.rb:27:in
dispatch from /Users/Home/.rvm/gems/ruby-2.1.1/gems/wordmove-1.2.0/bin/wordmove:6:in
main from /Users/Home/.rvm/gems/ruby-2.1.1/bin/ruby_executable_hooks:15:in
There seems to be an issue with the Database Dump. It’s creating backup files, but it’s not outputting anything to the server. I’ll add an image of the backup files being created below.

Lastly, here is my move file:
: : : # use an absolute path here : : : : :
: : : # use an absolute path here : : : : : # port: "3308" # Use just in case you have exotic server config : - - - - - - - - - # paths: # you can customize wordpress internal paths # wp_content: "wp-content" # uploads: "wp-content/uploads" # plugins: "wp-content/plugins" # themes: "wp-content/themes" # languages: "wp-content/languages" # themes: "wp-content/themes" : : : # password: "password" # password is optional, will use public keys if available. # port: 22 # Port is optional # rsync_options: "--verbose" # Additional rsync options, optional # gateway: # Gateway is optional # host: "host" # password: "password" # password is optional, will use public keys if available.
As far as I can tell, my passwords are correct and I don’t have any indention errors on the page. The ssh is working fine for both temial ssh as well as using an FTP client. I cannot get past the mySql 1045 error and thought you guys might have some idea to help. Thanks again for the efforts on the gem.
All the best,
Russell Brown
@russellbrownco
UPDATE 2012-01-19 11
Craig Efrein brought up an interesting question: if two identical usernames exist in the mysql.user table, one with a password and one without, does that mean that MySQL denies authentication when not using a password?
This question is an excellent heads up about MySQL user authentication.
Please note that the primary key of mysql.user is host,user. There are no other indexes. This allows multiple occurrences of a username. Each occurrence can have a different password or no password. This allows user ‘dbuser’ to login locally (dbuser@localhost) using no password and the same user login from another server within a given netblock (dbuser@’10.1.2.20′) with a password like ‘pass1′ and that user to login remotely from anywhere (dbuser@’%’) with a remote password like ‘pass2’.
Given the authentication algorithm that MySQL uses, there are no restrictions placed on users with the presence or absense of a password.
This is why MySQL 5.0 Certification Study Guide says on Page 498 Paragraph 6 in its bulletpoints brings out how to cleanup the authentication process:
- Set a password for the root accounts
- Remove any remotely accessible root accounts.
- Remove the anonymous user accounts. This improves security because
it prevents the possibility of anyone connecting to the MySQL server
as root from a remote host. The results is that anyone who wants to
connect as root must first be able to log in on the server host, which
provides an additional barrier against attack.- Remove the test database (If you remove the anonymous accounts, you
might also want to remove the test database to which they have
access).
Solve Access Denied for User Root Error
To be able to log into MySQL as root, first use sudo to modify the root user:
sudo mysqlEnter your password at the prompt. A MySQL shell loads.
Use the ALTER USER command and change the authentication method to log into MySQL as root:
ALTER USER 'root'@'localhost' IDENTIFIED WITH mysql_native_password BY 'insert_password';
This command changes the password for the user root and sets the authentication method to mysql_native_password. This is a traditional method for authentication, and it is not as secure as auth_plugin. In the example above, we set “root” as the password, but we encourage you to set a stronger password.
Test Root User MySQL Access
After you run the commands listed above, exit the MySQL shell by pressing CTRL + D on your keyboard or type exit; and hit enter. There is no need to restart the mysqld service to log in.
Now try again to access MySQL with root. In the terminal, type in:
mysql -u root -pEnter the password you used with the ALTER USER command. Do not type in the system password to access MySQL as it will not work. If everything worked fine, you should see the MySQL welcome message.
NOTE: The ALTER USER command may not work for MySQL and MariaDB versions older than 5.7.6 and 10.1.20 respectively.
Conclusion
Now you know how to bypass the MySQL ERROR 1698 (28000): Access denied for user ‘root’@’localhost’.
There are different ways to approach this issue, but we selected the easiest and fastest method. Make sure to enter the commands as listed in the article to avoid errors in SQL syntax.
Related Questions In Other DevOps Questions
- All categories
-

Apache Kafka -

Apache Spark -

Azure -

Big Data Hadoop -

Blockchain -
C# -
C++ -

Career Counselling -

Cloud Computing -

Cyber Security & Ethical Hacking -

Data Analytics -

Database -
Data Science -

DevOps & Agile -
Digital Marketing -

Events & Trending Topics -

IoT (Internet of Things) -

Java -
Kotlin -

Linux Administration -

Machine Learning -

MicroStrategy -
PMP -

Power BI -

Python -

RPA -
SalesForce -

Selenium -

Software Testing -

Tableau -

Talend -
TypeSript -

Web Development -
Ask us Anything! -
Others
Join the world’s most active Tech Community!
Welcome back to the World’s most active Tech Community!
Subscribe to our Newsletter, and get personalized recommendations.
Already have an account? Sign in.
Access denied for user ‘[email protected]’ (using password
I’m new to MySQL, I’m trying to run WordPress in my Windows desktop and it needs MySQL.
I install everything with Web Platform Installer which is provided by Microsoft. I never set a root password for MySQL and in the final step of installing WordPress, it asks for a MySQL server password.
What is the default password for root (if there is one) and how to change it?
I tried:
mysql -u root password '123'But it shows me:
Access denied for user '[email protected]' (using password:NO)After this I try:
mysql -u root -pHowever, it asks for a password which I don’t have.
Update: as Bozho suggested, I did the following:
- I stopped the MySQL Service from Windows services
- Opened CMD
- Changed the location to c:\program files\mysql\bin
Executed the command below
mysqld —defaults-file=»C:\\program files\\mysql\\mysql server 5.1\\my.ini» —init-files=C:\\root.txt
The command ran with a warning about character set which I mentioned below
- I start the MySQL service from Windows services
I write in the command line
mysql -u root -p
EnterPassword: 123 // 123 was the password
How do I solve this? I’m waiting to hear from you.
Solutions
You can reset your root password. Have in mind that it is not advisable to use root without password.
for this kind of error; you just have to set new password to the root user as an admin. follow the steps as follows:
[root ~]# mysql -u root
ERROR 1045 (28000): Access denied for user 'root'@'localhost' (using password:NO)
Stop the service/daemon of mysql running
[root ~]# service mysql stop
mysql stop/waiting
At this moment, the terminal will seem to halt. Let that be, and use new terminal for next steps.
mysql> use mysql;
Database changed
mysql> select * from user;
Empty set (0.00 sec)
mysql> truncate table user;
Query OK, 0 rows affected (0.00 sec)
mysql> flush privileges;
Query OK, 0 rows affected (0.01 sec)
mysql> grant all privileges on *.* to [email protected] identified by 'YourNewPassword' with grant option;
Query OK, 0 rows affected (0.01 sec)
*if you don`t want any password or rather an empty password
mysql> grant all privileges on *.* to [email protected] identified by '' with grant option; Query OK, 0 rows affected (0.01 sec)* mysql> flush privileges; Query OK, 0 rows affected (0.00 sec)Confirm the results:
 mysql> select host, user from user;
+-----------+------+
| host | user |
+-----------+------+
| localhost | root |
+-----------+------+
1 row in set (0.00 sec)
[root ~]# mysql -u root -pYourNewPassword mysql>
1) You can set root password by invoking MySQL console. It is located in
C:\wamp\bin\mysql\mysql5.1.53\bin by default.
Get to the directory and type MySQL. then set the password as follows..
> SET PASSWORD FOR [email protected] = PASSWORD('new-password');2) You can configure wamp’s phpmyadmin application for root user by editing
C:\wamp\apps\phpmyadmin3.3.9\config.inc.php Note :- if you are using xampp then , file will be located at
C:\xampp\phpMyadmin\config.inc.phpIt looks like this:
$cfg['Servers'][$i]['verbose'] = 'localhost'; $cfg['Servers'][$i]['host'] = 'localhost'; $cfg['Servers'][$i]['port'] = ''; $cfg['Servers'][$i]['socket'] = ''; $cfg['Servers'][$i]['connect_type'] = 'tcp'; $cfg['Servers'][$i]['extension'] = 'mysqli'; $cfg['Servers'][$i]['auth_type'] = 'config'; $cfg['Servers'][$i]['user'] = 'root'; $cfg['Servers'][$i]['password'] = 'YOURPASSWORD'; $cfg['Servers'][$i]['AllowNoPassword'] = false;The error «Access denied for user ‘[email protected]‘ (using password:NO)»
will be resolved when you set $cfg['Servers'][$i]['AllowNoPassword'] to false
If you priviously changed the password for ‘[email protected]‘, then you have to do 2 things to solve the error «Access denided for user ‘[email protected]‘»:
- if [‘password’] have a empty quotes like ‘ ‘ then put your password between quotes.
- change the (using password:NO) to (using password:YES)
This will resolve the error.
Note: phpmyadmin is a separate tool which comes with wamp.
It just provide a interface to MySQL. if you change my sql root’s password, then you should change the phpmyadmin configurations. Usually phpmyadmin is configured to root user.
Similar questions
mysql_query(): Access denied for user »@’localhost’ (using password: NO)
I’m running a cron job in my WordPress site and getting these two errors Warning: mysql_query(): A link to the server could not be established in /home/geekda6/public_html/wp-content/plugins/maxblogpress-ninja-affiliate/ninja-affiliate-library/include/mbp-ninja-affiliate.cls.php on line 251 Warning: mysql_query(): Access denied for user »@’localho…
Access denied for user »@’localhost’ (using password: NO) When Upgrading WordPress
I just tried to upgrade the latest wordpress version, and it throws this error. Access denied for user »@’localhost’ (using password: NO) . I immediately communicated it to the service provider, they say it is a database error. But i checked the wp-config file with correct database name, username and password, It is all perfect. But why still im g…
Форум
- Первое новое сообщение
- Поиск

ERserver
- Сообщения: 311
- Зарегистрирован: 03 авг 2015, 02:19
- Откуда: СССР
- Контактная информация:
doc777
- Сообщения: 1
- Зарегистрирован: 22 окт 2021, 20:36

Создано на основе phpBB® Forum Software © phpBB Limited
Разработчик визуального стиля Arty — MrGaby
Контакты:
, предоставляем бесплатную удалённую техническую поддержку через TeamViewer
© 2010-2021 «OSPanel.io»
Navicat Connect MySQL Report errors :1045 — Access denied for user ‘root’@‘localhost’ (using password
problem :
I haven’t used the database for a long time , There’s a project that needs to be used recently , But use Navicat When connecting to the database, an error is reported :1045 — Access denied for user ‘root’@‘localhost’ (using password: YES)

reason :
because MySQL8 Characteristics of , Shut down the root User login , The new version of the official website introduces
Solution :
If you forget the database password, follow the steps , If not, skip 123
This document is located in MySQL Installation directory
If you forget where to install, you can find the installation directory through the command line
“win”+"r" Input cmd Open the command line
mysql -u root -p Enter the password to open MySQL client
show variables like "%char% Check the installation path 
find MySQL The configuration file my. ini

stay **[mysqld] Under this item ** Join in skip-grant-tables Save and exit

restart mysql
Enter at the command line
stop it : net stop mysql start-up : net start mysql 
Get into MySQL client
At this time cmd In the input mysql -u root -p You can log in without a password , appear password: You can enter when you enter
Get into MySQL database , Reset password
# Access to database
use mysql
# Reset password
update mysql.user set authentication_string=password('root') where user='root'
# Refresh database
flush mysql
# sign out
quit
Delete step 2 The content of , And then restart
test
Edit connection , Enter a new password


版权声明
本文为[Not enough to eat]所创,转载请带上原文链接,感谢
https://cdmana.com/2021/12/20211204054245944g.html
How do I fix Access denied for user root localhost using password yes?
Use the ALTER USER command and change the authentication method to log into MySQL as root : ALTER USER ‘root’@’localhost’ IDENTIFIED WITH mysql_native_password BY ‘insert_password’, This command changes the password for the user root and sets the authentication method to mysql_native_password
How to Fix root Access Denied?
Solution 1: Sudo then Change Password If you get the “access denied” error, one way to solve it is by using sudo to log in to mysql and change the root password. Step 1: Open the command line on your system. Step 3: Enter the password for this account
Could not connect to MySQL Server Access Denied for user root’@’localhost using Password yes?
You will get this error when the user user_name does not have the right to access your MySQL database. To resolve the error, you must create a user with the following command: mysql>, GRANT ALL ON *. * to user_name@localhost IDENTIFIED BY ‘password’, 8 сент
How do I fix Access denied for user root localhost using password yes?
Use the ALTER USER command and change the authentication method to log into MySQL as root : ALTER USER ‘root’@’localhost’ IDENTIFIED WITH mysql_native_password BY ‘insert_password’, This command changes the password for the user root and sets the authentication method to mysql_native_password
How do I fix yes access denied for password?
The root account is by default only accessible from localhost, so you may get “Access denied for user (using password: YES)” if you try and log in remotely. In such eventuality, you will need to somehow gain local access to the server. To log into a remote MySQL database, simply replace hostname_or_ip with your own
How to Fix root Access denied?
Solution 1: Sudo then Change Password If you get the “access denied” error, one way to solve it is by using sudo to log in to mysql and change the root password. Step 1: Open the command line on your system. Step 3: Enter the password for this account
Could not connect to MySQL server Access denied for user root’@’localhost using password YES?
You will get this error when the user user_name does not have the right to access your MySQL database. To resolve the error, you must create a user with the following command: mysql>, GRANT ALL ON *. * to user_name@localhost IDENTIFIED BY ‘password’, 8 сент
How do I fix Access denied for user root localhost using password yes?
Use the ALTER USER command and change the authentication method to log into MySQL as root : ALTER USER ‘root’@’localhost’ IDENTIFIED WITH mysql_native_password BY ‘insert_password’, This command changes the password for the user root and sets the authentication method to mysql_native_password
How do I fix root access denied?
Solution 1: Sudo then Change Password If you get the “access denied” error, one way to solve it is by using sudo to log in to mysql and change the root password. Step 1: Open the command line on your system. Step 3: Enter the password for this account
")


")