

Updated on March 23, 2020
On this page, you will learn to root Samsung Galaxy Tab A SM-T550 running on Android 6.0.1 with the built id MMB29M.T550XXU1BPE1 using the Odin Application on Windows Computer.
Updated on March 23, 2020
On this page, you will learn to root Samsung Galaxy Tab A 8.0 SM-T350 running on Android 6.0.1 with the built id MMB29M.T350XXU1BPE3 using the Odin Application on Windows Computer.
Updated on March 23, 2020
On this page, you will learn to root Samsung Galaxy Note 4 SM-N9100 running on Android 6.0.1 with the built id MMB29M.N9100ZCU1DPH1 using the Odin Application on Windows Computer.
In this guide, you will learn How to Root MMB29K Android Marshmallow 6.0.1.You can also root device running Marshmallow 6.0.1 MMB29M using this guide.The process is very simple and easy.You just have to Flash the SuperSu 2.61 via TWRP to get the root access
Google has started rolling out Android 6.0.1 Marshmallow update for most of the Nexus devices like Nexus 5, Nexus 6, Nexus 6P, Nexus 7 2013, Nexus 5x and Nexus 9.The Update comes with built number MMB29K and MMB29M.If your nexus device is running on any of these builds, you can now root your device.
- How to Root MMB29K Android Marshmallow 6.0.1
- Remember Before rooting:
- How to Safely Root Nexus 6 On Android Marshmallow 6.0.1 (MMB29K)
- Manually Flash / Install Android 6.0.1 MMB29M On Nexus 6P Marshmallow Official Update Factory Image
- How to Root Nexus 6P on Android 6.0.1 MMB29M Marshmallow:
- What is Root?
- How the Team Win Recovery Project can be useful?
- How To Root HDC S7 MMB29M TWRP Recovery Download and Install
- Basic Requirements:
- Download HDC S7 MMB29M TWRP Recovery Bellow:
- Top Best Advantages of TWRP Custom Recovery
- Disadvantages Or Warnings OR Caution
- How to Install TWRP Recovery On HDC S7 MMB29M using ADB Fastboot Method?
- How To Root Galaxy Note Edge SM-N915F On Android 6.0.1 Marshmallow
- How To Root Galaxy Note Edge SM-N915F On Android 6.0.1 Marshmallow using Odin
- Rooting Galaxy Note Edge SM-N915F On Android 6.0.1 Marshmallow without PC.
- To uninstall Unwanted apps on Galaxy Note Edge SM-N915F On Android 6.0.1 Marshmallow
- Unroot Galaxy Note Edge SM-N915F On Android 6.0.1 Marshmallow
- How to install Android 7.0 Nougat update on Galaxy Note Edge SM-N915F ?
- How To Root Samsung Galaxy Note Edge SM-N9150 On Android 6.0.1 Marshmallow
- How To Root Samsung Galaxy Note Edge SM-N9150 On Android 6.0.1 Marshmallow using Odin
- Rooting Samsung Galaxy Note Edge SM-N9150 On Android 6.0.1 Marshmallow without PC.
- To uninstall Unwanted apps on Samsung Galaxy Note Edge SM-N9150 On Android 6.0.1 Marshmallow
- Unroot Samsung Galaxy Note Edge SM-N9150 On Android 6.0.1 Marshmallow
- How to install Android 7.0 Nougat update on Samsung Galaxy Note Edge SM-N9150 ?
- Root Samsung Galaxy Tab A SM-T550 using Odin
- Root Samsung Galaxy Tab A 8. 0 SM-T350 using Odin
- Root Samsung Galaxy Note 4 SM-N9100 using Odin
*Make sure there is at least 80% battery left on your smartphone before begin started this process
Official Android 6.0.1 Marshmallow Update Guides:
Now lets Root MMB29K Android Marshmallow 6.0.1
Download SuperSU v2.61
How to Root MMB29K Android Marshmallow 6.0.1
Step By Step Guide
- First of all Download the SuperSU v2.61 zip from the download section above
- Now connect your device to PC then transfer the downloaded SuperSu file to the internal memory of your android device
- Now Boot into TWRP or any other custom recovery of your choice.
- Then Install/Flash the SuperSU v2.61 zip from TWRP recovery’s Install section
- Done!!!Now you have succeeded to Root MMB29K Android Marshmallow 6.0.1
- For confirmation, install Root Checker from Google Play Store and confirm the root privileges in your smartphone.
If you have any question related to this post feel free to leave that in the comment section below.

An NIT Rourkela Graduate in CS, Blogger, Android Geek, and a Tennis Fanatic. I have been writing about Android OS for Last 8 years.
This Guide will help you to Safely Root Nexus 6 On Android Marshmallow 6.0.1 (MMB29K).The process is very simple and easy.You just have to Flash the SuperSu 2.61 via TWRP to get the root access.Don’t worry we will be sharing Full step by step guide below on How To Root Nexus 6 On Android Marshmallow 6.0.1 (MMB29K)
*Make sure there is at least 80% battery left on your smartphone before begin rooting your device.
Safely Root Nexus 6 On Android Marshmallow 6.0.1 (MMB29K)
Remember Before rooting:
How to Safely Root Nexus 6 On Android Marshmallow 6.0.1 (MMB29K)
- This tutorial is only for Nexus 6
- Rooting your phone can void your warranty
- After rooting you can tweak your phone
- You can unroot it if you want
- You can overclock or underclock your CPU to make your phone faster
Nexus 6 Related Post:
- Unlocked bootloader is required to install a custom recovery like TWRP on your device. Click here. (Same in all latest Nexus)
- Set up ADB and Fastboot on your computer. You can download the minimal ADB and fastboot tool from here (unzip it) or get the quick ADB and fastboot installer from here.
- Install Motorola USB Drivers on your computer.
- Open Settings> Developer options and enable USB Debugging on your device.
- Go to Developer options and enable Allow oem unlock.
Download SuperSU v2.61
How to Safely Root Nexus 6 On Android Marshmallow 6.0.1 (MMB29K)
- Make Sure Your device is running on latest Android 6.0.1 Marshmallow (MMB29K)
- Read the Pre-Requirement Section carefully and do all the necessary things
- Download the SuperSU v2.61 zip from the download section above
- Now connect your device to PC then transfer the downloaded SuperSu file to the internal memory of your android device
- Now Boot into TWRP or any other custom recovery of your choice.
If you have any question related to this post feel free to leave that in the comment section below.
An NIT Rourkela Graduate in CS, Blogger, Android Geek, and a Tennis Fanatic. I have been writing about Android OS for Last 8 years.
In this guide you will learn How to manually Flash / Install Android 6.0.1 MMB29M On Nexus 6P Marshmallow Official Factory Image.Google has started rolling out new Android marshmallow 6.0.1 update for Nexus devices.Nexus 6P gets the Marshmallow 6.0.1 Update.The Update comes with built number MMB29M.
The Update will be available via OTA.If you have a Nexus 6P with bootloader locked, then you can get the update notification and can easily Update Nexus 6P to Official Android 6.0.1 MMB29M Marshmallow.But If you have a rooted phone then you have to Flash / Install Android 6.0.1 MMB29M On Nexus 6P Marshmallow.Don’t worry we will be sharing to all the important files with step by step installation guide below.
The Latest Android 6.0.1 Marshmallow is available for Nexus 6P and Nexus 5x right now.The Android 6.0.1 brings critical security updates and stability improvements.This update is more focused on stability.
*Make sure there is at least 80% battery left on your smartphone before begin started this process
->Install USB Driver for Nexus 6P On your PC->Usb Drivers
->This guide is only For Nexus 6P (Code Name- Angler) with an Unlocked bootloader.So don’t try on other devices
Safely Flash / Install Android 6.0.1 MMB29M On Nexus 6P Marshmallow

Download Android 6.0 Factory Image ( File: angler-mmb29m-factory-8c31db3f.tgz)
Manually Flash / Install Android 6.0.1 MMB29M On Nexus 6P Marshmallow Official Update Factory Image
Step By Step Guide
Download Android 6.0 Factory Image on the desktop of your PC for Nexus 6P from the above link
Step 2. Unlock bootloader of your Nexus device, if you haven’t done this already. Help is here.
Connect your Nexus with PC using its USB -C cable.
Step 4. Extract the factory image file you downloaded In Step-1, using a free software like 7-zip on your PC. You should get flash-all.bat file. If not, then extract again.

Step 5. Disconnect your Nexus device from PC if it’s connected.
Step 6. Boot your Nexus device into bootloader/fastboot mode:
- Power off the device.
- Press and hold both Volume Down and Power button together until you see anything on screen. Fastboot should be written at top.
Step 7. Connect your Nexus device to PC now using USB cable.
Step 8. Double click the flash-all.bat file on Windows — it’s in the folder where you extracted all contents of the downloaded file.
- If you’re in Linux or Mac, use this command in terminal: sh ./flash-all.sh
DONE!!!. Once all files installed, your Nexus device will have the MMB29M build running.
An NIT Rourkela Graduate in CS, Blogger, Android Geek, and a Tennis Fanatic. I have been writing about Android OS for Last 8 years.
Are you excited about the Android 6.0.1 MMB29M Marshmallow update which is ready for your Google Nexus 6P? The update should be rolling out via OTA to this smartphone, but I cannot anticipate when exactly it will hit your device too. Isn’t waiting the best compromise in this case? Then, you can grab the factory image and flash it right away with the help of this procedure: Flash Android 6.0.1 Marshmallow MMB29M Firmware on Nexus 6P.
However, I know that some of you might want even more than that and this is exactly what you are getting. Here you can find a detailed step-by-step instructions guide on how to root Android 6.0.1 MMB29M Marshmallow on Nexus 6P, but make no confusion.
This root procedure is only for Android 6.0.1 (MMB29M) installed on Google Nexus 6P and it’s not compatible with any other variants of the Nexus 6P on other carriers. Then, my advice is to be prepared for anything and to take a Nandroid backup of your previous phone set up before proceeding. You don’t want to risk loosing all your data, trust me on that!
Your Nexus 6P bootloader should be unlocked and you also have to download Android SDK from the Android Developers website and install it right away (you should use this link for that). No less important, you have to enable the USB Debugging mode in your Nexus 6P and then, download Fastboot and extract it in android-sdk-windows\platform-tools directory:
How to Root Nexus 6P on Android 6.0.1 MMB29M Marshmallow:
- Download SuperSU v2.60 on your PC; use this link for that;
- Connect your Nexus 6P to the computer using the USB cable;
- Transfer the SuperSU-v2.60-20151205163135.zip file to your SD card;
- Then, turn off your phone;
- Now go into Fastboot/Bootloader Mode on Nexus 6P. For that, you have to press Volume Down + Power keys for a few seconds till you see some text on the screen;
- Go to android-sdk-windows\platform-tools directory;
- Open Command Prompt (Shift + Right-click > Open Command Prompt);
- Up next, it’s time to enter the following command:
fastboot flash recovery twrp-2.8.7.0-angler.img - Then, choose Recovery from the Fastboot menu and enter Recovery Mode;
- In recovery, scroll down to “flash zip from SD card” and press the power button to select it;
- Press the Power button again and select “choose zip from sdcard”;
- Go to the SuperSU-v2.60-20151205163135.zip and select it using the Power button;
- Don’t hesitate to confirm the installation on the next screen and the installation procedure should start;
- After the installation completes, you just have to reboot the phone by selecting the usual “reboot system now” from the Recovery menu.
That’s it! Your Nexus 6P is now rooted on Android 6.0.1 Marshmallow firmware on your phone! Has everything went according to the plan? You can verify that by using the popular Root Checker app or any other app of your choice.
S7 MMB29M TWRP Recovery

What is Root?
TWRP stands for Team Win Recovery Project. It is a fully touch-based custom recovery that was originally developed for Nexus devices, but now it is available for countless android smartphones in the world. TWRP is an open-source custom recovery. Team Win Recovery Project provides a touch screen enabled interface.
How the Team Win Recovery Project can be useful?
How To Root HDC S7 MMB29M TWRP Recovery Download and Install
Basic Requirements:
- You need a PC/laptop
- Make sure that your HDC S7 MMB29M is charged more upto 70%
- You need a Micro USB cable to connect your phone with PC
- Make sure to take a complete backup before doing anything.
- Before begin, please make sure that your device is Unlock Bootloader
- You must Download No Verity Opt Encrypt Zip File
- Download SuperSU Zip – To root using SuperSU
- Download Magisk Zip – To root using Magisk
- Now Download ADB, Fastboot Tools and Extract it in your PC
- Download HDC USB Drivers
Download HDC S7 MMB29M TWRP Recovery Bellow:
Download TWRP Recovery 3.5.2-0
Top Best Advantages of TWRP Custom Recovery
- By using TWRP you can easily Flash Custom ROM on HDC S7 MMB29M.
- Users can easily root their devices with the help of TWRP fishable zip SuperSU.
- By TWRP recovery users can access to restore Nan droid backup.
- With TWRP recovery users can clean cache, wipe and data.
- Users can remove all bloatware from their S7 MMB29M.
- Users can easily flash the image file with TWRP recovery.
- You can flash modding zip files to customize your phone
- Easy to flash and use Xposed Modules using TWRP
- You can install Magisk on S7 MMB29M.
- You can flash modding zip files to customize your phone, and To underclock and overclock.
Disadvantages Or Warnings OR Caution
- The above info is only for journal public interest, mobilewithdrivers or the author is not responsible for any loss damage or illegal misusage of the above material.
- You will no longer receive the official OTA updates.
- You can brick your device if you do not follow the steps carefully.
- Make sure to take a complete backup before doing anything. Do this at your own risk.
How to Install TWRP Recovery On HDC S7 MMB29M using ADB Fastboot Method?
Estimated time: .
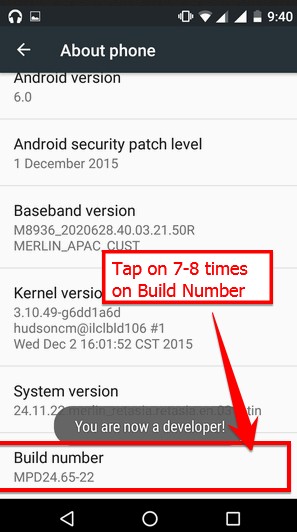
First of all, you need to enable the Developer Options, and USB Debugging mode on your device.
Now Go to Settings –>> System –>> About Phone and press on Build Number 7 – 8 times to enable Developer options mode. Until you see a toast message “You are now a developer”.
In this step, now open the developer option and enable the OEM Unlock toggle.

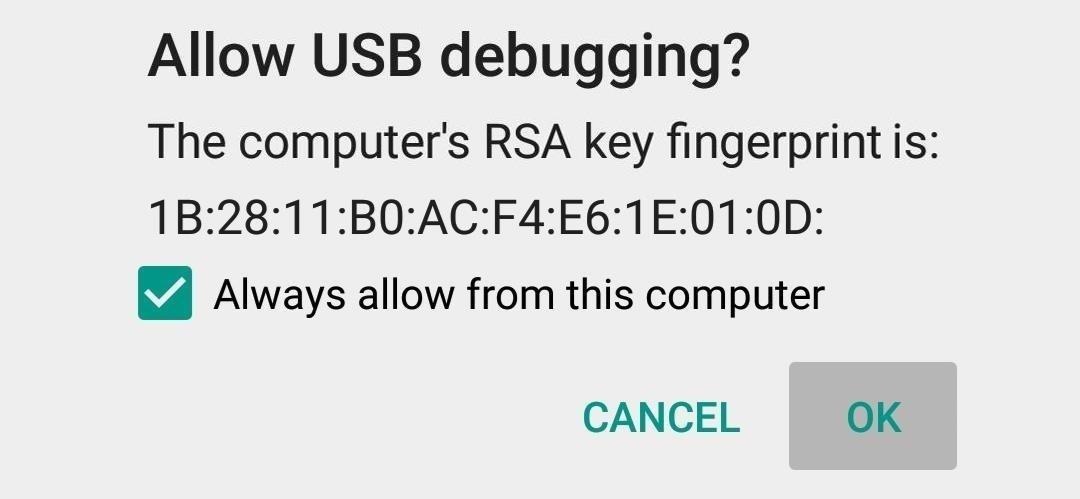
Under the Developer Options, you need to enable USB Debugging.

If the command show device is unauthorized on your HDC S7 MMB29M. Then, you will see a popup message to allow USB Debugging. Please
«Always allow from this computer» and press on the OK button.
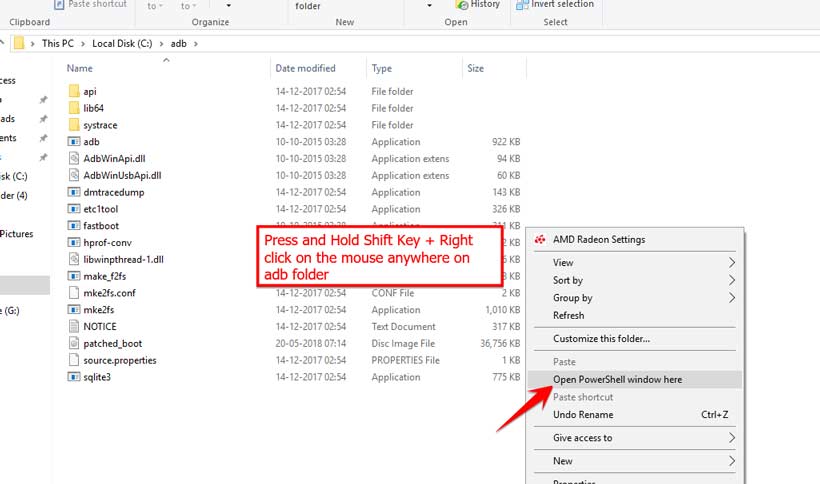
On your ADB Folder, Open the command window / PowerShell: To open Press the Shift key and Right Mouse click anywhere inside the folder.
Turn off your device > Press and hold the Volume Up + Power button together for a few seconds to enter into Fastboot mode.
adb reboot bootloader
Now, your device is connected successfully as a fastboot device.
fastboot flash recovery_a twrp.img
fastboot flash recovery_b twrp.img
Then reboot in TWRP manually or using a fastboot command
fastboot oem reboot-recovery
fastboot boot twrpname.img
That’s it. You’ve successfully installed the TWRP Recovery on the HDC S7 MMB29M device. Now, you have to flash the Root.
Read Me Once
TWRP Recovery process will affect your HDC S7 MMB29M Ultra phone data like images, videos, and files. We advise you before start TWRP Recovery you need to create a backup and save it in a safe location.

How To Root Galaxy Note Edge SM-N915F On Android 6.0.1 Marshmallow
These are the instructions to root Galaxy Note Edge SM-N915F On Android 6.0.1 Marshmallow with the built id MMB29M.N915FXXS1DPH2 using Odin.
In this tutorial, I will show you How To Root Galaxy Note Edge SM-N915F On Android 6.0.1 Marshmallow with the built id MMB29M.N915FXXS1DPH2 with Odin software and CF-Auto-Root file.You can’t use this operation if you want to “unlock” hidden features of your phone.
- Download CF-Auto-Root To Root Galaxy Note Edge SM-N915F On Android 6.0.1 Marshmallow.
- The above tutorial only works for Android 6.0.1 with the built id MMB29M.N915FXXS1DPH2 .
- If your device isn’t running on the same built id , then you need to download and flash the firmware based on the same build id then after try to root your device from the above method.
You can Easily root Galaxy Note Edge SM-N915F without the computer.You can Free Your Mobile From lots of unwanted applications.
- No data loss process: Your Personal Data including contacts, pictures, videos, music won’t be affected using the above method. In short, no data loss process.
- Samsung Stock Firmware: If you are looking for the original firmware for your device then head over to Download Samsung Stock Firmware for all devices page.
- Samsung USB Driver: If you are looking for the original USB Driver for your device then head over to Download Samsung USB Driver for all devices page.
- Big thanks to Chainfire for their CF Auto Root file for, without this tool, this tutorial was not possible.
How To Root Galaxy Note Edge SM-N915F On Android 6.0.1 Marshmallow using Odin
- Your should have at last 30-40 percent of battery to perform the rooting process.
- To root Galaxy Note Edge SM-N915F you need a PC with internet connection, a micro USB data cable, Odin software and the CF-Auto-Root file.
- go to Settings/About phone and enable Developer Options by pressing 7 times on Build Number, then, enter into Developer Options and enable USB Debugging and OEM unlock.
The Android version of this phone is and the Baseband version is.
If something goes wrong, or if you want to untoot Galaxy Note Edge SM-N915F, you must restore the original firmware with Samsung Kies 3. - Download and Install Samsung USB Driver on your computer. If Samsung USB Driver already installed on your computer then Skip this Step.
Rooting Galaxy Note Edge SM-N915F On Android 6.0.1 Marshmallow without PC.
This method has not been tried before , It can work and can not work
- Check Your Device Mobile No.
- Battery Percentage Above 50.
- Backup Your Device.
- Your Mobile data Should be turned On.
- Copy the apk files in your Mobile Device.
- Install the King root.
- If it says Warning Understand the Warning and Click install anyway.
- After Installation, Open your app and Select make it ra1n.
- In few minutes your Device will restart.
- When the restart Completes install Supersu.
To uninstall Unwanted apps on Galaxy Note Edge SM-N915F On Android 6.0.1 Marshmallow
- To uninstall unwanted apps you can use Root Cleaner.
- Download Root Cleaner>Copy to your mobile>Install it>Uninstall the unwanted apps.
- Check before Uninstall the apps.If you Uninstall system os apps it will affect your mobile working
- Using this app you can also move the Phone storage apps to SD card depends upon your system permission.
Unroot Galaxy Note Edge SM-N915F On Android 6.0.1 Marshmallow
- It works If you have Supersu.
- Go to installed Super SU.
- Go to Settings>Full unroot>Select Continue>The process will be done in few seconds.
- Uninstall Super su.
How to install Android 7.0 Nougat update on Galaxy Note Edge SM-N915F ?
How To Root Samsung Galaxy Note Edge SM-N9150 On Android 6.0.1 Marshmallow
These are the instructions to root Samsung Galaxy Note Edge SM-N9150 On Android 6.0.1 Marshmallow with the built id MMB29M.N9150ZHU1CQC1 using Odin.
In this tutorial, I will show you How To Root Samsung Galaxy Note Edge SM-N9150 On Android 6.0.1 Marshmallow with Odin software and CF-Auto-Root file.You can’t use this operation if you want to “unlock” hidden features of your phone.
- Download CF-Auto-Root To Root Samsung Galaxy Note Edge SM-N9150 On Android 6.0.1 Marshmallow.
- The above tutorial only works for Android 6.0.1 with the built id MMB29M.N9150ZHU1CQC1 .
- If your device isn’t running on the same built id , then you need to download and flash the firmware based on the same build id then after try to root your device from the above method.
When you can change your ROM.But normally You can delete some company.
applications and free your mobile memory and also you can increase your Phone memory.
You can Easily root Samsung Galaxy Note Edge SM-N9150 without the computer.You can Free Your Mobile From lots of unwanted applications.
- No data loss process: Your Personal Data including contacts, pictures, videos, music won’t be affected using the above method. In short, no data loss process.
- Samsung Stock Firmware: If you are looking for the original firmware for your device then head over to Download Samsung Stock Firmware for all devices page.
- Samsung USB Driver: If you are looking for the original USB Driver for your device then head over to Download Samsung USB Driver for all devices page.
- Big thanks to Chainfire for their CF Auto Root file for, without this tool, this tutorial was not possible.
How To Root Samsung Galaxy Note Edge SM-N9150 On Android 6.0.1 Marshmallow using Odin
- Your should have at last 30-40 percent of battery to perform the rooting process.
- To root Samsung Galaxy Note Edge SM-N9150 you need a PC with internet connection, a micro USB data cable, Odin software and the CF-Auto-Root file.
- go to Settings/About phone and enable Developer Options by pressing 7 times on Build Number, then, enter into Developer Options and enable USB Debugging and OEM unlock.
The Android version of this phone is and the Baseband version is.
If something goes wrong, or if you want to untoot Samsung Galaxy Note Edge SM-N9150, you must restore the original firmware with Samsung Kies 3. - Download and Install Samsung USB Driver on your computer. If Samsung USB Driver already installed on your computer then Skip this Step.
Rooting Samsung Galaxy Note Edge SM-N9150 On Android 6.0.1 Marshmallow without PC.
This method has not been tried before , It can work and can not work
- Check Your Device Mobile No.
- Battery Percentage Above 50.
- Backup Your Device.
- Your Mobile data Should be turned On.
- Copy the apk files in your Mobile Device.
- Install the King root.
- If it says Warning Understand the Warning and Click install anyway.
- After Installation, Open your app and Select make it ra1n.
- In few minutes your Device will restart.
- When the restart Completes install Supersu.
To uninstall Unwanted apps on Samsung Galaxy Note Edge SM-N9150 On Android 6.0.1 Marshmallow
- To uninstall unwanted apps you can use Root Cleaner.
- Download Root Cleaner>Copy to your mobile>Install it>Uninstall the unwanted apps.
- Check before Uninstall the apps.If you Uninstall system os apps it will affect your mobile working
- Using this app you can also move the Phone storage apps to SD card depends upon your system permission.
Unroot Samsung Galaxy Note Edge SM-N9150 On Android 6.0.1 Marshmallow
- It works If you have Supersu.
- Go to installed Super SU.
- Go to Settings>Full unroot>Select Continue>The process will be done in few seconds.
- Uninstall Super su.
How to install Android 7.0 Nougat update on Samsung Galaxy Note Edge SM-N9150 ?
Root Samsung Galaxy Tab A SM-T550 using Odin
Step 1: Download and install Samsung Mobile Driver on your Computer (if Samsung Mobile Driver is already installed on your computer, then you dont have to install it again).

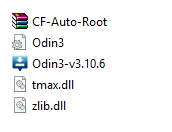
Step 2: Download root package on your computer. After downloading the package, you need to extract it on your computer.
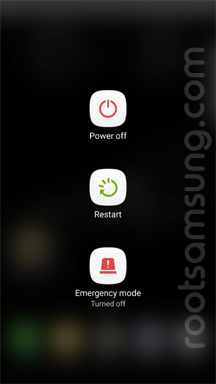
Step 3: Power off your Device.
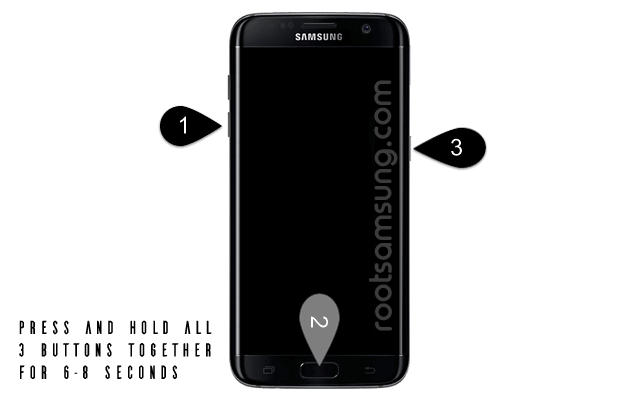
Step 4: Now, you need to boot the device into the download mode. To boot into the download mode, Press and Hold Volume Down + Home + Power button together for 6-8 seconds till you see the download screen.
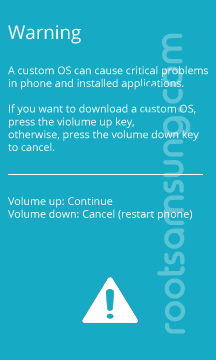
Step 5: Once you have entered into the download mode, you will be able to see the warning screen. You need to press the Volume UP button to continue.
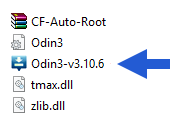
Step 6: Open Odin Tool from the autoroot package (you have extracted it in step#2) on your computer.
Step 7: Connect your device to the Computer.

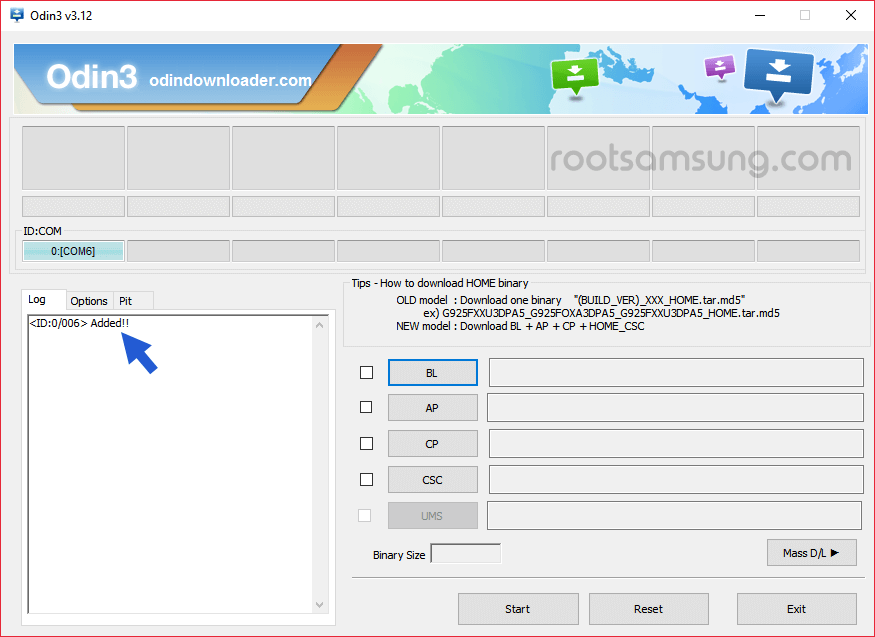
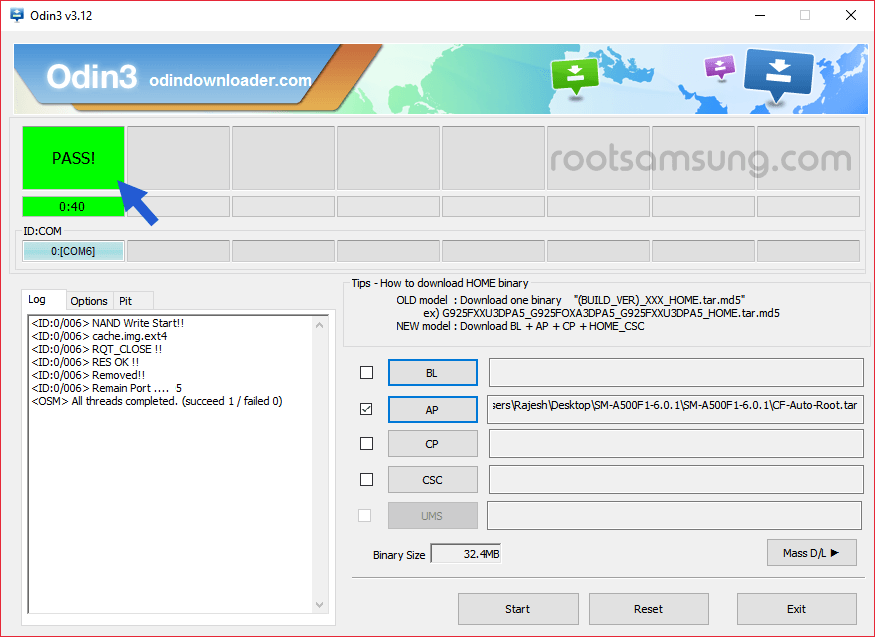
Step 8: Once your device is connected to the computer, Odin will automatically recognize it and will show Added message in log area.
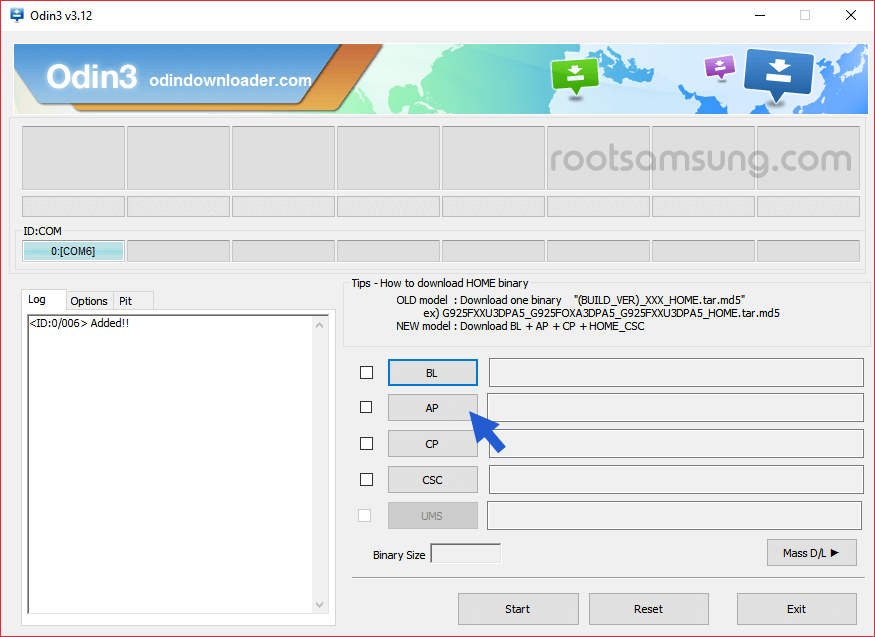
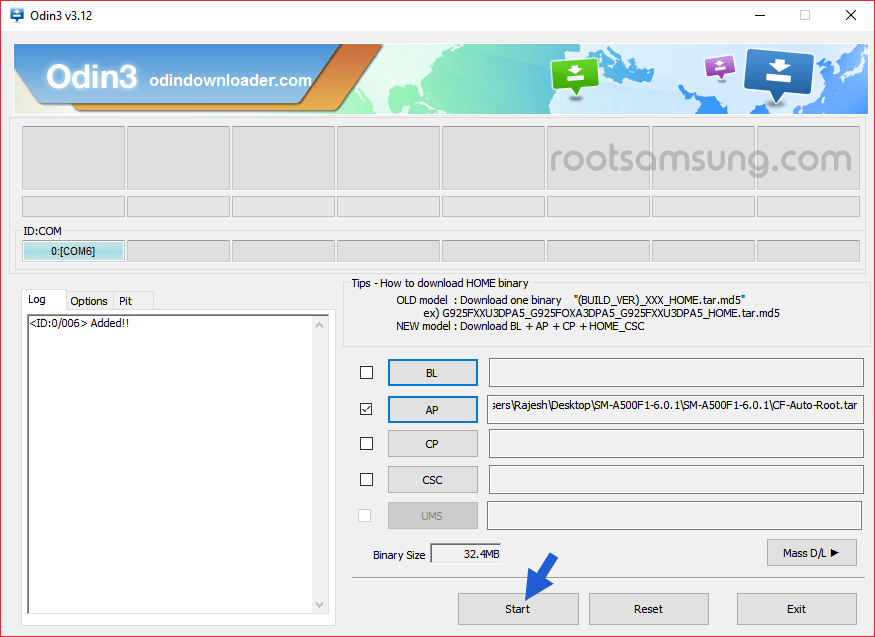
Step 9: Now, Click on the AP button (also called as PDA) and add the CF-Auto-Root.tar file (you have extracted it in step#2).
Step 10: Click on the Start button to begin the rooting process.
Step 11: once rooting process is completed, you will be able to see Green Box with PASS message.
Step 12: Now, disconnect your device from the computer and restart it.
Step 13: Your device is hopefully rooted now. To confirm the root, check the SuperSU app installed on your device. If SuperSU app is present, then your device is rooted.
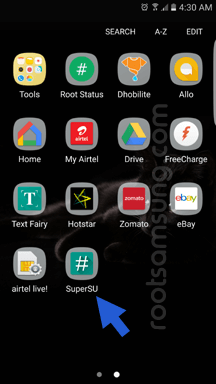
Alternatively, you can also check the root status of your device using the Root Checker App.
Root Samsung Galaxy Tab A 8. 0 SM-T350 using Odin
Step 1: Download and install Samsung Mobile Driver on your Computer (if Samsung Mobile Driver is already installed on your computer, then you dont have to install it again).
Step 2: Download root package on your computer. After downloading the package, you need to extract it on your computer.
Step 3: Power off your Device.
Step 4: Now, you need to boot the device into the download mode. To boot into the download mode, Press and Hold Volume Down + Home + Power button together for 6-8 seconds till you see the download screen.
Step 5: Once you have entered into the download mode, you will be able to see the warning screen. You need to press the Volume UP button to continue.
Step 6: Open Odin Tool from the autoroot package (you have extracted it in step#2) on your computer.
Step 7: Connect your device to the Computer.
Step 8: Once your device is connected to the computer, Odin will automatically recognize it and will show Added message in log area.
Step 9: Now, Click on the AP button (also called as PDA) and add the CF-Auto-Root.tar file (you have extracted it in step#2).
Step 10: Click on the Start button to begin the rooting process.
Step 11: once rooting process is completed, you will be able to see Green Box with PASS message.
Step 12: Now, disconnect your device from the computer and restart it.
Step 13: Your device is hopefully rooted now. To confirm the root, check the SuperSU app installed on your device. If SuperSU app is present, then your device is rooted.
Alternatively, you can also check the root status of your device using the Root Checker App.
Root Samsung Galaxy Note 4 SM-N9100 using Odin
Step 1: Download and install Samsung Mobile Driver on your Computer (if Samsung Mobile Driver is already installed on your computer, then you dont have to install it again).
Step 2: Download root package on your computer. After downloading the package, you need to extract it on your computer.
Step 3: Power off your Device.
Step 4: Now, you need to boot the device into the download mode. To boot into the download mode, Press and Hold Volume Down + Home + Power button together for 6-8 seconds till you see the download screen.
Step 5: Once you have entered into the download mode, you will be able to see the warning screen. You need to press the Volume UP button to continue.
Step 6: Open Odin Tool from the autoroot package (you have extracted it in step#2) on your computer.
Step 7: Connect your device to the Computer.
Step 8: Once your device is connected to the computer, Odin will automatically recognize it and will show Added message in log area.
Step 9: Now, Click on the AP button (also called as PDA) and add the CF-Auto-Root.tar file (you have extracted it in step#2).
Step 10: Click on the Start button to begin the rooting process.
Step 11: once rooting process is completed, you will be able to see Green Box with PASS message.
Step 12: Now, disconnect your device from the computer and restart it.
Step 13: Your device is hopefully rooted now. To confirm the root, check the SuperSU app installed on your device. If SuperSU app is present, then your device is rooted.
Alternatively, you can also check the root status of your device using the Root Checker App.
")


")