

Yes, the immediately above should do as you requested, always boot into the GRUB menu. That’s not the same as «the initramfs» but you should as mentioned not be booting into that by default anyway. Once you’re in the GRUB menu you can as per the «break» instructions boot into it on as-needed basis.
Historically, and still possible even if not normal today, that rootfs was your actual, on-disk root filesystem and its «init» the normal one you’d also interact wth during normal use, but as setups grew more complicated, having the kernel directly do and know all that can sometimes be needed to mount e.g. virtualized, networked and/or encrypted root filesystems became anything from hard to not even sanely possible; you’d first want a system basically already up and running to be able to do all that’s needed to even mount the root filesystem.
This is the point where the initramfs comes in. It’s a straightforward image of a filesystem the bootloader loads as a RAM-disk and points the kernel to for its initial, temporary rootfs. Its «init» then sets up all that is required to access the real root filesystem and continues the boot. Note that even for our uses something such as mounting the root filesystem via UUID is only possible due to this method.
In any case, you can from the description see that pausing in the initramfs is a good opportunity to fsck an as of yet unmounted real root filesystem as we’ve been doing. Also though that you shouldn’t normally; the initramfs is a very minimal environment, specialized (only) in getting the real root filesystem mounted.
Of course, this being Linux you can always boot into it, and simply adding «break» to the options always would be the method: you’d add it to the GRUB_CMDLINE_LINUX_DEFAULT options in /etc/default/grub and run sudo update-grub. But once more, DON’T DO THAT other than as a bit of experimenting: you are quite able to shoot yourself in particularly sensitive parts of your anatomy from the initramfs.
You also inquired after e2fsck. By «the type» I referred to the type of filesystem; usually ext4 for modern Linux filesystems, but could be btrfs or any of a host of other by Linux understood filesystem types, and e.g. NTFS for Windows filesystems. As gm10 said somewhere above, plain fsck is merely a wrapper around filesystem-specific checkers that determines that type and invokes the correct checker for it. In the case of ext4 the correct checker is fsck.ext4, or as its more colloquially known, e2fsck.
Linux Mint 18 on SDD with LVM ext4
Booting in recovery mode shows:
ata3.00: status: { DRDY DF ERR }
ata3.00: error: { ABRT }
ata3.00: configured for UDMA/100
sd 2:0:0:0: [sdb] tag#0 FAILED Result: hostbyte=DID_OK driverbyte=DRIVER_SENSE
=//= tag#0 Sense Key: Illegal Request [current] [descriptor]
=//= tag#0 Add. Sense: Unaligned write command
=//= tag#0 CDB: Syncronize Cache(10) 35 00 00 00 00 00 00 00 00 00
blk_update_request: I/O error, dev sdb, sector 0
ata3; EH complete
fsck exited whit status code 4
done.
Failure: File system check of the root filesystem failed
The root filesystem on dev/mapper/ming--vg-root requires manual fsck
BusyBox v1.22.1 ....
(initramfs)
Manual mount returns:
# mount /dev/mint-vg/root /mnt/asdx
mount: wrong fs type, bad option, bad superblock on /dev/mapper/mint--vg-root,
missing codepage or helper program, or other error
In some cases useful info is found in syslog - try
dmesg | tail or so.
Caja mounts disk with the same error:
Error mounting /dev/dm-0 at /media/batman/8b8126f2-1d26-4dee-b728-a85ca9274de5: Command-line `mount -t "ext4" -o "uhelper=udisks2,nodev,nosuid" "/dev/dm-0" "/media/batman/8b8126f2-1d26-4dee-b728-a85ca9274de5"' exited with non-zero exit status 32:
mount: wrong fs type, bad option, bad superblock on /dev/mapper/mint--vg-root,missing codepage or helper program, or other error
fsck and e2fsck not working as expected:
# e2fsck -f -b 32768 /dev/mapper/mint--vg-root
e2fsck 1.42.13 (17-May-2015)
Superblock needs_recovery flag is clear, but journal has data.
Recovery flag not set in backup superblock, so running journal anyway.
/dev/mapper/mint--vg-root: recovering journal
Superblock needs_recovery flag is clear, but journal has data.
Recovery flag not set in backup superblock, so running journal anyway.
Superblock needs_recovery flag is clear, but journal has data.
Recovery flag not set in backup superblock, so running journal anyway.
e2fsck: unable to set superblock flags on /dev/mapper/mint--vg-root
/dev/mapper/mint--vg-root: ***** FILE SYSTEM WAS MODIFIED *****
/dev/mapper/mint--vg-root: ********** WARNING: Filesystem still has errors **********
dev/sdb Input/Output errorsAutorepair from boot-repair not helped.
testdisk can list files.
How do I fix this?
My original topic with some boot-repair logs and SSD SMART errors: https://forums.linuxmint.com/viewtopic.php?p=1419387
Disk was exchanged under warranty, so now I have to restore backups.
TSerzhO_
- Posts: 6
- Joined: 2013-02-18 13:17
- (warning). fsck died with exit status 4 failed! (code 4).
- Re: (warning). fsck died with exit status 4 failed! (code 4)
- Re: (warning). fsck died with exit status 4 failed! (code 4)
- Re: (warning). fsck died with exit status 4 failed! (code 4)
- Re: (warning). fsck died with exit status 4 failed! (code 4)
- Re: (warning). fsck died with exit status 4 failed! (code 4)
- Re: (warning). fsck died with exit status 4 failed! (code 4)
- Re: (warning). fsck died with exit status 4 failed! (code 4)
- When to Use fsck Command in Linux
- fsck Command Options
- Run fsck Command to Repair Linux File System Errors
- Understanding fsck Exit Codes
- Fsck Repair Linux Filesystem
- How to Run fsck on Linux Root Partition
- Force fsck Upon System Boot
- Run fsck in Rescue Mode
- Further investigation and updates on the existing answer
- File system maximum number of mounts before check
- File system check interval
- Combination of both — The recommended way
(warning). fsck died with exit status 4 failed! (code 4).
by TSerzhO_ »
Code: Select all
done.
Setting parameters of disc: (none).
Setting preliminary keymap...done.
Activating swap...done.
Checking root file system...fsck from util-linux-ng 2.17.2
/dev/sda1 contains a file system with errors, check forced.
Inodes that were part of a corrupted orphan linked list found.
/dev/sda1: UNEXPECTED INCONSISTENCY; RUN fsck MANUALLY. (i.e., without -a or -p options)
fsck died with exit status 4
failed (code 4).
An automatic file system check (fsck) of the root filesystem failed. A manual fsck must be performed, then the system restarted. The fsck should be performed in maintenance mode with the root filesystem mounted in read-only mode. ... failed!
The root filesystem is currently mounted in read-only mode. A maintenance shell will now be started. After performing system maintenance, press CONTROL-D to terminate the maintenance shell and restart the system. ... (warning).
Give root password for maintenance
(or type Control-D to continue): _
TSerzhO_
- Posts: 6
- Joined: 2013-02-18 13:17
Re: (warning). fsck died with exit status 4 failed! (code 4)
by TSerzhO_ »
I have a ScreenShots, but can’t to attach it, because of:
Code: Select all
Internal Server Error
The server encountered an internal error or misconfiguration and was unable to complete your request.
Please contact the server administrator, forum-admin[at]forums[dot]debian[dot]net and inform them of the time the error occurred, and anything you might have done that may have caused the error.
More information about this error may be available in the server error log.
Apache Server at forums.debian.net Port 80
michapma
- Posts: 544
- Joined: 2008-05-04 20:49
- Location: Prague
Re: (warning). fsck died with exit status 4 failed! (code 4)
by michapma »
Secondly, don’t apologize for being a noob, it’s impossible to start as a guru. You did a good job of describing your problem and providing enough information for someone to provide help.
TSerzhO_
- Posts: 6
- Joined: 2013-02-18 13:17
Re: (warning). fsck died with exit status 4 failed! (code 4)
by TSerzhO_ »
Code: Select all
...
Give root password for maintenance
(or type Control-D to continue): _
Last edited by TSerzhO_ on 2013-02-19 11:09, edited 1 time in total.
michapma
- Posts: 544
- Joined: 2008-05-04 20:49
- Location: Prague
Re: (warning). fsck died with exit status 4 failed! (code 4)
by michapma »
When you’re entering your message, at the bottom is an area with two tabs: «Options» and «Upload attachment.» Use the second one. Otherwise, you can host the image online using a free site of your choice.
TSerzhO_
- Posts: 6
- Joined: 2013-02-18 13:17
Re: (warning). fsck died with exit status 4 failed! (code 4)
by TSerzhO_ »
mahboobehd
- Posts: 4
- Joined: 2016-01-27 22:53
Re: (warning). fsck died with exit status 4 failed! (code 4)
by mahboobehd »
I am running debian_squeeze_i386_desktop.qcow2, and it was working properly before I tried to make a bridge between host system and qemu.
Thank you in advace for the help,
Mahboobeh

kiyop
- Posts: 3983
- Joined: 2011-05-05 15:16
- Location: Where persons without desire to improve themselves fear to tread, in Japan
Re: (warning). fsck died with exit status 4 failed! (code 4)
by kiyop »
mahboobehd wrote:I have the same problem,
Even if you have similar problem, the cause of the problem may be different.
it is better for you to start a new thread. You can link this thread in your new thread.
I am running debian_squeeze_i386_desktop.qcow2, and it was working properly before I tried to make a bridge between host system and qemu.
Your debian_squeeze is booting as the host system, isn’t it?
I wonder if /dev/sda1 has bad sector(s).
I suggest you backing-up important data to a safe place such as a partition in an USB media (removable media).
Can you unmount /dev/sda1?
After backing up all the important data, unmount the partition which contains the copied data, and remove the USB media. Then, you can check /dev/sda1 like
Code: Select all
umount /dev/sda1
fsck -f -y -c -c /dev/sda1
with root privilege.
Linux Filesystems are responsible for organizing how data is stored and recovered. One way or another, with time, the filesystem may become corrupted and certain parts of it may not be accessible. If your filesystem develops such inconsistency it is recommended to verify its integrity.
This can be completed via a system utility called fsck (file system consistency check), which checks the root file system automatically during boot time or ran manually.
In this article, we are going to review the fsck command and its usage to help you repair Linux disk errors.
Table of Contents
When to Use fsck Command in Linux
There are different scenarios when you will want to run fsck. Here are a few examples:
- The system fails to boot.
- Files on the system become corrupt (often you may see input/output error).
- The attached drive (including flash drives/SD cards) is not working as expected.
fsck Command Options
-A– Used for checking all filesystems. The list is taken from/etc/fstab.-C– Show progress bar.-l– Locks the device to guarantee no other program will try to use the partition during the check.-M– Do not check mounted filesystems.-N– Only show what would be done – no actual changes are made.-P– If you want to check filesystems in parallel, including root.-R– Do not check the root filesystem. This is useful only with ‘-A‘.-r– Provide statistics for each device that is being checked.-T– Does not show the title.-t– Exclusively specify the Linux filesystem types to be checked. Types can be comma-separated lists.-V– Provide a description of what is being done.
Run fsck Command to Repair Linux File System Errors
In order to run fsck, you will need to ensure that the partition you are going to check is not mounted. For the purpose of this article, I will use my second drive /dev/sdb mounted in /mnt.
Here is what happens if I try to run fsck when the partition is mounted.
# fsck /dev/sdb
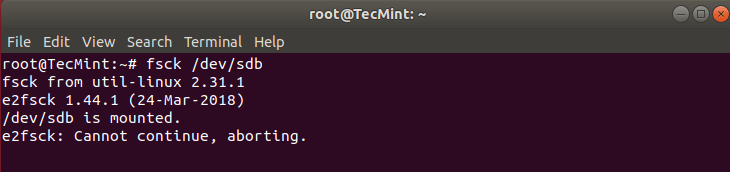
To avoid this unmount the partition using.
# umount /dev/sdb
Then fsck can be safely run with.
# fsck /dev/sdb
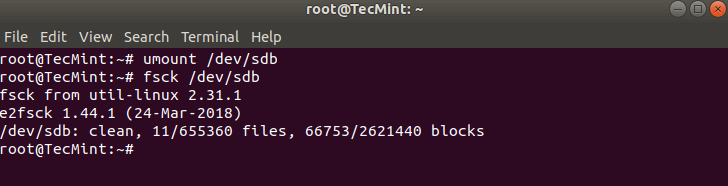
Understanding fsck Exit Codes
After running fsck, it will return an exit code. These codes can be seen in fsck’s manual by running:
# man fsck0 No errors
1 Filesystem errors corrected
2 System should be rebooted
4 Filesystem errors were left uncorrected
8 Operational error
16 Usage or syntax error
32 Checking canceled by user request
128 Shared-library error
Fsck Repair Linux Filesystem
Sometimes more than one error can be found on a filesystem. In such cases, you may want fsck to automatically attempt to correct the errors. This can be done with:
# fsck -y /dev/sdb
The -y flag, automatically “yes” to any prompts from fsck to correct an error.
Similarly, you can run the same on all filesystems (without root):
$ fsck -AR -y
How to Run fsck on Linux Root Partition
In some cases, you may need to run fsck on the root partition of your system. Since you cannot run fsck while the partition is mounted, you can try one of these options:
- Force fsck upon system boot
- Run fsck in rescue mode
We will review both situations.
Force fsck Upon System Boot
# touch /forcefsck
Then you can simply force or schedule a reboot of your system. During the next bootup, the fsck will be performed. If downtime is critical, it is recommended to plan this carefully, since if there are many used inodes on your system, fsck may take some extra time.
After your system boots, check if the file still exists:
# ls /forcefsck
If it does, you may want to remove it in order to avoid fsck on every system boot.
Run fsck in Rescue Mode
Running fsck in rescue mode requires a few more steps. First, prepare your system for reboot. Stop any critical services like MySQL/MariaDB etc and then type.
# reboot
During the boot, hold down the shift key so that the grub menu is shown. Select “Advanced options”.
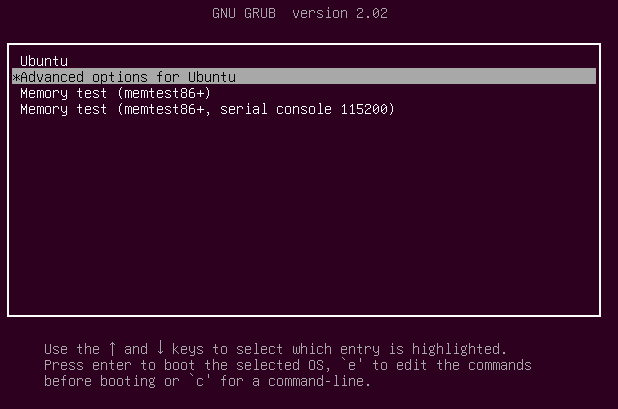
Then choose “Recovery mode”.
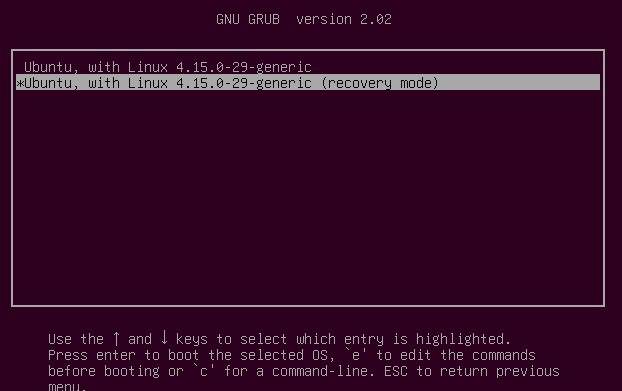
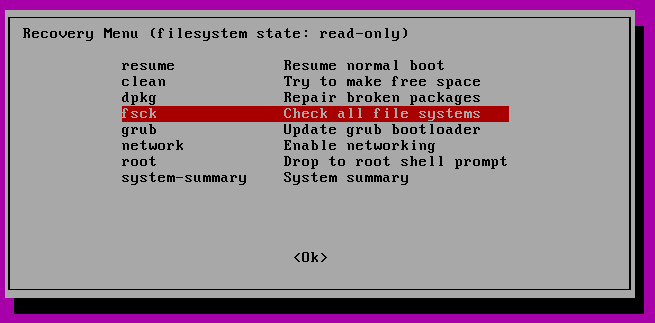
In the next menu select “fsck”.
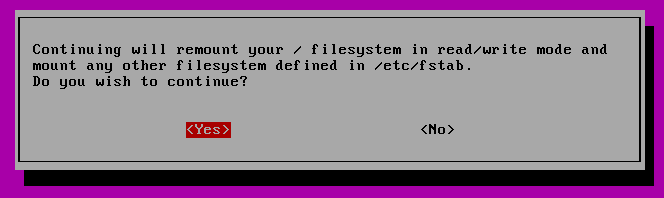
You will be asked if you wish to have your / filesystem remounted. Select “yes”.
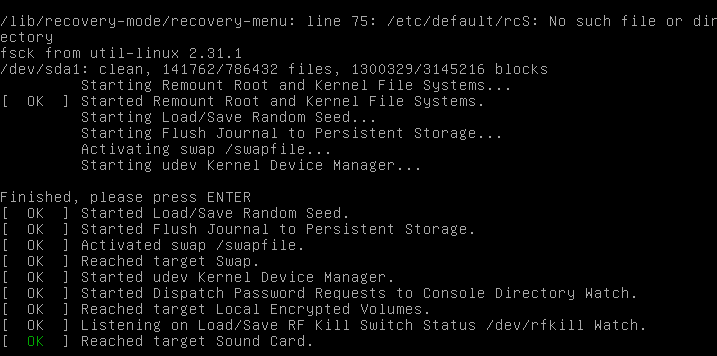
You should see something similar to this.
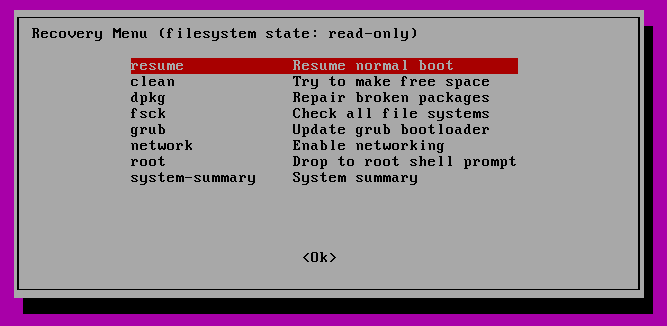
You can then resume normal boot, by selecting “Resume”.
Conclusion
In this tutorial, you learned how to use fsck and run consistency checks on different Linux filesystems. If you have any questions about fsck, please do not hesitate to submit them in the comment section below.
Further investigation and updates on the existing answer
I now just wanted to check, whether the above still works on Ubuntu 20.04/22.04-LTS-based systems (directly tested on Linux Mint 20/21 Cinnamon amd64 desktop and Ubuntu MATE 20.04/22.04 amd64 desktop), and I found out a few things, let’s start with the file system check interval (I ran all commands as root (as you might notice ~# in front of commands):
File system maximum number of mounts before check
~# LC_ALL=C tune2fs -l /dev/nvme0n1p2 | grep 'Maximum mount count'
Maximum mount count: -1
This setting adjusts how many mounts it takes till the file system gets checked. It’s ok what is written in the original answer:
~# LC_ALL=C tune2fs -c 1 /dev/nvme0n1p2
tune2fs 1.45.5 (07-Jan-2020)
Setting maximal mount count to 1
Just make sure you do not use 0 or -1 as it would become disregarded.
File system check interval
~# LC_ALL=C tune2fs -l /dev/nvme0n1p2 | grep 'Check interval'
Check interval: 0 (<none>)
Well, this was unexpected. I thought we took care of it, but can be fixed very easily. Take note, the number it takes as an argument is by default in days, so be sure to use 1s (1 seconds) instead of just 1 which would mean 1 day (86400 seconds):
~# LC_ALL=C tune2fs -i 1s /dev/nvme0n1p2
tune2fs 1.45.5 (07-Jan-2020)
Setting interval between checks to 1 seconds
Now, if we repeat the above check, we get:
Check interval: 1 (0:00:01)This does not mean the file system will be checked every second, of course. Rather, in effect it will force the file system check on every file system mount. (As there is no way of booting any system twice in one second 😀.)
Combination of both — The recommended way
Here you only change your disk name (e.g. sda, vda, nvme0n1, etc.), and partition number:
First, we find out the current status with:
partition=/dev/nvme0n1p2; LC_ALL=C tune2fs -l $partition | grep -E 'Check\ interval|Maximum\ mount\ count'Maximum mount count: -1
Check interval: 0 (<none>)Afterward, we set these values so that the file system is checked on every boot with:
partition=/dev/nvme0n1p2; LC_ALL=C tune2fs -i 1s -c 1 $partition 2>&1 | grep SettingSetting maximal mount count to 1
Setting interval between checks to 1 secondsFinally, let’s review the new status with the same first command:
partition=/dev/nvme0n1p2; LC_ALL=C tune2fs -l $partition | grep -E 'Check\ interval|Maximum\ mount\ count'Maximum mount count: 1
Check interval: 1 (0:00:01)Keep checking (pun intended)! 😎


