

Доброго времени суток, уважаемые читатели. Сегодня статья на тему: «Установка SSH и Root доступ в Debian 10». Рассмотрим установку OpenSSH-сервера, и настройку удалённого доступа под пользователем root.
В процессе установки Debian 10, не производится установки SSH-сервера. Поэтому сразу после установки, нет возможности удалённого подключения.
- Установка Openssh-сервера в Debian 10
- Настройка root доступа по ssh в Debian 10
- Introduction
- Prerequisites
- Related Blogs
- How To Auto Login tty1 In Debian 11 Server
- How To Enable SSH Root Login In Debian 11
- How To Setup Multiple Static IPS On Ubuntu 22
- Topic Contents
- Checking the SSH Server Status
- Starting and Stopping the SSH Server
- Adding and Removing the SSH Service from the System Startup
- Configuring the SSH Server
- Changing the Port of the SSH Server
- Conclusion
- Filtering the ssh port
- Using TCP wrappers to filter ssh
- Disabling the ssh service
- Press Y if requested to finish the removal.
- Related articles
- Installation
- Installation of the server
- Configuration files
- Regenerating host keys
- Remote login
- Using shared keys
- Keys management
- Good practices with SSH Server
- External Utilities
- Additional Commands
- Sftp
- Keychain
- Libpam-usb
- Remote commands
- Good practices of SSH usage
- Troubleshooting
- SSH hangs
- Resolution with IPQoS 0x00
- Resolution with netcat
- Keep SSH connection alive
- For Debian 7. x server
- See also
- TIME FORMATS
- TOKENS
- FILES
Установка Openssh-сервера в Debian 10
# apt-get install openssh-server
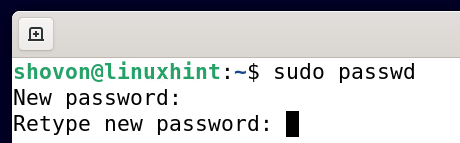
Настройка root доступа по ssh в Debian 10
# su —
PermitRootLogin yes
# systemctl restart ssh
Теперь можно напрямую авторизоваться под пользователем root, и производить любые действия, не производя никаких дополнительных манипуляций.
Надеюсь статья была вам полезна. До встречи в новых статьях.
Видео на тему «Установка SSH и Root доступ в Debian 10»:
Поблагодарить автора за полезную статью:

Linux System — Aug 14, 2022 Written by Ahmer Tahir

Introduction
We use SSH to log into the system like VPS for installing or setting it up. SSH login is a lightweight and fastest way to configure your system then using GUI with RDP or something. GUI is sometimes too slow to work with. But SSH is thousand times faster than any other access point. You can simply access it from your terminal or command line.
Prerequisites

Now you have to scroll down and uncomment the line by removing from its start and replacing with at the end, as shown in the image below:
If you want to disable it again, simply edit the file again and set to or comment it by placing at the start.

Related Blogs

Linux System — Jul 24, 2022
How To Auto Login tty1 In Debian 11 Server

How To Enable SSH Root Login In Debian 11

Linux System — Sep 25, 2022
How To Setup Multiple Static IPS On Ubuntu 22
This article serves as a guide on how to install the OpenSSH SSH server on Debian 11 and how to configure it. Let’s get started.
Topic Contents
The OpenSSH SSH server package is available in the official package repository of Debian 11, so it is very easy to install.

apt openssh-server

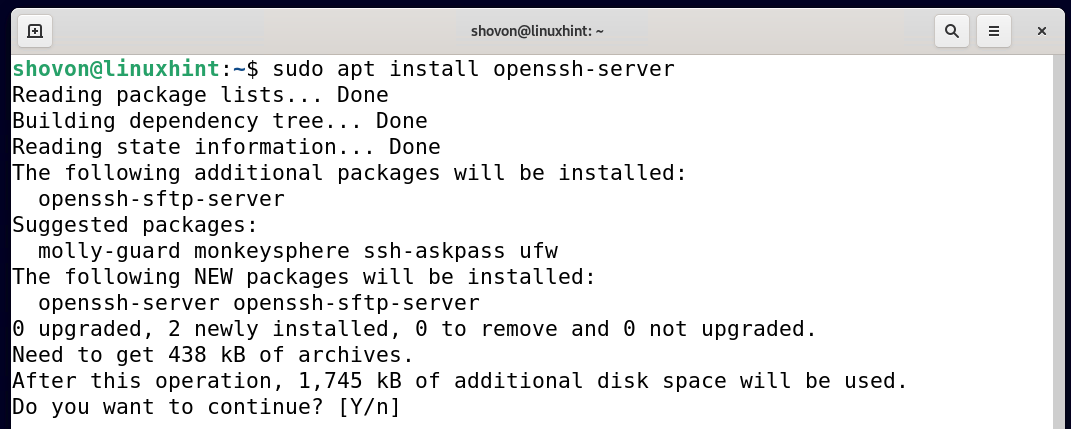
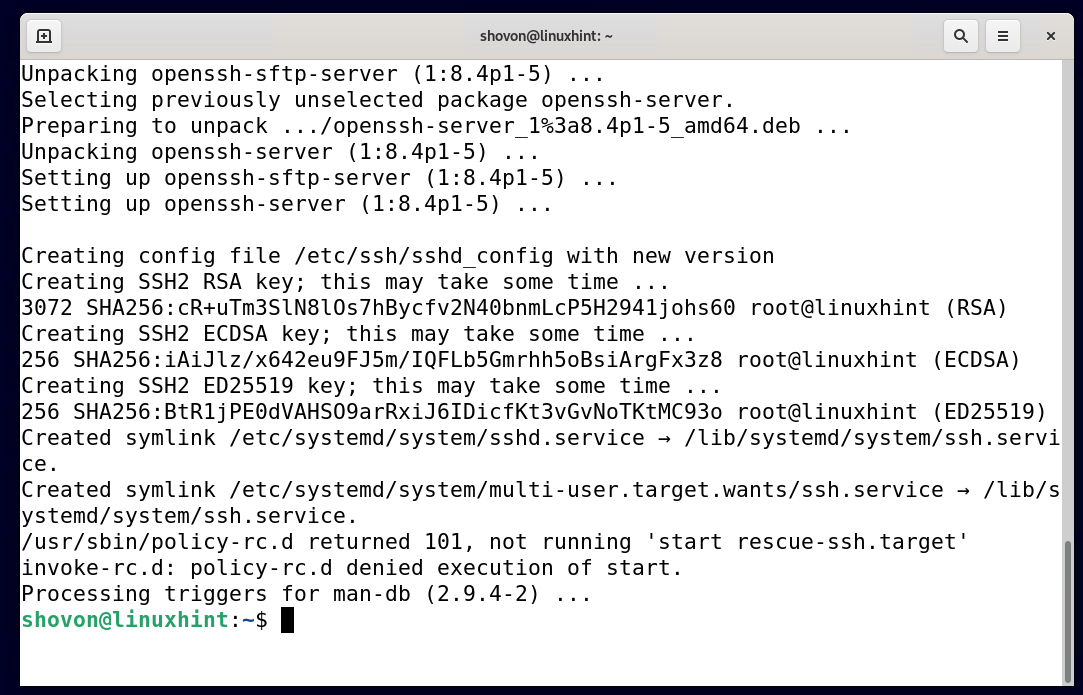
After confirming, the OpenSSH SSH server and all the required dependency packages will then be installed. It takes a few seconds to complete the installation process.
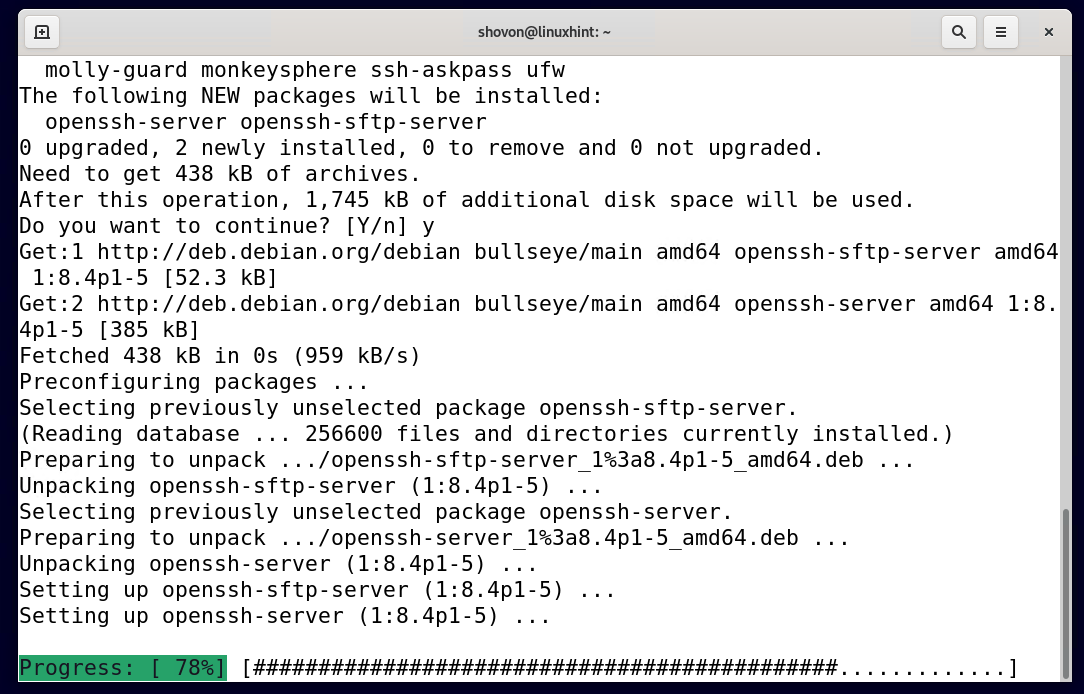
At this point, the OpenSSH SSH server should be successfully installed in the system.
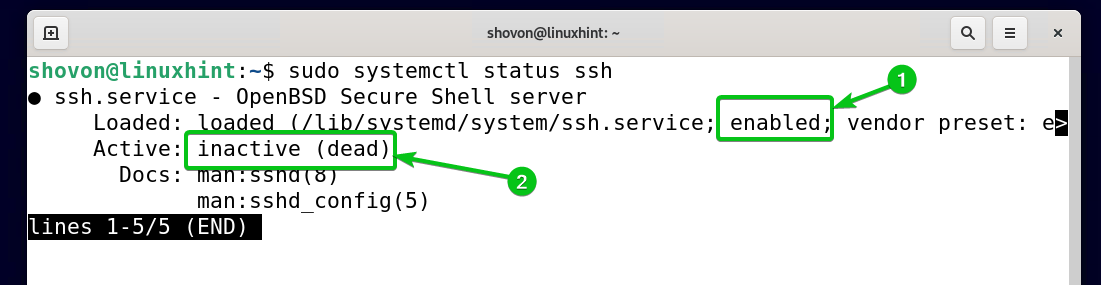
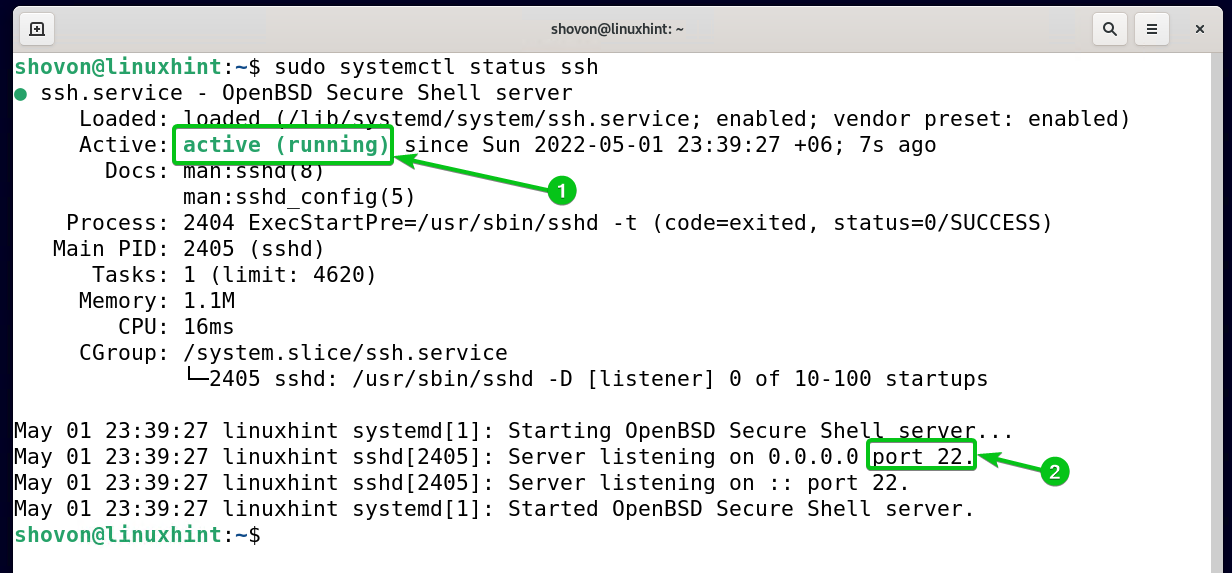
Checking the SSH Server Status

As you can see, the SSH server is enabled1. It means that it’s added to the system startup and it will automatically start on boot.
If the SSH server is inactive (dead)2, it means that it’s not running at the moment. If you see an active (running) status, it means that the SSH server is running.
Starting and Stopping the SSH Server

Here, you can see that the SSH server is active/running1. It’s listening on port 22 for SSH connections2.

Adding and Removing the SSH Service from the System Startup
You can add the SSH service to the system startup of Debian 11 using the command provided below to start the OpenSSH SSH server automatically on system boot.

If you don’t want to start the OpenSSH SSH server automatically on system boot, you can remove the SSH service from the system startup of Debian 11.

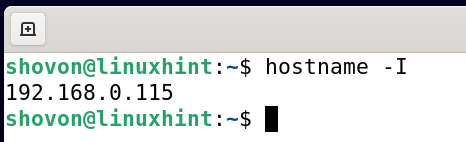
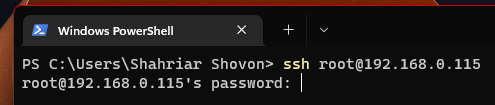
To access the OpenSSH SSH server, you will need to know the IP address of your Debian 11 desktop/server.

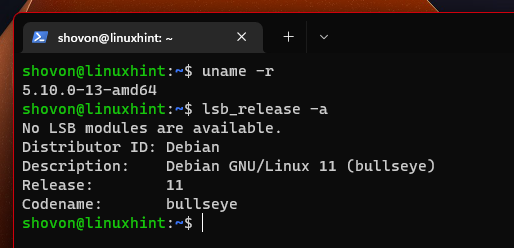
The IP address of my Debian 11 desktop is 192.168.0.115 as you can see in the screenshot below. It is different from yours, so make sure to input your desktop/server IP address.

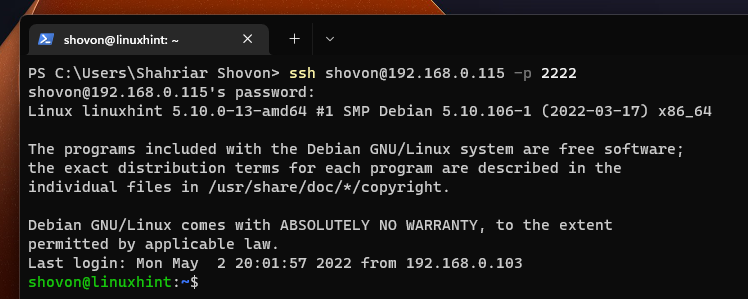
In my case, the command is:


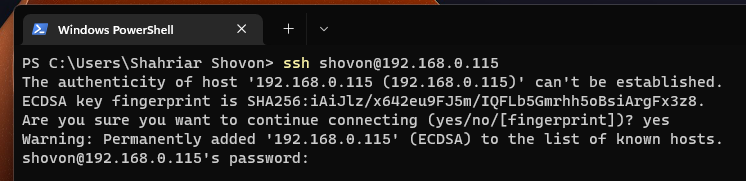
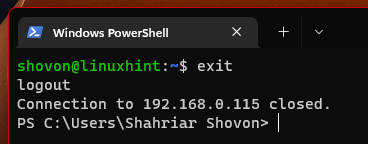
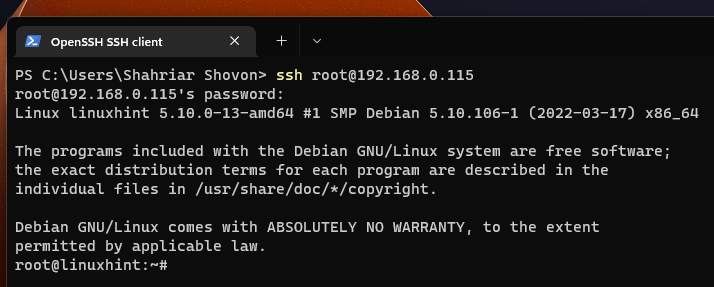
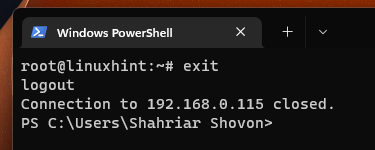
You should be logged in to your Debian 11 desktop/server remotely via SSH.
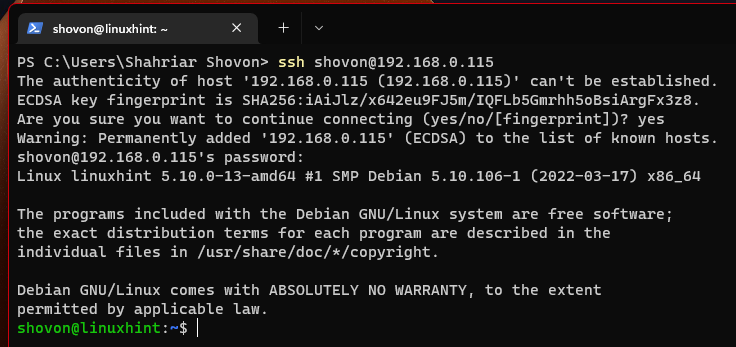
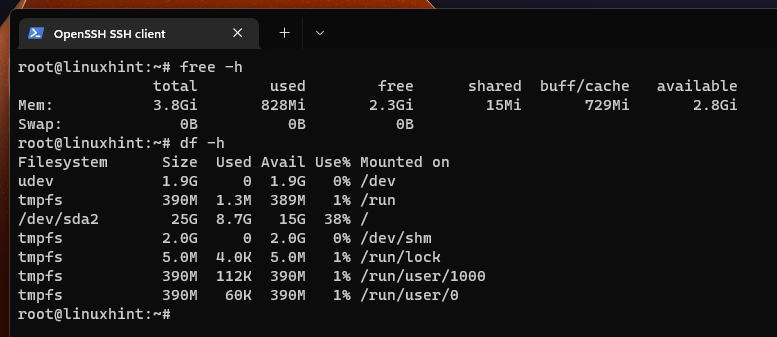
You can run any commands here for managing and monitoring your Debian 11 desktop/server remotely.
Configuring the SSH Server
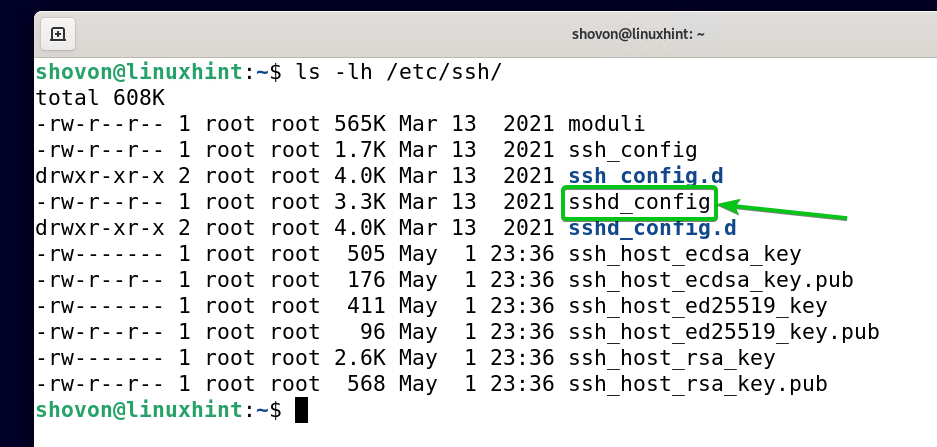
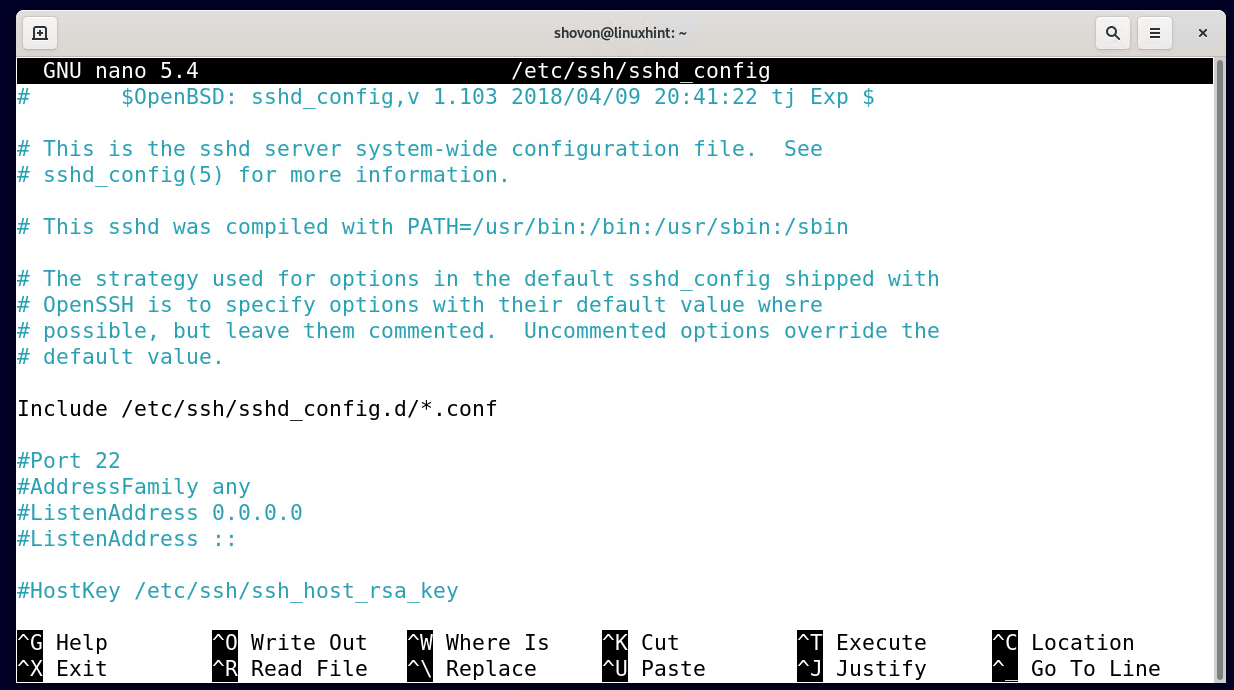
The configuration files of the OpenSSH SSH server are in the /etc/ssh directory. The main OpenSSH SSH server configuration file is sshd_config as you can see in the screenshot below.

The OpenSSH SSH server configuration file sshd_config should be opened with the nano text editor.

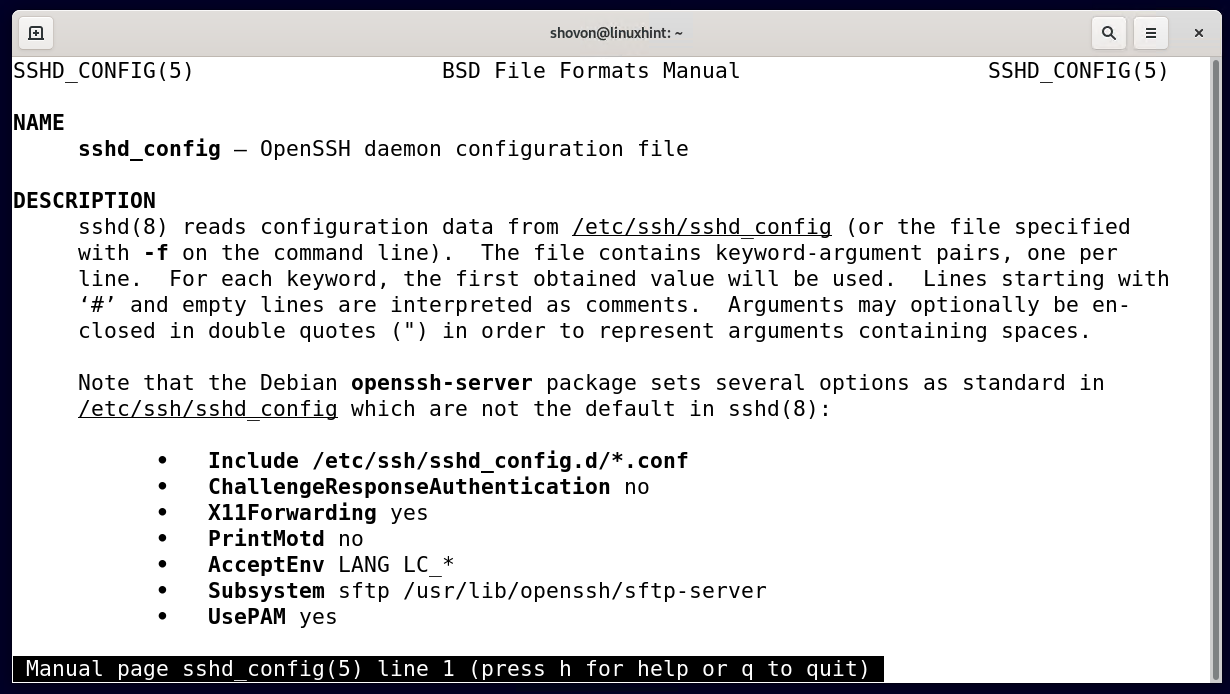
To learn about all the available options and what they are used for, you can read the manpage of the sshd_config configuration file.

The manpage of the sshd_config configuration file should be opened. Scroll up and down the manpage to find the information you need to configure the OpenSSH SSH server.

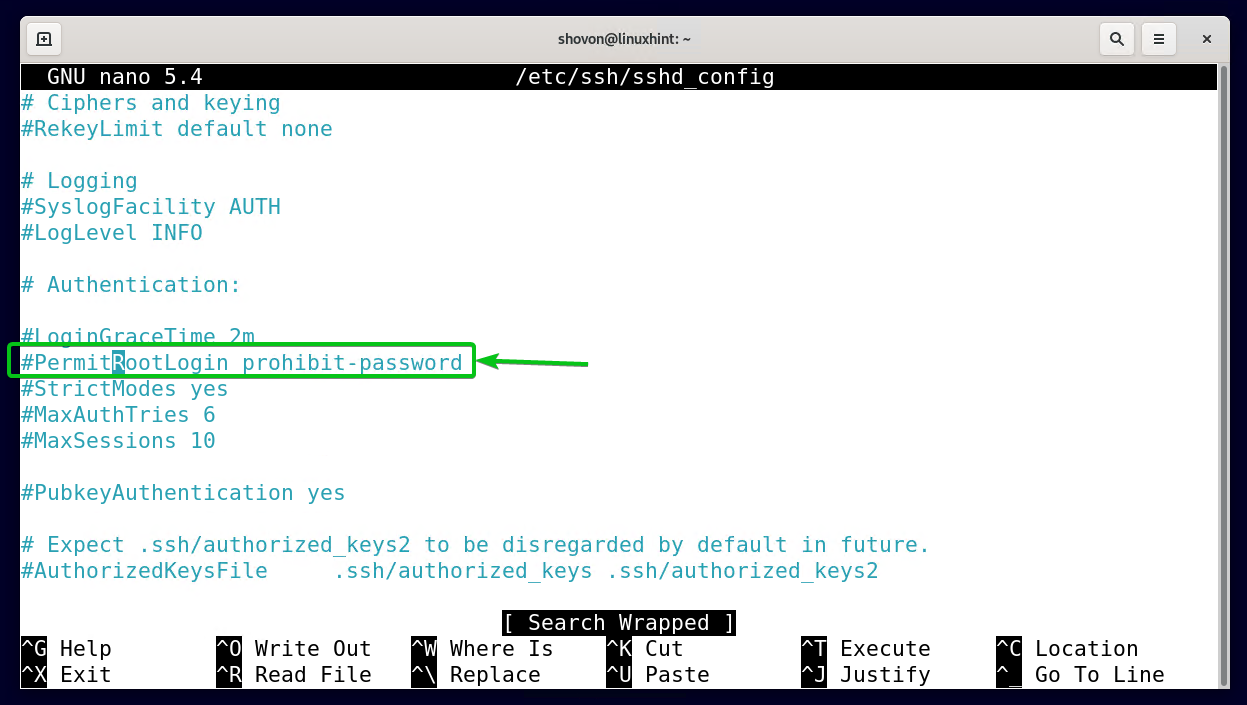
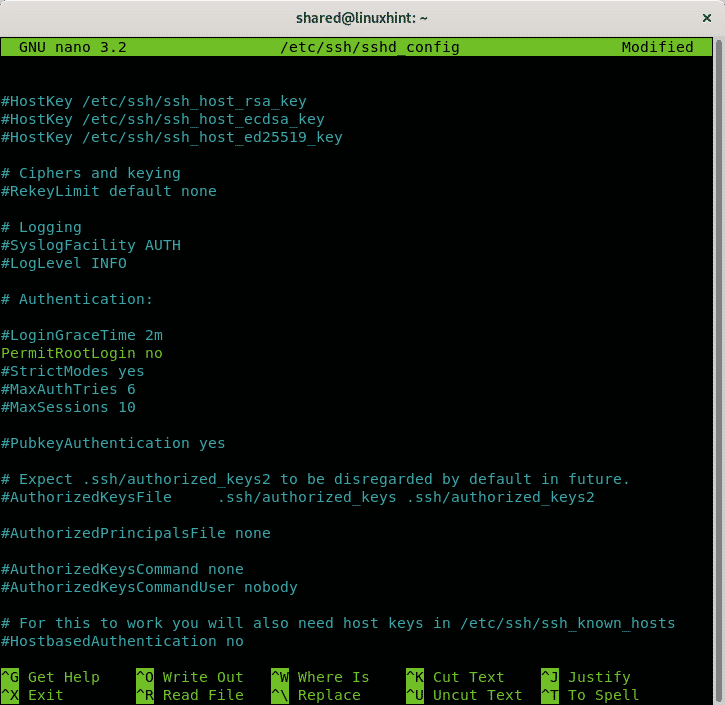
Find the PermitRootLogin option as marked in the screenshot below. It is commented out by default.
Uncomment the PermitRootLogin option and set it to yes as marked in the screenshot below.
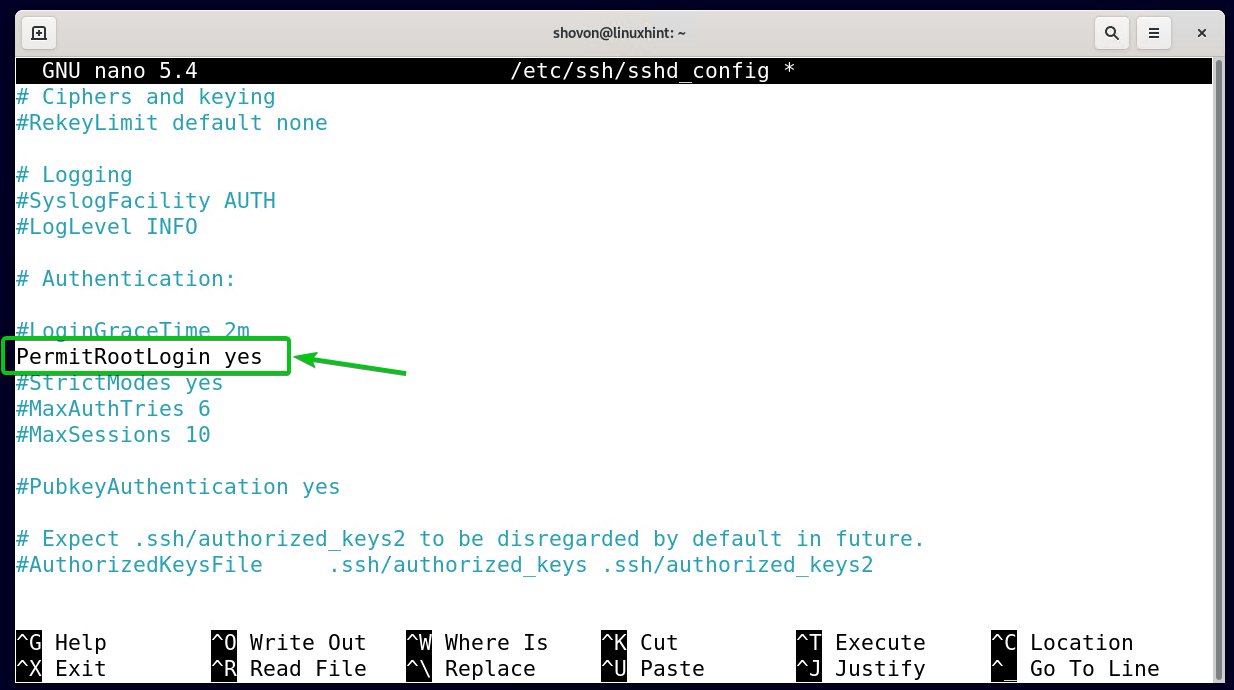


A root password should be set and the root account should be enabled.


You can run any command you want on your Debian 11 desktop/server from here.
Changing the Port of the SSH Server
At times, for security reasons, you will want to change the default SSH server port 22 to something like 2222.

You will find the Port option on top of the file as marked in the screenshot below.
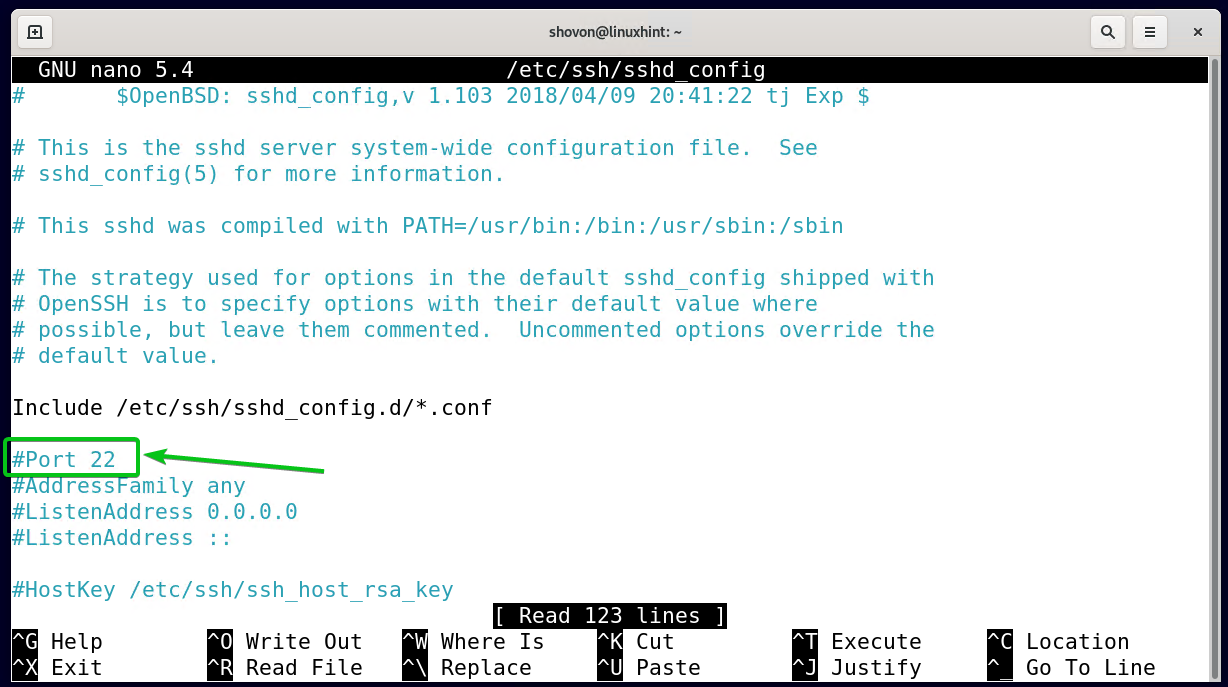
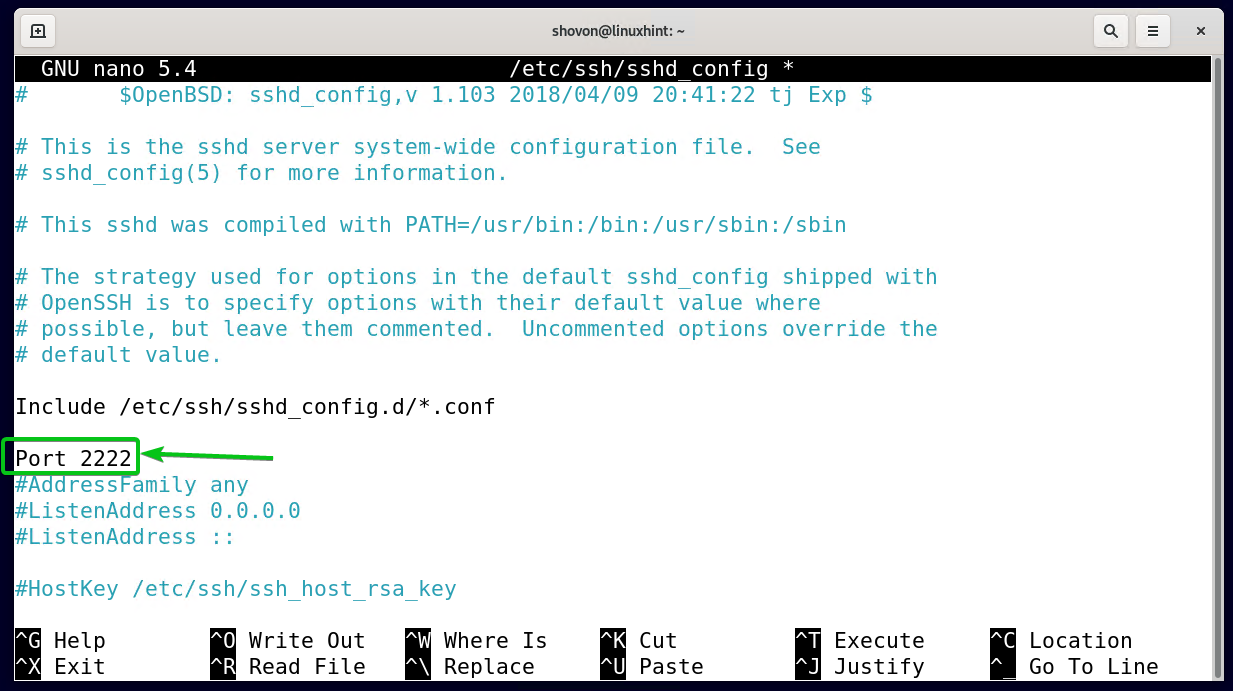
Uncomment the Port option and set it to 2222 as marked in the screenshot below to configure the SSH server to listen on port 2222.


Conclusion
This article guides you on how to install the OpenSSH SSH server on your Debian 11 desktop/server, how to access the SSH server to manage/monitor your Debian 11 desktop/server remotely via SSH, and how to configure the SSH server to enable root access and change the SSH port as well.
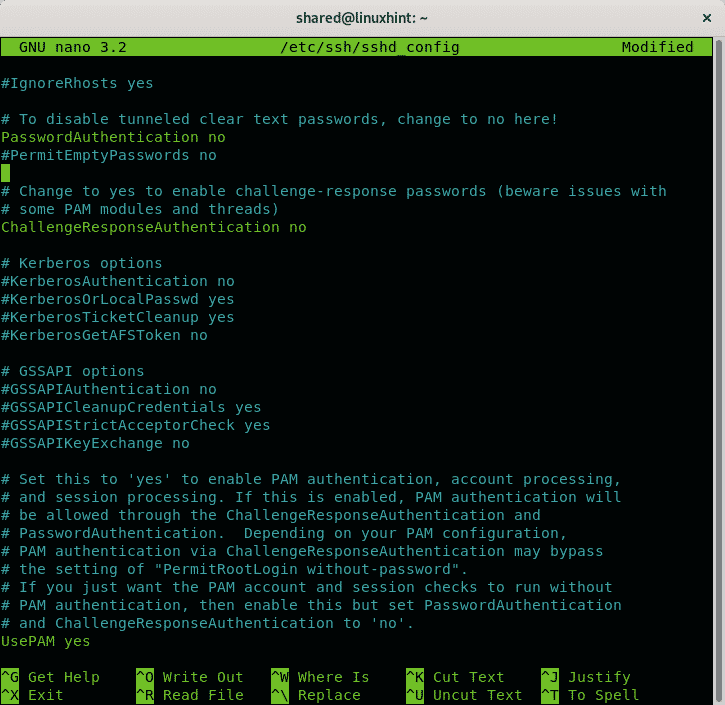
To disable ssh root access you need to edit the ssh configuration file, on Debian it is , to edit it using nano text editor run:


After disabling the root access press CTRL+X and Y to save and exit.
The prohibit-password option prevents password login allowing only login through fall-back actions such as public keys, preventing brute force attacks.
Restrict access to Public Key Authentication:
To disable password login allowing only login using a Public key open the configuration file again by running:

To disable password login allowing only login using a Public key open the /etc/ssh/ssh_config configuration file again by running:
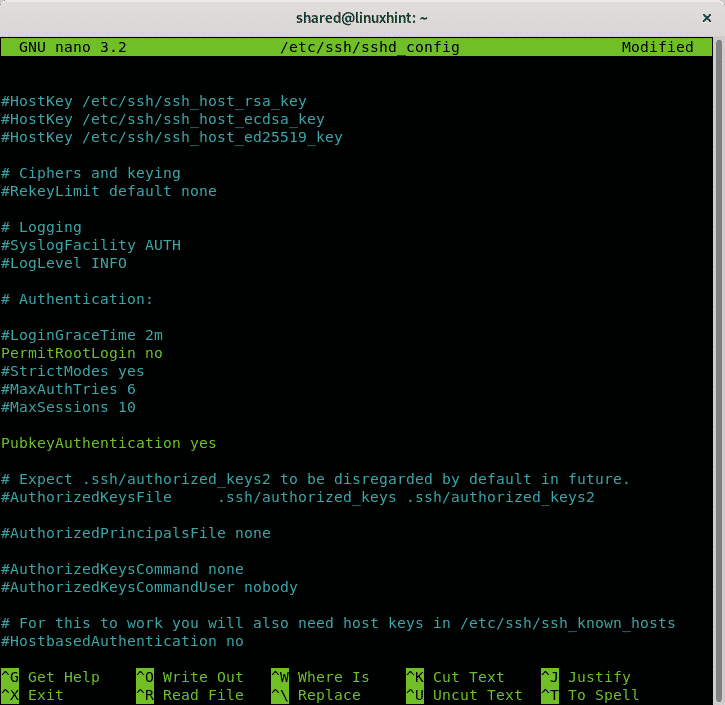
Find the line containing PubkeyAuthentication and make sure it says yes like in the example below:
Then press CTRL+X and Y to save and exit nano text editor.
Answer the question sequence leaving the first answer the default by pressing ENTER, set your passphrase, repeat it and the keys will be stored at ~/.ssh/id_rsa
Change the default ssh port:

Let’s say you want to use the port 7645 instead of the default port 22. Add a line like in the example below:
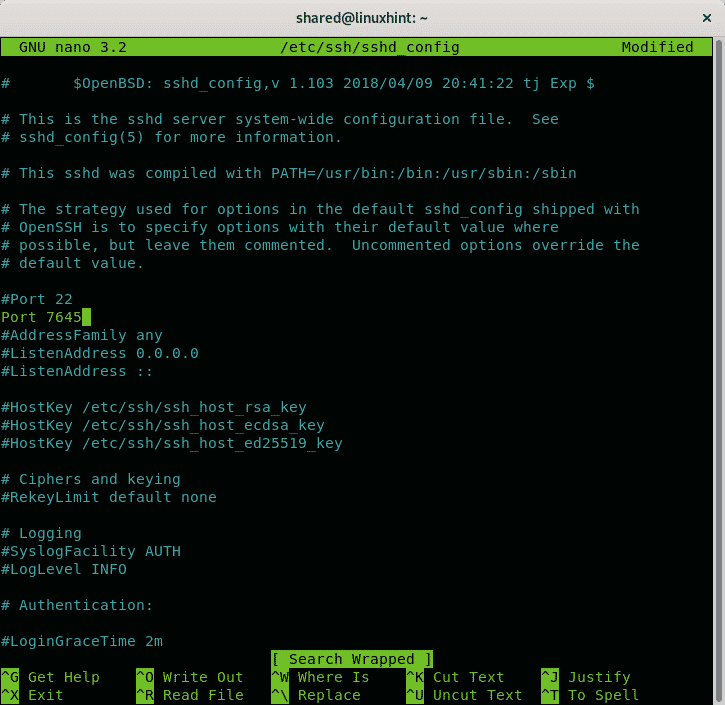
Then press CTRL+X and Y to save and exit.
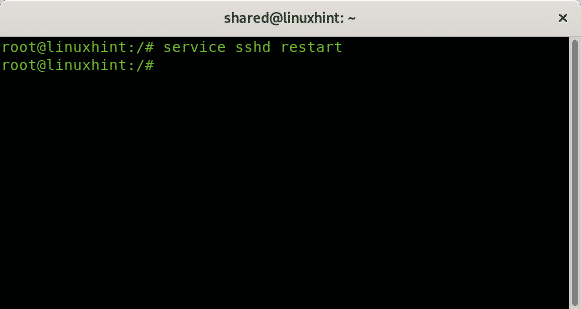
Restart the ssh service by running:
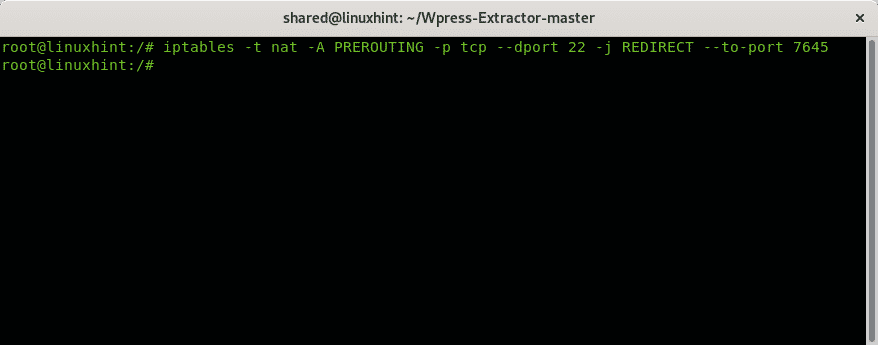
Then you should configure iptables to allow communication through port 7645:
iptables nat PREROUTING tcp REDIRECT
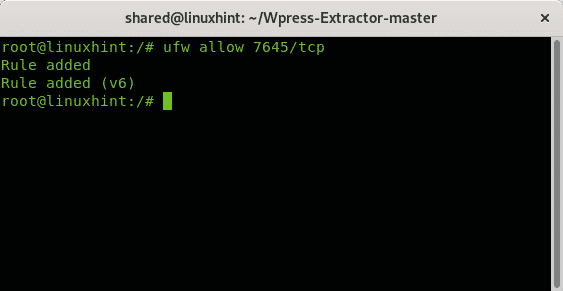
You can also use UFW (Uncomplicated Firewall) instead:
Filtering the ssh port
iptables INPUT tcp ALLOWED-IP ACCEPT
iptables INPUT tcp DROP
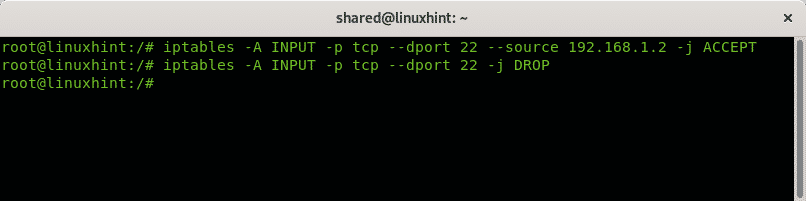
The first line of the example above instructs iptables to accept incoming (INPUT) TCP requests to port 22 from the IP 192.168.1.2. The second line instructs IP tables to drop all connections to port 22. You can also filter the source by mac address like in the example below:
iptables INPUT tcp mac 02::df:a0:d3:8f
REJECT

The example above rejects all connections except for the device with mac address 02:42:df:a0:d3:8f.
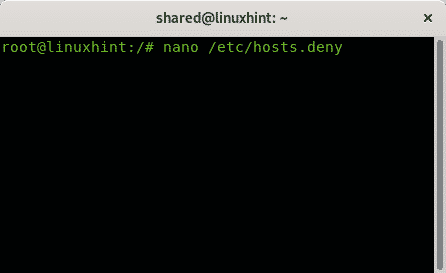
Using TCP wrappers to filter ssh
Another way to whitelist IP addresses to connect through ssh while rejecting the rest is by editing the directories hosts.deny and hosts.allow located in /etc.
To reject all hosts run:
Add a last line:
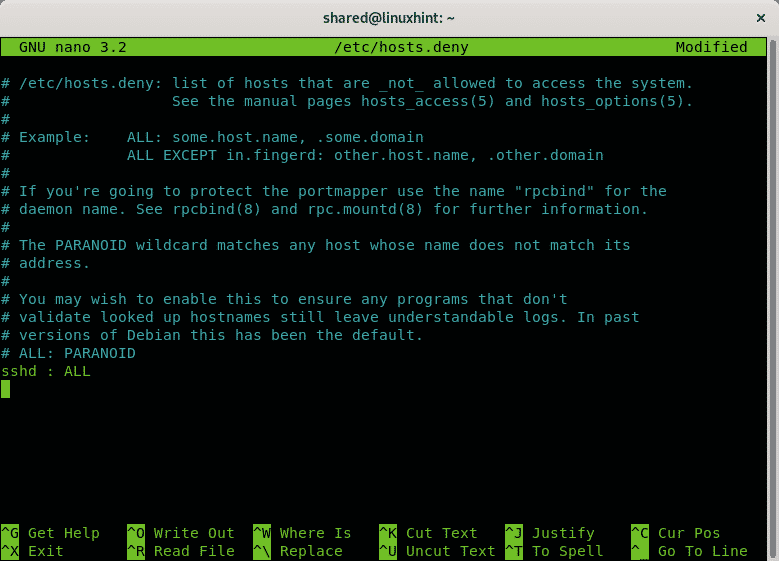
Press CTRL+X and Y to save and exit. Now to allow specific hosts through ssh edit the file /etc/hosts.allow, to edit it run:
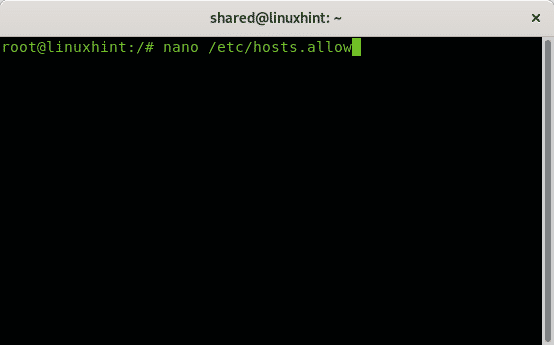
Add a line containing:
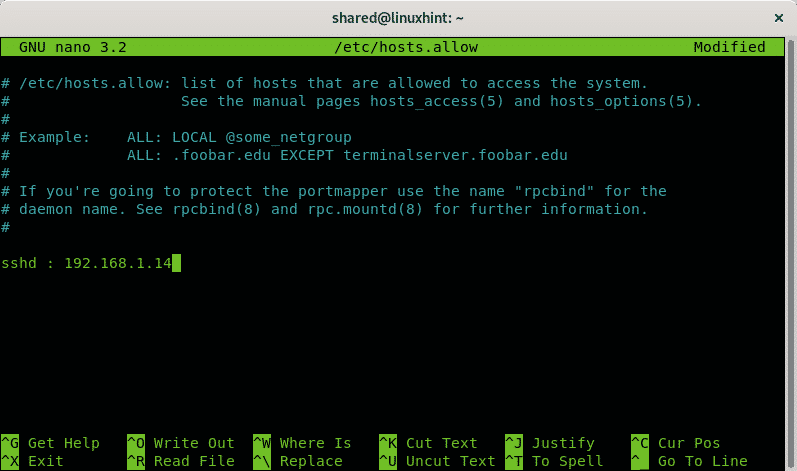
Press CTRL+X to save and exit nano.
Disabling the ssh service
On Debian Linux or based systems like Ubuntu you can remove services using the apt package manager.
To remove the ssh service run:
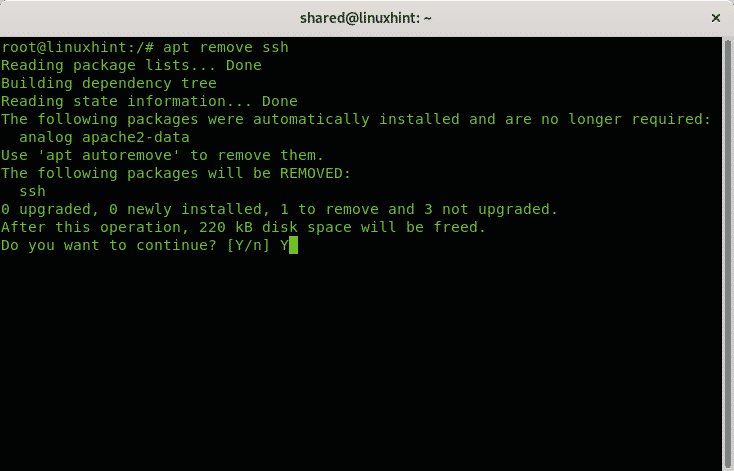
Press Y if requested to finish the removal.
And that’s all about domestic measures to keep ssh safe.
Related articles
Translation(s): Deutsch — English — Français — Italiano — Español — Português Brasileiro
ToDo: merge (and translate) this page and the french one (more complete)
Installation
Normally the client is installed by default. If not it suffices to run as root:
apt install openssh-client
Installation of the server
The server allows to connect remotely and gets installed by running as root:
apt install openssh-server
Configuration files
The main configuration files are in the directory /etc/ssh :
These have been enabled with the Include parameter in ssh_config and sshd_confg. Making changes locally using these directories can ease configuration management, and avoid issues with upgrades that make changes to package managed configuration files.
In addition the /etc/ssh directory contains the private/public key pairs identifying your host :
Since OpenSSH 5.73, a new private/public key pair is available:
Since OpenSSH 6.54, a new private/public key pair is available:
Regenerating host keys
rm /etc/ssh/ssh_host_*
dpkg-reconfigure openssh-server
Remote login
and then type in your password.
If this is the first time you login to the remote computer, ssh will ask you whether you are sure you want to connect to the remote computer. Answer ‘yes’ after you verified the remote computer’s fingerprint, type in your password, and ssh will connect you to the remote host.
Using shared keys
One of the functions of ssh is using a pair of private/public keys to connect to a remote host. Also known as SSH keys. This method allows you to login to a remote host without typing your password every time. To do this you must generate a pair of private/public keys on your local machine and deposit the public key on the remote host.
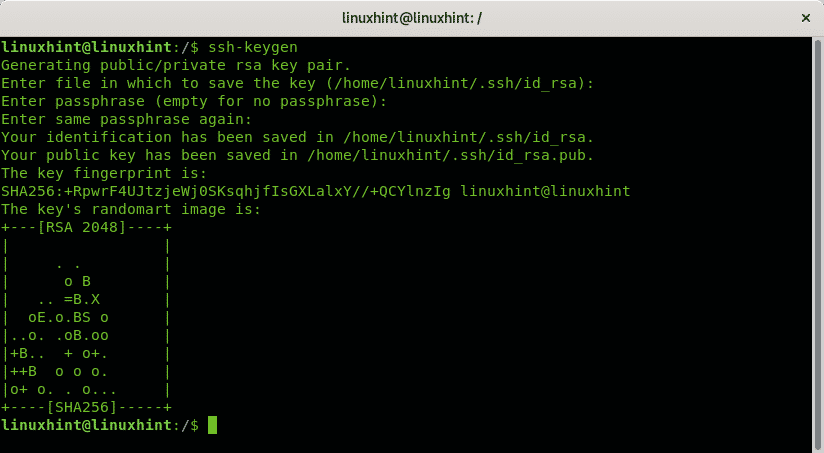
ssh-keygen -t rsa
This program generates a pair of private/public keys in the directory ~/.ssh. The program first asks for the destination files for the keys, by default located in ~/.ssh. Afterwards a passphrase is requested.
Note: We recommend not to leave the passphrase empty. An attacker who gets hold of your private key can otherwise connect to the hosts where you deposited you public key since the passphrase is empty. Choose a long and complex passphrase.
Your private key is id_rsa (don’t give it to someone else), your public key is id_rsa.pub.
You copy your public key to a remote host with the command ssh-copy-id
Now you can connect simply to the remote host and the passphase is asked for. Once done, you get connected to the remote host. In case of a new connection the passphrase does not get asked for again during your entire session.
Keys management
By default a SSH server is relatively secure. With the help of some good practices, configuration options, and external utilities it is possible to make it even harder for ‘robots’ and crackers
Good practices with SSH Server

One should edit the file /etc/ssh/sshd_config to change the parameters and then restart the ssh server with
service ssh restart
External Utilities
In file managers like Konqueror, Dolphin, Krusader and Midnight Commander you can use FISH to view files in a GUI using:
Additional Commands
scp is a command line utility allowing to transfer files between two machines.
Sftp
You will still need to tell the agent to manage your keys.
# List keys managed by the agent
ssh-add -l
# Add your ssh key
ssh-add ~/.ssh/your_private_key
When a private key is first needed, you are prompted for its passphrase. ssh-agent will then remember the key so that your passphrase doesn’t get asked anymore.
Keychain
ssh-askpass is an utility to simply the question for the password of a private key when using it. Several implementations exist:
Libpam-usb
libpam-usb is an utility (only available up to Debian Jessie) allowing authentication with an USB stick. This package includes a useful utilty : pamusb-agent. This utility, once correctly configured, allows to load the SSH keys present on the USB stick once it is connected and to unload them when it is disconnected.
Remote commands
If you just want to run one command on the remote computer, you don’t need to login. You can tell ssh to run the command without login, for instance,
Good practices of SSH usage
You must read this: https://web.archive.org/web/20230114043301/https://lackof.org/taggart/hacking/ssh/
Configure your ~/.ssh/config to send only the right key.
Troubleshooting
If you get an error message like this when starting the ssh daemon, you need to run:
apt install openssh-server openssh-client
Also see bug #732940.
SSH hangs
You are trying to SSH into a remote computer. But during SSH log-in the session hangs/freezes indefinitely. Thus you are not presented with the command prompt. And you are not able to use any SSH commands

When using SSH debug mode the session hangs at this line debug2: channel 0: open confirm rwindow 0 rmax 32768
With some routers behind NAT and when using OpenSSH. During session setup, after the password has been given, OpenSSH sets the TOS (type of service) field in the IP datagram. The router choke on this. The effect is that your SSH session hangs indefinitely. In other words, SSH commands or connections are seldom working or not working at all.
Resolution with IPQoS 0x00
Until your router manufacturer fix their firmware. Here is one option to resolve that issue:
Resolution with netcat

WARNING: It is suggested to consider using that other resolution with IPQoS 0x00 instead of using netcat/ProxyCommand nc %h %p option. Because IPQoS 0x00 is the official built-in OpenSSH option. Also IPQoS 0x00 is a more direct way to resolve that issue, and potentially more secure option. Because IPQoS 0x00 uses SSH’s built in encryption for secure transfers. Compare to netcat’s not encrypted transfers. Sources: 12. If you choose to use netcat/ProxyCommand nc %h %p option read on.
ProxyCommand nc %h %p
Keep SSH connection alive
For security reason, by default a SSH connection is automatically closed after a set period of time. But in some cases you want to keep that connection open. Such as cloud storage over SSH connection.
For Debian 7. x server
Steps to keep SSH connection alive.
# Keep client SSH connection alive by sending every 300 seconds a small keep-alive packet to the server in order to use ssh connection. 300 seconds equal 5 minutes.
ClientAliveInterval 300
# Disconnect client after 3333 «ClientAlive» requests. Format is (ClientAliveInterval x ClientAliveCountMax). In this example (300 seconds x 3333) = ~999,900 seconds = ~16,665 minutes = ~277 hours = ~11 days.
ClientAliveCountMax 3333
service sshd restart
Please note that on recent Debian systems (e.g. Wheezy 7 with current updates as of Nov. 2015), the above command no longer works and returns the error:
sudo service sshd restart
sshd: unrecognized service
See also
OpenSSH SSH daemon configuration file
TIME FORMATS
Each member of the sequence is added together to calculate the
total time value.
Time format examples:
600 seconds (10 minutes)
TOKENS
A literal ‘%’.
The routing domain in which the incoming connection was received.
The fingerprint of the CA key.
The fingerprint of the key or certificate.
The key ID in the certificate.
The base64-encoded CA key.
The base64-encoded key or certificate for authentication.
The serial number of the certificate.
The type of the CA key.
The key or certificate type.
AuthorizedKeysCommand accepts the tokens
%%, %f, %h, %k, %t, %U, and %u.
AuthorizedKeysFile accepts the tokens %%,
%h, %U, and %u.
AuthorizedPrincipalsCommand accepts the
tokens %%, %F, %f, %h, %i, %K, %k, %s, %T, %t, %U, and %u.
AuthorizedPrincipalsFile accepts the
tokens %%, %h, %U, and %u.
ChrootDirectory accepts the tokens %%, %h,
%U, and %u.
RoutingDomain accepts the token %D.
FILES
OpenSSH is a derivative of the original and free ssh 1.2.12 release by
. ,
, ,
, Theo de Raadt
and removed many bugs, re-added newer
features and created OpenSSH.
contributed the support for SSH protocol versions 1.5 and 2.0.
and
contributed support for privilege separation.
")


")