
")
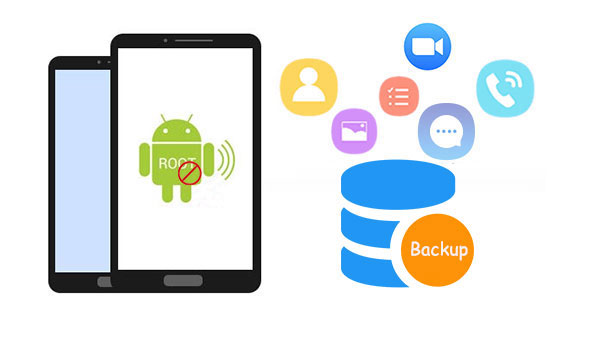
When you decide to update Android OS, do a factory reset, or flash a dead Android phone, you may need to back up your device data for preservation beforehand. The same is applicable to the desire to restore backups to your new cellphone. Maybe you just don’t want some apps to gain access to your mobile. So «best Android backup without root» is probably a topic of interest to you. Well, let’s take a closer look at the top ten tools of this kind.
Overview of MobiKin Backup Manager for Android:
- Fleetly back up Android phones/tablets without root.
- Restore Android devices with a single touch.
- Apply to such files as contacts, messages, call logs, photos, music, videos, documents, and apps.
- Easy connection, fast processing, and worry-free.
- Compatible with almost all iOS devices, including Samsung, Huawei, Sony, LG, Google, Motorola, OnePlus, Vivo, Xiaomi, OPPO, etc.
- It won’t let out your privacy.


How can I use Android Backup & Restore to backup my Android phone without root?
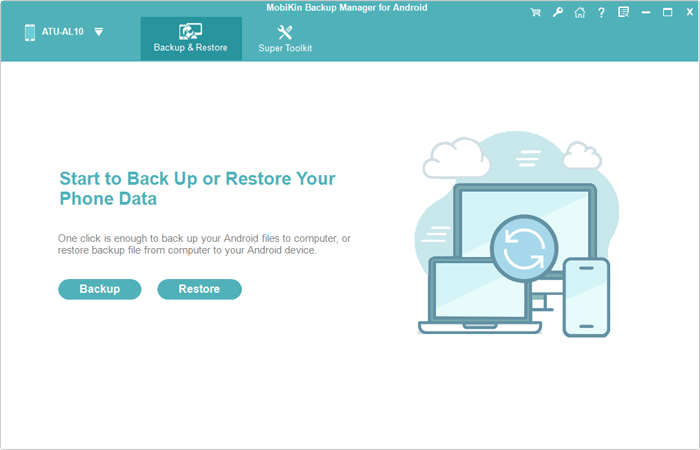
Step 1. Ensure your Android device is linked to a computer
Run the program on your computer when the free download and installation are done. Attach your phone to the computer via USB or Wi-Fi (How can I connect my Android phone via Wi-Fi?). You will soon get the main screen of the software.
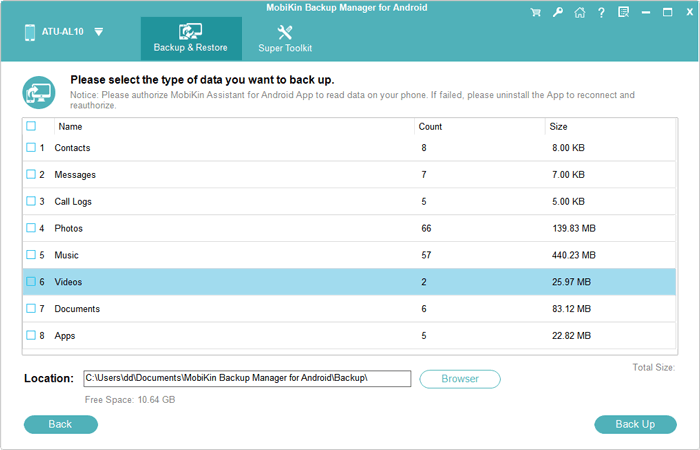
Step 2. Select the data types to back up
Click «Backup» from the page, and you’ll see a list of data types. Please check the items you want to back up before selecting them.
Step 3. Back up the Android phone to the computer without root
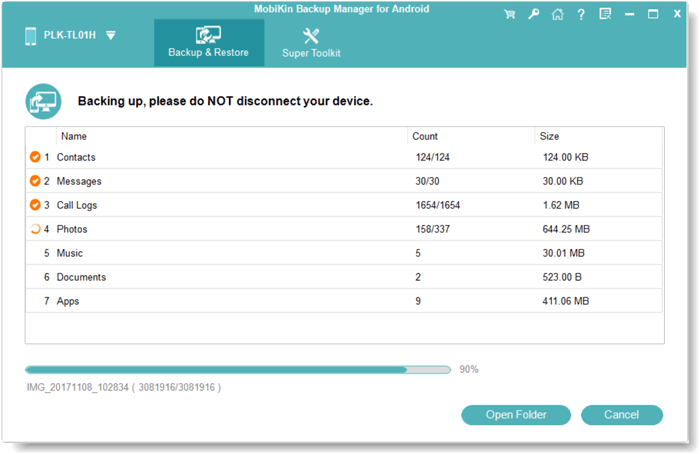
Hit «Browser» to set up a location for saving output content. Finally, please tap on «Back Up» to initiate Android backup without root.
- Free trial & $19.95/year.
You Might Be Interested in:
- MobiKin Assistant for Android
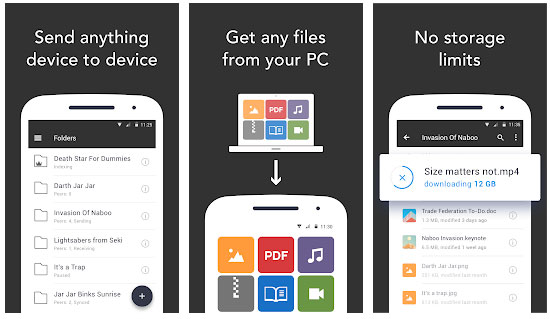
- Google Drive
- G Cloud Backup
- App Backup & Share
- Swift Backup
- Resilio Sync
- App Backup & Restore
- Helium
- Easy Backup
- Calling It a Wrap
- How to Backup Android Phone Completely
- 2. SMS & Messages
- 3. Photos & Videos
- 4. Applications and App Data
- » Non-rooted
- » Rooted Users
- 5. Full ROM/Firmware Backup (Nandroid)
- » Using TWRP
- » Using FlashFire App (Root users)
- 6. All Other Files on the Storage
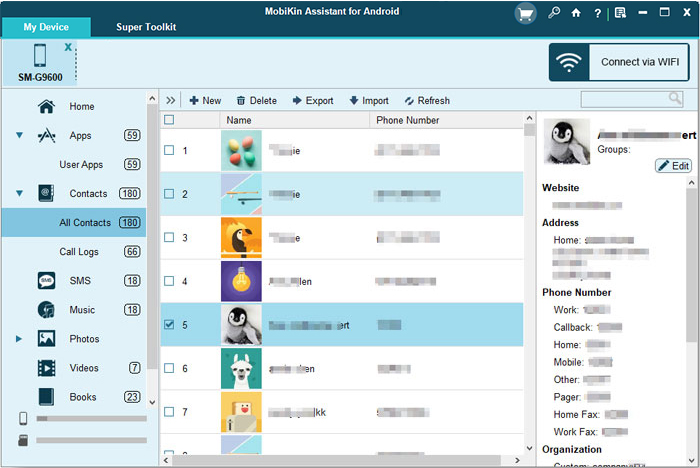
MobiKin Assistant for Android
As an enhanced version of the previous software, MobiKin Assistant for Android (Win and Mac) not only allows you to back up your entire Android phone to your computer in bulk but provides you with selective backup and restore, fitting well with «the best Android backup non-root». Often, when you want to transfer some contacts and photos from Android to your PC, you can preview and select them on the tool first after a flexible connection (USB & Wi-Fi).
In addition, as a multi-functional tool, it also offers you data management functions, through which you can organize your Android content directly on your computer. Further, this product can help handle items like contacts, messages, call history, pictures, songs, videos, documents, and applications.
- Free trial & $29.95/year.
Google Drive
- Start from $1.99/month.
Download Google Drive

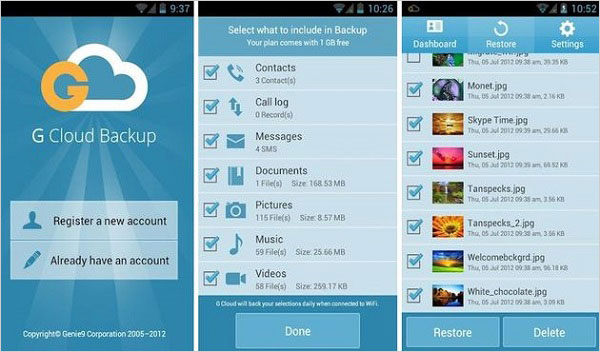
G Cloud Backup
Offering 1GB for free, G Cloud Backup gives you up to 10 GB of storage in its Cloud for a fee. This service lets you back up your Android phone without root, covering contacts, messages, images, videos, documents, call history, Whatsapp, Viber, and more for an easy restore. You can even use it to configure auto backup, let’s say when you connect your phone to Wi-Fi.
- $5.99/month or $59.99/year.
Download G Cloud Backup
App Backup & Share
- Start at $3.99.
Download Super Backup & Restore
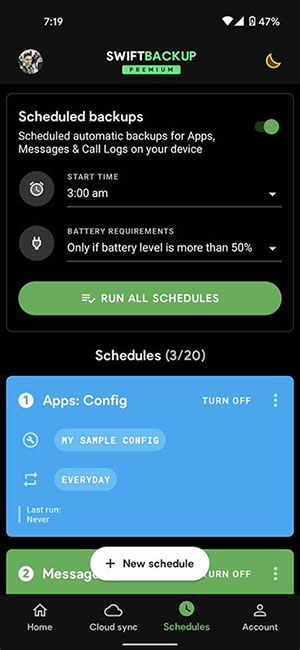
Swift Backup
As one of the best Android backup apps without root, Swift Backup runs backups of your Android phones on Google Drive, Dropbox, ownCloud, and Nextcloud, including SMS, call logs, wallpapers, contacts, etc.
To back up more data types, please root your phone. (Is my phone rooted?) And after that, you’ll be empowered to schedule backups efficiently. Further, its premium version gives you the ability to get app labels and custom backups on Cloud. Else, please note that Google Sign-in is needed for cloud backup.
- Start from $3.00 (50% off).
Download Swift Backup
Resilio Sync
Do you want to send your personal data to 3rd-party cloud storage? Try to use Resilio Sync to get your backups on a PC hard drive after hooking up your phone to the computer. This decent tool focus on automatic backup of your media files when you are running on a platform like PC/Mac/NAS/tablet. If you want more control of your phone, please turn to its premium version.
- Start at $7.00.
Download Resilio Sync
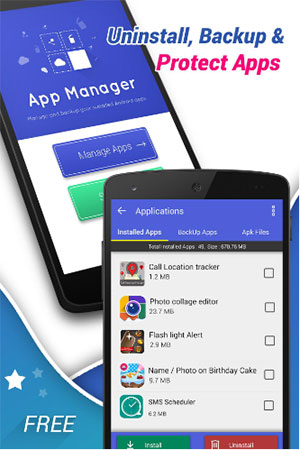
App Backup & Restore
- $19.99.
Download App Backup & Restore
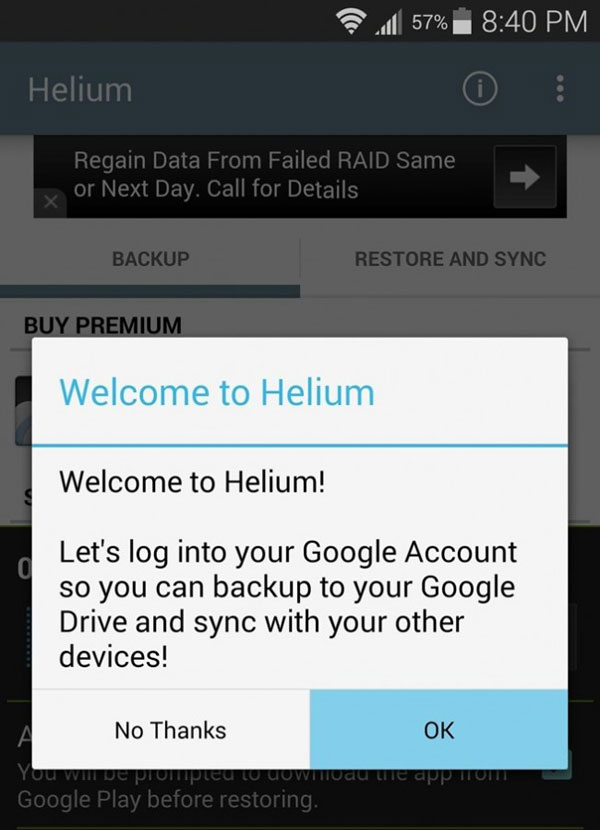
Helium
Helium centers on backing up Android devices with or without backup. You are free to perform Back up your Android phone to an SD card or to cloud storage. Unlike some other programs, it’s able to sync app data from another phone even if they aren’t within the same network. However, please note that this tool cannot work well with the app that disables ADB backup and may be incompatible with some phone brands.
- The current price is $11.59.
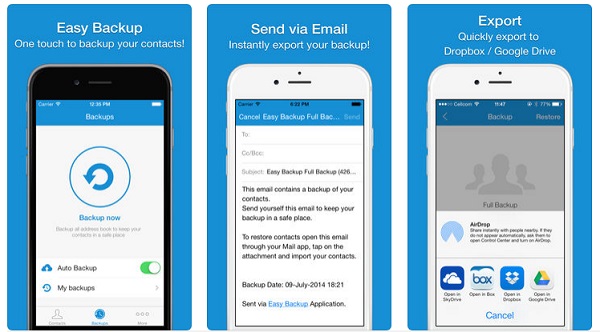
Easy Backup
If you just need to back up Android phone contacts without root, consider Easy Backup. This app focuses on making backups of contacts in .vcf, a handy contact backup & restoration extension, to cloud storage. You can do the task even without activating the Internet connection. What’s more, it makes it easy for you to swap contacts between different accounts as well.
- The current price is $18.45 (29% off)
Download Easy Backup
Calling It a Wrap
That’s all for today. Well, we just introduced the ten most recommended tools for Android backup without root. When deciding which one to choose for making copies, make sure that the programs support the data types you want since some of them can only cope with one or two. Finally, if you have any questions or find better utilities for Android backup, please let us know on the message board.
Want to Fake GPS with No Root? 6 Programs You’d Better Know
Top 5 Powerful Android Data Recovery Apps and Software of 2022
10 Best Android Phone Repair Software and Apps to Fix Android System Issues
This post has not been updated recently
Tips and Tricks
Are you thinking of flashing a custom ROM, or maybe just a mod? But before you head towards any of it, you might want to flip through this article that will show you how to backup Android devices and why you should do it.
A Backup is an accumulation of copied and archived data for restoring to the original state, in case of a data loss event.
While backing up is actually a matter of choice, but it is highly advised when it comes to performing actions like restoring stock ROMs, unlocking the bootloader, or even flashing custom ROMs. As time-consuming and boring it could be, preparing beforehand and backing up will save you from any regrets later. So let’s hit it and help you backup Android phones.
Why should you backup Android regularly? – It is always wise to take a backup before you land yourself in trouble. And by trouble, I mean “data loss”. I bet many of us are reluctant when it comes to taking regular backup of our data. Taking regular backups will safeguard you from any accidental data loss. So if you face such a scenario, you will have the tools to restore back to the original state.
So here’s an all-around tutorial to help you backup Android devices completely, from apps to complete firmware, we have got you covered. For every different type of data, we will try to provide you the most effective options to get the job done.
Table of Contents
- How to Backup Android Phone Completely
How to Backup Android Phone Completely
The first thing that you would never like to lose is your personal contacts and messages. Let us start from contacts. The best and most efficient way to backup Android contacts is to sync them with your Google account. This will also allow you to access contacts on your desktop and across all your synced devices.
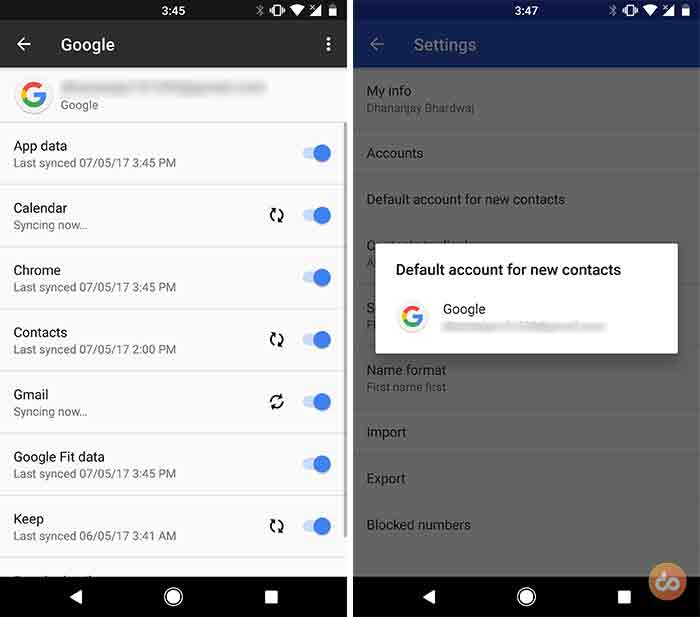
To get started you must have entered a Google account in Settings, that you would like to sync your contacts with. So, if you still haven’t done it, go to Settings > Accounts > Google and fill in your login details. Once you have done that, access the same menu again, and make sure that Contacts sync option is switched ON. All your existing contacts on your device will be pushed to Google for you to access them.
Now to make sure that your new contacts go to the same account, open the Contacts app and go to Settings. Tap on “Default account for new contacts” and select the default account.
Read – How to Customize Android Oreo Navigation Bar without root
2. SMS & Messages
Currently, there is no way to backup Android SMS by syncing them with Google. So in order to backup SMS, you have to opt for a third-party application to get the job done. I have my faith in this app called “SMS Backup & Restore”, since the last few years. You can download any similar app of your choice, but I would always recommend to use this.
Once you have it installed, launch the app and tap on “Backup”. The best part about this app is that it allows you to backup your text messages to either your Google Drive, Dropbox account, or to your local storage. Backing up to the cloud will allow you to access and restore wirelessly, even on other devices. So, if you lose your data, you will always have it preserved online.
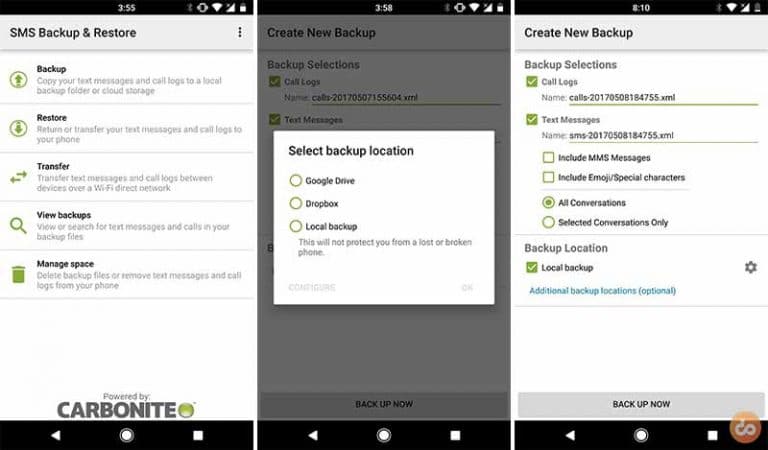
So select your preferred location. You can rename the backup files for your ease. The app also offers to backup only selected conversations, which is great. Once you have tweaked through all the available options, press the “BACK UP NOW” button to backup Android messages now.
TIP: The app also allows you to backup call logs. You can select the option while going though the backup procedure.
Now is the time for app messages, like those of WhatsApp, Telegram, etc. For those, you wouldn’t need any third-party app. Most of those offer in-app backup options and are best suitable for the situation. Read the article linked below, to know more about backing up WhatsApp messages to Google Drive.
Read: How to Backup WhatsApp Messages to Your Google Drive
3. Photos & Videos
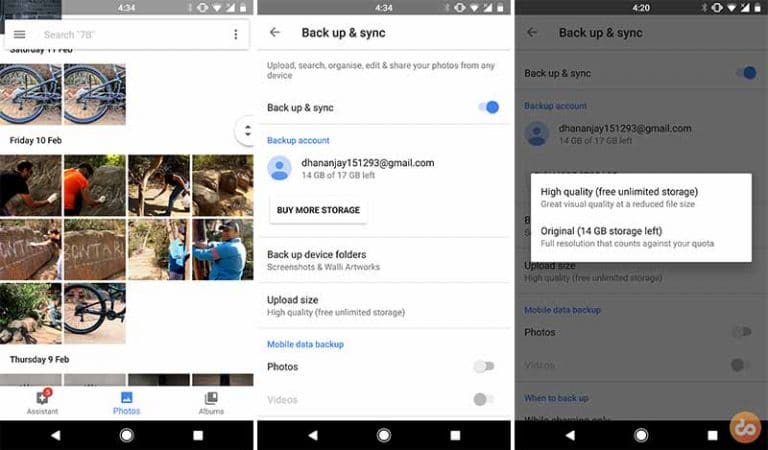
Google comes to rescue you again for this one. Google Photos enables you to backup Android photos and videos to the cloud.
However, you are only limited to back up against your allotted free storage quota, unless you choose “High Quality” as the Upload size. This will upload your media in the best possible quality for reduced file size. You still have the option to buy more storage from Google, if you’re willing to opt for original size backups.
The other way is to backup Android photos and videos is by manually copying them over to your PC. This may require a bit of effort but is worthwhile if you’re not willing to buy extra storage for your account. All you need to do is connect your device to the PC in MTP mode and manually copy the content to the PC.
Read – How to Change Android SMS Limit without Root
4. Applications and App Data
» Non-rooted
The most competent method to backup applications on your non-rooted Android is through Helium. It is an app, developed by the famous – Koushik Dutta. The idea behind the app is to provide complete application backups without any implications, such as requiring root.
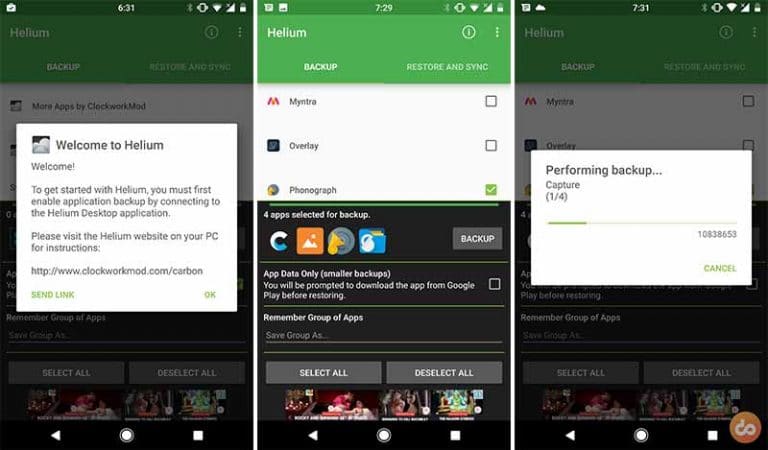
- Download the Helium app from the Google Play Store.
- Enable USB debugging on your Android.
- Next, download the Helium Desktop Installer for your OS and install it – Link
- If you’re a Windows user, it is important that you install the drivers and reboot your PC before heading further.
- Now run Helium Desktop application on the PC.
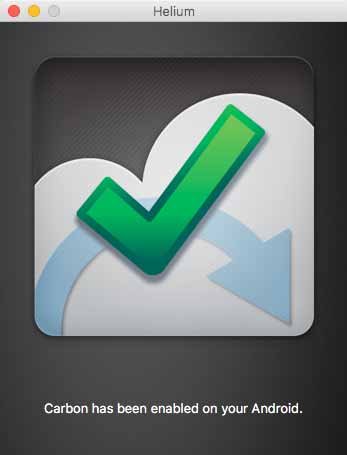
- Launch the Helium app on your Android and follow the on-screen instructions.
Note: Everytime you reboot your phone, it is required that you enable application data backup by connecting your device to the PC.
Once the process is done, you can head to the Helium app. Browse the applications in the “Backup” tab and select the ones that you want to backup. Finally, tap on BACKUP and choose the backup destination. You can either simply back up the application on the Internal storage, or add a cloud storage account (G Drive, Dropbox, and Box).
As soon as you select the destination, the process will begin. So sit back and give it the required time to backup Android apps on your non-rooted Android phone.
» Rooted Users
- Run the Titanium Backup app and grant it root permissions when prompted.
- Tap on the “Backup/Restore” tab
- In there, you will be able to scroll through all the installed and system applications present on your device.
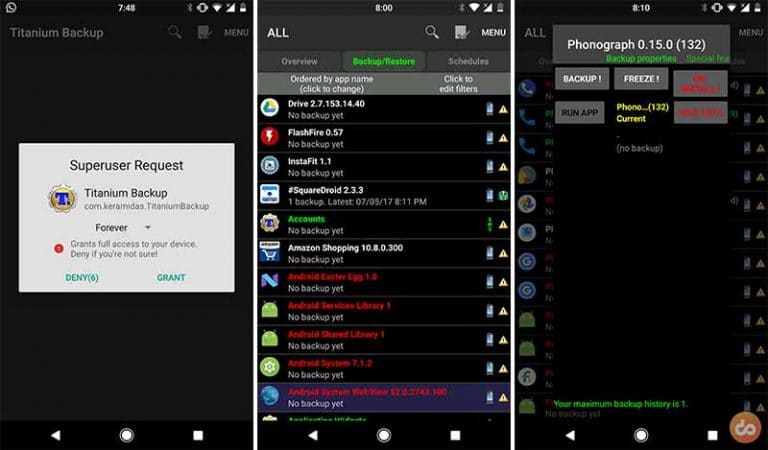
Backup Android apps and data using Titanium Backup - Select the app that you want to backup. Tap on the “BACKUP !” button.
- It will backup both the application and its complete data that is present at the moment.
Titanium backups are stored in storage > TitaniumBackup. So if you want to restore it on another device, you can always transfer the folder manually.
Read – How to Change DPI Density on Android (Root and No-Root)
5. Full ROM/Firmware Backup (Nandroid)
There’s more than one way to take backup Android ROMs completely. These full ROM backups are known as Nandroid backups and could help you restore back your complete firmware to the point where you left it.
While earlier we were only limited to using a custom recovery for this job, but now we have other ways to do it from within the OS. We will head on and demonstrate two different methods to backup Android ROMs.
» Using TWRP
Now if you’re headed to flash a custom ROM, we will presume that you already have TWRP installed. If not, you can search our website for the device-specific tutorial.
- The first step is to get into TWRP. The easiest way to it is by pressing the special buttons combination while your phone is powered down. But if you don’t know that, you can simply connect your device (You must have USB debugging enabled) to the PC and execute the following command in CMD window:
adb reboot recovery
- Tap on the “Backup” tab in the main TWRP screen.
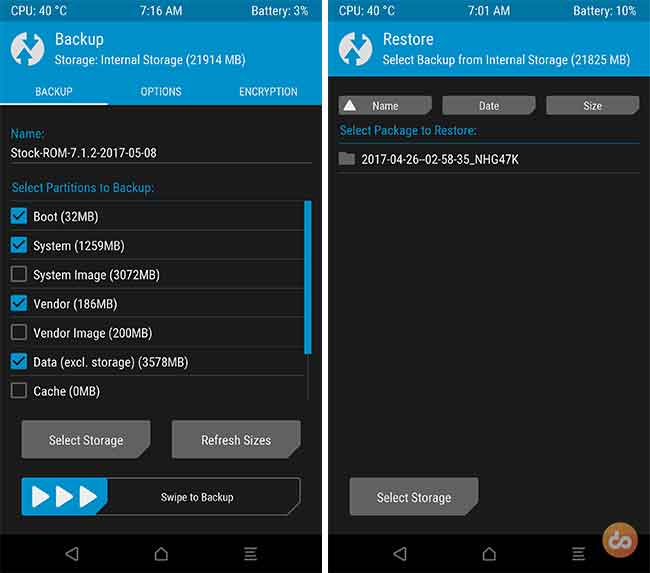
Backup Android ROM setup using TWRP recovery - Now in the backup screen, you will have the liberty to freely choose the partitions that you want to take a backup for. You can rewrite the backup name for your ease too. There are several other options like encrypting the backup and selecting the destination storage for it, which could be internal, a micro SD card, or even a USB OTG device.
- Generally, the only partitions you should check are – Boot, System, Vendor, Data, Cache, and EFS.
- Once you have selected those, you can swipe the button on the bottom of the screen to start the procedure.
TWRP backups are stored under Storage > TWRP > BACKUPS. You can manually move these backups to your PC to secure them for future purpose.
Bonus Tip: You can also backup Android ROMs over ADB. Here is the tutorial on how to do it.
» Using FlashFire App (Root users)
Backing up the ROM/Firmware from within the OS make things more efficient and easily accessible.
- The first step, of course, is to download and install the FlashFire app on your device: Get Flashfire on Google Play Store
- Launch the app once it is installed. You will be prompted to grant root permissions, so make sure that you do that or else it won’t work.
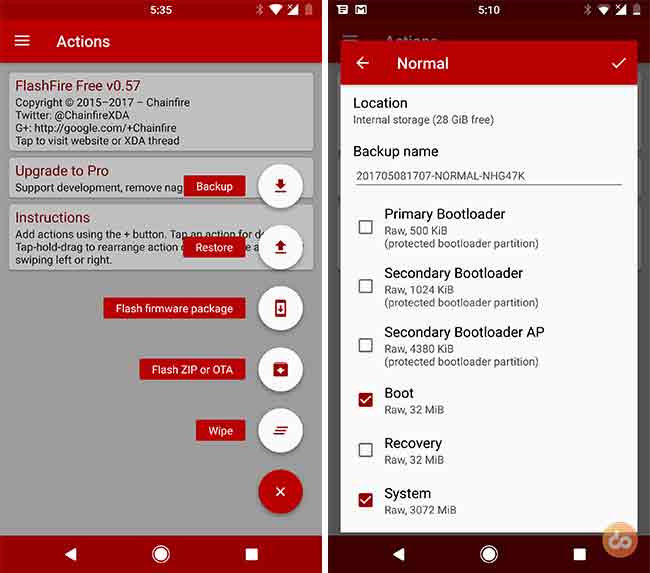
Backup Android ROM using Flashfire app - In the “Actions” menu, you will need to tap on the “+” icon on the bottom right and select “Backup”.
- For the backup type, you will have to select “Normal”. It includes all the regular partitions like Vendor, Boot, System, Data, and also the internal storage (You can deselect it if you don’t need it).
- Finally, you can rename the backup file and hit the checkmark icon on the top-right to start the backup process and backup Android ROM from directly within the OS.
Your device might show a black screen during this process, so don’t worry and make yourself a coffee until the backup’s complete and your phone boots back.
Read – How to Factory Reset OnePlus 5
6. All Other Files on the Storage
The last, yet not the least. One of the most important things is to backup Android device’s storage, which contains all your data and files. The best way to preserve the rest of the files on your storage is to manually back them up to your PC. You just need to connect your device in MTP mode and copy over all the files that you think are essential.
Yes, there are several tools out there that could help you backup Android device storage, but they will offer the same thing, just within the software’s UI. These toolkits can sometimes be unreliable. So, we recommend that you do not waste your time on those and carry out this process manually.
")


")