
It’s a good idea to change your passwords regularly and consider using enterprise password management software.
This guide will help you change your Linux root password in Ubuntu or CentOS, or reset the password.
- A computer running Linux
- Command-line interface (terminal)
- Introduction
- Prerequisites
- Reset Forgotten Root Password in RHEL/CentOS & Fedora
- Method-1: Resetting root password by booting into Single User Mode
- Final Thoughts
- Reset Forgotten root Password in CentOS 8
- Сброс пароля пользователя root на CentOS 8 / RHEL 8
- Share
- Changing Your Root Password in Ubuntu
- Step 1: Open a Terminal Window
- Step 2: Change Your Root Password
- Changing the Root Password in CentOS
- Step 1: Access the Command Line (Terminal)
- Step 2: Change the Password
- Step 1: Access Boot Menu
- Step 2: Edit Boot Options
- Step 3: Remount the Drive
- Step 4: Changing the Password
- Step 5: Restart
- Suggested Articles
- How to reset root password on Ubuntu 16.04 Cloud Server
- How to reset the root password on Ubuntu 16.04 on a dedicated server
- How to reset root password on Ubuntu 16.04 Cloud Server
- How to reset the root password on Ubuntu 16.04 on a dedicated server
- Resetting root password of RHEL/CentOS 6x or 7x
- Step 1: Reboot your server
- Step 2: Stop the automatic booting
- CentOS/RHEL 6.x
- CentOS/RHEL 7.x
- Step 3: Select the desired kernel to edit
- CentOS/RHEL 6.x
- CentOS/RHEL 7.x
- Step 4: Edit the desired kernel
- CentOS/RHEL 6x
- CentOS or RHEL 7x:
- Step 5: Reset root password and reboot
- CentOS/RHEL 6.x
- CentOS/RHEL 7.3
- Summary
- Resetting a Root Password in Ubuntu
- Step 1: Boot to Recovery Mode
- Step 2: Drop Out to Root Shell
- Step 3: Remount the File System with Write-Permissions
- Step 4: Change the Password
Introduction
Time Require: Less than 5 minutes
Prerequisites
- A server with CentOS or RHEL 6x or 7x installed
- You must have access to boot-loader screen (The black screen comes before operating system starts booting)
We’ve used 2 VPS for Demonstration. A locally hosted VPS in Oracle Virtual Box with CentOS 6.8 final and a remote VPS with VNC console access with CentOS 7.3 installed.
This article will guide you through simple steps to reset forgotten root password in RHEL-based Linux distributions such as CentOS 8 and Fedora 35/34.
Reset Forgotten Root Password in RHEL/CentOS & Fedora
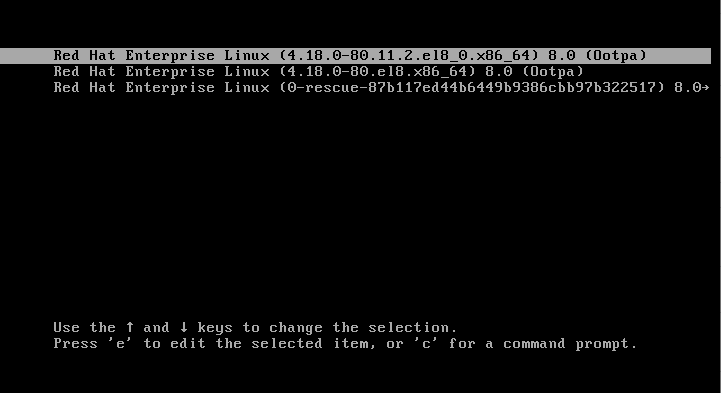
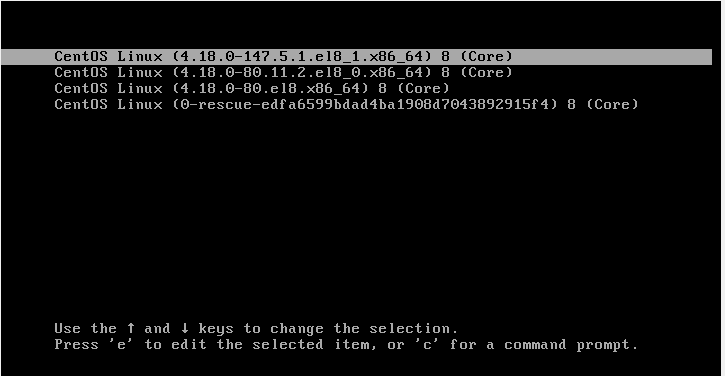
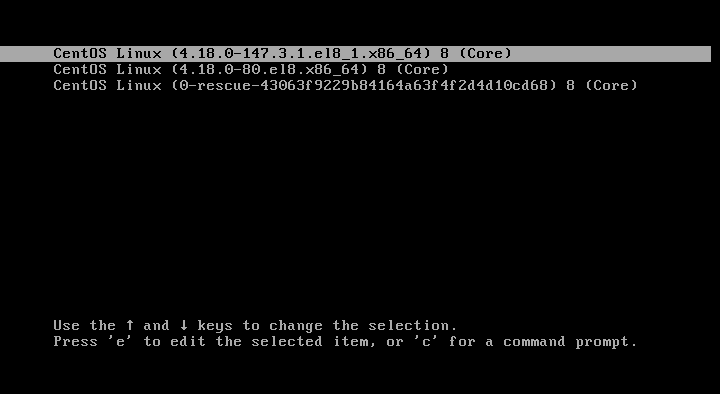
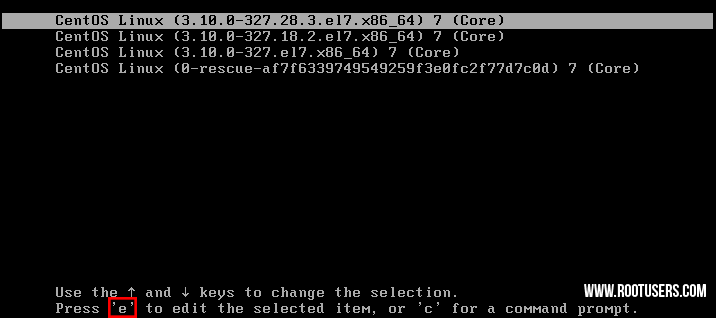
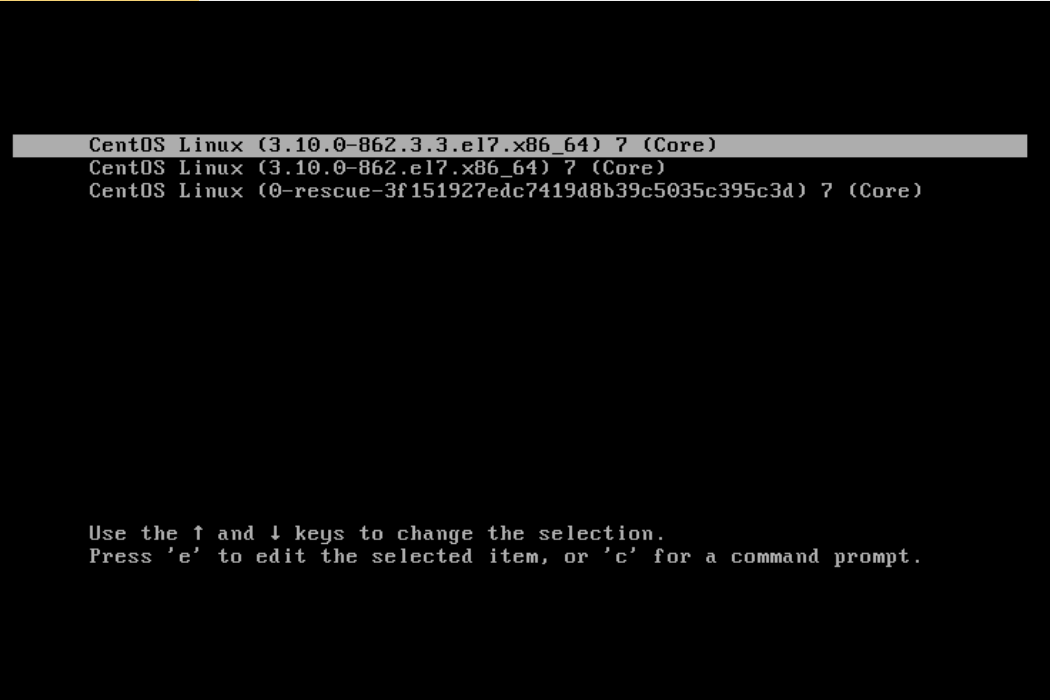
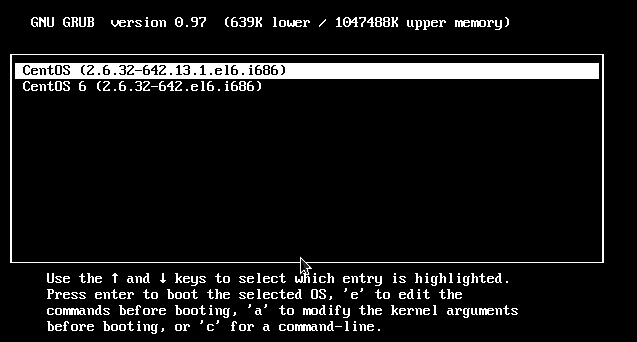
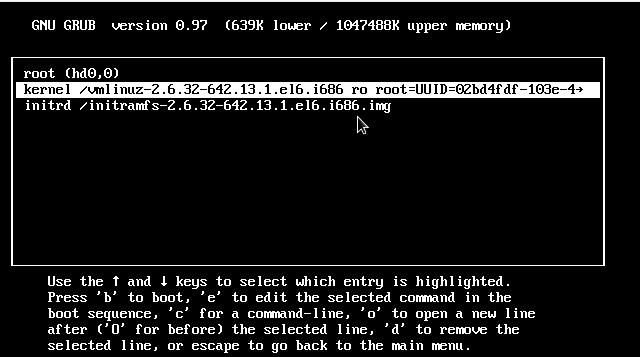
First, restart your system, and at the boot grub menu choose the kernel (mostly the first option) you wish to boot into and press the key 'e' on your keyboard.
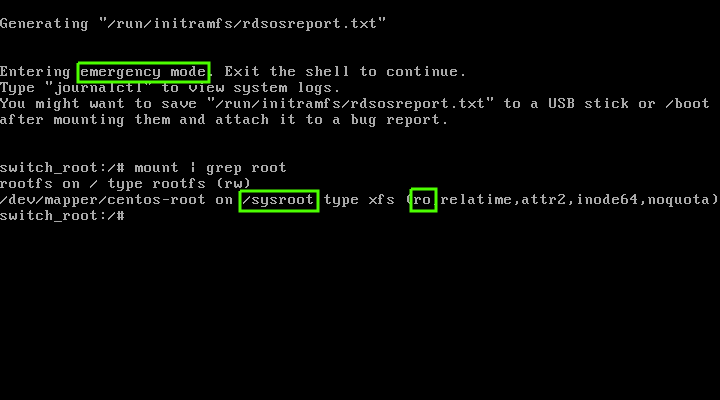
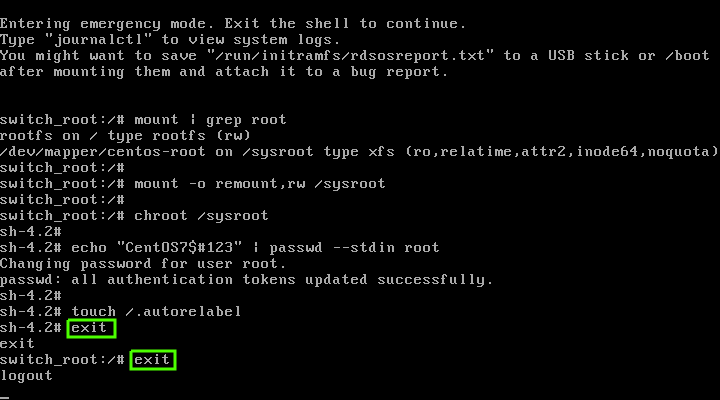
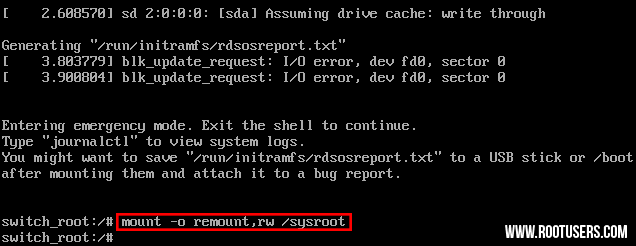
On the next screen, you will land into emergency mode, here press Enter key to get into the shell prompt. Now, make sure to confirm that you remount the sysroot directory with read and write permissions. By default, it is mounted with read-only mode indicated as ro.
# mount | grep sysroot
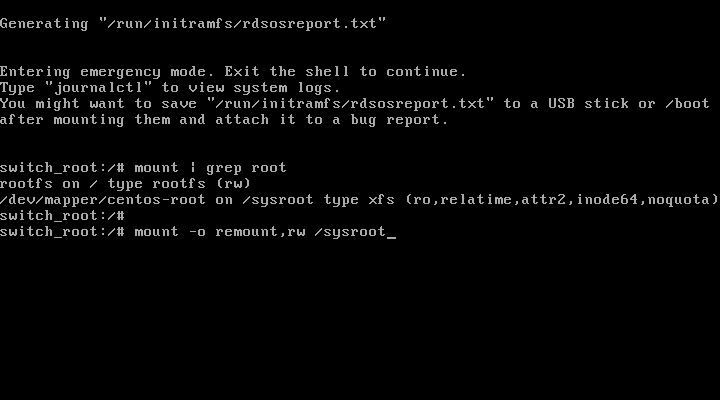
Now remount the sysroot directory with read and write permissions and confirm the permissions again. Note that this time, the permissions have changed from ro (read-only) to rw (read and write) as shown.
# mount -o remount,rw /sysroot/
# mount | grep sysroot

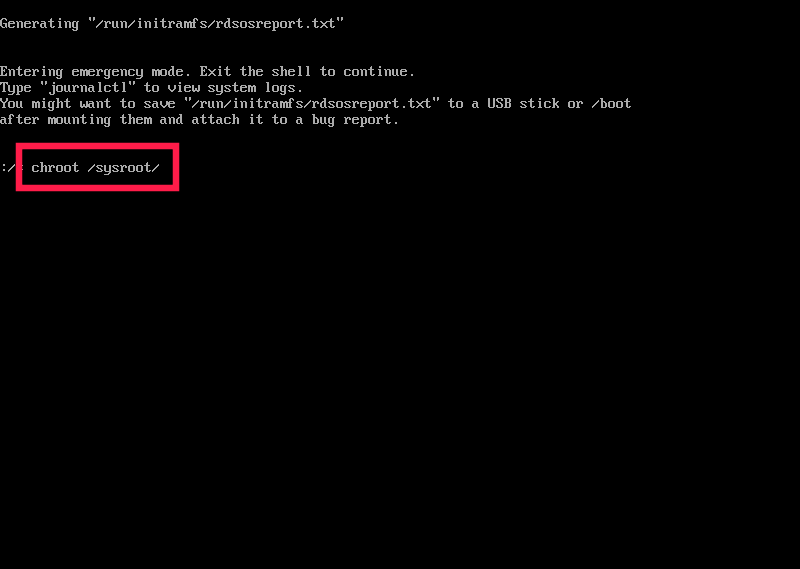
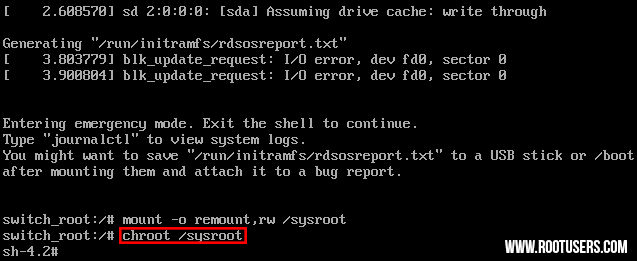
# chroot /sysroot
Next, use the passwd command to reset the root password with the new password and confirm it.
# passwd

# touch /.autorelabel

Finally, type exit and then log out to start the SELinux relabelling process.
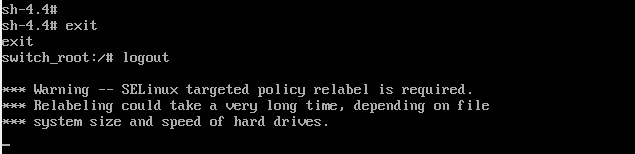
And that’s how you would reset a forgotten root password in RHEL/CentOS 8 and Fedora 35/34 Linux distributions.
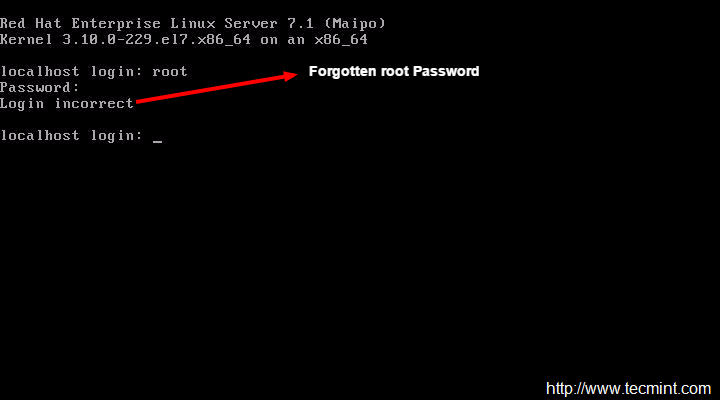
Have you forgot your root password for RHEL 7 and CentOS 7 systems? Want to reset a forgotten root password? If so, don’t worry, we are here to help you.
Please note that this procedure must be performed from a console session and can’t be accomplished over any SSH remote session, so make sure that you have console access in order to reset the password on RHEL 7 Linux and CentOS 7 Linux.
Method-1: Resetting root password by booting into Single User Mode
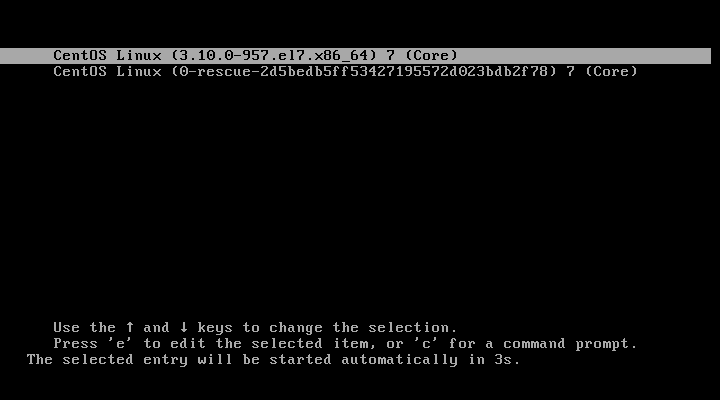
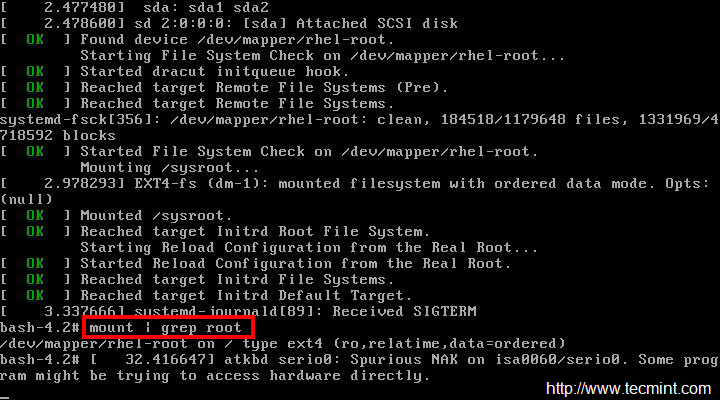
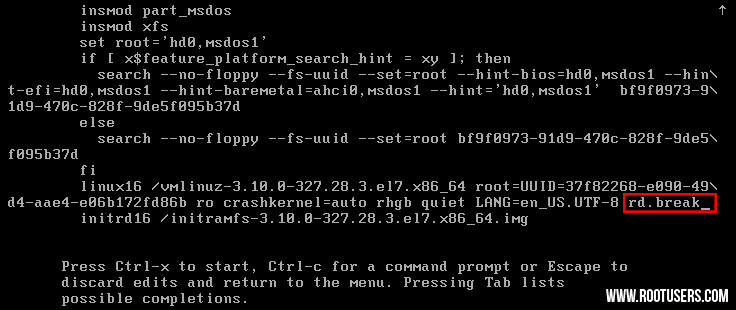
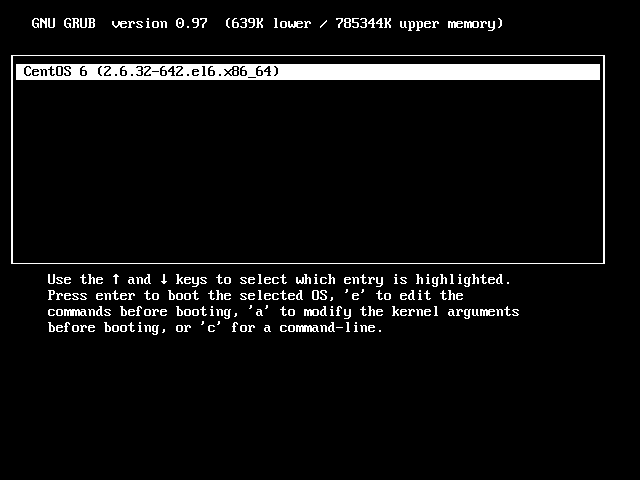
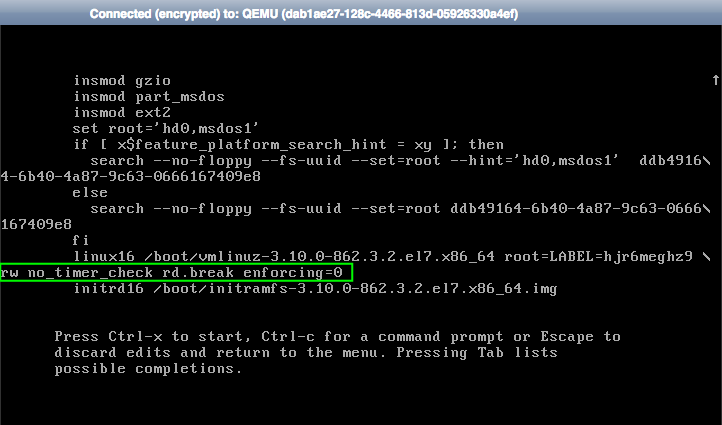
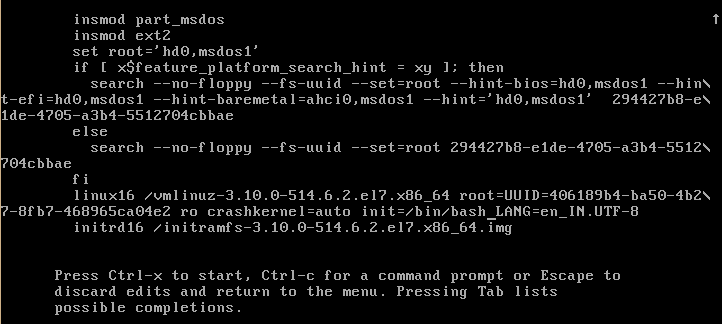
Step-1: Reboot your system and interrupt the 'GRUB 2' boot screen by hitting 'e' key.
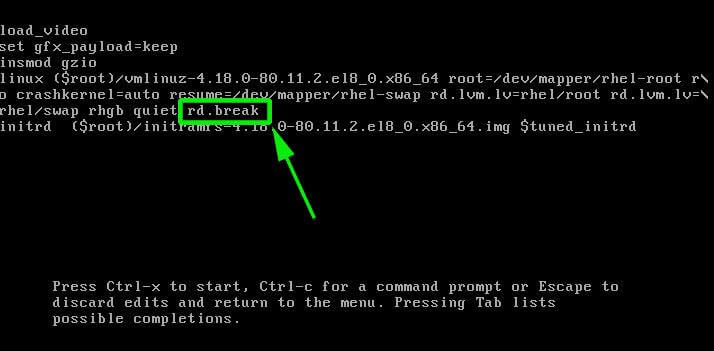
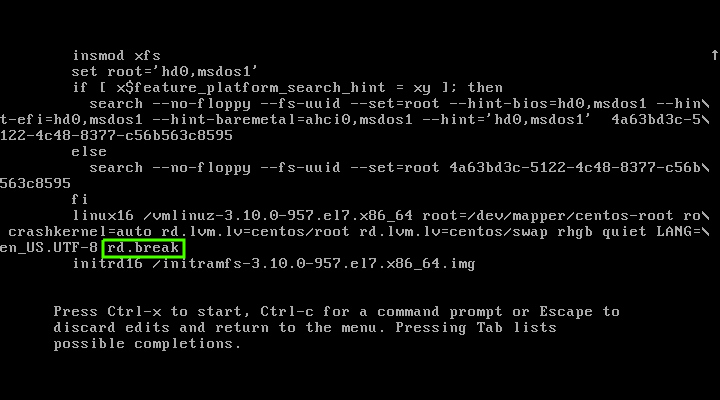
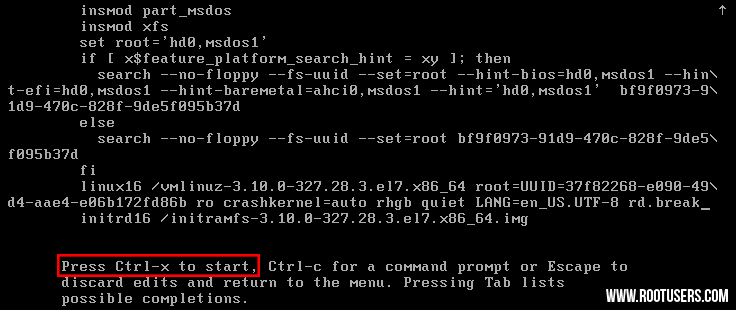
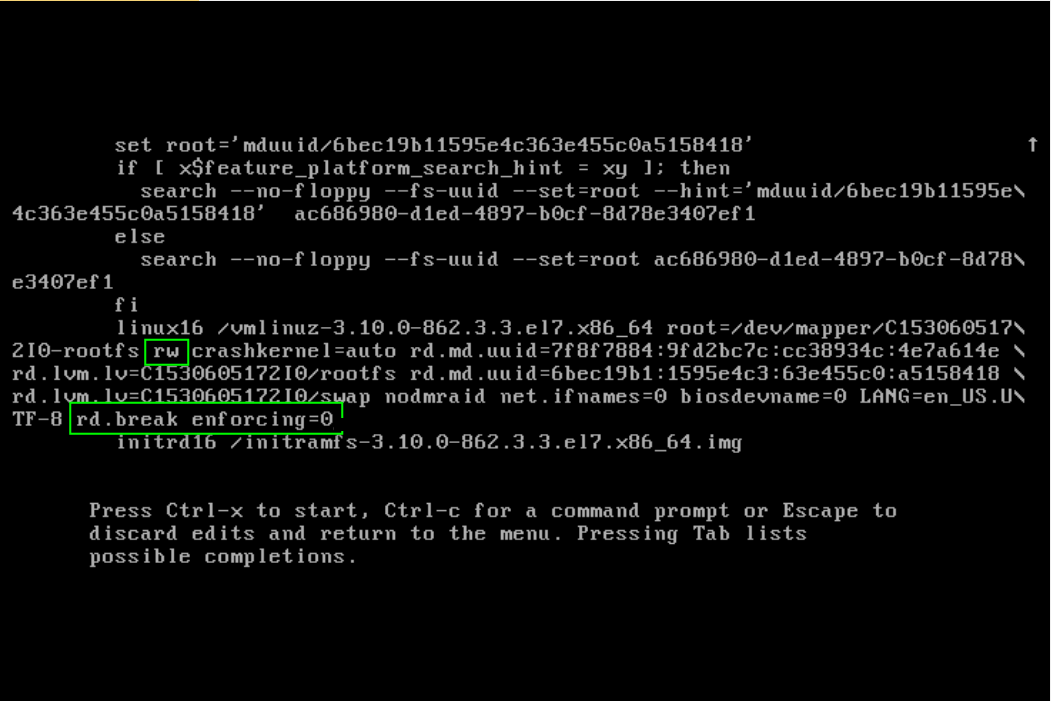
Step-2: The kernel boot parameters appear. Find the word 'linux16' and add ‘rd.break’ at the end of the line, then press 'Ctrl+x' to boot the system with the changed parameters.
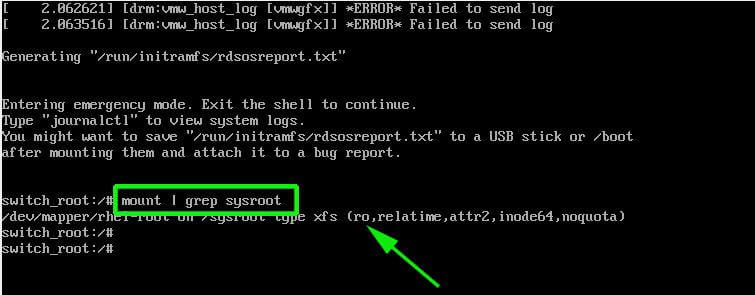
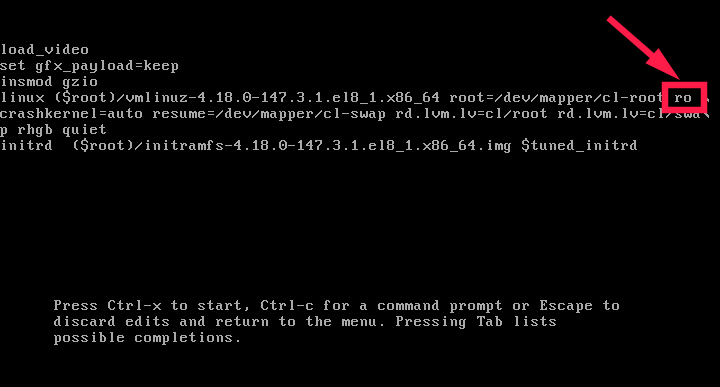
Step-3: By default, the root filesystem will be mounted in ‘Read only (RO)’ mode in the ‘/sysroot’ directory. You can verify this by running the below command.
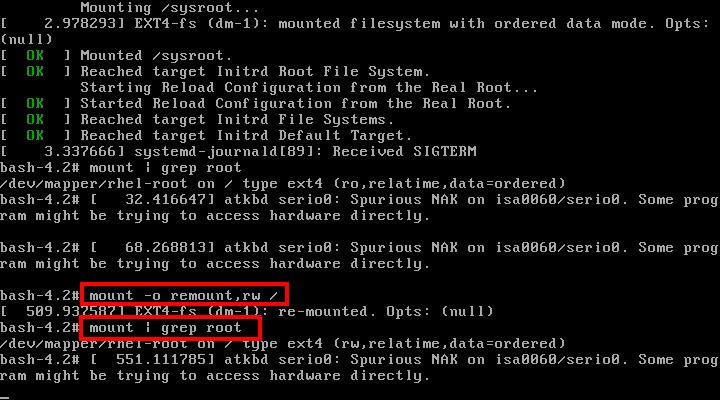
# mount | grep root
# mount -o remount,rw /sysroot
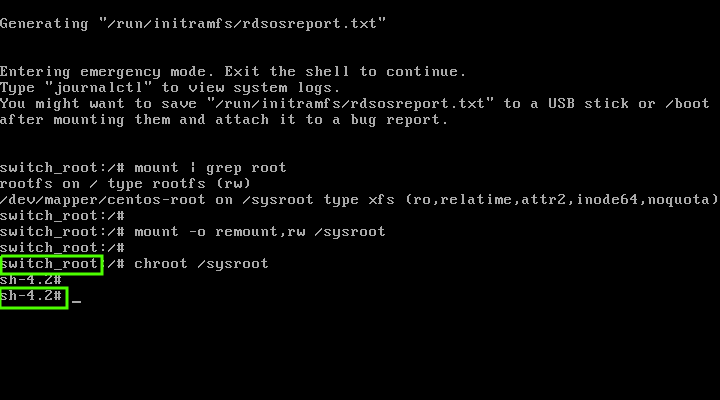
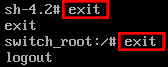
Step-5: Your file system is currently mounted as a temporary partition, which is why ‘switch_root:/#’ is displayed on the shell prompt.
# chroot /sysroot
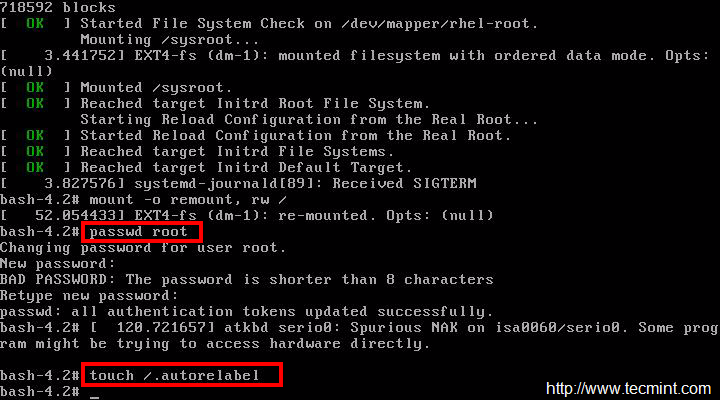
Step-6: You can now reset the root password using the passwd command as shown below:
# echo "CentOS7$#123" | passwd --stdin root
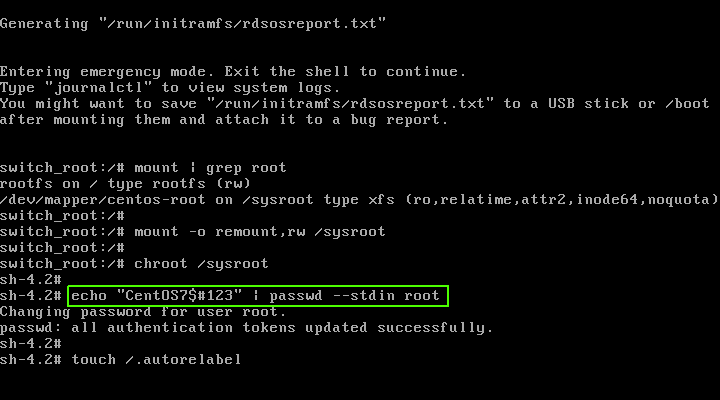
It allow us to fix the context of the /etc/shadow file.
# touch /.autorelabel

Step-8: Issue 'exit' command twice to exit from the chroot environment and reboot the system.
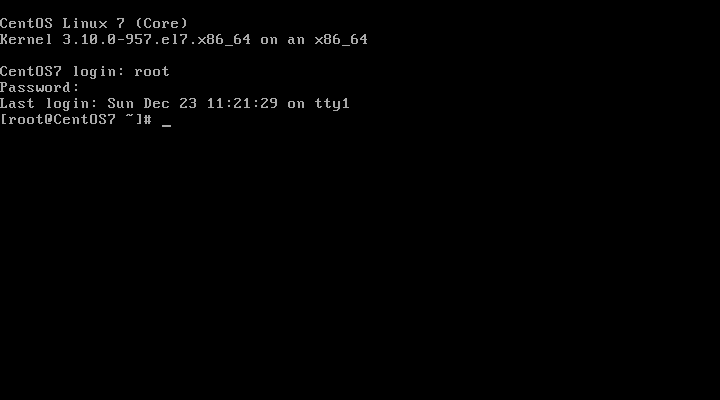
Step-9: Now you can login to your system with your new root password.
Final Thoughts
If you have any questions or feedback, feel free to comment below.
Read Also: How to Set Up Automatic Updates for CentOS 8 and How to Reset Forgotten Root Password in RHEL 8
Reset Forgotten root Password in CentOS 8
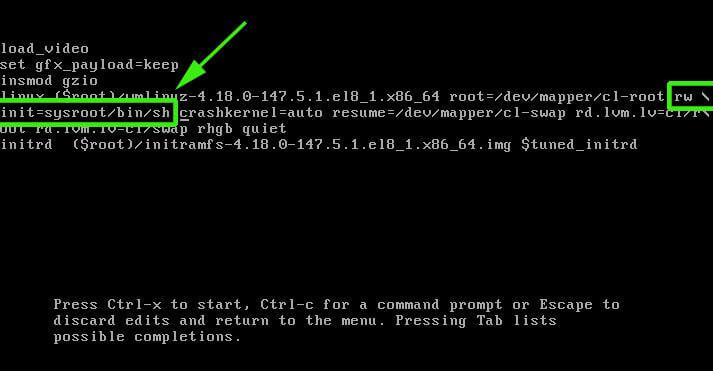
First, reboot or power on your CentOS 8 system. Select the kernel you want to boot into. Next, press ‘e’ on the keyboard to interrupt the boot process and make changes.
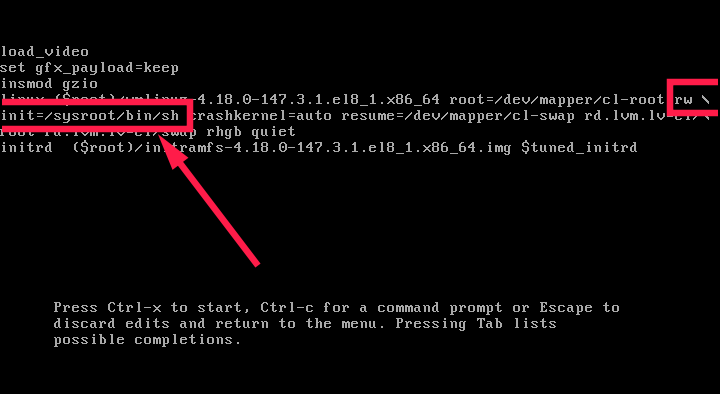
On the next screen, locate the ro (read-only) kernel parameter as highlighted below.
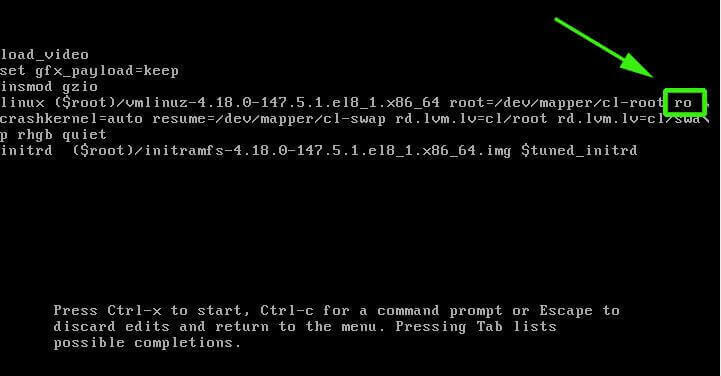
Replace the kernel parameter ro with rw and append an extra kernel parameter init=/sysroot/bin/sh. In a nutshell, simply replace the kernel parameter ro with rw init=/sysroot/bin/sh.
Next, run the command below to mount the root file system in read and write mode.
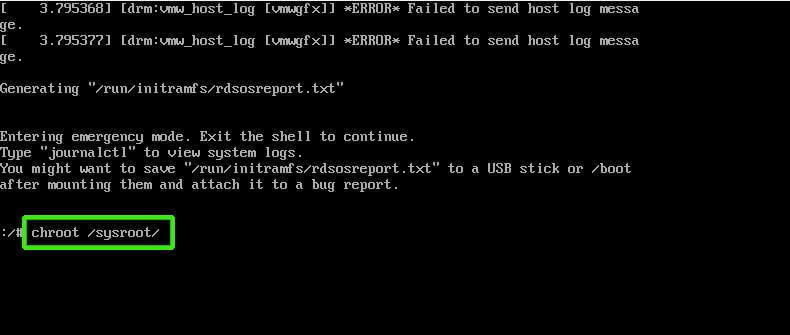
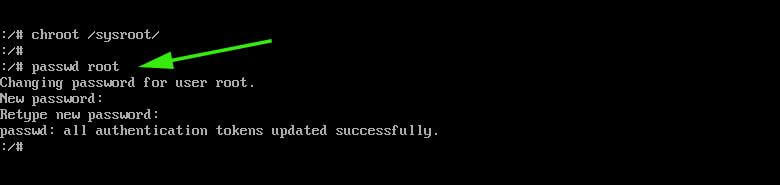
:/# chroot /sysroot
You can now change the root password by executing the command:
:/# passwd root
Provide a new root password and confirm it. For best practice select a password with a combination of uppercase, lowercase, numerical and special characters to boost password strength.
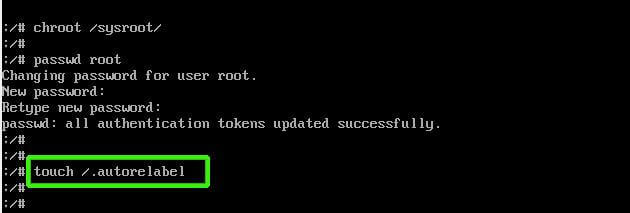
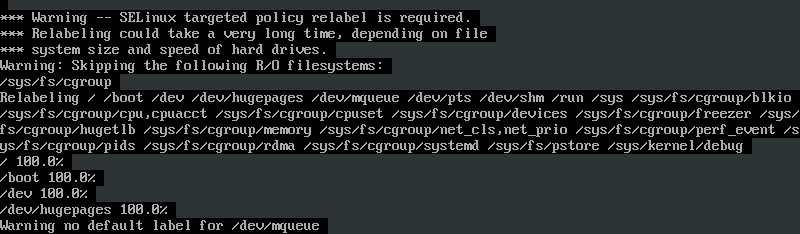
Next, run the command below to enable SELinux relabelling.
:/# touch /.autorelabel
To apply the changes, exit and reboot the CentOS 8 system.
:/# exit
:/# reboot
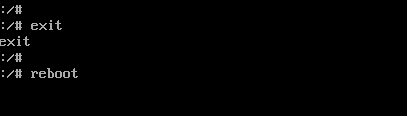
Upon reboot, the SELinux relabelling process will commence. Give it about 3 minutes.
We hope this tutorial will be beneficial to you. Feel free to weigh in your feedback if you are stuck.
Well here is the guide which will take you out of any such situation if you ever get into it. Here in this article we will be taking you to the journey of resetting your RHEL 7 and CentOS 7 root password.
This very morning I turned my RHEL 7 Linux server to find out that it has been locked. Either I messed up with password I changed last night or I have really forgotten it.
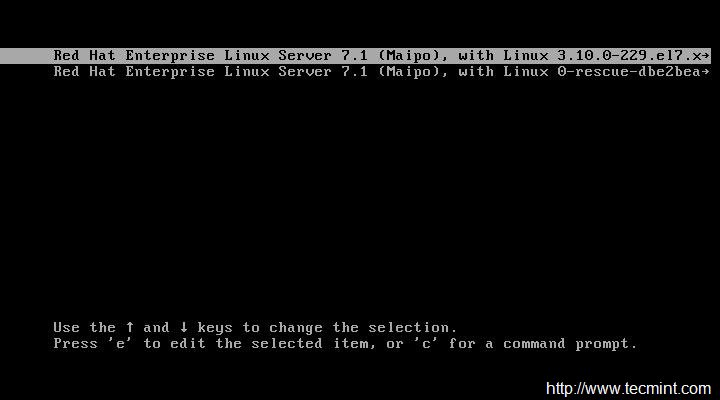
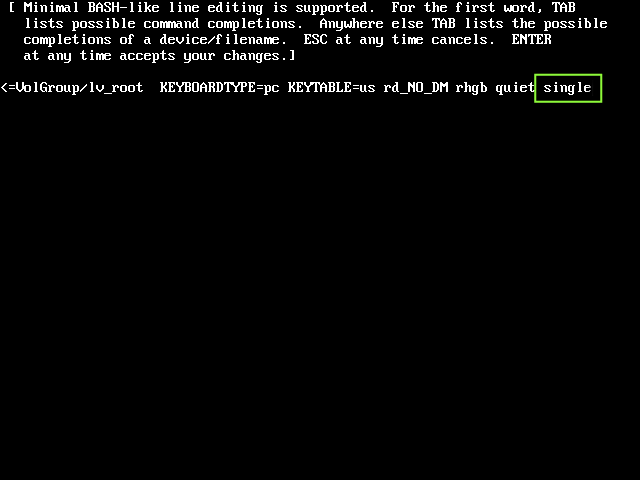
After you press 'e' from keyboard you would see a lot of text which may be clipped as per the size of your screen.
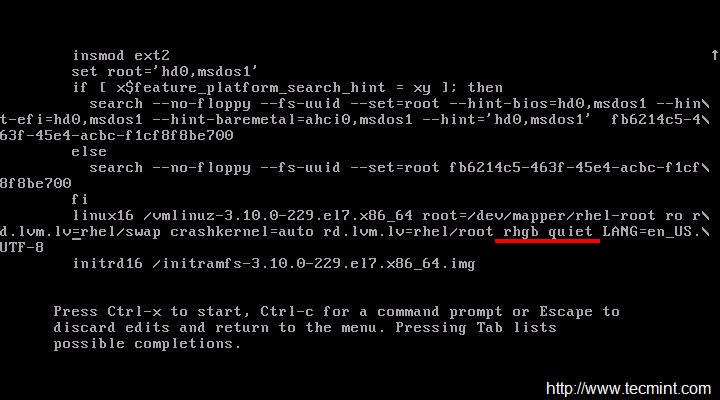
Search for the text “rhgb quiet” and replace it with “init=/bin/bash” without quotes.
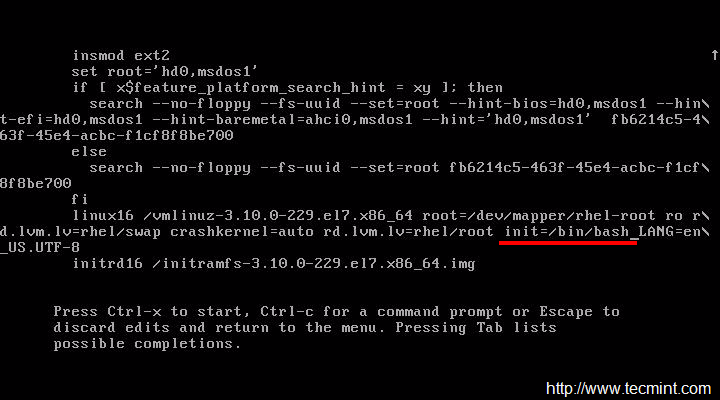
Once done editing press 'ctrl+x' and it will start booting with specified parameter. And you will get bash prompt.
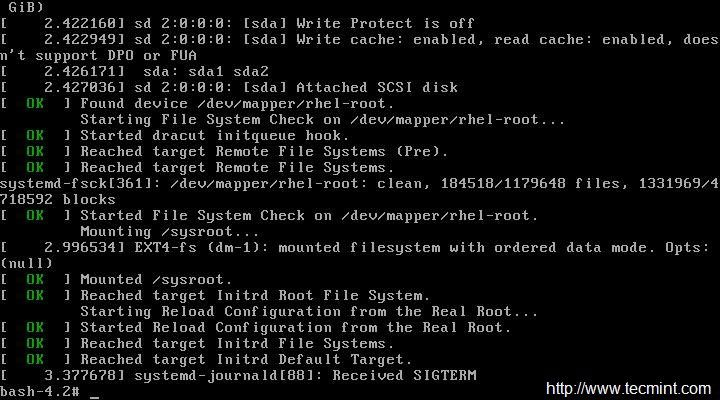
# mount | grep root
You may notice that root partition is reported to be 'ro' (Read Only). We need to have read-write permission on root partition to change the root password.
# mount -o remount,rw /
Also cross check, if the root partition is mounted with read-write permission mode.
# mount | grep root
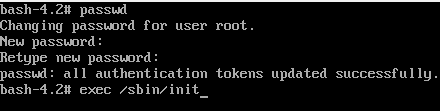
Now you can change the root password by typing the passwd command. But that is not done. We need to relabel SELinux context. If we skip relabeling the whole SELinux context we would be able to login using using password.
# passwd root
[Enter New Password]
[Re-enter New Password]
# touch /.autorelabel
Reboot and login again to root account and see if everything works ok or not?
# exec /sbin/init
В этом кратком руководстве объясняется, как сбросить пароль пользователя Root на серверах CentOS 8 и RHEL 8.
Этот быстрый совет будет полезен, если вы забыли пароль пользователя root и хотите восстановить его без каких-либо дополнительных инструментов восстановления.
Если сервер размещен где-то еще, вам может понадобиться помощь вашего хостинг-провайдера.
Сброс пароля пользователя root на CentOS 8 / RHEL 8
Я проверил это руководство на сервере CentOS 8, однако оно также должно работать и на сервере RHEL 8.
Включите сервер CentOS.
Когда появится загрузочное меню GRUB, выберите версию ядра, которую вы хотите загрузить, и нажмите e, чтобы отредактировать выбранную загрузочную запись.
На следующем экране вы увидите параметры загрузки ядра.
Найдите параметр ядра ro:
Проще говоря, замените параметр «ro» на «rw init=/sysroot/bin/sh».
В аварийном режиме введите следующую команду для монтирования корневой файловой системы (/) в режиме чтения/записи.
Теперь измените пароль пользователя root с помощью команды:
passwd root
Введите пароль дважды.
Я рекомендую вам использовать любой надежный пароль, который содержит цифры и специальные символы.
После обновления пароля root введите следующую команду, чтобы включить перемаркировку SELinux при перезагрузке:
touch /.autorelabel
Наконец, введите следующие команды, чтобы применить изменения и перезагрузить сервер CentOS в обычном режиме:
exit
reboot
Дождитесь завершения процесса перемаркировки SELinux.
Это займет некоторое время в зависимости от размера файловой системы и скорости вашего жесткого диска.
Пожалуйста, не спамьте и никого не оскорбляйте.
Это поле для комментариев, а не спамбокс.
Рекламные ссылки не индексируются!
Posted by
on September 14, 2016
Normally resetting the root password is a simple task if you’re logged in already with root privileges, however if you forget the password and need to change it things become a little more difficult.
This is also a task that you will need to know how to perform for the RHCSA exam.
This procedure will be completed in the console of the Linux system, so be sure that you have access to this prior to beginning. As with all system maintenance tasks, be sure you have a system backup/snapshot prior to proceeding.
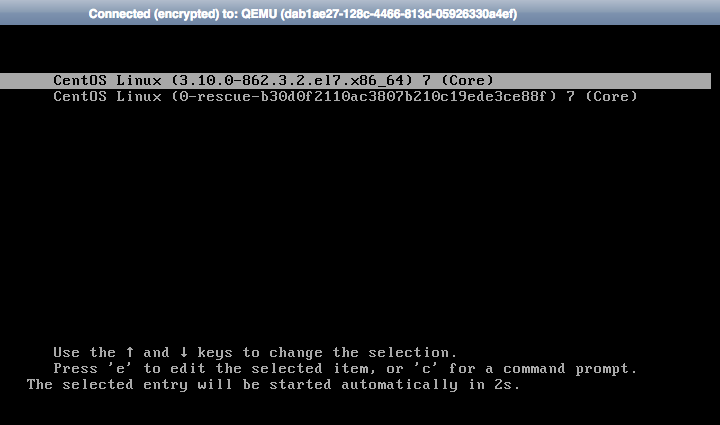
- If your Linux system is currently running, reboot it. If it is not yet running, start it up. At the boot menu, press the ‘e’ key to edit the first boot entry.
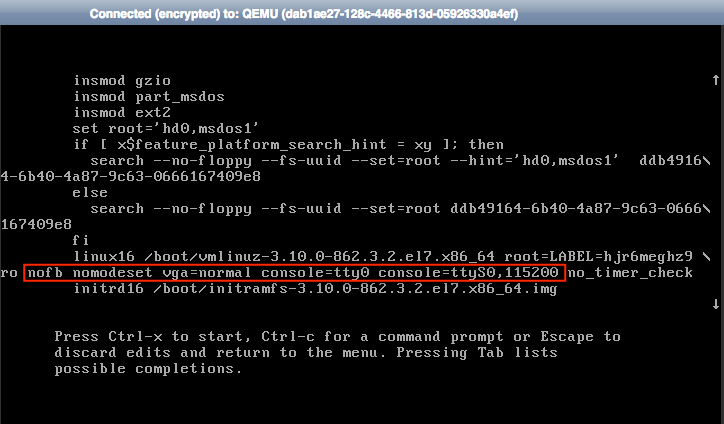
- From the grub options, find the line that starts with “linux16” and go to the end of it. Enter ‘rd.break’ without quotes at the end of this line, as shown below.
- Press “Ctrl+x” to boot with these options. This will boot to the initramfs prompt with a root shell.
- At this stage, the root file system is mounted in read only mode to /sysroot and must be remounted with read/write (rw) permissions in order for us to actually make any changes. This is done with the ‘mount -o remount,rw /sysroot’ command.
- Once the file system has been remounted, change into a chroot jail so that /sysroot is used as the root of the file system. This is required so that any further commands we run will be in regards to /sysroot. This is done by running ‘chroot /sysroot’.
- From here the root password can be reset with the ‘passwd’ command.

- If you’re not using SELinux, you could reboot at this point and everything would be fine, however by default CentOS/RHEL 7 use SELinux in enforcing mode, so we need to fix the context of the /etc/shadow file. This is because when the ‘passwd’ command is run, it creates a new /etc/shadow file. As SELinux is not running in this mode the file is created with no SELinux contexts, which can cause problems when we reboot. Create the /.autorelabel command using ‘touch’.

Creating this file will automatically perform a relabel of all files on next boot. Note that this may take some time depending on the amount of files you have on the file system. For a plain vanilla CentOS 7 server, it takes me about 2 minutes to complete.
- Enter the ‘exit’ command twice, the first one will exit the chroot jail environment while the second will exit the initramfs root shell and reboot the system.
Once the reboot has completed you will be able to use the root account with your newly set password.
- Password reset algorithm at a glance
- 1. Accessing VNC console
- 2. Restarting the server and editing kernel boot parameters
- 2.1. CentOS 6, Dedicated server
- 2.2. CentOS 6, Cloud server
- 2.3. CentOS 7, Dedicated server
- 2.3. CentOS 7, Cloud server
- 3. Setting a new root password
- 3.1 CentOS 6
- 3.2 CentOS 7
If you have lost the root password of your server, this article will help.
Password reset algorithm at a glance
Access the VNC console
Set a new root password without the old password required
1. Accessing VNC console
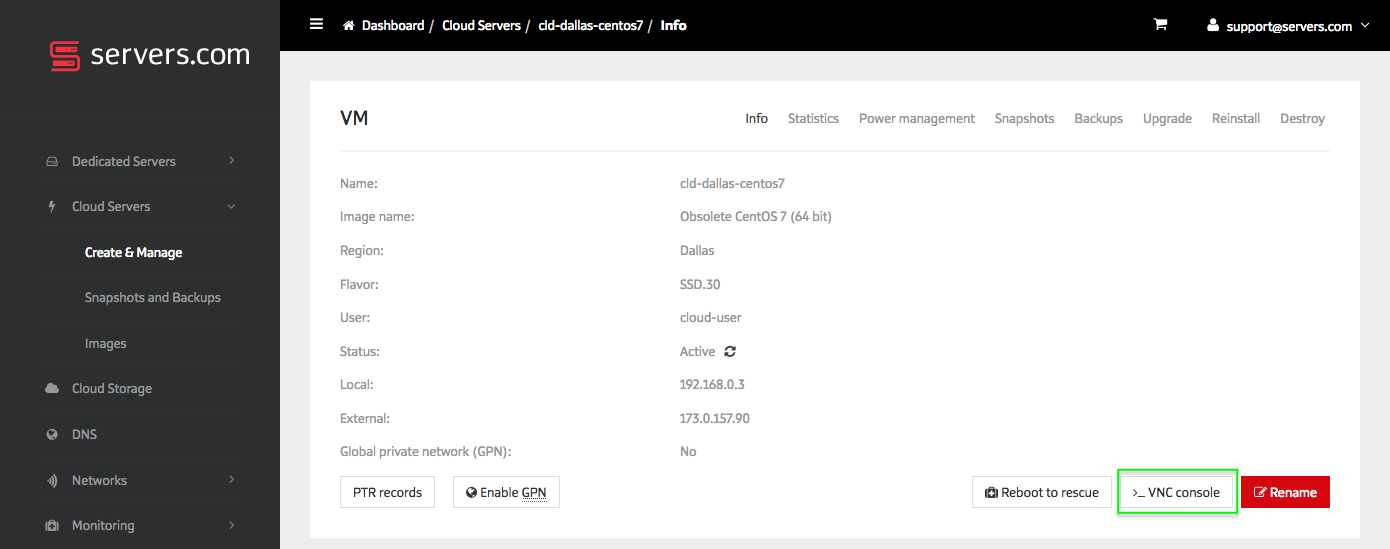
This step is the same for all varieties of Linux. For a cloud server, find your server in the «Cloud Servers > Create and Manage» section of the Customer Portal. For a dedicated server, look in the «Dedicated Servers > Create and Manage», respectively. Open VNC Console using the button of the same name:
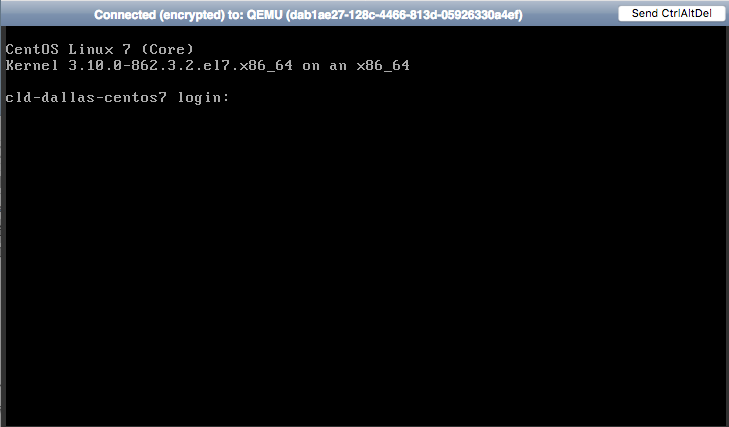
Look of VNC Console window may vary depending on the server type and OS.
2. Restarting the server and editing kernel boot parameters
2.1. CentOS 6, Dedicated server
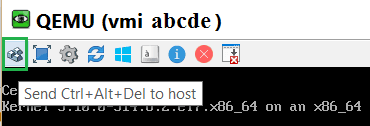
Restart the server by pressing CTRL + ALT + DEL in the VNC Console window.
After the BIOS menu, before the OS starts, a timer appears. Press ESC to stop the timer and access the GRUB boot menu.
Use the ↓ and ↑ keys to navigate through the menu. Select your boot line and press «e» to edit it.
Select the line that starts with «kernel /vmlinuz- «. Press «e» to edit it.

Add the «single» parameter after the space at the end of the line.
Proceed to the «Setting a new root password» section of this article.
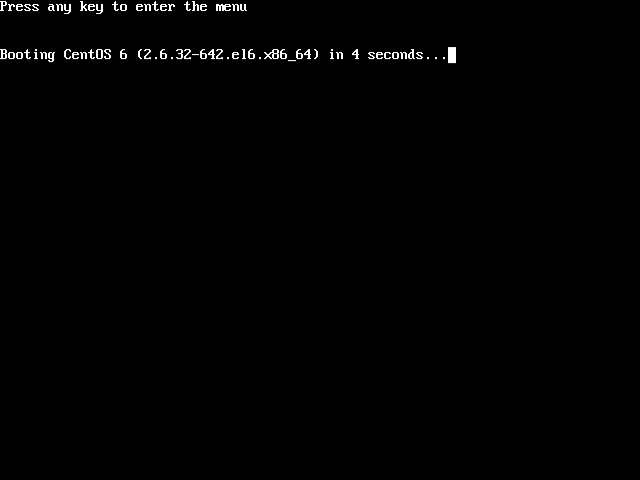
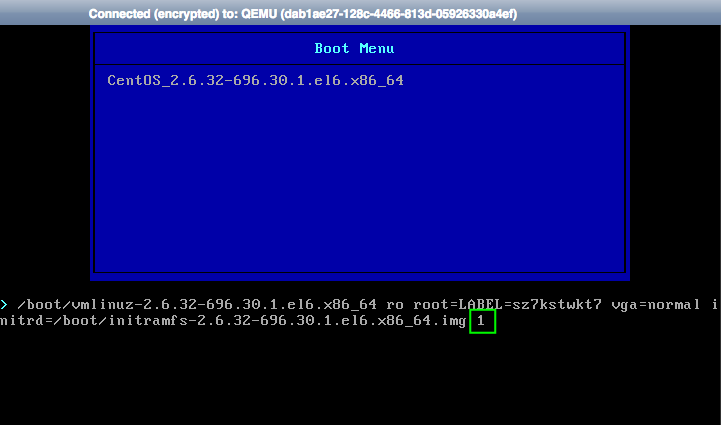
2.2. CentOS 6, Cloud server
Restart the server using «Send CtrlAltDel» button in the VNC Console window. While restarting, the boot menu with a timer will appear right after the BIOS menu.
Press TAB to stop the timer and edit the boot menu. Changes will persist until next boot.

Remove the parameters highlighted in red on the picture below. Add «1» (without surrounding quotes and with a leading space) at the end of the string.
2.3. CentOS 7, Dedicated server
Restart the server by pressing CTRL + ALT + DEL in the VNC console. After the BIOS menu, before the OS starts, GRUB menu appears.
Use the ↓ and ↑ keys to navigate through the menu, select your boot line and press «e» to edit it.
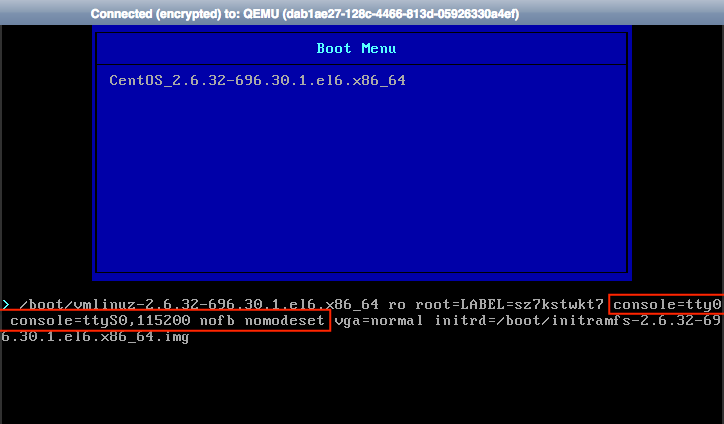
Scroll to the line that starts with «linux» in 64-Bit IBM Power Series or «linux16» in x86-64 BIOS-based systems, or «linuxefi» in the UEFI systems. Change the «ro» parameter to «rw», delete «rhgb» and «quiet» parameters; add «rd.break enforcing=0» at the end of the line.

2.3. CentOS 7, Cloud server
Restart the server using «Send CtrlAltDel» button in the VNC Console window. After the BIOS menu, before the OS starts, GRUB menu appears.
Use the ↓ and ↑ keys to navigate through the menu, select your boot line and press «e» to edit it.
Scroll to the line that starts with «linux» in 64-Bit IBM Power Series, «linux16» in x86-64 BIOS-based systems, «linuxefi» in the UEFI systems.
Change the «ro» parameter to «rw», remove the parameters highlighted in red on the picture below.
3. Setting a new root password
3.1 CentOS 6
passwd root reboot3.2 CentOS 7
chroot /sysroot passwd root touch /.autorelabel exit rebootShare

Существуют
различные способы сброса пароля root:
— Загрузка в однопользовательском режиме.
— Используя загрузочный диск отредактировать файл passwd .
— Смонтировать диск в другую систему и изменить файл passwd .
1) Сброс
пароля с помощью загрузки в однопользовательском режиме.
Сброс
пароля root в CentOS 7 и RHEL 7
В
однопользовательском режиме система запускает однопользовательскую оболочку, в
которой вы можете запускать команды без каких-либо учетных данных (имя
пользователя и пароль), вы попадаете прямо в ограниченную оболочку с доступом
ко всей файловой системе.
В
CentOS 7 и RHEL 7 порядок получения доступа к системе во время процесса
загрузки и изменения пароля root изменился из-за принятия Systemd.

В
начале процесса загрузки в меню GRUB нажмите на клавиатуре клавишу
«e» для редактирования.
Затем
перейдите к строке ядра (строка, начинающаяся с linux) и измените строку с
параметром ro. Замените ro на rw init=/sysroot/bin/sh

а
также добавьте следующие операторы в конце:
rd.break enforcing=0
Примечание:
rd.break запрашивает перерыв на ранней стадии процесса загрузки.
enforcing
= 0 переводит систему в разрешающий режим SELinux. Не путайте с selinux = 0,
который полностью отключает SELinux.
Нажмите
Ctrl + X, чтобы возобновить процесс загрузки.
Выполните
команду chroot в разделе / sysroot:
#chroot /sysrootВойдите
в систему как пользователь root и введите следующую команду, чтобы изменить
пароль пользователя root файле /etc/passwd.
# passwd root
# rebootСброс
пароля root в CentOS 6 и RHEL 6
При загрузке
нажмите кнопку «e»для
редактирования параметров загрузки

С помощью клавиш вверх/вниз на
клавиатуре выберите второй пункт «kernel /vmlinuz» и нажмите на клавиатуре «e».

Появится возможность отредактировать
параметры загрузки. Для загрузки CentOS 6 в режиме single mode допишите через пробел в конец строки с параметрами
‘s’ или ‘single’ как показано на следующем скриншоте. После нажмите Enter, а потом выберите загрузку операционной системы в этом
режиме, выбрав его с помощью вверх/вниз и нажав
«b» на клавиатуре.

С помощью «passwd» установите новый пароль. В случае успешного выполнения операции появится сообщение:
Passwd:
all authentication tokens updated successfully.

Если злоумышленник может иметь физический доступ к серверу, он также сможет выбрать ядро для загрузки из пункта меню grub, просто нажав клавишу «e» на клавиатуре, чтобы изменить параметр загрузки ro и загрузиться в однопользовательском режиме на CentOS без запроса пароля пользователя root, даже если строка SINGLE=/sbin/sushell заменена на SINGLE=/sbin/sulogin в файле /etc/sysconfig/init. Единственный способ защитить паролем однопользовательский режим в CentOS — это защитить GRUB паролем, используя следующие инструкции.
Как защитить
паролем Grub в CentOS
Сначала
создайте надежный зашифрованный пароль с помощью утилиты grub2-setpassword
# grub2-setpasswordТеперь
откройте файл /boot/grub2/grub.cfg и найдите загрузочную запись, которую вы
хотите защитить паролем, она начинается с menuentry . Когда запись —unrestricted
, удалите из —unrestricted параметр —unrestricted .
Сохраните
файл и закройте, теперь попробуйте перезагрузить CentOS и измените загрузочные записи, нажав клавишу e
, вам будет предложено предоставить учетные данные, как показано на скриншоте.
GRUB-меню CentOS успешно защищено
паролем.
2)
Сброс пароля root помощью редактирования файла /etc/passwd
Если у вас установлена 32 битная ОС, вам потребуется загрузочный диск с Linux x32 и наоборот. Загрузитесь с Live-диска или установите
жесткий диск, где установлена система с забытым паролем в другой компьютер с ОС
Linux.
# mkdir /mnt/centosОпределите
системный диск (sda1, sda2). Утилита fdisk выведет информацию о существующих разделах диска.
#fdisk -lСмонтируйте системный раздел:
# mount /dev/sda2 /mnt/centosНеобходимо изменить файл /mnt/centos/etc/shadow, удалив из него хэш пароля пользователя root
# sudo vi /mnt/centos/etc/shadow
Т.е. между „root” и номером группы пользователя “root” должно
стоять два знака двоеточия «::» (root::0). Нажмите Esc чтобы выйти из режима редактирования, сохраните файл — нажмите «:wq» и Enter.
В /mnt/centos/etc/passwd в строке, относящейся к root символ «x» необходимо заменить на, «*». Помните,
что файлы /etc/passwd и /etc/shadow, относятся к Live-системе.
Перезагрузите
систему. Введите имя пользователя root, на запрос пароля нажмите Enter и после этого сможете попасть в
систему без пароля. После перезагрузки не забудьте сразу новый пароль у
пользователя root.
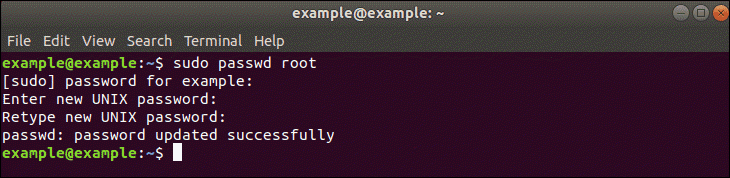
Changing Your Root Password in Ubuntu
Step 1: Open a Terminal Window
Right-click the desktop, then left-click Open in terminal.
Alternately, you can click Menu > Applications > Accessories > Terminal.
Step 2: Change Your Root Password
sudo passwd rootThe system will prompt you to enter your password – this is the same password you use to log in to the system.
Next, the system will prompt you to enter a new password. Do so, and then re-enter it exactly the same when the system prompts you to retype the password. This double-entry confirms that you have typed the password correctly.
Changing the Root Password in CentOS
Changing a password in CentOS is almost identical to changing it in Ubuntu.
Step 1: Access the Command Line (Terminal)
Right-click the desktop, then left-click Open in Terminal. Or, click Menu > Applications > Utilities > Terminal.
Step 2: Change the Password
sudo passwd root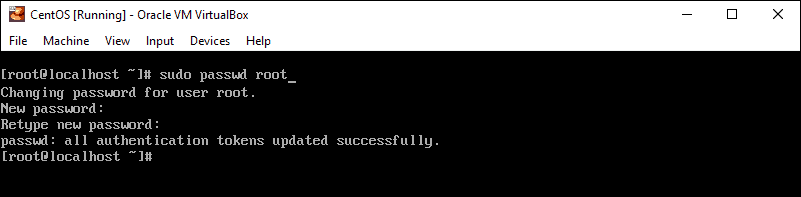
This is a similar process as in Ubuntu, with a couple of variations.
Step 1: Access Boot Menu
Restart the system, then tap the Esc key about once per second to launch the GRUB menu.
Step 2: Edit Boot Options
Use the arrows to highlight the version of Linux you boot into, then press e.
Use the arrows to highlight the line that starts with kernel or Linux.
Step 3: Remount the Drive
mount / -o remount,rwStep 4: Changing the Password
passwdPress Enter, and the system should prompt you to enter and confirm a new password.
Step 5: Restart
mount / -o remount,rosyncrebootYour system should restart. Confirm that your new password works by logging in.
Note: If you ever come across a Linux boot failure, be sure to save our guide on using GRUB rescue to troubleshoot it.
It can be more challenging if you’ve lost or forgotten a password, but with a little creative restarting and editing, you shouldn’t find it too hard.
Suggested Articles
How to reset root password on Ubuntu 16.04 Cloud Server
How to reset the root password on Ubuntu 16.04 on a dedicated server
How to reset root password on Ubuntu 16.04 Cloud Server
How to reset the root password on Ubuntu 16.04 on a dedicated server
Resetting root password of RHEL/CentOS 6x or 7x
Step 1: Reboot your server
Step 2: Stop the automatic booting
CentOS/RHEL 6.x

CentOS/RHEL 7.x
For CentOS 7, instead of above screen, versions a list of available kernel is displayed during system boot. Press any key to stop automatic boot and proceed to Step 3.
Step 3: Select the desired kernel to edit
CentOS/RHEL 6.x
CentOS/RHEL 7.x
After stopping the automatic boot by pressing a key select any Kernel from the list and press e to edit.

Step 4: Edit the desired kernel
This step is a little bit different for CentOS/RHEL 6x and CentOS/RHEL 7x. So here we’ve mentioned them separately.
CentOS/RHEL 6x
Original Text: <6 crashkernel=auto rd_NO_LVM rd_NO_DM rhgb quit
Change it to: <6 crashkernel=auto rd_NO_LVM rd_NO_DM rhgb quit 1
Look at the screenshot for reference


CentOS or RHEL 7x:
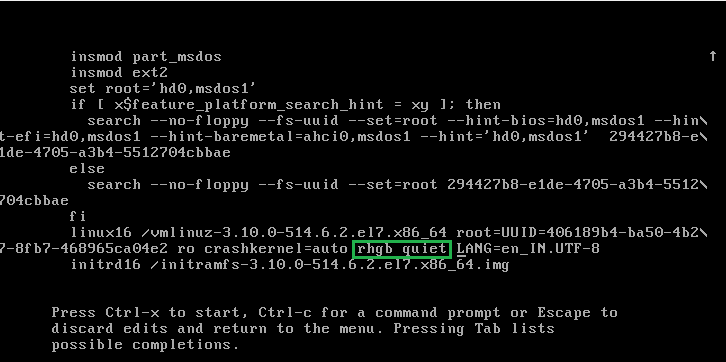
Depending on screen resolution the full kernel may not come in single screen. Press down arrow to select “rhgb quiet” delete it and replace with “init=/bin/bash”
Original: rhgb quiet
Replace with: init=/bin/bash
Press Ctrl-x to boot using this kernel and proceed to next step
Step 5: Reset root password and reboot
CentOS/RHEL 6.x
Enter New Password
Re-Enter new password
Now reboot your system with ‘reboot’ command to effect the new password.

From next time onward you can log in as usual with your new root password
CentOS/RHEL 7.3
Enter New Password
Re-Enter new password
Now you can log in with your new password as usual.
Note: You needn’t to edit back the kernel to it’s original state. After reboot the kernel will be restored automatically.
Summary
As shown we can reset the root password in Linux CentOS/RHEL 7 by booting with the ‘rd.break’ option, remounting the file system with read/write privileges, creating a chroot jail, executing the passwd command and then finally fixing up SELinux contexts.
After exiting the chroot and the initramfs root shell prompt the file system will be relabelled which may take a few minutes or more depending on the number of files you have. When your system has booted back up you’ll be able to use the new root password.
Resetting a Root Password in Ubuntu
In some situations, you may need to access an account for which you’ve lost or forgotten a password.
Step 1: Boot to Recovery Mode
Restart your system. Once you see the splash screen for the computer manufacturer, hold down the shift key. The system should come up with a black and white GRUB, or boot menu, with different Linux kernel versions displayed.
Step 2: Drop Out to Root Shell
The system should display a menu with different boot options. Use the arrow keys to navigate to the option labeled root and press Enter.
The system should respond by giving you a command-line interface with a prompt.
Step 3: Remount the File System with Write-Permissions
Right now, your system only has read-only access to your system. That means it can look at the data, but cannot make any changes. But we need write-access to change the password, so we’ll need to remount the drive with the appropriate permissions.
At the prompt, type:
mount –o rw,remount /Press Enter. This should allow you to make changes to the data on the hard drive.
Step 4: Change the Password
At the prompt, type:
passwd usernameshutdown –rHit Enter, and your system should restart. Don’t press any keys, let the system come up to the login screen, and test to make sure the new password works.
Note: Learn how to use the chpasswd command. Chpasswd is helpful for managing multiple passwords and making multiple changes.
")


")