

We don’t verify these methods of rooting. (Read disclaimer first) Choose any one way to Root Samsung Galaxy A31 devices.
We don’t verify these methods of rooting. (Read disclaimer first) Choose any one way to Root Samsung Galaxy Device devices.
We don’t verify these methods of rooting. (Read disclaimer first) Choose any one way to Samsung Galaxy A32 devices.
If you don’t have a PC, you can use the Samsung Galaxy A32’s PC method. I hope it helps.
If you are looking for a safe and easy way to root Samsung phone or tablet, then you should go on reading. In this post, you are going to learn two reliable methods to get root access on Samsung devices. The methods are workable for different Galaxy models: Samsung S7/S7 Edge/S6/S5/S4/S4, Note 5/4/3, Galaxy Tab A/2/3/4.
- Root Samsung Galaxy A32 Via KingoRoot App (Without PC) – 2nd Method
- Guide To Root Samsung Galaxy A31 Via KingoRoot App – 2nd Method
- Steps To Root Samsung Galaxy A31 Android A11 Without PC
- Root Samsung Galaxy A32 via Magisk – 1st Method
- Guide To Root Samsung Galaxy Device Via KingoRoot App – 2nd Method
- Steps To Root Samsung Galaxy Device Android A11 Without PC
- Guide To Root Samsung Galaxy A31 via Magisk – 1st Method
- Steps to Root Samsung Galaxy A31 With PC/Laptop
- Extract and Patch boot.image via magisk
- Flash The Patched boot Image on your device
- Guide To Root Samsung Galaxy Device via Magisk – 1st Method
- Steps to Root Samsung Galaxy Device With PC/Laptop
- Extract and Patch boot.image via magisk
- Flash The Patched boot Image on your device
- Before proceeding, make sure to complete the following tasks:
- Enabling Developer Mode on a Samsung Phone
- Enabling OEM Unlocking on a Samsung Phone
- Unlocking the Bootloader on Samsung Phones
- For older Samsung phones:
- For newer Samsung phones:
- Finding and Downloading the Correct Stock Firmware for your Samsung Phone
- Download 7zip and LZ4 Tools
- Preparing Patched Boot Image file
- Patch the boot.img Firmware File with Magisk App
- Convert .IMG File to .TAR (For ODIN)
- Boot your Samsung Phone’s into Download Mode
- Flash Magisk_Patched.tar using Odin flash tool
- Frequently Asked Questions
- Can I root my Samsung Phone without Custom Recovery?
- Conclusion
- What Is Root?
- Steps To Check Root Status
- Check Root status Of Root Samsung Galaxy Device
- FAQ (Frequently Asked Question)
- FAQ (Frequently Asked Question)
- Root Samsung Phone/Tablet in One Click
- Why do you need to Root Samsung Galaxy A31?
- Why Would You Like to Root Your Samsung Device?
- What Is Root?
- Why do you need to Root Samsung Galaxy A32?
- What Is Root?
- FAQ (Frequently Asked Question)
- Why do you need to Root Samsung Galaxy Device?
- Root Samsung Phone/Tablet by Flashing CF-Auto-Root Package
- Tips – Implement Before Rooting
- Merits And Demerits Of Root
- Check Root Status
- Steps To Check Root Status
- Check Root status Of Samsung Galaxy A31
- Merits And Demerits Of Root
- Merits And Demerits Of Root
- Tips – Implement Before Rooting
- Tips – Implement Before Rooting
- Guide To Root Samsung Galaxy A31 via one-click root (Recommended)
- Steps to Root Samsung Galaxy A31 Via One Click Root
- Guide To Root Samsung Galaxy Device via one-click root (Recommended)
- Steps to Root Samsung Galaxy Device Via One Click Root
- Root Samsung Galaxy A32 via one-click root (Recommended)
- Steps to Root Samsung Galaxy A32 Via One Click Root
Root Samsung Galaxy A32 Via KingoRoot App (Without PC) – 2nd Method
- KingoRoot Application from Playstore
- Open the application and click on “One Click Root
- Now, this app will start the Rooting Process.
- Once the whole process is done, you will see a notification that is “.”
Perfect! Your Samsung Galaxy A32 is rooted now and does whatever you want. Install and modify your device as you wish.
Guide To Root Samsung Galaxy A31 Via KingoRoot App – 2nd Method
This method will help you to Root Your Root Samsung Galaxy A31 via kingo application. It’ll hardly takes 5-10 minutes if you already installed this application.
Steps To Root Samsung Galaxy A31 Android A11 Without PC
- KingoRoot Application from Playstore
- Open the application and click on “One Click Root
- Now, this app will start the Rooting Process.
- Once the whole process is done, you will see a notification that is “.”
Perfect! Your Root Samsung Galaxy A31 is rooted now and does whatever you want. Install and modify your device as you wish.
Root Samsung Galaxy A32 via Magisk – 1st Method
- You have to download file on your Samsung Galaxy A32.
- Now Boot Device on recovery mode by Pressing.
- Volume Down + Power Button
- Done! Now Click On install and find the Magisk.zip file in ROM and select it.
- Now click on to confirm Flash.
- Next, the flashing process is done now by tapping on Reboot
- Congrats, you have successfully Rooted Samsung Galaxy A32.
Everything is perfect. You can customize your android device as you want. You can install mod apk, change fonts, and do whatever you want. I hope you enjoy this guide and drop down your suggestion in the comment section.
Guide To Root Samsung Galaxy Device Via KingoRoot App – 2nd Method
This method will help you to Root Your Root Samsung Galaxy Device via kingo application. It’ll hardly takes 5-10 minutes if you already installed this application.
Steps To Root Samsung Galaxy Device Android A11 Without PC
- KingoRoot Application from Playstore
- Open the application and click on “One Click Root
- Now, this app will start the Rooting Process.
- Once the whole process is done, you will see a notification that is “.”
Perfect! Your Root Samsung Galaxy Device is rooted now and does whatever you want. Install and modify your device as you wish.
SafeBoxGuide is not responsible for any kind of loss. The method of rooting in this article only works for a specific device. Don’t try this same Method for another device; if you do, this may be the reason you get brick.
Be careful while rooting your Samsung device. I suggest that you read the rooting process at least two times, because if you read this guide two times, then there are fewer chances of mistakes by you.
And last but not least, SafeBoxGuide is neither affiliated with any program nor sponsors any application to mention in this article. I only guide via this application because these are easy to use and easy interfaces.
SafeBoxGuide is not responsible for any kind of loss. The method of rooting in this article only works for a specific device. Don’t try this same Method for another device; if you do, this may be the reason you get brick.
Be careful while rooting your Root Samsung Galaxy A31 device. I suggest that you read the rooting process at least two times, because if you read this guide two times, then there are fewer chances of mistakes by you.
And last but not least, SafeBoxGuide is neither affiliated with any program nor sponsors any application to mention in this article. we only guide via these applications because these are easy to use and easy interfaces.
SafeBoxGuide is not responsible for any kind of loss. The method of rooting in this article only works for a specific device. Don’t try this same Method for another device; if you do, this may be the reason you get brick.
Be careful while rooting your Root Samsung Galaxy Device device. I suggest that you read the rooting process at least two times, because if you read this guide two times, then there are fewer chances of mistakes by you.
And last but not least, SafeBoxGuide is neither affiliated with any program nor sponsors any application to mention in this article. we only guide via these applications because these are easy to use and easy interfaces.
Hey folk, do you want to Root Samsung Galaxy A32 new smartphones? If yes, then this guide is especially for you. This article will guide you in-depth, so after reading this guide, you can easily root your Samsung device.
We’ll guide you through three methods to root Samsung Galaxy A32 devices, including PC and without PC method. Go with which you feel comfortable.
But before going to the immediate rooting process, you should have information about rooting like Pros and cons after rooting a device, and most asked why you need to root your android smartphone. Soon you’ll get every answer in this article until you stay tuned with us.
Hey folk, do you want to Root Samsung Galaxy A31 new smartphones? If yes, then this guide is especially for you. This article will guide you in-depth, so after reading this guide, you can easily root your Root Samsung Galaxy A31 device.
We’ll guide you three methods to Root Samsung Galaxy A31 devices, including PC and without PC method. Go with that method which you feel comfortable.
But before going to the immediate rooting process, you should have information about rooting like Pros and cons after rooting a device, and most asked why you need to root your android smartphone. Soon you’ll get every answer in this article, Just stay tuned with us.
Hey folk, do you want to Root Samsung Galaxy Device new smartphones? If yes, then this guide is especially for you. This article will guide you in-depth, so after reading this guide, you can easily root your Root Samsung Galaxy Device device.
We’ll guide you three methods to Root Samsung Galaxy Device devices, including PC and without PC method. Go with that method which you feel comfortable.
But before going to the immediate rooting process, you should have information about rooting like Pros and cons after rooting a device, and most asked why you need to root your android smartphone. Soon you’ll get every answer in this article, Just stay tuned with us.
- Connect your device with the computer via USB cable or micro USB
- After connecting the device, a message prompt on your device, i.e., “Allow USB debugging
- Now click on Always allow from this computer and tap the OK button.
- Before Entering the next step of the process, make sure your device charge at least 70% battery.
- Go to the SDK platform-tools folder on your computer.
- In the white space hold shift + right-click
- A menu will appear “Open command window here,” and a command window will open.
- In the cmd window, Type, ‘
adb devices,” and press enter your device will be listed. - Type “
adb reboot bootloader” and press enter your device will enter bootloader mode. - Type in the command window “
fastboot flash recovery TWRP.img” if your TWRP.img with another name, then change the entry for your corresponding device. - Finally, type in the command window “
fastboot boot TWRP.img” ( Make sure it is correct because, on your pc, this file name would be different )
Your device will begin to boot again, and the Team win logo will appear and begin to install. Congrats, you have installed TWRP Recovery on your Android Device without rooting. Have you enjoyed this article? Comment below your feedback.
Check out another guide to root Galaxy A11 android device to get more info about root process.
#RD # Полезное # Root права на Samsung через кастомное recovery (рекавери)
Всего:


Я думаю, что самый легкий и надёжный способ получить root права на Samsung, с помощью кастомного recovery
TWRP (Team Win Recovery Project)
Способы работают практически на всех Samsung устройствах.
Давайте приступать 🙂
—
- Скачиваем и копируем на внешнюю SDCard SuperSU (CWM/TWRP).
- Теперь нам нужно прошить кастомное рекавери .
- После прошивки, войти в него. (Как войти в меню recovery)
- Идем чётко по пунктам:
1) Install zip
2) Choose zip
3) SuperSU.zip
4) Подтверждаем установку и ждем пока установится суперпользователь.
5) Reboot system now
После перезагрузки, появится программа SuperSU, она и будет отвечать за root права на вашем устройстве.
—
TWRP (Team Win Recovery Project)
- Скачиваем и копируем в память устройства SuperSU (CWM/TWRP).
- Теперь нам нужно прошить кастомное рекавери .
- После прошивки, войти в него. (Как войти в меню recovery)
- Идем чётко по пунктам:
1) Install (Установить)
2) Выбираем из памяти устройства архив с SuperSU.zip.
3) Подтверждаем установку и ждем пока установится суперпользователь.
4) Reboot (Перезагрузка).
После перезагрузки, появится программа SuperSU, она и будет отвечать за root права на вашем устройстве.
Если по какой-то причине, телефон/планшет не влючается, попробуйте его перепрошить.
Вот и всё, на этом процесс получения root прав завершён, как вы уже, наверное, успели заметить, в этом нет ничего сложного.
Guide To Root Samsung Galaxy A31 via Magisk – 1st Method
This method will help you to root your Root Samsung Galaxy A31 android device via magisk zip.
Make sure you unlock bootloader first before implementing this method. A PC/Laptop is must to perform these steps.
Steps to Root Samsung Galaxy A31 With PC/Laptop
Extract and Patch boot.image via magisk
- First download the stock firmware. Next you have to download the stock boot image for your device latest version which is installed on your device currently. Next, extract it on your PC/laptop.
- Now connect your device with PC by using USB cable and transfer the extracted boot.img file to your PC/laptop storage.
- Next, download and install magisk manager on your Root Samsung Galaxy A31 device.
- Open the installed magisk application which you install on above step. Now tap on the install option and then select boot file.
- After selecting the boot file you need to wait a couple of minutes and soon the magisk will start patching the boot image.
- Once it patched successfully. It’ll store in your internal storage automatically.
Flash The Patched boot Image on your device
- You need to transfer the patched boot image file in your PC/laptop from android device.
- Switch off your Root Samsung Galaxy A31 and boot into fastboot mode.
- Next, open command prompt or PowerShell.
- Now flash the patched boot image and easily Root your device by entering following commands.
- Here’s the commands
fastboot flash boot patched_boot.img - Soon the flashing process will start and after it’ll complete. you need to reboot your device. For reboot you device run this command.
fastboot reboot
Everything is perfect. you successfully root your Root Samsung Galaxy A31 android device with magisk. If you find anything wrong then repeat these steps may be you missed any step which cause failure in order to root.
Now you can customize your android device as you want. You can install mod apk, change fonts, and do whatever you want. I hope you enjoy this guide and drop down your suggestion in the comment section.
Guide To Root Samsung Galaxy Device via Magisk – 1st Method
This method will help you to root your Root Samsung Galaxy Device android device via magisk zip.
Make sure you unlock bootloader first before implementing this method. A PC/Laptop is must to perform these steps.
Steps to Root Samsung Galaxy Device With PC/Laptop
Extract and Patch boot.image via magisk
- First download the stock firmware. Next you have to download the stock boot image for your device latest version which is installed on your device currently. Next, extract it on your PC/laptop.
- Now connect your device with PC by using USB cable and transfer the extracted boot.img file to your PC/laptop storage.
- Next, download and install magisk manager on your Root Samsung Galaxy Device device.
- Open the installed magisk application which you install on above step. Now tap on the install option and then select boot file.
- After selecting the boot file you need to wait a couple of minutes and soon the magisk will start patching the boot image.
- Once it patched successfully. It’ll store in your internal storage automatically.
Flash The Patched boot Image on your device
- You need to transfer the patched boot image file in your PC/laptop from android device.
- Switch off your Root Samsung Galaxy Device and boot into fastboot mode.
- Next, open command prompt or PowerShell.
- Now flash the patched boot image and easily Root your device by entering following commands.
- Here’s the commands
fastboot flash boot patched_boot.img - Soon the flashing process will start and after it’ll complete. you need to reboot your device. For reboot you device run this command.
fastboot reboot
Everything is perfect. you successfully root your Root Samsung Galaxy android device with magisk. If you find anything wrong then repeat these steps may be you missed any step which cause failure in order to root.
Now you can customize your android device as you want. You can install mod apk, change fonts, and do whatever you want. I hope you enjoy this guide and drop down your suggestion in the comment section.
Для успешного получения root прав, Вы должны:
Точно следовать инструкциям;
Зарядить батарею устройства на 50 и более %;
Убедиться, что модель и версия прошивки совпадают;
Быть готовым к возможному полному сбросу данных на вашем устройстве!
Если все пункты выполнены, можете приступать к получению root прав.
Наш сайт не дает 100% гарантии, что способ, приведенный в данной статье, точно заработает. Но мы изучаем большое количество источников, смотрим на результаты испытавших, а далее, на основании полученной информации, делаем выводы и выкладываем способы.
Все действия вы выполняете на свой страх и риск!
Администрация сайта Root-Device.ru не несёт ответственности за возможные негативные последствия для вашего устройства!!

В данной статье мы узнаем, как получить root права на Samsung Galaxy S10.
- Скачиваем и устанавливаем — драйвера;
- Скачиваем на ПК и распаковываем в любое удобное место — odin;
- Скачиваем самую последнюю доступную прошивку — samfw;
Разблокировка загрузчика (ДЕЛАЕТ СБРОС!)
Патчинг блока AP
- Теперь нужно прошить смартфон полной не модифицированной прошивкой;
- Помещаем каждый блок прошивки в нужное место BL — BL_ , AP — AP_ , CP — CP_ , CSC — CSC_OMC;
- Загружаем смартфон в режим Download — полностью выключите ваше устройство, нажмите и удерживайте кнопки Громкость вниз + Громкость вверх на устройстве, подключите его к компьютеру;
- Подключаем смартфон к ПК и программа Odin должна определить ваш смартфон — В поле должен высветиться номер порта, а в поле «Message» строка «-> ID:0 / 0xx -> Added!!«;
- Нажимаем на кнопку «Start» и ждём окончания прошивки: в верхней части Odin должно высветиться , а в поле Message строка «-> OSM -> All threads completed. (succeed 1 / failed 0)«;
- После процедуры прошивки, смартфон сам перезагрузится, после перезагрузки, настраивать смартфон пока не нужно, отключаем смартфон от ПК и выключаем его;
- В программе Odin нажимаем на кнопку Reset и нажимаем на «AP«, нужно выбрать ваш ранее скопированный на ПК, патченный AP (magisk_patched-23000_);
- Загружаем смартфон в режим Download — полностью выключите ваше устройство, нажмите и удерживайте кнопки Громкость вниз + Громкость вверх на устройстве и подключите его к компьютеру;
- Подключив смартфон к ПК, программа Odin должна определить ваш смартфон — В поле должен высветиться номер порта, а в поле «Message» строка «-> ID:0 / 0xx -> Added!!«;
- Нажимаем на кнопку «Start» и ждём окончания прошивки: в верхней части Odin должно высветиться , а в поле Message строка «-> OSM -> All threads completed. (succeed 1 / failed 0)«;
- После процедуры прошивки смартфон сам перезагрузится, после перезагрузки снова устанавливаем Magisk и настраиваем аппарат.
Rooting a Samsung phone can give you access to a whole new world of customization options, allowing you to remove limitations and take full control over your device. This process is often performed using two tools, Magisk and Odin, which are widely used for rooting Samsung phones. In this article, we will guide you through the steps to root your Samsung phone using both Magisk and Odin.
Before we dive into the steps to root your phone, it’s important to note that rooting your device will void its warranty and may also potentially cause software instability. However, with the proper precautions and a little bit of technical know-how, the process of rooting can be carried out with relative ease.

Before proceeding, make sure to complete the following tasks:
- Ensure that your phone has at least 80% battery charge.
- Backup all important files on your phone.
- Remove any screen locks and Google account from your phone.
- Install the latest Samsung USB driver on your computer.
- Download the latest version of the Odin tool.
Enabling Developer Mode on a Samsung Phone
- On your Samsung phone, go to the Phone Settings.
- Scroll down and select the “About phone” option.
- Find and select the “Software information” option.
- Tap on the “Build number” several times until you see a message that says “Developer mode has been enabled.”
- If your phone is locked, you may be prompted to enter your lock screen password.
- You will see a message on your phone screen indicating that “Developer mode has been enabled!”
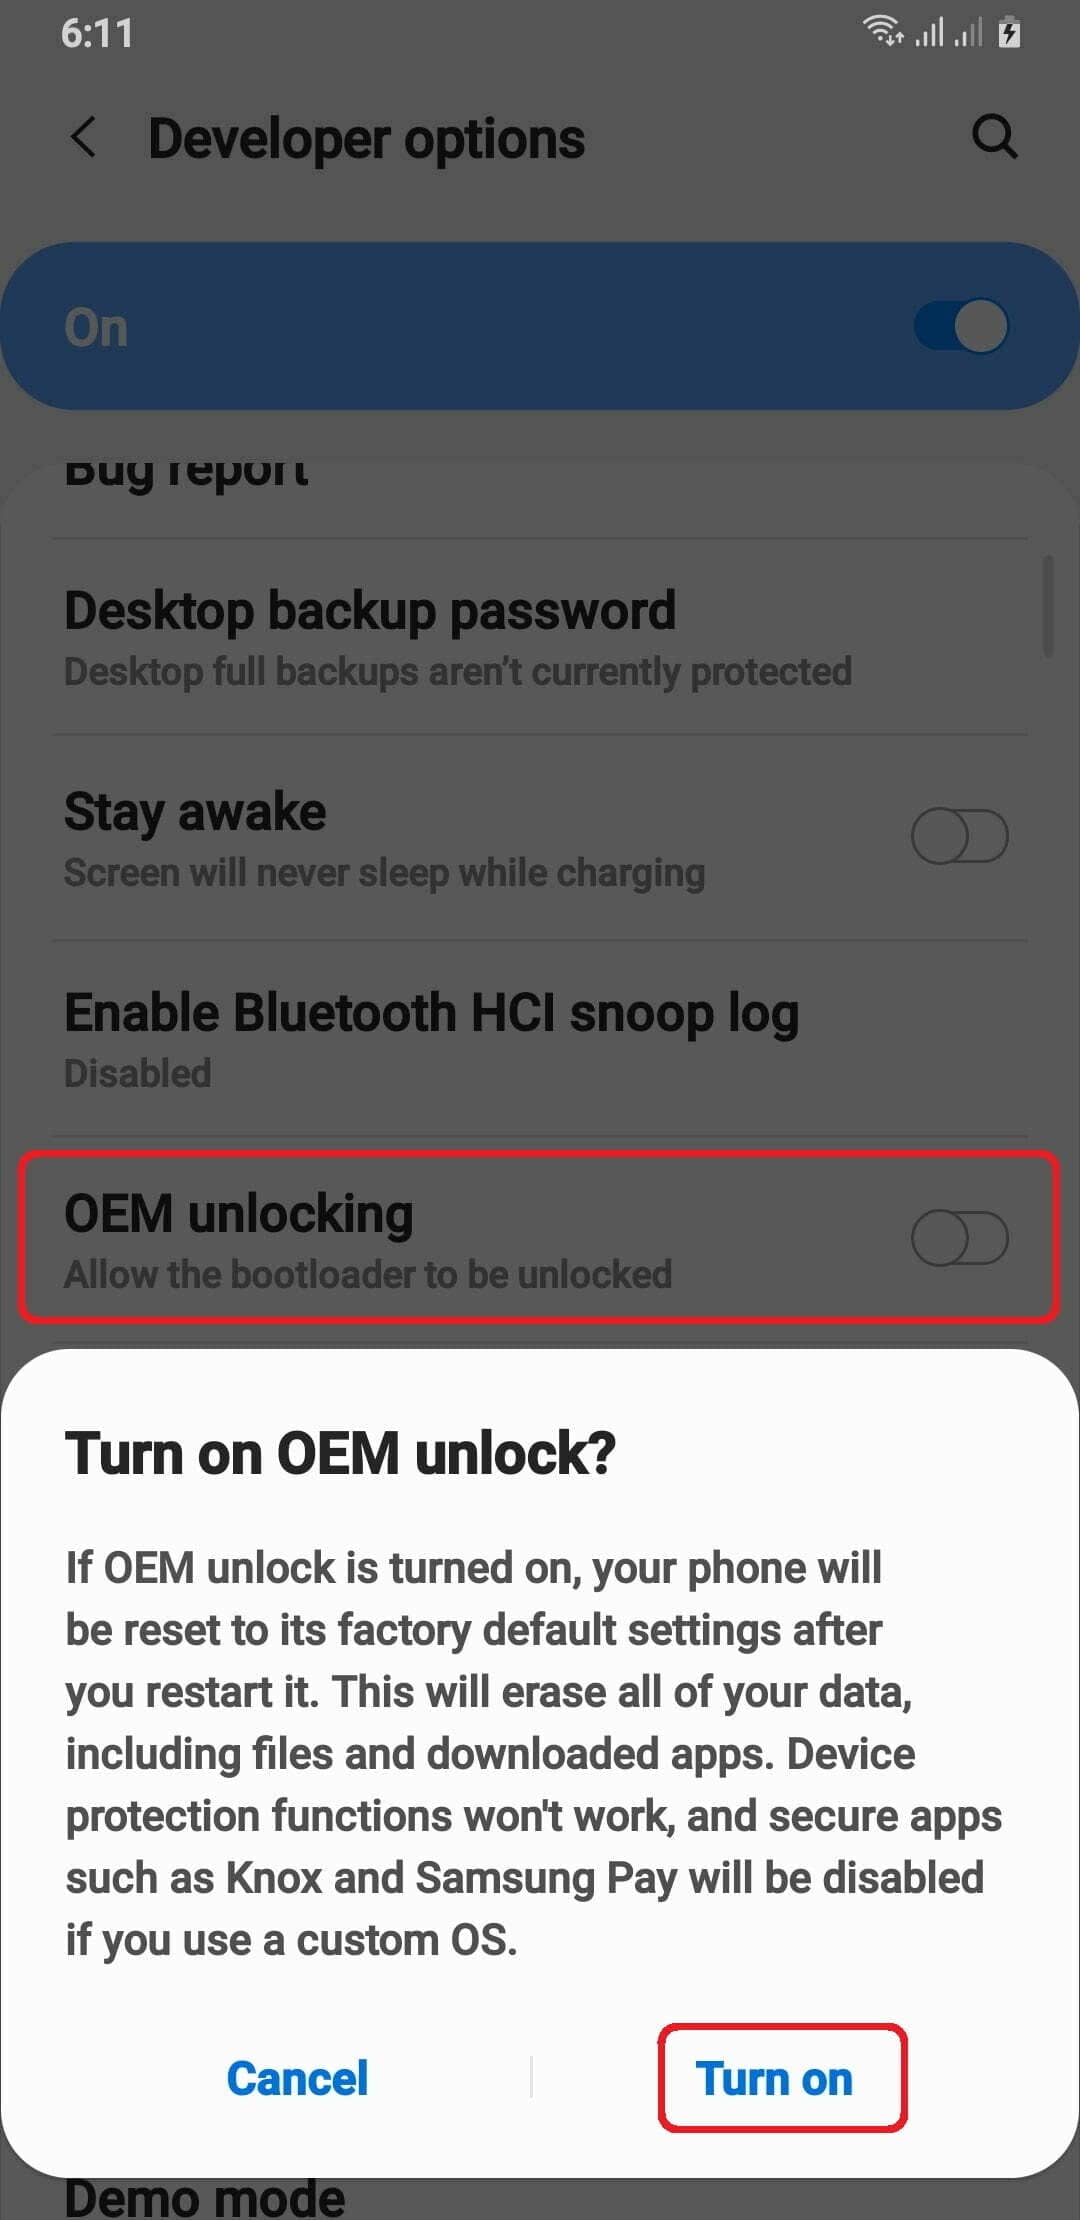
Enabling OEM Unlocking on a Samsung Phone
- Go to the Settings on your Samsung phone.
- Scroll down and select the “Developer options” option.
- Toggle the “OEM unlocking” option to the ON position.
Unlocking the Bootloader on Samsung Phones
Note: This process may vary depending on the age and model of your Samsung phone.
For older Samsung phones:
- After enabling OEM unlocking, the bootloader may be unlocked automatically upon restart.
For newer Samsung phones:
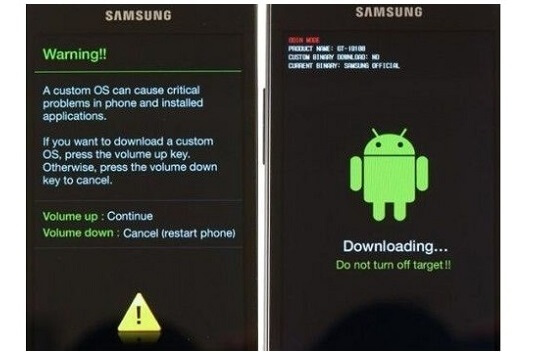
- Power off your phone and, keep pressing the “Volume Down”, “Volume Up” buttons simultaneously and connect phone to pc using data cable, you see the “Warning” screen.
- Keep press more than 7 second to “Volume Up” button to unlock bootloader option.
- You will be prompted to confirm whether you want to unlock the bootloader, use the volume buttons to navigate to ‘Yes’ and press the power button to confirm.
Finding and Downloading the Correct Stock Firmware for your Samsung Phone
- To download the stock firmware for your Samsung phone, you can visit SamFW.com.
- In order to download the correct firmware, you will need two pieces of information: your phone’s model number and its CSC (Country/Region Code).
- To find your phone’s model number, go to Settings → About phone.
Note: It is important to download the correct firmware for your specific phone model and region in order to avoid any potential issues or compatibility problems.
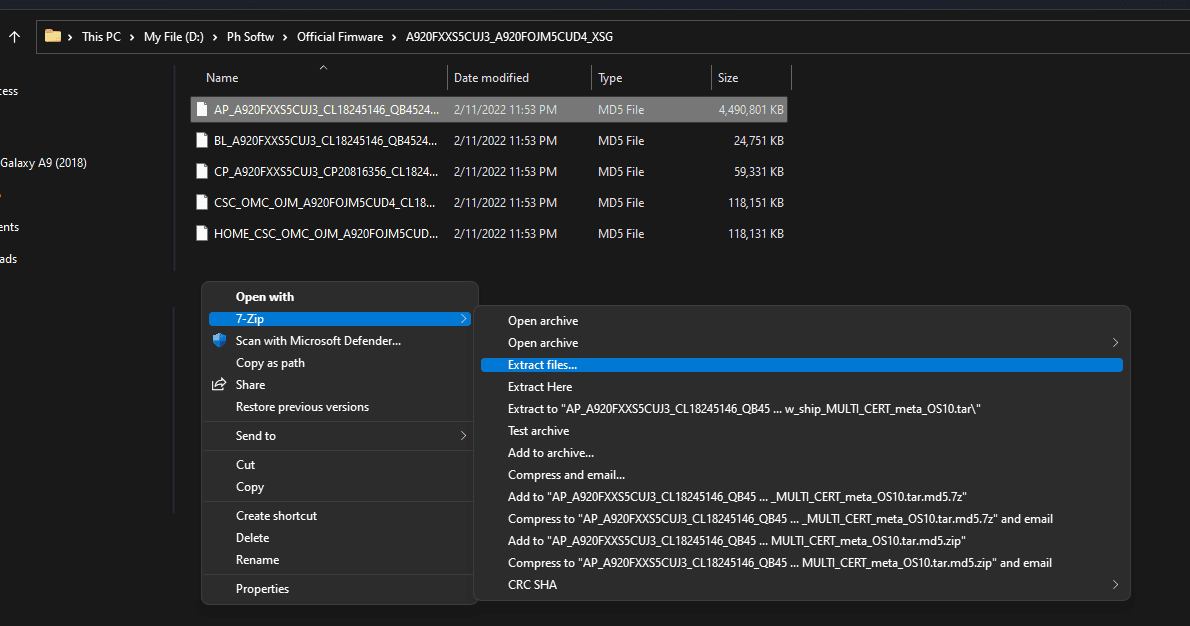
Download 7zip and LZ4 Tools
After downloading the firmware, we need to extract it. To extract the firmware, we need to use a lz4 extract tool, which can be downloaded from the link provided below.
Download: 7zip ToolDownload: LZ4 ToolTo make sure you can extract the firmware file properly, you need to download and install the 7zip software on your PC. Once installed, use it to extract the LZ4 tool downloaded. This will make it easier for you to extract the firmware file and access the files inside it.
Preparing Patched Boot Image file
- Extract the “AP” firmware package using 7zip.
- Open the extracted folder and again Extract AP firmware file.
- Now you will find boot.img.lz4 file.
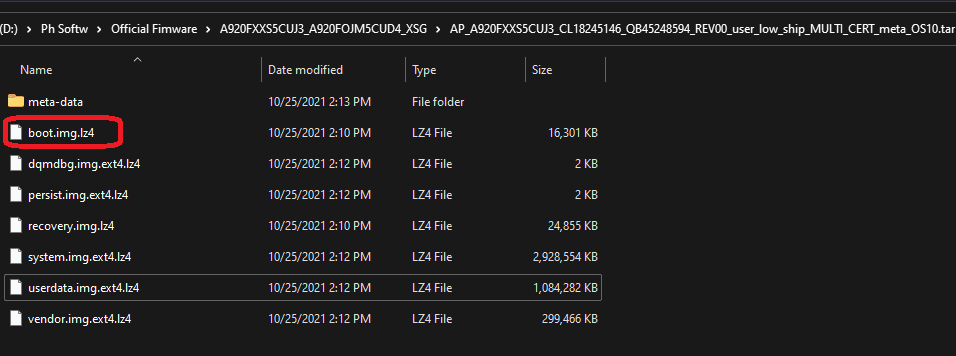
- Copy boot.img.lz4 to LZ4 Installed folder.

Next, we need to convert boot.img.lz4 to boot.img file.
- Open the lz4 extracted folder.
- Drag the boot.img.lz4 file to the lz4.exe program.
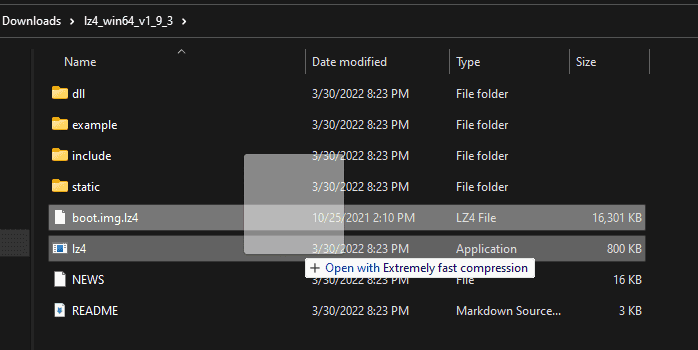
- This step converts the boot.img.lz4 file to boot.img format.
Patch the boot.img Firmware File with Magisk App
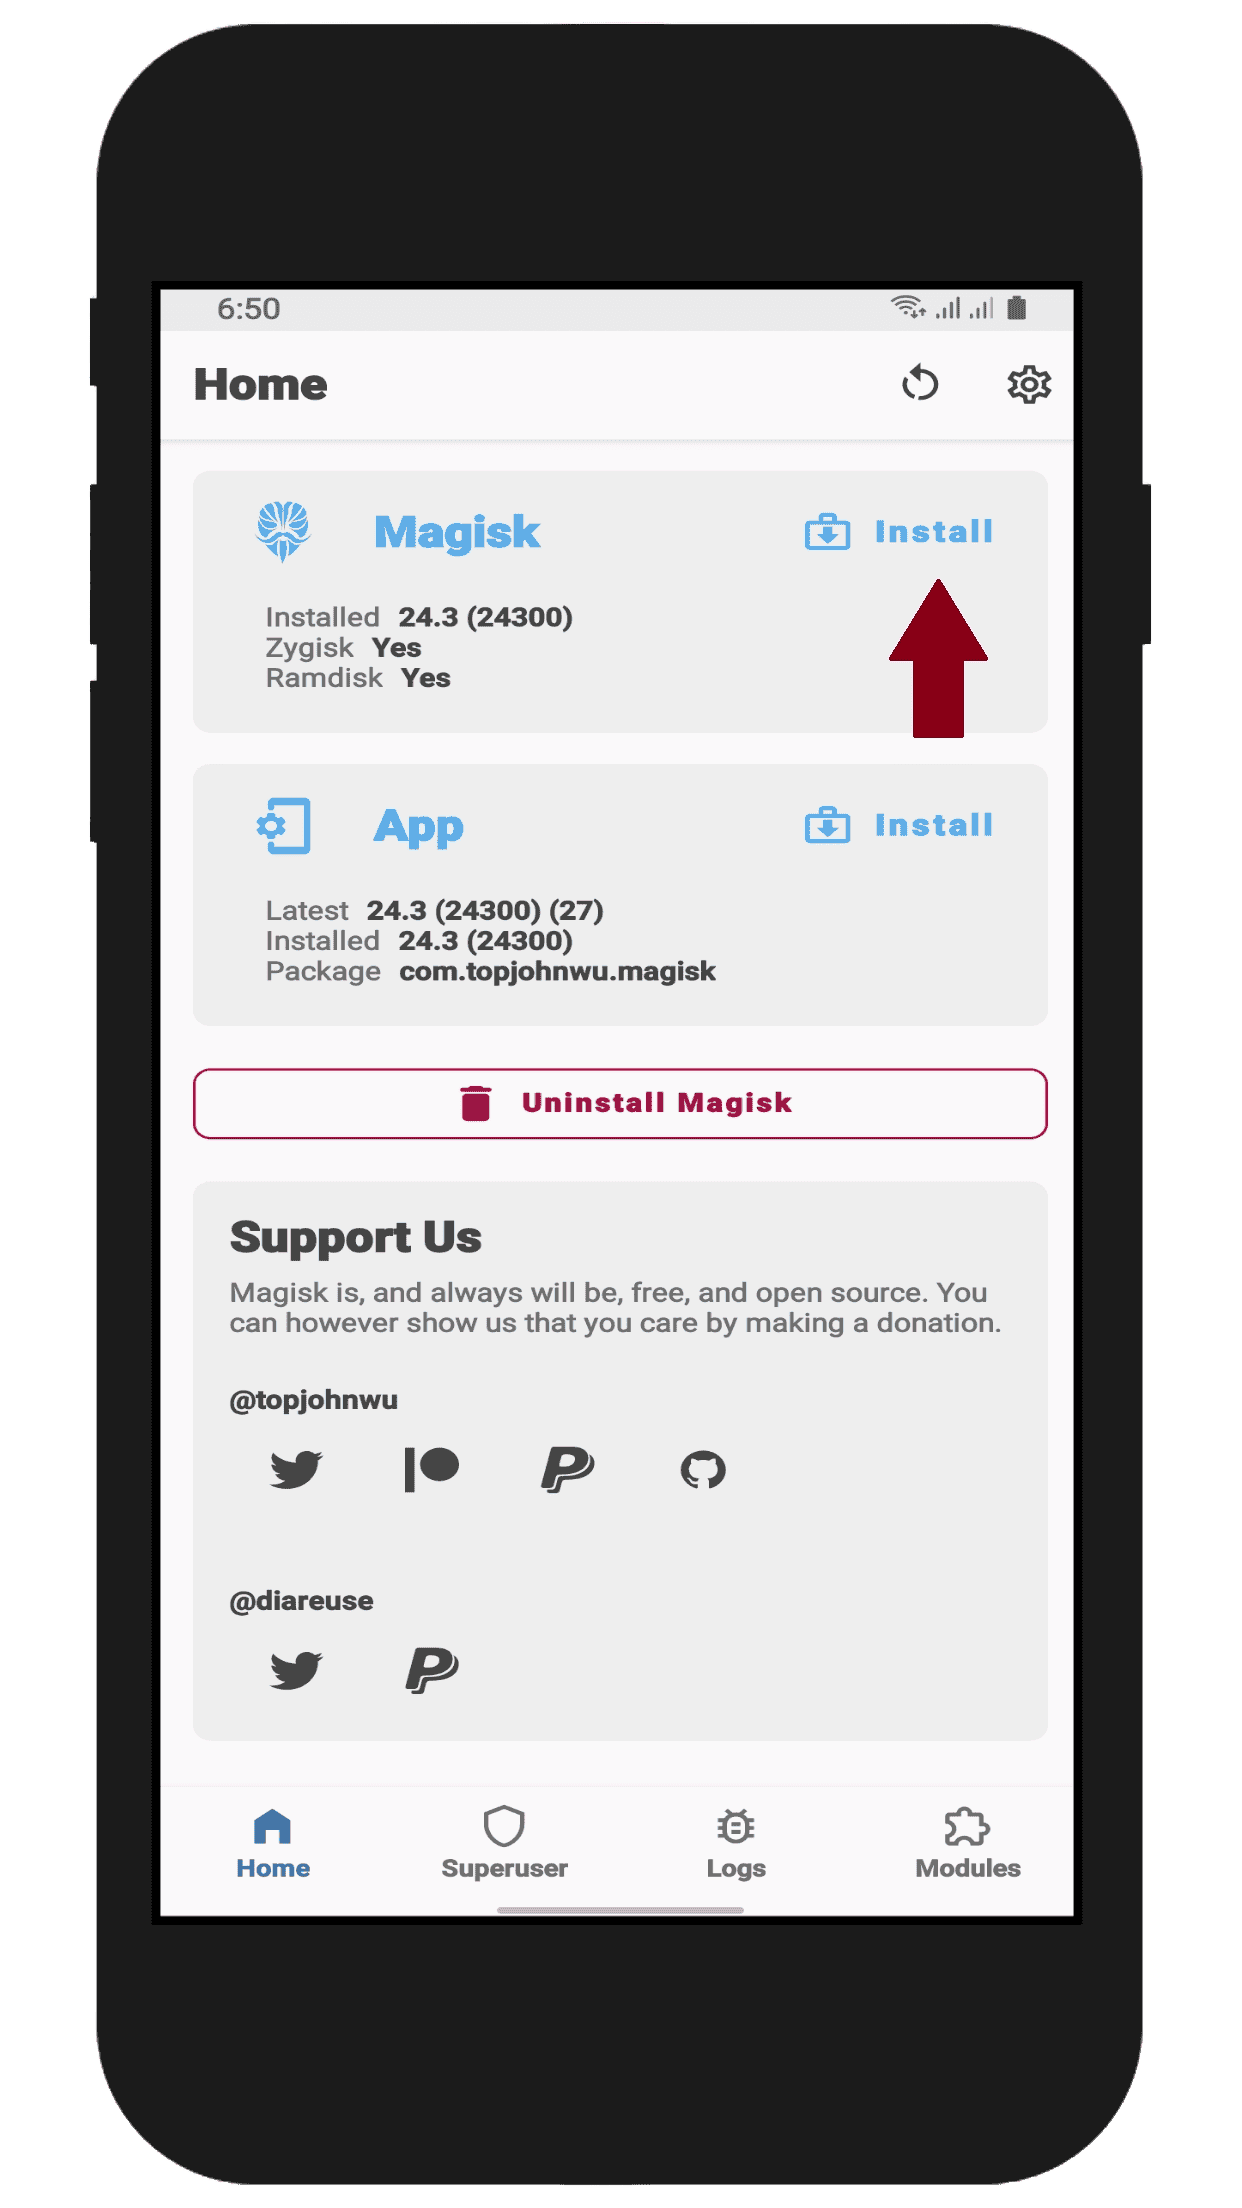
- Download and install Magisk App on your phone.
- Open the Magisk App.
- Tap on the INSTALL button.
- Then Select and Patch a File.
- Choose the boot.img File.
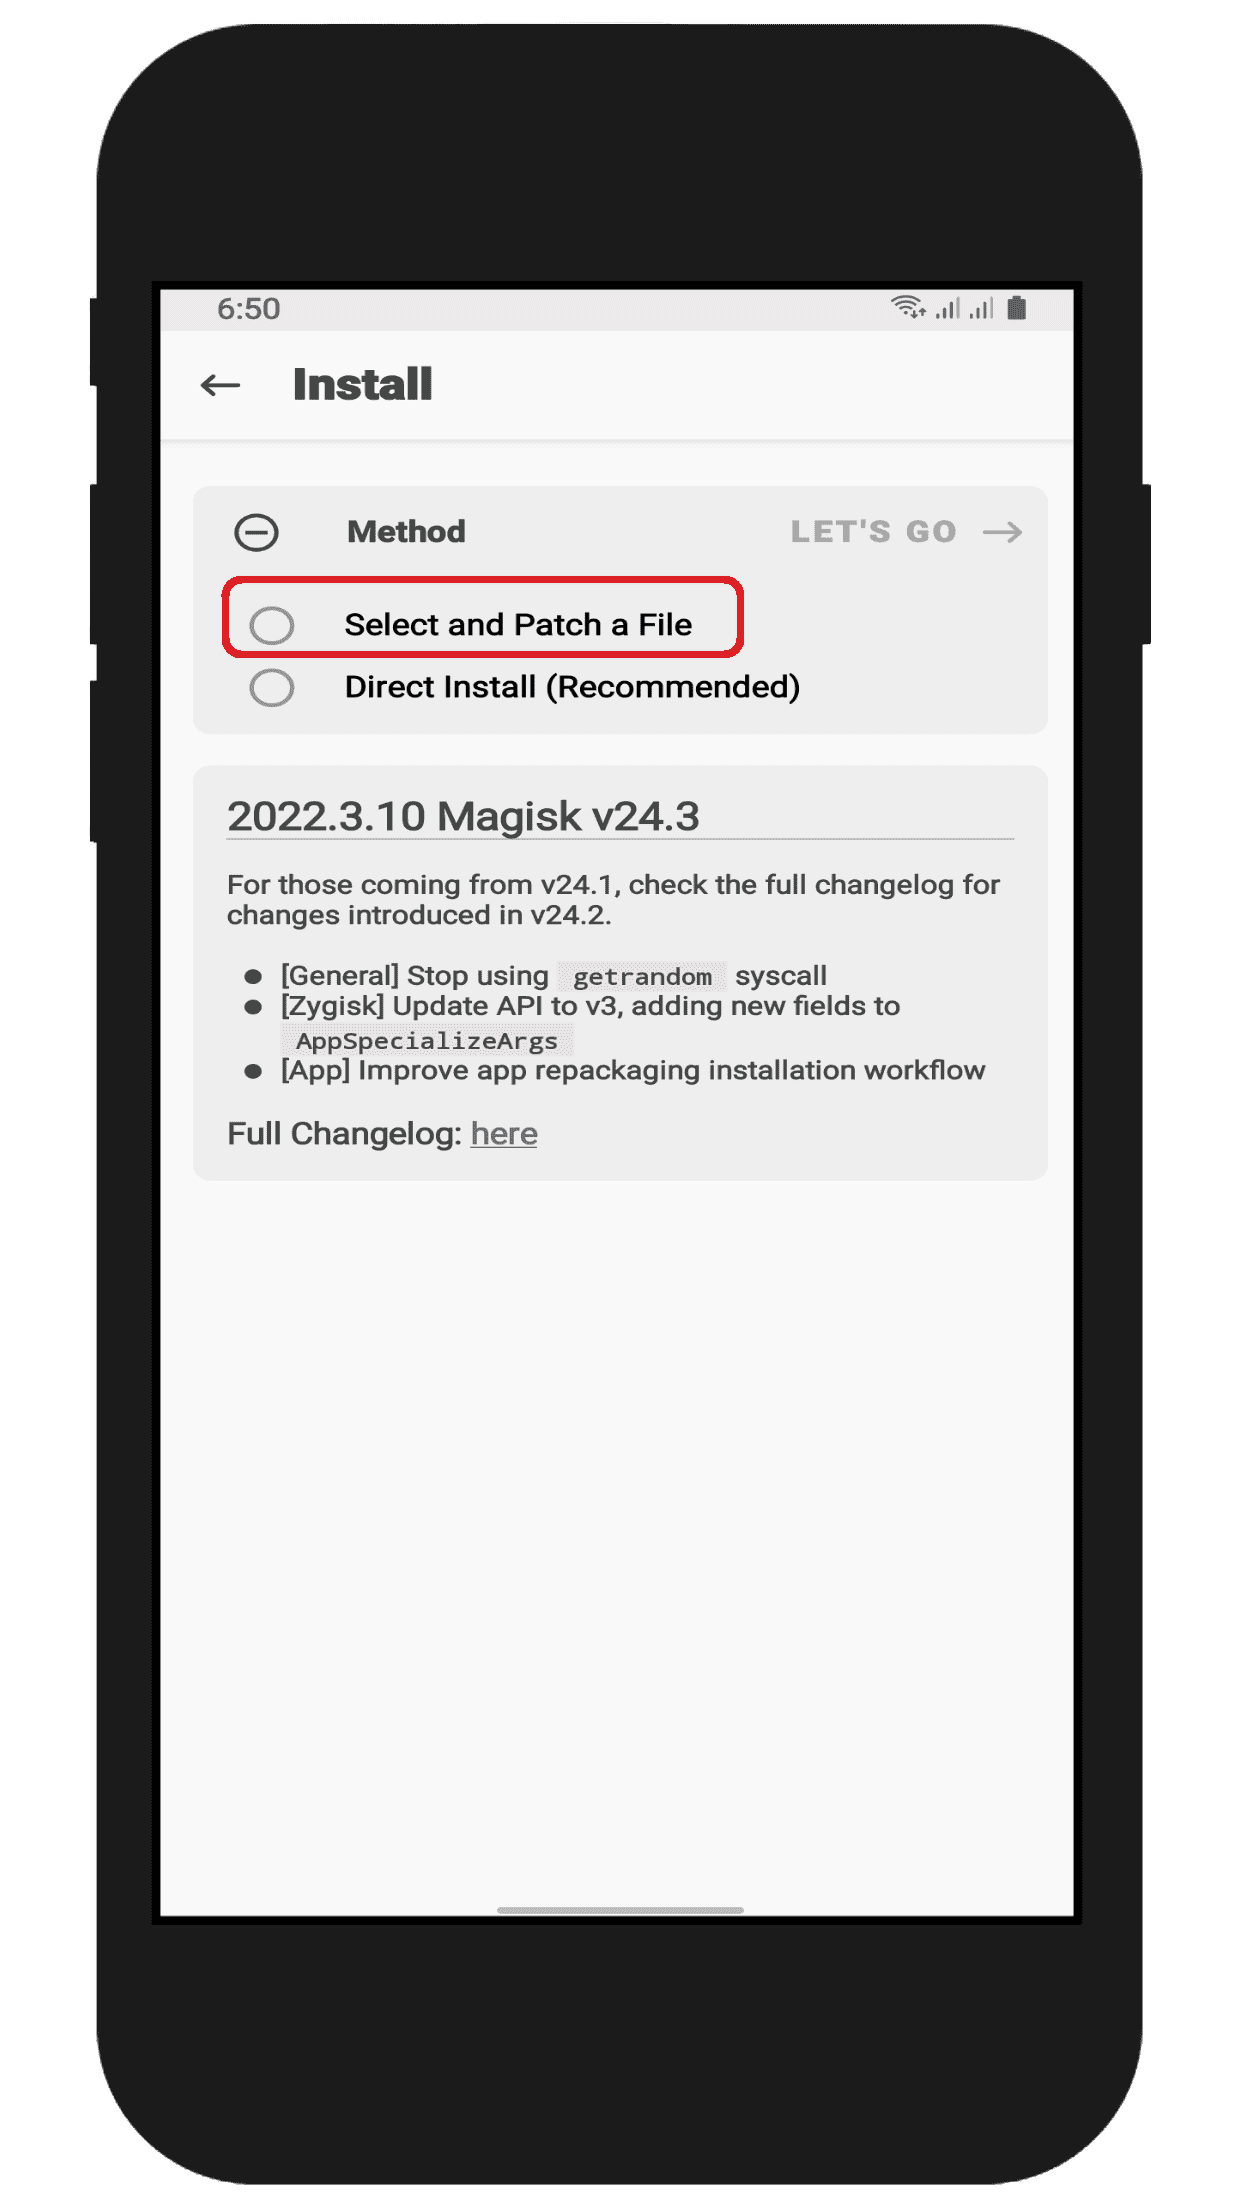
- Once the file is selected, tap on LET’S GO.
- The patched file can be found in the Downloads folder.
- Connect your phone to the PC and copy the magisk_patched.img file on your PC.
Convert .IMG File to .TAR (For ODIN)
- Download and Install 1st 7zip software in your PC.
- Select magisk_patched.img and right click mouse and point to 7zip > Add to archive.

- Archive formats select tar and click OK.

- Finally, we are building the magisk-patched.tar file for ODIN (AP)
Boot your Samsung Phone’s into Download Mode
- First, power off your phone.
- Press Button Volume Up, Volume Down and connect your phone to your PC using data cable.
"If you have Bixby button in your phone press "Volume Down", "Bixby" and "Power Button" simultaneously."
- You will now see the Bootloader warning screen.
- Long press Volume Up button to unlock bootloader.
- If your device bootloader already unlocks just press one time volume up button.
- Following this method, you enter to download mode.

Flash Magisk_Patched.tar using Odin flash tool
- Run Odin Tool.
- Connect your Samsung Galaxy device to a PC/Laptop.
- You will see ID:COM section light up blue. It means the port is working.

- BL: Select the firmware file starting BL.
- AP: Select the Magisk Patched AP firmware file (magisk_patched.tar)
- CP: Select the firmware file starting CP.
- CSC: Select the firmware file starting HOME_CSC.
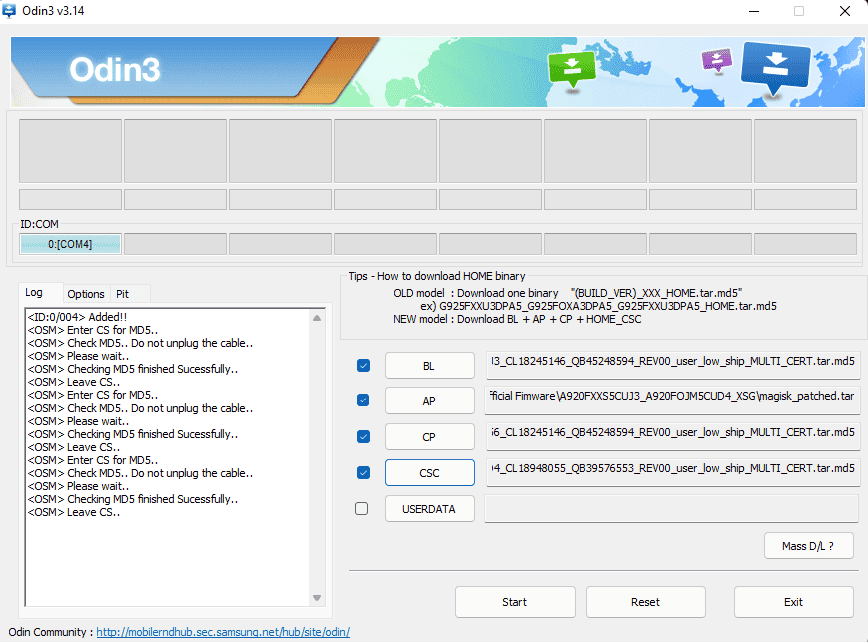
- Once done, click Start to begin the flashing process.
- The first boot will take some time.
Frequently Asked Questions
Rooting a Samsung phone is a process that allows you to gain access to the system files and settings on your device. This can be a useful step for customizing your phone or unlocking its full potential. However, rooting a Samsung phone also carries some risks and can void your warranty. Below are answers to some common questions about rooting Samsung phones.
Can I root my Samsung Phone without Custom Recovery?
Conclusion
What Is Root?
Below mentioned methods also work for Root Samsung Galaxy Device, so don’t worry because the manufacturer of this device has the same and almost similar vital features.
Steps To Check Root Status
Check Root status Of Root Samsung Galaxy Device
- Download Root checker App
- Tap on “Verify Root
- If your device is rooted then it will show you the messages i.e “Congratulations! Root access is properly installed on this device


FAQ (Frequently Asked Question)
How to root Samsung Galaxy A32 without PC
Mobile settings. Next Search security option. Now Enable to Unknown Sources. Download the one-click root app and install it safely. Now Open and click on Root Device. Now the rooting process will start once your device roots; then, you’ll get notified. I.e., Root successfully.
How to root Samsung Galaxy A32 with PC?
You have to download the Magisk.zip file on your Samsung Galaxy A32. Now Boot Device on recovery mode by pressing Volume Down + Power Button. Done! Now Click On install and find the Magisk.zip file in ROM and select it. Now click on to confirm Flash Next; the flashing process is done directly by tapping on Reboot. Congrats, you have successfully Rooted Samsung Galaxy A32.
Can I Install TWRP Recovery On Samsung Galaxy A32 without Root?
Yes, you can install twrp recovery on Samsung Galaxy A32 android device by using the PC method. But if you want to install twrp recovery via twrp official application, then you have to root the Samsung Galaxy A32 device before installing the recovery.
Can I Install Custom ROM on Samsung Galaxy A32 device?
Yes, Once you have installed twrp recovery on your device (Or Root your Samsung device.) Then you can easily install any compatible ROM on your Samsung Galaxy A32 device without any issue.
FAQ (Frequently Asked Question)
Can I Install TWRP Recovery On Root Samsung Galaxy Device without Root?
Yes, you can install twrp recovery on Root Samsung Galaxy Device android device by using the PC method. But if you want to install twrp recovery via twrp official application, then you have to root the Root Samsung Galaxy Device device before installing the recovery.
Can I Install Custom ROM on Root Samsung Galaxy Device device?
Yes, Once you have installed twrp recovery on your device (Or Root your Root Samsung Galaxy Device device.) Then you can easily install any compatible ROM on your Root Samsung Galaxy Device device without any issue.
Root Samsung Phone/Tablet in One Click
Download and install the program on your computer.
Step 1. Prepare for Rooting
Backup files on your Samsung phone or tab that are important to you. To do that, use Android Data Recovery to make a full backup of your messages, contacts, photos, video, apps and more. Moreover, make sure your device has at least 20% battery left.
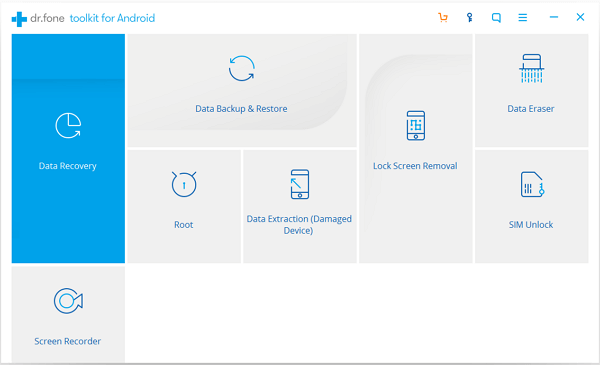
Step 2. Connect Samsung Device to the Program
Launch Android Data Recovery on your computer and choose «Root» from the multiple features on the main screen. Then connect your Samsung device to computer with USB cable.
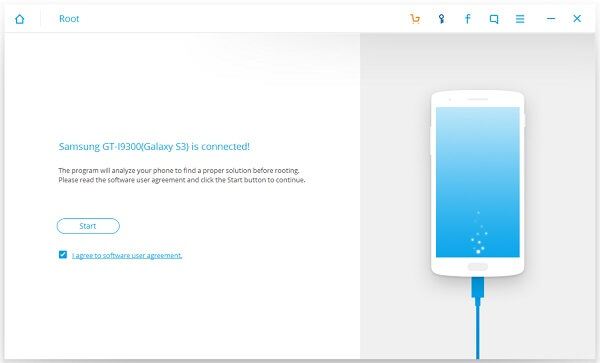
Step 3. Check Root Status
The program will automatically detect your device and begin to check the root status of your phone or tablet. If the phone has been rooted, you’ll see:
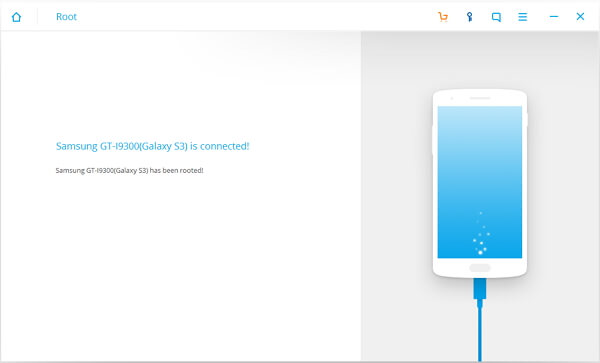
If not, click «Start» to continue.
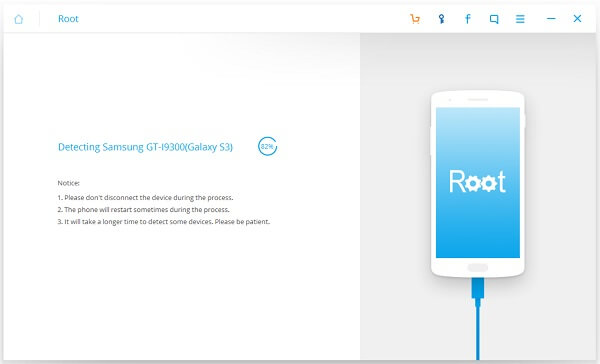
Step 4. Detect & Find Suitable Solution for Your Device
The program will start to detect details of your Samsung phone or tablet and find suitable root solution accordingly. During the process, you don’t need to do anything but keep the device connected to computer.
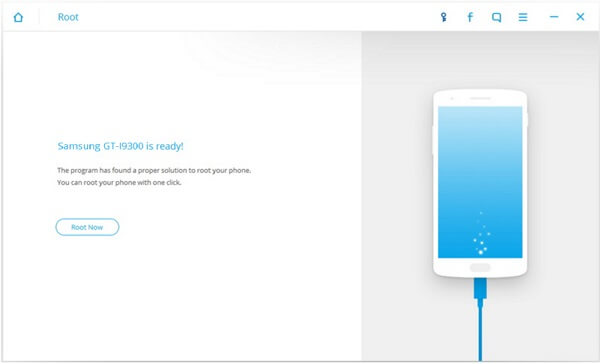
Step 5. Root Samsung Device in One Click
When you see «Root Now», it means that the program has fully prepared for rooting your device. Click «Root Now» and wait patiently until you see «XX(device model) root completed».
Why do you need to Root Samsung Galaxy A31?
Behind every work, there is a reason. So before rooting your android device, you should have a proper reason to root your smartphone.
But before going to the next steps, we should be thankful to the TWRP team and xda developers because these things can’t be possible without them.
Whether there are many third-party applications available on the play store, but and TWRP both are the sign of trust. So you can go with them. Did you enjoy this guide?
As everyone knows, after rooting, smartphones became very fast. But it’s ultimately a myth. Yes, I agree that after rooting, your device would perform better than before.
But It’s not necessary because this process is not as easy as you think. And with a bit of a mistake, your device may brick. Here I guide you with some easy steps to root an android device. If you love to phones, then you’ll love this guide. Before going to the next level, Let’s jump to the advantages of rooting.
Why Would You Like to Root Your Samsung Device?
1. Install custom ROMs with fabulous features that are unavailable on default ROM;2. Have complete backups of the entire phone/tablet;3. Get rid of Touchwiz with other themes and fonts;4. Access to more apps;5. Uninstall bloatwares.
What Is Root?
Below mentioned methods also work for Samsung Galaxy A32, so don’t worry because the manufacturer of this device has the same and almost similar vital features.
Why do you need to Root Samsung Galaxy A32?
Behind every work, there is a reason. So before rooting your android device, you should have a proper reason to root your smartphone.
But before going to the next steps, we should be thankful to the TWRP team and xda developers because these things can’t be possible without them.
Whether there are many third-party applications available on the play store, but and TWRP both are the sign of trust. So you can go with them. Did you enjoy this guide?
As everyone knows, after rooting, smartphones became very fast. But it’s ultimately a myth. Yes, I agree that after rooting, your device would perform better than before.
But It’s not necessary because this process is not as easy as you think. And with a bit of a mistake, your device may brick. Here I guide you with some easy steps to root an android device. If you love to phones, then you’ll love this guide. Before going to the next level, Let’s jump to the advantages of rooting.
What Is Root?
Below mentioned methods also work for Root Samsung Galaxy A31, so don’t worry because the manufacturer of this device has the same and almost similar vital features.
FAQ (Frequently Asked Question)
Can I Install TWRP Recovery On Root Samsung Galaxy A31 without Root?
Yes, you can install twrp recovery on Root Samsung Galaxy A31 android device by using the PC method. But if you want to install twrp recovery via twrp official application, then you have to root the Root Samsung Galaxy A31 device before installing the recovery.
Can I Install Custom ROM on Root Samsung Galaxy A31 device?
Yes, Once you have installed twrp recovery on your device (Or Root your Root Samsung Galaxy A31 device.) Then you can easily install any compatible ROM on your Root Samsung Galaxy A31 device without any issue.
Why do you need to Root Samsung Galaxy Device?
Behind every work, there is a reason. So before rooting your android device, you should have a proper reason to root your smartphone.
But before going to the next steps, we should be thankful to the TWRP team and xda developers because these things can’t be possible without them.
Whether there are many third-party applications available on the play store, but and TWRP both are the sign of trust. So you can go with them. Did you enjoy this guide?
As everyone knows, after rooting, smartphones became very fast. But it’s ultimately a myth. Yes, I agree that after rooting, your device would perform better than before.
But It’s not necessary because this process is not as easy as you think. And with a bit of a mistake, your device may brick. Here I guide you with some easy steps to root an android device. If you love to phones, then you’ll love this guide. Before going to the next level, Let’s jump to the advantages of rooting.
Root Samsung Phone/Tablet by Flashing CF-Auto-Root Package
1. Backup your Samsung device to computer or somewhere.
2. The device should be fully charged or at least 80% charged.
3. Check the model of your device. You should find it in «Settings» > «About Phone (Device)».
4. According to the model of your Samsung phone or tablet, find and download suitable CF-Auto-Root package
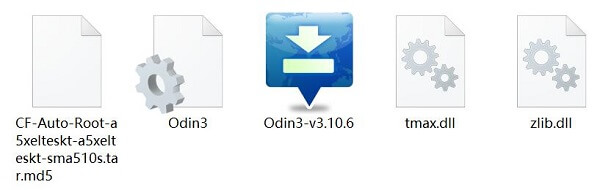
5. Unzip the downloaded file, and install Odin3 .exe file on your computer.
6. If you are using Android 5.0 or later, enable OEM Unlock on your Samsung device: Tap «Build number» seven times to enable»Developer options» and then toggle on «Enable OEM unlock» on «Developer Options».
7. Put Samsung device into Odin Download mode: turn off the device and keep holding Home + Power + Volume Down buttons until you see the warning window. Press Volume Up to enter.
8. Open Odin on your computer and connect your Samsung device to the computer. The messages «Added!» will appear, showing that Odin has detected your device.
9. Click the PDA button and select the .tar.md5 file from CF-Auto-Root package. After adding .tar.md5 file, click «Start» to commence rooting.

Tip: Ensure that Auto-reboot and Factory Reset Time options are ticked before rooting.
10. When you see «Pass!», you’ll know that the rooting process has been completed successfully. Your device will reboot in recovery mode.
11. Wait patiently until you see the home screen of your device, then disconnect your device with the computer.
Your device is successfully rooted. The first method works not only on Samsung devices, but others such as LG, Sony devices. However, the latter only supports Samsung devices.
Tips – Implement Before Rooting
These tips are a must; you can’t root your android device without implementing these tips. So I recommend you implement these tips before going to the next step of the rooting process. Steps are –
- Samsung Galaxy A32 bootloaders should be unlocked; unlocking the bootloader is quite an easy process.
- Before rooting, you have to install TWRP recovery on your device,
- The device battery should be charged at least 60%. This step is necessary because sometimes the rooting process takes time, so avoiding stopping the procedure makes sure you set the required % of battery.
Merits And Demerits Of Root
Here we’ll guide you to the dangerous things about roots. Let me clear some facts about Root. Yes, Root gives you more functionality to modify your Android device.
In other words, we can say these are the pros of Rooting. Below I mention some Gem points about Root. Let’s start –
Here we talk about some common and significant facts about rooting. Let’s start –
- You can easily customize your android device without facing any problem.
- Install Modified applications and enjoy the pro version for free
- install Android 11 Beta Custom ROM
Well, there are a bunch of demerits after rooting. So let’s explore step by step.
- First, after rooting, the Samsung Galaxy A31 device warranty would be lost permanently. Mean you can’t claim any hardware warranty against customer care. But if you want to back your device warranty, then you have to unroot your device.
- You can’t use banking applications because banking applications are too secure. So banking applications don’t run on any rooted device. But by using magisk, you can use banking applications without facing any problem. I suggest you download the magisk manager from the official website to use the banking application.
Check Root Status
- Download Root checker App
- Tap on “Verify Root
- If your device is rooted then it will show you the messages i.e “Congratulations! Root access is properly installed on this device
Steps To Check Root Status
Check Root status Of Samsung Galaxy A31
Note : This application is paid. But if you’re serious to check whether your android device is rooted or not. Then this application is perfect for you. Because checking root status yourself take lot’s of time & efforts. But Safe Root Checker will do it in 2-3 seconds for you. It’ll save your time and efforts. We think that your time is more important than money. Most important this application recommended by Safe Box Guide editor’s and it is 100% secured.
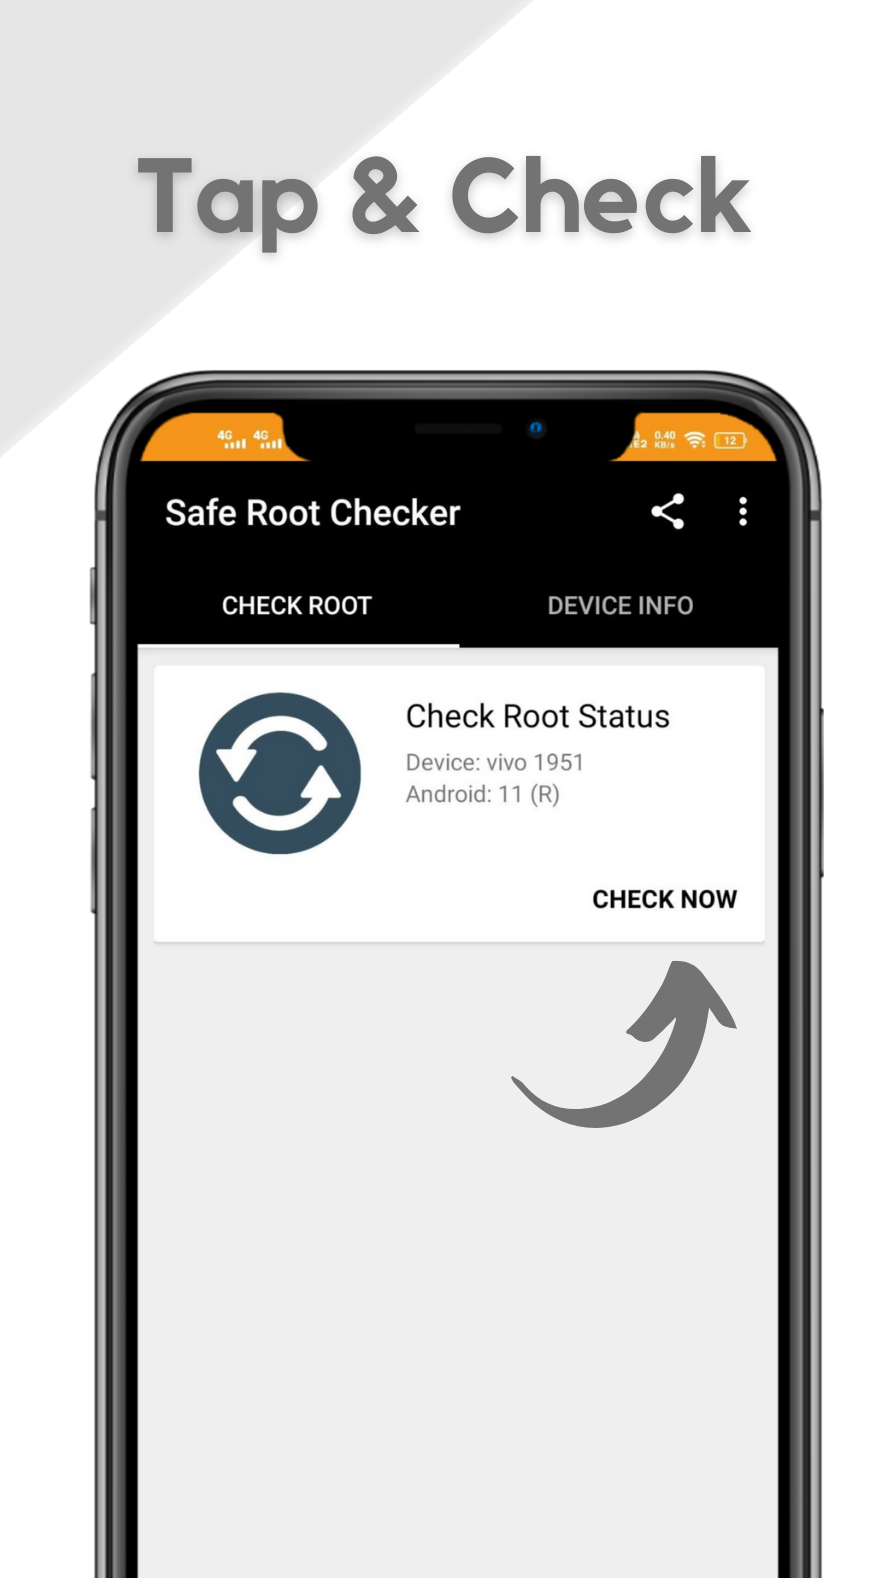
- Download Safe Root checker App – Check out here
- After installing properly, Next open application.
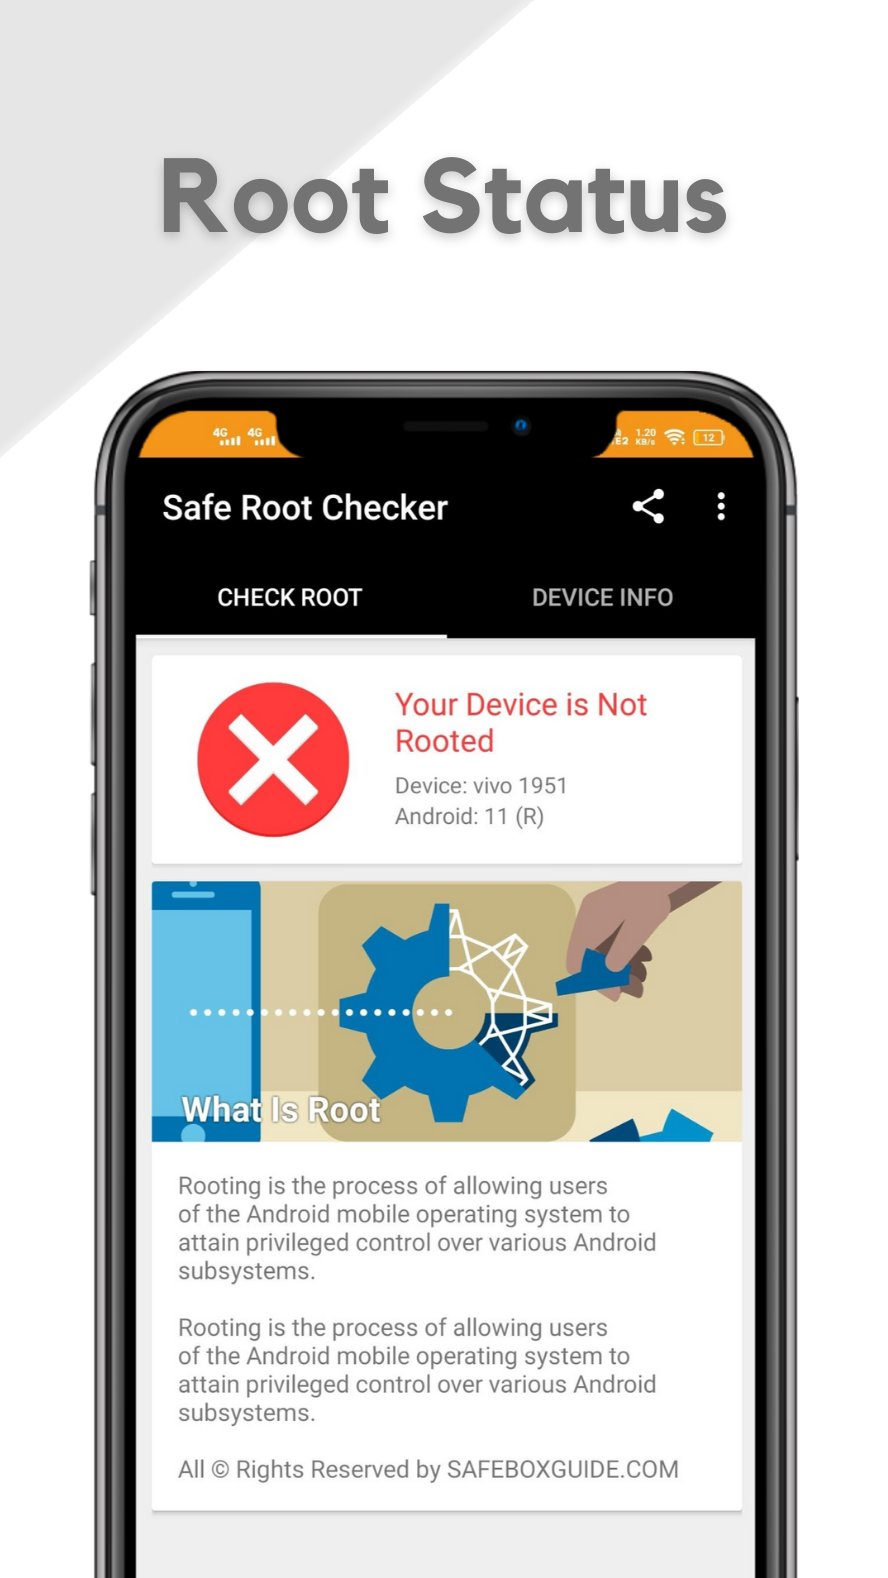
- Next, Tap on “Check Now” If your device is rooted then it will show you the messages i.e “Congratulations! Root access is properly installed on this device” Else you’ll get a message that “Your Device Is Not Rooted”
Isn’t it’s too much simple and time saving application.
Still want more information about safe root checker. Then make sure you check out the Safe Root Checker official released post here.
Merits And Demerits Of Root
Here we’ll guide you to the dangerous things about roots. Let me clear some facts about Root. Yes, Root gives you more functionality to modify your Android device.
In other words, we can say these are the pros of Rooting. Below I mention some Gem points about Root. Let’s start –
Here we talk about some common and significant facts about rooting. Let’s start –
- You can easily customize your android device without facing any problem.
- Install Modified applications and enjoy the pro version for free
- install Android 11 Beta Custom ROM
Well, there are a bunch of demerits after rooting. So let’s explore step by step.
- First, after rooting, the Samsung Galaxy Device device warranty would be lost permanently. Mean you can’t claim any hardware warranty against customer care. But if you want to back your device warranty, then you have to unroot your device.
- You can’t use banking applications because banking applications are too secure. So banking applications don’t run on any rooted device. But by using magisk, you can use banking applications without facing any problem. I suggest you download the magisk manager from the official website to use the banking application.
Merits And Demerits Of Root
Here we’ll guide you to the dangerous things about roots. Let me clear some facts about Root. Yes, Root gives you more functionality to modify your Android device.
In other words, we can say these are the pros of Rooting. Below I mention some Gem points about Root. Let’s start –
Here we talk about some common and significant facts about rooting. Let’s start –
- You can easily customize your android device without facing any problem.
- Install Modified applications and enjoy the pro version for free
- install Android 11 Beta Custom ROM
Well, there are a bunch of demerits after rooting. So let’s explore step by step.
- First, after rooting, the Samsung Galaxy A32 device warranty would be lost permanently. Mean you can’t claim any hardware warranty against customer care. But if you want to back your device warranty, then you have to unroot your device.
- You can’t use banking applications because banking applications are too secure. So banking applications don’t run on any rooted device. But by using magisk, you can use banking applications without facing any problem. I suggest you download the magisk manager from the official website to use the banking application.
Tips – Implement Before Rooting
You can’t root your android device without implementing these tips. So I recommend you implement these tips before going to the next step of the rooting process. Steps are –
- Samsung Galaxy Device bootloader should be unlocked; unlocking the bootloader is quite an easy process.
- Before rooting, you have to install TWRP recovery on your device,
- The device battery should be charged at least 60%. This step is necessary because sometimes the rooting process takes time, so avoiding stopping the procedure makes sure you set the required % of battery.
Tips – Implement Before Rooting
You can’t root your android device without implementing these tips. So I recommend you implement these tips before going to the next step of the rooting process. Steps are –
- Samsung Galaxy A31 bootloader should be unlocked; unlocking the bootloader is quite an easy process.
- Before rooting, you have to install TWRP recovery on your device,
- The device battery should be charged at least 60%. This step is necessary because sometimes the rooting process takes time, so avoiding stopping the procedure makes sure you set the required % of battery.
Guide To Root Samsung Galaxy A31 via one-click root (Recommended)
This method is most used and successful software to Root Samsung Galaxy A31 device. This software is paid and over 10000+ devices rooted successfully.
Your device will be root is guaranty. Else 100 % Money refund instantly. Sounds Crazy!
Note : This method is paid. We recommend to go with paid method only, if you want to save your time and efforts. Because doing this own-self takes lots of time and efforts. Believe me if you’re rooting your device first time, then it’ll be full of mess.
On the other hand at One Click Root, there are numbers of employees who are expert in Rooting android device. So they’ll root your device by charging a little amount. And lastly your device will be safe.
- Charge device 30% Battery or more.
- Make sure you have a USB cable.
- A PC/Laptop (May be required)
Steps to Root Samsung Galaxy A31 Via One Click Root
- First, Go the one click root website –
- Then Click on Root Now button.
- Next, type your device brand name. Next, type device model number, and tap on next button.
- Now select device version and tap on Verify Rootable.
- If your device is rootable then you need to pay the fees and follow their instruction to root your device.
Hope you understand all the steps mention above. Now check out the One Click Root website to implement the process. Believe us rooting more than easy as you think with the help of One Click Root.
That’s all! This method of rooting is just like above but with different applications. Now it’s your turn to root your device. Dropdown your root story in the comment section. If you face any problem, then ask your question. We’ll be glad to reply to you.
Want to Root your android device with the help of Root Expert.
Our team is ready to help you root your android device remotely. here to know more about Safe Box Guide Experts Appointment.
Guide To Root Samsung Galaxy Device via one-click root (Recommended)
This method is most used and successful software to Root Samsung Galaxy Device device. This software is paid and over 10000+ devices rooted successfully.
Your device will be root is guaranty. Else 100 % Money refund instantly. Sounds Crazy!
Note : This method is paid. We recommend to go with paid method only if you want to save your time and efforts. Because at One Click Root there are numbers of employees who are expert in Rooting android device. So they’ll root your device by charging a little amount.
- Charge device 30% Battery or more.
- Make sure you have a USB cable.
- A PC/Laptop (May be required)
Steps to Root Samsung Galaxy Device Via One Click Root
- First, Go the one click root website –
- Then Click on Root Now button.
- Next, type your device brand name. Next, type device model number, and tap on next button.
- Now select device version and tap on Verify Rootable.
- If your device is rootable then you need to pay the fees and follow their instruction to root your device.
Hope you understand all the steps mention above. Now check out the One Click Root website to implement the process. Believe us rooting more than easy as you think with the help of One Click Root.
That’s all! This method of rooting is just like above but with different applications. Now it’s your turn to root your device. Dropdown your root story in the comment section. If you face any problem, then ask your question. We’ll be glad to reply to you.
Root Samsung Galaxy A32 via one-click root (Recommended)
This method is most used and successful software to root Samsung Galaxy A32 device. This software is paid and over 10000+ devices rooted successfully.
Your device will be root is guaranty. Else 100 % Money refund instantly. Sounds Crazy!
- Charge device 30% Battery or more.
- Make sure you have a USB cable.
- A PC/Laptop (May be required)
Steps to Root Samsung Galaxy A32 Via One Click Root
- First, Go the one click root website –
- Then Click on Root Now button.
- Next, type your device brand name. Next, type device model number, and tap on next button.
- Now select device version and tap on Verify Root Rootable.
- If your device is rootable then you need to pay the fees and follow their instruction to root your device.
Hope you understand all the steps mention above. Now check out the One Click Root website to implement the process. Believe us rooting more than easy as you think with the help of One Click Root.
That’s all! This method of rooting is just like above but with different applications. Now it’s your turn to root your device. Dropdown your root story in the comment section. If you face any problem, then ask your question. We’ll be glad to reply to you.
")


")