

If you’re looking to get the most out of your Samsung Galaxy A31, then rooting it is the way to do it. Rooting your phone gives you access to its full potential and allows you to customize and optimize it however you see fit.
Finally, we have come to the end of our article. We have discussed six methods to Root Samsung Galaxy A31. Of these six methods, OneClickRoot and KingoRoot App are the easiest ones.
If you are a beginner or don’t want to go through all the hassle, we recommend using either of these two methods. All the other rooting methods require some level of expertise and knowledge about Android rooting and custom recovery.
This guide will show you How to Root Samsung Galaxy A31 with the advanced rooting method Magisk. I have shown you two methods to Root this device, one with TWRP recovery and the second one without the requirement of TWRP.
If your device doesn’t support TWRP, then you can go with the second step. For this method, we need the stock firmware of the Samsung Galaxy A31. After that, we need to extract the boot image and patch it with Magisk.
Now let me tell you why we are using Magisk over other rooting methods like SuperSU.
Rooting brings a lot of benefits to any Android device. Some of them are: You can use Magsik modules and Xposed Framework to get more powerful features, downclock or Overclock the CPU to increase battery and performance, and install Substratum to theme the UI to a whole new level.

Stock Firmware for Galaxy A31
Odin Flash Tool
Magisk and Manager
- How to Root Samsung Galaxy A31 with Magisk
- Unlock the Bootloader
- Patch the AP. tar. md5 file using Magisk Manager app
- Flash the patched boot. img using Odin
- Preparing Your Samsung Galaxy A31 for TWRP Installation
- Enable the OEM unlocking option on Samsung Galaxy A31
- Required Files for TWRP Installation
- Conclusion
- What is Root?
- Advantages of Root Samsung Galaxy A31
- Disadvantages of Root Samsung Galaxy A31
- How to Root Samsung Galaxy A31?
- Before You Begin
- Preparing boot image
- Patching boot image
- Flash patched boot file
- Re-installing Magisk
- Что означает root android?
- Каковы опасности рутирования вашего мобильного телефона Android?
- Учебник по рутингу Samsung Galaxy A31?
- Получите root права на свой андроид с помощью компьютера
- Получите root права на свой Samsung Galaxy A31 без компьютера
- Install TWRP on Samsung A31
- Root Samsung Galaxy A31 without TWRP
- Unlock Developer Options on Samsung Galaxy A31
- Confirming Bootloader Unlock
- Download Stock Firmware for Samsung Galaxy A31
- Download 7zip and LZ4 Tools
- Preparing Patched Boot Image file
- Patch the boot. img Firmware File with Magisk App
- Convert. IMG File to. TAR (For ODIN)
- Boot your Samsung Galaxy A31 into Download Mode
- Advantages of Rooting
- Disadvantages of Rooting
- What is the root and what are the benefits and harms
- What is the difference between SuperSU and Magisk
- How To Root Galaxy A315F
- What do you mean by Rooting Android?
- Advantages or Benefits of Rooting the Samsung Galaxy A31?
- Cons or Disadvantages of Rooting the Samsung Galaxy A31?
- What is Magisk?
- Let’s Root Samsung Galaxy A31
- Root Samsung Galaxy A31 By Magisk
- Root Samsung Galaxy A31 via PC
- Root Samsung Galaxy A31 via KingoRoot App
- Root Samsung Galaxy A31 By iRoot PC
- How To Root Galaxy A315G
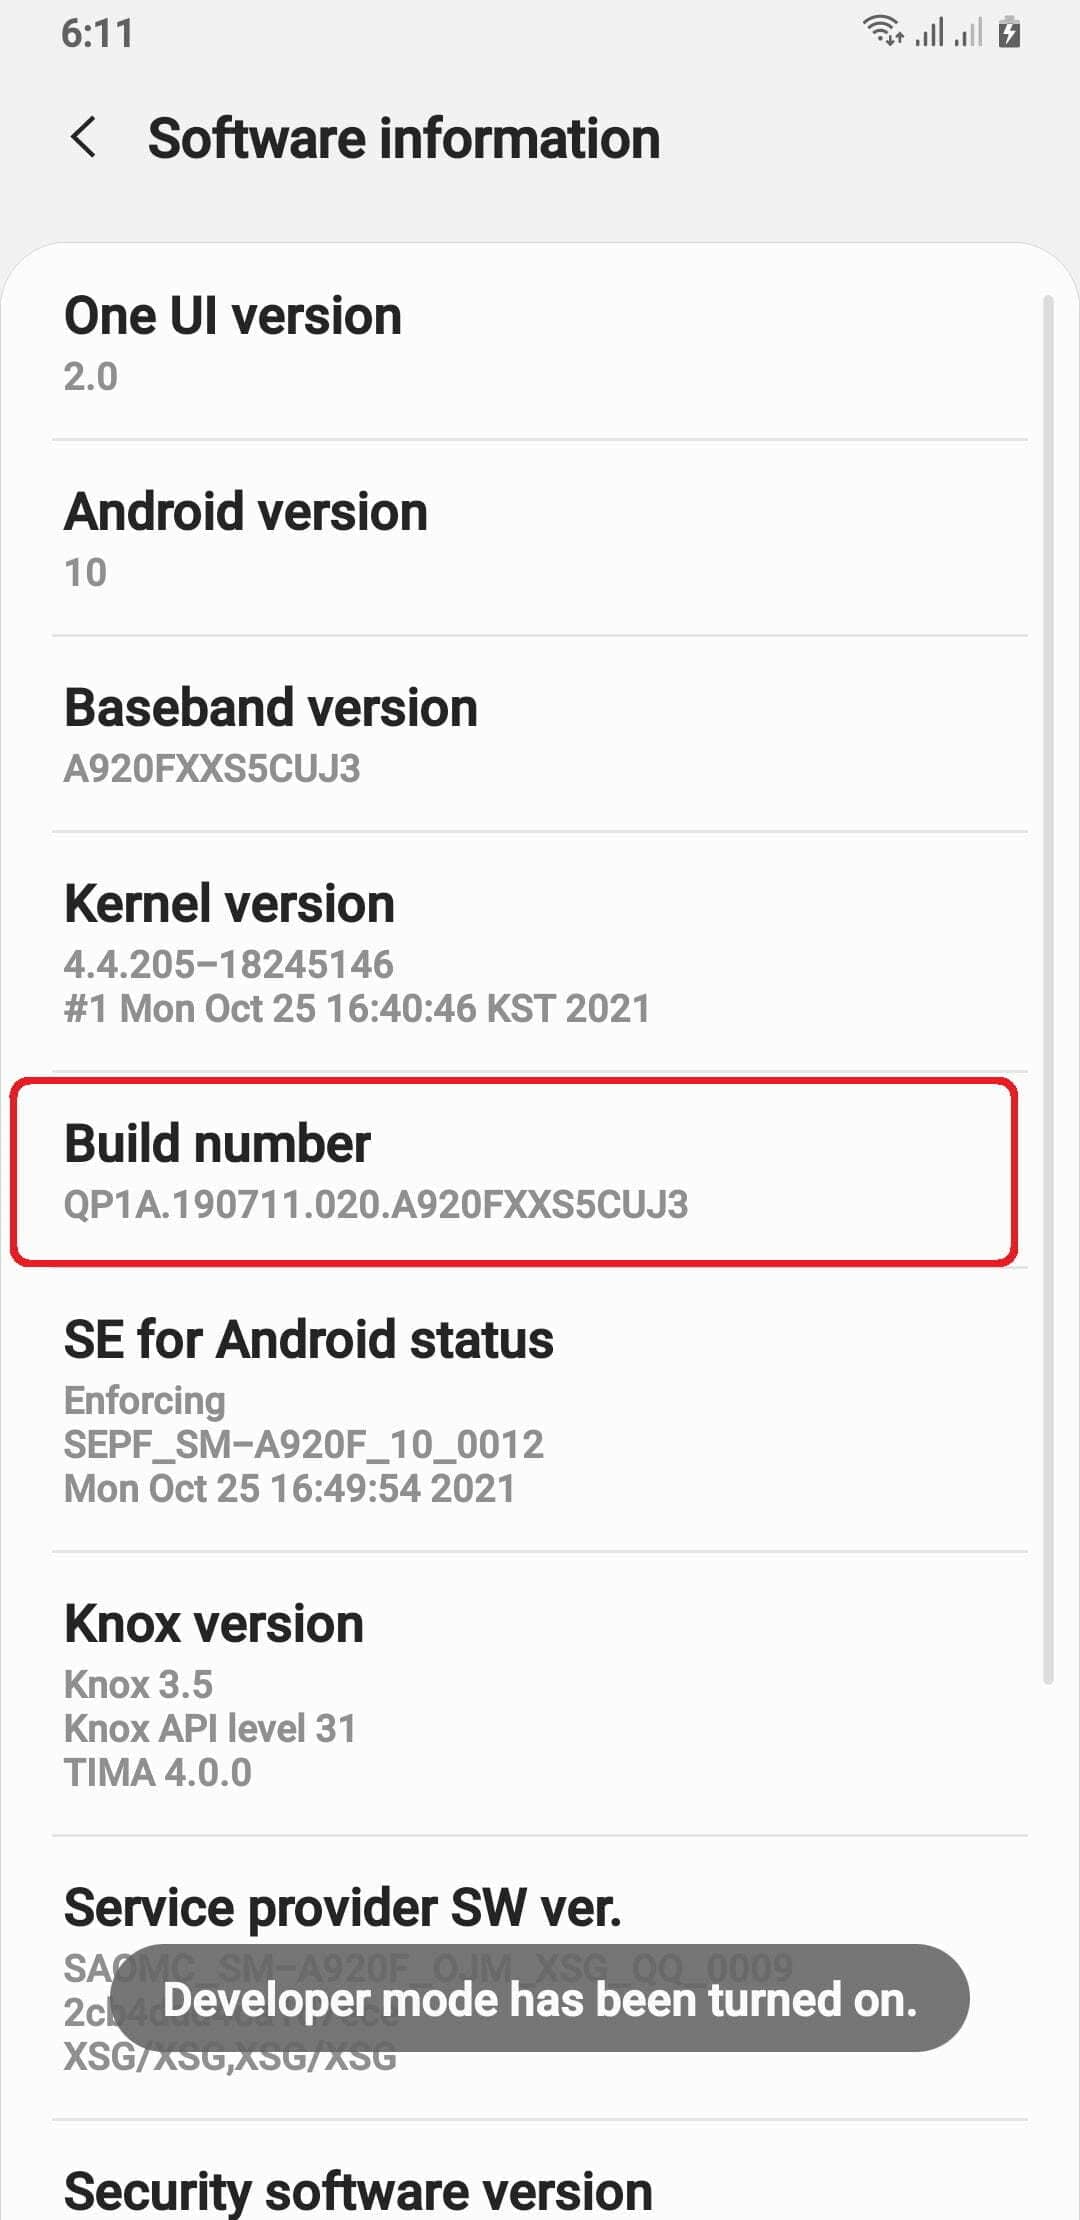
- How to Check if Your Samsung Galaxy A31 Is Rooted or Not?
- Root Samsung Galaxy A31 using TWRP Recovery
- Root Samsung Samsung Galaxy A31 without TWRP Recovery
- How to Verify if your Samsung Galaxy A31 is Rooted successfully?
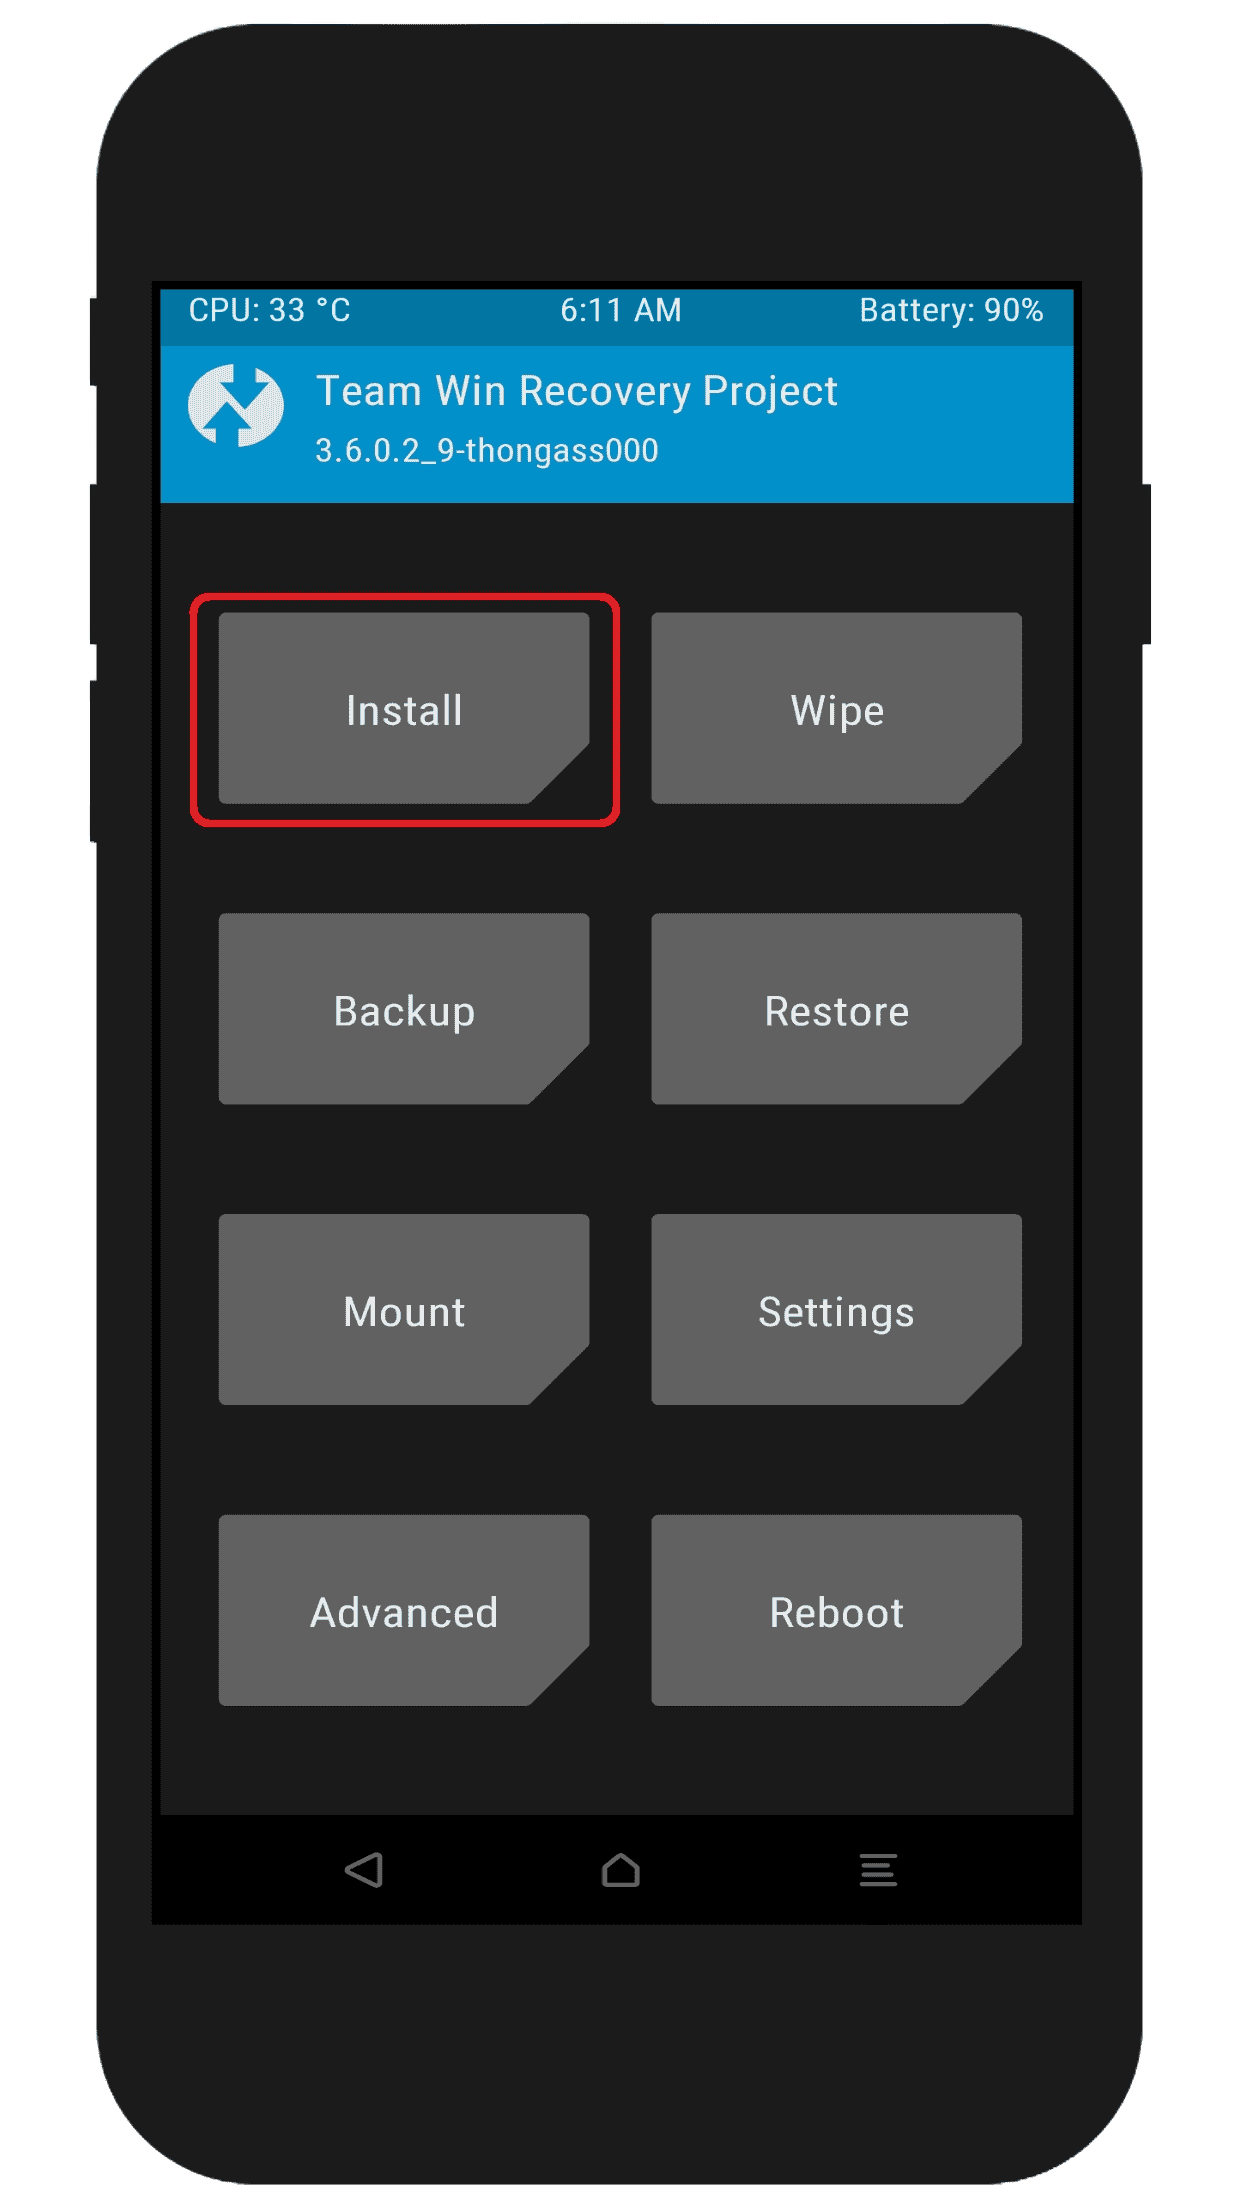
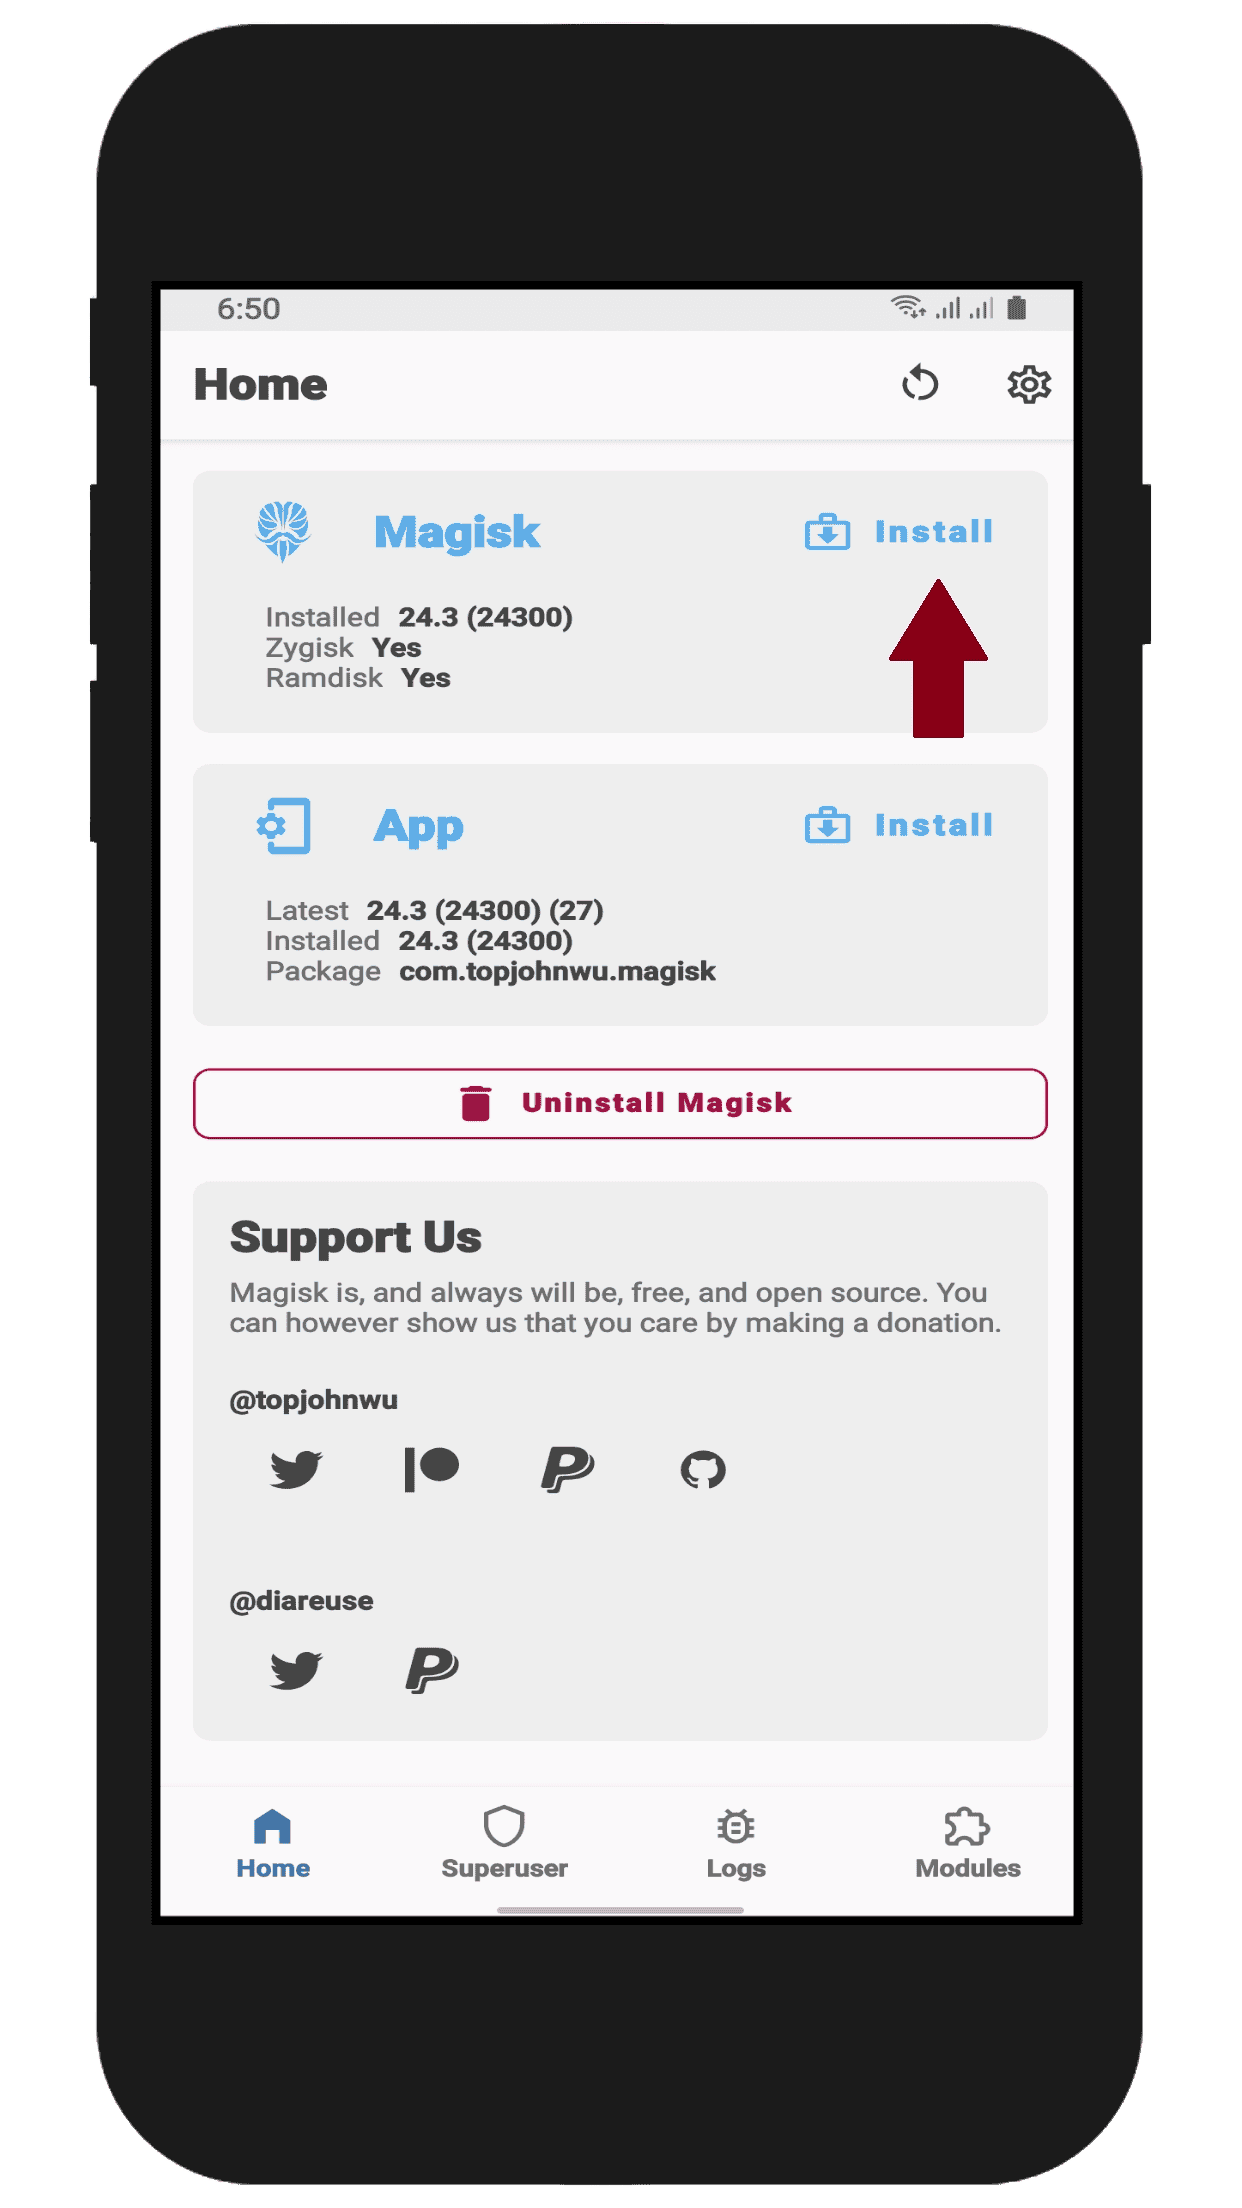
How to Root Samsung Galaxy A31 with Magisk
Step 1: Unlock the Bootloader.
Step 2: Download Firmware for Samsung Galaxy A31 and Extract AP.tar.md5 file.
Step 3: Patch the Boot.img using Magisk Manager.
Step 4: Flash the Patched Boot.img using PC (Odin).
Step 5: Factory Reset the Device and Boot into the System with Magisk with Right Key Combo.
Unlock the Bootloader

Patch the AP. tar. md5 file using Magisk Manager app

Flash the patched boot. img using Odin
That’s it. You have successfully Rooted Samsung Galaxy A31
If you are stuck in any step or have any problem, just leave a comment below and we will help you out.
Welcome to our guide on how to install TWRP recovery on your Samsung Galaxy A31. TWRP, or Team Win Recovery Project, is an open-source software that allows you to install custom ROMs, backups, and other modifications to your device. In this guide, we will be walking you through the process of installing TWRP recovery on your Samsung Galaxy A31, step by step.
Before we begin, it’s important to note that installing TWRP recovery will void your device’s warranty and that you do this at your own risk. It’s also important to make sure that your device is fully charged and that you have backed up all of your important data. With that out of the way, let’s get started and install TWRP recovery on your Samsung Galaxy A31.

Install TWRP Recovery on Samsung Galaxy A31
Preparing Your Samsung Galaxy A31 for TWRP Installation
Enabling developer options
Enable the OEM unlocking option on Samsung Galaxy A31
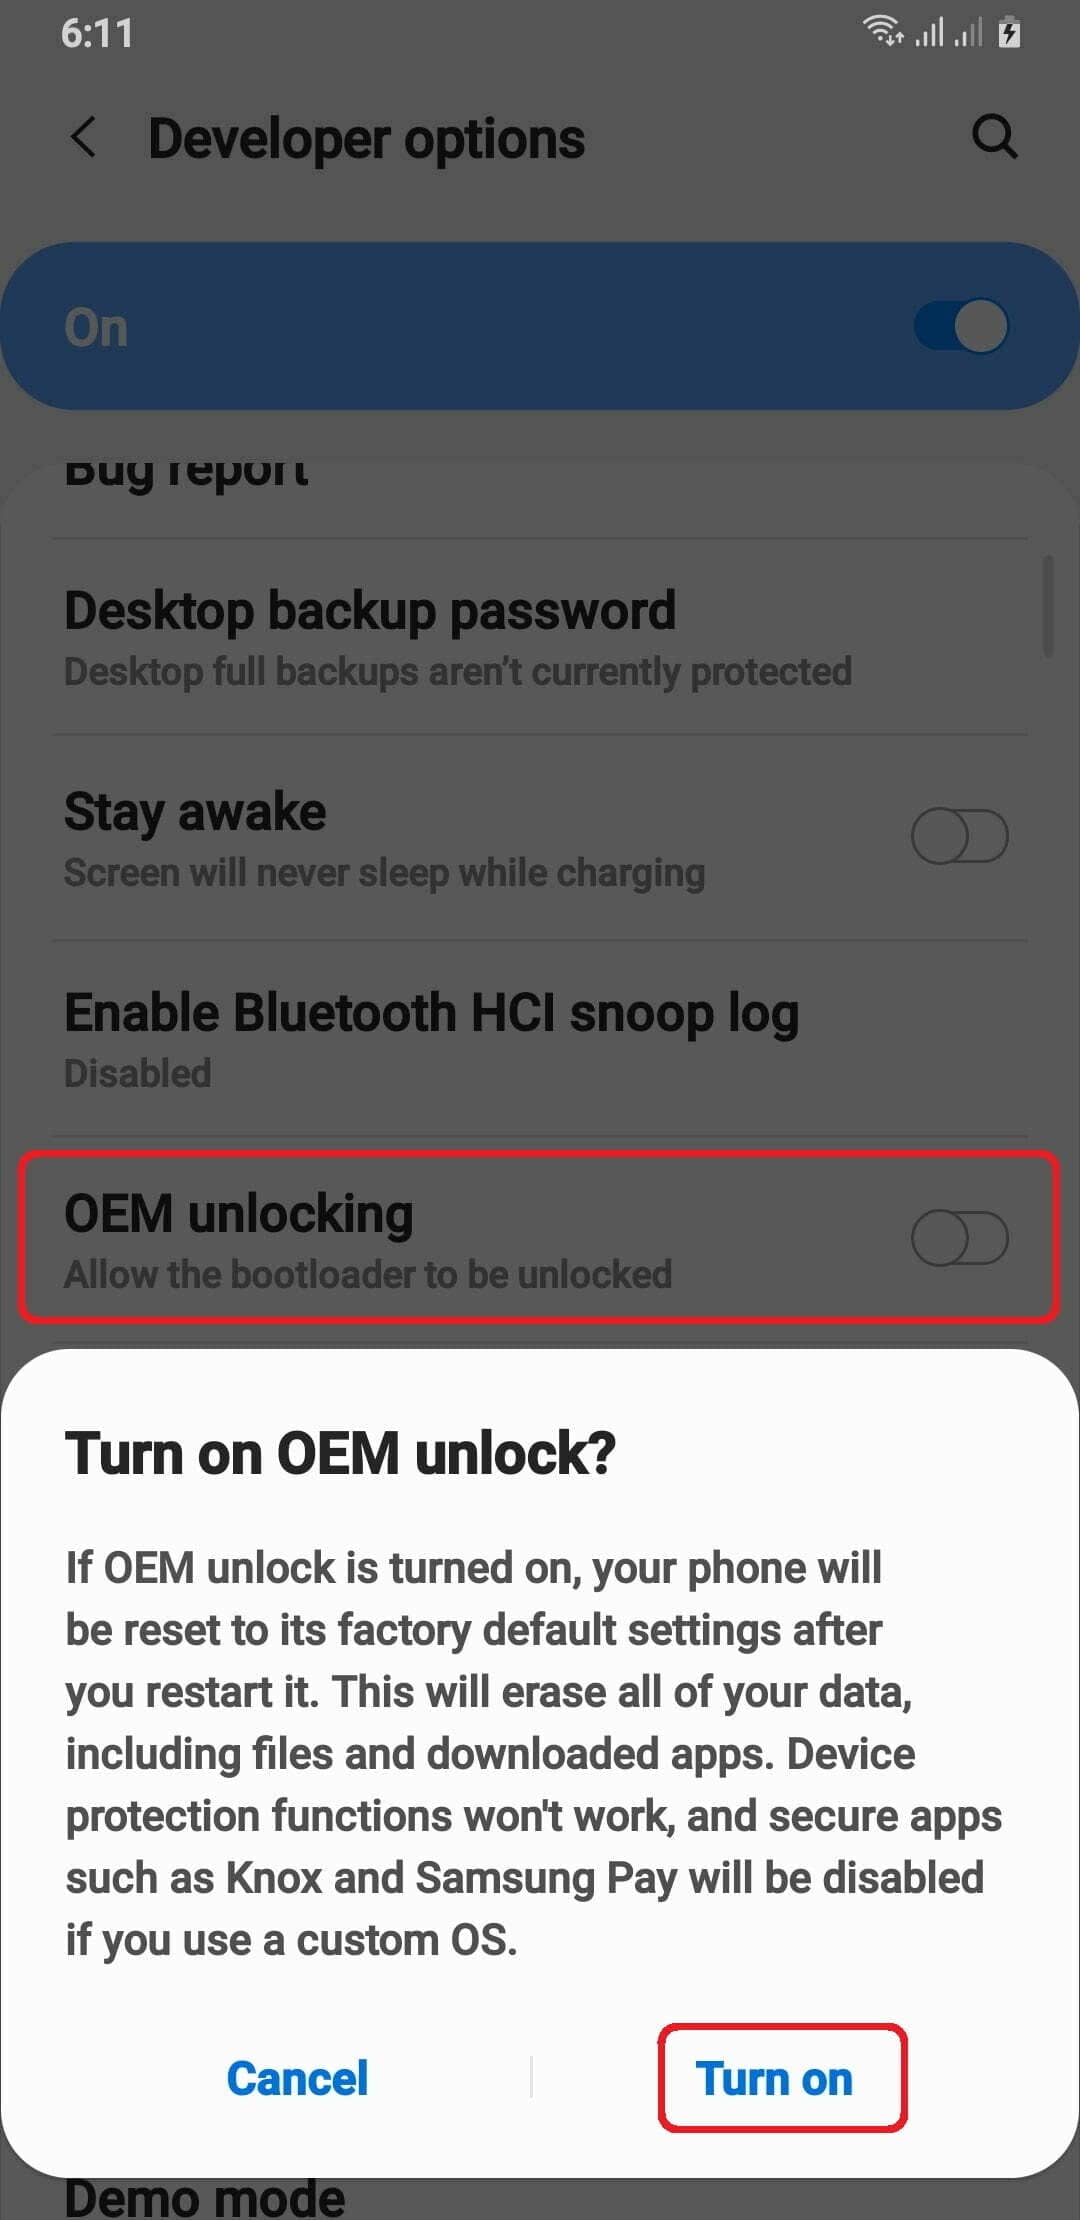
Enable the OEM Unlocking
In this section, we will successfully unlock the bootloader of your Samsung Galaxy A31. This is a necessary step before installing TWRP recovery on your device. Once the bootloader is unlocked, your phone will be ready for TWRP installation, and you will be able to modify the device’s software.

Samsung Download Mode
Required Files for TWRP Installation
In this section, we will be providing you with the necessary files to install TWRP recovery on your Samsung Galaxy A31. These files include TWRP, Disable Dm Verity Force Encrypt, and vbmeta. Make sure to download these files and have them ready before proceeding with the TWRP installation process. These files are essential for a successful TWRP installation and unlocking the full potential of your device.
Download: Disable DM Verity Forece Encrypt
Installation TWRP Recovery via Odin
Read this: How to Root Samsung Galaxy A31
Conclusion
Hey there fellows, are you looking for a simple method to root Samsung Galaxy A31? If yes, you have come across the right place. Here you will get a step-by-step guide.
You don’t want to stay behind the trend of the fast-growing tech world. In that case, if your phone won’t work correctly, what would you do? The one thing that you can try is to unlock the rooting privileges to take control over everything.
Once you have attained those immersive powers, you can change the interface layout, install custom rooms, and apply different software UI. And Before you get started, you need to know about some standalone apps for the upcoming process.
So let’s get started with the what is the root section and understand the basics.
What is Root?
Over the years, One UI has become quite useful compared to what it looked like last few years ago. The point here is that you won’t face too many problems while using this interface. But still, you will notice that there are a handful of lot bloatware apps.
If you don’t want to feel the same situation again, we highly recommend unleashing those impressive privileges. You can effortlessly install different advanced software, control your smartphone system properly, and install custom ROMs.
You can install the latest Android version, you can also do that. But If you open those fascinating traits, you have to face some flaws. So in that case, we suggest you read the pros and cons of rooting for understanding the process.
Advantages of Root Samsung Galaxy A31
Besides this, if you sense that the phone is running slowly, you can even improve the processing speed. Furthermore, there are numerous custom ROMs to design the best personalized interface that precisely works according to your commands.
Disadvantages of Root Samsung Galaxy A31
Likewise, overheating issues can be seen and immediate battery drains are the most common problems that appear, But in the worst-case scenario, your phone might get stuck in the bootloop or cause issues like a complete brick.
How to Root Samsung Galaxy A31?
I hope that you understand both sides of the rooting, it will help you to make the final decision whether you want to go for those fantastic features or not.
In the subsequent part, you will grasp a simple way to root. Make sure that you read the guide and finish the prerequisite first to avoid risk to some extent. With that said, let’s head to the next part of the procedure and begin our journey.
Before You Begin
Disclaimer: Droidmeguide is not responsible for any bricking or bootloop issue to your phone and you must take all the precautions to avoid damage.
Preparing boot image


Patching boot image


Flash patched boot file


Re-installing Magisk
Hurray! You have finished the rooting guide for Samsung Galaxy A31. With this, you can achieve new milestones and quickly implement many customization attributes.
Now, you can also flash various UI interfaces efficiently. So, what are you waiting for? Get those fantastic features! On the other hand, if you face any trouble while reading this guide, do let us know in the comment part. We will provide a solution ASAP.
Кому-то слово «корень» может показаться сложным. Получение root-прав на Android означает, что можно будет получить доступ к системным файлам вашего Samsung Galaxy A31 и изменить мельчайшие детали (внешний вид, аккумулятор, расположение приложений, установка обновлений и т. Д.). В этой статье мы подробно расскажем вам, что такое рутирование Android и почему это может быть интересно. Впоследствии вы увидите возможные опасности рутирования вашего Samsung Galaxy A31. И, наконец, вы увидите, что делать, чтобы получить root права на свой Samsung Galaxy A31 с помощью компьютера, но также и с помощью приложения.

Что означает root android?
Root an Android позволяет вам иметь доступ к исходным файлам, а также к системе (ОС) вашего Samsung Galaxy A31. Это позволит вам еще глубже изменить вашу ОС. Вы не будете ограничены никакими ограничениями, установленными производителем вашего Samsung Galaxy A31. Вы будете похожи на администратора своего мобильного телефона. Однако будьте осторожны, манипулирование системными файлами на телефоне Android может привести к серьезным сбоям в работе, если оно когда-либо будет выполнено неправильно. Не забудьте всегда делать резервную копию вашего Samsung Galaxy A31 непосредственно перед загрузкой файлов ROM (модифицированная версия Android).
В большинстве случаев рутирование ноутбука не принесет пользы. Обычное использование не требует такой практики. Вы можете быть заинтересованы в рутировании своего Samsung Galaxy A31 при определенных условиях, например:

Каковы опасности рутирования вашего мобильного телефона Android?
Есть риски при рутировании вашего Android:
Учебник по рутингу Samsung Galaxy A31?
У вас есть разные способы получить root права на android. Вы можете сделать это с помощью программного обеспечения или приложения.
Получите root права на свой андроид с помощью компьютера
У вас есть программное обеспечение для рутирования вашего телефона Android, например Kingoroot . Kingoroot — это программное обеспечение, которое позволит вам получить root-права на свой Samsung Galaxy A31 и, следовательно,:
Шаги для получения root-прав с помощью Kingo root в Windows
Получите root права на свой Samsung Galaxy A31 без компьютера
Будь то Android 10 или Android 11, Android 8.0, а также Android 7. 0, у вас может не быть ПК для этого. Что касается того, что вы ищете в корне вашего Samsung Galaxy A31 (аккумулятор, приложение, выпуск памяти и т. Д.), Вы найдете очень специфические корневые приложения, такие как: Root Essentials
Root Essentials позволит вам активировать подходящее хранилище на всех телефонах Android с версией Marshmallow и др. Вы сможете выбрать расположение приложений. Вы сможете откалибровать батарею, а также разрешение экрана. Вы сможете устанавливать новые шрифты и бесчисленные функции. Root Booster
Усилитель корня предназначен для людей, которым требуется более высокая производительность для плавного и бесперебойного использования своих приложений, или для людей, которым необходимо повысить свою автономность. Корневое приложение Kingo
Если вы ищете другие учебные материалы по своему Samsung Galaxy A31, вы можете изучить их в категории: Samsung Galaxy A31.
Rooting your phone is a great way to take control of your device and unlock its full potential. Not only does it allow you to remove unwanted system apps, but it also increases the performance of your device by increasing RAM usage and overclocking the CPU frequency. With a rooted Samsung Galaxy A31, you can experience a faster and more efficient device, ready to take on any task. So, let’s get started and root your Samsung Galaxy A31 using Magisk.
How to Root Samsung Galaxy A31 using Magisk
Install TWRP on Samsung A31
Before we begin with the rooting process, it’s important to first install TWRP recovery on your Samsung Galaxy A31. TWRP, or Team Win Recovery Project, is an open-source software that allows you to install custom ROMs, backups, and other modifications to your device. If you haven’t already installed TWRP on your Samsung Galaxy A31, don’t worry, we have a guide that will walk you through the process.
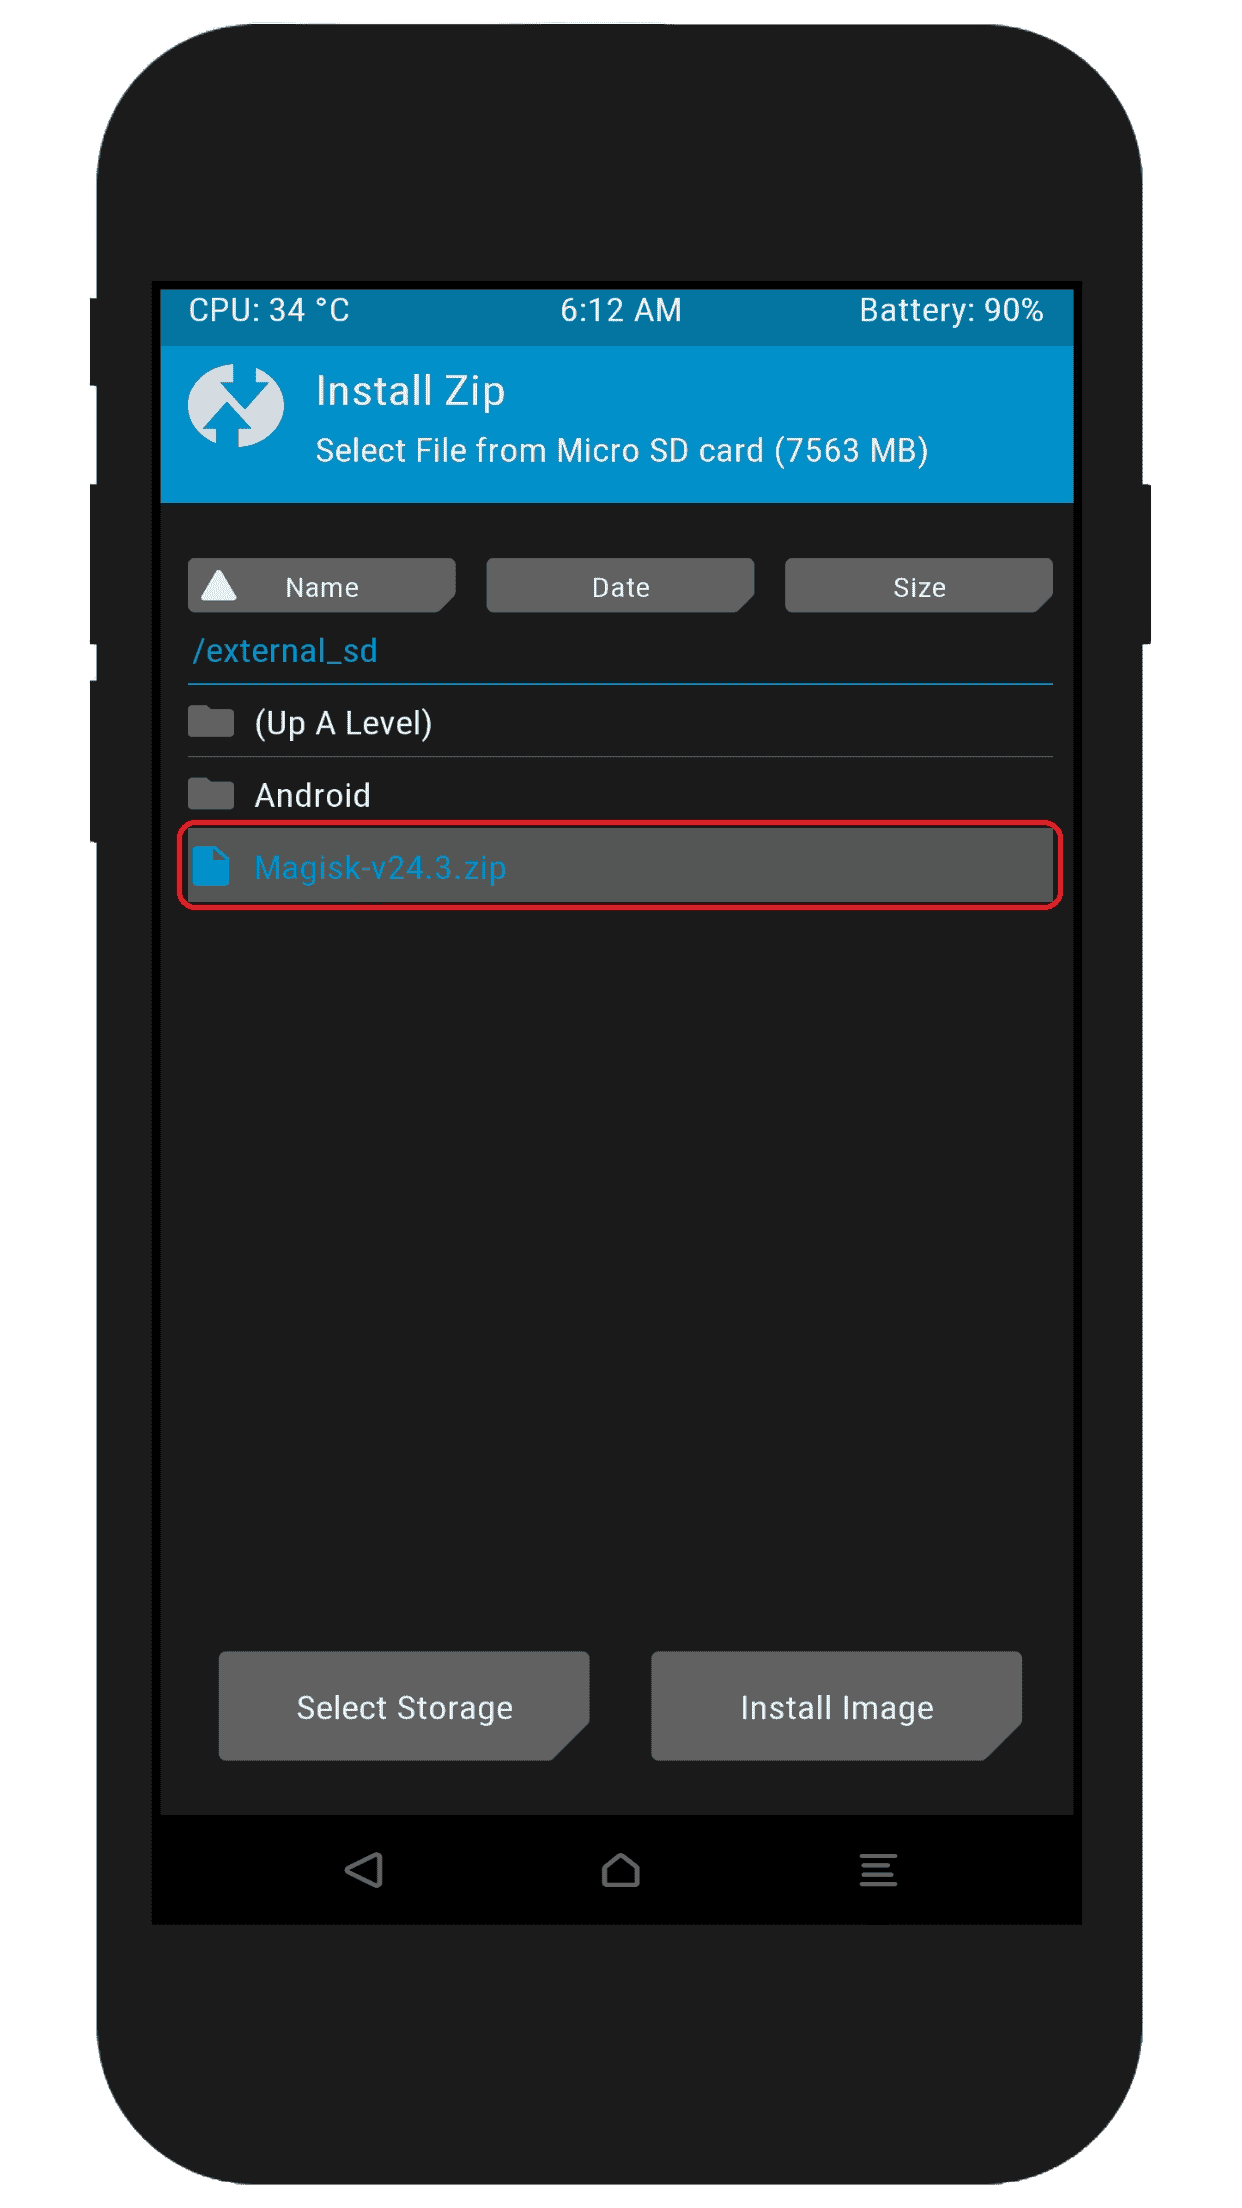
Install Magisk using TWRP
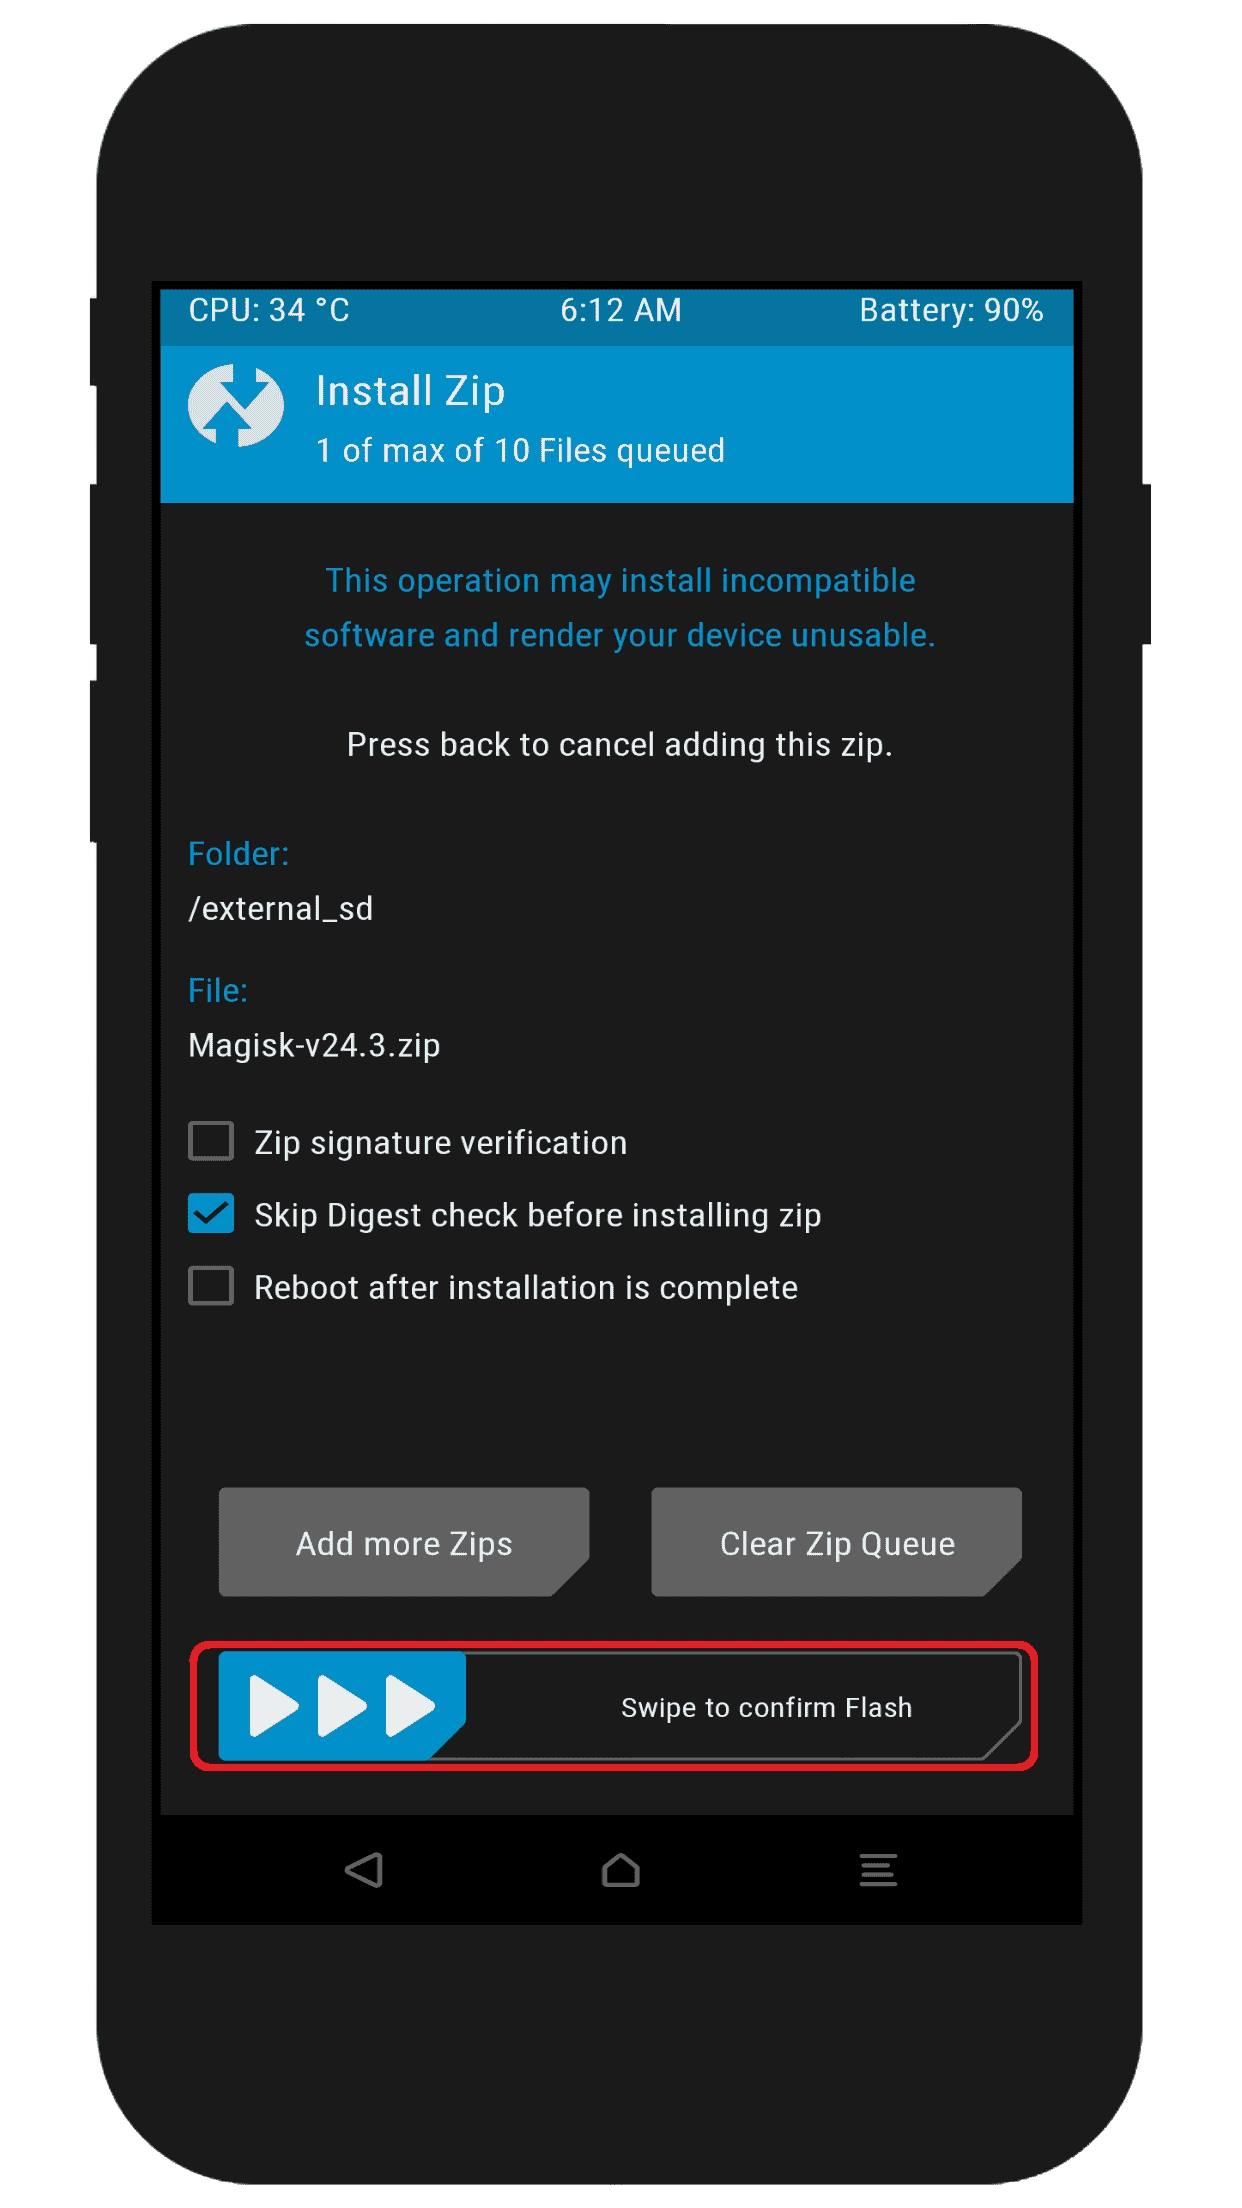
Swipe to conform Install
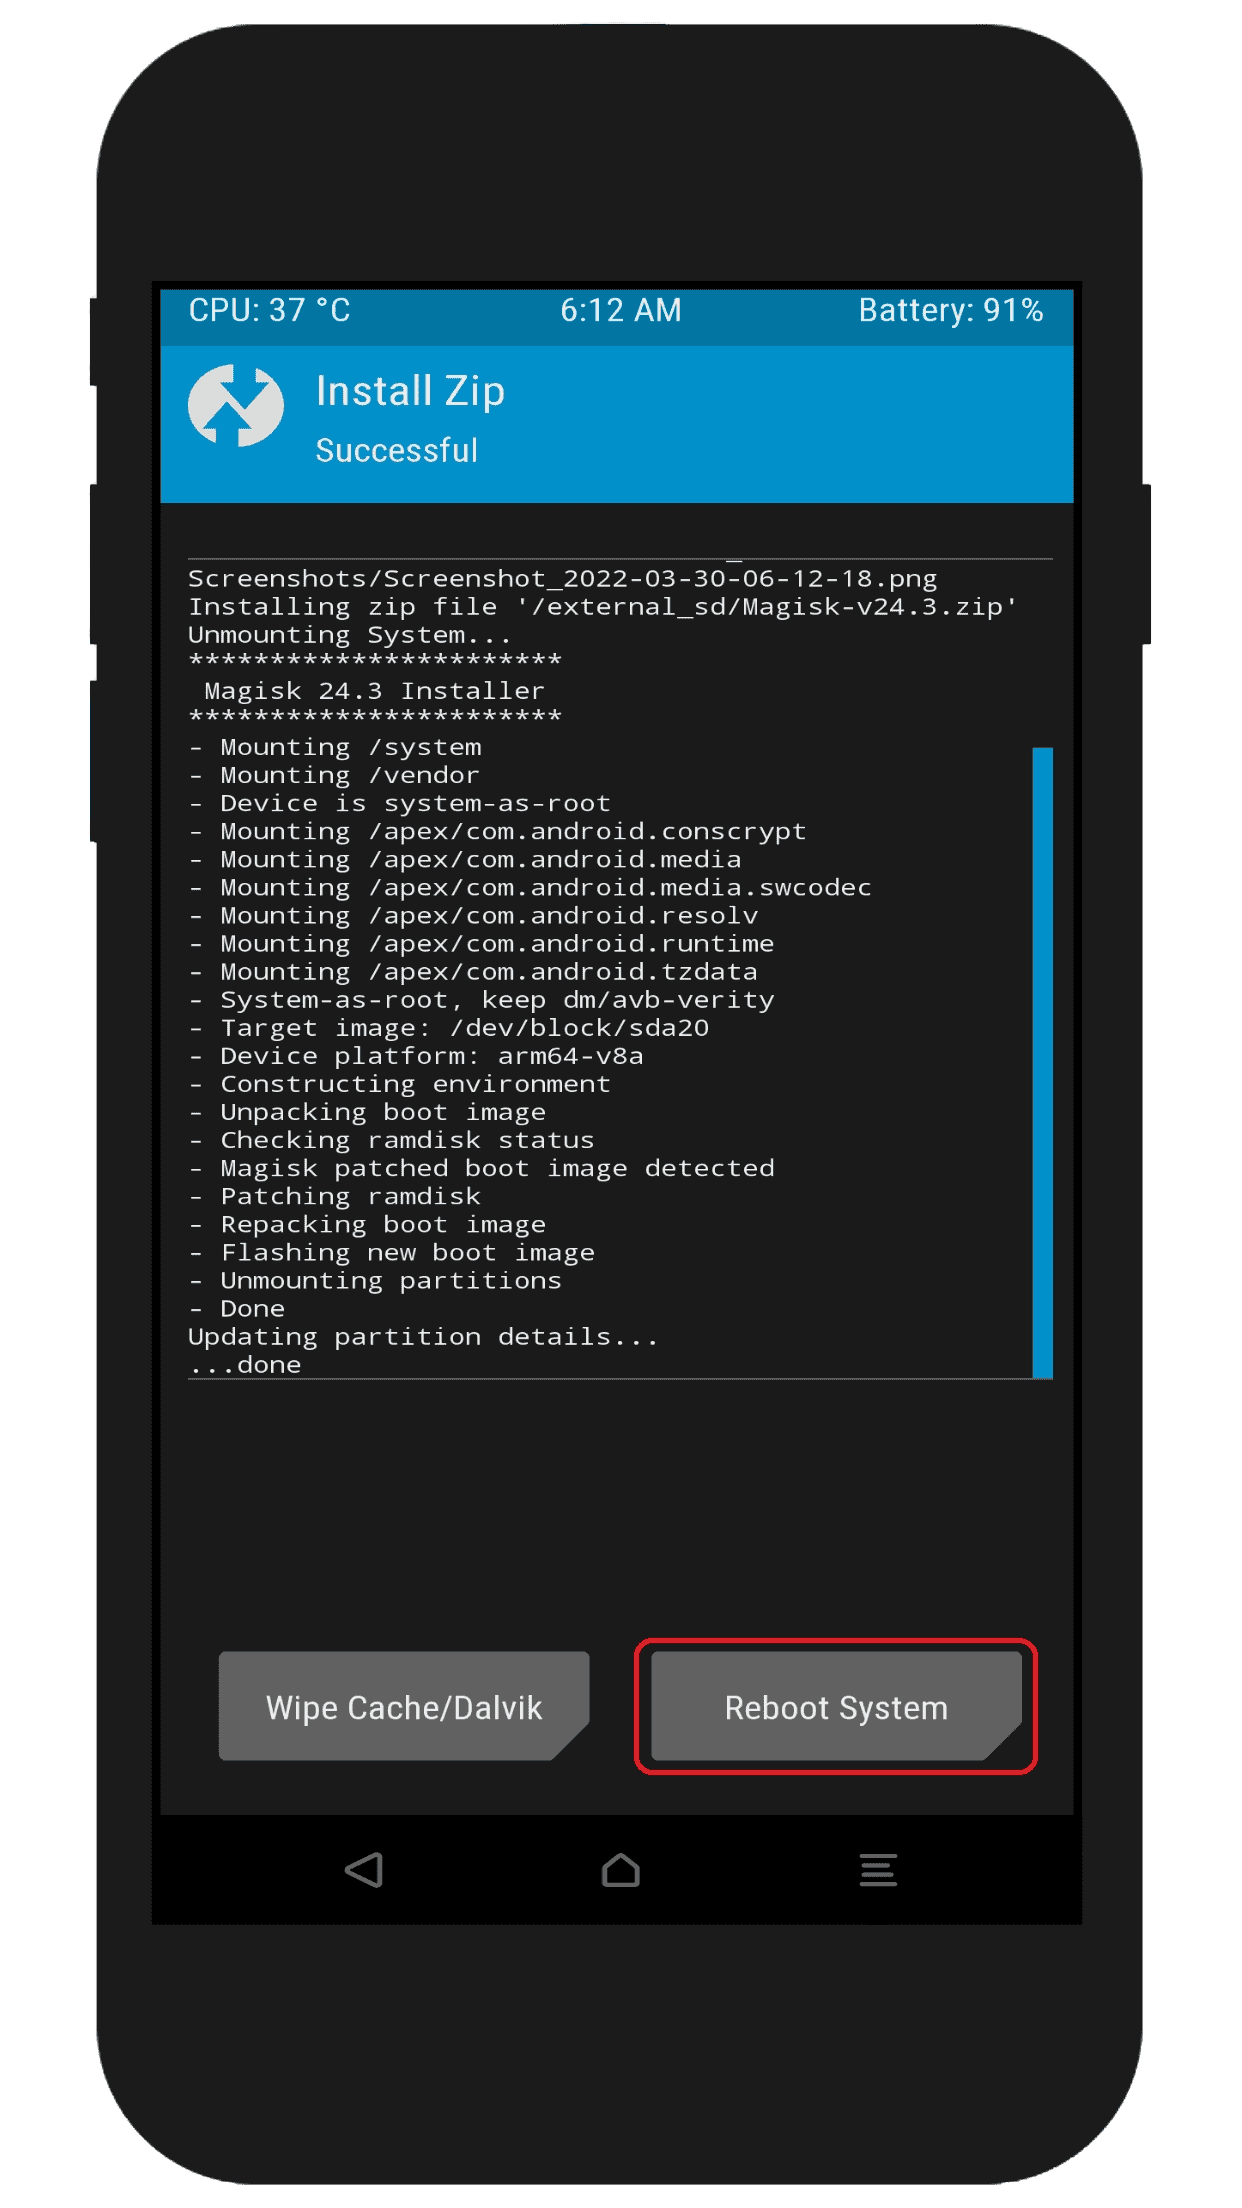
Reboot System using TWRP
Root Samsung Galaxy A31 without TWRP
Rooting your Samsung Galaxy A31 without TWRP recovery is also possible and in this section, we will be showing you how to do it. This method does not require TWRP recovery to be installed on your device, making it a simpler and easier process. However, it is important to note that this method may not be as stable as the method that uses TWRP and may have some limitations. Nevertheless, if you are looking for a quick and easy way to root your Samsung Galaxy A31 without TWRP, this method is a great option.
Unlock Developer Options on Samsung Galaxy A31
After enabling OEM unlocking, power off your phone. Press and hold the Volume Up and Volume Down buttons, then connect your phone to your PC using the data cable. Once you see the bootloader warning screen, press and hold the Volume Up button to unlock the bootloader on your device.
Confirming Bootloader Unlock
You will be prompted to confirm whether you want to unlock the bootloader, use the volume buttons to navigate to ‘Yes’ and press the power button to confirm.
Download Stock Firmware for Samsung Galaxy A31
You need a Samsung Galaxy A31 stock firmware, you can download from Samfw.com,
You need first your phone’s model number and second, and CSC/regional code.
Download 7zip and LZ4 Tools
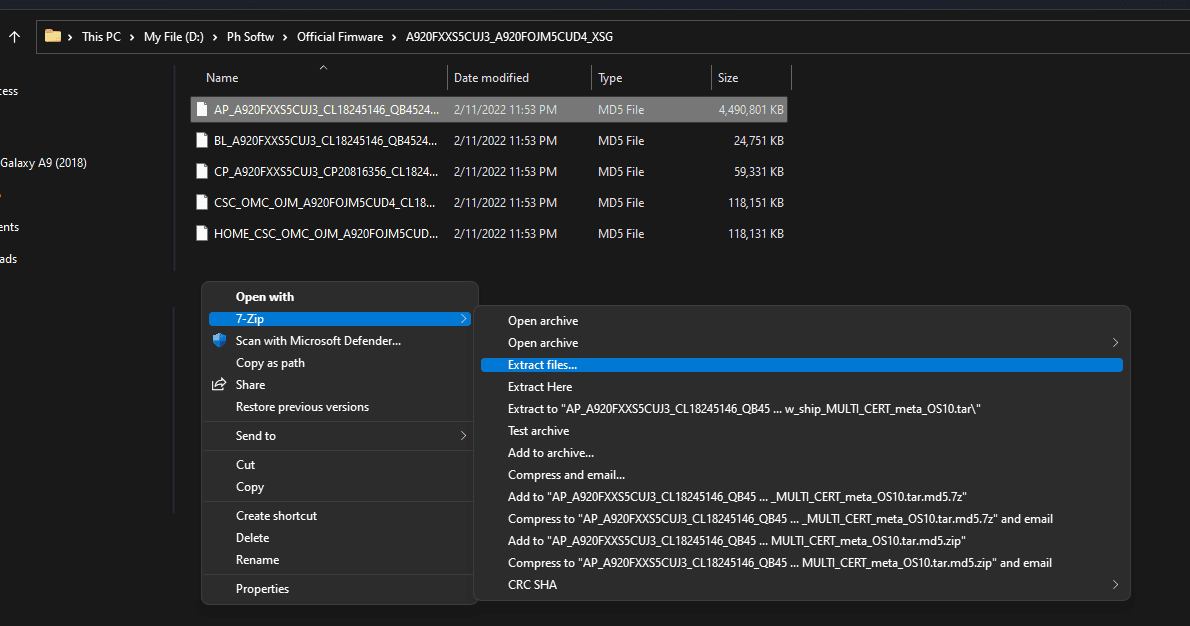
After downloading the firmware, we need to extract it. To extract the firmware, we need to use a lz4 extract tool, which can be downloaded from the link provided below.
Download: 7zip Tool
Download: LZ4 Tool
To make sure you can extract the firmware file properly, you need to download and install the 7zip software on your PC. Once installed, use it to extract the LZ4 tool downloaded. This will make it easier for you to extract the firmware file and access the files inside it.
Preparing Patched Boot Image file
Samsung Firmware Extract
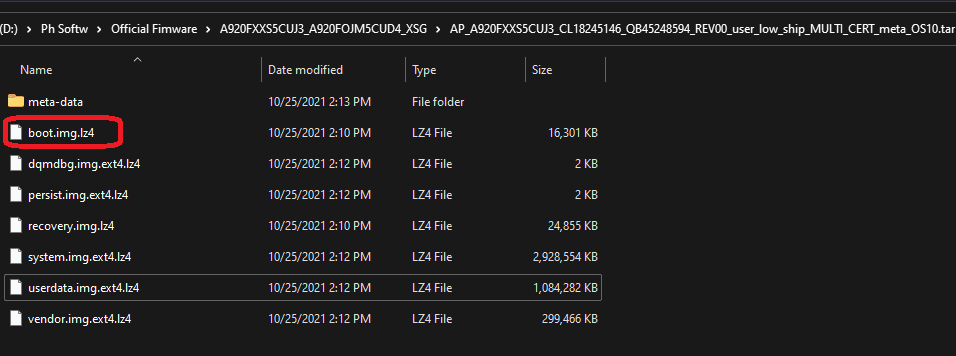
Get the boot.img file form Samsung Firmware

Copying boot.img.lz4 file from Samsung Firmware
Next, we need to convert boot.img.lz4 to boot.img file.
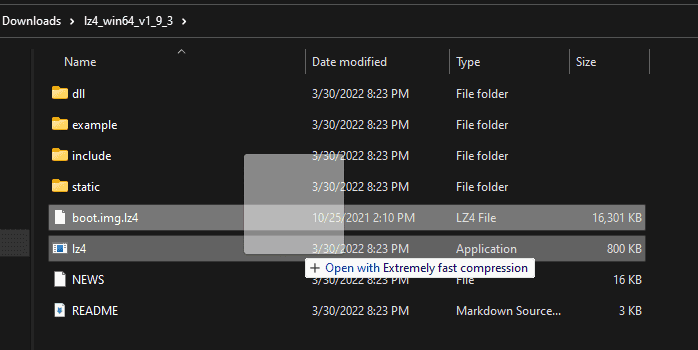
Converting boot.img.lz4 to boot.img file
Patch the boot. img Firmware File with Magisk App
Install button on Magisk App
Patching the boot.img with Magisk
Convert. IMG File to. TAR (For ODIN)

Add to archive on 7zip
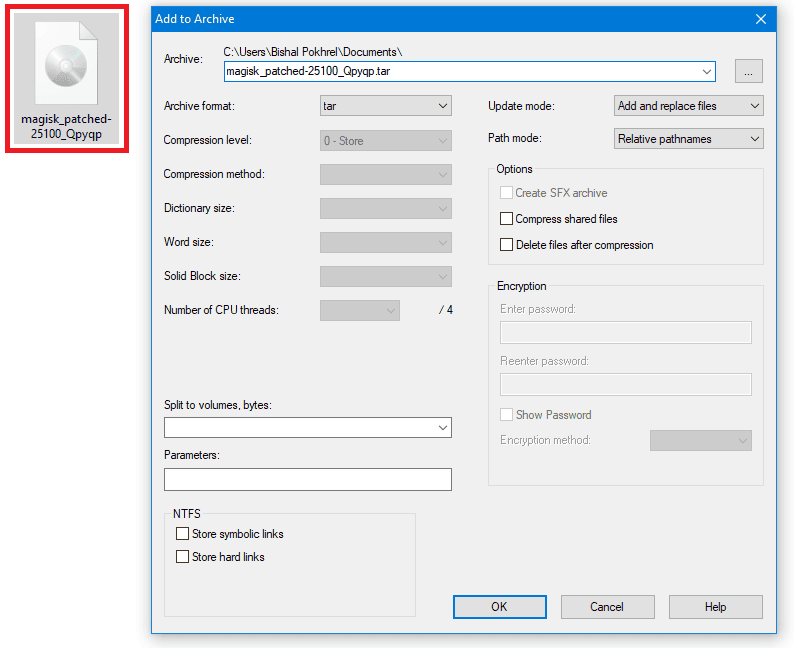
Add to archive file using 7zip
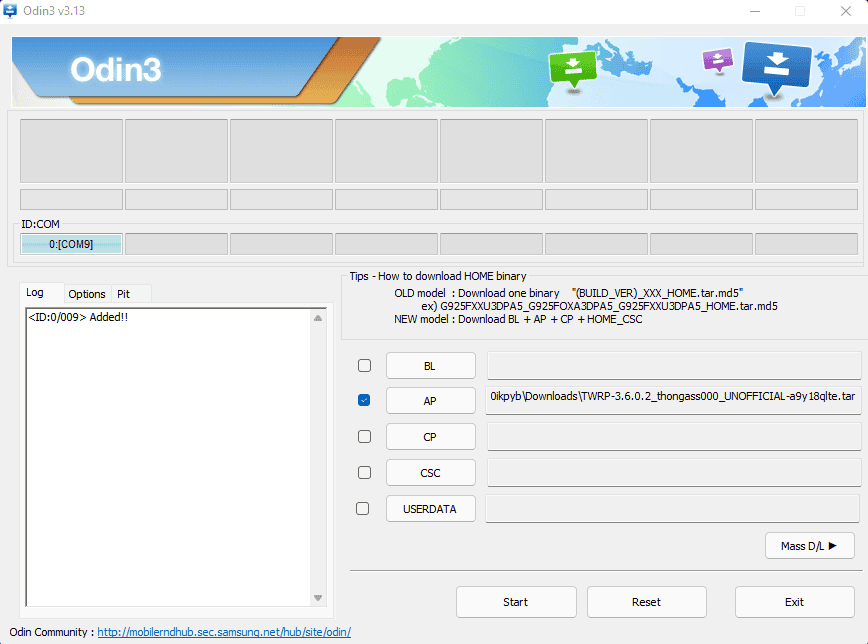
Boot your Samsung Galaxy A31 into Download Mode

Odin Tool Port Connection
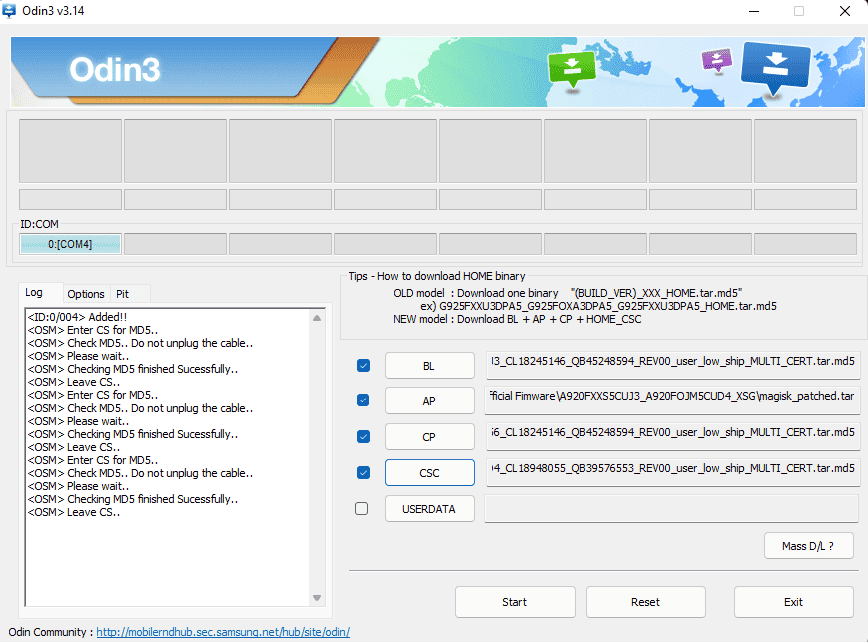
Flashing Firmware using Odin Tool
Rooting Android simply means giving a superpower to your phone. It opens up many customization and tweaks for your smartphone. Once you root your phone, you have full control over your Android System files.
You can do the very greatest thing after rooting your device is installing Custom ROM, removing unwanted apps (bloatware), installing Modules, and much more. But before we Root, we must understand the Advantages and Disadvantages of Rooting your device.
Advantages of Rooting
Here are some Pros or Advantages of Rooting Samsung Galaxy A31
Disadvantages of Rooting
Here are some Cons or Disadvantages of Rooting Samsung Galaxy A31
Apply the shown steps at your own risk. MyPhoneUpdate.com is not responsible for bricking your device.
What is the root and what are the benefits
and harms
1-Modify or delete files or applications of
the operating system.
2-Run programs that require root
permissions.
3-Change the basic fonts within the Android
system.
4-Move applications from device memory to
external memory.
5-Installation of Custom rom.
Cons of the root:
1-Loss of phone warranty.
2-Some applications do not work due to root
(blue stacks root / dr fone root).
3-Stand on the company logo as a result of
misuse.
4-The operating system crashed due to the
deletion or modification of important system files.
Installation and use of the root android
are entirely at your own risk and we do not take any responsibility for device failure.
Older versions of the Android system such
as Jelly Bean and KitKat was using apps (king root / kingo root / framaroot / iroot / root king / towel root) To get
root permissions either in new versions such as Lollipop, Marshmallow, Nougat, Pie and future versions of the
Android system, these applications do not work.
What is the difference between SuperSU and
Magisk
We will first talk about supersu root how
to get the root where it installs itself within the system files It changes the system files and adds new files to
the system partition on the phone, but with the enhancement of Google to protect Android it has become difficult to
do so that the amendment to the partition of the Android system to send an alert to applications that are trying to
detect the presence of root.
Google SafetyNet monitors the operating
system from any manipulation, and when it detects any manipulation in the Android operating system, most
applications will not work and will not send you OTA updates.
What about Magisk is one of the most
important features that does not touch system files, but modifies the boot partition instead so that it can trick
safetyNet service and show that everything is normal and allows Magisk Manager to fully control the root
settings.
Notes before the root
process
-Brand Name: Samsung Galaxy
-Device Name: Galaxy A31
-Model: SM-A315F root
-Operating system: Android Q 10, R 11, and S 12
How To Root Galaxy A315F
2. Boot the device into recovery mode, then
Wipe Data/Factory Reset, everything on the device will be erased, then Reboot system now, It will take about 10
minutes to boot the device. Here is the most important step when you start setting up the device. Add a Google
account and then continue to complete the setup.
3. Now when you boot into download mode it
should be FRP:OFF- OEM:OFF-KG STATE:Checking.
4. This step is very important. Please
focus now. We need to download a firmware compatible with the device model and version of the device. It is
preferable to download the same version on the device to avoid problems. You can find out the baseband version on
the phone or tablet by booting to recovery mode, An example of that.

6. After downloading the firmware we
extract the files it will show several files inside the extracted folder BL-AP-CP-CSC-HOME CSC.
7. All work on the AP file, since the file
suffix is .tar.md5, we will remove the .md5 suffix from the file name to become the suffix .tar

8. Copy the ap file to your Android
device.
10. Press the Install button in the Magisk
card.
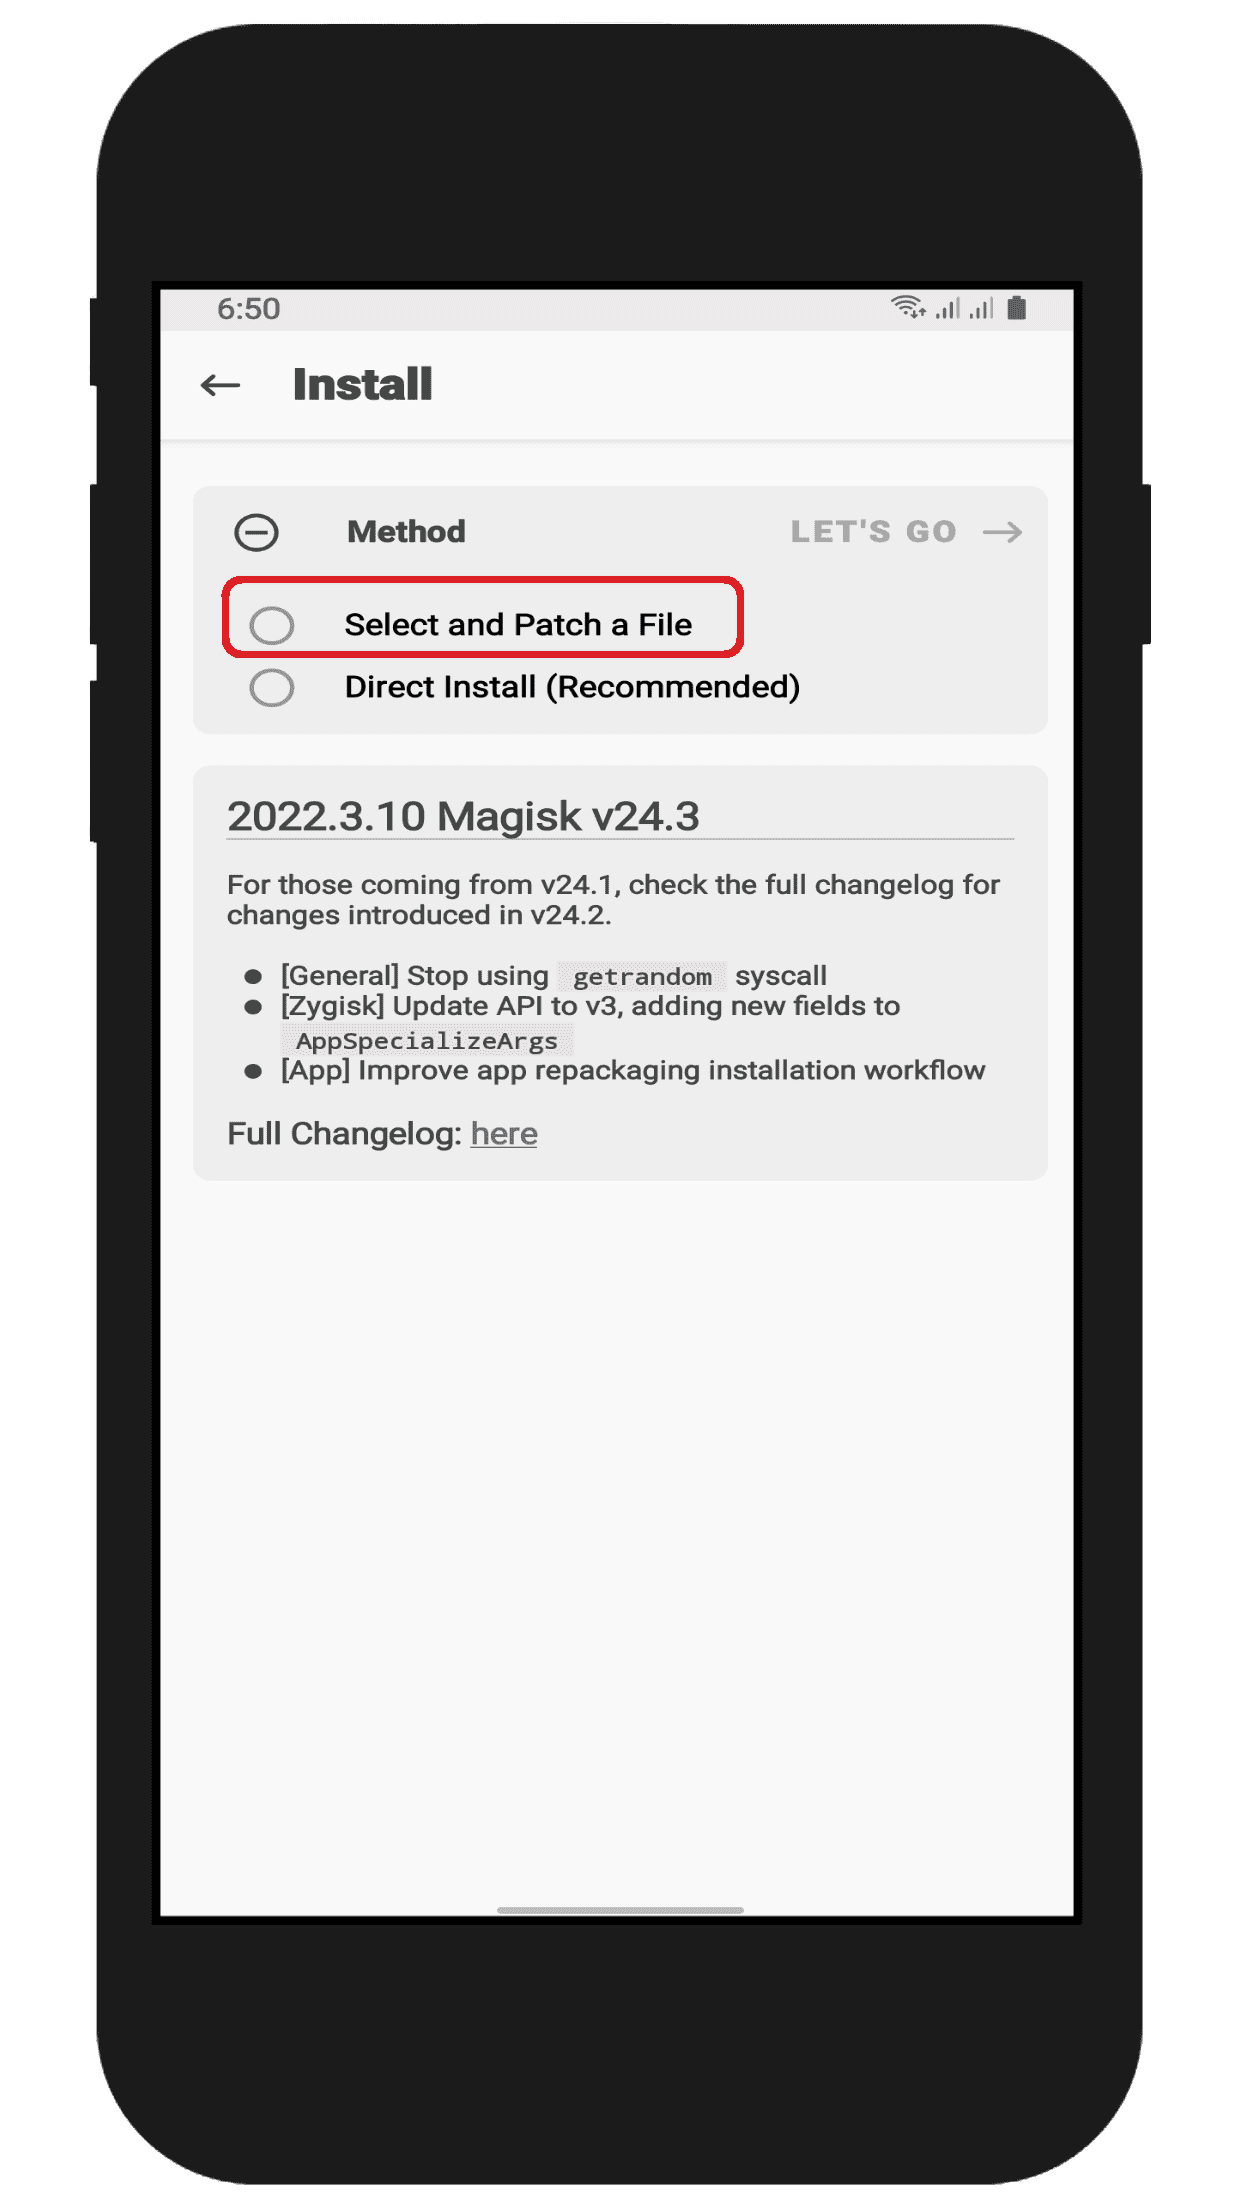
11. A new window will appear, choose Select
and Patch a File.
12. Choose the file you copied before and
press Let’s Go button.
13. Magisk will start patching the AP
firmware it won’t take long.
14. After the processing is finished, you
will go to the Downloads folder, there is a file magisk_patched, copy it to your PC.

16. Download latest
version.
17. Open the Odin tool and from the AP box
select the magisk_patched file and press start.
18. The device will start flashing, it will
take about 10 minutes when the flashing is finished, boot the device into recovery mode and wipe data again.
19. When you start setting up the device,
add a Google account and then complete the setup. This step is very important.
20. Install Magisk manger again and open
it.
21. In newer devices, you need to turn off
the device and then Power + Volume Up to get root permissions. As for older devices, you will get root once you open
the magisk manger application.
23. Your Galaxy A31 SM-A315F is now
rooted.
What do you mean by Rooting Android?
Rooting Android is the process of gaining privileged control or root access to your operating system. By rooting an Android phone, you can gain additional features and access otherwise restricted by default.
Overall, rooting your Android phone offers a wide range of benefits and allows for many types of customization and personalization. So if you want to take greater control over your mobile experience, consider rooting your Android device today!
But before you Root your Samsung Phone, it’s essential to know the Advantages and Disadvantages of Rooting. So, let’s discuss that.
Advantages or Benefits of Rooting the Samsung Galaxy A31?
There are lots of Advantages of Rooting, and Here I have shown you 6 Pros of Rooting the Samsung Galaxy A31 Android smartphone:
So, in the above section, I have covered the Top 6 Benefits of Rooting an android device. Now let’s discuss the Disadvantages or Cons of Rooting an android device.
Cons or Disadvantages of Rooting the Samsung Galaxy A31?
Now let’s discuss the various Disadvantages or Cons of Rooting Samsung Galaxy A31 Android smartphone:
Let’s have a quick look at the key specifications of the Samsung Galaxy A31.
MUST READ – Various Issues on the Samsung Galaxy A31 & How to Fix Them
What is Magisk?
Magisk is a highly advanced way of rooting android systemless-ly. This means that Magisk root android without changing or modifying the system partition. Hence you can receive OTA updates, run apps that need to pass Google’s SafetyNet test.
Unlike other methods, you have to struggle a lot to install OTA updates, but with Magisk, you can easily receive updates without any issues. The best part about this method is that you can install Magisk on almost any android device running Android 4.2 to Android 11 (Latest).
This is the reason why we are using Magisk to Root Samsung Galaxy A31 over other rooting methods.

The Samsung Galaxy A31 is a newly launched android smartphone. It offers great features for the price. Here is the Key Specification of this smartphone:
https://youtube.com/watch?v=tYb5_m_b-8c%3Fautohide%3D2%26autoplay%3D0%26mute%3D0%26controls%3D1%26fs%3D1%26loop%3D0%26modestbranding%3D0%26rel%3D1%26showinfo%3D1%26theme%3Ddark%26wmode%3D%26playsinline%3D0
Let’s Root Samsung Galaxy A31
Before we proceed to Root your Samsung Galaxy A31 smartphone, you have to fulfill the below Requirements:

Warning: All the tutorials/ guides shown in this blog are not tested for each and every smartphone. As the Rooting process is almost the same for every smartphone.
If anything happens to your smartphone RootingSteps.com is not responsible for loss and damage to your smartphone. Try these methods with your own risk!
Root Samsung Galaxy A31 By Magisk
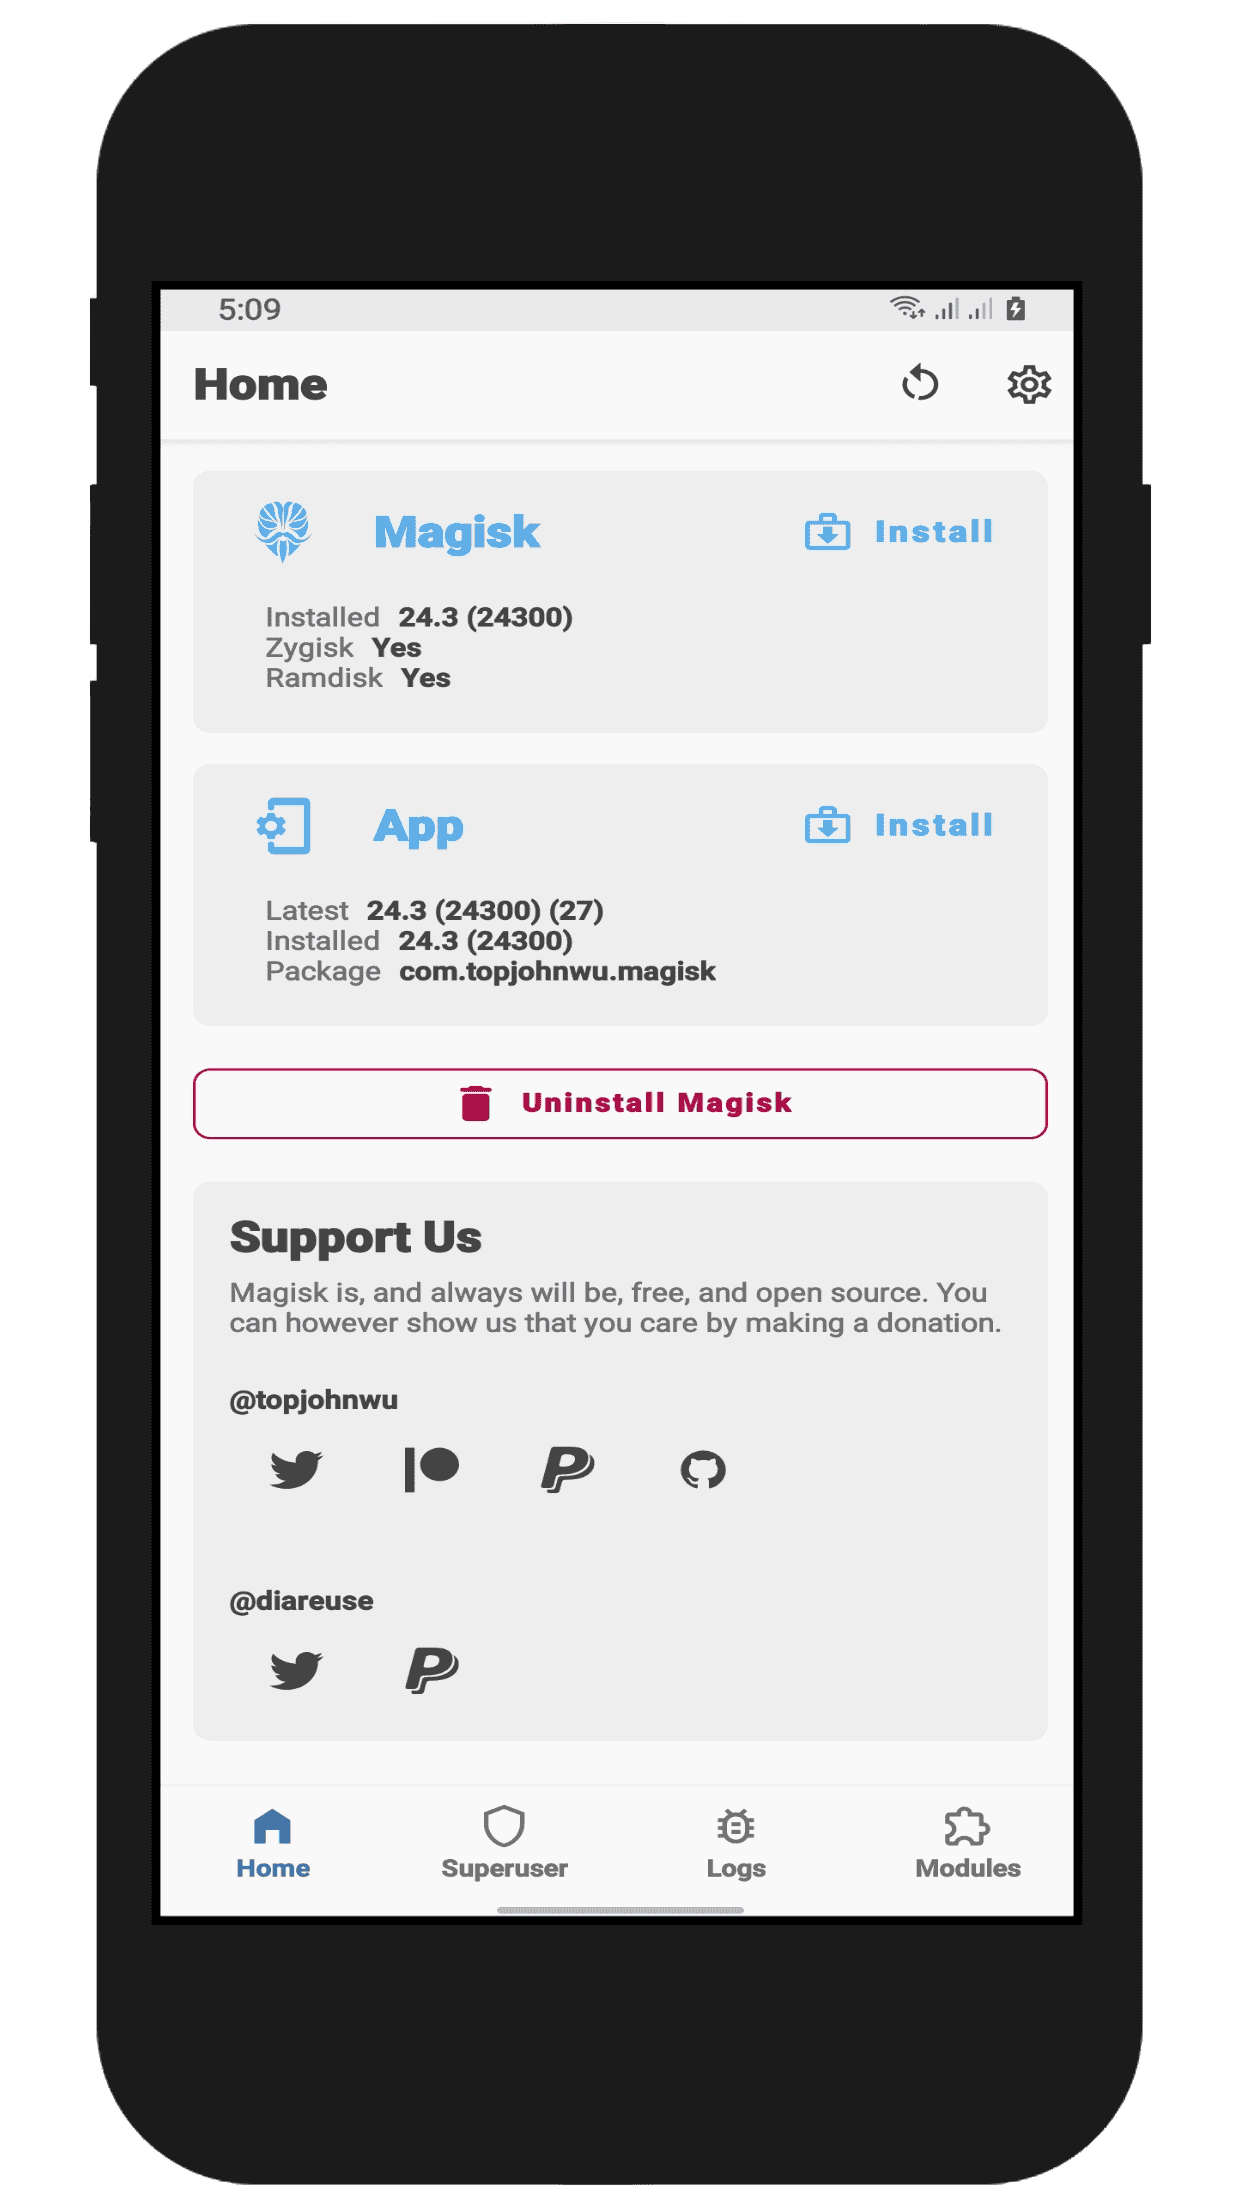
Once your device boots up, you will see the Magisk App in the apps menu. This app is very convenient for managing root permissions, installing modules, updating the app, etc.
RELATED – How to Install Custom ROM on Samsung Galaxy A31. (Custom ROM File May Or May Not Be available as per the development)
Root Samsung Galaxy A31 via PC
This SuperSU method is the most used Rooting method. We need TWRP Recovery or any Custom Recovery installed on your Samsung Galaxy A31 smartphone for this method.
NEXT – How to Unroot Samsung Galaxy A31
Root Samsung Galaxy A31 via KingoRoot App
MUST READ – Install Stock ROM on Samsung Galaxy A31
Root Samsung Galaxy A31 By iRoot PC
If the above method doesn’t work for you, try the below methods.
-Model: SM-A315G root
How To Root Galaxy A315G
23. Your Galaxy A31 SM-A315G is now
rooted.
How to Check if Your Samsung Galaxy A31 Is Rooted or Not?
If you are completely new to the rooting community, then don’t worry. We have included everything you need to know about the process of rooting android devices.
As I already mentioned above, this guide includes two types of methods, first by flashing the Magisk installer zip using TWRP recovery, and the second method by flashing Magisk patched boot image using fastboot command.
So, let’s quickly jump to the process.
Note: Make sure to read this guide completely to avoid confusion or misunderstanding.
Root Samsung Galaxy A31 using TWRP Recovery
Now open the Magisk App and check if you see all on the app screen. If you don’t see the app, you can manually download and install it.
After successfully applying the above steps, your Samsung Galaxy A31 device will get root access without any issues. In case you are facing any problems in any steps, let me know in the comments.
Root Samsung Samsung Galaxy A31 without TWRP Recovery
If you can not see Magisk Manager on your Samsung Galaxy A31 phone, you need to install the APK manually.
How to Verify if your Samsung Galaxy A31 is Rooted successfully?
So, this was a comprehensive guide on how to Root Samsung Galaxy A31 smartphone. I have tried my best to make this guide as simple as possible.
However, if you still encounter any problems while implementing the steps, please let me know in the comments. I will try to resolve your issues as soon as possible.
")


")