

- The export command in Linux
- The mkdir command in Linux
- Дамп сетевого трафика
- The alias command
- The uname and whoami commands
- Посмотреть открытые порты
- The cd command in Linux
- Как перейти в другую директорию
- По абсолютному пути
- По относительному пути
- С автодополнением
- Подняться наверх
- Где тренироваться
- Telnet
- The passwd command in Linux
- The pwd command in Linux
- The ls command in Linux
- Moving Around
- Изменить владельца файла
- Информация о системе
- The top command in Linux
- Pwd
- Looking Around with ls
- Exploring ls Options
- Using ls on Other Directories
- The cp and mv commands
- Информация о файловых системах (свободное место на дисках)
- Tail
- Вывести содержимое бинарного файла
- Rsync
- The ufw and iptables commands
- Как запустить приложение
- Scp
- The ssh command in Linux
- Как создать много тестовых папок и файлов
- Изменить права доступа файла
- Prerequisites
- Top 50 Linux Commands You Must Know as a Regular User
- Как перенести / скопировать файл
- Скопировать файл
- Скопировать директорию
- Переместить файл
- Переместить директорию
- Get help on Bash builtin pwd command.
- Kill
- Echo
- The sort command in Linux
- The cal command in Linux
- Как узнать версию OS
- Сетевая информация
- Узнать IP адрес по имени хоста
- The grep command in Linux
- Mkdir
- The rm command in Linux
- The ln command in Linux
- The tar, zip, and unzip commands
- И это все?
- Linux command name
- Как изменить владельца файла
- Ping
- Cat
- Как посмотреть использованные ранее команды
- The wget command in Linux
- The service command in Linux
- Предисловие
- Об этом руководстве
- The chmod and chown commands
- The head and tail commands
- Искать файлы
- Finding Out Where You Are with pwd
- Где я? Как понять, где находишься
- The sudo command in Linux
- Как создать файл
- The man command in Linux
- Смотреть установленные пакеты
- Как узнать, как работает команда
- Getting help on External pwd command.
The export command in Linux
The export command is specially used when exporting environment variables in runtime. For example, if I wanted to update the bash prompt, I’ll update the PS1 environment variable. The bash prompt will be updated with immediate effect.
root@ubuntu:~# export <variable name>=<value>
If for some reason, your bash prompt doesn’t update, just type in bash and you should see the updated terminal prompt.
The mkdir command in Linux
root@ubuntu:~# mkdir <folder name>
As you can see in the above screenshot, we created the JournalDev directory with just this simple command.
Дамп сетевого трафика
Для перехвата сетевого трафика в Linux используется утилита tcpdump. Чтобы сдампить трафик на порте 12345, можно воспользоваться следующей командой:
[user@testhost ~]$ sudo tcpdump -i any -A port 12345 Опция -A говорит о том, что мы ходим видеть вывод в ASCII (поэтому это хорошо для текстовых протоколов), -i any указывает, что нас не интересует сетевой интерфейс, port — трафик какого порта дампить. Вместо port можно использовать host, либо комбинацию host и port (host A and port X). И еще полезной может оказаться опция -n — не конвертировать адреса в хостнеймы в выводе.
Что если трафик бинарный? Тогда нам поможет опция -X — выводить данные в hex и ASCII:
[user@testhost ~]$ sudo tcpdump -i any -X port 12345При этом надо учитывать, что в обоих вариантах использования будут выводиться IP пакеты, поэтому в начале каждого из них будут бинарные заголовки IP и TCP. Вот пример вывода для запроса «123» посланного в сервер, слушающий порт 12345:
[user@testhost ~]$ sudo tcpdump -i any -X port 12345
tcpdump: verbose output suppressed, use -v or -vv for full protocol decode
listening on any, link-type LINUX_SLL (Linux cooked), capture size 262144 bytes
14:27:13.224762 IP localhost.49794 > localhost.italk: Flags [P.], seq 2262177478:2262177483, ack 3317210845, win 342, options [nop,nop,TS val 3196604972 ecr 3196590131], length 5
    0x0000:  4510 0039 dfb6 4000 4006 5cf6 7f00 0001  E..9..@.@.\.....
    0x0010:  7f00 0001 c282 3039 86d6 16c6 c5b8 9edd  ......09........
    0x0020:  8018 0156 fe2d 0000 0101 080a be88 522c  ...V.-........R,
    0x0030:  be88 1833 3132 330d 0a00 0000 0000 0000  ...3123.........
    0x0040:  0000 0000 0000 0000 00                   .........
The alias command
Do you have some commands that you run very frequently while using the terminal? It could be rm -r or ls -l, or it could be something longer like tar -xvzf. This is one of the productivity-boosting Linux commands you must know.
If you know a command that you run very often, it’s time to create an alias. What’s an alias? In simple terms, it’s another name for a command that you’ve defined.
root@ubuntu:~# alias lsl="ls -l"OR
root@ubuntu:~# alias rmd="rm -r"
Now every time you enter lsl or rmd in the terminal, you’ll receive the output that you’d have received if you had used the full commands.
The examples here are for really small commands that you can still type by hand every time. But in some situations where a command has too many arguments that you need to type, it’s best to create a shorthand version of the same.
The uname and whoami commands
Let’s see the output of both the commands and the way we can use these.
root@ubuntu:~# uname -a
The parameter -a which I’ve supplied to uname, stands for “all”. This prints out the complete information. If the parameter is not added, all you will get as the output is “Linux”.
Посмотреть открытые порты
Для этого используют утилиту netstat. Например, чтобы посмотреть все слушающие TCP и UDP порты с отображением PID’а процесса, слушающего порт, и с числовым представлением порта, нужно использовать ее со следующими опциями:
[user@testhost ~]$ netstat -lptnuThe cd command in Linux
root@ubuntu:~# cd <directory path>
As you can see in the above command, I simply typed cd /etc/ to get into the /etc directory. We used the pwd command to print the current working directory.
Как перейти в другую директорию
С помощью команды cd:
cd <путь к директории>Путь может быть абсолютным или относительным.
По абсолютному пути
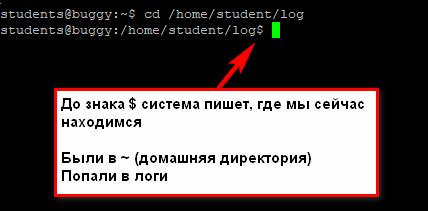
Либо у вас где-то записан путь, «куда идти», либо вы подсмотрели его в графическом интерфейсе (например, в WinSCP).
Вставляем путь в командную строку после «cd»
cd /home/student/logНу вот, мы переместились из домашней директории (обозначается как ~) в /home/student/log.
По относительному пути
Относительный путь — относительно вашей текущей директории, где вы сейчас находитесь. Если я уже нахожусь в /home/student, а мне надо в /home/student/log, команда будет такой:
cd log --- перейди в папку log из той директории, где ты сейчас находишьсяЕсли мне надо из /home/student/photo в /home/student/photo/city/msk/2017/cat_1, команда будет такой:
cd city/msk/2017/cat_1Я не пишу /home/student/photo, так как я уже там.

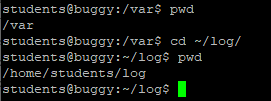
В линуксе можно задавать путь относительно домашней папки текущего пользователя. Домашняя директория обозначается ~/. Заметьте, не ~, а именно ~/. Дальше вы уже можете указывать подпапки:
cd ~/logВот пример, где я вошла под пользователем students. Исходно была в директории /var, а попала в /home/students/log:
С автодополнением
Если вы начнете набирать название папки и нажмете Tab, система сама его подставит. Если просто нажмете Tab, ничего не вводя, система начнет перебирать возможные варианты:
— (cd tab) Может, ты имел в виду папку 1?
— (tab) Нет? Может, папку 2?
— (tab) Снова нет? Может, папку 3?
— (tab) Снова нет? Может, файл 1 (она перебирает имена всех файлов и директорий, которые есть в той, где вы сейчас находитесь)?
— (tab) У меня кончились варианты, поехали сначала. Папка 1?

cd (Tab)(Tab)(Tab) — система перебирает все файлы / папки в текущей директории.
Это очень удобно, когда перемещаешься в командной строке. Не надо вспоминать точное название папки, но можно вспомнить первую букву-две, это сократит количество вариантов.
Подняться наверх
Подняться на уровень выше:
cd ..Если нужно поднять на два уровня выше, то
cd ../..И так до бесконечности =) Можно использовать файл, лежащий на уровне выше или просто сменить директорию.
Обратите внимание, что команда для линукса отличается от команды для винды — слеш другой. В винде это «cd ..\..», а в линуксе именно «cd ../..».
См также:
Путь к файлу в linux
Где тренироваться
Можно поднять виртуалку. Правда, тут сначала придется разбираться, как поднимать виртуалку )))
А можно купить облачную машину. Когда мне надо было поиграться с линуксом, я пошла на SimpleCloud (он мне в гугле одним из первых выпал и у него дружелюбный интерфейс. Но можно выбрать любой аналог) и купила самую дешманскую машину — за 150 руб в месяц. Месяца вам за глаза, чтобы «пощупать-потыркать», и этой машины с минимумом памяти тоже.
У меня был когда-то план самой платить эти 150р за то, чтобы дать машину в общий доступ. Но увы. Как я не пыталась ее огородить (закрывала команды типа ssh, ping и прочая), у меня не получилось. Всегда есть люди, которых хлебом не корми, дай испортить чужое. Выложил в общий доступ пароли? На тебе ддос-атаку с твоего сервера. Ну и сервер блокируют. После N-ой блокировки я плюнула на это дело. Кто хочет научиться, найдет 150р.
Чтобы подключиться к машине, используйте инструменты:
- Putty — командная строка
- WinSCP — графический интерфейс
WinSCP — что это и как использовать
Telnet
Клиент для протокола TELNET. Используется для коммуникации с другим хостом.
[user@testhost ~]$ telnet example.com 80
Trying 93.184.216.34...
Connected to example.com.
Escape character is '^]'.
GET / HTTP/1.1
Host: example.com
HTTP/1.1 200 OK
Cache-Control: max-age=604800
Content-Type: text/html; charset=UTF-8
Date: Tue, 26 Nov 2019 11:59:18 GMT
Etag: "3147526947+gzip+ident"
Expires: Tue, 03 Dec 2019 11:59:18 GMT
Last-Modified: Thu, 17 Oct 2019 07:18:26 GMT
Server: ECS (dcb/7F3B)
Vary: Accept-Encoding
X-Cache: HIT
Content-Length: 1256
... здесь было тело ответа, которое я вырезал руками ...
Если нужно использовать протокол TLS (напомню, что SSL давно устарел), то telnet для этих целей не подойдёт. Зато подойдёт клиент openssl:
Пример использования openssl с выводом ответа на GET запрос
[user@testhost ~]$ openssl s_client -connect example.com:443
CONNECTED(00000003)
depth=2 C = US, O = DigiCert Inc, OU = www.digicert.com, CN = DigiCert Global Root CA
verify return:1
depth=1 C = US, O = DigiCert Inc, CN = DigiCert SHA2 Secure Server CA
verify return:1
depth=0 C = US, ST = California, L = Los Angeles, O = Internet Corporation for Assigned Names and Numbers, OU = Technology, CN = www.example.org
verify return:1
---
Certificate chain
 0 s:/C=US/ST=California/L=Los Angeles/O=Internet Corporation for Assigned Names and Numbers/OU=Technology/CN=www.example.org
   i:/C=US/O=DigiCert Inc/CN=DigiCert SHA2 Secure Server CA
 1 s:/C=US/O=DigiCert Inc/CN=DigiCert SHA2 Secure Server CA
   i:/C=US/O=DigiCert Inc/OU=www.digicert.com/CN=DigiCert Global Root CA
 2 s:/C=US/O=DigiCert Inc/OU=www.digicert.com/CN=DigiCert Global Root CA
   i:/C=US/O=DigiCert Inc/OU=www.digicert.com/CN=DigiCert Global Root CA
---
Server certificate
-----BEGIN CERTIFICATE-----
MIIHQDCCBiigAwIBAgIQD9B43Ujxor1NDyupa2A4/jANBgkqhkiG9w0BAQsFADBN
MQswCQYDVQQGEwJVUzEVMBMGA1UEChMMRGlnaUNlcnQgSW5jMScwJQYDVQQDEx5E
aWdpQ2VydCBTSEEyIFNlY3VyZSBTZXJ2ZXIgQ0EwHhcNMTgxMTI4MDAwMDAwWhcN
MjAxMjAyMTIwMDAwWjCBpTELMAkGA1UEBhMCVVMxEzARBgNVBAgTCkNhbGlmb3Ju
aWExFDASBgNVBAcTC0xvcyBBbmdlbGVzMTwwOgYDVQQKEzNJbnRlcm5ldCBDb3Jw
b3JhdGlvbiBmb3IgQXNzaWduZWQgTmFtZXMgYW5kIE51bWJlcnMxEzARBgNVBAsT
ClRlY2hub2xvZ3kxGDAWBgNVBAMTD3d3dy5leGFtcGxlLm9yZzCCASIwDQYJKoZI
hvcNAQEBBQADggEPADCCAQoCggEBANDwEnSgliByCGUZElpdStA6jGaPoCkrp9vV
rAzPpXGSFUIVsAeSdjF11yeOTVBqddF7U14nqu3rpGA68o5FGGtFM1yFEaogEv5g
rJ1MRY/d0w4+dw8JwoVlNMci+3QTuUKf9yH28JxEdG3J37Mfj2C3cREGkGNBnY80
eyRJRqzy8I0LSPTTkhr3okXuzOXXg38ugr1x3SgZWDNuEaE6oGpyYJIBWZ9jF3pJ
QnucP9vTBejMh374qvyd0QVQq3WxHrogy4nUbWw3gihMxT98wRD1oKVma1NTydvt
hcNtBfhkp8kO64/hxLHrLWgOFT/l4tz8IWQt7mkrBHjbd2XLVPkCAwEAAaOCA8Ew
ggO9MB8GA1UdIwQYMBaAFA+AYRyCMWHVLyjnjUY4tCzhxtniMB0GA1UdDgQWBBRm
mGIC4AmRp9njNvt2xrC/oW2nvjCBgQYDVR0RBHoweIIPd3d3LmV4YW1wbGUub3Jn
ggtleGFtcGxlLmNvbYILZXhhbXBsZS5lZHWCC2V4YW1wbGUubmV0ggtleGFtcGxl
Lm9yZ4IPd3d3LmV4YW1wbGUuY29tgg93d3cuZXhhbXBsZS5lZHWCD3d3dy5leGFt
cGxlLm5ldDAOBgNVHQ8BAf8EBAMCBaAwHQYDVR0lBBYwFAYIKwYBBQUHAwEGCCsG
AQUFBwMCMGsGA1UdHwRkMGIwL6AtoCuGKWh0dHA6Ly9jcmwzLmRpZ2ljZXJ0LmNv
bS9zc2NhLXNoYTItZzYuY3JsMC+gLaArhilodHRwOi8vY3JsNC5kaWdpY2VydC5j
b20vc3NjYS1zaGEyLWc2LmNybDBMBgNVHSAERTBDMDcGCWCGSAGG/WwBATAqMCgG
CCsGAQUFBwIBFhxodHRwczovL3d3dy5kaWdpY2VydC5jb20vQ1BTMAgGBmeBDAEC
AjB8BggrBgEFBQcBAQRwMG4wJAYIKwYBBQUHMAGGGGh0dHA6Ly9vY3NwLmRpZ2lj
ZXJ0LmNvbTBGBggrBgEFBQcwAoY6aHR0cDovL2NhY2VydHMuZGlnaWNlcnQuY29t
L0RpZ2lDZXJ0U0hBMlNlY3VyZVNlcnZlckNBLmNydDAMBgNVHRMBAf8EAjAAMIIB
fwYKKwYBBAHWeQIEAgSCAW8EggFrAWkAdwCkuQmQtBhYFIe7E6LMZ3AKPDWYBPkb
37jjd80OyA3cEAAAAWdcMZVGAAAEAwBIMEYCIQCEZIG3IR36Gkj1dq5L6EaGVycX
sHvpO7dKV0JsooTEbAIhALuTtf4wxGTkFkx8blhTV+7sf6pFT78ORo7+cP39jkJC
AHYAh3W/51l8+IxDmV+9827/Vo1HVjb/SrVgwbTq/16ggw8AAAFnXDGWFQAABAMA
RzBFAiBvqnfSHKeUwGMtLrOG3UGLQIoaL3+uZsGTX3MfSJNQEQIhANL5nUiGBR6g
l0QlCzzqzvorGXyB/yd7nttYttzo8EpOAHYAb1N2rDHwMRnYmQCkURX/dxUcEdkC
wQApBo2yCJo32RMAAAFnXDGWnAAABAMARzBFAiEA5Hn7Q4SOyqHkT+kDsHq7ku7z
RDuM7P4UDX2ft2Mpny0CIE13WtxJAUr0aASFYZ/XjSAMMfrB0/RxClvWVss9LHKM
MA0GCSqGSIb3DQEBCwUAA4IBAQBzcIXvQEGnakPVeJx7VUjmvGuZhrr7DQOLeP4R
8CmgDM1pFAvGBHiyzvCH1QGdxFl6cf7wbp7BoLCRLR/qPVXFMwUMzcE1GLBqaGZM
v1Yh2lvZSLmMNSGRXdx113pGLCInpm/TOhfrvr0TxRImc8BdozWJavsn1N2qdHQu
N+UBO6bQMLCD0KHEdSGFsuX6ZwAworxTg02/1qiDu7zW7RyzHvFYA4IAjpzvkPIa
X6KjBtpdvp/aXabmL95YgBjT8WJ7pqOfrqhpcmOBZa6Cg6O1l4qbIFH/Gj9hQB5I
0Gs4+eH6F9h3SojmPTYkT+8KuZ9w84Mn+M8qBXUQoYoKgIjN
-----END CERTIFICATE-----
subject=/C=US/ST=California/L=Los Angeles/O=Internet Corporation for Assigned Names and Numbers/OU=Technology/CN=www.example.org
issuer=/C=US/O=DigiCert Inc/CN=DigiCert SHA2 Secure Server CA
---
No client certificate CA names sent
Peer signing digest: SHA256
Server Temp Key: ECDH, P-256, 256 bits
---
SSL handshake has read 4643 bytes and written 415 bytes
---
New, TLSv1/SSLv3, Cipher is ECDHE-RSA-AES128-GCM-SHA256
Server public key is 2048 bit
Secure Renegotiation IS supported
Compression: NONE
Expansion: NONE
No ALPN negotiated
SSL-Session:
    Protocol  : TLSv1.2
    Cipher    : ECDHE-RSA-AES128-GCM-SHA256
    Session-ID: 91950DC50FADB57BF026D2661E6CFAA1F522E5CA60D2310E106EE0E0FD6E70BD
    Session-ID-ctx:
    Master-Key: 704E9145253EEB4E9DC47E3DC6725D296D4A470EA296D54F71D65E74EAC09EB096EA1305CBEDD9E7020B8F72FD2B68A5
    Key-Arg   : None
    Krb5 Principal: None
    PSK identity: None
    PSK identity hint: None
    TLS session ticket lifetime hint: 7200 (seconds)
    TLS session ticket:
    0000 - 68 84 4e 77 be e3 f5 00-49 c5 44 40 53 4d b9 61   h.Nw....I.D@SM.a
    0010 - c9 fe df e4 05 51 d0 53-ae cf 89 4c b6 ef 6c 9e   .....Q.S...L..l.
    0020 - fe 12 9a f0 e8 e5 4e 87-42 89 ac af ca e5 4a 85   ......N.B.....J.
    0030 - 38 08 26 e3 22 89 08 b5-62 c0 8b 7e b8 05 d3 54   8.&."...b..~...T
    0040 - 8c 24 91 a7 b4 4f 79 ad-36 59 7c 69 2d e5 7f 62   .$...Oy.6Y|i-..b
    0050 - f6 73 a3 8b 92 63 c1 e3-df 78 ba 8c 5a cc 82 50   .s...c...x..Z..P
    0060 - 33 4e 13 4b 10 e4 97 31-cc b4 13 65 45 60 3e 13   3N.K...1...eE`>.
    0070 - ac 9e b1 bb 4b 18 d9 16-ea ce f0 9b 5b 0c 8b bf   ....K.......[...
    0080 - fd 78 74 a0 1a ef c2 15-2a 0a 14 8d d1 3f 52 7a   .xt.....*....?Rz
    0090 - 12 6b c7 81 15 c4 c4 af-7e df c2 20 a8 dd 4b 93   .k......~.. ..K.
    Start Time: 1574769867
    Timeout   : 300 (sec)
    Verify return code: 0 (ok)
---
GET / HTTP/1.1
Host: example.com
HTTP/1.1 200 OK
Cache-Control: max-age=604800
Content-Type: text/html; charset=UTF-8
Date: Tue, 26 Nov 2019 12:04:38 GMT
Etag: "3147526947+ident"
Expires: Tue, 03 Dec 2019 12:04:38 GMT
Last-Modified: Thu, 17 Oct 2019 07:18:26 GMT
Server: ECS (dcb/7EC8)
Vary: Accept-Encoding
X-Cache: HIT
Content-Length: 1256
<!doctype html>
<html>
<head>
    <title>Example Domain</title>
    <meta charset="utf-8" />
    <meta http-equiv="Content-type" content="text/html; charset=utf-8" />
    <meta name="viewport" content="width=device-width, initial-scale=1" />
    <style type="text/css">
    body {
        background-color: #f0f0f2;
        margin: 0;
        padding: 0;
        font-family: -apple-system, system-ui, BlinkMacSystemFont, "Segoe UI", "Open Sans", "Helvetica Neue", Helvetica, Arial, sans-serif;
    }
    div {
        width: 600px;
        margin: 5em auto;
        padding: 2em;
        background-color: #fdfdff;
        border-radius: 0.5em;
        box-shadow: 2px 3px 7px 2px rgba(0,0,0,0.02);
    }
    a:link, a:visited {
        color: #38488f;
        text-decoration: none;
    }
    @media (max-width: 700px) {
        div {
            margin: 0 auto;
            width: auto;
        }
    }
    </style>
</head>
<body>
<div>
    <h1>Example Domain</h1>
    <p>This domain is for use in illustrative examples in documents. You may use this
    domain in literature without prior coordination or asking for permission.</p>
    <p><a data-hren="https://www.iana.org/domains/example">More information...</a></p>
</div>
</body>
</html>
The passwd command in Linux
The command usage is pretty simple:
root@ubuntu:~# passwd
New password: 
The pwd command in Linux
The pwd command allows you to print the current working directory on your terminal. It’s a very basic command and solves its purpose very well.

Now, your terminal prompt should usually have the complete directory anyway. But in case it doesn’t, this can be a quick command to see the directory that you’re in. Another application of this command is when creating scripts where this command can allow us to find the directory where the script has been saved.
The ls command in Linux
The ls command is used to list files and directories in the current working directory. This is going to be one of the most frequently used Linux commands you must know of.

As you can see in the above image, using the command by itself without any arguments will give us an output with all the files and directories in the directory. The command offers a lot of flexibility in terms of displaying the data in the output.
Moving Around
So far, we’ve learned how to figure out where we are in the filesystem, and we’ve learned how to use the ls command to find out some information about files in certain directories.
But how do we change our working directory? Changing our working directory will allow us to use relative paths from a different location. Usually, it is easier to operate on files from the directory where they are contained.
We can move around the file hierarchy by using the cd command. This command stands for change directories.
In its most basic usage, we can just type:
cdThis will not appear to do anything. In fact, it hasn’t. What cd does without any additional information is change to your home directory. Since we are already in our home directory, there’s nothing for the command to do.
A more general idea of how to use the command is like this:
- /path/to/directory
In this instance, /path/to/directory should be substituted with the path of the directory location that you would like to move to. For instance, to change to the “root” directory, specified by a single slash (/), which is the top of the tree, we can type:
cd /You may have noticed that your command prompt has changed.
We can verify that we’re now in a different directory by using the pwd command again:
pwd/We can also check out the files in our new directory:
lsbin etc lib media proc sbin sys var
boot home lib64 mnt root selinux tmp vmlinuz
dev initrd.img lost+found opt run srv usrWe’ve successfully moved to a different location. Now, let’s try to move to a new directory using a relative path. We see that there is a directory called usr within this directory. Change to it by typing:
cd usrAs you can see, we can use relative paths with cd as well. How do we move back to the root directory? We could type the same cd / command that we used before, but let’s try something different.
Let’s try to move up the tree using relative paths. How do we reference the folder containing our current folder using relative paths?
Let’s move back up a level:
cd ..
pwd/As you can see, we’re back in the root directory. We can also reference our current directory with a single dot:
ls .bin etc lib media proc sbin sys var
boot home lib64 mnt root selinux tmp vmlinuz
dev initrd.img lost+found opt run srv usrThis is useful in a number of situations that may not be very apparent at this stage, but you will appreciate the ability to refer to your current directory easily later on.
As we said earlier, the “~” symbol references our home directory. Let’s use that as the start of another directory path to change to our “dir1” inside our home:
cd ~/dir1
pwd/root/dir1We have now moved into a directory within our home directory very easily using the “~” symbol to replace the first part of our path.
But what if we forgot to do something before changing directories and want to go back to our most recent directory? We can return to our previous directory by typing:
cd -
pwd/We are back in our last directory.
Let’s finish up by moving back to our home directory. We could do this by using the tilde as the path to switch to. But you may recall that the default mode of cd is to return us to our home directory if we don’t add any path. Let’s try that instead:
cd
pwd/rootAs you can see, we’ve made it back to our home directory again.
Изменить владельца файла
Изменить владельца файла или директории можно с помощью команды chown:
[user@testhost ~]$ chown user:user temp
[user@testhost ~]$ ls -l temp
-rw-rw-r-- 1 user user 31 Nov 26 11:09 temp
В параметр этой команде нужно отдать нового владельца и группу (опционально), разделенных двоеточием. Также при изменении владельца директории может быть полезна опция -R — тогда владельцы изменятся и у всего содержимого директории.
Информация о системе
Получить данную информацию можно с помощью команды uname.
[user@testhost ~]$ uname -a
Linux alexander 3.10.0-123.8.1.el7.x86_64 #1 SMP Mon Sep 22 19:06:58 UTC 2014 x86_64 x86_64 x86_64 GNU/Linux
Чтобы понять, в каком формате производится вывод, можно обратиться к help‘у данной команды:
[user@testhost ~]$ uname --help
Использование: uname [КЛЮЧ]…
Печатает определенные сведения о системе.  Если КЛЮЧ не задан,
подразумевается -s.
  -a, --all          напечатать всю информацию, в следующем порядке,
                       кроме -p и -i, если они неизвестны:
  -s, --kernel-name  напечатать имя ядра
  -n, --nodename     напечатать имя машины в сети
  -r, --release      напечатать номер выпуска операционной системы
  -v, --kernel-version     напечатать версию ядра
  -m, --machine            напечатать тип оборудования машины
  -p, --processor          напечатать тип процессора или «неизвестно»
  -i, --hardware-platform  напечатать тип аппаратной платформы или «неизвестно»
  -o, --operating-system   напечатать имя операционной системы
      --help     показать эту справку и выйти
      --version  показать информацию о версии и выйти
The top command in Linux
A few sections earlier, we talked about the ps command. You observed that the ps command will output the active processes and end itself.
The top command is like a CLI version of the task manager in Windows. You get a live view of the processes and all the information accompanying those processes like memory usage, CPU usage, etc.
To get the top command, all you need to do is type the word top in your terminal.

Pwd
Вывести текущую (рабочую) директорию.
[user@testhost ~]$ pwd
/home/user
Looking Around with ls
Now you know which directory you are currently in. But how do we know what is in this directory?
We can ask our server what files and directories are in the current directory with a command called ls. Type it in at the command prompt now:
lsThis should just return you to the command prompt and not give you any information. Did the command fail? No, it succeeded, it just didn’t find any files or folders in your current directory.
Let’s create a few test files to see how ls behaves when there are files in this directory. Type this to create a few files:
touch file{1..5}Let’s retry the ls command to see what it will do:
lsfile1 file2 file3 file4 file5Wonderful. The command now recognizes that we have some files in our home directory.
Most commands have default behavior that gets executed when you call it like we did above. However, most command behavior can also be augmented by passing optional arguments to the command. You may hear these referred to as “options”, “arguments”, “flags”, or “parameters”.
Sometimes, these activate optional functionality available through the command and other times these specify the object that the command should be taken against.
Let’s start with the first situation.
Exploring ls Options
Not all commands have a built-in help option, but we many do. Most of the time, you can access this by adding a --help or -h at the end of the command. We can try this with the ls command now:
ls --helpUsage: ls [OPTION]... [FILE]...
List information about the FILEs (the current directory by default).
Sort entries alphabetically if none of -cftuvSUX nor --sort is specified.
Mandatory arguments to long options are mandatory for short options too. -a, --all do not ignore entries starting with . -A, --almost-all do not list implied . and .. --author with -l, print the author of each file -b, --escape print C-style escapes for nongraphic characters --block-size=SIZE scale sizes by SIZE before printing them. E.g.,
. . .This will give you some guidance on the correct usage of the command and give you an idea of what options are available to alter the default behavior. The column on the left gives you the characters to type in to augment the command, and the column on the right describes each flag.
The --help that we added on was an example of an option that we can pass.
man lsYou can scroll through the page with the arrow keys and exit by typing “q”.
As you can see, ls has quite a few options that we can pass to the command to change its behavior. Let’s try a few out.
ls -l-rw-r--r-- 1 root root 0 Feb 28 19:45 file1
-rw-r--r-- 1 root root 0 Feb 28 19:45 file2
-rw-r--r-- 1 root root 0 Feb 28 19:45 file3
-rw-r--r-- 1 root root 0 Feb 28 19:45 file4
-rw-r--r-- 1 root root 0 Feb 28 19:45 file5This shows us the same five files, but it shows them in “long” format. This gives us more information about the files, such as the owner (first “root”), the group owner (second “root”), the size of the file ( 0 ), the date the file was last modified, and some other information.
Let’s try another option:
ls -a. .aptitude .bashrc file2 file4 .profile .ssh
.. .bash_history file1 file3 file5 .rnd .viminfoThis shows us some files that we didn’t see before. The -a flag is synonymous with the --all flag. This shows us all of the files in the current directory, including hidden files.
We can pass multiple flags as well, by simply stringing them together:
ls -l -adrwx------ 4 root root 4096 Feb 28 19:45 .
drwxr-xr-x 23 root root 4096 May 3 2013 ..
drwx------ 2 root root 4096 Feb 28 17:19 .aptitude
-rw------- 1 root root 2036 Feb 28 18:20 .bash_history
-rw-r--r-- 1 root root 570 Jan 31 2010 .bashrc
-rw-r--r-- 1 root root 0 Feb 28 19:45 file1
. . .This works well, but we can also collapse option flags like this:
ls -laThis will function exactly the same, and takes less typing.
Another interesting option is the -R flag, which lists files recursively. Since the only directories we have within our home directory are hidden, we’ll have to pass the -a option too:
ls -Ra .:
. .aptitude .bashrc file2 file4 .profile .ssh
.. .bash_history file1 file3 file5 .rnd .viminfo
./.aptitude:
. .. cache config
./.ssh:
. .. authorized_keysNow that we know how to change how ls behaves, let’s change the “object” that ls operates on.
Using ls on Other Directories
By default, ls will list the contents of the current directory. However, we can pass the name of any directory that we would like to see the contents of at the end of the command.
For instance, we can view the contents of a directory called /etc that is available on all Linux systems by typing:
ls /etcacpi fstab magic rc.local
adduser.conf fstab.d magic.mime rc.local.orig
aliases fuse.conf mailcap rcS.d
aliases.db gai.conf mailcap.order reportbug.conf
alternatives groff mailname resolvconf
anacrontab group mail.rc resolv.conf
apm group- manpath.config rmt
. . .We see here that there are many files in this directory.
Any directory path that begins with a slash (/) is known as an “absolute” path. This is because it references the directory path specifically from the very highest directory, the root directory, which is specified by the “/” character.
Another way to reference a directory is using a “relative” path. This will look for a directory relative to the directory that you are currently in. These directory specifications don’t start with a slash.
We don’t have any non-hidden directories in our current folder, so let’s make some really quickly to demonstrate. We’ll also add some files inside. Don’t worry about these commands right now, they’re just used to demonstrate an idea right now, so just type them in as-is:
mkdir dir{1..3}
touch dir{1..3}/test{A,B,C}
This will create some directories with some files inside. We can see the directories with a normal ls command:
lsdir1 dir2 dir3 file1 file2 file3 file4 file5In order to see what is inside of the “dir1” directory, we could give the absolute path like we demonstrated above, by appending the directory we want to see onto the end of the value of our current directory. We could find out the current directory:
pwd/rootAnd then add the directory we’re interested in onto the end:
ls /root/dir1testA testB testC But we don’t have to do this. We can reference directories inside of our current directory by just naming the directory, like this:
ls dir1testA testB testCIf we don’t begin a path specification with a slash, the operating system looks for the directory path starting at the current directory.
The cp and mv commands
The cp and mv commands are equivalent to the copy-paste and cut-paste in Windows. But since Linux doesn’t really have a command for renaming files, we also make use of the mv command to rename files and folders.
root@ubuntu:~# cp <source> <destination>
In the above command, we created a copy of the file named Sample. Let’s see how what happens if we use the mv command in the same manner. For this demonstration, I’ll delete the Sample-Copy file.
root@ubuntu:~# mv <source> <destination
In the above case, since we were moving the file within the same directory, it acted as rename. The file name is now changed.
Информация о файловых системах (свободное место на дисках)
Команда df позволяет посмотреть, сколько места свободно и занято на примонтированных файловых системах.
[user@testhost ~]$ df -hT
Файловая система Тип      Размер Использовано Дост Использовано% Cмонтировано в
/dev/vda1        ext4 79G         21G 55G 27% /
devtmpfs         devtmpfs 2,0G           0 2,0G 0% /dev
tmpfs            tmpfs 2,0G           0 2,0G 0% /dev/shm
tmpfs            tmpfs 2,0G         57M 1,9G 3% /run
tmpfs            tmpfs 2,0G           0 2,0G 0% /sys/fs/cgroup
tmpfs            tmpfs 396M           0 396M 0% /run/user/1001
Опция -T указывает, что нужно выводить тип файловой системы.
Вывести список процессов.
[user@testhost ~]$ ps
    PID TTY          TIME CMD
 761020 pts/2    00:00:00 bash
 809720 pts/2    00:00:00 ps
Я сам обычно использую BSD опции «aux» — вывести все процессы в системе (так как процессов может быть много, я вывел только первые 5 из них, использовав конвейер (pipe) и команду head):
[user@testhost ~]$ ps aux | head -5
USER         PID %CPU %MEM    VSZ RSS TTY   STAT START TIME COMMAND
root           1 0.0 0.0 19692  2600 ? Ss Jul02   0:10 /sbin/init
root           2 0.0 0.0   0 0 ? S    Jul02 0:03 [kthreadd]
root           4 0.0 0.0   0 0 ? I<   Jul02 0:00 [kworker/0:0H]
root           6 0.0 0.0   0 0 ? I<   Jul02 0:00 [mm_percpu_wq]
Многие также используют BSD опции «axjf«, что позволяет вывести дерево процессов (здесь я убрал часть вывода для демонстрации):
[user@testhost ~]$ ps axjf
   PPID     PID PGID     SID TTY TPGID STAT   UID TIME COMMAND
      0       2 0       0 ? -1 S        0 0:03 [kthreadd]
      2       4 0       0 ? -1 I<       0 0:00 \_ [kworker/0:0H]
      2       6 0       0 ? -1 I<       0 0:00 \_ [mm_percpu_wq]
      2       7 0       0 ? -1 S        0 4:08 \_ [ksoftirqd/0]
...
...
...
      1    4293   4293 4293 tty6        4293 Ss+ 0 0:00 /sbin/mingetty /dev/tty6
      1  532967  532964 532964 ?             -1 Sl 495 0:00 /opt/td-agent/embedded/bin/ruby /usr/sbin/td-agent --log /var/log/td-agent/td-agent.log --use-v1-config --group td-agent --daemon /var/run/td-agent/td-agent.pid
 532967  532970 532964  532964 ?     -1 Sl 495 803:06 \_ /opt/td-agent/embedded/bin/ruby /usr/sbin/td-agent --log /var/log/td-agent/td-agent.log --use-v1-config --group td-agent --daemon /var/run/td-agent/td-agent.pid
      1  537162  533357 532322 ?             -1 Sl 0 5067:43 /usr/bin/dockerd --default-ulimit nofile=262144:262144 --dns=172.17.0.1
 537162  537177 537177  537177 ?     -1 Ssl 0 4649:28  \_ docker-containerd --config /var/run/docker/containerd/containerd.toml
 537177  537579 537579  537177 ?     -1 Sl 0 4:48 |   \_ docker-containerd-shim -namespace moby -workdir /var/lib/docker/containerd/daemon/io.containerd.runtime.v1.linux/moby/0ee89b20deb3cf08648cd92e1f3e3c661ccffef7a0971
 537579  537642 537642  537642 ?     -1 Ss 1000 32:11 |   | \_ /usr/bin/python /usr/bin/supervisord -c /etc/supervisord/api.conf
 537642  539764 539764  537642 ?     -1 S 1000 0:00 |   | \_ sh -c echo "READY"; while read -r line; do echo "$line"; supervisorctl shutdown; done
 537642  539767 539767  537642 ?     -1 S 1000 5:09 |   | \_ php-fpm: master process (/etc/php73/php-fpm.conf)
 539767  783097 539767  537642 ?     -1 S 1000 0:00 |   | | \_ php-fpm: pool test
 539767  783131 539767  537642 ?     -1 S 1000 0:00 |   | | \_ php-fpm: pool test
 539767  783185 539767  537642 ?     -1 S 1000 0:00 |   | | \_ php-fpm: pool test
...
...
...
У этой команды много различных опций, так что при активном использовании рекомендую ознакомиться с документацией. Для большинства же случаев хватит просто знать «ps aux«.
Tail
Вывести n последних строк или байт файла.
[user@testhost ~]$ tail -1 temp
Lalalala...
Очень полезной является опция -f — она позволяет выводить новые данные в файле в реальном времени.
Переместить или переименовать файл или директорию.
[user@testhost ~]$ ls -ltr
total 4
drwxrwxr-x 2 user user 4096 Nov 26 10:29 test
-rw-rw-r-- 1 user user    0 Nov 26 10:45 temp
-rw-rw-r-- 1 user user    0 Nov 26 10:46 temp_clone
[user@testhost ~]$ ls test
[user@testhost ~]$ mv test test_renamed
[user@testhost ~]$ mv temp_clone test_renamed/
[user@testhost ~]$ ls
temp  test_renamed
[user@testhost ~]$ ls test_renamed/
temp_clone
Вывести содержимое бинарного файла
Это можно сделать с помощью утилиты hexdump. Ниже приведены примеры её использования.
[user@testhost ~]$ cat temp
Content of a file.
Lalalala...
[user@testhost ~]$ hexdump -c temp
0000000   C o n   t e n t       o f a f   i l
0000010   e . \n   L a l a   l a l a .   . . \n
000001f
[user@testhost ~]$ hexdump -x temp
0000000    6f43 746e    6e65 2074 666f    6120 6620 6c69
0000010    2e65 4c0a    6c61 6c61 6c61    2e61 2e2e 000a
000001f
[user@testhost ~]$ hexdump -C temp
00000000  43 6f 6e 74 65 6e 74 20  6f 66 20 61 20 66 69 6c |Content of a fil|
00000010  65 2e 0a 4c 61 6c 61 6c  61 6c 61 2e 2e 2e 0a |e..Lalalala....|
0000001f
С помощью этой утилиты можно вывести данные и в других форматах, однако наиболее часто могут пригодиться именно такие варианты её использования.
Rsync
Также для синхронизации директорий между хостами можно использовать rsync (-a — archive mode, позволяет скопировать полностью всё содержимое директории «как есть», -v — вывод на консоль дополнительной информации):
MacBook-Pro-User:~ user$ ls Downloads/user
ls: Downloads/user: No such file or directory
MacBook-Pro-User:~ user$ rsync -av user@testhost:/home/user Downloads
receiving file list ... done
user/
user/.bash_history
user/.bash_logout
user/.bash_profile
user/.bashrc
user/.lesshst
user/.mongorc.js
user/.viminfo
user/1
user/man_signal
user/man_signal_error_log
user/temp
user/.ssh/
user/.ssh/authorized_keys
user/test/
user/test/created_today
user/test/temp_clone
sent 346 bytes  received 29210 bytes  11822.40 bytes/sec
total size is 28079  speedup is 0.95
MacBook-Pro-User:~ user$ ls -a Downloads/user
.                    .bash_history .bash_profile        .lesshst .ssh 1                    man_signal_error_log test
..                   .bash_logout .bashrc              .mongorc.js .viminfo man_signal           temp
The ufw and iptables commands
UFW and IPTables are firewall interfaces for the Linux Kernel’s netfilter firewall. IPTables directly passes firewall rules to netfilter while UFW configures the rules in IPTables which then sends those rules to netfilter.
Why do we need UFW when we have IPTables? Because IPTables is pretty difficult for a newbie. UFW makes things extremely easy. See the below example where we are trying to allow the port 80 for our webserver.
root@ubuntu:~# iptables -A INPUT -p tcp -m tcp --dport 80 -j ACCEPTroot@ubuntu:~# ufw allow 80I’m sure you now know why UFW was created! Look at how easy the syntax becomes. Both these firewalls are very comprehensive and can allow you to create any kind of configuration required for your network. Learn at least the basics of UFW or IPTables firewall as these are the Linux commands you must know.
Как запустить приложение
Некоторые приложения запускаются через скрипты. Например, чтобы запустить сервер приложения WildFly, нужно перейти в папку bin и запустить там standalone.sh. Файл с расширением .sh — это скрипт.
Чтобы запустить скрипт, нужно указать полный путь к нему:
/opt/cdi/jboss/bin/standalone.sh — запустили скрипт standalone.shЭто важно! Даже если вы находитесь в той папке, где и скрипт, он не будет найден, если просто указать название sh-скрипта. Надо написать так:
./standalone.sh — запустили скрипт, если мы в той же директорииПоиск идет только в каталогах, записанных в переменную PATH. Так что если скрипт используется часто, добавляйте путь туда и вызывайте просто по названию:
standalone.sh --- запустили скрипт standalone.sh, путь к которому прописан в PATHСм также:
Запуск скрипта sh в Linux — подробнее о скриптах

Если же приложение запускается как сервис, то все еще проще:
service test start — запустить сервис под названием «test»
service test stop — остановить сервис
Чтобы сервис test запускался автоматически при рестарте системы, используйте команду:
chkconfig test onОна добавит службу в автозапуск.
Scp
Копировать файлы между хостами (для этого используется ssh).
[user@testhost ~]$ pwd
/home/user
[user@testhost ~]$ ls
temp  test_renamed
[user@testhost ~]$ exit
logout
Connection to 11.11.22.22 closed.
MacBook-Pro-Aleksandr:~ user$ scp user@11.11.22.22:/home/user/temp Downloads/
temp                                                                                                                                                                                                        100% 31 0.2KB/s 00:00
MacBook-Pro-Aleksandr:~ user$ cat Downloads/temp
Content of a file.
Lalalala...
The ssh command in Linux
The ssh command allows us to connect to an external machine on the network with the use of the ssh protocol. The basic syntax of the ssh command is:
root@ubuntu:~ -- username@hostnameКак создать много тестовых папок и файлов
Допустим, у нас есть некая папка test. Создадим в ней сотню директорий и кучу файликов в каждой:
mkdir -p test/dir--{000..100}
touch test/dir--{000..100}/file-{A..Z}
Вот и все, дальше можно играться с ними!
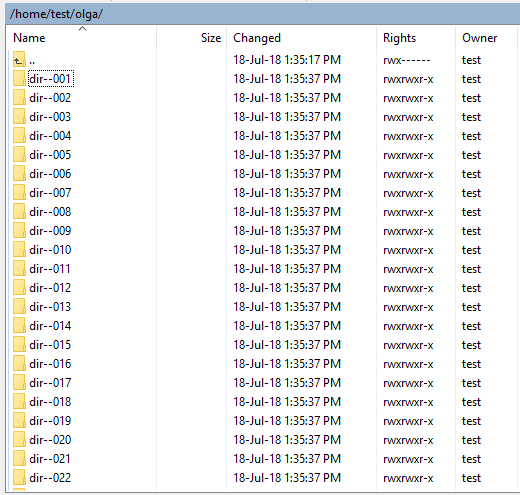
- mkdir — создать директорию
- touch — создать файл (или изменить существующий, но если файла с таким именем нет, то команда создаст новый, пустой)
А выражения в скобках играют роль функции, которая выполняется в цикле и делает ручную работу за вас:
- {000..100} — пробежится по всем числам от 0 до 100
- {A..Z} — пробежится по всем буквам английского алфавита от A до Z
Как я пробовала эту команду. Сначала посмотрела, где нахожусь:
$ pwd
/home/test
Символ $ при описании команд означает начало строки, куда мы пишем команду. Так мы отделяем то, что ввели сами (pwd) от ответа системы (/home/test).
Ага, в домашней директории. Создам себе песочницу:
mkdir olgaВот в ней и буду творить!
mkdir -p olga/dir--{000..100}
touch olga/dir--{000..100}/file-{A..Z}
А потом можно проверить, что получилось:
cd olga
ls -l
Как-то так! Имхо, полезные команды.
Я нашла их в книге «Командная строка Linux. Полное руководство», они используются для того, чтобы создать песочницу для прощупывания команды find. Я, как и автор, восхищаюсь мощью командной строки в данном случае. Всего 2 строчки, а сколько боли бы принесло сделать похожую структуру через графический интерфейс!
И, главное, тестировщику полезно — может пригодиться для тестов.
Изменить права доступа файла
Эта задача решается с помощью команды chmod. В качестве примера приведу установку прав «владельцу разрешено чтение, запись и исполнение, группе разрешено чтение и запись, всем остальным — ничего»:
[user@testhost ~]$ ls -l temp
-rw-rw-r-- 1 user user 31 Nov 26 11:09 temp
[user@testhost ~]$ chmod 760 temp
[user@testhost ~]$ ls -l temp
-rwxrw---- 1 user user 31 Nov 26 11:09 temp
Первая 7 (это 0b111 в битовом представлении) в параметре означает «все права для владельца», вторая 6 (это 0b110 в битовом представлении) — «чтение и запись», ну и 0 — это ничего для остальных. Битовая маска состоит из трёх битов: самый младший («правый») бит отвечает за исполнение, следующий за ним («средний») — за запись, и самый старший («левый») — за чтение.
Также можно выставлять права с помощью специальных символов (мнемонический синтаксис). Например, в следующем примере сначала убираются права на исполнение для текущего пользователя, а затем возвращаются обратно:
[user@testhost ~]$ ls -l temp
-rwxrw---- 1 user user 31 Nov 26 11:09 temp
[user@testhost ~]$ chmod -x temp
[user@testhost ~]$ ls -l temp
-rw-rw---- 1 user user 31 Nov 26 11:09 temp
[user@testhost ~]$ chmod +x temp
[user@testhost ~]$ ls -l temp
-rwxrwx--x 1 user user 31 Nov 26 11:09 temp
У этой команды есть много вариантов использования, поэтому советую прочитать про неё подробнее (особенно про мнемонический синтаксис, например, здесь).
Prerequisites
This article is very basic, so it does not assume much prior knowledge. However, you will need to be logged into your VPS instance to start exploring. The options that you have available to do this depends largely on the operating system that you are using at home.
When you create a new DigitalOcean droplet, you will be emailed a password and given an IP address to access your new server. Use the linked article to learn how to connect to your VPS.
- root@your_IP
Another option is to use the “Console Access” button in the top-right corner of your DigitalOcean control panel. This will create a virtual terminal session directly in your web browser window.
Top 50 Linux Commands You Must Know as a Regular User
Now let’s dive a little deeper into each of these commands and understand them in more detail. We already have a lot of existing articles for each of those individual commands. For your convenience, we’ll add links to all the existing articles, and continue to update the article as new topics are covered.
Как перенести / скопировать файл
Допустим, у нас в директории /opt/app/log находится app.log, который мы хотим сохранить в другом месте. Как перенести лог в нужное место, если нет графического интерфейса, только командная строка?
Скопировать файл
cp что_копировать куда_копироватьЕсли мы находимся в директории /opt/app/log:
cp app.log /home/olgaВ данном примере мы использовали относительный путь для «что копировать» — мы уже находимся рядом с логом, поэтому просто берем его. А для «куда копировать» используем абсолютный путь — копируем в /home/olga.
Можно сразу переименовать файл:
cp app.log /home/olga/app_test_2020_03_08.logВ этом случае мы взяли app.log и поместили его в папку /home/olga, переименовав при этом в app_test_2020_03_08.log. А то мало ли, сколько логов у вас в этом папке уже лежит, чтобы различать их, можно давать файлу более говорящее имя.
Если в «куда копировать» файл с таким именем уже есть, система не будет ничего спрашивать, просто перезапишет его. Для примера положим в папку log внутри домашней директории файл «app.log», который там уже есть:

Никаких ошибок, система просто выполнила команду.
См также:
Копирование файлов в linux
Скопировать директорию
Команда остается та же, «cp», только используется ключ R — «копировать папку рекурсивно»:
cp -r путь_к_папке путь_к_новому_местуcp /opt/app/log /home/olgaТак в директории /home/olga появится папка «log».
Переместить файл
Если надо переместить файл, а не скопировать его, то вместо cp (copy) используем mv (move).
cp app.log /home/olga
↓
mv app.log /home/olga
Можно использовать относительные и абсолютные пути:
mv /opt/app/logs/app.log /home/olga — абсолютные пути указаны, команда сработает из любого местаМожно сразу переименовать файл:
mv app.log /home/olga/app_2020_03_08.log — перенесли лог в /home/olga и переименовалиПереместить директорию
Аналогично перемещению файла, команда mv
mv /opt/app/log/ /home/olga/bakup/Get help on Bash builtin pwd
command.
Print the current working directory.
With the -P option, pwd prints
the physical directory, without
any symbolic links; the -L option
Print the absolute pathname
of the current working directory. If
the `-P’ option is supplied,
the pathname printed will not contain
symbolic links. If
the `-L’ option is supplied, the pathname
printed may contain symbolic
links. The return status is zero
unless an error is encountered
while determining the name of the
current directory or an
invalid option is supplied.
NOTE
: open the on-line manuals in the «Info format» by execute ‘info bash’ command
then scroll down to the “* Builtin Index:: Index of Bash builtin
commands.” Hit Enter key, then look for “* pwd: (Bourne Shell
Builtins.) on (line 163) “ hit Enter key again.
Kill
Послать сигнал процессу. По умолчанию посылается сигнал SIGTERM, который завершает процесс.
[user@testhost ~]$ ps ux
USER         PID %CPU %MEM    VSZ RSS TTY   STAT START TIME COMMAND
531      1027147 0.0  0.0 119956 4260 ?        S 14:51 0:00 sshd: user@pts/1
531      1027149 0.0  0.0 115408 3396 pts/1    Ss 14:51 0:00 -bash
531      1027170 0.0  0.0 119956 4136 ?        R 14:51 0:00 sshd: user@pts/2
531      1027180 0.0  0.0 115408 3564 pts/2    Ss 14:51 0:00 -bash
531      1033727 0.0  0.0 107960 708 pts/1    S+ 15:17 0:00 sleep 300
531      1033752 0.0  0.0 117264 2604 pts/2    R+ 15:17 0:00 ps ux
[user@testhost ~]$ kill 1033727
[user@testhost ~]$ ps ux
USER         PID %CPU %MEM    VSZ RSS TTY   STAT START TIME COMMAND
531      1027147 0.0  0.0 119956 4260 ?        S 14:51 0:00 sshd: user@pts/1
531      1027149 0.0  0.0 115408 3396 pts/1    Ss+ 14:51 0:00 -bash
531      1027170 0.0  0.0 119956 4136 ?        R 14:51 0:00 sshd: user@pts/2
531      1027180 0.0  0.0 115408 3564 pts/2    Ss 14:51 0:00 -bash
531      1033808 0.0  0.0 117268 2492 pts/2    R+ 15:17 0:00 ps ux
Так как процесс может иметь обработчики сигналов, kill не всегда приводит к ожидаемому результату — моментальному завершению процесса. Чтобы «убить» процесс наверняка, нужно послать процессу сигнал SIGKILL. Однако это может привести к потере данных (например, если процесс перед завершением должен сохранить какую-то информацию на диск), так что нужно пользоваться такой командой осторожно. Номер сигнала SIGKILL — 9, поэтому короткий вариант команды выглядит так:
[user@testhost ~]$ ps ux | grep sleep
531      1034930 0.0  0.0 107960 636 pts/1    S+ 15:21 0:00 sleep 300
531      1034953 0.0  0.0 110516 2104 pts/2    S+ 15:21 0:00 grep --color=auto sleep
[user@testhost ~]$ kill -9 1034930
[user@testhost ~]$ ps ux | grep sleep
531      1035004 0.0  0.0 110516 2092 pts/2    S+ 15:22 0:00 grep --color=auto sleep
Помимо упомянутых SIGTERM и SIGKILL существует еще множество различных сигналов, их список можно легко найти в интернете. И не забывайте, что сигналы SIGKILL и SIGSTOP не могут быть перехвачены или проигнорированы.
Echo
Вывести на экран строку текста.
[user@testhost ~]$ echo "Hello"
Hello
Здесь заслуживают внимания опции -n — не дополнять строку переносом строки в конце, и -e — включить интерпретацию экранирования с помощью «\».
[user@testhost ~]$ echo "\tHello\n"
\tHello\n
[user@testhost ~]$ echo -n "\tHello\n"
\tHello\n[user@testhost ~]$
[user@testhost ~]$ echo -ne "\tHello\n"	Hello
Также с помощью этой команды можно выводить значения переменных. Например, в Linux exit code последней завершенной команды хранится в специальной переменной $?, и таким образом можно узнать, какая именно ошибка произошла в последнем запущенном приложении:
[user@testhost ~]$ ls    # ошибки не будет
1  man_signal  man_signal_error_log  temp test
[user@testhost ~]$ echo $?    # получим 0 — ошибки не было
0
[user@testhost ~]$ ls qwerty    # будет ошибка
ls: cannot access qwerty: No such file or directory
[user@testhost ~]$ echo $?    # получим 2 — Misuse of shell builtins (according to Bash documentation)
2
[user@testhost ~]$ echo $?    # последний echo отработал без ошибок, получим 0
0
Изменить текущую директорию.
[user@testhost ~]$ pwd
/home/user
[user@testhost ~]$ cd /home/
[user@testhost home]$ pwd
/home
Если не передавать имя директории в качестве аргумента, будет использоваться переменная окружения $HOME, то есть домашняя директория. Также может быть удобно использовать `~` — специальный символ, означающий $HOME:
[user@testhost etc]$ pwd
/etc
[user@testhost etc]$ cd ~/test/
[user@testhost test]$ pwd
/home/user/test
The sort command in Linux
The sort command will provide a sorted output of the contents of a file. Let’s use the sort command without any parameters and see the output.
The basic syntax of the sort command is:
root@ubuntu:~# sort <filename>
The cal command in Linux
Ever wanted to view the calendar in the terminal? Me neither! But there apparently are people who wanted it to happen and well here it is.
The cal command displays a well-presented calendar on the terminal. Just enter the word cal on your terminal prompt.
root@ubuntu:~
root@ubuntu:~# cal May 2019
Even though I don’t need it, it’s a really cool addition! I’m sure there are people who are terminal fans and this is a really amazing option for them.
Как узнать версию OS
Сидите вы у Заказчика на линуксовой машине. Пытаетесь что-то установить — не работает. Лезете гуглить, а способы установки разные для разных операционных систем. Но как понять, какая установлена на данной машине?
cat /etc/*-release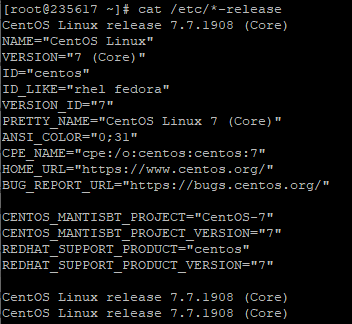
На этой виртуалке стоит CentOs 7.
Если нужна версия ядра:
uname -aСм также:
Как узнать версию Linux
Сетевая информация
Можно использовать ifconfig:
[user@testhost ~]$ ifconfig
eth0: flags=4163<UP,BROADCAST,RUNNING,MULTICAST>  mtu 1500
        inet 47.89.93.67  netmask 255.255.224.0  broadcast 47.89.95.255
        inet6 fd90::302:57ff:fe79:1  prefixlen 64 scopeid 0x20<link>
        ether 04:01:57:79:00:01  txqueuelen 1000 (Ethernet)
        RX packets 11912135  bytes 9307046034 (8.6 GiB)
        RX errors 0  dropped 0 overruns 0  frame 0
        TX packets 14696632  bytes 2809191835 (2.6 GiB)
        TX errors 0  dropped 0 overruns 0  carrier 0 collisions 0
lo: flags=73<UP,LOOPBACK,RUNNING>  mtu 65536
        inet 127.0.0.1  netmask 255.0.0.0
        inet6 ::1  prefixlen 128  scopeid 0x10<host>
        loop  txqueuelen 0  (Local Loopback)
        RX packets 10  bytes 866 (866.0 B)
        RX errors 0  dropped 0 overruns 0  frame 0
        TX packets 10  bytes 866 (866.0 B)
        TX errors 0  dropped 0 overruns 0  carrier 0 collisions 0
А можно и ip:
[user@testhost ~]$ ip a
1: lo: <LOOPBACK,UP,LOWER_UP> mtu 65536 qdisc noqueue state UNKNOWN group default
    link/loopback 00:00:00:00:00:00 brd 00:00:00:00:00:00
    inet 127.0.0.1/8 scope host lo
       valid_lft forever preferred_lft forever
    inet6 ::1/128 scope host
       valid_lft forever preferred_lft forever
2: eth0: <BROADCAST,MULTICAST,UP,LOWER_UP> mtu 1500 qdisc pfifo_fast state UP group default qlen 1000
    link/ether 04:01:57:79:00:01 brd ff:ff:ff:ff:ff:ff
    inet 47.89.93.67/19 brd 47.89.95.255 scope global eth0
       valid_lft forever preferred_lft forever
    inet6 fd90::302:57ff:fe79:1/64 scope link
       valid_lft forever preferred_lft forever
3: ip_vti0: <NOARP> mtu 1500 qdisc noop state DOWN group default
    link/ipip 0.0.0.0 brd 0.0.0.0
При этом, если, например, вас интересует только IPv4, то можно добавить опцию -4:
[user@testhost ~]$ ip -4 a
1: lo: <LOOPBACK,UP,LOWER_UP> mtu 65536 qdisc noqueue state UNKNOWN group default
    inet 127.0.0.1/8 scope host lo
       valid_lft forever preferred_lft forever
2: eth0: <BROADCAST,MULTICAST,UP,LOWER_UP> mtu 1500 qdisc pfifo_fast state UP group default qlen 1000
    inet 47.89.93.67/19 brd 47.89.95.255 scope global eth0
       valid_lft forever preferred_lft forever
Узнать IP адрес по имени хоста
С этим поможет одна из следующих команд:
[user@testhost ~]$ host ya.ru
ya.ru has address 87.250.250.242
ya.ru has IPv6 address 2a02:6b8::2:242
ya.ru mail is handled by 10 mx.yandex.ru.
[user@testhost ~]$ dig +short ya.ru
87.250.250.242
[user@testhost ~]$ nslookup ya.ru
Server: 8.8.8.8
Address: 8.8.8.8#53
Non-authoritative answer:
Name: ya.ru
Address: 87.250.250.242
The grep command in Linux
root@ubuntu:~
Mkdir
[user@testhost ~]$ mkdir test
[user@testhost ~]$ ls -ltr
total 38184
-rw-rw-r-- 1 user user 39091284 Nov 22 14:14 qqq
drwxrwxr-x 2 user user     4096 Nov 26 10:29 test
Иногда нужно создать определенную структуру директорий: например, директорию в директории, которой не существует. Чтобы не вводить несколько раз подряд mkdir, можно использовать опцию -p — она позволяет создать все недостающие директории в иерархии. Также с этой опцией mkdir не вернет ошибку, если директория существует.
[user@testhost ~]$ ls
qqq  test
[user@testhost ~]$ mkdir test2/subtest
mkdir: cannot create directory ‘test2/subtest’: No such file or directory
[user@testhost ~]$ mkdir -p test2/subtest
[user@testhost ~]$ ls
qqq  test test2
[user@testhost ~]$ ls test2/
subtest
[user@testhost ~]$ mkdir test2/subtest
mkdir: cannot create directory ‘test2/subtest’: File exists
[user@testhost ~]$ mkdir -p test2/subtest
[user@testhost ~]$ ls test2/
subtest
The rm command in Linux
In the previous section, we deleted the Sample-Copy file. The rm command is used to delete files and folders and is one of the important Linux commands you must know.
root@ubuntu:~# rm <file name>root@ubuntu:~# rm -r <folder/directory name>
To delete a directory, you have to add the -r argument to it. Without the -r argument, rm command won’t delete directories.
The ln command in Linux
root@ubuntu:~# ln -s <source path> <link name>
The basic syntax involves using the -s parameter so we can create a symbolic link or soft link.
The tar, zip, and unzip commands
The tar command in Linux is used to create and extract archived files in Linux. We can extract multiple different archive files using the tar command.
To create an archive, we use the -c parameter and to extract an archive, we use the -x parameter. Let’s see it working.
root@ubuntu:~# tar -cvf <archive name> <files seperated by space>root@ubuntu:~# tar -xvf <archive name>
In the first line, we created an archive named Compress.tar with the New-File and New-File-Link. In the next command, we have extracted those files from the archive.
Now coming to the zip and unzip commands. Both these commands are very straight forward. You can use them without any parameters and they’ll work as intended. Let’s see an example below.
root@ubuntu:~# zip <archive name> <file names separated by space>root@ubuntu:~# unzip <archive name>
Since we already have those files in the same directory, the unzip command prompts us before overwriting those files.
И это все?
Разумеется, нет =))
Еще полезно изучить команду find и регулярные выражения. Тестировщику как минимум надо уметь «грепать логи» — использовать grep. Но это уже остается на самостоятельный гуглеж.
База, которая всегда нужна — pwd, cp, mv, mkdir, touch. Остальное можно легко гуглить, как только возникает необходимость.
Вот вам еще пара ссылочек от меня:
Для понимания структуры папок рекомендую статью «Структура папок ОС Linux. Какая папка для чего нужна. Что и где лежит в линуксе»
Linux command name
The Linux ‘pwd’ (Print the current working
directory) command is used to display the directory that you are currently
in or your working directory.
Bourne Shell Builtins command.
pwd is a shell builtin
Копировать файл или директорию.
[user@testhost ~]$ ls
temp  test
[user@testhost ~]$ cp temp temp_clone
[user@testhost ~]$ ls
temp  temp_clone  test
У этой команды также есть опции -r и -f, их можно использовать, чтобы гарантированно скопировать иерархию директорий и папок в другое место.
Как изменить владельца файла
Это плохо, потому что никто другой с ними работать уже не сможет. Но можно создать файл под root-ом, а потом изменить его владельца с помощью команды chown.

chown testbase:testbase test.txt — сменить владельца файла
chown -R testbase:testbase user — сменить владельца папки
В итоге был владелец root, а стал testbase. То, что надо!
См также:
Команда chown Linux
Ping
[user@testhost ~]$ ping google.com
PING google.com (172.217.15.78) 56(84) bytes of data.
64 bytes from iad23s63-in-f14.1e100.net (172.217.15.78): icmp_seq=1 ttl=47 time=1.85 ms
64 bytes from iad23s63-in-f14.1e100.net (172.217.15.78): icmp_seq=2 ttl=47 time=1.48 ms
64 bytes from iad23s63-in-f14.1e100.net (172.217.15.78): icmp_seq=3 ttl=47 time=1.45 ms
64 bytes from iad23s63-in-f14.1e100.net (172.217.15.78): icmp_seq=4 ttl=47 time=1.46 ms
64 bytes from iad23s63-in-f14.1e100.net (172.217.15.78): icmp_seq=5 ttl=47 time=1.45 ms
^C
--- google.com ping statistics ---
5 packets transmitted, 5 received, 0% packet loss, time 4006ms
rtt min/avg/max/mdev = 1.453/1.541/1.850/0.156 ms
По умолчанию ping работает, пока его не завершить вручную. Поэтому может быть полезна опция -c — количество пакетов, после отправки которых ping завершится самостоятельно. Ещё одна опция, которую я иногда использую — -i, интервал между посылками пакетов.
[user@testhost ~]$ ping -c 3 -i 5 google.com
PING google.com (172.217.5.238) 56(84) bytes of data.
64 bytes from iad30s07-in-f238.1e100.net (172.217.5.238): icmp_seq=1 ttl=47 time=1.55 ms
64 bytes from iad30s07-in-f14.1e100.net (172.217.5.238): icmp_seq=2 ttl=47 time=1.17 ms
64 bytes from iad30s07-in-f14.1e100.net (172.217.5.238): icmp_seq=3 ttl=47 time=1.16 ms
--- google.com ping statistics ---
3 packets transmitted, 3 received, 0% packet loss, time 10006ms
rtt min/avg/max/mdev = 1.162/1.295/1.551/0.181 ms
Cat
Вывести содержимое файла (или файлов).
[user@testhost ~]$ cat temp
Content of a file.
Lalalala...
Также стоит обратить внимание на команды head (вывести n первых строк или байт файла) и tail (о ней — далее).
Как посмотреть использованные ранее команды
Вот, допустим, вы выполняли какие-то сложные действия. Или даже не вы, а разработчик или админ! У вас что-то сломалось, пришел коллега, вжух-вжух ручками, magic — работает. А что он делал? Интересно же!
Или, может, вы писали длинную команду, а теперь ее надо повторить. Снова набирать ручками? Неохота! Тем более что есть помощники:
↑ (стрелочка «наверх») — показать последнюю команду
history — показать последние 1000 команд
Если надо «отмотать» недалеко, проще через стрелочку пролистать команды. Один раз нажали — система показала последнюю команду. Еще раз нажали — предпоследнюю. И так до 1000 раз (потому что именно столько хранится в истории).

Большой бонус в том, что линукс хранит историю даже при перезапуске консоли. Это вам не как в винде — скопировал текст, скопировал другой, а первый уже потерялся. А при перезагрузке системы вообще все потерялось.
Если тыкать в стрелочку не хочется, или команды была давно, можно напечатать «history» и внимательно изучить команды.
См также:
История команд Linux — больше о возможностях history
The wget command in Linux
If you want to download a file from within the terminal, the wget command is one of the handiest command-line utilities available. This will be one of the important Linux commands you should know when working with source files.
When you specify the link for download, it has to directly be a link to the file. If the file cannot be accessed by the wget command, it will simply download the webpage in HTML format instead of the actual file that you wanted.
Let’s try an example. The basic syntax of the wget command is :
root@ubuntu:~ -->> wget  OR
root@ubuntu:~ -->> wget -c
The -c argument allows us to resume an interrupted download.
The service command in Linux
The service command in Linux is used for starting and stopping different services within the operating system. The basic syntax of the command is as below.
root@ubuntu:~ -- status
root@ubuntu:~ -- stop
root@ubuntu:~ -- start 
As you can see in the image, the ssh server is running on our system.
Предисловие
Об этом руководстве
Добро пожаловать в первую из четырех частей обучающего руководства по основам Linux, разработанного чтобы подготовить вас к сдаче экзамена Linux Professional Institute 101. В нем вы познакомитесь с bash (стандартной оболочкой командного интерпретатора в Linux), узнаете о большинстве возможностей таких стандартных команд Linux, как ls, cp и mv, разберетесь в инодах, жестких и символьных ссылках, и многом другом. К концу этого руководства у вас сформируется некий фундамент знаний, и вы будете готовы к изучению основ администрирования Linux. К концу всего курса (8 частей), у вас будет достаточно навыков, чтобы стать системным администратором Linux и пройти сертификацию LPIC Level 1 от Linux Professional Institute, если конечно захотите.
Данная первая часть руководства отлично подходит для новичков в Linux, а также для тех пользователей, кто хочет освежить или улучшить свое понимание фундаментальных концепций Linux, таких, как копирование и перемещение файлов, создание символических и жестких ссылок, а также стандартных команд обработки текста, включая конвейеры и перенаправления. По ходу мы также дадим множество советов, подсказок и трюков, что делает это руководство насыщенным и практичным, даже для тех, кто уже имеет солидный опыт работы с Linux. Для начинающих большая часть этого материала будет новой, но более продвинутые пользователи Linux найдут это руководство отличным средством, чтобы разложить свои фундаментальные навыки по полочкам у себя в голове.
Тем, кто изучал первую версию этого руководства с целью, отличной от подготовки к экзамену LPI, возможно, что вам не нужно его перечитывать. Однако, тем же, кто планирует сдавать экзамены, стоит обязательно просмотреть данную исправленную версию.
The chmod and chown commands
The chmod and chown commands give us the functionality to change the file permissions and file ownership are the most important Linux commands you should know.
The main difference between the functions of the two commands is that the chmod command allows changing file permissions, while chown allows us to change the file owners.
root@ubuntu:~ -- +x loop.sh
root@ubuntu:~ -- root:root loop.sh

The head and tail commands
When outputting large files, the head and the tail commands come in handy. I’ve created a file named “Words” with a lot of words arranged alphabetically in it. The head command will output the first 10 lines from the file, while the tail command will output the last 10. This also includes any blank lines and not just lines with text.
root@ubuntu:~# head <file name>root@ubuntu:~# tail <file name>
As you can see, the head command showed 10 lines from the top of the file.

The tail command outputted the bottom 10 lines from the file.
Искать файлы
Найти файл по части имени в дереве каталогов можно с помощью команды find:
[user@testhost ~]$ find test_dir/ -name "*le*"
test_dir/file_1
test_dir/file_2
test_dir/subdir/file_3
Также доступны другие опции и фильтры поиска. Например, так можно найти файлы в папке test, созданные более 5 дней назад:
[user@testhost ~]$ ls -ltr test
total 0
-rw-rw-r-- 1 user user 0 Nov 26 10:46 temp_clone
-rw-rw-r-- 1 user user 0 Dec  4 10:39 created_today
[user@testhost ~]$ find test/ -type f -ctime +5
test/temp_clone
Finding Out Where You Are with pwd
At this point, you should be logged into your Linux machine. You will likely see something that looks like this:
root@your_hostname:~# This is the prompt. It is where we type commands.
But there’s more to it than that. You are also in a specific place in the server’s file system. You will always be in one location or another in your server’s file hierarchy and this has implications on how the commands you type will operate.
This is similar to when you open the file browser on your local computer. You can click on different folders to travel to different places in the file system. If you go to the edit menu of your file browser, you might have some options that will apply to the items in the specific folder you are in.
The command line is just a textual representation of the same idea.
Another way to find out where you are in the file system is with a command called pwd. This will be your first command!
Type these characters into your terminal and press ENTER:
pwd/root
/home/your_usernameГде я? Как понять, где находишься
pwd --- мы ввели команду
/home/test --- ответ системы, мы находимся в домашней директории пользователя test
Очень полезная команда, когда у вас нет ничего, кроме командной строки под рукой. Расшифровывается как Print Working Directory. Запомните ее, пригодится.
The sudo command in Linux
“With great power, comes great responsibility”
non-root-user@ubuntu:~# sudo <command you want to run>Password: Как создать файл
touch app.logТакая команда создаст пустой файл с названием «app.log». А потом уже можно открыть файл в редакторе и редактировать.
The man command in Linux
The man command is a very useful Linux command you must know. When working with Linux, the packages that we download can have a lot of functionality. Knowing it all is impossible.
The man pages offer a really efficient way to know the functionality of pretty much all the packages that you can download using the package managers in your Linux distro.
root@ubuntu:~# man <command>Смотреть установленные пакеты
Универсальной команды нет, потому что всё зависит от дистрибутива Linux и используемого пакетного менеджера. Скорее всего вам поможет одна из следующих команд:
yum list installed
apt list --installed
zypper se —installed-only
pacman -Qqe
dpkg -l
rpm -qa
Как узнать, как работает команда
Если вы не знаете, как работает команда, всегда можно спросить о ней саму систему, используя встроенную команду man:
man ls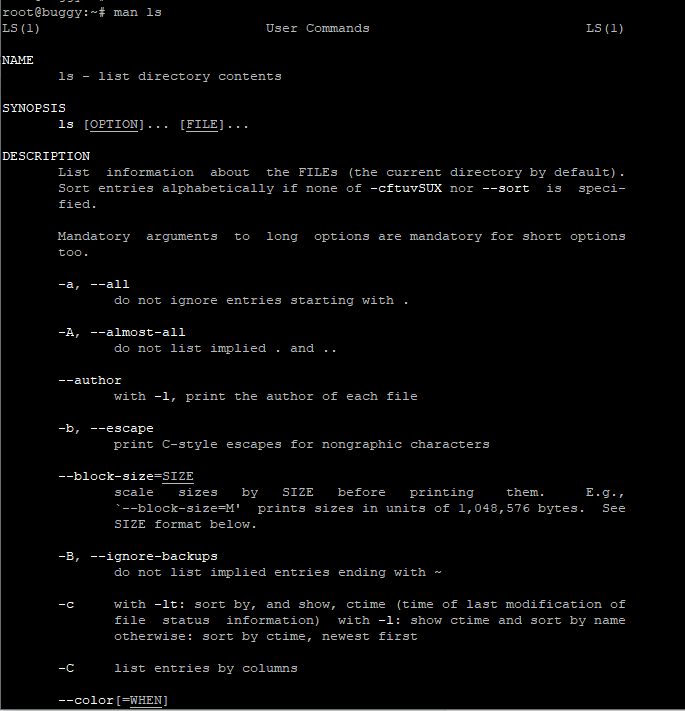
Закрыть мануал можно с помощью клавиши q. Для того, кто первый раз в линуксовой консоли, это совсем не очевидно, а подсказки есть не везде.
Команда удобна тем, что не надо даже уходить из командной строки, сразу получаешь всю информацию. К тому же это всегда актуальная информация. А что вы там нагуглите — неизвестно =))
Хотя лично мне проще какую-то команду прогуглить, ведь так я получу русское описание + сначала самые главные флаги (а их может быть много). Но я сама новичок в линуксе, это подход новичка. А лучше сразу учиться прокачивать навык поиска по man-у. Он вам очень пригодится для более сложных задач!
Если man у программы нет, используйте флаг -h (—help):
ls -hGetting help on External pwd command.
The ‘whereis’
command above is used to locate the binary, source, and manual page files
for a pwd command
pwd — print name of current/working directory
NOTE: your shell may have its own version of pwd which will
supercede
the version described here. Please refer to your shellâs documentation
for details about the options it supports.
Print the full filename of the current working directory.
—help display this help and exit
output version information and exit
Written by Jim Meyering.
This is free software; see the source for copying conditions. There
is
NO warranty; not even for MERCHANTABILITY or FITNESS FOR A PARTICULAR
The full documentation for pwd is maintained as a Texinfo manual.
If
the info and pwd programs are properly installed at your site, the com-
info coreutils pwd
should give you access to the complete manual.
19.1 `pwd’: Print working directory
`pwd’ prints the fully resolved name
of the current directory. That
is, all components of the printed
name will be actual directory
names—none will be symbolic links.
Because most shells
have a built-in command by the same name, using
the unadorned command name in a script
or interactively may get you
different functionality than that
described here.
The only options are
a lone `—help’ or `—version’. *Note Common
An exit status of zero
indicates success, and a nonzero value
The ‘
’ and ‘
’
command above, display the same help output for ‘‘ command.
Need help or
need more information use:
# info pwd
# info coreutils
pwd
# man pwd
# help pwd
Keywords: pwd, pwd command, using
pwd command, linux pwd command, print current working directory, current
working directory, working directory, use pwd, working directory.
")


")