

Primary group: Also known as the login or default group. If the user creates a file, the primary group takes the group ownership. Usually, the primary group has the same name as the user.Secondary group: Also known as a supplementary group. It is used to grant specific permissions to users. For example, in Ubuntu, only members of the sudo groups can run commands with sudo.
- How to check the groups of a user
- List groups of the current user
- List groups of the other users
- List all the groups in Ubuntu
- How to list groups using the getent command
- List every member of a specific group
- Want to know how you can add a user to a group?
- List all users with /etc/passwd file
- So many users? Which ones are real?
- Only list user names, not other details in /etc/passwd
- Use getent command to list users
- Use compgen to get the list of users
- Check if a user exists on the system
- New Book: Efficient Linux at the Command Line
- List normal users only (for scripting)
- List currently logged in users
- In the end.
- How to test whether a user has sudo privileges or not
- Method 1: Check if user is sudoer with the sudo command
- Method 2: Check if user is part of the sudo group
- Bonus Tip: How to find all sudo users in your system
- Check user group in Linux command line
- Find out groups of other users in Linux
- Bonus Tip: Get group information along with gid
- Bonus Tip 2: Get primary group of a user in Linux
- Add a User to a Group in Linux
- Remove a User from a Group in Linux
- Adding User Accounts
- Linux File Permissions
- Group Management
- Special Linux File Attributes
- Accessing the root Account and Using sudo
- PAM (Pluggable Authentication Modules)
- Summary
How to check the groups of a user
List groups of the current user
groups
Yep, all you have to do is execute the groups command!
List groups of the other users
groups usernamegroups root
groups sagar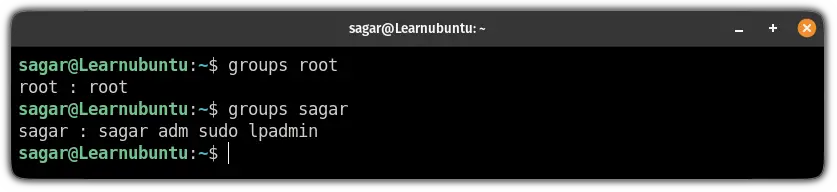
List all the groups in Ubuntu
The /etc/group file contains all the necessary information about the local group.
So you can read the contents of that file and easily list the groups:
cat /etc/group
Similarly, if you want to find a specific group, you can use the grep command to filter the output:
cat /etc/group | grep sudo
In case you are wondering about the meaning of the output, here’s what that means:
sudois the name of the group.xindicates that shadow passwords are being used and can be found at/etc/gshadow.27is the group ID.sagaris the list of the group users. You can have multiple of them.
And if they seem irrelevant, you can use the cut command and print the group names only:
cut -d: -f1 /etc/group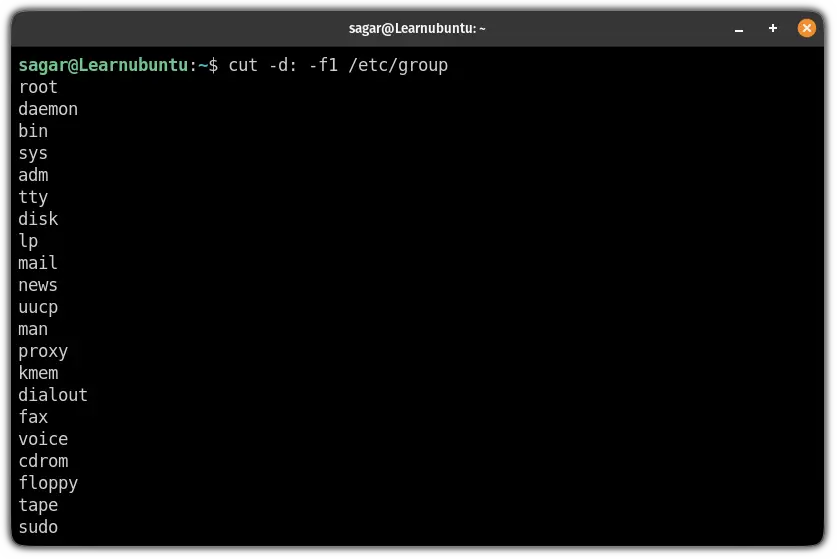
Another option is to use the getent command
How to list groups using the getent command
The getent command is used to get entries from the database, including passwd and group database.
This means it can be used for our purpose too!
To get a list of groups, all you need to do is append group to the getent command:
getent group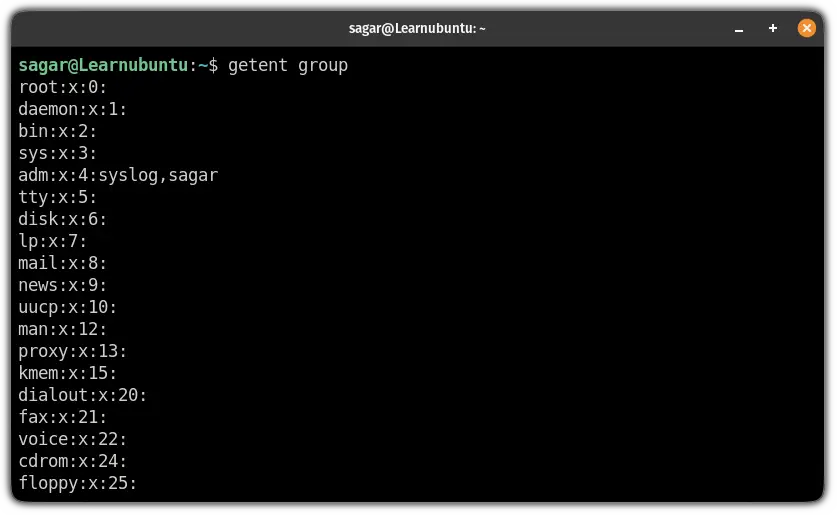
List every member of a specific group
getent group [group_name]getent group sudo
Want to know how you can add a user to a group?
Cannot see the group you are looking for? How about creating that group?
How to Add New Groups in Ubuntu
Need to create a new group? Here’s how to create groups in Ubuntu using the groupadd command.
![]()


I hope you will find this guide helpful and if you have any queries, let me know in the comments.
Subscribe
Join the newsletter to get the latest updates.
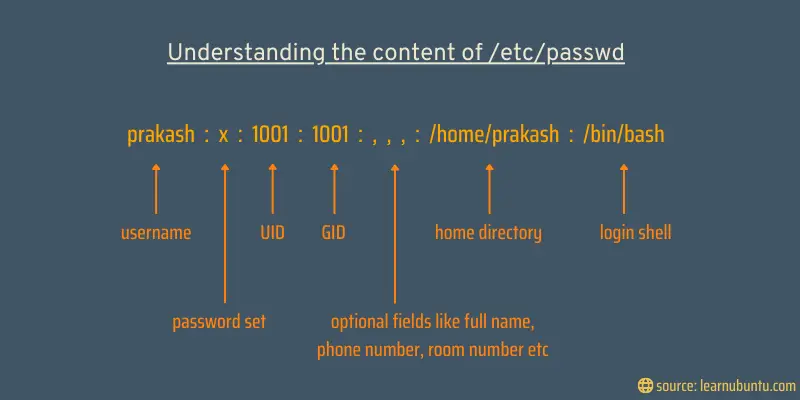
List all users with /etc/passwd file
cat /etc/passwdYou’ll probably see a huge output like this:
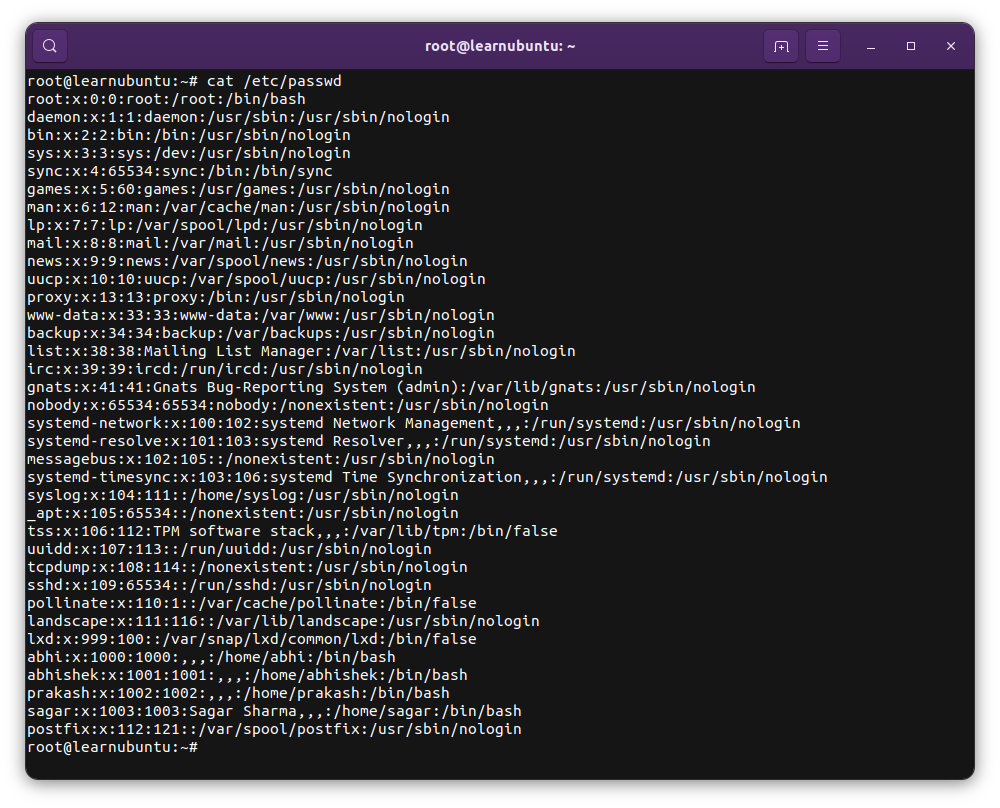
- User name
- Password, x means that a password is set for the user
- User ID (UID)
- User’s group ID (GID)
- Full name, room number, phone number etc (optional)
- Home directory of the user
- Default login shell for the user
So many users? Which ones are real?
grep -E '^UID_MIN|^UID_MAX' /etc/login.defsIn some Linux systems, UID_MIN is 500. But in Ubuntu it is 1000.
[email protected]:~# grep -E '^UID_MIN|^UID_MAX' /etc/login.defs
UID_MIN 1000
UID_MAX	60000
DigitalOcean – The developer cloud
Helping millions of developers easily build, test, manage, and scale applications of any size – faster than ever before.
 Explore our products

Only list user names, not other details in /etc/passwd
Use the cut command to use the : as column separator and then display the first column.
cat /etc/passwd | cut -d: -f1You can do the same with the awk command:
cat /etc/passwd | awk -F: '{print $1}'Both commands will give you output like this:
root
daemon
bin
sys
sync
games
man
lp
Forgot your own password or have to reset it for others? Here’s how to change the password in the Ubuntu command line.
Use getent command to list users
The getent command queries the configuration files located at /etc/nsswitch.conf. The /etc/passwd file is one of them.
So, you query it with getent like this:
getent passwdThis will give you a result similar to what you saw in the contnet of /etc/passwd file:
[email protected]:~# getent passwd
root:x:0:0:root:/root:/bin/bash
daemon:x:1:1:daemon:/usr/sbin:/usr/sbin/nologin
bin:x:2:2:bin:/bin:/usr/sbin/nologin
sys:x:3:3:sys:/dev:/usr/sbin/nologin
sync:x:4:65534:sync:/bin:/bin/sync
games:x:5:60:games:/usr/games:/usr/sbin/nologin
man:x:6:12:man:/var/cache/man:/usr/sbin/nologin
getent passwd | cut -d: -f1Use compgen to get the list of users
compgen -uroot
daemon
bin
sys
sync
games
man
lpCheck if a user exists on the system
getent passwd : grep user_name[email protected]:~# getent passwd | grep prakash
prakash:x:1002:1002:,,,:/home/prakash:/bin/bashIf you don’t see it, it doesn’t.
[email protected]:~# getent passwd | grep random[email protected]:~# 
New Book: Efficient Linux at the Command Line
Get it from Amazon
List normal users only (for scripting)
This is good enough for day-to-day, manual use. But things will be different if you want to use this information in a script.
In that case, you could do something like this:
eval getent passwd {$(awk '/^UID_MIN/ {print $2}' /etc/login.defs)..$(awk '/^UID_MAX/ {print $2}' /etc/login.defs)} | cut -d: -f1List currently logged in users
There are multiple ways to do that. The most common is the who command:
whoIt will show additional details like the time of the last login and the IP address from where it was accessed.
[email protected]:~# who
root pts/0 2022-09-07 02:23 (103.211.12.162)users[email protected]:~# users
rootIn the end.
That’s a pretty good addition to your Linux knowledge. Feel free to leave your questions and suggestions in the comments.
Wondering if you have sudo rights on your system? It’s easy to verify. Just run any command with sudo. If you don’t have sudo rights, you should see it in the output:
[email protected]:~$ sudo -v
Sorry, user standard may not run sudo on linuxhandbook.
How to test whether a user has sudo privileges or not
Method 1: Check if user is sudoer with the sudo command
sudo -l -U user_nameMatching Defaults entries for abhi on test-server: env_reset, mail_badpass, secure_path=/usr/local/sbin\:/usr/local/bin\:/usr/sbin\:/usr/bin\:/sbin\:/bin\:/snap/bin
User abhi may run the following commands on test-server: (ALL : ALL) NOPASSWD: ALLUser abhi is not allowed to run sudo on test-server.sudo -lDid you know?
This command also shows what commands are forbidden for you to run with sudo. Yes, that’s right. You can configure what commands can be run with sudo and what cannot. This is useful in an environment where the dev team needs to run only a certain applications with sudo. Limiting their use of sudo to these applications only will help the system from unwarranted misuse of the sudo rights by the hands of the developers.
Method 2: Check if user is part of the sudo group
groups user_name[email protected]:~$ groups abhi
abhi : abhi sudoBonus Tip: How to find all sudo users in your system
In Linux, there are multiple ways to achieve the same result. Unsurprisingly, you have multiple ways to list the members of a group in Linux.
getent group sudoAnd this would list all the sudoers:
[email protected]:~$ getent group sudo
sudo:x:27:abhi,seeni
If you have some other cool tip on this topic, please leave a comment below.
Now that might make you curious about knowing which groups you belong to and this is exactly what I am going to show you in this quick tutorial.
Check user group in Linux command line
groupsThis will show all the groups you belong to.
[email protected]:~$ groups
abhishek adm cdrom sudo dip plugdev lpadmin sambashare kvm
Find out groups of other users in Linux
groups user_name[email protected]:~$ groups prakash
prakash : prakash sudogroups user_1 user_2 user_3[email protected]:~$ groups abhishek prakash
abhishek adm cdrom sudo dip plugdev lpadmin sambashare kvm
prakash : prakash sudoBonus Tip: Get group information along with gid
id user_nameuid=1000(abhishek) gid=1000(abhishek) groups=1000(abhishek),4(adm),24(cdrom),27(sudo),30(dip),46(plugdev),116(lpadmin),126(sambashare),127(kvm)5 Commands for Group Management in Linux
Group is an essential part of Linux system management and security. Check out various commands that you can use for managing groups in Linux.
![]()

Bonus Tip 2: Get primary group of a user in Linux
id -gn user_nameIf you have questions or suggestions, please feel free to use the comment section.
# groups tecminttecmint : tecmint wheel
# grouproot
Add a User to a Group in Linux
# usermod -aG postgres tecmint
# groups tecmint
Remove a User from a Group in Linux
# gpasswd -d tecmint postgres
# groups tecmint
$ sudo deluser tecmint postgres
$ man groups
$ man usermod
$ man gpasswd
$ man deluser
Adding User Accounts
# adduser [new_account]
# useradd [new_account]
.bash_logout
.bash_profile
.bashrc
Understanding /etc/passwd
[username]:[x]:[UID]:[GID]:[Comment]:[Home directory]:[Default shell]
- Fields [username] and [Comment] are self explanatory.
- The x in the second field indicates that the account is protected by a shadowed password (in /etc/shadow), which is needed to logon as [username].
- The [UID] and [GID] fields are integers that represent the User IDentification and the primary Group IDentification to which [username] belongs, respectively.
- The [Home directory] indicates the absolute path to [username]’s home directory, and
- The [Default shell] is the shell that will be made available to this user when he or she logins the system.
Understanding /etc/group
[Group name]:[Group password]:[GID]:[Group members]
- [Group name] is the name of group.
- An x in [Group password] indicates group passwords are not being used.
- [GID]: same as in /etc/passwd.
- [Group members]: a comma separated list of users who are members of [Group name].
# usermod [options] [username]
Setting the expiry date for an account
# usermod --expiredate 2014-10-30 tecmint
Adding the user to supplementary groups
# usermod --append --groups root,users tecmint
Changing the default location of the user’s home directory
# usermod --home /tmp tecmint
Changing the shell the user will use by default
# usermod --shell /bin/sh tecmint
Displaying the groups an user is a member of
# groups tecmint
# id tecmint
Now let’s execute all the above commands in one go.
# usermod --expiredate 2014-10-30 --append --groups root,users --home /tmp --shell /bin/sh tecmint
Disabling account by locking password
# usermod --lock tecmint
Unlocking user password
# usermod --unlock tecmint
Creating a new group for read and write access to files that need to be accessed by several users
# groupadd common_group # Add a new group
# chown :common_group common.txt # Change the group owner of common.txt to common_group
# usermod -aG common_group user1 # Add user1 to common_group
# usermod -aG common_group user2 # Add user2 to common_group
# usermod -aG common_group user3 # Add user3 to common_group
Deleting a group
# groupdel [group_name]
If there are files owned by group_name, they will not be deleted, but the group owner will be set to the GID of the group that was deleted.
Linux File Permissions
Besides the basic read, write, and execute permissions that we discussed in Archiving Tools and Setting File Attributes – Part 3 of this series, there are other less used (but not less important) permission settings, sometimes referred to as “special permissions”.
Like the basic permissions discussed earlier, they are set using an octal file or through a letter (symbolic notation) that indicates the type of permission.
Deleting user accounts
# userdel --remove [username]
Group Management
- user1 (primary group: user1)
- user2 (primary group: user2)
- user3 (primary group: user3)
# chmod 660 common.txt
OR
# chmod u=rw,g=rw,o= common.txt [notice the space between the last equal sign and the file name]
This is where groups come in handy, and here’s what you should do in a case like this.
Understanding Setuid

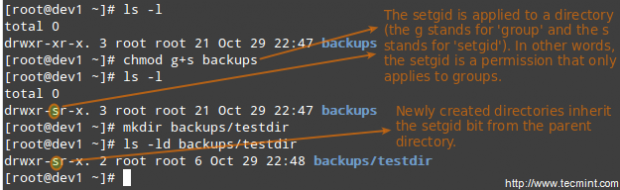
Understanding Setgid
# chmod g+s [filename]
To set the setgid in octal form, prepend the number 2 to the current (or desired) basic permissions.
# chmod 2755 [directory]
Setting the SETGID in a directory
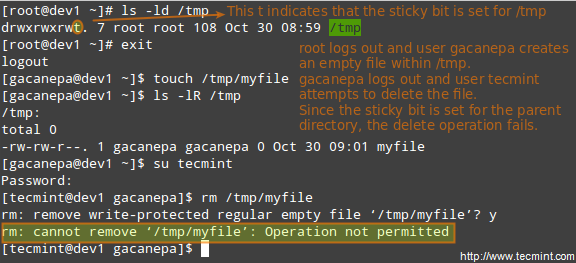
Understanding Sticky Bit
# chmod o+t [directory]
To set the sticky bit in octal form, prepend the number 1 to the current (or desired) basic permissions.
# chmod 1755 [directory]
Without the sticky bit, anyone able to write to the directory can delete or rename files. For that reason, the sticky bit is commonly found on directories, such as /tmp, that are world-writable.
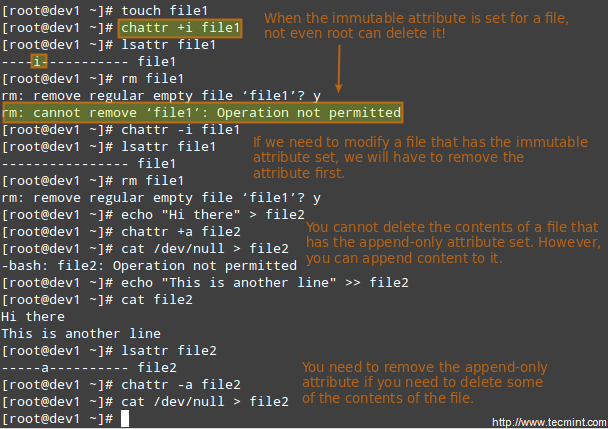
Special Linux File Attributes
# chattr +i file1
# chattr +a file2
After executing those two commands, file1 will be immutable (which means it cannot be moved, renamed, modified or deleted) whereas file2 will enter append-only mode (can only be open in append mode for writing).
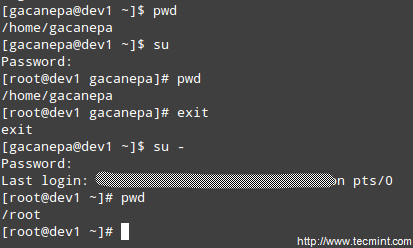
Accessing the root Account and Using sudo
$ su
and then entering root’s password.
If authentication succeeds, you will be logged on as root with the current working directory as the same as you were before. If you want to be placed in root’s home directory instead, run.
$ su -
and then enter root’s password.
# visudo
These are the most relevant lines.
Defaults secure_path="/usr/sbin:/usr/bin:/sbin"
root ALL=(ALL) ALL
tecmint ALL=/bin/yum update
gacanepa ALL=NOPASSWD:/bin/updatedb
%admin ALL=(ALL) ALL
Let’s take a closer look at them.
Defaults secure_path="/usr/sbin:/usr/bin:/sbin:/usr/local/bin"
The next lines are used to specify permissions.
root ALL=(ALL) ALL
- The first ALL keyword indicates that this rule applies to all hosts.
- The second ALL indicates that the user in the first column can run commands with the privileges of any user.
- The third ALL means any command can be run.
tecmint ALL=/bin/yum update
gacanepa ALL=NOPASSWD:/bin/updatedb
%admin ALL=(ALL) ALL
To see what privileges are granted to you by sudo, use the “-l” option to list them.
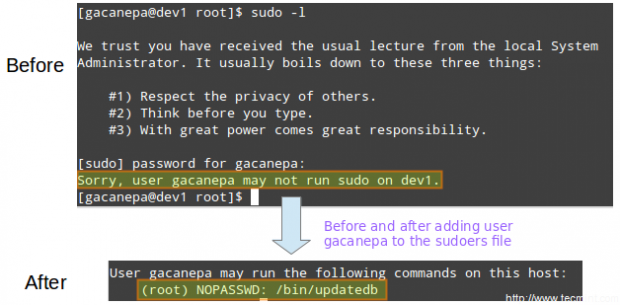
PAM (Pluggable Authentication Modules)
Pluggable Authentication Modules (PAM) offer the flexibility of setting a specific authentication scheme on a per-application and / or per-service basis using modules. This tool present on all modern Linux distributions overcame the problem often faced by developers in the early days of Linux, when each program that required authentication had to be compiled specially to know how to get the necessary information.
For example, with PAM, it doesn’t matter whether your password is stored in /etc/shadow or on a separate server inside your network.
Files inside /etc/pam.d indicate which applications are using PAM natively. In addition, we can tell whether a certain application uses PAM by checking if it the PAM library (libpam) has been linked to it:
# ldd $(which login) | grep libpam # login uses PAM
# ldd $(which top) | grep libpam # top does not use PAM

# cat /etc/passwd
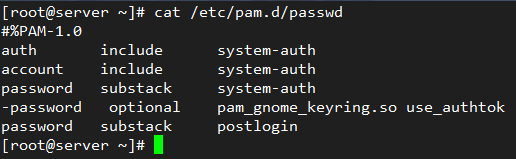
The first column indicates the type of authentication to be used with the module-path (third column). When a hyphen appears before the type, PAM will not record to the system log if the module cannot be loaded because it could not be found in the system.
account: this module type checks if the user or service has supplied valid credentials to authenticate.auth: this module type verifies that the user is who he / she claims to be and grants any needed privileges.password: this module type allows the user or service to update their password.session: this module type indicates what should be done before and/or after the authentication succeeds.
The second column (called control) indicates what should happen if the authentication with this module fails:
requisite: if the authentication via this module fails, overall authentication will be denied immediately.requiredis similar to requisite, although all other listed modules for this service will be called before denying authentication.sufficient: if the authentication via this module fails, PAM will still grant authentication even if a previous marked as required failed.optional: if the authentication via this module fails or succeeds, nothing happens unless this is the only module of its type defined for this service.includemeans that the lines of the given type should be read from another file.substackis similar to includes but authentication failures or successes do not cause the exit of the complete module, but only of the substack.
The fourth column, if it exists, shows the arguments to be passed to the module.
For example, if you append
remember=2
password sufficient pam_unix.so sha512 shadow nullok try_first_pass use_authtok
password sufficient pam_unix.so sha512 shadow nullok try_first_pass use_authtok remember=2

")


")