
- Make a complete backup of your Android device. Although rooting an Android device doesn’t wipe data, still, it is always recommended to be on a safer side.
- Your device should also be having an unlocked bootloader. If that’s not the case, please refer to our guide on how to unlock the bootloader of Android devices.
- Set up the Android SDK Platform Tool on your PC.
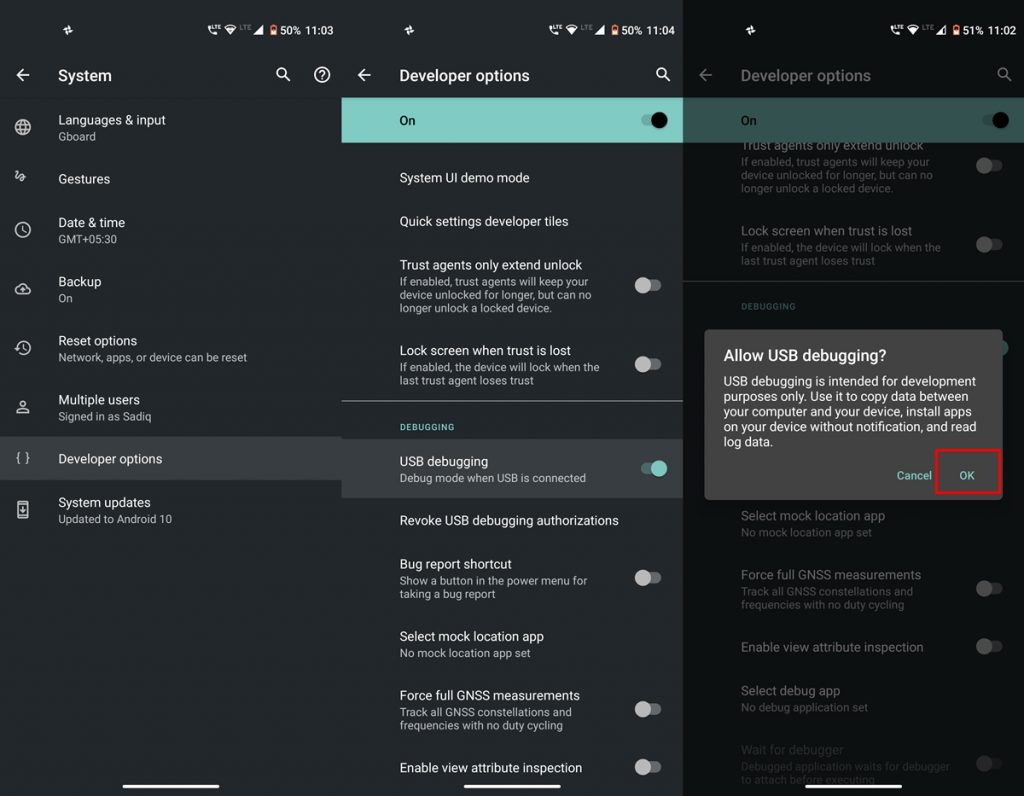
- Similarly, enable USB Debugging on your device from Developer Options. This will create a debug bridge between your device and platform tools to successfully execute ADB Commands.
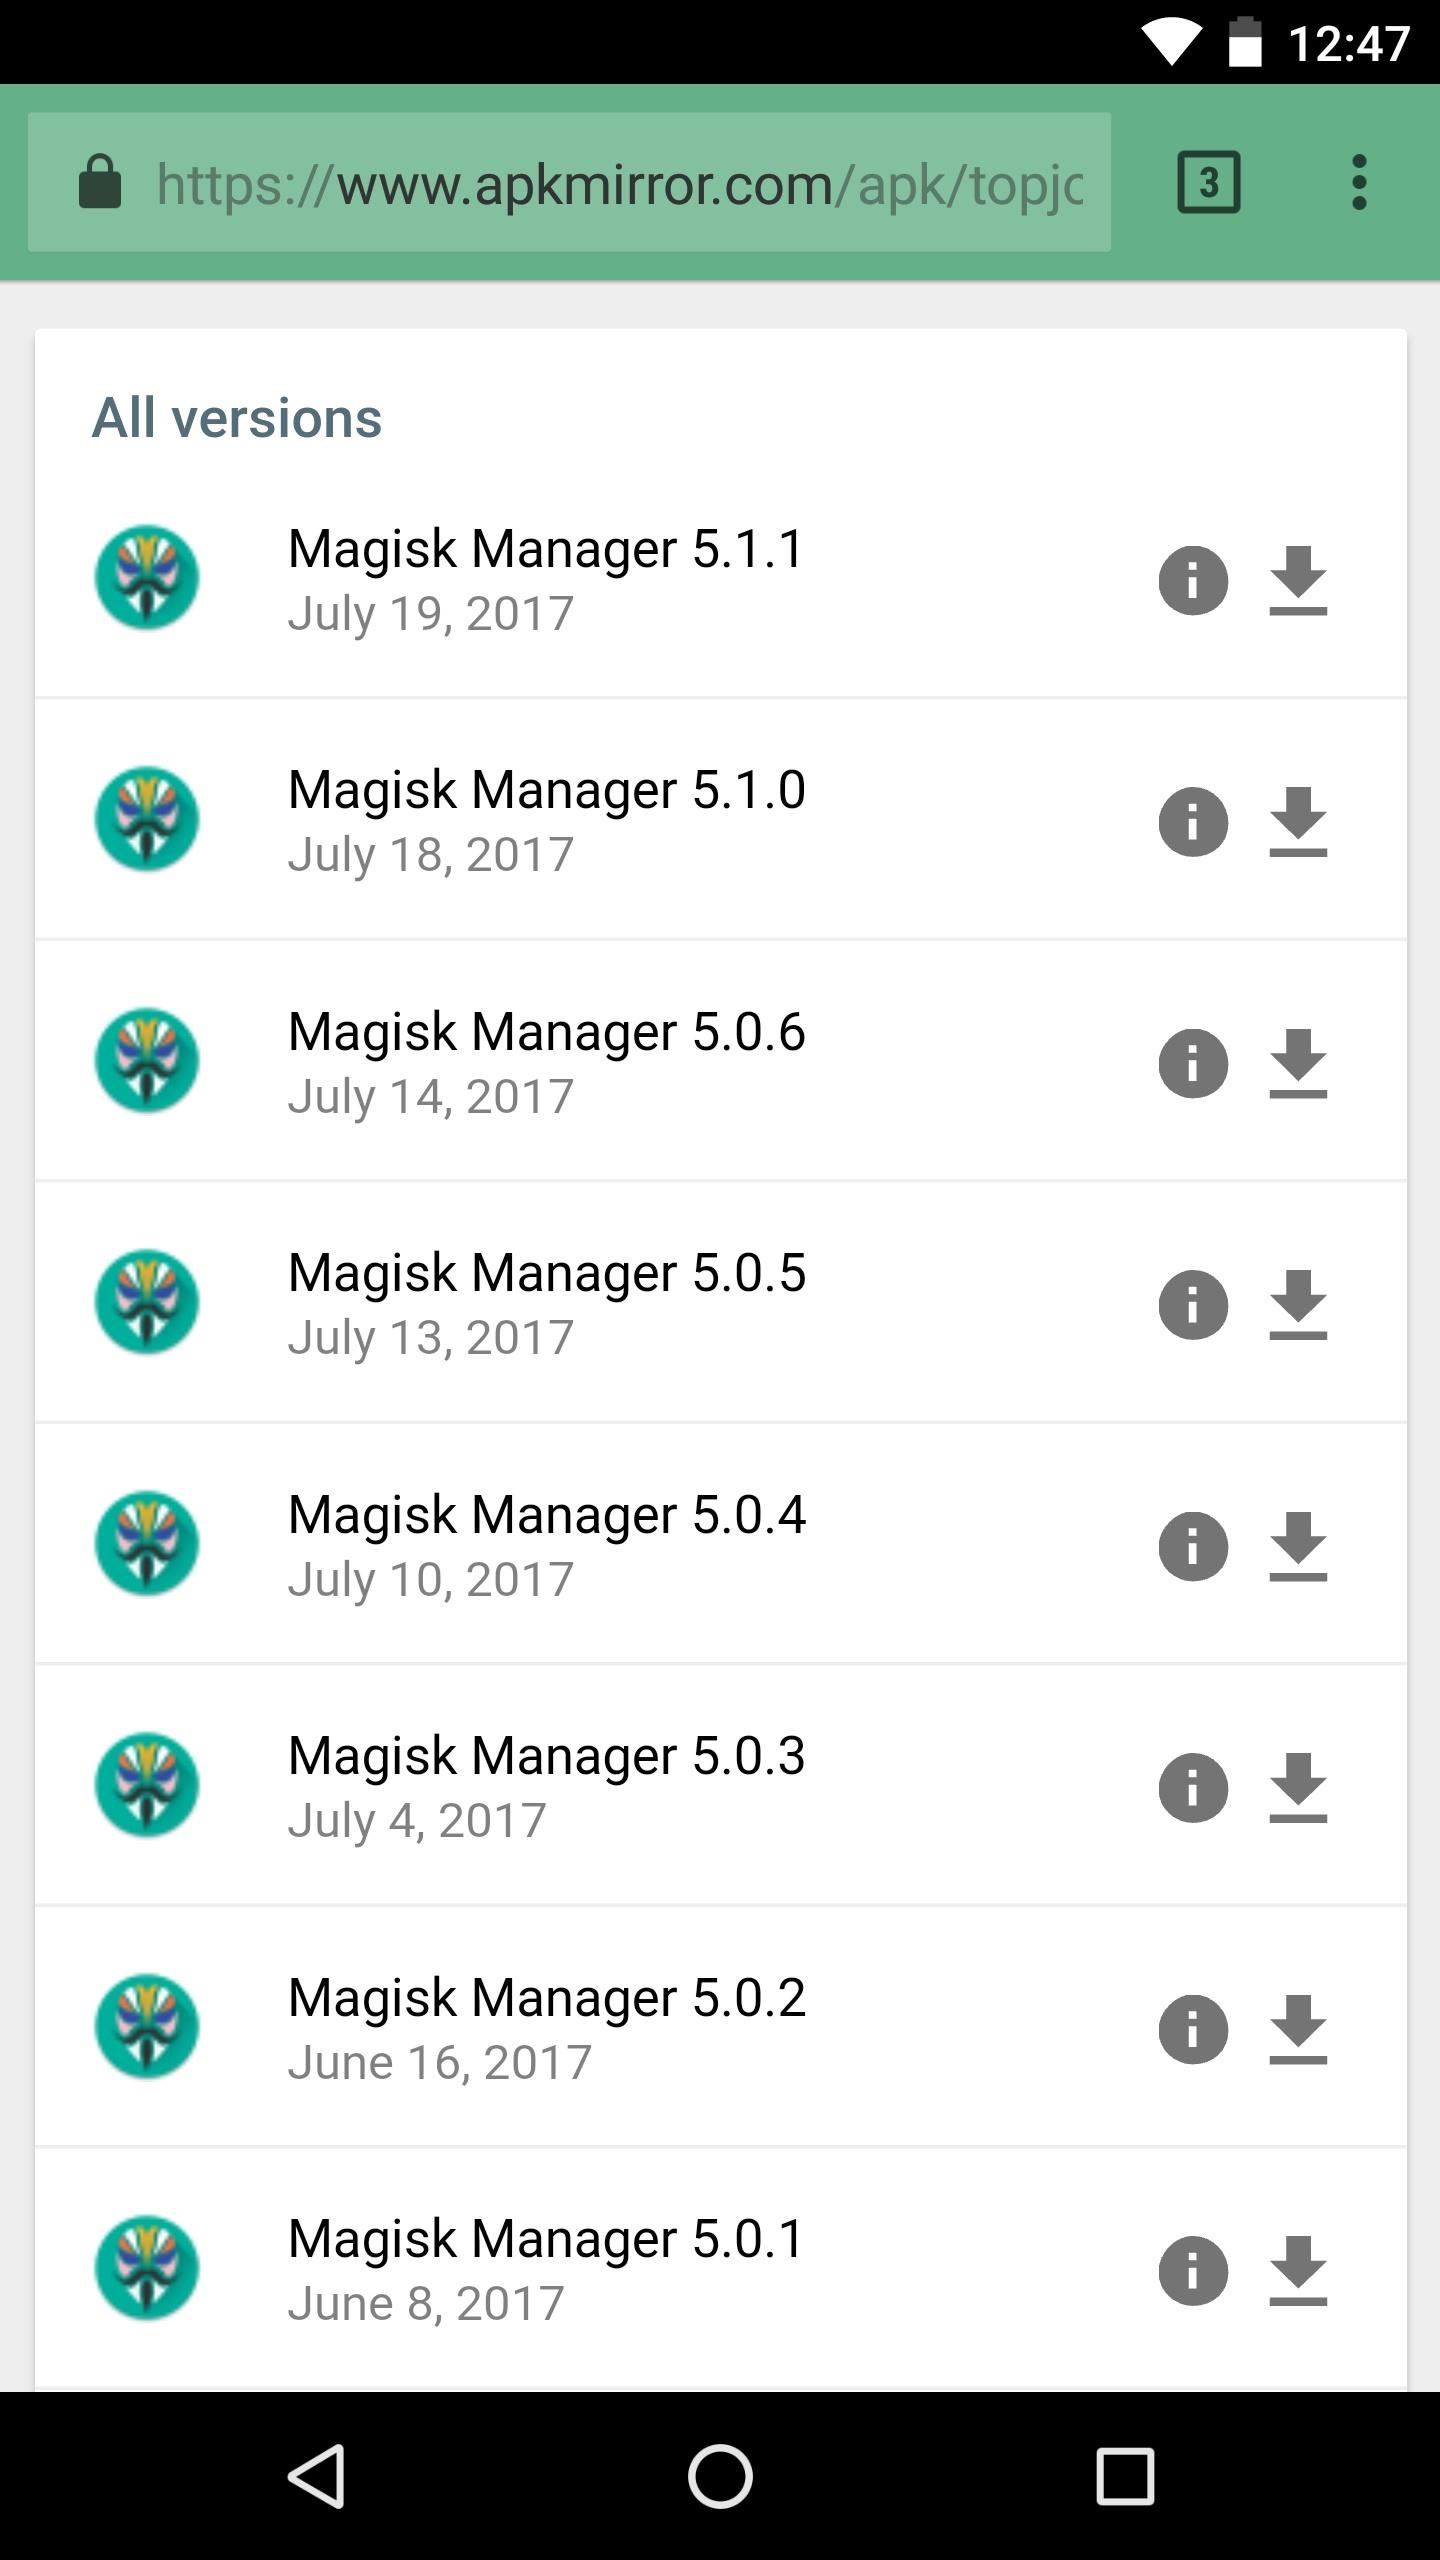
- Download the latest Magisk Manager APK and Magisk ZIP. Transfer it to your device’s internal storage or SD Card.
With the requirements now clear, here are both the methods to root your Android devices.
The main reason for that is the fact that it carries out all the modifications systemless-ly. That is, it doesn’t modify the device’s system partition. As a result, Google’s Safety Net won’t be triggered and the apps dependent on it will continue to function as expected. Apart from that, Magisk also holds some other benefits like the Magisk Hide feature.
This allows you to hide root from apps that don’t work on the rooted devices (like banking apps, Pokemon Go among others). Owing to all these reasons, we will be listing two different methods to root your Android device via Magisk itself. So without any further wait, let us begin with the guide. With that said, here are the 6 most popular universal root tools for Android that you should definitely check out.
Magisk is currently the most popular Android rooting solution and is also the most widely used one as well. SuperSU has enjoyed a monopoly in the world of Android rooting for a significant time period until Magisk made its debut. Magisk has quickly become the preferred choice for those who are looking to root their Android devices. There are many advantages of rooting Android with Magisk and we shall discuss the same in a short while. One of the most important among them is that Magisk also offers several other functionalities such as hiding root from apps that will not work on rooted Android devices.
In this article, we will show you how to install Magisk Zip along with Magisk Manager APK. which will help you manage root access on your Android.

As you know for rooting an android device the first requirement is the Unlocked Bootloader and then on the second step, you will need TWRP Recovery installed on your phone.
The Stock Recovery that comes preinstalled on our smartphone has very limited features. Like you can’t root or flash files using the stock recovery.
Now if you want to flash Custom ROM or any flashable zip files then you must have a custom recovery installed on your phone. The reason why we use TWRP over other custom recoveries is the simplicity and the availability of the image file.
TWRP is available for almost every android device out there. However, for newly launched phones the availability of TWRP recovery may take some time as per the development. Plus you will see a lot of useful features like taking full Backup of Android, flashing ROMs, Rooting, and much more.

Любой телефон, работающий под управлением Android, имеет встроенное меню восстановления Recovery. Зайти в него можно нажав на выключенном телефоне одновременно кнопки включения и повышения громкости (на некоторых моделях устройств используются другие сочетания). Однако стандартное меню обычно имеет не особо богатый функционал, позволяя делать лишь бэкап и восстановление системы, сброс до заводских настроек и еще пару-тройку операций. Ввиду такой ограниченности многие пользователи, особенно продвинутые, смотрят в сторону так называемых кастомных Рекавери, обладающих расширенным набором функций и гораздо более приятным интерфейсом. Одним из самых популярных модифицированных меню восстановления является TWRP Recovery (Team Win Recovery Project). О том, как его установить, как раз и поговорим в данной статье.
- Install TWRP Recovery Using ADB & Fastboot (No Root Required)
- Root Android Phone via TWRP
- Что такое root права и для чего они нужны
- Root Android with ADB & Fastboot Commands
- Install TWRP Recovery On Samsung Phones
- Flashing the TWRP Recovery using Odin –
- Step 1: Install TWRP
- Step 2: Install Magisk Manager
- Step 3: Download the Magisk ZIP
- Step 4: Flash Magisk in TWRP
- Step 5: Verify Root & SafetyNet Status
- Requirements
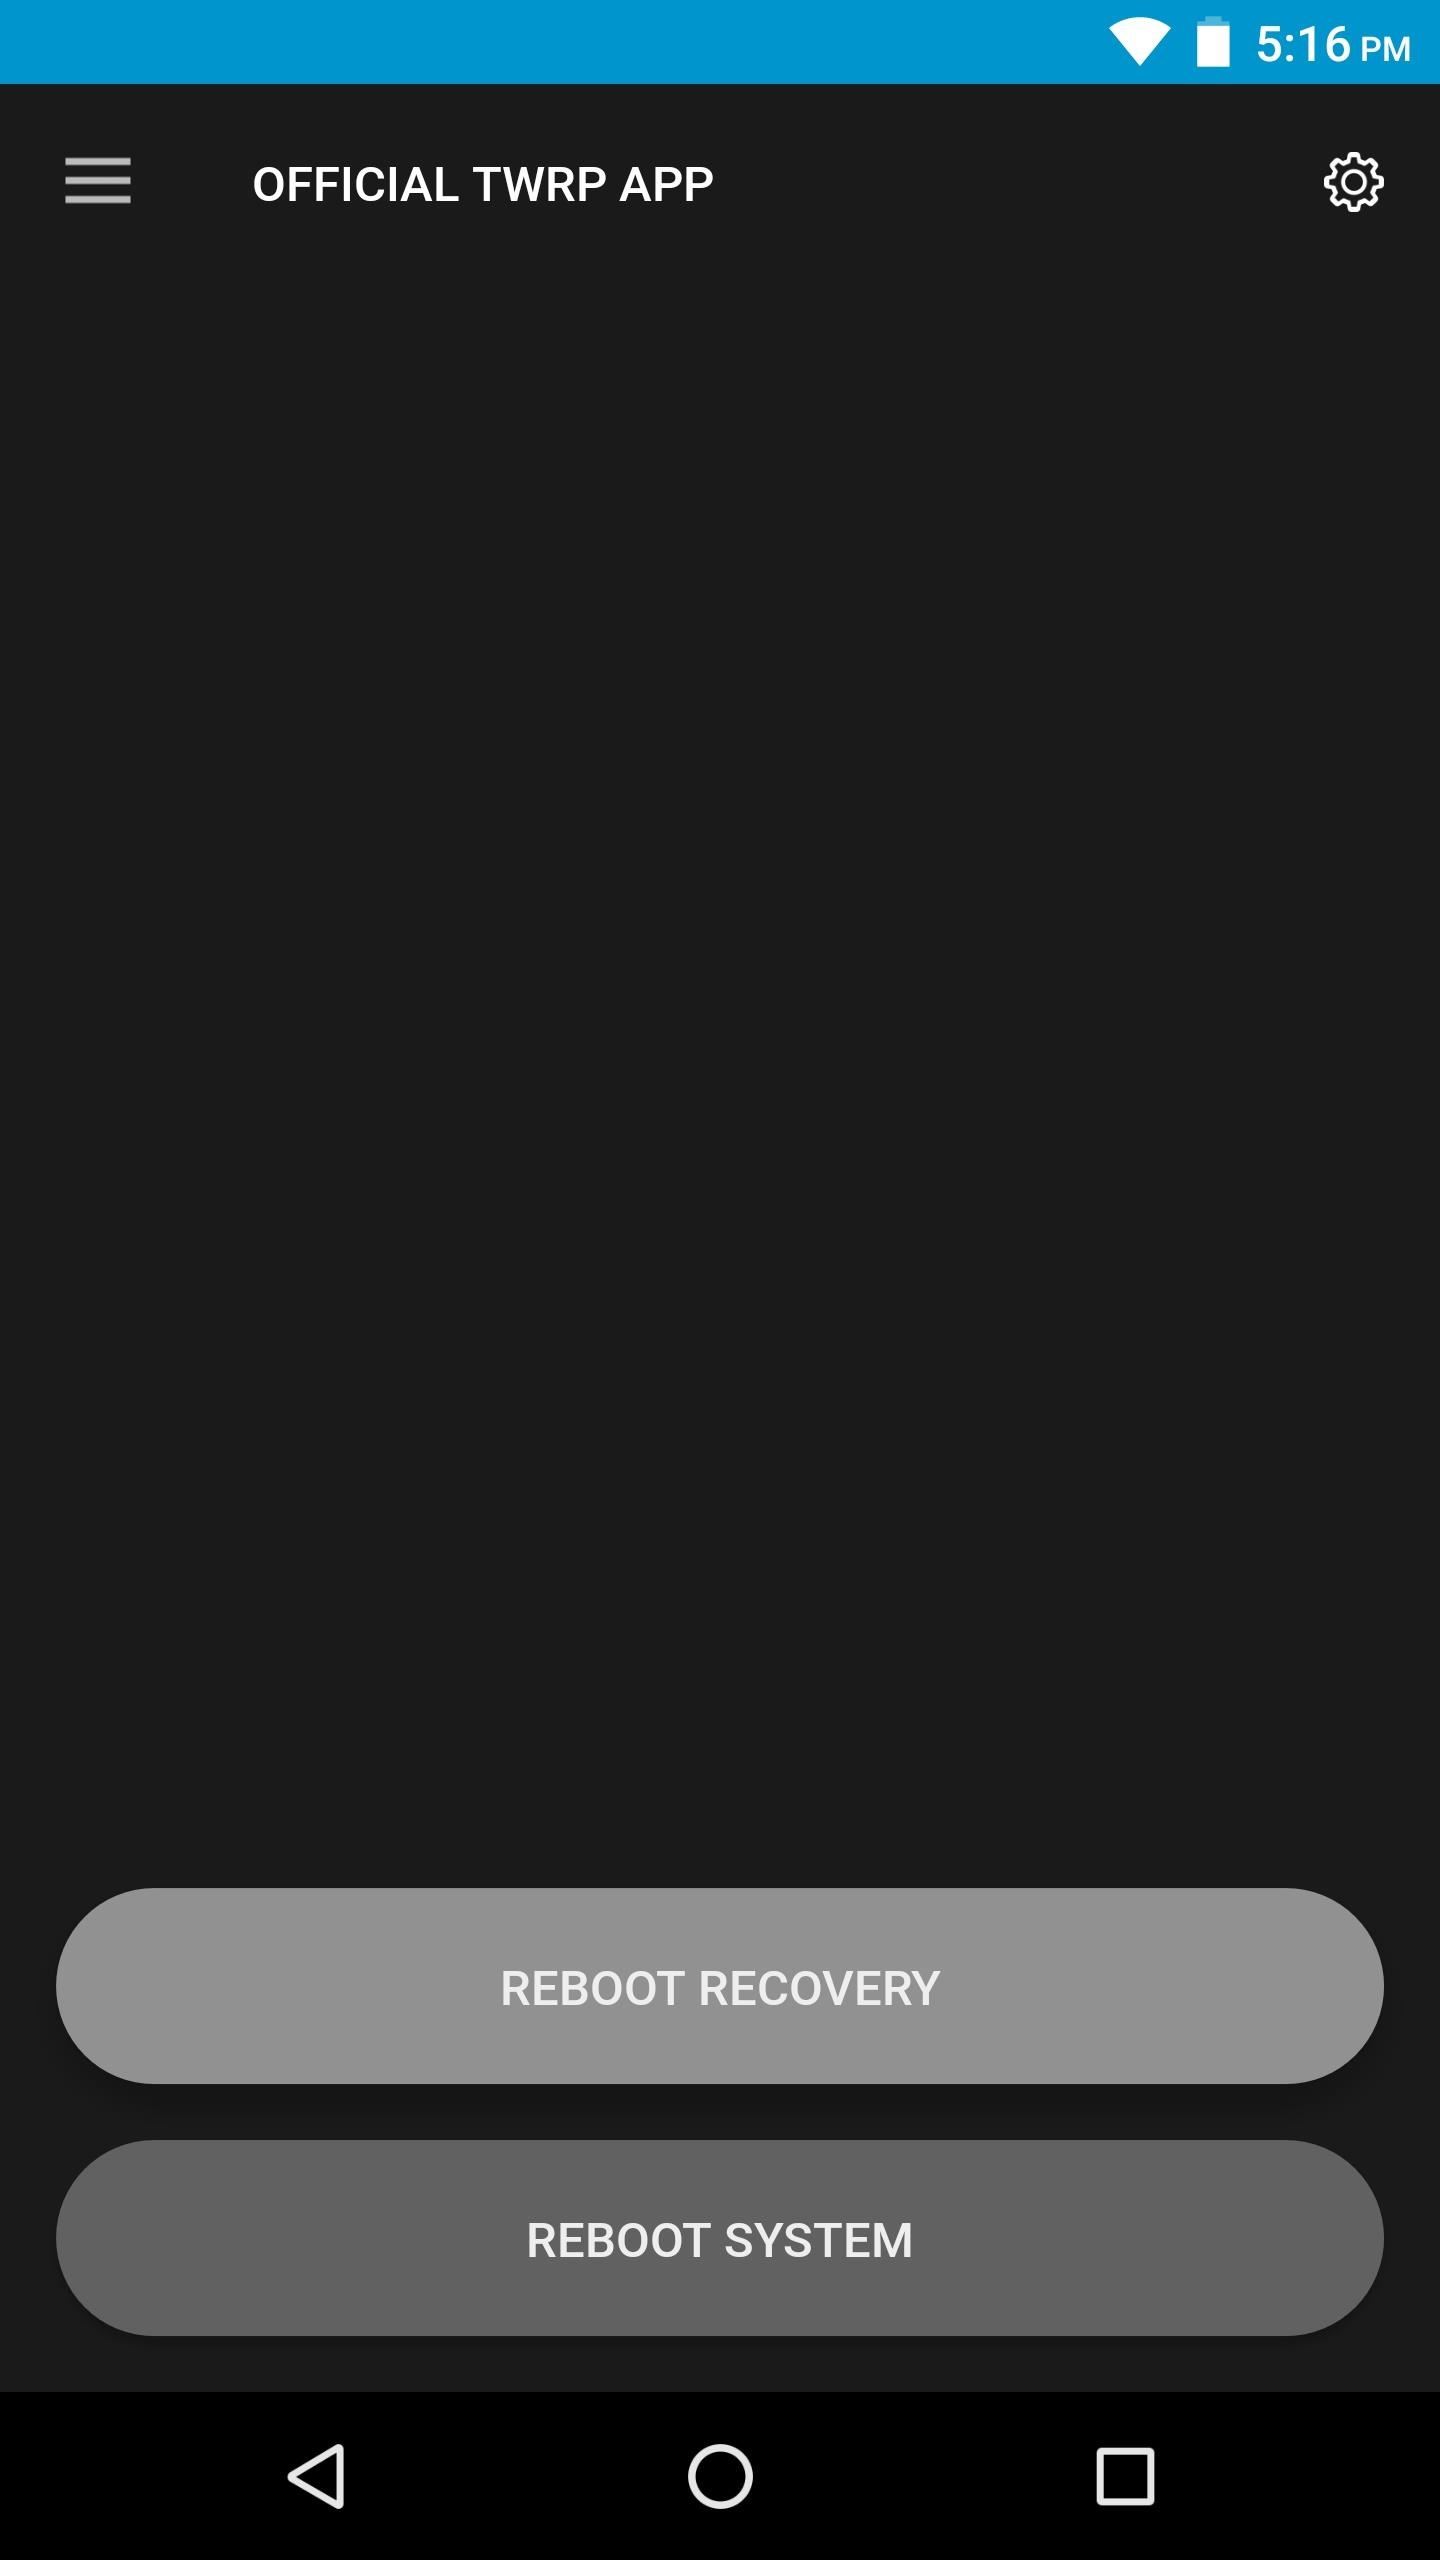
- Step 1: Install the Official TWRP App
- Step 2: Grant Permissions
- Step 3: Back Up Your Existing Recovery
- Step 4: Download the TWRP Image for Your Device
- Step 5: Install TWRP
- Step 6: Make TWRP Your Permanent Recovery
- Как рутировать с помощью TWRP Recovery
- Навигация по записям
- Tip #1. Accessing TWRP’s Interface
- Google Nexus Devices
- Samsung Galaxy Devices
- HTC One (M7 or M8)
- Software Methods
- Tip #2. Making a NANDroid Backup
- Tip #3. Restoring an Existing Backup
- Tip #4. Flashing ZIPs
- Flashing More Than One ZIP at Once
- Finalizing the Flashing Process
- Tip #5. Wiping Existing Data
- Tip #6. Fixing Permissions
- Tip #7. Booting Back into Android
- Getting to know Magisk
- What is Magisk?
- Magisk – A Magic Mask to Alter System Systemless-ly
- What We Can Do with Magisk and Root?
- Использование официального приложения Official TWRP App
- Как установить SuperSU через TWRP Recovery
- Как проверить наличие SuperUser в Android
- Установка TWRP через ADB и Fastboot
- Как получить рут права на Android через CWM
- Steps to Install Magisk and Root Android Device
- Method 1: Flashing Magisk Zip using TWRP Recovery
- Method 2: Flashing Magisk Patched Boot Image
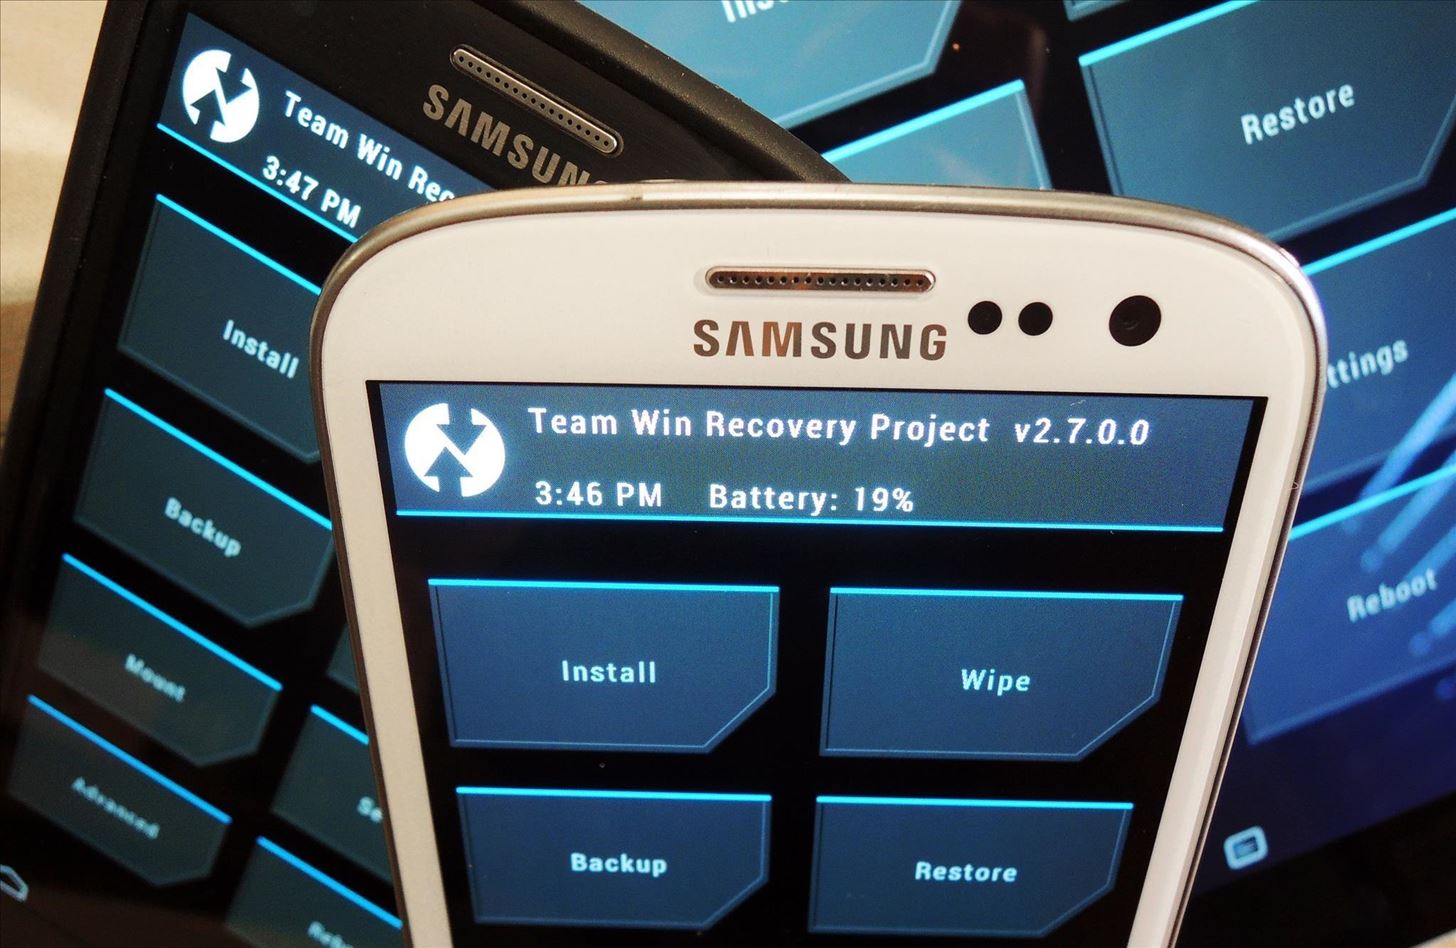
- What is TWRP?
Install TWRP Recovery Using ADB & Fastboot (No Root Required)
Before you proceed to the steps make sure to complete the requirements.
- Your device Bootloader must be unlocked.
- Download and Install SDK platform tool.
- Enable USB Debugging on your phone.
- Take Full Backup of your phone.
- Fully charge your phone.
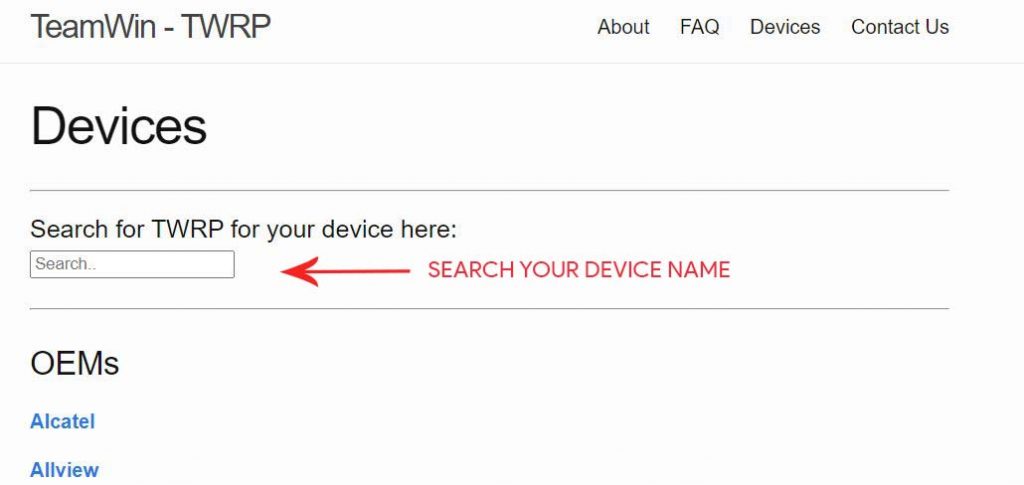
- First, download the TWRP Recovery file from the official website.
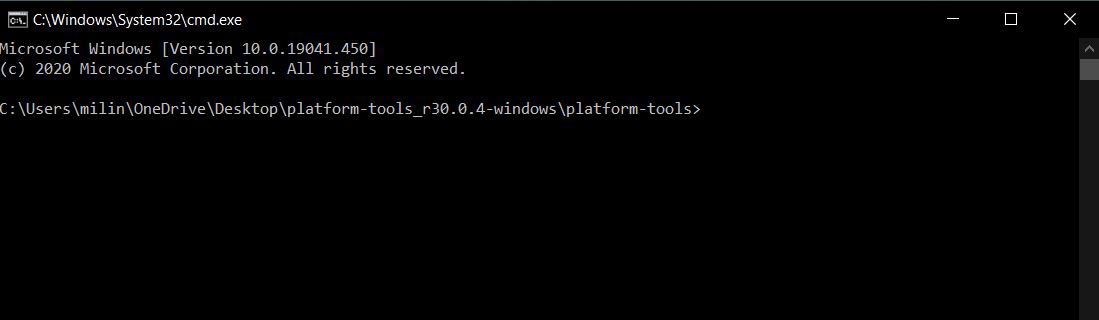
- Extract the SDK platform zip file to your desktop.
- Copy the TWRP Recovery .img file to the SDK platform folder.
- Rename the recovery file to twrp.img.
- Now type “cmd” in the address bar of the SDK platform folder and Hit Enter.

- A command window will open.
- Connect your smartphone to PC/Laptop and type the following command. (If you see any permission popup on your phone then allow it)
adb reboot bootloader
- The above command will boot your phone into bootloader/fastboot mode.
- Once the device boots into bootloader mode, type the below command.
fastboot flash recovery twrp.img
- Once the TWRP is successfully flashed on your phone, type the last command to reboot your device.
fastboot reboot
- That’s all. TWRP recovery is installed on your device.
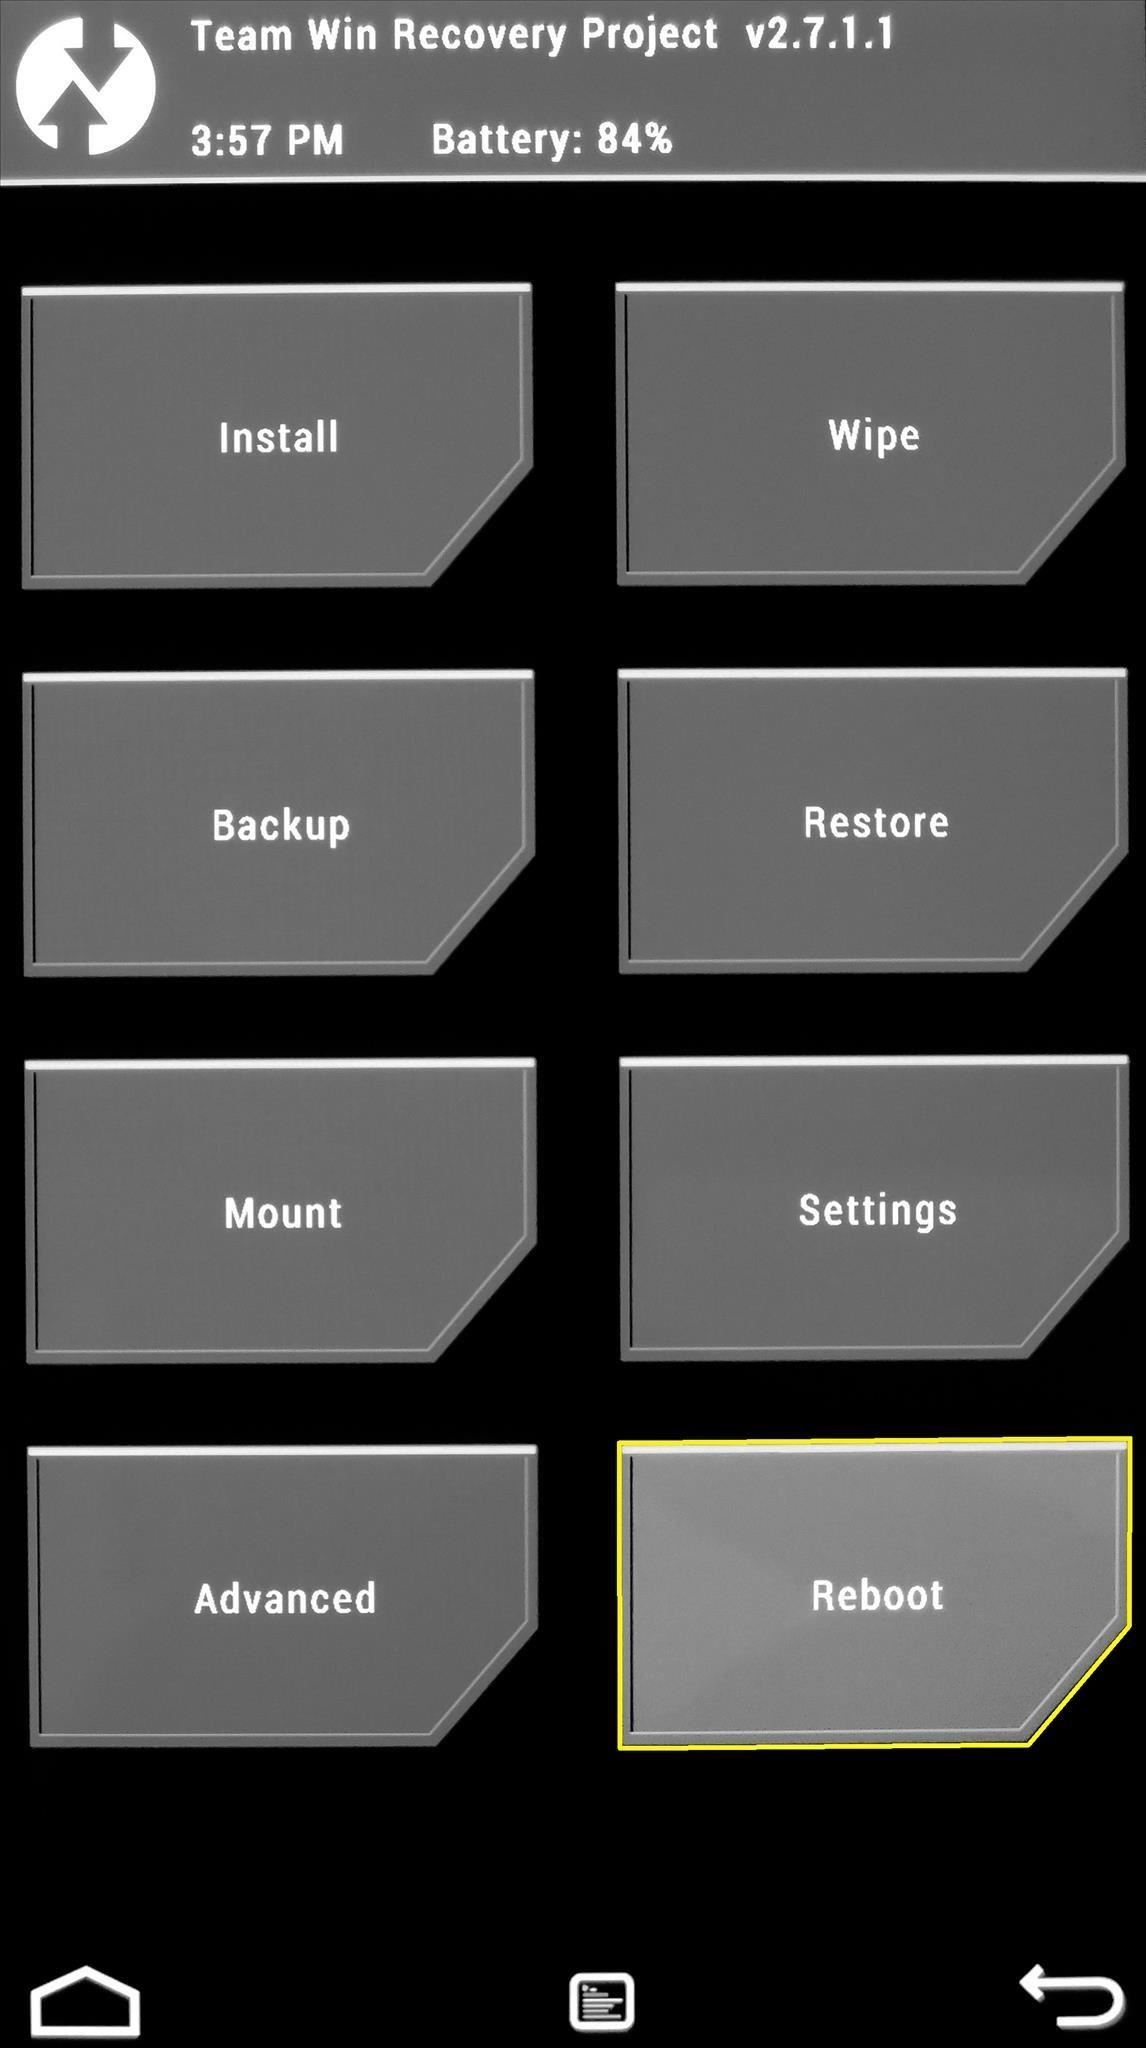
Root Android Phone via TWRP
First off, to root your Android device via recovery, you will need a working TWRP image for your device. Please don’t use any other device’s recovery. You will definitely end up in a bootloop. If there isn’t one for your device, then skip to Method 2. Also, make sure the recovery has been installed on your device. We have a detailed tutorial on installing TWRP on Android. Now with the instructions clear, let us proceed with the steps to root your Android device.

- Boot your device to TWRP Recovery. Either use the specific hardware key combinations for that or execute the below command. For the latter, head over to the platform-tools folder and type cmd in the address now, and hit Enter.
- Now enter the given command in the Command Prompt:
adb reboot recovery
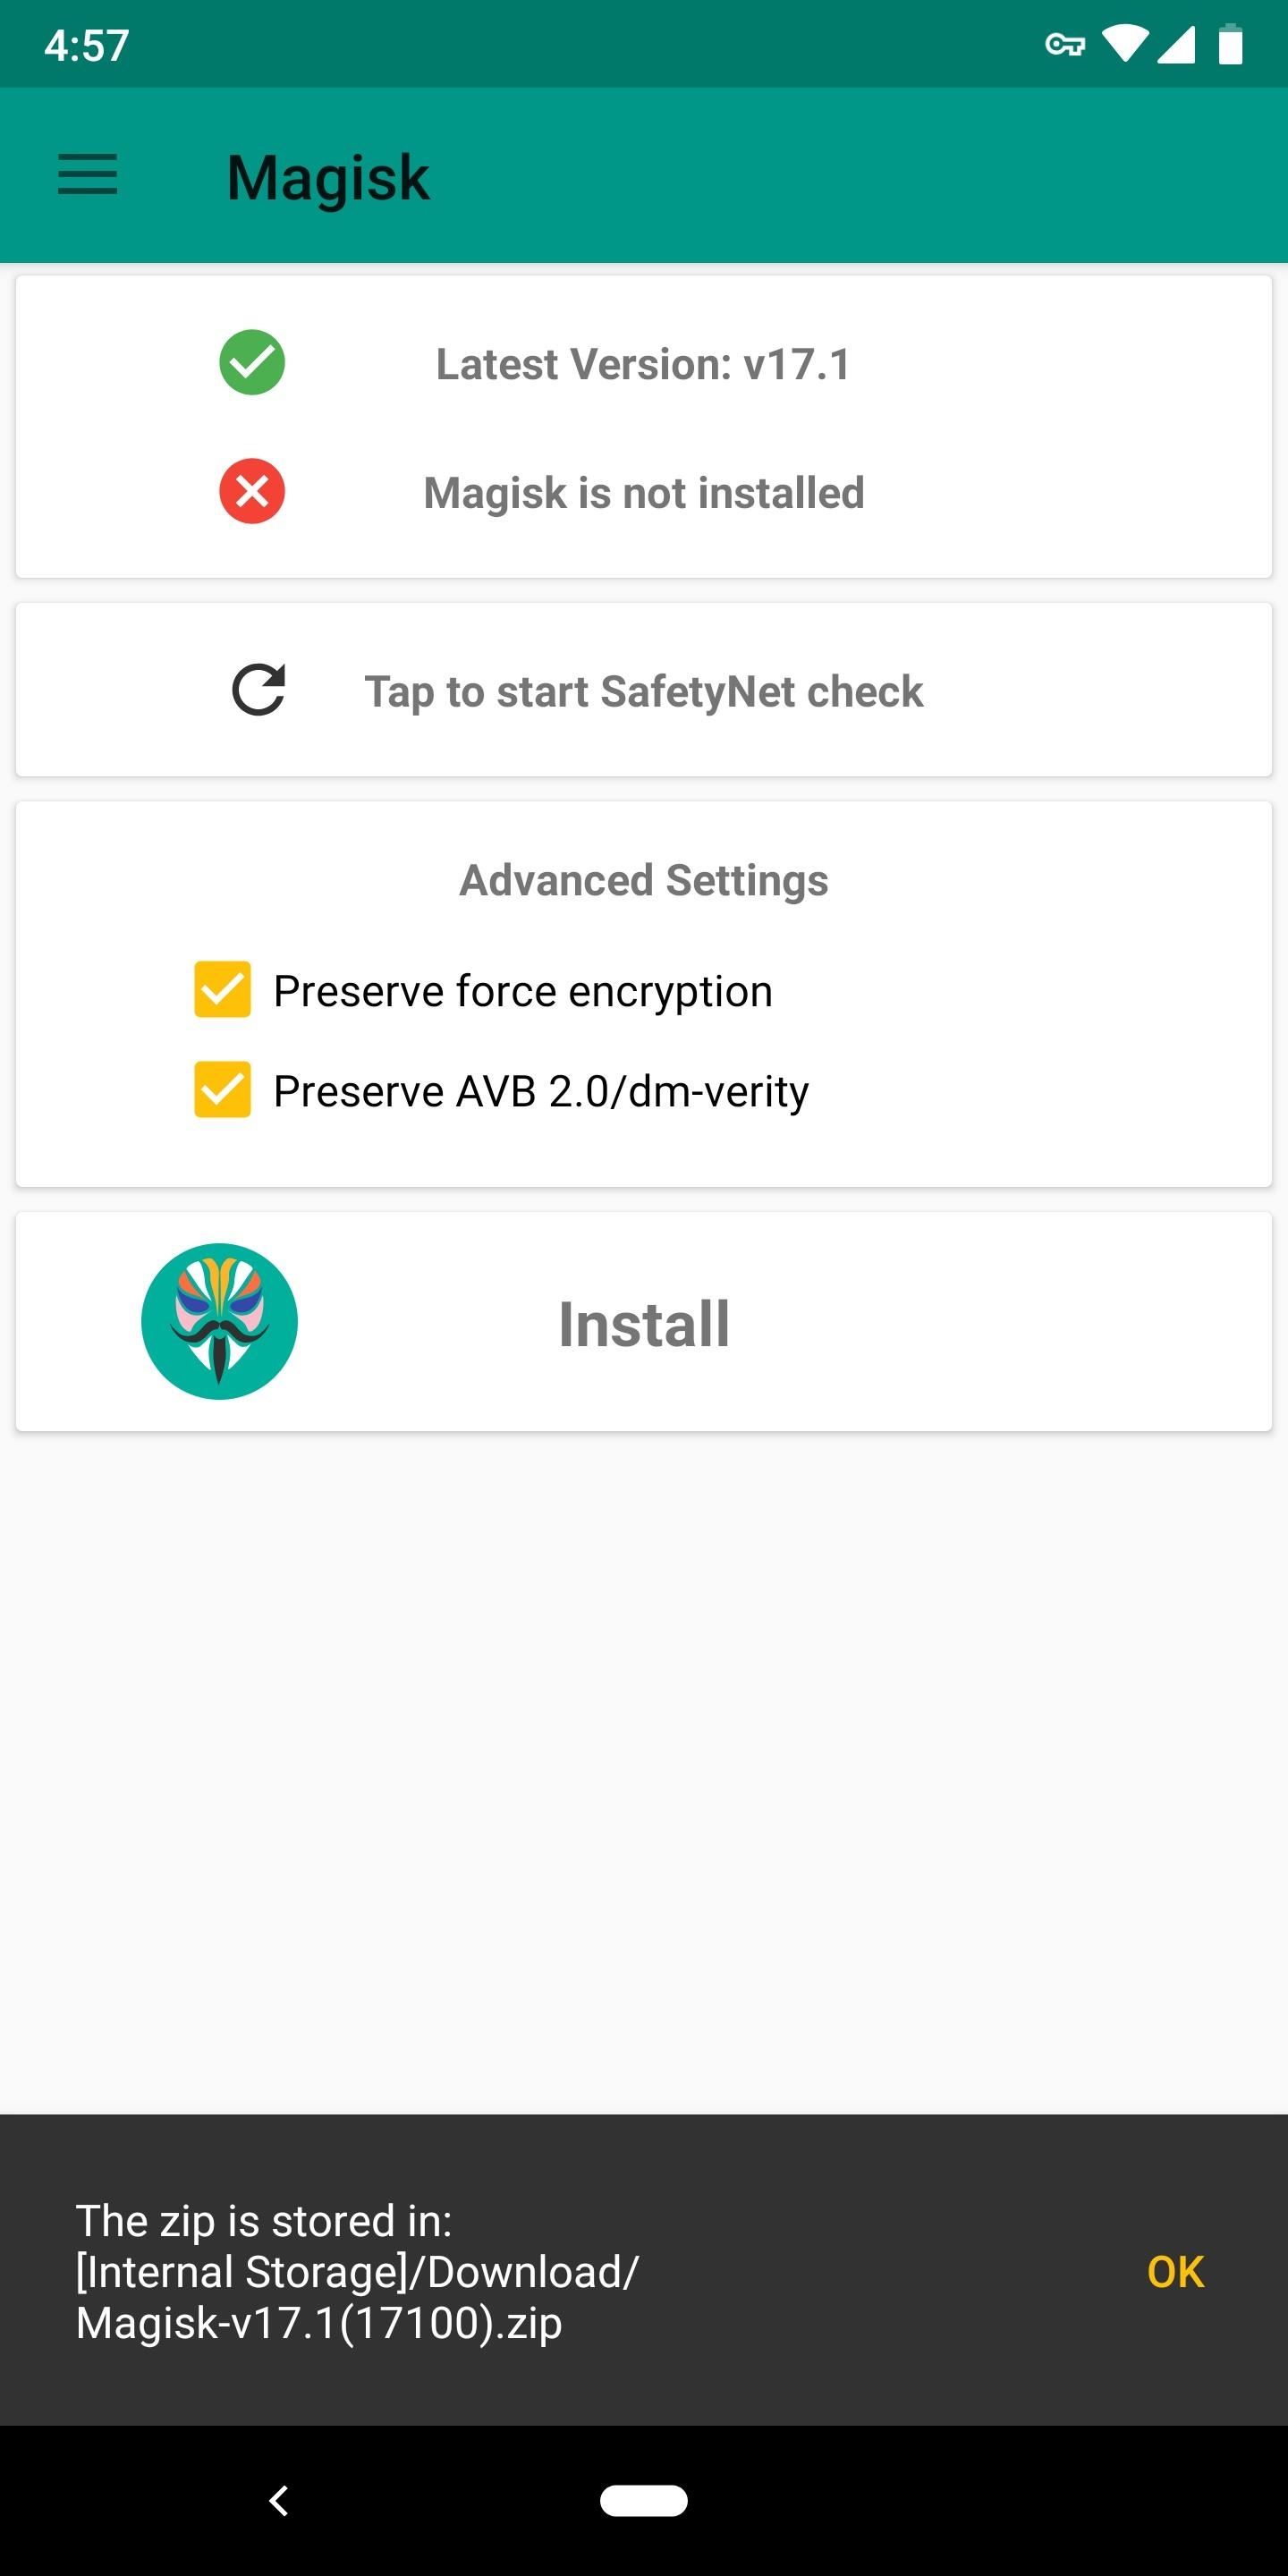
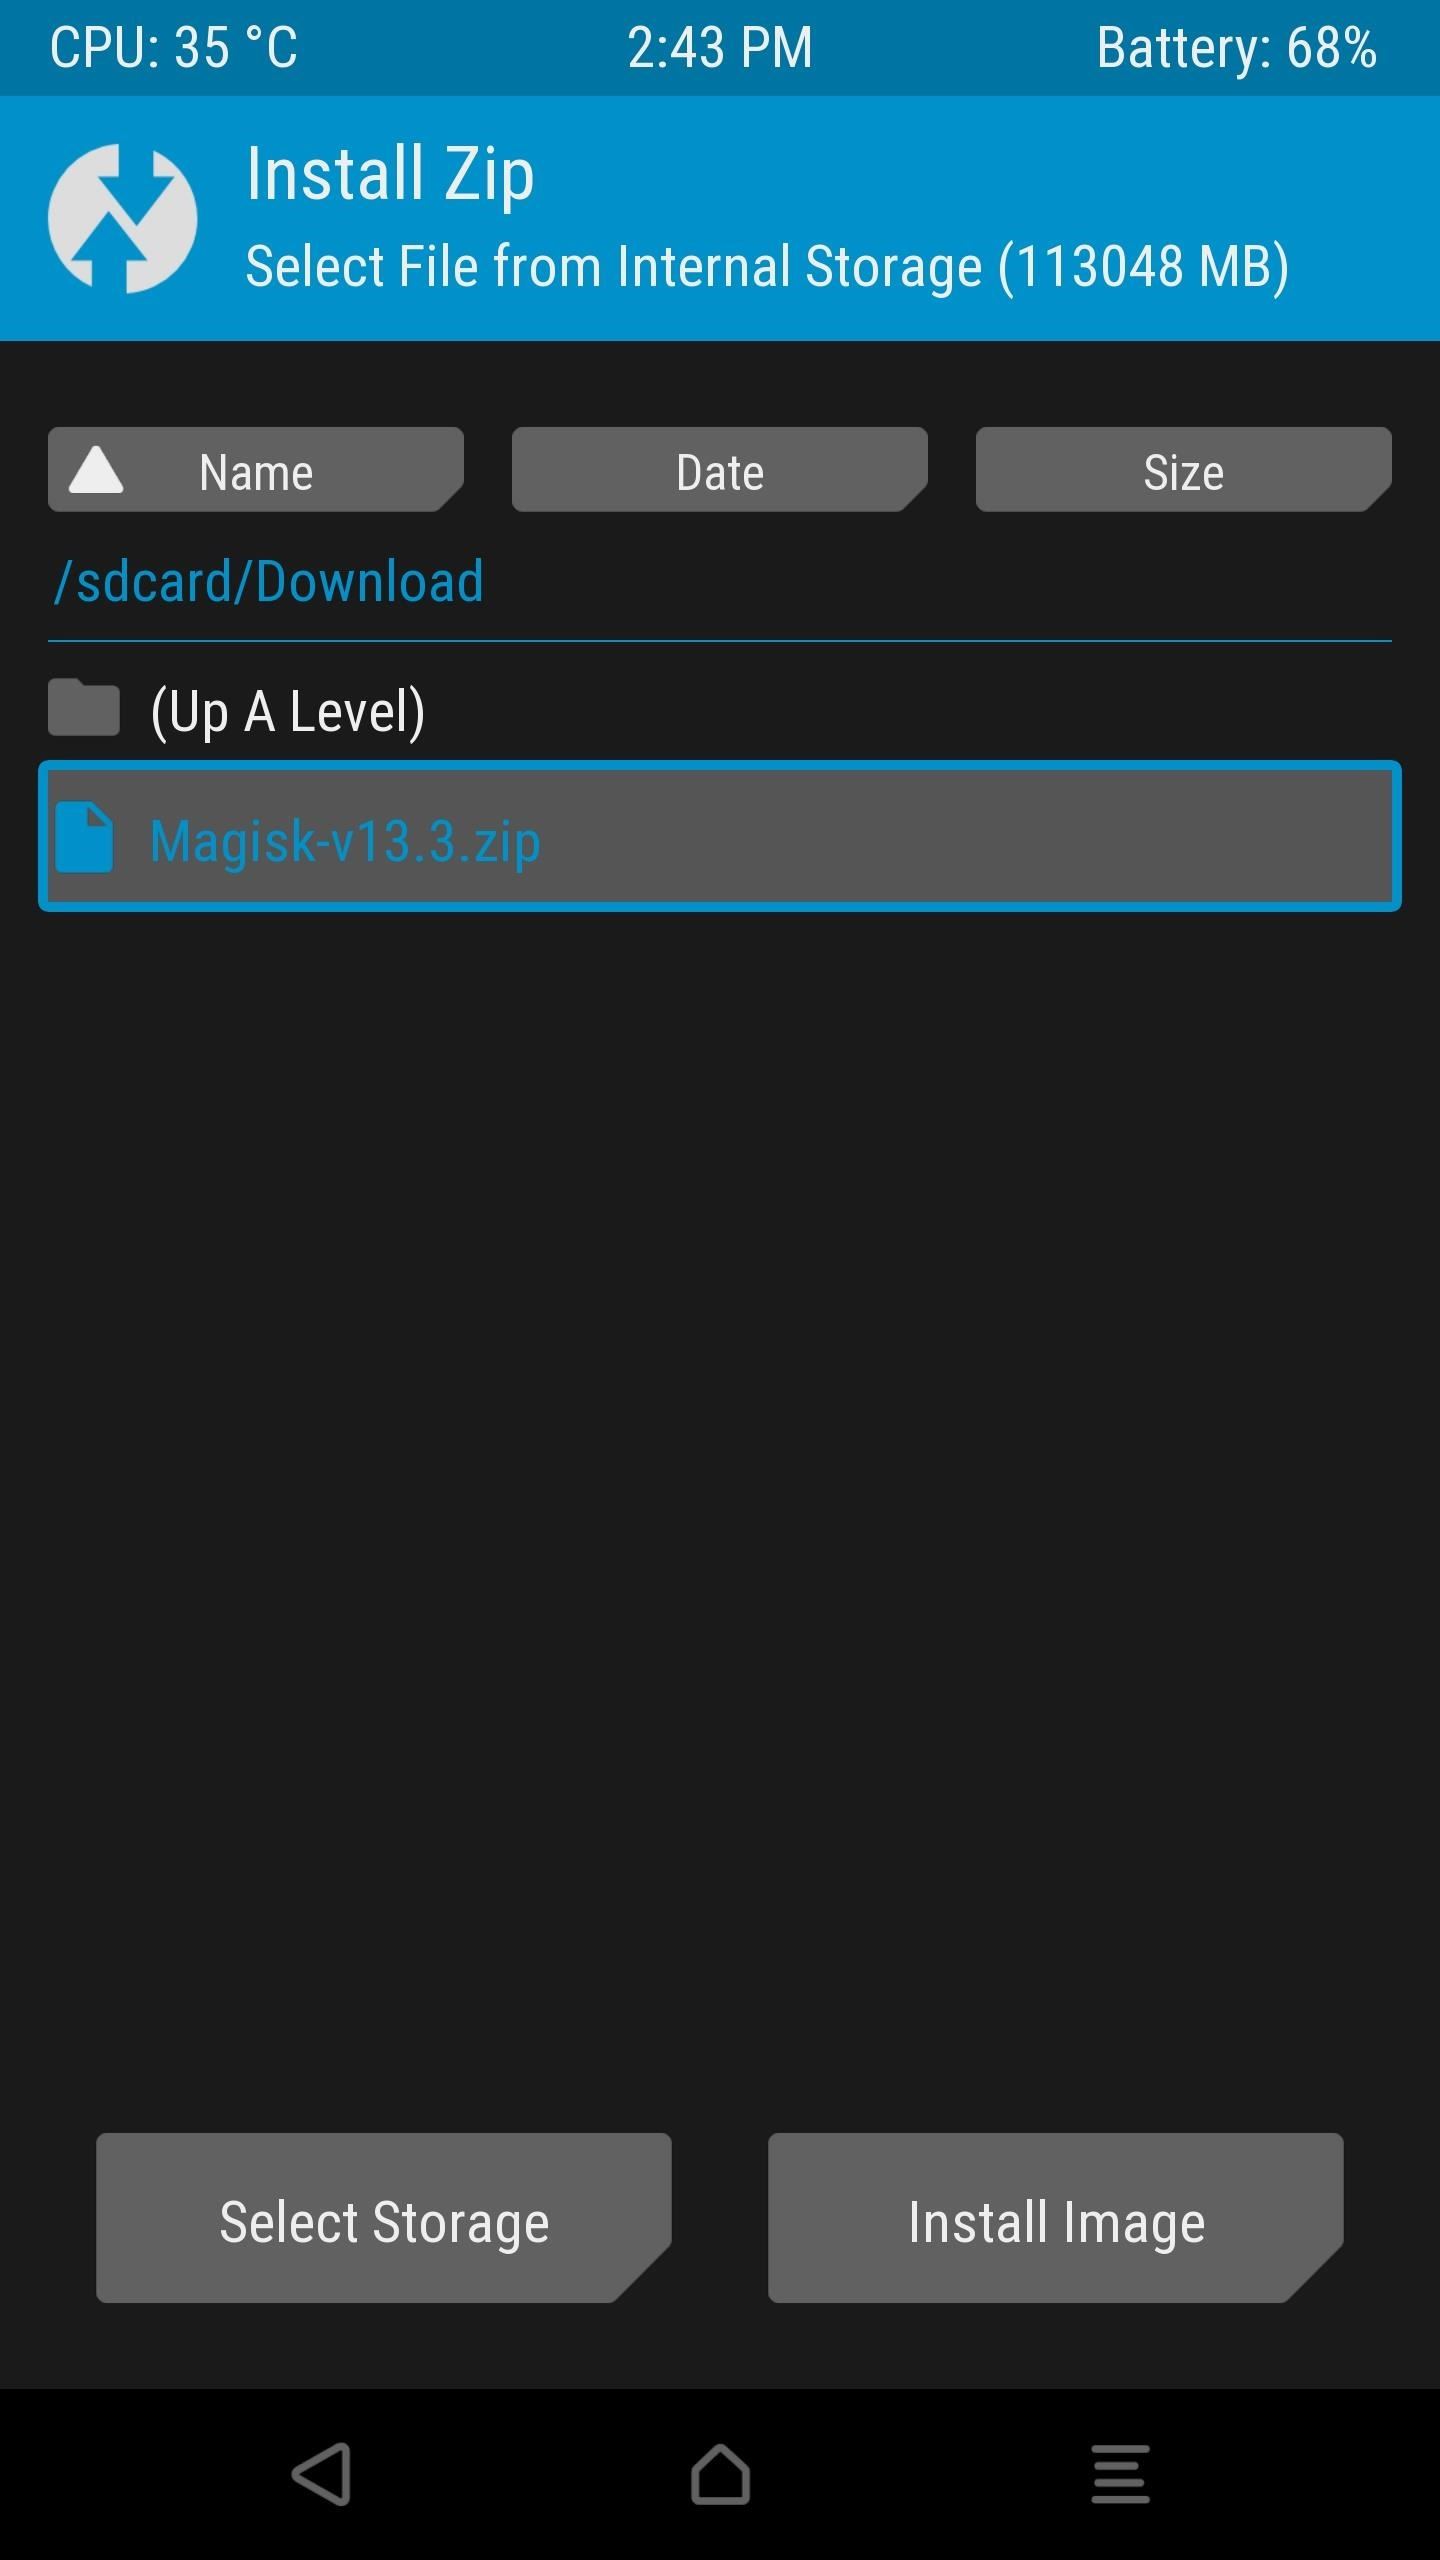
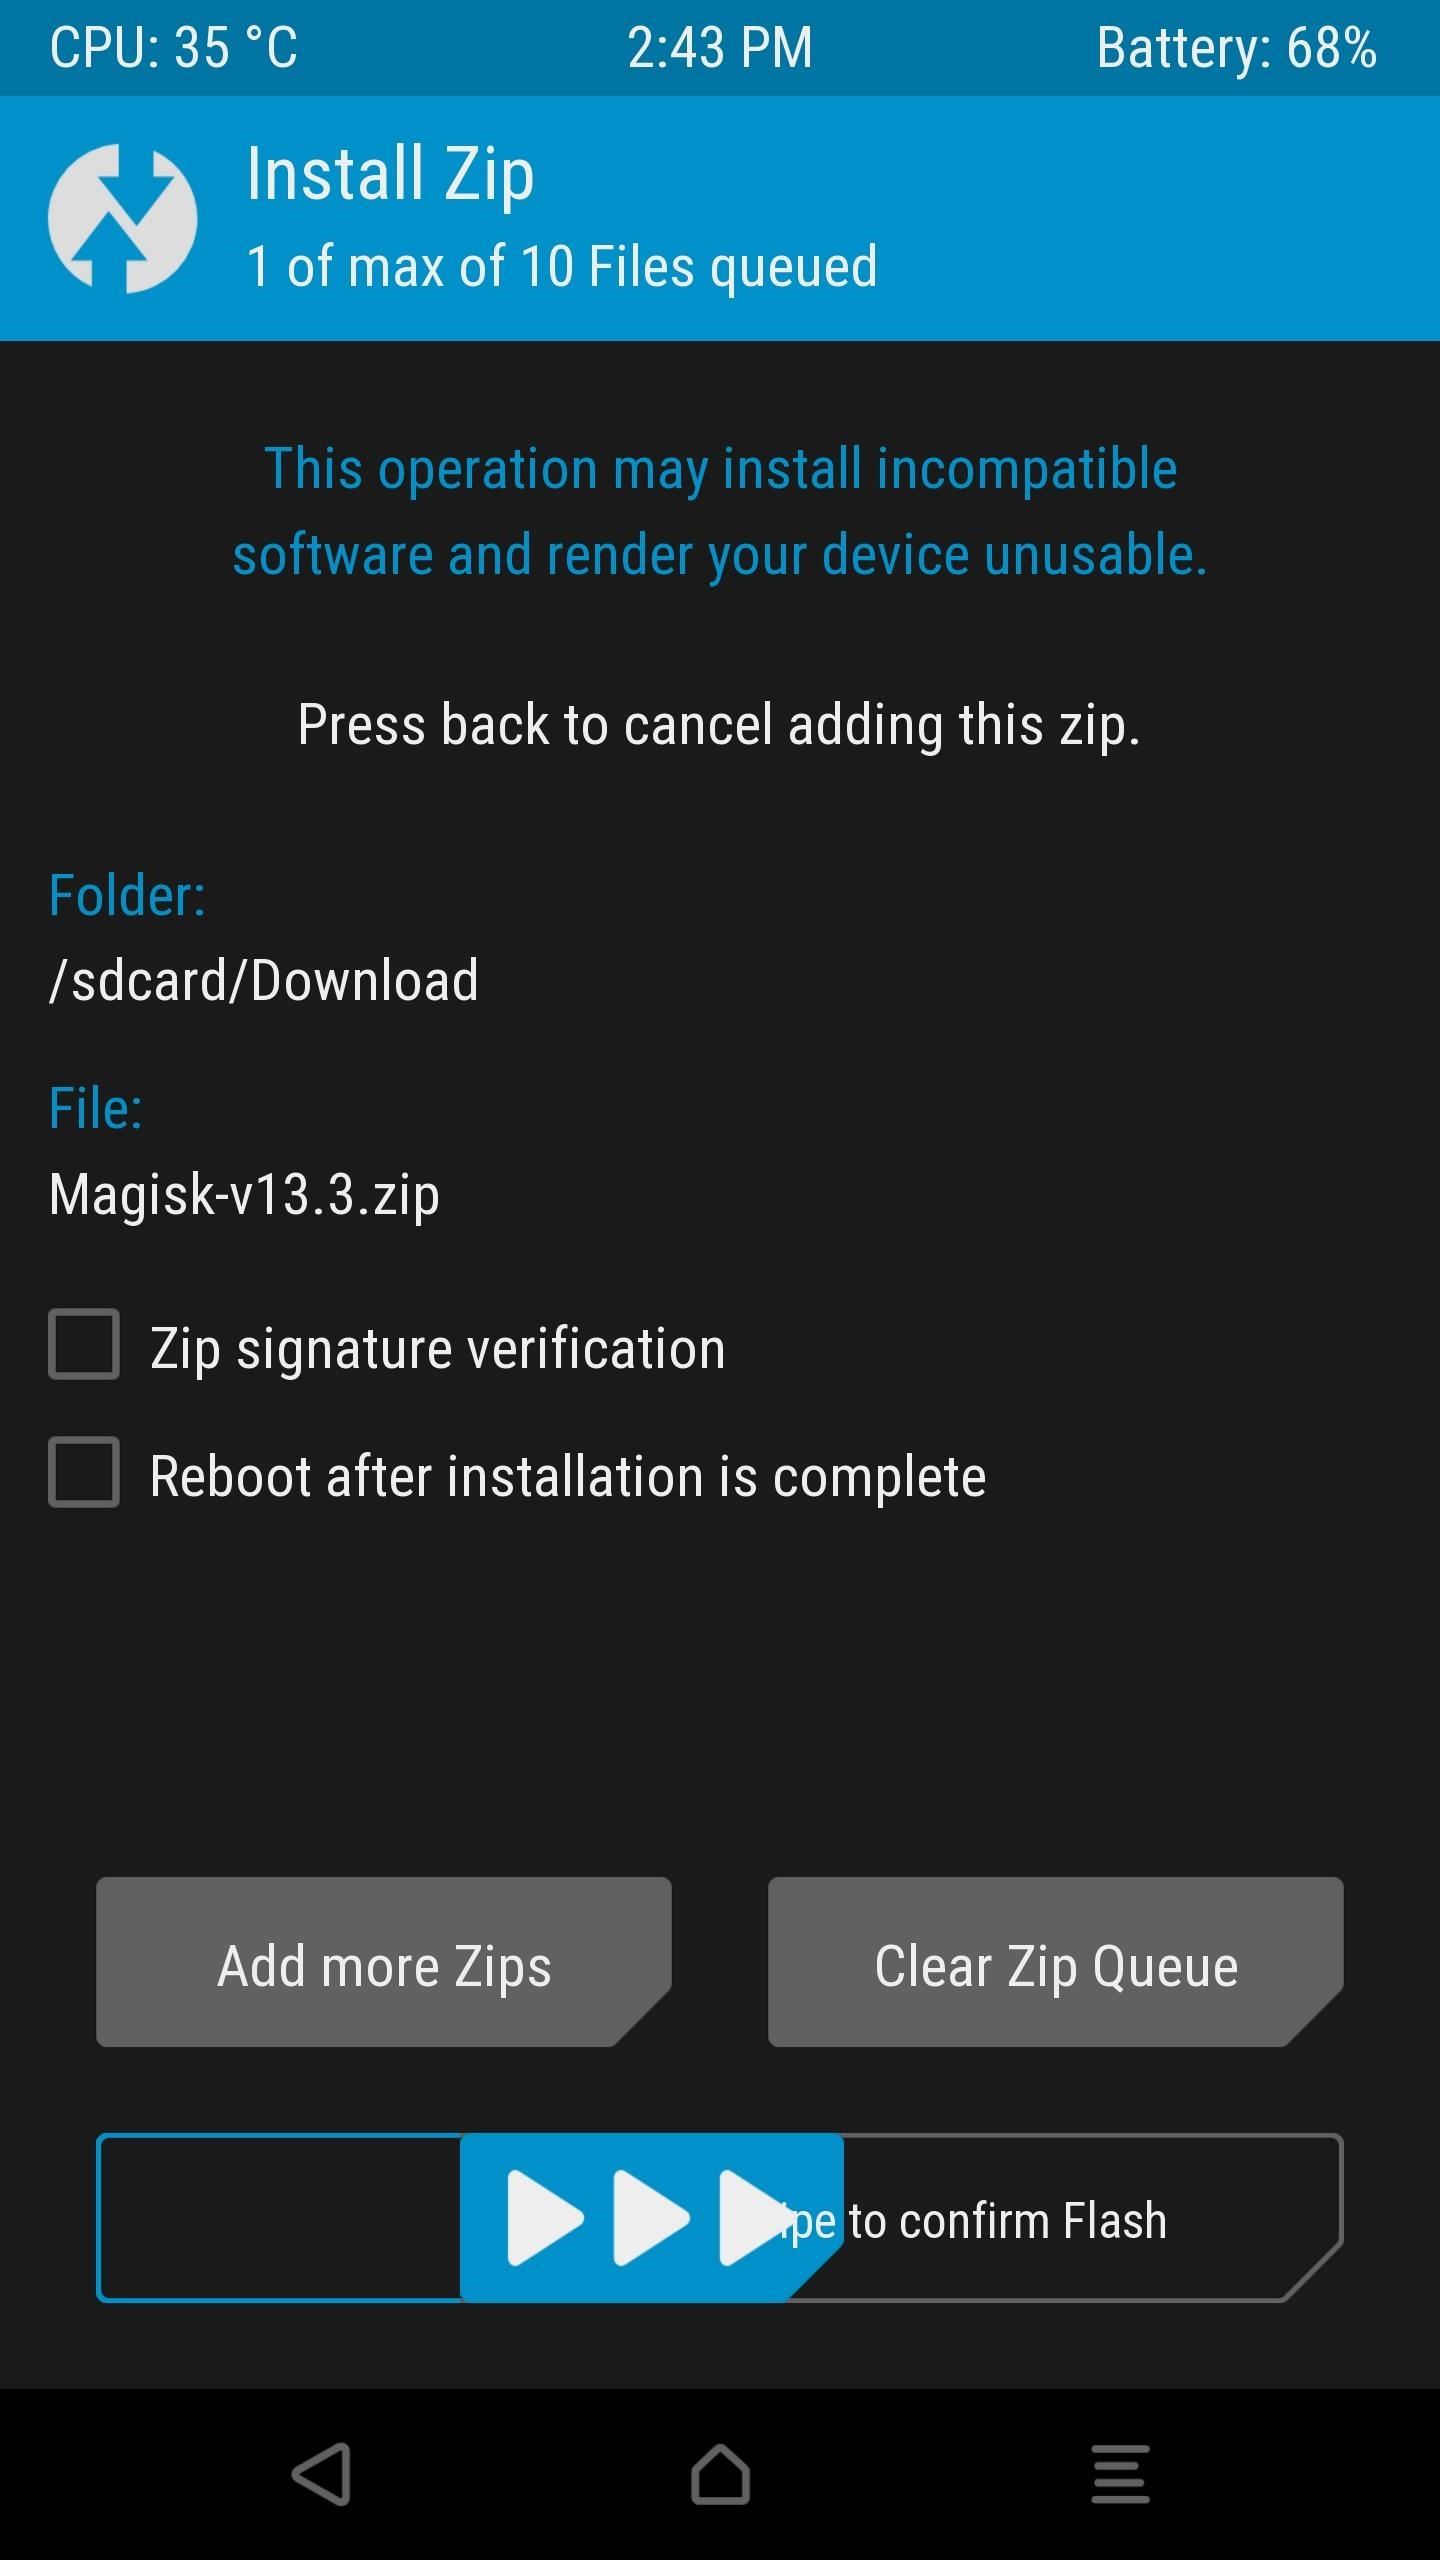
- Your device will now boot to TWRP Recovery. Go to Install, browse to the Magisk ZIP file and perform a right swipe to install it. This zip file is needed to root your Android device.
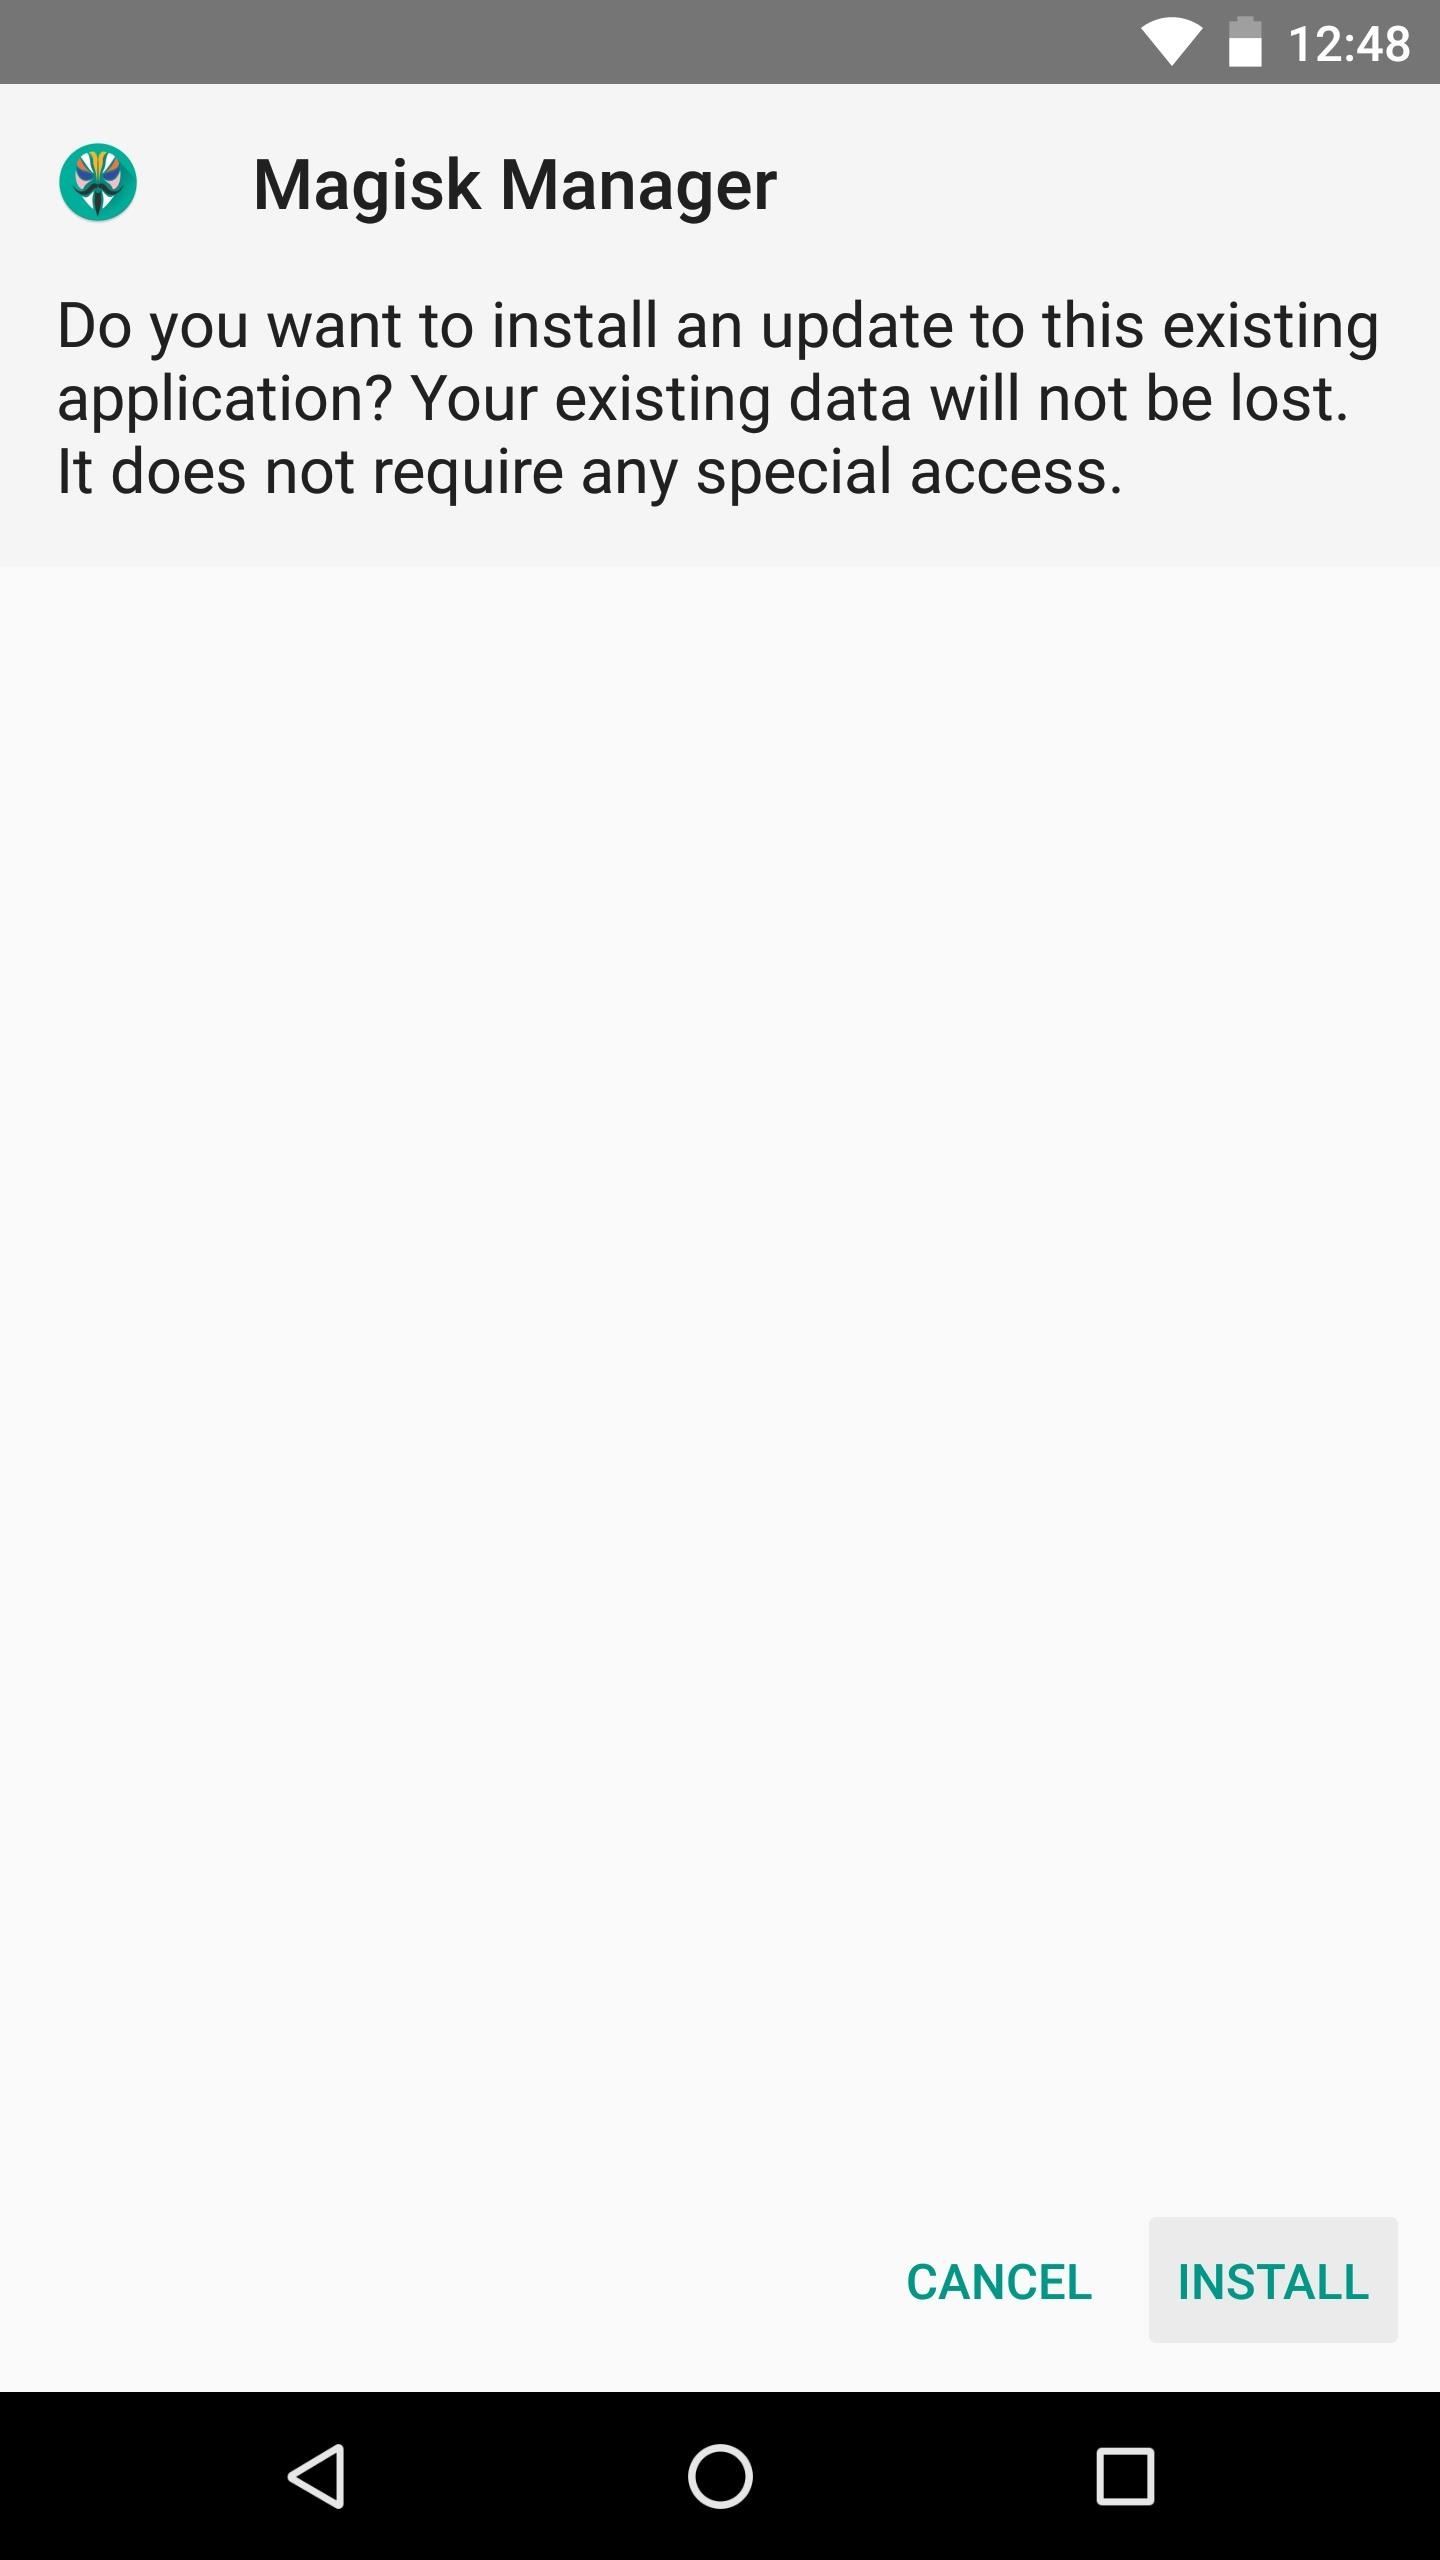
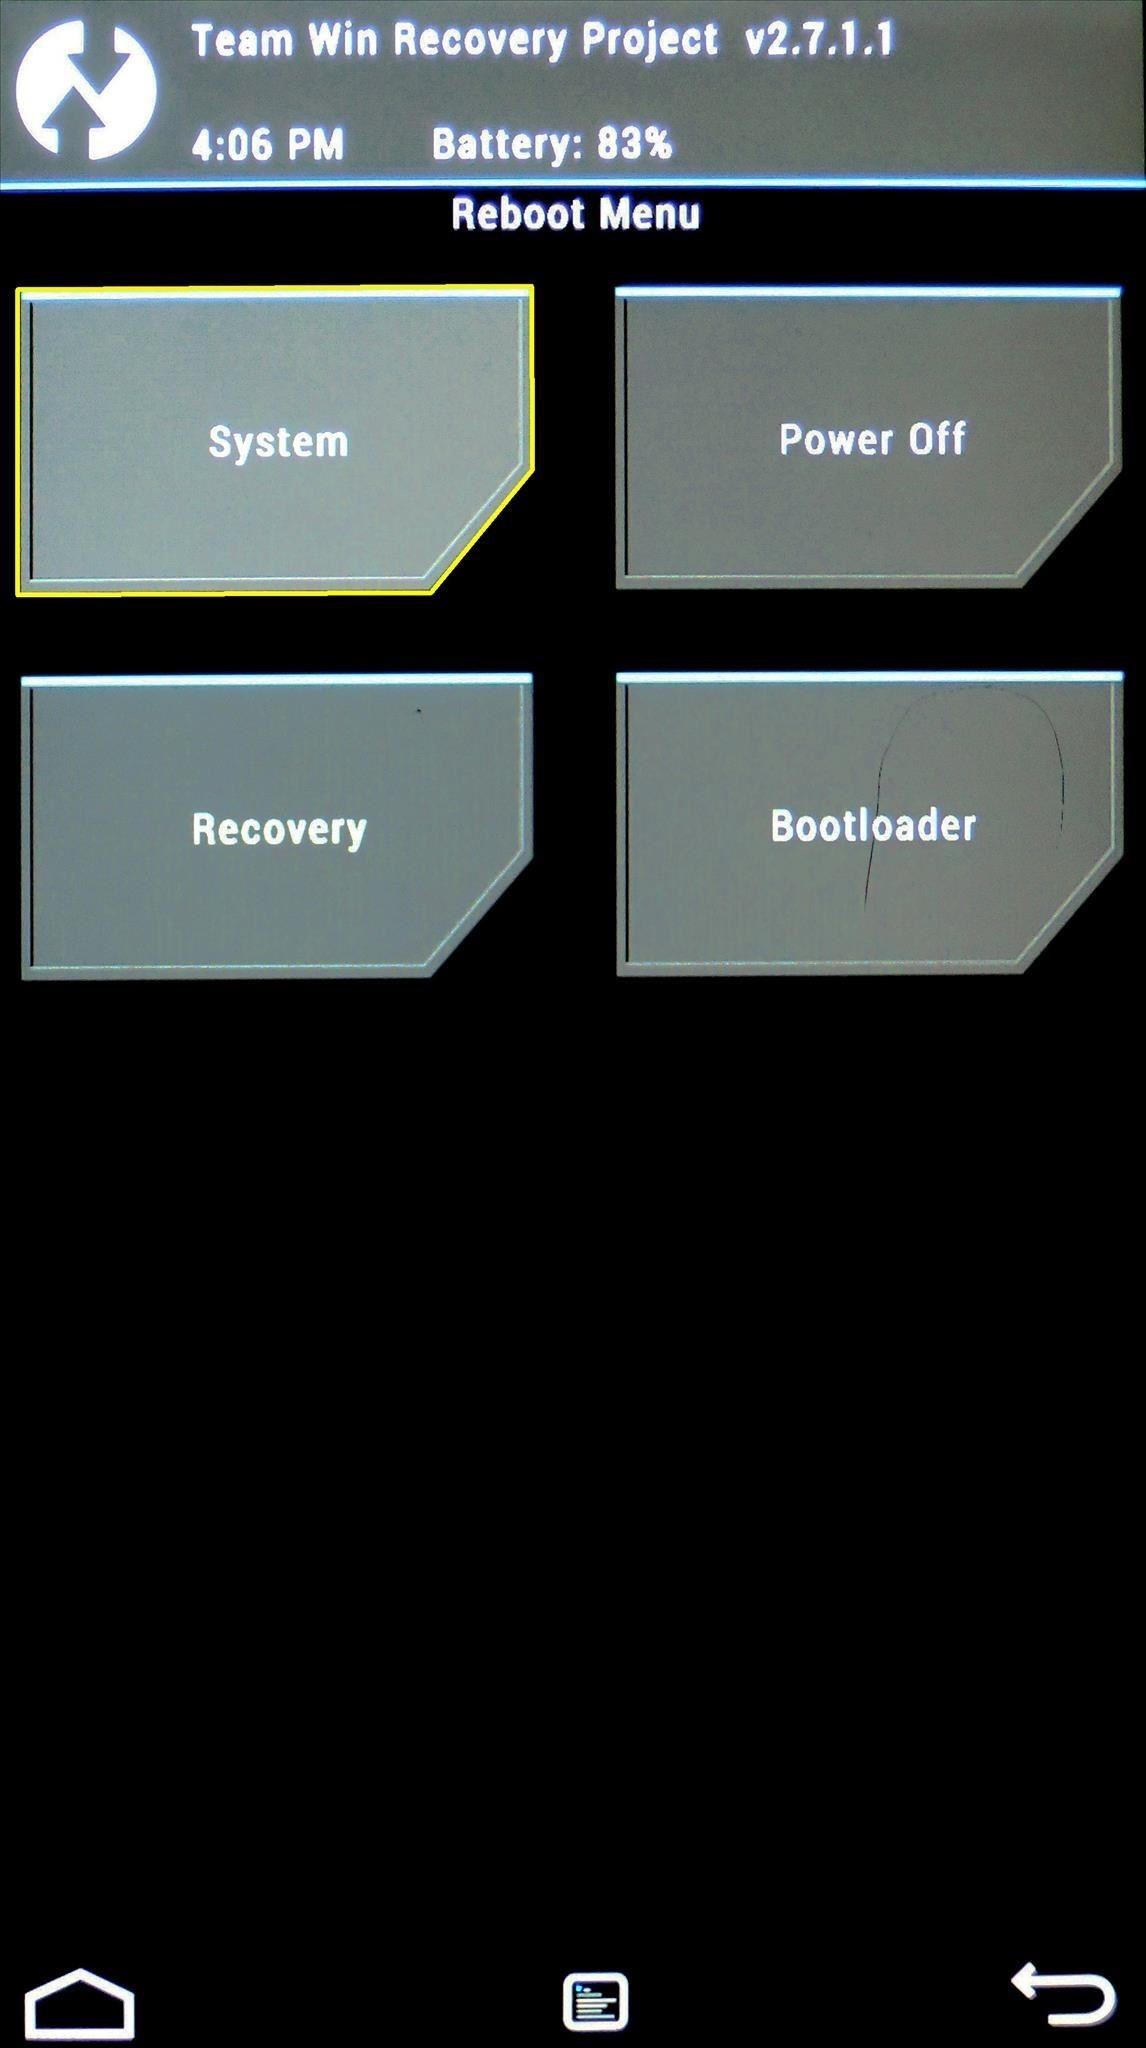
- Now go to Reboot and tap on System. Once your device boots up, install the Magisk Manager APK.
- That’s it. Open the app and you should now see the message that Magisk is up to date (see screenshot below).
With that, you have successfully rooted your Android device. Let’s now check out the steps to do so via fastboot commands. On that note, also have a look at 10 useful Windows command prompt tricks that you should be aware of.
Существует немало так называемых «однокликовых» программ для получения ROOT прав на Android. Данными эксплойтами легко пользоваться: достаточно установить утилиту на ПК или приложение на смартфон, если нужно – включить отладку по USB, сделать пару нажатий и готово! Но их главная проблема заключается в том, что они не могут рутировать 100% устройств. В этой инструкции мы поговорим о способе, который подойдет для всех смартфонов и планшетов на которые можно установить кастомное рекавери: CWM, TWRP.

Что такое root права и для чего они нужны
Хотя Android является самой кастомизируемой мобильной ОС, на любом девайсе «из коробки» закрыт доступ к корневому каталогу и редактированию системных файлов – они монтируются в режиме «только для чтения». Имея root (аккаунт Суперпользователя), становится доступной запись в системный раздел. Пользователь может максимально настроить систему под себя: удалить ненужные приложения, убрать рекламу, обойти ограничения Google Play, отключить фоновые процессы и многое другое.
В процессе рутинга на смартфон, планшет устанавливаются приложение администратор рут прав SuperSU, бинарный файл SU, который записывается по пути /system/xbin/ и набор консольных утилит BusyBox.
![MIUI v12 [20.7.9]](https://portal.mi-room.ru/wp-content/uploads/2018/07/9281082.png)
— это кастомное рекавери (специальный режим смартфона), которое позволяет:
- Устанавливать неофициальные прошивки
- Устанавливать дополнения и патчи
- Создавать резервную копию как всей прошивки, так и отдельных её частей
- Восстанавливать данные из ранее созданной резервной копии
- Подключаться к ПК по USB в режиме съёмного накопителя
- Подключиться к ПК по USB в режиме ADB
- Сбрасывать данные к заводским настройкам (Очистка data), очищать раздел кэша (Очистка cache), очищать далвик кэш (Очистка Dalvik-cache)
- Форматировать и создавать разделы
Инструкция по установке TWRP Recovery:
![MIUI v12 [20.7.9]](https://portal.mi-room.ru/wp-content/uploads/2018/08/3242343.png)
- В настройках для разработчиков включите пункт «Отладка по USB».
- Выключаем телефон
- Одновременно зажимаем клавишу громкости вниз и клавишу включения, удерживаем несколько секунд, пока телефон не окажется в режиме Fastboot (на большинстве устройств должен быть изображен кролик в шапке ушанке)
![MIUI v12 [20.7.9]](https://portal.mi-room.ru/wp-content/uploads/2018/08/1555-740x339-350x339.jpg)
- Подключаем телефон к компьютеру
- В папке с инструментом для установки рекавери запускаем файлик «Install.bat» двойным нажатием кнопки мыши. (в случае, если вы скачали «полный комплект для установки», нужно запустить файлик «TWRP_Install_select.bat», нажать цифру «1» и клавишу «Enter»)
![MIUI v12 [20.7.9]](https://portal.mi-room.ru/wp-content/uploads/2018/08/111.png)
- Рекавери должно установиться автоматически. После этого войдите в TWRP Recovery вручную: зажмите клавиши громкости вверх и питание, а после того как на экране появится логотип Mi, отпустите клавишу питания, а громкость продолжайте удерживать.
Если установка рекавери не произошла, убедитесь, что у вас установлены драйвера для вашего устройства, а также разблокирован загрузчик. (как проверить статус загрузчика читаем здесь)
Root Android with ADB & Fastboot Commands
If there isn’t any working TWRP for your device or you don’t wish to install one for whatever reason, then this method might come in handy. For this to work, you will be needing the stock boot.img file of the same version which is currently installed on your device. You could extract the same from the stock firmware of your device. Just make sure that there is no version mismatch. Otherwise, bootloop is evident.
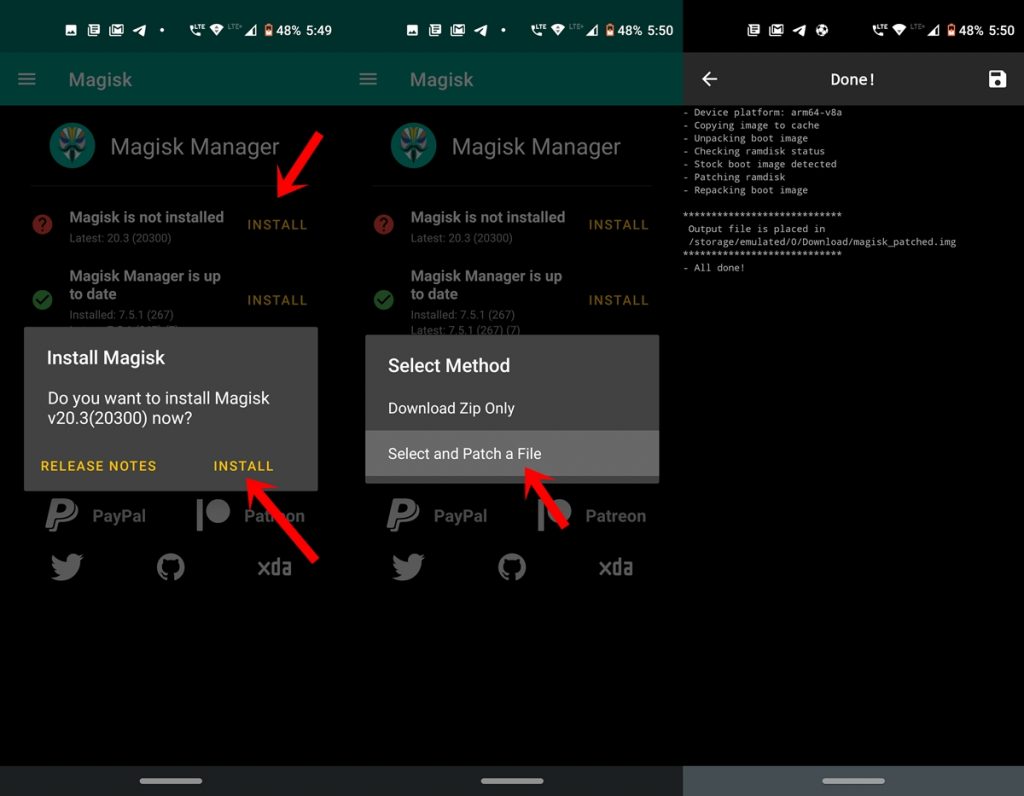
- Install Magisk Manager APK on your device. Open it and tap on Install next to “Magisk is not installed” keyword. Again tap on Install in the next pop-up.
- Now tap on Select and patch a file. Select the boot.img file and wait till Magisk patches it.
- Connect your device to PC via USB cable. Head over to the Downloads folder on the Internal Storage, copy the magisk_patched.img file and transfer it to the platform-tools folder on your PC. This file is needed to root your Android device.
- Now, enter cmd in the address bar of platform-tools and press Enter. This will launch the Windows Command Prompt window. Enter the below code to boot your device to fastboot or bootloader mode:
adb reboot bootloader
- Your device should now be boot into fastboot mode. Execute the following command to flash this patched boot image onto your device:
fastboot flash boot magisk_patched.img
- It should be successfully installed on your device within a matter of seconds. You could now reboot your device via the Power key or the below command:
fastboot reboot
That’s it. You have now successfully rooted your device via TWRP Recovery. Now go ahead and dive deep into the mods community and give our device a completely new makeover. There are tons of Magisk Modules, Xposed framework, and Custom ROMs, all waiting for a place on your device. Go and give them a shot!
Must Read: How to Android Lock Screen PIN & Pattern via ADB
We have compiled quite a huge list of ADB, ADB Shell, and Fastboot commands with detailed explanations to all commands you may ever need to use.
Install TWRP Recovery On Samsung Phones
The below steps are applicable only for Samsung phones. So, do not try the below steps of any other smartphones other than Samsung phones. Also, make sure to read the requirements before applying the steps.
- Download Odin Tool on your PC/Laptop.
- Download TWRP Recovery file for your Samsung phone. (Make sure to download .tar file)
- Take a complete backup of your smartphone.
- Fully charge your phone.
Flashing the TWRP Recovery using Odin –
- First, enable OEM Unlock on your phone. Go to Settings > About Phone > Tap on Build Number 6-7 times. This will enable developer options on your phone.
- Again Go back to Settings > Developer Options > enable OEM Unlock and USB Debugging.
- Now Reboot your phone into Download mode.
- Power Off your phone.
- Next, press and hold the “Home + Power + Volume down” button until you see a warning screen.
- Press the Volume Up button to enter into the Download Mode.
- Once done, connect your Samsung phone to the PC/Laptop via the original USB cable.
- Now on your PC extract the Odin zip file to your desktop.
- Open the extracted folder and run Odin3 xxx.exe file.
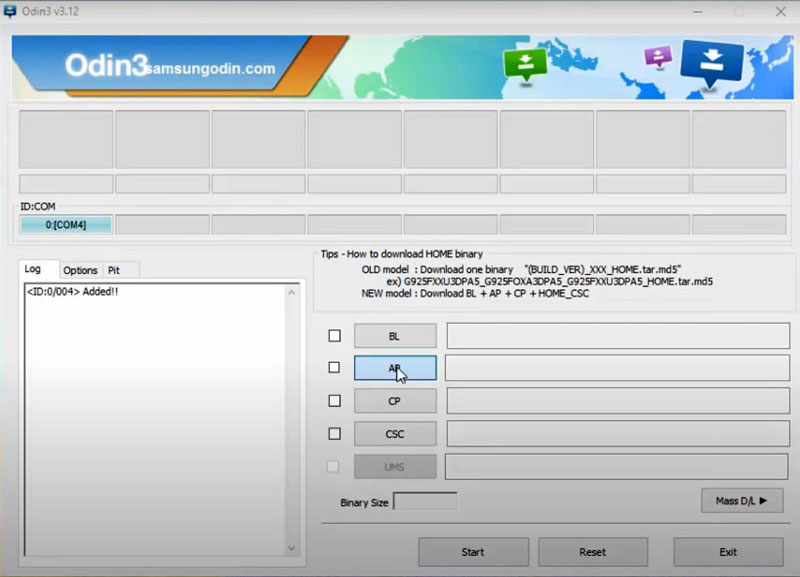
- Click on the AP tab option and select the TWRP recovery file. (Again make sure that the recovery is a .tar file, or else it may cause some problems.)
- Go to options and uncheck Auto Reboot option.
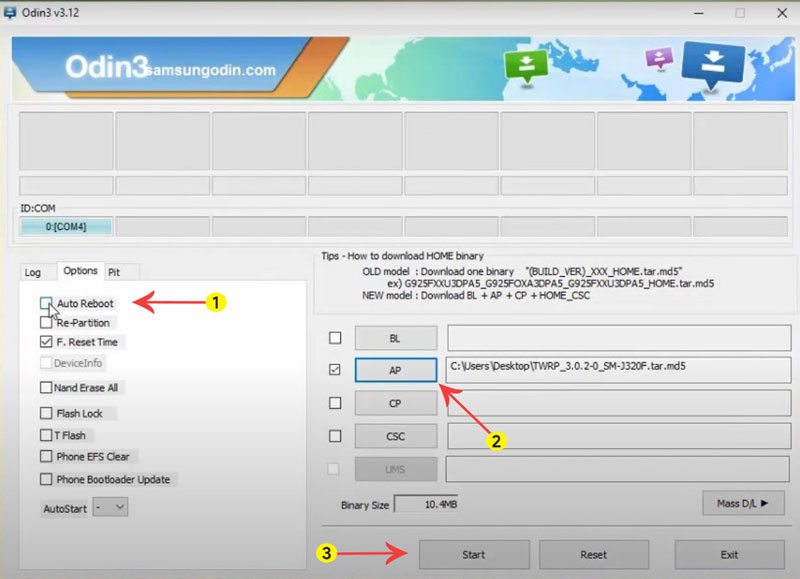
- Now Tap on Start button and wait for a few minutes.
- Once completed, you see the message on the Odin screen.
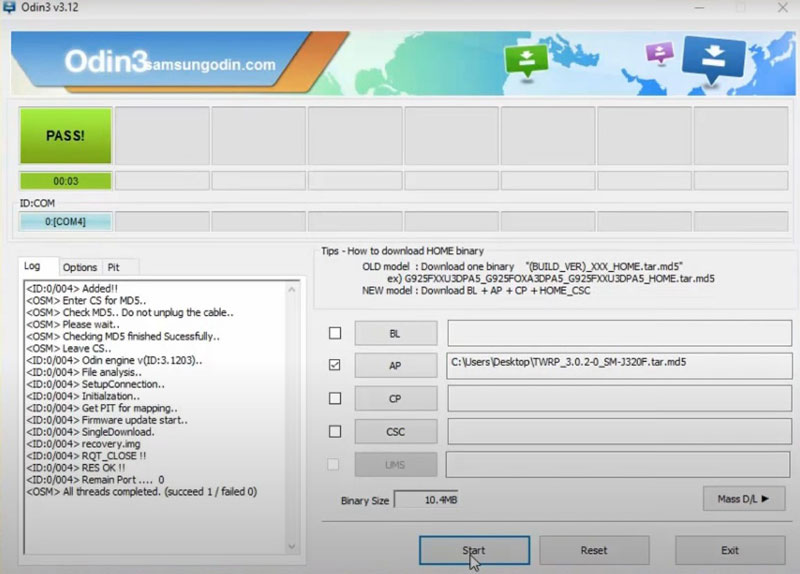
- That’s it you have successfully flashed TWRP recovery on your Samsung phone.
You can now Boot your Phone into TWRP Recovery by press & hold Home + Power + Volume Up button until you see the Samsung logo on the screen, release all the buttons and your device will boot into TWRP Recovery Mode.
This was the official guide on how to install TWRP recovery on Samsung devices. Now you can flash Custom ROM, Root your phone, Stock ROM’s, etc.
So, in this guide, we have included everything you need to know about what is TWRP, its advantages, disadvantages, and the installation process. I hope you find this guide helpful.
If you have any questions or facing errors while applying the steps then you can leave a comment. We will try to resolve your problems as soon as possible.
There are a few different ways to install Magisk. If you’re already rooted and you just want access to Magisk modules, you can use Magisk Manager to install the Magisk framework. Or, if you want to pass SafetyNet on a rooted device, you can switch from SuperSU to Magisk SU. But the best way to do it is to start fresh by installing Magisk on a non-rooted phone using TWRP.
The main reason we prefer this method is because it’s the cleanest. No need to remove old root binaries, just flash the Magisk ZIP and you’ll be good to go. In doing so, you’ll actually root your phone and install Magisk in one shot, plus you’re far more likely to pass SafetyNet’s CTS Profile check this way.
Step 1: Install TWRP
This method works by flashing the Magisk ZIP in TWRP, so you’ll need to install the custom recovery before you begin. Much like Magisk itself, there are multiple ways to install TWRP. If you’re rooted, you can use this method, but note that you’ll have to do a full unroot in SuperSU after you’re done.
Step 2: Install Magisk Manager
Once you’ve got TWRP installed successfully, boot into Android and install the Magisk Manager app. This isn’t the Magisk framework, which provides root access and the ability to install Magisk modules. It’s simply an app for downloading and updating the Magisk framework and managing modules.
Step 3: Download the Magisk ZIP
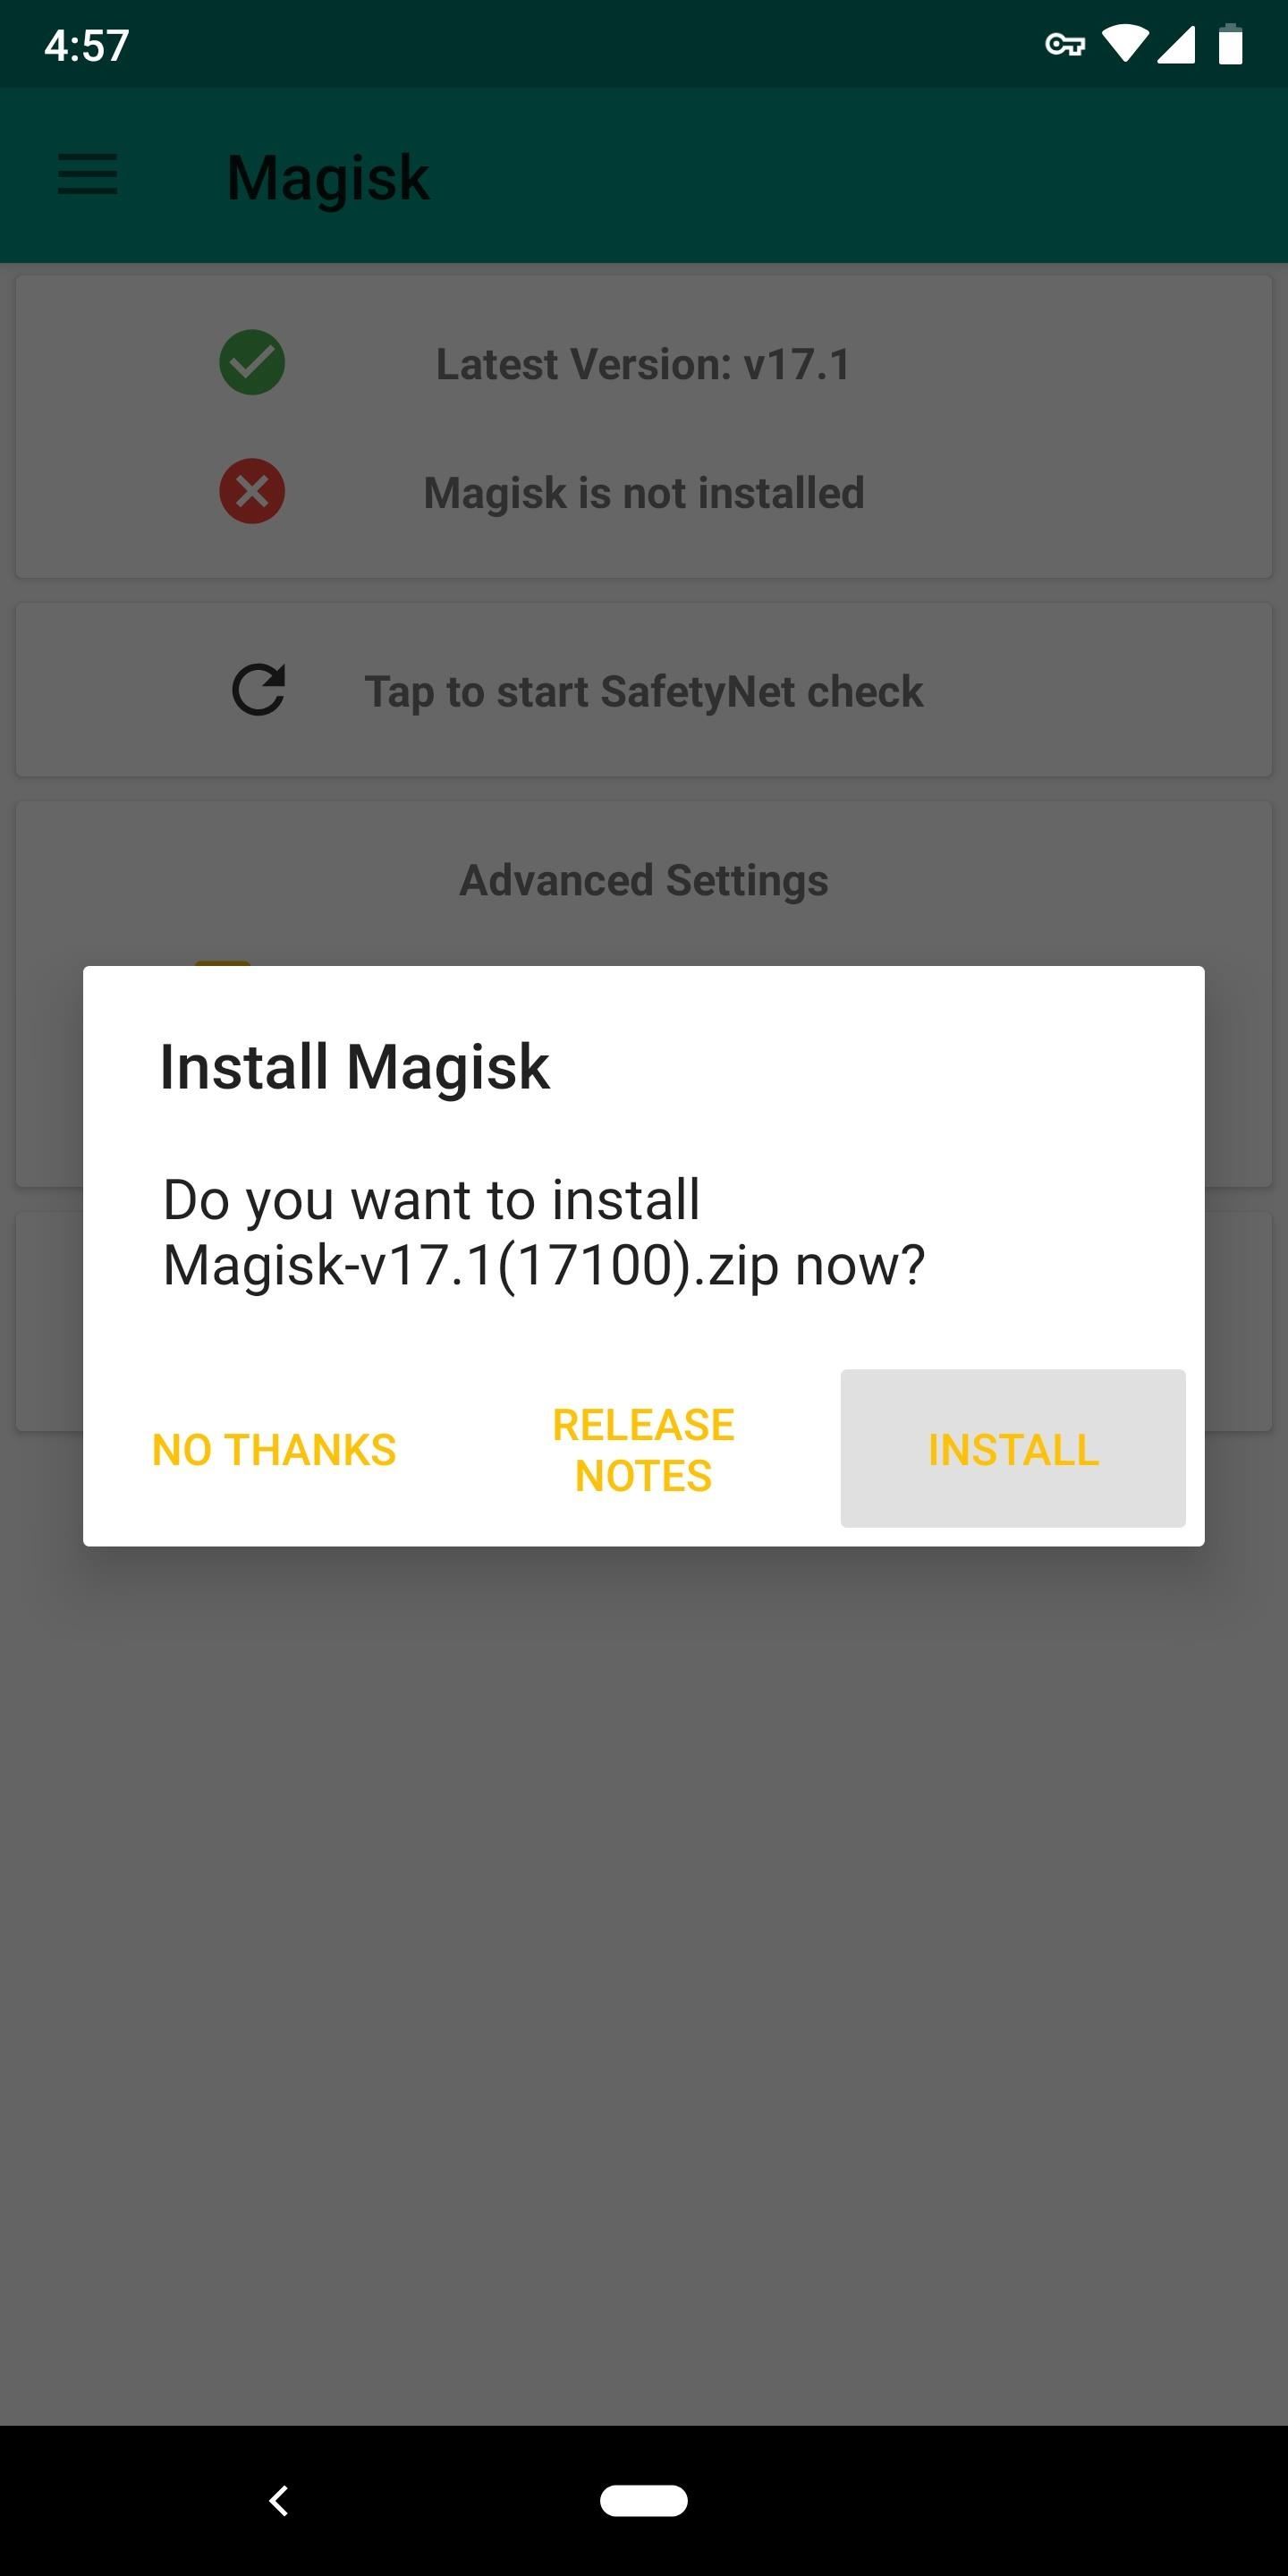
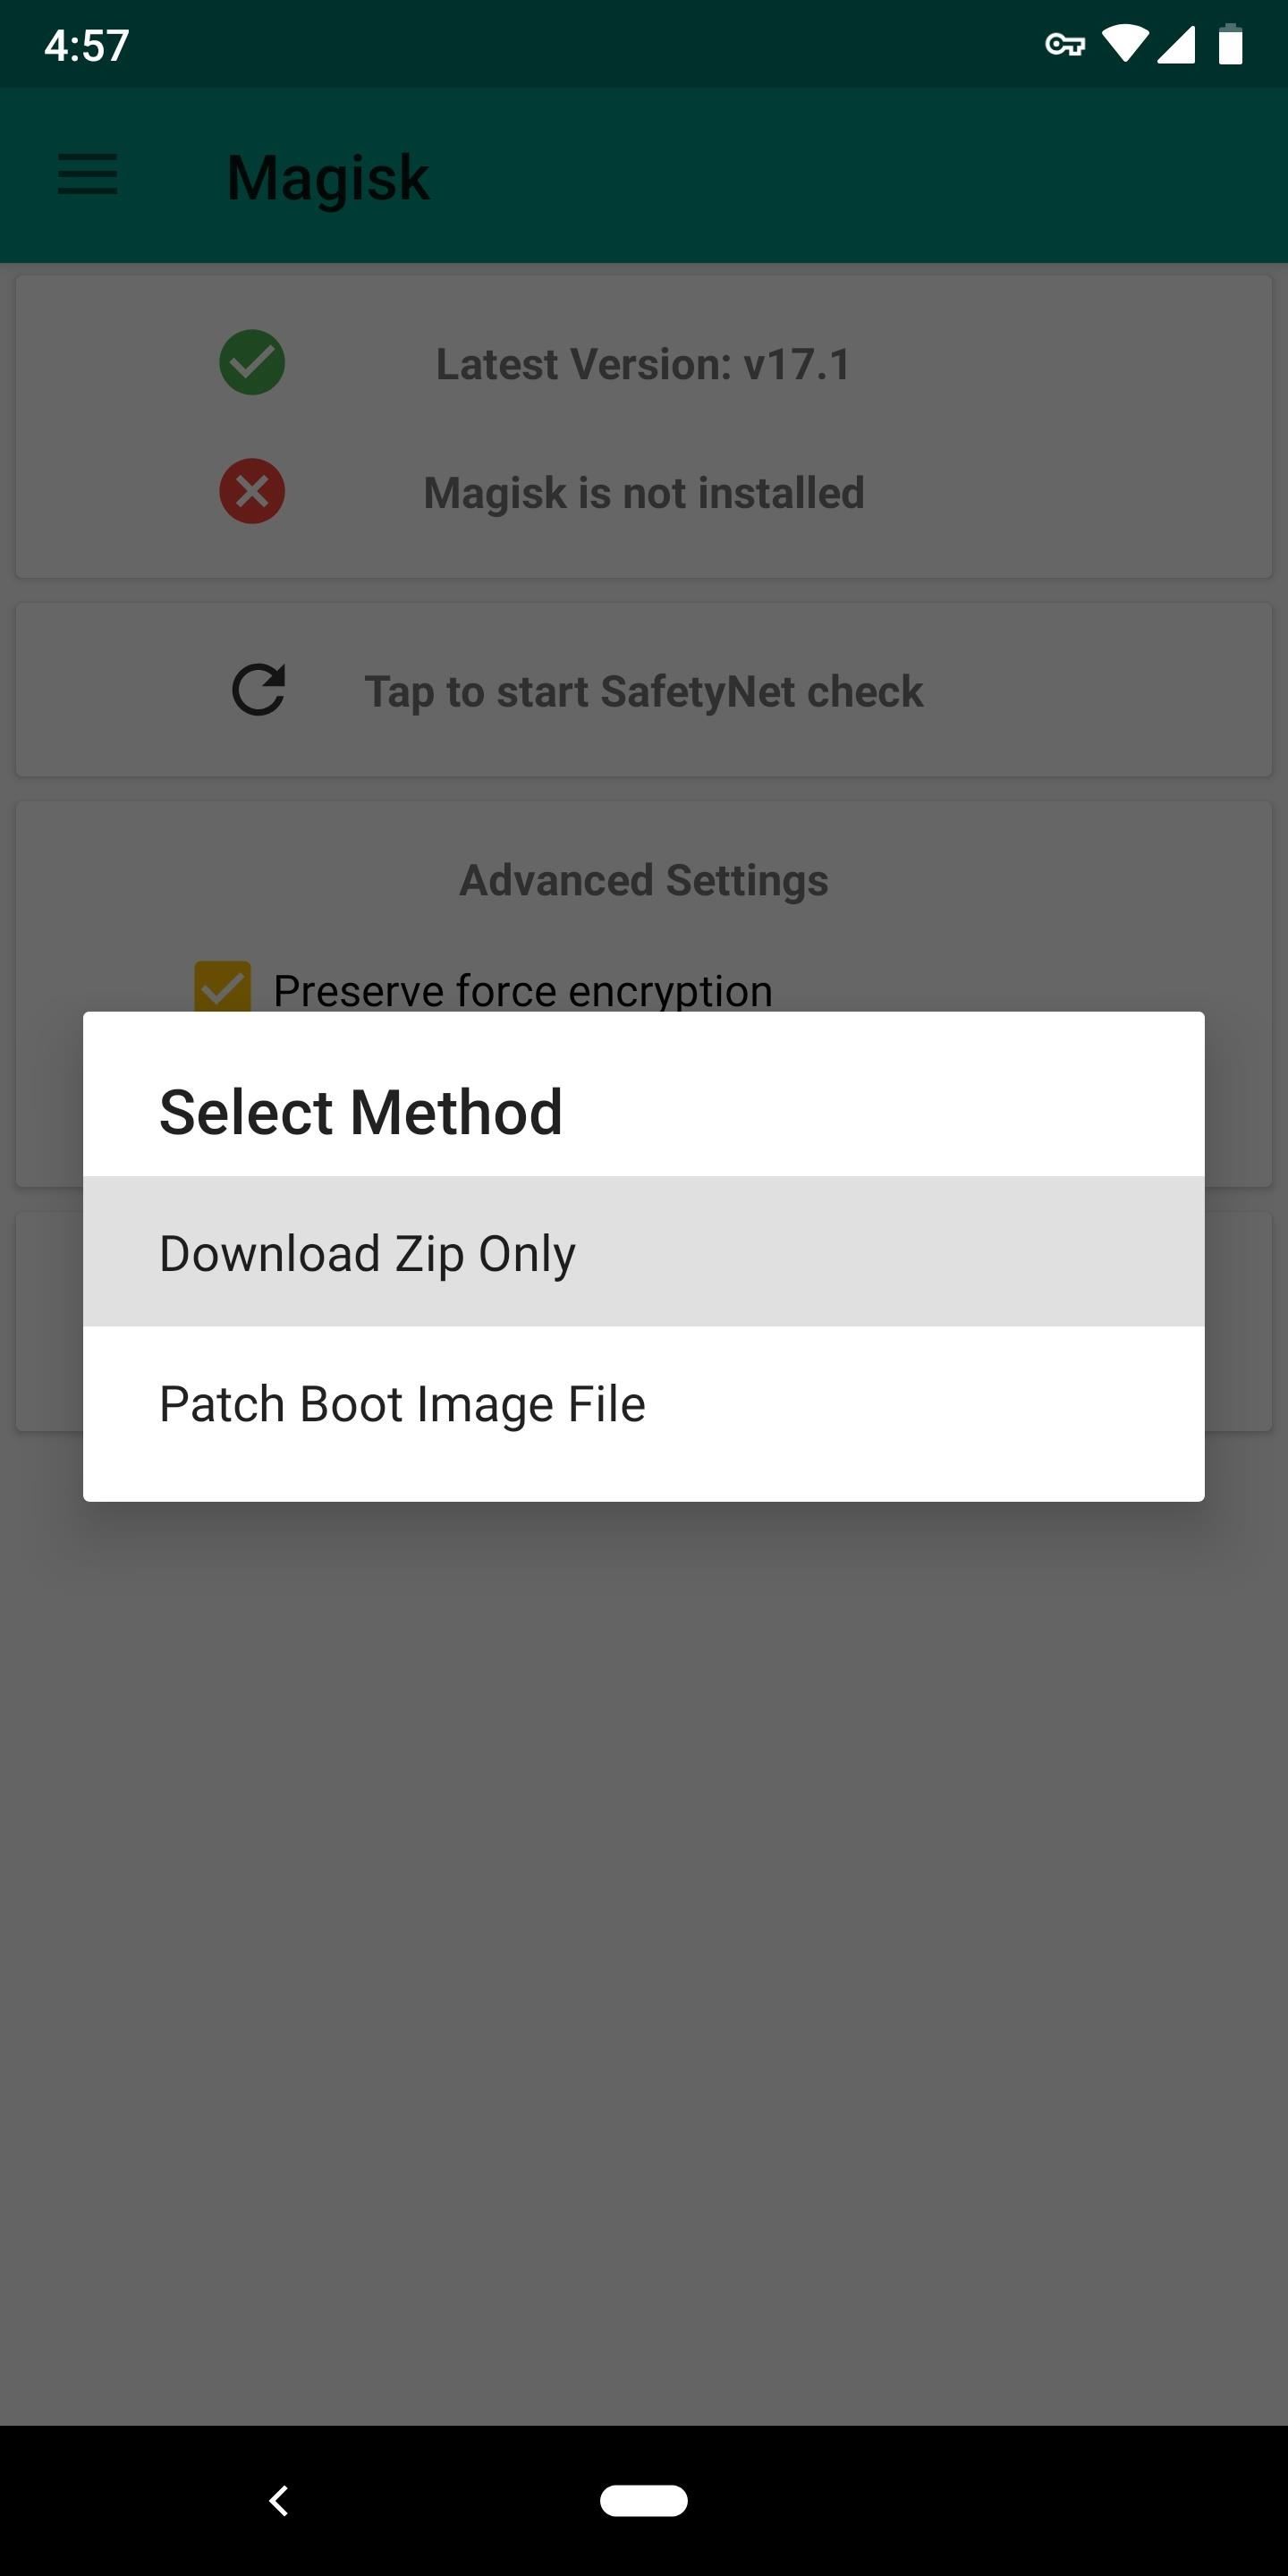
Next, open the Magisk Manager app. You’ll get a popup asking if you’d like to install the Magisk framework. Tap «Install» here, then hit «Download Zip Only» on the subsequent popup. Wait until you see a message at the bottom of the app’s main menu stating that the file has been downloaded.
Step 4: Flash Magisk in TWRP
Next, boot your phone into recovery mode, then tap the «Install» button in TWRP’s main menu. From there, navigate to your device’s Download folder, then select the Magisk ZIP. After that, just swipe the slider at the bottom of the screen to install Magisk, then tap «Reboot System.»

Step 5: Verify Root & SafetyNet Status
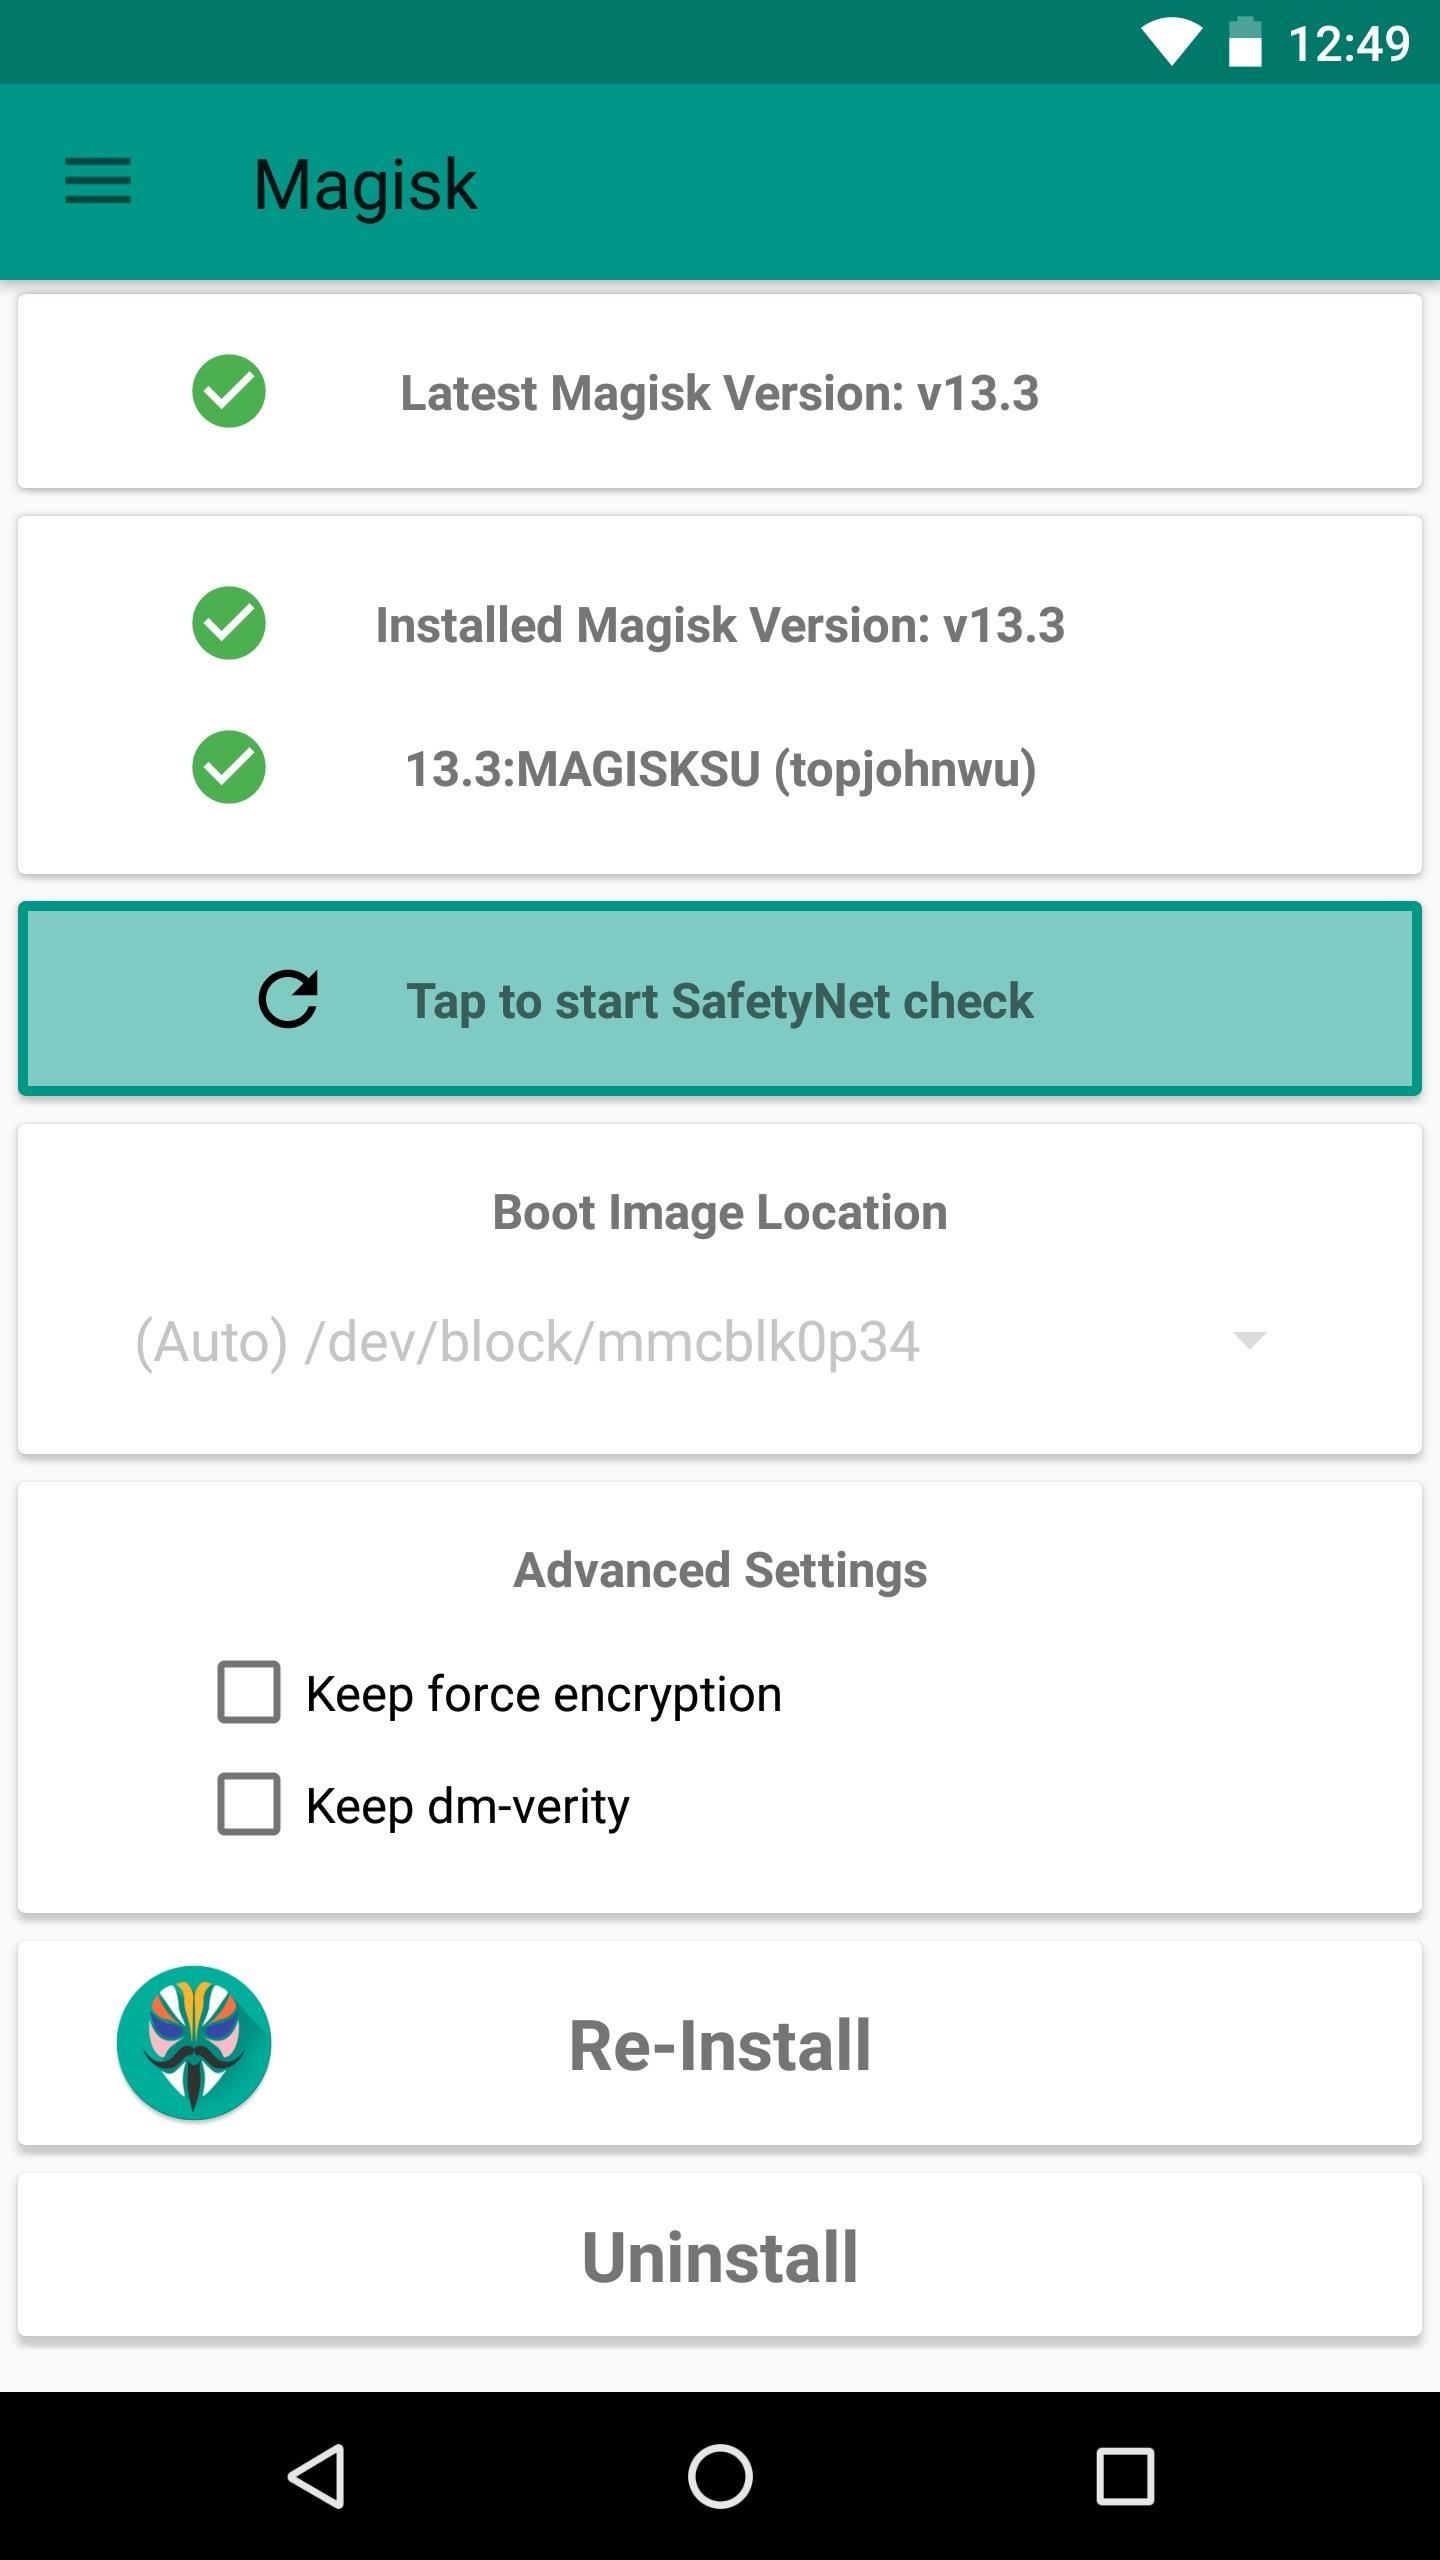
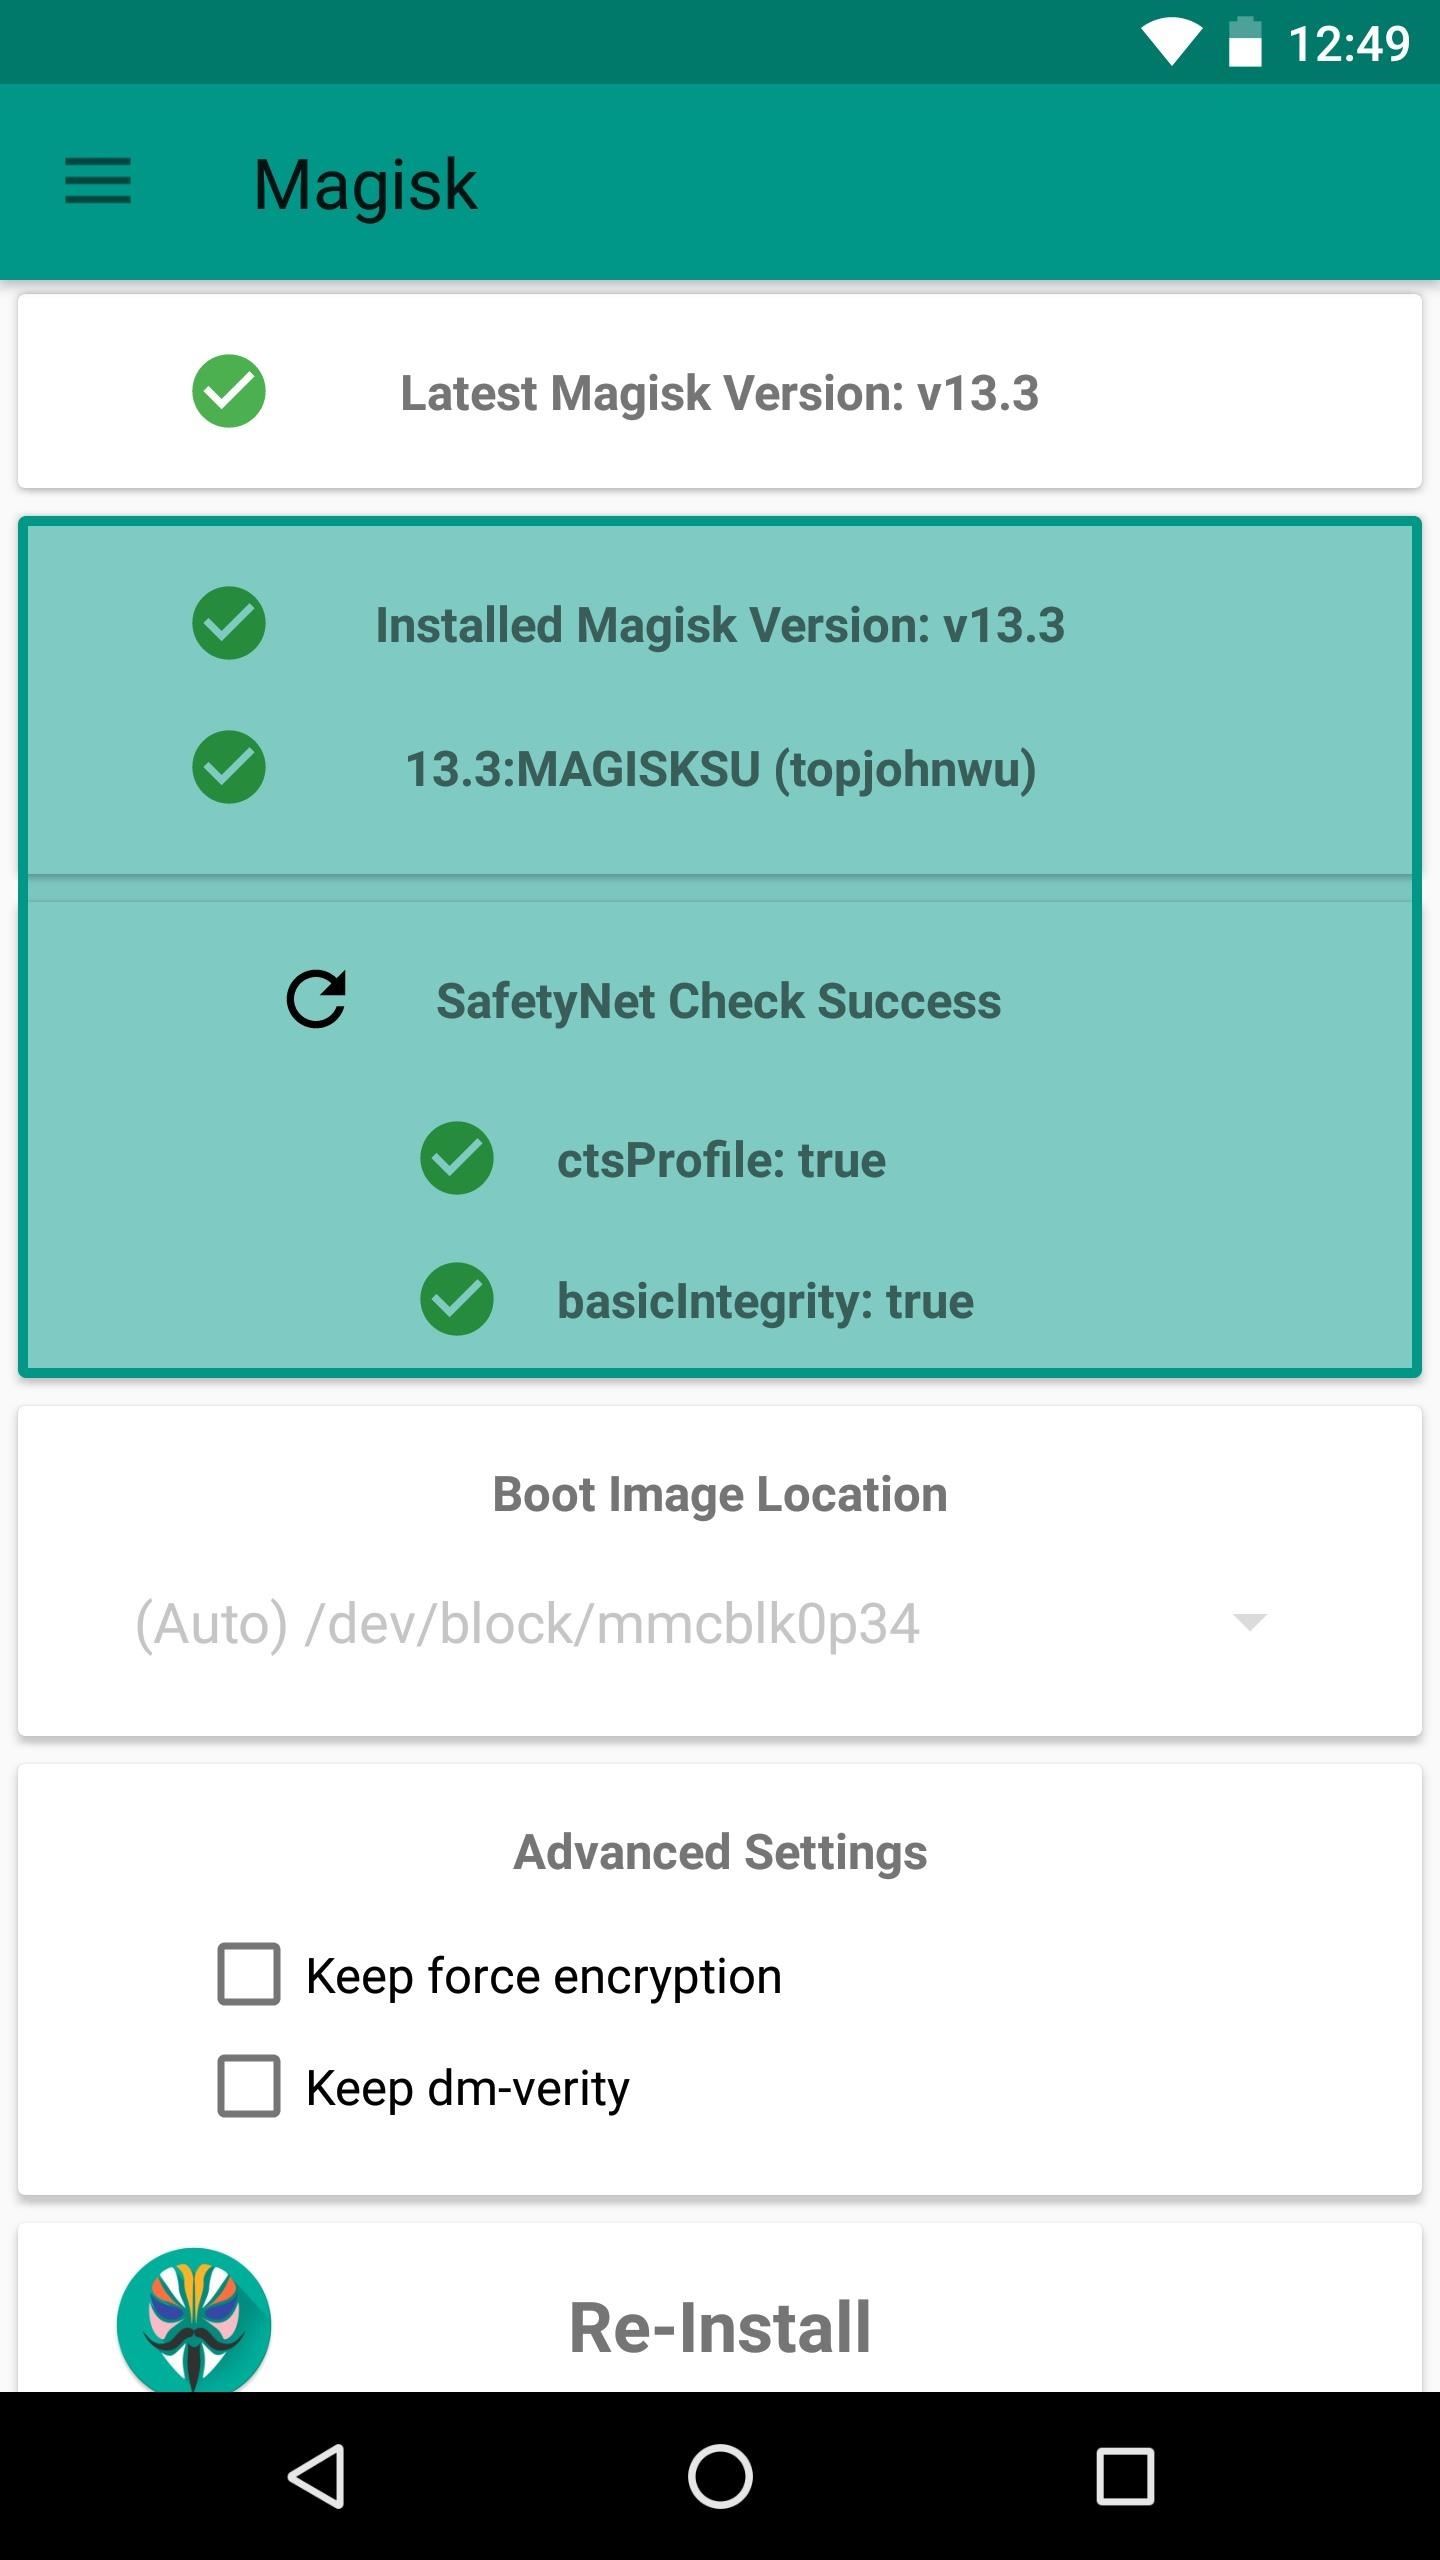
Next, go ahead and open the Magisk Manager app. If everything went off without a hitch, you’ll see a message towards the top of the screen that says «MAGISKSU (topjohnwu)» with a green check mark next to it. This means your phone is now officially rooted, and since it was done with Magisk, it’s a systemless root.
Aside from that, the main advantage of Magisk is that you can have root without tripping SafetyNet. To verify that your phone still passes Google’s SafetyNet check, press the corresponding button towards the top of the screen. If you see two extra green check marks after this test is run, you’re all set to go!
- Follow Gadget Hacks on Facebook, Twitter, Google+, YouTube, and Instagram
- Follow WonderHowTo on Facebook, Twitter, Pinterest, and Google+
Keep Your Connection Secure Without a Monthly Bill. Get a lifetime subscription to VPN Unlimited for all your devices with a one-time purchase from the new Gadget Hacks Shop, and watch Hulu or Netflix without regional restrictions, increase security when browsing on public networks, and more.
Buy Now (80% off) >
Other worthwhile deals to check out:
When it comes to modding Android, root gets all the glory, but a good custom recovery is really the only thing you need. Not only does it allow you to back up your entire phone, install flashable ZIPs, and load custom ROMs like LineageOS, but a custom recovery will even let you root your device. For years now, the only custom recovery worth mentioning has been Team Win’s TWRP.
The reason for TWRP’s success is simple — it supports hundreds of phones and tablets, and its touch-based interface makes performing complicated tasks incredibly easy. Really, the only hurdle when it comes to using TWRP is getting the custom recovery installed in the first place, so we’ll show you how to do just that.
Requirements
To use this method, your phone will need to be rooted and your bootloader will need to be unlocked.
This is because the app that installs TWRP uses root to do so, and with TWRP being a custom recovery image (rather than one provided by your phone’s manufacturer), your phone will not let TWRP replace your stock recovery interface unless the bootloader is unlocked.
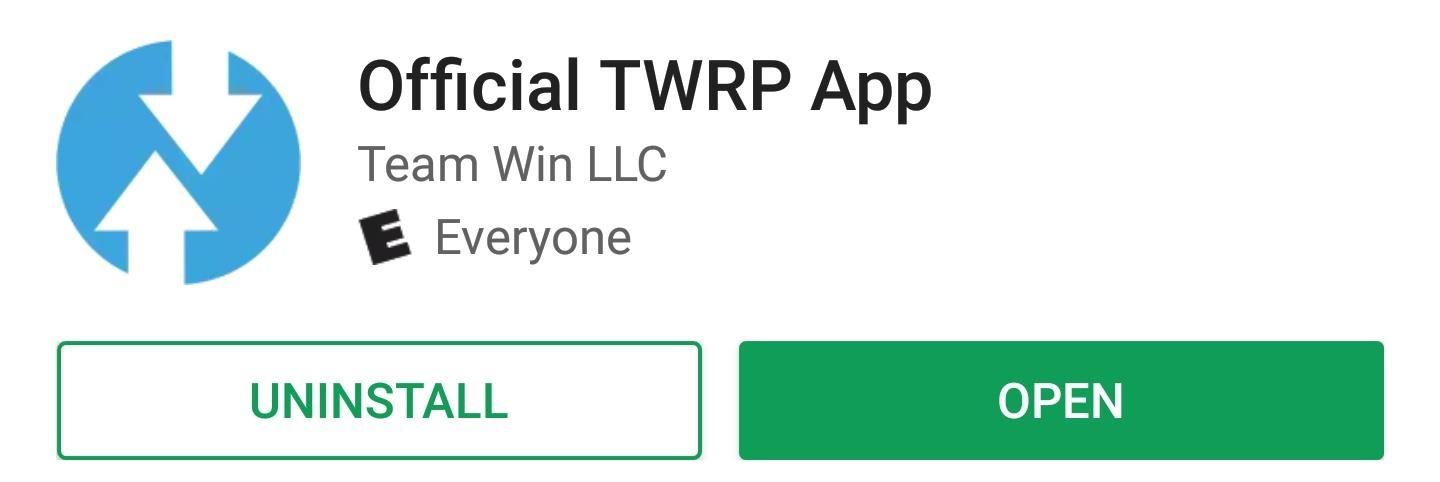
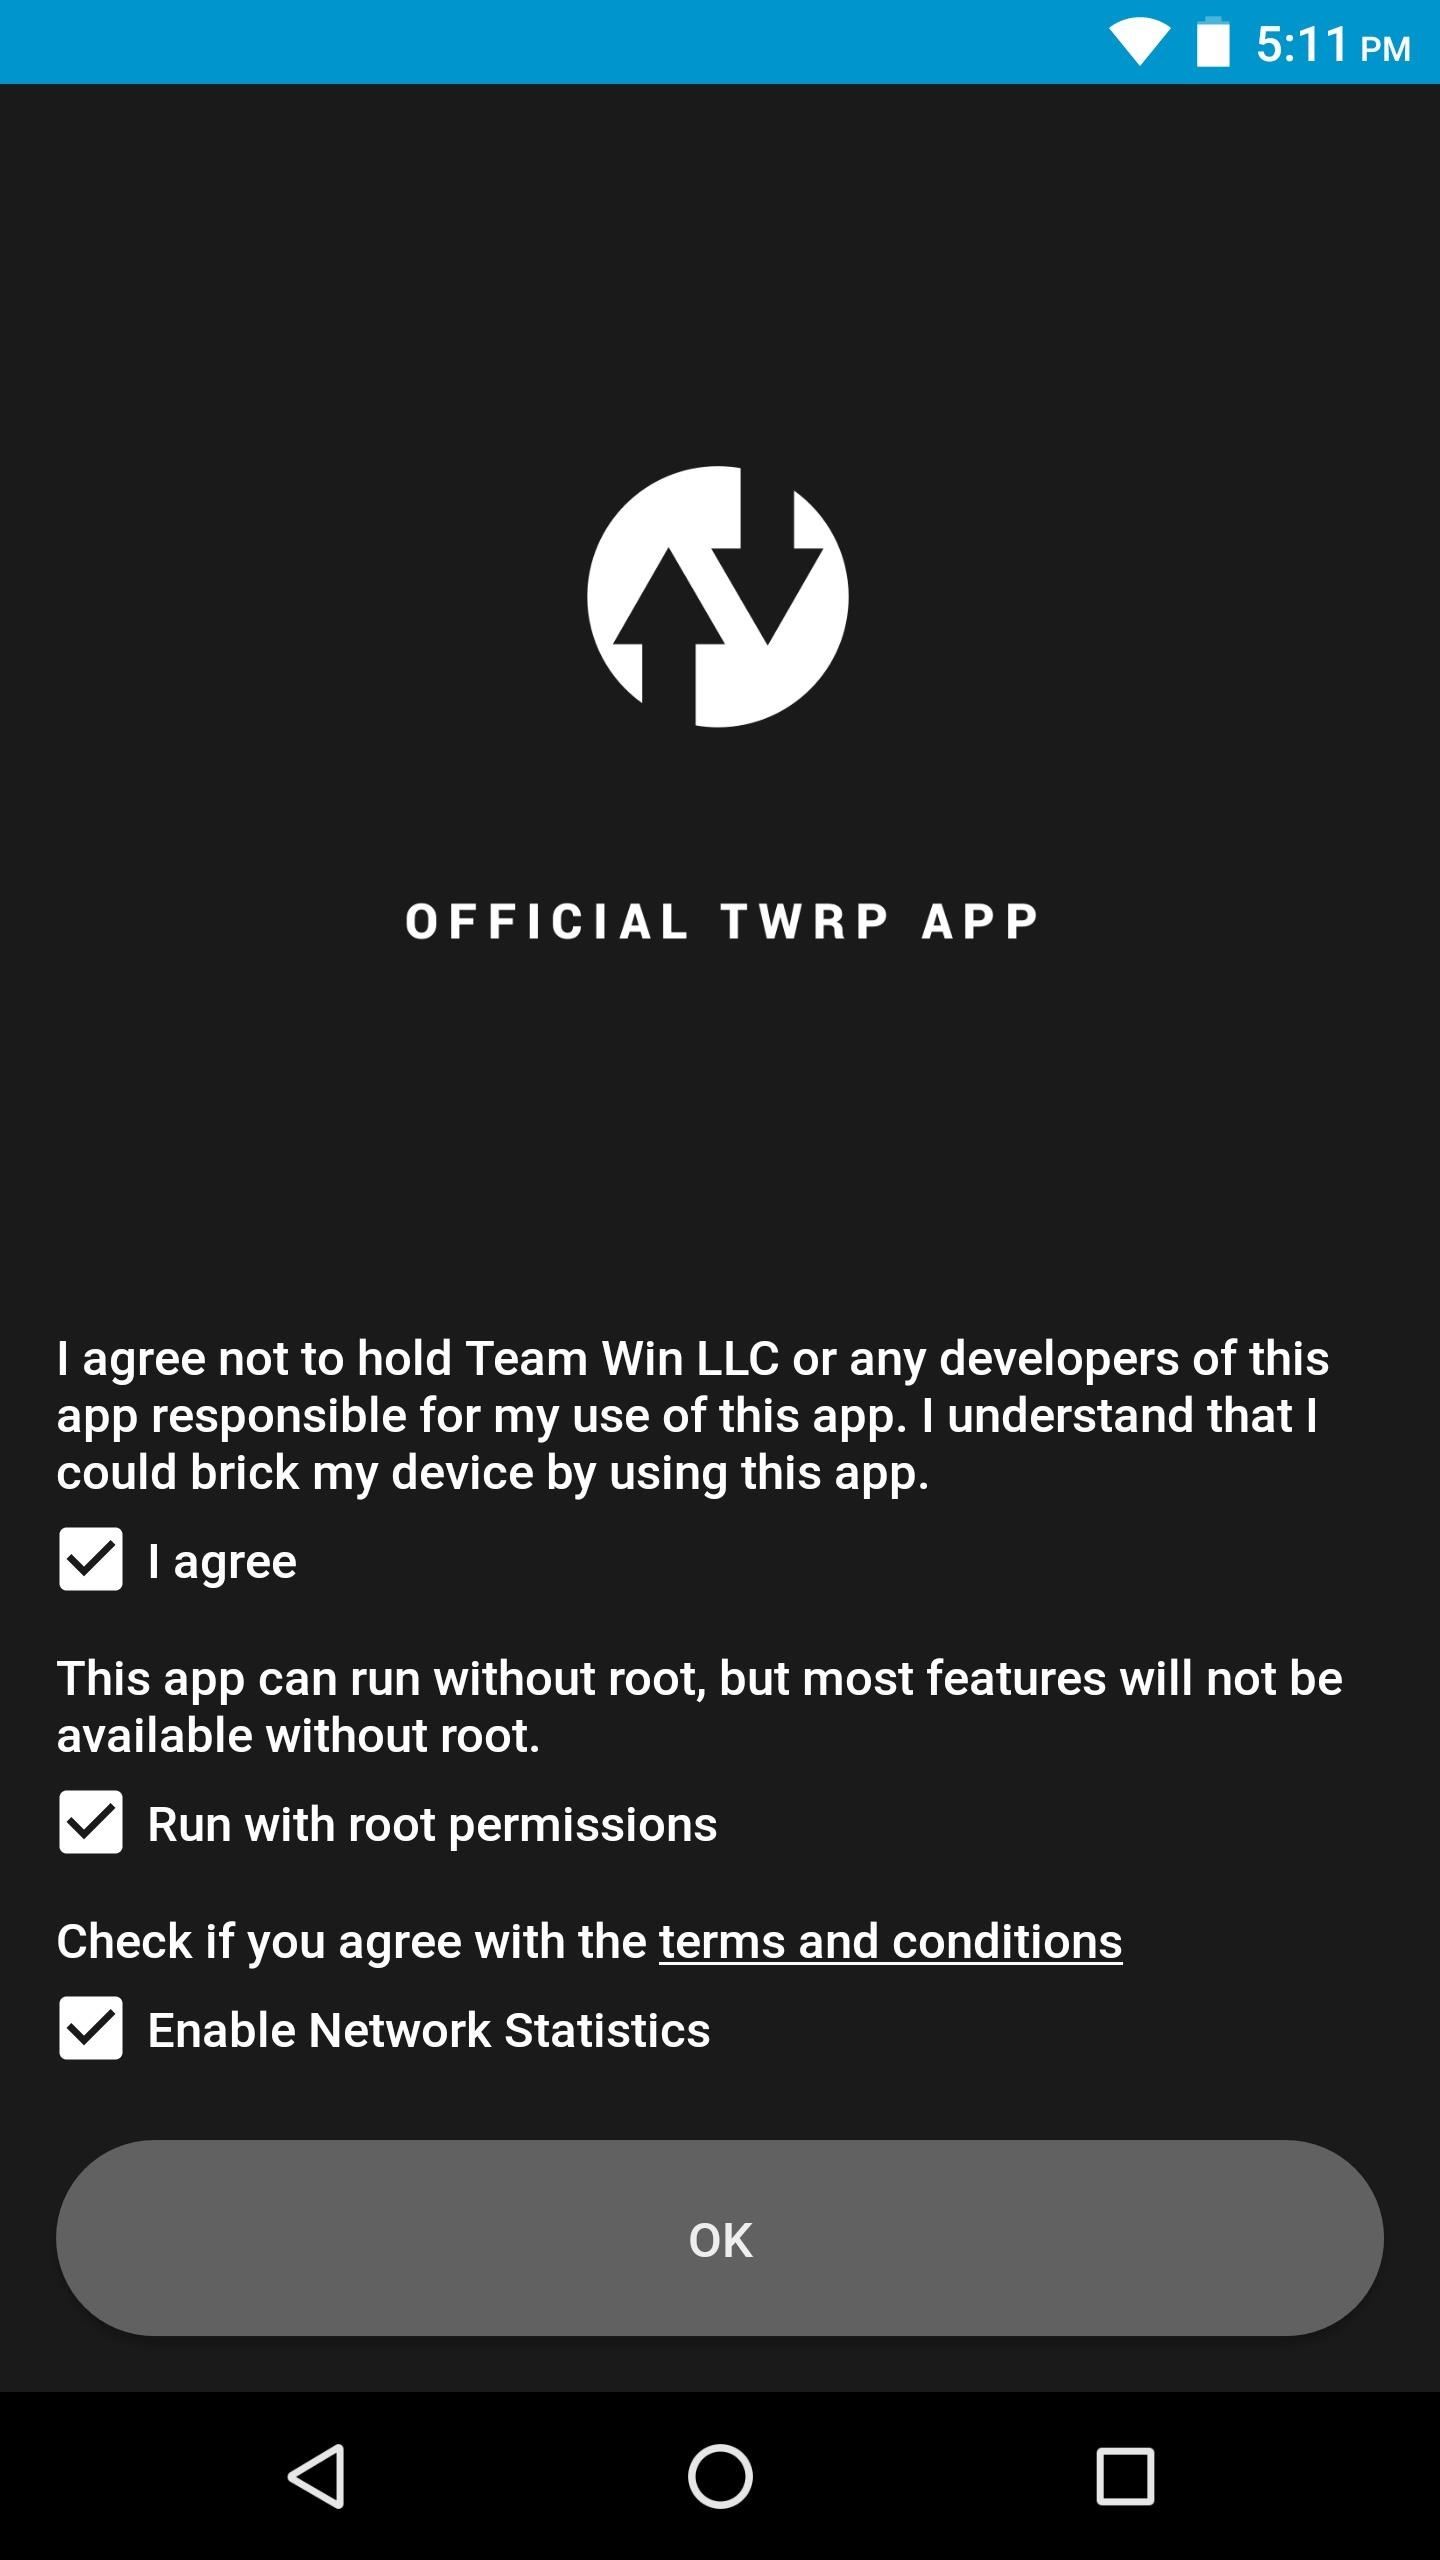
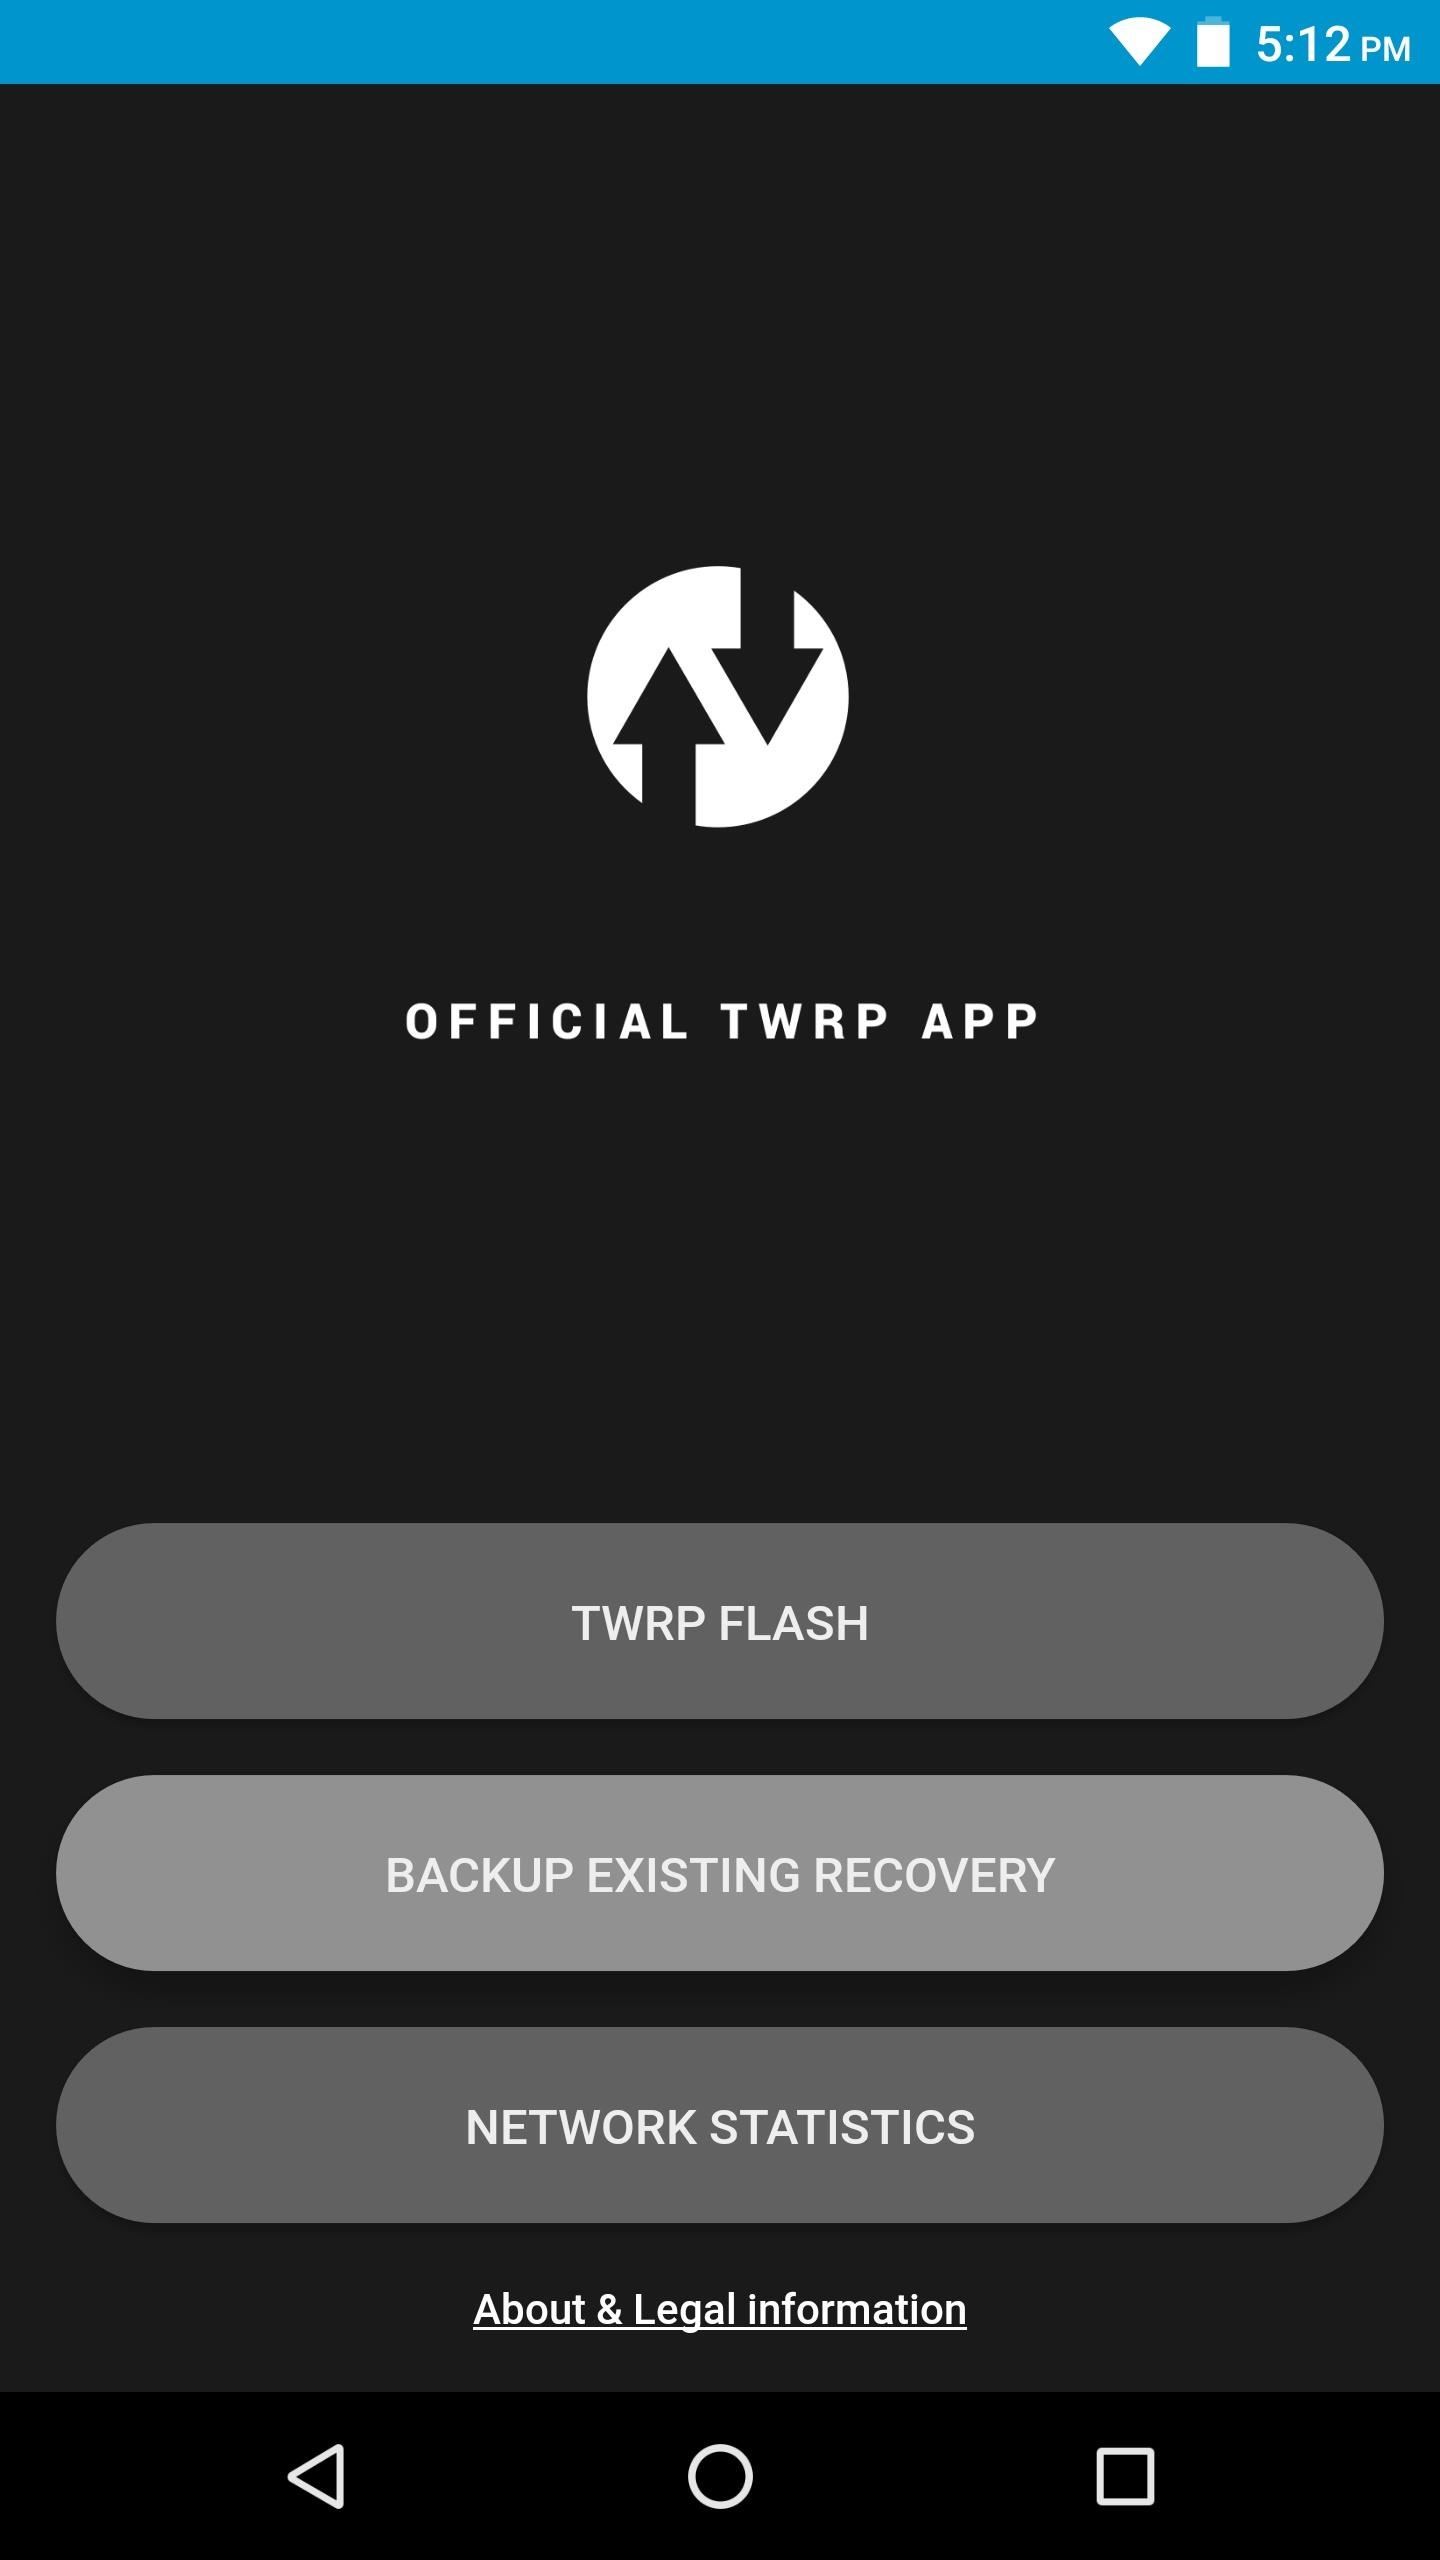
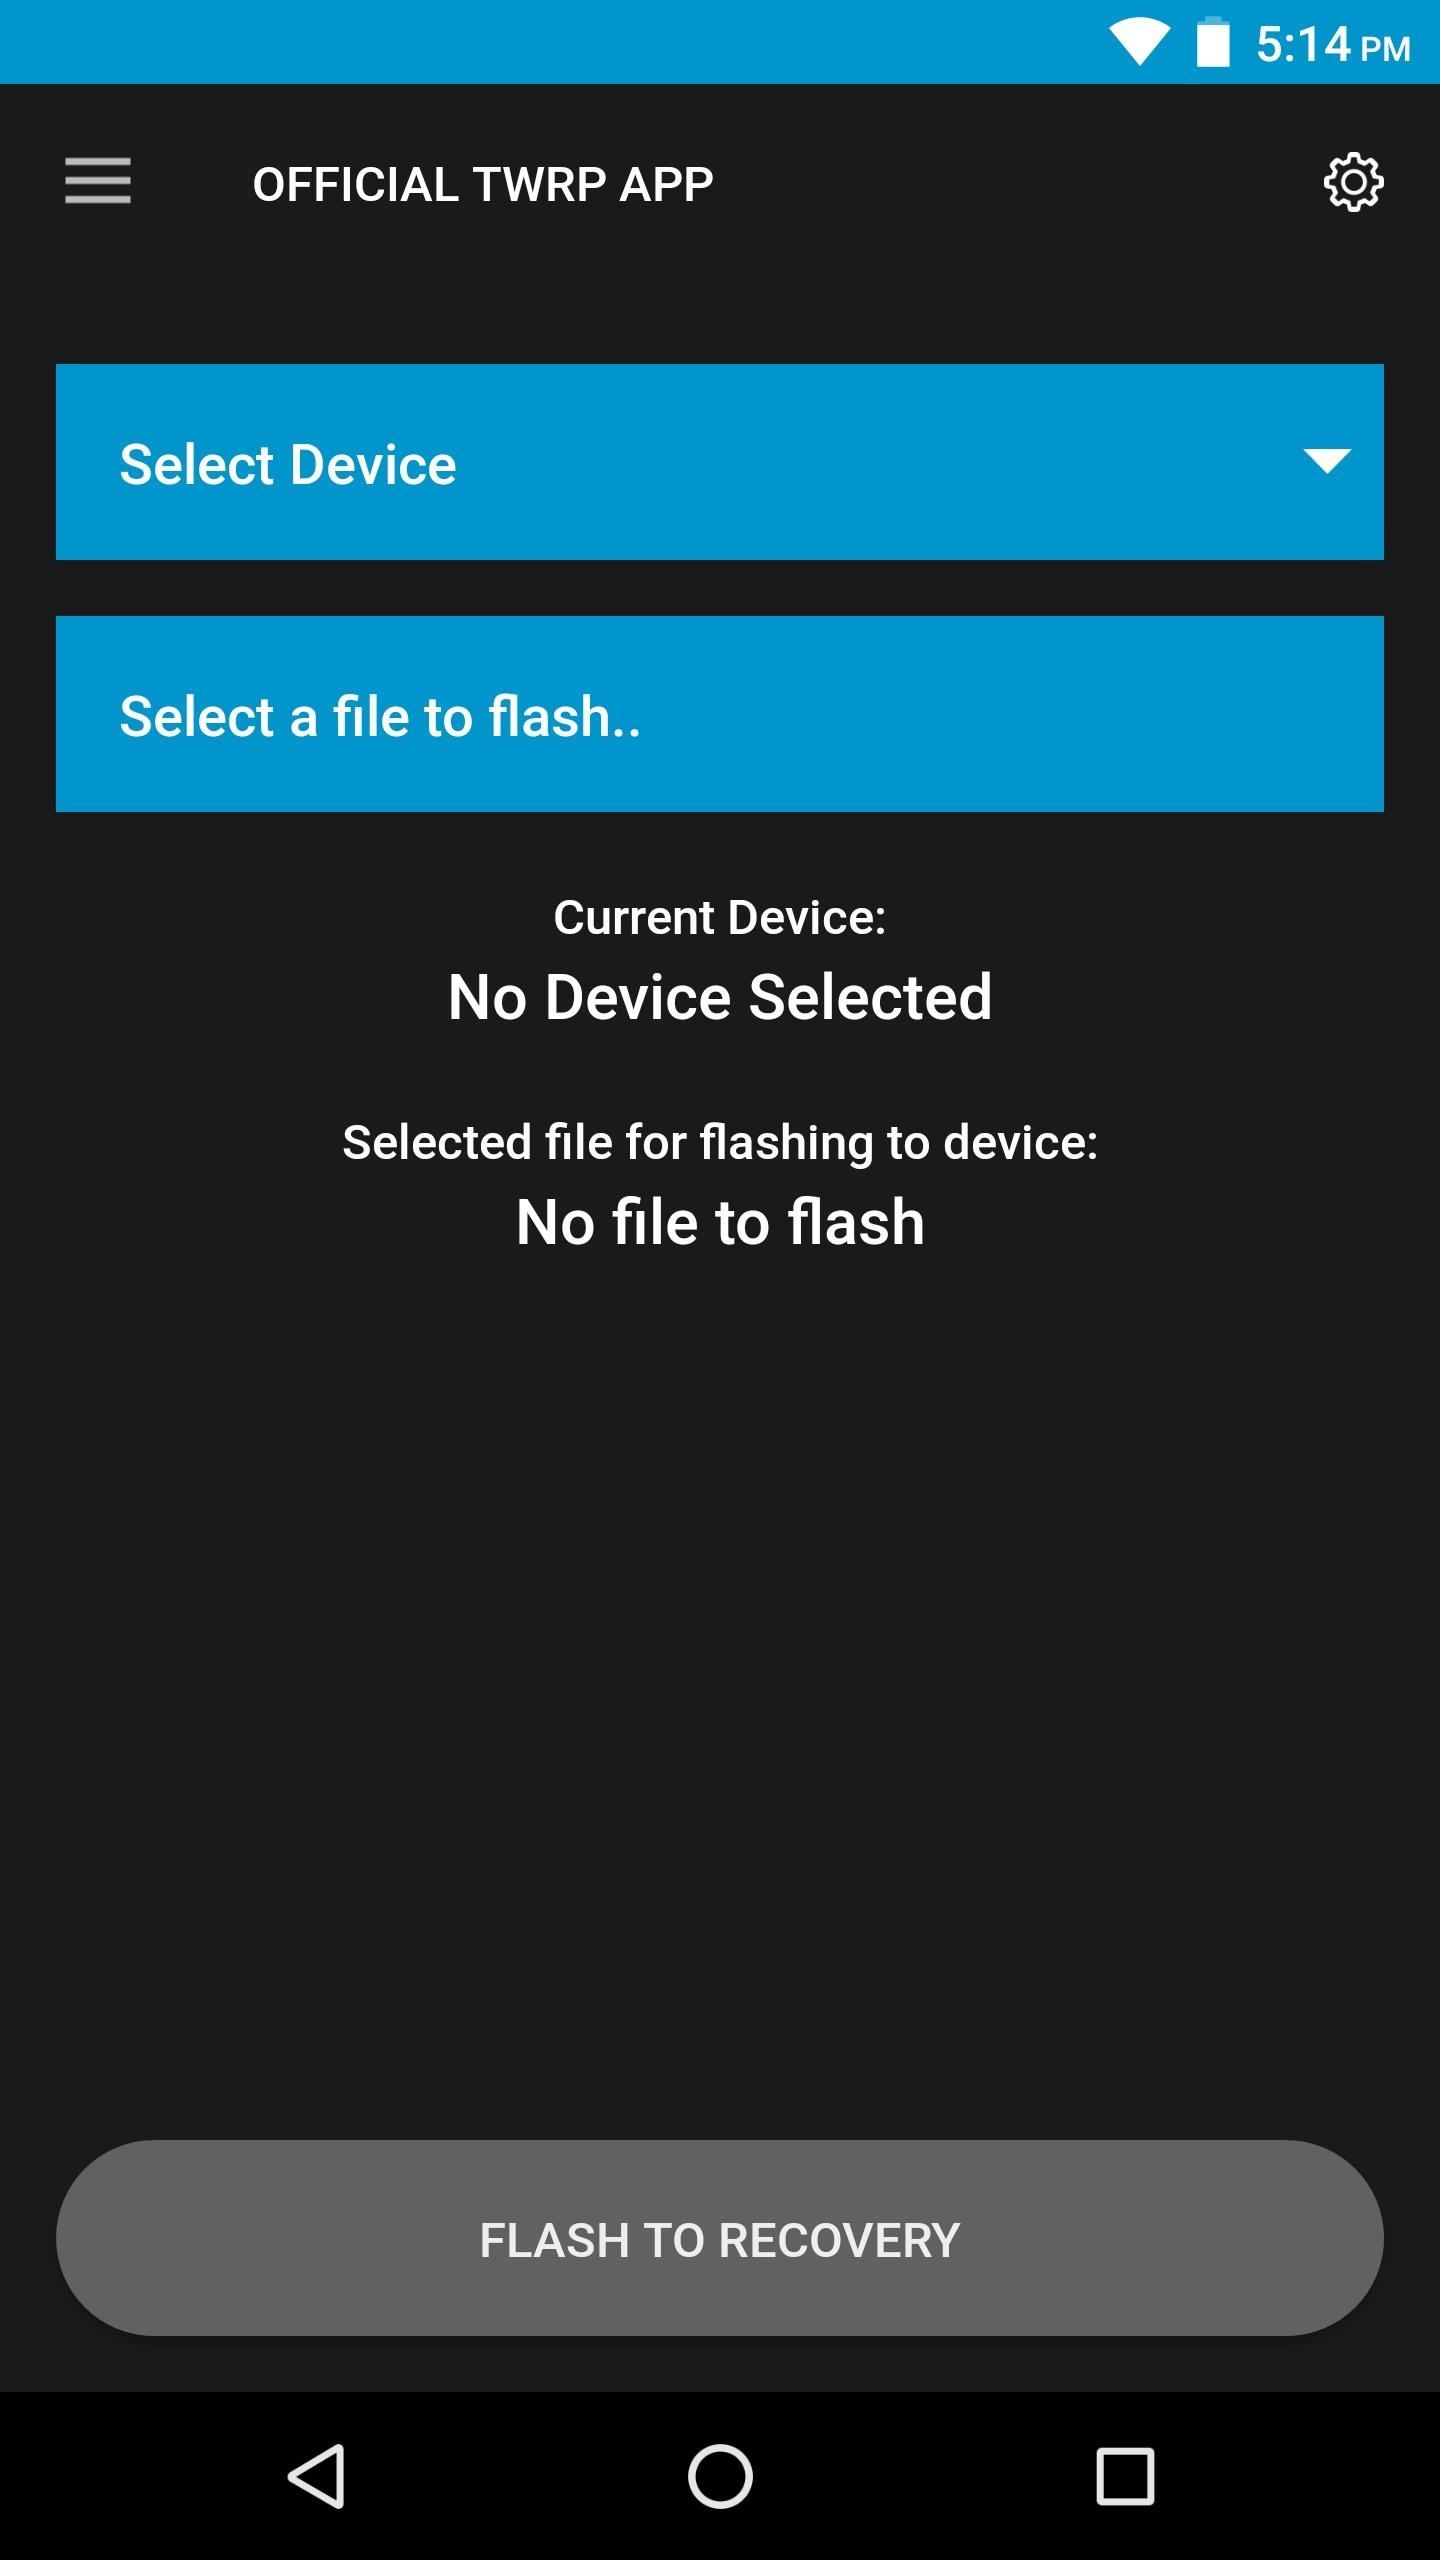
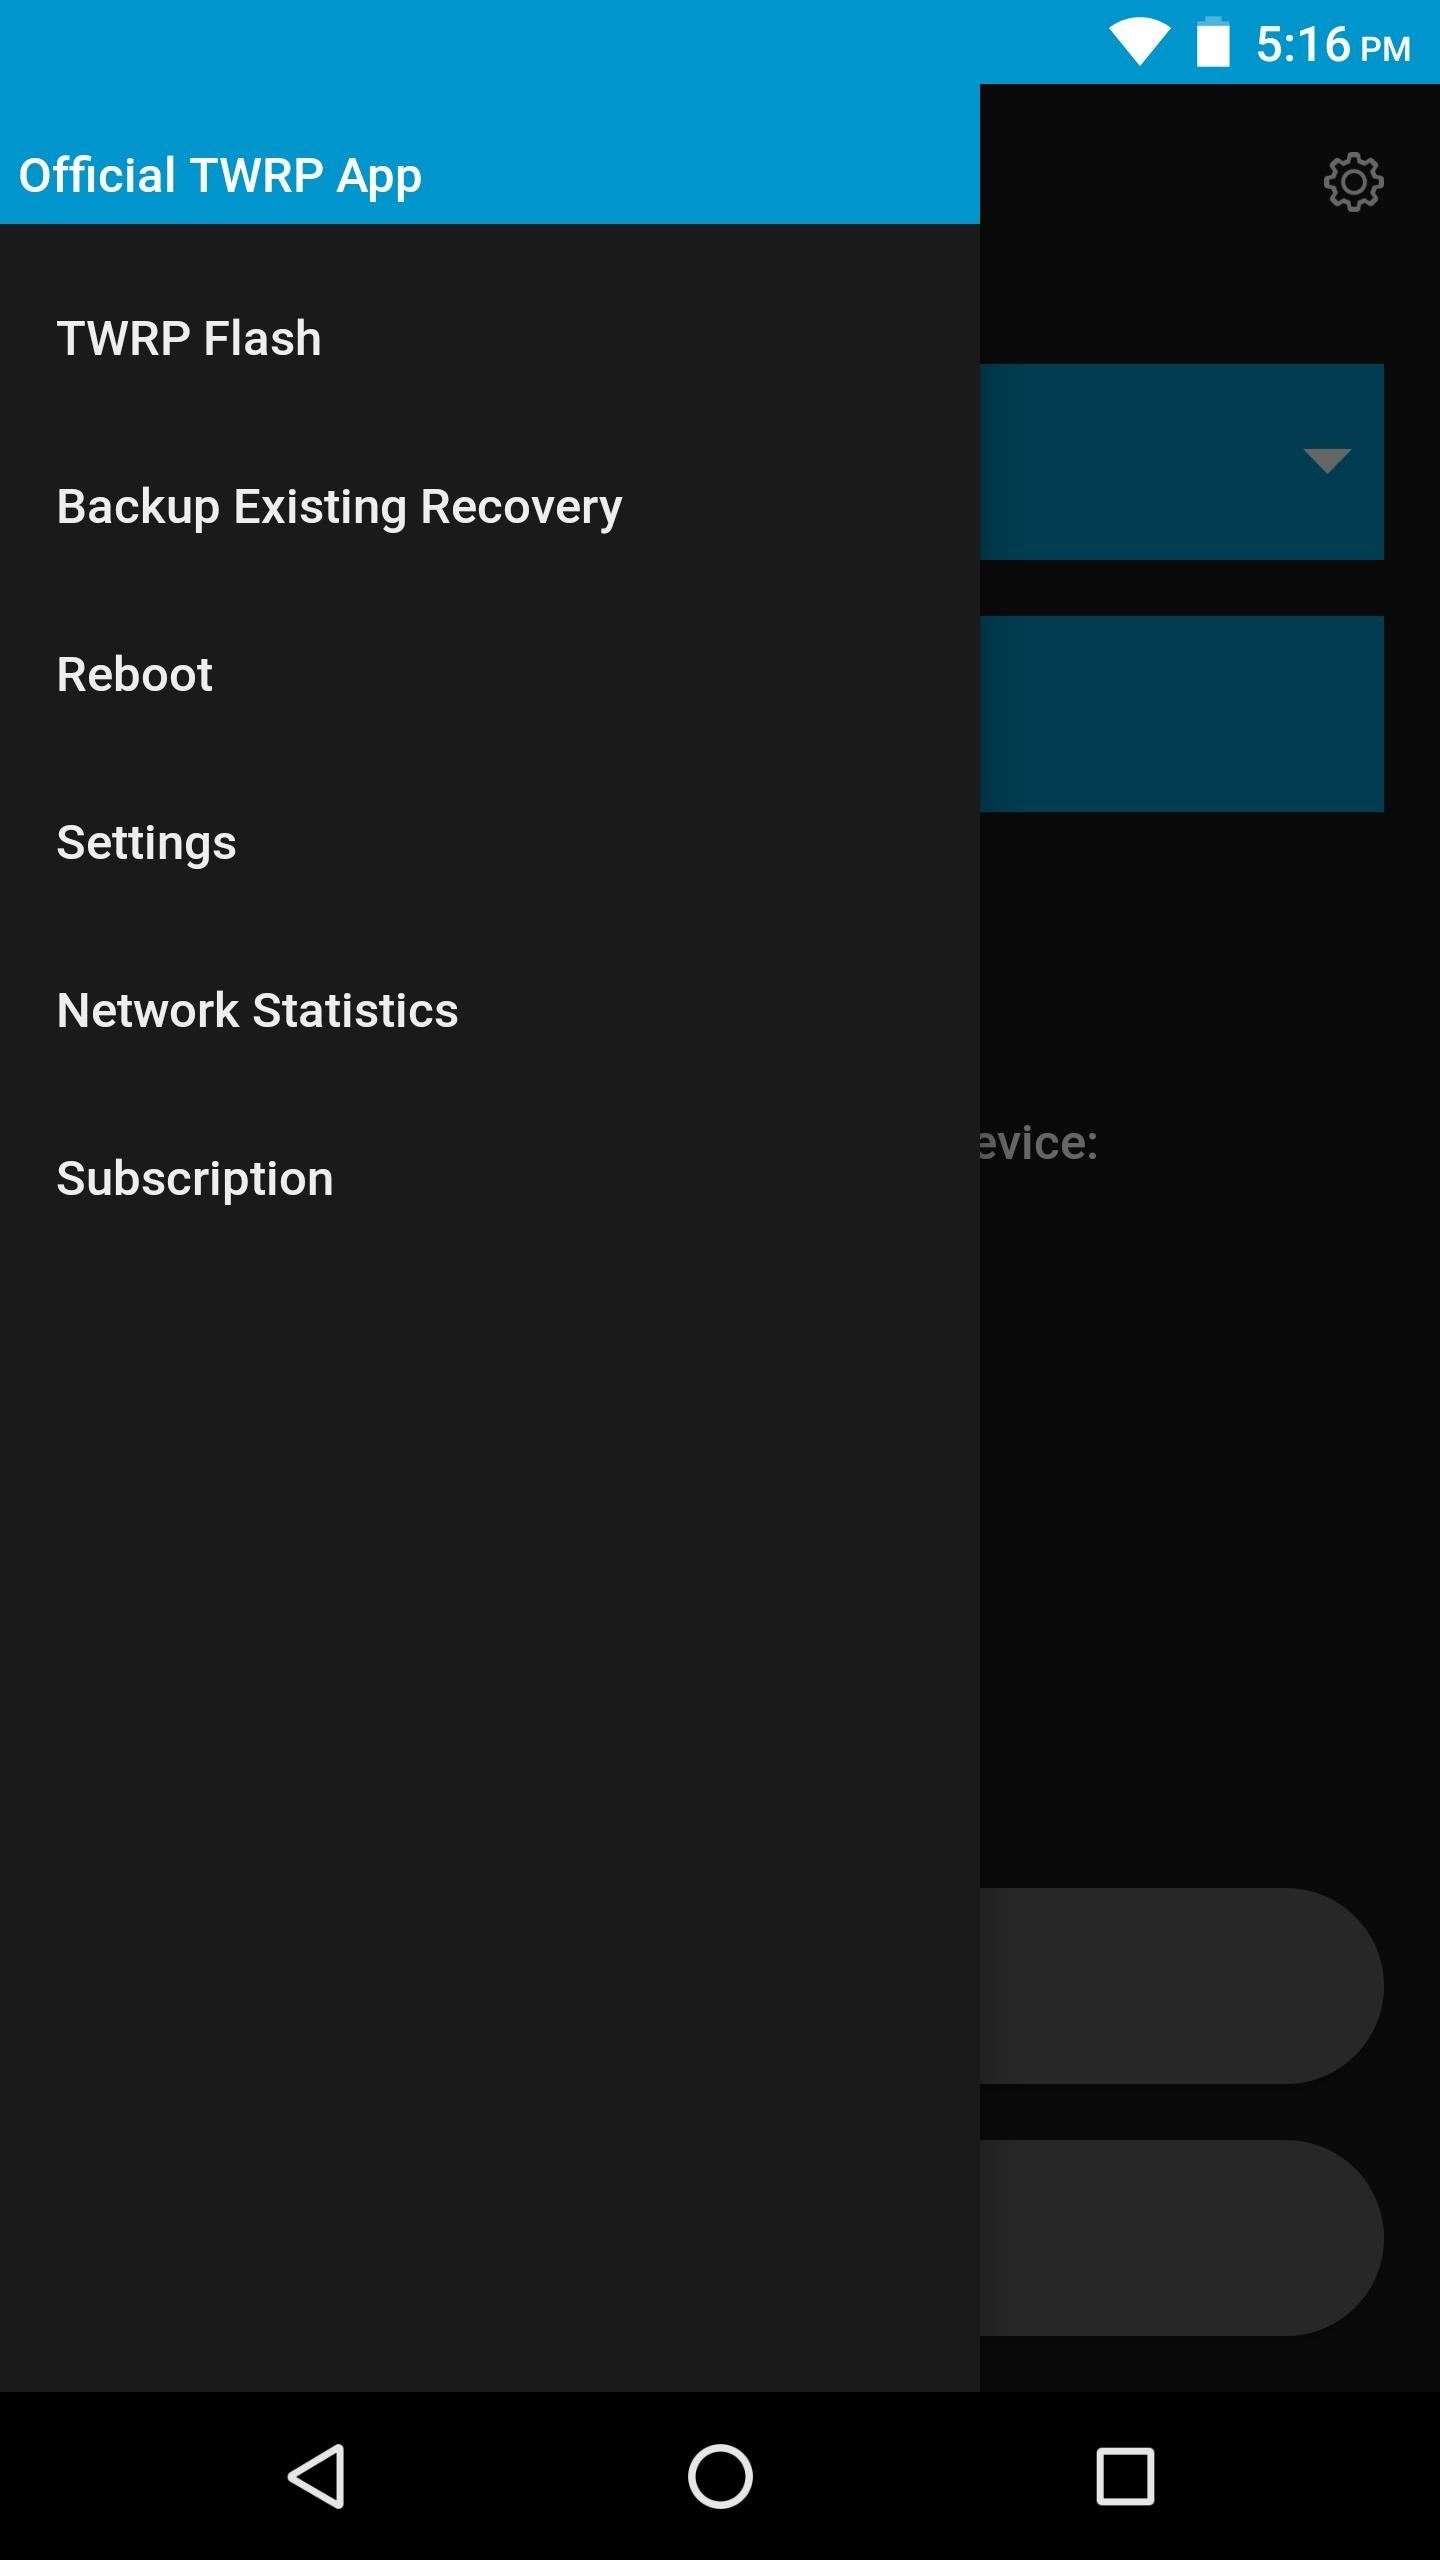
Step 1: Install the Official TWRP App
First up, you’ll need to install the app that will help you install TWRP on your phone. It’s the official TWRP app from Team Win, and you can grab it for free from the Google Play Store.
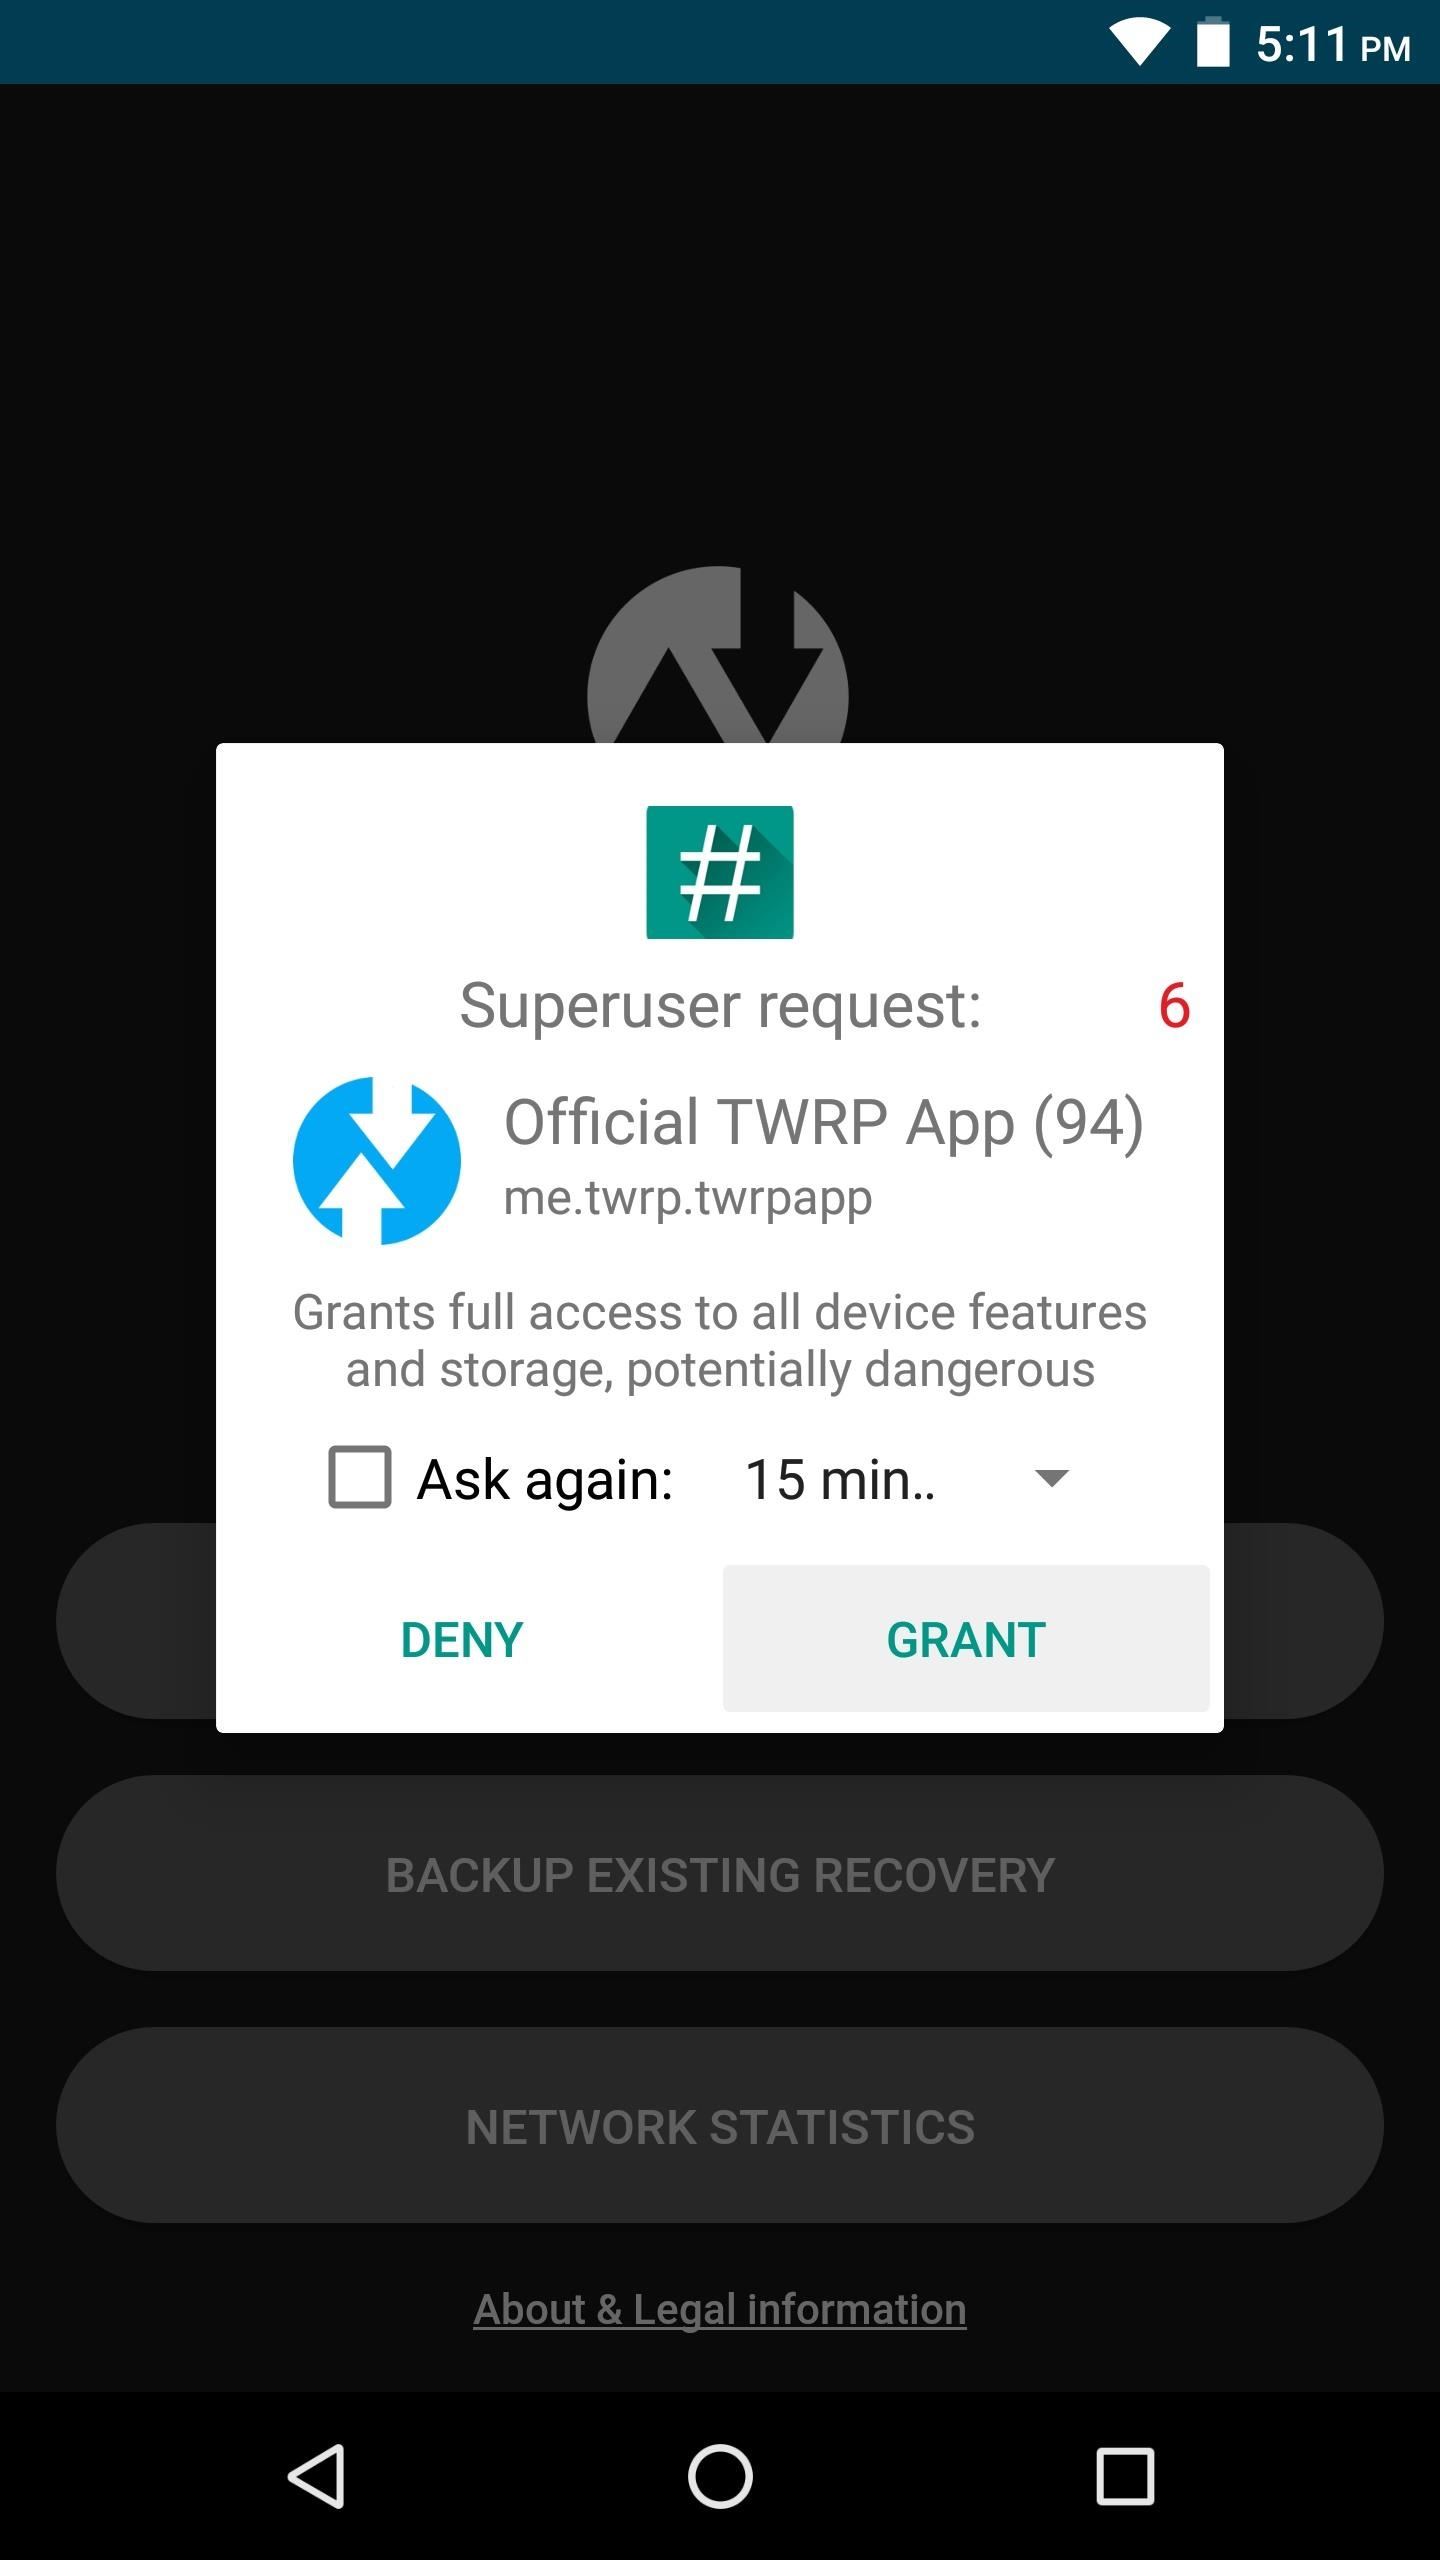
Step 2: Grant Permissions
Step 3: Back Up Your Existing Recovery
In the future, if you want to accept OTA updates or revert to stock, the best way to do this would be to create a backup of your existing recovery image before you flash TWRP. To do that, tap «Backup Existing Recovery» in the TWRP app’s main menu, then select «Backup Recovery» and press «Okay.»
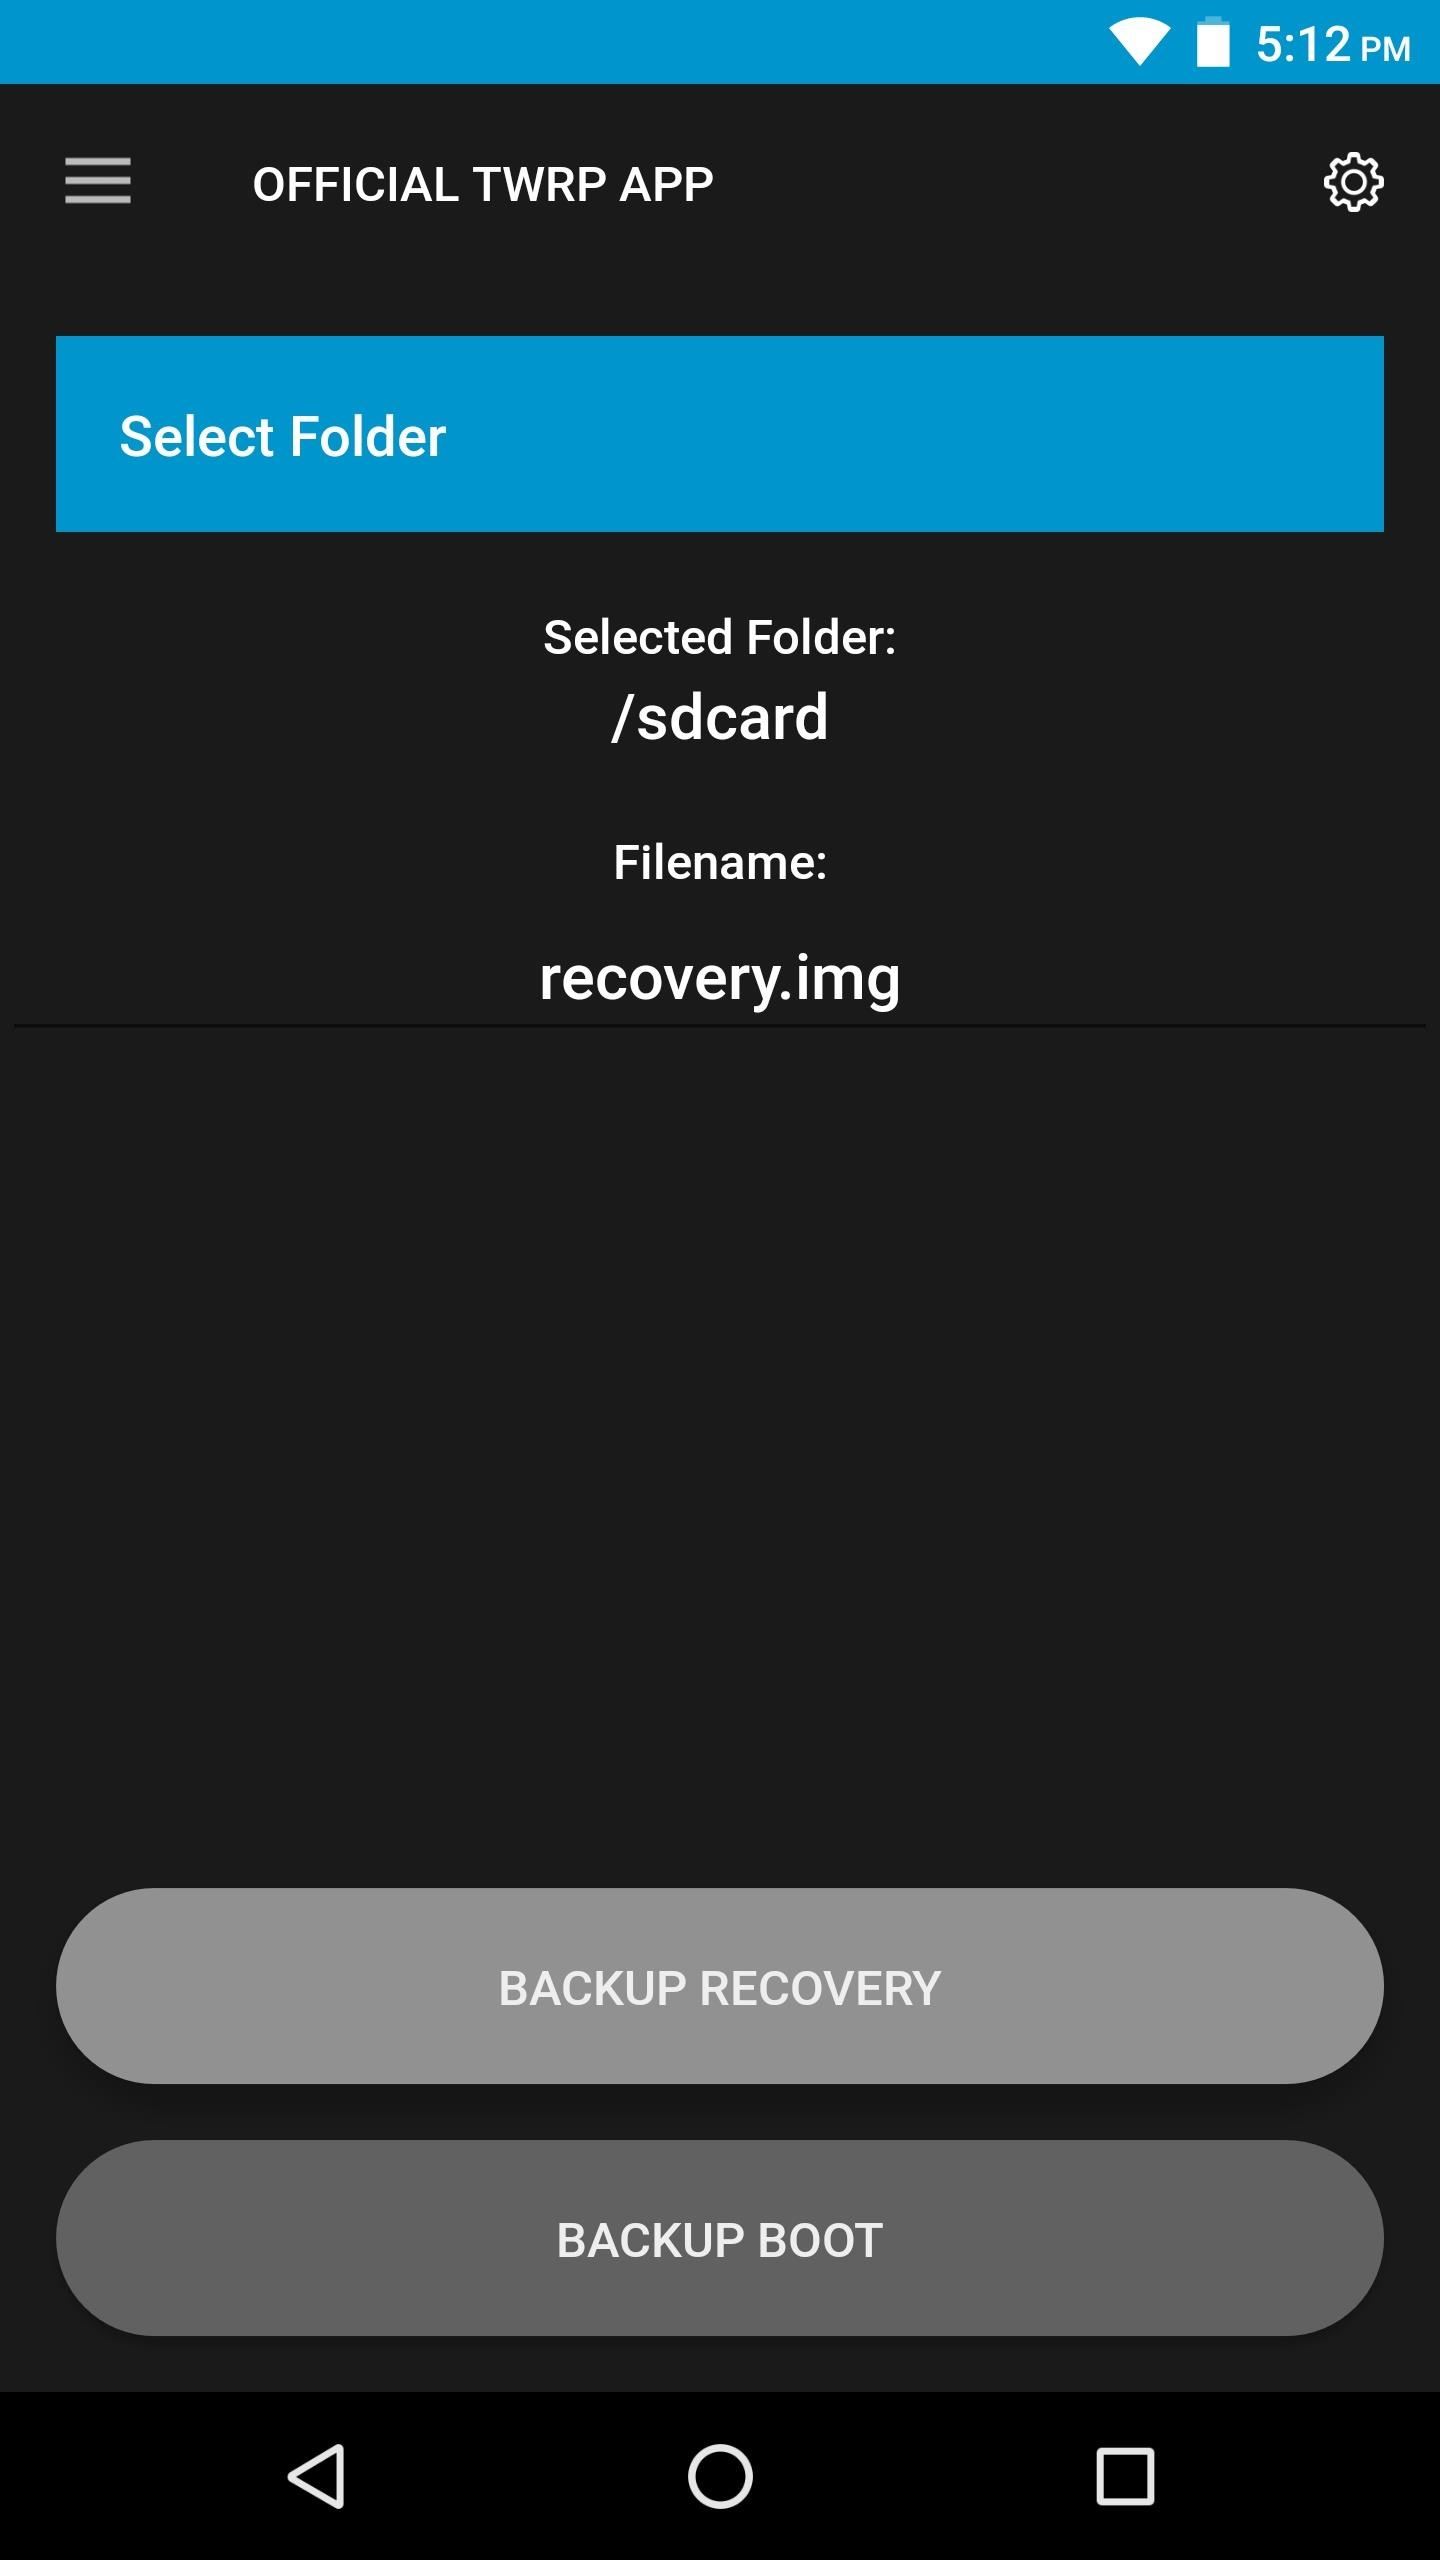
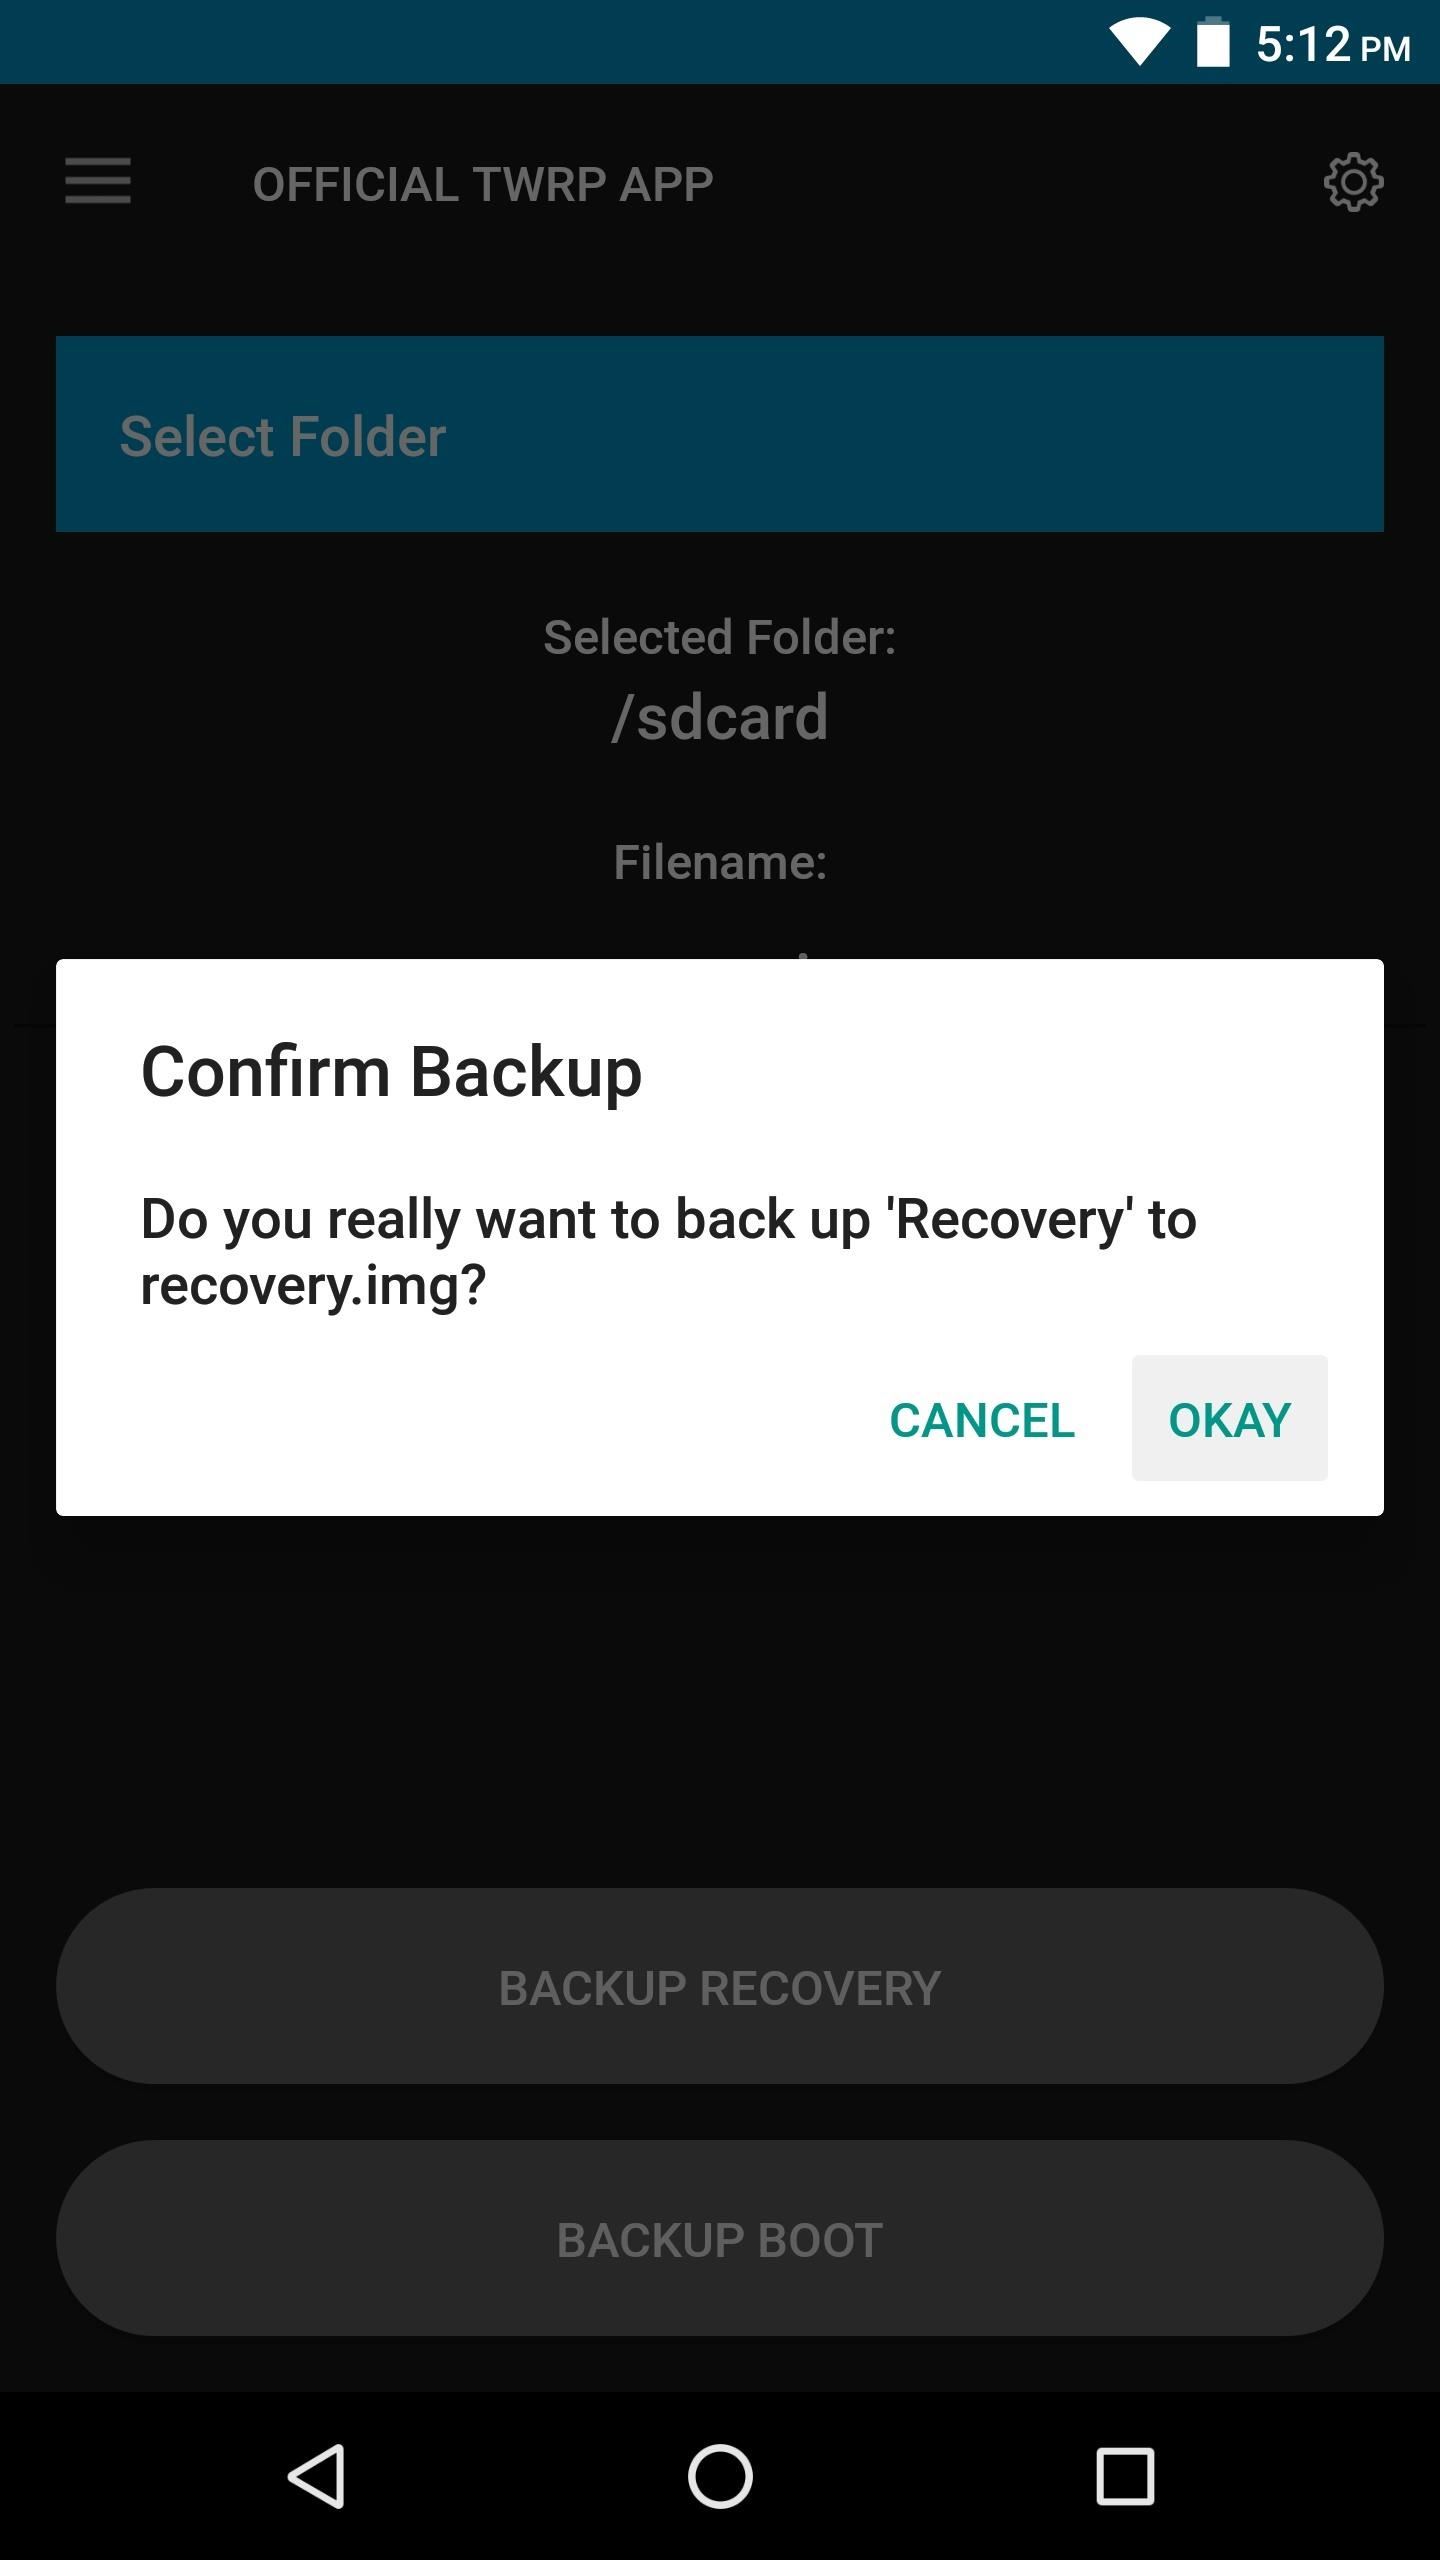
This process will take a minute or two, but when it’s done, a copy of your existing recovery image will be saved on your SD card or internal storage partition. Keep track of this file, and if you need to remove TWRP in the future, you can restore this using the TWRP app’s «TWRP Flash» function.
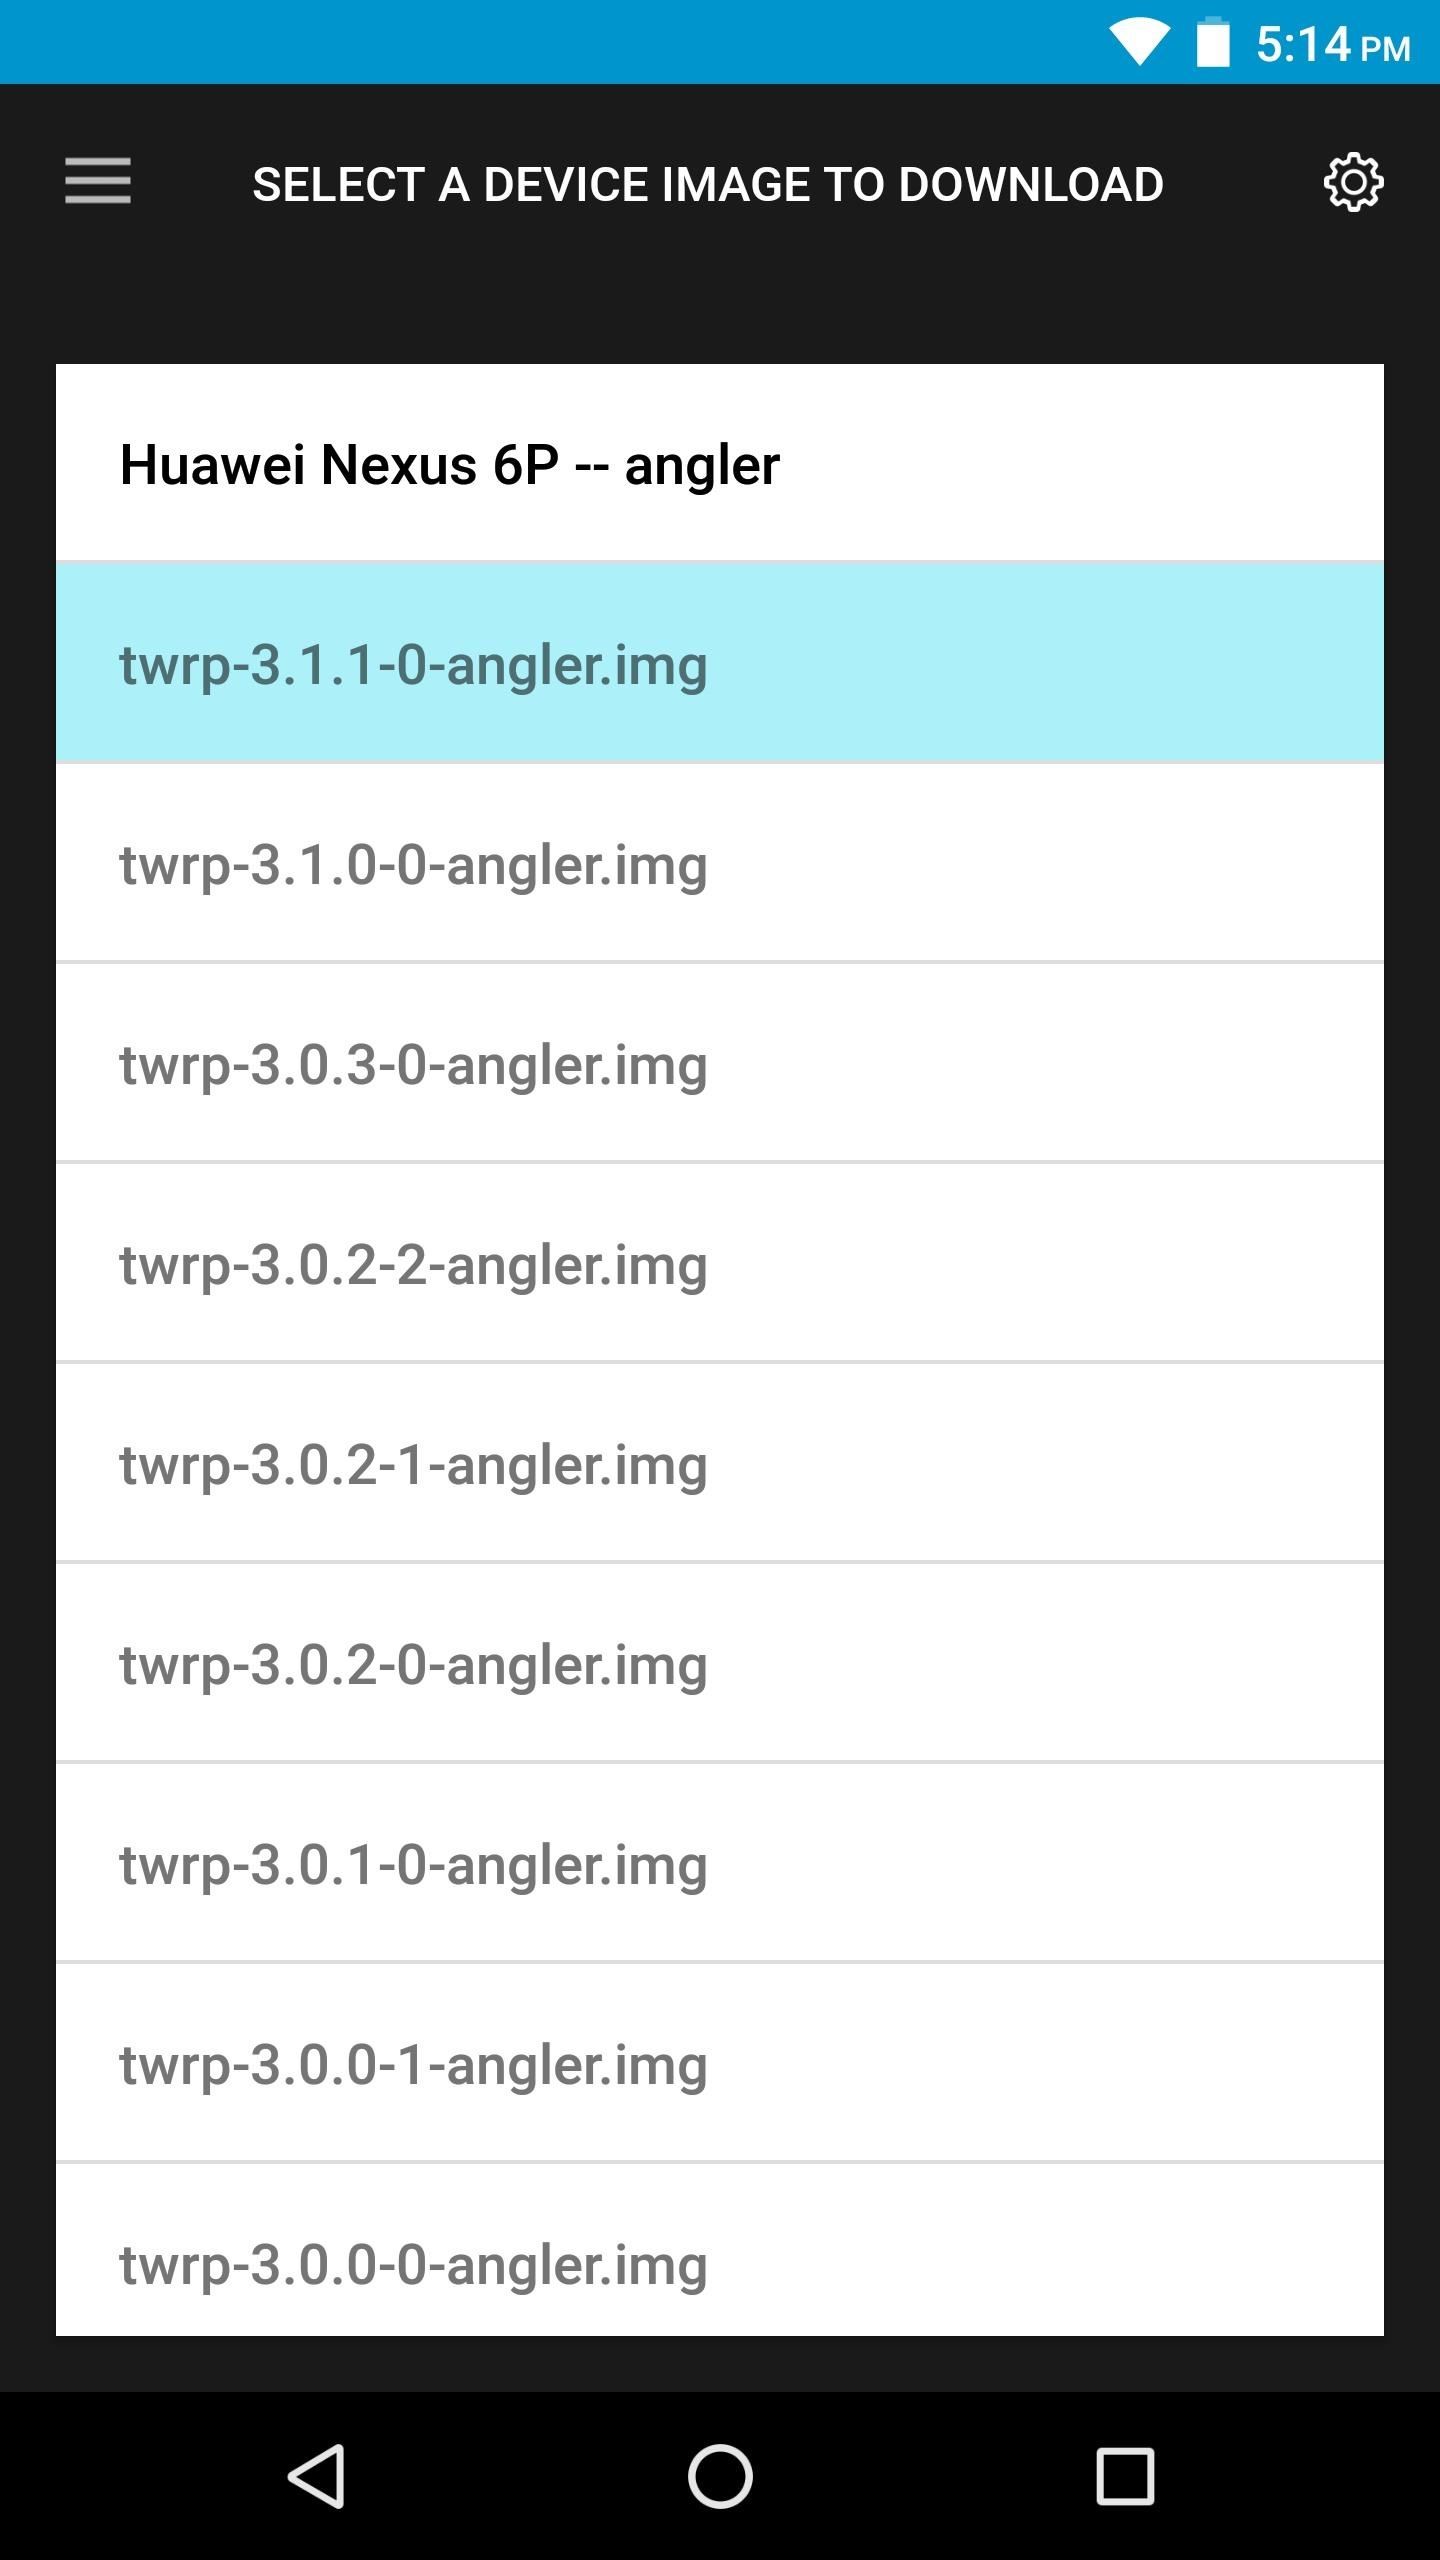
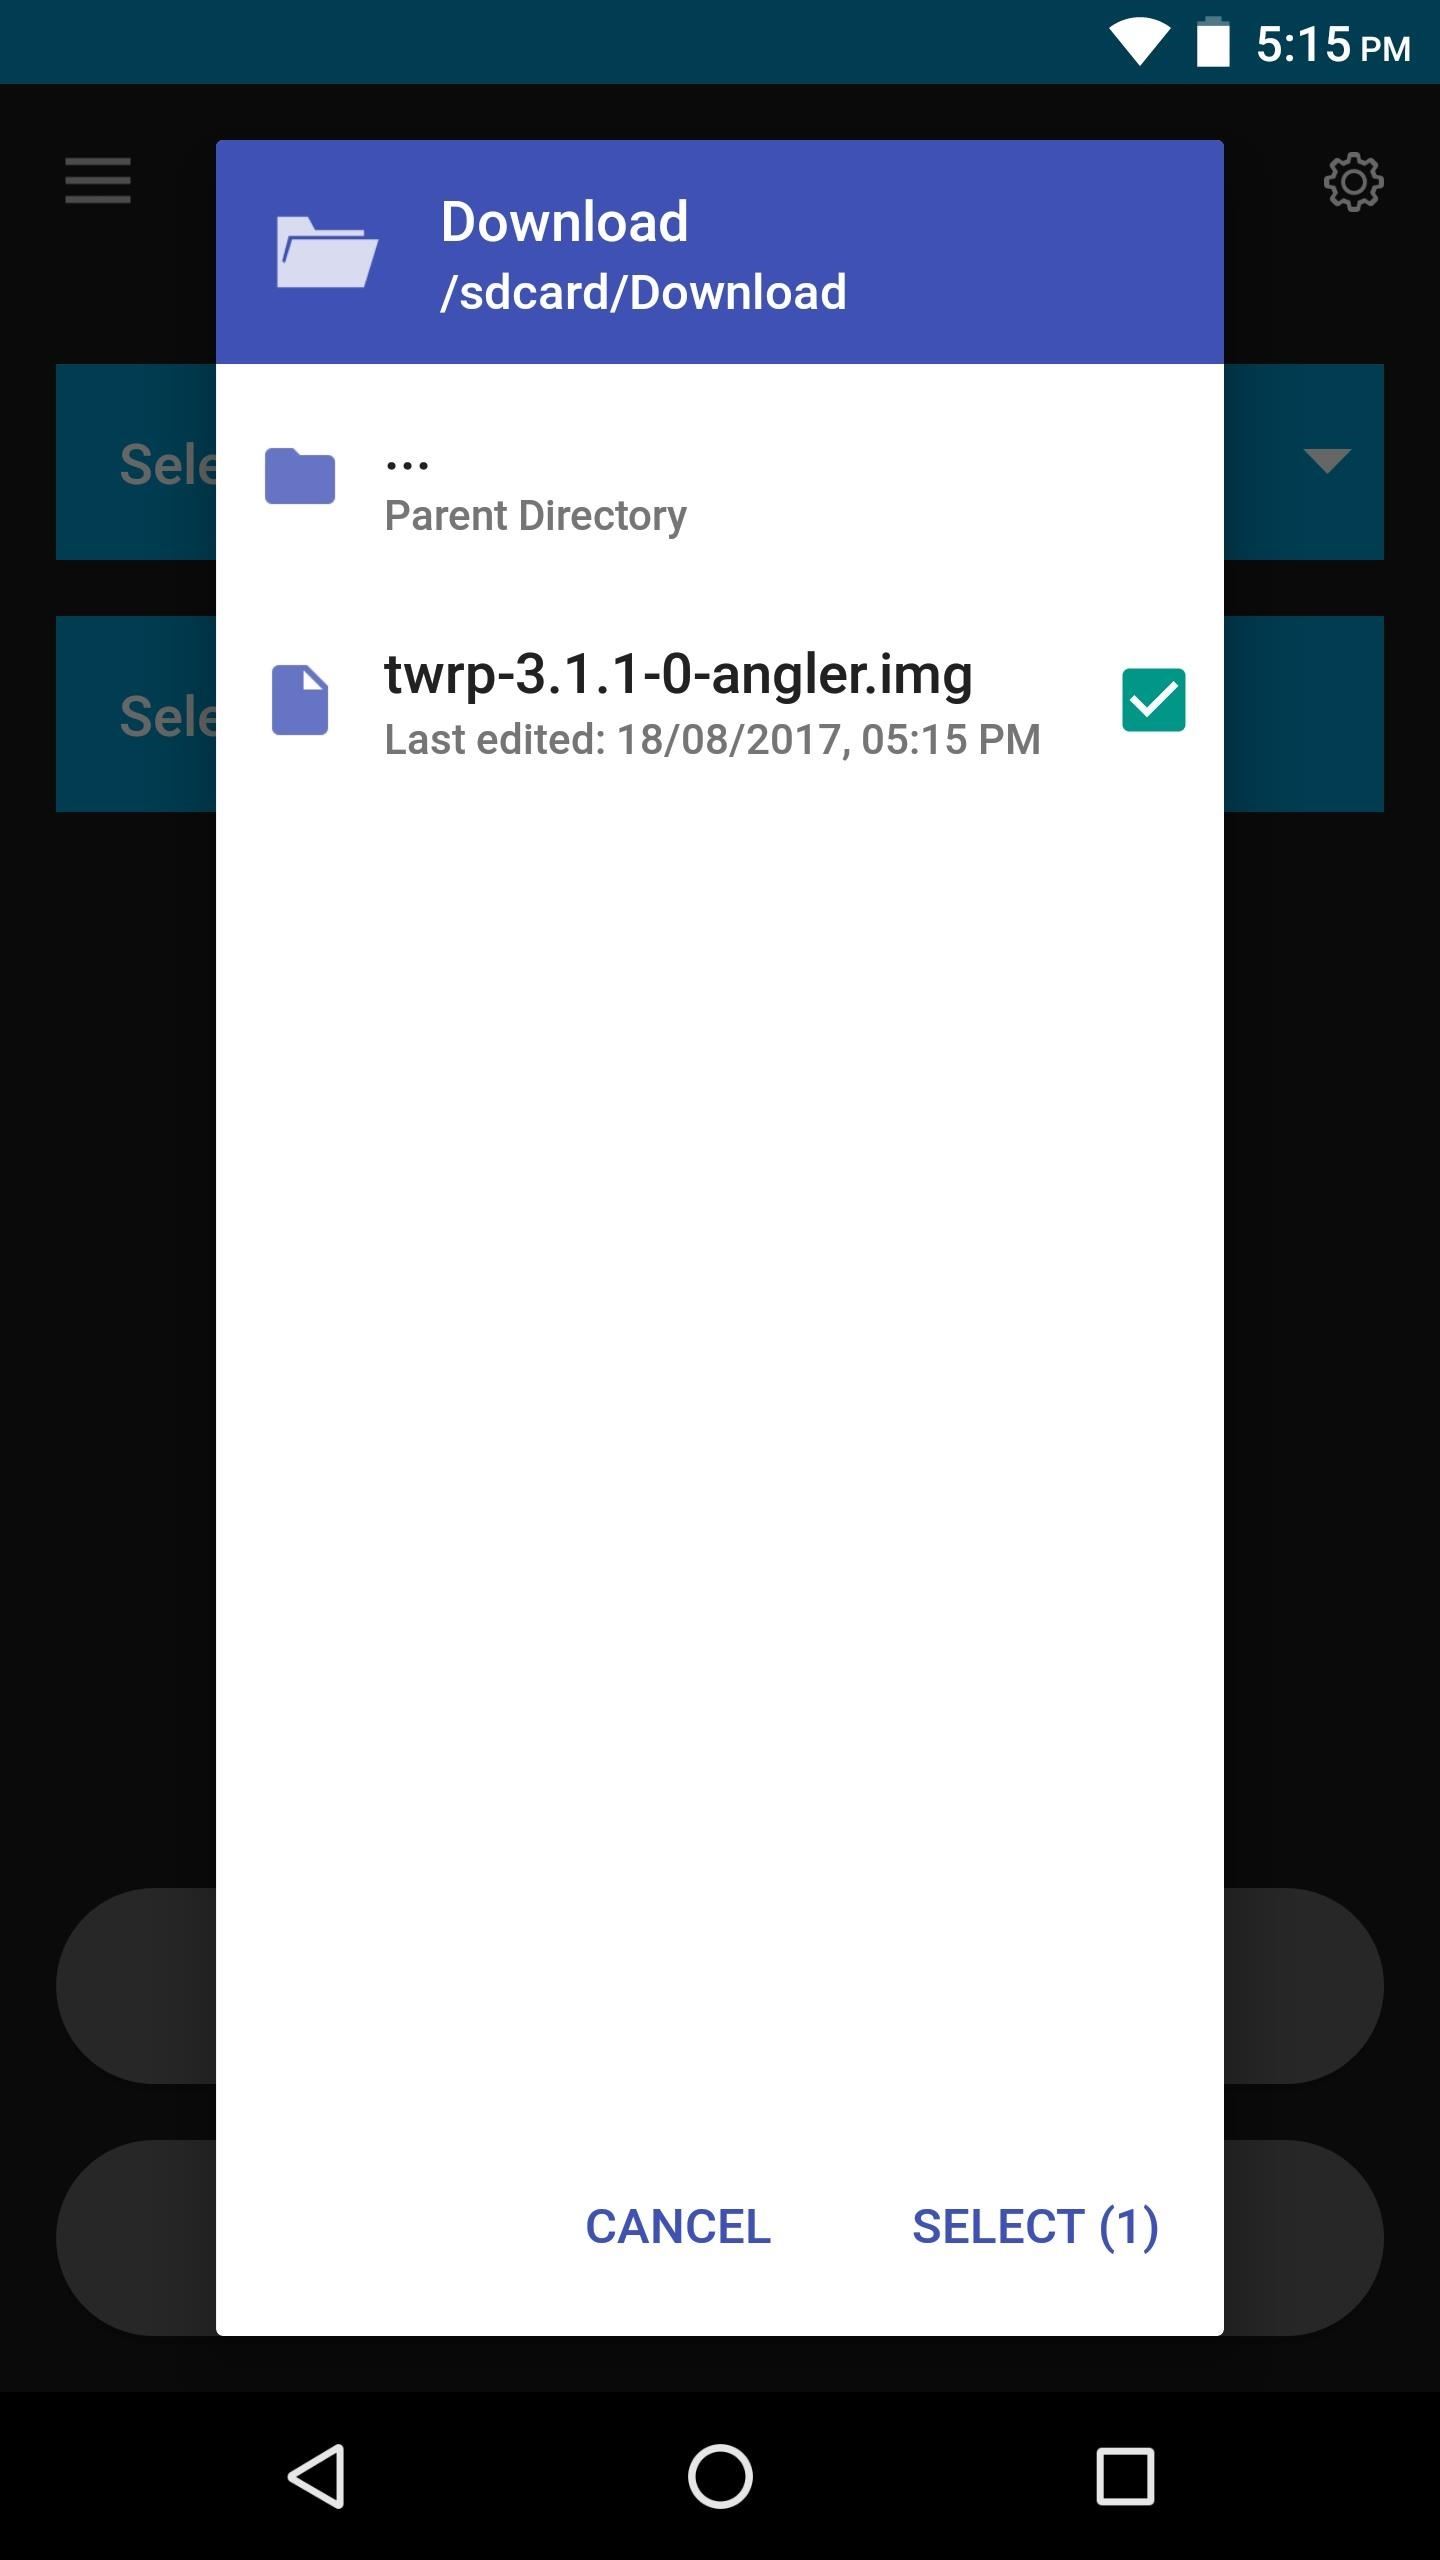
Step 4: Download the TWRP Image for Your Device
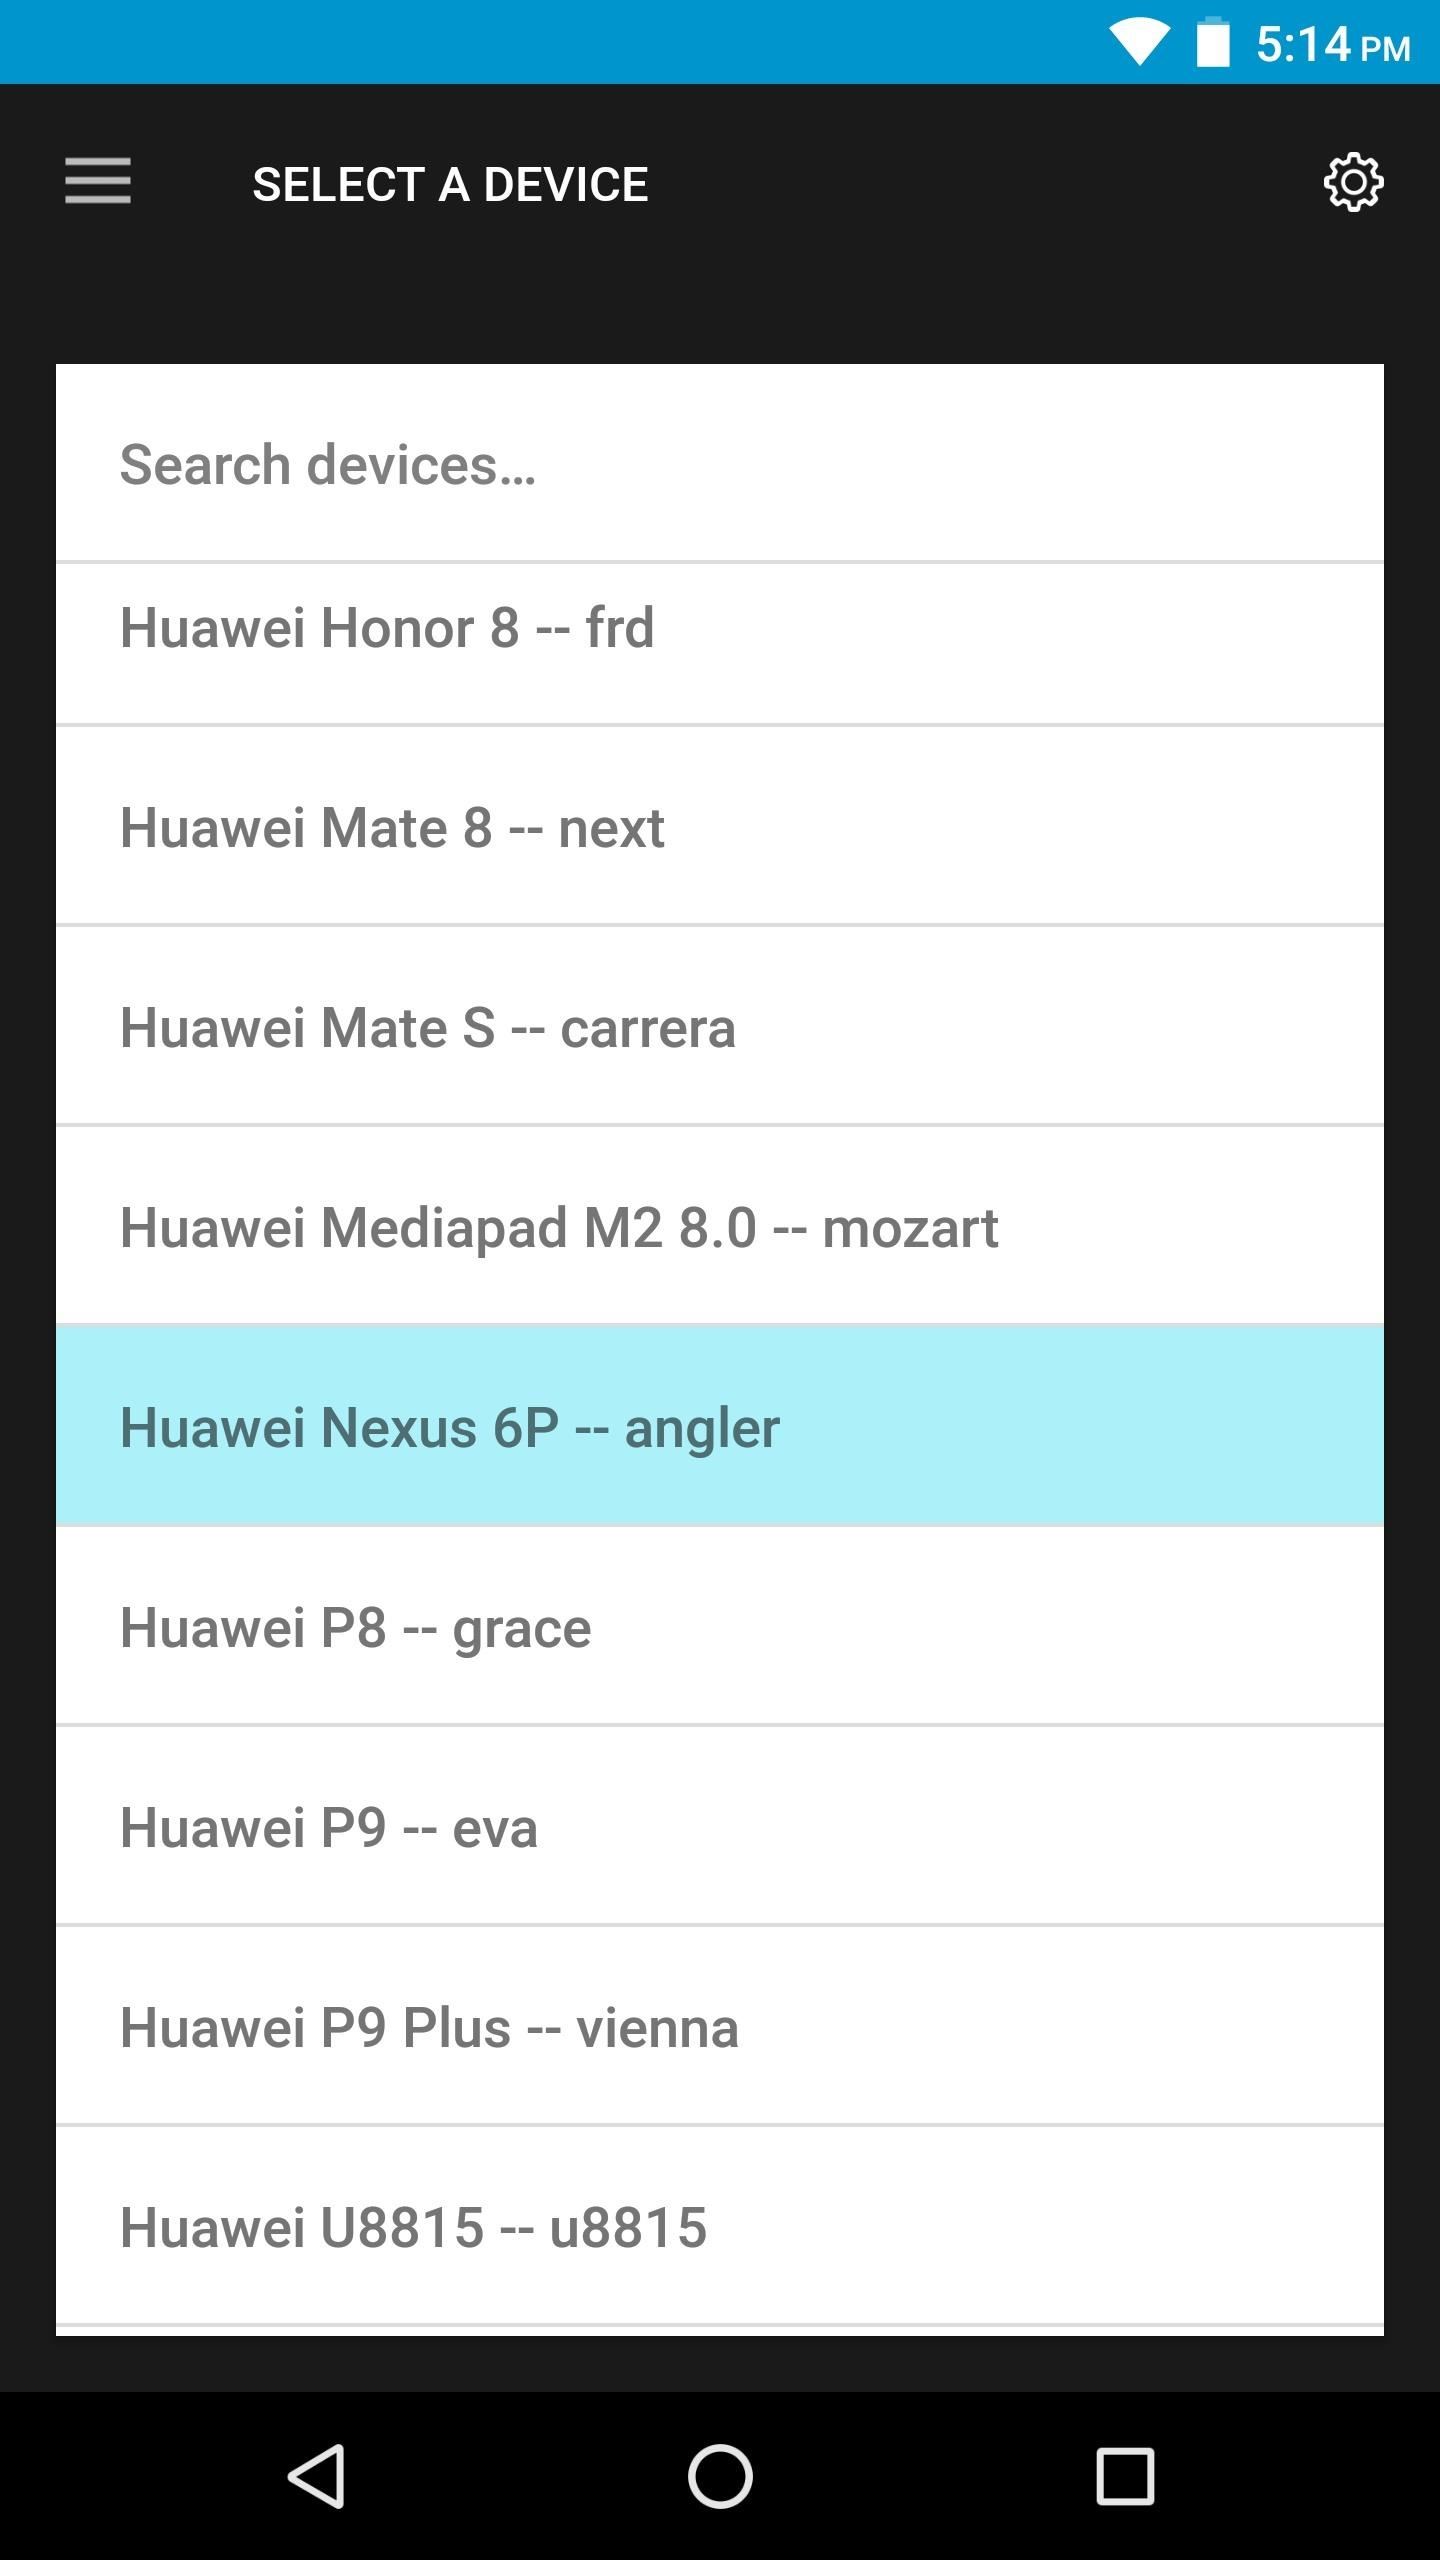
Next, you’ll be prompted to choose a TWRP version to download. We recommend going with the latest version, which will be first in the list. Once you’ve selected a version, you’ll be taken to a download page in your browser. Tap the main download link towards the top of the page, and when that’s finished, press your back button to head back to the TWRP app.

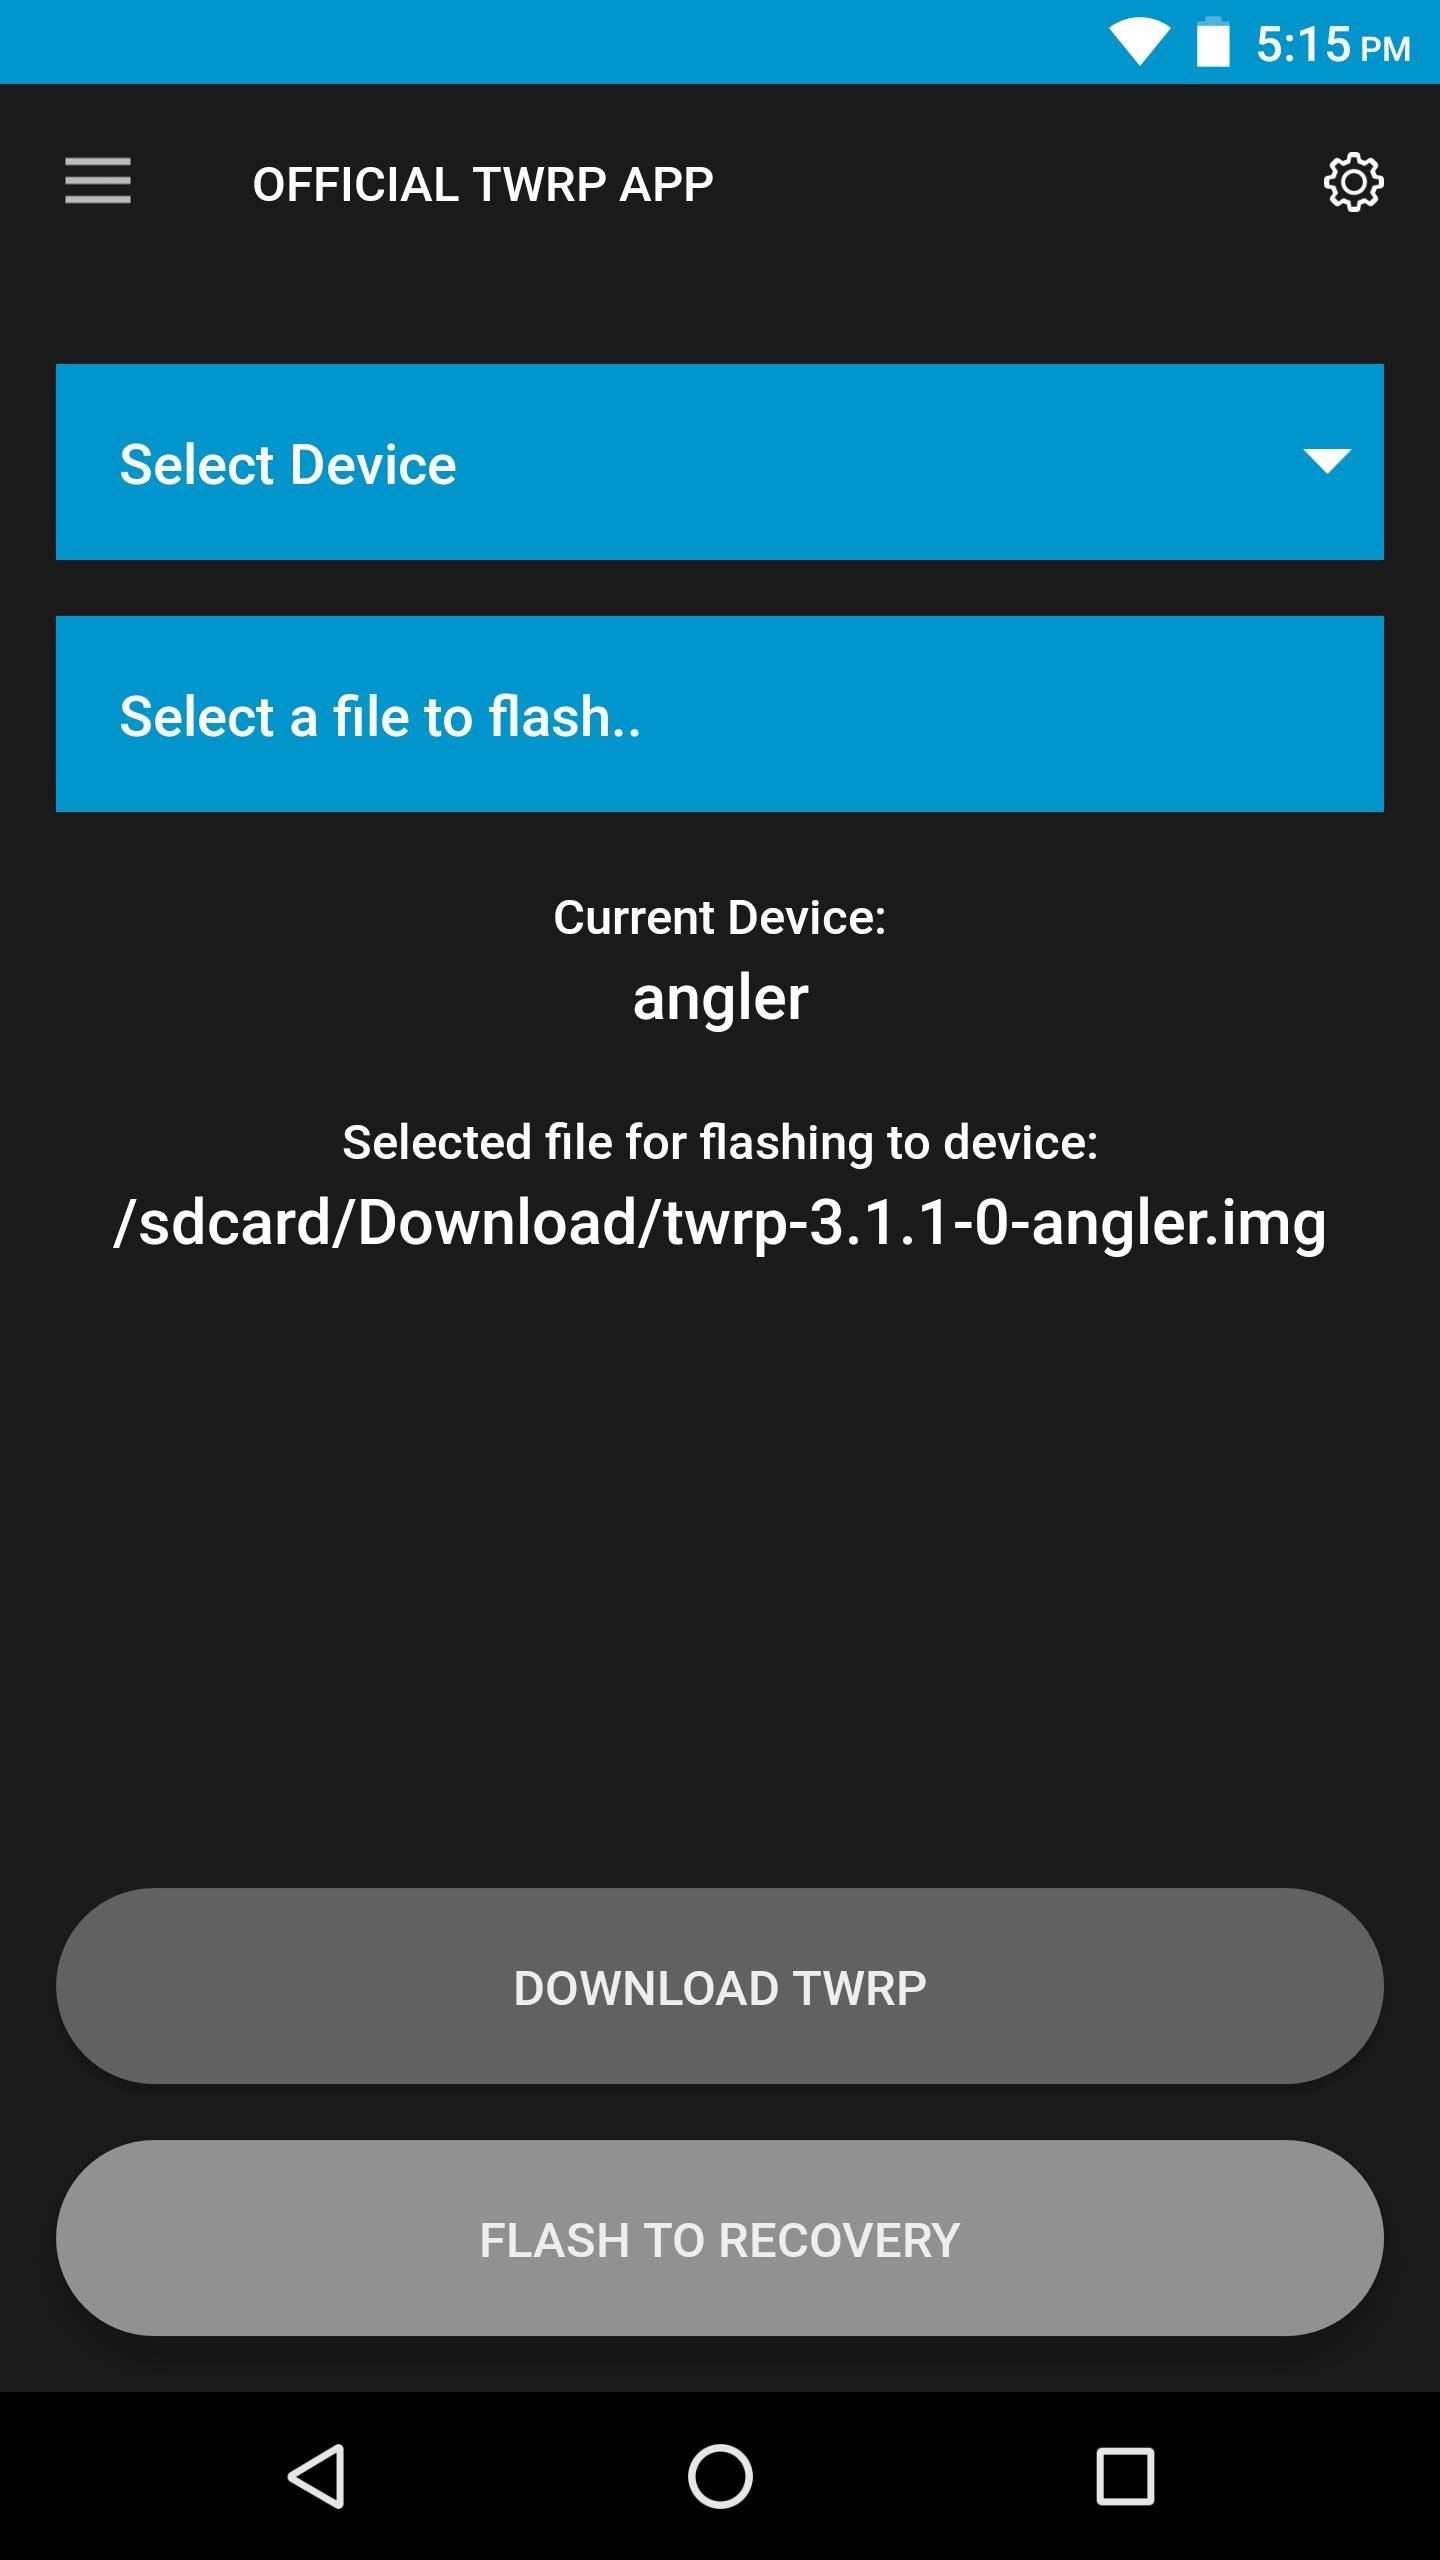
Step 5: Install TWRP
Next, from the TWRP Flash menu, tap «Select a file to flash.» From there, use the menu that appears to navigate to your device’s download folder, then select the TWRP IMG file and tap the «Select» button.
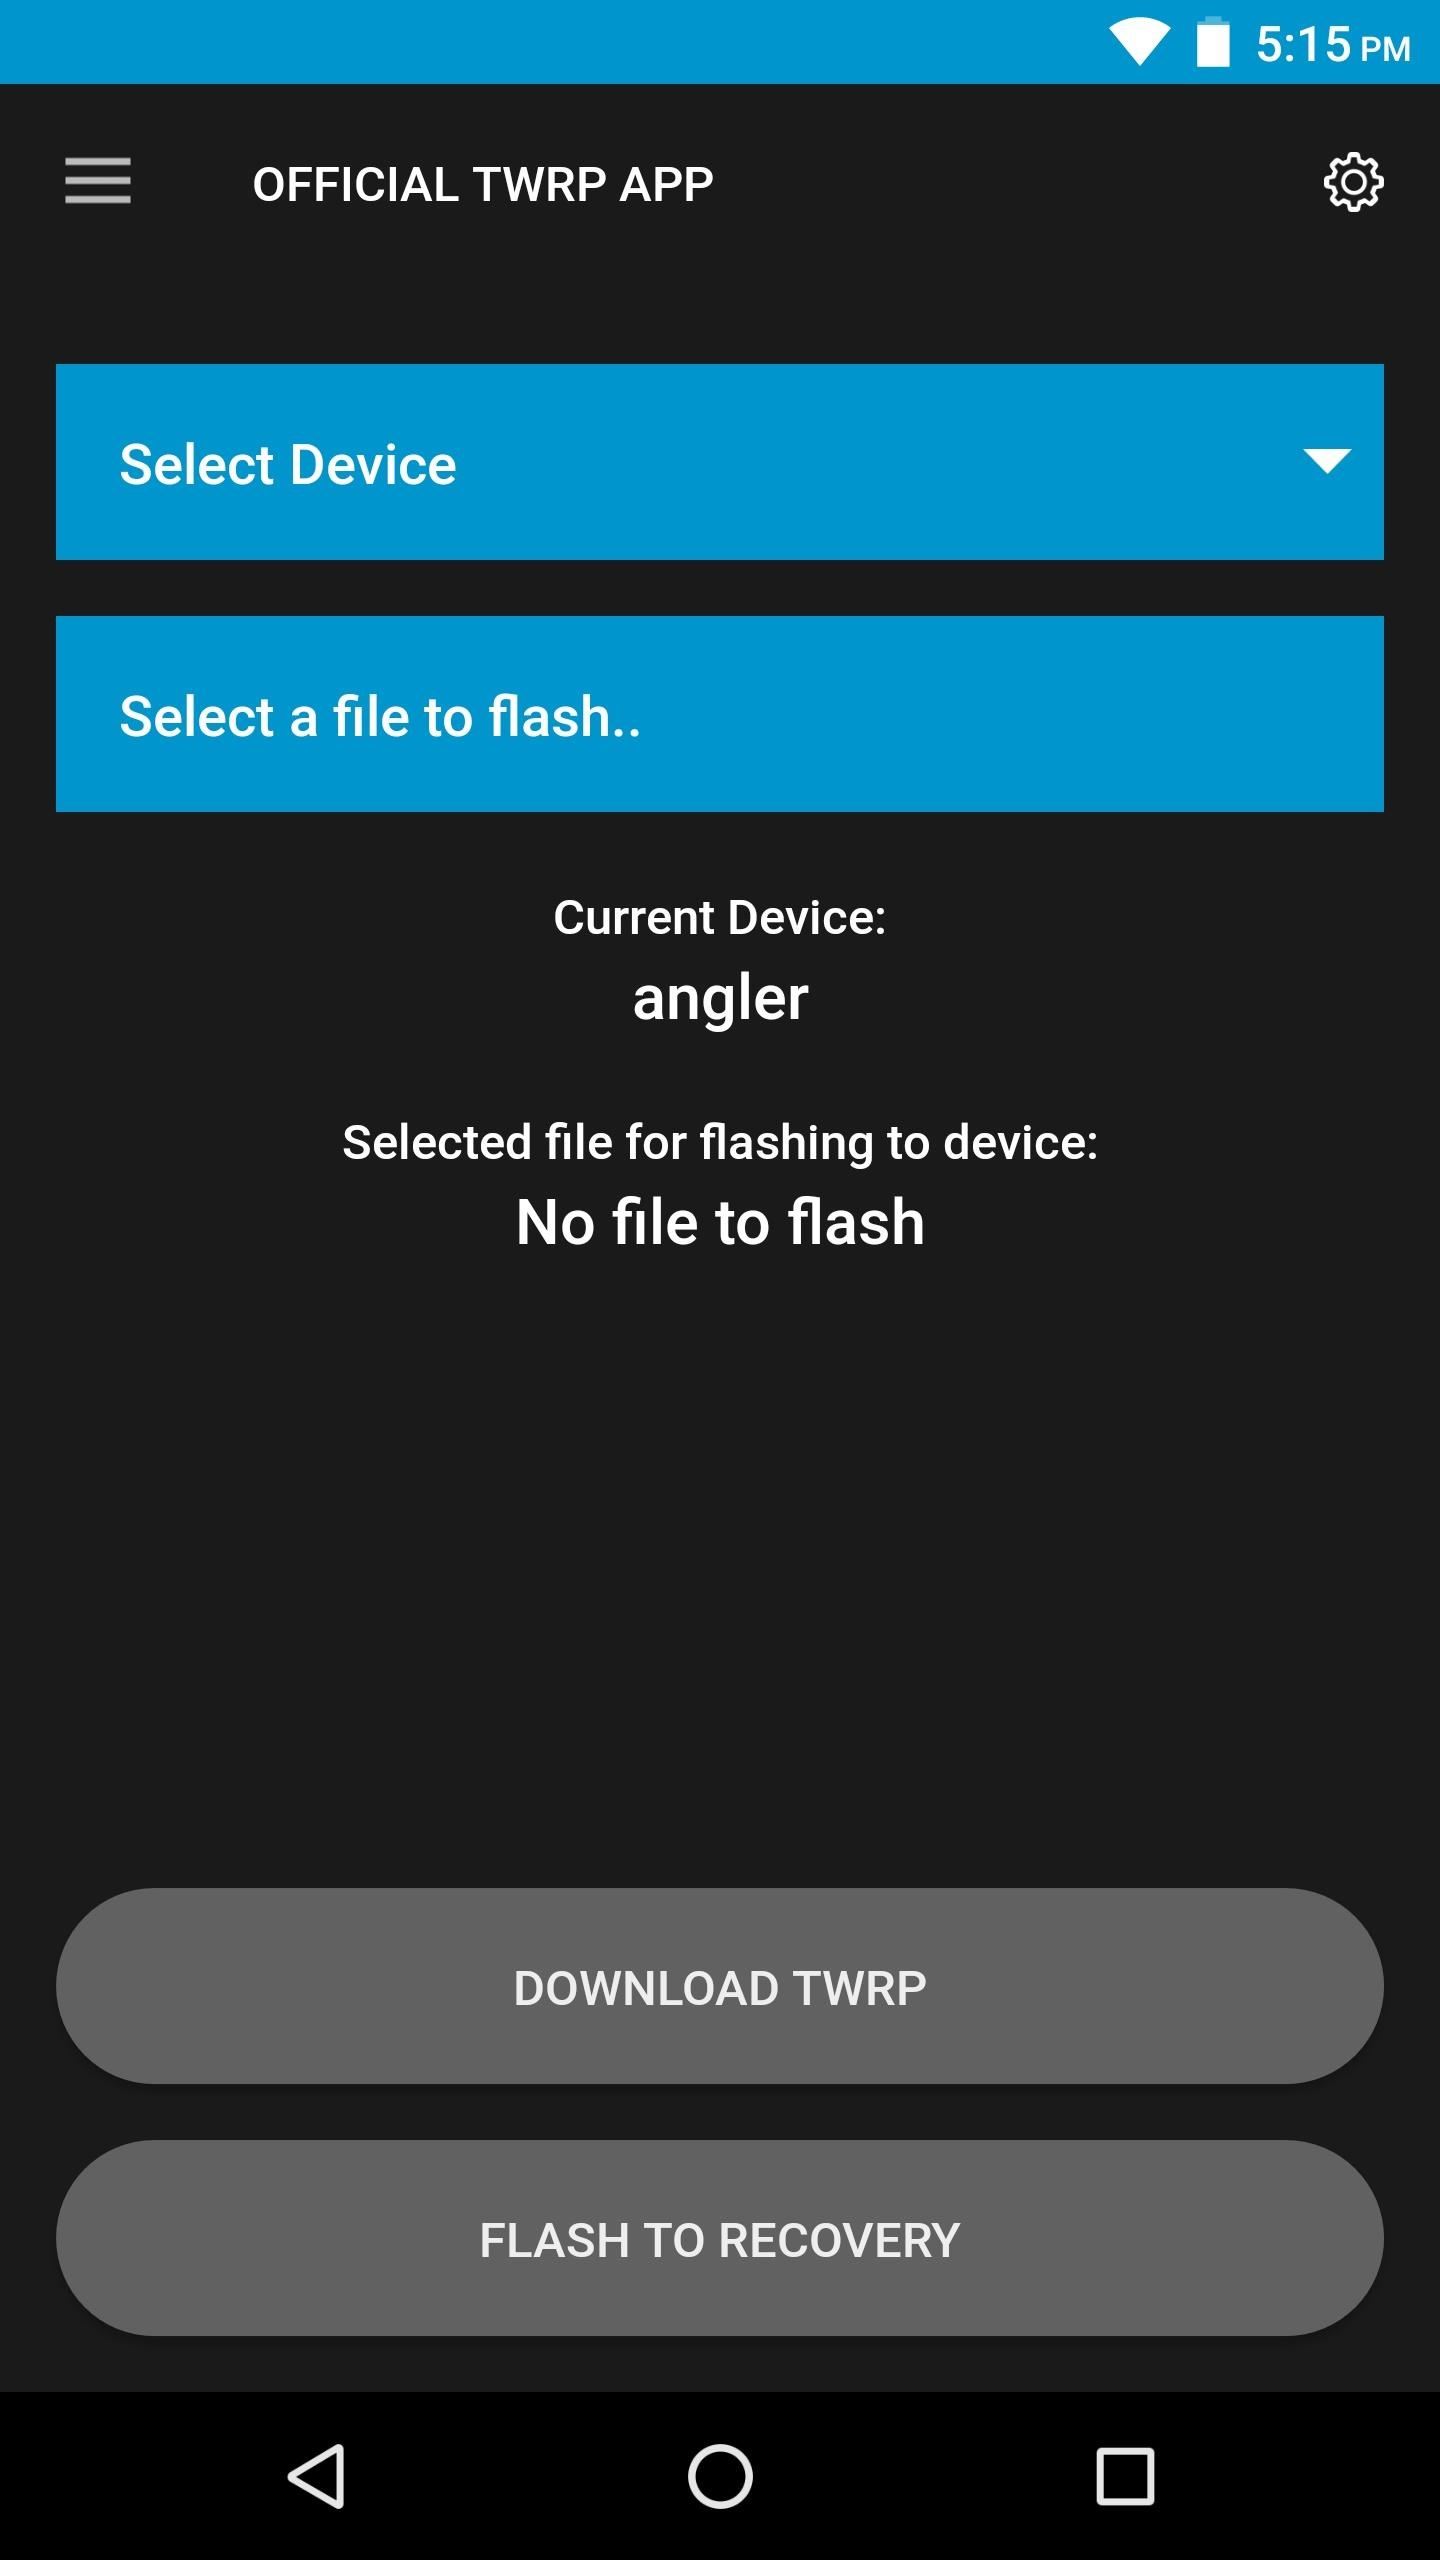
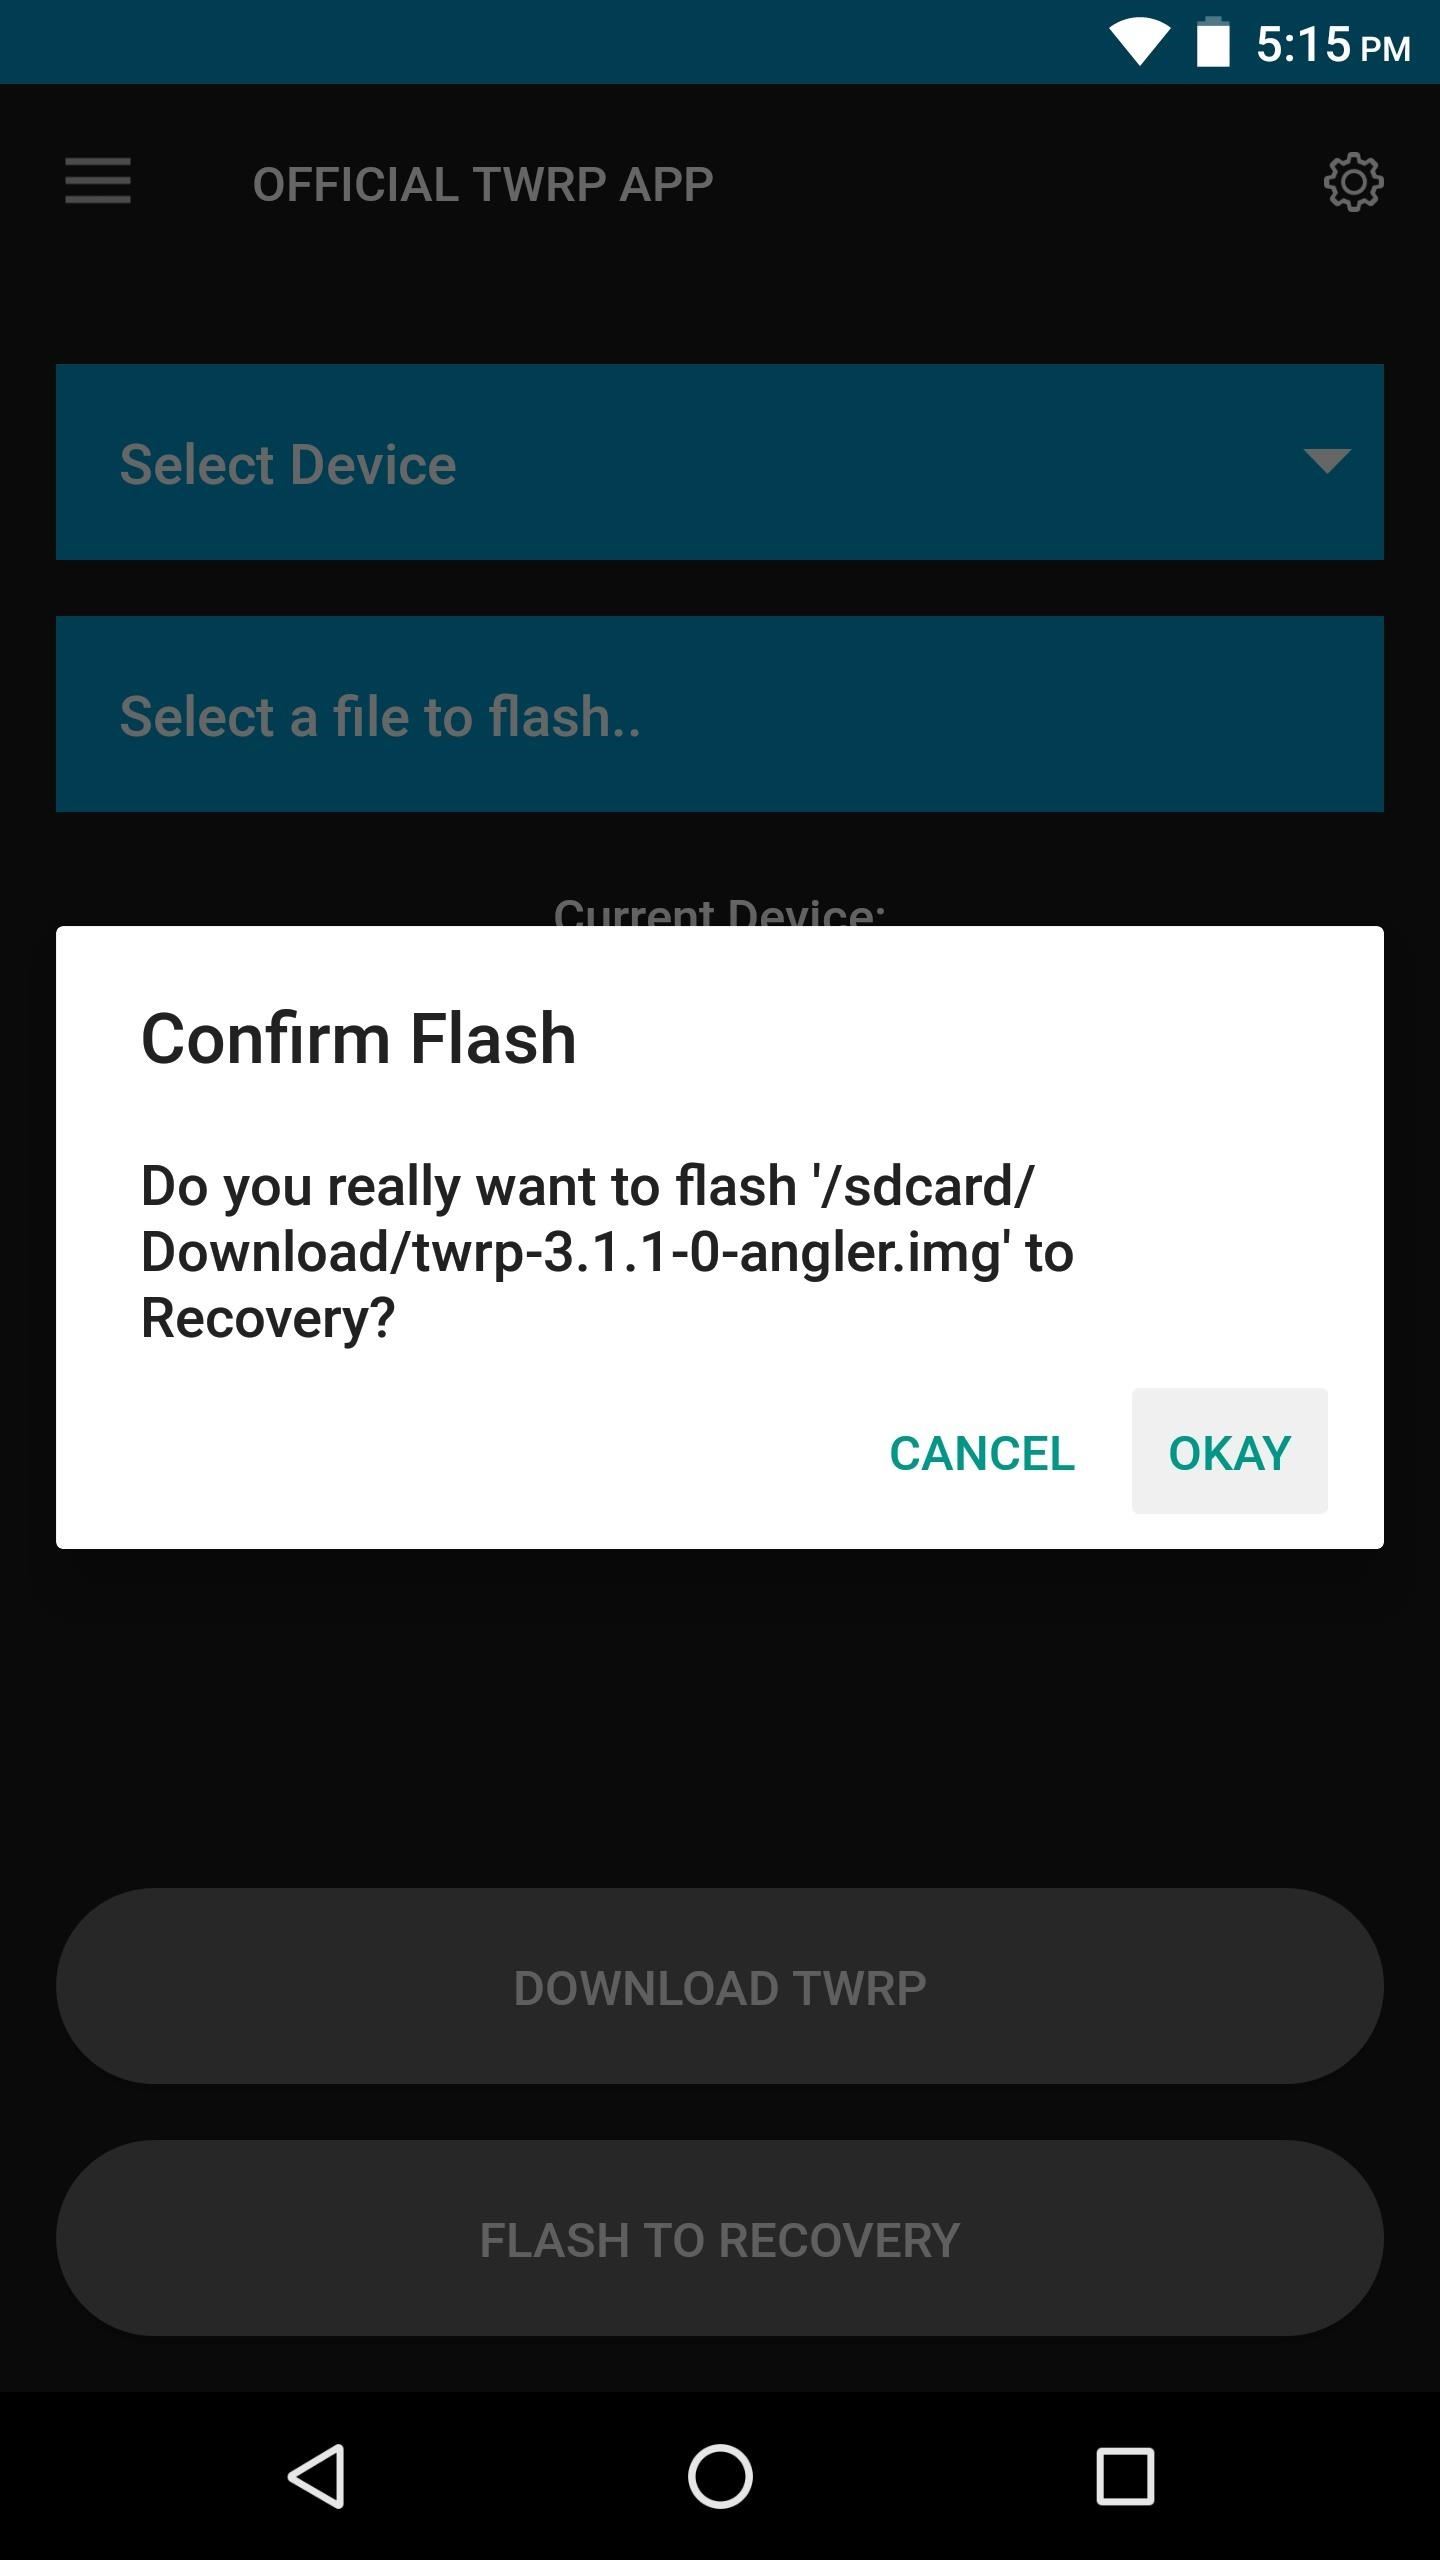
At this point, you’re ready to install TWRP. So tap «Flash to Recovery» at the bottom of the screen, then press «Okay» on the prompt. It’ll take roughly 30 seconds to complete, and when it’s done, you’ll see a message confirming that TWRP was installed.
Step 6: Make TWRP Your Permanent Recovery
- Follow Gadget Hacks on Facebook, Twitter, Google+, YouTube, and Instagram
- Follow WonderHowTo on Facebook, Twitter, Pinterest, and Google+
Keep Your Connection Secure Without a Monthly Bill. Get a lifetime subscription to VPN Unlimited for all your devices with a one-time purchase from the new Gadget Hacks Shop, and watch Hulu or Netflix without regional restrictions, increase security when browsing on public networks, and more.
Buy Now (80% off) >
Other worthwhile deals to check out:
После того, как на вашем устройстве установлено TWRP-восстановление, установить root-доступ на вашем устройстве будет очень просто. Получив root-доступ, вы можете предоставить root-доступ приложениям с запросом root, а затем использовать такие приложения для расширенной настройки или повышения производительности.
Xposed — одно из таких приложений и одна из основных причин для рутирования устройства, помимо возможности создавать резервные копии приложений, игр и данных. Когда вы рутируете свое устройство, вы получаете доступ суперпользователя к устройству и возможность изменять заблокированный системный раздел.
Получение root-прав через TWRP recovery — один из очень удобных способов получить root-доступ. Вам просто нужно загрузить и прошить файл SuperSU из восстановления TWRP — это можно сделать и из других пользовательских восстановлений, таких как CWM, Philz, Carliv и т. Д. — для рутирования вашего устройства.
После рутирования устройства у вас будет приложение SuperSU на вашем устройстве, которое позволит вам управлять правами root-доступа для приложений. Вы можете заблокировать и разрешить приложениям, использующим приложение SuperSU. Root-доступ — это доступ администратора, и вы определенно не хотите, чтобы какое-либо приложение получало его, поэтому приложение SuperSU является обязательным.
Давайте теперь посмотрим на корневой процесс во флэш-памяти.
Как рутировать с помощью TWRP Recovery
Этот файл SuperSU содержит необходимые корневые файлы и совместим со всеми устройствами Android с разблокированным загрузчиком и установленным пользовательским восстановлением, таким как TWRP. Если это не сработает, попробуйте новую бета-версию SuperSU здесь: SuperSU v2.49 бета
- Установлены все устройства Android с разблокировкой загрузчика и кастомным восстановлением, такие как TWRP, CWM, Philz, Carliv, Safestrap и т. Д.
- Не пробуйте это ни на одном другом устройстве!
Гарантия на ваше устройство может быть аннулирована, если вы будете следовать процедурам, приведенным на этой странице. Только вы несете ответственность за свое устройство. Мы не несем ответственности в случае повреждения вашего устройства и / или его компонентов.
Резервный важные файлы, хранящиеся на вашем устройстве, прежде чем продолжить действия, описанные ниже, чтобы на случай, если что-то пойдет не так, у вас будет резервная копия всех ваших важных файлов.
- Убедитесь, что у вас установлено кастомное восстановление. См. Это для помощи с TWRP восстановление. Это для устройств HTC, но процесс одинаков для всех устройств, использующих fastboot для прошивки восстановления TWRP. Возможно, вам потребуется разблокировать загрузчик вашего устройства, прежде чем вы сможете установить восстановление TWRP. Вот наше описание разблокировки загрузчика устройств: HTC, Sony и LG.
- Скачать файл SuperSU на вашем устройстве. Если вы загружаете его на ПК, обязательно перенесите его на устройство.
- Вы можете Отключить устройство с ПК.
- Перезагрузитесь в режим восстановления попасть в рекавери TWRP. Процесс перезагрузки в режиме восстановления может переходить от устройства к устройству. В общем, по OEM это так:
- Для устройств HTC выключите питание, затем удерживайте Power + Volume вниз, чтобы перейти в режим HBOOT, затем перезагрузитесь для восстановления, используя эту опцию.
- Для устройств Motorola выключите питание, а затем удерживайте нажатой кнопку Power + Volume, чтобы перейти в режим загрузчика (вы увидите надпись FASTBOOT AP в верхней части экрана), затем перезагрузитесь для восстановления, используя указанную здесь опцию.
- Для устройств Samsung выключите питание, затем нажмите и удерживайте Power + Home + Volume up, пока не увидите логотип Samsung.
- Для устройств Sony выключите питание, нажмите Power + Volume down, пока устройство не начнет немного вибрировать, а когда это произойдет, отпустите кнопку питания, удерживая нажатой кнопку уменьшения громкости. Теперь, когда вы видите Android на среднем экране, отпустите кнопку уменьшения громкости.
- Для устройств LG выключите питание, затем нажмите и удерживайте Power + Volume down, пока не увидите логотип LG, и когда вы его увидите, отпустите только кнопку питания в течение 2 секунд, а затем снова нажмите и удерживайте кнопку питания, пока вы все еще удерживаете громкость все время вниз. Отпустите обе кнопки, когда увидите свое собственное восстановление.
- Для другого устройства это могло быть то же самое, что и HTC. В противном случае Google — ваш друг.
- [Optional] Создать резервный. Нажмите на резервную копию, затем выберите разделы по вашему выбору, желательно все, а затем выполните Проведите пальцем действие внизу, чтобы начать резервное копирование всего телефона! Он всегда будет очень кстати, если с телефоном случится что-нибудь плохое. Вернитесь на главный экран TWRP, нажав кнопку «Домой» в нижнем левом углу.
- На главном экране TWRP нажмите на Установить, а затем найдите и выберите файл SuperSU. На следующем экране просто сделайте Проведите пальцем действие внизу, чтобы рутировать ваше устройство.
- Нажмите на Reboot System, чтобы перезапуск Устройство.
Сообщите нам, если вам понадобится помощь с этим. Используйте раздел комментариев ниже, чтобы мы могли быстрее ответить.
Just the fact that you own an Android device means you’re privy to an entire world of third-party development. Many of the mods you’ll see here on Gadget Hacks can be performed fresh out of the box, but with root and Xposed, the list grows longer. But to truly be able to take advantage of all that Android’s massive development community has to offer, you’ll need to have a custom recovery installed.
While I can’t guide you through installing every custom recovery on every Android device in one article, I can help you learn how to tap the full potential of this powerful tool.
This guide is tailored to using TWRP, otherwise known as Team Win Recovery Project, by none other than the TeamWin group. It’s the recovery of choice here at Gadget Hacks, due to its widespread adoption and ease of use.
Tip #1. Accessing TWRP’s Interface
The actual process of booting into custom recovery varies from device to device. If you have one of the more common devices, though, I’ll outline the process below.
Google Nexus Devices
To boot into recovery with any Nexus device, start by powering your phone or tablet completely off. When the screen goes black, press and hold the Volume Down button with one finger. Then, while still holding this button, press and hold the Power button with another finger.
This will bring up the Bootloader menu, where you should tap the Volume Down button twice to highlight Recovery Mode. From here, simply press the Power Button once to confirm your selection, and recovery should come right up.
Samsung Galaxy Devices
For any Samsung Galaxy device that has a physical Home button, booting into Custom Recovery should be the same.
Start by powering your Galaxy completely off. When the screen goes black, press and hold the Volume Up, Power and Home keys simultaneously. This will take you directly to your custom recovery.
HTC One (M7 or M8)
Before you begin, make sure Fast boot mode is turned off. To do this, head to Settings, then Power, and make sure the box next to the Fast boot option is not ticked.
Then, power your HTC One completely off. When the screen goes black, press and hold the Volume Down and Power buttons simultaneously. This will bring up Android’s bootloader menu. From here, tap the Volume Down button once to highlight the Recovery option, then tap the Power button to confirm your choice.
Software Methods
All devices, if rooted, can utilize various software options to enter recovery from within Android. I’ve previously highlighted some of these options in this tutorial. While the article is geared toward a Nexus 5, all options listed should work just fine on all of the above-listed phones and tablets.
Tip #2. Making a NANDroid Backup
First and foremost, when using custom recovery to install various hacks, you should always have a backup handy in case things were to go awry. This is called a nandroid—»NAND» as in flash memory, and «droid» as in Android.
TWRP has made this process about as simple as it gets. From the home screen, simply tap Backup to begin. From here, leave all the options ticked just as they are, and swipe the slider at the bottom to create your backup.

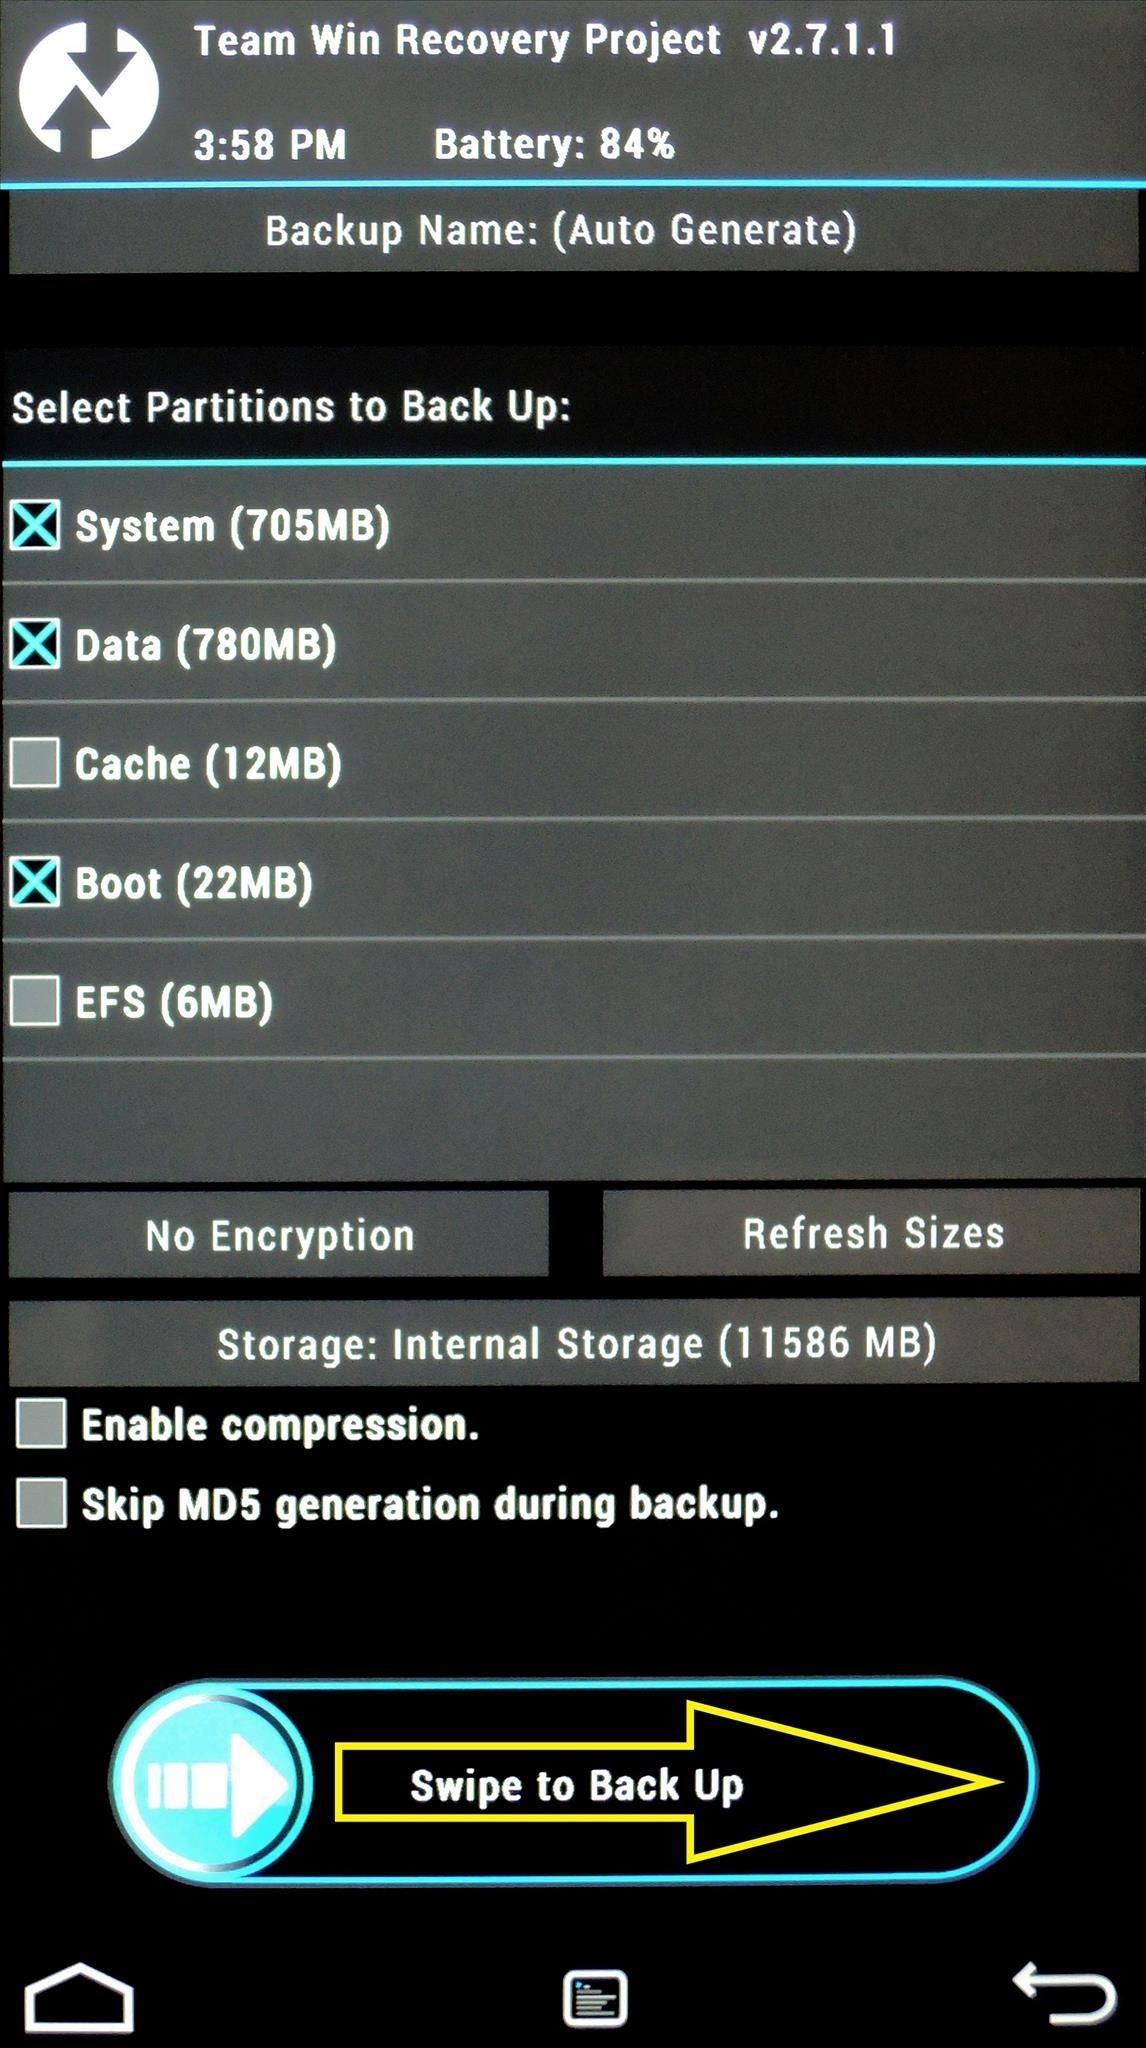
This will create a set of image files that function as a snapshot of your device’s current setup. If you ever need to restore this backup, every tiny little aspect of your device will be recreated as if nothing ever changed.
Because nandroids are snapshots of everything, they can take up quite a bit of storage on your device. For this reason, you may want to consider copying the file over to your computer via USB cable—they will be in your TWRP/Backup folder.
Tip #3. Restoring an Existing Backup
Say you’ve already created a backup and you were tinkering around with a cool mod. But this mod wasn’t compatible with your device, and now you can’t seem to start Android. No worries, you have a custom recovery installed, remember?
From TWRP’s main screen, tap the Restore button. Next, you’ll be shown a list of all the backups you’ve made with TWRP. Just tap the one with the most recent date as its file name, and you’ll be presented with the available partition images that you can restore. If you copied the nandroid to your computer, move it back to the TWRP/Backup before you restore.
Again, it’s probably best to leave everything ticked, then you can simply swipe the slider to restore.
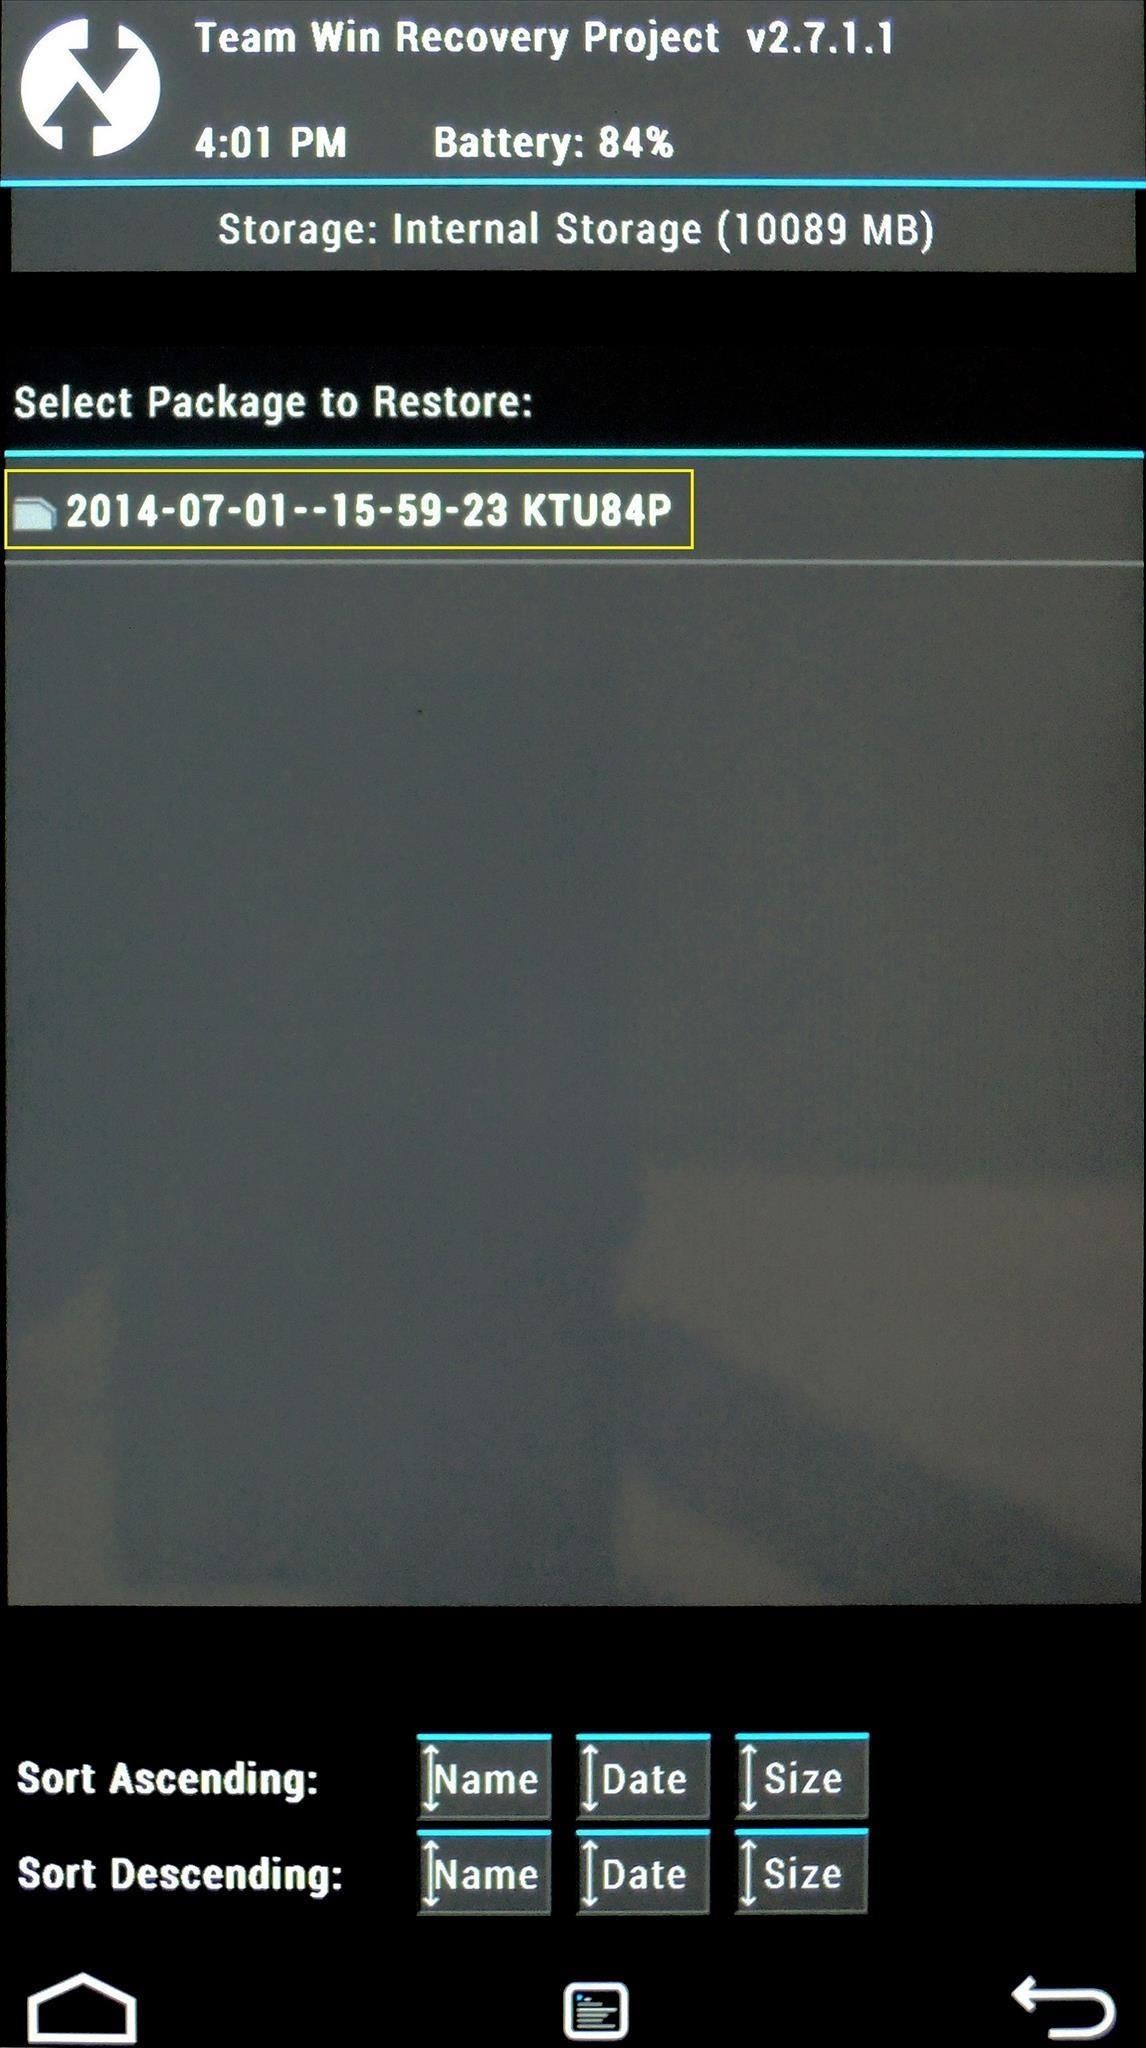
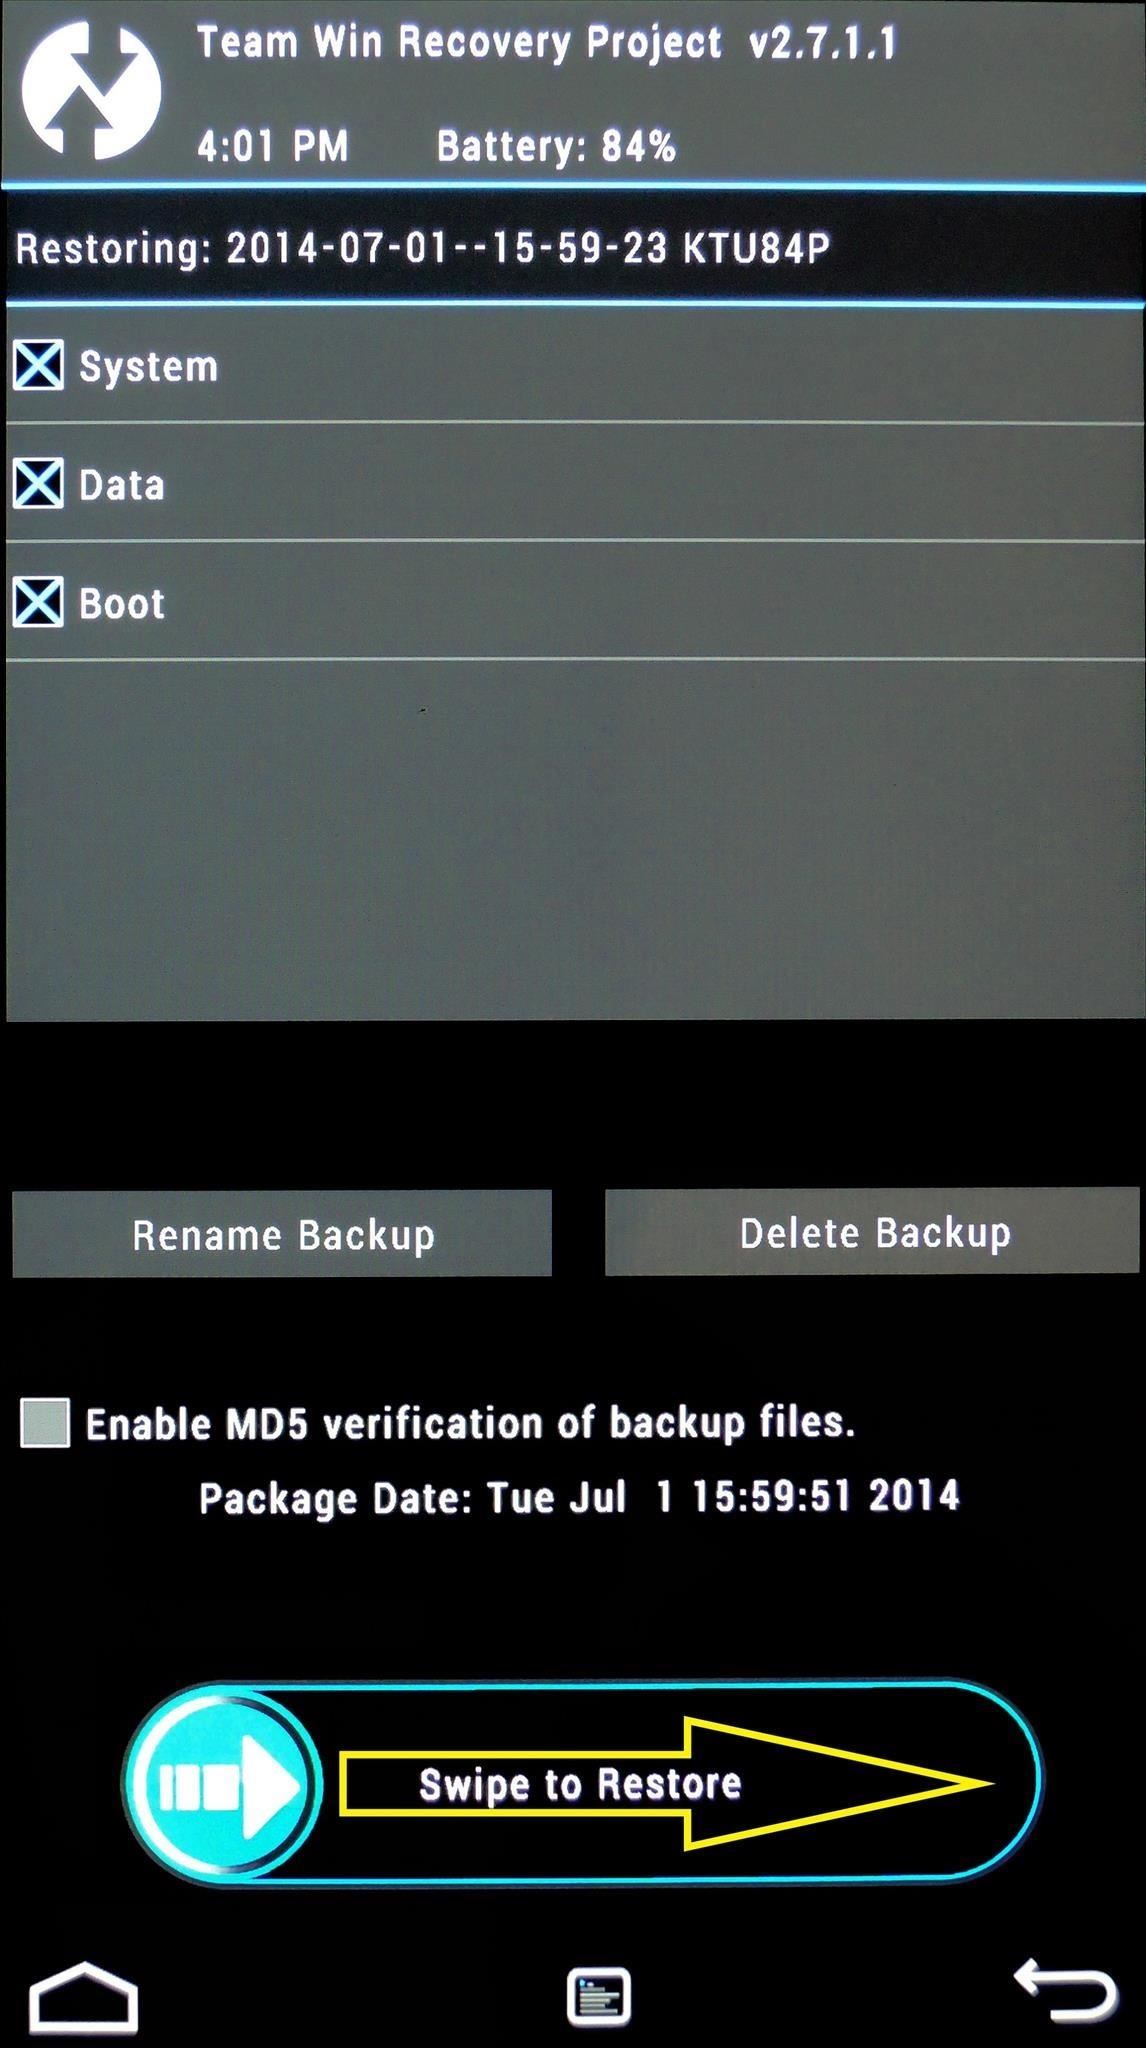
When the restore process is finished, everything on your Android device will be exactly the same as it was when you created the backup files.
Tip #4. Flashing ZIPs
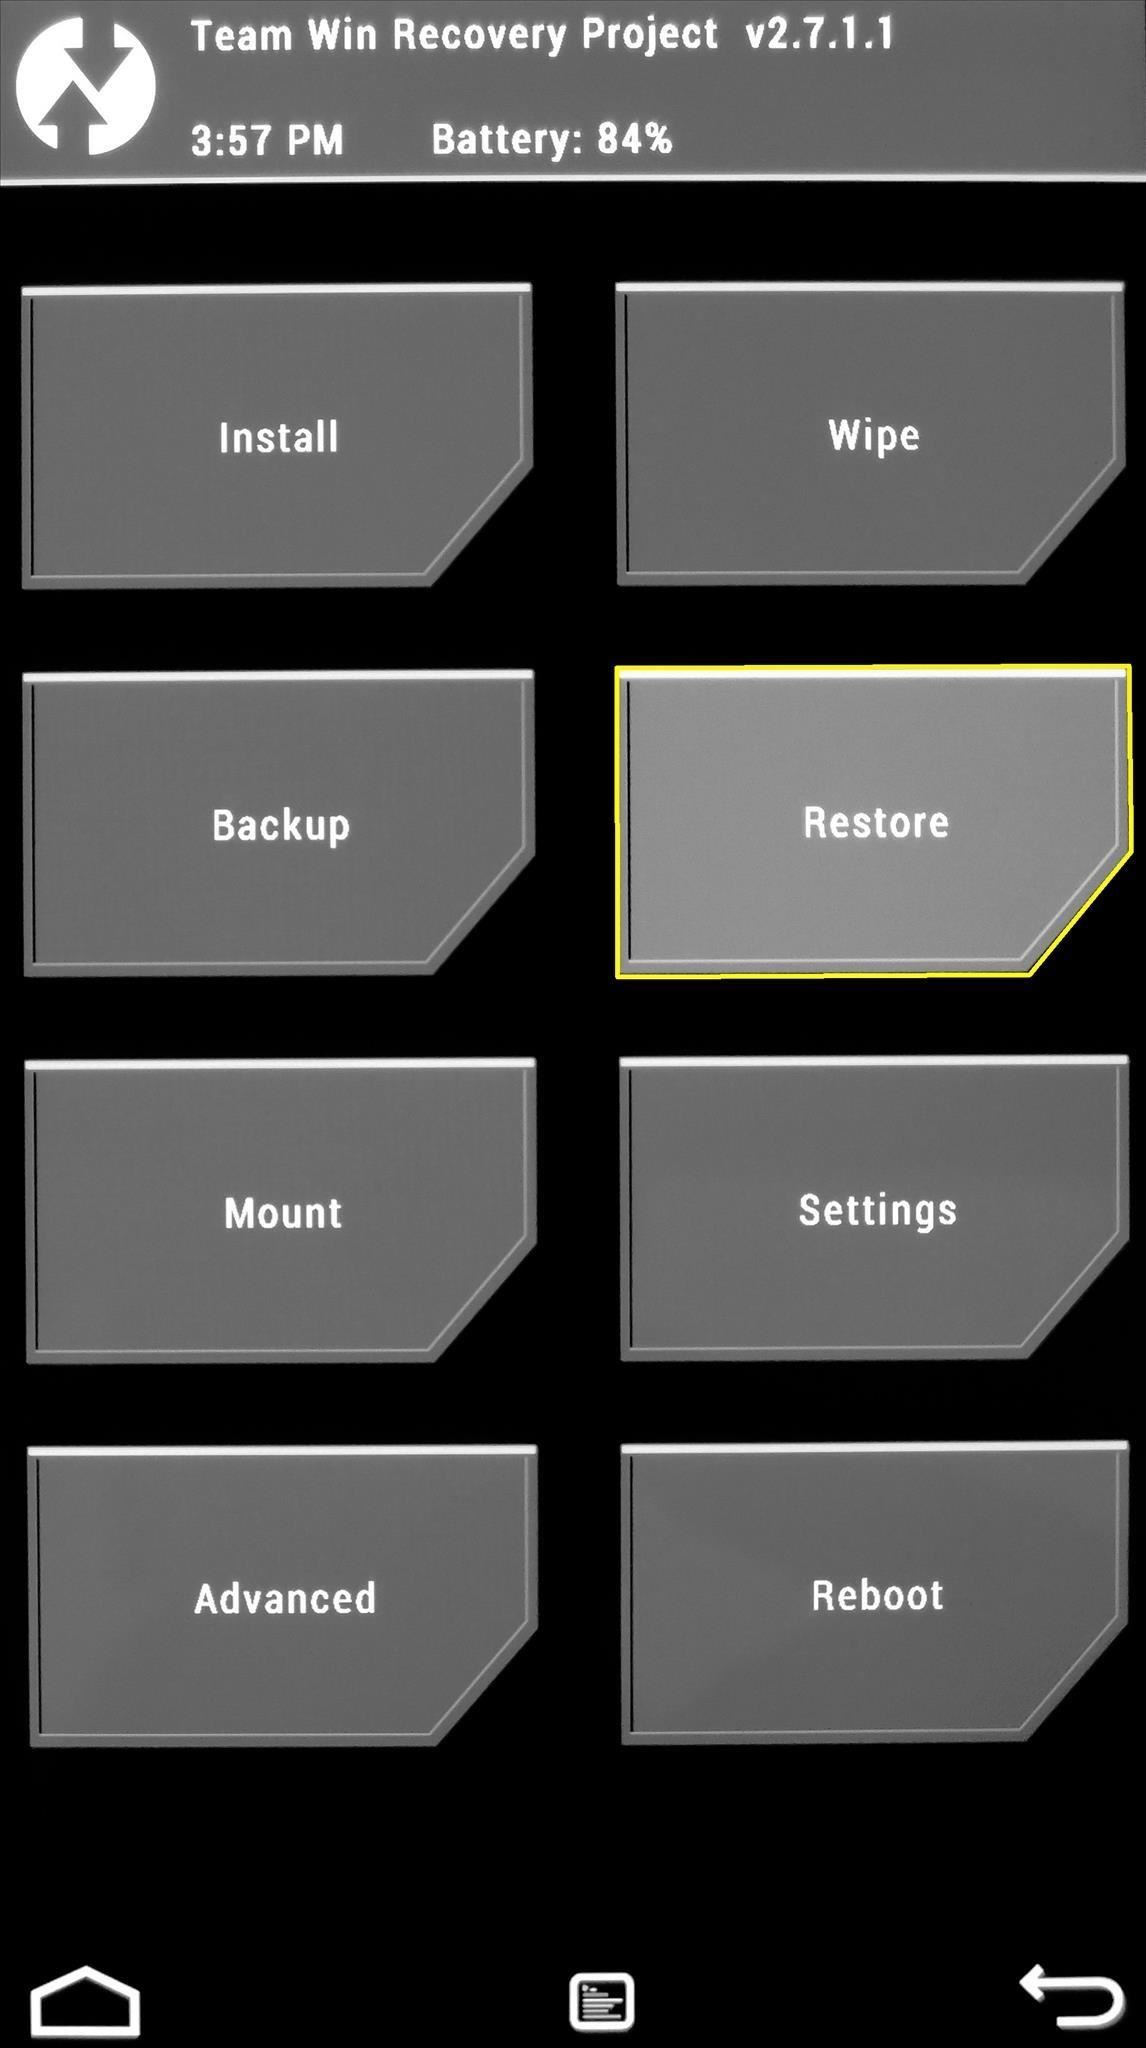
Let’s face it, this is the main reason you installed a custom recovery—to have access to all of the hacks that come in the form of a flashable ZIP file. In fact, it’s such a key feature of TWRP that it’s the very first button on the home screen.
To start flashing a ZIP, just hit the Install button on TWRP’s main menu. From here, you’ll be shown your device’s internal storage folder tree. As a rule of thumb, ZIPs that you’ve downloaded from the internet will be in your Download folder, so head in there.

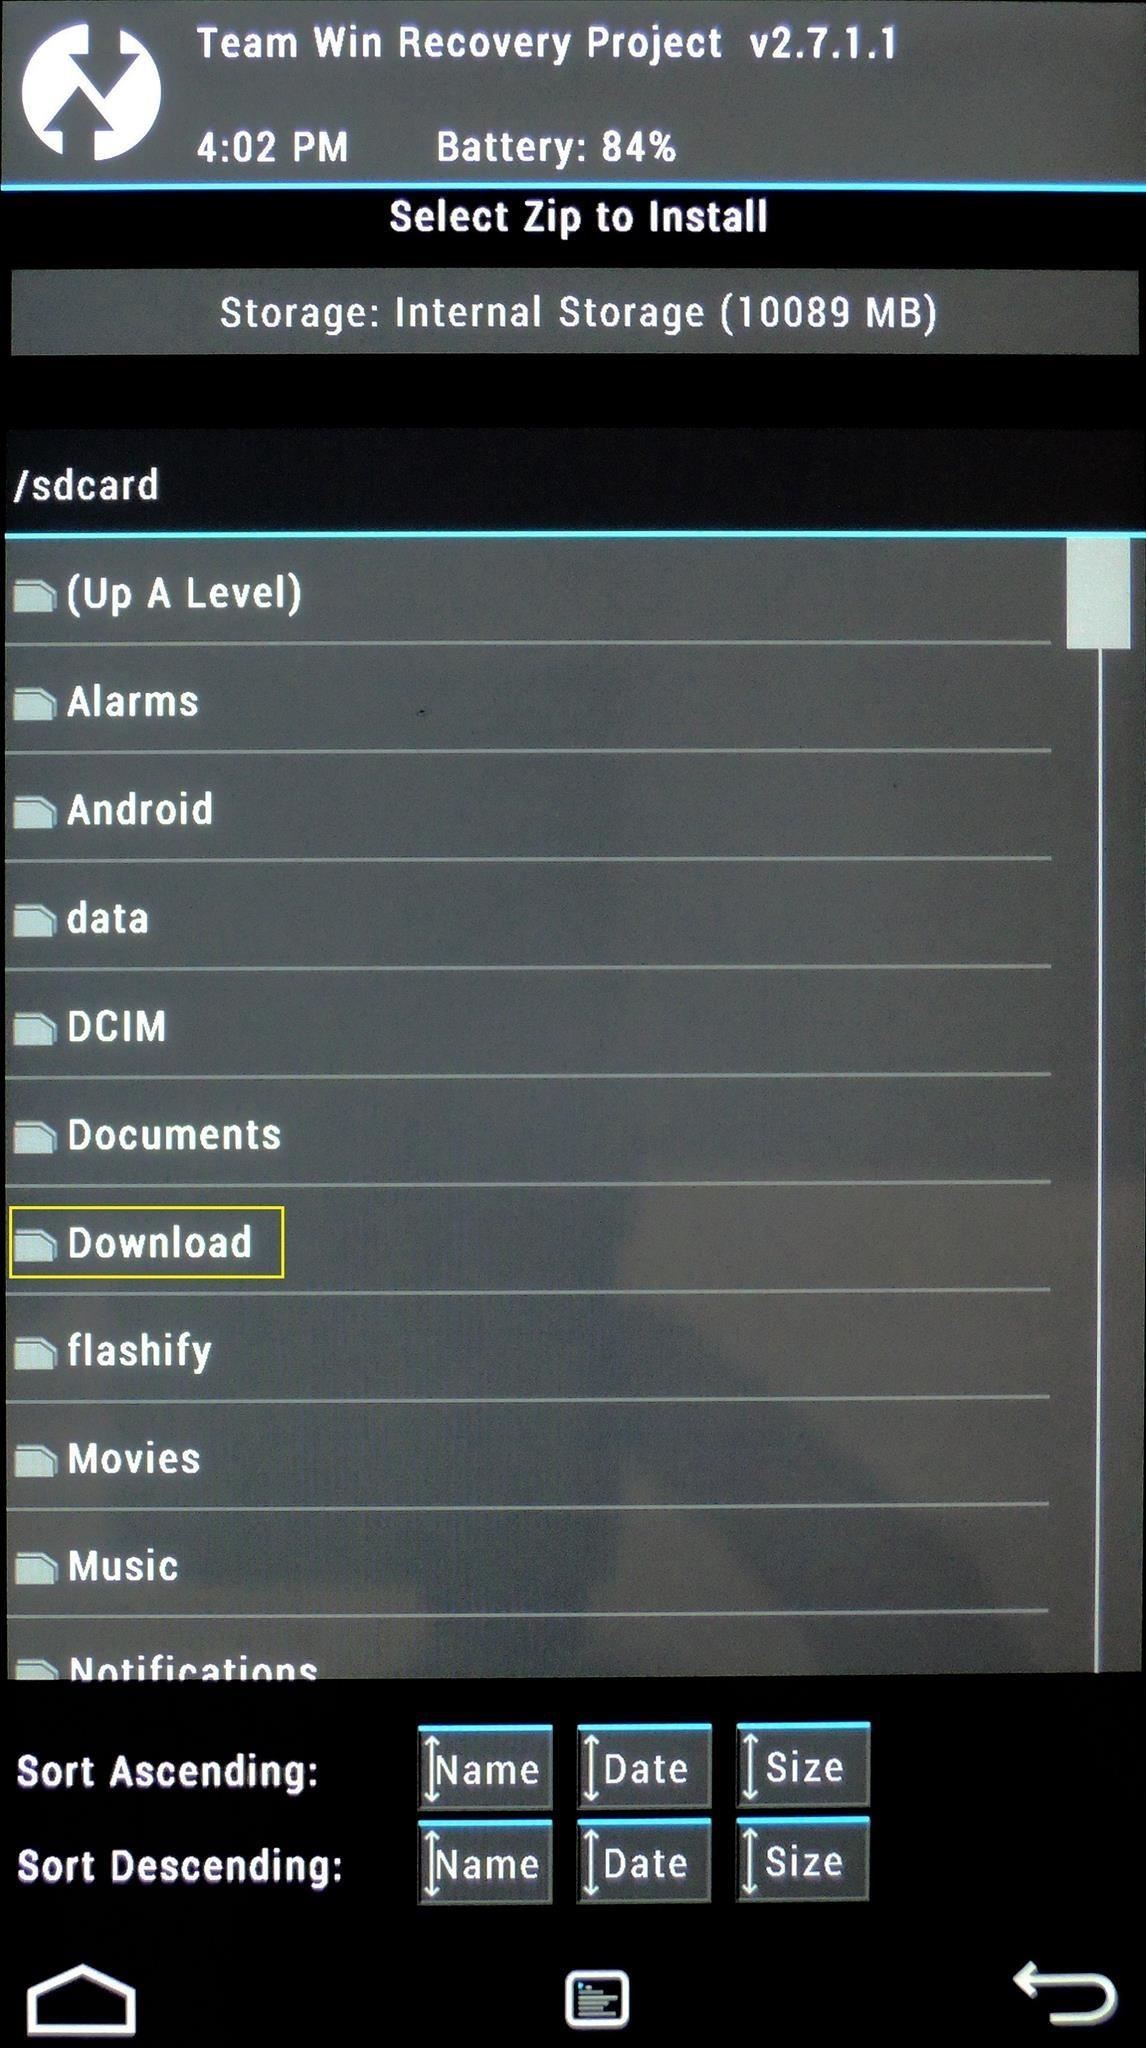
From here, it’s just a matter of tapping the ZIP file in question, then swiping the slider at the bottom to flash it.

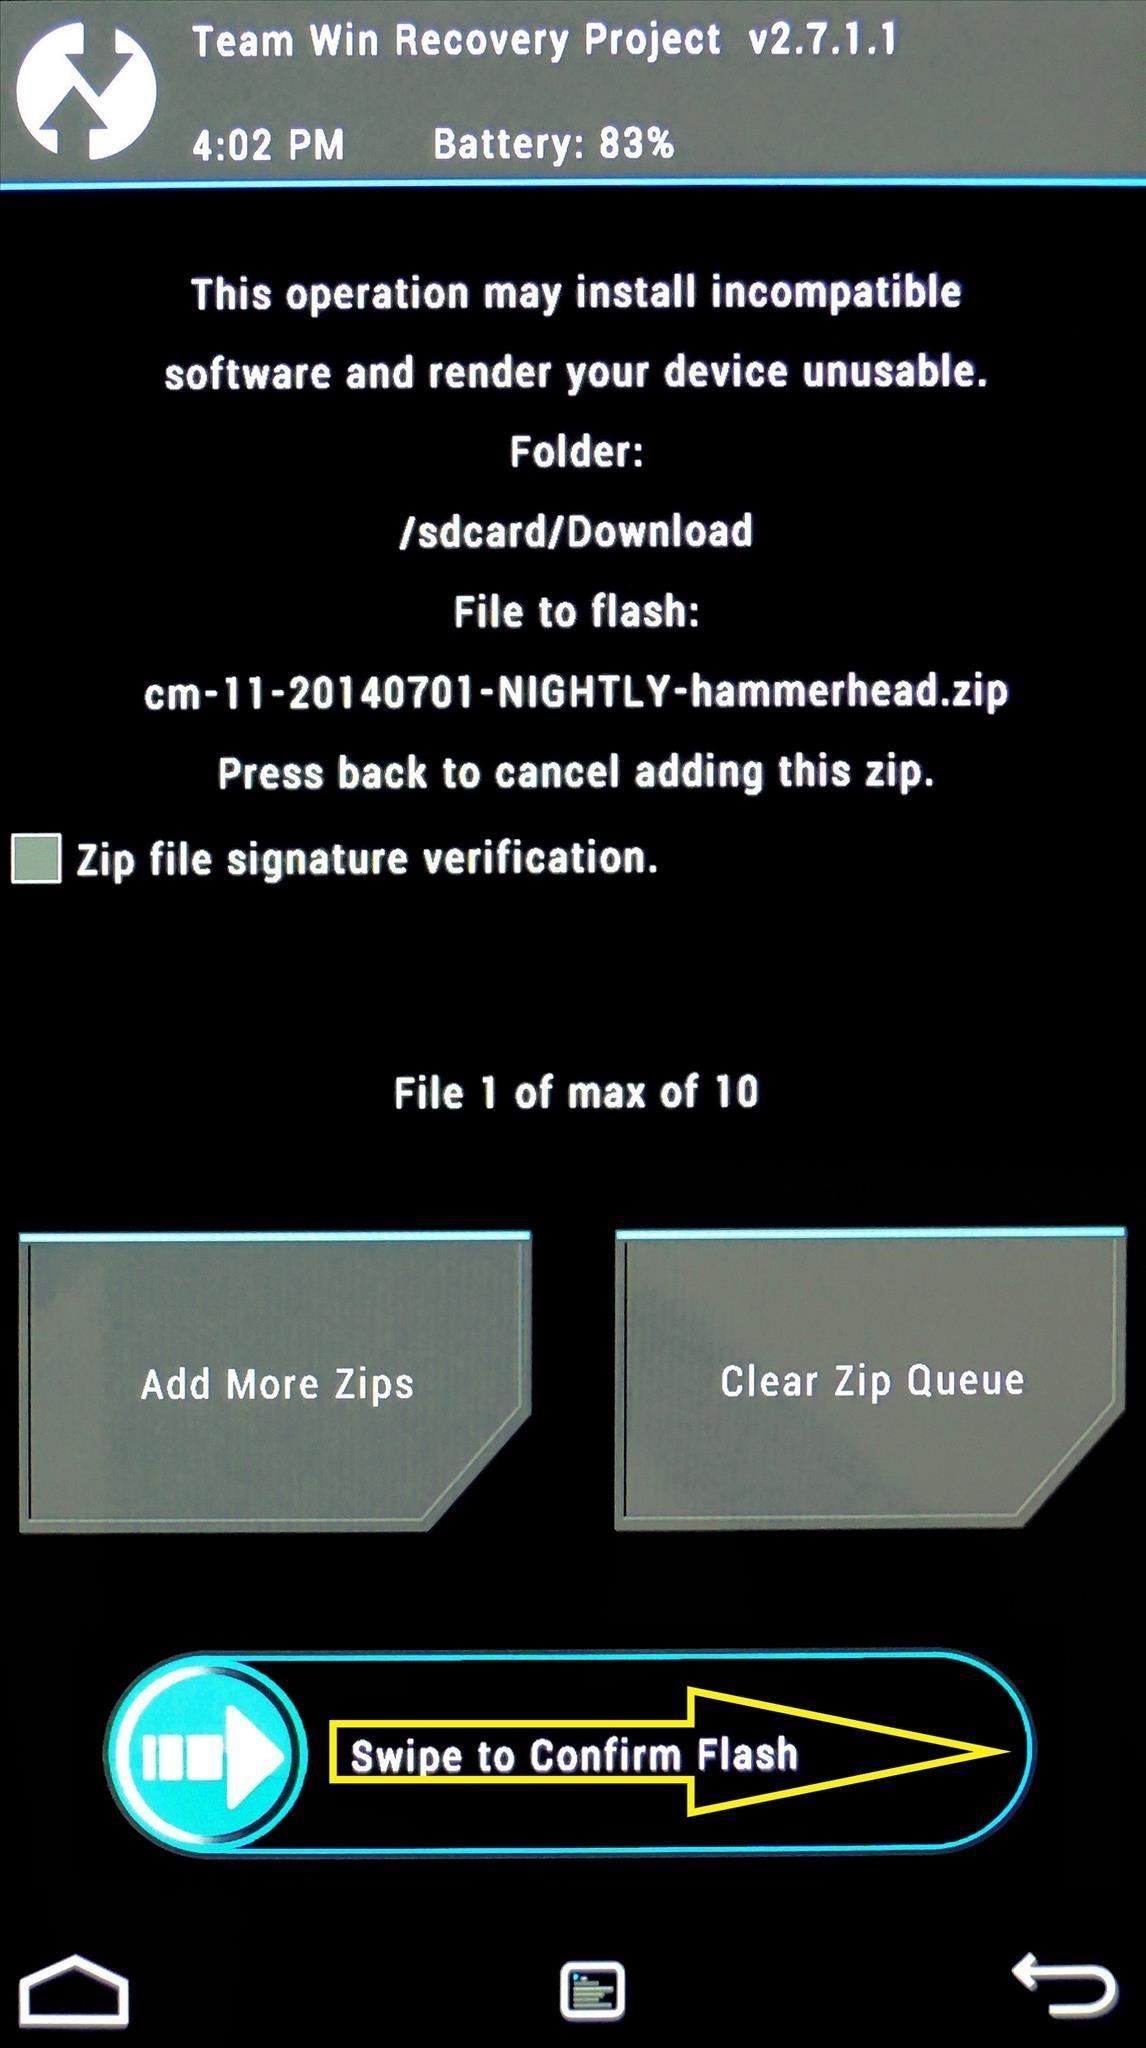
Flashing More Than One ZIP at Once
But let’s say there are multiple ZIPs that you want to flash at one time. This is common with custom ROMs that require a separate ZIP for access to Google apps and such.
When you’ve tapped the first ZIP, rather than swiping the slider to install it, then repeating the process for all the ZIPs in question, simply hit the Add More Zips button. This will take you back to the folder tree view, where you can select your second ZIP. Hit Add More ZIPs again to add a third, and so on.
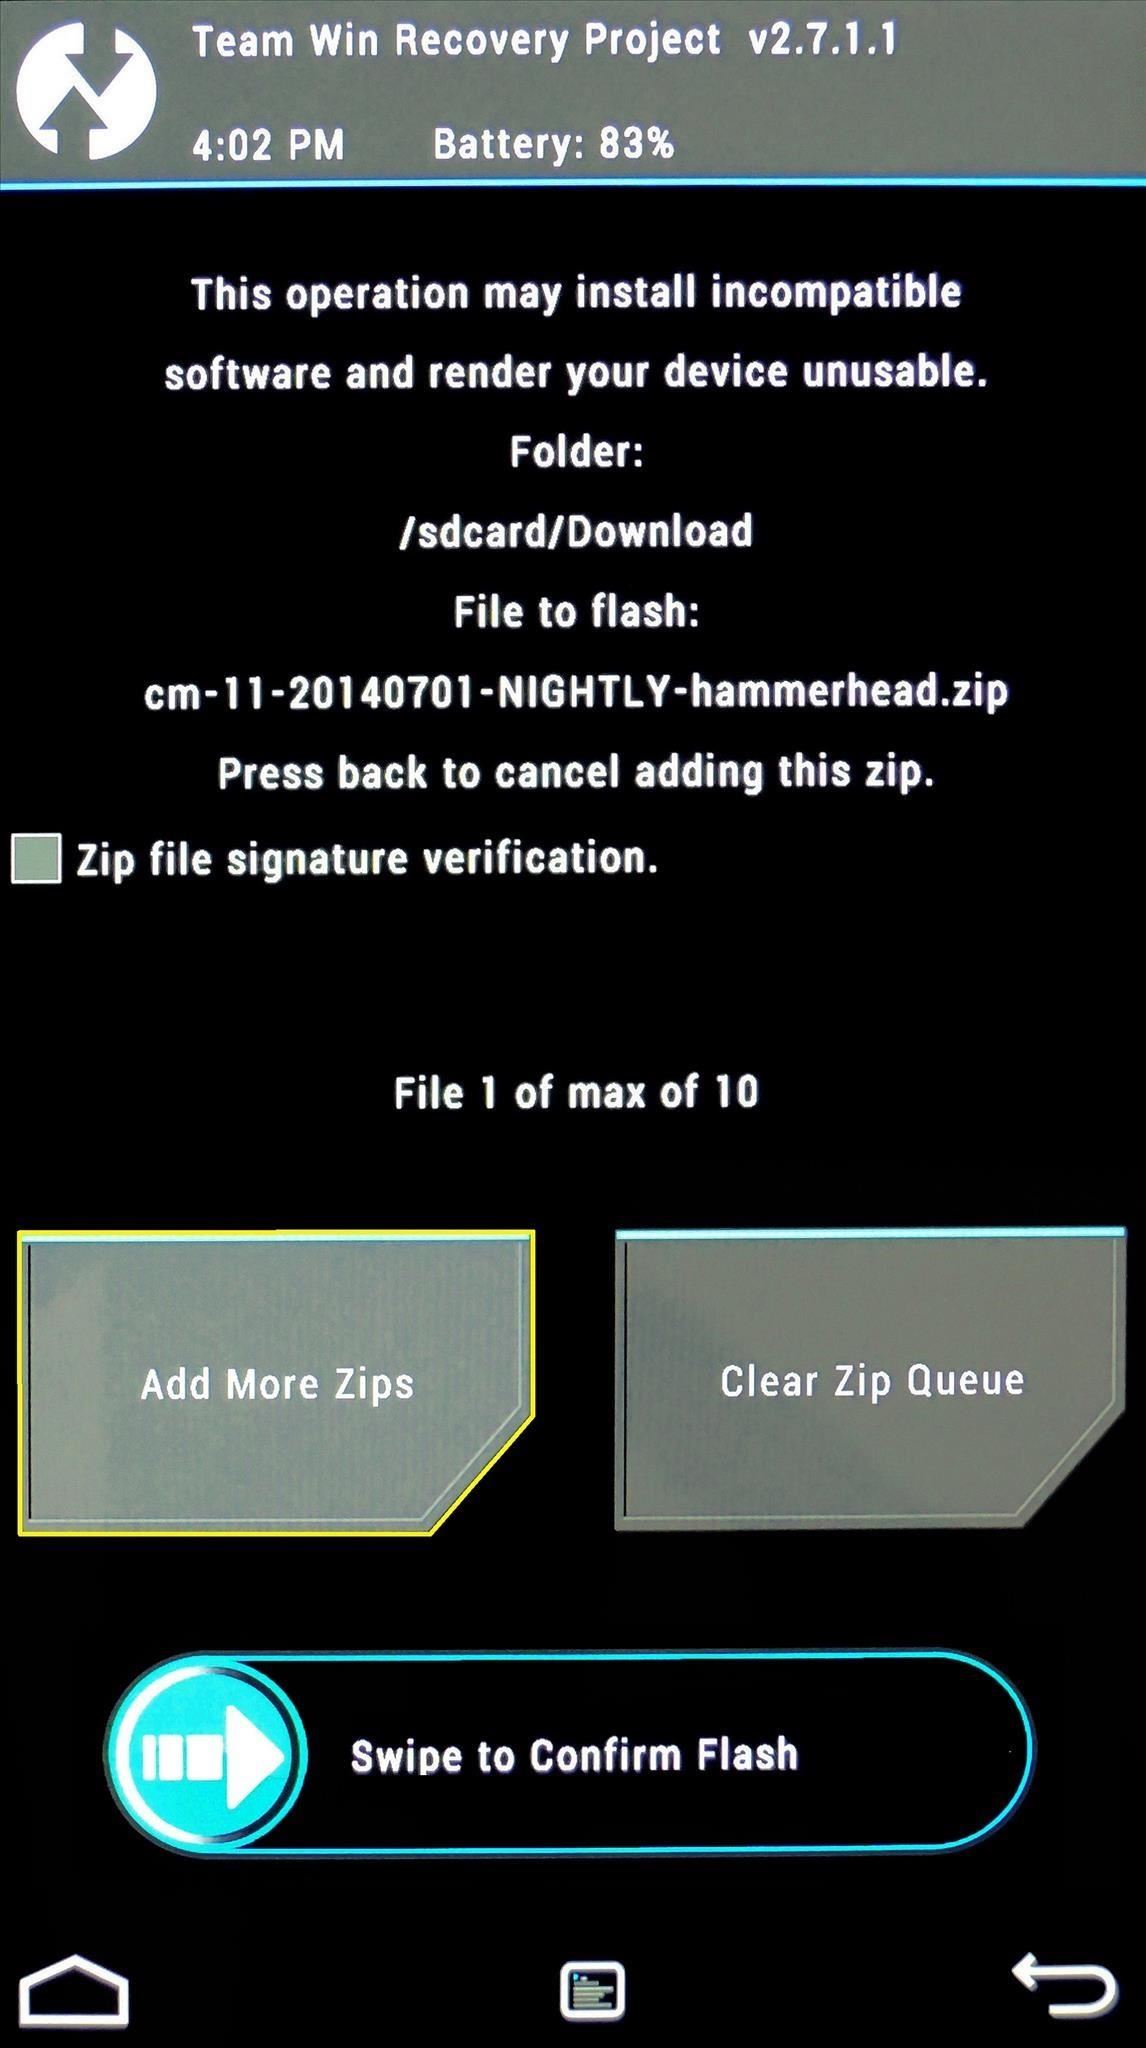
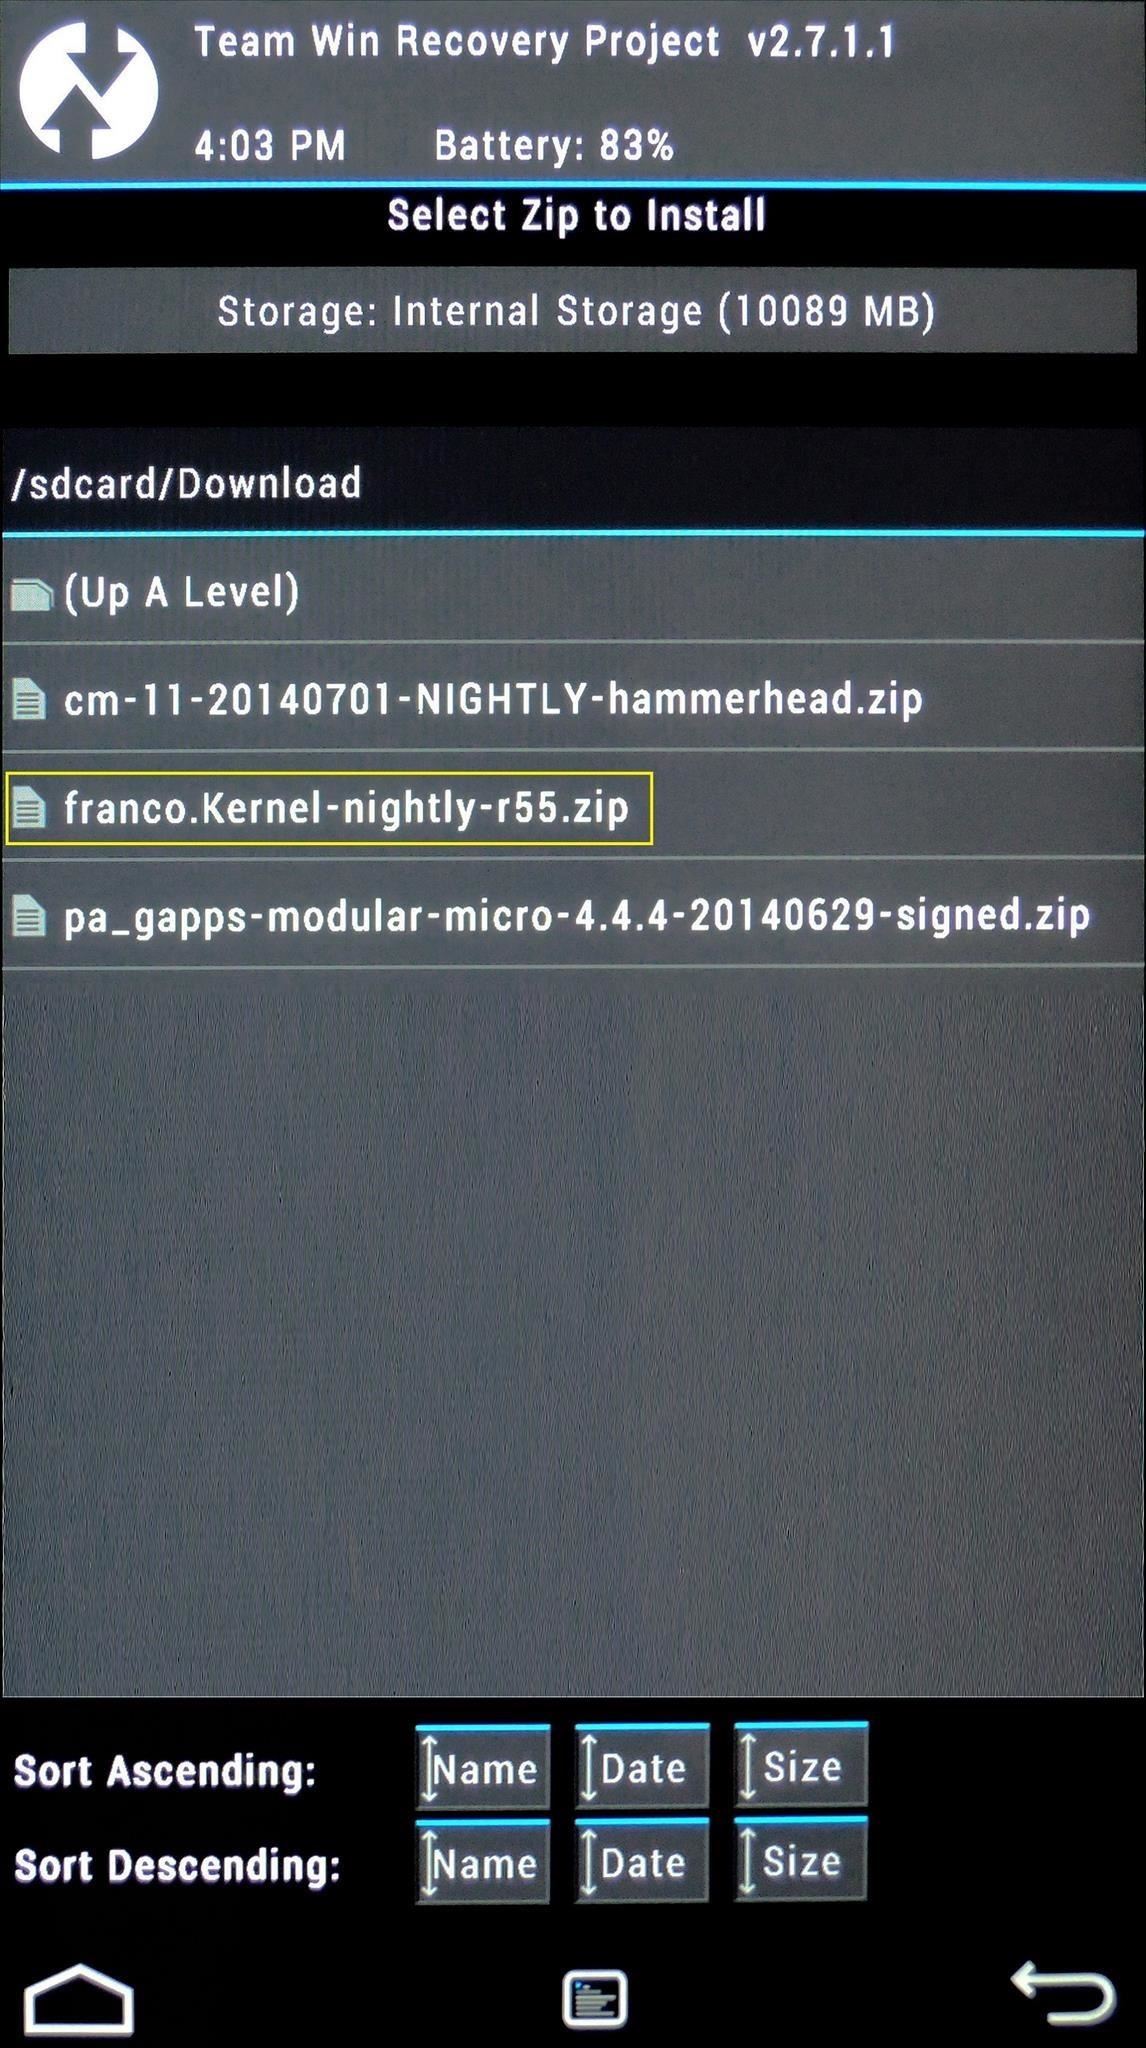
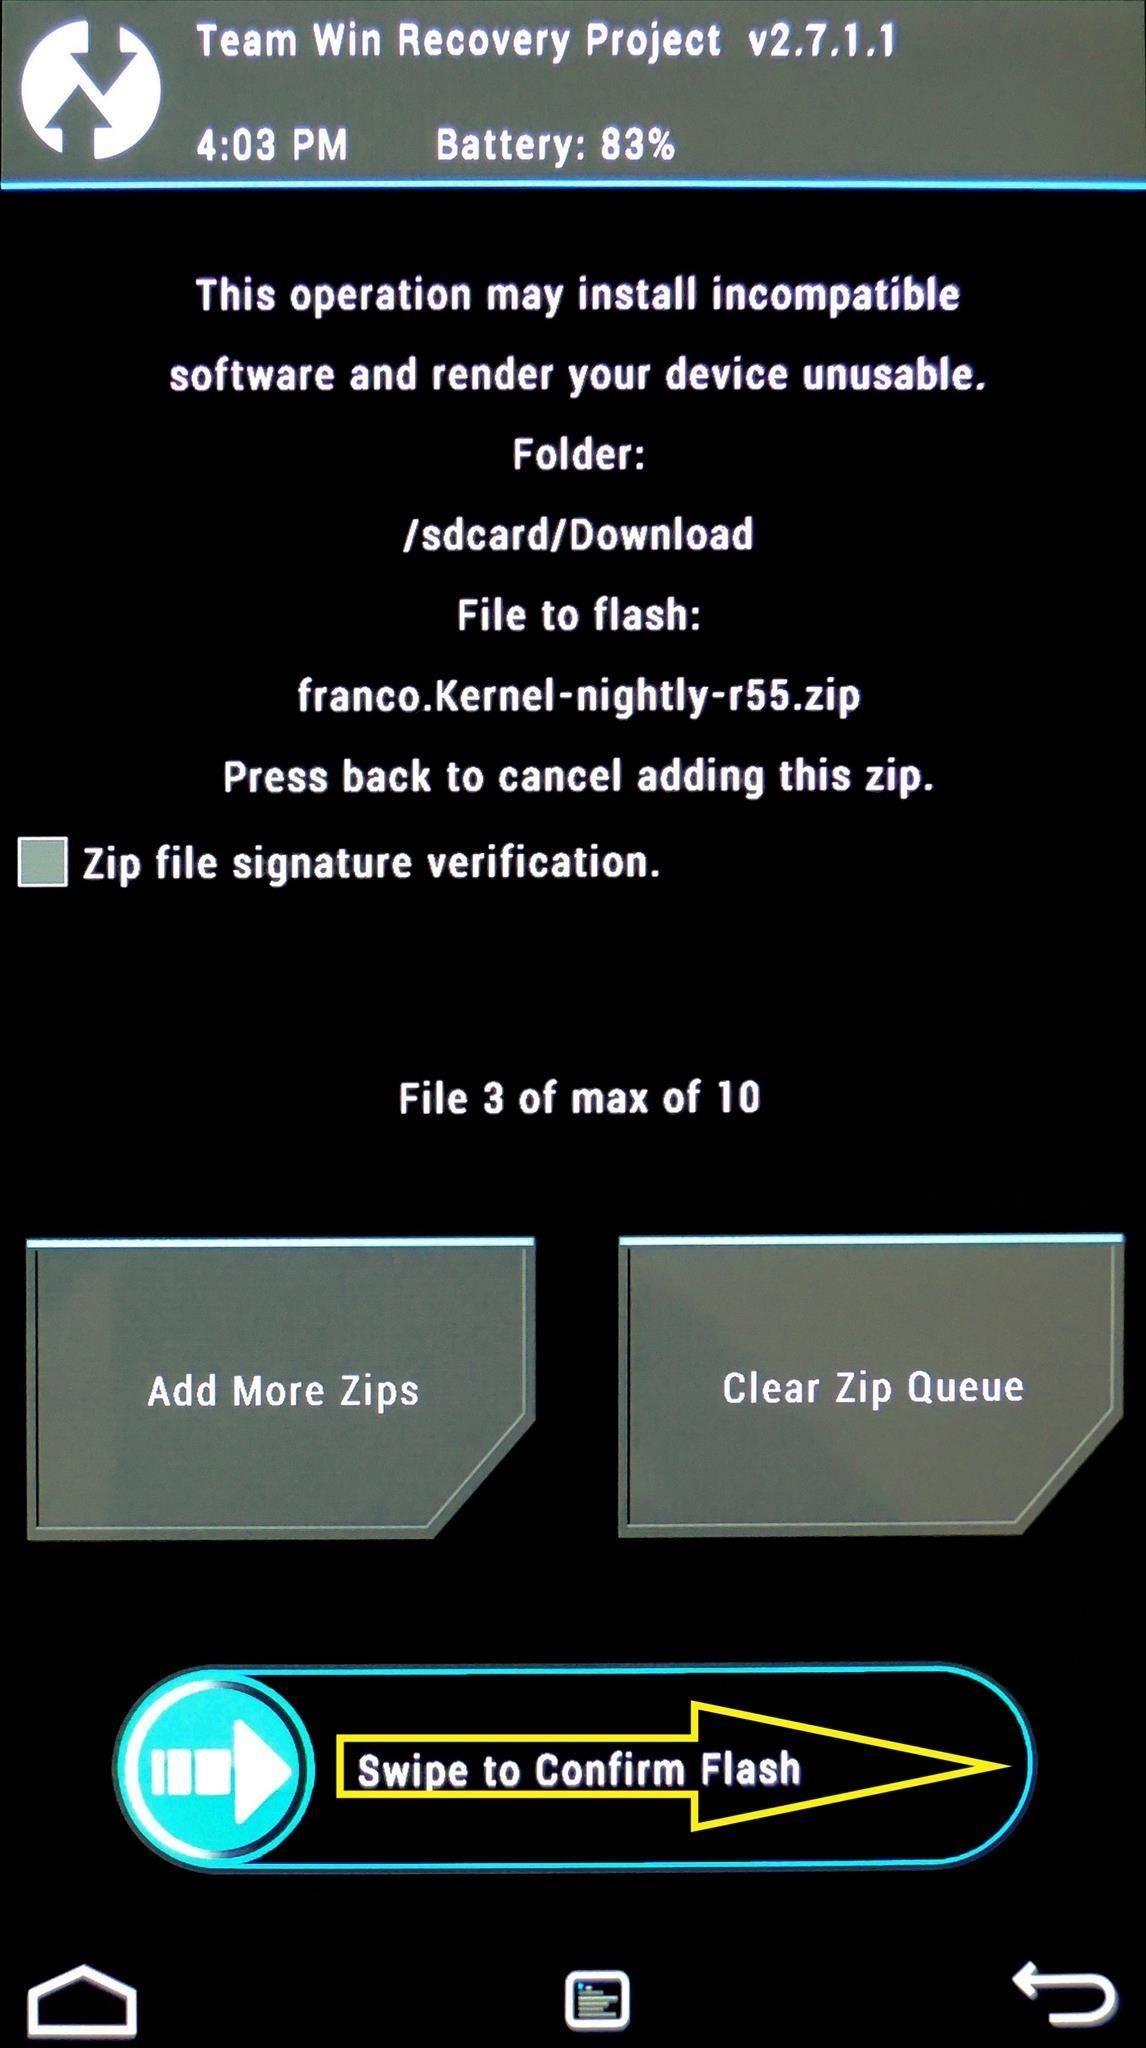
When you’re satisfied with your selections, swipe the slider at the bottom, and all of your ZIPs will be flashed in sequential order.
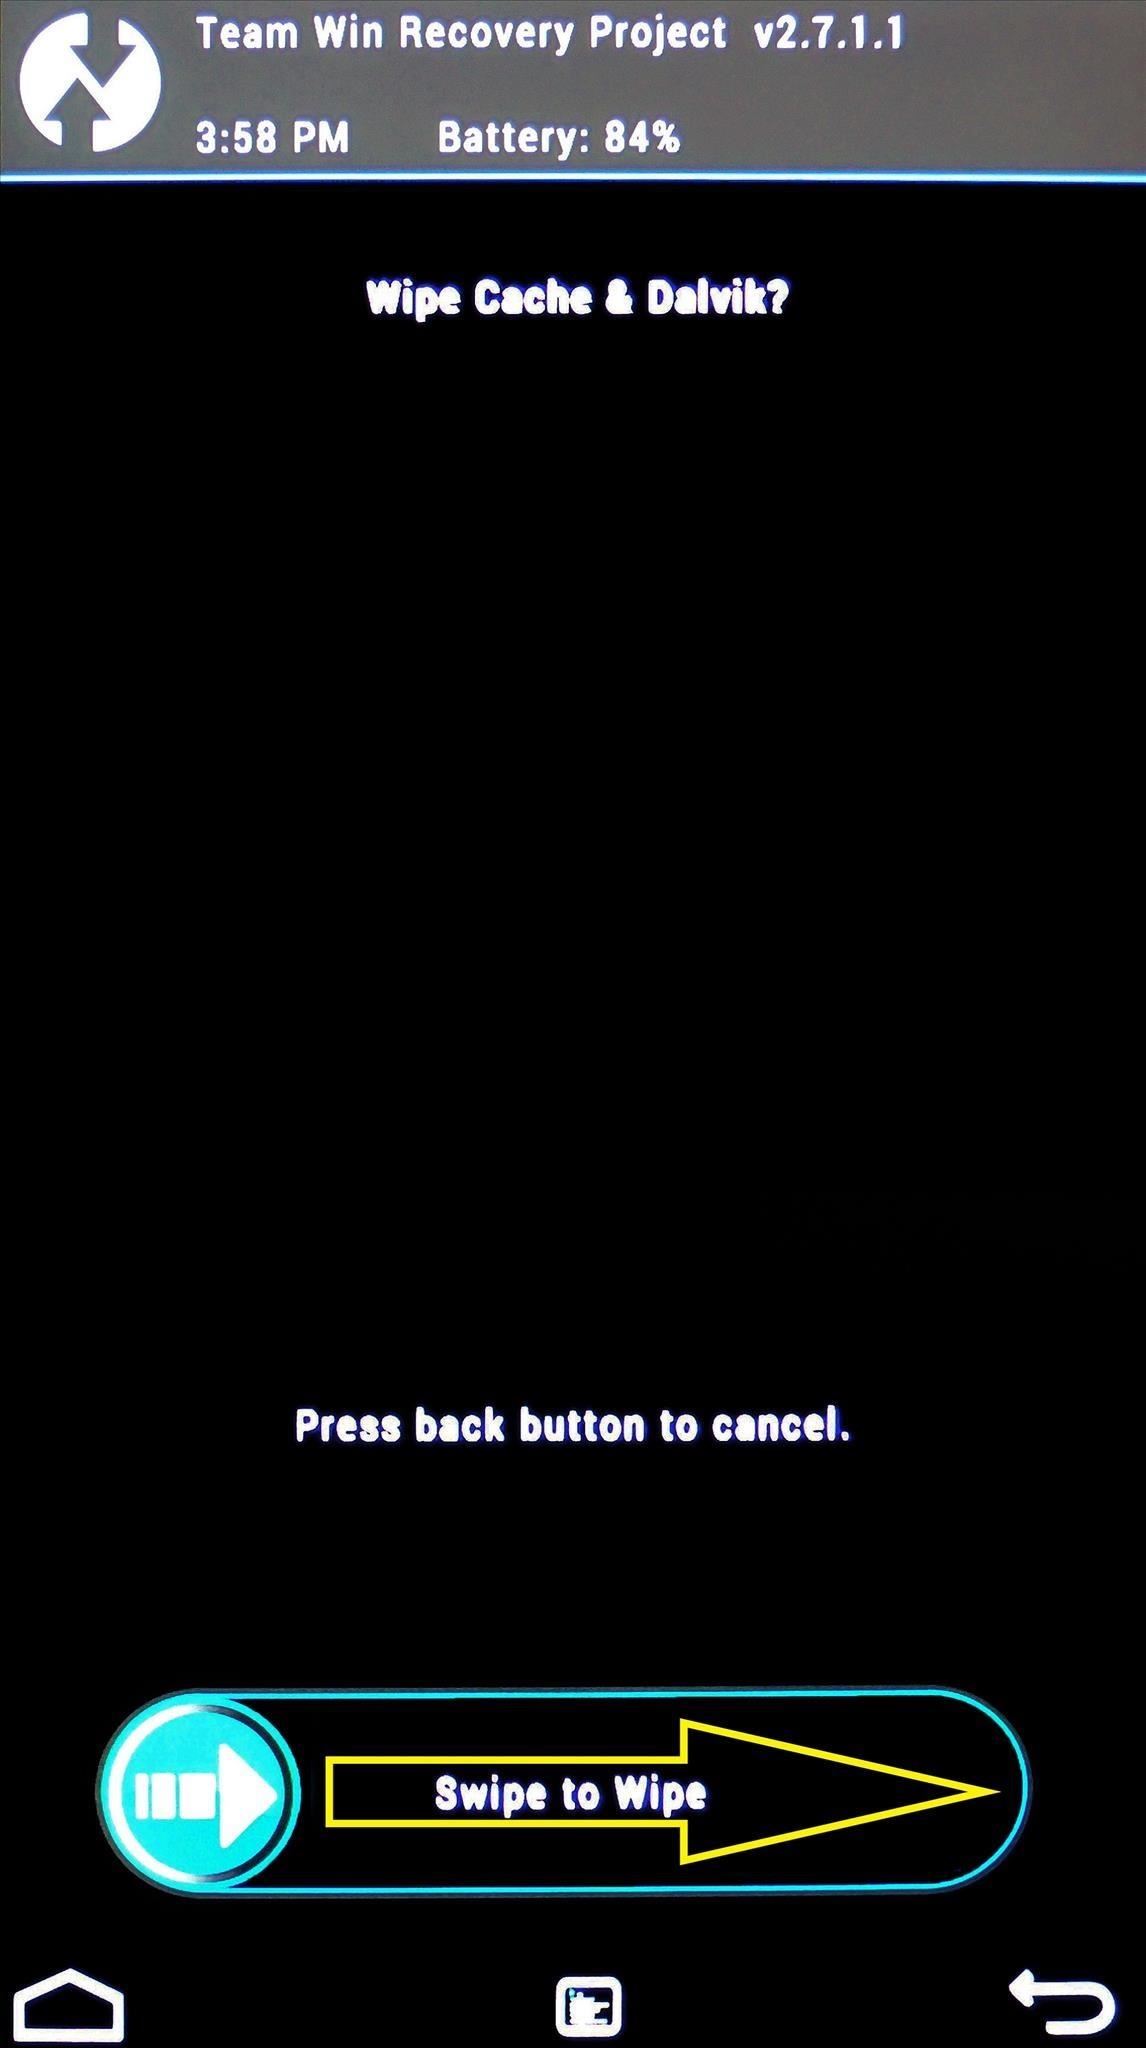
Finalizing the Flashing Process
After installing a ZIP file, TWRP gives you a few options: Home, Wipe Cache/Dalvik and Reboot System. The first option takes you back to TWRP’s main screen, and the third option should be self-explanatory. The second option, Wipe Cache/Dalvik, is one that should be noted.
Android accumulates various bits of data as you continue to use it. Sometimes, this data is specific to your current setup. Certain mods will cause conflicts between the new functionality they bring and the existing data on your device.
Most mods, however, will not cause a conflict with this data. But when in doubt, wipe it out—simply tap Wipe Cache/Dalvik after flashing a ZIP, then swipe the slider at the bottom to remove any potentially-conflicting data.

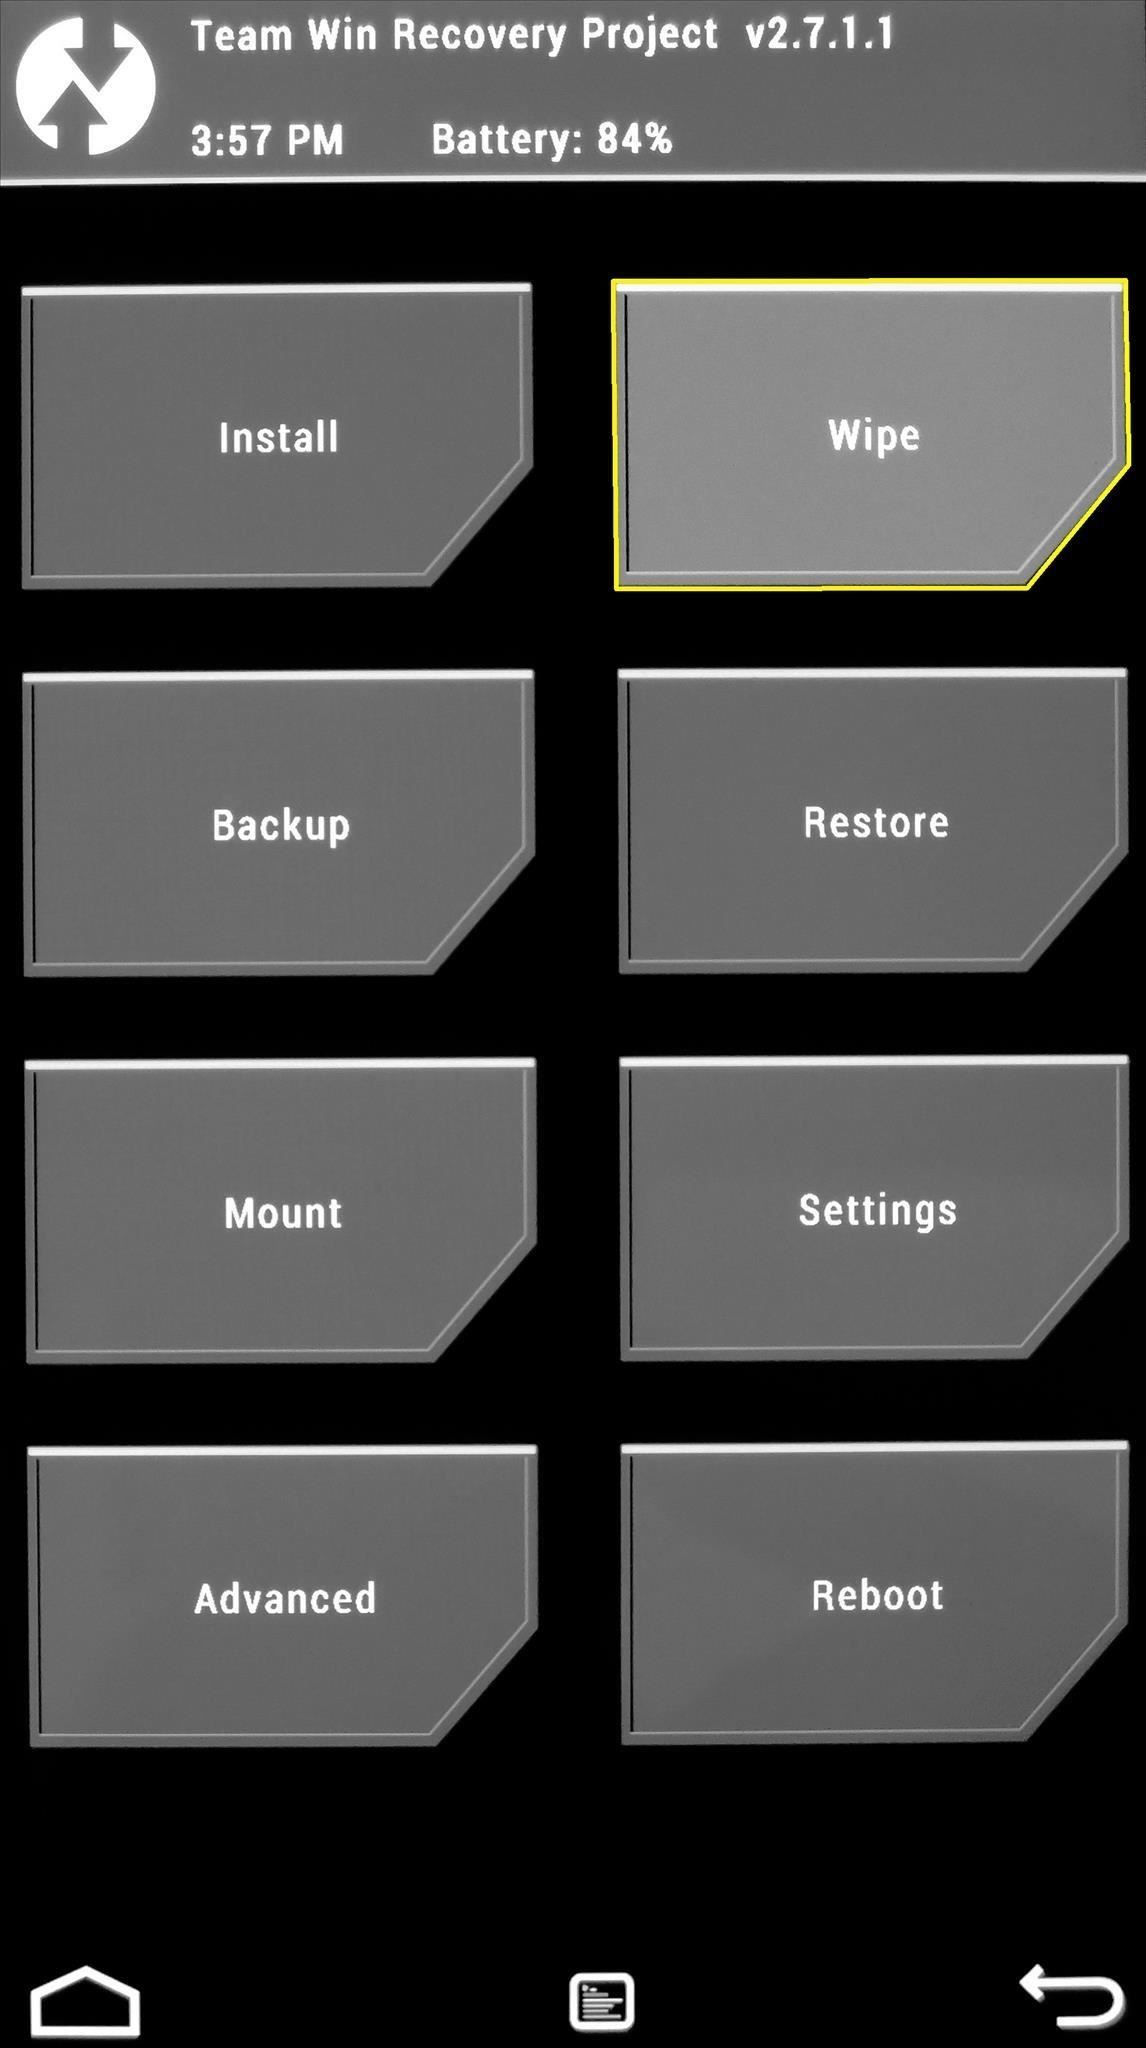
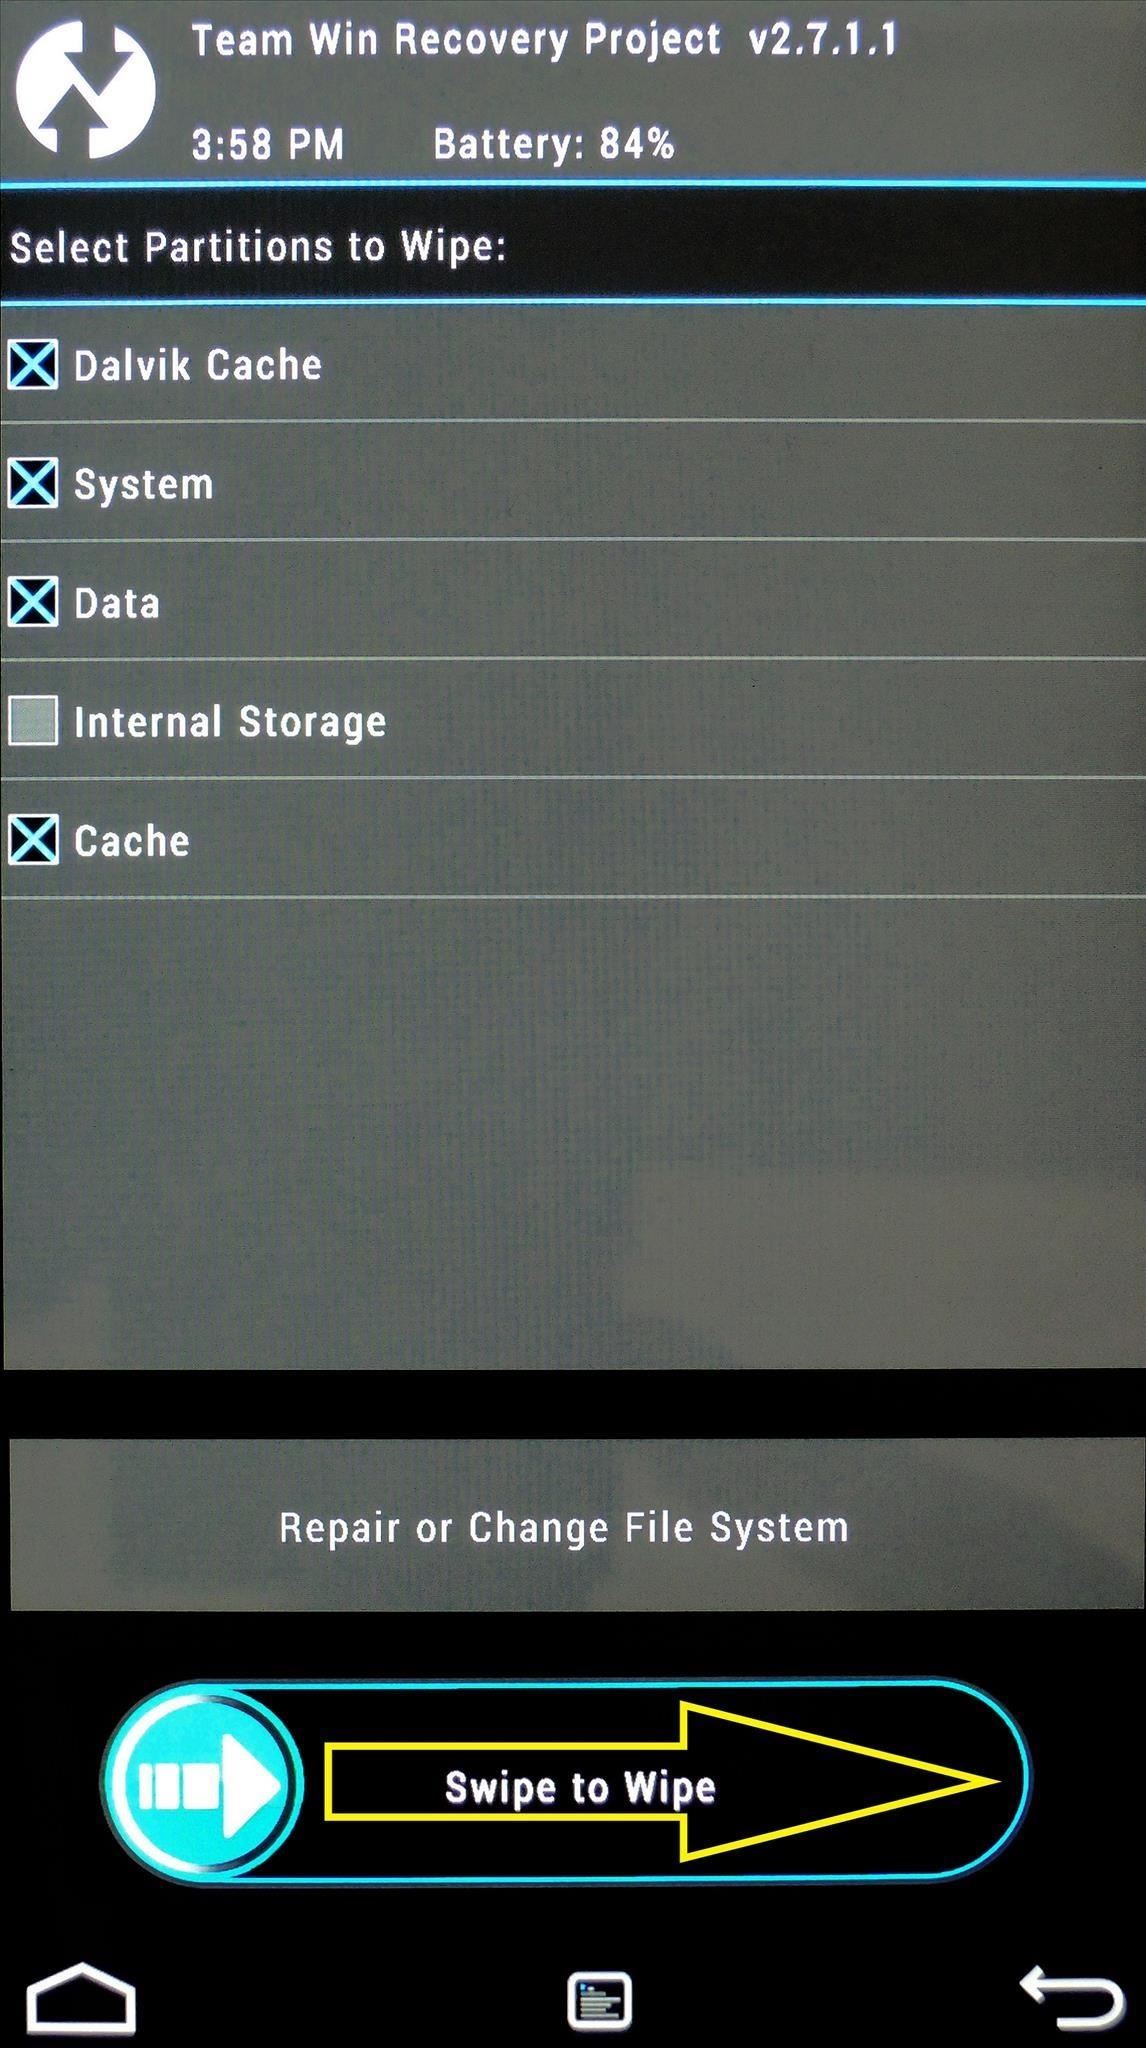
Tip #5. Wiping Existing Data
When using TWRP to install a new ROM, it’s a good idea to wipe the existing firmware to give the new system a clean slate upon which to install.
So before installing CyanogenMod, for instance, you’ll want to wipe the stock firmware from your device so there are no conflicts. From TWRP’s main screen, tap Wipe to begin. The preset wipe mode will work perfectly fine in most cases, so swipe the slider at the bottom to perform the wipe.
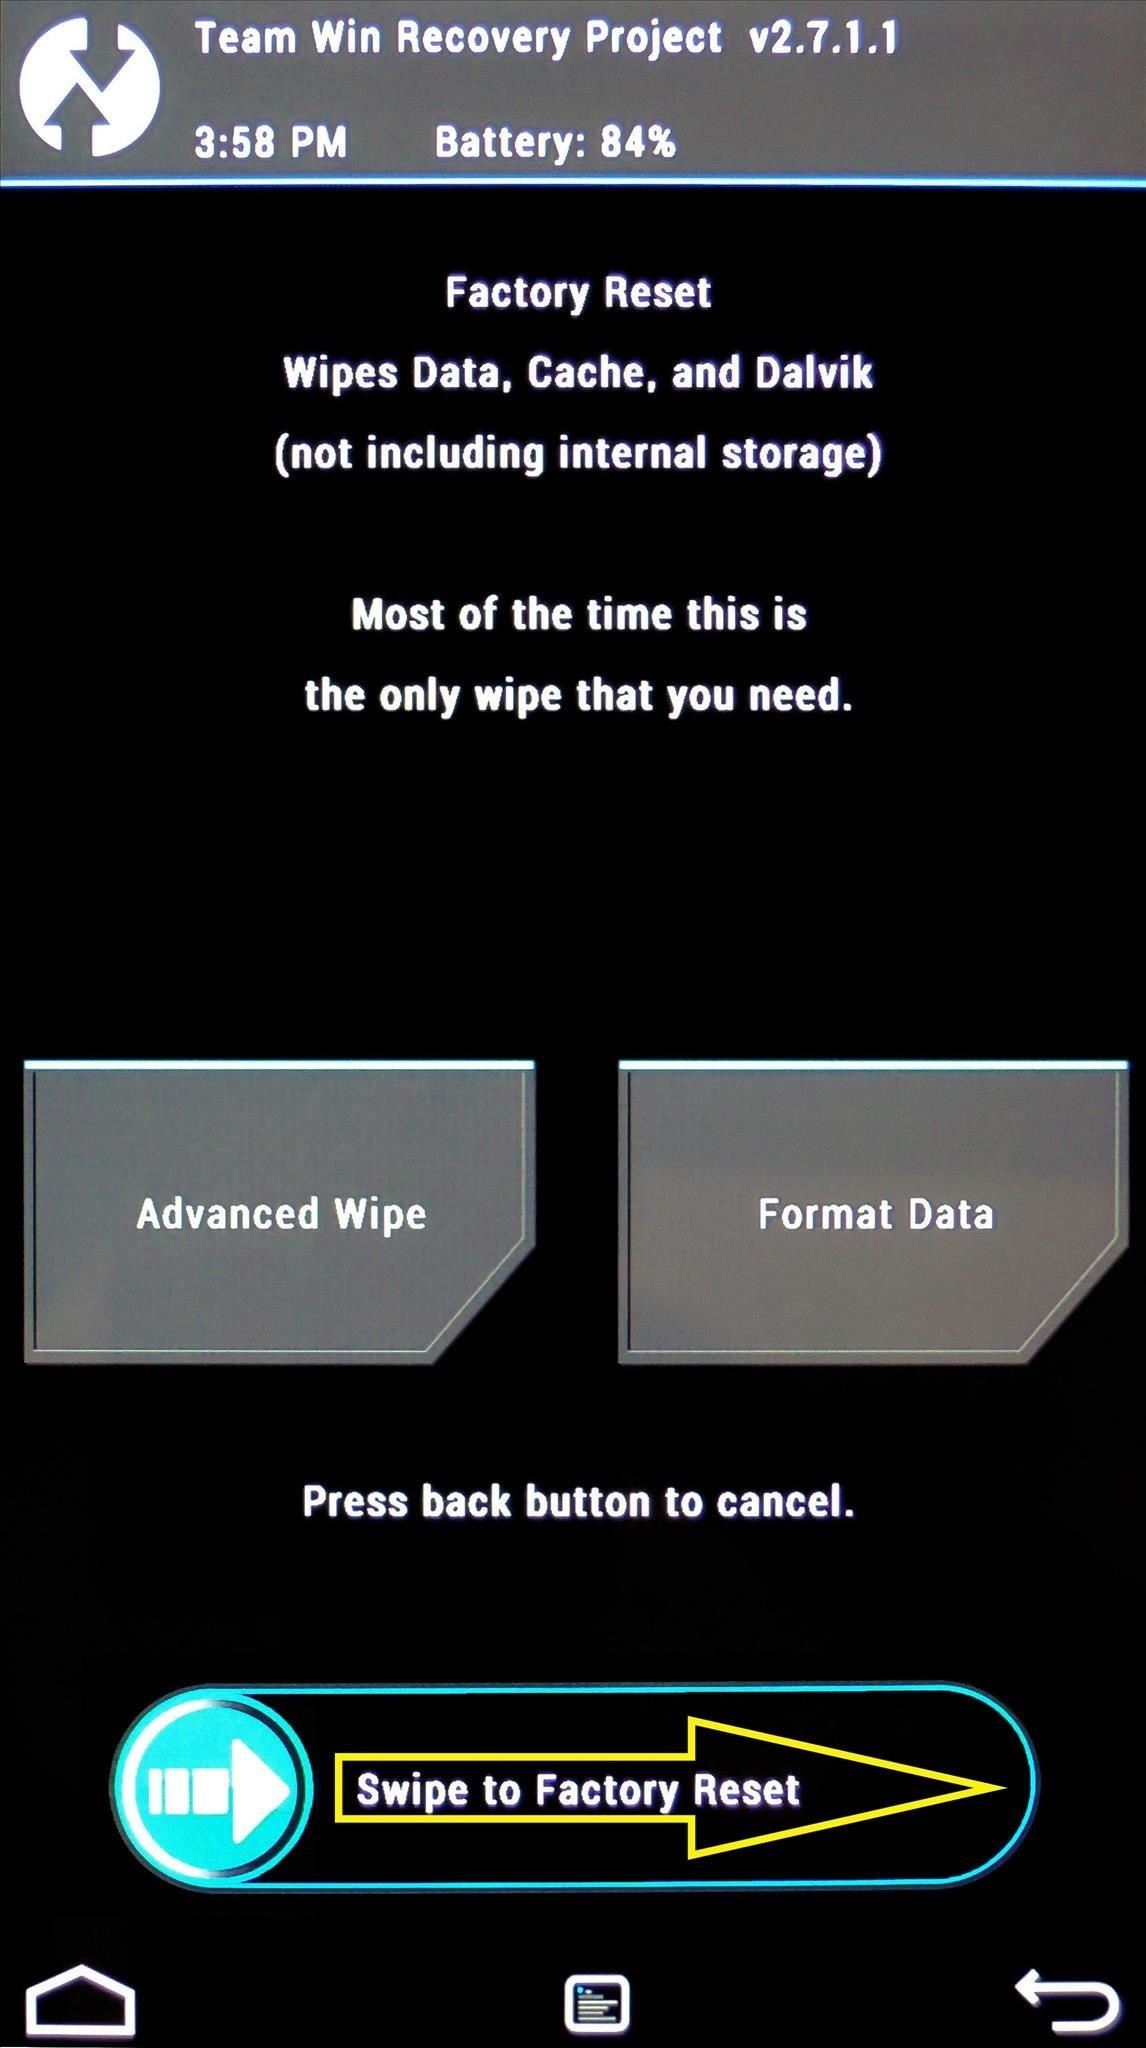
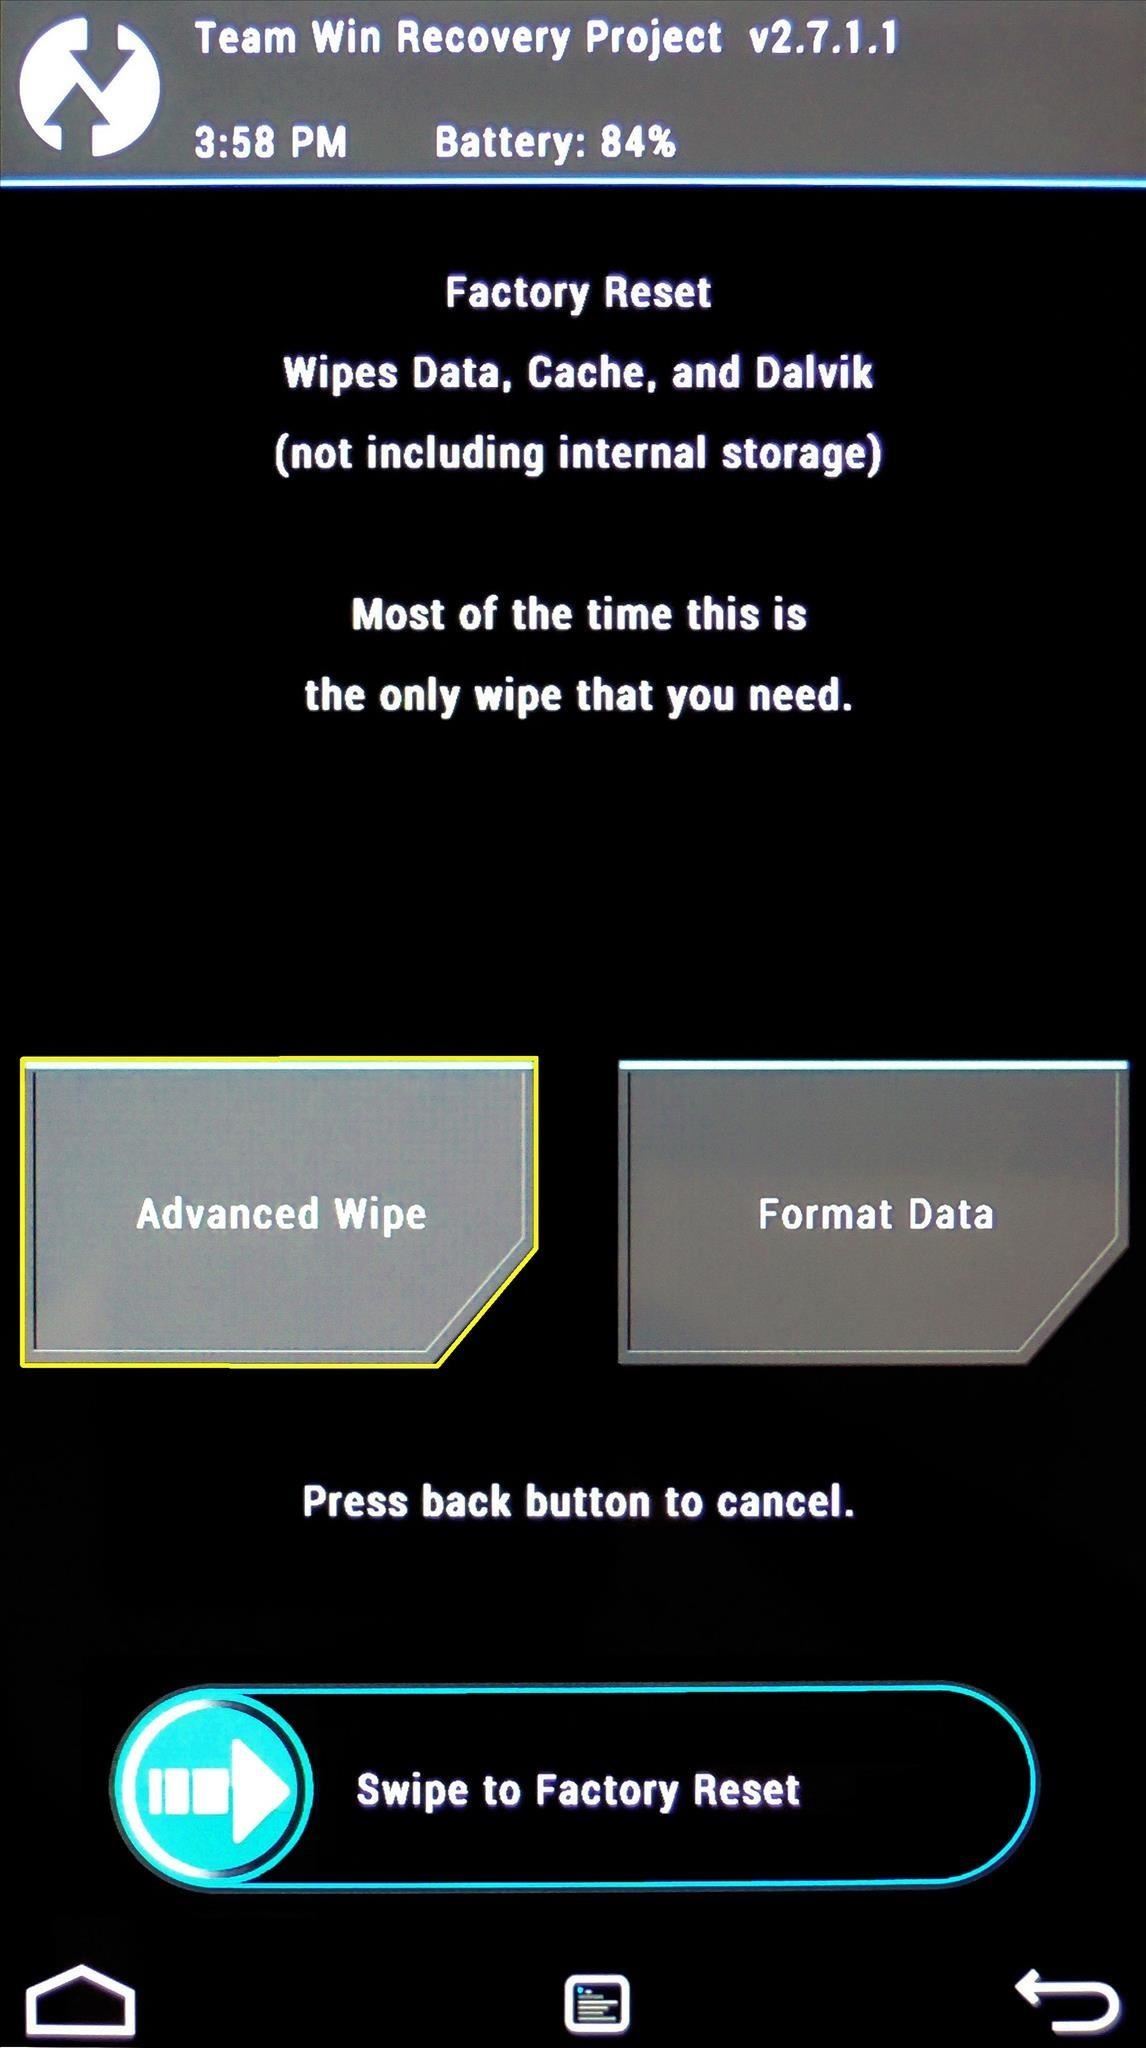
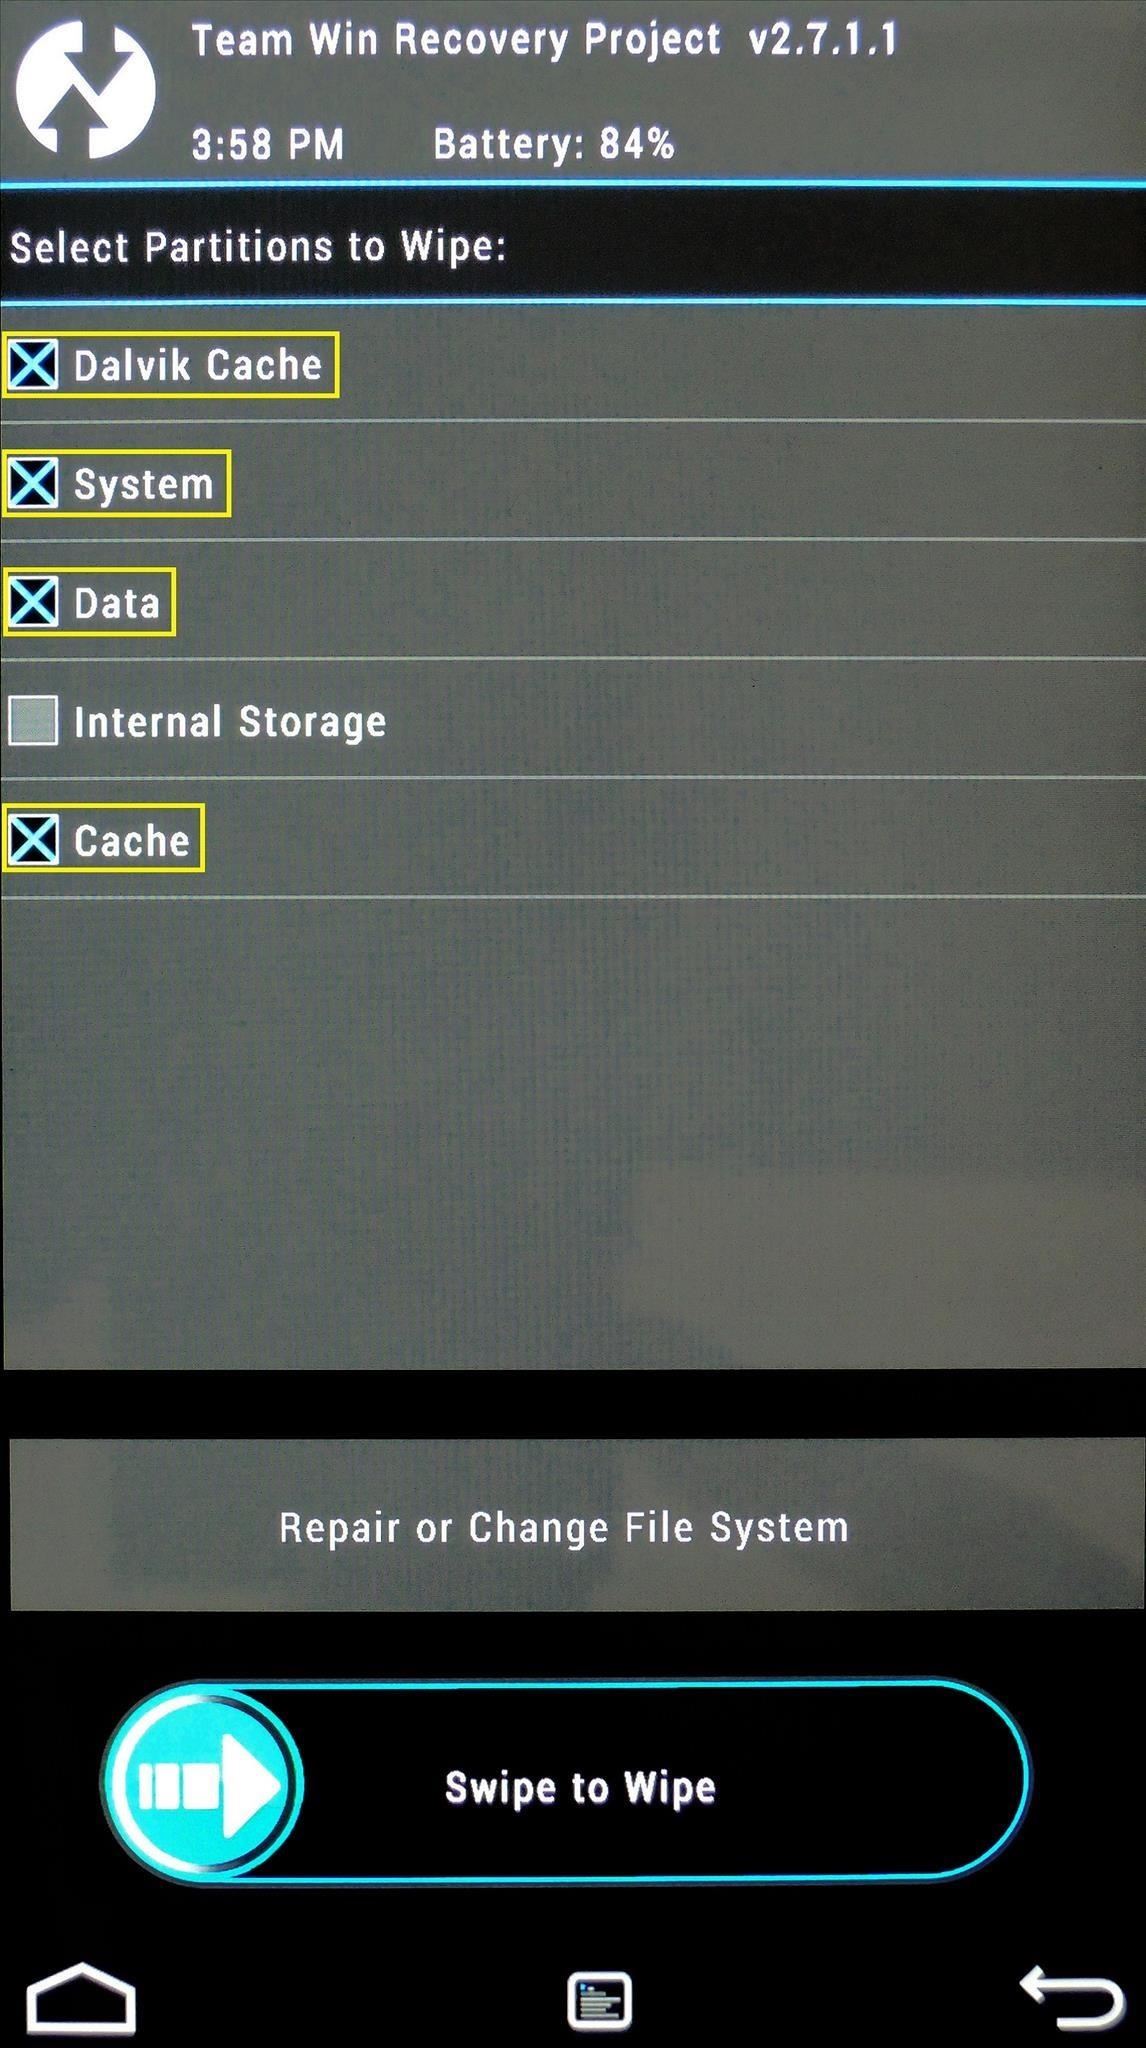
If you’re experiencing bugs and you want a completely fresh start, or you just want to be entirely sure there’s no preexisting data left to cause conflicts, you can use the Advanced Wipe feature from the same screen. From here, just tick the boxes next to Dalvik Cache, System, Data and Cache, then swipe the slider at the bottom to perform a full wipe.
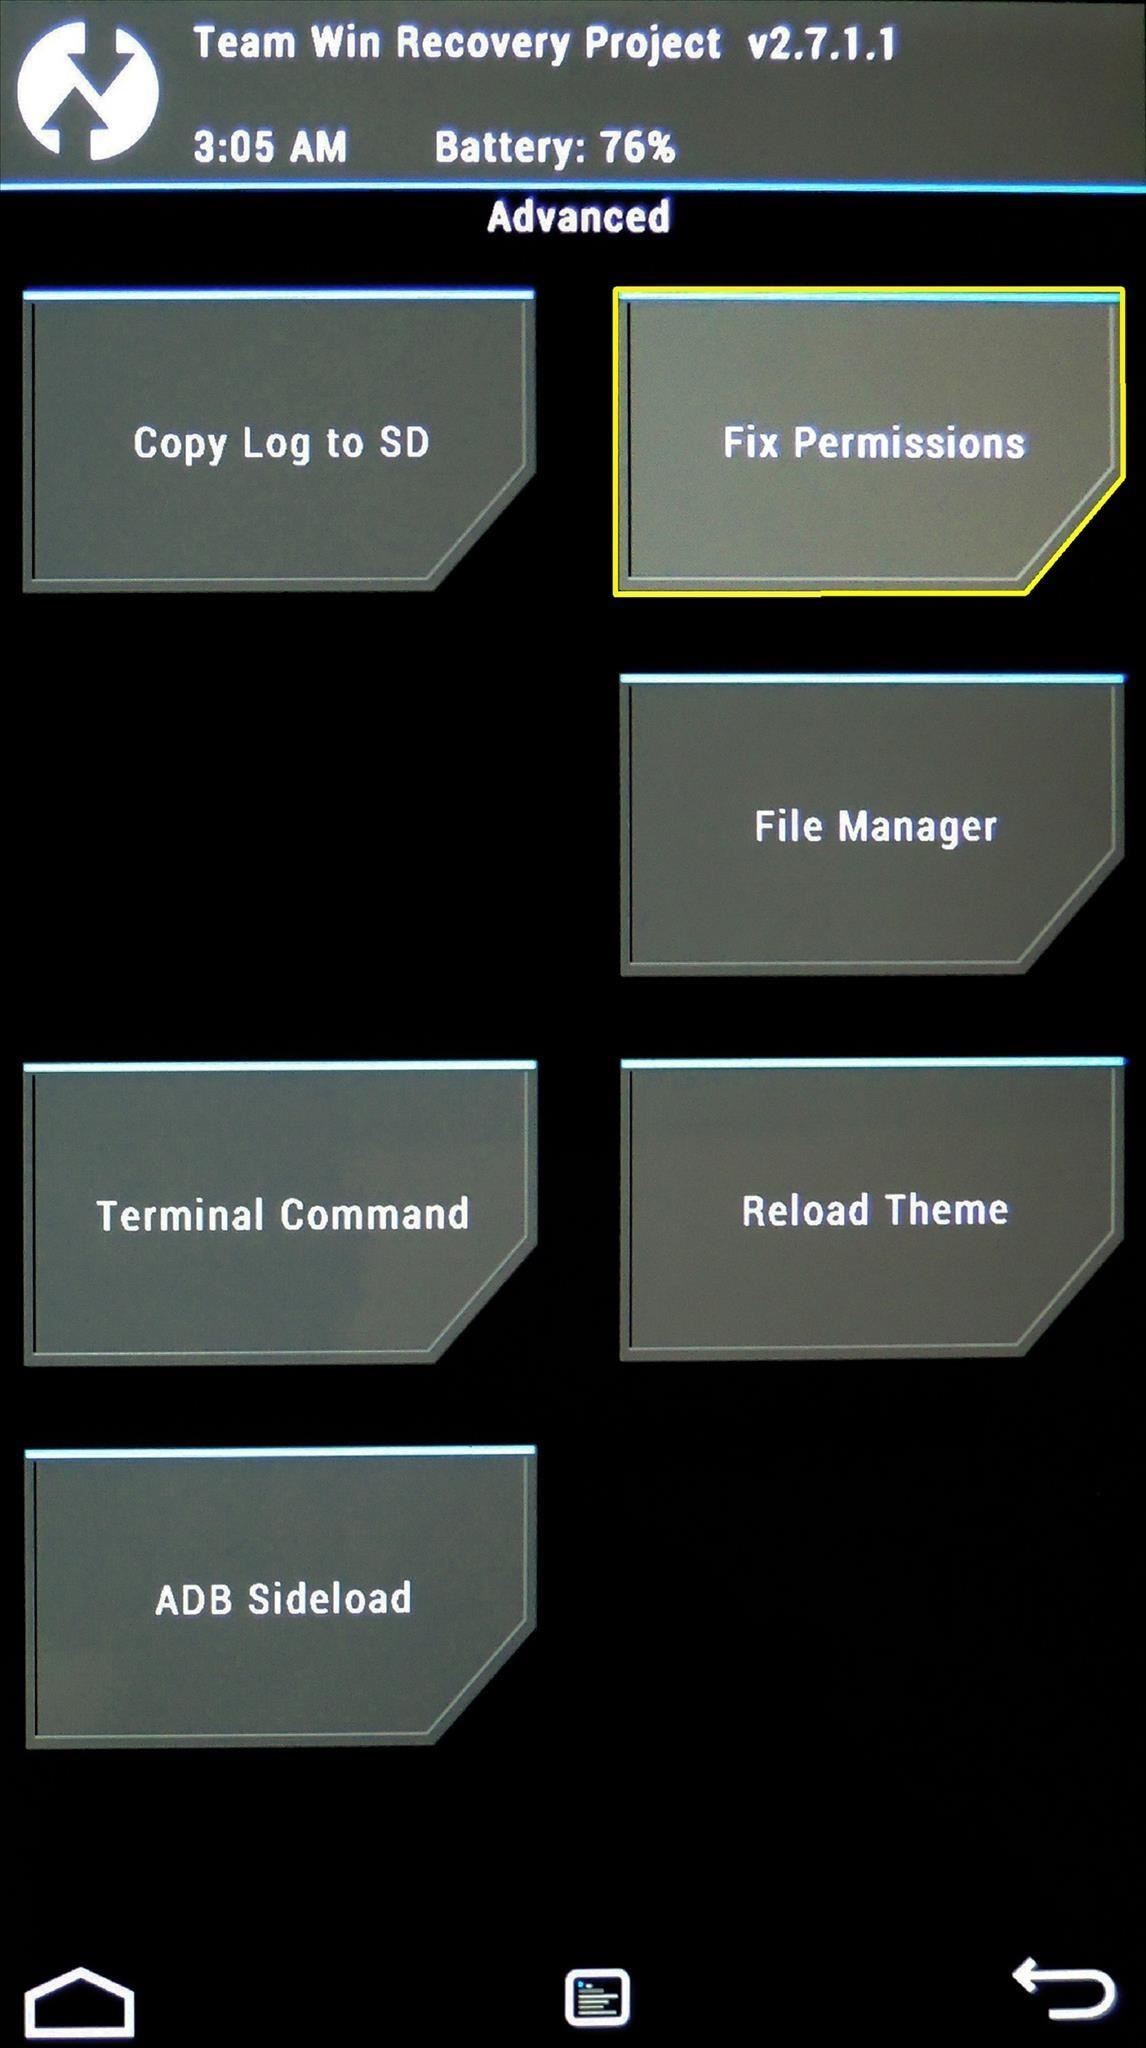
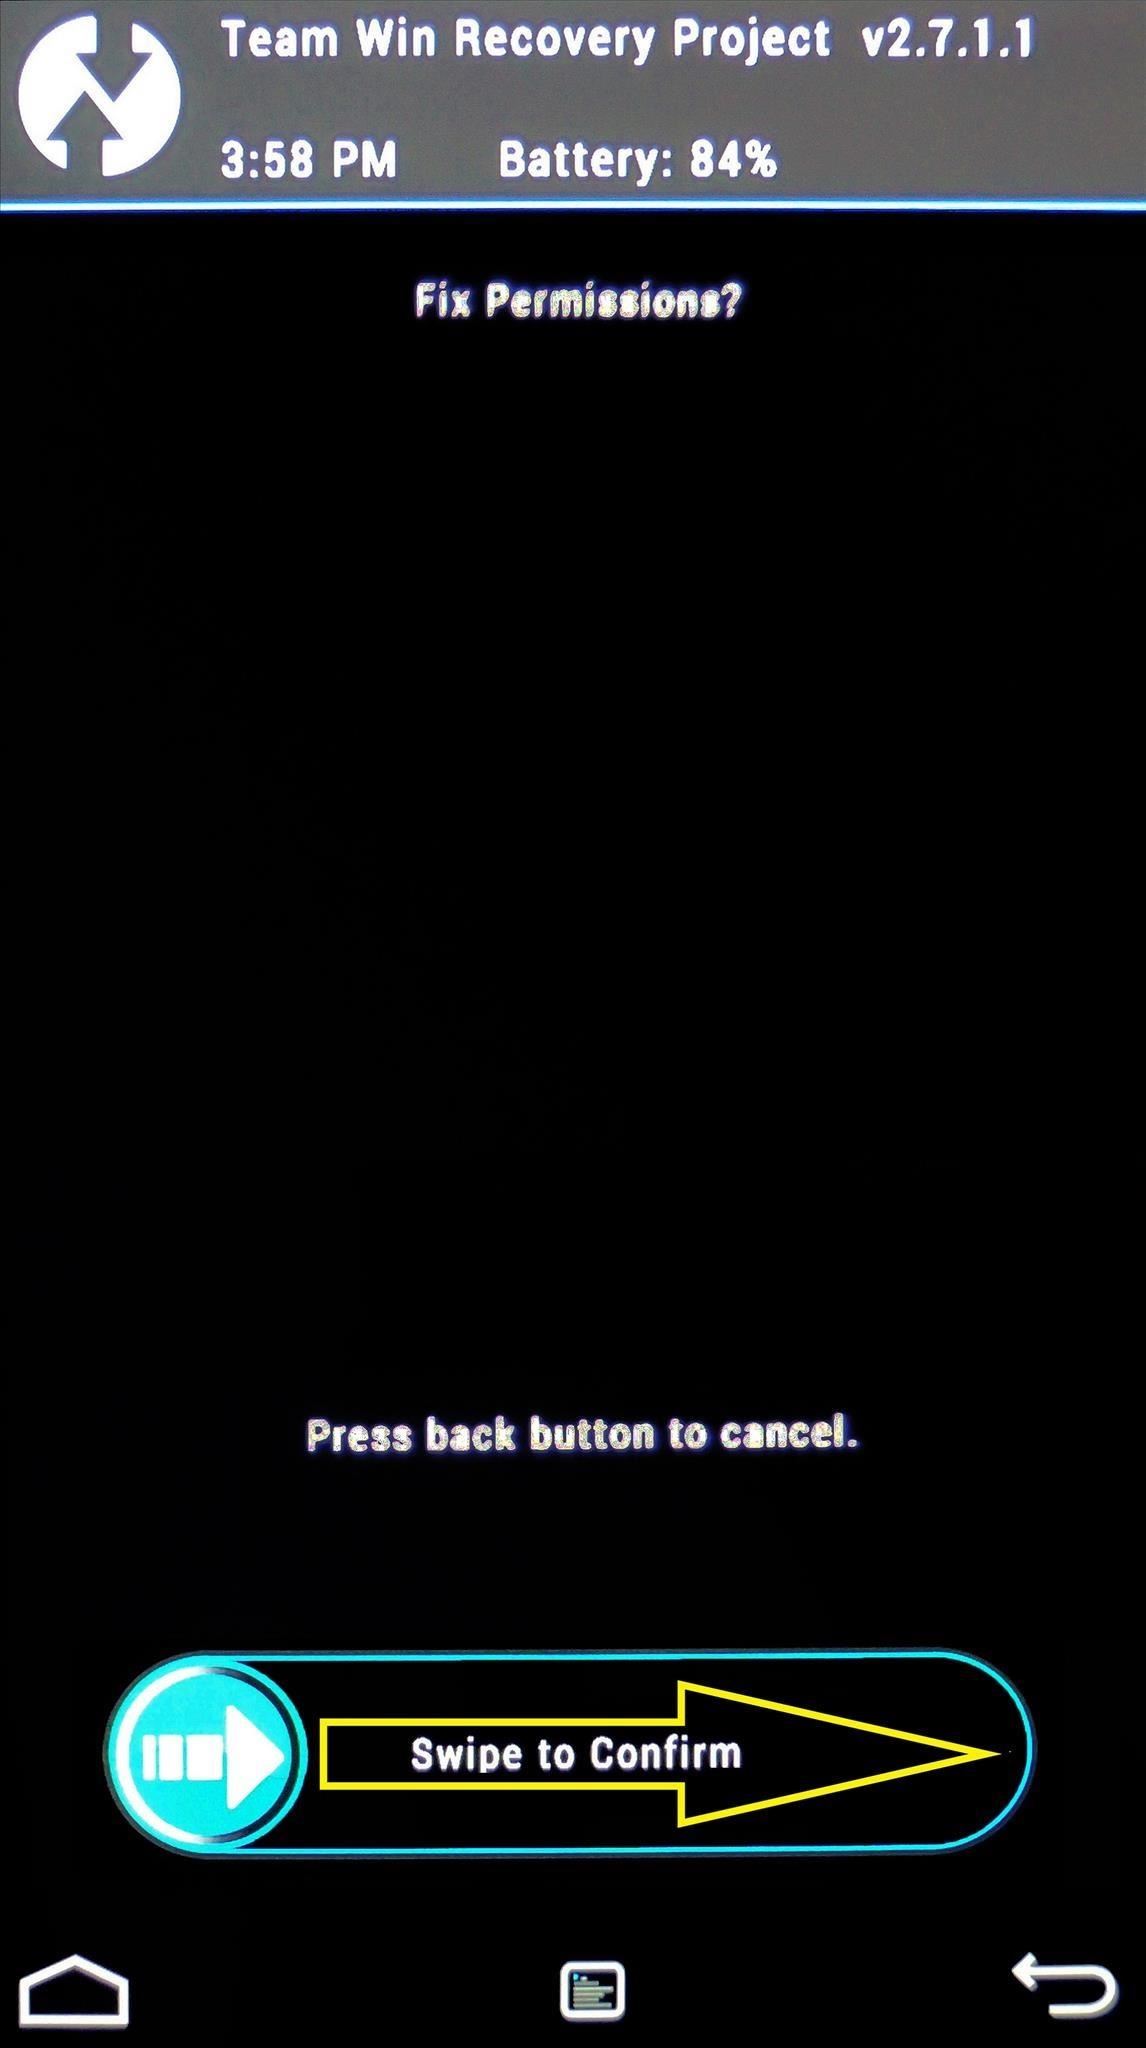
Tip #6. Fixing Permissions
Sometimes, flashing mods and installing root apps can cause Android to sorta «forget» what permissions various apps had to begin with. System-level apps need their permissions set a certain way to perform correctly, so you could end up with minor bugs and force closes after installing a hack.
If this ever happens, you can easily reset all apps on your device back to their proper permissions using TWRP.
Tip #7. Booting Back into Android
To get out of TWRP and back into Android, start by tapping the Reboot option from the home screen. On the next menu, simply tap System to boot back into Android.
I hope this guide helped you get to know TWRP, because there are so many powerful things it can do. If you have any questions, post them in the comments section below and we’ll be sure to answer them.
Keep Your Connection Secure Without a Monthly Bill. Get a lifetime subscription to VPN Unlimited for all your devices with a one-time purchase from the new Gadget Hacks Shop, and watch Hulu or Netflix without regional restrictions, increase security when browsing on public networks, and more.
Buy Now (80% off) >
Other worthwhile deals to check out:
Getting to know Magisk
What is Magisk?
Magisk is a popular Android rooting solution that comes in the form of ZIP file which is used to root Android devices. It was developed by the developer topjohnwu in 2016 as an alternative way to root Android devices other than the famous SuperSU by Chainfire.
The Magisk comes in the form of a zip file that can be flashed via custom recovery such as TWRP in order to achieve root on Android devices. Once you have flashed the Magisk Zip file via TWRP, you can handle the front end activities, including but not limited to manager root access, via an App called Magisk Manager.
Magisk – A Magic Mask to Alter System Systemless-ly
SuperSU is the most popular rooting method for Android by Chainfire, but it lost its popularity after Chainfire sold it to a Chinese company and they stopped the SuperSU development. However, topjohnwu’s started to work on Magisk and it became the most popular rooting method. Magisk popularity is by its massive features.
The main goal of these root methods is to manage which installed apps have root access. Not all apps are made to have access root. System apps like Google, Gmail and others will not have benefits from having root privileges. There are apps which are designed specifically keeping the root in mind.
You can even choose how these apps have the root access either permanently or temporarily. Thus making sure only allow the trusted app to have root access.
All Rooting methods offer very much similar functionality, but Magisk and the way you can use any application without any issues makes it stand out from other root methods. Suppose having SuperSU and want to run a banking app is not possible, unrooting is the only way to use the bank app again.
Every time you want to use the app, it’s not possible to unroot the device. Magisk has a feature that hides the rooting from these apps and no need of unrooting the device by hiding root from your device. Unlike SuperSu it doesn’t modify or alter system partition, which means we are not messing with the system files.
What We Can Do with Magisk and Root?
Magisk a very powerful tool to run modifications (modding Android) without messing with the system. That’s the reason it is referred to as the “systemless” method. Using the Magisk manager you’re going to take advantage of Magisk features.
With the ability to install “modules” from the Magisk manager app we can use handy modifications without the need for root apps. These modules allow you to install different handy modifications. Here are some of the best modules for Magisk.
Few modules which I personally use with Magisk:
- Substratum: For to apply system-wide themes on my Android.
- Dolby Atmos: For Dolby Atmos sound enhancements to my device.
- Kernel Manager: Tweak a variety of things of my device to boost performance.
- Greenify4Magisk: For saving battery life by putting my device on hibernate.
- Xposed Framework: For modding my device for other changes to the UI.
Now, I know most of the phones out there have the ability to theme the device, but the substratum is more useful for the stock Android phones. I know most devices support Substratum without root. Phones which are on Android Pie or higher require root to apply the theme. Dolby Atmos is not integrated by every phone manufacturer, by giving root access to the app we can enjoy audio enhancements on our phone.
Not all the kernels of the phones, use the full capacity of the phone. Kernel manager will be able to tune certain parameters or even install custom kernels on the device for improved performance and saving battery life.
So here we go, there are a lot of things we can do with the root access. My examples are just small things that we can do form root access. There is so much more we can do from root access.
Использование официального приложения Official TWRP App
Если установить TWRP Recovery через компьютер не получилось или же этот способ показался вам слишком сложным, ничего не мешает воспользоваться официальной программой от разработчиков TWRP. Правда, в этом случае обязательно потребуется наличие прав Суперпользователя. Скачиваем приложение с Плей Маркета, а потом запускаем его, предоставив при первом запуске root-права.
Далее нажимаем на кнопку «TWRP Flash», а потом в выпадающем списке выбираем модель устройства и версию ПО.

Подтверждаем переход на официальный сайт TWRP, с которого загружаем файл Recovery.

После окончания скачивания жмем на «Select a file to flash..» и выбираем сохраненный образ img.

Кликаем по кнопке «Flash to recovery» для начала установки.

При ее успешном завершении появится сообщение «Flash Completed Successfully!».
Заменить стандартную среду восстановления Андроид на модифицированную TWRP Recovery можно с помощью еще целого ряда приложений. Каждое из них работает только при наличии рут-прав. Перечислим самые популярные программы.


Последовательность действий во всех приложениях практически одинакова. Сначала выбирается модель телефона/планшета, а потом версия TWRP Рекавери. После скачивания файла осуществляется установка кастомного меню. Для проверки работоспособности гаджет перезагружается в режиме восстановления.
В заключение хочется сказать, что установка TWRP вместо штатного Рекавери сопряжена с определенными рисками. Чтобы свести их к минимуму, установочный файл необходимо выбирать строго по модели устройства. Если вашего гаджета нет в списке или же вы не уверены в правильности подбора образа img, то лучше вовсе отказаться от процедуры замены меню восстановления. В противном случае вы рискуете получить неработоспособное устройство.
Как установить SuperSU через TWRP Recovery
Теперь аналогичная инструкция по TWRP. Первым делом выполните первые два пункта из вышеизложенного FAQ по прошивке архива SuperSU из CWM.
1. Затем в главном меню TWRP выберите «Install».

2. Найдите загруженный на SD ZIP-архив с SuperSU.

3. Сделайте свайп, тем самым дав согласие на прошивку.
![MIUI v12 [20.7.9]](https://4idroid.com/wp-content/uploads/2017/04/rooting-twrp-3.jpg)
4. Successful! Рут права получены, выбирайте «Reboot System», чтобы загрузить систему.

Как проверить наличие SuperUser в Android
Установка TWRP через ADB и Fastboot
Для начала приведем самый распространенный способ инсталляции – с помощью компьютера и консольного приложения Fastboot. Этот способ не требует root-прав, но на телефоне обязательно должен быть разблокирован загрузчик (Bootloader). О том, что это такое и как произвести разблокировку на устройствах Huawei, вы можете прочитать в отдельной статье.
Итак, будем считать, bootloader разблокирован, и можно приступить к самой процедуре. Сначала необходимо установить на ПК утилиты ADB и Fastboot. После того, как это будет сделано, подключите телефон с Андроид к компьютеру через USB-кабель и включите на мобильном устройстве отладку по USB (Настройки – Для разработчиков – Отладка по USB).

Далее запустите командную строку и перейдите в расположение файлов ADB и Fastboot, введя команду cd Путь_к_папке_с_ADB (в нашем случае cd C:\sdk-tools-windows-3859397\platform-tools). Проверьте командой adb devices видимость мобильного устройства. Если ваш телефон отобразится в консоли, значит все в порядке и можно переходить к следующему шагу.


На следующей странице находим пункт «Download Links» и кликаем по ссылке Primary.

Сохраняем файл в той же папке, где находятся adb и fastboot (у нас это C:\sdk-tools-windows-3859397\platform-tools).

После скачивания для удобства переименовываем файл в «twrp.img».

Если вашей модели гаджета нет на сайте twrp.me, то нужный образ TWRP Рекавери следует поискать на форуме XDA Developers (https://forum.xda-developers.com/). Здесь же можно узнать обо всех нюансах, касающихся конкретной марки мобильного устройства.
Идем дальше. Открываем командную строку и выполняем команду adb reboot bootloader, после чего телефон должен перезагрузиться в режиме Fastboot (на экране смартфона появится соответствующая картинка).


Теперь все готово непосредственно к установке кастомного TWRP Recovery. Производится она командой fastboot flash recovery twrp.img, где twrp.img – файл нового Рекавери. Если все прошло успешно, то появится сообщение как на скриншоте ниже.

Перезагрузить телефон в обычном режиме можно командой fastboot reboot.
Вход в среду восстановления TWRP Recovery осуществляется так же, как и в заводское меню. Выключаем устройство, а потом используем сочетание кнопок включение + увеличение громкости (или другую комбинацию в зависимости от модели и производителя). Выглядит TWRP Рекавери для Андроид примерно так, как на снимке ниже.

Как получить рут права на Android через CWM

2. Зайдите в Рекавери – как это делается можно узнать из инструкции по ссылке.
3. В CWM выберите пункт «install zip» (выбор осуществляется кнопкой питания) либо «install zip from sdcard» (для старых CWM версии ниже 6.X.X).

4. Затем «choose zip from /sdcard», если прошиваемый архив находится на SD-карте.

5. Перейдите к папке в которую сохранили «SuperSU-version.zip» и подтвердите клавишей включения.

6. Согласитесь на установку, выберите «Yes – Install SuperSU-version.zip».
![MIUI v12 [20.7.9]](https://4idroid.com/wp-content/uploads/2017/04/cwm-recovery-installing-supersu-4.jpg)
7. Начнется процесс рутирования мобильного девайса.

8. В конце вы увидите сообщение «Install from sd card complete», что в нашем случае подразумевает получение root прав.

9. Вернитесь в главное меню CWM.

10. Нажмите «reboot system now», чтобы перезагрузиться в Android.

Steps to Install Magisk and Root Android Device
There are two ways to install Magisk on an Android device and we shall see them both in detail below.
Method 1: Flashing Magisk Zip using TWRP Recovery
- Download the latest Magisk Zip file from here: Magisk Zip
- Transfer the downloaded Magisk Zip file to your phone’s internal memory.
- If your device is connected to your PC, disconnect the same.
- Reboot your device into TWRP Recovery. If you do not know the button combination to boot into TWRP, you can use the following ADB command:
adb reboot recovery
Note: You may need to enable USB Debugging before using the above command.
- Once you are in TWRP Recovery: Tap on ‘Install‘ and select the downloaded latest Magisk Zip File and ‘Swipe to confirm flash‘ to install Magisk Zip file.

- Once the above process completes, reboot your device.
Once the device reboots, you should have the Magisk Manager app installed on your device.
Method 2: Flashing Magisk Patched Boot Image
When the device reboots, go to Magisk Manager and make sure that magisk is properly installed.
These are the two ways by which you can install Magisk on your Android device.
What is TWRP?
TWRP technically stands for “Team Win Recovery Project” Which is an open-source custom recovery image for Android devices. It does require a condition though which is that your phone’s bootloader must be unlocked.
So TWRP is a custom recovery that you need to flash on to your stock recovery to get the most out of your phone. There are more custom recoveries like CWM but they don’t work as well. Flashing TWRP opens up a whole new world of custom ROMS, Mods, Apps that are not officially supported, and much much more.
TWRP does have a touch interface while stock recoveries work without it and are based on volume keys and power buttons. Now on Stock recoveries are extremely limited and wouldn’t allow you to do basically anything they just allow you to flash the stock ROM. While with TWRP you can flash third-party ROMs and mods like Xposed installer and Lineage OS Etc.
Flashing TWRP does void your warranty so if you want that this might not be a way to go. If you remove TWRP and you get back to stock recovery somehow then you might get your phone warranty back.
If you want to take full advantage of TWRP then you must know the advantage and disadvantages of flashing TWRP recovery on your android phone.
- You can Wipe data or Factory reset
- Take full Backup using Nandroid backup
- Fully Restore a Nandroid backup
- You can easily Root your phone using Magisk
- Install apps from your desktop via ADB Sideload
- Easily Mount partitions
- File Manager
- Your phone warranty gets void
- Flashing the wrong file may brick your phone
Now that you have learned what is TWRP and its advantage and disadvantage. Let’s quickly proceed to the installation part.
")


")