


To get root access, finally, you make up your mind to root your phone or tablet, but get stuck on selecting the right one from lots of Android root tools? You don’t have to.

We all love modification in one way or the other. Of course, change is not bad and what if you can modify your own Android phone in your own style? Sounds good, isn’t it? Well! You just need to carry out the rooting method, if that actually sounded good to you!


 (4,93 / голосов — 100)
Nexus Root Toolkit — получение root-прав Нексус Рут Тулкит
Nexus Root Toolkit (Нексус Рут Тулкит) — бесплатная утилита для получения прав администратора на Android-устройствах Нэксус.

In this era of smartphones or android phones, where we feel almost incomplete without these gadgets, there is also a need for us to push a little more to get familiar with these devices. For those who feel annoyed with the unwanted preinstalled applications and want to remove them from their phones, all they need is to get informed about root access. Read on for tip how to get root access on Android.
Are you looking to root your Android device with your PC or computer? Rooting your Android device can unlock new features, enhance performance, and provide greater customization options. However, to root your device, you’ll need to use specialized software. In this article, we’ve compiled a list of the 8 best root software options to help you root your Android device with ease. Whether you’re a seasoned tech expert or a beginner, these root software options can help you get the most out of your Android device. So, without further ado, let’s dive into the world of rooting software for Android devices.


- Two Methods to Get Root Access on Android
- How to use dr.fone — Android Toolkit
- Method 2: Easy Way to Get Root Access on Android via Framaroot
- How to use Framaroot
- Get Samsung Root Permission with Android Root Toolkit
- Get Samsung Root Permission with iRoot
- Get Samsung Root Permission with KingoRoot
- Conclusion
- 1. dr.fone — Android Toolkit
- Part 1 – What exactly is root access?
- Part 2 – How to Gain Root Access on Android Using Android Root Toolkit
- Part 3 – How to Gain Root Access Through KingoRoot
- Part 4 – How to Gain Root Access Using KingRoot Software
- Part 5 – How to Gain Root Access Using iRoot on Your PC
- SRSRoot
- SuperSU Pro Root App
- Why Root Android?
- 8 Best Android Root Software for PC
- 1. iRoot
- 2. Root Master
- 3. One Click Root
- 4. King Root
- 5. Towelroot
- 6. Baidu Root
- 7. SRS Root
- 8. 360 Root
- Best 4 Android Rooting Tool to Root Android with Computer
- Why People Want to Root Android Device
- 1. dr.fone — Android Toolkit
- Steps to use dr.fone – Android Toolkit
- Steps to use CF Auto Roots
- How to root Android ONE devices with Android ONE Toolkit
- What Is Rooting an Android Device?
- Related Articles & Tips
- Get familiar with Android ONE
- Android ONE and Android, aren’t they the same?
- Main features of Android ONE
- Benefits of rooting Android ONE
- Root Genius
- Apps to Root Android KitKat without Computer
- Best 3 Root Apps for Android to Root Android without Computer
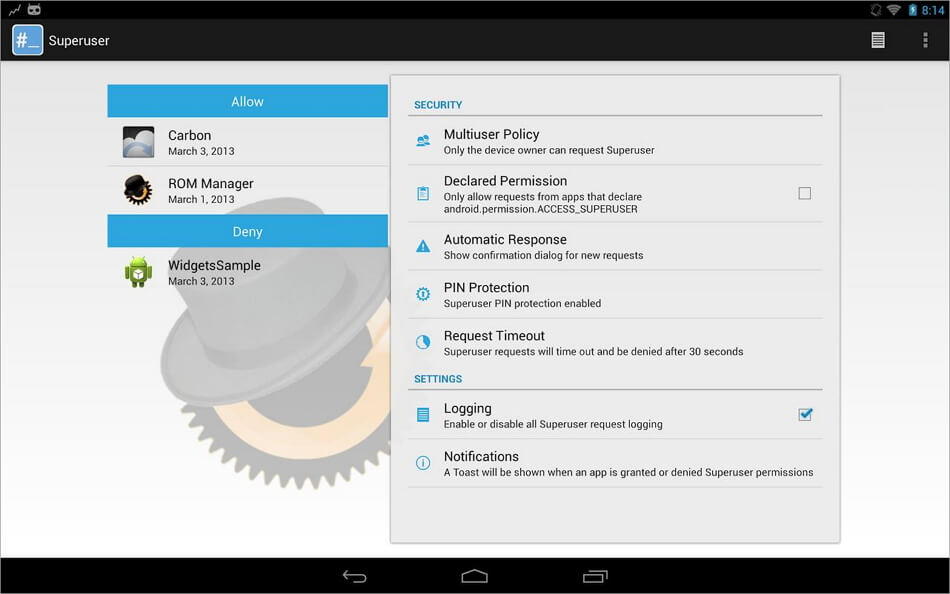
- Superuser X [L] Root App
- Superuser Root App
- What is Rooting?
- How do you root your phone?
- Для чего нужна программа Nexus Root Toolkit (Нексус Рут Тулкит)?
- Full Advantages and Disadvantages of Rooting an Android Device
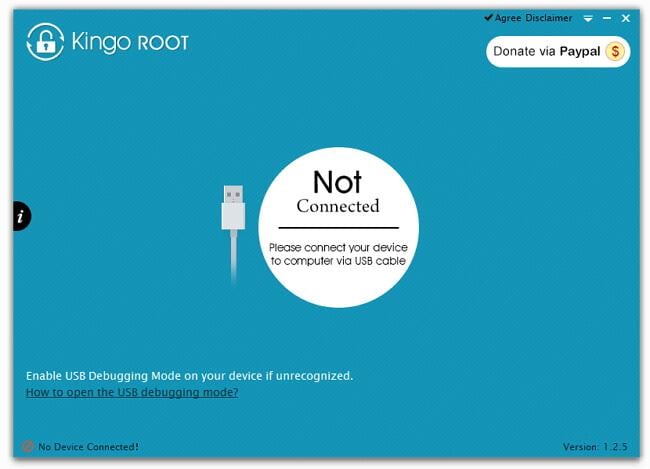
- Kingo
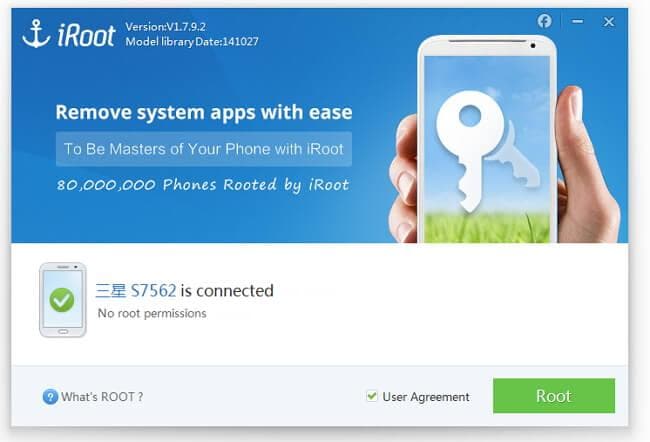
- IRoot
- Conclusion
- Dr.Fone — Data Recovery (Android)
Two Methods to Get Root Access on Android
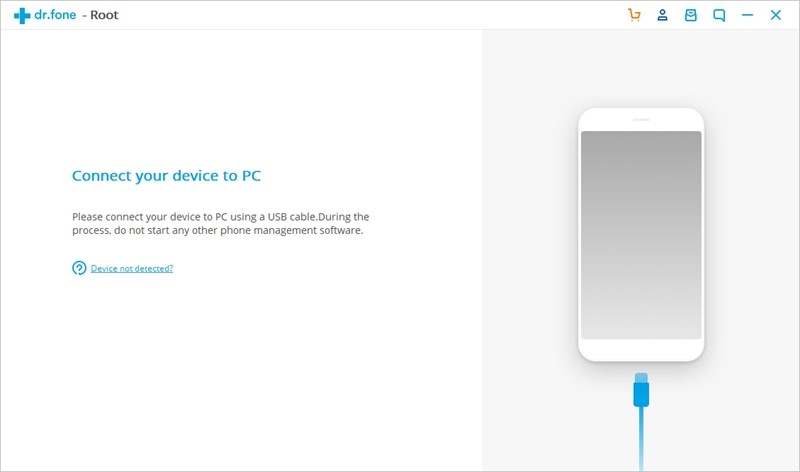
How to use dr.fone — Android Toolkit
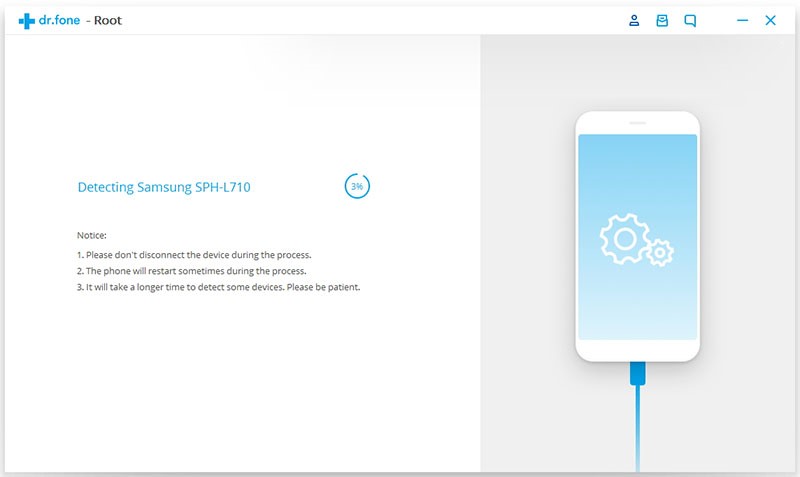
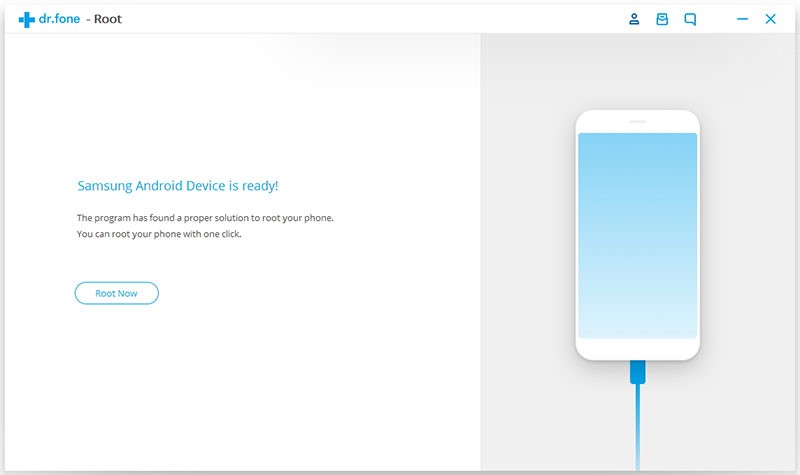
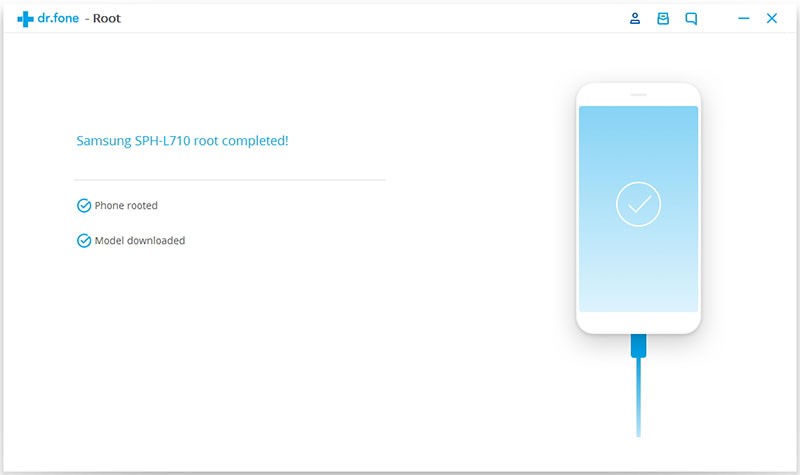
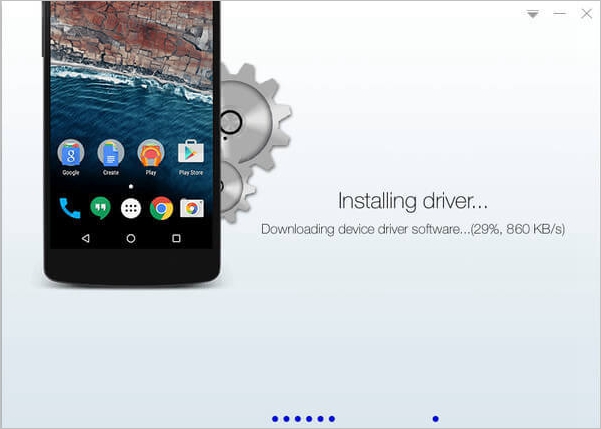
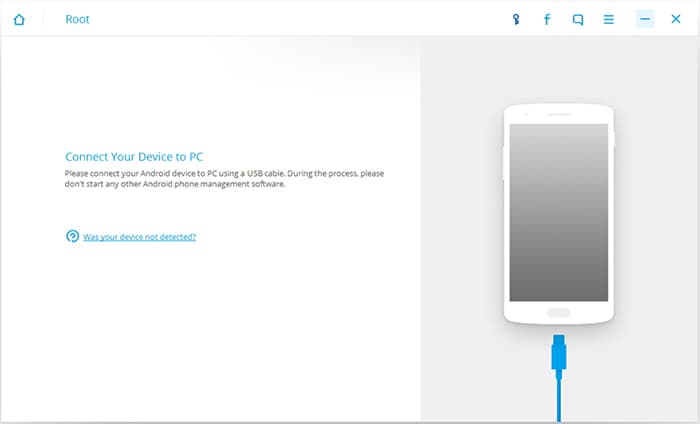
Step 1: Install the iSkysoft toolbox and download Android Toolkit on computer using this link below. Launch the application and then select “Root”. Connect your phone to the computer using USB cable. In case, if you haven’t connected your android device before, you need to install the right driver on your computer.
Step 2: Make sure that the USB Debugging Mode is turned on. Clicking on ‘Root Now’ will begin the rooting method.
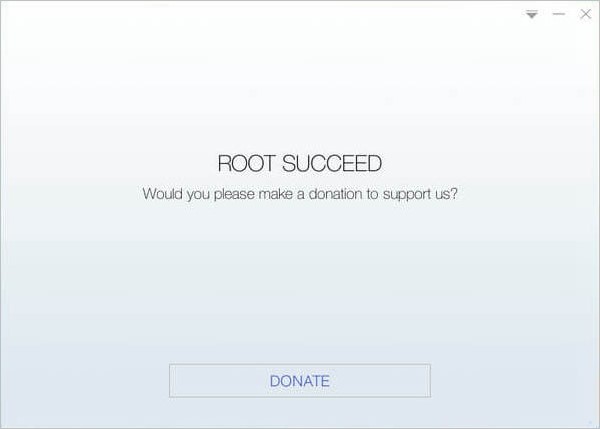
Step 3: Within a few minutes, your device will be successfully rooted. Once rooted, a prompt message will appear on phone’s screen notifying you the process is done!
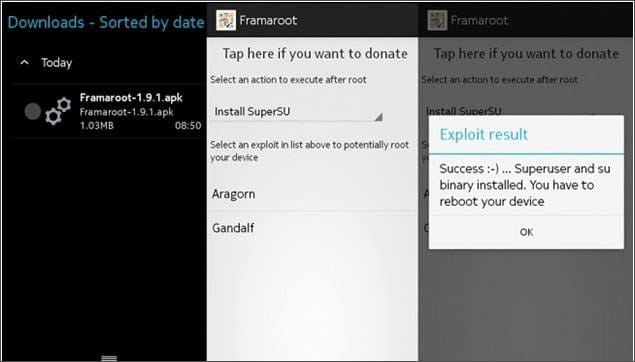
Method 2: Easy Way to Get Root Access on Android via Framaroot
How to use Framaroot
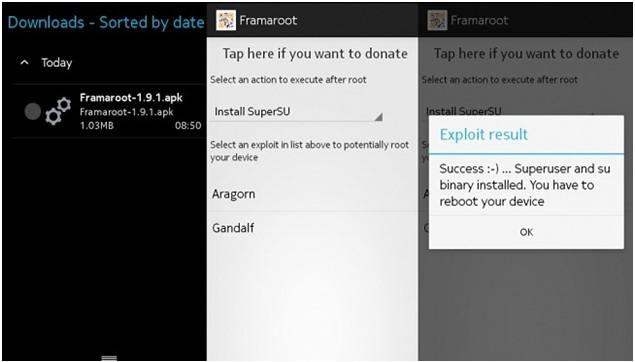
1. Before beginning, make sure that the level of device’s battery is 50% and more. Also, remember to make a backup file of your data.
2. Download the Framaroot application file on your device.
4. Choose the apt exploit for your device for different exploits works for different devices.
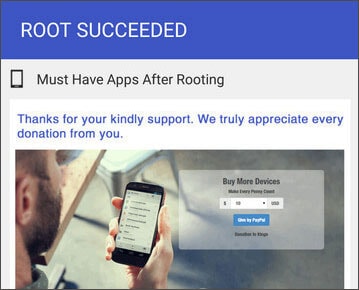
6. The rooting process will start and you need to reboot your device once it’s done, to let it apply the settings properly.
Possible outcomes after choosing the exploit
Crux of the matter:
To put everything as a whole, dr.fone — Android Toolkit guarantees excellent success rate ensuring full safety while rooting. Moreover, there’s no need to worry about the device’s battery level, as in the case of Framaroot, where the device needs minimum 50% battery level. Also, Framaroot fails to assist android version that are 4.3 and above.
Part 1: Get Samsung Root Permission with Android Root Toolkit
Part 2: Get Samsung Root Permission with iRoot
Part 3: Get Samsung Root Permission with KingoRoot
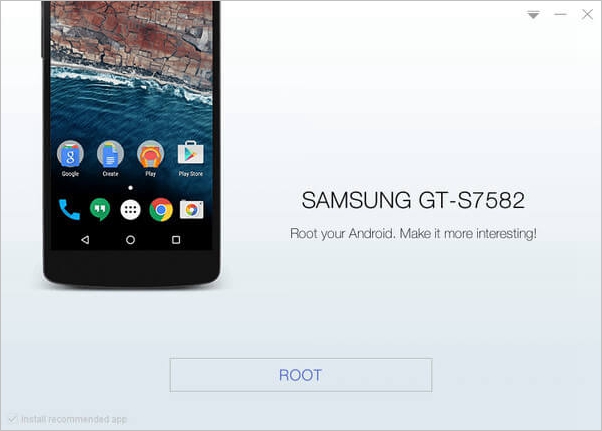
Get Samsung Root Permission with Android Root Toolkit
Android Root is a very simple process to root your Samsung device. It is one of the most popular ways to root smartphones and has a high success rate. It supports a lot of devices and the entire process is easy and hassle-free. It also ensures that no data or information from your device gets lost or leaked during the process. Down below we list the steps for rooting with Android Root Toolkit.
Download WinDownload Mac
Step 1. First of all, download the Android root toolkit on your computer and install it.
Step 2. Connect your Samsung device to your computer.
The Android toolkit application on your computer will recognise the device automatically.
Step 3. Click on Start from Android Toolkit. The application will find automatically start preparing your device for rooting. You should wait patiently at this time as it will take a couple of minutes. Your phone might also start restarting a few times.
Step 4. Click on the option Root Now to start the rooting process. A pop-up message will come will ask for your permission to start the process. Click on confirm. The rooting process will start. Within a few minutes, your phone will be rooted successfully.
Android Toolkit is very easy to operate and can be used by anyone. Get ready to enjoy the new features of your phone now.
Important tips to keep in mind while rooting your Samsung phone
· Always use the original USB cable provided with your device
· Learn how to enter your phone into the USB debugging mode.
· Sometimes the warranty of your device might get void if you root it.
Download WinDownload Mac
Get Samsung Root Permission with iRoot
iRoot is another popular way of rooting your Samsung device. It supports a lot of Samsung devices.
Warning: Verizon and AT&T have locked the Bootloader in Android, Phones manufactured by Verizon and AT&T may not be rooted using this process.
Step 1. You should download iRoot and install it on your computer.
Step 2. Connect your Samsung phone to your computer via a USB cable and enable USB debugging on your device.
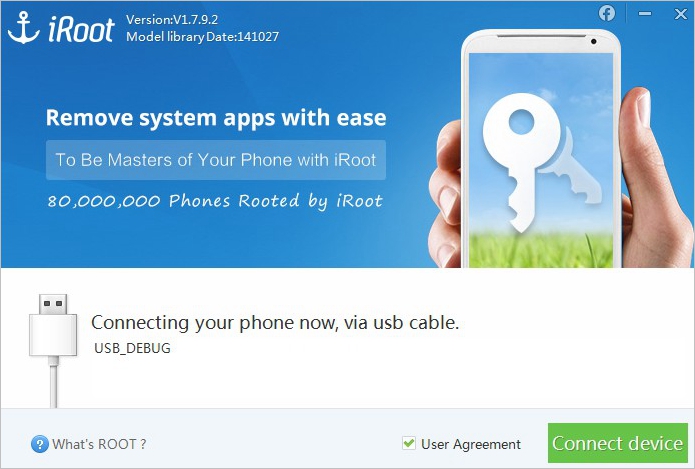
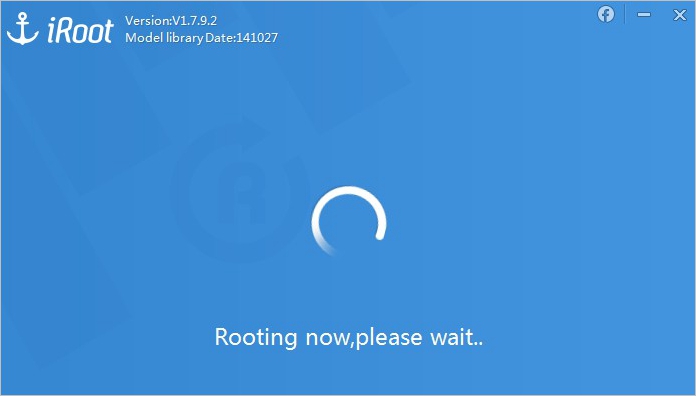
Step 3. The iRoot application on your device will automatically recognise your device. A dialogue box will open with a ‘Root’ option on it. Now, Click on ‘Root’. The application will then start preparing itself for rooting your device.
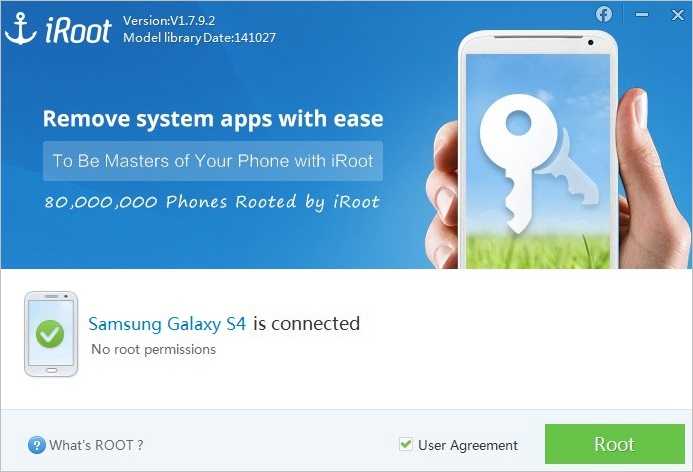
Note: you might still need system tools for disabling and removing any system apps that might remain after rooting your device.
Get Samsung Root Permission with KingoRoot
A. Gain root without the PC
Step 1. Download the .apk of KingoRoot on your device.
Step 2. Install the application and launch it on your phone.
Step 3. Click on ‘One Click Root’ on the interface of the app. Wait for a few seconds for the results to appear. If this method fails to try a few times more with different methods of rooting.
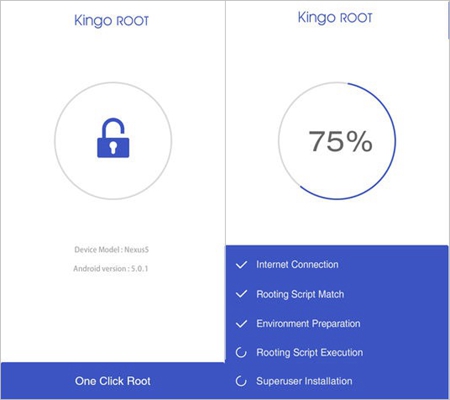
B. Gain root with PC
Step 1. Download the KingoRoot software on your computer. It is completely free to use. Install the software and launch it.
Step 2. Plug your device into your PC via a USB cable. Then enable USB debugging mode on your device.
One benefit of using KingoRoot is if the drivers of your device are not installed on your PC, KingoRoot will do it automatically for you.
Step 3. Check the screen of your Samsung device for any notifications. You might get a pop-up message showing ‘Always allow from this computer’. Click on it.

Step 4. Click on the ‘Root’ option on the Kingo application. Your Samsung will start getting rooted. Be patient and do not touch your device during the process. Also, do not disconnect the USB cable under any circumstances.
Conclusion
Android is an open source platform and has a lot of features which one can take advantage of. However, the manufacturer of your Android phone or device puts a lot of restrictions on your device for your security and safety. Also, carrier networks and manufacturers of phones request devices to come locked. When you root your phone there are certain responsibilities that come with it. Any system updates will have to be done manually by you. You will also have to install a variety of third-party apps to ensure that everything runs smoothly.
Rooting is defined as a process where you get privileges to get the root access to Android operating system code and also enable you install the softwares that you are normally not allowed to do.
Let us see the benefits of rooting:
- With rooting you can install the apps that otherwise you are not allowed to. Also, these apps add the features to your device which are not even given by Android. Hence, once you root your device you are able to reap those benefits of using unused features.
- Rooting gives you more battery power and also improves phone’s speed.
- The Ads that pop up in between while using the other apps can eat up your data. But when you root the data. You can live add free.
- Some of the Android’s tweaks require custom kernel and rooting provides you with the custom kernel.
- Rooting also enables you to use a custom ROM. This helps in adding unique and required features.
- You can use all blocked facilities by rooting and thus you own your phone completely.
1. dr.fone — Android Toolkit
Using dr.fone – Android Toolkit
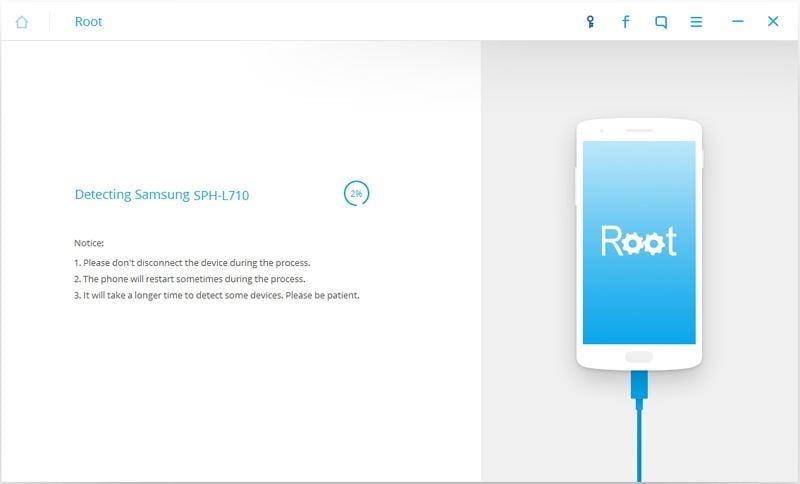
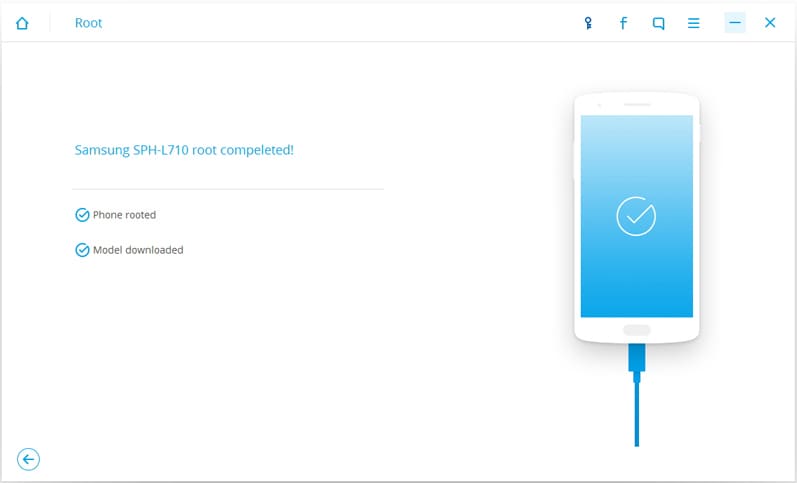
Step 1: Install dr.fone — Android Toolkit and launch it. Select ‘Root’.
Step 2: Connect Android device to PC. Enable the USB Debugging on your phone. dr.fone will detect the appropriate package for rooting your device.
Step 3: Click on «Root Now» and then click on «Confirm» to proceed. Thus dr.fone — Android Toolkit makes the rooting process even simpler and easy. Why not just download the free trial version and have a try?
Framaroot is the rooting apks which allows you to root and unroot in very less time.
Step 1: Download and install Framaroot
Step 2: Launch Framaroot and choose ‘SuperSU’. Rooting process is started using selected exploit . Reboot the device after conclusion of process.
Cons : It did not execute on some of the popular phones like Galaxy Nexus 5 and s5. It does not work on Android phones that use Kitkat version.
3. Kingo Android root apk
Step 1: Download and install file.
Step 2: Launch “Kingo app” and rooting process is started by clicking on one click root.
Step 3: A result screen appears.
Step 4: Finally you will get a window which shows status of the process.
Pros: It is very easy and simple to use. The rooting process is completed at fast rate. Many exploits are available that simplifies the process.
Cons : It is difficult to know if the app will work or a particular device before installing it. Kingo may not work after updating it.
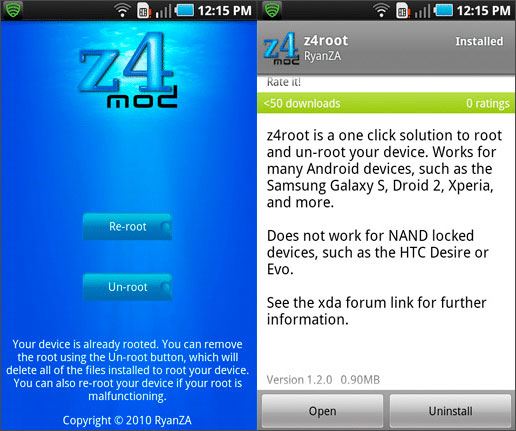
Step 1: Download and install file.
Step 2: Open Z4Root and tap on “Root” button and wait for the process to get over and reboot your device.
Step 3: Let the process end and reboot your device.
Step 4: This completes your entire process.
5. iRoot Apk
Pros: It roots your phone just on one tap. After root process, it suggests you the apps that when installed give you improved performance. Be sure of never losing the data. It is ensured to be secure.
Cons : It is one of the oldest rooting app having no extraneous features. It is incompatible with many devices and there is no means to check the compatibility until and unless you actually try it.

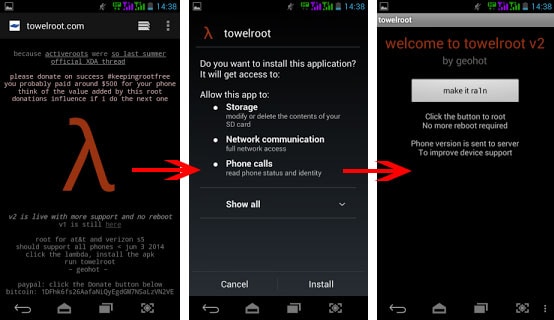
Step 1: Download and install Towelroot app.
Step 2: After opening the app,click on ‘Make it ra1n’ which starts the rooting process.
Pros: You have another option “modstrings” to make Towelroot compatible with your device. It modifies TowelRoot settings to suit to your device. It runs the process faster . It gives better performance and uses battery optimally.
Cons : There are increased security risks as for any app you can get the privileges. So, you need
to install another app like SuperSU which will take care of the security. TowelRoot runs on latest Android versions of KitKat only. There is no way to unroot the device using TowelRoot.
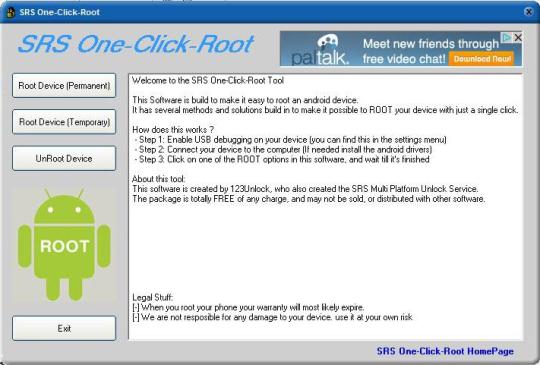
7. SRS Root
Step 1: Download SRS and install it.
Step 2: Connect Android device to PC and enable USB debugging in order to detect the device.
Step 3: When you launch the software you can either choose to root device permanently or temporarily.
Pros: It works well with many devices ranging from the Android 1.5 up to Android 4.2. The way it simplifies rooting process, unroot is also supported by SRS Root
Cons : It does not support the devices using Android above 4.2

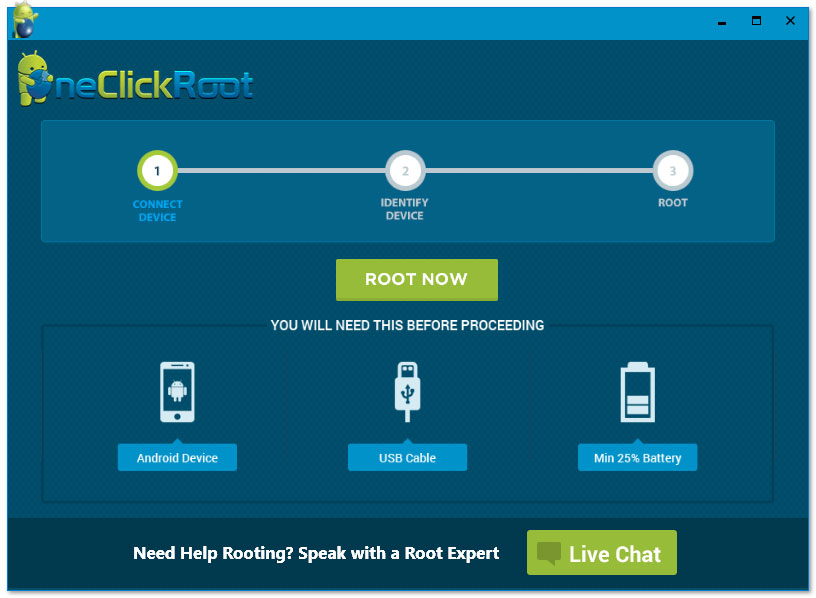
8. One Click Root
Step 1: Download one click root application.
Step 2: Connect your Device to PC. Enable USB debugging
Step 3: Run One Click Root. Your phone gets rooted and the process is completed.
Pros: Rooting process gets started only at one click. The process becomes faster and secure. It also provides live chat feature so that you can get your doubts cleared.
Cons : Unrooting of the device is not possible. It does not support all HTC devices and the devices running on an older Android version.
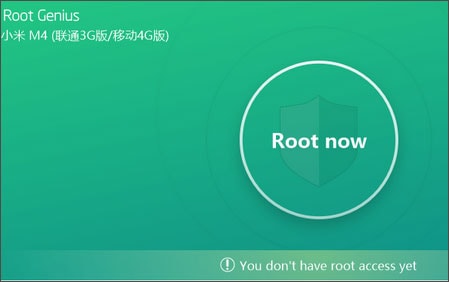
9. Root Genius
Step 1: Enable Debugging feature on your mobile.
Step 2: Download and install the Root Genius Application. Connect your phone to PC. Root Genius will detect your Android device.
Step 3: Click on the Root Now button and rooting process for device will be initiated.
Cons : It cannot unroot the device. Also the app is not available in languages other than English and Chinese.
10. Dr.fone toolkit: Android Root
Step 1: Download and install dr.fone toolkit: Android Root and open it after installation.
Step 2: Connect Android phone to PC.
Step 3: Once our phone is detected, click on start to initiate the process. You will get a message informing that the phone is rooted successfully.
Pros: It is also used to recover lost or deleted data if it is lost or deleted. For this you device can be rooted or unrooted. It provides easy recovery for Windows as well as Mac.

Have you ever wanted total customisation control of your Android device and change the very make-up of your operating system? If the answer is yes, then read on through this tutorial and we will explain, in detail, what software you need to get the job done and how to go about gaining root access on your Android device.
Part 1 – What exactly is root access?
Part 2 – How to Gain Root Access on Android Using Android Root Toolkit
Part 3 – How to Gain Root Access Through KingoRoot
Part 4 – How to Gain Root Access Using KingRoot Software
Part 5 – How to Gain Root Access Using iRoot on Your PC
Part 1 – What exactly is root access?
The term “root access” is used to explain the process of customising and modifying your Android operating system through software and gaining total access to the factory set operating system. This comes in handy when you want to eliminate any restrictions that have put on your phone by either the manufacturer or the mobile phone carrier.
Part 2 – How to Gain Root Access on Android Using Android Root Toolkit
The first method available to root your Android phone is through a well-known and respected software platform know as Android Root toolkit. This software is compatible with Windows 10/Mac OS and supports over 7000 different Android devices. This software is safe, reliable and produces the highest root success rate in the business.
Download WinDownload Mac
Note: Before you get started, make sure that your phone is fully charged, you back up all data on your Android device and you have a strong and stable internet connection to maximise the chances of a successful root first time around.
Step 1. Install and launch the Android Root toolkit.
Step 2. Once the toolkit screen is available, simply select “Root” feature from the dashboard.
Step 3. Use a USB cable to connect the phone to your PC and the Root toolkit software will automatically recognize your phone and prompt you to connect.
Step 4. Click start to continue and the Root toolkit will detect the phone and prompt you to click “Root Now” once the software is ready to work.
Step 5. Wait patiently as the Android Root toolkit does its magic and after a few minutes, your device will have been successfully rooted and you are ready to experience the sheer power of root access.
Download WinDownload Mac
Part 3 – How to Gain Root Access Through KingoRoot
Step 1. Download the free KingoRoot software which can be easily found here. Once the software is downloaded, install and launch KingoRoot for PC.
Step 2. Connect your Android device to your PC through the USB cable and the KingoRoot software will scan and detect your device.
If you haven’t already installed the driver, the program will automatically install the driver for you. When all the above is finished, the program will make a connection with your device and prepare for rooting.
Step 4. Simply click “Root” to get the party started and sit back for a few minutes while everything starts working. Rooting times will vary depending on connection and model of Android phone so don’t lose your patience.
Step 5. Tadaaa!! You will get a message saying that your Root was successful and now you can safely remove the USB cable and start to work on making your Android device your own. If you are feeling flush and would like to donate anything towards the work that KingoRoot does, feel free to do so at this point.
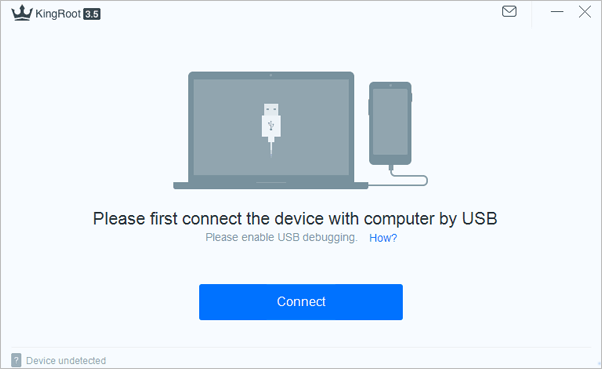
Part 4 – How to Gain Root Access Using KingRoot Software
Step 1. Download a safe and stable version of KingRoot for PC which can be found here.
Step 2. Once the download has finished, install and launch the KingRoot software on your PC
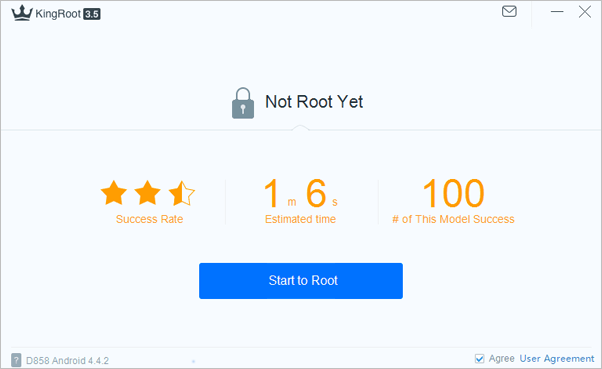
Step 4. The KingRoot program will now scan and detect your phone for rooting. If your device is compatible, you will receive a “connection successful” message on your PC.
Step 5. KingRoot will be able to detect if the device has been rooted before and if not, you will be able to start the process by simply clicking the “Start to Root” button.
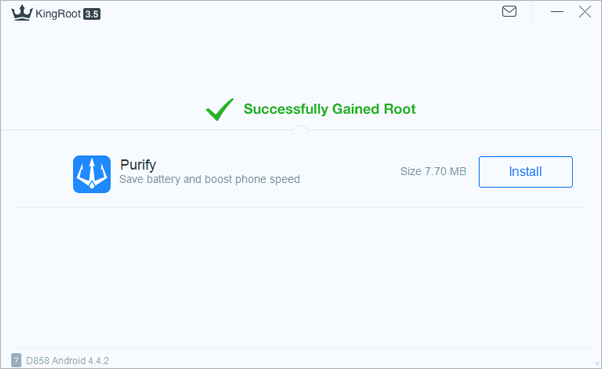
Step 6. Your device will begin to root and the device will switch off and come back on again which is normal so don’t panic. You will see a message saying, “Successfully Gained Root” (which just sounds awesome) and you are now ready to take over the world.
That’s it! You are now ready to enjoy full control of your device and from there, the possibilities are endless.
Part 5 – How to Gain Root Access Using iRoot on Your PC
Step 1. Simply download the safe and secure iRoot software here and install the program onto your desktop. When the program has finished downloading, just click the program button to install and launch the iRoot Software.
Step 2. Plug in your phone using the stock USB cable that came with your phone. This will bring up a screen asking permission to enable USB debugging and just grant permission and click done.
Step 3. As soon as your phone has been detected and compatibility confirmed, you will see the interface present you with the option of rooting. Click the “Root” button to get things moving.
Step 4. After a few minutes, the device will be successfully rooted and you can safely remove the USB cable. From there, you are in the possession of a fully unlocked Android device which you can fully control and customise.
So, there you have it. These above options are all great ideas when it comes to breaking down the restrictions placed on your device from the manufacturer. You now have full root access and the only question now is what are you going to do with all the options at your fingertips?
SRSRoot
SRSRoot is a little rooting software for Android. With it, you can root your Android phone or tablet, as well as remove root access of rooted Android devices with a single click. It’s free of charge and provides you with two ways to root. One is Root Device (All Methods) the other is Root Device (SmartRoot).
Download URL: http://www.srsroot.com/
- Work well with Android 1.5 up to Android 4.2.
- Support unroot.
- Not support Android 4.4 or up.

SuperSU Pro Root App
- Root access prompting, logging, and notifications.
- Temporarily unroot or completely unroot your phone or tablet.
- Work even when Android is not properly booted.
- Wake on prompt.
- Work as a system app.
- Accesses it by dialing *#*#1234#*#* or *#*#7873778#*#* from the dialer even it is hidden from the launcher.
- Selectable themes Dark, Light, Light- Dark Actionbar, and Default device.
- Selectable icons for the Android root app.
- Smooth Android root app, no extra load on CPU.
- No advertisement.
- Can be hidden.
- Small in size, just 2.2MB space.
- Root without PC.
- You cannot lock the app with a pin, but this feature is added in the Pro version which is a paid version of this app.
Download SuperSU Pro from Google Play Store: https://play.google.com/store/apps/details?id=eu.chainfire.supersu.pro
Why Root Android?
Why you should root the Android phone?
8 Best Android Root Software for PC
1. iRoot

iRoot is a free app that allows you to root your Android device without the need for a computer.
You can root your device without internet, once you download it.
- iRoot has higher chances of messing up the Bootloader while rooting your Android phone.
- It is a bit confusing for a beginner to understand the rooting operations of iRoot.
- Root is not available on the Google Play Store, so you’ll need to download it from a third-party source, which can be risky.
2. Root Master
Root Master is another popular rooting software that is easy to use and supports a wide range of Android devices. It is free to download and use and has a high success rate. The software is compatible with both Windows and Mac computers, and it can root your device in just a few clicks. Like any other rooting application for Android mobiles, Root Master can help you get root access to the underlying software in your device. You get permission to customize your Android phone with this android root software for PC.

- Root Master is a free app and does not require any payment for its services.
- You get access to download more apps on your mobile with Root Master.
- The software does not guarantee safe rooting and may brick your Android device.
- It also has been reported that the software isn’t compatible with various devices.
3. One Click Root
Formerly known as Rescue, One Click Root has simple and crisp instructions. They have round the clock support to ensure the safe routing of Android devices.

- They offer 24/7 customer support.
- One Click Root offers to restore and backup service for free.
- You can’t uninstall this App, once you root your Android device with this software.
- It only works for Android version 3 or higher.
4. King Root
King Root is one such root app for PC that can help you root your Android device. This is an easy-to-use tool for rooting your Android mobile.

- It has an easy and convenient user interface.
- Supports various Android devices.
- You have a high chance of bricking the Android device with this rooting program.
- There are hardly any updates for King Root.
5. Towelroot
Towel Root is one of the popular android root software for PC, available in the APK version. It is a one click solution for rooting Android devices. With Towel Root version v3 or above, you can unroot a device as well.

- It is easy to use and available for free.
- With just a single click, your device gets rooted.
- It works for only Android 4.4 and higher versions.
- It doesn’t work on Motorola handsets.
- Quite an ugly user interface.
6. Baidu Root
Baidu Root is a root software for PC, meant for Android devices. It supports Android devices with v2.2 and above. It is also a program that nicely manages memory usage of the device.

- It supports more than 6000 Android device models.
- It is a one click installation software.
- It may turn out to install lots of unexpected bloatware on your phone.
- The software isn’t available in the English language.
7. SRS Root
It is yet another android root software for PC, which has a good success rate in rooting your Android devices. Moreover, this rooting software for PC comes with a range of exploits for your needs. Let’s check out its pros and cons.

- The software is quite easy to use.
- A free trial version is available.
- The software requires some sort of special permission to carry out rooting, which may cause inconveniences.
- The software’s user interface is quite ugly.
8. 360 Root
360 Root app is the last on today’s list of best root software for PC but certainly not the least. 360 Root can root your Android device with just a simple click and claims to root 9000 Android devices. However, when testing carried out, it failed to root Xiaomi Mi 4, which was running on Android version 4.4, but yes, it worked well on other manufacturers like HTC, Samsung, etc.

- It enables you to root your android device with just one click.
- Works on all devices with Android 2.2 or higher.
- Helps to carry out system cleaning to clear out junk and system cache.
- The UI of this App is not very good.
- The App doesn’t support the English language, which is one of the biggest con of this App.
- Failed to root some famous android phones like Xiaomi Mi 4.
Best 4 Android Rooting Tool to Root Android with Computer
In this part, I recommend the best 5 root tools for Android, which enable us to root your phone or tablet from the computer easily and conveniently. If you failed to find the tool you need, you could also check the top 30 Android Root Apps in 2017. You can also get Security Apps for Mobile Phones after you root your Android phone.
Why People Want to Root Android Device
You must have observed the preinstalled applications on your smartphone and tried to delete at least one of those (don’t lie to yourself). Or maybe you don’t like those pop-up ads when you are at the height of enjoyment while playing games. If yes, there is a need to root your Android device.
Gaining root access is similar to get full control over the Android and run the device as a master. Not just that, you can install the incompatible applications to your device, your device’s speed will be increased and so the device’s battery life. You will also be able to track your device in case if it is missing.
There are some risks involved too, in the rooting process which can make you to give a second thought about it, like the device’s warranty will be void or there are chances of updating issues with the device. One of the possible and highest risk include data loss. Yes, you may put your data in jeopardy. For this issue, it is favourably recommended to use dr.fone — Phone Backup (Android) to create a backup of your device prior to performing rooting process.
- For one click root Android 4.4.2 and 4.4.4 with a computer, the desktop softwares dr.fone – Android Toolkit, SRSRoot, CF-Auto Root will work.
- For one click root Android 4.4.2 and 4.4.4 without a computer, the apps Framaroot, Z4Root and iRootapk are some good options.
1. dr.fone — Android Toolkit
dr.fone – Android Toolkit is believed to be the best software for rooting any Android device with the computer. It is adaptable to around 7000 Android devices. Having high success rate, your device can be easily rooted with a PC. The rooting process can be done in whatever brand of smartphone you are using and no matter what version of Android you have.
Steps to use dr.fone – Android Toolkit
Step 1: The first step is installing the iSkysoft toolbox for Android, download Android Toolkit on your computer.
Step 2: Choose “Root” option.
When the Android is detected, enable USB Debugging Mode.
Step 3: Select “Root Now” and root your device.
Wait for a notification and reboot.
SRSRoot is a simple method to root an Android device having various exploits. It supports the android versions between 1.5 to 4.2. You can also unroot your device, in case you change your mind. You need to backup your data before rooting procedure to avoid the risk of data loss. And just need to connect your phone with the computer.
Steps to use SRSRoot:
- Download SRSRoot and install SRSRoot in your computer.
- Enable the USB Debugging Mode in your smartphone before connecting it to the computer.
- Open SRSRoot on your computer. Choose one of the Root options from given in the software.
- Give some time to finish, and your device will be rooted.
3. CF Auto Root
If you are new to rooting process, CF Auto Root is the best option for you. It is the simplest method to root your Android device. Be it your Galaxy S1, S2, Galaxy Note, Galaxy Nexus, this software is able to root almost 300 devices. For beginners, it is a must know that the device’s bootloader should be unlocked, otherwise there is a chance to lose the data of your phone.
Steps to use CF Auto Roots
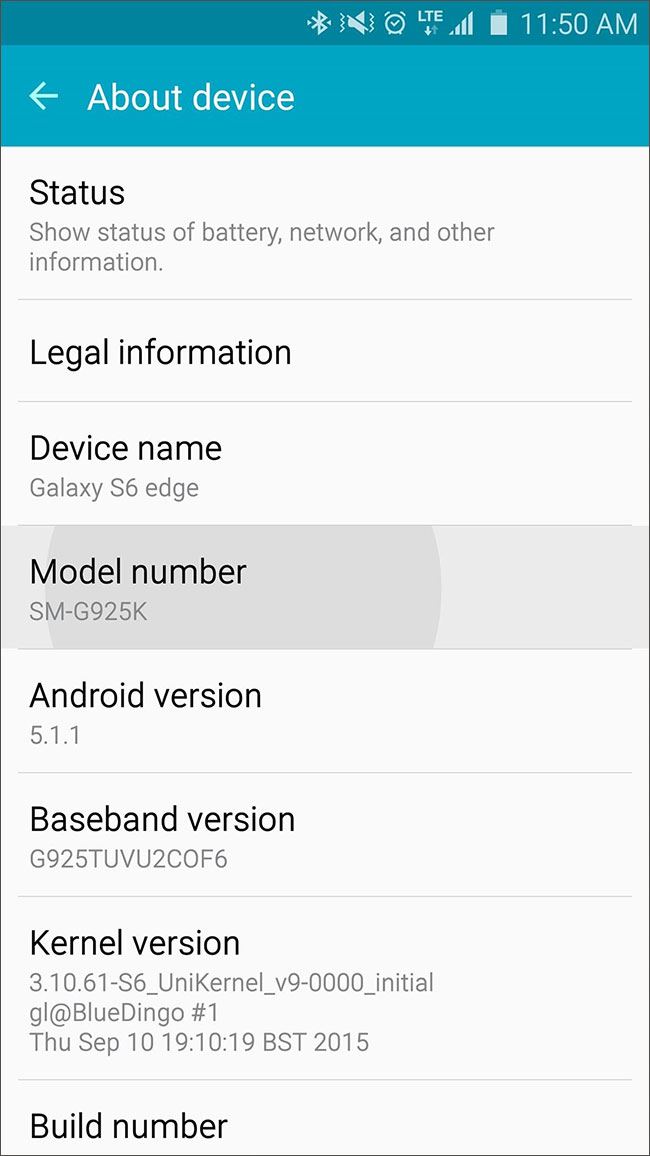
Step 1: Download the right CF Auto Root package, ensuring your phone’s model number. If you’re confused, head to “Settings”>”About Phone”>”Model Number.
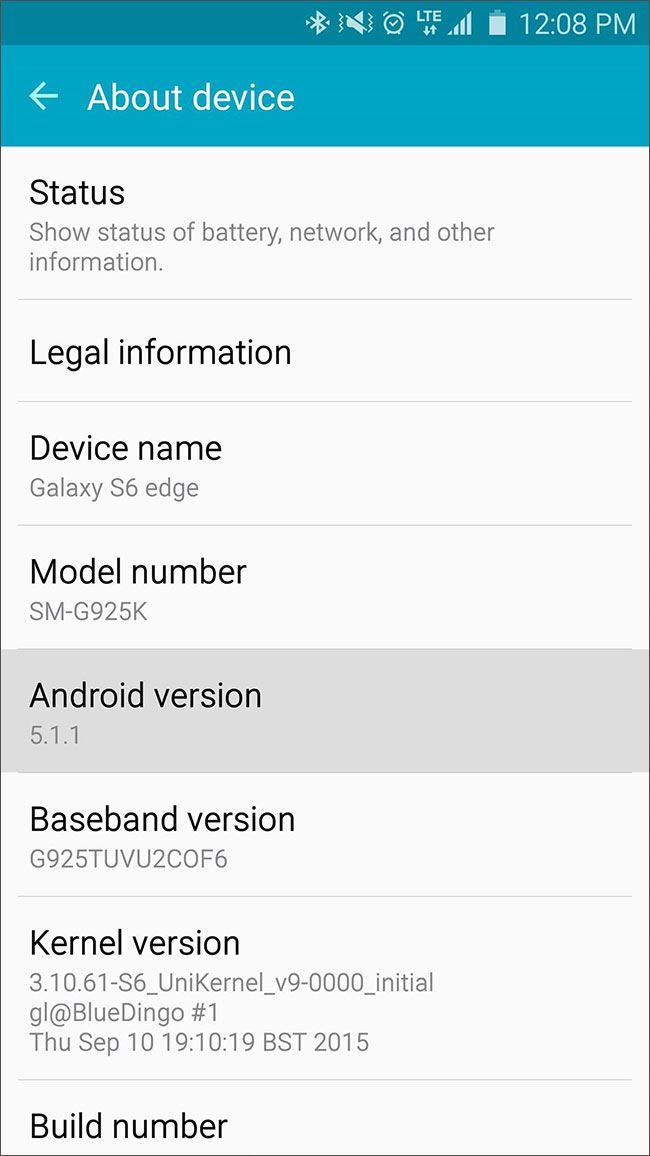
Step 2: You need to go down a little further in the “About Phone” option and observe the digits below “Android Version” option.
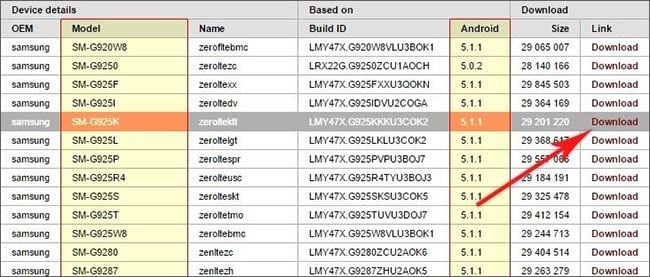
Step 3: From the list in the CF Auto Root page, find your device’s number and Android version and download from the link given in the right of your information. This way, you will get the right CF Auto Root package.
Extract the CF Auto Root and run CF Auto Root by clicking Odin3.exe file.
Turn off your device and hold “volume down + home + power button” and let it boot.
Connect the device to the computer and you will see a message “Added” in Odin (If you have already installed your device’s drivers in your computer).
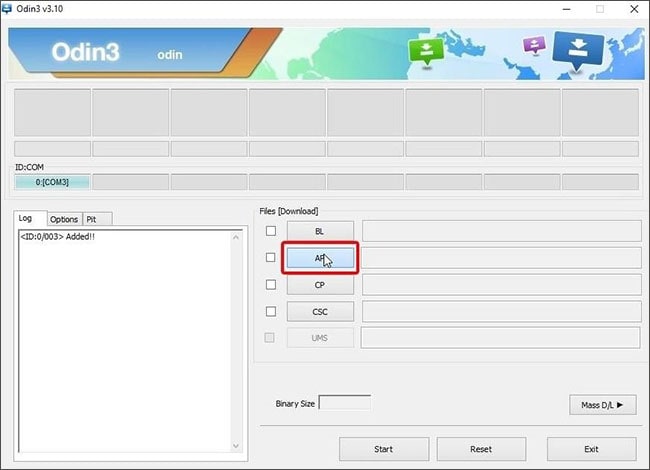
Step 4: The ID: COM bar on the top left corner will turn blue.
Now click on AP button and locate .tar.md5 file in the extracted folder. After selecting, click on “Start”.
Your device will reboot on its own once flashing is done. And a “Pass” message will appear in Odin.
How to root Android ONE devices with Android ONE Toolkit
Apart from other leading software applications available in the market, you can also root your Android ONE mobile using Android ONE toolkit. It supports only Android devices and helps to recover flash memory, relocks or unlocks – root locked or unlocked Bootloader, and allows single/bulk APK installation.
Rooting with Android ONE toolkit is quite a lengthy and time consuming process, more over you have to be very attentive towards the process or you may end up bricking your Android device. Ensure to take necessary backups and charge the battery before starting the rooting process.
Let’s go through the step-by-step process to download Android ONE Toolkit and root an Android ONE device.
1. Download the Android ONE Toolkit software to your PC from the internet for free. Install it once download is complete.
2. Connect your Android ONE device and the computer using a USB cable. Launch Android ONE Toolkit and select «Install Drivers». You should see your device in the list.

3. Click «Unlock Bootloader» to let the device enter fastboot mode. Unlock the Bootloader with your device specific key and click «Flash Recovery». Wait a few seconds.

4. Once the recovery is flashed on screen, click on «Root» to initiate Android ONE device rooting. Disconnect your device from the computer when rooting is complete.

5. Check if SuperSU is installed in your phone or not. In case it is missing, download from Google Play Store and launch the App. If a popup appears, when you click «Check Root Access» and asks root permission, you have successfully rooted your Android ONE device.

What Is Rooting an Android Device?
Rooting is a process that allows you to obtain complete rights over your Android device. Gaining root-level access or rooting enables you to customize the device as per your needs. By using a reliable root App for PC, you can unlock a varied range of features on your Android mobile.
There are situations when you experience storage space crunch in your mobile, but can’t get rid of unwanted pre-installed Apps. Rooting your Android device allows you to get the authority for removing pre-installed Apps and unlock more features in your device.
You can use rooting tools in two ways, i.e., with or without a PC depending on your convenience and what the device supports. Here we have gathered eight widely used android root software for PC and mobiles, which you can try.
Related Articles & Tips
Get familiar with Android ONE
Android ONE and Android, aren’t they the same?
There is no need for getting confused with Android and Android ONE. Android ONE is the «stock» version of Android OS developed and launched by Google in 2014. If you do not have Android ONE as your OS in your device, then most probably the Android OS you have is a modified version that mobile handset manufacturers offer with their devices. Android ONE is simple, secure, and smart, with fresh OS updates.
Main features of Android ONE
- It has a neat and bloatware free simple interface.
- It ensures security through Google Play Protect.
- It is a smart OS, well optimized to support Google Assistant and other services from Google.
- Android ONE is fresh, with its promised software updates for two years. Usual Android devices have updates depending on OEMs.
- It predefines the hardware standards, bringing down the extra work.
- It brings cost effective devices, with the basic and reliable OS.
Benefits of rooting Android ONE
Here in this section we will discuss the benefits of rooting an Android ONE device:
- A rooted device performs better as you have more free memory.
- Android ONE rooting will stop the popup Ads coming up during mobile use.
- You have more free space in your device as you can delete various preinstalled Apps.
- Rooting would help your device to install tracking Apps, so that you can track your mobile, in situations like loss or theft.
- You are able to install custom ROMs that enhance your flash memory. You get more storage, when you perform Android ONE rooting.
- You can download more Apps, which were «incompatible» before your Android ONE was rooted.
Root Genius
As its name suggests, Root Genius is a smart Android root software created in China. It makes Android rooting simple, easy, and fast.
Download URL: http://www.shuame.com/en/root/
- Support more than 10,000 Android phones.
- One-click to root, simple, and easy.
- Enable to flash custom ROM, and remove built-in-apps after rooting.
- Compatible with Android from 2.2 to 6.
- Free
- Not offer unroot function for the time being

Apps to Root Android KitKat without Computer
One of the most familiar and popular tool for rooting Android device is iRoot tool. It assists you to root any Android device with just a single click. You can use this tool if you don’t have a computer. In other words, it is a popular tool to root your kitkat Android without a computer.
Steps to use iRoot:
- Make sure the battery is amid 70-80%.
- Back up all your data.
- Head to “Settings”>”Security” and check the “Unknown Sources”.
- Download iRoot from the official website.
- Install iRoot apk by clicking on the apk file stored on SD Card.
- Open the application and choose “I Agree”.
- Click on Root Now button.
- The rooting process will be done and you will observe a Kinguser app icon in the application menu informing you that your device has gained root access now.
- You are done!
Steps to use Framaroot:
- Battery level should be 50% and above.
- Backing up all the data of your android is highly recommended.
- Download the app and head to “Settings”>”Security”>”Unknown Sources”.
- Install the Framaroot app and select the suitable exploit.
- Stay there and wait for notification saying, “the superuser settings have been installed”.
- The process of rooting will begin. Reboot once the device will root.
Steps to use Z4Root:
- Start the rooting method by downloading Z4Root apk (as it is mentioned above, you have to download it online).
- Remember to turn on unknown sources. For this, head to “Settings”>”Security”>”Unknown Sources”.
- Head to your File Manager and then downloads folder to install the Z4Root.
- After installation, hit “Root” button.
- The process will begin and you just have to wait for the rooting to be done.
- Reboot once the process is complete.
Best 3 Root Apps for Android to Root Android without Computer
In this part, I recommend the best 3 Android root apps, which enable you to root your phone or tablet directly on your Android devices. So that you can root without PC easily.
Superuser X [L] Root App
It is an Android root app designed for experienced people, developers, newbies, or amateurs who are advised to stay away from this app. This app permits all the apps to access roots once the binary file gets installed. You can also remove this app after that. Hence, you won’t get any pop-ups asking for permission to access the root, those pop-ups might be irritating for you if you use plenty of rooted apps for Android. Using this app you can stay away from that irritation to root without PC freely.
- You will be getting root access even if this app is uninstalled or gets corrupted once the binary file gets installed.
- You can also uninstall the app after installing the binary file. Hence, you can save memory space.
- Gives root access to every app without prompting for permission which can save your time, memory, and CPU.
- Root without PC.
- The rooted Android app is designed for developers and experienced users, if you feel secure by giving the root access by prompting for it, then the root app is not for you.
- If you are in a habit of downloading and installing random rooted apps for Android from the web, then the app is not for you. You might brick your rooted Android phone in that case.
- The free version of this app shows some ads, to get rid of that, you should purchase the paid version.
- This root app for Android is currently available for those Android devices which are running on the ARM processor.
- The Android root app is based on a command-line interface. A graphical user interface is not provided.
Superuser Root App
This rooted app for Android does almost the same as the SuperSU Android Root tool. With this app, you are going to get PIN protection for the fee, which is available after paying for it in the SuperSU.
This Android root app is a little heavy compared to SuperSU when it comes to CPU use. The interface was not that good when the beta version was launched, but the official version is fine and runs smoothly and root without PC. The developer of this app has announced that this app will always be free and no paid version will ever be launched.
- It provides multi-user support (Android 4.2 onwards).
- It is an open-source project; you can find the source code on Github.
- PIN protection. It asks for a PIN whenever it encounters a root access request.
- Every root app for Android can be configured separately.
- Root access prompting, logging, and notification features.
- Root without PC.
- It can handle multiple root access requests at the same time.
- Updates very frequently in the marketplace, hence you will get added support to all the newly rooted Android versions almost instantly.
- You can set the duration of the request before they time out.
- If you are looking for a free rooted Android app, then you cannot find any app better than this one. You will never feel that you make a compromise by not going for a paid Android root app.
- No security voids in this rooted Android app, everything is transparent.
- This Android root app is a little bit heavy in terms of CPU uses
- The interface could be made better, but this can be of personal preference. If I don’t like the interface doesn’t mean you will feel the same.
What is Rooting?
How do you root your phone?
- Select and download the Android Root tool.
- Enable the Android Root tool to access your Android devices.
- Root your Android phone or tablet easily.
Android rooting might cause data loss on your phone. Check out this Android backup software to take a full backup beforehand.
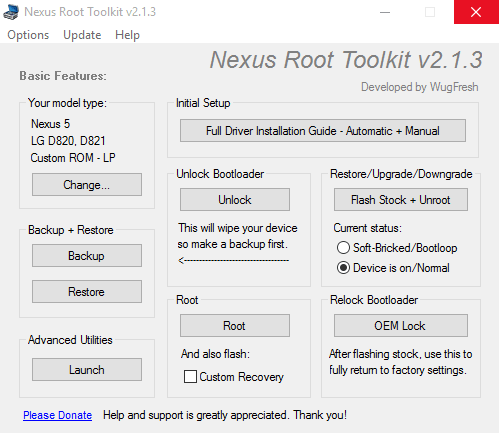
Для чего нужна программа Nexus Root Toolkit (Нексус Рут Тулкит)?
Программа необходима для получения ROOT-прав на мобильных устройствах Nexus (планшеты, смартфоны, медиаплееры) с установленной операционной системой Android.
Для этого необходимо в выпадающем списке интерфейса программы выбрать модель устройства
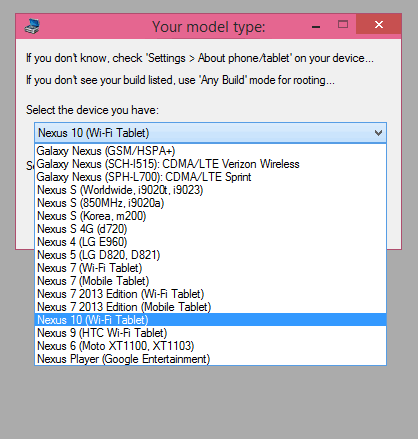
Выбор устройства Нексус
а затем версию операционной системы Android и модификацию прошивки
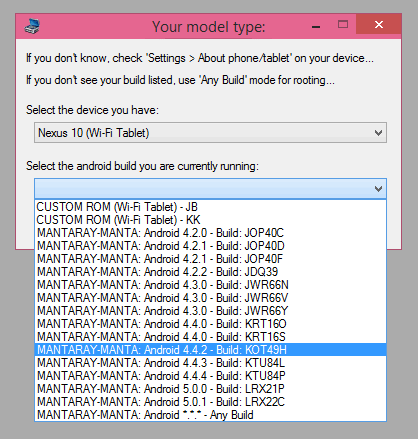
Выбор версии прошивки
Подключить устройство и включить режим отладки.
На изображении ниже, показан порядок включения режима отладки для устройств с системой Android 5.
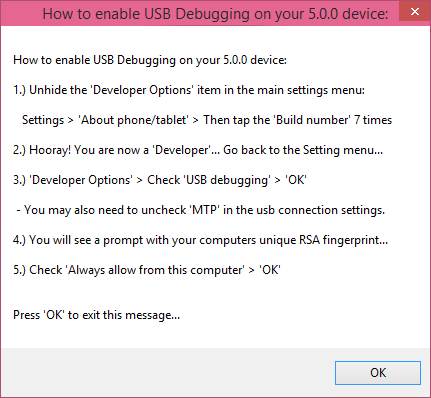
Нексус Рут Тулкит — очередность подключения устройства
Для этого необходимо зайти в «Настройки» (Settings) и выбрать пункт о «Телефоне/Планшете» (About phone/tablet) и тапнуть на Номер билда (Build number) семь раз. Затем вернуться в «Настройки» (Settings), отметить пункт «Отладка по USB» (USB debugging) и тапнуть на «ОК». Нужно так же снять отметку с «MTP» в настройках USB соединения.
Затем должно появиться приглашение подключения от персонального компьютера. Отметьте пункт «Always allow from this computer» и тапните на «OK».
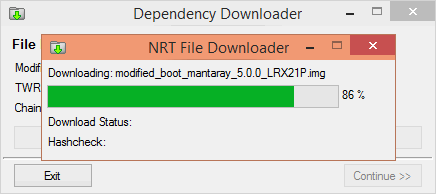
Загрузка файлов прошивки
Так же для получения root-прав для Android-устройств можно воспользоваться бесплатными программами Kingo ROOT или Mobogenie представленных на соответствующих страницах нашего ресурса. К тому же Mobogenie позволяет производить обмен данными между Вашим персональным компьютером и мобильным устройством, такими как контакты, музыка, фотографии и прочие файлы.
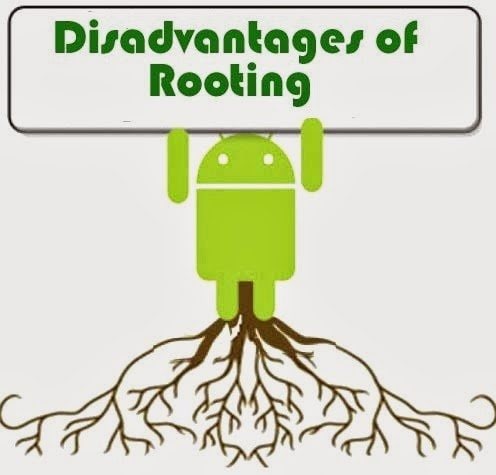
Full Advantages and Disadvantages of Rooting an Android Device
- Flashing a custom ROM is one of the biggest advantages after rooting your phone. In contrast with stored operating systems, these custom ROMs are more accessible.
- You can simply remove all those annoying preinstalled applications from your device by rooting.
- You must be tired of those pop-up ads! Rooting a device allows to remove these ads and you can enjoy games with no trouble.
- Probably you want to install some amazing applications but unable to do the same as they insist root access before installation. Perform rooting process in your smartphone and you can be entertained by more applications.
- Some dominant applications can upgrade the functioning of your device such as your device’s speed and battery life. Of course, these applications require root access. In short, perform rooting method and make your android perform better too!
- You can track your android device after rooting it same as you track your iPhone. You just need to install a tracking app and you can track your missing device.
- With a rooted device, you get the freedom to transfer any application from internal memory to external memory or SD card. This way you can free the running down internal memory of your device.
- Long for changing those uninteresting default themes available in your device? Or want to modify the bootlogo in your preferred style? You can get this done with some available applications, after rooting. Not only this, you can alter your device visually be it the colour of battery icon or underclocking and overclocking of phone’s CPU and GPU, quite technical, huh?
- To put it simply, you become the master of your android smartphone once you root your device.

- Chances are that your device or operating system may get exploited while rooting or flashing ROMs.
- With rooting your device, you are cancelling your device’s warranty yourself. Some devices can be un-rooted but not all devices can be un-rooted. Now when the warranty is invalid, just in case anything occurs to your device during the remaining warranty period, you will be charged by the company for any fix.
- While rooting your android device, there is an increased risk of establishing viruses in the device.
Kingo
Download URL: http://www.kingoapp.com/
- Fully compatible with Android 2.3 up to Android 4.2.2.
- Enable to remove root at any time.
- Free of charge.
- Safe and risk-free.
- Not support Android 4.4 or up.
IRoot
Just like Root Genius, iRoot is another powerful root software created by Chinese people. Just one click, and you can be the master of your rooted Android phone or tablet.
Download URL: http://www.mgyun.com/en/getvroot
- Support thousands of Android phones.
- The high success rate of rooting Android.
- Free of charge.
- Not offer unroot function for the time being.
Conclusion
In conclusion, rooting your Android device with the help of a PC or computer can be a great way to unleash the full potential of your device. The process may seem daunting at first, but with the right root software, it can be a quick and easy process. The 8 best root software listed in this article offer a range of features and benefits to help you root your device safely and easily. Whether you’re looking to customize your device or gain access to new features, these root software options are sure to meet your needs. So, why not give them a try and see what your Android device is truly capable of?
![]()
Dr.Fone — Data Recovery (Android)
Recover Deleted Files from Android Without Root
- Recover data from Android devices.
- Supports to recover Contacts, Messages, Call history, Video, Photo, Audio, WhatsApp message & attachments, documents, etc.
- Supports 6000+ Android phones and tablets from brands like Samsung, HTC, Motorola, LG, Sony, Google.
- Highest retrieval rate in the industry.
3981454 people have downloaded it
")


")