
")
Прежде чем начать взлом Android, надо понять, как он в целом работает, и лишь затем можно приступать к разблокировке загрузчика системы. Итак, попробуем разобраться.
Finally! This is how you can unlock the bootloader of any Android phone with a PC. Now you can root, install a custom recovery, flash custom ROMs, take Nandroid backup, and much more. If you face any problems, then please comment below.
Finally! This is how you can Unlock the Bootloader of Huawei and Honor phones. Please feel free to comment below your queries or suggestions related to this tutorial.
Comments are closed.
- 59 thoughts on “How to Unlock Bootloader of Huawei and Honor Phones ”
- What is bootloader?
- Advantage of Unlock bootloader
- Disadvantage of Unlock bootloader
- First Step – Open Developer settings
- Second Step – Unlock the bootloader
- F.A.Q (Frequently Asked Questions)
- Last thoughts:
- What is Bootloader?
- Advantage of Unlock bootloader
- Disadvantage of Unlock bootloader
- Step 1 – Open the Developer Mode
- Step 2 – Set up the In-depth App
- Step 3 – Interlink to other device or PC
- Step 4 – Apply fastboot commands
- F.A.Q (Frequently Asked Questions)
- What is Bootloader?
- Why Should I Unlock the Bootloader of My Device
- Downsides of Unlocking the Bootloader
- So, Should I Unlock My Device’s Bootloader
- Prerequisites
- Warning
- Steps to Unlock Bootloader of Android Devices
- OEM Specific Bootloader Unlock Guide
- Conclusion
- Important Points
- STEP 1: Set Up init.d Support
- STEP 2: Setting up Magisk Boot and MTK-SU
- FAQ1: How to Update Magisk on a Locked Bootloader Rooted MediaTek Device
- About Chief Editor
- Sadique Hassan
- What is bootloader?
- Advantage of Unlock bootloader
- Disadvantage of Unlock bootloader
- Step 1 – Unlock the developer mode
- Step 2 – Interlinking the devices
- Step 3 – Applying the commands
- Step 4 – Unlocking the bootloader!
- F.A.Q (Frequently Asked Questions)
- What is Bootloader?
- Advantage of Unlock bootloader
- Disadvantage of Unlock bootloader
- How to Unlock Bootloader on any Android Phone
- Method #1 – Unlock Bootloader All Phones
- Step 1: Unlocking developer mode
- Step 2: Attach your phone and PC
- Step 3: Insert ADB/ Fastboot commands
- Step 4: Finally, unlock the bootloader
- Method #2 – Unlock Bootloader Samsung phones
- Step 1: Open developer settings
- Step 2: Simply unlock the bootloader
- Method #3 – Unlock Bootloader Xiaomi phones
- Step 1: Unlock Developer settings
- Step 2: Log in to Mi account
- Step 3: Join the devices
- Frequently Asked Questions (FAQs)
- Last thoughts:
- STEP 1: Backup All Data
- STEP 2: Enable USB Debugging and OEM Unlocking
- STEP 3: Install Android SDK Platform Tools
- STEP 4: Unlock Bootloader on Android 11
- STEP 5: Download Stock Firmware for your Android 11 device
- STEP 6: Extract Android 11 Stock Boot.img
- STEP 7: Patch Stock Boot.img file via Magisk on Android 11
- STEP 8: Root Android 11 by Flashing Magisk Patched Boot.img File
- About Chief Editor
- Sadique Hassan
- Steps to Unlock Bootloader on Android
- What is DC-Unlocker?
- What is Bootloader?
- Why is Bootloader locked?
- Why unlock Bootloader on Android?
- How to Unlock Bootloader of Huawei and Honor Phones
- How to Unlock Bootloader of Huawei and Honor Phones
- Steps to Unlock Bootloader of Huawei & Honor
- Как разблокировать загрузчик
- Что происходит при включении и запуске Android?
59 thoughts on “How to Unlock Bootloader of Huawei and Honor Phones”
Unlock Bootloader of Android with our easy method. Using a simple steps guide, officially unlock the bootloader of Redmi, Poco f1, Moto, Mi, Realme, Xioami, Zuk, Sony, Samsung, Huawei, Nokia, Honor, Google Nexus, Google Pixel, LG, Vivo, Oppo, OnePlus, etc. Unlock bootloader without the PC using ADB and Fastboot. This guide can fix bootloader unlock allowed no error.
Do you want to root the Android smartphone or tablet? Do you want to install TWRP recovery and flash custom ROMs? If yes, then you are in the right place. In this tutorial, we’ll discuss some easy steps for unlocking the bootloader of any Android phone. Before you install TWRP recovery or flash custom ROMs, you will have to unlock the bootloader of your Android.
There are tons of things you can accomplish when you have to unlock bootloader on any Samsung phones. It’s the primary step to unfasten the fancy root access features.
You might know or not, but the easiest way to unlock the bootloader would be present by the Samsung devices since you didn’t have to use the computer to run commands.
In this article, we have covered everything from scratch! So even if you are a newbie who didn’t know to implement the method, we got your back through a simple guide.
Not only will you get fascinating features, but the process of unlocking the bootloader is essential, one of the crucial pillars that will clear the path of endless customization.
Besides, you can install custom ROMs, flash TWRP recovery, root any android device, unleash true potential with the immersive third-party features without any problem.
Are you thrilled to know about the way to unlock bootloader on any Samsung phones? Yes, you are excited, but before that, let’s understand what bootloader is in the device.
What is bootloader?
The bootstrap loader or the bootloader runs commands behind the scene when your device is going through the booting process, which performs it works in two formats.
The first one includes the usual method of opening the system while checking the img files; the second one covers safe mode that requires a boot pattern to unlock safely.
However, you can’t achieve the fascinating features of root access. Unless you have the key to unlock bootloader on any Samsung phones; you can desire that too, correct!
But before heading to the method to open the boot program settings— let’s first grasp the powerful features and the unwanted drawbacks to make the final decision or not.
Advantage of Unlock bootloader
The first thing a tech enthusiast will perform after unlocking the bootloader is flashing the custom recovery. The TWRP will unleash the immersive customization traits.
You can adjust the system according to your requirement while making a personalized interface at your fingertips, from the primary appearance traits to the cores settings.
Are you bored with the plain old UI setting? Worry not; you can root your device and attain the Android version faster, while you can also choose any custom interface.
Once you have unlocked the bootloader, you can achieve next-level performance with overclocking software. And increase the battery and software optimization precisely.
Disadvantage of Unlock bootloader
The locked bootloader eliminates threats while booting the system, when you unlock those doors, you won’t attain any further protection or security layering on the phone.
Once the bootloader is open, and you start customizing the interface. But if you install incompatible software or ROM into the system, it can brick the device permanently.
Disclaimer: In the subsequent method, your handset data will be wiped out and can’t recover back; make sure to take backup. So you won’t face hassle in unlock bootloader on any Samsung phones. Plus, the Magisk update is not accountable for any damage!
First Step – Open Developer settings
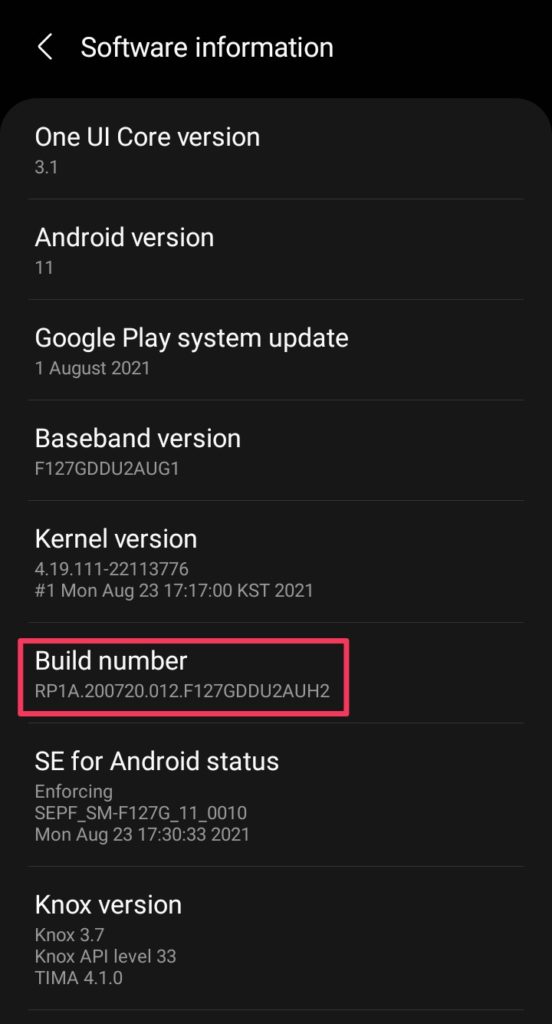
- Take a backup before running the unlock bootloader process. Head toward the Setting app→scrolls down to About Phone→Tap on Build number a few times.
- With this, the Developer options will open for you, and search developer in the search bar, or scroll down in the setting menu and enter into that menu first.
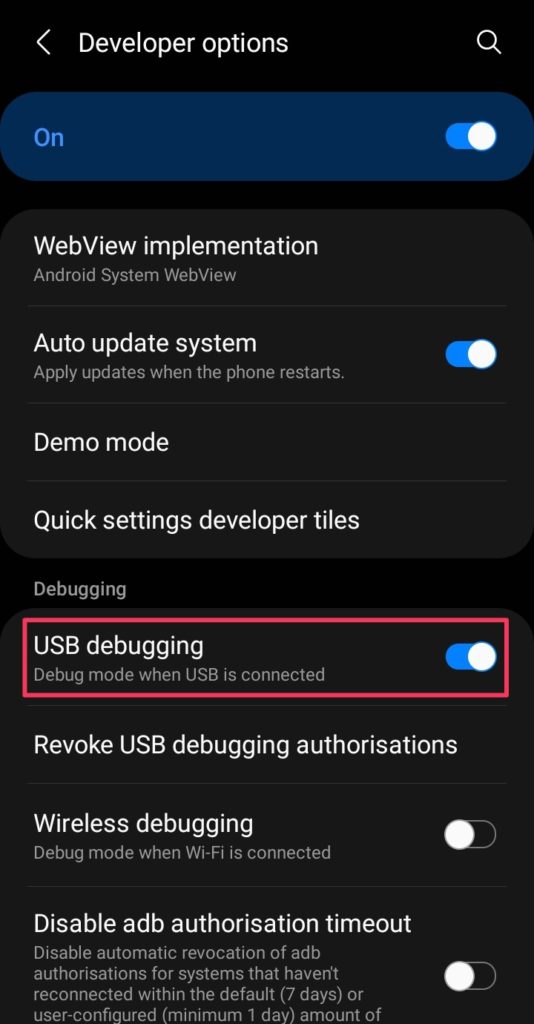
- Enable both the OEM unlock and USB debugging settings through that menu.
- After confirming that, come out from setting apps and Turn off the smartphone.
Second Step – Unlock the bootloader
- Put the phone into the fastboot mode by pressing Volume Up and Down first.
- Once the fastboot logo appears on the screen, connect to the PC via USB cable.
- While being connected, press and hold the Volume Up button for 2-3 seconds.
- In the unlock mode, once again, tap on the Volume Up button for confirmation.
F.A.Q (Frequently Asked Questions)
Q- Is bootloader unlock safe?
Ans. Unlocking the bootloader is secure until you flash some remarkable custom ROM features over the device. If you don’t want any risk, avoid unlocking the bootloader.
Q- Can I root my phone without unlocking the bootloader?
Q- Is OEM unlock the same as root?
Ans. Both terms are co-related to each other since root access grants privileges. While the OEM unlock (unlock bootloader) is essential for flashing custom recovery.
Q- What is Samsung OEM unlock?
Ans. The OEM unlock is one of the primary features available in the developer mode in the Android OS, which is generally utilized to unfasten the bootloader settings easily.
Q- What happens if I reboot to the bootloader?
Ans. Nothing will happen to your device since the bootloader didn’t perform anything, but if you try to unlock the bootloader, you will most like lose your precious data.
Q- How do I unlock bootloader on any Samsung phones?
Last thoughts:
You will unlock the bootloader on any Samsung phones with the above method while skipping the PC connecting if you have to install the Bugjaeger on the other device.
You didn’t need computer support to interlink with that app. Besides, you can also run fastboot commands. If you have queries about the process, pin down them below.
Are you looking for a method that will provide root privileges? Okay, you are searching that way. But first, let’s understand about unlock bootloader on any Realme phones.
Because the first thing you need to root any android device is to unlock the bootloader as you can quickly access the system setting files if that bootstrap lid is open for you.
The process takes place with the help of the and a bit aid of the platform tool, but here we will provide a subtle method that will kickstart your rooting journey.
Ultimately, are you ready to the master of your destiny, and you can unlock bootloader on any Realme phones, but before, let’s grasp what a basic functioning bootloader is?
What is Bootloader?
The bootloader is the primary software that runs the boot img file behind its boot logo. Different companies utilize unique patterns and themes to improvise their overall look.
On the other hand, there’re endless possibilities that will unfold the immersive settings and specialties once you unlock the bootloader settings also prepare custom ROMs.
Like rooting any android device, unlock bootloader on any Realme phones begins with its risk factor. Therefore, everyone needs to understand the pros and cons aspects too.
Advantage of Unlock bootloader
The primary advantage of unlocking the bootloader is that you easily enter it into the system. Besides, custom ROMs will enhance the overall interface settings features.
Once you have unlocked the bootloader settings further their core features, you equip TWRP custom recovery and implement different visual software that improves the UI.
Besides this, you can transform the performance into several folds with overclocking software support, and it will also increase the high-end gaming experience precisely.
On top of that, you can remove the annoying bloatware that never comes in daily use, except for some system applications, and you can throw away those boring apps too.
Disadvantage of Unlock bootloader
As we have earlier mentioned, the security factor is already been compromised, and for someone, if the device bootloader is unlocked, they can bypass the encryption key.
Disclaimer: As usual, you should always prepare for the worst case. If you want to unlock the bootloader, then make sure to take a complete backup. The Magisk Update will support you! But will not be accountable for damage; do at your risk.
Step 1 – Open the Developer Mode
- Inside the phone screen, head toward settings→about phone→build number.
- Click on the build number/model number more than 7~8 times simultaneously.
- Now come back to the settings menu and search for the developer mode first.
- Inside the developer menu, you have to allow OEM unlock and USB debugging.
Step 2 – Set up the In-depth App
- Next, you have to download the latest version of the In-depth App; install that.
- Press on Start Applying and proceed with agreeing terms and conditions and then click on the Submit button, while you have to wait more than 15 minutes.
- During that time, the handset screen will showcase query application status.
- A Start In-depth Test appears. Click on it to put the phone into fastboot mode.
Step 3 – Interlink to other device or PC
Note: If you want to unlock bootloader without PC, you will need the Bugjaeger app to run the fastboot command on the other device, so make sure you have it already.
- Download and install the latest version of the platform tools set up on the PC.
- Connect the primary device to the computer/other device using the USB cable.
- For the PC users, search the Window Powershell and run as the administer.
- For mobile users, enter into the Bugjarger app and head to the flash options.
- In both cases, a new dialog box will appear on the screen where you have run some basic fastboot commands to unlock bootloader on any Realme phones.
Step 4 – Apply fastboot commands
Note: In both cases, whether you are using the computer setup or using other devices, you will be using the same command to unlock the bootloader settings, so worry not!
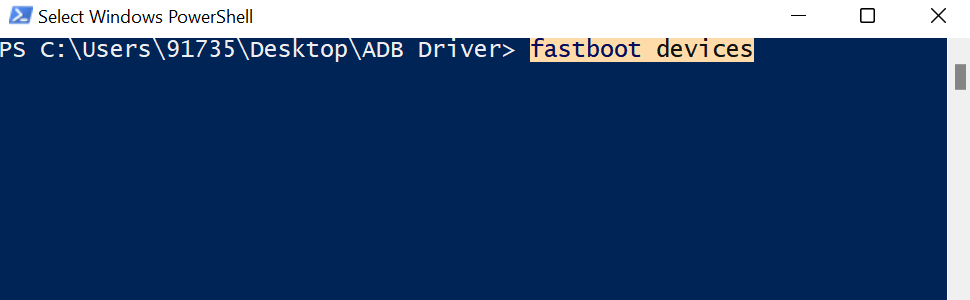
- Enter the first command – fastboot devices – it checks device connectivity. If it’s not showing anything, try to reconnect the device once again also check cable.
- Afterward insert – fastboot flashing unlock – this will access the bootloader.
- There will Yes/No option for the Volume up and Volume down button. You have to select that option that tells you to unlock the bootloader in the first place.
- Following that, you apply – fastboot reboot – command to restart the device.
F.A.Q (Frequently Asked Questions)
Q- Is it safe to unlock the bootloader?
Ans. Unlock bootloader on any Realme phones is quite simple, but if you don’t want to install custom ROMs in the Andriod ecosystem, it is not necessary in the first place.
Q- Can I relock the bootloader?
Ans. Yes, you can relock the bootloader, and for that, you run fastboot commands, it’s pretty easy, and you can perform that anytime when you want with stock firmware.
Q- What does unlock bootloader mean?
Q- Will unlock bootloader erase data?
Q- Can you root a phone with a locked bootloader?
Ans. There are tons of methods to root a device without unlocking the bootloader—as if you didn’t desire to unlock the bootloader, try KingRoot apk to gain root privileges.
The first question that might come to your mind is what is a Bootloader and do I need to unlock it. Well, in short, if you aren’t one of those technical geeks who like to tweak their device’s software, then quite frankly you shouldn’t be unlocking the device bootloader. Although there are tons of benefits of having an unlocked bootloader, it sure does have its downsides as well. We will have a look at both sides of the coin in a while. But first, let’s know more about the bootloader.
What is Bootloader?
According to Google “A bootloader is a vendor-proprietary image responsible for bringing up the kernel on a device. It guards the device state and is responsible for initializing the Trusted Execution Environment (TEE) and binding its root of trust”. Confused? So am I! let us leave all this aside. In simpler terms, a Bootloader is software that runs every time your phone boots (start). It contains a set of instructions that tells the device which program to load at what instance. It also decides whether to boot your device to ‘Android OS’ or the ‘recovery mode’.
By default, most of the OEMs ships their devices with a locked bootloader. The reason for their part is quite simple: they only want you to run the OS that they ship on their device. The reason for the same is due to security concerns. But they still leave a window of opportunity for the tech geeks those who wish to tweak their device’s system. And if you are one of them, then this guide is all that you will require.
Why Should I Unlock the Bootloader of My Device
What is even more interesting is the fact that just by using a single line of code, the bootloader could be unlocked. So what are you waiting for, go ahead and give it a try, or should you? Before beginning with the process, make sure to read the downsides of unlocking it. All this is mentioned in the below article.
Downsides of Unlocking the Bootloader
Apart from the warranty void, you will also lose all the data stored on your device. Moreover, some apps like Netflix also have some negative consequences. The L1 Widevine Certificate gets lowered to L3 and as a result, you wouldn’t be able to stream Netflix content in HD quality. Last but not the least, there’s always some chances of your devices getting bootloop or ending in a bricked state.
So, Should I Unlock My Device’s Bootloader
See, the onus completely lies in your hands. If you are among the tech geeks who love to tweaks their devices, then give no further thoughts. As far as the warranty is concerned, well trust me there is ‘no’ software issue that cannot be rectified by yourself if you have some knowledge about rooting and flashing-related stuff.
So the need to meet the guys at the service center does not arise! In a nutshell, if custom ROMs and rootings are what you think of day and night, then look no further. But if you only use your device only for chatting and calling purposes, then I’m there isn’t much in store for you. You could very well carry on with the normal uses, without ever giving a second thought of unlocking the bootloader.
Prerequisites
Warning
DroidWin or any of its members won’t be held responsible in case anything happens to your device while performing the below steps. You completely understand the risk of bootloader unlocking and proceed ahead at your peril.
Steps to Unlock Bootloader of Android Devices
- Connect your device to the PC via USB cable.
- Navigate to the folder where you have installed Android SDK and Platform Tools.
- Inside the folder, while pressing the ‘Shift’ key, right-click on an empty location.
- Select ‘Open PowerShell window here’.
- Well, you could also use Command Prompt if you wish [recommended]. For that, type in cmd in the platform-tools address bar and hit Enter. This shall launch the Command Prompt window.
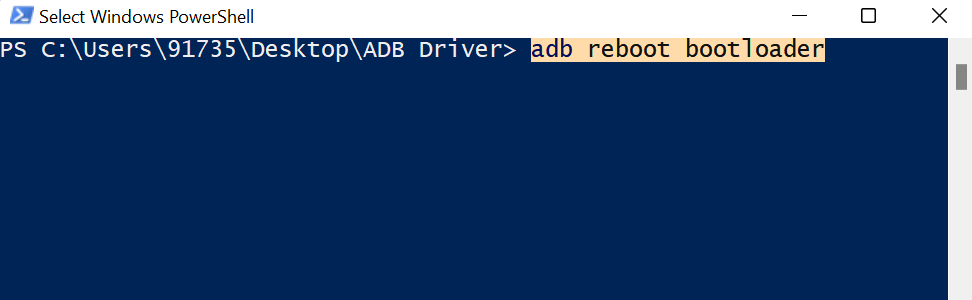
- Next, type the below code to boot your device to fastboot/bootloader mode:
adb reboot bootloader
- Now type the below code to unlock the bootloader of your Android device. Executing the below code will also wipe off all the data from your device.
fastboot flashing unlock
- For devices launched prior to 2015, you should try the following command:
fastboot oem unlock
- Furthermore, if you are willing to flash a custom ROM, then you will have to unlock the partition as well. Use the below command for that:
fastboot flashing unlock_critical
- If you get a confirmation message on your screen, reply in affirmative (‘Yes’, ‘I agree’, Unlock the Bootloader’, etc).
- Reboot the device by typing the below code:
fastboot reboot
That’s it. You have successfully unlocked your device’s bootloader. The first boot may take a little longer than usual. That is completely normal. Furthermore, you will also have to set up your device using your Google Account.
OEM Specific Bootloader Unlock Guide
As already mentioned in the introductory para, there are some smartphone manufacturers that take a slightly different approach when it comes to unlocking the bootloader. For example, Realme requires In-Depth APK, Samsung calls for disabling Vault Keeper, Sony requires device-specific code, and so on. Hence we have compiled a separate guide for all these OEMs below, you may refer to it:
Conclusion
Now that you have successfully unlocked the bootloader of your Android device, go ahead and try rooting your device, flashing various custom ROMs and installing tons of amazing mods, including GCam. So with that, we conclude this comprehensive guide on how to Unlock the Bootloader of Any Android Device. If you are having any issues concerning any part of this guide, do let me know. I will get back to you with a solution.
OTHER IMPORTANT ARTICLES WORTH YOUR ATTENTION
In this guide, we will show you the steps to root your MediaTek device having a locked bootloader. Android has literally become a synonym with the word “customization”. Well, if an OS is open-source in nature, then a plethora of mods and tweaks are always on the cards. We aren’t just talking about installing launchers and icon packs, there exists another less traveled territory that beholds a plentitude of tweaks.
This road leads us to custom development, where the possibilities stand endless. For example, you could replace the device’s stock recovery with a custom one such as TWRP. Likewise, you could also install custom ROMs, or gain access to the system partition. The latter is possible by rooting the device via Magisk- flashing Magisk App via TWRP or patching and flashing the boot.img via Fastboot Commands.
This way you could then flash binaries such as Magisk Modules, Substratum Themes, Xposed Frameworks, and the likes. However, to carry out any of the aforementioned tweaks, you need to checkmark a major requirement- your device’s bootloader needs to be unlocked. Or should it? Well there now seems to be a workaround that allows you to root your Mediatek device directly on a locked bootloader.
As a result, your device warranty might not be nullified and there will be no data loss as well. Furthermore, in some Xiaomi MTK devices, you have to wait around 168 hours before you could start with the unlocking process. But using this guide, you could easily skip this wait time as well (since no unlocking is required!). So without any further ado, let’s get started with the instructions.
Important Points
- This guide to root MediaTek devices on a locked bootloader is applicable for devices that come with MediaTek ARMV8 chipset. These include the MT67xx, MT816x, MT817x, or MT6580 chipsets. [Credits: XDA Senior Member diplomatic.]
- Since the bootloader is locked, you wouldn’t be able to modify the boot partition. As a result, you should not use the Direct Install Method of Magisk to update it.
- Furthermore, as of now, this method works on Magisk v19.4 to v21.4 only. It isn’t compatible with Magisk v22. But this shouldn’t be a cause of concern as the earlier builds work pretty well without any issue. With that said, there is still a way of updating magisk, which we have mentioned at the end of this guide. Interested users should definitely check it out.
So keeping all these points in mind, let’s start off with the guide to root your MediaTek device with a locked bootloader.
STEP 1: Set Up init.d Support
- To begin with, download and install the init.d scripts support App from Play Store.
- Now create a new folder on your Internal Storage and name it init.d.
- After this, create a new folder inside this init.d folder and name it bin.
- Now launch the init.d scripts support app and set it up as follows:
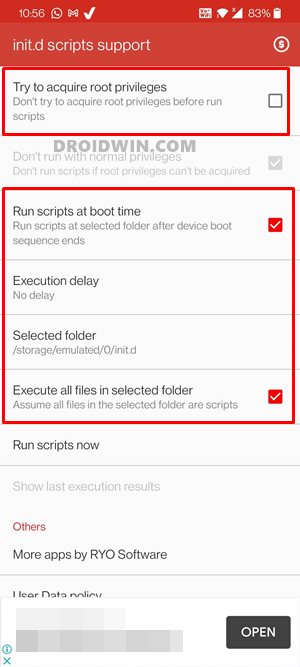
Before moving ahead, make sure that the init.d script support on your device exactly matches the value as is shown in my screenshot. Furthermore, the Selected Folder patch should be: /storage/emulated/0/init.d. If that is all well and good, then you are good to proceed ahead to root your MediaTek device on a locked bootloader.
STEP 2: Setting up Magisk Boot and MTK-SU
- Download and install the Magisk Manager app on your device.
- Next up, download the magisk-boot.zip file and extract its content. Upon extraction, you should get the magisk-boot.sh file. Transfer it to the init.d folder.
- Then download the mtk-su_r23.zip file and extract it. You should get two folders: arm and arm64. Head over to the folder that corresponds to your device’s CPU architecture [Reference: How to Check Android Device’s CPU Architecture] and copy the resultant mtk-su file from that folder.
- Now paste that copied mtk-su file to the bin folder (which you have created inside the init.d folder).
- Next up, download the Magisk ZIP [any version between v19.4 to v21.4]. Please don’t use the latest Magisk as of now. You may update it to the latest build after the setup is complete (instructions for which are given at the end of this guide).
- Now extract this Magisk ZIP file, go to its arm folder and copy the required magiskinit file [magiskinit for 32 bit and magiskinit64 for 64-bit devices].
- Move this file to the init.d > bin folder on your device. If you have downloaded the 64 bit, then rename it from magiskinit64 to magiskinit.
- When that is done, launch the init.d scripts support app and tap on Run scripts now.

- The script should be executed within a few seconds and you should the output along the following lines:
Temporary root by [email protected] Home URL: https://forum.xda-developers.com/android/development/amazing-temp-root-mediatek-armv8-t3922213 -------------------------------------------------- /data/data/com.ryosoftware.initd/files/bin UID: 0 cap: 3fffffffff selinux: permissive Load policy from: /sys/fs/selinux/policy 20.3:MAGISK (20300) client: launching new main daemon process - Now launch the Magisk Manager app and you shall get a Requires Additional Setup prompt. Tap on Yes and wait for the process to complete. Your device might automatically reboot once and the process stands complete.
FAQ1: How to Update Magisk on a Locked Bootloader Rooted MediaTek Device
Since your device’s bootloader is locked, you wouldn’t be able to update it via the conventional Direct Install method. Rather, download the latest Magisk ZIP file, extract it, copy the magiskinit file, and copy it to the bin folder. Then launch the init.d scripts support app and run the scripts.
So this is all from this section. I will be populating this FAQ section with more queries and tips as and when I get hold of the same. In the meantime, if you have any questions on the steps to root any MediaTek device on a locked bootloader, feel free to drop them in the comments below.
About Chief Editor

Sadique Hassan
A technical geek by birth, he always has a keen interest in the Android platform right since the birth of the HTC Dream. The open-source environment always seems to intrigue him with the plethora of options available at his fingertips. “MBA by profession, blogger by choice!”
There are two methods in which one needed the computer while the other didn’t need it since you will require in your smartphone while choosing anyone you prefer to use.
Besides this, in this tutorial, we have covered everything that you will necessitate for the process, such as essential tools and software with a precise step-by-step guide.
With the below method, you can do several things; for instance, if you desire to root android phone without pc, then the first thing you require is to unlock the bootloader.
Moreover, it won’t affect the device in any way, unlike the rooting process, where you will lose all the warranty privileges, and there’s a constant risk, but the risk is minimal.
But before heading toward the method of how to unlock bootloader on any Android phone, let’s first understand the terminology and get a grasp of what you are doing!
What is bootloader?
During the boot process, the bootloader operates on the internal booting settings and encrypts the security data—such as Pin, Passwords, and fingerprint scanner details.
The code is executed when the operating system start/boot, while every manufacture has a different OS kernel and has their version of the bootloader to start the phone.
The features that will be achieved from unlock bootloader on any Android phone are quite tempting, on the other hand, so it’s necessary to understand the pros and cons.
Advantage of Unlock bootloader
The first thing you can perform after unlocking the bootloader is to obtain a custom recovery like TWRP. That will authorize you to flash powerful settings over the device.
You can try out equipping different things, and implementing customization are the primary elements that can be attained after unlock bootloader on any Android phone.
The most annoying part of the system layering is that it provides bloatware apps, but once the bootloader is unlocked, you can delete the system apps without any trouble.
Several customizations features authorize you to modify and alter system limits, while the overclocking attributes will increase the performance speed of the smartphone.
Disadvantage of Unlock bootloader
The main working of the bootloader is to encrypt PIN, Pattern, fingerprint, but when you unlock them, the security factor becomes vulnerable and easy to access by others.
Typically as part of the process, the system will entirely erase data, while if you didn’t take the backup before, you lose your precious data, so make sure to take backup.
Let’s suppose someone steals your handset, your device’s bootloader is unlocked, then the thief will freeze your device and bypass the encryption key and install a new UI.
You are theoretically bricking your device in an indirect format since with unlocking the bootloader, you can install custom ROM, and it somehow crashes and brick the phone.
There are two methods from which you obtain unlock the bootloader on any Android phone without worrying. The first process includes the full support of the computer.
Disclaimer: The magisk update is not responsible for damage performed at your risk, while our team recommends you to take an entire backup of your data first.
Step 1 – Unlock the developer mode
- Inside the phone, click on the settings apps→about phone→build number.
- Tap on the build number a few times till you are developer doesn’t appear.
- Now, proceed to the setting menu, and search for the “developer mode” first.
- Enable the unlock OEM and USB debugging settings for the upcoming part.
Step 2 – Interlinking the devices
- Put the device into the fastboot mode, and join to the PC will help the cable.
- Install essential USB drivers with ADB driver for better usage of the process.
- After installing the drivers, hold shift and right-click on the remaining space.
- Following that, you will notice that open command window here; tap it first.
Step 3 – Applying the commands
- Before entering into the cmd prompt, confirm that you obtain a USB debugging message prompt on the screen and confirm access by pressing the OK button.
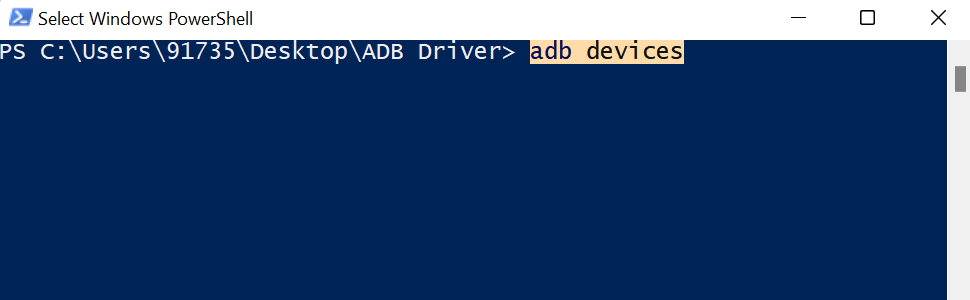
- Use – adb devices – the first command to check the device is connected or not.
- If the prompt is not showing your handset in the first place, like the screenshot, reconnect the device into fastboot and check if it has an issue with the cable.
- Now enter the second command – adb reboot bootloader -This will reset all of the settings while this command will unlock bootloader on any android phone.
- From the above step, the phone will go into the fastboot mode. Next, you have insert – fastboot devices – to once again enter into the phone fastboot mode.
- Lastly, you can enter – fastboot oem unlock – to unlock the bootloader. Yet, if this command doesn’t work, try – fastboot flashing unlock – this one out.
Step 4 – Unlocking the bootloader!
- On the smartphone screen, a message will pop to unlock the bootloader or not!
- Besides this, you can navigate through the Volume up and down buttons, while the Power button will help you select the respective option you want to choose.
- Select Yes to unlock the bootloader, or pick No to didn’t perform that process.
- With this, the handset will restart, and you can enjoy the customization traits.
F.A.Q (Frequently Asked Questions)
Q- What does unlock bootloader mean?
Ans. Unlocking the bootloader grants your the choice to change the system firmware of your phone and freely install the privileges to improve and modify the phone skills.
Q- Is bootloader unlock safe?
Ans. Unlocking the bootloader is safe until you have entered into the endless world of customization of ROM. But if you didn’t want to install, avoid the unlocking process.
Q- How unlock bootloader without PC?
Ans. Desire to unlock the bootloader without PC assistance; you will be required a third-party app to run the commands—it is a risky task, so avoid using this process.
Q- Will unlock bootloader erase data?
Ans. The unlocked bootloader instruct wipe data and when you switch the stock ROM interface into a custom ROM. In that case, you will most likely delete data files as well.
Q- Does unlocking the bootloader will violate the warranty?
Q- Does unlock bootloader helps in rooting?
You can’t access unique and exciting custom ROMs unless you know how to unlock bootloader on any Android phone. Here’s an easy tutorial to open those settings.
Whether you want to utilize the exciting privileges of rooting or merely want to add extra customization features, you need to be aware of the proper method to unlock bootloader on any Android phone. Because without this, you can’t move forward.
Even though you heard that techie stuff for the first time, worry not, you can unleash your phone’s true abilities. With that said, let’s grasp a bit of info on the bootloader.
What is Bootloader?
The bootloader of the bootstrap command software is operating system software that is responsible to kick start the overall system processes in the RAM section. The boot program starts working with several processes when you press the power button.
Consequently, the system process checks the entire system behind the booting logo, and everything completely in only a few seconds. Besides, it’s stored primary system data that helps us to factory reset the phone or simply boot it into the safe.
Now that you have understood the basics about the bootloader and it’s working, let’s move forward to why you need to unlock the bootloader in the first place!
The reason can differ from person to person, but in most cases, if you want to root any Android phone or flash the latest Android version over your phone, the first thing you need to perform is to unlock bootloader on any Android phone.
But it doesn’t mean that unlocking those attributes would come without impacts. So, it’s necessary to understand the pros and cons before leading to unlock bootloader on any Android phone.
Advantage of Unlock bootloader
First and foremost, you can easily root your device if you have unlocked the bootloader settings. Besides this, you can also add different custom ROMs and other software.
To flash those characteristics, you will need a custom TWRP recovery that can only be installed once you have opened the bootloader features of your phone not long ago.
Moreover, you can apply impressive features such as overclocking and underclocking to get more performance for advanced-level gaming sessions and better battery life.
You can take advanced complete backup that can attain after root your smartphone without a PC and changing the overall settings and Android interface layout traits.
Disadvantage of Unlock bootloader
The locked bootloader offers better security protection and armed firewall settings, but once you have unlocked those doors, you have to compromise with security.
Your device won’t be eligible for the future Android update. In case the device is stuck in the bootloop, you will get a hard time repairing it from the authentic service center.
How to Unlock Bootloader on any Android Phone
Disclaimer: Droidmeguide is not accountable for specific damage that happens to the reader’s device. Make sure to take a Backup Android Phone to avoid any further risks.
Method #1 – Unlock Bootloader All Phones
Step 1: Unlocking developer mode
- First and foremost, you have open the Settings App.
- Inside the Settings menu, click on the About Phone section.
- Next, you have to tap on the Build Number several times.
- A pop-up message will appear saying, you are now a developer.
- following this, you can enter the Developer mode menu.
- Enable both the OEM unlocking and USB debugging options.
Step 2: Attach your phone and PC
- Ensure you have downloaded and installed USB drivers/ ADB tools.
- Press “cmd” in the search bar of Windows to open a command prompt.
- Interlink your phone using the original data cable to the computer.
- Make sure have got USB debugging alert and click on OK.
Step 3: Insert ADB/ Fastboot commands
- Inside the command prompt, enter “adb devices” to check phone connectivity.
- If you see a combination of numbers and alphabets, you are ready for next step.
- Now, you have to boot into the bootloader. Enter “adb reboot bootloader”
- Following this, you can enter the fastboot command. Use “fastboot devices”
- Unlock the OEM feature by applying “fastboot OEM unlock” command.
- Lastly, you can utilize “fastboot flashing unlock” to finish the process.
Step 4: Finally, unlock the bootloader
- Inside the phone’s screen, you have options to unlock the bootloader or not.
- Navigate via the Volume keys to apply to require step and press Power button.
- You have to pick the option that says Yes, unlock the bootloader.
- After this, the phone will take some time to complete the reset.
- Now, you have successfully unlocked the bootloader on your phone.
Method #2 – Unlock Bootloader Samsung phones
Step 1: Open developer settings
- Like usual, go to Settings → About Phone → Tap on build number.
- Click on the build number a few times to open developer mode.
- Now, navigate to Additional Settings and then Developer Settings.
- Following this, enable USB debugging and OEM unlocking toggle.
- Lastly, you have to Turn off your device by pressing the Power key.
Step 2: Simply unlock the bootloader
- Press and hold the Volume Up + Down key, until the fastboot logo appears.
- Next, you have to connect your Samsung device to your PC through a USB cable.
- A warning message will appear on the screen, then long press Volume Up key.
- On the next screen, you have to press Volume Up key to unlock the bootloader.
With this method, you can successfully unlock bootloader on any Samsung phone.
Method #3 – Unlock Bootloader Xiaomi phones
Step 1: Unlock Developer settings
- Go to the Settings App and enter the About Phone section.
- Tap on MIUI version a few times, till you’re developer didn’t appear.
- Navigate to the Additional settings and press on Developer Mode.
- Allow OEM unlocking, USB debugging, and Install Via USB toggles.
Step 2: Log in to Mi account
- First of all, turn off the Wifi, the enable Mobile data and location options.
- Now, log in to your Mi account and allow the Find my device toggle.
- Again, navigate to developer mode to enter in Mi unlock status.
- Tap on the Agree button and click on Add account and device.
- Once, you have successfully added the account, turn off your device
- Press Volume Down + Power button to enter into fastboot mode.
Step 3: Join the devices
- Download and extract the Mi Unlock Tool inside your computer.
- Following this, connect your Xiaomi phone to a PC using a USB cable.
- Open the Mi unlock tool, there you will see your device is connected.
- If not, try to reconnect once again and click on the Unlock button.
- With this, you will unlock the Xiaomi phone’s bootloader precisely.
Frequently Asked Questions (FAQs)
Q- How unlock bootloader without PC?
Ans. First of all, you will need two phones to unlock the bootloader without a PC. With this, you also need to download & install a third-party ADB command tool apk.
Q- Is bootloader unlock good?
Q- Unlock bootloader will erase data?
Ans. Yes, if you are unlocking the bootloader your data can wipe out from the internal storage. Therefore, we recommend you take a backup before starting the process.
Q- How to avoid bootloop problem on Android?
Ans. To avoid the bootloop issues, you can start with soft resetting the phone. Or you can factory reset/hard reset will do the work too. Lastly, by using TWRP recovery.
Q- Can I root my phone without unlocking the bootloader?
Ans. No, you can root your phone without unlocking the bootloader because you won’t be able to boot the device. So make sure to unlock it first before rooting.
Last thoughts:
I hope that you grasp the information about how to unlock bootloader on any Android phone, while I have also covered different methods for Samsung and Xiaomi phones.
If you encounter any problem during the unlock process or facing a bootloop issue on your phone, let us know in the comment section to solve your trouble ASAP!
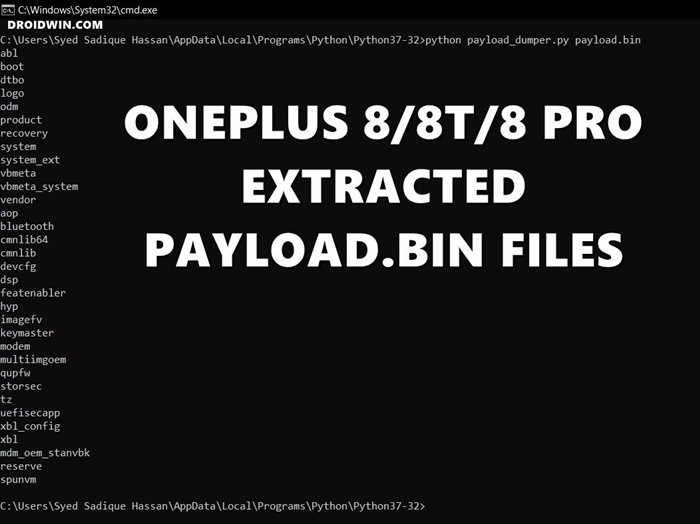
In this guide, we will show you how to root any device running the latest Android 11 via Magisk (without using TWRP). So here is what we will be doing in this guide. First off, we will show you how to extract the stock ROM for your device, be it in ZIP, OZIP, payload.bin, or any other format. After this, the steps will be given to extract the stock boot.img file from that firmware. Next up, we will show you how to patch this stock boot.img file via the new version of Magisk. Finally, this file will then be flashed onto your device via Fastboot Commands.
Silicon Valley giants have just raised the curtains from its latest OS offering. Android 11 is already live for Pixel devices whereas other OEMs are climbing this ladder as well. This straightway translates to that you are about to welcome a plethora of new features. These include a new conversation section in the notification panel and the ability to prioritize notifications from a particular sender. Likewise, there is new one-time permission, a native screen recorder, chat bubbles, and the ability to schedule dark mode.
Well, there are a plentitude of other changes and this list could go on and on. Then to further exploit the device’s full potential, you could step into the custom development scene. Once you have the bootloader unlocked, you have opened the gates to the plethora of customizations. These include the flashing of custom ROMs, custom recoveries like TWRP and Lineage and even gain access to the system partition. The latter, in simpler terms, is also known as rooting the device.
Now there are two different approaches to root your device: with TWRP or without TWRP. The first method is rather simple- just flash the Magisk Installer ZIP via TWRP. On the other hand, the latter method calls for a lot of efforts, as mentioned in the introductory paragraph, you will have to get the stock boot.img file, patch it via Magisk, and flash it via Fastboot commands. So one obvious question that some of you might ask is why to take the ‘road less traveled’?
Well, the thing is not every device has a working TWRP. Furthermore, the relationship is quite complicated as of now between Android 11 and TWRP. So the road ahead looks patchy as of now. Hence rooting an Android 11 device via Magisk Patched boot.img (without TWRP) seems to the only road forward. And in this tutorial, we will ‘guide’ you to this path only. So fasten on the seatbelts and get ready to step into the uncharted territory ahead!
STEP 1: Backup All Data
While rooting doesn’t wipe off data, but its prerequisites do. That is, when you unlock the device bootloader, all the data will be wiped off. SO take a backup beforehand. Even if you have unlocked the bootloader before and just wish to root your Android 11 device, we would still suggest taking a complete backup beforehand, just to be on the safer side.
STEP 2: Enable USB Debugging and OEM Unlocking
Next up, you will have to enable USB Debugging and OEM Unlocking. The first makes it possible for the device to be recognized by the PC in ADB Mode. This will in turn allow you to execute ADB Commands. But why would you need ADB Commands as of now? Well, it would be needed to boot your device to Fastboot Mode.
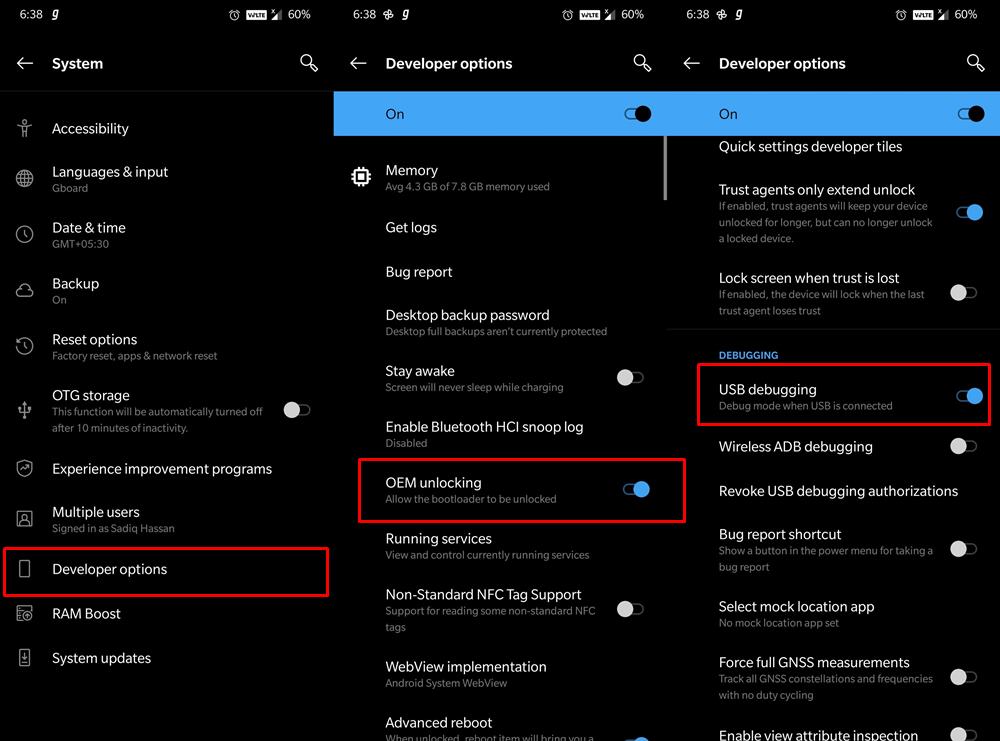
The Fastboot mode will be used twice- once to unlock the bootloader and the second time to flash the magisk patched boot.img file (that will then be used to root your Android 11 device). On the other hand, OEM Unlocking is needed to allow for the Unlocking process. So head over to Settings > About Phone > Tap on Build Number 7 times > Go back to Settings > System > Advanced > Developer Options > Enable USB Debugging and OEM Unlocking.
STEP 3: Install Android SDK Platform Tools
You will now have to install the Android SDK Platform Tools on your PC. This will provide us with all the necessary ADB and Fastboot binaries. Do keep in mind that there are already a plethora of tools for the same, but we would suggest you keep a safe distance from all of them and only stick with this offering from Google.
STEP 4: Unlock Bootloader on Android 11
We are now slowly but surely reaching our destination to root your Android 11 device via Magisk Patched boot.img (without TWRP). The first step towards the same is to unlock the device bootloader. We would like to highlight a few risks associated with this process. First and foremost, it might make the device warranty null and void. Furthermore, you will also lose all the data on your device.
Likewise, apps like Google Pay, Netflix (WideVine L1 degradation to L3), and Pokemon Go might not function as expected. While the latter two issues could be fixed, there is no workaround for the warranty, unlocking the bootloader will nullify the device’s warranty. If that is well and good, then here are the steps to unlock the device’s bootloader:
- With USB Debugging and OEM unlocking enabled, connect your device to the PC via USB cable.
- Head over to the platform-tools folder, type in CMD in the address bar, and hit Enter. This will launch the Command Prompt.
adb reboot bootloader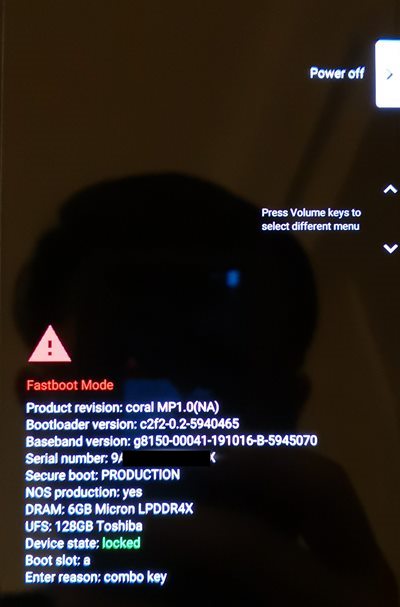
Fastboot Mode on Pixel 4 [Reference Image] - Once booted to Fastboot, you will have to type in the below command to unlock the bootloader:
fastboot oem unlock fastboot flashing unlock- Upon entering the above command, you might now get a prompt on your device. Use the Volume keys to select Yes, Unlock the Bootloader, or any other similar option that replies in the affirmative.
With this, you have successfully unlocked the bootloader on your device. It’s now time to get hold of the stock boot.img file, patch it via Magisk, and flash it via Fastboot to root your Android 11 device.
STEP 5: Download Stock Firmware for your Android 11 device
You will now have to download the stock ROM or firmware for your device. You could download the same from the respective OEM’s Download or Support section (some links: Google, OnePlus). There is one thing to keep in mind before downloading the file. You should only download the firmware that is currently installed on your device. This is because we would be using the stock boot.img file from this downloaded firmware only.
If you patch and flash boot.img file older or newer than the current OS installed on your device, then your device will end up in a bootloop or soft brick (or in rare cases, hard brick as well). So head over to the Settings page on your device and look at the About Phone section. There you should see the current installed OS version, download that same build from the company’s website and proceed to the next step to extract the stock boot.img file, patch it via Magisk, and flash it via Fastboot to root your Android 11 device.
STEP 6: Extract Android 11 Stock Boot.img
Now comes the challenging part. Most of the OEM uploads their firmware in a ZIP format or JAR(which could easily be renamed to ZIP and extracted, yes changing the extension doesn’t do any harm in this case). All well and good up to this point. But once you extract the stock firmware, you wouldn’t directly get the partition IMG files.
STEP 7: Patch Stock Boot.img file via Magisk on Android 11
You will now have to install the Magisk Manager APK on your device. At the time of writing, the stable version is causing a few issues while patching the boot.img file. So as of now, you will have to download the Canary build of Magisk Manager and then switch the update Channel to Canary from within the app itself. You may also refer to our guide for a much detailed explanation on this: Fix Magisk patched boot.img issue while Rooting Android 11
Once that is done, it’s time to patch the stock boot.img file via Magisk. You may either refer to the below steps or check out our comprehensive coverage on the same topic: Patch Stock Boot Image via Magisk and Flash it using Fastboot
- Launch the Magisk Manager app on your Pixel device.
- Then tap on the Install button situated next to Magisk.
- From the Method section, choose Select and Patch a file.
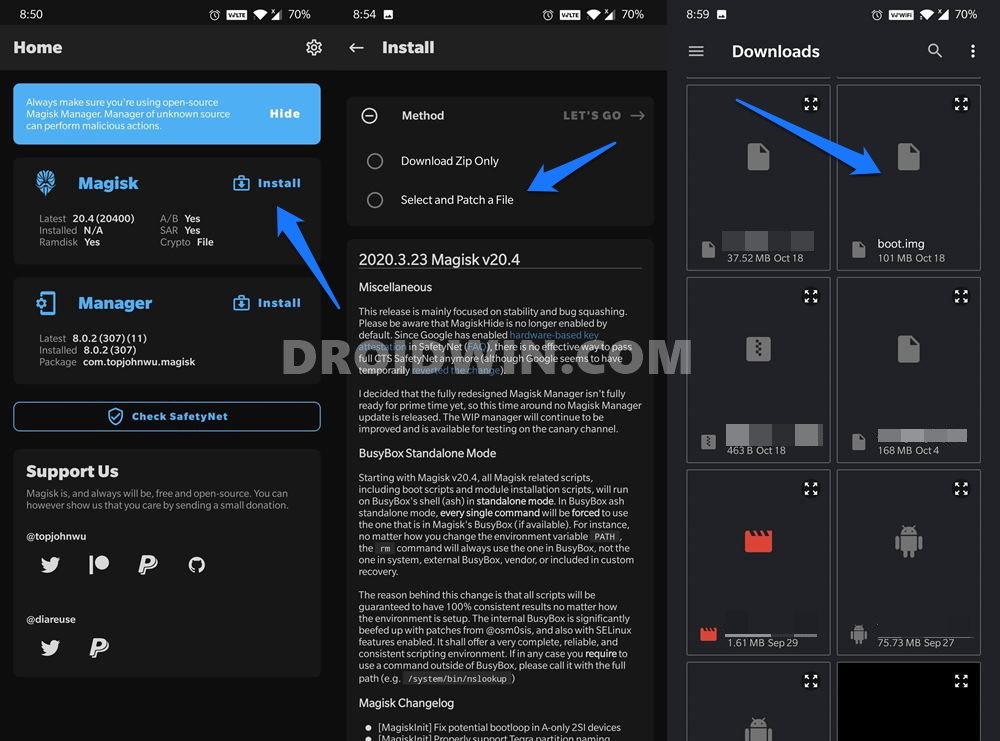
- Browse to the extracted boot.img file and select it.
- Then tap on the Let’s Go option situated at the top right.
- Magisk will now load the boot.img file and will patch it accordingly. Once that is done, you would get the Download Complete message.
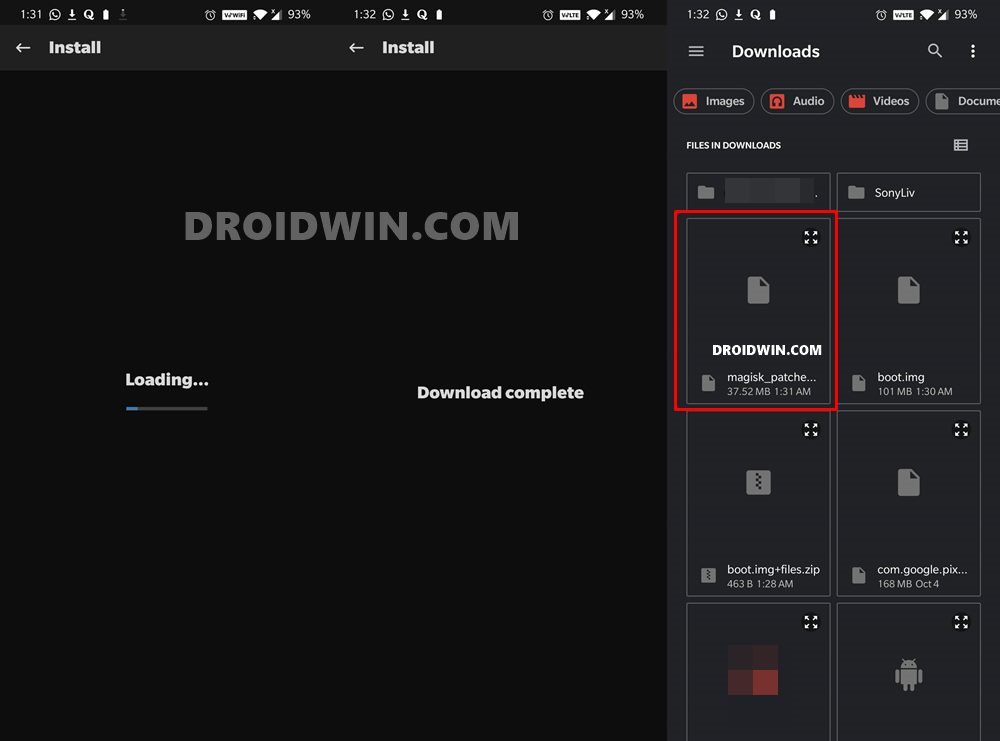
- The patched boot image file will be saved in Internal Storage > Downloads. The name of the file will be magisk_patched.img
STEP 8: Root Android 11 by Flashing Magisk Patched Boot.img File
Finally, it’s now time to root the device. For this, you will have to flash this magisk_patched.img file via Fastboot Commands. And this requires you to boot the device to the Fastboot Mode. Here are the instructions for the same. For detailed instructions on the said topic, you may refer to our guide: How to Flash magisk_patched bot.img file via Fastboot
- Connect the device to the PC via USB Cable.
- Now transfer the patched boot file from your device to the platform-tools folder on your PC.
- Inside the same folder, type in CMD in the address bar and hit Enter. This will launch the Command Prompt.

- Type in the below command to boot your device to fastboot command:
adb reboot bootloader fastboot flash boot magisk_patched.img
That’s it. This was our comprehensive guide on how to root Android 11 via Magisk Patched boot.img (without TWRP). I have explained all the instructions in depth. However, if you have any queries concerning the aforementioned steps, do let me know in the comments section. I will get back to you with a solution at the earliest.
About Chief Editor
Sadique Hassan
A technical geek by birth, he always has a keen interest in the Android platform right since the birth of the HTC Dream. The open-source environment always seems to intrigue him with the plethora of options available at his fingertips. “MBA by profession, blogger by choice!”
Steps to Unlock Bootloader on Android
- Go to Settings and enable USB debugging mode on your device.
- Also, enable OEM unlocking and Advance reboot mode from the Developer options.
- Note: Older Android devices may not have these options. So if you don’t find these options anywhere, skip this step.
- Download and install ADB drivers on your Windows PC.
- Using a standard USB cable, connect your Android device to a PC.
- Furthermore, ensure that Mobile USB drivers are installed on your PC.
- Go to the location where you’ve installed ADB and Fastboot drivers. (For example, C:\Program Files\Minimal ADB and Fastboot folder).
- Then by holding the shift button of your keyboard, right-click on space.
- From the list, choose the Open command window here option. This will launch the command window.
- Then type the following commands one after one in the cmd window, and press the enter key:
- With this command, a message saying ‘List of devices attached’ along with a few random numbers will appear.
- That means it will confirm that your Android device is successfully connected to the PC.
- Note: If such a thing doesn’t happen, then either re-install mobile USB drivers or change the USB cable/PC.
- Type the next command and press enter:
adb reboot bootloader
- This will restart your device into Fastboot mode.
- Then type the Fastboot command and press enter:
- To unlock the bootloader, type either of the command and press enter:
fastboot oem unlock
fastboot flashing unlock
- With this command, you’ll see a message on your device asking to Unlock Bootloader.
- Note: On your phone screen, use Volume Up and Down keys for navigation and the Power key for selection.
- So using the Volume keys navigate to the Yes option and press the Power key to select it.
- The actual bootloader unlocking process will begin now.
- Once the bootloader unlocking process completes, your Android device will automatically restart itself.
- Note: If the following screen appears on your phone, then use the Volume and Power keys to select the Start option and reboot your phone.
What is DC-Unlocker?
Here, we’ll answer your question about How to unlock a Huawei android device’s bootloader without an unlock code. Till last year, Huawei used to provide bootloader unlock codes from their official EMUI website.
The main benefits of bootloader unlocking are rooting, flashing custom ROM, and installing mods like Magisk, Xposed, SuperSU, etc. The disadvantages include the warranty getting void, chances of bricked devices, and problems in receiving official software updates.
There are many third-party services to unlock the bootloader of your device. But unfortunately, these are paid services and are priced from 20$ to 50$ to get the bootloader to unlock the code.
Some of these paid services include FunkyHuawei, Ministry of Solutions, and Global Unlocking Solutions. You can either provide them with your mobile IMEI number or model, serial number, and firmware, and they usually send the unlock code through email.
What is Bootloader?
The bootloader is a code that is executed before any Operating System starts. Every Android phone has a bootloader that instructs the OS kernel to boot normally. Since Android OS is an open-source OS, every manufacturer has its own bootloader version.
Why is Bootloader locked?
Why unlock Bootloader on Android?
If you want to root, flash a custom recovery like CWM/ TWRP, or flash custom ROMs, then you need to have your bootloader unlocked. That means unlocking the bootloader allows you to gain root access, flash unofficial custom recoveries, third-party custom ROMs, take Nandroid backup and restore, increase internal memory, remove bloatware, and much more.
Phones like Motorola, Sony, LG, HTC, Xiaomi, and Huawei use a unique code through their website to unlock bootloaders. Samsung phones (Exynos models) that can be rooted have unlocked bootloaders. Whereas the new Snapdragon models of Galaxy S9, S9 Plus, S8, S8 Plus, S7, S7 Edge, Note 8, etc. all have locked bootloaders.
Moreover, the bootloader of Google Nexus or Pixel devices like Pixel 2 XL, Pixel 2, Pixel XL, Nexus 6, Nexus 6P, etc., can be easily unlocked using this guide. Also, the bootloaders of all OnePlus devices, including the OnePlus 6, OnePlus 5/5T, OnePlus 3/3T, etc., can be unlocked. If you’re unsure whether your device’s bootloader can be unlocked, you can still refer to this tutorial. It’s great if it passes. If it fails, no damage will be done.
We at Droid Thunder are not responsible for any damage caused to your device by referring to this guide. Also, you will lose your phone’s warranty.
- Charge your Android device at least up to 50%.
- Unlocking the bootloader will erase everything on your Android. Hence backup your data, including contacts, messages, apps, call logs, notes, etc.
How to Unlock Bootloader of Huawei and Honor Phones

Unlock Bootloader of Huawei for Free using an Unofficial method. This easy steps guide will assist you in downloading Huawei bootloader unlock tool. Almost every Android OEM company releases its smartphones with a locked bootloader.
But if you want to root Android, install TWRP or CWM custom recovery, and flash custom ROM like LineageOS, you must unlock the bootloader. Android phones like Samsung, Motorola, OnePlus, and Google can be modified easily.
It is possible to root these smartphones or install a custom ROM. But unfortunately, companies like Huawei are not friendly toward customization or modifications. The bootloader is a code or program that runs when you boot up your Android phone.
Also Read: 10 Best PSP Games for Android
How to Unlock Bootloader of Huawei and Honor Phones
With this guide, you can unlock the bootloader of the Huawei P9, Huawei P10, Huawei Mate X, Huawei Mate 20 Pro, Huawei Mate 10 Pro, etc. Besides, you can also unlock the bootloader of the Honor 7x, Honor 8x, Honor 9n, Honor View 20, Honor Note 10, etc.
This process will void your device warranty. Proceed at your own risk. We at Droid Thunder will not be held responsible for damaged/bricked phones after referring to this guide.
- Charge your phone to a minimum of 50%.
- Back up your contacts, apps, call logs, notes, etc., for safety.
- Install the latest Huawei USB drivers on your computer.
- Also, install ADB drivers on your PC.
- Enable USB Debugging and unlock OEM from device settings.
After doing everything mentioned above, let’s start the process of unlocking the bootloader of Huawei phones.
DC Unlocker CRACK
Steps to Unlock Bootloader of Huawei & Honor
- Extract the downloaded zip file.
- Launch the dc-unlocker2client.exe file.
- As soon as you run it, the following window will popup:
- Click on the Server tab and type in username and password. Then click on Check login.
- On the other hand, connect your mobile to your PC using a USB cable.
- Enable Manufacturer Mode on your phone. For doing so, type *#*#2846579#*#* in the dial pad.
- As soon as you type it, the following Project menu will popup on the screen:
- Simply click on the Background Settings option.
- On the next screen, click on the USB Port Settings button.
- Finally, click on the Manufacture Mode option.
- In DC-Unlocker, click on the Manufacturer type section and select Huawei Phones from the drop-down menu.
- Similarly, click on the Model type section and select the Auto detect (recommended) option.
- Now, click on the Search button.
- This will detect your phone.
- If you get an error and the device is not detected, then re-install the latest USB drivers from the links given in the Pre-Requisites section.
- Next, click on the Unlocking tab present on the DC-Unlocker client.
- Then, select the Read Bootloader Code option.
- Wait until the bootloader code generates.
- After the DC-Unlocker tool generates bootloader code, copy it, and save it in a Notepad file.
- Disconnect your phone from the PC by safely removing the USB cable.
- Download Huawei Unlock Bootloader.zip.
- Extract the zip file. You’ll see the following files after extraction:
- Power off your phone and boot it into Fastboot mode.
- For that, press and hold the Volume down key + Power button simultaneously until fast boot mode appears.
- Keeping the mobile in fast boot mode, connect it to the PC using a USB cable.
- Now, double-click the Unlock-Bootloader.bat file.
- The following cmd window will appear:
- Firstly, it will ask you to choose a language. So type 2 for English and press the Enter key.
- On the next screen, it will confirm whether phone drivers are installed or not.
- So hit the enter key to continue.
- Again hit the Enter key.
- Now it will ask you to type the code which you received earlier.
- So type the bootloader unlock code and press the Enter key.
- Type Y to confirm that you’ve entered the bootloader unlock code correctly. Then hit the Enter key.
- Again press Enter to start the bootloader unlocking process.
- Be patient and wait until the process to unlock the bootloader of the Huawei Honor phone completes.
Как разблокировать загрузчик
Большинство смартфонов Android имеют так называемый режим fastboot. Это своего рода «расширенный загрузчик». С помощью этого режима обычный загрузчик можно разблокировать. Базовым инструментом для этого является «Android Debug Bridge», или ADB. Он ориентирован, в первую очередь, для разработчиков приложений под Android, но и обычным пользователям дает много возможностей.
Для начала вам нужны драйвера для смартфона. Их можно легко установить автоматически из Windows 7, просто подключив смартфон к ПК.
Также нужны драйвера ADB и Fastboot. Для этого загрузите из интернета установщик и запустите скачанный файл в режиме администратора. Обязательно установите драйвера для всей системы. Установщик спросит вас, действительно ли вы хотите это сделать.
После того, как вы совершили эти шаги, необходимо подключить устройство к ПК в режиме fastboot. У многих смартфонов есть для этого специальная комбинация клавиш. В качестве альтернативы, однако, вы также можете подключить включенный смартфон к ПК и ввести команду «adb reboot bootloader» в командной строке. Однако сначала вы должны включить «Отладку по USB» в настройках смартфона. Если необходимо, вы также должны включить функцию «Разрешить OEM-разблокировку».
Теперь вы можете легко разблокировать загрузчик командой «fastboot flashing unlock». Затем снова загрузитесь в режим fastboot и введите «fastboot flashing unlock_critical», чтобы окончательно разблокировать загрузчик. Таким образом вы можете свести к минимуму риск того, что ваш смартфон превратится в «кирпич» при установке новой прошивки.
В качестве альтернативы на некоторых смартфонах разблокировка может быть выполнена с помощью команды «fastboot oem unlock».
Однако бывают исключения. Например, смартфоны Samsung не имеют реального режима fastboot. Вместо этого есть режим загрузки. Чтобы разблокировать загрузчик, необходимо использовать программу Odin, которая может устанавливать файлы, умеющие это делать. Для получения root-прав или установки кастомного ROM или Recovery на устройства Samsung это не обязательно.
Еще одно исключение составляют смартфоны от Sony. Перед тем, как взломать смартфон, вам сначала сначала придется зарегистрировать устройство на странице разработчика, введя IMEI и свой e-mail, чтобы получить специальный код разблокировки.
О том, как инсталлировать кастомную систему восстановления данных, читайте в следующем материале.
Что происходит при включении и запуске Android?
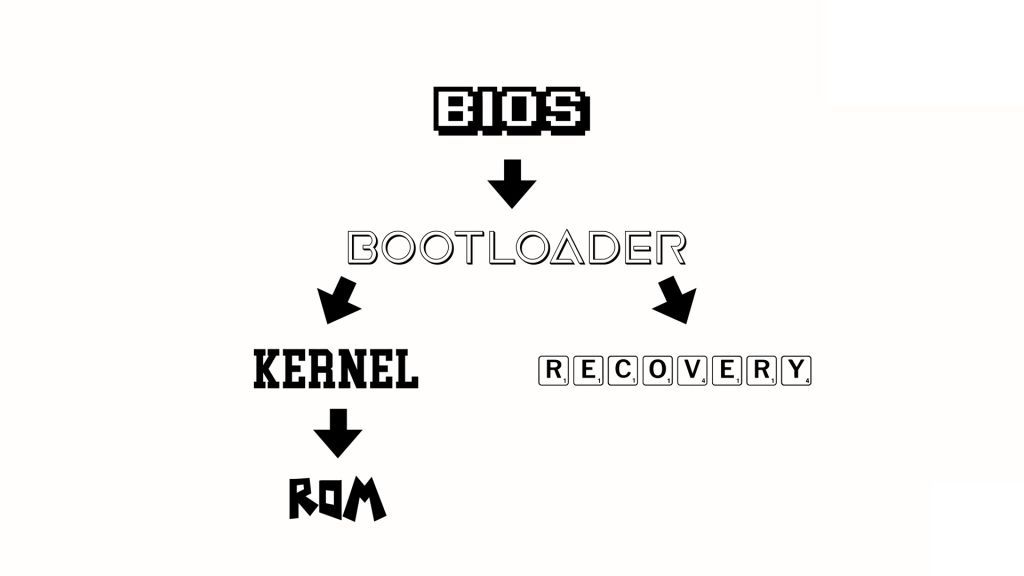
Перед нами выключенный смартфон под управлением Android. Давайте разберемся, что произойдет, если его включить.
Сначала произойдет запуск BIOS мобильного телефона. ВIOS (Basic Input/Output System ) в переводе с английского означает «Базовая система ввода / вывода». Она постоянно автосохраняется и обеспечивает работу входов и выходов. В частности, эта система также запускает загрузчик (Bootloader).
Как явствует из названия, загрузчик загружает другие части операционной системы, например, ядро. Ядро операционной системы — это основная ее часть. По сути, это нижний уровень системы Android, который отвечает за ход основных процессов и организацию данных.
Затем запускается основная операционная система под названием «ПЗУ/ ROM». ROM означает «Read Only Memory», или «Постоянное запоминающее устройство», используемое для запоминания всего массива неизменяемых данных. Будучи обычным пользователем, вы ничего не можете в ней поменять.
Параллельно загрузчик запускает не только ядро, но и Recovery, или систему восстановления.
Если система Android вдруг оказывается повреждена, можно загрузить Recovery и из нее восстановить OS с нуля или с момента сохранения. Также в системе Recovery можно (и нужно) создавать резервные копии.
В свою очередь, загрузчик может находиться в трех разных состояниях: «Заблокировано», «Открыто» или «Зашифровано». Если загрузчик открыт, в систему могут быть внесены глубокие изменения, например, можно установить собственную операционную систему, также называемую «кастомной ПЗУ», вместо стандартной, то есть, «стоковой ПЗУ». Но и другие моменты, такие как изменение Recovery или получение root-прав на смартфон, можно проводить только с помощью открытого загрузчика.
Если загрузчик зашифрован, могут быть установлены лишь самые срочные обновления системы от изготовителя. То же самое относится и к заблокированному загрузчику, но, в отличие от зашифрованного, его можно разблокировать.
")


")