

Why are we waiting? Let’s get into business.
Why are we waiting? Let’s get into business.
Rooting not only allows you to customise your device but to increase your device’s potential. Below are some of the features of rooting your Zenfone 2:
- Boost your Phone speed & Battery Life.
- Remove Preinstalled crapware like System Apps.
- Remove Bloatwares, Apps like Facebook, Chrome Keep sucking your Ram & battery by running in background So, Among the smartphone geek crowd, applications like these are referred to as “bloatware:” they do nothing but bloat the software by existing as unnecessary applications.
- Tweak your phone like : Increase Video streaming speed, Increase Wifi Speed, Increase SIM detecting Speed, Increase SD read/write speed.
- Most Important & Best part, Install Custom Kernel & Custom ROMS ( I will explain about it in Installing Custom ROM section Custom ROM section )
- Finally, Truly Own your Device, Make it appear in the way you want.
- Prerequisite for rooting Zenfone 2 Laser:
- How to Install CWM Recovery in Zenfone 2 (ZE551ML, ZE550ML)
- How To Root Your Zenfone 2
- Получение root права суперпользователя на Asus ZenFone 2 (ZE551ML)
- Magisk keeps uninstalling
- Process error
- MagiskHide or SafetyNet fails after an update
- Magisk isn’t working
- I can’t root Asus Zenfone 2 Deluxe ZE551ML with Magisk
- Magisk keeps uninstalling
- I unroot Asus Zenfone 2 Deluxe ZE551ML but still the apps say my mobile is rooted.
- I unroot Asus Zenfone 2 ZE551ML but still the apps say my mobile is rooted.
- Magisk ERROR when installing
- Process error
- Asus Zenfone 2 Deluxe ZE551ML got stuck at boot after uninstalling Magisk from app
- Invalid image
- Magisk isn’t working
- Invalid image
- How to Root Asus Zenfone 2 Deluxe ZE551ML using Magisk Patched Boot. img
- Step 1 : Install Android SDK
- Step 2 : Enable USB Debugging and OEM Unlocking on Asus Zenfone 2 Deluxe ZE551ML
- Step 3 : Unlock Asus Zenfone 2 Deluxe ZE551ML Bootloader
- Step 4 : Extract Boot.img from Asus Zenfone 2 Deluxe ZE551ML Firmware
- Step 5 : Patch Stock Boot.img via Magisk
- Step 6 : Boot to Fastboot Mode on Asus Zenfone 2 Deluxe ZE551ML
- Step 7 Flash Magisk Patched Boot.img and Root Asus Zenfone 2 Deluxe ZE551ML
- Unable to repack boot image
- MagiskHide or SafetyNet fails after an update
- I can’t root Asus Zenfone 2 ZE551ML with Magisk
- OTA Update fails after using Magisk Root [Install failReason
- How to Root Asus Zenfone 2 ZE551ML using Magisk Patched Boot. img
- Step 1 : Install Android SDK
- Step 2 : Enable USB Debugging and OEM Unlocking on Asus Zenfone 2 ZE551ML
- Step 3 : Unlock Asus Zenfone 2 ZE551ML Bootloader
- Step 4 : Extract Boot.img from Asus Zenfone 2 ZE551ML Firmware
- Step 5 : Patch Stock Boot.img via Magisk
- Step 6 : Boot to Fastboot Mode on Asus Zenfone 2 ZE551ML
- Step 7 Flash Magisk Patched Boot.img and Root Asus Zenfone 2 ZE551ML
- Asus Zenfone 2 ZE551ML got stuck at boot after uninstalling Magisk from app
- Unable to repack boot image
- Magisk ERROR when installing
- OTA Update fails after using Magisk Root [Install failReason
Prerequisite for rooting Zenfone 2 Laser:
- Additionally, you must have a Windows PC.
- Install USB drivers for your Asus Zenfone 2.
- Goto Settings -> About Phone and tap 7 times continuously on “Build number” to active “Developer options” and then Go to Settings -> Developer options and enable “USB Debugging” option.
Download Rooting Tools:
- ClockWorkMod Recovery for Zenfone 2: CWM Zip
- Debugging drivers for Zenfone 2: ADB USB Drivers
- USB Drivers for Zenfone 2: Asus Android USB Driver
- SuperSU: Beta Super SU Pro (Super Su.zip)
How to Install CWM Recovery in Zenfone 2 (ZE551ML, ZE550ML)
Step 1: Download all the Rooting tools From above links.
Step 2: Install ADB USB Drivers & Asus Android USB Driver into your Windows PC or Laptop.
Step 4: Now on CMD type “T4” without wuote and hit Enter. Your Asus Zenfone 2 Will Reboot Into CWM Recovery.
How To Root Your Zenfone 2
First Install CWM Recovery Using Above Steps 1 to 4.
Step 1: Place The Downloaded SuperSu Pro.zip File into Your Device SD Card or Internal Storage.
Step 2: Boot Into CWM Recovery And Select Install Zip From SD Card. Now Locate SuperSu Pro.Zip File in Your Device And Flash it.

Step 3: Most Important Part Of Rooting is Patience wait For Minimum 5 Minutes to Boot Your Device. Hurrah! You Done it Well. Check Your Device Root Status By Any Root Checking App.


Инструкция по прошивке смартфона Asus ZenFone 2 (ZE551ML, ZE550ML, ZE500CL) на новую версию операционной системы Android, а так же получение Root (прав суперпользователя) на Asus ZenFone 2 (ZE551ML, ZE550ML, ZE500CL)
Если текст и скриншоты не совпадают — не «ругайтесь» (текст редактировать намного проще чем делать новый скрин. Не обращаем внимания так же и на на версию рекавери.
Zenfone 2 Android 5.1 Phone W
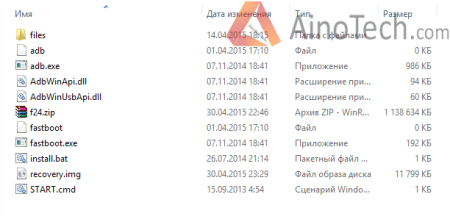
Создаем на ПК, в любом месте, папку куда и скидываем все файлы. В конечном итоге папка должна иметь подобный вид.
Устанавливаем все драйвера на ПК, установку проводить от имени администратора.
А теперь перейдем до непосредственного процесса прошивки телефона Asus ZenFone 2. Для этого выключаем телефон и переводим его в режим прошивки (recovery), включить держа кнопки Power + Volume Up, после двойной вибрации отпустить Power, продолжая удерживать Volume Up до тех пор пока не появится изображение робота.

Подключаем телефон к ПК при помощи комплектного USB кабеля.
1. Открываем командную строку на компьютере. Заходим в папку куда распаковали архив, нажимаем Shift и правая кнопка мыши — Открыть окно команд
2. Далее прошиваем в смартфон наше кастомное рекавери (Recovery) — в командной строке вводим
fastboot flash recovery recovery.img

3. После прошивки выбираем Recovery кнопками громкость

Нажимаем кнопку питания. Ждем 5-10 секунд. После появления первого робота — ждем. Как появится маленький робот
— Входим в рекавери —
держать кнопку питание + кратковременное нажатие увеличение громкости
Должно быть так —

4. После того как мы попали в кастомное ( и теперь уже основное) рекавери делаем «Factory Reset» то есть делаем полный сброс телефона.
5. После сброса на телефоне выбираем пункт — apply update from ADB, выбор подтверждаем кнопкой питания.
6. Далее вводим на ПК в командную строку команду — adb sideload f24.zip — нажимаем Enter
После чего должен запустится процесс прошивки смартфона Asus ZenFone 2.
Прошивка ставится значительное время, около 10-13 минут. После прошивки нажимаем Reboot.
Телефон перезагрузится с новой прошивкой, обычно первая загрузка щанимает больше времени.
Получение root права суперпользователя на Asus ZenFone 2 (ZE551ML)
Прошивка полностью стоковая, добавлен только root.
1. Скачиваем и устанавливаем драйвера для телефона и для ADB (см. выше)
Скачиваем pre-root system.img
Скачиваем FLASHTOOL (см. выше)
Zenfone 2 Android 5.1 Phone W
2. Заходим на телефоне в настройки-справка-сведения о ПО и жмем на Номер сборки, пока не появится сообшение, что вы разработчик))
3. Далее Настройки-для разработчиков ставим галочку отладка USB
4. Распаковываем flashtool и кладем его в одну папку с system.img
5. Входим в режим BOOTLOADER
6. в папке где лежит flashtool держа шифт жмем правую кнопку мыши и выбираем «открыть окно команд».
7. Вводим команду: fastboot flash system.img
8. Ждем пока установится IMG.
8. Перезагружаем телефон, после загрузки у вас будет телефон с root . После обновления OTA root пропадет.
Что ж, это должно поднять настроение обладателям новенькой новинки. Asus Zenfone 2 — Восстановление ClockworkMod, также известное как CWM, теперь доступен для их устройства, но не как постоянная установка. Вы загрузитесь в CWM recovery сразу после установки, но как только вы выйдете из режима восстановления, он будет автоматически удален с телефона. Но в любом случае это дает возможность корень ваш Zenfone 2 довольно легко, независимо от того, какая у вас прошивка, без необходимости установки данной прошивки с предварительным рутированием.
И знаете что, установка CWM recovery тоже чертовски проста. Вам просто нужно загрузить необходимые материалы, запустить только один файл и выполнить два небольших шага, и вскоре вы перейдете в режим восстановления CWM.
Вы должны поблагодарить пользователя XDA за это, который передал это Zenfone 2, используя оригинальную работу другого пользователя, социальные концепции дизайна, на телефонах Intel с заблокированными загрузчиками. И конечно же, Chainfire, для файла SuperSU.
С помощью восстановления CWM на вашем Zenfone 2 вы также можете создать резервную копию nandroid, от чего мы очень зависим. Это особенность спасения при кастомном восстановлении, будь то CWM или TWRP. Пока нет новостей о TWRP для Zenfone 2, мы очень надеемся, что он появится на устройстве. Но нет ETA!
Очевидно, что установка восстановления CWM на Zenfone 2 дает множество преимуществ, и главная из них — root. За исключением прошивки с предварительно установленным рут-рутом, которая зависит от региона, хорошего корневого решения нет. Но с доступностью восстановления CWM вы можете прошить корневой пакет Chainfire SuperSU на своем Zenfone 2, чтобы получить root-права, и это также является лучшим корневым решением, благодаря ClockworkMod recovery.
Посмотрим, как установить Zenfone 2 CWM recovery.
- Asus Zenfone 2, модель no. ZE550ML и ZE551ML
- Не пытайся на любом другом устройстве Android
Загрузки
Инструкция по установке
Гарантия на ваше устройство может быть аннулирована, если вы будете следовать процедурам, приведенным на этой странице. Только вы несете ответственность за свое устройство. Мы не несем ответственности в случае повреждения вашего устройства и / или его компонентов.
Важная заметка: Резервное копирование важные файлы (музыка, фотографии, документы, видео и т. д.), хранящиеся на вашем устройстве, прежде чем переходить к следующим шагам. Есть вероятность, что все на вашем телефоне может быть удалено, следовательно, потребуется соответствующее резервное копирование файлов и контактов.
- Если у вас нет АБР уже установлены драйверы, сделайте это сейчас, следуя нашим Руководство по установке ADB. Вернитесь к этому руководству после установки ADB.
- Также вам необходимо иметь Asus драйверы установлены. Скачать с здесь и установите их, если у вас их еще нет.
- Убедитесь, что ваш Zenfone 2 включен и подключен к ПК.
- Перевод файл корневого пакета UPDATE-SuperSU-v2.46.zip в Zenfone 2 (запомните его местоположение, оно нам понадобится на шаге 10 ниже).
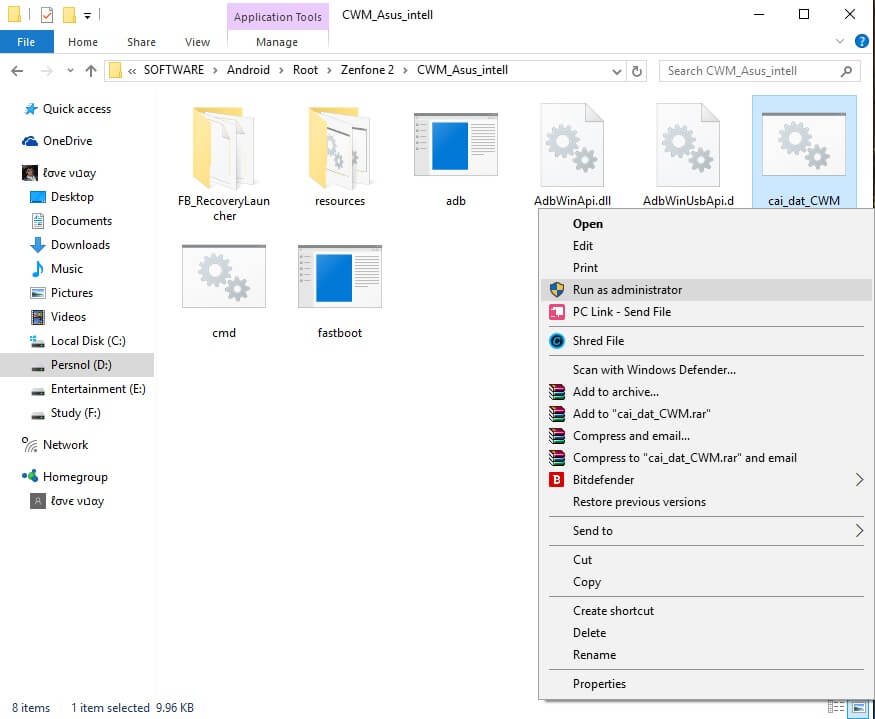
- Извлекать файл восстановления CWM, который вы загрузили сверху, в папку с помощью бесплатного программного обеспечения, такого как 7-zip. Вы должны получить файлы, как показано на изображении ниже.
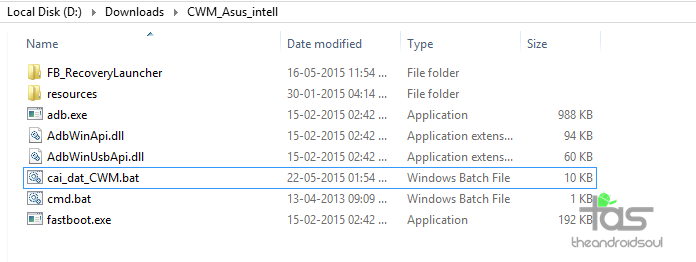
- Дважды щелкните на cai_dat_CWM.bat файл для запуска инструмента установки восстановления, чтобы начать установку восстановления CWM на Zenfone 2.
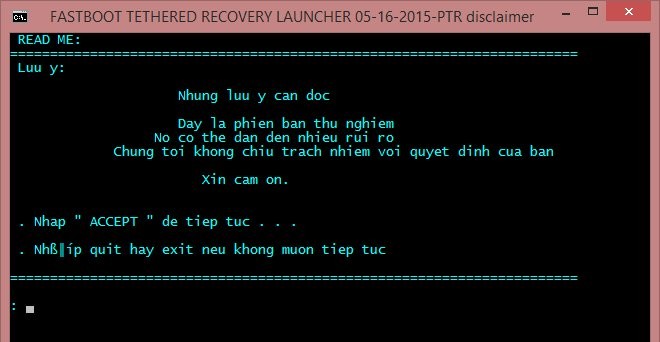
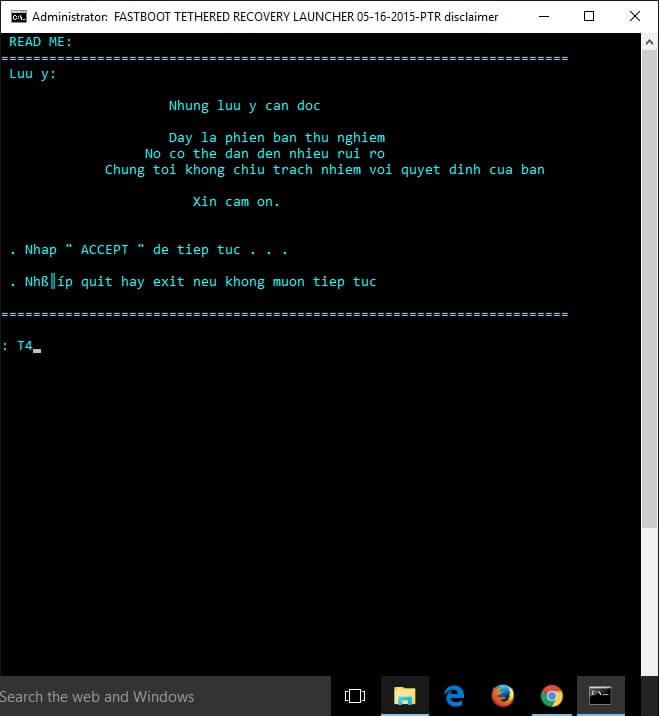
- Тип ПРИНИМАТЬ а затем нажмите клавишу ввода в появившемся окне командной строки, и вам будут представлены различные параметры.
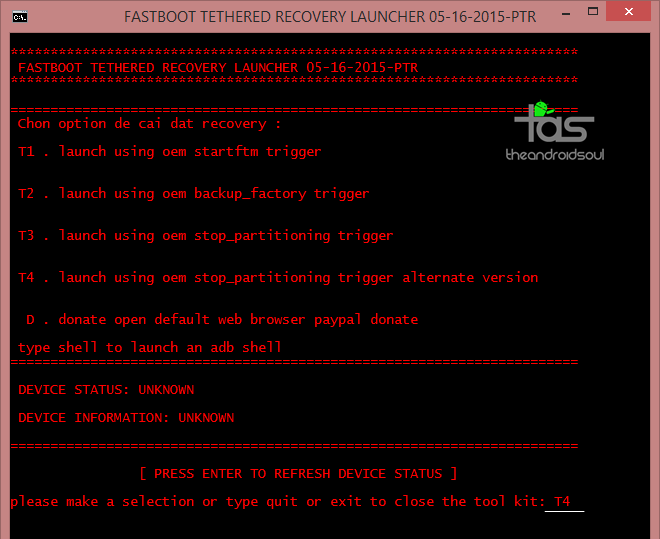
- Тип T4 а затем нажмите клавишу ввода, чтобы начать перепрошивку восстановления CWM.
- После прошивки восстановления CWM на Zenfone 2 с помощью инструмента, вы загрузитесь в CWM рекавери автоматически.
- Выбирать Установить zip с sdcard вариант, а затем выберите файл корневого пакета UPDATE-SuperSU-v2.46.zip (с шага 4).
- Выбирать да на следующем экране, чтобы подтвердить прошивку root.
- Когда закончите, вернитесь и выберите перезагрузите систему для перезапуска Zenfone 2.
- [Optional] Загрузите приложение вроде Корневой чекер чтобы подтвердить root-доступ на вашем Zenfone 2.
Вот и все.
Наслаждайтесь корневым доступом и корневыми приложениями.
Если вам нужна помощь по этому поводу, обязательно сообщите нам об этом в комментариях ниже. Мы сделаем все возможное, чтобы помочь вам.
Magisk keeps uninstalling
Q: During the past 4 days I had to re-install Magisk 16.3 at least 4 times a day. Because it keeps uninstalling itself. I have previously experienced this issue with Magisk, but it has gotten worse instead of being solved.
A: After uninstalling, you can try flashing the stock boot image from your ROM/firmware package/factory image.
Process error
A “process error” when installing Magisk is usually caused when the app doesn’t have storage permission. So you can fix it by clearing app data.
MagiskHide or SafetyNet fails after an update
If MagiskHide or SafetyNet starts failing after an update to either Magisk, the app, or both you can fix it by toggling MagiskHide off and on (also see ”Test MagiskHide”).
Magisk isn’t working
If you can boot up, but Magisk isn’t working as expected (not detecting the Magisk installation, loss of root, etc), there are a few troubleshooting steps you can try.
- First, Reboot. Sometimes this helps Magisk to mount everything as it should.
- Try removing any installed modules. So that you can see if it’s a faulty module causing issues.
- If that seems to fix it, just install the modules one at a time to find which one causes issues.
- If nothing else works, try starting from the very beginning with a new installation.
- check here: “Asking for help/reporting bugs”.
I can’t root Asus Zenfone 2 Deluxe ZE551ML with Magisk
Magisk keeps uninstalling
Q: During the past 4 days I had to re-install Magisk 16.3 at least 4 times a day. Because it keeps uninstalling itself. I have previously experienced this issue with Magisk, but it has gotten worse instead of being solved.
A: After uninstalling, you can try flashing the stock boot image from your ROM/firmware package/factory image.
I unroot Asus Zenfone 2 Deluxe ZE551ML but still the apps say my mobile is rooted.
Q: I completely unrooted my mobile a few days back. But still, many apps say that the device is rooted. Thereafter I rooted my device using Magisk HIDE. Please help me!
A: If your bootloader is unlocked, they will report your device as a rooted device. According to your description, Magisk Hide alone has failed to do the job. I suggest you try the “Repackage Magisk Manager” option in the Magisk Manager settings. It worked for me.
I unroot Asus Zenfone 2 ZE551ML but still the apps say my mobile is rooted.
Q: I completely unrooted my mobile a few days back. But still, many apps say that the device is rooted. Thereafter I rooted my device using Magisk HIDE. Please help me!
A: If your bootloader is unlocked, they will report your device as a rooted device. According to your description, Magisk Hide alone has failed to do the job. I suggest you try the “Repackage Magisk Manager” option in the Magisk Manager settings. It worked for me.
Magisk ERROR when installing
Q: I got this error when installing Magisk using TWRP. What am I supposed to do now?
Updater process ended with ERROR:1
Error installing zip file '/sdcard/MagiskManager/Magisk-v13.3.zip'
A: I advise you to use the magisk_uninstaller.zip first. From what I saw in your log, your boot. img is already patched by something else. Therefore, you need to install Magisk on your stock boot.img.
Process error
A “process error” when installing Magisk is usually caused when the app doesn’t have storage permission. So you can fix it by clearing app data.
Asus Zenfone 2 Deluxe ZE551ML got stuck at boot after uninstalling Magisk from app
Q: I installed Magisk via TWRP(Temp version) and installed some modules. Thereafter, I decided to uninstall Magisk using the Magisk Manager APK. Then the phone rebooted and stuck into the phone logo with the red danger logo. I tried flashing Magisk again via Temp TWRP, but now a few apps keep crashing. I tried uninstalling and reinstalling them. But couldn’t fix it. Can you help me?
A: If your phone is stuck in the boot loop or apps still crashing, then you have to wipe the Dalvik cache again. If you still need to unroot for whatever reason you can try this:
- update magisk first and then clicking uninstall from Magisk manager.
- manually flash uninstaller.zip from TWRP.
- flash the uninstaller as a module as stated in this post.
- Finally if it’s still no use, then you can factory reset the device to remove the root.
Invalid image
If you see a message in the install log, indicating “Invalid image: not signed”, that means your boot image is not signed. Don’t panic! It’s perfectly normal and nothing to worry about.
Magisk isn’t working
If you can boot up, but Magisk isn’t working as expected (not detecting the Magisk installation, loss of root, etc), there are a few troubleshooting steps you can try.
- First, Reboot. Sometimes this helps Magisk to mount everything as it should.
- Try removing any installed modules. So that you can see if it’s a faulty module causing issues.
- If that seems to fix it, just install the modules one at a time to find which one causes issues.
- If nothing else works, try starting from the very beginning with a new installation.
- check here: “Asking for help/reporting bugs”.
Invalid image
If you see a message in the install log, indicating “Invalid image: not signed”, that means your boot image is not signed. Don’t panic! It’s perfectly normal and nothing to worry about.
How to Root Asus Zenfone 2 Deluxe ZE551ML using Magisk Patched Boot. img
Step 1 : Install Android SDK
Firstly you need to install the Android SDK Platform Tools on your PC. As some of you are already aware this is the recommended official ADB and Fastboot binary given by Google. Just download it and extract it to any convenient location on your PC. Then you will have the platform-tools folder, which is essential for the process.
Step 2 : Enable USB Debugging and OEM Unlocking on Asus Zenfone 2 Deluxe ZE551ML
Then you should enable USB Debugging and OEM Unlocking on your Asus Zenfone 2 Deluxe ZE551ML. By unlocking OEM, you will be able to make your phone discoverable by the PC in ADB mode. And then allowing you to boot your device to Fastboot Mode.
Here’s how you gonna do that. : Enable USB Debugging and OEM Unlocking
Step 3 : Unlock Asus Zenfone 2 Deluxe ZE551ML Bootloader
As the third step, you need to unlock the bootloader of the phone. Don’t ever forget that unlocking will wipe all the device data. So, perform a complete backup beforehand and then refer to our guide on How to Unlock the Bootloader on Asus Zenfone 2 Deluxe ZE551ML.
Step 4 : Extract Boot.img from Asus Zenfone 2 Deluxe ZE551ML Firmware
Then you have to download the firmware for your Asus Zenfone 2 Deluxe ZE551ML. You have to download the same version that is currently installed onto your device. After downloading, extract the file to a suitable location on your PC.
Still Can’t found boot.img or Don’t know how to find?
Step 5 : Patch Stock Boot.img via Magisk
- Firstly install the Magisk app to your phone. Read More: Everything about Magisk
- And confirm whether the boot.img has been transferred to the device.
- Now tap on Install button. (see below image)
- In the Options menu, enable both the Preserve Force Encryption and Recovery Mode options.
- Then tap Next.
- You will be navigated to the Method selection screen. Now choose Select and Patch a file.
- As the next step, browse to the extracted boot.img file and select it.
- And tap in the Let’s Go button and Magisk will now load the boot.img file and start patching.
- You will see a message saying Download Complete once the patching is done.
- Then the patched patched boot image file will be saved as magisk_patched.img in Internal Storage > Downloads.
- You can rename the file by deleting the random numbers at the end of the name. So the file will be named as magisk_patched.img.
- Finally transfer the file to the internal storage of your device for future use.
Step 6 : Boot to Fastboot Mode on Asus Zenfone 2 Deluxe ZE551ML
- Enable USB Debugging and connect your device to the PC using a USB cable.
- Now go to the platform-tools folder, type CMD in the address bar and press Enter. or Search CMD and open it. after that, navigate to the platform-tools folder
- That will launch the Command Prompt.
- Then type the following command in the CMD window to boot your device to Fast boot mode.
adb reboot bootloaderfastboot devicesDisable DM Verity: Only if you have a problem with performing step 7.
Step 7
Flash Magisk Patched Boot.img and Root Asus Zenfone 2 Deluxe ZE551ML
- First transfer the magisk_patched.img file to the platform-tools folder.
- Then type the following command in the CMD window to flash the Magisk Patched file.
fastboot flash boot magisk_patched.img- Finally enter the following command to reboot your device to the OEM.
fastboot rebootNow, you have successfully rooted your device.
Unable to repack boot image
Q : I tried to install MAGISK v16.O using MAGISK installer. But there is a message saying, Installation failed with (! Unable to repack boot image! Failed! ! Installation failed). What can I do to get rid of this?
A: Just try uninstalling v15.3 first and then install v16.0 clean.
MagiskHide or SafetyNet fails after an update
If MagiskHide or SafetyNet starts failing after an update to either Magisk, the app, or both you can fix it by toggling MagiskHide off and on (also see ”Test MagiskHide”).
I can’t root Asus Zenfone 2 ZE551ML with Magisk
OTA Update fails after using Magisk Root [Install failReason
- To start you need to fully restore to stock and erase user data. (basically, the same as starting with a brand new phone).
- Then, flash Magisk (I used the image provided on the thread about Magisk) fastboot flash boot magisk_patched.img.
- Boot to Android.
- Next, install magisk manager.
- Verify root works.
- Now, reboot to bootloader, flash default boot.img: fastboot flash boot boot.img.
- Next, reboot to android.
- Finally, apply OTA update.
How to Root Asus Zenfone 2 ZE551ML using Magisk Patched Boot. img
Step 1 : Install Android SDK
Firstly you need to install the Android SDK Platform Tools on your PC. As some of you are already aware this is the recommended official ADB and Fastboot binary given by Google. Just download it and extract it to any convenient location on your PC. Then you will have the platform-tools folder, which is essential for the process.
Step 2 : Enable USB Debugging and OEM Unlocking on Asus Zenfone 2 ZE551ML
Then you should enable USB Debugging and OEM Unlocking on your Asus Zenfone 2 ZE551ML. By unlocking OEM, you will be able to make your phone discoverable by the PC in ADB mode. And then allowing you to boot your device to Fastboot Mode.
Here’s how you gonna do that. : Enable USB Debugging and OEM Unlocking
Step 3 : Unlock Asus Zenfone 2 ZE551ML Bootloader
As the third step, you need to unlock the bootloader of the phone. Don’t ever forget that unlocking will wipe all the device data. So, perform a complete backup beforehand and then refer to our guide on How to Unlock the Bootloader on Asus Zenfone 2 ZE551ML.
Step 4 : Extract Boot.img from Asus Zenfone 2 ZE551ML Firmware
Then you have to download the firmware for your Asus Zenfone 2 ZE551ML. You have to download the same version that is currently installed onto your device. After downloading, extract the file to a suitable location on your PC.
Still Can’t found boot.img or Don’t know how to find?
Step 5 : Patch Stock Boot.img via Magisk
- Firstly install the Magisk app to your phone. Read More: Everything about Magisk
- And confirm whether the boot.img has been transferred to the device.
- Now tap on Install button. (see below image)
- In the Options menu, enable both the Preserve Force Encryption and Recovery Mode options.
- Then tap Next.
- You will be navigated to the Method selection screen. Now choose Select and Patch a file.
- As the next step, browse to the extracted boot.img file and select it.
- And tap in the Let’s Go button and Magisk will now load the boot.img file and start patching.
- You will see a message saying Download Complete once the patching is done.
- Then the patched patched boot image file will be saved as magisk_patched.img in Internal Storage > Downloads.
- You can rename the file by deleting the random numbers at the end of the name. So the file will be named as magisk_patched.img.
- Finally transfer the file to the internal storage of your device for future use.
Step 6 : Boot to Fastboot Mode on Asus Zenfone 2 ZE551ML
- Enable USB Debugging and connect your device to the PC using a USB cable.
- Now go to the platform-tools folder, type CMD in the address bar and press Enter. or Search CMD and open it. after that, navigate to the platform-tools folder
- That will launch the Command Prompt.
- Then type the following command in the CMD window to boot your device to Fast boot mode.
adb reboot bootloaderfastboot devicesDisable DM Verity: Only if you have a problem with performing step 7.
Step 7
Flash Magisk Patched Boot.img and Root Asus Zenfone 2 ZE551ML
- First transfer the magisk_patched.img file to the platform-tools folder.
- Then type the following command in the CMD window to flash the Magisk Patched file.
fastboot flash boot magisk_patched.img- Finally enter the following command to reboot your device to the OEM.
fastboot rebootNow, you have successfully rooted your device.
Asus Zenfone 2 ZE551ML got stuck at boot after uninstalling Magisk from app
Q: I installed Magisk via TWRP(Temp version) and installed some modules. Thereafter, I decided to uninstall Magisk using the Magisk Manager APK. Then the phone rebooted and stuck into the phone logo with the red danger logo. I tried flashing Magisk again via Temp TWRP, but now a few apps keep crashing. I tried uninstalling and reinstalling them. But couldn’t fix it. Can you help me?
A: If your phone is stuck in the boot loop or apps still crashing, then you have to wipe the Dalvik cache again. If you still need to unroot for whatever reason you can try this:
- update magisk first and then clicking uninstall from Magisk manager.
- manually flash uninstaller.zip from TWRP.
- flash the uninstaller as a module as stated in this post.
- Finally if it’s still no use, then you can factory reset the device to remove the root.
Unable to repack boot image
Q : I tried to install MAGISK v16.O using MAGISK installer. But there is a message saying, Installation failed with (! Unable to repack boot image! Failed! ! Installation failed). What can I do to get rid of this?
A: Just try uninstalling v15.3 first and then install v16.0 clean.
Magisk ERROR when installing
Q: I got this error when installing Magisk using TWRP. What am I supposed to do now?
Updater process ended with ERROR:1
Error installing zip file '/sdcard/MagiskManager/Magisk-v13.3.zip'
A: I advise you to use the magisk_uninstaller.zip first. From what I saw in your log, your boot. img is already patched by something else. Therefore, you need to install Magisk on your stock boot.img.
OTA Update fails after using Magisk Root [Install failReason
- To start you need to fully restore to stock and erase user data. (basically, the same as starting with a brand new phone).
- Then, flash Magisk (I used the image provided on the thread about Magisk) fastboot flash boot magisk_patched.img.
- Boot to Android.
- Next, install magisk manager.
- Verify root works.
- Now, reboot to bootloader, flash default boot.img: fastboot flash boot boot.img.
- Next, reboot to android.
- Finally, apply OTA update.
")


")