
- What Is A Superuser?
- Add The New User To The “Sudo” Group
- Add A Public Key To The New user
- Varify The New User’s Login
- What is root user? Why is it locked in Ubuntu?
- How to run commands as root user in Ubuntu?
- How to become root user in Ubuntu?
- How to enable root user in Ubuntu?
- Updated February 15, 2021
- Why is root lower case?
- The Linux version of Windows admin
- Linux as an upside-down tree
- What can you do as root?
- Linux User
- Read permission
- Write permission
- How to Change Permissions in Linux Using the chmod Command
- How to Change Permissions using Symbolic Mode
- Example
- How to Change Permissions using Absolute Mode
- How to Change Ownership using the chown Command
- How to change user ownership with chown
- How to change user and group ownership simultaneously
- Linux Permissions Guided Exercise
- Visualization of the problem
- Wrapping up
- Local Security Principles
- User Accounts
- Types of Accounts
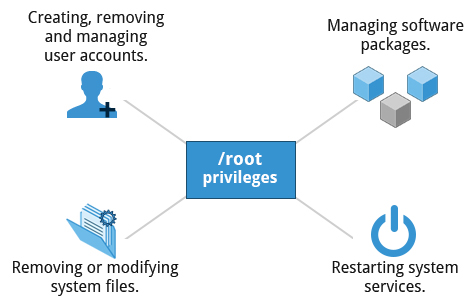
- Understanding the root Account
- Operations Requiring root Privileges
- Operations Not Requiring root Privileges
- Comparing sudo and su
- The sudoers File
- Command Logging
- Process Isolation
- Keeping Current
- How Passwords Are Stored
- Password Algorithm
- Good Password Practices
- Requiring Boot Loader Passwords
- Hardware Vulnerability
- Software Vulnerability
- Chapter Summary
- Получение прав root без переключения
- Переключение на суперпользователя в терминале
- Вход под суперпользователем
- Графически приложения от имени суперпользователя
- Выводы
What Is A Superuser?
The system will ask a set of questions. Answer those and you are all set.
Add The New User To The “Sudo” Group
su — rajib
sudo ls -la /root
Add A Public Key To The New user
Create the authorized_key file inside the .ssh folder and add the public key. Once pasted, please save the file.
sudo nano ~/.ssh/authorized_keys
Varify The New User’s Login
Как вы знаете, Linux очень серьезно относится к управлению пользователями и предоставлению им прав на работу с системой. Обычный пользователь может записывать файлы только в свой каталог и каталог /tmp/. Также есть возможность читать некоторые файлы в корневой файловой системе. Но вы не можете устанавливать программы, ведь для этого нужно право на запись, не можете изменять атрибуты файлов, не можете запускать сервисы, не можете читать некоторые файлы логов и еще много чего не можете.
В Linux управлять корневой файловой системой и создавать там файлы имеет право только пользователь root.
В этой статье мы рассмотрим какие программы нужны для того, чтобы получить права root пользователя linux, как они работают, как выполнять программу с правами root от обычного пользователя и как запускать графические программы с правами root. А также выясним что такое sudo в чем разница su или sudo.
Очень долго перечислять чего не может обычный пользователь Linux, проще сказать на что у него есть право, а именно при стандартной настройке полномочий для файлов в Linux, обычный пользователь может:
Если же нужно сделать что-то большее нам понадобятся права root пользователя linux. У root есть право делать все в вашей файловой системе независимо от того какие права установлены на файл.
Either you run commands with root privilege like this:
What is root user? Why is it locked in Ubuntu?
You don’t need to have root privilege for your daily tasks like moving file in your home directory, downloading files from internet, creating documents etc.
Take this analogy for understanding it better. If you have to cut a fruit, you use a kitchen knife. If you have to cut down a tree, you have to use a saw. Now, you may use the saw to cut fruits but that’s not wise, is it?
Does this mean that you cannot be root in Ubuntu or use the system with root privileges? No, you can still have root access with the help of ‘sudo’ (explained in the next section).
How to run commands as root user in Ubuntu?
So, how do you run commands as root? The simple answer is to add sudo before the commands that require to be run as root.
sudo apt update
If you are absolutely new to Linux, you might be surprised that when you start typing your password in the terminal, nothing happens on the screen. This is perfectly normal because as the default security feature, nothing is displayed on the screen. Not even the asterisks (*). You type your password and press enter.
Bottom line:To run commands as root in Ubuntu, add sudo before the command.When asked for password, enter your account’s password.When you type the password on the screen, nothing is visible. Just keep on typing the password and press enter.
How to become root user in Ubuntu?
The sudo command allows you to simulate a root login shell with this command:
You’ll notice that when you switch to root, the shell command prompt changes from $ (dollar key sign) to # (pound key sign). This makes me crack a (lame) joke that pound is stronger than dollar.
If you try to use the su command without sudo, you’ll encounter ‘su authentication failure’ error.
How to enable root user in Ubuntu?
sudo passwd root
Again, this is not recommended and I won’t encourage you to do that on your desktop. If you forgot it, you won’t be able to change the root password in Ubuntu again.
sudo passwd -dl root
I hope you have a slightly better understanding of the root concept now. If you still have some confusion and questions about it, please let me know in the comments. I’ll try to answer your questions and might update the article as well.
Updated February 15, 2021
Who cares about root access? Do you need it? If you do, what can you do with it? Learn about the Linux root, what it can do for you, and how a Unix-like operating system is organized as an upside-down tree.
Why is root lower case?
Why does this decision bother people? Well, because there is a certain logic to the non-use of capital letters in that context. The idea is that initial-caps of words – or “proper case” – within case-sensitive code is typically only a convention that is applied to void methods and properties; you should start with the lower case for methods that return a value and local variables, says this perspective.
Oscilatingcretin notes that he has too often felt that the supposed need to use this convention is perhaps more arbitrary than it is rational – although he does note that he has “never needed a casing convention to tell me whether or not something is a local variable or property” because he has “always used a very intuitive naming convention.”
The bottom line is that you should write root without a capital letter; and if you want, you can question whether the lack of a capital letter makes sense.
The Linux version of Windows admin
KnownHost, buy your VPS Now!
Linux as an upside-down tree
To better understand how the concepts in the above section interrelate, this account is called root because it has exclusive write permissions within the root directory – i.e. it can change any files contained therein.
The root directory is called that because the hierarchy of a Unix-like OS is designed to be similar to a tree, with everything sprouting and branching off from one directory that serves as the roots. Flip the tree over, and you see the hierarchy, with root on top.
What can you do as root?
This question could be rephrased as, “What are example root privileges?” That is essentially what we are talking about with privileges is the ability to do other stuff on your dedicated or VPS server (the latter provided you have full root access). Here are 5 broad examples of what you can do within this account:
1. Edit whatever files you choose
2. Change the system however you want
3. Provide and remove permissions to other accounts (which will affect whether they can read, change, or execute certain directories and files)
4. Install software server-wide (MySQL, Apache, etc.)
5. Set up configurations for software throughout the server
You can get root access on a dedicated or virtual private server, provided this feature is available through your hosting provider. With a good service, logging in as root should be a snap. At KnownHost, support is something we pride ourselves on, so you can rest easy knowing we’ve got your back. See our full-root-access fully managed VPS plans.
Linux User
File permissions fall in three categories: read, write, and execute.
Read permission
Similarly for directories, read permissions allow the listing of directory content without any modification in the directory.
Write permission
Symbolic representation of permissions
Note that we can find permissions of files and folders using long listing (ls -l) on a Linux terminal.
Output of long listing
In the output above, d represents a directory and- represents a regular file.
How to Change Permissions in Linux Using the chmod Command
Now that we know the basics of ownerships and permissions, let’s see how we can modify permissions using the chmod command.
Syntax of chmod:
chmod permissions filename
We can change permissions using two modes:
Now, let’s see them in detail.
How to Change Permissions using Symbolic Mode
We can use mathematical operators to add, remove, and assign permissions. The table below shows the summary:
Example
Suppose, I have a script and I want to make it executable for owner of the file zaira.
Let’s split the permissions like this:
To add execution rights (x) to owner (u) using symbolic mode, we can use the command below:
chmod u+x mymotd.sh
Now, we can see that the execution permissions have been added for owner zaira.
Additional examples for changing permissions via symbolic method:
How to Change Permissions using Absolute Mode
Absolute mode uses numbers to represent permissions and mathematical operators to modify them.
The below table shows how we can assign relevant permissions:
Permissions can be revoked using subtraction. The below table shows how you can remove relevant permissions.
chmod 451 file-name
This is how we performed the calculation:
Note that this is the same as r—r-x—x.
To remove execution from other and group, subtract 1 from the execute part of last 2 octets.
This would be the same as rwxr-xr—.
How to Change Ownership using the chown Command
Next, we will learn how to change the ownership of a file. You can change the ownership of a file or folder using the chown command. In some cases, changing ownership requires sudo permissions.
Syntax of chown:
How to change user ownership with chown
chown news mymotd.sh
Command to change ownership: sudo chown news mymotd.sh
How to change user and group ownership simultaneously
In case we only need to change the group owner, we can use chown by preceding the group name by a colon :
Linux Permissions Guided Exercise
Up until now we have explored permissions, ownerships, and the methods to change them. Now we will reinforce our learning with a guided exercise.
Visualization of the problem
We can visualize the problem like this:
Use the sudo command with flag i.
If you have the root password, you can login using that as well.
If you do not have root access, use the commands with appending sudo.
Step 2: Create a group dev-team
Use the groupadd command.
Syntax: groupadd group-name
Enter groupadd dev-team to create the dev-team group
Where -G specifies the group.
Use command passwd
Step 5: Create a directory in /home and name it dev-team
Use command mkdir
mkdir creates a directory.
Syntax: mkdir directory-name
Step 6: Change the group ownership of the folder dev-team to group dev-team
Use command chown
Syntax: chown :group-name folder
chown :dev-team /home/dev-team/
Step 7: Make sure the permissions of folder dev-team allow group members to create and delete files.
Use command chmod
Syntax: chmod permissions folder
chmod g+w /home/dev-team/
Step 8: Ensure that ‘others’ don’t have any access to the files of dev-team folder.
Remove read, write, execute permissions from ‘others’ if they exist.
chmod o-rx dev-team
Step 9: Exit the root session and switch to John
su — John
Verify with command whoami.
Step 10: Navigate to folder: /home/dev-team
Use command cd to switch folders.
Syntax: cd /path/to/folder
Confirm current path with pwd.
Step 11: Create an empty file in the folder: /home/dev-team
Use command touch to create an empty file.
Syntax: touch filename
Verify: ls -lrt
Step 12: Change the group ownership of the created file to dev-team and verify.
Use command chown to change ownership.
Syntax: chown :group file-name
chown :dev-team john-file.txt
Once group ownership is modified, all members of the group can access this file.
Verify ls -lrt
Use command exit to exit the terminal.
su — Bob
Step 14: Navigate to the path /home/dev-team
Step 15: Find out Bob’s privileges to access john-file.txt
Use command ls -l for long listing.
Does group have rw- permissions?
Step 16: Modify the file john-file.txt while logged in as Bob
This would redirect the quoted text to end of the file.
If all the permissions are correctly set, Bob would be allowed to edit and save this file. Otherwise you would get an error like this: Permission denied.
Verify cat john-file.txt
Step 17: Create another group project-manager and assign a member Fatima to it
Use command groupadd to add a new group.
Step 18: Navigate to folder /home/dev-team and verify if Fatima can access it
Use cd to navigate to /home/dev-team.
We get this error:
This is because, others don’t have any access to the folder dev-team.
If we recall, below are the rights of the dev-team folder.
Wrapping up
Thanks to Tom Mondloch for his help with the guided exercise.
Learn to code for free. freeCodeCamp’s open source curriculum has helped more than 40,000 people get jobs as developers. Get started
This is part two. First read part one: https://www.freecodecamp.org/news/introduction-to-linux/
Local Security Principles
By the end of this chapter, you should be able to:
User Accounts
Types of Accounts
By default, Linux distinguishes between several account types in order to isolate processes and workloads. Linux has four types of accounts:
Understanding the root Account

When you are signed in as, or acting as root, the shell prompt displays ‘#’ (if you are using bash and you have not customized the prompt, as we have discussed previously). This convention is intended to serve as a warning to you of the absolute power of this account.
Operations Requiring root Privileges
root privileges are required to perform operations such as:
Operations Requiring root Privileges
Operations Not Requiring root Privileges
The table provides examples of operations which do not require root privileges:
Comparing sudo and su

The sudoers File
who where = (as_whom) what
# visudo /etc/sudoers# visudo -f /etc/sudoers.d/student
The actual specific editor invoked will depend on the setting of your EDITOR environment variable.
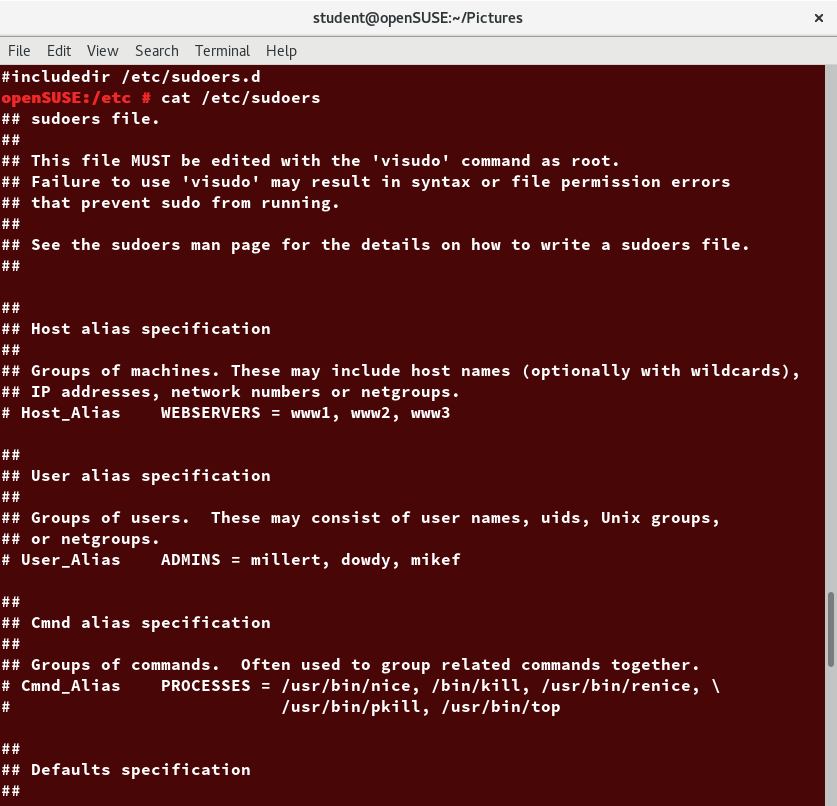
The sudoers File
Command Logging
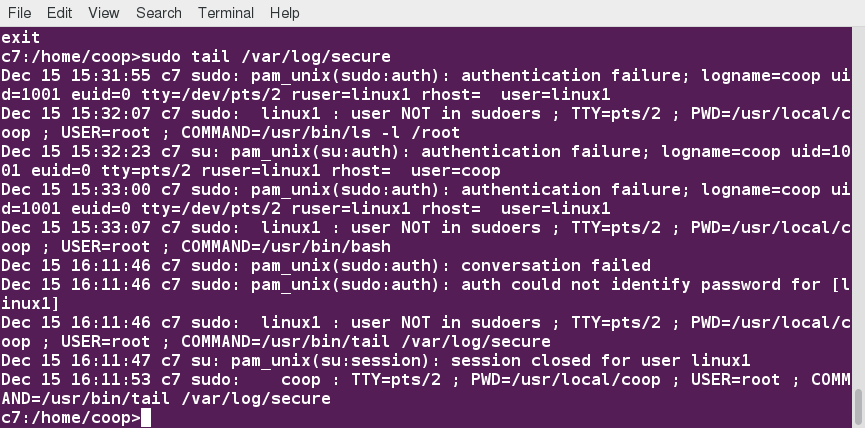
By default, sudo commands and any failures are logged in /var/log/auth.log under the Debian distribution family, and in /var/log/messages and/or /var/log/secure on other systems. This is an important safeguard to allow for tracking and accountability of sudo use. A typical entry of the message contains:
Running a command such as sudo whoami results in a log file entry such as:
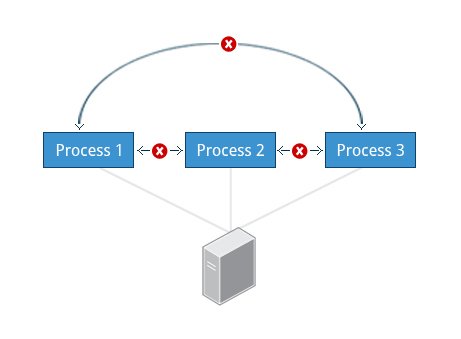
Process Isolation
More recent additional security mechanisms that limit risks even further include:
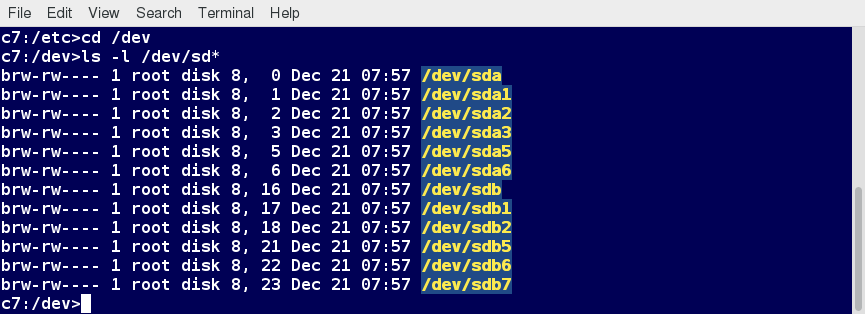
Hardware Device Access
Keeping Current
When security problems in either the Linux kernel or applications and libraries are discovered, Linux distributions have a good record of reacting quickly and pushing out fixes to all systems by updating their software repositories and sending notifications to update immediately. The same thing is true with bug fixes and performance improvements that are not security related.
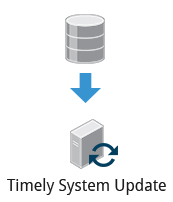
So the best practice is to take advantage of your Linux distribution’s mechanism for automatic updates and never postpone them. It is extremely rare that such an update will cause new problems.
How Passwords Are Stored
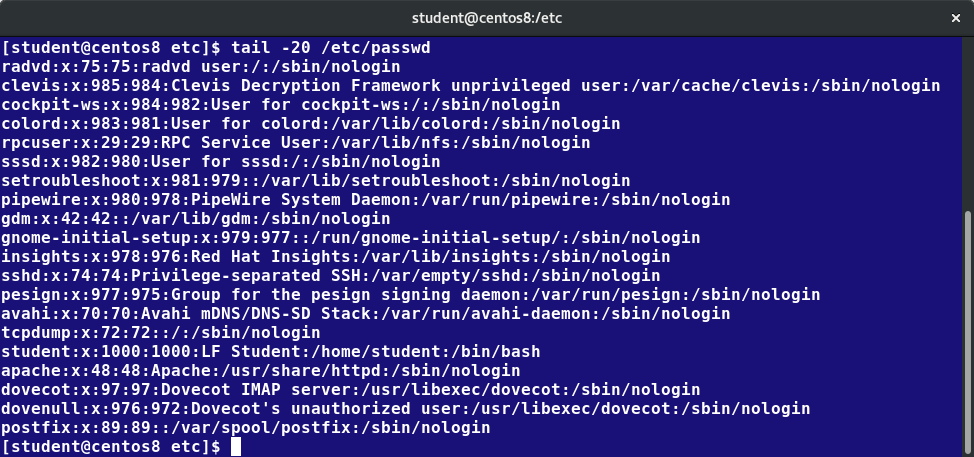
Originally, encrypted passwords were stored in the /etc/passwd file, which was readable by everyone. This made it rather easy for passwords to be cracked.
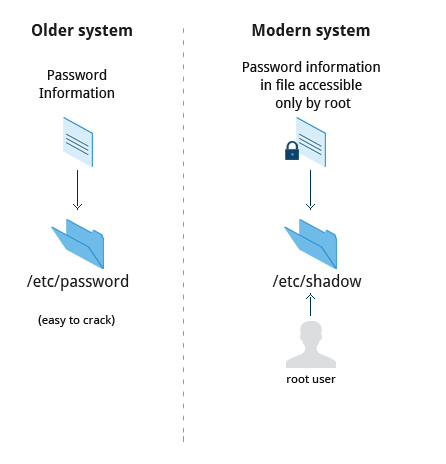
How Passwords Are Stored
On modern systems, passwords are actually stored in an encrypted format in a secondary file named /etc/shadow. Only those with root access can read or modify this file.
Password Algorithm
Protecting passwords has become a crucial element of security. Most Linux distributions rely on a modern password encryption algorithm called SHA-512 (Secure Hashing Algorithm 512 bits), developed by the U.S. National Security Agency (NSA) to encrypt passwords.
The SHA-512 algorithm is widely used for security applications and protocols. These security applications and protocols include TLS, SSL, PHP, SSH, S/MIME and IPSec. SHA-512 is one of the most tested hashing algorithms.
For example, if you wish to experiment with SHA-512 encoding, the word «test» can be encoded using the program sha512sum to produce the SHA-512 form (see graphic):

Password Encryption: sha512sum
Good Password Practices
Requiring Boot Loader Passwords

Furthermore, you never edit grub.cfg directly; instead, you can modify the configuration files in /etc/grub.d and /etc/defaults/grub, and then run update-grub, or grub2-mkconfig and save the new configuration file.
Hardware Vulnerability
When hardware is physically accessible, security can be compromised by:
Your IT security policy should start with requirements on how to properly secure physical access to servers and workstations. Physical access to a system makes it possible for attackers to easily leverage several attack vectors, in a way that makes all operating system level recommendations irrelevant.
The guidelines of security are:
Software Vulnerability
Like all software, hackers occasionally find weaknesses in the Linux ecosystem. The strength of the Linux (and open source community in general) is the speed with which such vulnerabilities are exposed and remediated. Specific coverage of vulnerabilities is beyond the scope of this course, but the Discussion Board can be used to carry out further discussion.

Chapter Summary
You have completed Chapter 18. Let’s summarize the key concepts covered:
Получение прав root без переключения
Чтобы реализовать максимально безопасный интерфейс для работы с правами суперпользователя в Linux была разработана команда sudo. Давайте рассмотрим что такое sudo. Эта команда пишется перед каждой командой, которую нужно выполнить от имени суперпользователя, и для ее выполнения нужно ввести пароль уже не root, а всего лишь вашего пользователя. Так же, как и в предыдущей, в этой утилиты есть свои опции. Сначала рассмотрим синтаксис:
Вы можете выполнить те же эксперименты, только для этой команды, чтобы понять как использовать команду sudo. Например:
sudo -u test ls
Использование sudo — это рекомендованный способ выполнять команды от имени суперпользователя в Linux. Так вы не забудете с чем имеете дело и меньше всего рискуете повредить систему. Более подробно о команде sudo читайте здесь. Но остался еще один нерешенный вопрос — как быть с графическими утилитами? Ведь команда sudo их не запускает, а запускать графическую оболочку от имени root небезопасно. Это мы и рассмотрим далее.
Переключение на суперпользователя в терминале
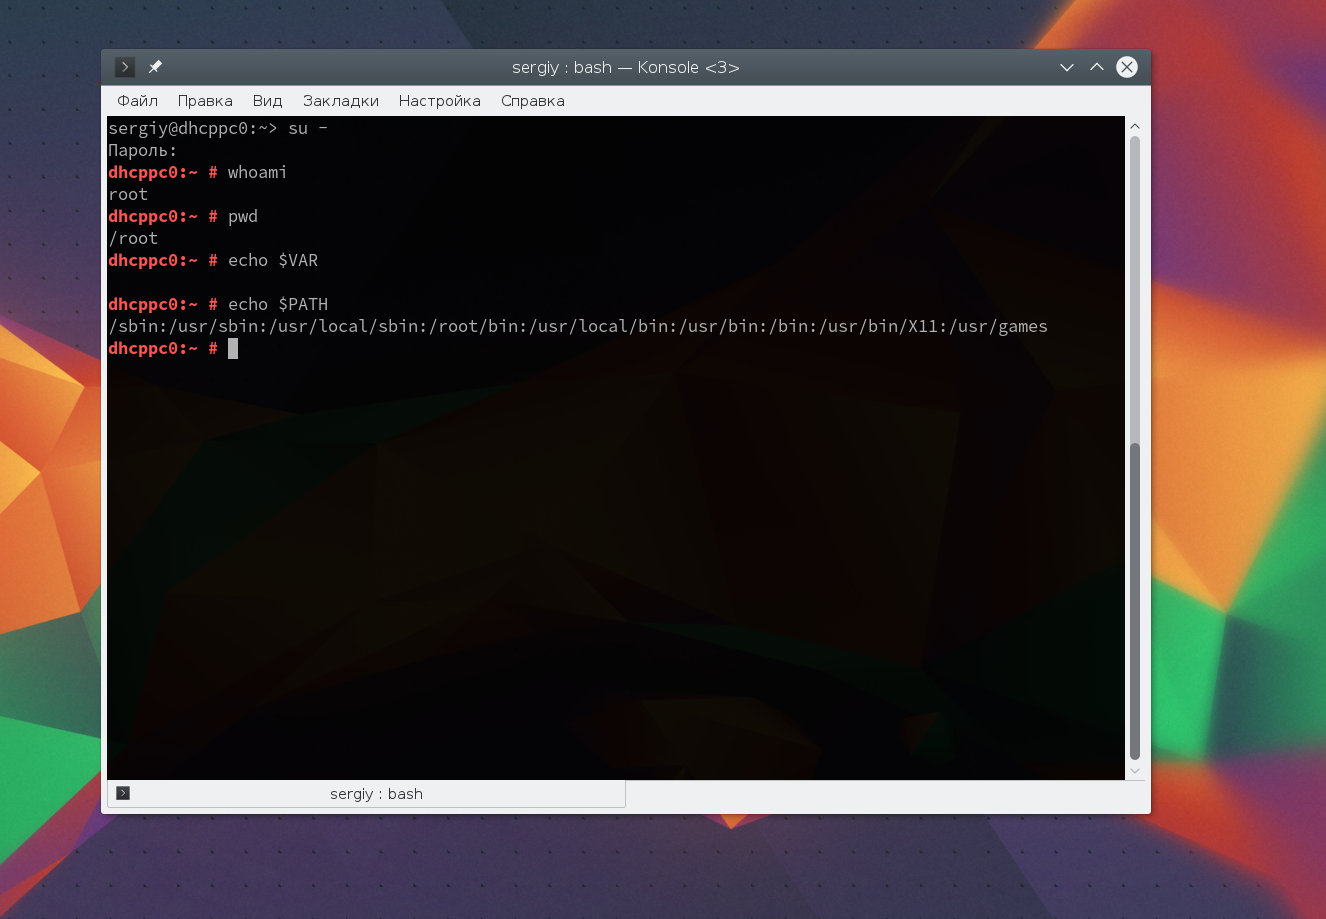
Теперь мы подошли к более интересному и практичному. С помощью специальных утилит вы можете переключить текущий эмулятор терминала в окружения суперпользователя и выполнять все следующие команды не от своего имени, а от его, таким образом, дав программе права root linux. Для этого существует утилита su. Вообще говоря, эта утилита позволяет не только переключаться на пользователя root но и на любого другого пользователя, но по умолчанию используется именно root. Рассмотрим ее подробнее. Команда su linux имеет следующий синтаксис:
Вот ее основные опции:
Теперь немного поэкспериментируем, чтобы понять как работает команда su linux.
Сначала выполним su без параметров, но для начала создадим переменную окружения, чтобы проверить как с ними обходится эта команда:
Теперь смотрим что получилось:

Из этих команд мы видим, что теперь мы пользователь root, но домашней директорией считается директория нашего предыдущего пользователя и наша переменная не сохранилась также изменилась переменная PATH, теперь там добавлен путь /sbin.
И повторим ту же комбинацию:
Та же ситуация, только на этот раз изменена ко всему еще и домашняя директория на директорию root. Но мы можем сохранить наши переменные окружения, если это нужно, для этого есть опция -p:
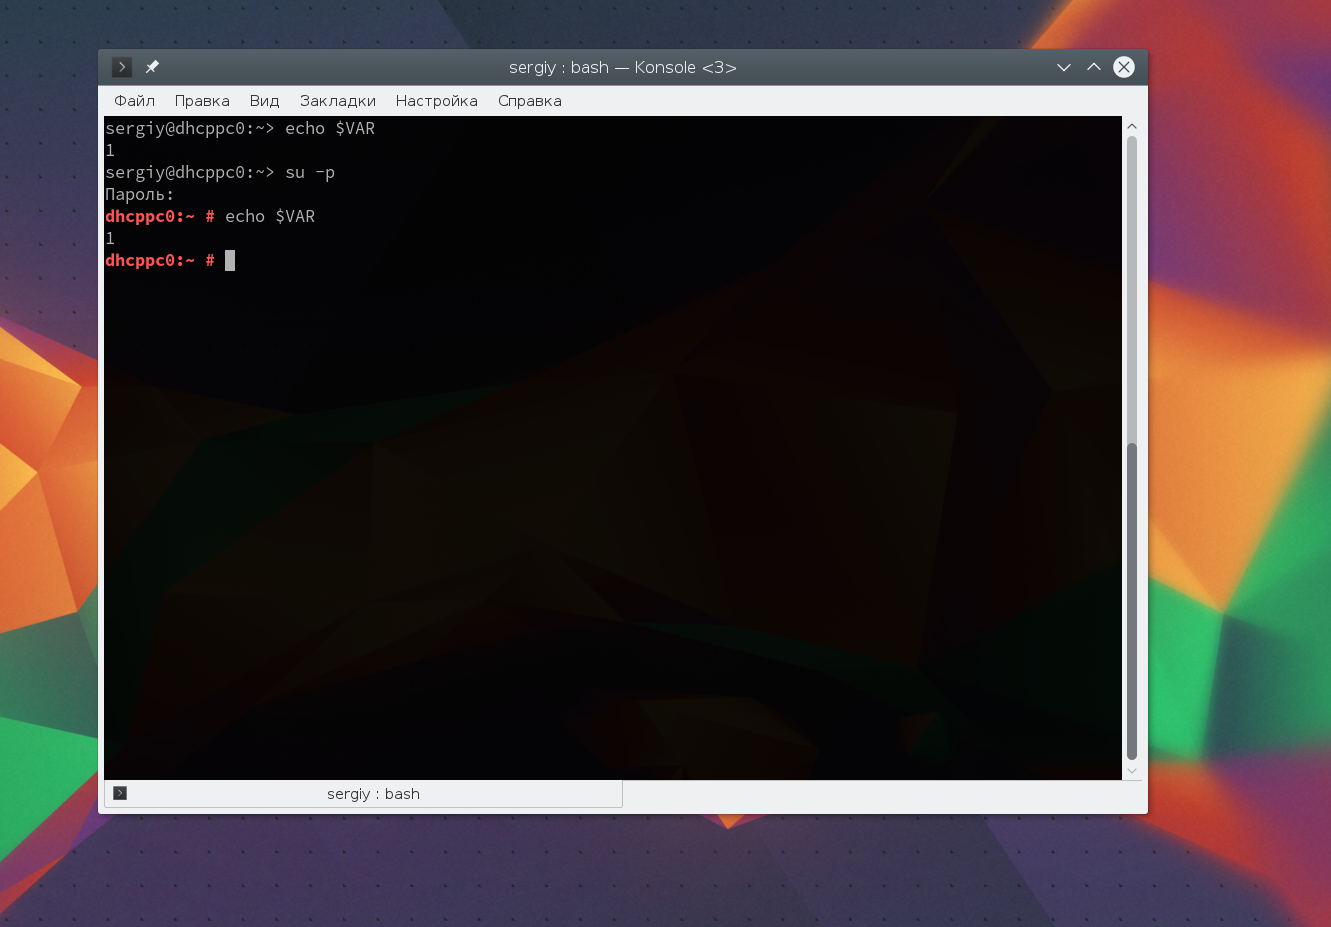
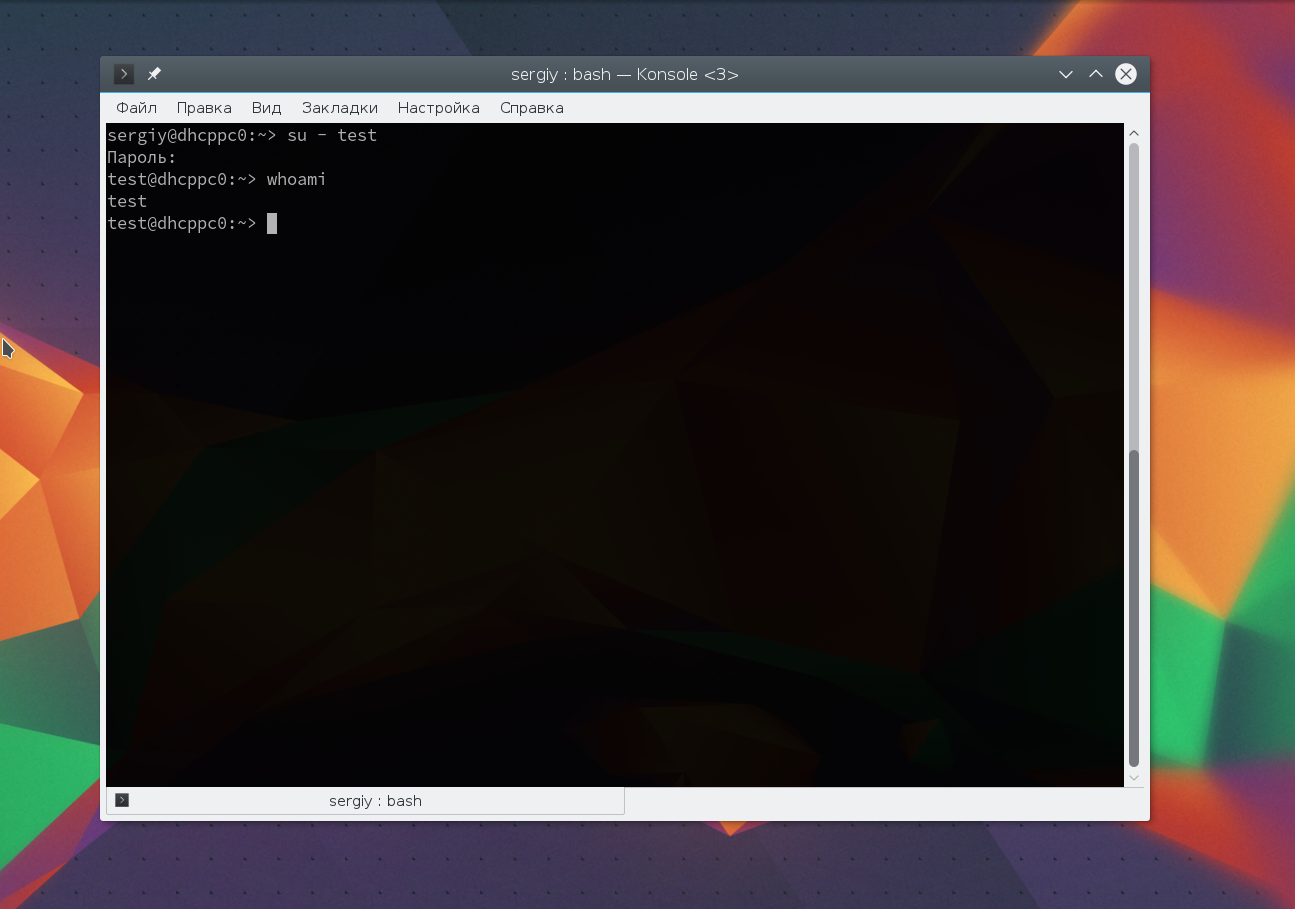
Как видите, наша переменная осталась. Вы также можете переключится на любого другого пользователя. Например:
su — test
Более подробно о команде su вы можете почитать в отдельной статье. Получение прав суперпользователя таким способом используется во многих дистрибутивах, например, Debian, OpenSUSE, ArchLInux, Gentoo и т д. Но в Ubuntu, как дистрибутиве для начинающих вход под пользователем root отключен. Это сделано потому, что это тоже не очень безопасно, вы можете забыть что выполняете команду от root и что-то натворить в системе. Поэтому переходим к следующей программе.
Вход под суперпользователем
Вы получите полноценное окружение root с возможностью выполнять все действия, но такой способ очень непрактичный, так как вы теряете все преимущества использования графического интерфейса.
Графически приложения от имени суперпользователя
Для запуска графических приложений от имени суперпользователя существуют специальные утилиты. Они сохраняют все необходимые переменные окружения и полномочия. В KDE это команда kdesu, а в Gnome команда gksu.
Просто наберите gksu или kdesu, а затем нужную команду:
Эта команда запустит файловый менеджер KDE с правами суперпользователя. В Gnome это будет выглядеть вот так:
Программа запросит пароль, уже в графическом окне, а потом откроется файловый менеджер.
Выводы
Вот и все. Теперь вы знаете как получить права суперпользователя в Linux, знаете как использовать команду sudo и в чем разница sudo или su. Теперь программы, требующие дополнительных привилегий в системе, не вызовут у вас проблем. Если остались вопросы, пишите в комментариях!
Обнаружили ошибку в тексте? Сообщите мне об этом. Выделите текст с ошибкой и нажмите Ctrl+Enter.
")


")