

So, this was the comprehensive guide on how to Root your Xiaomi Redmi 8 smartphone. I have tried my best to make this guide as simple as possible.
However, if you still encounter any problems while implementing the steps, please let me know in the comments. I will try to resolve your issues as soon as possible.
So, this was the comprehensive guide on how to Root your Xiaomi Redmi Note 8 Pro smartphone. I have tried my best to make this guide as simple as possible.
However, if you still encounter any problems while implementing the steps, please let me know in the comments. I will try to resolve your issues as soon as possible.
So, this was the comprehensive guide on how to Root your Xiaomi Redmi Note 8 smartphone. I have tried my best to make this guide as simple as possible.
However, if you still encounter any problems while implementing the steps, please let me know in the comments. I will try to resolve your issues as soon as possible.
How to Root Redmi Note 8 Pro Using Magisk and SuperSu – Today, through this Article, I will show how to root Redmi Note 8 Pro. We will use Magisk Manager and SuperSu application to root Redmi Note 8 Pro. This process will be very simple and will be in English language. Before starting this process, let me warn you that if your mobile phone is dead in this process, then I will not have any responsibility. Do this process at your own risk. Here you will not be told any wrong procedure.
This guide will show you How to Root Xiaomi Redmi 8 with the advanced rooting method Magisk. I have shown you two methods to Root this device, one with TWRP recovery and the second one without the requirement of TWRP.
If your device doesn’t support TWRP, then you can go with the second step. For this method, we need the stock firmware of Xiaomi Redmi 8. After that, we need to extract the boot image and patch it with Magisk.
Now let me tell you why we are using Magisk over other rooting methods like SuperSU and KingoRoot.
- What is Magisk?
- About Xiaomi Redmi 8
- What Does Rooting Means?
- Let’s Root Xiaomi Redmi 8 (Beginners Friendly Guide)
- Conclusion
This guide will show you How to Root Xiaomi Redmi Note 8 Pro with the advanced rooting method Magisk. I have shown you two methods to Root this device, one with TWRP recovery and the second one without the requirement of TWRP.
If your device doesn’t support TWRP, then you can go with the second step. For this method, we need the stock firmware of Xiaomi Redmi Note 8 Pro. After that, we need to extract the boot image and patch it with Magisk.
Now let me tell you why we are using Magisk over other rooting methods like SuperSU and KingoRoot.
- What is Magisk?
- About Xiaomi Redmi Note 8 Pro
- What Does Rooting Means?
- Let’s Root Xiaomi Redmi Note 8 Pro (Beginners Friendly Guide)
- Conclusion
This guide will show you How to Root Xiaomi Redmi Note 8 with the advanced rooting method Magisk. I have shown you two methods to Root this device, one with TWRP recovery and the second one without the requirement of TWRP.
If your device doesn’t support TWRP, then you can go with the second step. For this method, we need the stock firmware of Xiaomi Redmi Note 8. After that, we need to extract the boot image and patch it with Magisk.
Now let me tell you why we are using Magisk over other rooting methods like SuperSU and KingoRoot.
- What is Magisk?
- About Xiaomi Redmi Note 8
- What Does Rooting Means?
- Let’s Root Xiaomi Redmi Note 8 (Beginners Friendly Guide)
- Conclusion
» » Root Xiaomi Redmi Note 5 Pro Oreo 8.1 using TWRP and Install Magisk
If you hate Custom Skin OS like MIUI, you can use any Custom ROM and Pixel Experience ROM after rooting your Xiaomi Redmi Note 5 Pro. But, IF you don’t know why you need Root, I advise you to stay with the MIUI ROM. There are plenty of features and Minimized Ad Optimizations are coming in Upcoming Updates. You can Experience better performance compared with the MIUI If you use Custom Lite Weight ROMs. If you root, Because you hate Ads, At the end of this article, I attached the link to disable ads, without Root. Beyond these reasons with this much of Good Hardware, you don’t need root.
- Why should you Root Xiaomi Redmi Note 5 Pro?
- Things to check out for;
- Unlock Bootloader using ADB and Fastboot
- Install Magisk in your Xiaomi Redmi Note 5 Pro using TWRP
- Reader Interactions
- Why should you Root Xiaomi Redmi Note 8/8T/Note 8 Pro?
- Things to check out for;
- Unlock Bootloader using ADB and Fastboot
- Flash TWRP on Redmi Note 8
- Flash TWRP on Note 8 Pro
- Install Magisk and Disable Dm-Verity-ForceEncrypt in your Xiaomi Redmi Note 8/Note 8 Pro using TWRP
- Reader Interactions
- Should you need to Root Xiaomi Redmi Note 8/8T Android 10?
- How to Root Xiaomi Redmi Note 8/8T Android 10 version? (Ginkgo, Willow)
- Things to check out for;
- Unlock Xiaomi Redmi Note 8/8T Bootloader using ADB and Fastboot
- Flash Recovery Image using ADB and Fastboot
- Install Magisk, VBmeta Patcher, and Disable Dm-Verity-Force-Encrypt in your Xiaomi Redmi Note 8/8T using TWRP
- About Xiaomi Redmi 8
- What Does Rooting Means?
- Root Redmi Note 8 Pro Via Magisk and SuperSu
- Magisk Manager :-
- SuperSu :-
- What is Magisk?
- What is Magisk?
- What Does Rooting Means?
- Quick specification of Redmi Note 8 Pro
- Advantage of Rooting in Redmi Note 8 Pro.
- DisAdvantage of Rooting in Redmi Note 8 Pro.
- There are 4 easy Steps in this process .
- Pre-Requirement for Redmi Note 8 Pro
- Download Link
- Step 1.Unlock Bootloader on Redmi Note 8 Pro
- Step 2.Install TWRP Recovery on Redmi Note 8 Pro
- What is Magisk?
- Check Root on Redmi Note 8 Pro Via Root Checker
- What Does Rooting Means?
- Let’s Root Xiaomi Redmi Note 8 Pro (Beginners Friendly Guide)
- Method 1: Root your Xiaomi Redmi Note 8 Pro using TWRP Recovery
- Method 2: Root Xiaomi Redmi Note 8 Pro without TWRP Recovery
- How to Verify if your Xiaomi Redmi Note 8 Pro is Rooted successfully?
- Let’s Root Xiaomi Redmi Note 8 (Beginners Friendly Guide)
- Method 1: Root your Xiaomi Redmi Note 8 using TWRP Recovery
- Method 2: Root Xiaomi Redmi Note 8 without TWRP Recovery
- How to Verify if your Xiaomi Redmi Note 8 is Rooted successfully?
- Let’s Root Xiaomi Redmi 8 (Beginners Friendly Guide)
- Method 1: Root your Xiaomi Redmi 8 using TWRP Recovery
- Method 2: Root Xiaomi Redmi 8 without TWRP Recovery
- How to Verify if your Xiaomi Redmi 8 is Rooted successfully?
Why should you Root Xiaomi Redmi Note 5 Pro?
You should have a proper reason, and you know what you are doing. Yes, with a Minimum of 6 GB RAM and Qualcomm SDM636 Snapdragon 636 processor, You can use this mobile without root for 2-3 Years If you use correctly. There are promised Pie 9.0 update for this mobile. Don’t root because everybody is saying when root your mobile it can become the fastest car in the world. No. Rooting is to extract some performance from the device. But, you already have Powerful specs and software. So, If you are addicted to some root apps, you can root. But, if you want to test, I won’t recommend it.
Xiaomi Redmi Note 5 Pro International Variants comes with a flexible bootloader other than some locked devices. Example- In Samsung, Verizon mobiles come with locked Bootloader. This means that different smartphone variants can be easily rooted. Also, the device can accept to install TWRP recovery or any other custom recovery file/app alike.
With the help of TWRP Recovery, you can quickly flash the latest version of Magisk into your Xiaomi Redmi Note 5 Pro to gain root access. Before sharing the tutorial, you may want to know that, with the TWRP recovery present on your device, you can easily install any custom ROM or firmware. Does it seem complicated? Relax, everything will be explained succinctly in bullets.
Things to check out for;
Make sure your device battery is charged above 50%
Backup your current files and data, full data loss process (save them on external storage).
Enable USB Debugging Mode and OEM Unlock in your mobile. To do this; go to settings >>> about >>> Tap on the “Build Number” 7-10 times consistently to enable “Developer Options,” then go to the “Developer Options” and enable USB Debugging Mode, OEM Unlock, and Enable the ‘Advanced Reboot.’ There is no complicated process in Xiaomi Redmi Note 5 Pro.
Also, download the ADB drivers. Install It in your PC.
- Download Magisk.Zip (Latest Version) and Copy it to Your Phone Memory.
Download and save the TWRP File in your Internal Memory and rename it to recovery.img.
- twrp-3.3.1-0-whyred.img (Redmi Note 5 Pro)
- Download dummy.img and Save it in your PC Fastboot folder.
Unlock Bootloader using ADB and Fastboot
- Enter your Mobile details like phone number, IMEI, reason. You will get the confirmation code on your mobile. Enter the confirmation code on the Mi website and request for unlocking. You will receive a confirmation mail after the approval in 2-10 Days.
Install the Mi Flash Tool in the received mail. Log in with your Same Mi Account, which used to get the Software.
- Switch off your device. Connect your mobile to PC. Then, enter into Fastboot mode. To do this; Press and hold down the Volume Down + Power buttons at the same time for some time. It will boot your mobile into Fastboot mode.
After you successfully boot into Fastboot mode, Select Unlock. It will take 2-3 minutes to finish the process. After the successful process completion, Reboot your mobile.
Check again enable “Developer Options,” then go to the “Developer Options” and enable USB Debugging Mode, OEM Unlock and Enable the “Advanced Reboot.” Sometimes they disabled them self after the boot.
- Switch off your device. Connect your mobile to PC. Then, enter into Fastboot mode. To do this; Press and hold down the Volume Down + Power buttons at the same time for some time. It will boot your mobile into Fastboot mode.
Now, connect the Xiaomi Redmi Note 5 Pro mobile to the computer via USB cable.
Launch the fastboot on your computer. Open a Command prompt on your PC and type below command and Press Enter.
- fastboot flash antirbpass dummy.img
- After the successful command, type below command and press Enter.
- fastboot flash recovery recovery.img
Don’t boot into Normal OS. Type the below command to Boot into TWRP.
- fastboot boot recovery.img
- After the process complete, It will boot into the temporary TWRP. Don’t Boot into standard OS until we flash magisk.
Install Magisk in your Xiaomi Redmi Note 5 Pro using TWRP
- Select Wipe->Advance Wipe->Select Cache Data.
- Return to Home of TWRP select Install.
- After the Installation Again navigates to Home and Select Install.
- Select Magisk.Zip. After the successful installation, Reboot your mobile.
Xiaomi Redmi Note 5 Pro has a minimum of 6 GB RAM, and it is a Good Mid-end phone; There are Major regular updates and monthly updates, from Xiaomi for a long duration. If you compare it with Old devices, they still receiving updates. So, you know what you are doing and the real purpose, you can root your device. If you want to disable Ads, you can use other methods, which doesn’t require root. Xiaomi promised to optimize these Ads in the upcoming versions.

Selva Kumar is an Android Devices Enthusiast, Who Can Talk and Write About Anything If You Give a Hint About the respective devices. He is a Computer Science Graduate and Certified Android Developer, Making His Career towards this Technology. He is always eager to try new Android devices — not only Software level but Hardware-level Also. Beyond this, He is a Good Swimmer, Guitarist.
Reader Interactions
» » Root Xiaomi Redmi Note 8/8T and Note 8 Pro Pie 9.0 using TWRP and Install Magisk
Why should you Root Xiaomi Redmi Note 8/8T/Note 8 Pro?
We thank the TWRP team and XDA Developer- fi4tch, Uwai yan (Found TWRP Link). Without the TWRP developer’s work, this process can’t happen. If you want to root your mobile, you should have a proper reason, and you know what you are doing. Yes, with a minimum of 4-6 GB RAM, MediaTek Helio G90T processor (Note 8 Pro), and Qualcomm SDM665 Snapdragon 665 processor (Note 8), You can use this mobile without root for 2-3 Years If you use correctly. Don’t root because everybody is saying when root your mobile it can become fastest. No. Rooting is to extract some performance from the device. But, you already have Powerful specs and software. So, If you are addicted to some root apps, you can root. But, if you want to test, I won’t recommend it.
Xiaomi Redmi Note 8 Pro and regular version International Variants come with a flexible bootloader other than some locked devices. Example- In Samsung, Verizon mobiles come with locked Bootloader. This means that different smartphone variants can be easily rooted. Also, the device can accept to install TWRP recovery or any other custom recovery file/app alike.
With the help of TWRP Recovery, you can quickly flash the latest version of Magisk into your Redmi Note 8 to gain root access. Before sharing the tutorial, you may want to know that, with the TWRP recovery present on your device, you can easily install any custom ROM or firmware. Does it seem complicated? Relax, everything will be explained succinctly in bullets.
Things to check out for;
Make sure your device battery is charged above 50%
Backup your current files and data, full data loss process (save them on external storage).
Enable USB Debugging Mode and OEM Unlock on your mobile. To do this; go to settings >>> about >>> Tap on the “Build Number” 7-10 times consistently to enable “Developer Options,” then go to the “Developer Options” and enable USB Debugging Mode, OEM Unlock. There is no complicated process in Xiaomi Redmi Note 8/Pro.
Also, download the ADB drivers. Install it on your PC.
- Download Magisk.Zip (Latest Version) and Copy it to Your Phone Memory.
Download, extract, and save the TWRP Recovery on your PC and rename the recovery file to recovery.img. Copy this file to the folder where you installed ADB and Fastboot.
- Download Disable_Dm-Verity_ForceEncrypt.zip and Save it in your mobile.
Unlock Bootloader using ADB and Fastboot
- Enter your Mobile details like phone number, IMEI, reason. You will get the confirmation code on your mobile. Enter the confirmation code on the Mi website and request for unlocking. You will receive a confirmation mail after the approval in 2-10 Days.
Install the Mi Flash Tool in the received mail. Log in with your Same Mi Account, which used to get the Software.
- Switch off your device. Connect your mobile to the PC. Then, enter into Fastboot mode. To do this; Press and hold down the Volume Down + Power buttons at the same time for some time. It will boot your mobile into Fastboot mode.
After you successfully boot into Fastboot mode, Select Unlock. It will take 2-3 minutes to finish the process. After the successful process completion, Reboot your mobile.
Check again enable “Developer Options,” then go to the “Developer Options” and enable USB Debugging Mode, OEM Unlock. Sometimes they disabled themselves after the boot.
Flash TWRP on Redmi Note 8
- Switch off your device. Connect your mobile to the PC. Then, enter into Fastboot mode. To do this; Press and hold down the Volume Down + Power buttons at the same time for some time. It will boot your mobile into Fastboot mode.
Now, connect the Xiaomi Redmi Note 8 mobile to the computer via USB cable.
Launch the fastboot on your computer. Open a Command prompt on your PC and type below command.
- fastboot flash recovery recovery.img
Don’t boot into Normal OS. Type the below command to Boot into TWRP.
- fastboot reboot recovery
- After the process complete, It will boot into the temporary TWRP. If you can’t boot into TWRP, press and Hold Volume Up Button Until TWRP appears. Don’t Boot into standard OS until we flash magisk.
Flash TWRP on Note 8 Pro
- Connect your Bootloader unlocked mobile with PC.
Extract downloaded ifelixit.zip file and you will find ADB and Fastboot drivers along with TWRP, .bat file.
- After the flash move to below Magisk installation steps.
Install Magisk and Disable Dm-Verity-ForceEncrypt in your Xiaomi Redmi Note 8/Note 8 Pro using TWRP
- Select Wipe->Advance Wipe->Select Cache Data.
- Return to Home of TWRP select Install.
- Select Disable Dm-Verity-ForceEncrypt.Zip.
- After the Installation Again, navigates to Home and Select Install.
- Select Magisk.Zip. After the successful installation, Reboot your mobile.
Xiaomi Redmi Note 8 and Pro version has a minimum of 4-6 GB RAM of RAM. It is a Good Mid-Range phone with a reasonable price; If you feel you have not sufficient RAM, Refer- How much RAM you need. There are Major regular updates and monthly updates, from Xiaomi for a long duration. If you compare it with Old devices, they still receiving updates. So, you know what you are doing and the real purpose, you can root your device. If you want to disable Ads, you can use other methods, which doesn’t require root. Xiaomi promised to optimize these Ads in the upcoming versions.
Source, (2), (3), (4)
Selva Kumar is an Android Devices Enthusiast, Who Can Talk and Write About Anything If You Give a Hint About the respective devices. He is a Computer Science Graduate and Certified Android Developer, Making His Career towards this Technology. He is always eager to try new Android devices — not only Software level but Hardware-level Also. Beyond this, He is a Good Swimmer, Guitarist.
Reader Interactions
» » Root Xiaomi Redmi Note 8/8T Android 10 using TWRP and Magisk
Should you need to Root Xiaomi Redmi Note 8/8T Android 10?
We thank XDA Developer- topjohnwu and mauronofrio (Who successfully tested this method). Without their hard work, We can’t make this method. Coming to root, you should have a proper reason, and you know what you are doing. Yes, with a minimum of 3-6 GB RAM and Qualcomm SDM665 Snapdragon 665 Octa-Core processor, You can use this mobile for basic tasks without root for 2-3 years of use correctly. Software is better compared with other manufacturers, Custom skin OS. Don’t root because everybody says that it can become the fastest car in the world when rooting your mobile. No. Rooting is to extract some performance from the device. But, you already have Powerful specs and software. So, If you are addicted to some root apps, you can root. But, if you want to test, I won’t recommend it.
How to Root Xiaomi Redmi Note 8/8T Android 10 version? (Ginkgo, Willow)
Xiaomi Redmi Note 8/8T International Variants come with a flexible bootloader other than some carrier-locked devices. It means that We can easily root different smartphone variants. The device can also accept installing TWRP recovery or any other custom recovery file/app.
You can install Official TWRP Recovery once available for your Xiaomi Redmi Note 8/8T to gain more features. Before sharing the tutorial, you may want to know that you can install any custom ROM or firmware with your device’s TWRP recovery. Does it seem complicated? Relax; we will explain everything briefly in bullets.
Things to check out for;
Make sure your device battery is above 50%.
You should back up your current files and data, full data loss process (save them on external storage).
Enable USB Debugging Mode and OEM Unlock on your mobile. To do this, go to settings >>> about >>> Tap on the “Build Number” 7-10 times consistently to enable “Developer Options,” then go to the “Developer Options” and enable USB Debugging Mode, OEM Unlock. There is no complicated process in Xiaomi Redmi Note 8/8T.
Unlock Xiaomi Redmi Note 8/8T Bootloader using ADB and Fastboot
- Enter your Mobile details like phone number, IMEI, reason. You will get the confirmation code on your mobile. Enter the confirmation code on the Mi website and request for unlocking. You will receive a confirmation mail after the approval in 2-10 Days.
Install the Mi Flash Tool in the received mail. Log in with your Same Mi Account, which is used to get the software.
- Switch off your device. Connect your mobile to the PC. Then, enter into Fastboot mode. To do this; Press and hold down the Volume Down + Power buttons at the same time for some time. It will boot your mobile into Fastboot mode.
After you successfully boot into Fastboot mode, Select Unlock. It will take 2-3 minutes to finish the process. After the successful process completion, Reboot your mobile.
Check again to enable “Developer Options,” then go to the “Developer Options” and enable USB Debugging Mode, OEM Unlock. Sometimes they disabled themselves after the boot.
Flash Recovery Image using ADB and Fastboot
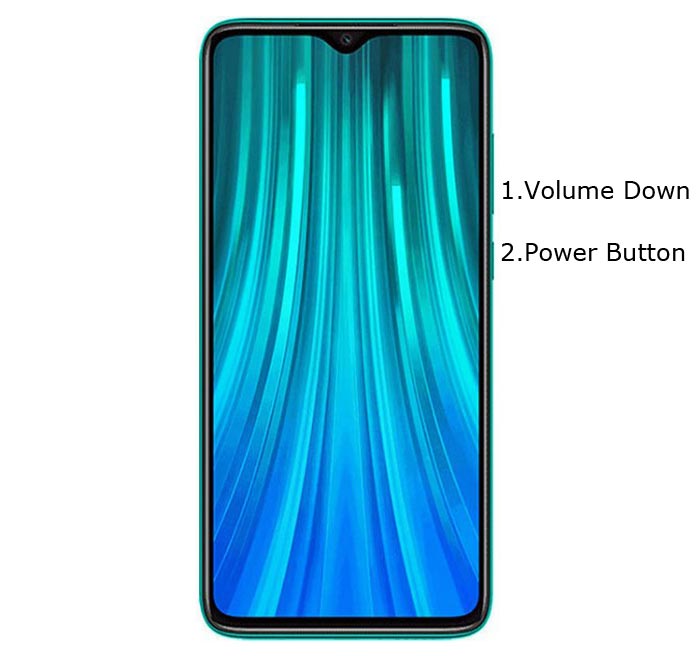
- Switch off your device. Then, enter into Fastboot mode. To do this- Press and hold down the Volume Down + Power buttons at the same time for some time.
Press the Volume Up button to continue when you see the warning message.
Now, connect the Xiaomi Redmi Note 8/8T mobile to the USB cable computer.
Launch the fastboot on your computer. Open a Command prompt on your PC and type the below command.
- It should display the connected devices. If you didn’t get the device, restart the command prompt and Disconnect and Connect your Xiaomi Redmi Note 8/8T. If you are detected, type the below commands one by one and hit Enter.
- You should execute the commands after every successful response.
- fastboot flash recovery recovery.img
- The above command will flash recovery on your mobile. Type the below command to boot into recovery, or you can use key combinations.
- fastboot boot recovery.img

- After the process complete, Press the Volume Down+ Power button to exit Fastboot mode. When the screen goes off, Immediately Press Volume Up + Power buttons to boot into Recovery mode.
- You can also use the fastboot reboot recovery command to boot into recovery. After entering into recovery mode, Go to Wipe Data/Factory Reset and Select Yes to wipe data. It will erase your saved data on your device.
Install Magisk, VBmeta Patcher, and Disable Dm-Verity-Force-Encrypt in your Xiaomi Redmi Note 8/8T using TWRP
- Select Wipe->Advance Wipe->Select Cache Data.
- Return to Home of TWRP select Install.
- Select Disable Dm-Verity-Force-Encrypt.Zip.
- After the installation, Again, navigates to Home and Select Install.
- Select Vbmeta patcher.Zip. In the same way, install Magisk.zip.
- After the successful installation, Reboot your mobile.
In my opinion, you don’t need to root your Xiaomi Redmi Note 8/8T Android 10 version. If you thought you could Improve Performance By Root; With the Qualcomm SDM665 Snapdragon 665 Octa-Core processor and 3-6 GB RAM, your device can perform well. If you don’t know how much RAM you need, You will never use this much RAM. It would help if you did not Boot into Normal OS Booting by pressing the power button after firmware flash. It will boot you to a Non-Rooted environment. So, you should pay attention to the first recovery boot step.
If you root your device because of the battery drain issues, you can optimize your battery without root. Beyond this, if your purpose is to Disable Bloatware apps, you can do that without using them. This method is based on TWRP custom recovery. Thus you can install Custom ROMs. When you have any suggestions or doubts, comment below.
Selva Kumar is an Android Devices Enthusiast, Who Can Talk and Write About Anything If You Give a Hint About the respective devices. He is a Computer Science Graduate and Certified Android Developer, Making His Career towards this Technology. He is always eager to try new Android devices — not only Software level but Hardware-level Also. Beyond this, He is a Good Swimmer, Guitarist.
About Xiaomi Redmi 8
The Xiaomi Redmi 8 is a newly launched android smartphone. It offers great features for the price. Here is the Key Specification of Xiaomi Redmi 8:
What Does Rooting Means?
Rooting Android simply means giving a superpower to your phone. It opens up many customization and tweaks for your smartphone. Once you root your phone, you have full control over your Android System files.
You can do the very greatest thing after rooting your device installing Custom ROM, removing unwanted apps (bloatware), installing Modules, and much more. But before we proceed to the Rooting process, we must understand the Advantages and Disadvantages of Rooting your android device.
Here are some Pros or Advantages of Rooting Xiaomi Redmi 8:
- You can install Custom ROM on your device.
- Update your Phone to a newer version of Android.
- Easily install Incompatible Apps on your phone.
- You can flash Custom Kernel to increase device performance.
- Take a Complete Backup of your Xiaomi Device using NANDroid backup.
Here are some Cons or Disadvantages of Rooting Xiaomi Redmi 8:
- The phone warranty will get void.
- Xiaomi Redmi 8 will no longer be Secure.
- You may face lagging issues on Xiaomi Redmi 8.
- While Rooting, if you miss out on any steps, then your device might get bricked.
- Before proceeding to the steps, Unlock the Bootloader on Xiaomi Redmi 8.
- Fully charge your device. If not, then you will be stuck in between the process.
- Take the full backup of your Xiaomi android.
- Download Latest Magisk App on your phone.
- For method 1: You need to Install TWRP Recovery on Xiaomi Redmi 8.
- For method 2:
- Download the Latest SDK Platform tools and ADB Fastboot Tool.
- Install the latest Xiaomi USB Drivers.
- This method requires a PC/Laptop to execute ADB commands.
- Xiaomi Redmi 8 original USB cable.
- This guide is only for Xiaomi Redmi 8. Please do not try these steps on any other smartphone.
Apply the shown steps at your own risk. MyPhoneUpdate.com is not responsible for bricking your device.
Must Try: OneClickRoot (Paid)
Are you new to Rooting? If yes then you must use the OneClickRoot service. Rooting the latest android phones like Xiaomi Redmi 8 is a complex process. As a beginner, you might end up bricking your Xiaomi device. So, it’s better to hire a professional.
Why Choose One Click Root Service?
✔️ Certified Android Experts root your Xiaomi Redmi 8.
✔️ They provide a 100% rooting guarantee.
✔️ You will not be charged until your device is successfully rooted.
✔️ Provide 24/7 support and Device Warranty.
Root Redmi Note 8 Pro Via Magisk and SuperSu
Magisk Manager :-
- First download the Magisk Manager File in your phone.
- Now move the Magisk Manager file to your internal storage.
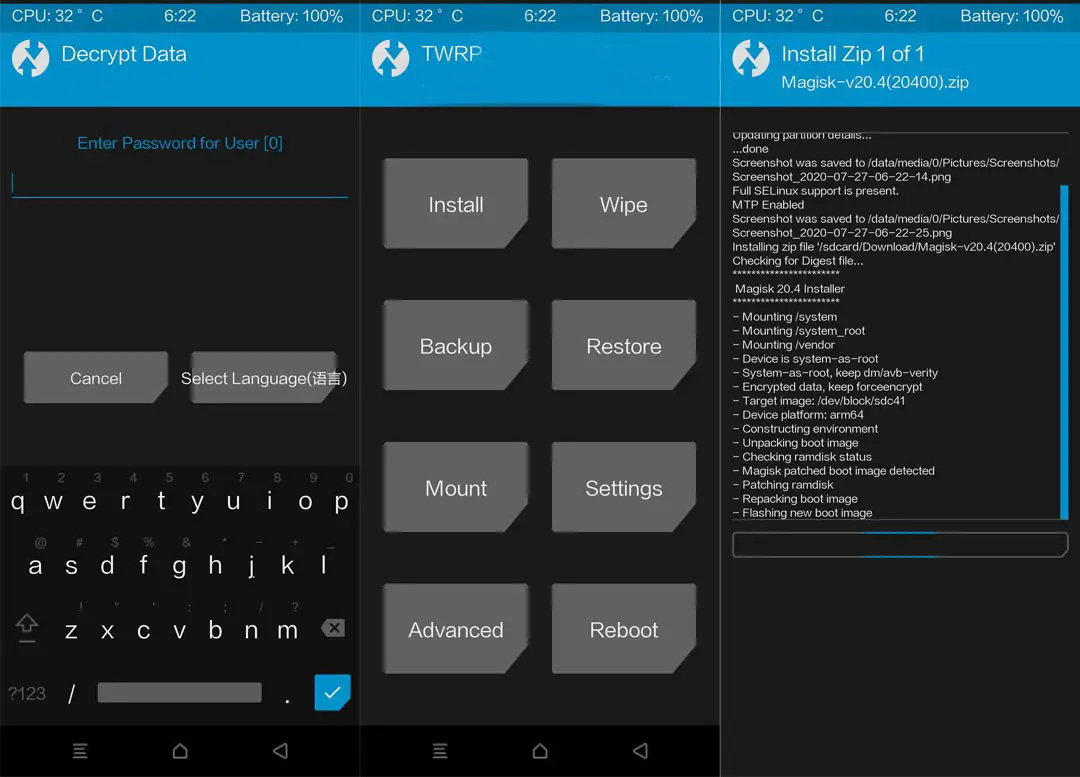
- Make sure that TWRP Recovery Mode is properly installed in your phone.
- After this you have to switch off your Redmi Note 8 Pro and after switch off, you have to press Volume Down + Power Button simultaneously. After that your phone will come to TWRP Recovery Mode.


- Click on Install.
- After clicking install, you have to select the Magisk Manager file and Slide Swipe To Comfirm Flash.
- After flash, you have to click on the Reboot System.
- Now your Redmi Note 8 Pro has been completely rooted.
SuperSu :-
This is the second process of rooting.
- First download the SuperSu in your phone.
- Now move the SuperSu file to your internal storage.
- After this you have to switch off your Redmi Note 8 Pro and after switch off, you have to press Volume Down + Power Button simultaneously. After that your phone will come to TWRP Recovery Mode.


- Click on Install.
- After clicking install, you have to select the SuperSu file and Slide Swipe To Comfirm Flash.
- After flash, you have to click on the Reboot System.
- Now your Redmi Note 8 Pro has been completely rooted.
What is Magisk?
Magisk is a highly advanced way of rooting android systemless-ly. This means that Magisk root android without changing or modifying the system partition. Hence you can receive OTA updates, and run apps that need to pass Google’s SafetyNet test.
Unlike other methods, you have to struggle a lot to install OTA updates, but with Magisk, you can easily receive updates without any issues. The best part about this method is that you can install Magisk on almost any Xiaomi device running Android 4.2 to Android 8.7 (Latest).
This is the reason why we are using Magisk to Root your Xiaomi Redmi Note 8 device over other rooting methods.
The Xiaomi Redmi Note 8 is a newly launched android smartphone. It offers great features for the price. Here is the Key Specification of Xiaomi Redmi Note 8:
What is Magisk?
Magisk is a highly advanced way of rooting android systemless-ly. This means that Magisk root android without changing or modifying the system partition. Hence you can receive OTA updates, and run apps that need to pass Google’s SafetyNet test.
Unlike other methods, you have to struggle a lot to install OTA updates, but with Magisk, you can easily receive updates without any issues. The best part about this method is that you can install Magisk on almost any Xiaomi device running Android 4.2 to Android 8.7 (Latest).
This is the reason why we are using Magisk to Root your Xiaomi Redmi Note 8 Pro device over other rooting methods.
The Xiaomi Redmi Note 8 Pro is a newly launched android smartphone. It offers great features for the price. Here is the Key Specification of Xiaomi Redmi Note 8 Pro:
What Does Rooting Means?
Rooting Android simply means giving a superpower to your phone. It opens up many customization and tweaks for your smartphone. Once you root your phone, you have full control over your Android System files.
You can do the very greatest thing after rooting your device installing Custom ROM, removing unwanted apps (bloatware), installing Modules, and much more. But before we proceed to the Rooting process, we must understand the Advantages and Disadvantages of Rooting your android device.
Here are some Pros or Advantages of Rooting Xiaomi Redmi Note 8:
- You can install Custom ROM on your device.
- Update your Phone to a newer version of Android.
- Easily install Incompatible Apps on your phone.
- You can flash Custom Kernel to increase device performance.
- Take a Complete Backup of your Xiaomi Device using NANDroid backup.
Here are some Cons or Disadvantages of Rooting Xiaomi Redmi Note 8:
- The phone warranty will get void.
- Xiaomi Redmi Note 8 will no longer be Secure.
- You may face lagging issues on Xiaomi Redmi Note 8.
- While Rooting, if you miss out on any steps, then your device might get bricked.
- Before proceeding to the steps, Unlock the Bootloader on Xiaomi Redmi Note 8.
- Fully charge your device. If not, then you will be stuck in between the process.
- Take the full backup of your Xiaomi android.
- Download Latest Magisk App on your phone.
- For method 1: You need to Install TWRP Recovery on Xiaomi Redmi Note 8.
- For method 2:
- Download the Latest SDK Platform tools and ADB Fastboot Tool.
- Install the latest Xiaomi USB Drivers.
- This method requires a PC/Laptop to execute ADB commands.
- Xiaomi Redmi Note 8 original USB cable.
- This guide is only for Xiaomi Redmi Note 8. Please do not try these steps on any other smartphone.
Apply the shown steps at your own risk. MyPhoneUpdate.com is not responsible for bricking your device.
Must Try: OneClickRoot (Paid)
Are you new to Rooting? If yes then you must use the OneClickRoot service. Rooting the latest android phones like Xiaomi Redmi Note 8 is a complex process. As a beginner, you might end up bricking your Xiaomi device. So, it’s better to hire a professional.
Why Choose One Click Root Service?
✔️ Certified Android Experts root your Xiaomi Redmi Note 8.
✔️ They provide a 100% rooting guarantee.
✔️ You will not be charged until your device is successfully rooted.
✔️ Provide 24/7 support and Device Warranty.
Quick specification of Redmi Note 8 Pro
Advantage of Rooting in Redmi Note 8 Pro.
- Can easily install Custom Rom.
- You can customize your mobile phone in your own way.
- You will have complete control over your mobile.
- Uninstall pre-install apps.
- You can install all the applications of Root.
DisAdvantage of Rooting in Redmi Note 8 Pro.
- If your mobile phone is in Warranty then you will lose your Warranty.
- If you make any mistake at the time of rooting, then your phone can be brick.
- Your phone’s entire security will be gone.
- You will not get OTA Update on your phone.

This process is only for Redmi Note 8 Pro . Do not try to call this process to someone else. Otherwise your phone may be dead.
There are 4 easy Steps in this process .
Step 1. Bootloader Unlock on Redmi Note 8 Pro
Step 2. Install TWRP Recovery on Redmi Note 8 Pro
Step 3. Root Redmi Note 8 Pro Via Magisk and SuperSu
Step 4. Check Root on Redmi Note 8 Pro Via Root Checker
Pre-Requirement for Redmi Note 8 Pro
- You charge your phone more than 75%.
- A PC / Laptop will be required.
- You have full Backup of your Mobile .
- You Carry the Original USB cable of Redmi Note 8 Pro.
- SDK Platform-Tools Application for Computer .
- Xiaomi USB Driver for Computer .
- Redmi Note 8 Pro TWRP Recovery File.
- Mi Unlock Application For Computer
- Bootloader of this phone should remain unlocked .
- Magisk Manager and SuperSu App For Redmi Note 8 Pro
Download Link
Step 1.Unlock Bootloader on Redmi Note 8 Pro
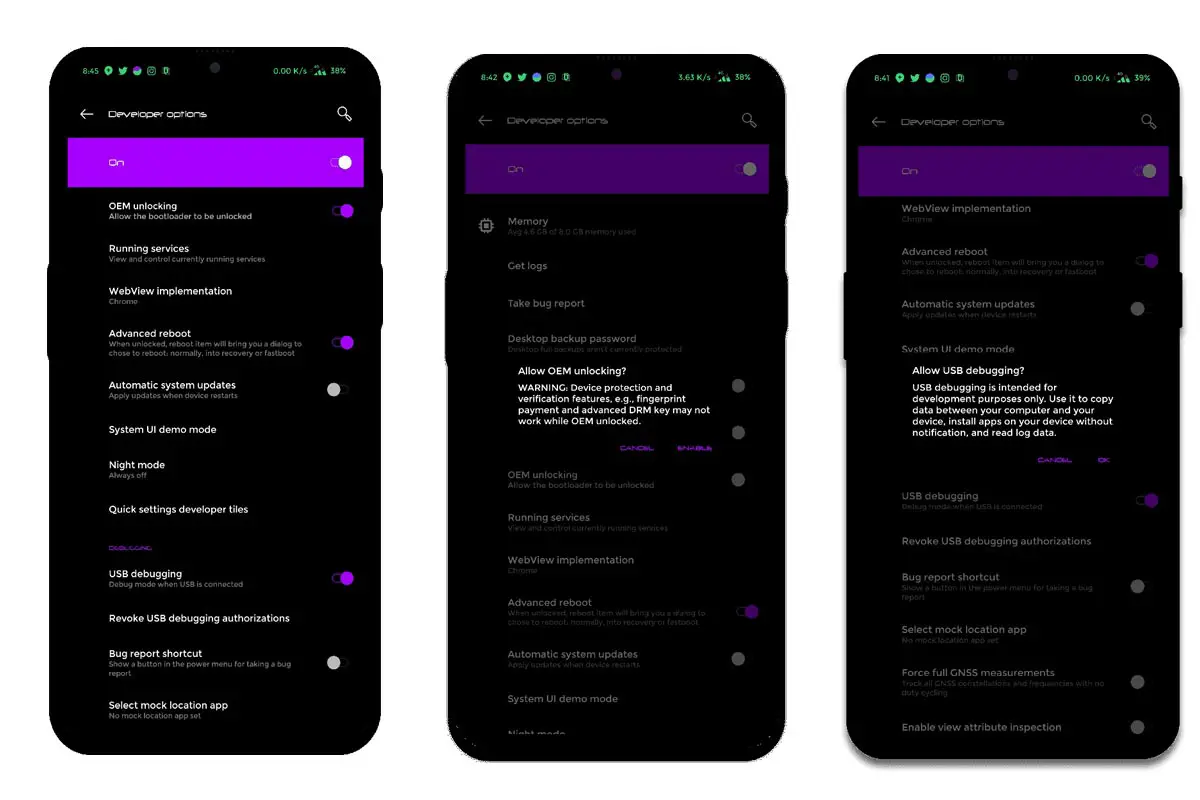
- Enable Developer Option in Redmi Note 8 Pro
‘Settings‘> ‘About Phone‘> Click on ‘MIUI Version’ 5-6 times. After this, your phone developer option will be enabled.
- Now you have to enable OEM Unlock in your Redmi Note 8 Pro.
You have to scroll down by going to Settings> Additional settings> Developer options, after clicking on OEM unlocking, you will find the option of Cancel and Enable below and you have to click on Enable.
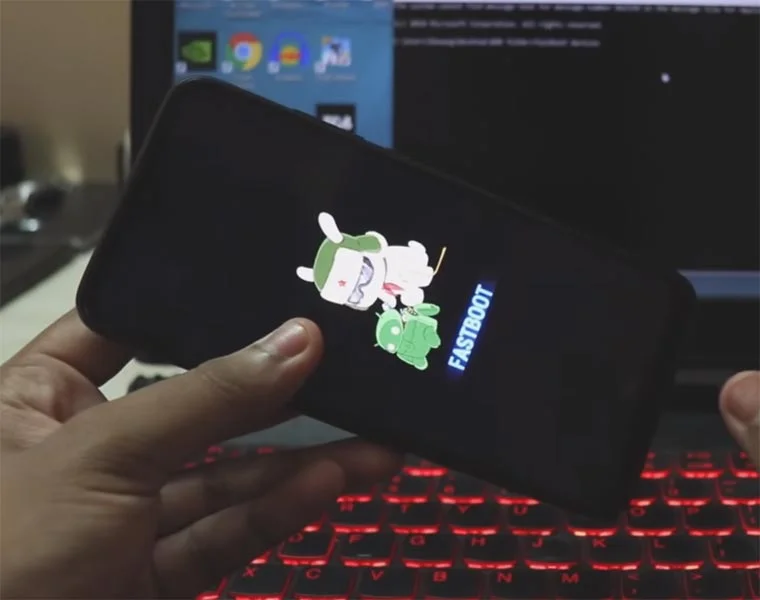
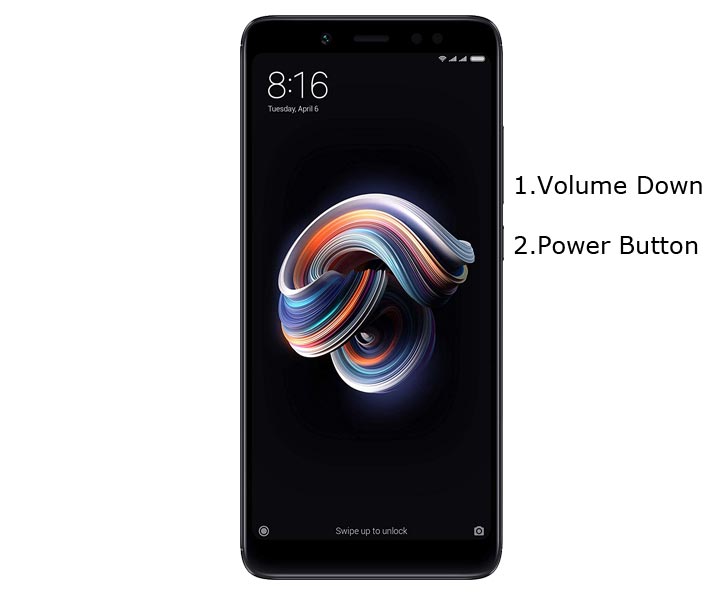
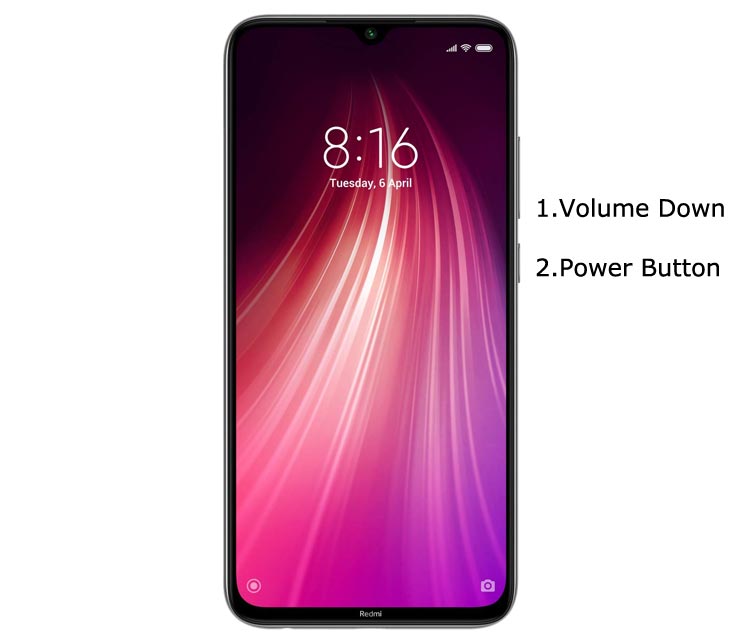
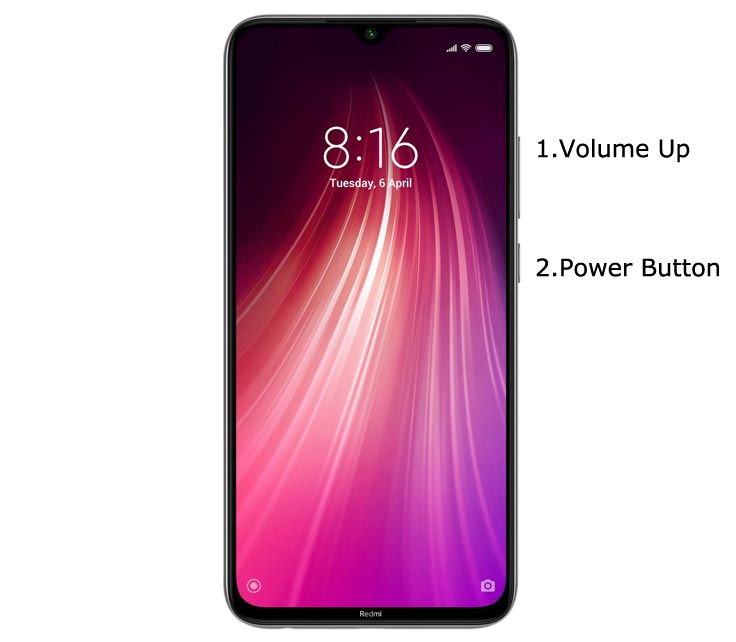
- Reboot your phone in Fastboot mode.
Switch off your phone and after that press the Power Button + Volume down (-) simultaneously and your phone will reboot in Fastboot. If your phone does not reboot in Fastboot mode by this process then do Search Google.
- You have to install Xiaomi USB Driver in your computer.
- Make sure in your computer that ADB Fastboot Drivers is installed in your computer.
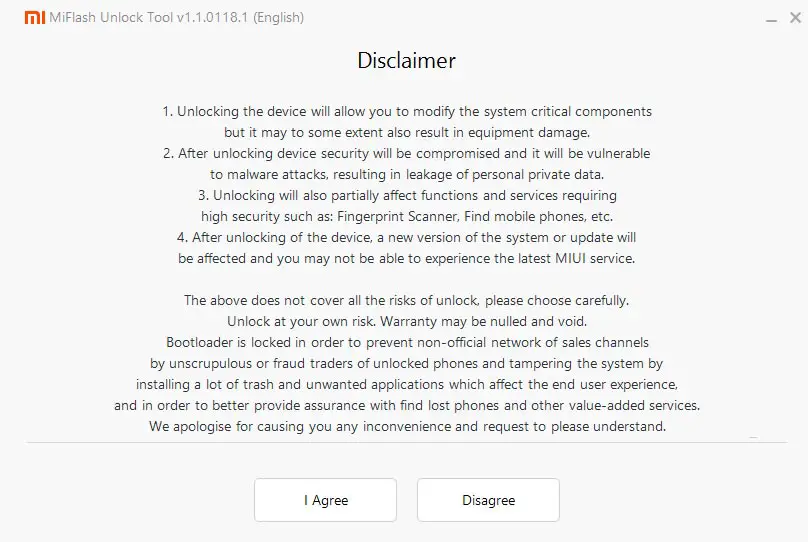
- Mi unlock file also has to be installed on the computer.
- After installing Mi Unlock, you have to connect your phone to the computer in Fastboot mode.
- Mi unlock app has to be opened and here you have to login with your Mi Account.
(Keep in mind that here you have to login Mi Account of the same phone that you have to unlock the bootloader.)
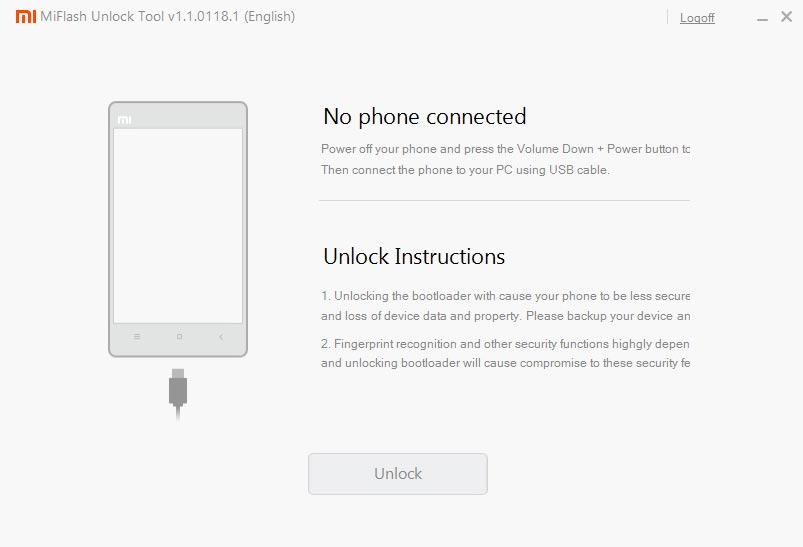
- After this, the Mi Unlock app will check whether your phone is eligible for Bootloader Unlock.
- If you are eligible for Phone Bootloader Unlock then the message of Phone connected will come.
- Now you will have the option to Unlock below. Click on Unolock. After this, the message of Unlocked successfully will come in your Redmi Note 8 Pro phone. Click on the Reboot Phone below. Now your phone’s bootloader has been unlocked.
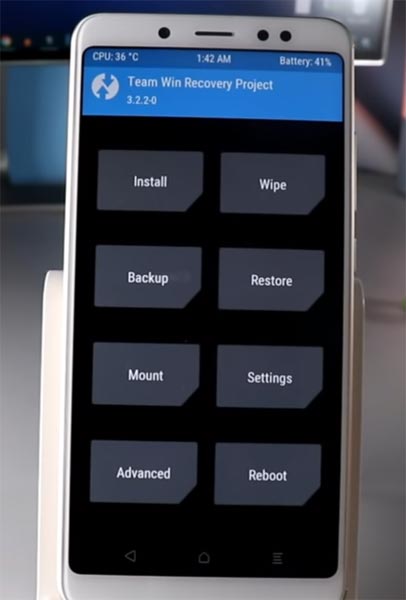
Step 2.Install TWRP Recovery on Redmi Note 8 Pro
- First of all, you have to download SDK Platform Tools and install it in your PC / Laptop.
- Move the TWRP Recovery file of Redmi Note 8 Pro to the SDK Platform Tools folder.
- TWRP recovery file has to be renamed with this name twrp.img
- Now you have to download SDK Platform Tools and install it in your PC / Laptop.
- After this, you have to go to the Command Prompt from the SDK Platform Tools file.
You have to click the Shift Key + Right Mouse Button on the empty space in your computer’s SDK Platform Tools folder.

Above you have to type CMD in the location containing the file.


- Now you have to connect your phone to the computer via USB cable in Fastboot Mode.
(Switch off your phone and after switching off, press the Volume UP + Power button simultaneously)
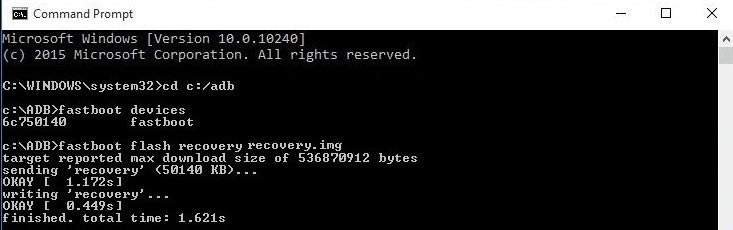
- After this, you have to type the Command in your PC / Laptop in this way.
1.Command :-
2 .Command :- Fastboot flash recovery twrp.img3 .Command :- Fastboot boot recovery twrp.img4 .Command :-
Now TWRP Recovery has been completely installed in your phone.
What is Magisk?
Magisk is a highly advanced way of rooting android systemless-ly. This means that Magisk root android without changing or modifying the system partition. Hence you can receive OTA updates, and run apps that need to pass Google’s SafetyNet test.
Unlike other methods, you have to struggle a lot to install OTA updates, but with Magisk, you can easily receive updates without any issues. The best part about this method is that you can install Magisk on almost any Xiaomi device running Android 4.2 to Android 8.7 (Latest).
This is the reason why we are using Magisk to Root your Xiaomi Redmi 8 device over other rooting methods.
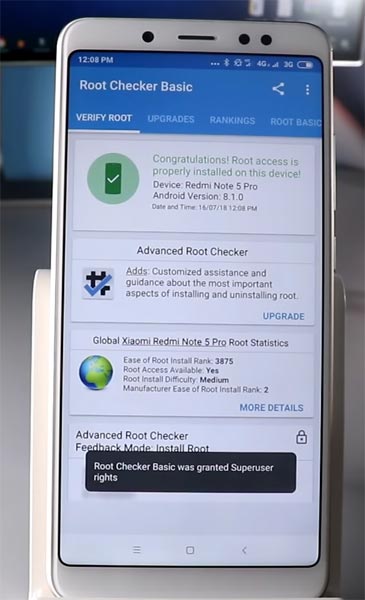
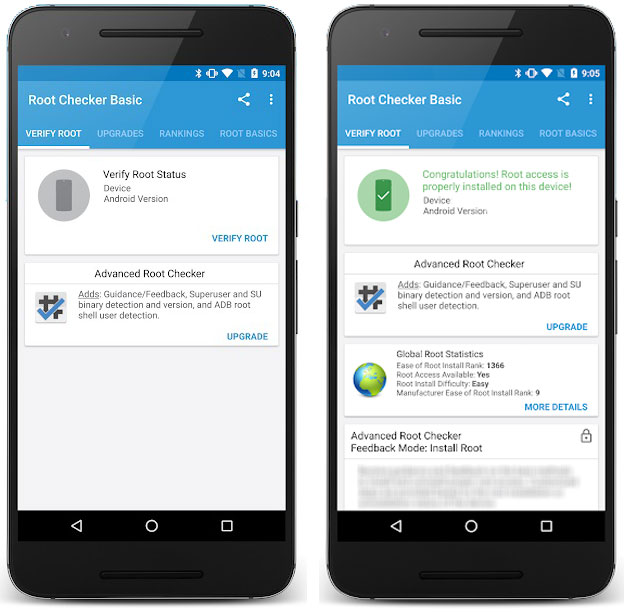
Check Root on Redmi Note 8 Pro Via Root Checker
- First of all, you have to install Root checker App in your phone from Play Store.
- After this you have to open the app and click on Verify Root.
- Now you have to give grant permission in the app.
- You will get the message: Congratulations in the app! Root Access is properly installed on this device.


Thank you for taking the time in this website.
What Does Rooting Means?
Rooting Android simply means giving a superpower to your phone. It opens up many customization and tweaks for your smartphone. Once you root your phone, you have full control over your Android System files.
You can do the very greatest thing after rooting your device installing Custom ROM, removing unwanted apps (bloatware), installing Modules, and much more. But before we proceed to the Rooting process, we must understand the Advantages and Disadvantages of Rooting your android device.
Here are some Pros or Advantages of Rooting Xiaomi Redmi Note 8 Pro:
- You can install Custom ROM on your device.
- Update your Phone to a newer version of Android.
- Easily install Incompatible Apps on your phone.
- You can flash Custom Kernel to increase device performance.
- Take a Complete Backup of your Xiaomi Device using NANDroid backup.
Here are some Cons or Disadvantages of Rooting Xiaomi Redmi Note 8 Pro:
- The phone warranty will get void.
- Xiaomi Redmi Note 8 Pro will no longer be Secure.
- You may face lagging issues on Xiaomi Redmi Note 8 Pro.
- While Rooting, if you miss out on any steps, then your device might get bricked.
- Before proceeding to the steps, Unlock the Bootloader on Xiaomi Redmi Note 8 Pro.
- Fully charge your device. If not, then you will be stuck in between the process.
- Take the full backup of your Xiaomi android.
- Download Latest Magisk App on your phone.
- For method 1: You need to Install TWRP Recovery on Xiaomi Redmi Note 8 Pro.
- For method 2:
- Download the Latest SDK Platform tools and ADB Fastboot Tool.
- Install the latest Xiaomi USB Drivers.
- This method requires a PC/Laptop to execute ADB commands.
- Xiaomi Redmi Note 8 Pro original USB cable.
- This guide is only for Xiaomi Redmi Note 8 Pro. Please do not try these steps on any other smartphone.
Apply the shown steps at your own risk. MyPhoneUpdate.com is not responsible for bricking your device.
Must Try: OneClickRoot (Paid)
Are you new to Rooting? If yes then you must use the OneClickRoot service. Rooting the latest android phones like Xiaomi Redmi Note 8 Pro is a complex process. As a beginner, you might end up bricking your Xiaomi device. So, it’s better to hire a professional.
Why Choose One Click Root Service?
✔️ Certified Android Experts root your Xiaomi Redmi Note 8 Pro.
✔️ They provide a 100% rooting guarantee.
✔️ You will not be charged until your device is successfully rooted.
✔️ Provide 24/7 support and Device Warranty.
Let’s Root Xiaomi Redmi Note 8 Pro (Beginners Friendly Guide)
If you are completely new to the rooting android community, then don’t worry. We have included everything you need to know about the process of rooting android devices.
As I already mentioned above, this guide includes two types of methods, first by flashing the Magisk installer zip using TWRP recovery, and the second method by flashing Magisk patched boot image using fastboot command.
So, let’s quickly jump to the process.
Note: Make sure to read this guide completely to avoid confusion or misunderstanding.
Method 1: Root your Xiaomi Redmi Note 8 Pro using TWRP Recovery
- Download the Latest Magisk Zip and Lazy flasher Zip file on your Xiaomi Redmi Note 8 Pro device.
- Move the downloaded zip file to your phone’s external storage.
- Now, Reboot Xiaomi Redmi Note 8 Pro in TWRP recovery mode.
- Turn Off your phone.
- Press and hold the
Volume Up + Power buttonuntil you see the boot screen, release the Power button (do not release the volume up key until you boot into TWRP mode.)
- Alternatively, you can also use the ADB command to boot into recovery mode.
- Connect Xiaomi Redmi Note 8 Pro to your PC/Laptop.
- Open the Command Prompt on your PC and type the following command.
adb reboot recovery
- This will boot Xiaomi Redmi Note 8 Pro in recovery mode.
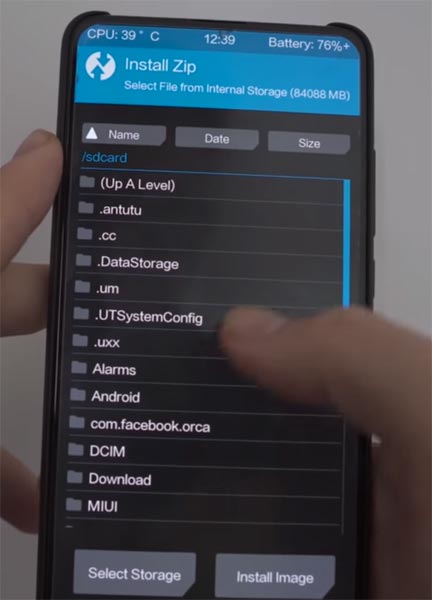
- On TWRP main screen, Tap on “Install.”
- Locate the Magisk installer zip file and Select it.

- Finally, “Swipe the Slider” on the bottom of the screen to flash the file and install Magisk on your Xiaomi Redmi Note 8 Pro phone.
- Next, flash Lazy flasher Zip on your device.
- Once the flashing process completes, Tap on Reboot System.
Now open the Magisk App and check if you see all on the app screen. If you don’t see the app, you can manually download and install it.
After successfully applying the above steps, your Xiaomi Redmi Note 8 Pro device will get root access without any issues. In case you are facing any problems in any steps, let me know in the comments.
Method 2: Root Xiaomi Redmi Note 8 Pro without TWRP Recovery
If you can not see Magisk Manager on your Xiaomi Redmi Note 8 Pro phone, you need to install the APK manually. You will find the link in the requirement section of this guide.
How to Verify if your Xiaomi Redmi Note 8 Pro is Rooted successfully?
- Download Root Checker app from Google Play Store.
- Open the app and tap on “Verify Root.”
- If your device is rooted successfully, you will see this message “Congratulations! Root access is properly installed on this device!”.
- As you can see from the above screenshot.
Let’s Root Xiaomi Redmi Note 8 (Beginners Friendly Guide)
If you are completely new to the rooting android community, then don’t worry. We have included everything you need to know about the process of rooting android devices.
As I already mentioned above, this guide includes two types of methods, first by flashing the Magisk installer zip using TWRP recovery, and the second method by flashing Magisk patched boot image using fastboot command.
So, let’s quickly jump to the process.
Note: Make sure to read this guide completely to avoid confusion or misunderstanding.
Method 1: Root your Xiaomi Redmi Note 8 using TWRP Recovery
- Download the Latest Magisk Zip and Lazy flasher Zip file on your Xiaomi Redmi Note 8 device.
- Move the downloaded zip file to your phone’s external storage.
- Now, Reboot Xiaomi Redmi Note 8 in TWRP recovery mode.
- Turn Off your phone.
- Press and hold the
Volume Up + Power buttonuntil you see the boot screen, release the Power button (do not release the volume up key until you boot into TWRP mode.)
- Alternatively, you can also use the ADB command to boot into recovery mode.
- Connect Xiaomi Redmi Note 8 to your PC/Laptop.
- Open the Command Prompt on your PC and type the following command.
adb reboot recovery
- This will boot Xiaomi Redmi Note 8 in recovery mode.
- On TWRP main screen, Tap on “Install.”
- Locate the Magisk installer zip file and Select it.
- Finally, “Swipe the Slider” on the bottom of the screen to flash the file and install Magisk on your Xiaomi Redmi Note 8 phone.
- Next, flash Lazy flasher Zip on your device.
- Once the flashing process completes, Tap on Reboot System.
Now open the Magisk App and check if you see all on the app screen. If you don’t see the app, you can manually download and install it.
After successfully applying the above steps, your Xiaomi Redmi Note 8 device will get root access without any issues. In case you are facing any problems in any steps, let me know in the comments.
Method 2: Root Xiaomi Redmi Note 8 without TWRP Recovery
If you can not see Magisk Manager on your Xiaomi Redmi Note 8 phone, you need to install the APK manually. You will find the link in the requirement section of this guide.
How to Verify if your Xiaomi Redmi Note 8 is Rooted successfully?
- Download Root Checker app from Google Play Store.
- Open the app and tap on “Verify Root.”
- If your device is rooted successfully, you will see this message “Congratulations! Root access is properly installed on this device!”.
- As you can see from the above screenshot.
Let’s Root Xiaomi Redmi 8 (Beginners Friendly Guide)
If you are completely new to the rooting android community, then don’t worry. We have included everything you need to know about the process of rooting android devices.
As I already mentioned above, this guide includes two types of methods, first by flashing the Magisk installer zip using TWRP recovery, and the second method by flashing Magisk patched boot image using fastboot command.
So, let’s quickly jump to the process.
Note: Make sure to read this guide completely to avoid confusion or misunderstanding.
Method 1: Root your Xiaomi Redmi 8 using TWRP Recovery
- Download the Latest Magisk Zip and Lazy flasher Zip file on your Xiaomi Redmi 8 device.
- Move the downloaded zip file to your phone’s external storage.
- Now, Reboot Xiaomi Redmi 8 in TWRP recovery mode.
- Turn Off your phone.
- Press and hold the
Volume Up + Power buttonuntil you see the boot screen, release the Power button (do not release the volume up key until you boot into TWRP mode.)
- Alternatively, you can also use the ADB command to boot into recovery mode.
- Connect Xiaomi Redmi 8 to your PC/Laptop.
- Open the Command Prompt on your PC and type the following command.
adb reboot recovery
- This will boot Xiaomi Redmi 8 in recovery mode.
- On TWRP main screen, Tap on “Install.”
- Locate the Magisk installer zip file and Select it.
- Finally, “Swipe the Slider” on the bottom of the screen to flash the file and install Magisk on your Xiaomi Redmi 8 phone.
- Next, flash Lazy flasher Zip on your device.
- Once the flashing process completes, Tap on Reboot System.
Now open the Magisk App and check if you see all on the app screen. If you don’t see the app, you can manually download and install it.
After successfully applying the above steps, your Xiaomi Redmi 8 device will get root access without any issues. In case you are facing any problems in any steps, let me know in the comments.
Method 2: Root Xiaomi Redmi 8 without TWRP Recovery
If you can not see Magisk Manager on your Xiaomi Redmi 8 phone, you need to install the APK manually. You will find the link in the requirement section of this guide.
How to Verify if your Xiaomi Redmi 8 is Rooted successfully?
- Download Root Checker app from Google Play Store.
- Open the app and tap on “Verify Root.”
- If your device is rooted successfully, you will see this message “Congratulations! Root access is properly installed on this device!”.
- As you can see from the above screenshot.
")


")