

- Configuration of CERN ROOT development environment in WSL
- Requirements
- Preparing for the WSL
- Installing the WSL
- Enabling the Graphic User Interface (GUI) with XMing
- Preparing for ROOT installation
- Requirements
- Burning the image
- Installing ROOT on Raspberry Pi – Jessie
- Sources:
- 1. Preparing for software installation
- Second, install ROOT
- Prepare source files
- Set environment variables
- Prepare the installation script
- software test
- Compile ROOT Locally
- Run in a Docker container
- 1 License
- Pre-compiled ROOT
- Run on CERN LXPLUS
- Baidu Root 2
- 1 License
- Installing ROOT
- Linux package managers
- Fedora
- CentOS
- Arch Linux
- Gentoo
- Ubuntu and Debian-based distributions
- Build from source
- 6 File system. rootrc
- 30.6.1 TCanvas Specific Settings
- 30.6.2 THtml Specific Settings
- 30.6.3 GUI Specific Settings
- 30.6.4 TBrowser Settings
- 30.6.5 TRint Specific Settings
- 30.6.6 ACLiC Specific Settings
- 30.6.7.2 Server Authentication in TServerSocket
- Third, install XMING
- Installing root on windows
- 6 File system. rootrc
- 30.6.1 TCanvas Specific Settings
- 30.6.2 THtml Specific Settings
- 30.6.3 GUI Specific Settings
- 30.6.4 TBrowser Settings
- 30.6.5 TRint Specific Settings
- 30.6.6 ACLiC Specific Settings
- 30.6.7.2 Server Authentication in TServerSocket
- Installing CERN ROOT under Windows 10 with Subsystem for Linux
- Improve the configuration
- 1. Reinstall for WSL
- 2. Mount U disk & mobile hard disk under WSL
- 360 Root 8
- Gentoo Prefix on CVMFS
- 2 Installing ROOT
- 2 Installing ROOT
- Second, install Windows Terminal Preview
- SuperSU 2
- 3 Choosing a Version
- 5 Installing the Source
- 30.5.1 Installing and Building the Source from a Compressed File
- 30.5.1.1 Target directory
- 30.5.1.2 Makefile targets
- 30.5.2 More Build Options
- 30.5.2.1 Installing the Source from Subversion
- 30.5.2.2 Subversion for Windows
- 30.5.2.3 Staying up-to-date
- Install the Windows Subsystem for Linux
- Download a pre-compiled binary distribution
- Pre-compiled ROOT
- 5 Installing the Source
- 30.5.1 Installing and Building the Source from a Compressed File
- 30.5.1.1 Target directory
- 30.5.1.2 Makefile targets
- 30.5.2 More Build Options
- 30.5.2.1 Installing the Source from Subversion
- 30.5.2.2 Subversion for Windows
- 30.5.2.3 Staying up-to-date
- Installing CERN ROOT under Windows 10 with Subsystem for Linux
- Install via a package manager
- Fourth, install CERN ROOT
- MacOS package managers
- Homebrew
- Macports
- 4 Installing Precompiled Binaries
- 3 Choosing a Version
- First, install WSL
- Framaroot 1
- Root-права и Rooting
- Compile ROOT Locally
- 4 Installing Precompiled Binaries
- Kingo ROOT 2
- KingRoot 5
- Conda
- Install the Windows Subsystem for Linux
- Pre-built ROOT without dependencies
- ROOT plus dependencies
Configuration of CERN ROOT development environment in WSL
Updated on Wed, 2020-07-22 15:51. Originally created by rsalinas on 2019-06-27 16:27.
- Downloading ROOT
- It is important you download the same version of root as you have visual studio
- To check what version you have: control panel -> programs -> programs and features
- Once there, check for «Microsoft visual C++ 20**» and that’ll be the version you have
- The asterisks are just numbers (2018,2019,2020)
- Of course, you can download a newer version if you want
- Here is the link for root: root.cern.ch/downloading-root
- What I recommend — to simplify a lot of things — is to download the .exe file. If you do that, it will download itself when you click on the download (keep track of where it downloads) and do its thing.
- It is important you download the same version of root as you have visual studio
Learn from a particle physicist
Jun 29, 2015
learning
Windows
ROOT
The good news is that learning ROOT can be separated from learning Unix/Linux
commands. Students can start learning ROOT from day one without any knowledge
about Linux server, SSH, SHELL, etc., on Windows. Here is how.
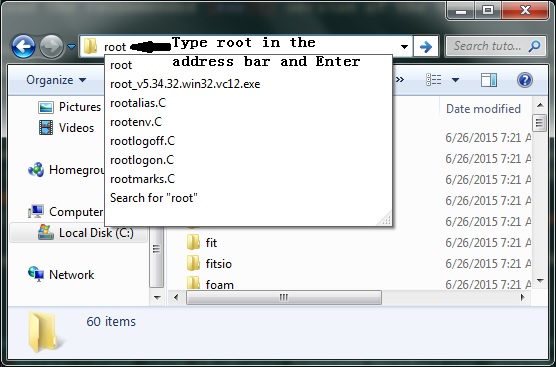
go to http://root.cern.ch, HOVER your mouse on the “Download” menu, click
All Release in the drop down menu, scroll down to “Version 5”
section of the page, click Release 5.34/36 — 2016-04-05, download
root_v5.34.36.win32.vc12.exe.type root in the address bar and Enter to launch
ROOT in the current directory:
Now you can run ROOT scripts in the folder
C:\root_v5.34.32\tutorials
by typing in the ROOT interactive session.x hsimple.C:
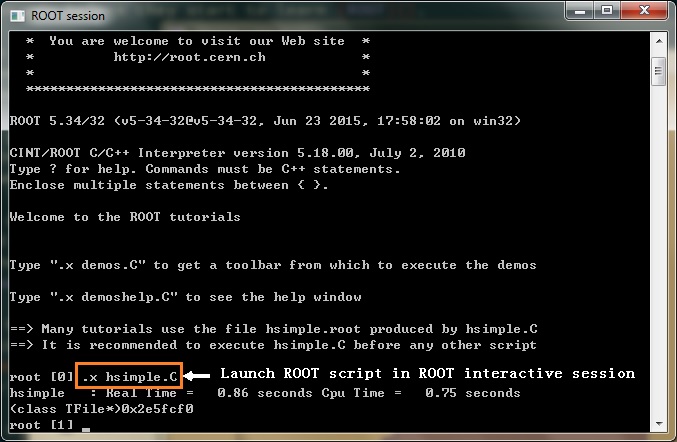
That’s it. It takes about 10 minutes and 5 steps for you to start running ROOT
scripts on a Windows machine. You can learn Linux commands in parallel to be
prepared for using ROOT in some Linux servers, which is not a must to start
with though.
Sometimes the installation and usage of CERN’s ROOT on a Windows computer can bring some criticality, especially when it comes for the usage of macros which are mainly developed for a linux system, such as ROOTgression or RootProf.
Requirements
A Windows 10 PC
Preparing for the WSL
First of all, you have to go to Settings and click on Apps. On the right side of the window, you’ll find Programs and Features. If you click on that, the window will change and you’ll find on the left Turn Windows features on or off. By clicking on that, a pop-up will open with many option. Be sure to put the check on Windows Subsystem for Linux, then hit Ok and Restart Now.
Installing the WSL
You can start Ubuntu by searching Ubuntu or bash in the start menu.
The first thing to do with a new linux system is to bring it up-to-date, so open the terminal and hit:
sudo apt update && sudo apt upgradeThen hit Y or Yes every time is asked to. Don’t forget to clean your system of the useless packages by hitting:
sudo apt autoclean && sudo apt autoremoveOnce the upgrade is finished.
Enabling the Graphic User Interface (GUI) with XMing
Now, if you kept open the terminal windows during the installation, you’ll notice that hitting firefox won’t get better. In fact, the XMing server has to be opened before the terminal is. So, to test it, you can open it by calling in the Start menu XMing and only then opening the terminal by calling Ubuntu.
If you don’t want to bother about it, I suggest to set XMing as a Start App, so that you don’t have to remember to open it before the terminal because it will be automatically executed.
Preparing for ROOT installation
First of all, you have to install the dependencies by hitting:
sudo apt-get install dpkg-dev cmake g++ gcc binutils libx11-dev libxpm-dev \
libxft-dev libxext-dev python
I also suggest to install the optional packages:
sudo apt-get install gfortran libssl-dev libpcre3-dev \
xlibmesa-glu-dev libglew1.5-dev libftgl-dev \
libmysqlclient-dev libfftw3-dev libcfitsio-dev \
graphviz-dev libavahi-compat-libdnssd-dev \
libldap2-dev python-dev libxml2-dev libkrb5-dev \
libgsl0-dev qt5-default
Once is done, move to the Download area and choose a release which is compatible with your WSL. I chose the release 6.22.00 for Ubuntu 20.04, which you can download here.
Once the compressed package is downloaded, open the terminal and hit:
sudo mv /mnt/c/Users/YOURUSERNAME/Downloads/root_v6.22.00.Linux-ubuntu20-x86_64-gcc9.3.tar.gz /opt/Now change your directory with:
cd /opt/If you hit ls or ll you’ll obtain the name of the root package. Hit:
gunzip root_v6.22.00.Linux-ubuntu20-x86_64-gcc9.3.tar.gzNow you’ll have a package named “root_v6.22.00.Linux-ubuntu20-x86_64-gcc9.3.tar“. Extract it by hitting:
tar -xvf root_v6.22.00.Linux-ubuntu20-x86_64-gcc9.3.tarUsually you will obtain a folder named root, but sometimes it can have the full name, so something like root_v6.22.00. Be sure to check with an ls command because the last part of the installation process will need the name of the folder.
The last thing you have to do is to automatically load the root libraries on the terminal start, and you can do it by modifying the .bashrc file. Move to the starting folder with:
cd --And open the .bashrc file with:
sudo nano .bashrcIf it does not work, maybe you don’t have nano editor installed, so you can install it by hitting sudo apt install nano.
#root source source /opt/root/bin/thisroot.sh Save the file by pressing CTRL+O and exit with CTRL+X.
Close the terminal. Be sure that XMing is started. If you reopen the terminal and hit
rootthe ROOT6 logo should appear and you’ll be able to work.

Ph.D. student in chemistry?? Homebrewer? Japanese language student ?? Webdesigner ? Amateur cook ? What else? ☕️
In the previous tutorial, I explained how to install the latest version of CERN’s ROOT on a Windows Subsystem for Linux. This is, under my point of view, the best solution for using the framework on a non-linux system. Obviously, the preferred way would be directly installing a Scientific Linux release (CentOS), but sometimes we can’t just wipe out our PC, or install a virtual machine or even buy a new one.
Now, many scientists want to try the incredible power of the ROOT framework on a Raspberry Pi cluster or, for simple calculations, even on a single RPi. However, the only known working release of Cern’s ROOT for Raspberry Pi (even if unofficial), is the 5.34.36 and it happens to perfectly combine with the Raspbian Jessie release of the operating system.
Requirements
- 1x Raspberry Pi.
- 1x Micro SD card (with a reader suited for your PC) of at least 16GB.
- 1 PC.
- The Raspbian Jessie image file.
- An image burner such as Etcher or the official one from the Raspberry website.
- ROOT framework, release 5.34.36.
- Before using ROOT, I recommend to extend the swap of your RPi. Here you can read how.
Burning the image
First of all, we have to install Jessie on the Raspberry Pi, and this is done by burning the image you downloaded on the SD card. Etcher and the Raspberry Pi editor have basically the same interface, so you’ll be asked to load an image file (the .img file you find at the previous link), to select the device on which you want to burn it (the SD card) and then you’ll have to press “burn” or “start“. It’s unlikely that the process stops or gives an error, but if something happens, just format the SD card and retry.
Once the process of burning is finished, you’ll have your brand new (old) operative system. Insert the SD card in the Raspberry Pi and plug it to a monitor, keyboard and mouse. If you don’t have these accessories or you just want to access to the raspberry from the linux shell (or PuTTY for Windows) via ssh, just plug it to the ethernet cable of your modem.
Installing ROOT on Raspberry Pi – Jessie
Login to your Raspberry Pi and open a terminal. Update, upgrade and clean your RPi with:
sudo apt update && sudo apt upgradesudo apt autoclean && sudo apt autoremoveWhen asked for the password, just inserted the default one: raspberry. We’ll start installing the required libraries with:
sudo apt-get install -y libx11-dev libxft-dev libxext-dev libxpm-devThen, we define the installation directory with:
install -d YOURPATH/rootinstall -d /home/user/Documents/rootMove to the installation directory with che cd command:
cd /home/user/Documents/rootNow we can get the ROOT 5.34.36 tarball with:
wget https://root.cern.ch/download/root_v5.34.36.source.tar.gznow we have to extract it with:
gunzip root_v5.34.36.source.tar.gz && tar -xvf root_v5.34.36.source.tarIf these command don’t work, remember to check if gunzip and tar are installed with:
sudo apt install gunzip && sudo apt install tarNow we can move to the extracted folder, that will be called “root” with the same command used before:
cd root./configure --with-x11-libdir=/usr/lib/arm-linux-gnueabihf/ --with-xpm-libdir=/usr/lib/arm-linux-gnueabihf/ --with-xft-libdir=/usr/lib/arm-linux-gnueabihf/ --with-xext-libdir=/usr/lib/arm-linux-gnueabihf/ And then hit:
make -j4 &> log_make.txtThis will start the check for the compilation and the &> log_make.txt part of the command will create a .log file with the outcome. Now hit:
export ROOTSYS=/home/user/Documents/work/install/ And begin the compilation with:
make installsource $ROOTSYS/bin/thisroot.shNow you can reboot your system and start the framework by hitting in the terminal:
rootSources:
Ph.D. student in chemistry?? Homebrewer? Japanese language student ?? Webdesigner ? Amateur cook ? What else? ☕️
ROOT is a data analysis software developed by the European Nuclear Center (CERN), which is widely used for particle physics data analysis. This article mainly introduces its installation method on Ubuntu 18.04, the installation version is ROOT v6.14.00, other versions can be changed accordingly. This article is written based on the painful lessons of multiple installation failures, please be sure to install carefully!
- Use default bash
- Assume the installation directory is
/projects/soft/ext
1. Preparing for software installation
In the process of installing ROOT, you need to use some preparatory software, see the official website for detailshttps://root.cern.ch/build-prerequisites
Most of the software can be used directly orInstallation, for simplicity, use hereinstallation.
sudo apt-get update
sudo apt-get install synaptic
This is a package manager, open after download, As shown

Don’t forget to refresh after changing the software source
then clicksearch for , Enter ready to install software, and double-click to select
Other recommended software:
- vim
- vim-doc
- vim-scripts
- emacs
- colordiff
- lftp
- dkms
- build-essential
- libzlcore-dev
- libxmu-dev
Click after selectingApplyWait for the installation to complete.
Second, install ROOT
Prepare source files
sudo mkdir -p /projects/soft/ext/sources
cd /projects/soft
sudo chown -R root4:root4 ext
(Note that the two root4 respectively represent the user name and group name. If you use another user name, you need to replace it accordingly. You can execute echo $USER and echo $GROUP on the command line to get the current user name and group name.)
mkdir -p ext/root/pro
cd ext/sources
git clone http://github.com/root-project/root-git (You can also go to the official website to download the compressed package https://root.cern.ch/content/release-61400 and unzip it to the current folder)
tar -zxvf root_v6.14.00.source.tar.gz
Set environment variables
#!/bin/bash # export ROOTSYS=/projects/soft/ext/root/pro if ! echo ${PATH} | grep -q $ROOTSYS/bin ; then export PATH=$ROOTSYS/bin:$PATH fi if [ -n "$LD_LIBRARY_PATH" ]; then if ! echo ${LD_LIBRARY_PATH} | grep -q $ROOTSYS/lib ; then export LD_LIBRARY_PATH=$ROOTSYS/lib:$LD_LIBRARY_PATH fi else export LD_LIBRARY_PATH=$ROOTSYS/lib fisource $HOME/ROOT.shPrepare the installation script
cd /projects/soft/ext/sources
mkdir build
cd build
#!/bin/bash
# install ROOT with CMake
#export basedir=/projects/soft/ext
#export GSL_DIR=${basedir}/gsl/1.16
#export PATH=${basedir}/cmake/cmake-3.1.1/bin:$PATH
#cd ${basedir}/sources/buildROOT
cd /projects/soft/ext/sources/build
cmake ../root-6.14.00 \
-DCMAKE_INSTALL_PREFIX=/projects/soft/ext/root/pro \
-Dbuiltin_freetype=ON \
-Dbuiltin_lzma=ON \
-Dbuiltin_pcre=ON \
-Dbuiltin_xrootd=ON \
-Dcintex=ON \
-Dexplicitlink=ON \
-Dgdml=ON \
-Dgenvector=ON \
-Dmathmore=ON \
-Dminuit2=ON \
-Dreflex=ON \
-Droofit=ON \
-Dtmva=ON \
-Dtable=ON \
-Dunuran=ON \
-Dasimage=ON \
-Dastiff=ON \
-Dfftw3=ON \
-Dqt=ON \
-Dkrb5=ON \
-Dmysql=ON \
-Dpython=ON \
-Dodbc=OFF \
-Drfio=OFF \
-Dpythia6=OFF \
-Dalien=OFF \
-Dmonalisa=OFF \
-Dgfal=OFF \
-Dchirp=OFF \
-Dclarens=OFF \
-Dglite=OFF \
-Dhdfs=OFF \
-Dpeac=OFF \
-Dsapdb=OFF \
-Dsrp=OFF \
-Dpch=OFF \
-Doracle=OFF \
-Dcastor=OFF \
-DPYTHIA8_DIR=/usr -DPYTHIA8_INCLUDE_DIR=/usr/include/pythia8/ -DPYTHIA8_PATH_LIB=/usr/lib/x86_64-linux-gnu \
>& log.cmakesource install_ROOT_cmake.shmake -j4>log.make4 of them can be replaced by other less than or equal to the number of CPU cores used by your computer
- It is best to connect the power to the computer;
- Try not to run other programs when running;
- The system clock must be accurate;
- If you are stuck for a long time, then shut down forcibly~, restart this activity after shutdown, the previous progress is saved, you can continue;
While waiting, you can open a new window and execute:
cd /projects/soft/ext/sources/build/
tail -f log.make
Check the compilation progress and pay attention to whether there are errors in the two windows
During this time, you may be able to brush a movie or watch a World Cup~
If there is no error in the screen and log.make after cmake is completed, proceed:
make install>log.installThis step is faster
software test
Now let’s test whether we have installed ROOT and set the path. The easiest way is to directly enter root at the command line to see how it reacts.

/projects/soft/ext/root/pro/binIf not, try to execute again:
source $HOME/ROOT.sh
Then congratulations on your successful installation!
This is actually not perfect. Every time you open a new command window, you need to source $HOME/ROOT.sh, which is not convenient. For a source, a lifetime PATH, we can add this statement to the .bashrc file:
vi ~/.bashrcOpen the file, press ‘I’ to enter the editing state, add at the end:
source $HOME/ROOT.shOr copy the contents of ROOT.sh to .bashrc. After that, ROOT.sh is useless and can be deleted. Then press ESC, respectively: wq save and exit. Bashrc
Note: Copy & Paste is a small white operation. The real old driver operates like this:
Or if vim has opened .bashrc, a better way is to enter in vim command mode:
Now open a new command window, enter root, and you will find OK!
Now you can run some tutorials:
mkdir $HOME/workdir
cd $HOME/workdir
cp -r $ROOTSYS/tutorials ./
cd tutorials/roofit
root -l rf101_basics.C
Note: The main reference for this article
Compile ROOT Locally
to build ROOT 5.34.36 under Ubuntu 14.04
to build ROOT 6.14.02 under Ubuntu 18.04
Run in a Docker container
ROOT Docker containers for several linux flavours are available at ROOT’s official DockerHub.
For example, to try out the latest ROOT release just run docker run -it rootproject/root .
1 License
ROOT is made available under the LGPL v2.1 license. For full details see the file LICENSE in the ROOT distribution.
Pre-compiled ROOT
A precompiled release for Ubuntu 14.04/18.04 works. You should make sure you have the prerequisites listed above installed though. Otherwise you will see some errors.
7a. Just unzip the file and source root/bin/thisroot.sh.
You should now see the ROOT splash screen and the CINT command line.
Run on CERN LXPLUS
Note that certain features (e.g. multi-threading capabilities) are not available on lxplus.cern.ch (or, equivalently, lxplus7.cern.ch ) due to incompatible versions of certain ROOT dependencies on CentOS7. You can use lxplus8.cern.ch to get access to CentOS8, where this limitation is not present.
Baidu Root 2
Baidu Root – утилита для получения прав суперпользователя на мобильных Андроид устройствах. Приложение совместимо с версиями операционной системы от 2.2 и старше. Русскоязычная версия софта реализована усилиями независимых программистов. Перевод интерфейса частичный. Важное дополнение владельцам телефонов Samsung На смартфонах указанного производителя . >
бесплатно Русский язык 21 Мб.
1 License
ROOT is made available under the LGPL v2.1 license. For full details see the file LICENSE in the ROOT distribution.
Installing ROOT
ROOT is available on Linux, Mac, and (as a beta release) on Windows.
The latest stable ROOT release is 6.24/00 (about ROOT versioning scheme).
Linux package managers
Fedora
Fedora’s ROOT package can be installed with
CentOS
ROOT is available on CentOS via EPEL. To install ROOT on CentOS, just run
Arch Linux
Arch’s ROOT package can be installed with
Gentoo
The Gentoo package for ROOT is sci-physics/root. It can be installed with
Ubuntu and Debian-based distributions
The ROOT team is working on the release of an official .deb package. More news on this topic very soon.
In the meanwhile, ROOT is available on Ubuntu via conda or our pre-compiled binaries.
Build from source
In case no other installation method is available, or if you want full control over the options ROOT is built with, it is possible to compile ROOT from source. See Building ROOT from source for detailed instructions.
As a quick summary, after installing all required dependencies, ROOT can be compiled with these commands on most UNIX-like systems:
6 File system. rootrc
ROOT Environment settings are handled via the class TEnv . gEnv->Print() shows which values are active. Any settings can be obtained by TEnv::GetValue methods that return an integer, double or character value for a named resource. If the resource is not found, the default value (given as the second parameter) is returned.
Via the method TEnv::SetValue allows you can set the value of a resource or create a new resource:
Path where to look for TrueType fonts:
Use Net* API functions:
Use thread library (if exists).
Select the compression algorithm (0=old zlib, 1=new zlib). Setting this to `0’ may be a security vulnerability.
Show where item is found in the specified path:
Activate memory leak checker (use in conjunction with $ROOTSYS/bin/memprobe ). Currently only works on Linux with gcc.
Global debug mode. When >0 turns on progressively more details debugging.
Settings for X11 behaviour.
Default editor in use.
Default 3d Viewer. By default 3-D views are shown in the pad, if the next line is activated, the default viewer will be OpenGL.
Default Fitter (current choices are Minuit , Minuit2 , Fumili and Fumili2 ).
Specify list of file endings which TTabCom (TAB completion) should ignore.
30.6.1 TCanvas Specific Settings
Opaque move and resize show full pad during the operation instead of only the outline. Especially for resize you will need serious CPU power. UseScreenFactor=true means to size canvas according to size of screen, so a canvas still looks good on a low resolution laptop screen without having to change canvas size in macros.
Hight color 2 is the red one.
AutoExec allows TExec objects to be executed on mouse and key events.
Canvas print directory is set to the current one by default:
Default histogram binnings used by TTree::Draw() method.
Default statistics names used for parameters in TPaveStats :
30.6.2 THtml Specific Settings
XHTML content charset (see http://www.w3.org/TR/2002/REC-xhtml1-20020801, default: ISO-8859-1) is set by:
Stem of a search engine for the documentation, where %s is replaced by the term entered in the search text box (example: http://www.google.com/search?q=%s+site%3Aroot.cern.ch%2Froot%2Fhtml , default is «» )
Link to the site’s search engine (default: «» , example: http://root.cern.ch/root/Search.phtml )
String to prepend to TClass::GetImplFileName() names containing directories when looking for source files (default: «» , e xample: ../root )
Link stem to ViewCVS entry for classes, where a class name is assumed to match a file name (default: «» , example: http://root.cern.ch/viewcvs ).
Stem of the CERN XWho system (default: http://consult.cern.ch/xwho/people? )
If set to Doc++, allow method documentation in front of method even for methods in the source file (default: «» )
Search path for the source and header files with their default settings:
URL stem for ROOT documentation pages (default is «» ).
Filesystem output directory for generated web pages (default: htmldoc) .
Address of the package’s home page (default: http://root.cern.ch):
Tag for detecting class description comments (default value is set below).
Tag for detecting “Author” comment (default value is set below).
30.6.3 GUI Specific Settings
Set the “ native ” ROOT GUI interface to be used in a ROOT session. If set to “ qt ”, the “ native ” GUI interface is replaced with one based on Qt by the regular ROOT plug-in mechanism.
GUI default fonts in use:
Regular background and foreground colors in use:
Selection background and foreground colors in use:
Document background and foreground colors in use:
Tooltip background and foreground colors in use:
Path where all GUI icons in use can be found:
Mime type file setting:
If $(HOME)/.root.mimes does not exists, defaults to this:
30.6.4 TBrowser Settings
Current icon style selection — can be either small , big , list , details :
Current sorting rule applied on the browser objects — can be name , type , size , date :
Number of items in a group view:
Show or not hidden items:
Create a thumbnail view after executing the macro (default is yes ).
30.6.5 TRint Specific Settings
Rint (interactive ROOT executable) specific alias, logon and logoff macros.
Record ROOT session commands in a given history file (default is $(HOME)/.root_hist ). If set to “ — ”, it turn off the command recording.
30.6.6 ACLiC Specific Settings
ACLiC.Linkdef specifies the suffix that will be added to the script name to try to locate a custom linkdef file when generating the dictionary.
The top directory for storing the libraries produced by ACLiC is set by:
The additional include directives for ACLiC compilations are set by:
PROOF debug options.
PROOF GDB hooks allows a debugger to be attached early in the startup phase of proofserv: 0 — don’t wait; 1 — master proofserv enters wait loop; 2 — slave proofserv enters wait loop; 3 — any proofserv enters wait loop
On the master to enable the parallel startup of workers using threads set next to “ yes ” (default is “ no ”):
Certificate and key
Default authentication method for rootd and proofd . These are supported for backward compatibility but have a very low priority. System defaults are generated by configure as a list in system.rootauthrc in $ROOTSYS/etc/ or /etc/root ; the file $HOME/.rootauthrc can be used to override the system defaults.
The value meaning: 0=UsrPwd , 1=SRP , 2=Krb5 , 3=Globus , 4=SSH , 5=UidGid .
Connection is shutdown at timeout expiration. Timeout is in seconds. Negotiation cannot be attempted at low level (i.e.В inside TAuthenticate::Authenticate()) because of synchronization problems with the server. At higher level, TAuthenticate::HasTimedOut() gives information about timeout: 0 = no timeout; 1 = timeout, no methods left; 2 = timeout, still methods to be tried. Caller should decide about an additional attempt. Timeout is disabled by default ( TAuthenticate::SetTimeOut(to_value) .
Password dialog box is set to 0 if you do not want a dialog box to be popped-up when a password is requested. Default setting is 1.
Default login name (if not defined it is taken from $(HOME) ).
To be prompted for login information.
To reuse established security context.
Duration validity of the sec context for UsrPwd, SRP and SSH. Format: : (default 24:00)
To control password encryption for UsrPwd authentication.
Globus Miscellaneous — Globus Proxy duration: HH:MM (ex 12:15 for 12 hours and 15 min); †default ’ for system default.
Number of bits for the initial key.
Path to alternative †ssh ’ (to override $PATH if ever needed).
In case of error, SSH returns 1 (or 256=0x100 ). To trap those errors for which one should retry, error printouts must be parsed; any substring found under the TEnv SSH.ErrorRetry triggers a retry condition; strings can be added here in the form (including double quotes):
This is what one usually gets if the server has reached the maximum number of sshd daemons (defined by MaxStartups in sshd_config ); this is a typical case in which one should retry.
Max number of retries for SSH in case of retry error (see above).
Type of key to be used for RSA encryption: 0=local ; 1=SSL ( default if openssl available).
In case of ‘RSA.KeyType: 1 ’ this specifies the number of bits to be used for the Blowfish key used to encrypt the exchanged information: default — 256, minimum — 128, maximum — 15912.
30.6.7.2 Server Authentication in TServerSocket
General setting: file with server access rules
Check of host equivalence via /etc/hosts . equiv or $HOME/.rhosts .
SRP: pass file (default $HOME/.srootdpass ).
Globus/GSI: hostcert configuration file.
Globus/GSI: gridmap file.
SSH: port for the sshd daemon.
Force file opening via TNetFile ( TXNetFile ) if a hostname is specified in the Url. By default, for local files TFile::Open() invokes directly TFile.
Third, install XMING
- First, install Xming software under Win10.

- After installation, return to the Ubuntu terminal, enter:
~/.bashrc ~/.bashrc x11-apps- Finally, the Ubuntu terminal input:
xeyesSuccessfully displayed in testing installation:

Installing root on windows
Получение ROOT
 Разные варианты получения прав root
- Желательно иметь на компьютере установленный AndroidSDK
- Как включить «Отладку по USB» на китайских устройствах. Спасибо говорим Chervanev
- Для телефонов HTC EVO 4G, Sprint Hero, HTC Desire, HTC Wildfire, HTC Aria, HTC Droid Incredible необходимо сначала провести процедуру разблокировки NAND
- Разблокировки загрузчиков HTC через сайт
- При наличии мод. рекавери для устройства (CWM, TWRP, PhilZ, Carliv и пр.) рут можно получить путем прошивания мод. рекавери и последующей установкой пакета UPDATE-SuperSU***.zip из темы ® SuperSU.
- Тем, у кого нет root-прав после репака образа system.img со встраиванием root, возможно поможет этот пост Создание кастомных прошивок (Пост #26378422) и ниже.
 Universal_Androot_1.6.2_beta6.apk ( 2,33 МБ )
 *выпуск новых версий прекращен*
X10Root.1.0.8.zip ( 714,76 КБ ) *только для Sony Ericsson X10 (2.1)*
VISIONary___r14.apk ( 1,18 МБ ) GingerBreak_v1.20.apk ( 295,24 КБ )
A500root_GingerBreak_v1.20.apk ( 296,81 КБ ) *для Iconia A500*
update.zip ( 1,11 МБ ) *для SGA (2.3.x), установка из под рекавери*
Сообщение отредактировал AUDIMEN — 03.12.19, 20:14
Абсолютно ничего. В программе содержится код (или скрипт) для получения рута через уязвимость в защите OS Android.
В данном случае, приложение ставит рута, однако в остальных случаях, другими неизвестными приложениями, можно получить доступ к телефону и напакостить.
И официальная позиция Каспера — оставить все как есть — т.е. файл похож на вирус, а значит по умолчанию они его блокируют
Впрочем, этот файл и еще Universal AndRoot (который так же содержит тот же код) — они рекомендуют добавить в исключения.
На всех версиях программы пишет синтаксическая ошибка пакета.Куда копать? :blush: SGS
Сообщение отредактировал robert 1974 — 21.11.10, 21:54
Samsung Galaxy S прошивка JPB.
Получил root с помощью z4root 1.3.0 по следующему алгоритму:
1. Пришлось сначала поставить BusyBox
2. Сделал Temporary root, потом дал root самой программе z4root и BusyBox
3. Сделал Permanent root.
По другому не получалось, при нажатии сразу на Permanent root зависала или была выгружена.
На сколько я понял.
temporary — временные права до первой перезагрузки.
permanent — постоянные права, которые остаются и после перезагрузки .
Иных различий нет.
На последнем варианте применял unroot. ПО требующие root права, ругалось на их отсутствие . Однако проверить сколько «грязи» осталось после этих телодвижений я к сожалению не могу, т.к. нет достаточного опыта .
Пы . Сы .
Применил z4root на Samsung GT-I9000 (родная «проша» 2.2, обновленная через «кису»)
Сообщение отредактировал mikhenty — 02.12.10, 08:30
z4root 1.3.0 слетает при нажатии на любую кнопку.
сначала девайс вибронул 1 раз, потом два раза, и тишина.
ктото пробовал на данной прошивке рутится?
Зарутился с помощью SuperOneClick, спасибо lonely_nemo подсказал.
Правда на нее касперский ругается, удаляет один файл. Отключил, зарутился, включил.
Или я задаю вопрос невнятно, или мне совсем не понятны ваши ответы.
1. Если я сделаю root, гарантия слетает ?
2. Если я сделаю после root un-root, тел. возвращается в прежнее состояние (как с ответов понял исчезает суперпользователь), что тогда с гаранией?
3. Для живых обоев (тел. Samsung I5800) нужен постоянно root ?
Альтернатива Universal AndRoot (использующая тот же самый эксплоит rageagainstthecage как и Universal AndRoot, z4root и прочие подобные программы)
http://forum.xda-developers.com/showthread.php?t=827058
Не обновлялась с 3 ноября 2010
Не поддерживаются
* Samsung i9000 / i6500U / i7500 / i5700
* Motorola ME600 / ME501 / MB300 / CLIQ XT
* Motorola 2.2 FRG22D
* Archos 5
* HuaWei U8220
* HTC Desire / Legend /
* HTC EVO 4G / Aria
* SonyEricsson X10i R2BA020
* myTouch Slide
Добрый вечер!
Приобрел НТС Desire! Все устраивает! Попытался установить программу Font Size (что бы буковки побольше стали — уж больно мелкова-то) Она запросила root права. Перепробовал все Ваши выше описанные варианты — результат ноль
SuperOneClick — не помогает (faild)
z4root — вроде дает временные права — запускаю прогу Font Size — после перезагрузки все как было маленькое так и осталось
Permanent — тоже результата не дает
Universal AndRoot *выпуск новых версий прекращен* — faild при рутировании
Если не трудно подскажите выход из данной ситуации?
Данную прогу (Font size) проверял на HTC HD2 Андроиде 2.2 (сборка revolution) — работает тока в путь
а вот с тем что ниже незнаю что делать
HTC Desire Android 2.2 Версия модуля 32.49.00.32U_5.11.05.27 Номер ПО 2.29.405.5CL293415 release=-keys
Z4 Root гарантированно не работает. Пробовал на droid v2.2.1 (frg83d). На предыдущей прошивке работало.
Мне помог этот способ http://www.droidforums.net/forum/droid-lab. os-version.html
Других способов на frg83d в прошлом году не было!
Сообщение отредактировал phu — 06.01.11, 18:14
6 File system. rootrc
ROOT Environment settings are handled via the class TEnv . gEnv->Print() shows which values are active. Any settings can be obtained by TEnv::GetValue methods that return an integer, double or character value for a named resource. If the resource is not found, the default value (given as the second parameter) is returned.
Via the method TEnv::SetValue allows you can set the value of a resource or create a new resource:
Path where to look for TrueType fonts:
Use Net* API functions:
Use thread library (if exists).
Select the compression algorithm (0=old zlib, 1=new zlib). Setting this to `0’ may be a security vulnerability.
Show where item is found in the specified path:
Activate memory leak checker (use in conjunction with $ROOTSYS/bin/memprobe ). Currently only works on Linux with gcc.
Global debug mode. When >0 turns on progressively more details debugging.
Settings for X11 behaviour.
Default editor in use.
Default 3d Viewer. By default 3-D views are shown in the pad, if the next line is activated, the default viewer will be OpenGL.
Default Fitter (current choices are Minuit , Minuit2 , Fumili and Fumili2 ).
Specify list of file endings which TTabCom (TAB completion) should ignore.
30.6.1 TCanvas Specific Settings
Opaque move and resize show full pad during the operation instead of only the outline. Especially for resize you will need serious CPU power. UseScreenFactor=true means to size canvas according to size of screen, so a canvas still looks good on a low resolution laptop screen without having to change canvas size in macros.
Hight color 2 is the red one.
AutoExec allows TExec objects to be executed on mouse and key events.
Canvas print directory is set to the current one by default:
Default histogram binnings used by TTree::Draw() method.
Default statistics names used for parameters in TPaveStats :
30.6.2 THtml Specific Settings
XHTML content charset (see http://www.w3.org/TR/2002/REC-xhtml1-20020801, default: ISO-8859-1) is set by:
Stem of a search engine for the documentation, where %s is replaced by the term entered in the search text box (example: http://www.google.com/search?q=%s+site%3Aroot.cern.ch%2Froot%2Fhtml , default is «» )
Link to the site’s search engine (default: «» , example: http://root.cern.ch/root/Search.phtml )
String to prepend to TClass::GetImplFileName() names containing directories when looking for source files (default: «» , e xample: ../root )
Link stem to ViewCVS entry for classes, where a class name is assumed to match a file name (default: «» , example: http://root.cern.ch/viewcvs ).
Stem of the CERN XWho system (default: http://consult.cern.ch/xwho/people? )
If set to Doc++, allow method documentation in front of method even for methods in the source file (default: «» )
Search path for the source and header files with their default settings:
URL stem for ROOT documentation pages (default is «» ).
Filesystem output directory for generated web pages (default: htmldoc) .
Address of the package’s home page (default: http://root.cern.ch):
Tag for detecting class description comments (default value is set below).
Tag for detecting “Author” comment (default value is set below).
30.6.3 GUI Specific Settings
Set the “ native ” ROOT GUI interface to be used in a ROOT session. If set to “ qt ”, the “ native ” GUI interface is replaced with one based on Qt by the regular ROOT plug-in mechanism.
GUI default fonts in use:
Regular background and foreground colors in use:
Selection background and foreground colors in use:
Document background and foreground colors in use:
Tooltip background and foreground colors in use:
Path where all GUI icons in use can be found:
Mime type file setting:
If $(HOME)/.root.mimes does not exists, defaults to this:
30.6.4 TBrowser Settings
Current icon style selection — can be either small , big , list , details :
Current sorting rule applied on the browser objects — can be name , type , size , date :
Number of items in a group view:
Show or not hidden items:
Create a thumbnail view after executing the macro (default is yes ).
30.6.5 TRint Specific Settings
Rint (interactive ROOT executable) specific alias, logon and logoff macros.
Record ROOT session commands in a given history file (default is $(HOME)/.root_hist ). If set to “ — ”, it turn off the command recording.
30.6.6 ACLiC Specific Settings
ACLiC.Linkdef specifies the suffix that will be added to the script name to try to locate a custom linkdef file when generating the dictionary.
The top directory for storing the libraries produced by ACLiC is set by:
The additional include directives for ACLiC compilations are set by:
PROOF debug options.
PROOF GDB hooks allows a debugger to be attached early in the startup phase of proofserv: 0 — don’t wait; 1 — master proofserv enters wait loop; 2 — slave proofserv enters wait loop; 3 — any proofserv enters wait loop
On the master to enable the parallel startup of workers using threads set next to “ yes ” (default is “ no ”):
Certificate and key
Default authentication method for rootd and proofd . These are supported for backward compatibility but have a very low priority. System defaults are generated by configure as a list in system.rootauthrc in $ROOTSYS/etc/ or /etc/root ; the file $HOME/.rootauthrc can be used to override the system defaults.
The value meaning: 0=UsrPwd , 1=SRP , 2=Krb5 , 3=Globus , 4=SSH , 5=UidGid .
Connection is shutdown at timeout expiration. Timeout is in seconds. Negotiation cannot be attempted at low level (i.e.В inside TAuthenticate::Authenticate()) because of synchronization problems with the server. At higher level, TAuthenticate::HasTimedOut() gives information about timeout: 0 = no timeout; 1 = timeout, no methods left; 2 = timeout, still methods to be tried. Caller should decide about an additional attempt. Timeout is disabled by default ( TAuthenticate::SetTimeOut(to_value) .
Password dialog box is set to 0 if you do not want a dialog box to be popped-up when a password is requested. Default setting is 1.
Default login name (if not defined it is taken from $(HOME) ).
To be prompted for login information.
To reuse established security context.
Duration validity of the sec context for UsrPwd, SRP and SSH. Format: : (default 24:00)
To control password encryption for UsrPwd authentication.
Globus Miscellaneous — Globus Proxy duration: HH:MM (ex 12:15 for 12 hours and 15 min); †default ’ for system default.
Number of bits for the initial key.
Path to alternative †ssh ’ (to override $PATH if ever needed).
In case of error, SSH returns 1 (or 256=0x100 ). To trap those errors for which one should retry, error printouts must be parsed; any substring found under the TEnv SSH.ErrorRetry triggers a retry condition; strings can be added here in the form (including double quotes):
This is what one usually gets if the server has reached the maximum number of sshd daemons (defined by MaxStartups in sshd_config ); this is a typical case in which one should retry.
Max number of retries for SSH in case of retry error (see above).
Type of key to be used for RSA encryption: 0=local ; 1=SSL ( default if openssl available).
In case of ‘RSA.KeyType: 1 ’ this specifies the number of bits to be used for the Blowfish key used to encrypt the exchanged information: default — 256, minimum — 128, maximum — 15912.
30.6.7.2 Server Authentication in TServerSocket
General setting: file with server access rules
Check of host equivalence via /etc/hosts . equiv or $HOME/.rhosts .
SRP: pass file (default $HOME/.srootdpass ).
Globus/GSI: hostcert configuration file.
Globus/GSI: gridmap file.
SSH: port for the sshd daemon.
Force file opening via TNetFile ( TXNetFile ) if a hostname is specified in the Url. By default, for local files TFile::Open() invokes directly TFile.
Installing CERN ROOT under Windows 10 with Subsystem for Linux
Oct 27, 2016 · 4 min read
I am not a coding expert by any means, just a physicist that needs to code some stuff sometimes. Hopefully this helps someone else.
Update: The speeds seem to be comparable.
Update 10.08.2018: It seems some people have actually read this, and added helpful information in the comments. Thanks, everyone! I’ve added some notes inline as well. I am repeating the installation on a new laptop and will add updates to mirror the changes I found. Current Windows version is 1803.
I also noticed that there is now a preview version compiled under Win32, but this failed to run on my new pc. (preview Windows Visual Studio 2017 (dbg) root_v6.14.02.win32.vc15.debug.exe 167MB)
So let’s try compiling on the linux subsystem.
Improve the configuration
1. Reinstall for WSL
The middle step has a problem, and the time to find the problem is worse than starting from the beginning, reinstalling WSL.
Open Windows PowerShell
Enter to uninstall WSL
wslconfig.exe /u Ubuntu-20.042. Mount U disk & mobile hard disk under WSL
- Insert the mobile hard disk, observe the mobile hard disk drive letter, with E as an example,
First create a folder:
/mnt/e- Mount Pozzle E
-t drvfs E: /mnt/e👀 If you want to exit the hardware safely under Win10, you need to cancel the mount in the terminal:
/mnt/e360 Root 8
360 Root – приложение для получения прав администратора на Андроид устройствах. Софт создан китайскими разработчиками (Qihoo), специализирующимися на выпуске систем защиты от вредоносного ПО. Отдельно реализована версия программы для ПК под ОС Windows (только для китайских ОС). Интерфейс программного продукта исполнен . >
Gentoo Prefix on CVMFS
ROOT is also experimentally available in a Gentoo Prefix installation inside the contrib area of the SFT CVMFS repository. To use it from there, run
This will drop you into a new shell where all software from the prefix is available.
2 Installing ROOT
To install ROOT you will need to go to the ROOT website at: http://root.cern.ch/drupal/content/downloading-root
You have a choice to download the binaries or the source. The source is quicker to transfer since it is only 31 MB, but you will need to compile and link it. The binaries range from 50 MB to 100 MB depending on the target platform.
Second, install Windows Terminal Preview
- Direct installation is finished.

- Open Windows Terminal Preview, select Ubuntu-20.04, and enter the terminal of Ubuntu.

- For later installation work, you can replace the domestic common source:
/etc/apt/sources.list /etc/apt/sources.list.backup vim /etc/apt/sources.listAfter opening Sources.list with Vim, first the cursor is placed in the first line, and the original information is removed in the first line.
Then press «I» to enter the edit mode and copy these in:
####### ######## Default Note The source image image is improved to improve the APT Update. If necessary, you can cancel your comment.deb https://mirrors.tuna.tsinghua.edu.cn/ubuntu/ focal main restricted universe multiverse# deb-src https://mirrors.tuna.tsinghua.edu.cn/ubuntu/ focal main restricted universe multiversedeb https://mirrors.tuna.tsinghua.edu.cn/ubuntu/ focal-updates main restricted universe multiverse# deb-src https://mirrors.tuna.tsinghua.edu.cn/ubuntu/ focal-updates main restricted universe multiversedeb https://mirrors.tuna.tsinghua.edu.cn/ubuntu/ focal-backports main restricted universe multiverse# deb-src https://mirrors.tuna.tsinghua.edu.cn/ubuntu/ focal-backports main restricted universe multiversedeb https://mirrors.tuna.tsinghua.edu.cn/ubuntu/ focal-security main restricted universe multiverse# deb-src https://mirrors.tuna.tsinghua.edu.cn/ubuntu/ focal-security main restricted universe multiverse# , does not recommend enable# deb https://mirrors.tuna.tsinghua.edu.cn/ubuntu/ focal-proposed main restricted universe multiverse# deb-src https://mirrors.tuna.tsinghua.edu.cn/ubuntu/ focal-proposed main restricted universe multiverse####### Aliyuan #######deb http://mirrors.aliyun.com/ubuntu/ focal main restricted universe multiverse
deb-src http://mirrors.aliyun.com/ubuntu/ focal main restricted universe multiverse
deb http://mirrors.aliyun.com/ubuntu/ focal-security main restricted universe multiverse
deb-src http://mirrors.aliyun.com/ubuntu/ focal-security main restricted universe multiverse
deb http://mirrors.aliyun.com/ubuntu/ focal-updates main restricted universe multiverse
deb-src http://mirrors.aliyun.com/ubuntu/ focal-updates main restricted universe multiverse
deb http://mirrors.aliyun.com/ubuntu/ focal-proposed main restricted universe multiverse
deb-src http://mirrors.aliyun.com/ubuntu/ focal-proposed main restricted universe multiverse
deb http://mirrors.aliyun.com/ubuntu/ focal-backports main restricted universe multiverse
deb-src http://mirrors.aliyun.com/ubuntu/ focal-backports main restricted universe multiverse
After copying, press «ESC» to return to the instruction mode, and enter «: wq» Enter, save and exit.
After saving, enter:
update upgradeComplete the update and upgrade of source information.
SuperSU 2
SuperSU – менеджер root прав для мобильных устройств на Андроид. Программа совместима с версиями системы от 2.3 и выше. Начиная с Android Oreo (8.1) Супер СУ устанавливается не на всех смартфонах. С платформой Pie (9.0) софт уже не совместим. Программа имеет . >
бесплатно/платно Русский язык 6 Мб.
3 Choosing a Version
The pro (production) version is a version we feel comfortable with to exposing to a large audience for serious work. The change rate of this version is much lower than for the new version, it is about 3 to 6 months.
The old version is the previous pro version that people might need for some time before switching the new pro version. The old change rate is the same as for pro.
5 Installing the Source
You have a choice to download a compressed (tar ball) file containing the source, or you can use the Subversion (svn) source code change control system and check out the most recent source. The compressed file is a one time only choice; every time you would like to upgrade you will need to download the entire new version. Choosing the CVS option will allow you to get changes as they are submitted by the developers and you can stay up to date.
30.5.1 Installing and Building the Source from a Compressed File
To install the ROOT source you can download the tar file containing all the source files from the ROOT website. The first thing you should do is to get the latest version as a tar file. Unpack the source tar file, this creates directory вЂroot’:
Type the build commands:
Add bin/ to PATH and lib/ to LD_LIBRARY_PATH . For the sh shell family do:
and for the csh shell family do:
Try running root:
30.5.1.1 Target directory
By default, ROOT will be built in the $ROOTSYS directory. In that case the whole system (binaries, sources, tutorials, etc.) will be located under the $ROOTSYS directory.
30.5.1.2 Makefile targets
The Makefile is documented in details in the README/BUILDSYSTEM file. It explains the build options and targets.
30.5.2 More Build Options
/libshift.a ’ or the configure flag ‗with-rfio=
/libshift.a’ . For pre-built version of libshift.a see ftp://root.cern.ch/root/shift/
To build the PAW and Geant3 conversion programs h2root and g2root you need to define either the environment variable вЂCERNLIB= вЂor the configure flag ‗with-cern-libdir= ’.
To build the MySQL interface library you need to install MySQL first. Visit http://www.mysql.com/ for the latest versions.
To build the strong authentication module used by rootd , you first have to install the SRP (Secure Remote Password) system. Visit http://srp.stanford.edu
To use the library you have to define either the environment variable †SRP= ’ or the configure flag ‗with-srp= ‘.
To build the event generator interfaces for Pythia and Pythia6, you first have to get the Pythia libraries available from ftp: ftp://root.cern.ch/root/pythia6.tar.gz.
To use the libraries you have to define either †PYTHIA=
’ or the configure flag ‗with-pythia=
’. The same applies for Pythia6.
30.5.2.1 Installing the Source from Subversion
This paragraph describes how to checkout and build ROOT from Subversion for Unix systems. For description of a checkout for other platforms, please see ROOT installation web page: http://root.cern.ch/drupal/content/installing-root-source.
30.5.2.2 Subversion for Windows
Although there exists a native version of Subversion for Windows, we only support the build process under the Cygwin environment. You must have svn version 1.6 or newer. The checkout and build procedure is similar to that for UNIX. For detailed install instructions, see the file REAMDE/INSTALL.
30.5.2.3 Staying up-to-date
To keep your local ROOT source up-to-date with the Subversion repository you should regularly run the command:
Install the Windows Subsystem for Linux
You will require Update for Windows 10 Version 1607 or newer for x64-based Systems.
- To get Linux on Windows10 running: under Settings → Updates & Security → For Developers → enable Developer Mode
- open Control Panel → Programs → Turn Windows features on or off → enable Windows Subsystem for Linux .
- Windows will install some files and restart.
- You will need to install and run an X-windows server on Windows: Xming official site: http://www.straightrunning.com/XmingNotes/ or vcXsrv: https://sourceforge.net/projects/vcxsrv/ . Either will run in the background in your taskbar. Be sure to add the additional fonts: https://sourceforge.net/projects/xming/files/Xming-fonts/
- To run Linux for Windows, from the search window, search for and run “bash.exe”. This will open a terminal window (bash shell) and install Ubuntu for Windows from the Windows Store. Enter a user account name and password when prompted. It shows up in the Start menu later “Bash on Ubuntu on Windows” later. I pinned it to the start menu for quick access.
Update 10.08.2018: It seems you can now install many Linux flavours that you like from the Microsoft Store first without executing bash.exe. I chose Ubuntu 18.04 this time for continuity. - Update your distribution. It’s probably a little out of date. It also helped with missing packages.
Skip to to helpful hints at the bottom for additional tips.
- Version Information:
Ubuntu 20.04 LTS
root_v6.22.06.Linux-ubuntu20-x86_64-gcc9.3 - The software required for this article is downloaded here:
Link: https: //pan.baidu.com/s/1HVVhe1lpbtuaxsm86ejyhg
Extraction code: Exh1
After copying this content, open Baidu network disk mobile phone app, more convenient operation — Sharing from Baidu network disk super member V4
Download a pre-compiled binary distribution
We distribute pre-compiled ROOT for several major Linux distributions as well as MacOS and (as a beta) Windows. The steps to install a pre-compiled binary are simple:
- Install all required dependencies with the system package manager
- Download the release for the desired platform and ROOT version
- Unpack the archive
- Add the ROOT libraries and executables to your environment by sourcing the appropriate thisroot.* script. These setup scripts can be found in the ROOT binary release, in the bin directory.
To avoid having to source thisroot.sh every time one needs to use ROOT, it is typical to add the instruction to .bashrc , .profile or analogous configuration files. Note, however, that sourcing thisroot.sh might interfere with ROOT versions installed with different methods.
Pre-compiled ROOT
A precompiled release for Ubuntu 14.04/18.04 works. You should make sure you have the prerequisites listed above installed though. Otherwise you will see some errors.
7a. Just unzip the file and source root/bin/thisroot.sh.
You should now see the ROOT splash screen and the CINT command line.
5 Installing the Source
You have a choice to download a compressed (tar ball) file containing the source, or you can use the Subversion (svn) source code change control system and check out the most recent source. The compressed file is a one time only choice; every time you would like to upgrade you will need to download the entire new version. Choosing the CVS option will allow you to get changes as they are submitted by the developers and you can stay up to date.
30.5.1 Installing and Building the Source from a Compressed File
To install the ROOT source you can download the tar file containing all the source files from the ROOT website. The first thing you should do is to get the latest version as a tar file. Unpack the source tar file, this creates directory вЂroot’:
Type the build commands:
Add bin/ to PATH and lib/ to LD_LIBRARY_PATH . For the sh shell family do:
and for the csh shell family do:
Try running root:
30.5.1.1 Target directory
By default, ROOT will be built in the $ROOTSYS directory. In that case the whole system (binaries, sources, tutorials, etc.) will be located under the $ROOTSYS directory.
30.5.1.2 Makefile targets
The Makefile is documented in details in the README/BUILDSYSTEM file. It explains the build options and targets.
30.5.2 More Build Options
/libshift.a ’ or the configure flag ‗with-rfio=
/libshift.a’ . For pre-built version of libshift.a see ftp://root.cern.ch/root/shift/
To build the PAW and Geant3 conversion programs h2root and g2root you need to define either the environment variable вЂCERNLIB= вЂor the configure flag ‗with-cern-libdir= ’.
To build the MySQL interface library you need to install MySQL first. Visit http://www.mysql.com/ for the latest versions.
To build the strong authentication module used by rootd , you first have to install the SRP (Secure Remote Password) system. Visit http://srp.stanford.edu
To use the library you have to define either the environment variable †SRP= ’ or the configure flag ‗with-srp= ‘.
To build the event generator interfaces for Pythia and Pythia6, you first have to get the Pythia libraries available from ftp: ftp://root.cern.ch/root/pythia6.tar.gz.
To use the libraries you have to define either †PYTHIA=
’ or the configure flag ‗with-pythia=
’. The same applies for Pythia6.
30.5.2.1 Installing the Source from Subversion
This paragraph describes how to checkout and build ROOT from Subversion for Unix systems. For description of a checkout for other platforms, please see ROOT installation web page: http://root.cern.ch/drupal/content/installing-root-source.
30.5.2.2 Subversion for Windows
Although there exists a native version of Subversion for Windows, we only support the build process under the Cygwin environment. You must have svn version 1.6 or newer. The checkout and build procedure is similar to that for UNIX. For detailed install instructions, see the file REAMDE/INSTALL.
30.5.2.3 Staying up-to-date
To keep your local ROOT source up-to-date with the Subversion repository you should regularly run the command:
Installing CERN ROOT under Windows 10 with Subsystem for Linux
Oct 27, 2016 · 4 min read
I am not a coding expert by any means, just a physicist that needs to code some stuff sometimes. Hopefully this helps someone else.
Update: The speeds seem to be comparable.
Update 10.08.2018: It seems some people have actually read this, and added helpful information in the comments. Thanks, everyone! I’ve added some notes inline as well. I am repeating the installation on a new laptop and will add updates to mirror the changes I found. Current Windows version is 1803.
I also noticed that there is now a preview version compiled under Win32, but this failed to run on my new pc. (preview Windows Visual Studio 2017 (dbg) root_v6.14.02.win32.vc15.debug.exe 167MB)
So let’s try compiling on the linux subsystem.
Install via a package manager
Fourth, install CERN ROOT
- First install the dependencies necessary for CERN ROOT:
dpkg-dev cmake g++ gcc binutils libx11-dev libxpm-dev libxft-dev libxext-dev python openssl-devYou can choose these commonly used dependents, and it is recommended to install all installations:
 gfortran libpcre3-dev \
xlibmesa-glu-dev libglew1.5-dev libftgl-dev \
libmysqlclient-dev libfftw3-dev libcfitsio-dev \
graphviz-dev libavahi-compat-libdnssd-dev \
libldap2-dev python-dev libxml2-dev libkrb5-dev \
libgsl0-dev libqt4-dev
There is a problem in the installation of libqt4-dev, you can choose nothing, there is no problem during current use.
- Place the root_v6.22.06.linux-ubuntu20-x86_64-gcc9.3.tar.gz file in the D disk root directory under the Win10 file system.
And enter the following complete decompression and installation:
/mnt/d/ -xzvf root_v6.22.06.Linux-ubuntu20-x86_64-gcc9.3.tar.gz root/bin/thisroot.sh- enter
rootIf you are displayed:

Successful installation!
MacOS package managers
Homebrew
On Mac, ROOT is also available as a homebrew formula. You can install it with
Macports
After installing macports, the ROOT port can be installed with
4 Installing Precompiled Binaries
The binaries are available for downloading from http://root.cern.ch/drupal/content/downloading-root. Once downloaded you need to unzip and de-tar the file. For example, if you have downloaded ROOT v5.30 for Linux-SLC5:
This will create the directory root. Before getting started read the file README/README. Also, read the Introduction chapter for an explanation of the directory structure.
3 Choosing a Version
The pro (production) version is a version we feel comfortable with to exposing to a large audience for serious work. The change rate of this version is much lower than for the new version, it is about 3 to 6 months.
The old version is the previous pro version that people might need for some time before switching the new pro version. The old change rate is the same as for pro.
First, install WSL
- Control Panel 👉 Program 👉 Program and Function 👉 Enable or turn Windows functionality

- ✔ Suitable for Windows subsystems for Linux

- Install Ubuntu 20.04 LTS

Framaroot 1
Framaroot – приложение для разблокировки режима суперпользователя на телефоне. Программа совместима с версиями Android 2.0 – 4.2. Данная программа временно недоступна из-за проблем с безопасностью файла установки. Разработка софта прекращена в 2014 году. Как результат, на современных Андроид устройствах утилита бесполезна. Под . >
бесплатно Русский язык 1.3 Мб.
Root-права и Rooting
Рутинг — процесс получения прав суперпользователя root на устройствах под управлением операционной системы Android. Имея доступ к этому профилю, появляется целый ряд возможностей, не доступных в обычном режиме работы.
Compile ROOT Locally
to build ROOT 5.34.36 under Ubuntu 14.04
to build ROOT 6.14.02 under Ubuntu 18.04
4 Installing Precompiled Binaries
The binaries are available for downloading from http://root.cern.ch/drupal/content/downloading-root. Once downloaded you need to unzip and de-tar the file. For example, if you have downloaded ROOT v5.30 for Linux-SLC5:
This will create the directory root. Before getting started read the file README/README. Also, read the Introduction chapter for an explanation of the directory structure.
Kingo ROOT 2
Kingo Root – утилита для получения рут-прав. Приложения выпускается в двух версиях: для мобильных устройств на платформе Андроид – apk файл и Windows релиз – стандартный exe-установщик. Интерфейс софта реализован на 5 языках, где русская версия дополнена английским, испанским, французским и . >
бесплатно Русский язык 3 Мб.
KingRoot 5
KingRoot – утилита для получения прав суперпользователя на Андроид устройствах. Приложение выпускается в двух изданиях: apk файл для смартфонов, планшетов и exe-установщик на ПК. Русская версия интерфейса доступна только для мобильных аппаратов. Краткая инструкция по установке Инсталляция на телефон, планшет производится после разблокировки . >
бесплатно Русский язык 62 Мб.
Conda
For any Linux distribution and MacOS, ROOT is available as a conda package. To create a new conda environment containing ROOT and activate it, execute
More instructions about using the conda package are available in this blog post.
Please report any issues with the conda package here.
On many Linux distributions, ROOT can be installed via Snap. For example, on Ubuntu:
Install the Windows Subsystem for Linux
You will require Update for Windows 10 Version 1607 or newer for x64-based Systems.
- To get Linux on Windows10 running: under Settings → Updates & Security → For Developers → enable Developer Mode
- open Control Panel → Programs → Turn Windows features on or off → enable Windows Subsystem for Linux .
- Windows will install some files and restart.
- You will need to install and run an X-windows server on Windows: Xming official site: http://www.straightrunning.com/XmingNotes/ or vcXsrv: https://sourceforge.net/projects/vcxsrv/ . Either will run in the background in your taskbar. Be sure to add the additional fonts: https://sourceforge.net/projects/xming/files/Xming-fonts/
- To run Linux for Windows, from the search window, search for and run “bash.exe”. This will open a terminal window (bash shell) and install Ubuntu for Windows from the Windows Store. Enter a user account name and password when prompted. It shows up in the Start menu later “Bash on Ubuntu on Windows” later. I pinned it to the start menu for quick access.
Update 10.08.2018: It seems you can now install many Linux flavours that you like from the Microsoft Store first without executing bash.exe. I chose Ubuntu 18.04 this time for continuity. - Update your distribution. It’s probably a little out of date. It also helped with missing packages.
Skip to to helpful hints at the bottom for additional tips.
Pre-built ROOT without dependencies
If your platform mounts CVMFS (as, for example, CERN LXPLUS does), ROOT is directly available as an LCG release.
ROOT installations with minimal external dependencies are available for Fedora, Ubuntu, CentOS 7 and MacOS at:
For example, to set up ROOT 6.22/00 on a CentOS7 machine that already has all ROOT required dependencies installed, just run:
ROOT plus dependencies
On CentOS7, ROOT as well as its dependencies and many other packages are also available as an LCG view:
For example, to set up a full environment with ROOT 6.20/02 on CERN LXPLUS, you can run:
To check what ROOT version is contained in an LCG release, check lcginfo.cern.ch.
")


")